


R
BOTTOM FREEZER REFRIGERATOR
Use & Care Guide
CONGELADOR INFERIOR REFRIGERADOR
Guía para el Uso y Cuidado
CONGÉLATEUR INFÉRIEUR RÉFRIGÉRATEUR
Guide d'Utilisation et d'Entretien
Models / Modelos / Modèles
795.7840*, 795. 7841*
* =color number, número de color, numéro de couleur
FRANÇAIS ESPAÑOL ENGLISH
MFL61987624 |
Sears Brands Management Corporation Hoffman Estates, Il60179 USA |
www.sears.com |
Printed in Mexico

TABLE OF CONTENTS
English Version |
2 |
Warranty |
3 |
Protection Agreements |
4 |
Safety Instructions |
5 |
Grounding Require ments |
6 |
Parts and Features |
7 |
Refrigerator Installation |
8-15 |
Unpacking Your Refrigerator |
8 |
Installation |
8 |
Base Grille |
8 |
Removing and Replacing |
|
Your Refrigerator Doors |
9-14 |
Leveling and Door Alignment |
15 |
Using Your Refrigerator |
16-23 |
Setting the Controls |
16 |
Ensuring Proper Air Circulation |
17 |
Multi Flow |
17 |
Ice Bucket |
18 |
Adjusting Controls Settings |
18 |
Water Dispenser |
19 |
Food Storage Guide |
19 |
Storing Frozen Food |
19 |
Refrigerator Shelves |
20 |
Snack Pan |
21 |
Crisper Humidity Control |
21 |
Crisper Cover |
21 |
Modular Door Bins |
21 |
Dairy Corner |
21 |
Egg box |
21 |
Can Rack |
21 |
Durabase |
22 |
Ice Bin |
22 |
Durabase Divider |
22 |
Glide Out Drawer Basket |
22 |
Filter |
23 |
Care and Cleaning |
24-25 |
General Cleaning Tips |
24 |
Outside |
24 |
Inside Walls |
24 |
Door Liner and Gaskets |
24 |
Plastic Parts |
24 |
Light Bulb Replacement |
24-25 |
Power Interruptions |
25 |
When you go on vacation |
25 |
About the Automatic Icemaker |
26 |
Connecting the Water Line |
27-29 |
Troubleshooting Guide |
30-33 |
Customer Service |
Back Cover |
2

BOTTOM FREEZER REFRIGERATOR
R
Kenmore Appliance Warranty
One Year Limited Warranty
When installed, operated and maintained according to all instructions supplied with the product, if this appliance fails due to a defect in material or workmanship within one year from the date of purchase, call 1-800-4-MY-HOME R to arrange for free repair.
If this appliance is used for other than private family purposes, this warranty applies for only 90 days from th date of purchase.
This Warranty covers only defects in material and workmanship. Sears will NOT pay for:
1.Expendable items that can wear out from normal use, including but not limited to filters, belts, light bulbs, and bags.
2.A service technician to instruct the user in correct product installation, operation or maintenance.
3.A service technician to clean or maintain this product.
4.Damage to or failure of this product if it is not installed, operated or maintained according to all instructions supplied with the product.
5.Damage to or failure of this product resulting from accident, abuse, misuse or use for other than its intended purpose.
6.Damage to or failure of this product caused by the use of detergents, cleaners, chemicals or utensils other than those recommended in all instructions supplied with the product.
7.Damage to or failure of parts or systems resulting from unauthorized modifications made to this product.
Disclaimer of implied warranties; limitation of remedies
Customer's sole and exclusive remedy under this limited warranty shall be product repair as provided herein. Implied warranties, including warranties of merchantability or fitness for a particular purpose, are limited to one year or the shortest period allowed by law. Sears shall not be liable for incidental or consequential damages.
Some states and provinces do not allow the exclusion or limitation of incidental or consequential damages, or limitations on the duration of implied warranties of merchantability or fitness, so these exclusions or limitations may not apply to you.
This warranty applies only while this appliance is used in the United States and Canada.
This warranty gives you specific legal rights, and you may also have other rights which vary from state to state.
Sears Brands Management Corporation, Hoffman Estates, IL 60179
Sears Canada, Inc., Toronto, Ontario, Canada M5B 2B8
3

PROTECTION AGREEMENTS
Master Protection Agreements
Congratulations on making a smart purchase. Your new KenmoreR product is designed and manufactured for years of dependable operation. But like all products, it may require preventive maintenance or repair from time to time. That's when having a Master Protection Agreement can save you money and aggravation.
The Master Protection Agreement also helps extend the life of your new product. Here’s what the Agreement* includes:
Parts and labor needed to help keep products operating properly under normal use, not just defects. Our coverage goes well beyond the product warranty. No deductibles, no functional failure excluded from
coverage - real protection.
Expert service by a force of more than 10,000 authorized Sears service technicians, which means someone you can trust will be working on your product.
Unlimited service calls and nationwide service, as often as you want us, whenever you want us.
"No-lemon” guarantee - replacement of your covered product if four or more product failures occur within twelve months.
Product replacementif your covered product can’t be Fixed.
Annual Preventive Maintenance Check at your Request - no extra charge.
Fast help by phone - we call it Rapid Resolution - phone support from a Sears representative on all products. Think of us as a ”talking owner’s manual.”
Power surge protection against electrical damage due to power fluctuations.
$250 Food Loss Protection annually for any food
’
spoilage that is the result of mechanical failure of any Covered refrigerator or freezer.
Rental reimbursement if repair of your covered product takes longer than promised.
10% discount off the regular price of any non-covered repair service and related installed parts.
Once you purchase the Agreement, a simple phone call is all that it takes for you to schedule service. You can call anytime day or night, or schedule a service appointment online.
The Master Protection Agreement is a risk free purchase.
If you cancel for any reason during the product warranty period, we will provide a full refund. Or, a prorated refund anytime after the product warranty period expires. Purchase your Master Protection Agreement today!
Some limitations and exclusions apply. For prices and additional information in the U.S.A. call 1-800-827-6655.
*Coverage in Canada varies on some items. For full details call Sears Canada at 1-800-361-6655.
Sears Installation Service
For Sears professional installation of home appliances, garage door openers, water heaters, and other major home items, in the U.S.A. or Canada call
1-800-4-MY-HOME R .
PRODUCT RECORD
In the space below, record the date of purchase, model and serial number of your product. You will find the model and serial number printed on an identification label located on the right-hand side of the refrigerator compartment. Have these items of information available whenever you contact Sears concerning your product.
Model No. |
|
Date of Purchase |
|
|
Serial No. |
|
Dealer |
|
|
Save these instructions and attach your sales receipt for future reference.
4
IMPORTANT SAFETY INSTRUCTIONS
SAFETYMESSAGES
This guide contains many important safety messages. Always read and obey all safety messages.
This is the safety alert symbol. It alerts you to safety messages that inform you of hazards that can kill or hurt you or others, or cause damage to the product.
All safety messages will be preceded by the safety alert symbol and the hazard signal word DANGER, WARNING, or CAUTION. These words mean:
You will be killed or seriously injured if you don’t follow instructions.
You can be killed or seriously injured if you don’t follow instructions.
Indicates an imminently hazardous situation which, if not avoided, may result in minor or moderate injury, or product damage only.
All safety messages will identify the hazard, tell you how to reduce the chance of injury and tell you what can happen if the instructions are not followed.
To reduce the risk of fire,electric shock,or injury to persons when using your product,basic safety
precautions should be followed,including the following: Read all instructions before using this appliance:
 NEVER unplug your refrigerator by pulling on the power cord. Always grip the plug firmly and pull it straight out from the outlet.
 Repair or replace immediately all electric service cords that have become frayed or otherwise damaged. Do not use a cord that shows cracks or abrasion damage along its length or at either the plug or connector end.
 Do not modify or extend the power cord lenght. It could cause electric shock or fire.
 When moving your refrigerator away from the wall, be careful not to roll over or damage the power cord.
 DO NOTstore or use gasoline or other flammable vapors and liquids in the vicinity of this or any other appliance.
 DO NOTallow children to climb, stand, or hang on the refrigerator doors or shelves in the refrigerator. They could damage the refrigerator and seriously injure themselves.
 Keep fingers out of “pinch point” areas; clearances between the doors and cabinet are necessarily small. Be careful when you open the doors when children are in the area.
 Unplug your refrigerator before cleaning or making any repairs. NOTE: We strongly recommend that any servicing be performed by a qualified technician.
 Before replacing a burned-out light bulb, unplug the refrigerator or turn off power at the circuit breaker or fuse box in order to avoid contact with a live wire filament. (Aburnedout light bulb may break when being replaced.) NOTE: Setting either or both controls to the OFF position does not remove power to the light circuit.
NOTE: Some models have LED interior lighting and service should be perfomed by a qualified technician.
 When you are finished, reconnect the refrigerator to the electrical source and reset the controls. (Thermostat, Refrigerator Control, and or Freezer Control, depending on the model) to the desired setting.
 This refrigerator must be properly installed in accordance with the Attention Installer Instructions that were taped to the front of the refrigerator.
 After your refrigerator is in operation, do not touch the cold surfaces in the freezer compartment when hands are damp or wet. Skin may adhere to the extremely cold surfaces.
 In refrigerators with automatic icemakers, avoid contact with the moving parts of the ejector mechanism, or with the heating element that releases the cubes. DO NOTplace fingers or hands on the automatic icemaking mechanism while the refrigerator is plugged in.
 DO NOTrefreeze frozen foods which have thawed completely.
The United States Department of Agriculture in Home and Garden Bulletin No. 69 says:
“...You may safely refreeze frozen foods that have thawed if they still contain ice crystals or if they are still cold below 40°F (4°C).”
“...Thawed ground meats, poultry, or fish that have any off-odor or off-color should not be refrozen and should not be eaten. Thawed ice cream should be discarded. If the odor or color of any food is poor or questionable, get rid of it. The food may be dangerous to eat.”
“Even partial thawing and refreezing reduces the eating quality of foods, particularly fruits, vegetables and prepared foods. The eating quality of red meats is affected less than that of many other foods. Use refrozen foods as soon as possible to save as much of their quality as you can.”
SAVE THESE INSTRUCTIONS
5
This appliance is not intended for use by persons (including children) with reduce physical, sensory or mental capabilities, or lack of experience and knowledge, unless they have been given supervision or instruction concerning use of the appliance by person responsible for their safety.
Children should be supervised to ensure that they do not play with the appliance.
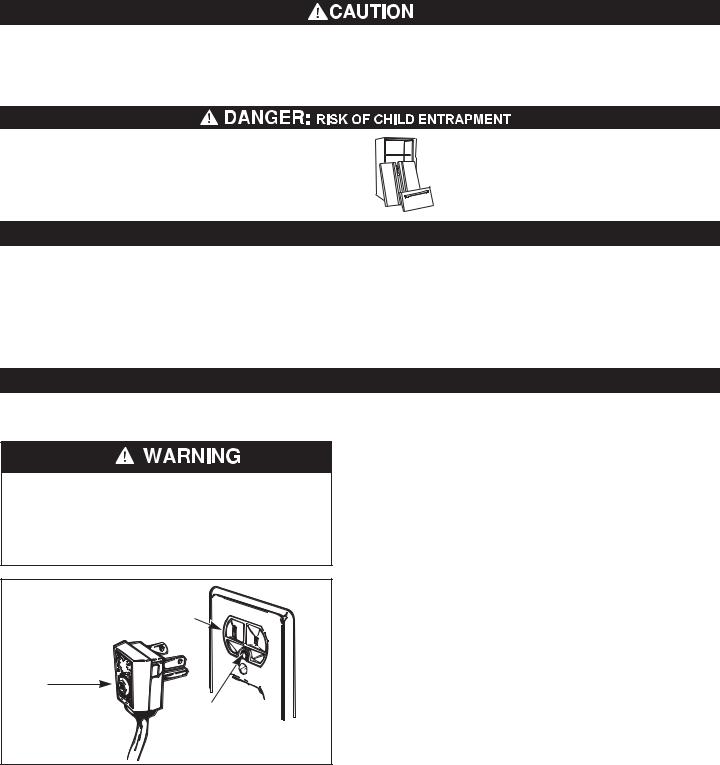
Child entrapment and suffocation are not problems of the past. Junked or abandoned refrigerators are still dangerous… even if they will sit for “just a few days”. If you are getting rid of your old refrigerator, please
follow the instructions at right to help prevent accidents.
Before you throw away your old Refrigerator or freezer:
•Take off the doors.
•Leave the shelves in place so that children may not easily climb inside.
CFC DISPOSAL
Your old refrigerator may have a cooling system that used CFCs (chlorofluorocarbons). CFCs are believed to harm stratospheric ozone. If you are throwing away your old refrigerator, make sure the CFC refrigerant is removed for proper disposal by a qualified servicer. If you intentionally release this CFC refrigerant, you can be subject to fines and imprisonment under provisions
of environmental legislation. This appliance contains fluid (refrigerant, lubricant), and is made of parts and materials which are reusable and / or recyclable. All the important materials should be sent to the collection center of waste material and can be reused after rework
(recycling). To recycle, please contact your local agency.
GROUNDING REQUIREMENTS
IMPORTANT: Please read carefully.
TO CONNECT ELECTRICITY
Electrical Shock Hazard
FOR PERSONAL SAFETY, this appliance must be properly grounded. Have the wall outlet and the circuit checked by a qualified electrician to make sure the outlet is properly grounded.
3-prong grounding type wall receptacle
3-prong grounding plug
Ensure proper ground exists before use.
USE OF EXTENSION CORDS
Because of potential safety hazards under certain conditions, we strongly recommend against the use of an extension cord. However, if you still elect to use an extension cord, it is absolutely necessary that it be a
UL-listed (in the United States), 3-wire grounding type appliance extension cord having a grounding type plug and outlet, and that the electrical rating of the cord be
15 amperes (minimum) and 120 volts.
Use of an extension cord will increase the clearance needed for the back of the refrigerator. If the supply cord is damaged, it must be replaced by the manufacturer or its service agent or a similarly qualified person in order to avoid any hazard.
RECOMMENDED GROUNDING METHOD
The refrigerator should always be plugged into its own individual properly grounded electrical outlet rated for 115 volts, 60Hz, AC only and fused at 15 or 20 amperes. This provides the best performance and also prevents overloading house wiring circuits which could cause a fire hazard from overheated wires. It is recommended that a separate circuit serving only this appliance be provided. Use a receptacle which cannot be turned off with a switch or pull chain. Do not use an extension cord.
Where a standard two-prong wall outlet is encountered, it is your personal responsibility and obligation to have it replaced with a properly grounded three-prong wall outlet. Do not, under any circumstances, cut or remove the third (Ground) prong from the power cord.
NOTE: Before performing any type of installation, cleaning, or removing a light bulb, turn the control (Thermostat, Refrigerator Control or Freezer Control, depending on the model) to OFF and then disconnect the refrigerator from the electrical source. When you are finished, reconnect the refrigerator to the electrical source and reset the control (thermostat, refrigerator control or freezer control, depending on the model) to the desired setting.
6

|
PARTS AND FEATURES |
A |
I |
B |
J |
|
|
C |
K |
|
|
D |
|
E |
L |
|
|
F |
|
|
M |
G |
N |
|
|
|
O |
H |
P |
|
|
|
Q |
Use this section to become more familiar with the parts and features.
NOTE:This guide covers several different models.The refrigerator you have purchased may have some or all of the items listed below.The locations of the features shown below may not match your model.
A Ice Room |
J |
Dairy Corner |
|
(Icemaker and Ice Bucket) |
K Can Rack* |
|
|
B Refrigerator Light |
|
||
|
|
Ice Bucket |
|
|
L Modular Door Bins |
||
C Refrigerator Shelves |
|
||
|
|
Ice Room Door |
|
|
M |
Crisper |
|
D EggBox |
|
||
|
|
|
|
E Snack Pan |
N Freezer Light |
|
|
|
|
|
|
F Water Tank Cover |
O Pull out Drawer |
|
|
G Turbo Motor |
P Durabase |
|
|
H Ice Bin |
Q Divider |
|
|
I Filter (Inside) |
* On some models |
|
|
7
REFRIGERATOR INSTALLATION
Excessive Weight Hazard
Use two or more people to move and install refrigerator.
Failure to do so can result in back or other injury.
UNPACKING YOUR REFRIGERATOR
Remove tape and any temporary labels from your refrigerator before using. Do not remove any warningtype labels, the model and serial number label, or the
TechSheet that is attached to back wall of the refrigerator.
To remove any remaining tape or glue, rub the area briskly with your thumb. Tape or glue residue can also be easily removed by rubbing a small amount of liquid dish soap over the adhesive with your fingers. Wipe with warm water and dry.
Do not use sharp instruments, rubbing alcohol, flammable fluids, or abrasive cleaners to remove tape or glue. These products can damage the surface of your refrigerator. For more information, see the Important Safety Instructions section.
Refrigerator shelves are installed in the shipping position.
Please reinstall shelves according to your individual storage needs.
When Moving Your Refrigerator:
Your refrigerator is heavy. When moving the refrigerator for cleaning or service, be sure to protect the floor. Always pull the refrigerator straight out when moving it. Do not wiggle or walk the refrigerator when trying to move it, as floor damage could occur.
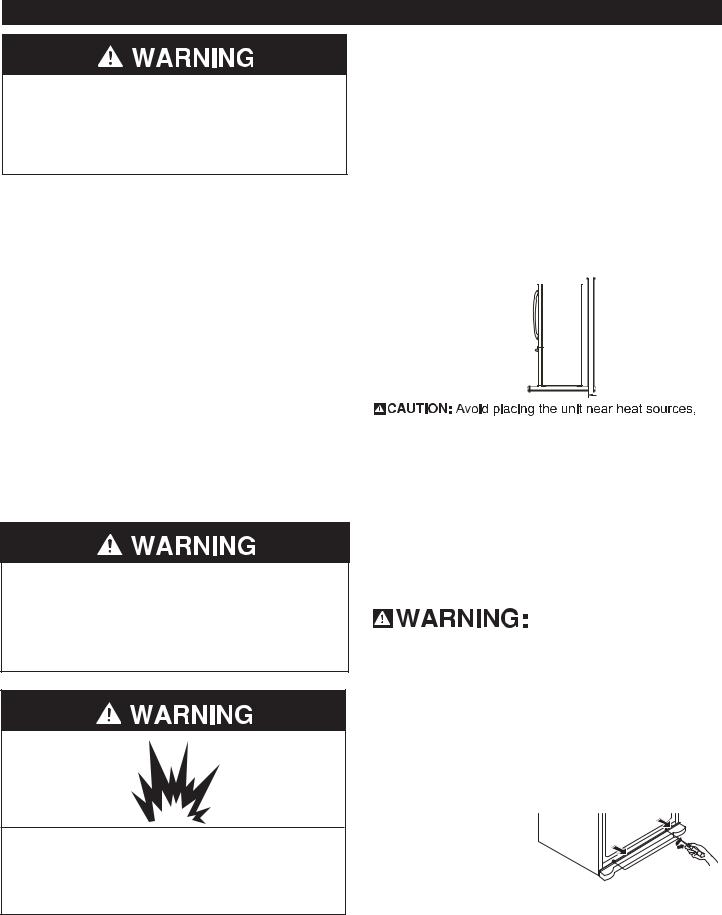
Explosion Hazard
Keep flammable materials and vapors, such as gasoline, away from refrigerator.
Failure to do so can result in death, explosion or, fire.
INSTALLATION
1.To avoid vibration, the unit must be level. If required, adjust the leveling screws to compensate for unevenness of the floor. The front should be slightly higher than the rear to aid in door closing. Leveling
screws can be turned easily by tipping the cabinet
slightly. Turn the leveling screws clockwise (  ) to raise the unit, counterclockwise (
 ) to lower it.
2.Install this appliance in an area where the temperature is between 55°F (13°C) and 110°F (43°C.) If the temperature around the appliance is too low or high, cooling ability may be adversely affected.
3.Keep the refrigerator at a proper distance from adjacent Items and surfaces. Too small a distance may result in lowered freezing capability and increased electricity charge consumption.
(5.08 cm) 2” 

direct sunlight or moisture.
NEXT
1.Clean your refrigerator thoroughly and wipe off all dust accumulated during shipping.
2.Install accessories such as ice cube bin, drawers, shelves, etc., in their proper places. They are packed together to prevent possible damage during shipment.
3.Let your refrigerator run for 2 or 3 hours before putting food in it. Check the flow of cold air in the freezer compartment to ensure proper cooling. Your refrigerator is now ready for use.
 Be careful when you work with hinge, base grille, stopper etc. You may be injured.
 Do not put hands or metal sticks into air vents, base
Grille, or bottom of refrigerator. You may be injured or receive an electrical shock.
BASE GRILLE INSTALLATION
To install or replace Base Grille:
1.Remove the 2 screws from the bottom front part of
Refrigerator.
2. Place Base Grille into position and insert and tighten screws.
To remove the Base Grille
1.Open the doors. (Refrigerator and Freezer)
2.Once doors are open, remove screws from Base Grille and remove.
3.Reattach screws to the base of refrigerator.
8
REFRIGERATOR INSTALLATION
NOTE: It is “always” recommeded that the doors be removed when it is necessary to move the refrigerator through a narrow opening. If it is necessary to remove the handles follow the directions below.
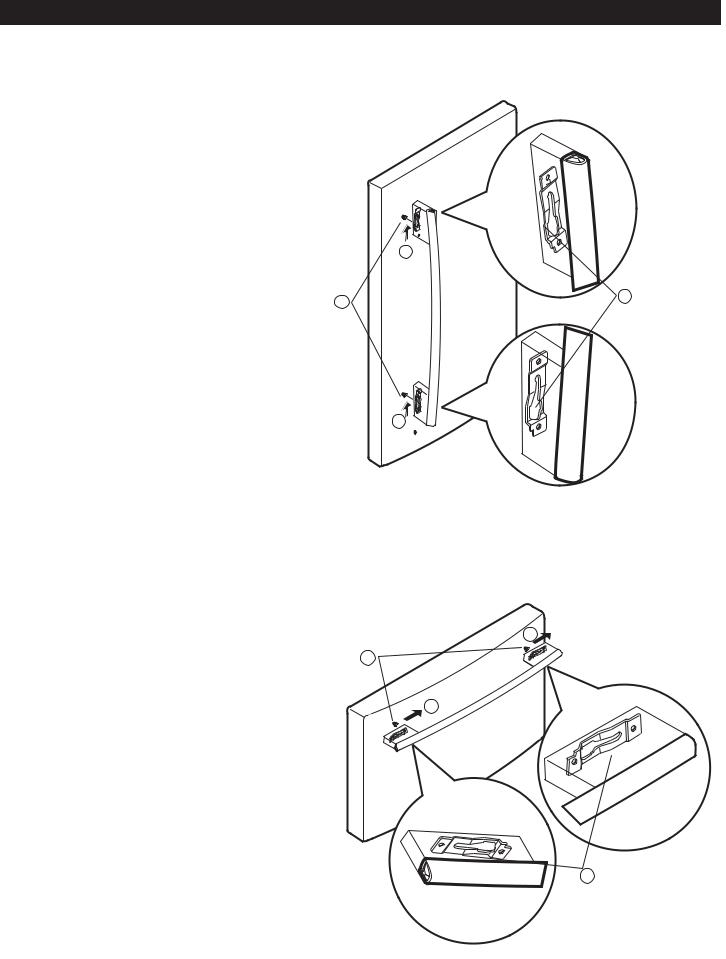
HOW TO REMOVE DOOR HANDLES
NOTE : Handle appearance may vary from illustrations on this page.
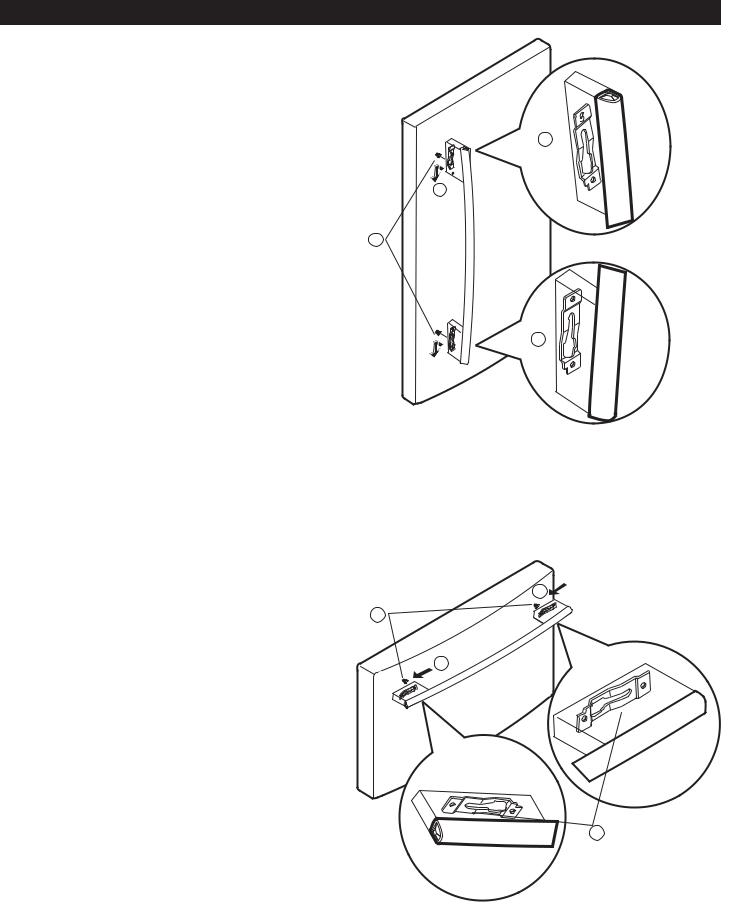
1.Removing Refrigerator Handle
•Grasp the handle tightly with both hands and slide the handle up (1)(this may require some force).
•The keyhole slots (2) on the back of the handle allow the handle to separate from the mounting screws (3).

 The handle could be damaged if you hit it with a hammer while removing or attaching.

 When you assemble or disassemble handle, you must push or pull with reasonable force.
1
Screws mounted 3 on door
1
Keyhole slots 2 on back of
handle
2.Removing Freezer Drawer Handle
•Press the handle against door first.
•Grasp the handle tightly with both hands and slide the handle to right (1)(this may require some force).
•The keyhole slots (2) on the back of the handle allow the handle to separate from the mounting screws (3).
Screws |
1 |
mounted |
3 |
on door |
|
|
1 |
2
Keyhole slots on back of handle
9
REFRIGERATOR INSTALLATION
HOW TO REPLACE DOOR HANDLES
NOTE: Handle appearance may vary from illustrations on this page.
1.Reinstalling the Refrigerator Door Handle
•Align keyhole slots (1) on the top and bottom of the back of the handle with the screws (2) mounted on the front of the door.
•Press the handle against the door front, making sure that the screws (2) go into the keyhole slots (1).
•Holding the handle with both hands, press it firmly against the front of the door and slide the handle down (3).
2.Reinstalling the Freezer Drawer Handle
•Align keyhole slots (4) on the right and left sides of the back of the handle with the screws (5) mounted on the front of the drawer.
•Press the handle against the drawer front, making sure that the screws (5) go into the keyhole slots (4).
•Holding the handle with both hands, press it firmly against the front of the drawer and slide the handle to the left (6).
Screws mounted 2 on door
Screws mounted 5 on door
1 1
3
1
6
6
4
Keyhole slots on back of handle
10
REFRIGERATOR INSTALLATION
REMOVING REFRIGERATOR DOORS
1. Removing Refrigerator Door
NOTE: Handle appearance may vary.
IMPORTANT: Before you begin, turn the refrigerator OFF and unplug it.Remove food and any bins from doors.
 Left Door
 Loosen the screws and remove the cove on back side (see figure A).
 Disconnect water supply tube by pushing back on the disconnect ring (3).
 Loosen the cover screw (1).
 Disconnect door switch wire (2).
 Pull out the tube (4).
 CAUTION: If a tube end is deformed or worn out, cut the damaged portion away.
 Disconnect wire harness (5).
 Remove the ground screw (6).
 Loosen screws (7) and lift off the top hinge (8).
 Place the door on a non-scratching surface with the inside up.
 CAUTION: When removing top hinge, be careful that the door does not fall forward.
 Right Door
 Loosen the cover screw (1).
 Disconnect door switch wire (2).
 Loosen screws (7) and lift off the top hinge (8).
 Place the door on a non-scratching surface with the inside up.
|
(1) |
|
|
(2) |
|
|
(1) |
|
(6) |
(4) |
(7) |
|
||
|
(5) |
|
(7) |
(2) |
(8) |
|
||
|
(8) |
|
Figure A
3
11
 Loading...