Kenmore 110.6806*, 110.6808*, 110.6809*, 110.7806*, 110.7808* Quick Reference Guide
...
 Quick Start Dryer Guide
We have taken great care to give your new dryer the most convenient and easy-to-use features. Use this guide to help optimize the use of your dryer. This information covers several different models. Your dryer may vary from the model shown and may not have all the cycles and features described. Consult the Use and Care Guide for more detailedinstructions.TocontactSears Service,call 1-800-4-MY-HOME♣ (1-800-469-4663).
Models/Modelos 110.6806 , 6808 , 6809 , 7806 , 7808 , 7809
WARNING
Keep flammable |
vapors, such as |
gasoline, away from |
|
Do not dry anything that has ever had anything flammable on it (even after washing).
Failure to follow these instructions can result in death, explosion, or fire.
START
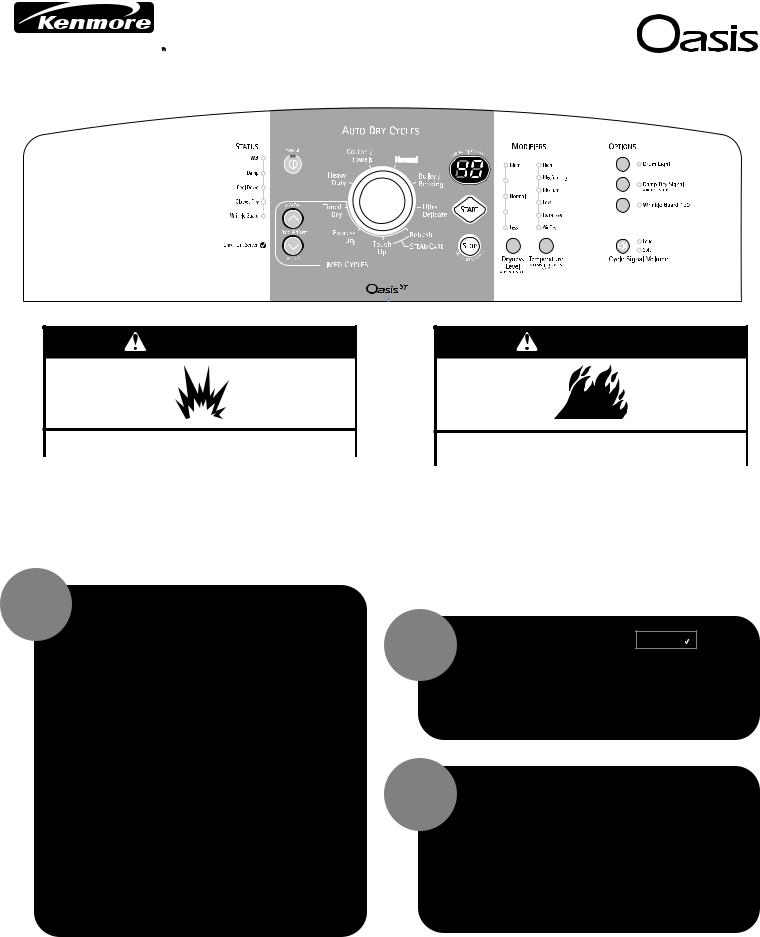
1. Clean the lint screen.
2. Place laundry in dryer.
3. Shut the door.
4.Press POWER.
5.Select Auto Dry Cycle,
•Turn cycle knob to recommended Auto Dry Cycle for type of load being dried.
•If desired, adjust the Dryness Level.
•Temperatures cannot be adjusted on Auto Dry Cycles. or select Timed Cycle.
• Turn cycle knob to Timed Dry.
• Select drying time usingMoreTime or Less Time buttons.
• Select temperature setting using Temperature button.
6.Select OPTIONS.
•Tobe alerted when cycle is complete, select the Cycle Signal.
•During Auto Dry Cycles, to be alerted when clothes are still damp, select the Damp Dry Signal.
•Tohelp keep wrinkles from forming after drying is complete, select Wrinkle Guard®.
7.Press and hold the START button.
WARNING
Fire Hazard
No washer can completely remove oil.
Do not dry anything that has ever had any type of oil on it (including cooking oils).
Items containing foam, rubber, or plastic must be dried on a clothesline or by using an Air Cycle. Failure to follow these instructions can result in death or fire.
CHECK LINT SCREEN
This feature is a reminder to check whether the lint screen needs to be cleaned. The Check Lint Screen light will come on when the dryer is turned on. The light will flash until the cycle is started or the door is opened.
ESTIMATED TIME REMAINING
A preset time is displayed when an Auto Dry Cycle is selected. During the first few minutes of the drying process, the cycle time may automatically vary from the preset time based on the size and fabric type of the load. Toward the end of the drying process, the estimated time
display will adjust again, showing the final drying time. For Timed Cycles, this time will count down from the start of the cycle.
W10164637B |
Continued on back |

CYCLE SELECTOR CONTROL
Auto Dry Cycles
Auto Dry Cycles may be used for most loads. These cycles give optimal drying in the shortest time. Drying time varies according to the type of fabric, size of the load, and dryness setting.
Auto Dry Cycles
All Auto Dry Cycles are preset to the Normal Dryness Level, which is good for most fabrics. At the end of the cycle, you may check the dryness of the load.
•If the load is drier than you like, you may select the Less Dryness Level the next time you dry a simliar load.
•If the load is not as dry as you like, you may select the More Dryness Level the next time you dry a similar load. Youmay complete drying using a Timed Cycle.
Auto MoistureSensing
Dryness is determined by an electronic sensor that “senses” the amount of moisture in clothes as they pass over it. When the dryness selected is reached, the dryer goes into a cool down period of up to 10 minutes.
AUTO PRESETCYCLESETTINGS
AUTODRY CYCLES |
TEMPERATURE |
TIME* |
|
LOADTYPE |
(Minutes) |
||
|
|||
|
|
|
|
HEAVYDUTY |
High |
50 |
|
Heavyweightmixed loads, |
|
|
|
cottons,jeans |
|
|
|
|
|
|
|
COTTON/TOWELS |
High |
45 |
|
Towels,sheets,cottons |
|
|
|
|
|
|
|
NORMAL |
Medium |
40 |
|
Corduroys,work clothes |
|
|
|
|
|
|
|
BULKY/BEDDING |
Medium |
60 |
|
Jackets,comforters,cotton |
|
|
|
or polyesterfiber filledpillows |
|
|
|
|
|
|
|
ULTRADELICATE |
Extra Low |
25 |
|
Lingerie,blouses,washable |
|
|
|
knit fabrics |
|
|
|
|
|
|
*EstimatedTime with Auto Dry Level (Normal)setting. Time will vary dependingon load type and load size.
Timed Dry
This cycle may be used to get up to 80–90 minutes (depending on the model) of heated drying time. The heating portion of the cycle is followed by a cool down period of up to 10 minutes. Both time and temperature levels can be adjusted.
Express Dry™
This cycle may be used for drying small loads that need a short drying time.
TIMEDPRESETCYCLESETTINGS
TIMEDCYCLES |
DEFAULT |
DEFAULT |
|
TEMPERATURE |
TIME |
||
LOADTYPE |
|||
|
(Minutes) |
||
|
|
||
|
|
|
|
TIMEDDRY |
High |
40 |
|
Heavyweight,bulky items, |
|
|
|
work clothes |
|
|
|
|
|
|
|
EXPRESSDRY™ |
High |
23 |
|
Small loads |
|
|
|
|
|
|
|
STEAMCAREPRESETCYCLESETTINGS |
|
||
|
|
|
|
TIMEDCYCLES |
DEFAULT |
DEFAULT |
|
TIME |
|||
LOADTYPE |
TEMPERATURE |
||
(Minutes) |
|||
|
|
||
|
|
|
|
REFRESH |
MediumHigh |
15 |
|
Helps to smooth out wrinkles |
|
|
|
and reduce odors from loads |
|
|
|
consisting of one to four dry |
|
|
|
items. |
|
|
|
|
|
|
|
TouchUp |
MediumHigh |
20 |
|
Helps to smoothout wrinkles |
|
|
|
in loads left in the dryer for an |
|
|
|
extendedperiod.If desired, |
|
|
|
adjusttime and temp. |
|
|
|
|
|
|
|
OPTIONS
Options allow you to customize your cycle.
WRINKLE GUARD® (30, 60, 90, 150)
WRINKLE GUARD® helps smooth out wrinkles that may form when clothes are not removed promptly at the end of a cycle. WRINKLE GUARD® periodically starts and stops the dryer, tumbling the load without heat for 30, 60, 90, or 150 minutes (dependingon your model) unless you open the dryer door.
During WRINKLE GUARD®, the Cycle Signal will sound every 5 minutes unless the signal is turned off.
End of Cycle Signal Control
When it is selected, the Cycle Signal sounds when a cycle is complete. On some models, the variable control lets you select a volume of soft or loud.
Heated Drying Rack
The drying rack may be used to machine dry itemsyou do not want to tumble dry or that you wouldnormallyline dry. Items containing foam, rubber,or plasticmust be driedon a clotheslineor by using the Air Dry temperaturesetting.
NOTE: This featureis to be used with TimedDry Cycles only.
W10164637B
TROUBLESHOOTING –
LONG DRY TIMES, LOAD NOT DRYING
Before you call service...
check for the following.
Is the lint screen clogged with lint?
• Clean the lint screen before each load.
Is the exhaust vent or outside exhaust hood clogged with lint?
•Lint should be cleaned out of the exhaust vent at least once every 2 years.
Is the Auto Dry Cycle ending early?
• Do not use a drying rack with an Auto Dry Cycle.
Are all your Auto Dry Cycle loads consistently not as dry as you would like?
•You may change the preset Dryness Level settings to increase dryness for all Auto Dry Cycles. See “Changing Cycles, Modifiers, and Options” in the Use and Care Guide.
See the Use and Care Guide for complete details.
11/09
© 2009 Sears Brands, LLC |
® Registered Trademark / TM Trademark / SM Service Mark of Sears Brands, LLC |
Printed in U.S.A. |
 Loading...