


Kenmore 110.6012, 110.7012, 110.6022*, 110.7022*, 110.6233* Owner's Manual
...Use & Care Guide
Manual de uso y cuidado
English / Español
Table of Contents......2 / Índice......14
Models/Modelos: 110.6012, 7012, 6022*, 7022*, 6233*, 7233*
Kenmore®
Electric or Gas Dryer Secadora eléctrica o a gas
* = color number, número de color
P/N W10738930C
Sears Brands Management Corporation
Hoffman Estates, IL 60179 U.S.A.
www.kenmore.com

TABLE OF CONTENTS
DRYER SAFETY............................................................................. |
2 |
CHECK YOUR VENT SYSTEM FOR GOOD AIR FLOW....... |
4 |
USE AUTO DRY CYCLES FOR BETTER FABRIC CARE |
|
AND ENERGY SAVINGS........................................................... |
4 |
CONTROL PANEL AND FEATURES........................................... |
5 |
CYCLE GUIDE.............................................................................. |
6 |
USING YOUR DRYER................................................................. |
7 |
DRYER CARE................................................................................ |
9 |
TROUBLESHOOTING............................................................... |
11 |
WARRANTY............................................................................... |
13 |
ASSISTANCE OR SERVICE..................................... |
Back Cover |
Sears Installation Service
For Sears professional installation of home appliances, garage door openers, water heaters, and other major home items, in the U.S.A.call 1-844-553-6667.
DRYER SAFETY
IMPORTANT: When discarding or storing your old clothes dryer, remove the door.
2
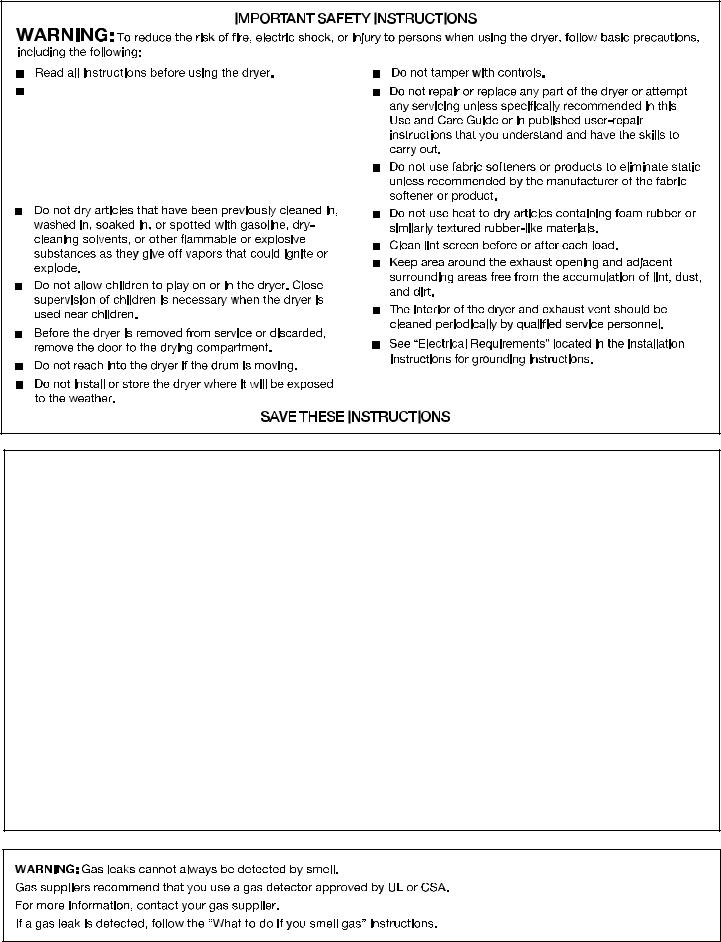
Do not place items exposed to cooking oils in your dryer. Items contaminated with cooking oils may contribute to a chemical reaction that could cause a load to catch re.
To reduce the risk of re due to contaminated loads, thenal part of a tumble dryer cycle occurs without heat (cool down period). Avoid stopping a tumble dryer before the end of the drying cycle unless all items are quickly removed and spread out so that the heat is dissipated.
 WARNING:
FIRE OR EXPLOSION HAZARD
Failure to follow safety warnings exactly could result in serious injury, death or property damage.
–Do not store or use gasoline or other flammable vapors and liquids in the vicinity of this or any other appliance.
–WHAT TO DO IF YOU SMELL GAS:
•Do not try to light any appliance.
•Do not touch any electrical switch; do not use any phone in your building.
•Clear the room, building, or area of all occupants.
•Immediately call your gas supplier from a neighbor's phone. Follow the gas supplier's instructions.
•If you cannot reach your gas supplier, call the fire department.
–Installation and service must be performed by a qualified installer, service agency, or the gas supplier.
3
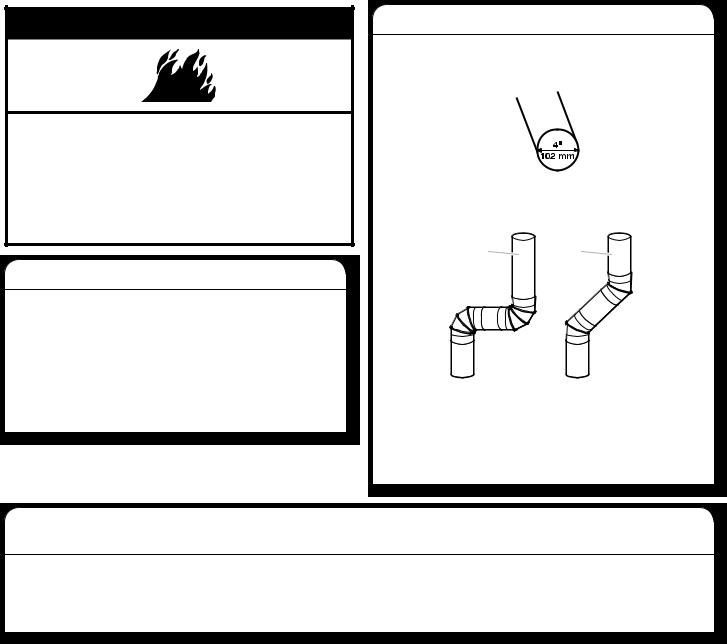
CHECK YOUR VENT SYSTEM FOR GOOD AIR FLOW
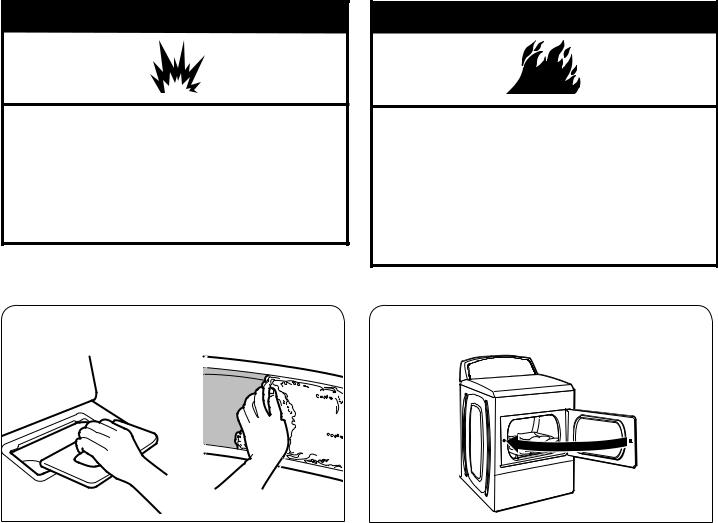
 WARNING
Fire Hazard Use a heavy metal vent.
Do not use a plastic vent. Do not use a metal foil vent.
Failure to follow these instructions can result in death or fire.
Good Air Flow
Along with heat, dryers require good air flow to efficiently dry laundry. Proper venting will reduce your drying times and improve your energy savings. See Installation Instructions.
The venting system attached to the dryer plays a big role in good air flow.
Service calls caused by improper venting are not covered by the warranty and will be paid by the customer, regardless of who installed the dryer.
Maintain good air flow by:
■■ Cleaning your lint screen before each load.
■■ Replacing plastic or foil vent material with 4" (102 mm) diameter heavy, rigid vent material.
■■ Using the shortest length of vent possible.
■■ Using no more than four 90° elbows in a vent system; each bend and curve reduces air flow.
Good Better
■■ Removing lint and debris from the exhaust hood.
■■ Removing lint from the entire length of the vent system at least every 2 years. When cleaning is complete, be sure to follow the Installation Instructions supplied with your dryer for final product check.
■■ Clearing away items from the front of the dryer.
USE AUTO DRY CYCLES FOR
BETTER FABRIC CARE AND ENERGY SAVINGS
Use the Auto Dry cycles to provide the most energy savings and enhanced fabric care from the dryer. During Auto Dry cycles, drying air temperature and moisture level are sensed in the load. This sensing occurs throughout the drying cycle and the dryer shuts off when the load reaches the selected dryness.
With Timed Dry cycle, the dryer runs the amount of time set and sometimes results in shrinkage, wrinkling, and static due to overdrying. Use Timed Dry cycle for the occasional damp load that needs a little more drying time or when using the drying rack.
4
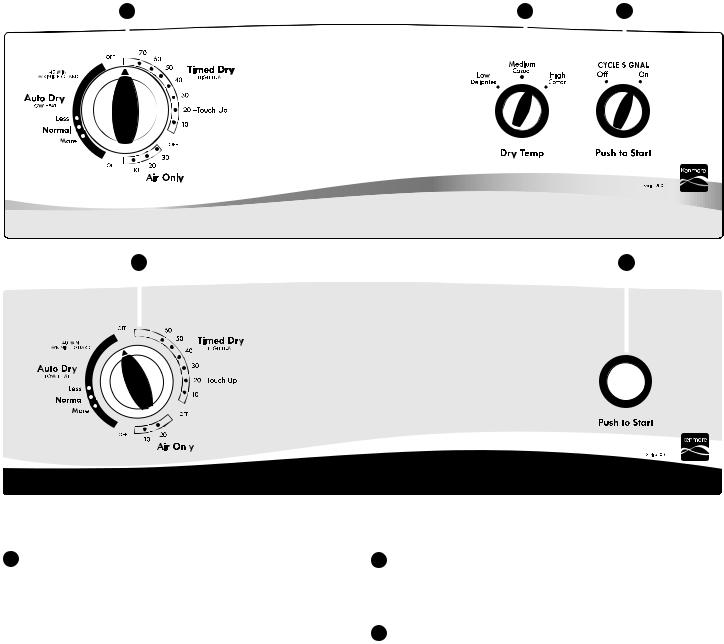
CONTROL PANEL AND FEATURES
1 |
|
|
2 |
|
3 |
|||||||
|
|
|
|
|
|
|
|
|
|
|
|
|
|
|
|
|
|
|
|
|
|
|
|
|
|
|
|
|
|
|
|
|
|
|
|
|
|
|
|
|
|
|
|
|
|
|
|
|
|
|
|
|
|
|
|
|
|
|
|
|
|
|
|
|
|
|
|
|
|
|
|
|
|
|
|
|
|
|
|
|
|
|
|
|
|
|
|
|
|
|
|
|
|
|
|
|
|
|
|
|
|
|
|
|
|
|
|
|
|
|
|
|
|
|
|
|
|
|
|
|
|
|
|
|
|
|
|
|
|
1 |
3 |
||
|
|
|
|
|
|
|
|
Not all features and options are available on all models.
Appearance may vary.
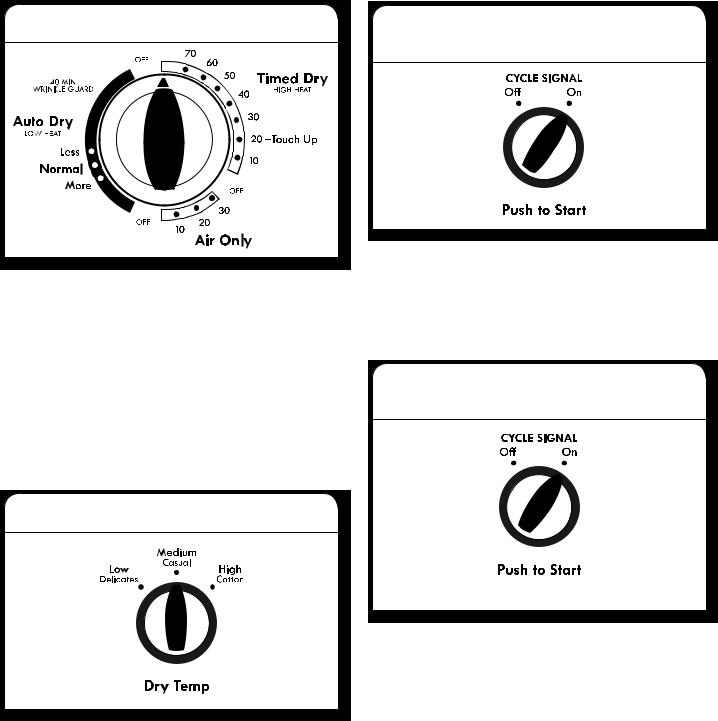
1 DRYER CYCLE KNOB
Turn the knob to select a cycle for your laundry load. See “Cycle Guide” for detailed descriptions of cycles.
Timed Dry
Will run the dryer for the specified time on the control. On models with a selectable temperature knob, you may choose a setting based on the fabrics in your load. Drying time and temperature will depend on your dryer model.
Auto Dry
Auto Dry cycles give the best drying in the shortest time. Drying time will vary based on fabric type, load size, and dryness setting.
Air Only
Use the Air Only setting to dry foam, rubber, plastic, or heat-sensitive fabrics.
Wrinkle Guard™ function (on some models)
When you are unable to remove a load of clothes from the dryer as soon as it stops, wrinkles can form. The Wrinkle Guard™ function periodically tumbles, rearranges, and fluffs the load without heat to help keep wrinkles from forming, for up to 40 minutes
at the end of a cycle.
2 Dry Temp (on some models)
Select a drying temperature based on the fabrics in your load. If you are unsure of the temperature to select for a load, select the lower setting rather than the higher setting. See “Cycle Guide.”
3 Cycle Signal/Push to Start
The Cycle Signal produces an audible sound when the drying cycle is finished. On some models, this knob is combined with the Push to Start button. Promptly removing clothes at the end of the cycle reduces wrinkling.
Turn the CYCLE SIGNAL knob to select the desired setting (On or Off). With combined buttons, press and hold the CYCLE SIGNAL/PUSH TO START button to start the dryer. On models without the cycle signal, press the PUSH TO START button to start the dryer.
NOTE: During the Wrinkle Guard™ function and when the Cycle Signal is on, the tone will sound every 5 minutes until the clothes are removed or the Wrinkle Guard™ function ends.
5
CYCLE GUIDE – AUTO DRY CYCLES
Not all cycles and settings are available on all models. Settings and options shown in bold are default settings for that cycle.
AUTO DRY – Senses moisture in the load or air temperature and shuts off when the load reaches the selected dryness level. Depending on model, temperature may be selected on cycle knob or be a separate control.
NOTE: Government Energy Certifications for the Gas and Electric models were based on the Timed Dry Cycle with the Maximum Drying Temperature Setting. The as - shipped defaults of Auto Dry, Accura Dry, Automatic Dry, Auto Moisture Sensing or Sensor Dry, Normal or Energy Preferred Cycle, Low Heat, Wrinkle Guard or Wrinkle Prevent were not used.
|
Jeans, heavy work |
High Cotton |
More |
Cycle Signal |
|
||||
|
clothes, towels |
|
Normal |
Dry Temp |
|
|
|
Less |
|
|
Work clothes, medium |
Medium Casual |
More |
Cycle Signal |
|
weight fabrics, sheets |
|
Normal |
Dry Temp |
|
|
|
Less |
|
|
Casual, shirts, pants, |
Low Delicates |
More |
Cycle Signal |
|
lightweight items, |
|
Normal |
Dry Temp |
|
synthetics, delicates, |
|
Less |
|
|
athletic wear |
|
|
|
Automatic cycles give the best drying in the shortest time. Drying time varies based on load size and dryness setting.
Select a drying temperature based on the fabrics in your load. If you are unsure of the temperature to select for a load, select the lower setting rather than the higher setting.
NOTE: If loads do not seem as dry as you would like, select More next time you dry a similar load. If loads seem drier than you like, select Less next time you dry a similar load.
CYCLE GUIDE – TIMED DRY CYCLES
Not all cycles and settings are available on all models.
TIMED DRY – Will run the dryer for the specified time on the control. Depending on model, temperature may be selected on cycle knob or be a separate control.
|
|
|
|
|
Any load |
Timed Dry |
High Heat |
Dry Temp |
Select a drying temperature based on the |
|
|
|
(on some models) |
fabrics in your load. If you are unsure of |
|
|
|
|
the temperature to select for a load, select |
|
|
|
|
the lower setting rather than the higher |
|
|
|
|
setting. |
Any load |
Touch up |
Any |
N/A |
This is the last step in a cycle that uses |
|
|
|
|
heat. The load is cooled slowly to reduce |
|
|
|
|
wrinkling and make it easier to handle. |
|
|
|
|
Use this cycle to smooth wear or packing |
|
|
|
|
wrinkles. |
Rubber, plastic, heat |
Air Only |
No heat |
Time Adjustment |
Use a Air Only (no heat) setting for foam, |
sensitive fabrics |
|
|
|
rubber, plastic, or heat-sensitive fabrics. |
Setting the Drying Temperature
If your dryer has multiple temp settings:
A High Cotton temp setting may be used for drying heavyweight items such as towels and work clothes.
A Low Delicates or Medium Casual temp setting may be used for drying medium-weight items such as sheets, blouses, dresses, underwear, permanent press fabrics, and some knits.
Use a Air Only (no heat) setting for foam, rubber, plastic, or heat-sensitive fabrics. Line dry bonded or laminated fabrics.
NOTE: If you have questions about drying temperatures for various loads, refer to the care label directions.
6
USING YOUR DRYER
 WARNING
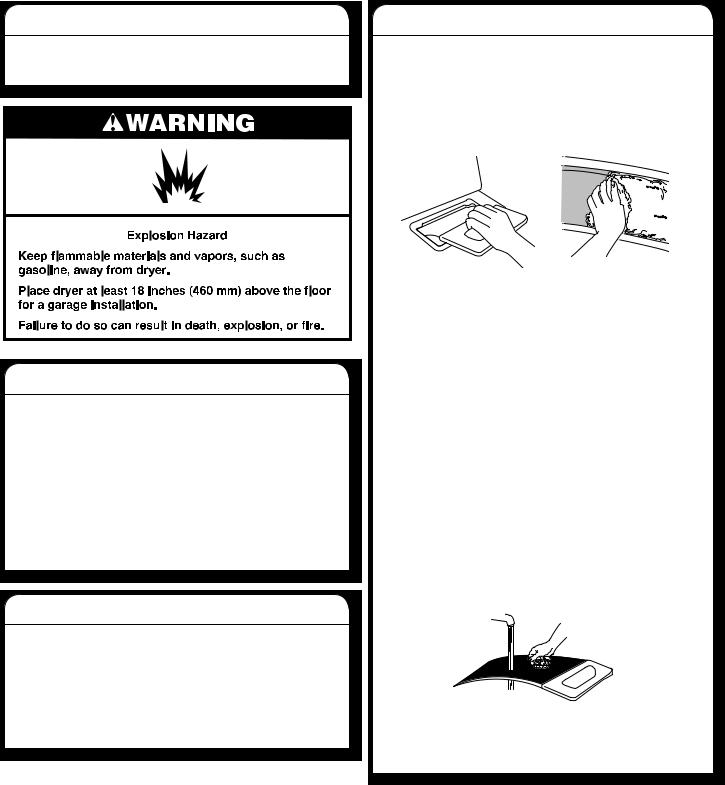
Explosion Hazard
Keep flammable materials and vapors, such as gasoline, away from dryer.
Do not dry anything that has ever had anything flammable on it (even after washing).
Failure to follow these instructions can result in death, explosion, or fire.
WARNING: To reduce the risk of fire, electric shock, or injury to persons, read the IMPORTANT SAFETY INSTRUCTIONS before operating this appliance.
 WARNING
Fire Hazard
No washer can completely remove oil.
Do not dry anything that has ever had any type of oil on it (including cooking oils).
Items containing foam, rubber, or plastic must be dried on a clothesline or by using an Air Cycle.
Failure to follow these instructions can result in death or fire.
|
1. Clean the lint screen |
|
|
2. Load the dryer |
||
|
|
|
|
|
|
|
|
|
|
|
|
|
|
Clean the lint screen before each load. Pull the lint screen out of its holder. Roll lint off the screen with your fingers. Do not rinse or wash screen to remove lint. Push the lint screen firmly back into place. For additional cleaning information, see “Dryer Care.”
Place laundry in the dryer. Close the door. Do not tightly pack the dryer; clothes should be able to tumble freely.
NOTE: Your model may have a different door than the one shown. Some models have drop down doors.
7
3. Select the desired cycle
Appearance may vary.
Select the desired cycle for your load. See the “Cycle Guide” for more information about each cycle.
Auto Dry cycles
You can select a different dry level, depending on your load, by turning the knob to More, Normal, or Less.
Selecting More, Normal or Less automatically adjusts the dryness level at which the dryer will shut off. Once a dry level is set, it cannot be changed without stopping the cycle.
Auto Dry cycles give the best drying in the shortest time. Drying time varies based on fabric type, load size, and dryness setting.
NOTE: More Dry removes more load moisture. Normal Dry is used for a starting point for Auto Dry cycles. Less Dry removes less moisture and is used for loads you may want to put on a hanger to complete drying.
4. Set temperature (on some models)
Turn the DRY TEMP knob to change the drying temperature setting. See “Setting the Drying Temperature.”
5. Select Cycle Signal, if desired (on some models)
Turn the CYCLE SIGNAL knob to select the desired setting
(On or Off). The Cycle Signal produces an audible sound when the drying cycle is finished. Promptly removing clothes at the end of the cycle reduces wrinkling.
NOTE: During the Wrinkle Guard™ function and if the Cycle Signal is on, the tone will sound every 5 minutes until the clothes are removed or the Wrinkle Guard™ function ends.
6. Press and hold PUSH TO START to begin cycle
Appearance may vary.
Press and hold the PUSH TO START button to begin the cycle.
Promptly remove garments after cycle has completed to reduce wrinkling. The Wrinkle Guard™ function at the end of the cycle avoids wrinkling when you are unable to remove a load from the dryer as soon as it stops.
8
DRYER CARE
Cleaning the dryer location
Keep dryer area clear and free from items that would block the air flow for proper dryer operation. This includes clearing piles of laundry in front of the dryer.
Cleaning the dryer interior
To clean dryer drum
1.Apply a liquid, nonflammable household cleaner to the stained area of the drum and rub with a soft cloth until stain is removed.
2.Wipe drum thoroughly with a damp cloth.
3.Tumble a load of clean cloths or towels to dry the drum.
NOTE: Garments that contain loose dyes, such as denim blue jeans or brightly colored cotton items, may discolor the dryer interior. These stains are not harmful to your dryer and will not stain future loads of clothes. Dry these items inside out to avoid drum staining.
Removing accumulated lint
From Inside the Dryer Cabinet
Lint should be removed every 2 years, or more often, depending on dryer usage. Cleaning should be done by a qualified servicer.
From the Exhaust Vent
Lint should be removed every 2 years, or more often, depending on dryer usage.
Cleaning the lint screen
Every load cleaning
The lint screen is located in the dryer. A screen blocked by lint can increase drying time.
To clean:
1.Pull the lint screen out of its holder. Roll lint off the screen with your fingers. Do not rinse or wash screen to remove lint.
2. Push the lint screen firmly back into place.
IMPORTANT:
■■ Do not run the dryer with the lint screen loose, damaged, blocked, or missing. Doing so can cause overheating and damage to both the dryer and fabrics.
■■ If lint falls off the screen into the dryer during removal, check the exhaust hood and remove the lint. See “Venting Requirements” in the Installation Instructions.
As needed cleaning
Laundry detergent and fabric softener residue can build up on the lint screen. This buildup can cause longer drying times for your clothes or cause the dryer to stop before your load is completely dry. The screen is probably clogged if lint falls off while the screen is in the dryer.
Clean the lint screen with a nylon brush every 6 months, or more frequently, if it becomes clogged due to a residue buildup.
To wash:
1.Roll lint off the screen with your fingers.
2.Wet both sides of lint screen with hot water.
3.Wet a nylon brush with hot water and liquid detergent. Scrub lint screen with the brush to remove residue buildup.
4.Rinse screen with hot water.
5.Thoroughly dry lint screen with a clean towel. Reinstall screen in dryer.
9
 Loading...