


Kenmore 11029133411, 11029133410, 11029132410, 11028133414, 11028133411 Owner’s Manual
...Use & Care Guide
Manual de uso y cuidado
Guide d’utilisation et d’entretien
English / Español / Français
Table of Contents...2 / Índice...20 / Table des matières...40
Models/Modelos/Modèles: 110.2813*410, 110.2913*410
Kenmore®
Top-Loading High Efficiency
Low-Water Washer
Designed to use only HE High Efficiency detergents.
Diseñada para utilizar solamente detergentes de alto rendimiento (HE).
Conçue pour l’utilisation d’un détergent haute efficacité seulement.
Lavadora de carga superior, de alto rendimiento y con nivel bajo de agua
Laveuse haute efficacité à faible consommation d’eau avec chargement par le dessus
* = color number, número de color, numéro de la couleur
P/N W10682720C
Sears Brands Management Corporation
Hoffman Estates, IL 60179 U.S.A.
www.kenmore.com
Sears Canada Inc.
Toronto, Ontario, Canada M5B 2C3
www.sears.ca

TABLE OF CONTENTS
WASHER SAFETY 2 WHAT'S NEW UNDER THE LID? 3 CONTROL PANEL AND FEATURES 4 Dispensers 6 CYCLE GUIDE 7 USING YOUR WASHER 9 Using Laundry Product Dispensers 10
WASHER MAINTENANCE 12 TROUBLESHOOTING 14 PROTECTION AGREEMENTS 19 WARRANTY 19 ASSISTANCE OR SERVICE Back Cover
WASHER SAFETY
2
WHAT’S NEW UNDER THE LID?
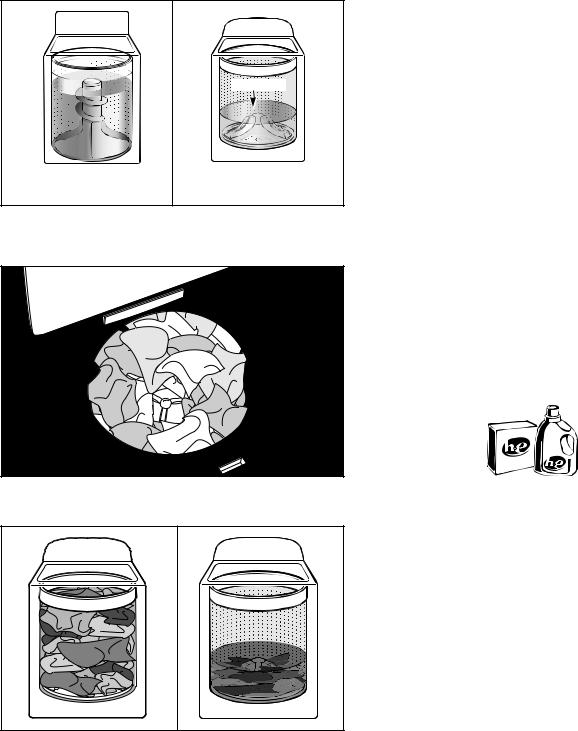
Cleaning with Less Water
|
Washplate |
Traditional agitator-style |
Washer with low-water |
washer |
washplate wash system |
The most striking difference in your new washer is the low-water washplate wash system. The washer automatically adjusts the water level to the load size—no water level selector is needed.
For best performance, it is recommended to load items in loose heaps evenly around the washplate.
As the washer dampens and moves the load, the level of the items will settle in the basket. This is normal and does not indicate that more items should be added.
IMPORTANT: You will not see a washer basket full of water as with your past agitator-style washer. It is normal for some of the load to be above the water line.
Automatic Load Size Sensing
Once you start the cycle, the lid will lock, and the washer will begin the sensing process to determine the correct water level for the load. This may take several minutes before water is added. You will find a step-by-step description in the “Cycle
Status Lights” section.
Initially the basket will start to spin prior to adding water; this is part of the sensing process and is normal. This low-water wash method uses less water and energy compared to a traditional agitator-style washer.
Choosing the Right Detergent
Use only High Efficiency detergents. The package will be marked “HE” or “High Efficiency.” Low-water washing creates excessive sudsing with a non-HE detergent. Using non-HE detergent
will likely result in longer cycle times and reduced rinsing performance. It may also result in component malfunction and, over time, buildup of mold or mildew. HE detergents should be low-sudsing and quick-dispersing to produce the right amount of suds for the best performance. They should hold soil in suspension so it is not redeposited onto clean clothes. Not all detergents labeled as High Efficiency are identical in formulation and their ability to reduce suds. For example, natural, organic, or homemade HE detergents may generate a high level of suds. If you use one of these and see an “F0E2” error code appear
in the display, consider using a different HE detergent. Always follow the detergent manufacturer’s instructions to determine the amount of detergent to use. Do not go over the Max line on the dispenser. See “Using Laundry Product Dispensers”
for more information.
Use only High Efficiency (HE) detergent.
Improved Cleaning
Low-water cleaning means concentrated cleaning. Rather than diluting detergent as done in an agitator-style washer, this washer delivers the detergent directly to the soils. This low
water wash also allows the clothing to move in a more effective way to remove soils.
Normal Sounds You Can Expect
At different stages of the wash cycle, you may hear sounds and noises that are different from those of your previous washer. For example, you may hear a clicking and hum at the beginning of the cycle, as the lid lock goes through a self-test. There
will be different kinds of humming and whirring sounds as the washplate moves the load and as basket is slowing down to stop. And sometimes, you may hear nothing at all, as the washer determines the correct water level for your load or allows time for clothes to soak.
3
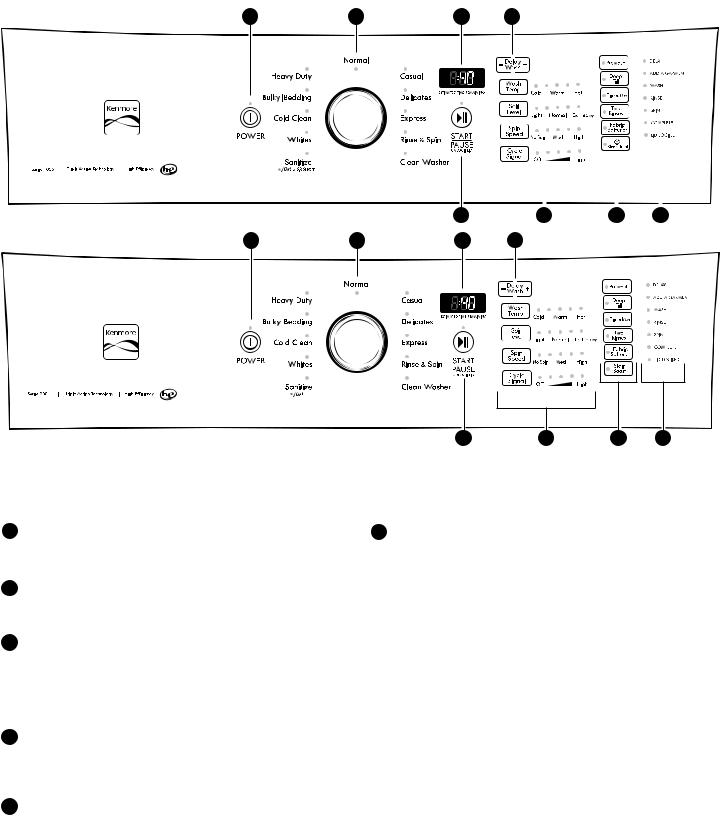
CONTROL PANEL AND FEATURES
STEAM MODEL |
1 |
2 |
3 |
4 |
|
|
|
|
|
|
|
|
|
|
|
|
|
|
|
|
|
|
5 |
|
|
|
|
|
|
|
|
|
|
|
|
|
|
|
|
|
|
|
|
|
|
|
|
|
|
|
|
|
|
|
|
|
|
|
|
|
|
|
|
|
|
|
|
|
|
|
|
|
|
|
|
|
|
|
|
|
|
|
|
|
|
|
|
|
|
|
|
|
|
|
|
|
|
|
|
|
|
|
|
|
|
|
|
|
|
|
|
|
|
|
|
|
|
|
|
|
|
|
|
|
|
|
|
|
|
|
|
|
|
|
|
|
|
|
|
|
|
|
|
|
|
|
|
|
|
|
|
|
|
|
|
|
|
|
|
|
|
|
|
|
|
|
|
|
|
|
|
|
|
|
|
|
|
|
|
|
|
|
|
|
|
|
|
|
|
|
|
|
|
|
|
|
|
|
|
|
|
|
|
|
|
|
|
|
|
|
|
|
|
|
|
|
|
|
|
|
|
|
|
|
|
|
|
|
|
|
|
|
|
|
|
|
NON-STEAM MODEL |
|
|
|
|
|
|
|
|
|
|
|
|
|
6 |
|
7 |
|
8 |
||||||||||
1 |
2 |
|
|
|
|
3 |
4 |
|
|
|
|
|
|
|
|
|||||||||||||
|
|
|
|
|
|
|
|
|
|
|
|
|
|
|
|
|
|
|
|
|
|
|
|
|
|
|
|
|
|
|
|
|
|
|
|
|
|
|
|
|
|
|
|
|
|
|
|
|
|
|
|
|
|
|
|
|
|
|
|
|
|
|
|
|
|
|
|
|
|
|
|
|
|
|
|
|
|
|
|
|
|
|
|
|
|
|
|
|
|
|
|
|
|
|
|
|
|
|
|
|
|
|
|
|
|
|
|
|
|
|
|
|
|
|
|
|
|
|
|
|
|
|
|
|
|
|
|
|
|
|
|
|
|
|
|
|
|
|
|
|
|
|
|
|
|
|
|
|
|
|
|
|
|
|
|
|
|
|
|
|
|
|
|
|
|
|
|
|
|
|
|
|
|
|
|
|
|
|
|
|
|
|
|
|
|
|
|
|
|
|
|
|
|
|
|
|
|
|
|
|
|
|
|
|
|
|
|
|
|
|
|
|
|
|
|
|
|
|
|
|
|
|
|
|
|
|
|
|
|
|
|
|
|
|
|
|
|
|
|
|
|
|
|
|
|
|
|
|
|
|
|
|
|
|
|
|
|
|
|
|
5 |
6 |
7 |
8 |
Not all features and cycles are available on all models
NOTE: The control panel features a sensitive surface that responds to a light touch of your fi nger. To ensure your selections are registered, touch the control panel with your fi ngertip, not your fi ngernail. When selecting a setting or option, simply touch its name until the desired section is illuminated
1POWER BUTTON
Touch to turn on the washer Touch to stop/cancel a cycle at any time
2WASH CYCLE KNOB
Turn the Wash Cycle knob to select a cycle for your laundry load See “Cycle Guide” for detailed descriptions of cycles
3TIME DISPLAY
The Estimated Time Remaining display shows the time required for the cycle to complete Factors such as load size and water pressure may aff ect the time shown in the display. Overloading, unbalanced loads, or excessive suds may cause the washer to adjust the cycle time as well
4DELAY WASH
Use “+” and “–” to delay the start of the wash cycle by up to 12 hours. To turn off Delay Wash, use “+” and “–” to set the delay time to “0,” or touch POWER
5START/PAUSE/UNLOCK LID BUTTON
Touch and hold START/PAUSE button for up to 3 seconds or until the washer starts the selected cycle; touch again to pause a cycle
NOTE: If the washer is spinning, it may take several minutes to unlock the lid
6CYCLE MODIFIERS
When you select a cycle, its default settings will light up
WASH TEMP
Wash Temp control senses and maintains uniform water temperatures by regulating incoming hot and cold water
Select a wash temperature based on the type of fabric and soils being washed For best results and following the garment label instructions, use the warmest wash water safe for your fabric
•On some models and cycles, warm and hot water may be cooler than what your previous washer provided
•Even for cold wash settings, some warm water may be added to the washer to maintain a minimum temperature
SOIL LEVEL
Select the most suitable setting for your load For heavily soiled items, select Ex Heavy Soil Level for more wash time For lightly soiled items, select Light Soil Level for less wash time
Lighter soil level setting will help reduce tangling and wrinkling
SPIN SPEED
This washer automatically selects the spin speed based on the cycle selected The preset speeds can be changed Not all spin speeds are available with all cycles
•Faster spin speeds mean shorter dry times, but may increase wrinkling in your load
•Slower spin speeds mean less wrinkling but will leave your load more damp
4

CYCLE SIGNAL |
8 CYCLE STATUS LIGHTS INDICATOR |
|
Use this option to adjust volume of the signal that sounds |
The Cycle Status Lights show the progress of a cycle. At each |
|
at end of cycle. The Cycle Signal is a helpful reminder to |
stage of the process, you may notice sounds or pauses that |
|
remove items from washer as soon as the cycle has |
are different from traditional washers. |
|
completed. |
DELAY |
|
To turn Button Sounds either On or Off: |
||
When the Delay Wash is selected, this light will come on |
||
While washer is on, touch and hold Cycle Signal for 3 |
||
to indicate your washer is set-up to run a delayed wash. |
||
seconds. Washer will make a single beep when the process |
||
is complete. |
ADD A GARMENT |
|
NOTE: |
||
You may place additional clothing in the wash when the |
||
• Cycle Signal button will still operate, even if you turned |
||
Add a Garment indicator is lit without sacrificing wash |
||
the button sounds off. |
performance. Touch START/PAUSE once. The Lid Locked |
|
• Whatever your preferences are, they remain in effect |
light will turn off. Open the washer lid, add garments, |
|
through a power loss. |
and close the lid. Touch and hold START/PAUSE to restart. |
|
• The Default setting for button sounds is ON. |
WASH |
|
7 CYCLE OPTIONS |
You will hear the motor and washplate moving the load. |
|
It is normal for some of the load to be above the water |
||
You may add or remove options for each cycle. Note that |
line. Low-water cleaning means concentrated cleaning. |
|
not all options can be used with all cycles, and some are |
Rather than diluting detergent as done in an agitator-style |
|
preset to work with certain cycles. |
washer, this washer delivers the detergent directly to the |
|
PREWASH |
soils. The motor sounds may change at different stages |
|
in the cycle. The wash time is determined by the selected |
||
Use this option to add an extra agitation and soak time |
Soil Level. |
|
to the beginning of any cycle to break up tough stains. |
RINSE |
|
|
DEEP FILL
Will add the most amount of water for large or bulky loads. Items need to move freely. Tightly packing the load can lead to poor cleaning performance, and may increase wrinkling and tangling.
TimedOxi
This washer is designed to dispense laundry boosters such as oxygenated stain treaters and color-safe bleach at the right time in the cycle for best cleaning performance. Do not use laundry boosters and chlorine bleach in the same cycle.
TWO RINSES
This option can be used to automatically add a second rinse to most cycles.
NOTE: If you want to Drain and Spin only, select the Rinse
& Spin cycle; then touch to turn off the Two Rinses option.
FABRIC SOFTENER
This option must be set to ON if using fabric softener. It ensures that fabric softener is added at the correct time in the rinse for even distribution.
STAIN TREAT for Steam models or STAIN BOOST for Non-Steam models
This option provides enhanced cleaning action for tough stains. It will add additional agitation and soak time to the cycle.
You will hear sounds similar to the wash cycle as the washer rinses and moves the load. Fabric softener will be added if the Fabric Softener option was selected.
SPIN
The washer spins the load at increasing speeds for proper water removal, based on the selected cycle and spin speed.
COMPLETE
Once the cycle is complete, this light will come on. Remove the load promptly for best results.
LID LOCKED
To allow for proper load sensing and spinning, the lid will lock and the Lid Locked light will turn on. This light indicates that the lid is locked and cannot be opened.
If you need to open the lid, touch START/PAUSE/Unlock Lid. The lid will unlock once the washer movement has stopped. This may take several minutes if the load was spinning at high speed. Touch and hold START/PAUSE/ Unlock Lid again for up to 3 seconds to resume the cycle.
5

Dispensers
A Liquid fabric softener dispenser
|
Pour measured liquid fabric softener into the liquid fabric |
B |
|
|
softener dispenser, if desired. It will dispense automatically |
||
|
at the optimum time. |
|
|
|
• Use only liquid fabric softener in this dispenser. |
C |
|
|
High Efficiency “HE” detergent dispenser |
||
B |
A |
||
Add liquid or powdered HE detergent product to this |
|||
|
|
||
|
dispenser for your main wash cycle. Remove tray if using |
|
|
|
powder detergent. |
|
IMPORTANT: Make sure tray is in drawer when using liquid detergent and removed when using powder detergent and do not go over the Max line.
Use only High Efficiency (HE) detergent.
NOTE: Follow the manufacturer’s instructions to determine the amount of detergent to use. Do not add single-dose laundry packets, color-safe bleach, or fabric softener crystals to dispensers. They will not dispense correctly.
|
Oxi dispenser |
|
C |
|
|
This dispenser holds up to ¾ cup (180 mL) Oxi booster or |
|
|
|
|
|
|
other laundry booster, such as powdered or liquid color-safe |
|
|
bleach. Laundry boosters are automatically dispensed at |
|
|
the proper time during the wash cycle. Be sure to select Oxi |
D |
|
from the options to ensure proper dispensing. |
NOTE: Fill dispenser with only oxi. Do not mix with bleach.
DLiquid chlorine bleach dispenser
This dispenser holds up to ¾ cup (180 mL) liquid chlorine bleach. The bleach will be automatically diluted and dispensed at the optimum time during the wash cycle. This dispenser cannot dilute powdered bleach.
NOTE: Fill dispenser with only liquid bleach.
6
 Loading...