


 Loading...
Operating manual |
Englisch |
UFS 90si/sw
HDTV Satellite receiver

Preface
Dear customer,
this operating manual is intended to help you make the fullest use of the extensive range of functions offered by your new satellite receiver.
We have tried to make the operating instructions as easy as possible to understand, and to keep them as concise as possible. To help you understand particular specialist terms that cannot be translated, we have added a short glossary at the end of the manual.
The power switch is an environmentally friendly feature. If you will not be using your receiver for an extended period, you should use the power switch to disconnect it from the power supply and save energy. For shorter breaks, you can use the remote control to switch the receiver to standby, which uses only a minimal amount of energy.
We wish you good reception and hope you will enjoy using your new HDTV receiver.
Your
KATHREIN team
2
Difference between PAL and HDTV
The difference between PAL and HDTV
High-resolution TV is characterised by a significantly higher number of picture lines on the TV set. The usual European standard PAL achieves a resolution of 576 lines vertically and 720 lines horizontally. High-resolution TV provides an impressive resolution, up to five times higher than the usual PAL standard TV, and hence delivering more detail sharpness and responsiveness.
A HDTV picture can contain up to five times as many picture points, that is, approximately 2 million pixels compared to a conventional PAL picture with only approximately 400,000 pixels.
Worldwide there are currently two HDTV standards, based on the two formats 1080i and 720p. The two standards differ in the number of picture lines and in the transmission procedure. For the human eye, the difference between the two HDTV standards is hardly perceptible, however; in comparison to the PAL system, moving pictures look much more dynamic. Transmission technology and reception equipment will be able to handle both standards in the future.
1080i 1920 x 1080
720p 1280 x 720
PAL 720 x 576
3

List of Contents
Preface.......................................................... |
2 |
Difference between PAL and HDTV ........... |
3 |
List of Contents ........................................... |
4 |
Safety Instructions - Important Notes ....... |
6 |
Connection and setup............................... |
10 |
Scope of supply......................................... |
10 |
Inserting batteries into the remote control. 10 |
|
Front/rear view of the receiver ................... |
11 |
Connecting the receiver ............................ |
12 |
TV connection ........................................... |
13 |
Audio connection....................................... |
13 |
Digital ............................................................... |
13 |
Analogue .......................................................... |
13 |
First installation ......................................... |
14 |
Basic Functions......................................... |
29 |
Remote control for live operation (TV/Radio) |
|
.................................................................. |
29 |
I want to watch TV .................................... |
30 |
I want to listen to the radio ... .................... |
31 |
I want to see teletext ... ............................. |
32 |
I want to watch timeshift TV ... .................. |
33 |
I want to record a programme immediately ... |
|
.................................................................. |
34 |
I want to record a programme that is sche- |
|
duled for later (timer list) ........................... |
35 |
I want to play back a recording ... ............. |
36 |
I want to delete a recording ...................... |
37 |
Editing and selection options in the menus 38 |
|
Channel selection from the channel list .... |
39 |
Channel Information.................................. |
41 |
Select Audio track ..................................... |
42 |
Select subtitle............................................ |
42 |
Videotext (Teletext).................................... |
43 |
One-Touch Recording (OTR) - recording |
|
directly to a hard disk *) ........................................................ |
44 |
Electronic Programme Guide (EPG)........ |
45 |
General information on the programme guide |
|
.................................................................. |
45 |
Calling up the EPG.................................... |
46 |
Navigation in the EPG (remote control but- |
|
tons in the EPG)........................................ |
47 |
Views using the EPG................................. |
48 |
“Preview” view (Program guide) ....................... |
48 |
“Current” View .................................................. |
49 |
Timer list view................................................... |
49 |
Recording settings (programming the timer) |
|
.................................................................. |
50 |
Recording “once”.............................................. |
51 |
Recording “daily” .............................................. |
52 |
Recording “weekly”........................................... |
52 |
Timer list ........................................................... |
53 |
Timer overlap.................................................... |
53 |
Recording Archive (Playing Back/Editing |
|
Recordings)................................................ |
54 |
Calling up the recording archive................ |
54 |
Selection options (remote control buttons in |
|
the recording archive) ............................... |
55 |
Sorting the recordings ............................... |
55 |
Playing back a recording........................... |
56 |
Playback functions .................................... |
56 |
Editing recordings ..................................... |
57 |
Delete ............................................................... |
57 |
Rename............................................................ |
58 |
Media centre............................................... |
59 |
General multimedia information (UFS 90). 59 |
|
Playing media files (selecting source directo- |
|
ry) .............................................................. |
59 |
Picture playback ............................................... |
60 |
MP3 playback................................................... |
61 |
Main Menu.................................................. |
62 |
Calling up the main menu and introduction 62 |
|
Menu overview .......................................... |
63 |
Main Menu - Edit Channel List ................. |
64 |
Calling up the “Edit Channel List” menu.... |
64 |
Selecting the channel list/favourites list to be |
|
edited ........................................................ |
64 |
Selecting the channels to be edited .......... |
65 |
Move................................................................. |
65 |
Delete ............................................................... |
66 |
4

List of Contents
Skip .................................................................. |
66 |
Lock.................................................................. |
67 |
Add to favourites list ......................................... |
67 |
Start Blockselection.......................................... |
68 |
Editing channels (favourites lists).............. |
68 |
Remove from favoritelist................................... |
68 |
Lock.................................................................. |
69 |
Rename favoritelist........................................... |
69 |
Start Blockselection.......................................... |
69 |
Main Menu - Search Channels.................. |
70 |
Automatic channel search......................... |
70 |
Manual channel search ............................. |
72 |
Channel Search with service ID ................ |
73 |
Main Menu - Parental Control................... |
75 |
Main Menu - Settings................................. |
77 |
First installation ......................................... |
77 |
TV, video and audio................................... |
77 |
Suit screen menu ...................................... |
79 |
Date and time............................................ |
80 |
Antenna Configuration .............................. |
80 |
Main Menu - Service Menu........................ |
81 |
Software update ........................................ |
81 |
Software update via SAT.................................. |
81 |
Software update over USB............................... |
83 |
Restore factory settings ............................ |
84 |
USB Device Management......................... |
84 |
Creating a dedicated hard disk (archive hard |
|
disk).................................................................. |
85 |
Main Menu - Language.............................. |
86 |
Operation without the remote control ..... |
87 |
Backup operation ...................................... |
87 |
Troubleshooting ........................................ |
88 |
Technical appendix ................................... |
89 |
Alphanumeric entries ................................ |
89 |
Advanced connection example ................. |
90 |
Technical Specifications ............................ |
91 |
Sat IF connection examples...................... |
92 |
Single systems ................................................. |
92 |
Community antenna network systems (4 x Sat IF)
......................................................................... 92
Community antenna network systems (8 x Sat |
|
IF), multi-feed ................................................... |
93 |
Community antenna network systems (16 x Sat |
|
IF), multi-feed ................................................... |
93 |
Single cable systems........................................ |
94 |
Short technical guide................................ |
96 |
5
Safety Instructions - Important Notes
These two pages contain important information about operation, installation location and connection of the unit. Read these instructions carefully before setting up the unit.
Danger!
Warning!
Mains cable
Make sure that the mains cable (power supply cable) is not damaged. Units with a damaged mains cable must be disconnected from the mains (unplugged at the mains power socket) and repaired by an electrical specialist before being used. Only use the power pack supplied (if available)!
Risk of fatal injury due to electric shock!
Cleaning
Disconnect the mains plug before cleaning the unit. Only use a dry cloth for cleaning and only clean the outer surface. Never open the casing of the unit.
Touching the parts inside the unit carries a risk of death due to electric shock!
Playing children
Make sure that children do not push any objects into the ventilation slots.
Risk of fatal injury due to electric shock!
Earthing
The antenna system must be earthed as specified or equipotentially bonded.
EN 60728/11 and any national regulations must be complied with.
Risk of voltage surges due to lightning strikes!
Power supply voltage
Only operate the unit at the specified mains voltage (indicated on the rear of the unit or on the external power pack). The unit may only be connected to the mains and turned on once it has been connected to the antenna and to the TV set or the cable network and PC.
If the mains voltage is too high, there is a risk of fire!
Warning!
Warning!
Do not 
 cover
cover

Moisture, direct sunlight, heat, naked flames
Protect the unit against moisture,
dripping and |
splashed water |
(do |
not place any |
filled objects |
such |
as vases on top of the unit). Do not place the unit close to a heater or expose it to direct sunlight and do not operate it in damp locations. Only use the unit in a moderate climate, not in tropical conditions! Place no naked flames such as candles on top of the unit!
There is a risk of fire!
Batteries
If your unit was supplied with batteries (e.g. for the remote control), take care that the batteries are not exposed to excessively high temperatures, direct sunshine or fire. Exchange the batteries only with types that are identical or equivalent. Otherwise the batteries and also the remote control may be damaged. Comply also with the safety instructions stated on the batteries:
There is a risk of explosions!
Ventilation
The heat generated in this unit is adequately dissipated. However, the unit should never be installed in a cupboard or on shelves with inadequate ventilation. Never cover the cooling slots on the unit (e.g. with other equipment, magazines, tablecloths, clothing or curtains)!
Do not place any objects on top of the unit. Unless stated to the contrary in the “Connection and Set-Up” and “Installation” sections in the manual included, maintain a clearance of at least 10 cm above the unit, 2 cm to either side and 5 cm behind the unit, to allow unobstructed dissipation of the heat generated.
There is a risk of fire!
6
Safety Instructions - Important Notes
|
Repairs |
|
|
|
|
Ensure that any repairs |
to |
your |
|
|
unit are carried out by qualified |
|||
Important |
personnel. |
Opening the |
unit |
and |
|
attempting to repair it yourself will |
|||
|
void all warranty claims! |
|
|
|
|
Improper work on the unit may |
|||
|
jeopardise |
the electrical |
safety of |
|
|
the unit. |
|
|
|
The manufacturer accepts no liability for accidents caused by the user opening the casing of the unit!
Connections
Incorrect wiring of the connections can lead to malfunctions or defects on the unit!
Periods of extended absence, thunderstorms, mains socket accessibility
In order to disconnect the unit from the mains completely, the mains plug must be unplugged from the wall socket! Therefore install the unit close to a mains socket and make sure that socket is accessible at all times, so that you can disconnect the unit from the mains if necessary.
If you are away for an extended period, and during thunderstorms, always switch the unit off at the mains and unplug it from the socket. This also applies to the other equipment connected to the unit. Isolation from the cable network is also recommended. Note any timer programming (receiver) and turn the unit on again promptly before the recording time.
Installation location
All electronic equipment generates heat, However, the heating of this unit lies within the permissible range. Sensitive furniture surfaces and veneers may become discoloured by the effects of constant heat over time. The feet of the unit can also cause colour changes to treated furniture surfaces. If necessary, place the unit on a suitable stable and flat base!
Electronic equipment is not domestic waste - it must be disposed of properly in accordance with directive 2002/96/EC OF THE EUROPEAN PARLIAMENT AND THE COUNCIL dated 27th January 2003 concerning used electrical and electronic appliances.
At the end of its service life, take this device for disposal at a designated public collection point.
Spent batteries are special waste!
Do not throw spent batteries into your domestic waste; take them to a collection point for spent batteries!
7
Safety Instructions - Important Notes
Chan e assignm nt
The channels available on the satellites and transponders are subject to continual change. If changes do occur, the new channels have to be set on the receiver because the factory preset programming corresponds to the status on the date of manufacture. The information for these settings can be found on the Internet or in relevant magazines.
Updating the receive softwa e
Your receiver was equipped in the factory with the latest software version at that time. We are, however, constantly working on adapting the software to the wishes of our customers and to developments in technology. Further information on this can be found in the sections “Main Menu - Service Menu”, “Software Update”.
Prod t tu /origi l ck in
Please keep the original packaging in case you need to return the product at any time. The receivers are fragile due to their construction and are only adequately protected by the original packaging. If the receiver is not shipped correctly the guarantee/warranty on it will be voided.
Software ha ges/use of applicatio s
Any modifications to the receiver software, or the use of applications not provided by Kathrein, will invalidate the warranty! You will have to bear the costs yourself for shipping and repairing any receiver that requires attention due to modifications to the software and use of applications other than those provided by Kathrein!
Therefore exclusively use only software and applications provided by Kathrein for your receiver. These are available by downloading from the satellite or from our Internet pages (www.kathrein.de).
Ventilatio slot |
the nit |
Make sure that the ventilation slots on the unit are not covered in any way. Otherwise the unit may overheat.
There is a risk of fire!
8
Safety Instructions - Important Notes
Switching th eceivver off
Before you switch the receiver using the power switch, you must switch the remote control into stand-by
mode by pressing the stand-by button ( ). In standby mode, any changed or new data that are broadcast will be saved by the receiver. Once the receiver is in standby mode it can be fully switched off at any time at the power switch at the front of the unit.
Do not switch the receiver off at the power switch directly from operating mode! This can lead to a loss of data and corruption of the software.
Innfo atio |
Audio MPEG In nd S.I.SV.EL S.P.A: |
This unit makes use of legally protected technologies, which are protected by patents in the USA and also by other intellectual property rights in other countries.
KATHREIN-Werke KG has obtained licences from Audio MPEG Inc. and Societa‘ Italiana per lo sviluppo dell‘elettronica, S.I.SV.EL, S.P.A to use these technologies. These licences carry certain restrictions, which apply also to you as the customer. Accordingly this unit may only be used by the end customer for private non-commercial purposes and for the licensed content. It may not be used for commercial purposes. The use of products or processes that are sold or used with this unit is not included in this statement. The use of reverse engineering is not permitted in respect of the licensed technologies, nor is disassembly.
Mi ella
The information in this operating manual was correct at the time of going to print. We reserve the right however to make changes at any time and without prior notice. If new software is released for your receiver, and this affects the information in the operating manual (e.g. changes to the menus and/or functions), if we believe it necessary we will make available a new operating manual for download under “www.kathrein.de”.
Make a note of the receiver's basic settings (these are set during the first installation), so you can restore them if necessary!
Included in the software for this receiver is software that is licensed under the GNU (General Public Licence). The source code of the program is obtainable under: www.kathrein.de/linux/receiver/ufs90
The term DiSEqC™ used in this operating manual is a registered trade mark of the European Telecommunication Satellite Organisation (EUTELSAT).
Manufactured under licence from Dolby Laboratories. “Dolby” and the double-D symbol are registered trademarks of Dolby Laboratories.
®HDMI, the HDMI logo and High-Definition Multimedia Interface are trademarks or registered trademarks of HDMI Licensing LLC.
9
|
Connection and setup |
Scop of supply |
|
UFS 90 |
Operating Manual |
Remote control RC 674 |
Safety instructions (multi-lingual) |
HDMI cable |
|
2 batteries AAA 1.5 V |
|
Inn rtinn batt ie into the |
ot |
nt |
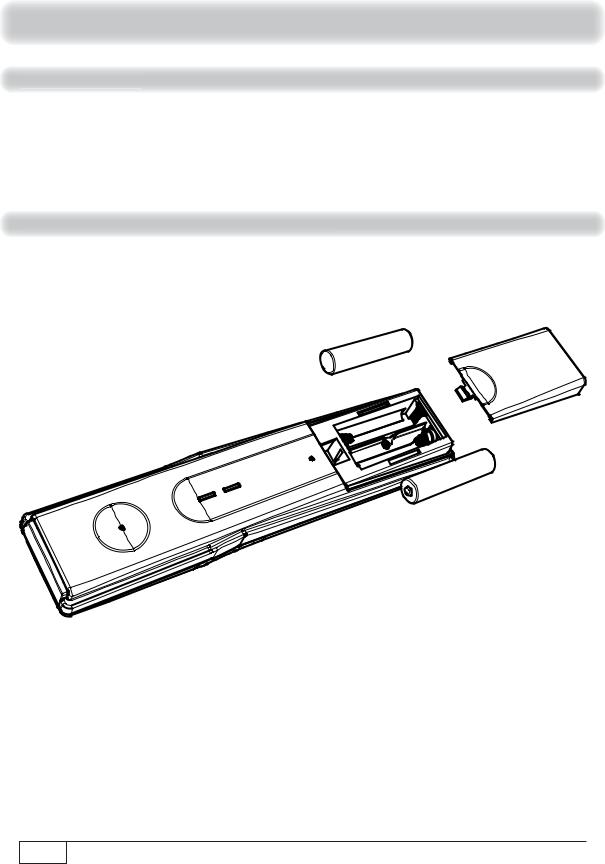
Remove the cover on the rear of the remote control. Insert the two batteries supplied into the remote control. Ensure correct polarity of the batteries; the + and – markings as indicated inside the battery compartment. Slide the cover back onto the housing until it locks in place.
10
Connection and setup
Front/ ear view of the eceiver
2 3 4
6 |
2 |
3 |
5 |
9 |
7 |
8 |
0 |
4 |
1.On/Off switch 1)
2.Channel selection (P-)
3.4-character display
4.Channel selection (P+)
5.RF(IF) loop-through output
6.RF(IF) input
7.USB 2.0 port (USB-A connector)
8.HDMI connection
9.Data interface (only for service), optionally for an infrared sensor (not included)
10.Scart socket for TV connection
11.Digital data stream output (S/PDIF = Sony/ Philips Digital Interface Format) for Dolby Digital AC 3 audio
12.Video output (composite colour)
13.Audio outputs (L/R) - cinch sockets
14.Power supply
1)The unit is not fully disconnected from the mains (see the sections “Safety Instructions - Important Notes” and “Periods of extended absence, thunderstorms, mains socket accessibility”)
HDMI = High-Definition Multimedia Interface (digital interface for video and audio) |
11 |
|
|
RF(IF) = Intermediate frequency - satellite signal for the receiver converted by the LNB |
|

Connection and setup
LED in the front panel display:
The LED lights up:
Red |
Receiver is in stand-by mode |
|
Green |
Remote control has been pressed |
|
Display in the front panel: |
||
Rec |
|
Recording in progress |
Display flashing |
Timeshift in progress |
|
Co necti the r ceiv
If you do not know the configuration of your satellite reception system, contact your specialist dealer.
Connect the Sat IF input on the receiver to the satellite reception system.
Use coaxial cable with an F standard connector (see illustration on right).
TV
Conventional
DiSEqC™ system
HDMI Scart
12

Connection and setup
TV con ectio
Connect the satellite receiver (HDMI or alternatively TV Scart socket) and the TV set using an HDMI or Scart cable (see “Connection example”).
For system reasons, the same video signals are present at both the TV Scart socket and also the video cinch output.
Audio connectio
Digital
There are two ways you can access the digital audio.
HDMI
The stereo audio is transmitted to your TV set via the HDMI interface. If your TV set also supports Dolby Digital, you can also receive the Dolby Digital audio via the HDMI interface (providing it is broadcast by the channel provider). On this issue refer to the operating manual for your TV set.
S/PDIF Dolby Digital output
The S/PDIF output is intended for the connection of a Dolby Digital system (see “Advanced connection example” in the technical appendix). Connect the S/PDIF output and the Dolby Digital system using an appropriate cable.
Anal
If you want to play the sound on your hi-fi system, connect the audio cinch sockets to the input sockets on the hi-fi system, using an appropriate cable (see “Advanced connection example” in the technical appendix).
S/PDIF = Sony/Philips Digital Interface Format (digital output for Dolby Digital AC 3 audio) |
13 |
|
Connection and setup
First installatio
Before you start to use the UFS 90, read the sections “Safety Instructions - Important Notes”, “Important Information” and “Connection and Set-Up” through to the item “First installation”.
Do not connect the unit to the mains until all installation work has been properly carried out.
The guidance provided in the “First installation” section assumes that the receiver has been properly connected as per the “Safety Instructions - Important Information” and “Connection and Set-Up” sections through to the “First installation” section.
Required buttons on remote control for initial installation:
... |
Numerical input |
|
(green) |
|
Proceed to next step in |
|
|
the first installation |
|||
|
|
|
|||
|
|
|
|
|
|
(red) |
Go back one step in the |
|
|
|
Confirm the changed |
first installation |
|
|
values/setting |
||
|
Select/change individual |
|
|
|
|
menu parameters, navigation |
|
|
|
|
|
|
|
|
|
|
|
|
Cancel input, go back |
|
|
|
|
|
|
|
|
|
|
First switch your |
TV set on and select the AV/HDMI |
input you have |
used to connect the receiver |
||
to your TV set. Switch on the receiver at the power switch on the front of the unit. Undertake the first installation. If you have any questions or encounter problems, contact your specialist dealer.
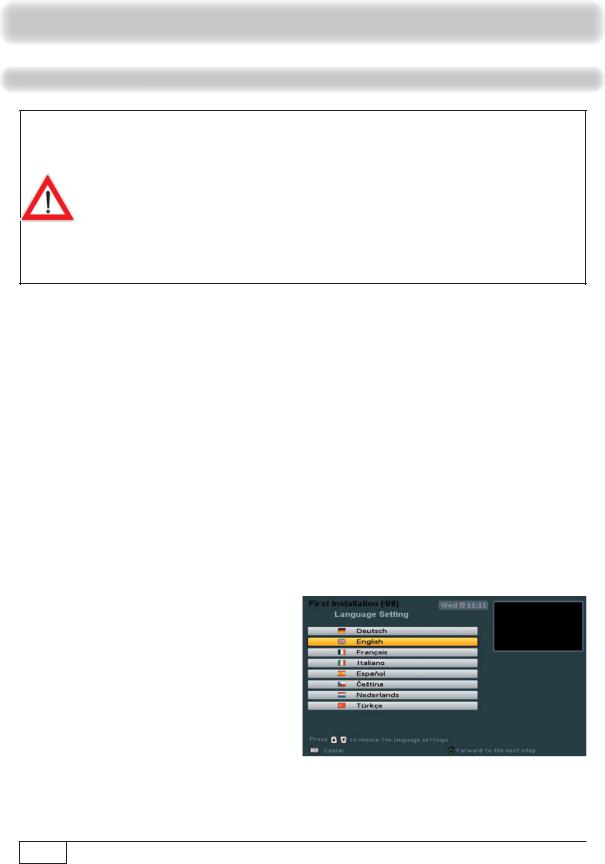
The following on-screen display appears:
Use the buttons to select the desired menu language for your receiver. The selected language will be given a coloured background. The following languages are available: German, English, French, Italian, Spanish, Czech, Dutch and Turkish.
14
Connection and setup
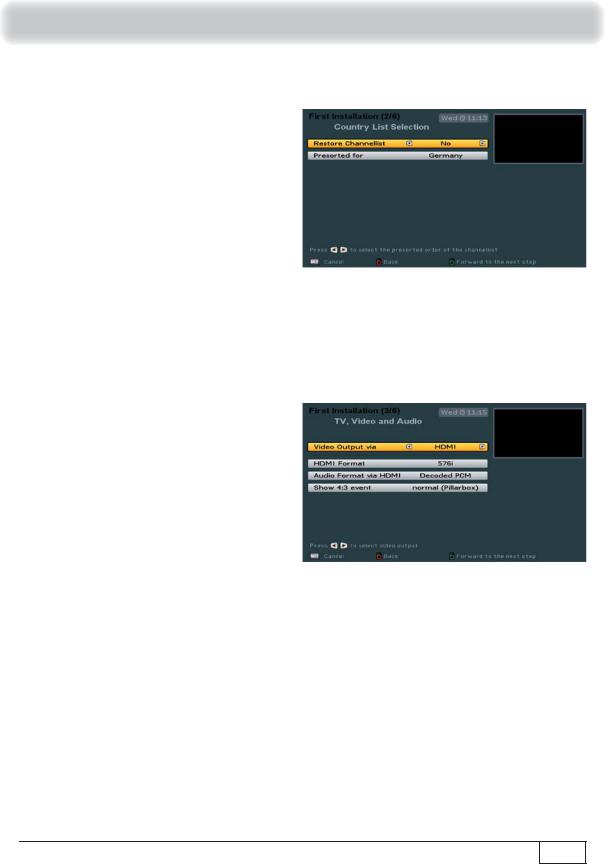
Press the (green) button to move to the next menu. The following on-screen display appears:
Use the buttons to select whether to replace the factory pre-programmed channel list by a pre-sorted channel list for a specific country (at present only a limited number of pre-sorted channel lists are available). If you prefer to use the factory pre-programmed channel list, choose “No” under “Restore Channellist”.
Press the (green) button to move to the next menu. The following on-screen display appears:
Use the buttons here to select the basic settings for the video and audio output from the receiver to the TV set.
During this process refer to the operating manual for your TV set and take care to select only those settings that your TV set can process.
Video Output via
Select the connection on the receiver to which you have connected your television. Either
15

Connection and setup
HDMI |
or |
SCART |
|
|
|
|
|
|
|
|
|
HDMI Format
Here you can select the video resolution that will be sent to your TV set. Either:
-1080i (resolution 1920 x 1080, half-screen images)
-576p (resolution 720 x 576, full-screen images) or
-720p (resolution 1280 x 720, full-screen images)
-Automatic
Audio Format via HDMI
Here you can select the type of audio signal that is transmitted by the HDMI interface. Select the signal that your TV set can process:
-Decoded PCM or
-S/PDIF format
Show 4:3 event
Here you can select the type of screen display mode for 4:3 broadcasts on a 16:9 TV set:
-normal (Pillarbox)
-stretched (Full Screen) or
-zoom in (Pan & Scan)
TV aspect ratio
Here you can select the TV picture format. Either:
-4:3 or
-16:9
Picture format
Select the type of screen display, depending on your setting for the TV aspect ratio:
-TV aspect ratio “4:3”: Pan & Scan or Letterbox
-TV aspect ratio “16:9”: Always 16:9 or Automatic
TV Scart signal output
Select the type of video signal at the TV Scart socket here. Select the signal that your TV set can process:
-CVBS – Colour Video Baseband Signal or
-RGB – Red/Green/Blue signal
Television System
Here you select whether your TV set is a
-PAL or
-NTSC
set. If you don’t know which it is, select the setting “AUTO” for automatic.
Press the (green) button to move to the next menu.
16 |
PAL and NTSC are TV standards. NTSC is used primarily in the North American region. |
|
Connection and setup
The following on-screen display appears:
|
If your |
receiver |
is |
connected as |
in the |
connection |
example |
|
|
Tip! |
(see “Connecting the receiver” in this section), no changes are |
Tip! |
|||||||
necessary in the rest of the first installation. If you are not familiar |
|||||||||
with the details of your reception system, note the following: |
|
||||||||
In |
many |
cases |
the |
satellite reception system is a DiSEqC™1.0 |
|||||
system. This type of system is preadjusted. Confirm the rest of the on- |
|||||||||
screen displays during |
the first installation using |
the (green) button. |
|||||||
|
You |
cannot damage |
your reception |
system |
during this |
process! |
|
||
If you do not receive a TV picture at the end of the first installation, contact your specialist dealer.
You should perform the tuner configuration/make changes yourself only if you are fully familiar with the particulars of your reception system.
You can set up the antenna (tuner) configuration for the following types of reception systems:
-LNB only
-DiSEqC™1.0
-Single-cable system
Continue as described in the initial installation for the type of reception you have selected.
17
Connection and setup
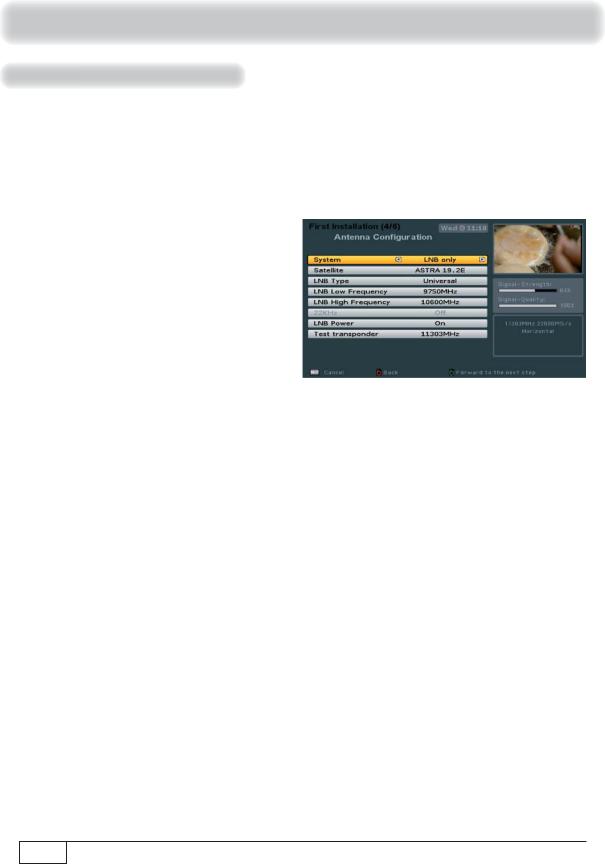
LNB ly
The individual items are selected using the buttons. If you need to access sub-menus, they can be called up using the button. The changes to the current settings can be performed using the buttons or the number pad.
The following on-screen display appears:
Select the satellite
Use the buttons here to select the satellite whose signal is present at the tuner.
LNB Type
If your reception system does not have a Universal LNB, use the buttons to select the LNB types that are used in your reception system. You can choose from the following LNB types:
-Universal or
-Single
LNB Low Frequency
You only need to specify this data if your LNB type is not “Universal LNB”. For this, refer to the documentation supplied with your LNB. Enter the LNB low frequency, using the numeric pad or
the buttons.
LNB High Frequency
You only need to specify this data if your LNB type is not “Universal LNB”. For this, refer to the documentation supplied with your LNB. Enter the LNB high frequency, using the numeric pad or the
buttons.
18 |
LNB = Low Noise Block converter (feed system) |
|

Connection and setup
22 kHz Signal
This cannot be set and is not required
LNB Power
This is factory-set to “On”, but must be changed of your LNB has its own power supply. In most cases the LNB power supply is provided by the receiver.
Test transponder
Select the “Test transponder” field. Here you can select a transponder for checking whether your settings are correct using the signal strength bar and signal quality bar.
When you have completed all settings, press the (green) button.
The receiver will automatically display the screen for the channel search. Continue the first installation with the “Channel Search” section.
19
Connection and setup
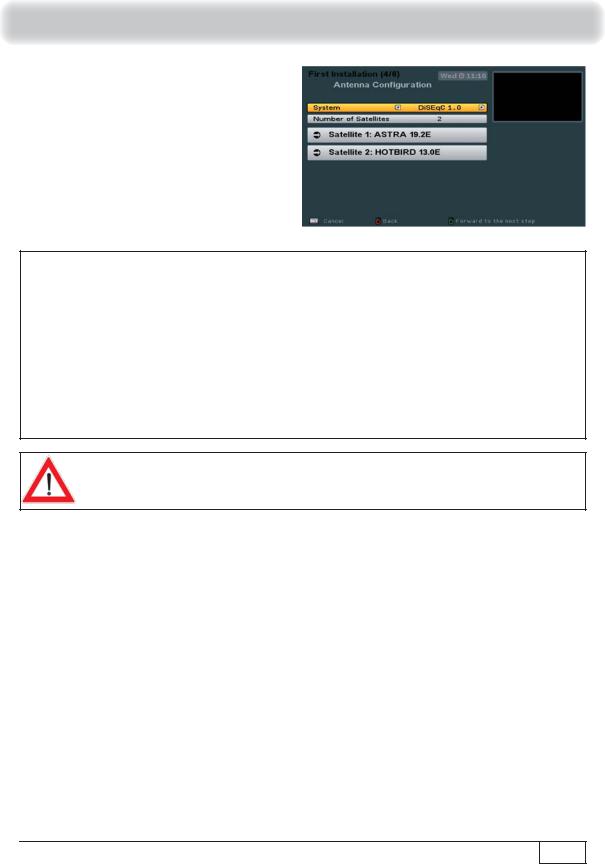
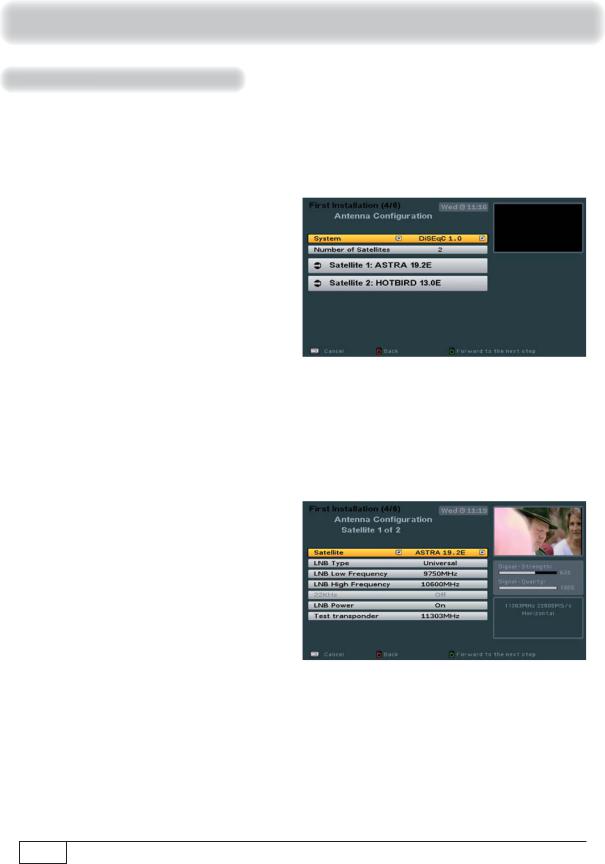
DiSEqC™1 .0
The individual items are selected using the buttons. If you require to access submenus, they can be called up using the button. The changes to the current settings can be performed using the buttons or the number pad.
Number of Satellites
Use the buttons to select how many satellites (max. 4) you would like to receive with your reception system.
Satellite selection/setting
Then use the buttons to select the first satellite slot. Press the button to open the menu for the satellite settings. The following on-screen display appears (example):
Satellite
Use the buttons to set the desired satellite (selection from 17 pre-programmed options).
20
Connection and setup
LNB Type
If your reception system does not have a Universal LNB, use the buttons to select the LNB types that are used in your reception system. You can choose from the following LNB types:
-Universal or
-Single
LNB Low Frequency
You only need to specify this data if your LNB type is not “Universal LNB”. For this, refer to the documentation supplied with your LNB. Enter the LNB low frequency, using the numeric pad or
the buttons.
LNB High Frequency
You only need to specify this data if your LNB type is not “Universal LNB”. For this, refer to the documentation supplied with your LNB. Enter the LNB high frequency, using the numeric pad or
the buttons.
22 kHz Signal
You only need to specify this data if your LNB type is “Single”. The 22 kHz signal is needed to switch LNBs when using multi-feed reception and to switch between Low and High band. For this, refer to the documentation supplied with your LNB.
LNB Power
This is factory-set to “On”, but must be changed of your LNB has its own power supply. In most cases the LNB power supply is provided by the receiver.
Test transponder
To check whether the settings that you have made are correct, use the buttons to move to
the “Test transponder” field. Use the buttons to select the required transponder from the various ones listed. If your settings are correct, you will see at the top right of the screen the live signal of a channel from the currently selected transponder.
If you do not receive a signal, check your settings again and if necessary call for expert help.
You have now completed all settings for the first satellite. Press the (green) button to return to the “Satellite Selection Menu” and perform the settings in the same way for the remaining satellites.
When you have finished configuring the satellite, press the (green) button. The receiver then automatically calls up the selection menu for the channel search. Continue the first installation by selecting “Execute Channel search”.
LNB = Low Noise Block converter (feed system) |
21 |
|
Connection and setup
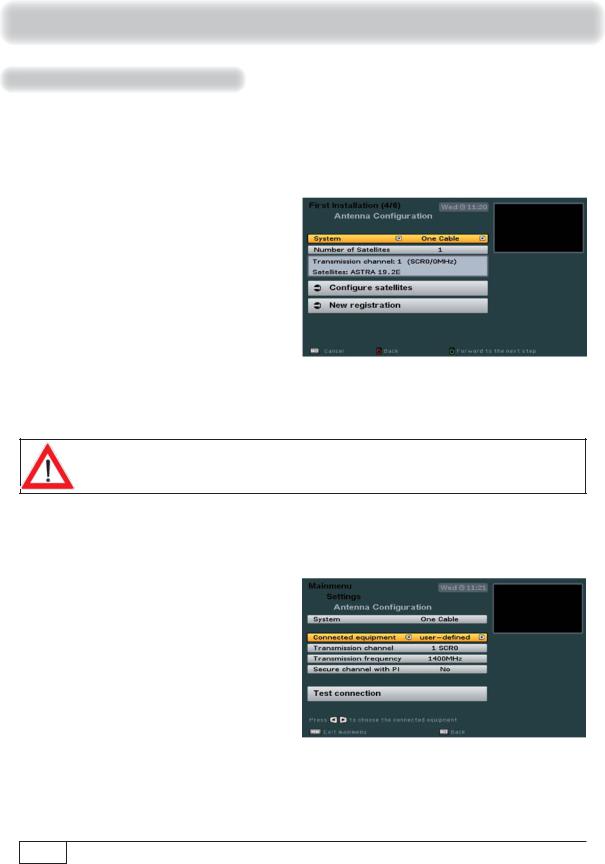
One Cable
The individual items are selected using the buttons. If you require to access submenus, they can be called up using the button. The changes to the current settings can be performed using the buttons or the number pad.
Number of Satellites
Use the buttons to select how many satellites (max. 2) you would like to receive with your reception system.
If you use a UAS 481 (single cable LNB) in your reception system, you are only allowed to select one satellite.
Now use the buttons to select the “New registration” line and press the button to confirm.
The individual items are selected using
the buttons.
The changes to the current settings can
be performed using the buttons or the number pad.
22
Connection and setup
Connected equipment
Use the buttons to select the single cable system used in your reception system: Either:
-KATHREIN UAS 481 (single-cable LNB),
-KATHREIN EXR 551,
-KATHREIN EXR 552,
-KATHREIN EXR 4 (Kathrein single cable matrices for four subscribers),
-KATHREIN EXR 8 (Kathrein single cable matrices for eight subscribers),
-KATHREIN EXU 908 or
-User-defined (for all single-cable systems not covered by any of the above specifications)
Refer to the documentation supplied with your system for the settings for the SCR, frequencies and any PIN assigned to the tuner. You will find there a printed list showing the assignment between the various SCRs and the respective transmission frequencies. It may happen that you cannot freely select the PIN for protection of individual frequencies; this also may be listed in the documentation for the single-cable components.
Please note also that multiple receivers cannot share the same frequencies/ channels - the receivers would interfere with each other.
Transmission channel
Select a free available transmission channel.
Transmission frequency
If not preset by the receiver, select here one of the free available transmission frequencies.
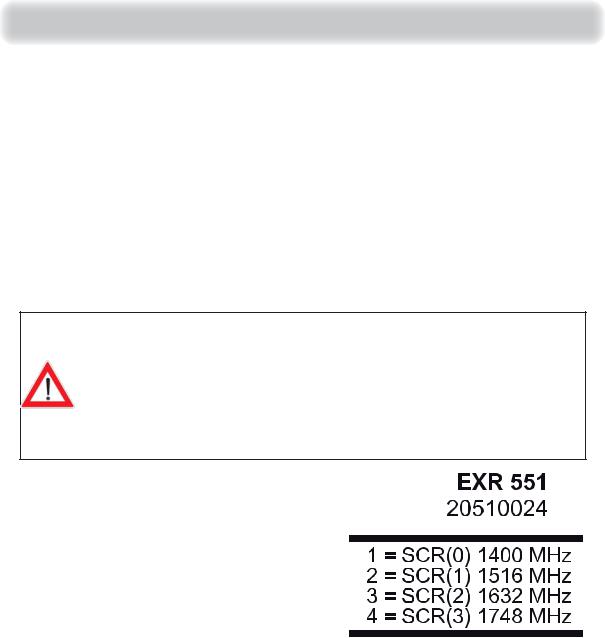
See example on the right (EXR 551) for assignment of a transmission channel to a transmission frequency.
SCR = Satellite Channel Router (transmission channel) |
23 |
|
Connection and setup
Secure channel with PIN (not possible in every system)
If your single cable system allows the transmission frequency to be protected by entering a PIN, this is the menu where that can be done. No other receiver can then use this transmission frequency unless the PIN is entered.
Select the setting “Yes”. You then have the facility of using the number keys to input a PIN code (0-255) in the line beneath “Password PIN”.
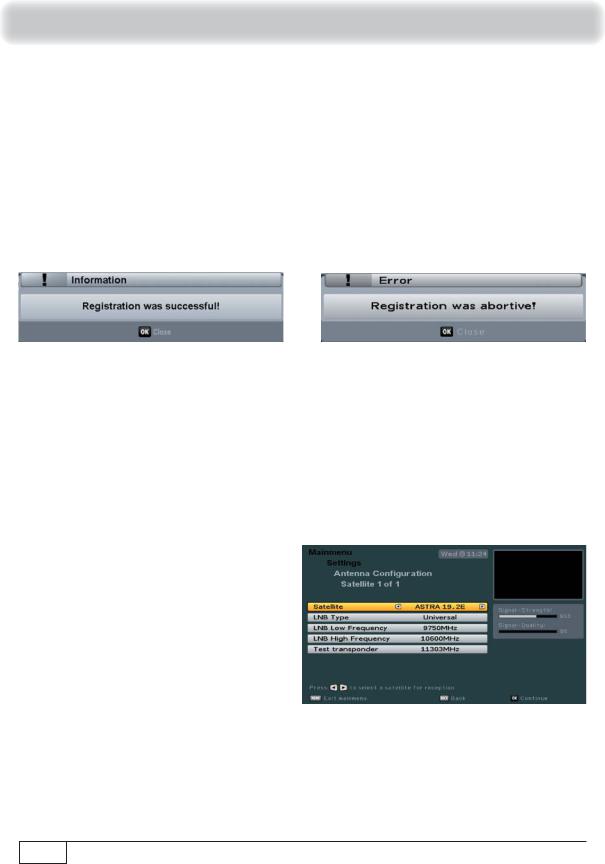
Test connection
Press the button to test the connection. The following on-screen display appears:
Press the button to confirm the displayed
message. Then press the button to return to the Antenna Configuration menu.
Satellite
Press the button to confirm the displayed message. If no connection can be established to the single-cable system, check your settings (transmission channel) and if necessary call for expert help.
Use the buttons to set the desired satellite (selection from 17 pre-programmed options).
24

Connection and setup
LNB Type
If your reception system does not have a Universal LNB, use the buttons to select the LNB types that are used in your reception system. You can choose from the following LNB types:
-Universal or
-Single
LNB Low Frequency
You only need to specify this data if your LNB type is not “Universal LNB”. For this, refer to the documentation supplied with your LNB. Enter the LNB low frequency, using the numeric pad or
the buttons.
LNB High Frequency
You only need to specify this data if your LNB type is not “Universal LNB”. For this, refer to the documentation supplied with your LNB. Enter the LNB high frequency, using the numeric pad or
the buttons.
Test transponder (this works only after a new registration)
To check whether the settings that you have made are correct, use the buttons to move to
the “Test transponder” field. Use the buttons to select the required transponder from the various ones listed. If your settings are correct, you will see at the top right of the screen the live signal of a channel from the currently selected transponder.
If you do not receive a signal, check your settings again and if necessary call for expert help.
You have now completed all settings for the first satellite. Press the button. If at “Number of Satellites” you selected two satellites, first follow the same procedure to perform the settings for the second satellite.
When you have finished the satellite configuration, press the button. The receiver automatically switches back to the “Antenna Configuration” overview.
Now |
press |
the |
|
(green) |
button. |
The |
receiver |
will |
automatically |
display |
||
the |
screen |
for |
the |
channel |
search. |
Continue |
the |
first |
installation |
with |
the |
|
“Channel Search” section. |
|
|
|
|
|
|
|
|
|
|||
LNB = Low Noise Block converter (feed system) |
25 |
|
Connection and setup
Channel Search
The individual items are selected using the buttons. Changes to the current settings can be made using the buttons.
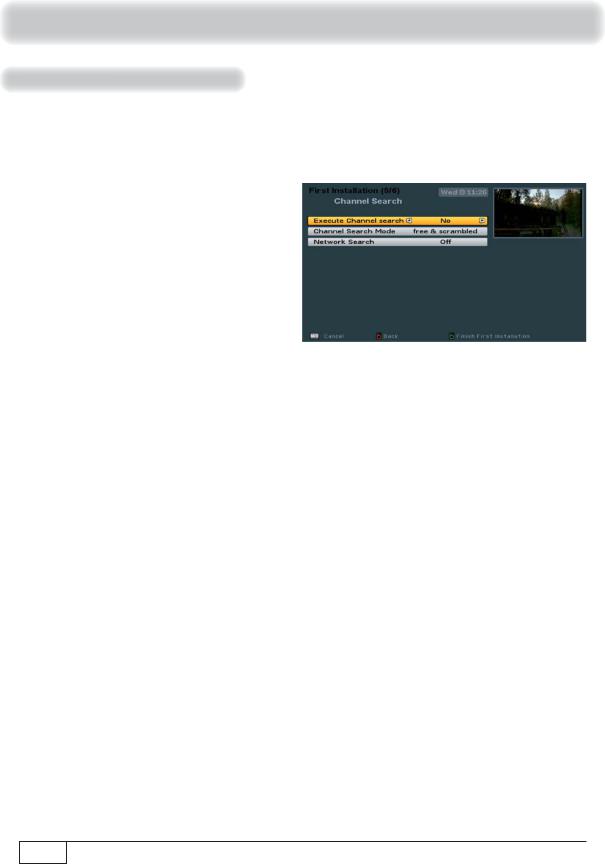
If you do not wish to perform a channel
search, press the (green) button and continue with the “Date and time” section of the first installation.
If you want to perform a channel search, use the buttons to select “Yes”.
Channel Search Mode
Use the buttons to select the type of channels that are to be searched for. You have three options:
- |
“free and scrambled” |
All channels are searched for |
- |
“only free” |
Only free-to-air channels are searched for |
To |
view encrypted channels |
you need an appropriate CA (Conditional Access) module and |
a valid smart card together with a valid subscription to the relevant Pay TV provider.
26 |
Pay TV = Pay-per-View (such as Sky or Arena) |
|
Connection and setup
Network Search
Use the buttons (On/Off) to select whether a network search should be performed. If you set the network search to “Off”, only the factory default transponders for the satellite(s) you previously selected will be searched for new as yet unsaved channels. If you set the network search to “On”, the transponder network enables additional transponders that have not yet been stored to be located. They are then stored and searched for new channels in the same way as the existing transponders.
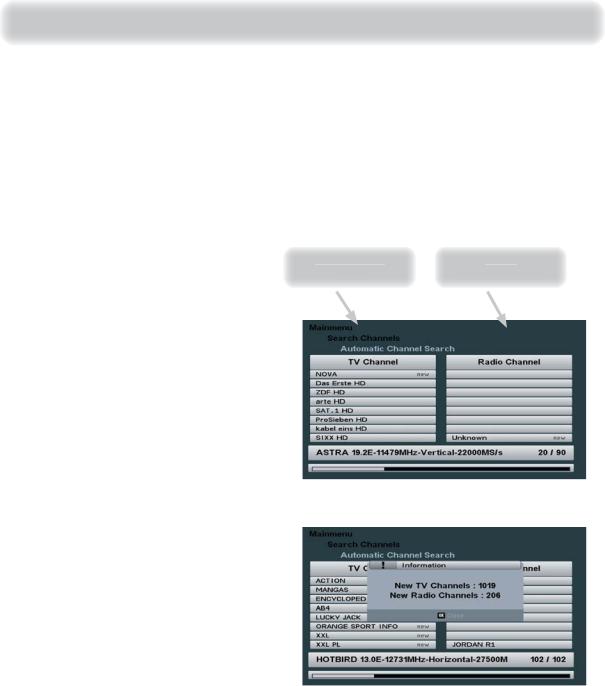
When you have completed all settings, press the (green) button. The following on-screen displays appear (example):
TV channels |
ch |
Radio |
fo d |
ls f nd |
During the search you will see the following on-screen display (example):
Newly found channels are identified with the suffix “New” (see screenshot example, right).
Note:
You can cancel the search at any time by pressing the button.
After completion of the search, you will see the following on-screen display (example):
Press the button. The newly found channels are added at the end of the existing complete list.
Transponder = frequency converter (see Short Technical Guide) |
27 |
|
Connection and setup
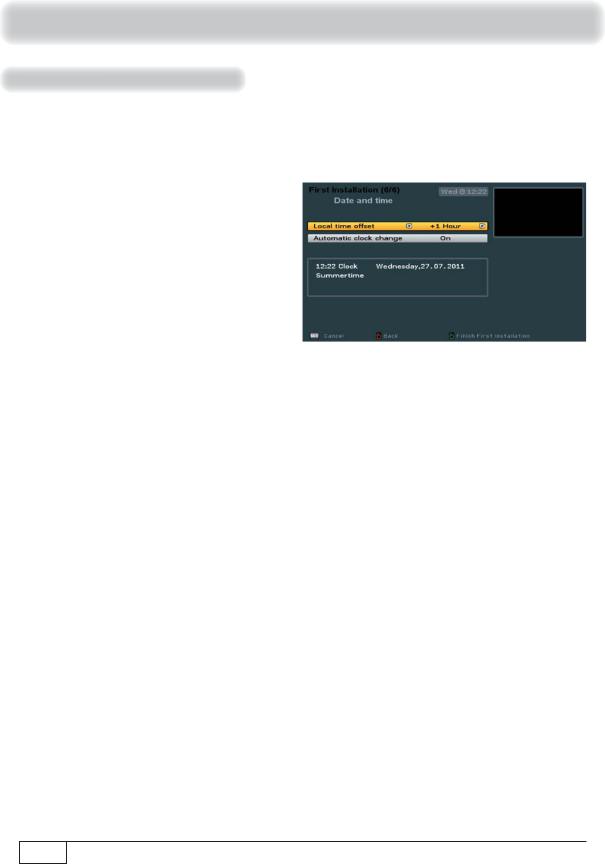
Date and time
The individual items are selected using the buttons. Changes to the current settings can be made using the buttons.
Local time offset (GMT)
Here you can select the local time offset to UTC (formerly GMT) (e.g. for Germany: + 1 hour). You can set the offset in 1 hour steps. The maximum offset is 12 hours (+ and -).
Automatic clock change (Summer Time)
Here you can select whether the receiver should automatically change over to and from summer and winter time. Either:
-On or
-Off
If you select “Off”, “Summertime” will be displayed in the line below. Here you manually set the time of the receiver to summer time (selection “Yes”). If “Summertime No” is selected, winter time is automatically selected.
28GMT = Greenwich Mean Time (time zone +0)
UTC = Universal Time Coordinated, the successor to GMT

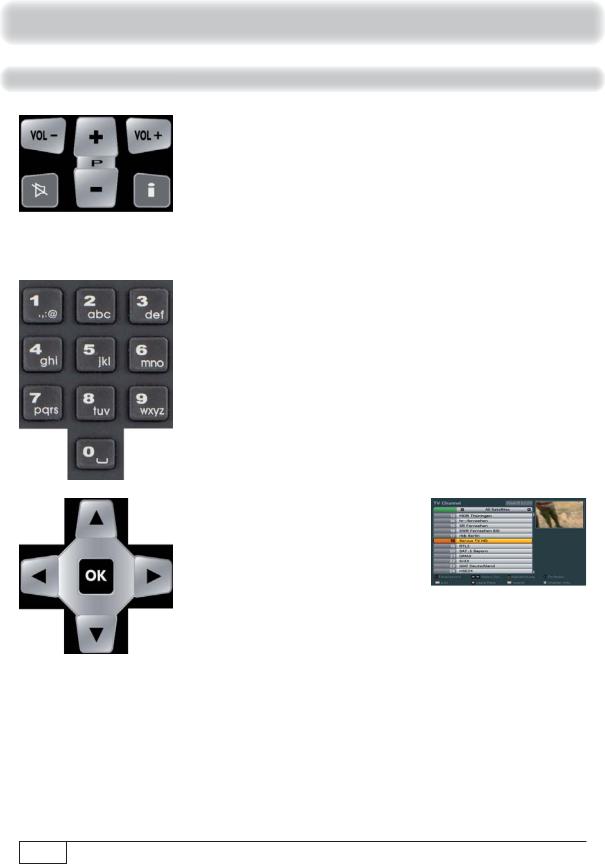
Basic Functions
Remote control for live operation (TV/Radio)
 Currently unavailable
 Number pad
 Call up main menu
 Volume “-” (softer)
 Mute
Mute
= Call up favourites list
= 1 x display of 4:3 broadcast
= 2 x HDMI format
Call up EPG (Electronic
Programme Guide)
Select last channel called up, exit on-screen displays/ menus step by step
= Fast Rewind
= Start playback/
Call up recording archive
= Fast Forward
 Operation (on)/standby (off)
 Call up teletext
 Volume “+” (louder)
 Channel selection


 Call up channel information (info banner and detailed information)
 = Call up options menu
= Switch between TV/radio mode
 Calling up the recording archive
= Navigation/channel or change channel option
= Call up channel list, confirmation/call up selection
 Call up the Media Centre
= Pause/Start Time-shift
= Start recording (OTR)
= Stop Playback/ Time-shift/Record
OTR = One Touch Recording |
29 |
|
|
Time-shift = Time shift TV |
|
Basic Functions
want t w tch TV
-Press to increase and decrease the volume
-Press to switch channels
-Press to display and hide additional channel information
-Press to mute the sound
-Press ... to enter the channel number directly
-Press to call up the channel list,
-Press to select a channel,
-Press twice to call up a channel and close the channel list
30
Loading...