


UFS 601si
Table of contents
 Loading...
Operating manual
- Englisch -
DVB Satellite
Receiver
UFS 601si

2
PREFACE
IMPORTANT INFORMATION
Dear customer,
This operating manual is intended to help you make the fullest use of the extensive range of functions offered
by your new satellite receiver.
We have tried to make the operating instructions as easy as possible to understand, and to keep them as
concise as possible.
If you will not be using your receiver for a longer period, you should use the power switch to disconnect it
from the power supply to save energy. For shorter breaks, you can switch the receiver to standby on the
remote control, which uses only a minimal amount of energy.
We wish you good reception and much pleasure using your new DVB Sat receiver.
Yours,
The KATHREIN team
The channels available on the satellites and transponders are subject to continual change. This means
the channel presets must be regularly updated, though the factory presetting always represents the latest
updated version. The information for this reset can be found on the Internet or in relevant magazines.
Your receiver is factory fi tted with the latest software version. We are, however, constantly working on
adapting the software to the wishes of our customers and to developments in technology. The „Software
Update“ section provides more information on this.
Please keep the original packaging in case you need to return the product at any time!

3
RECEIVER FEATURES
The UFS 601si receiver is suitable for the reception of FTA digital satellite TV and radio programmes.
The receiver comes in a modern mini-casing, which despite its small size offers a wide range of connection
possibilities, such as two Scart sockets and an optical digital audio output.
The audio output allows you to reproduce cinema sound in your living room with Dolby Digital equipment.
The infra-red sensor, which is included with the receiver, enables the mini receiver to be hidden from view.
In addition, the receiver has a 12 V input as well as a separate 230 V/12 V power supply enabling both
stationary and mobile use.
The receiver can also be mounted vertically, and the display output changed to suit the mounting
arrangement (see installation menu/user settings). The mounting kit supplied provides additional security
to prevent the receiver slipping down or falling off.
The UFS 601si is available only in silver.

4
CONTENTS
Preface ..................................................................................................................................... 2
Important Information ................................................................................................................ 2
Receiver Features ..................................................................................................................... 3
Contents .................................................................................................................................. 4
Safety Instructions ................................................................................................................... 6
Connection and Set-Up ............................................................................................................. 7
Connecting the Unit .................................................................................................................. 7
Sat IF connection .................................................................................................................... 7
Reception requirements ............................................................................................................ 7
Reception system presets ......................................................................................................... 7
TV connection ........................................................................................................................ 8
IR receiver ............................................................................................................................ 8
Inserting batteries into the remote control ...................................................................................... 8
Suspended installation .............................................................................................................. 8
Mounting on a fixed flat surface ................................................................................................. 9
Views and Connections .......................................................................................................... 10
Frontal View ........................................................................................................................... 10
Rear View .............................................................................................................................. 10
Side View .............................................................................................................................. 10
Remote Control ....................................................................................................................... 11
Remote Control Function Buttons .............................................................................................. 11
Remote control RC 660 ........................................................................................................... 12
First Installation...................................................................................................................... 13
Operation ............................................................................................................................... 17
Using the Remote Control ....................................................................................................... 17
Channel Selection (TV and Radio) ............................................................................................. 17
Direct Channel Selection ......................................................................................................... 17
Channel Selection From Channel List ......................................................................................... 17
Banner .................................................................................................................................. 18
Teletext ................................................................................................................................. 18
Electronic Programme Guide (EPG) ......................................................................................... 19
Sort Order ........................................................................................................................... 19
Info (Additional Programme Information) ..................................................................................... 19
Programme Preview .............................................................................................................. 20
Timer Programming From EPG ................................................................................................. 21
Audio .................................................................................................................................... 22
Main Menu .............................................................................................................................. 23
Opening the Main Menu (MENU Button) ................................................................................... 23
Channel Lists ......................................................................................................................... 24

5
CONTENTS
Channel Lists Management ..................................................................................................... 25
Deleting a Channel ................................................................................................................. 25
Moving/Sorting a Channel ....................................................................................................... 25
Favourites Lists ...................................................................................................................... 26
Adding a Channel to a Favourites List ........................................................................................ 26
Deleting a Channel From a Favourites List .................................................................................. 26
Moving/Sorting a Channel ....................................................................................................... 27
Timers .................................................................................................................................... 28
Manual Timer Setting .............................................................................................................. 28
Automatic Timer Setting .......................................................................................................... 29
Deleting a Timer Event ............................................................................................................ 29
Installation & Settings Menu ................................................................................................... 30
User Preferences ................................................................................................................... 31
Output Settings ...................................................................................................................... 31
Regional Settings ................................................................................................................... 33
Language Settings ................................................................................................................. 33
Access Control ....................................................................................................................... 34
Channel Lock ....................................................................................................................... 34
Change PIN ......................................................................................................................... 35
Menu Lock .......................................................................................................................... 36
TV Reception & Channel Search .............................................................................................. 36
Antenna Configuration ............................................................................................................ 36
Signal Reception ................................................................................................................... 38
Automatic Search .................................................................................................................. 38
Manual Search Parameters ..................................................................................................... 39
Update & Factory Settings ....................................................................................................... 40
Download ............................................................................................................................ 40
Reinstallation ....................................................................................................................... 41
System Information ................................................................................................................ 42
Software Update ..................................................................................................................... 43
Software Update via Internet ................................................................................................... 43
Service .................................................................................................................................. 43
CONNECTING UP THE VIDEO/PVR ......................................................................................... 44
RECORDING ......................................................................................................................... 44
PLAYBACK ............................................................................................................................ 44
Functions and Technical Data ................................................................................................. 45
Technical data ........................................................................................................................ 46
Connection Diagram ............................................................................................................... 47

6
SAFETY INSTRUCTIONS

7
When fi tting the connector, make sure that no wires from the braiding are touching the inner
conductor, so no short circuit can occur.
The quality of the reception signal depends on this connection!
CONNECTION AND SET-UP
The following section is intended specifi cally for specialist dealers. You only need to read this
section if you are carrying out the installation yourself. The “Connection Diagram” section provides
a sample confi guration.
Do not connect the unit to the mains until all installation work has been properly carried out. Refer also to the
information in the “Safety Instructions” section.
CONNECTING THE UNIT
Connect the Sat IF input on the receiver to the satellite reception system.
Use a coaxial cable with a standard F connector.
If the F connector is not yet fi tted to the cable, strip the insulation from the cable as shown in the following
illustration and carefully twist the F connector onto the end of the cable until it is securely fi tted to the
cable.
RECEPTION REQUIREMENTS
Ensure that your satellite antenna system is designed for digital reception.
RECEPTION SYSTEM PRESETS
The presets for the control signals are for standard reception systems, i.e. 14/18 V for polarity switching and
22 kHz switching signal for low/high band changeover. Be sure to follow the operating instructions for the
matrices used.
The parameters on the “Antenna Confi guration” menu should only be changed by experienced installers.
SAT IF CONNECTION
8
TV CONNECTION
Connect the satellite receiver (TV Scart socket) to the TV set with a Scart cable.
If your TV has a stereo feature, you can receive the sound in stereo via the Scart connection.
Connect the satellite receiver to the video/DVD recorder with a Scart cable.
CONNECTION AND SET-UP
INSERTING BATTERIES INTO THE REMOTE CONTROL
Remove the cover on the rear of the remote control.
Insert the two supplied batteries into the remote control. Ensure correct polarity of the batteries;
the + and – markings are indicated inside the battery compartment.
Slide the cover back into the housing until it locks in place.
Used batteries are special waste!
Do not throw spent batteries into your domestic waste; take them to a collection point for old
batteries.
Electronic equipment is not household waste - in accordance with directive 2002/96/EC OF
THE EUROPEAN PARLIAMENT AND THE COUNCIL dated 27
th
January 2003 on waste
electrical and electronic equipment, it must be disposed of properly.
At the end of its service life, take this unit for disposal at a designated public collection point.
IR RECEIVER
If the receiver is not set up within the reception range of the remote control’s infrared signals (concealed
installation), connect the infrared receiver (and not included in the delivery scope of UFS 601 si with the
order no. 20210095, please order separately) to the “IR SENSOR” socket and position it so that you are in
sight of the remote control.
The mounting kit supplied offers you the option not only of placing the receiver on a solid fl at surface, but
also of mounting it suspended (e.g. underneath a shelf).
INSTALLING THE UFS 601SI USING THE MOUNTING KIT
When selecting the mounting location, take care that it conforms to the instructions in
the chapter “Safety Instructions”! Note the need to access the connection sockets at
the rear of the receiver and allow suffi cient space for the cables once connected!
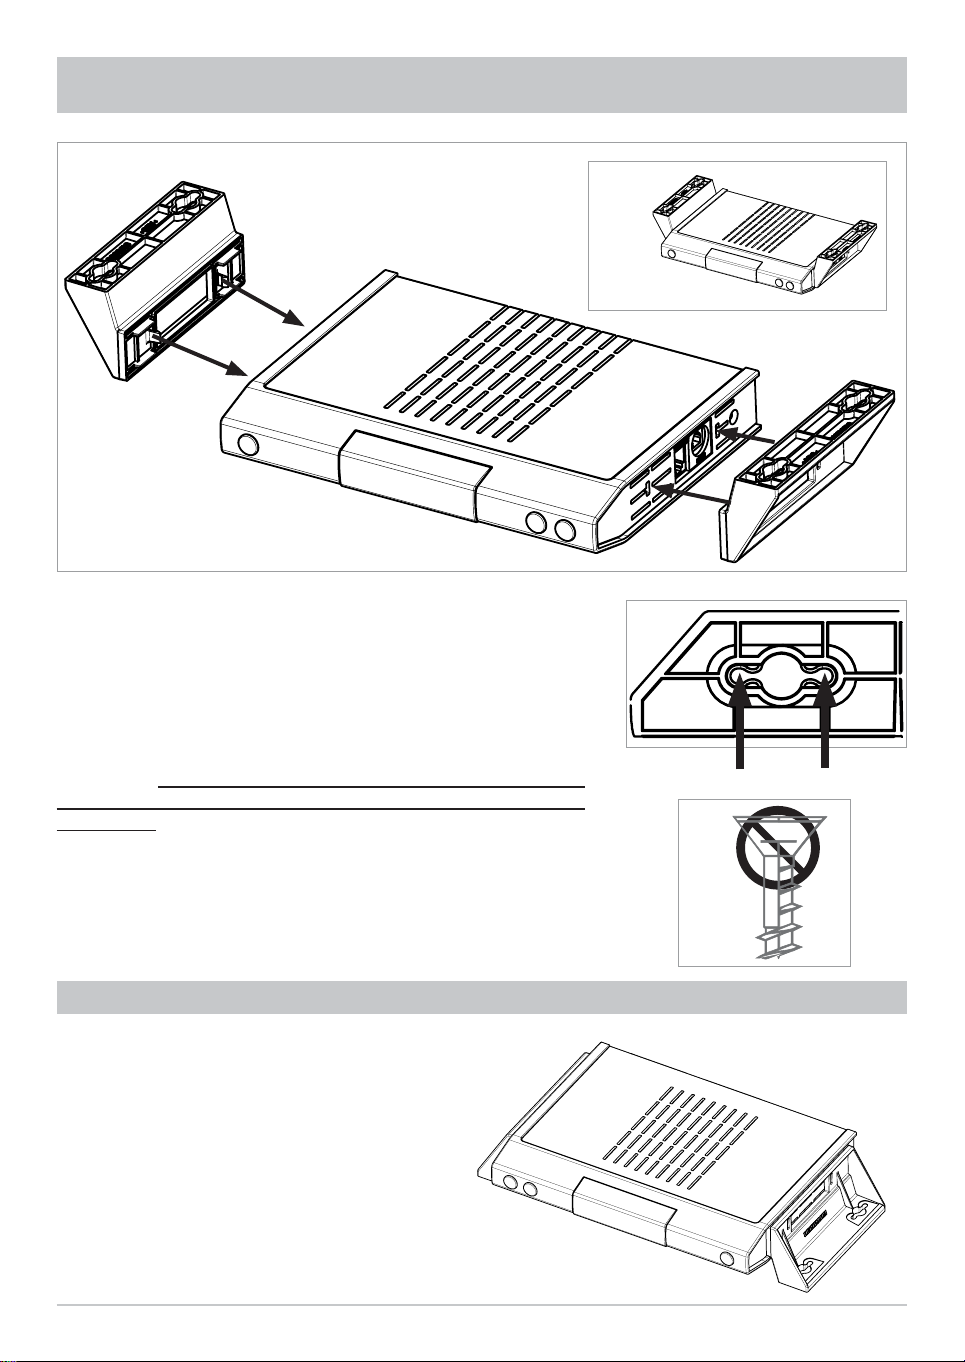
Insert the two mounting piece projections into the vertical slots in the centre rows on each side, as shown in
Fig. 1 (see next page).
SUSPENDED INSTALLATION
9
CONNECTION AND SET-UP
Now push the mounting kit fi rmly against the receiver casing, until
the catch audibly snaps home (see Fig 2).
Now hold the receiver, with the installation kit attached, at
the installation location. Screw in the wood screws supplied
through the smaller holes in the screw attachment area (4 x)
(see Fig. 3). Wherever possible, use the wood screws supplied.
If these are unsuitable, other screws of adequate size and strength
can be used. Under no circumstances however use countersunk
wood screws, since these can damage the attachment area
(see Fig. 4).
Then screw all four screws fully home, so that the installation kit is
no longer able to come free.
or
MOUNTING ON A FIXED FLAT SURFACE
So as to prevent the receiver slipping down
or falling off, the installation kit can also be
reversed before attachment to the receiver
(see illustration on the right). Assembly is the
same as for suspended mounting, except
that the mounting kit faces downwards when
inserted into the side of the receiver.

10
VIEWS AND CONNECTIONS
FRONTAL VIEW
Power/standby button
Channel select buttons
Channel display
REAR VIEW
SAT IF input socket
Scart connection for TV set
Scart connection for video recorder
Mains power cable
RJ 11 interface for connection of infrared receiver and null modem cable
Optical S/PDIF connection for Dolby Digital system
SIDE VIEW

11
REMOTE CONTROL
REMOTE CONTROL FUNCTION BUTTONS
(Red)
Channel list selection in
channel lists management
(Arrow buttons)
Change the channel and/or
navigation in the menus
Mute on/off
"
(Yellow)
Open options menu
...
To enter channel numbers
or menu parameters
Open teletext
Off mode
(Stand-by)
Open main menu
(EXIT)
Close menus and
sub-menus
Programme information for
the current programme
Confi rm sub-menus
and menu options,
open channel list
#
(Blue)
Toggle between
radio and TV mode
%
Volume
!
(Green)
Select channel list
in favourites lists
management
&
Channel selection
Currently not used
The button symbols shown here will also be found in the description of the operating steps.
Currently not used
Currently not used
Open electronic
programme guide
Currently not used
Currently not used
Setting a Timer in the EPG

12
REMOTE CONTROL RC 660
The RC 660 remote control supports up to four devices (which are supplied with the RC 660 as standard) as
well as the receivers of the UFD 5xx (not UFD 552, 554, 558) and UFD 4xx families.
First switch all receivers off at the power switch.
To confi gure a receiver to an infrared code:
Switch on the relevant receiver.
On the remote control simultaneously press
Address 1 =
+
+
Then switch the receiver off again at the power switch and do the same for the other units (
+
+
for second receiver;
+
+
for third receiver and
+
+
for fourth receiver).
Make sure only one receiver is on at a time!
To switch the remote control to an infrared code:
When you have confi gured all receivers to their infrared code, to switch between units on the remote control
do the following:
For the fi rst receiver‘s remote (address 1) press
+
; for the second receiver
+
; for the third
receiver
+
; and for the fourth receiver
+
.
+
(red) = Kathrein UFD 5xx code for remote control RC 400
The RC 600 and RC 650 remote controls cannot be replaced with the RC 660!
REMOTE CONTROL
The UFS 601si receiver accepts exclusively infrared code 1.This is reserved for the
receiver and there is no facility to change it.
13
FIRST INSTALLATION
Before using your unit for the fi rst time, read the “Safety Instructions” and “Connection
and Set-Up” sections.
The “Connection Example” section provides a sample confi guration.
Do not connect the unit to the mains until all installation work has been properly
carried out.
The guidance given in the “First Installation” section assumes that the receiver has
been properly connected, as per the “Safety Instructions” and “Connection and Set-
Up” sections.
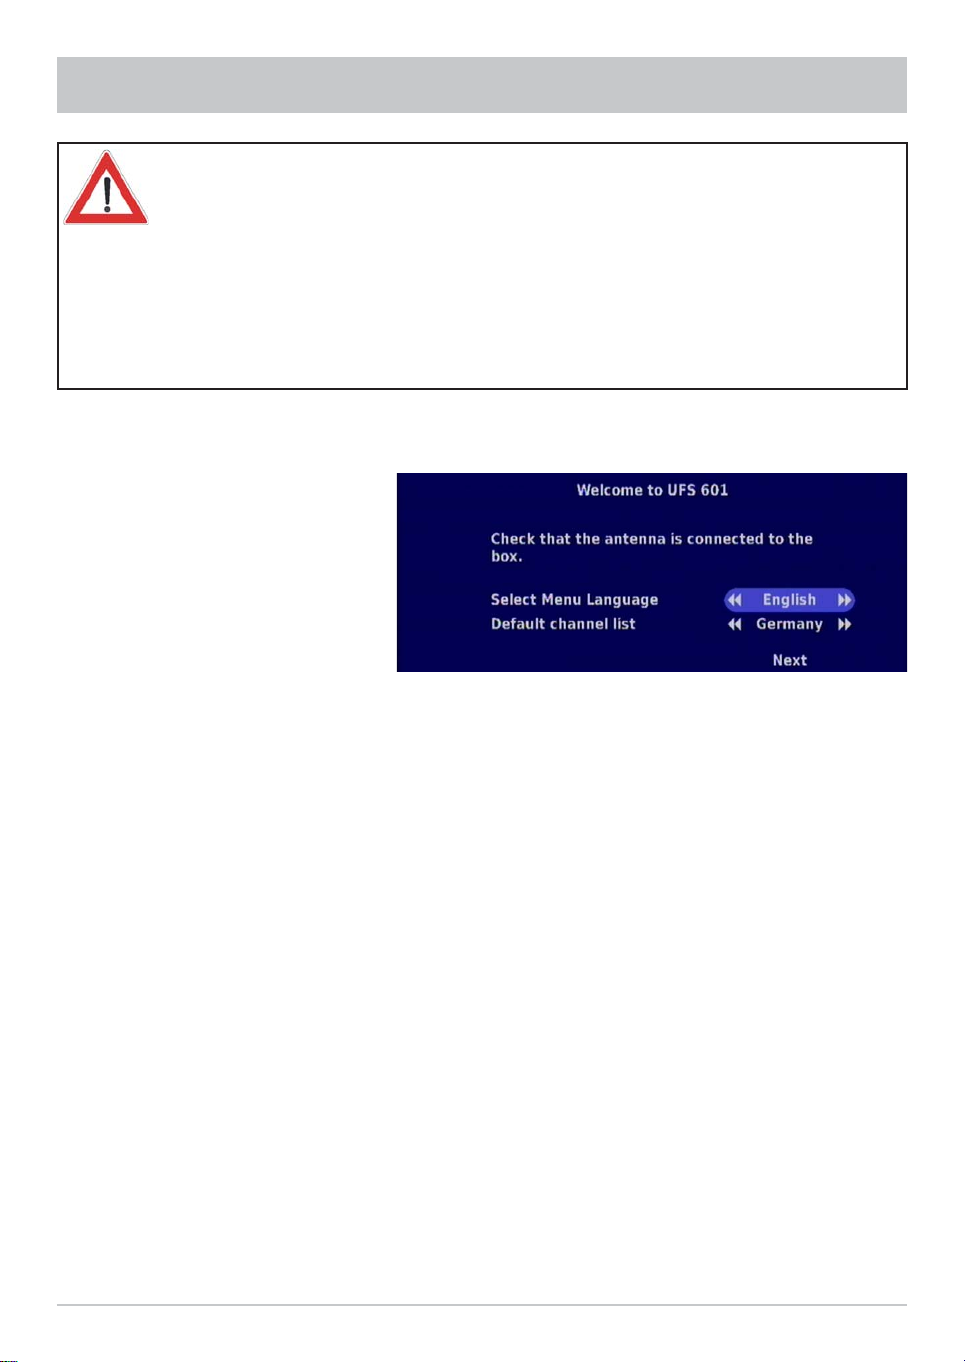
First switch your TV set on and select the AV channel position. Connect your receiver to the power supply.
The following display appears:
Change to the line for selecting the language using the
buttons. Select the menu language you want
using the
buttons.
Available options: German, English, French, Czech, Hungarian, Dutch, Portuguese, Turkish Spanish, Italian
and Polish.
Press the
buttons to change to the channel-list selection. Press
to choose the required channel
list. If you select the channel list for Germany , the ASTRA-channels will appear on the top of the channel list.
If you choose the channel list for Italy, the Hotbird-channels will appear on the top of the channel list.
Select “Next” using the
buttons and confi rm your selection by pressing the
button to open the next
menu. The following display appears:

14
Note: If you are unsure whether you chose the right option from a previous menu, you can go back a
step at any time during the fi rst installation process by selecting “Back” instead of “Next”. You
can then go back one step by pressing the
button.
FIRST INSTALLATION
Select your country using the
buttons. Then select “Preferred Timezone” using the
buttons.
Using the
buttons select your time zone (“0” = UMTC (formerly Greenwich Mean Time GMT), +1” =
Central European winter time, “+2” = Central European summer time).
Select “Next” using the
buttons and confi rm your selection by pressing the
button to open the next
menu. The following display appears:
Select the setting that matches your reception system using the
buttons and confi rm your selection by
pressing the
button. You will fi nd an explanation of the possible settings on the next page.
If you do not know the settings or
components used in your reception
system, ask a specialist engineer!

15
FIRST INSTALLATION
Use the “One Antenna/One LNB” setting if you are only using one antenna/one LNB.
In case of multifeed reception (e.g. ASTRA + Hotbird), use the setting “2-way DiSEqC Switch”. On the
„Antenna Confi guration“ menu, connection 2 must be selected and Hotbird selected for “Satellite”.
In case of reception from more than 2 satellites, “4-way DiSEqC Switch” must be selected.
Select “Next” using the
buttons and confi rm your selection by pressing the
button to open the next
menu. The following display appears:
Select the setting to match your LNB using the
buttons. The following options are available:
- Universal (usual default setting)
- 9750 MHz (LNB low frequency)
- 10000 MHz
- 10600 MHz (LNB high frequency)
- 10750 MHz
- 11250 MHz
- 11300 MHz
- 11475 MHz
Select “LNB Offset” using the
buttons. Make the setting for the power supply to your LNB here using
the
buttons (“0 V”, or for long cables “1 V”).
With longer antenna cables the polarisation switching from vertical to horizontal channels may not work
correctly. By setting “LNB Offset” to “1 V”, the LNB supply voltage is increased by 1 V.
Select “Satellite” using the
buttons. Select the required satellite from the satellites pre-confi gured in
the factory using the
buttons.
Loading...