


 Loading...
EH ..., EHK ...
BUILT IN ELECTRIC OVEN
EINBAU-ELEKTRO-BACKOFEN
ВСТРАИВАЕМЫЙ ЭЛЕКТРИЧЕСКИЙ ДУХОВОЙ ШКАФ
 USER MANUAL
 GEBRAUCHSANWEISUNG
 ИНСТРУКЦИЯ ПО ОБСЛУЖИВАНИЮ И ЭКСПЛУАТАЦИИ

EN
DEAR CUSTOMERS,
we thank to you for the acquisition of our technology.
We are convinced that you have made a right choice. This product which satisfies the high quality demands and corresponds to world comprehensive standards realizes your cookeries, and his modern appearance which has been developed by the best European designers will decorate your kitchen splendidly.
We ask you to read the operating instructions before usage thoroughly. The consideration of recommendations protects you from possible inconveniences which can appear as a result of the wrong use of the oven, and allows you to reduce the consumption of electric energy. If the use corresponds to the present operating instructions, the oven will bring you a lot of pleasure for a long time.
Our ovens correspond to the main demands of the security, hygiene and environment protection, according to the directives of the EU which is confirmed with certificates DIN ISO 9001, ISO 1400, according to the norms counting within the frames of the EU, they also correspond to the Gosstandart of Russia, standards of the CIS, which is confirmed with the corresponding certificates.
With the thoughts of a constant improvement of the quality of our ovens the changes in design and equipment which lead only to positive changes of the technical qualities are reserved by the manufacturer.
We wish you an effective use of our oven.
Yours faithfully
OLAN-Haushaltsgeräte
Berlin Germany
We Inform you that our devices which are the object of the present operating instructions are precertain exclusively for the domestic use.
2

DE |
RU |
LIEBE KUNDIN, LIEBER KUNDE, |
УВАЖАЕМЫЙ ПОКУПАТЕЛЬ, |
wir danken Ihnen für den Erwerb unserer Technik.
Wir sind überzeug, dass Sie eine richtige Wahl getroffen haben. Dieses Produkt, das die hohen Forderungen zur Qualität befriedigt und weltumfassenden Standards entspricht, verwirklicht Ihre Kochkünste, und sein modernes Aussehen, das von besten europäischen Designer entwickelt worden ist, wird Ihre Küche prächtig schmücken.
Wir bitten Sie die Bedienungsanleitung vor der Nutzung aufmerksam zu lesen. Die Beachtung von Empfehlungen schützt Sie von eventuellen Unannehmlichkeiten, die als Folge der falschen Nutzung des Backofens auftreten können, und ermöglicht Ihnen den Verbrauch von Elektroenergie zu reduzieren. Der Backofen bringt Ihnen viel Vergnügen auf lange Zeit, wenn der Gebrauch der vorliegenden Bedienungsanleitung entsprechen wird.
Unsere Backöfen entsprechen den Hauptforderungen der Sicherheit, der Hygiene und des Umweltschutzes, laut den Direktiven der EU, was mit Zertifikaten DIN ISO 9001, ISO 1400, entsprechend den im Rahmen der EU geltenden Normen, bestätigt ist, und genauso auch den Anforderungen von Gosstandart in Russland und Standards anderer GUS Länder, was durch die Identifikationszertifikate bestätigt ist.
благодарим Вас за приобретение нашей техники.
Мы уверены, что Вы сделали правильный выбор. Данный продукт, удовлетворяющий самым высоким требованиям и отвечающий мировым стандартам, позволит Вам легко воплотить все Ваши кулинарные способности, а его современный вид, разработанный лучшими европейскими дизанерами, великолепно украсит Вашу кухню.
Просим Вас внимательно прочитать инструкцию по обслуживанию и эксплуатации до пуска устройства. Соблюдение содержащихся в ней рекомендаций защитит Вас от возможных неприятностей при неправильной эксплуатации духового шкафа, а также позволит Вам уменьшить расход электроэнергии. Если эксплуатация духового шкафа будет соответствовать настоящей инструкции, наш духовой шкаф будет радовать Вас долгое время.
Наши духовые шкафы полностью соответствуют основным требованиям безопасности, гигиены и защиты окружающей среды, согласно директивам Европейского Союза, что подтверждено сертификатами DIN ISO 9001, ISO 1400, в соответствии с настоящими нормами, действующими на территории Европейского сообщества, a также полностью отвечают всем требованиям Госстандарта России и стандартов других стран СНГ, что подтверждается сертификатами соответствия.
Mit den Gedanken der ständigen Verbesserung der Qualität unserer Backöfen sind Änderungen bei Design und Einrichtung, die nur zu positiven Veränderungen der technischen Eigenschaften führen, vom Hersteller vorbehalten.
Wir wünschen Ihnen die effektive Nutzung unseres Backofens.
Hochachtungsvoll
С мыслью о дальнейшем повышении технических и эксплуатационных характеристик наших бытовых приборов мы оставляем за собой право на внесение изменений в дизайн и устройство, влияющих только положительно на потребительские качества и свойства продукта.
Желаем Вам эффективного пользования духовым шкафом нашей фирмы.
Уважающий Вас
OLAN-Haushaltsgeräte |
OLAN-Haushaltsgeräte |
Berlin Germany |
Берлин Германия |
Wir Informieren Sie, dass unsere Geräte, die der Gegenstand der vorliegenden Bedienungsanleitung sind, sind ausschließlich für den häuslichen Gebrauch vorbestimmt.
Информируем, что наши приборы, являющиеся предметом настоящей Инструкции, предназначены исключительно для домашнего пользования.
3
EN
CONTENTS
INSTALLATION INSTRUCTIONS |
6 |
Electrical connection |
6 |
Installation of the oven |
8 |
Preparation |
10 |
BRIEF DESCRIPTION |
12 |
Location drawing |
12 |
Control panel |
16 |
EQUIPMENT |
20 |
Cooking zones control |
20 |
Multifunction oven control |
22 |
Operation functions of the oven |
24 |
USAGE |
28 |
Mechanical timer of the |
|
ovens Belle Époque |
30 |
Electronic clock timer of the |
|
ovens Belle Époque |
34 |
Digital clock timer of the ovens |
|
AvantgardePLUS |
40 |
Digital clock timer with sensor Touch control of
the ovens AvantgardePLUS and CHEF |
52 |
Specialities of the ovens AvantgardePLUS and |
|
Prestige |
66 |
Digital clock timer of the ovens |
|
AvantgardePLUS and Prestige |
68 |
Digital clock timer of the ovens CHEF with full |
|
sensor control |
84 |
Digital clock timer of the ovens AvantgardePLUS |
|
F12 BITURBO with full sensor control |
98 |
Digital clock timer of the ovens AvantgardePLUS |
|
and La Perle F14 BITURBO with full sensor |
|
control |
116 |
Specialities of the ovens LIFT |
138 |
TABLEWARE WARMING DRAWER |
140 |
PRACTICAL ADVICES |
146 |
CARE AND ATTENDANCE |
154 |
RESPECT FOR THE ENVIROMENT |
166 |
4
DE RU
INHALTSVERZEICHNIS |
|
ОГЛАВЛЕНИЕ |
|
FÜR DEN INSTALLATEUR |
7 |
ИНСТРУКЦИЯ ПО МОНТАЖУ |
7 |
Stromanschluss |
7 |
Подключение к электросети |
7 |
Einbau des Backofen |
9 |
Установка |
9 |
Vorbereitung |
11 |
Подготовка |
11 |
KURZBESCHREIBUNG |
13 |
КРАТКОЕ ОПИСАНИЕ |
13 |
Gesamtansicht |
13 |
Внешний вид |
13 |
Bedienblende |
17 |
Панель управления |
17 |
AUSSTATUNG |
21 |
ОБОРУДОВАНИЕ |
21 |
Kochfeldersteuerung |
21 |
Управление работой нагревательных полей |
21 |
Steuerung von Multifunktionsbackofen |
23 |
Управление работой многофункционального |
|
|
|
духового шкафа |
23 |
Betriebsfunktion des Backofens |
25 |
Рабочие функции духового шкафа |
25 |
BENUTZUNG |
29 |
ИСПОЛЬЗОВАНИЕ |
29 |
Mechanische Zeitschaltuhr von |
|
Механический таймер |
|
Backöfen Belle Époque |
31 |
духовок Belle Époque |
31 |
Elektronische Zeitschaltuhr von |
|
Электронное программирующее |
|
Backöfen Belle Époque |
35 |
устройство духовок Belle Époque |
35 |
Elektronische Zeitschaltuhr von |
|
Электронное программирующее устройство |
|
Backöfen AvantgardePLUS |
41 |
духовок AvantgardePLUS |
41 |
Elektronische Zeitschaltuhr mit Sensor Touch |
Сенсорное электронное программирующее |
|
|
control von Backöfen AvantgardePLUS and |
устройство Touch control духовок |
|
|
CHEF |
53 |
AvantgardePLUS и CHEF |
53 |
Besonderheiten bei den Backöfen |
|
Особенности духовок AvantgardePLUS и |
|
AvantgardePLUS und Prestige |
67 |
Prestige |
67 |
Elektronische Zeitschaltuhr von Backöfen |
|
Электронное программирующее устройство духовок |
|
AvantgardePLUS und Prestige |
69 |
AvantgardePLUS и Prestige |
69 |
Elektronische Zeitschaltuhr von Backöfen |
|
Электронное программирующее устройство |
|
CHEF mit Vullsensorbedienung |
85 |
духовок CHEF с полным сенсорным |
|
|
|
управлением |
85 |
Elektronische Zeitschaltuhr von Backöfen |
|
Электронное программирующее устройство |
|
AvantgardePLUS F12 BITURBO mit |
|
духовок AvantgardePLUS F12 BITURBO |
|
Vollsensorbedienung |
99 |
с полным сенсорным управлением |
99 |
Elektronische Zeitschaltuhr von Backöfen |
|
Электронное программирующее устройство |
|
AvantgardePLUS und La Perle F14 BITURBO |
духовок AvantgardePLUS и La Perle F14 |
|
|
mit Vollsensorbedienung |
117 |
BITURBO с полным сенсорным управлением |
117 |
Besonderheiten bei den Backöfen LIFT |
139 |
Особенности духовок LIFT |
139 |
GESCHIRRWÄRME-SCHUBLADE |
141 |
ШКАФ ДЛЯ ПОДОГРЕВА ПОСУДЫ |
141 |
PRAKTISCHE EMPFEHLUNGEN |
147 |
ПРАКТИЧЕСКИЕ СОВЕТЫ |
147 |
PFLEGE UND WARTUNG |
155 |
ОБСЛУЖИВАНИЕ И УХОД |
155 |
UMWELTVERTRÄGLICHKEIT |
167 |
ОХРАНА ОКРУЖАЮЩЕЙ СРЕДЫ |
167 |
5
EN
INSTALLATION INSTRUCTIONS
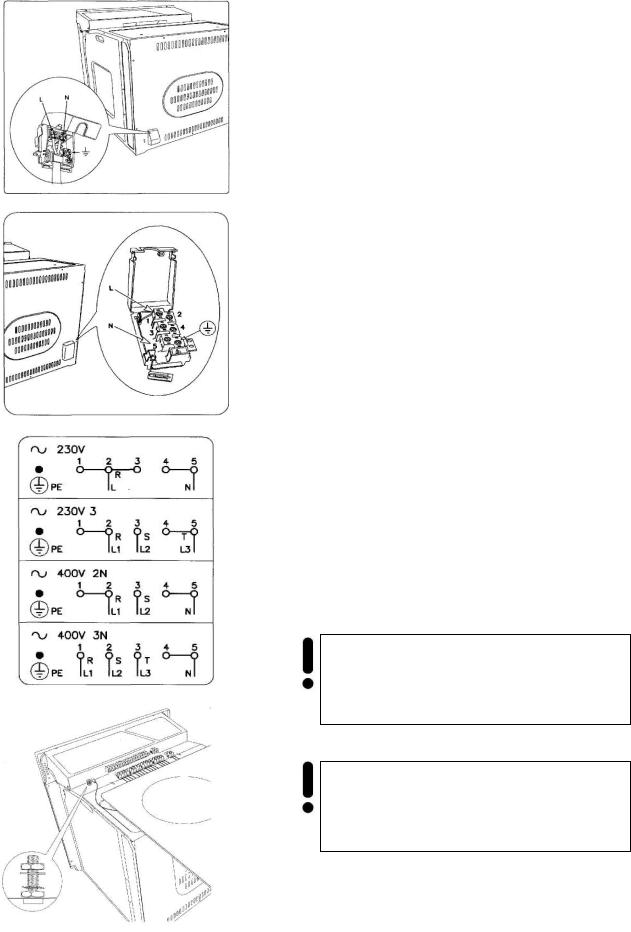
ELECTRICAL CONNECTION
Before connecting the oven to the mains power supply, make sure that:
•The supply voltage corresponds to the specifications on the data plate on the front of the oven.
•The mains supply has an efficient ground connection complying with all applicable laws and regulations.
Correct grounding is a legal requirement. If the appliance is not pre-fitted with a power cable and/or plug, use only suitable cables and plugs capable of handling the power specified on the appliance's data plate and capable of resisting heat. The power cable should never reach a temperature 50 °C above ambient temperature at any point along its length.
If the appliance is to be connected directly to mains terminals, fit a switch with minimum aperture of 3 mm between the contacts. Make sure that the switch is of sufficient capacity for the power specified on the appliance's data plate, and compliant with applicable regulations. The switch must not break the yellow-green earth wire. The socket or switch must be easily reachable with the oven fully installed.
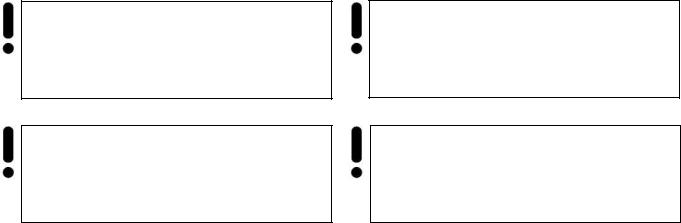
Attention! Installation and electrical connection must be made by a qualified expert only.
Attention! The manufacturer declines all responsibility for damage or injury if the above instructions and normal safety precautions are not respected.
6
DE RU
FÜR DEN INSTALLATEUR |
ИНСТРУКЦИЯ ПО МОНТАЖУ |
|
||
STROMANSCHLUSS |
ПОДКЛЮЧЕНИЕ К ЭЛЕКТРОСЕТИ |
|
||
Vor der Durchführung des Stromanschlusses muss |
Перед подключением духовки к эл. сети, |
|||
sichergestellt werden, dass: |
необходимо убедиться, что |
|
|
|
• die Eigenschaften des Stromnetzes mit den |
• параметры сети соответствуют данным в |
|||
Werten auf dem angebrachten Typenschild |
табличке на задней стенке духовки, |
|||
auf der hinteren Wand des Backofens |
|
|
|
|
übereinstimmen; |
• эл. сеть заземлена в |
соответствии с |
||
• das Stromnetz gemäß den geltenden |
||||
Bestimmungen und Rechtsvorschriften |
действующими предписаниями. |
|
||
geerdet ist. |
|
|
|
|
Die Erdung ist eine notwendige Voraussetzung der |
Заземление является необходимым условием |
|||
Nutzung des Gerätes. Falls der Backofen nicht mit |
правильной эксплуатации. Если духовка не |
|||
Kabel und\ oder Netzstecker ausgestattet ist, muss |
оборудована кабелем и/или штекером, |
|||
geeignetes Material verwendet werden, das der auf |
применяйте |
только |
материалы, |
|
dem Typenschild auf der hinteren Wand des |
соответствующие данным, указанным в |
|||
Gerätes angegebene Stromaufnahme und der |
табличке на задней стенке прибора, которые |
|||
Betriebstemperatur entspricht. Das Kabel darf an |
могут функционировать в рабочем режиме |
|||
keiner Stelle keinesfalls eine Temperatur von über |
температур. Кабель ни в коем случае не |
|||
50 °C erreichen. |
должен нагреваться выше температуры более |
|||
|
50 °С. |
|
|
|
Wenn ein direkter Netzanschluss gewünscht wird, |
В случае подсоединения непосредственно к эл. |
|||
muss ein allpoliger Schalter mit Kontaktöffnung von |
сети, необходимо использовать специальный |
|||
min. 3mm vorgesehen werden, der erlaubt das |
автоматический выключатель с зазором между |
|||
Gerät vom Netz zu trennen, der den technischen |
контактами не менее 3 мм, позволяющий |
|||
Daten der geltenden Vorschriften entsprechen |
отсоединять прибор от сети, соответственно |
|||
muss (das gelb-grüne Erdungskabel darf nicht vom |
техническим |
данным |
действующих |
|
genannten Schalter unterbrochen werden). Der |
предписаний |
(желто-зеленый |
кабель |
|
Stecker bzw. der allpolige Schalter müssen bei |
заземления не должен прерываться данным |
|||
installiertem Gerät problemlos zugänglich sein. |
выключателем). Штекер или автоматический |
|||
|
выключатель |
на правильно |
установленном |
|
|
приборе должен быть всегда легко досягаем. |
|||
Achtung! Die Montage und
Stromnetzanschluss soll nur von einem qualifizierten Fachmann durchgeführt werden.
Achtung! Der Hersteller ist nicht haftbar, wenn bei der Installation des Gerätes alle obenangeführten Anweisungen nicht befolgt werden.
Внимание! Монтаж и подключение
духового шкафа должны проводиться только квалифицированным специалистом.
Внимание! Изготовитель не несет
никакой ответственности, если при установке прибора не соблюдаются все вышеприведенные предписания.
7
EN
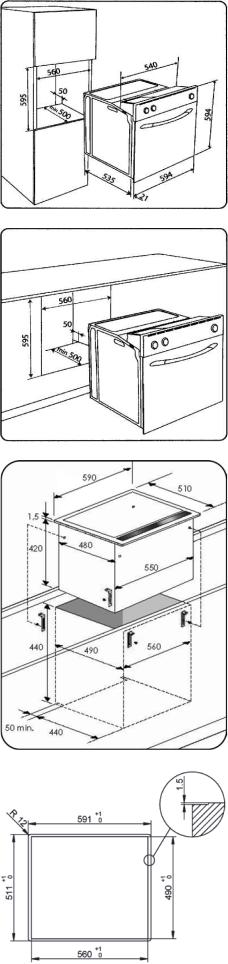
INSTALLATION OF THE OVEN
The oven can be installed under a work top or in a cooking column. Figure shows the installation dimensions. Make sure that surrounding materials are heat resistant. Align the oven centrally with respect to the side walls of the units surrounding it and fix it in place with the screws and Allen screws provided.
See the accompanying instructions for combining the oven with multi-functional gas or gas-electric cookers.
LIFT oven
The oven LIFT must be installed on the work top such as a cooking hob. The dimensions of the built-in cabinet must be those shown in the figure below.
The oven can be inserted with the external frame that supports the top, taking care to position the sealing gasket, or by milling the top around the hole to a depth of 1.5 mm, following the dimensions of the oven frame, and always interposing the sealing gasket provided.
8
|
DE |
|
|
|
RU |
|
EINBAU DES BACKOFENS |
|
УСТАНОВКА |
|
|
|
|
Der Backofen kann unter einer Arbeitsplatte oder in |
Духовка предназначена для встройки либо под |
|||||
einen Schrank eingebaut werden. Die Einbaumaße |
рабочую поверхность стола, либо в шкаф. |
|||||
müssen den auf der Abbildung dargestellten |
Размеры, |
которыми |
необходимо |
|||
Massen entsprechen. Das Möbelmaterial muss |
руководствоваться при встройке, указаны на |
|||||
hitzebeständig sein. Der Backofen muss zu den |
рисунке. Мебель должна быть изготовлена из |
|||||
Möbelwänden zentriert, und mit den mitgelieferten |
нагревостойкого материала. Духовка должна |
|||||
Schrauben und Buchsen befestigt werden. |
|
быть отцентрована по отношению к стенкам |
||||
|
|
|
мебели и надежно закреплена при помощи |
|||
|
|
|
поставляемых |
в |
комплекте |
крепежных |
|
|
|
материалов. |
|
|
|
Für die Kombination des Backofens mit den Gas- |
Для комбинации духовки с газовой или газо- |
|||||
oder |
Gas-Elektrokombikochfeldern |
siehe |
электрической |
поверхностью |
используйте |
|
beiliegende Anleitungen. |
|
прикладываемую документацию. |
|
|||
LIFT Backofen |
Духовой шкаф LIFT |
|
||
Der LIFT Backofen ist dafür bestimmt, in eine |
Духовой шкаф LIFT предназначен для |
|||
Arbeitsplatte eingebaut zu werden. Die |
встройки в рабочую поверхность стола. |
|||
Einbaumaßen, an die man sich beim Einbauen |
Размеры, |
|
которыми |
необходимо |
halten soll, sind in der Abbildung aufgeführt. |
руководствоваться при встройке, указаны на |
|||
|
рисунке. |
|
|
|
Der Backofen kann mit einem externen |
Духовой шкаф может быть установлен с |
|||
Halterungsrahmen installiert werden. Dabei soll die |
поддерживающей внешней рамкой, учитывая |
|||
Position der Dichtung oder oberen Öffnung bis zu |
положение уплотнительной прокладки, или |
|||
einer Tiefe von 1,5 mm, entsprechend der Massen |
верхнего отверстия, на глубину до 1,5 мм, в |
|||
von Backofenrahmen berücksichtigt und eine |
соответствии с размерами рамки духового |
|||
dazugehörende Dichtung angewendet werden. |
шкафа |
и |
обязательным |
применением |
|
прилагаемой уплотнительной прокладки. |
|||
9

EN
Separation panel 1 must be installed below the
oven at a minimum distance of 15 mm from the bottom of the oven.
PREPARATION
1
Clean the oven thoroughly with soapy water and rinse well. To remove the lateral frames from smooth-walled ovens, proceed as shown in the figure.
Operate the oven for about 30 minutes at maximum temperature to burn off all traces of grease which might otherwise create unpleasant smells when cooking.
Important!!!
As a safety precaution, before cleaning the oven, always disconnect the plug from the power socket or the power cable from the oven. Do not use acid or alkaline substances to clean the oven (lemon juice, vinegar, salt, tomatoes etc.). Do not use chlorine based products, acids or abrasive products to clean the painted surfaces of the oven.
Attention! You must set the time on the clock before you can use the oven.
(See chapter Digital clock timer).
If the time is not set, the oven will not work!
10
DE |
RU |
Die Trennwand 1 muss unterhalb des Backofens |
Разделительная панель 1 должна быть |
bei einem Mindestabstand von 15 mm von der |
установлена ниже духового шкафа на |
Unterseite montiert werden. |
минимальном расстоянии 15 мм от его нижней |
|
части. |
VORBEREITUNG |
ПОДГОТОВКА |
Vor dem ersten Gebrauch muss der Backofen gründlich mit Seifenwasser gesäubert und anschließend mit klarem Wasser abgewaschen werden. Die mitgelieferten Einhängegitter auf die Seitenwände einbauen und die Gitter und Bleche aufstellen. Den Backofen für etwa 30 Minuten auf Höchsttemperatur aufheizen, auf diese Weise werden alle fetthaltigen Bearbeitungsrückstände eliminiert, die beim Backen unangenehme Gerüche verursachen könnten.
Перед первым пользованием тщательно очистить духовку мыльным раствором и хорошо промыть достаточным количеством воды. Навесить на боковые стенки поставляемые в комплекте лестнички и установить на них решетки и противни. В течение примерно 30 минут прогреть духовку до максимальной температуры, при этом нейтрализуются все жиросодержащие вещества, используемые при производственной обработке изделия, которые могут обусловить появление неприятных запахов при первом приготовлении блюд.
Wichtig!!! |
Важно!!! |
|
|
|
|
Als Sicherheitsvorkehrung muss vor jeder |
В |
качестве |
меры |
предосторожности |
|
Reinigung des Backofens immer das Stromnetz |
необходимо перед каждой чисткой духовки |
||||
abgeschaltet werden. Zum Reinigen dürfen keine |
отключать ее от сети. Не применяйте для |
||||
sauren oder alkalischen Substanzen verwendet |
чистки кислотоили щелочесодержащих |
||||
werden (Zitronensaft, Essig, Salz, usw.). |
веществ (уксус, лимонный сок, соль и т.д.). Ни в |
||||
Chlorhaltige Produkte (Bleichmittel u. s. w.) sind |
коем |
случае |
не |
применяйте |
также |
ebenfalls zu vermeiden, dies gilt vor allem für die |
хлоросодержашие средства (отбеливающие и |
||||
Reinigung der emaillierten Oberflächen |
т.д.). Особенно это нужно иметь в виду при |
||||
|
чистке эмалированных поверхностей духовок. |
||||
Achtung! Vor dem ersten Gebrauch des
Backofens muss die aktuelle Tageszeit eingestellt werden. (siehe Kapitel
Elektronische Zeitschaltuhr).
Ohne eingestellte Uhr funktioniert der Backofen nicht!
Внимание! |
Перед |
первым |
|
использованием духовки |
необходимо |
||
выставить |
текущее |
время |
на |
часах (см. раздел Электронное программирующее устройство).
В прoтивном случае духовка не будет работать!
11
1
7
2
6
3
5
3
6
7
5
6
6
7
8
EN
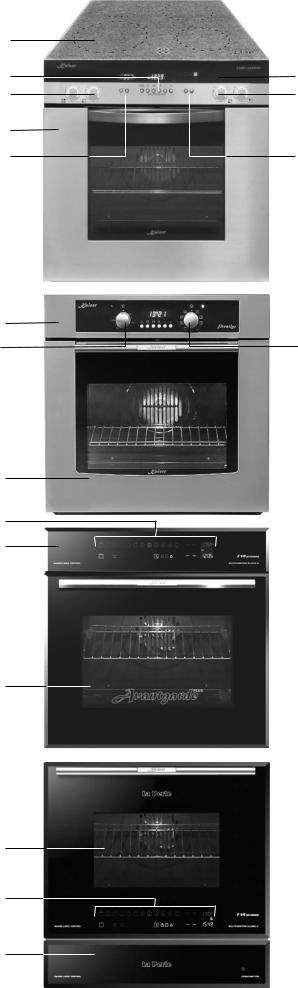
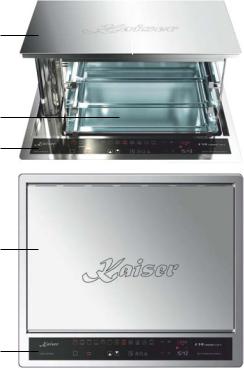
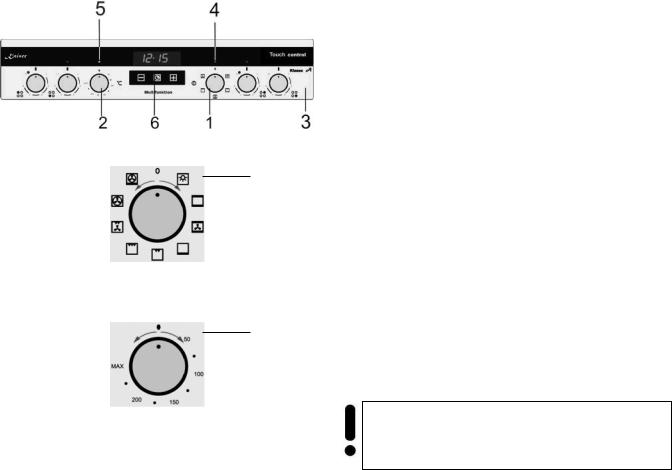
BRIEF DESCRIPTION
LOCATION DRAWING
5
2
BUILT-IN COOKERS (SETS)
4
4
BUILT-IN OVENS
Arrangement of functional assemblies
1.Vitroceramic cooking hob
2.Rotary handles of the cooking zones regulator
3.Rotary handles / keys of the oven temperature regulator
4.Rotary handles / keys of the oven operating functions
5.Control panel
6.Oven door
7.Digital clock timer
8.Tableware warming drawer
Different control panels are put on different models according to their technical equipment on which the operating elements are arranged sensibly.
12
DE
KURZBESCHREIBUNG
GESAMTANSICHT
EINBAU-ELEKTROHERDE
EINBAU-BACKÖFEN
Anordnung von Funktionsbaugruppen
1.Glaskeramik-Kochfeld mit Kochzonen
2.Drehknebel der Kochzonenregler
3.Drehknebel / Tasten des Backofentemperaturreglers
4.Drehknebel / Tasten der Backofenbetriebsfunktionen
5.Bedienblende
6.Backofentür
7.Elektronische Zeitschaltuhr
8.Geschirrwärme Schublade
Verschiedene Modelle, je nach ihrer technischen Ausrüstung, sind mit verschiedenen Bedienblenden versehen, an denen die Bedienelemente sinnvoll angeordnet sind.
RU
КРАТКОЕ ОПИСАНИЕ
ВНЕШНИЙ ВИД
ВСТРАИВАЕМЫЕ ПЛИТЫ (КОМПЛЕКТЫ)
ВСТРАИВАЕМЫЕ ДУХОВЫЕ ШКАФЫ (НЕЗАВИСИМЫЕ)
Примерное размещение функциональных узлов
1.Керамическая поверхность с нагревательными полями
2.Ручки / кнопки управления нагревательных полей
3.Ручки / кнопки терморегулятора духовки
4.Ручки / кнопки режима работы духовки
5.Пaнeль управления
6.Дверь духового шкафа
7.Электронное программирующее устройство
8.Шкаф для подогрева посуды
Отдельные модели, в зависимости от их технического оборудования, имеют различные панели управления с соответственно размещенными на них элементами управления.
13
EN
LOCATION DRAWING
BUILT-IN OVENS LIFT
1
Arrangement of functional assemblies
1. Oven top
2 2. Accessory
3. Control panel
3
1
3
Different control panels are put on different models according to their technical equipment on which the operating elements are arranged sensibly.
14
|
DE |
|
RU |
GESAMTANSICHT |
ВНЕШНИЙ ВИД |
||
EINBAU-BACKÖFEN LIFT |
ВСТРАИВАЕМЫЕ ДУХОВЫЕ ШКАФЫ |
||
|
|
(НЕЗАВИСИМЫЕ) LIFT |
|
Anordnung von Funktionsbaugruppen |
Примерное размещение функциональных |
||
|
|
узлов |
|
1. |
Backofenabdeckung |
1. |
Поверхность духового шкафа |
2. |
Zubehör |
2. |
Принадлежности |
3. |
Bedienblende |
3. |
Пaнeль управления |
Verschiedene Modelle, je nach ihrer technischen Ausrüstung, sind mit verschiedenen Bedienfeldern versehen, an denen die Bedienelemente sinnvoll angeordnet sind.
Отдельные модели, в зависимости от их технического оборудования, имеют различные панели управления с соответственно размещенными на них элементами управления.
15
EN
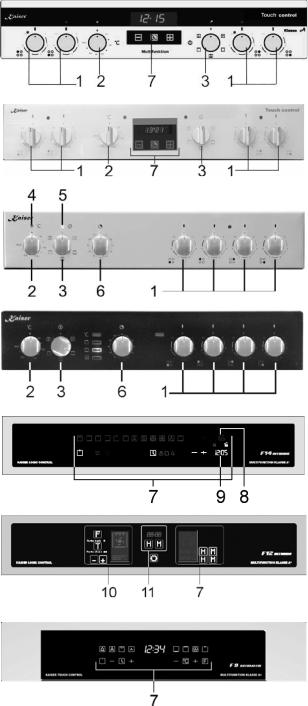
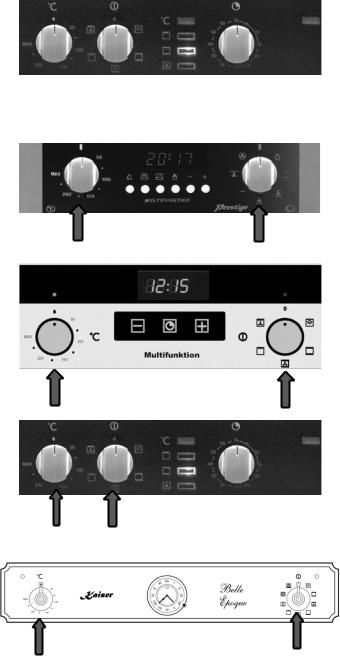
CONTROL PANEL
BUILT-IN COOKERS (SETS)
Model range AvantgardePLUS with electronic sensor Touch control and rotary handles
PUSH
Model range Prestige with electronic sensor Touch control and ergonomical knobs
Model range Prestige with mechanical timer and ergonomical knobs
BUILT-IN OVENS
Model range AvantgardePLUS and La Perle with sensor control Full Touch control
Model range CHEF with sensor control Full Touch control
1.Rotary handles of cooking zones
2.Rotary handles / keys of the oven temperature regulator
3.Rotary handles / keys of the oven oven operating functions
4.Controlling light ON/OFF (yellow)
5.Oven operation - Controlling light (red)
6.Rotary clutch of the timer
7.Digital time switch clock
8.Temperature indicator
9.Oven function indicator
10.Funktion/ temperature set area
11.Clock setting/ ON-OFF area
Electronic time switch clock can be executed differently according to the model. See a precise description in the suitable chapter.
16
DE
BEDIENBLENDE
EINBAU-ELEKTROHERDE
Modellreihe AvantgardePLUS mit
elektronischer Sensorbedienung Touch control und drehknebeln PUSH
Modellreihe Prestige mit elektronischer Sensorbedienung Touch control und
ergonomischen drehknebeln
Modellreihe Prestige mit mechanische Zeitschaltuhr und ergonomischen drehknebeln
EINBAU-BACKÖFEN
Modellreihe AvantgardePLUS und La Perle mit Vollsensorbedienung Full Touch control
Modellreihe CHEF mit Vollsensorbedienung
Full Touch control
1.Drehknebel der Kochzonenregler
2.Drehknebel / Tasten des Backofentemperaturreglers
3.Drehknebel / Tasten der Backofenbetriebsfunktionen
4.Kontrollleuchte ON/OFF (gelb)
5.Backofenbetrieb - Kontrollleuchte (rot)
6.Drehknebel des Kurzzeitweckers
7.Elektronische Zeitschaltuhr
8.Temperaturanzeige
9.Backofenfunktionsanzeige
10.Bereich für Temperutur-/ Funktioneneinstellungen
11.Bereich für Uhreinstellung, Ein-/ Auschalten vom Backofen
Elektronische Zeitschaltuhr kann je nach Modell unterschiedlich ausgeführt werden. Genaue Beschreibung siehe im entsprechenden Kapitel.
RU
ПАНЕЛЬ УПРАВЛЕНИЯ
ВСТРАИВАЕМЫЕ ПЛИТЫ (КОМПЛЕКТЫ)
Модельный ряд AvantgardePLUS с
электронным сенсорным управлением
Touch control и ручками PUSH
Модельный ряд Prestige с сенсорным электронным управлением Touch control и
эргономичными ручками
Модельный ряд Prestige с механическим таймером и эргономичными ручками
ВСТРАИВАЕМЫЕ ДУХОВЫЕ ШКАФЫ (НЕЗАВИСИМЫЕ)
Модельный ряд AvantgardePLUS и La Perle
с полным сенсорным электронным управлением Full Touch control
Модельный ряд CHEF с полным сенсорным электронным управлением Full Touch control
1.Ручки управления нагревательных полей
2.Ручки / кнопки терморегулятора духовки
3.Ручки / кнопки режима работы духовки
4.Контрольная лампа Вкл/Выкл (желт.)
5.Контрольная лампа работы духовки(красн.)
6.Ручка минутника
7.Электронное программирующее устройство
8.Дисплей значения температуры
9.Дисплей функций духовки
10.Область установки температур/ функций
11.Область установки часов, включение/ отключение духового шкафа
Электронное программирующее устройство, в зависимости от модели, может быть различным. Tочное описание смотрите в соответствующем разделе.
17
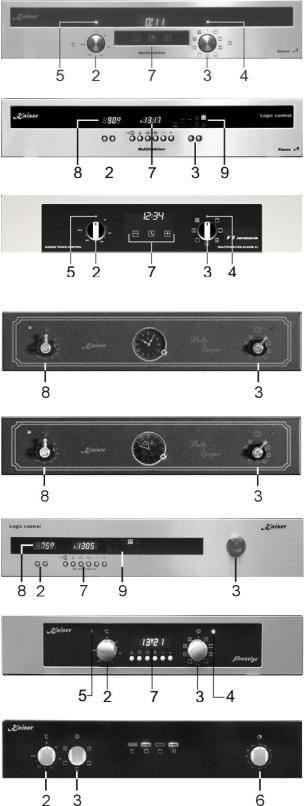
EN
Model range AvantgardePLUS with sensor control Touch control and rotary handles
PUSH
Model range AvantgardePLUS with full electronic control
Model range CHEF with sensor control Touch control and ergonomical rotary handles/
PUSH
Model range Belle Époque with mechanical timer
Model range Belle Époque with electronic clock timer
Model range Prestige with full electronic control
Model range Prestige with digital timer Logic control and ergonomical rotary handles
Model range Prestige with mechanical timer and ergonomical rotary handles
1.Rotary handles of cooking zones
2.Rotary handles / keys of the oven temperature regulator
3.Rotary handles / keys of the oven oven operating functions
4.Controlling light ON/OFF (yellow)
5.Oven operation - Controlling light (red)
6.Rotary handle of the timer
7.Digital time switch clock
8.Temperature indicator
9.Oven function indicator
Electronic time switch clock can be executed differently according to the model. See a precise description in the suitable chapter.
18
DE |
RU |
Modellreihe AvantgardePLUS mit |
Модельный ряд AvantgardePLUS с |
Sensorbedienung Touch control und |
электронным сенсорным управлением |
drehknebeln PUSH |
Touch control и ручками PUSH |
Modellreihe AvantgardePLUS mit |
Модельный ряд AvantgardePLUS с полным |
vollelektronischer Bedienung |
электронным управлением |
Modellreihe CHEF mit Sensorbedienung Touch control und und ergonomischen
drehknebeln/ PUSH
Modellreihe Belle Époque mit mechaniche Zeitschaltuhr
Modellreihe Belle Époque mit elektronischer Zeitschaltuhr
Modellreihe Prestige mit vollelektronischer Bedienung
Modellreihe Prestige mit elektronischer Zeitschaltuhr Logic control und
ergonomischen drehknebeln
Modellreihe Prestige mit mechanische Zeitschaltuhr
1.Drehknebel der Kochzonenregler
2.Drehknebel / Tasten des Backofentemperaturreglers
3.Drehknebel / Tasten der Backofenbetriebsfunktionen
4.Kontrollleuchte ON/OFF (gelb)
5.Backofenbetrieb - Kontrollleuchte (rot)
6.Drehknebel des Kurzzeitweckers
7.Elektronische Zeitschaltuhr
8.Temperaturanzeige
9.Backofenfunktionsanzeige
Elektronische Zeitschaltuhr kann je nach Modell unterschiedlich ausgeführt werden. Genaue Beschreibung siehe im entsprechenden Kapitel.
Модельный ряд CHEF с электронным сенсорным управлением Touch control и
эргономичными ручками/ PUSH
Модельный ряд Belle Époque с механическим таймером
Модельный ряд Belle Époque
с электронным программирующим устройством
Модельный ряд Prestige с полным электронным управлением
Модельный ряд Prestige с электронным программирующим устройством Logic control и эргономичными ручками
Модельный ряд Prestige с механическим таймером
1.Ручки управления нагревательных полей
2.Ручки / кнопки терморегулятора духовки
3.Ручки / кнопки режима работы духовки
4.Контрольная лампа Вкл/Выкл (желт.)
5.Контрольная лампа работы духовки(красн.)
6.Ручка минутника
7.Электронное программирующее устройство
8.Дисплей значения температуры
9.Дисплей функций духовки
Электронное программирующее устройство, в зависимости от модели, может быть различным. Точное описание смотрите в соответствующем разделе.
19
3
4
5
6
EN
EQUIPMENT
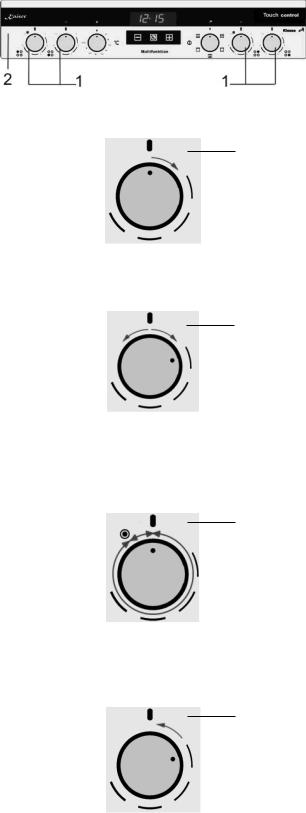
COOKNG ZONES CONTROL
The cooking zones regulation ensues with the help of rotary handles 1 which are set up on the control panel 2 of the oven.
The graphic symbols which are beside the rotary handles of the cooking zones shows which cooking zone the chosen rotary clutch manages.
To turn on or regulate a cooking zone do the following:
•Turn the rotary handle clockwise 3
•Bring the rotary handle to the chosen position 4.
You can regulate the amount of the heat supply to the dishes fluently within the rotary area.
The double field heating elements are steered by the energy regulators with the integrated switch of the outer field.
You can regulate the amount of the heat supply to the dishes fluently within the rotary area up to
symbol 5 only for the inner cooking zone. To turn off the outer field:
•Turn rotary handle clockwise as far as it will go and let go.
By this moment you can regulate the amount of the heat supply to the dishes fluently for both cooking zones (inner and outer).
To turn off the cooking zones 6 bring the rotary handle to position «0»
If the control panel of your oven is equipped with rotary handles Push (sunk rotary handles), for the control with these rotary handles is necessary:
•Push the rotary handle carefully and let it
go
The rotary handle will come out of the control panel
To countersink the rotary handle:
•Push the rotary handle as far as it will go and let go
20
|
|
|
DE |
|
|
|
|
|
RU |
|
|
|
AUSSTATUNG |
|
|
|
ОБОРУДОВАНИЕ |
|
|
|
|||||
KOCHFELDERSTEUERUNG |
|
УПРАВЛЕНИЕ РАБОТОЙ |
|
|
|
|||||||
|
|
|
|
|
|
НАГРЕВАТЕЛЬНЫХ ПОЛЕЙ |
|
|
||||
Die Kochzonensteuerung erfolgt mit Hilfe von |
Управление режимом работы нагревательных |
|||||||||||
Drehknebel 1, die auf der Bedienblende des |
полей осуществляется поворотом ручек 1, |
|||||||||||
Backofens 2 eingerichtet sind. |
|
установленных на панели управления духового |
||||||||||
|
|
|
|
|
|
шкафа 2. |
|
|
|
|
|
|
Die graphischen Symbole, die sich neben den |
Графические |
обозначения, |
установленные |
|||||||||
Drehknebel der Kochzonen befinden, zeigen, über |
рядом с ручками управления нагревательными |
|||||||||||
welche Kochzone der gewählten Drehknebel |
полями показывают, каким нагревательным |
|||||||||||
verwaltet. |
|
|
|
|
полем управляет выбранная ручка. |
|
|
|||||
Zum Einschalten oder zur Regulierung einer |
Для включения нагревательного поля или |
|||||||||||
Kochzone müssen sie wie folgt vorgehen: |
регулировки |
мощности нагревательного |
поля |
|||||||||
• Drehknebel im Uhrzeigersinn drehen 3 |
следует: |
|
|
|
|
|
||||||
• |
den |
Drehknebel in |
ausgewählte Position |
• повернуть ручку по часовой стрелке 3 . |
||||||||
|
bringen 4 |
|
|
|
• |
установить |
ручку |
в |
избранное |
|||
|
|
|
|
|
|
|
положение 4 |
|
|
|
|
|
In dem Drehbereich kann man fließend die Menge |
В пределах регулятора возможна плавная |
|||||||||||
der Wärmezufuhr zum Geschirr regulieren. |
регулировка количества тепла нагревательного |
|||||||||||
|
|
|
|
|
|
поля. |
|
|
|
|
|
|
Die Heizelemente mit dem doppelten Feld werden |
Нагревательные элементы с двойным полем |
|||||||||||
durch den Energieregler, mit dem eingebauten |
управляются |
при помощи |
регулятора |
со |
||||||||
Schalter des Außenfeldes gesteuert. |
|
встроенным выключателем внешнего поля. |
||||||||||
In dem Drehbereich bis zum Symbol 5 kann man |
В пределах регулятора до знака 5, возможна |
|||||||||||
fließend die Menge der Wärmezufuhr zum Geschirr |
плавная регулировка количества тепла только |
|||||||||||
nur von innerem Kochfeld regulieren. Zum |
внутреннего поля. Для включения внешнего |
|||||||||||
Einschalten des Außenfeldes: |
|
нагревательного поля: |
|
|
|
|||||||
• Drehknebel bis zum Anschlag im |
• |
ручку |
повернуть до упора по часовой |
|||||||||
|
Uhrzeigersinn umdrehen und loslassen. |
|
стрелке и отпустить. |
|
|
|
||||||
Von diesem Moment kann man fließend die Menge |
С этого момента, возможна плавная |
|||||||||||
der Wärmezufuhr zum Geschirr von beiden |
регулировка |
обоих |
нагревательных |
полей |
||||||||
Kochfeldern (inneres und äußeres) regulieren |
(внутреннего и внешнего). |
|
|
|
||||||||
Zum Abschalten beider Kochfeldern 6 den |
Для отключения обоих полей 6 установить |
|||||||||||
Drehknebel in die Position «0» bringen. |
ручку в положении «0». |
|
|
|
||||||||
Wenn die Bedienblende Ihres Backofens mit |
Если Ваша духовка оборудована ручками Push |
|||||||||||
Drehknebeln Push |
(versenkbare |
Drehknebel) |
(утоплеными в панели), то для управления |
|||||||||
ausgestattet ist, ist zur Steuerung mit diesen |
этими ручками необходимо: |
|
|
|
||||||||
Drehknebeln nötig: |
|
|
|
• осторожно нажать на ручку и отпустить |
||||||||
• |
den |
Drehknebel vorsichtig |
drücken und |
|||||||||
|
loslassen. |
|
|
|
|
ее. |
|
|
|
|
|
|
Drehknebel |
wird |
aus |
der |
Bedienblende |
Ручка выйдет из панели. |
|
|
|
||||
herauskommen.
Um den Drehknebel wieder zu versenken,:
•den Drehknebel vorsichtig bis zum Anschlag drücken und loslasse
Для того чтобы вновь утопить ручку:
•осторожно нажать на ручку до упора и отпустить.
21
1
2
EN
MULTIFUNCTION OVEN CONTROL
Oven operation functions are steered through turning of the rotary handle mode of operation 1 and rotary handle temperature regulator 2 on the control panel 3.
The graphic symbols next to the rotary handles show the chosen operation modes.
To turn off the oven bring the rotary handle operating mode 1 and the rotary handle temperature regulator 2 to position «0».
For more comfort you can use the digital clock timer 6. It enables you to run the oven in an automatical, half automatical or manuel cycle.
Important! The activation of the oven is signalizes by the flashing up of controlling
lights in yellow 4 and red 5.
If the red controlling light lapses it signalizes that the set oven temperature has been reached.
If a cooking recipe advices you to put the meal in a preheated oven, o this after the lapse of the red controlling light.
The red controlling light can also glow when the rotary handle is in the oven inner allumination
position, but in this rotary handle position the heating element is always off.
If the control panel of your oven is equipped with rotary handles Push (sunk rotary handles), for the control with these rotary handles is necessary:
•push the rotary handle carefully and let it go
The rotary handle will come out of the control panel
To countersink the rotary handle:
•push the rotary handle as far as it will go and let go.
*for models with digital time switch clock
22

DE |
RU |
|
STEUERUNG VON MULTIFUNKTIONS- |
УПРАВЛЕНИЕ РАБОТОЙ |
|
BACKOFEN |
МНОГОФУНКЦИОНАЛЬНОГО ДУХОВОГО |
|
|
ШКАФА |
|
Backofenbetriebsfunktionen werden durch Drehen |
Управление режимом работы духового шкафа |
|
von Drehknebel Betriebsart 1 und Drehknebel |
осуществляется поворотом ручек выбора |
|
Temperaturregler 2 auf der Bedienblende 3 |
режима работы 1 и терморегулятора 2 |
|
gesteuert. |
духовки, установленных на панели управления |
|
|
духового шкафа 3. |
|
Die graphischen Symbole neben den Drehknebeln |
Графические обозначения, |
установленные |
zeigen die gewählten Backofenbetriebarten. |
рядом с ручками управления показывают |
|
|
выбранные параметры работы духовки. |
|
Zum Abschalten des Backofens den Drehknebel |
Для отключения духовки |
установить ручки |
Betriebsart 1 und den Drehknebel Temperaturregler 2 in die Position «0» bringen.
Für mehr Komfort können Sie die Elektronische
выбора режима работы 1 и терморегулятора 2 в положении «0».
Для большего комфорта Вы также можете
Zeitschaltuhr* 6 benutzen, die ermöglicht den |
использовать электронное программирующее |
|||
Backofen im automatischen, halbautomatischen |
устройство* 6, дающее возможность управлять |
|||
und manuellen Zyklus zu betreiben. |
работой |
духовки |
в |
автоматическом, |
|
|
|
|
|
полуавтоматическом и ручном режимах. |
|||
|
Wichtig! Die Einschaltung vom Backofen |
|
Важно! |
Включение |
духовки |
|||
|
wird durch Aufleuchten von Kontrolllampen |
|
сигнализируется включением контрольных |
|||||
|
gelben 4 und roten 5 Farben signalisiert. |
|
ламп желтого 4 и красного 5 цветов. |
|||||
|
|
|
|
|||||
|
|
После того, как Ваша духовка достигнет |
||||||
Wenn die rote Kontrollleuchte erlischt, signalisiert |
||||||||
es, dass die voreingestellte Backofentemperatur |
установленной температуры красная лампа |
|||||||
erreicht worden ist. |
|
|
погаснет. |
|
|
|||
Wenn ein Kochrezept empfiehlt, die Speise in den |
Если кулинарные рецепты рекомендуют ставить |
|||||||
vorgewärmten Backofen hineinzulegen, so ist es |
блюдо в прогретую духовку, делайте это после |
|||||||
nach dem Erlöschen der roten Kontrollleuchte zu |
выключения красной контрольной лампы. |
|||||||
tun |
|
|
|
|
|
|
|
|
Die rote Kontrollleuchte kann auch bei der |
Контрольная лампа может также светиться в |
|||||||
Einstellung des Drehknebels in der Position |
положении ручки |
Освещение |
духового |
|||||
Innenbeleuchtung |
des Backofens leuchten, |
шкафа, но в этом положении нагревательные |
||||||
jedoch sind die Heizkörper bei dieser |
элементы всегда выключены. |
|
||||||
Drehknebelposition immer ausgeschaltet. |
|
|
|
|
||||
Wenn die Bedienblende Ihres Backofens mit |
Если Ваша духовка оборудована ручками Push |
|||||||
Drehknebeln |
Push |
(versenkbare |
Drehknebel) |
(утоплеными в панели), то для управления |
||||
ausgestattet ist, ist zur Steuerung mit diesen |
этими ручками необходимо: |
|
||||||
Drehknebeln nötig: |
|
|
|
• осторожно нажать на ручку и отпустить |
||||
|
• den |
Drehknebel vorsichtig |
drücken und |
|
||||
|
loslassen. |
|
|
|
ее. |
|
|
|
Drehknebel wird aus der Bedienblende |
Ручка выйдет из панели. |
|
||||||
herauskommen. |
|
|
Для того чтобы вновь утопить ручку: |
|
||||
Um den Drehknebel wieder zu versenken,: |
|
|||||||
|
• den Drehknebel vorsichtig bis zum |
|
• осторожно нажать на ручку до упора и |
|||||
|
Anschlag drücken und loslassen. |
|
отпустить. |
|
|
|||
* für Modelle mit elektronischer Zeitschaltuhr |
|
* для моделей с электронным программатором |
||||||
23

EN
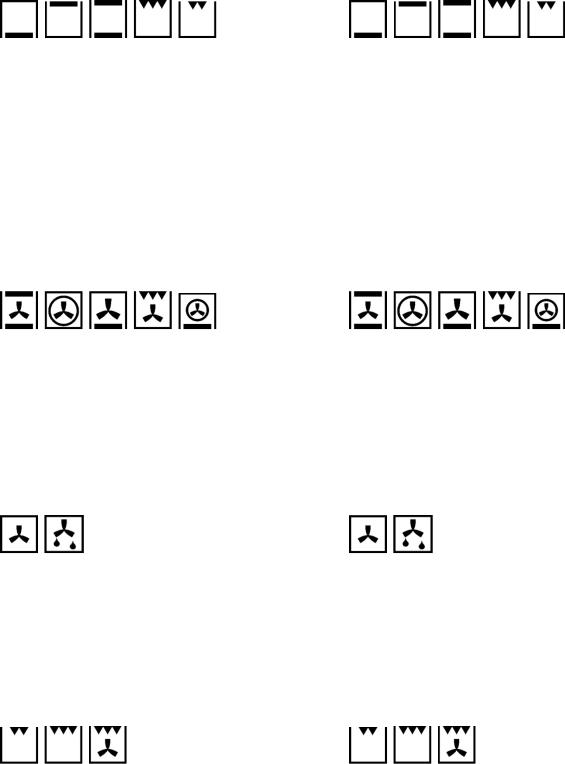
OPERATION FUNCTIONS OF THE OVEN
CONVENTIONAL COOKING
A classical system in which top and bottom heat are used to cook a single dish.
Place the food in the oven only once cooking temperature has been reached, i.e. when the heating indicator goes out.
If you want to increase top or bottom temperature towards the end of the cooking cycle, set the temperature control to the right position. It is advisable to open the oven door as little as possible during cooking.
FAN COOKING
For this type of cooking a fan positioned at the back allows the circulation of hot air inside the oven, creating uniform heat. In this way cooking is more rapid than conventional cooking. It is a suitable method for cooking dishes on more than one shelf, especially when the food is of different types (fish, meat etc.)
DEFROSTING
By selecting one of the fan cooking functions and setting the temperature regulator to zero, the
fan allows cold air to circulate inside the oven. In this way frozen food can be rapidly defrosted.
It is not essential to pre-heat the oven, but you are adviced to do so when cooking pastries.
GRILL COOKING
This function is used to grill or brown foods.
Place the shelf with the food to be cooked in the 1st or 2nd position from the top.
Pre-heat the oven for 5 minutes. Set the temperature regulator to a temperature between 50 °C and 200 °C.
24
|
DE |
|
|
|
|
|
|
RU |
|
|
BETRIEBSFUNKTIONEN DES BACKOFENS |
РАБОЧИЕ ФУНКЦИИ ДУХОВОГО ШКАФА |
|||||||||
KONVENTIONELLES BACKEN |
|
|
ОБЫЧНОЕ ПРИГОТОВЛЕНИЕ |
|
|
|||||
Ein klassisches System, bei dem Unteroder |
Классическая |
|
система, |
при |
которой |
|||||
Oberhitze verwendet werden, die für die |
применяется верхний или нижний нагрев, |
|||||||||
Zubereitung nur eines Gerichts geeignet ist. |
пригодна для приготовления только одного |
|||||||||
Die Speisen sollten möglichst eingeschoben |
блюда. Блюда должны помещаться в духовку, |
|||||||||
werden, wenn der Backofen bereits die |
по возможности, лишь после достижения |
|||||||||
vorgegebene Temperatur erreicht hat, das heißt, |
заданной температуры, т.е. когда погаснет |
|||||||||
nach Erlöschen der Kontrolllampe. |
|
контрольная лампочка. |
|
|
||||||
Wenn die Unteroder Oberhitze gegen Ende des |
Если к концу процесса приготовления блюда |
|||||||||
Backvorgangs erhöht werden muss, ist der |
Вы желаете повысить температуру верхнего |
|||||||||
Schalter in die jeweilige gewünschte Position zu |
или |
нижнего |
|
нагревателя, |
установите |
|||||
bringen. Während des Backvorgangs sollte die |
переключатель на соответствующую желаемую |
|||||||||
Backofentür möglichst wenig geöffnet werden. |
функцию. В течение выпекания дверцу духовки |
|||||||||
|
|
|
|
рекомендуется открывать как можно реже. |
||||||
UMLUFTBACKEN |
|
|
|
ПРИГОТОВЛЕНИЕ С ОБДУВОМ |
|
|||||
Bei dieser Backofenfunktion bringt der Ventilator, |
При этом режиме приготовления, находящийся |
|||||||||
der sich im hinteren Backofenteil befindet, heiße |
в дальней части духовки вентилятор, |
|||||||||
Umluft in den Backofen und verteilt diese |
осуществляет циркуляцию горячего воздуха, |
|||||||||
gleichmäßig, wobei die Zubereitungszeit geringer |
равномерно его распределяя, тем самым |
|||||||||
als beim konventionellen Backen ist. Diese |
сокращая время приготовления по сравнению с |
|||||||||
Methode eignet sich zum Garen auf mehreren |
обычным приготовлением. Этот метод |
|||||||||
Einschubhöhen, |
auch |
von |
Speisen |
подходит |
для одновременного приготовления |
|||||
unterschiedlicher Art (Fisch, Fleisch usw.). |
|
разных видов блюд (рыба и мясо и т.д.) при |
||||||||
|
|
|
|
разных высотах положения противня. |
||||||
AUFTAUEN |
|
|
|
ОТТАИВАНИЕ |
|
|
|
|
||
Falls eine der Umluftfunktionen ausgewählt und der |
При включенном обдуве и установленном на |
|||||||||
Temperaturregler auf Null gestellt wird, führt |
ноль |
|
терморегуляторе, |
|
вентилятор |
|||||
der Ventilator Kaltluft in den Backofen und fördert |
осуществляет циркуляцию холодного воздуха, |
|||||||||
das schnelle Auftauen der Tiefkühlkost. |
|
обеспечивая тем самым быстрое оттаивание |
||||||||
Ein Vorheizen des Backofens ist eigentlich nicht |
замороженных продуктов. |
|
|
|||||||
notwendig, aber für Patisserie dennoch |
Предварительный |
прогрев |
духовки |
|||||||
empfehlenswert. |
|
|
|
необязателен, |
|
однако |
при |
выпечке |
||
|
|
|
|
кондитерских изделий рекомендован. |
||||||
GRILLEN |
|
|
|
ГРИЛЬ |
|
|
|
|
|
|
Diese Funktionen werden zum Grillen oder |
Этот режим используется для приготовления на |
|||||||||
Bräunen von Speisen benutzt. |
|
|
гриле или подрумянивания блюд. |
|
||||||
Der Rost mit der Speise wird in der 1. oder 2. |
Решетка |
с |
приготавливаемым |
блюдом |
||||||
Schiene von oben eingeschoben. |
|
|
устанавливается на 1-й или 2-й уровень сверху. |
|||||||
Den Backofen 5 Minuten vorheizen. Den |
Прогреть духовку в течение 5 минут. |
|||||||||
Temperaturregler auf Temperaturen von 50 °С |
Терморегулятор установить на температуру |
|||||||||
bis 200 °C einstellen. |
|
|
|
от 50 °C до 200 °C. |
|
|
||||
25
EN
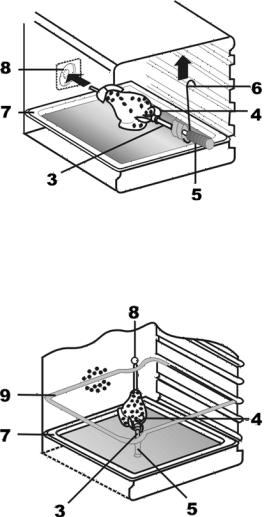
SPIT
Some ovens are completely equipped with stick engine and rotary spit for spit roast. The spit* allows to roast food in the oven rotary. It serves primarily for the roasting of shashliks, fowl, small sausages and similar dishes. The switch on and off of the spit actuation occurs simultaneously with the switch on and off of the Grill functions


 .
.
ATTENTION! No separate controlling rotary handle is assigned to the spit on the control panel.
PREPARING OF THE FOOD ON THE SPIT
To do this you have to proceed the following:
•Spear the food on the handle of the spit 3 and fix it on it with the help of forks 4,
•Screw on handle 5, when required,
•Arrange the spit frame 9 in height "II" in the oven,
•Shift the end piece of the spit 3 into the drive coupling 8; besides, is to be noted that the spit frame hook intervenes in the groove of the spit clutch metal part,
•Unscrew the handle 5,
•Shift the metal tray 7 in the oven space by the lowest height and abut the oven door.
To take out food of the oven use the handle 5 implicitly to avoid burns.
COOLING FAN
The cooling fan* is positioned on the upper part of the oven and creates a circle of cooling air on the inside of the furniture and through the door of the oven.It is turned on automatically when the temperature of the outer shell of the oven exceeds 60°C.
By switching on the oven with the thermostat at 200°C the fan starts working after approx.10 min. It is turned off when the temperature of the outer
shell of the oven descends under 60°C.
By switching off the oven with the thermostat at 200°C the fan stops working after approx.
30 min.
26
DE |
RU |
DREHESPIESS |
ВЕРТЕЛ |
Einige Backöfen sind komplett mit Stabmotor und Drehspieß für Spießbraten ausgestattet.
Der Spieß* erlaubt es, Speisen im Backofen rotierend zu rösten. Er dient hauptsächlich zum Rösten von Schaschliks, Geflügel, Würstchen u.ä. Speisen. Die Einund Ausschaltung vom Spießantrieb erfolgt gleichzeitig mit der Einund
Ausschaltung von Grillfunktionen 


Некоторые духовки оборудованы вертелом, приводимым во вращение эл. мотором, Благодаря вертелу* возможна вращательная обжарка блюд в духовке. Служит главным образом для обжарки домашней птицы, шашлыков, колбасок и других блюд. Включение и выключение привода вертела происходит одновременно со включением и выключением
функций гриля 

 .
.
ACHTUNG! Dem Spieß ist kein separater Steuerdrehknebel an Bedienblende zugeordnet.
GRILLEN AM DREHESPIESS
Um dies zu tun ist wie folgt vorzugehen:
•die Speise auf den Stiel vom Spieß 3
aufspießen und sie darauf mit Hilfe von Gabeln 4 fixieren,
•bei Bedarf den Handgriff 5 aufschrauben,
•den Spießrahmen 9 an der Höhe „II“ im Backofen einordnen,
•Das Endstück vom Spieß 3 in die Antriebskupplung 8 hineinschieben; dabei ist zu beachten, dass der Spießrahmenhaken in die Rille des Spießgriffmetallteils eingreift,
•den Handgriff 5 herausschrauben,
•das Blechtablett 7 in den Backofenraum in niedrigster Höhe hineinschieben und die Backofentür anlehnen.
Beim Herausnehmen von Speisen benutzen Sie unbedingt den Handgriff 5, um eine Verbrennung zu vermeiden.
KÜHLVENTILATOR
ВНИМАНИЕ! Вертел не имеет отдельной ручки управления.
ПРИГОТОВЛЕНИЕ НА ВЕРТЕЛЕ
Для этого необходимо следующее:
•нанизать блюдо на пруток вертела 3 и закрепить его при помощи вилок 4,
•при необходимости надеть ручку 5 на вертел,
•рамку 9 поставить в духовку на уровень
„II“,
•конец прутка вертела 3 вставьте в муфту привода 8, обращая внимание на то, чтобы выемка рамки попала в канавку металлической части держателя вертела,
•выверните ручку 5,
•вставьте противень 7 на самый низкий уровень духового шкафа и прикройте дверцу.
При вынимании блюда во избежание ожега обязательно использовать ручку 5.
ОХЛАЖДАЮЩИЙ ВЕНТИЛЯТОР
Der Kühlventilator* befindet sich auf der oberen |
Охлаждающий вентилятор* находится на |
Seite des Backofens und dient zur Kühlung |
верхней части духовки и служит для |
sowohl des Einbaumöbels als auch der |
охлаждения как встроенной мебели, так и |
Backofentüre. Der Ventilator schaltet sich |
самой дверцы духовки. Вентилятор включается |
selbsttätig ein, wenn das äußere Gehäuse des |
автоматически при достижении температуры |
Backofens eine Temperatur von 60°C |
внешней поверхности духовки 60° С. |
überschreitet. |
Например, при установке духовки на 200° С |
Wird der Backofen z.B. auf 200°C eingestellt, |
вентилятор включится приблизительно через 10 |
schaltet sich die Kühlung nach etwa 10 Min ein. |
мин. При понижении температуры внешней |
Der Ventilator schaltet sich selbsttätig aus, |
поверхности духовки ниже 60° С вентилятор |
wenn das äußere Gehäuse des Backofens eine |
автоматически отключается. Например, после |
Temperatur von 60°C unterschreitet. |
выключения духовки, установленной на 200° |
z.B. Wenn der Backofen nach Betrieb bei 200°C |
С, вентилятор выключится приблизительно |
ausgeschaltet ist, schaltet sich die Kühlung |
через 30 мин. |
nach etwa 30 Min. aus. |
|
|
27 |
 1
1
2 |
1 |
2 |
1 |
2 1
2 |
1 |
EN
MECHANICAL TIMER *
To start using: turn the rotary handle 1 clockwise as far as it will go and then set the wanted time between 0 and 60 minutes.
The machanical Timer cannot steer the oven operation and only serves as a signalling device to remind of the execution.
OVEN LIGHT
The oven is equipped with an oven light. If you want to control your food after preparing it, bring the rotary handle oven operating mode in the light position.
USAGE
You can start the process of baking with a few easy handels.
•Choose the wanted baking function with the rotary handle 1 oven operating mode.
•Set the wanted temperature with rotary handle 2 temperature regulator.
The activation of the oven is signalizes by the flashing up of controlling lights in yellow and red.
If the red controlling light lapses it signalizes that the set oven temperature has been reached. Now you can insert the food.
* – if available
28
|
|
DE |
|
|
RU |
MECHANISCHER KURZZEITWECKER * |
|
МЕХАНИЧЕСКИЙ МИНУТНИК * |
|||
Um in Betrieb zu nehmen: den Drehknebel 1 bis zum |
Для приведения в действие повернуть ручку |
||||
Anschlag im Uhrzeigersinn drehen, und dann auf die |
переключателя 1 по часовой стрелке до упора, |
||||
gewünschte Zeit zwischen 0-60 Minuten einstellen. |
а затем установить на желаемое время в |
||||
Der mechanische Kurzzeitwecker kann die den |
пределах от 0 до 60 минут. |
||||
Минутник не управляет работой плиты,а |
|||||
Betrieb vom Backofen nicht steuern und dient nur als |
является лишь сигнализатором, напоминающим |
||||
eine Signaleinrichtung, die an die Ausführung |
о выполнении. |
||||
erinnert. |
|
|
|
|
|
INNENBELEUCHTUNG |
|
|
ОСВЕЩЕНИЕ ДУХОВКИ |
||
Der Backofen ist mit Innenbeleuchtung ausgestattet. |
Духовка оснащена системой освещения. Если |
||||
Wenn Sie nach Zubereitung Ihr Gericht kontrollieren |
вы хотите проконтролировать состояние блюда |
||||
möchten, |
stellen |
Sie |
den |
Drehknebel |
после его приготовления установите ручку |
Backofenbetriebsart |
in die Position Licht. |
выбора режимов духовки в положение Свет. |
|||
BENUTZUNG |
|
|
|
ИСПОЛЬЗОВАНИЕ |
|
|
|||
Zum Backen genügen wenige einfache Handgriffe. |
В несколько простых движений Вы можете |
||||||||
|
|
|
|
начать процесс приготовления. |
|
|
|||
• Gewünschte |
Backfunktion |
mit |
dem |
• |
Ручкой |
1 |
режима работы |
духовки, |
|
Drehknebel 1 Backofenbetriebsart |
wählen. |
|
выберите |
желаемый |
режим |
||||
|
|
|
|
|
приготовления. |
|
|
||
• Gewünschte Temperatur mit dem Drehknebel |
• |
Ручкой |
2 |
терморегулятора |
,выберите |
||||
2 Temperaturregler wählen. |
|
|
|
желаемую температуру приготовления. |
|||||
Die Einschaltung vom Backofen wird durch |
Включение |
|
духовки |
сигнализируется |
|||||
Aufleuchten von gelben und roten Kontrolllampen auf |
включением контрольных ламп желтого и |
||||||||
der Bedienblende signalisiert. |
|
|
красного цветов на панели управления. |
||||||
Wenn die rote Kontrollleuchte erlischt, signalisiert es, |
После того как Ваша духовка достигнет |
||||||||
dass die voreingestellte Backofentemperatur erreicht |
установленной |
температуры |
красная лампа |
||||||
worden ist, jetzt können Sie Ihre Speise einschieben. |
погаснет и Вы можете ставить в нее блюдо, |
||||||||
|
|
|
|
которое хотите готовить |
|
|
|||
* – falls vorhanden |
* – если имеется |
29
EN
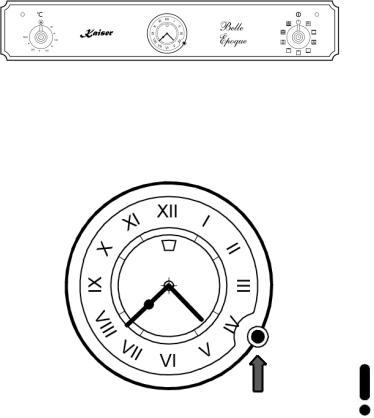
MECHANICAL TIMER OF THE OVENS Belle Époque
Setting the clock
To set the current day time:
•Push the rotary switch 1 and turn it counter clockwise.
Setting the end of cooking time
The oven must switch off after the set end time.
Before setting the end of cooking time you have to set the oven operating function and the
temperature (see chapter «Multifunction oven control»).
•Pull the rotary switch 1 out, turn it counter clockwise and set the end of preparation.
1 |
Important! You should set a time which |
differs from the current day time. |
|
|
|
After the set end time is reached, the alarm will sound and the oven switches itself off.
•Set the oven operating function and the temperature in the position 0.
To switch off the alarm tone:
•Turn the rotary switch 1 counter clockwise to position  .
.
For undefined time of cooking, leave the knob in the manual position  .
.
30
Loading...