


EG ...
BUILT IN GAS OVEN
EINBAUGASBACKOFEN
ВСТРАИВАЕМЫЙ ГАЗОВЫЙ ДУХОВОЙ ШКАФ
 USER MANUAL
 GEBRAUCHSANWEISUNG
 ИНСТРУКЦИЯ ПО ОБСЛУЖИВАНИЮ И ЭКСПЛУАТАЦИИ

EN
DEAR CUSTOMERS,
thank you for purchasing this Kaiser product.
We are convinced that you have made a right choice. This product which satisfies the high quality demands and corresponds to world comprehensive standards realizes your cookeries, and his modern appearance which has been developed by the best European designers will decorate your kitchen splendidly.
We ask you to read the operating instructions before usage thoroughly. The consideration of recommendations protects you from possible inconveniences which can appear as a result of the wrong use of the oven, and allows you to reduce the consumption of gas and electrical energy. If the use corresponds to the present operating instructions, the oven will bring you a lot of pleasure for a long time.
Our ovens correspond to the main demands of the security, hygiene and environment protection, according to the directives of the EU which is confirmed with certificates DIN ISO 9001, ISO 1400, according to the norms counting within the frames of the EU, they also correspond to the Gosstandart of Russia, standards of the CIS, which is confirmed with the corresponding certificates.
With the thoughts of a constant improvement of the quality of our ovens the changes in design and equipment which lead only to positive changes of the technical qualities are reserved by the manufacturer.
We wish you an effective use of our oven.
Yours faithfully
OLAN-Haushaltsgeräte
Berlin Germany
We Inform you that our devices which are the object of the present operating instructions are precertain exclusively for the domestic use.
2

DE RU
LIEBE KUNDIN, LIEBER KUNDE, |
ВА А |
А |
, |
wir danken Ihnen für den Erwerb unserer Technik. |
|
|
. |
Wir sind überzeug, dass Sie eine richtige Wahl getroffen |
, |
|
. |
haben. Dieses Produkt, das die hohen Forderungen zur |
, |
|
, |
Qualität befriedigt und weltumfassenden Standards |
|
|
|
entspricht, verwirklicht Ihre Kochkünste, und sein |
, |
|
, |
modernes Aussehen, das von besten europäischen |
|
||
Designer entwickelt worden ist, wird Ihre Küche |
, |
|
. |
prächtig schmücken. |
|
||
Wir bitten Sie die Bedienungsanleitung vor der Nutzung |
|
|
|
aufmerksam zu lesen. Die Beachtung von Empfehlungen |
. |
|
|
schützt Sie von eventuellen Unannehmlichkeiten, die als |
|
|
|
Folge der falschen Nutzung des Backofens auftreten |
|
|
|
können, und ermöglicht Ihnen den Verbrauch von Gas |
, |
|
|
und Elektroenergie zu reduzieren. Der Backofen bringt |
. |
|
|
Ihnen viel Vergnügen auf lange Zeit, wenn der |
|
|
|
Gebrauch der vorliegenden Bedienungsanleitung |
, |
|
|
entsprechen wird. |
|
|
|
|
. |
|
|
Unsere Backöfen entsprechen den Hauptforderungen |
|
|
, |
der Sicherheit, der Hygiene und des Umweltschutzes, |
|
, |
|
laut den Direktiven der EU, was mit Zertifikaten DIN |
, |
|
|
ISO 9001, ISO 1400, entsprechend den im Rahmen der |
|
ISO 1400, |
|
EU geltenden Normen, bestätigt ist, und genauso auch |
DIN ISO |
9001, |
|
den Anforderungen von Gosstandart in Russland und |
|
|
, |
Standards anderer GUS Länder, was durch die |
, a |
|
|
Identifikationszertifikate bestätigt ist. |
|
|
|
|
, |
. |
|
|
|
|
|
Mit den Gedanken der ständigen Verbesserung der |
|
|
|
Qualität unserer Backöfen sind Änderungen bei Design |
|
|
|
und Einrichtung, die nur zu positiven Veränderungen |
|
, |
|
der technischen Eigenschaften führen, vom Hersteller |
|
|
|
vorbehalten. |
. |
|
|
|
|
|
|
Wir wünschen Ihnen die effektive Nutzung unseres |
. |
|
|
Backofens. |
|
|
|
Hochachtungsvoll |
У |
|
|
OLAN-Haushaltsgeräte |
OLAN-Haushaltsgeräte |
Berlin Germany |
Berlin Germany |
Wir Informieren Sie, dass unsere Geräte, die der Gegenstand der И vorliegenden Bedienungsanleitung sind, sind ausschließlich für den häuslichen Gebrauch vorbestimmt.
, |
, |
И |
, |
|
. |
3
EN
CONTENTS
SAFETY INSTRUCTIONS |
6 |
INSTALLATION INSTRUCTIONS |
12 |
Electrical connection |
12 |
Gas connection |
14 |
Conversion to a different gas type |
16 |
Installation of the oven |
22 |
SAFETY CONDITIONS |
26 |
BRIEF DESCRIPTION |
30 |
Control panel |
32 |
EQUIPMENT AND USAGE |
34 |
Preparation |
34 |
Oven temperature control |
36 |
Electric grill |
38 |
Digital clock timer with sensor Touch control of
the ovens Grand CHEF |
40 |
Spit |
58 |
PRACTICAL ADVISES |
60 |
CARE AND ATTENDANCE |
66 |
RESPECT FOR THE ENVIRONMENT |
74 |
DISPOSAL INSTRUCTIONS |
74 |
4
DE
INHALTSVERZEICHNIS
SICHERHEITSHINWEISE |
7 |
FÜR DEN INSTALLATEUR |
13 |
Stromanschluss |
13 |
Gasanschluss |
15 |
Umstellen auf einen anderen Gastyp |
17 |
Einbau des Backofens |
23 |
SICHERHEITSBEDINGUNGEN |
27 |
KURZBESCHREIBUNG |
31 |
Bedienblende |
33 |
AUSSTATUNG UND BENUTZUNG |
35 |
Vorbereitung |
35 |
Temperatureinstellung |
37 |
Elektrogrill |
39 |
Elektronische Zeitschaltuhr mit Sensor Touch |
|
control von Backöfen Grand CHEF |
41 |
Bratspieß |
59 |
PRAKTISCHE EMPFEHLUNGEN |
61 |
PFLEGE UND WARTUNG |
67 |
UMWELTVERTRÄGLICHKEIT |
75 |
ANWEISUNGEN ZUR ENTSORGUNG |
75 |
RU
7
13
13
15
17
23
27
|
31 |
|
33 |
|
35 |
|
35 |
|
37 |
|
39 |
Touch control |
|
Grand CHEF |
41 |
|
59 |
61
67
75
75
5
EN
Please read this instruction carefully before using the appliance for the first time, to avoid the risk of accidents and damage of the appliance.
The instruction contains important notes about installation, safety, use and maintenance of the appliance. The manufacturer cannot be held liable for damage caused by non-compliance of this instruction.
Keep this instruction in a safe place. Pass it on to any future owner of the appliance.
SAFETY INSTRUCTIONS
TECHNICAL SAFETY
Installation of this appliance must be performed only by a licensed electrician. The installer is responsible for connecting the appliance to the mains power supply in observance of the relevant safety recommendations.
Check the appliance for visible signs of damage before using it. If the appliance has been damaged in transport, do not connect it. Never use a damaged appliance! It could be dangerous!
Repairs should be performed by a licensed technician only. Improper repair may result in considerable danger to you and others. If your appliance needs repair, contact a Service Centre or your dealer.
If the supply cord is damaged, it must be replaced by the manufacturer, its service agent or similarly qualified persons in order to avoid a hazard.
Electrical leads and cables must not be touching the appliance.
The appliance should be connected to the mains power supply by means of an approved circuit breaker or fuse.
Never use multiple plug adapters or extension leads to connect appliance to the mains electricity supply.
The power supply of the appliance should be turned off before repair or clean.
This appliance must not be used in a nonstationary location (for example on a ship).
Attention! To avoid the possibility of electric shock, the appliance should be powered down before replacing the lamp.
6

|
|
DE |
|
|
|
|
RU |
|
|
Lesen Sie bitte diese Gebrauchsund |
, |
|
|
|
|||||
Montageanweisung aufmerksam durch, bevor Sie |
|
|
|
|
|||||
das Gerät in Betrieb nehmen. Sie enthält wichtige |
. |
|
|
|
|||||
Hinweise für den Einbau, die Sicherheit, den |
|
|
|
||||||
Gebrauch und die Wartung. Dadurch schützen Sie |
, |
щ |
|
, |
|||||
sich und vermeiden Schäden am Gerät. |
|
, |
.Т |
В |
щ |
||||
|
|
|
|
|
|
|
|||
|
|
|
|
|
ё |
|
|
|
. |
Der Hersteller kann keine Verantwortung für die |
|
|
|
, |
|||||
Schäden |
übernehmen, |
die |
infolge |
von |
|
|
|
||
Nichtbeachtung dieser Sicherheitshinweise |
und |
. |
- |
|
|
||||
Warnungen verursacht werden. |
|
|
|
|
|
||||
Bewahren |
Sie |
die |
Gebrauchs- |
und |
, |
|
|
|
|
Montageanweisung auf, und geben Sie sie einem |
ё, |
|
|
|
|||||
eventuellen Nachbesitzer weiter. |
|
|
. |
|
|
|
|||
SICHERHEITSHINWEISE
TECHNISCHE SICHERHEIT
Das Gerät darf nur von einer qualifizierten Fachkraft eingebaut werden, und von einer Elektrofachkraft an das Stromnetz angeschlossen werden.
Kontrollieren Sie das Gerät auf sichtbare Schäden. Beschädigungen der Technik können Ihre Sicherheit gefährden. Nehmen Sie niemals ein beschädigtes Gerät in Betrieb.
Reparaturen dürfen nur von einem anerkannten Elektriker durchgeführt werden. Bei einer nicht fachgerechten Reparatur bringen Sie sich oder andere in Gefahr. Wenn Ihr Gerät eine Reparatur benötigt, wenden Sie sich bitte an unseren Service.
Wenn das Netzkabel defekt ist, muss es durch einen Servicefachmann ersetzt werden.
Elektrische Leitungen dürfen das Gerät nicht berühren.
Das Gerät sollte durch einen zugelassenen Leistungsschalter angeschlossen werden.
Verwenden Sie niemals mehrere Mehrfachsteckdosen oder Verlängerungskabel um das Gerät anzuschließen.
Die Stromversorgung des Gerätes soll vor der Reparatur oder Reinigung ausgeschaltet werden.
Dieses Gerät darf nicht an nichtstationären Aufstellungsorten (z. B. Schiffen) betrieben werden.
Achtung! Um einen elektrischen Schlag zu vermeiden soll das Gerät vom Strom genommen werden, bevor Sie eine Lampe auswechseln
-.
.
.
ё |
! |
.
.
.
,
.
,
,
.
.
.
.
( ,
).
:
,
.
7
EN
TERMS OF USE
This appliance is intended for use in domestic households and it is not intended for outdoor use.
Danger of burning. During use, the appliance interior surface becomes hot enough to cause burns. There is danger to burn yourself on the heating elements, appliance interior, cooked food, appliance accessories or hot steam. Wear oven gloves while placing food in the appliance or removing it and while adjusting the appliance shelves etc.
Never store the flammable materials in the appliance.
Take care while putting cooking containers into the appliance or removing them. Do not spill the contents.
Take care by opening the appliance door while cooking. Hot air and steam can escape rapidly.
Take care while cooking dishes that contain alcohol. The alcohol may evaporate due to the high temperatures and its vapour can catch fire if it comes into contact with a hot part of the appliance.
Frozen foods such as pizzas should be cooked on the wire grill. If the baking tray is used, it may become deformed due to the great variation in temperatures.
The appliance door must be closed during cooking.
Do not place an aluminium foil or any trays on the appliance bottom. The aluminium foil blocks the heat, which may cause a damage to the surfaces and cause the bad cooking results.
Fruit juices can leave stains, which will become indelible from the surfaces of the appliance. Use the deep pan while cooking of very moist cakes.
Do not put bakeware on the opened door of the appliance.
If a cooking time is not entered, the appliance will shut itself off after a while.
Plastic dishes which are not heatand steam resistant melt at high temperatures and can damage the appliance.
8
DE
NUTZUNGSBEDINGUNGEN
Dieses Gerät wurde für die Zubereitung von Lebensmitteln in den privaten Haushalten hergestellt.
Verbrennungsgefahr. Das Gerät wird heiß im Betrieb. Sie können sich an Heizkörpern, Garraum, Gargut, Zubehör und heißem Dampf verbrennen. Ziehen Sie Topfhandschuhe an beim Einschieben oder Herausnehmen von heißem Gargut sowie bei Arbeiten im heißen Garraum.
Stellen Sie niemals entflammbare Materialien in das Gerät.
Achten Sie beim Einschieben und Entnehmen von Garbehältern darauf, dass der Inhalt nicht überschwappt wird.
Achten Sie beim Öffnen der Tür darauf, dass die Heißluft und der Dampf schnell entweichen können.
Wenn für die Zubereitung von Lebensmitteln alkoholische Getränke verwendet werden, beachten Sie, dass Alkohol bei hohen Temperaturen verdampft. Dieser Dampf kann sich an den heißen Heizkörpern entzünden.
Tiefkühlkost wie Pizza soll auf dem Grill gegart werden. Wenn dafür das Backblech benutzt wird, kann es sich bei großen Temperaturunterschieden verformen.
Während das Gerät in Betrieb ist, soll die Tür geschlossen bleiben.
Legen Sie keine Aluminiumfolie und stellen Sie keine Pfannen, Töpfe usw. direkt auf den Garraumboden, da die Oberfläche beschädigt werden kann.
Fruchtsäfte können Flecken hinterlassen, die sich von der Oberfläche nicht mehr beseitigen lassen. Wenn Sie sehr feuchte Gerichte zubereiten, verwenden Sie dafür die tiefen Gefäße.
Stellen Sie kein Geschirr auf die geöffnete Tür des Gerätes.
Wenn keine Kochzeit eingegeben wird, schaltet sich das Gerät nach einer Weile selbst aus.
Nicht gerättaugliches Kunststoffgeschirr schmilzt bei hohen Temperaturen und kann das Gerät beschädigen oder das Brennen verursachen.
RU
.
|
! |
.
,
,
.
,
.
.
,
.
|
, |
, |
,
. |
|
|
|
|
|
|
|
|
|
|
, |
|
. |
|
|
|
. |
, |
|
, |
|
||
|
|
|
|
ё |
. |
|
|
|
|
. |
|
|
|
|
|
|
, |
|
|
|
. |
|
|
|
|
|
|
|
, |
|
. . |
|
|
|
, |
|
. |
|
, |
|
|
||
|
. |
, |
|
|
. |
|
|
|
|
|
|
|
|
|
|
|
. |
|
|
|
|
|
|
|
, |
. |
|
|
|
|
|
|
|
|
|
|
|
ё |
ё |
|
|
|
, |
|
|
. |
|
9
EN
CHILD SAFETY
This appliance is not intended for use by persons (including children) with reduced physical, sensory or mental capabilities, or lack of experience and knowledge, unless they have been given supervision or instruction concerning use of the appliance by a person slide for their safety.
Children should be supervised to ensure, that they do not play with the appliance.
This appliance can be used by children aged from 8 years and above and persons with reduced physical, sensory or mental capabilities or lack of experience and knowledge if they have been given supervision or instruction concerning use of the appliance in a safe way and understand the hazards involved.
Attention! Appliance interior will become hot during of use. Your children must be kept away from it.
It is not allowed to climb, stand, lean, sit, or hang on any part of the appliance. This can damage the appliance, and the device may tip over, potentially causing severe injury.
Children and pets should not be left alone or unattended in the area where the appliance is in use. They should never be allowed to play in its vicinity, whether or not the appliance is in use.
10
DE
KINDERSICHERHEIT
Die Kinder oder Personen, die wegen geistigen, physischen und motorischen Fähigkeiten oder wegen des Fehlens der notwendigen Erfahrungen oder Kenntnisse nicht in der Lage sind, das Gerät sicher zu benutzen, dürfen das Gerät nicht ohne Aufsicht oder Anweisungen durch eine verantwortliche Person benutzen.
Die Kinder müssen unter Aufsicht bleiben, um sicherzustellen, dass sie mit dem Gerät nicht spielen.
Die Kinder ab 8 Jahren oder Personen mit begrenzten geistigen, physischen oder motorischen Fähigkeiten oder Personen ohne notwendige Erfahrungen und Kenntnisse können das Gerät unter Aufsicht oder mit Anweisungen durch eine verantwortliche Person benutzen. Die verantwortliche Person muss für die Betriebssicherheit und die Vermeidung möglicher Gefahren sorgen.
Achtung! Innere Geräteteile können während der Verwendung heiß werden. Kleine Kinder sollen vom Gerät fern gehalten werden.
Stehen, sitzen, klettern oder lehnen auf verschiedenen Teilen des Gerätes ist untersagt. Das kann das Gerät beschädigen und möglicherweise schwere Verletzungen verursachen.
Kinder und Haustiere sollen in der Nähe des angeschalteten Gerätes nicht alleine oder unbeaufsichtigt bleiben. Den Kindern ist es nicht erlaubt, in der Nähe des Gerätes zu spielen, unabhängig davon, ob das Gerät in Betrieb oder außer Betrieb ist.
RU
|
|
,, |
|
|
|
|
, |
|
|
|
|
. |
||
, |
, |
|||
|
|
|||
|
|
. |
||
|
8 |
|||
|
|
|
||
|
|
, |
|
|
|
|
|
, |
|
|
|
. |
|
|
|
|
|
|
|
|
|
: |
. |
|
|
|
|
||
|
|
|
. |
|
|
|
|
|
|
|
, |
, |
||
|
|
. |
|
|
|
|
. |
||
|
|
|||
|
|
|
. |
|
, |
|
, |
||
ё |
. |
|||
11
|
|
EN |
|
|
INSTALLATION INSTRUCTIONS |
||
|
ELECTRICAL CONNECTION |
||
|
Before connecting the oven to the mains power |
||
|
supply, make sure that: |
||
|
the supply voltage corresponds to the |
||
|
|
specifications on the data plate 1 on the |
|
|
|
front of the oven, |
|
|
the mains supply has an efficient ground |
||
1 |
|
connection complying with all applicable |
|
|
laws and regulations. |
||
|
|
||
|
Correct grounding is a legal requirement. If the |
||
|
appliance is not pre-fitted with a power cable |
||
|
and/or plug, use only suitable cables and plugs |
||
|
capable of handling the power specified on the |
||
|
appliance's data plate 1 and capable of resisting |
||
|
heat. The power cable should never reach a |
||
|
temperature 50°C above ambient temperature at |
||
|
any point along its length. |
||
|
If the appliance is to be connected directly to |
||
|
mains terminals, fit a switch with minimum |
||
|
aperture of 3 mm between the contacts. Make sure |
||
|
that the switch is of sufficient capacity for the |
||
|
power specified on the appliance's data plate, and |
||
|
compliant with applicable regulations. The switch |
||
|
must not break the yellow-green earth wire. The |
||
|
socket or switch must be easily reachable with the |
||
|
oven fully installed. |
||
|
Cable types and diameters |
||
|
230V H05VV-F 3 x 1.0 mm² |
||
|
|
|
|
|
|
Attention! The manufacturer declines all |
|
|
|
responsibility for damage or injury if the |
|
|
|
above instructions and normal safety |
|
|
|
precautions are not respected |
|
|
|
|
|
12

DE RU
FÜR DEN INSTALLATEUR
STROMANSCHLUSS
Vor der Durchführung des Stromanschlusses muss |
|
|
|
, |
. |
, |
||||
sichergestellt werden, dass: |
|
|
|
: |
|
|
||||
|
die Eigenschaften des Stromnetzes mit den |
|
|
|
|
|
|
|
||
|
Werten auf dem angebrachten Typenschild |
|
|
1 |
|
|
|
|
||
|
1, das bei geöffneter Backofentür sichtbar |
|
|
, |
|
|
|
|
||
|
ist, übereinstimmen, |
|
|
, |
|
|
|
|
||
|
das Stromnetz gemäß den geltenden |
|
|
. |
|
. |
|
|
||
|
Bestimmungen |
und Rechtsvorschriften |
|
|
|
|
|
|
||
|
geerdet ist. |
|
|
|
|
|
|
|
|
|
Die Erdung ist eine notwendige Voraussetzung der |
|
|
|
|
. |
|
|
|||
Nutzung des Gerätes. Falls der Backofen mit |
|
|
|
|
|
|
||||
keinem Kabel und/oder Netzstecker ausgestattet |
|
|
|
|
/ |
, |
||||
ist, muss geeignetes Material verwendet werden, |
|
|
|
|
, |
, |
||||
das den Werten auf dem Typenschild des Gerätes |
|
|
|
1. |
|
|
||||
1 entspricht. Das Kabel darf an keiner Stelle |
|
|
|
|
|
|
||||
keinesfalls eine Temperatur von über 50°C |
50° . |
|
|
|
|
|
||||
erreichen. |
|
|
|
|
|
|
|
|||
Wenn ein direkter Netzanschluss gewünscht wird, |
, |
|
|
|
. |
|||||
muss ein allpoliger Schalter mit Kontaktöffnung von |
|
|
|
|
|
|||||
min. 3mm vorgesehen werden, der erlaubt das |
|
|
|
3 |
, |
|
|
|||
Gerät vom Netz zu trennen, der den technischen |
|
|
|
|
|
|||||
Daten der geltenden Vorschriften entsprechen |
|
|
|
|
, |
|
|
|||
muss (das gelb-grüne Erdungskabel darf nicht vom |
|
|
( |
|
|
|
|
|||
genannten Schalter unterbrochen werden). Der |
|
|
- |
|
|
|
||||
Stecker bzw. der allpolige Schalter müssen bei |
|
|
). |
|
|
|
|
|||
dem installierten Gerät problemlos zugänglich sein. |
|
|
|
|
|
|
||||
|
|
|
|
|
|
, |
|
|
. |
|
|
|
|
|
|
|
, |
|
|
|
|
Kabeltyp und Durchmesser |
|
|
|
|
|
|
|
|||
230V H05VV-F 3 x 1.0 mm² |
230V H05VV-F 3 x 1.0 mm² |
|
|
|
||||||
|
|
|
|
|
|
|
|
|
|
|
|
Achtung! Der Hersteller ist nicht haftbar, |
|
|
|
! |
|
, |
|
|
|
|
wenn bei der Installation des Gerätes alle |
|
|
|
|
|
|
|
||
|
oben angeführten |
Anweisungen nicht |
|
|
|
|
|
|
|
|
|
befolgt werden. |
|
|
|
|
|
|
. |
|
|
|
|
|
|
|
|
|
|
|
|
|
13
EN
GAS CONNECTION
The oven is designed to operate with both natural gas (methane) and liquid gas (LPG), and can be easily converted from one type to another following the instructions given in the relative section of this booklet (Conversion to a different type of gas).
At factory the appliance has been pre-installed to natural gas.
Attention! Connection to the gas supply and conversion to a different type of gas 1  must be carried out by qualified technicians
and in conformance with the requirements.
2
|
If the appliance is to operate with gas bottles |
||||
3 |
(LPG), a pressure regulator conforming to the |
||||
5 |
requirements. |
|
|
|
|
|
On the pipe 1 is a nut 2, with a fixed service- |
||||
|
adapter 3, which is for gas service personal only. |
||||
|
The gas connection with this adapter is prohibited. |
||||
|
Before connecting the gas the service-adapter 3 |
||||
1 |
has to be removed. |
|
|
|
|
2 |
Rigid pipe connection |
|
|
||
|
Connection to the mains gas supply may be made |
||||
5 |
via a metal pipe which is tightly connect to the pipe |
||||
1 or via a rigid stainless steel pipe, or via a flexible |
|||||
|
steel-tipped hose 4 firmly attached to the fitting 5. |
||||
|
When connecting to LPG, use fitting 6 instead of |
||||
4 |
fitting 5 |
|
|
|
|
|
The fittings 5 and 6 with seal are supplied with the |
||||
|
appliance, and comply with standards. |
|
|||
|
The gas fitting 5 should be turned to the optimal |
||||
|
direction for installation and gas connection. |
||||
6 |
Important: |
|
|
|
|
|
|
|
|
||
|
Use two wrenches to turn the fitting 5 to the |
||||
|
required position. When the fitting is in the desired |
||||
|
position, firmly tighten nut 2 |
|
|
||
|
|
|
|
|
|
|
|
Attention! |
CHECK |
UP |
LEAK |
|
|
PROOFNESS of the connection to the gas |
|||
|
|
supply pipe or gas cylinder using soap |
|||
|
|
suds only. |
|
|
|
|
|
Don’t use open flame – danger to life! |
|||
14 |
|
|
|
|
|
|
|
|
|
|
|

|
DE |
|
RU |
|
|
GASANSCHLUSS |
|
|
|
||
Der Backofen kann mit Erdgas (Methan) oder |
|
( |
) |
||
Flüssiggas betrieben und ganz einfach von einem |
|
|
|
||
Gastyp auf den anderen umgestellt werden (siehe |
|
|
|
||
Abschnitt „Umstellen auf einen anderen Gastyp“). |
( . |
„ |
“). |
||
Am Werk wurde das Gerät auf Erdgas |
|
|
|
||
vorinstalliert. |
|
. |
|
||
|
|
|
|
|
|
|
Achtung! Der Anschluss an das Gasnetz |
|
|
! |
|
|
und Umstellung auf einen anderen Gastyp |
|
|
|
|
|
muss von einer Fachperson gemäß den |
|
|
|
|
|
geltenden Vorschriften ausgeführt werden. |
|
|
|
|
|
|
|
|
|
|
Wird das Gerät mit Flüssiggas aus einer Gasflasche versorgt, muss der Druckregler gemäß den geltenden Vorschriften benutzt werden.
Auf dem Rohr 1 befindet sich eine Mutter 2 mit befestigtem Service-Adapter 3, der nur für Fachpersonen des Kundendienstes bestimmt ist. Der Anschluss mit dem Adapter ist verboten. Der Service-Adapter 3 muss vor dem Anschluss ans Gasnetz entfernt werden.
Anschluss an die Gasleitung
Der Anschluss zum Stadtgas kann mit Hilfe eines steifen Metallrohres zum Rohr 1 hergestellt werden, oder mit einem Sicherheits-Gasschlauch mit Stahlspitze 4 mittels Gewindefittings 5 verbunden sein muss.
Beim Anschluss zur Flüssiggas, benutzen Sie Gewindefitting 6 statt Rohranschluss 5.
Die Gewindefittings 5 und 6 mit Dichtungen werden zusammen mit dem Gerät als Zubehör geliefert und entsprechen den Normen.
Das Gewindefitting 5 sollte für die Installation und Gasanschluss in die optimale Richtung gedreht werden.
Wichtig:
Zum Installieren des Gewindefittings 5 benutzen Sie bitte zwei Schlüssel. Wenn der Rohranschluss in die gewünschte Richtung zeigt, die Mutter 2 fest anziehen.
Achtung! Nach dem Anschließen des Gerätes an das Gasnetz (bzw. die Gasflasche) mit Seifenwasser KONTROLLIEREN, ob der Anschluss DICHT ist bzw. Gas austritt. Auf keinen Fall einen Feuerzeug, einen Zündholz oder offene Flamme anderer Art benutzen.
|
, |
|
|
. |
|
1 |
2, |
ё |
- |
3, |
. |
|
|
|
. |
ё . |
- |
3 |
|
, |
1, |
|
||
|
|
4 |
|
|
|
|
5. |
|
|
|
|
, |
|
|
5 |
6. |
|
|
|
5 |
6 c |
|||
|
|
. |
|
|
5 |
ё |
|||
|
|
. |
|
|
: |
|
|
|
|
. |
5 |
|
|
|
2. |
|
|
||
|
|
|
|
|
|
|
|
|
|
|
|
|
|
|
! |
|
|
|
|
|
|
. |
|
|
|
. |
|
|
|
|
|
|
|
|
|
|
|
|
|
|
|
15 |
||
EN
CONVERSION TO A DIFFERENT TYPE OF
GAS
Before converting the appliance for operation with a different gas type, check which type of gas it is currently set to operate with (adhesive label 1 on appliance).
For the correct nozzle diameter, refer to the table
“Nozzle Table”.
|
|
|
|
||||
|
|
Attention! Connection to the gas supply |
|||||
|
|
and converting to a different type of gas |
|
||||
|
|
must be carried out by qualified technicians |
|
||||
|
|
and in conformance with the requirements. |
|
||||
1 |
|
Depending |
on |
regional |
rules |
and |
|
|
regulations, |
may |
be used |
different |
(from |
|
|
|
|
mentioned) types of connections. |
|
|
|||
|
|
|
|
|
|
|
|
|
|
|
|
|
|
|
|
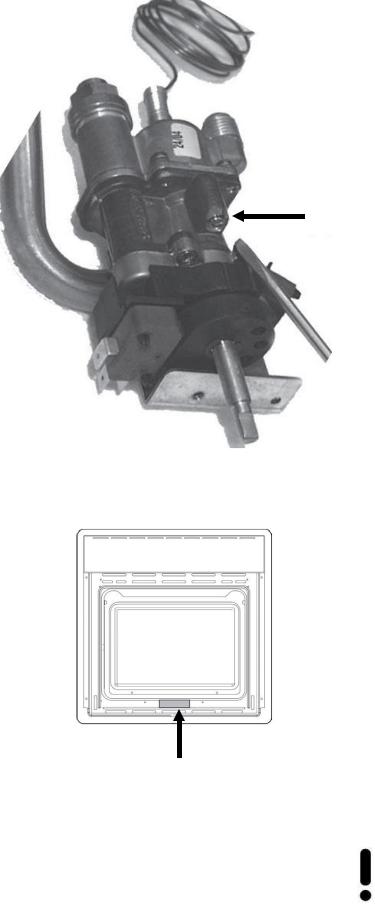
Conversion procedure:
Disconnect the electrical power supply to
|
|
2 |
|
the appliance, |
|
|
|
|
|||
|
|
Change the main oven nozzle: |
|||||||||
|
|
|
|||||||||
|
|
|
|
Remove |
the burner cover plate (see |
||||||
|
|
|
|
«Removal of the burner cover plate»), |
|||||||
|
|
|
Remove |
the screws securing the oven |
|||||||
|
|
|
|
burner 2 and with draw the burner from the |
|||||||
|
|
|
|
support together with the heat sensor and |
|||||||
|
|
|
|
the ignition spark plug, |
|
|
|
|
|||
|
|
3 |
|
Remove |
the nozzle using a 7 mm box |
||||||
|
|
|
|||||||||
|
|
|
|
wrench 3, |
|
|
|
|
|||
|
|
|
Screw the new nozzle in fully (diameter in |
||||||||
|
|
|
|
hundredths of millimetre stamped on the |
|||||||
|
|
|
|
nozzle), taking care not to cross the thread, |
|||||||
|
|
|
Loosen the screw 4 and adjust according |
||||||||
|
|
|
|
to table the opening size a for air supply by |
|||||||
|
|
|
|
rotation of the sleeve 5, |
|
|
|||||
|
|
|
Tighten the screw 4, |
|
|
|
|
||||
|
|
|
|
Replace the burner reversing the |
|||||||
|
|
|
|
operations in step 2 above, |
|
|
|||||
|
|
|
Replace the cover plate. |
|
|
||||||
5 |
4 |
|
NOZZLE TABLE |
|
|
|
|
|
|
||
|
|
|
|
|
|
|
|
|
|
||
|
|
|
Burner |
|
Rated |
Nozzle bore in mm |
|||||
|
|
|
|
load kW |
G20/20 |
|
G30/29 |
|
G30/50 |
||
|
|
|
|
|
|
|
|||||
|
|
|
|
|
|
|
|
||||
|
|
|
|
|
|
|
|
|
|
|
|
|
|
|
Oven |
|
2,50 |
1,18 |
|
0,77 |
|
0,65 |
|
|
|
|
burner |
|
|
|
|||||
|
|
|
|
|
|
|
|
|
|
|
|
|
|
|
|
|
|
|
|
|
|
|
|
|
|
|
TABLE OPENING SIZE |
|
|
|
|
||||
|
|
|
|
|
|
|
|
||||
|
|
|
Type of gas |
Natural gas |
|
|
Liquid gas |
||||
|
|
|
Size a, mm |
3,0 |
|
|
|
5,0 |
|||
|
|
|
|
|
|
|
|
|
|
|
|
16
DE |
RU |
UMSTELLEN AUF EINEN ANDEREN GASTYP
Vor dem Umstellen auf einen anderen Gastyp den Gastyp feststellen, auf den das Gerät eingestellt ist (siehe Typenschild des Gerätes 1).
Für den Düsendurchmesser siehe «Tabelle der Düsen».
Achtung! Der Anschluss an das Gasnetz und Umstellung auf einen anderen Gastyp muss von einer Fachperson gemäß den geltenden Vorschriften ausgeführt werden.
Je nach den regionalen Vorschriften und Bestimmungen können die Arten von Verbindungen verwendet werden, die vom angegebenen abweichen.
Vorgangsweise bei Umstellung auf einen anderen Gastyp:
Das Gerät vom Stromnetz trennen,
Die Hauptdüsen des Backofens wie folgt auswechseln:
Die Brennerabdeckung herausziehen (siehe »Herausziehen des Bodens«),
Die Schrauben 2, mit deren der Backofenbrenner befestigt ist, ausschrauben und den Backofenbrenner zusammen mit dem Heizelement und der elektrischen Zündkerze herausnehmen,
Die Düse mit einem 7er-Steckschlüssel 3 herausschrauben,
Die neue Düse aufschrauben (Durchmesser ist in Hundertstelmillimeter auf der Düse eingestanzt) und dabei darauf achten, dass das Gewinde exakt sitzt,
Die Schraube 4 lösen und die Öffnungsgröße a für die Luftzufuhr entsprechend der Tabelle durch Drehen der Buchse 5 justieren,
Die Schraube 4 festziehen,
Den Brenner wieder montieren (wie oben in Punkt 2, jedoch in umgekehrter Reihenfolge)
Die Abdeckung wieder korrekt einsetzen.
TABELLE DER DÜSEN
Brenner |
Nennlast |
Durchmesser der Düse in mm |
|||
kW |
G20/20 |
G30/29 |
G30/50 |
||
|
|||||
|
|
||||
|
|
|
|
|
|
Backofen- |
2,50 |
1,18 |
0,77 |
0,65 |
|
Brenner |
|||||
|
|
|
|
||
|
|
|
|
|
|
|
|
|
, |
|
( . |
|
1). |
|
|
« |
|
». |
|
|
|
|
|
|
|
|
|
! |
|
|
|
|
, |
|
|
|
|
|
. |
|
|
|
, |
. |
|
|
|
|
||
|
|
|
|
|
: |
. |
|
||
|
, |
|||
|
: |
|
||
|
( . |
|||
|
||||
« |
») |
2, |
||
|
|
|||
|
|
ё |
, |
|
|
|
, |
||
|
|
o |
||
|
|
7 3, |
||
|
|
( |
||
|
|
), |
, |
|
|
4 |
|||
a |
||||
|
|
|
||
|
|
|
5, |
|
|
4, |
|
||
|
( |
|
||
|
|
2, |
|
|
|
), |
. |
||
|
||||
.
G20/20 G30/29 G30/50
2,50 |
1,18 |
0,77 |
0,65 |
TABELLE ÖFFNUNGSGRÖßE
Gastyp |
Erdgas |
Flüssiggas |
Größe a, mm |
3,0 |
5,0 |
|
|
- |
a, |
3,0 |
5,0 |
17

EN DE RU
Burner and Nozzle Data Table
Brenner und Düsendatentabelle
Appliance category |
|
Gerätekategorie |
|
|
|
|
|
|
|
Gas types |
|
Gasarten |
|
|
|
|
|
|
|
Gas pressure (mbar) |
|
Gasdruck (mbar) |
( |
) |
|
|
|
|
|
Heat input (Hs) |
|
Spezifischer |
|
|
|
|
Gasverbrauch (Hs) |
(Hs) |
|
|
|
|
|
|
Injector size |
|
Injector Größe |
|
|
|
|
|
|
|
|
|
|
|
|
Appliance category: |
|
Gerätekategorie |
|
|
|
|
|
|
|
Gas types |
|
Gasarten |
|
|
|
|
|
|
|
Gas pressure (mbar) |
|
Gasdruck (mbar) |
( |
) |
|
|
|
|
|
Heat input (Hs) |
|
Spezifischer |
|
|
|
|
Gasverbrauch (Hs) |
(Hs) |
|
|
|
|
|
|
Injector size |
|
Injector Größe |
|
|
|
|
|
|
|
Voltage/ frequency |
|
Stannung/ Frequenz |
/ |
|
|
|
|
|
|
|
|
|
I3+(28- |
I3B/P(30) |
I3B/P(37) |
I3B/P(50) |
I2H |
I2E |
I2E+ |
I2L |
I2LL |
||
|
|
|
30/37) |
|
|
|
|
|
|
|
|
|
|
|
|
|
|
|
|
|
|
|
|
|
|
|
|
2H3B/P |
|
|
|
|
|
|
|
|
|
|
|
|
|
2H3+ |
|
|
|
|
|
|
|
|
|
|
|
|
|
2E+3+ |
|
|
|
|
|
|
|
|
|
|
|
|
|
|
|
|
|
|
|
|
|
|
|
|
|
|
|
2ELL3B/P |
|
|
|
|
|
|
|
|
|
|
|
|
|
|
|
|
|
|
|
|
|
|
|
|
|||
|
Model |
|
|
Heating elements |
|
|
|
|
|
|
|||
|
Modell |
|
|
Heizelemente |
|
|
|
|
|
|
|
||
|
|
|
|
||||||||||
|
EG 63… |
|
Top: 1.8kW electrothermal tube / Oben: 1,8 kW Elektroheiz- |
||||||||||
|
|
|
|
|
Rohr / |
: |
1.8kW |
|
|
|
|
|
|
|
|
|
|
|
Bottom: gas burner / Unten: Gasbrenner |
|
|
|
|||||
|
|
|
|
|
: |
|
|
|
|
|
|
|
|
18
EN DE RU
Burner and Nozzle Data Table
Brenner und Düsendatentabelle
I3+(28-30/37) |
I3B/P(30) |
I3B/P(37) |
I3B/P(50) |
|
||||
|
|
|
|
|
|
|
|
|
□G30 |
|
□G31 |
□G30/G31 |
□G30/G31 |
□G30/G31 |
|
||
28-30 |
|
37 |
30 |
37 |
|
50 |
|
|
|
|
|
|
|
|
|
||
Burner/ Brenner/ |
Burner/ Brenner/ |
Burner/ Brenner/ |
Burner/ Brenner/ |
|
||||
2.5kW(182g/h) |
2.5kW(182g/h) |
2.5kW(182g/h) |
2.5kW(182g/h) |
|
||||
|
|
|
|
|
|
|
|
|
0.77mm |
|
0.77m |
0.77mm |
0.71mm |
0.65mm |
|
||
|
|
|
|
|
|
|
|
|
I2H |
|
I2E |
I2E+ |
|
I2L |
I2LL |
||
|
|
|
|
|
|
|
|
|
□G20 |
|
□G20 |
□G20 |
|
□G25 |
□G25 |
□G25 |
|
|
|
|
|
|
|
|
|
|
20 |
|
20 |
20 |
|
25 |
25 |
20 |
|
|
|
|
|
|
|
|||
Burner/ Brenner/ |
Burner/ Brenner/ |
Burner/ Brenner/ |
Burner/ Brenner/ |
Burner/ Brenner/ |
||||
2.6 kW |
|
2.6 kW |
2.6 kW |
|
2.6 kW |
2.2kW |
||
|
|
|
|
|
|
|
||
1.18mm |
|
1.18mm |
1.18mm |
|
1.18mm |
1.18mm |
||
|
|
|
|
|
||||
220 – 240 V/ 50 Hz |
220 – 240 V/ 50 Hz |
220 – 240 V/ 50 Hz |
220 – 240 V/ 50 Hz |
220 – 240 V/ 50 Hz |
||||
|
|
|
|
|
|
|
|
|
Total heating input
Insgesamt Heizungseingang
G30(30,37,50) |
G20(20) |
G25(20) |
|
|
|
2.5KW |
2.6KW |
2.2KW |
|
|
|
19
|
|
|
EN |
|
|
Adjustment of the minimum setting |
|||
|
following conversion to a different gas type |
|||
|
Conversion from natural gas to LPG |
|||
|
Ovens with stainless steel front: |
|||
|
Turn the temperature control knob to the |
|||
|
|
|
minimum position, |
|
|
Then remove the knob. Insert a screwdriver |
|||
|
1 |
|
through the aperture to engage the bypass |
|
|
|
|
screw 1, |
|
|
Turn the adjusting screw fully to the right, |
|||
|
|
|
then loose it by 1/8 turn. |
|
|
Ovens with glass fronts: |
|||
|
Turn the temperature control knob to the |
|||
|
|
|
minimum position, |
|
|
Remove the front by unscrewing the two |
|||
|
|
|
ring nuts, |
|
|
Insert a screwdriver through the hole in the |
|||
|
|
|
front wall of the oven and turn the screw 1 |
|
|
|
|
fully clockwise, then loosen it by 1/8 turn. |
|
|
|
Reinstall the front. |
||
|
Conversion from LPG to natural gas |
|||
|
Turn the oven temperature control knob to |
|||
|
|
|
the „Maximum“ position and allow the |
|
|
|
|
appliance to warm up for about 10 minutes, |
|
|
Turn the temperature control knob to the |
|||
|
|
|
minimum position and then remove it |
|
2 |
Insert a screwdriver through the hole in the |
|||
|
|
front wall of the oven and turn the screw 1 |
||
|
|
|
||
|
|
|
fully clockwise. Then loosen it by 1 turn to a |
|
|
|
|
obtain a low but stable flame, |
|
|
|
|
|
|
|
|
|
Attention! After converting the appliance |
|
|
|
|
to a different type of gas, remember to |
|
|
|
|
change the data plate 2 to one with the |
|
|
|
|
new data (gas type and pressure) |
|
|
|
|
|
|
20
DE
Einstellen der minimalen Gaszufuhr bei der Umstellung auf einen anderen Gastyp
Umstellen vom Erdgas auf Flüssiggas
Geräte mit Edelstahl-Bedienblende:
Den Drehregler des Thermostats auf Minimum stellen und dann abnehmen,
Den Schraubendreher durch die Öffnung in die Schraube des Gas-Thermostats 1 einführen,
Die Regulierschraube festziehen, dann die um 1/8 Umdrehung lockern.
Geräte mit Glas-Bedienblende:
Den Drehregler des Thermostats auf Minimum stellen und dann abnehmen,
Die Bedienblende abnehmen; dafür die beiden fixierenden Nutmuttern lösen,
Mit dem Schraubendreher die Schraube des Gas-Thermostates 1 festziehen, dann lockern es um 1/8 Umdrehung.
Die Bedienblende wieder montieren.
Umstellen vom Flüssiggas auf Erdgas
Den Thermostat des Backofens in die Stellung „Maximum“ drehen und das Gerät etwa 10 Minuten lang erwärmen,
Den Drehregler des Thermostats auf Minimum stellen und dann abnehmen
Mit dem Schraubendreher die Schraube des Gas-Thermostates 1 festziehen. Dann die Regulierschraube um eine Umdrehung lockern, bis eine kleine, aber stabile Flamme zu sehen ist.
Achtung! Nach der Umstellung auf einen anderen Gastyp müssen die Daten auf
dem Typenschild 2 korrigiert werden (neue Werte für Gastyp und Gasdruck).
RU
: |
|
|
|
|
, |
|
|
1, |
|
|
, |
1/8 |
. |
|
: |
|
|
|
, |
|
; |
|
, |
|
|
1, |
1/8 |
. |
|
|
. |
„ |
“ |
10 ,
,
1, |
1 |
, |
,
,
!
2 (
).
21
EN
INSTALLATION OF THE OVEN
The regulations covering the installation, maintenance and operation of gas appliances for domestic use are applicable regulations.
Positioning
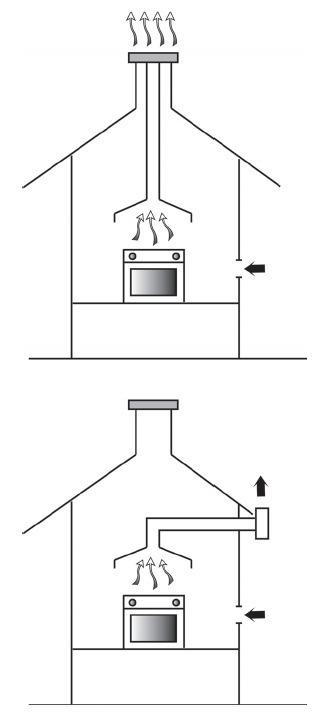
The products of combustion from cooking appliances must always be discharged into suitable extractor hoods, which must be connected to a chimney, flue or vented directly to outside the building.
In situations where it is not possible to install an extractor hood, an electric extractor fan installed in a window or external wall may be used, provided that all requirements of the ventilation regulations are satisfied; the fan should switch on whenever the appliance is in operation.
Ventilation of the room
It is essential that the room in which gas appliances are installed is adequately ventilated to ensure that all the appliances receive the required quantity of fresh air for combustion.
To ensure an adequate air flow, it may be necessary to create apertures in accordance with the following requirements:
With cross-sectional area of 6 cm² per kW
with a minimum cross-sectional area of 100 cm² (these apertures may also be created by increasing the gap between the bottom of doors and the floor),
Situated at the bottom of an external wall, preferably opposite the wall on which combustion products are extracted,
The positions of the apertures should selected so as to avoid the possibility of their being obstructed and, if made in external walls, they must be protected with grilles, metal meshes, etc. installed on the outside face of the wall.
If an electric extractor fan for the removal of foul air is installed in the room, the apertures provided for air changes must allow a ventilation rate of at least 35 m³/h per kW of power installed.
22
DE
EINBAU DES BACKOFENS
Für die Installation, Wartung und Benutzung von Gasgeräten des privaten Gebrauchs handeln Sie entsprechend den geltenden Normen und Vorschriften.
Standort
Die Verbrennungsprodukte von Kochgeräten müssen in eine zu diesem Zweck vorgesehene Abzugshaube abgeleitet werden, die an einen Kamin oder einen Rauchkanal angeschlossen sein soll, oder den Rauch direkt nach außen abführt.
Besteht keine Möglichkeit, eine Dunstabzugshaube zu installieren, kann auch, sofern die belüftungsrelevanten Normen eingehalten werden, ein am Fenster oder einer Außenwand installierter Elektroventilator benutzt werden, der gleichzeitig mit dem Gerät betrieben werden muss.
Raumbelüftung
Der Raum, in dem mit Gas funktionierende Geräte installiert sind, muss mindestens mit so viel Frischluft versorgt werden, wie zur Verbrennung des von allen Geräten verbrauchten Gases erforderlich ist.
Es müssen also für die Raumbelüftung LuftzufuhrÖffnungen angebracht werden, die die folgenden Voraussetzungen erfüllen:
Freier Gesamtquerschnitt soll 6 cm² pro kW und mindestens 100 cm² betragen (diese Öffnungen können gegebenenfalls auch durch Erweiterung des Schlitzes zwischen Tür und Fußboden erhalten werden),
Die Öffnungen müssen sich im unteren Abschnitt einer Außenwand befinden, die vorzugsweise gegenüber der Wand, an der die Verbrennungsprodukte abgeführt werden, liegt,
Sie müssen so platziert werden, dass sie nicht verlegt werden können, und wenn sie sich in einer Außenwand befinden, müssen sie durch klar abgegrenzte Gitter, Metallnetze o. ä. Vorrichtungen an der Außenseite der Wand geschützt sein.
Sollte im Raum ein Elektroventilator zur Abführung der abgearbeiteten Luft installiert sein, müssen die Öffnungen für den Luftaustausch einen Luftdurchsatz von mindestens 35 m³/h pro kW im Raum installierter Leistung ermöglichen.
RU
,
.
,
,
.
,
,
,
.
,
,
|
|
, |
|
|
. |
|
|
, |
|
|
: |
|
|
|
|
|
6 ² |
|
|
, |
100 |
² |
( |
ё |
|
), |
|
|
|
|
|
|
|
|
, |
|
|
, |
|
|
, |
|
|
|
, |
|
, |
, |
|
, |
|
, |
. |
|
|
|
|
|
, |
35 |
|
³/ |
|
|
. |
23
EN
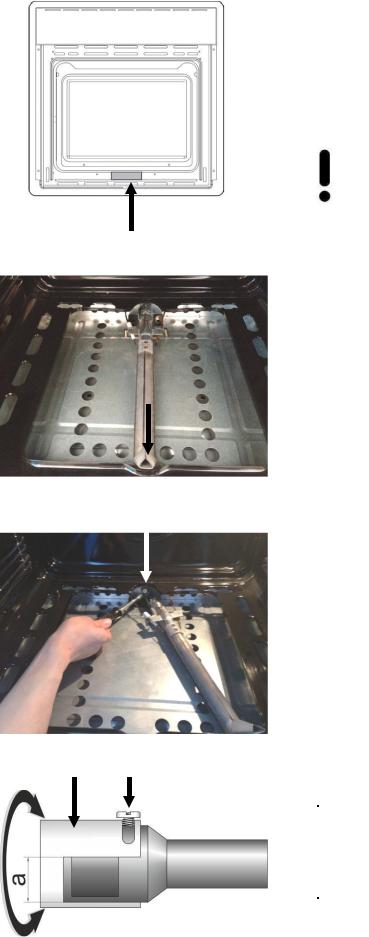
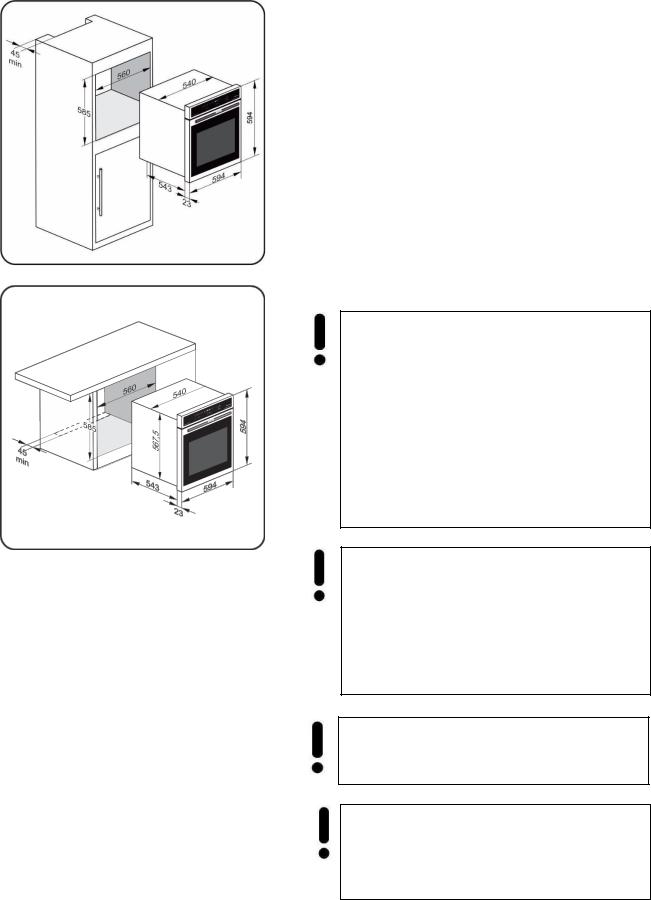
Flush fitting
The oven can be installed under a work top or in a cooking column.
Figure shows the installation dimensions.
The installation space measurements are given in mm.
Make sure that surrounding materials are heat resistant. Align the oven centrally with respect to the side walls of the units surrounding it and fix it in place with the screws and bushings provided.
See the accompanying instructions for combining the oven with multi-functional gas or gas-electric cookers.
Attention! To install the appliance is not recommended the use of the silicone or other sealants and other adhesives besides the supplied mounting materials. If additional fastening materials and substances have been used, the removing the device from the mounting niche in case of necessary service is provided by and at the expense of the owner. The manufacturer and the customer services are not responsible for damages of equipment and furniture because of the disassembling.
Attention! You must set the time on the clock before you can use the oven.
(See chapter Digital clock timer with sensor).
If the time is not set, the oven will not work!
Attention! Installation and connection of the appliance must be made by a qualified expert only.
Attention! We Inform you that our devices which are the object of the present operating instructions are precertain exclusively for the domestic use.
24

DE
Einbau des Backofens
Der Backofen kann unter einer Arbeitsplatte oder in einen Schrank eingebaut werden.
Die Einbaumaßen müssen den auf der Abbildung dargestellten Massen entsprechen.
Die Einbaumaßen sind in mm angegeben.
Das Möbelmaterial muss hitzebeständig sein. Der Backofen muss zu den Möbelwänden zentriert, und mit den mitgelieferten Schrauben und Buchsen befestigt werden.
Für die Kombination des Backofens mit den Gas-
oder |
Gas/Elektrokombikochfeldern |
siehe |
beiliegende Anleitungen.
Achtung! Beim Einbau ist zu beachten: die
Verwendung von der Silikonfuge, anderen Dichtungsmittel oder Klebstoffe zusätzlich zu den gelieferten Befestigungsmaterialien wird nicht empfohlen. Bei der Verwendung der zusätzlichen Befestigungsmaterialien und Stoffen, falls die Servicedienstleitung notwendig ist, wird das Herausnehmen des Gerätes aus der Montagenische auf eigenen Kosten und aus eigener Kraft des Inhabers des Gerätes durchgeführt. Der Hersteller und das Kunden-Service übernehmen keine Verantwortung für die Schäden des Gerätes und der Möbel bei der Demontage.
Achtung! Vor dem ersten Gebrauch des Backofens muss die aktuelle Tageszeit eingestellt werden. (siehe Kapitel
Elektronische Zeitschaltuhr mit Sensor). Ohne eingestellte Uhr funktioniert der Backofen nicht!
Achtung! Die Montage und Anschluss des Gerätes soll nur von einem qualifizierten Fachpersonal durchgeführt werden.
Achtung! Wir Informieren Sie, dass unsere Geräte, die der Gegenstand der vorliegenden Bedienungsanleitung sind, sind ausschließlich für den häuslichen Gebrauch vorbestimmt.
RU
, |
. |
,
,
.
.
.
.
-
,
.
!
,
,
.
ё
,
ё
ё |
. |
.
!
( .
).
o
!
!
.
! ,
,
,
.
25
EN
SAFETY CONDITIONS
Please, keep watch over children as long as the gas oven is in operation. Children are unaware of operating rules. Hot gas hot oven cavity, oven door can cause a skinburn.
If faults occur, further operation is not allowed until the appliance has been repaired by an authorized serviceman.
Don’t turn on the valve of the gas inlet or gas cylinder before you make sure that the gas burners are switched off.
Unauthorized persons are not allowed to carry on amendments or repair the oven.
Don’t blow out the flame of the burner!
Users are not allowed to adjust the ovens to different gas type on their own, move the oven to another place or make changes in the gas supply system. These operations can be carried on only by an authorized serviceman.
Don’t let children and persons who are not informed about the operation instructions to operate the oven.
The liquefied gas equipment is intended only for domestic use. This equipment should be checked every 2 years on security.
This device is not intended for use by children. The nozzles, adapters and other small components and accessories can be swallowed by children and can cause a risk of strangulation. Do not allow children to play with the device or close to it. During operation, the surface is heated. Children should not admit to it until it has cooled down.
26
DE
SICHERHEITSBEDINGUNGEN
Während des Gasbackofenbetriebs auf Kinder aufpassen, weil sie über keine Kenntnisse hinsichtlich der Backofenbedienung verfügen. Insbesondere heiße Backofenraum, Rost, Türscheibe können bei Kindern Verbrennungen verursachen.
Falls der Backofen beschädigt wird, darf er erst wieder benutzt werden, nachdem die Beschädigung von einem qualifizierten Fachmann beseitigt ist.
Den Gasabsperrhahn an der Gasanschlussstelle bzw. an der Gasflasche niemals öffnen ohne sichergestellt zu haben, dass alle Gassperrventile des Backofens zugedreht sind.
Es ist streng verboten, den Backofen von nicht speziell ausgebildeten Personen zu modifizieren bzw. reparieren zu lassen.
Gasbrennerflamme nie durch Blasen löschen.
Eigenwillige Anpassung vom Backofen an einen anderen Gastyp, Umstellen des Backofens auf einen anderen Platz sowie Einführung von Änderungen in die Gasversorgungsleitung sind verboten. Diese Tätigkeiten dürfen ausschließlich von einem autorisierten Installateur durchgeführt werden.
Kleine Kindern und Personen, welche mit der Gebrauchsanweisung des Backofens nicht vertraut sind, den Gasbackofen nicht bedienen lassen.
Die Flüssiggasanlagen sind nur für den privaten Haushalt bestimmt. Diese Anlagen sollen alle 2 Jahre auf Sicherheit geprüft werden.
Das Gerät darf von den Kindern nicht verwendet werden. Die Düsen, der Adapter und weitere kleine Bestandteile und Zubehör des Geräts können von den Kindern verschluckt werden, was die Gefahr einer Strangulation hervorrufen kann. Das Kochfeld bleibt beim Funktionieren immer warm. Erlauben Sie den Kindern daher nicht, mit dem Gerät oder in seiner Nähe zu spielen.
RU
|
, |
|
|
, |
|
. |
, |
, |
|
. |
|
|
|
, |
|
. |
|
|
|
|
|
, |
|
|
. |
|
|
|
|
|
, |
|
|
. |
|
|
|
. |
|
|
|
|
|
, |
|
|
, |
. |
|
|
|
. |
|
|
, |
, |
|
. |
|
|
|
|
|
|
|
, |
|
. |
|
|
|
2 |
. |
|
|
|
|
|
. |
, |
c |
. |
|
. |
. |
|
|
|
|
|
, |
. |
27
 Loading...