


4K UHD HDR Smart TV
LT-55MA877 (55" class/ 54.64" diagonal)
INSTRUCTIONS
ENGLISH
1 2 3
4 5 6
7 8 9
0
ATTENTION
If you purchase a universal remote control from your local retailer, please contact the remote manufacturer for the required programming code.
PLEASE HAVE THE MODEL NUMBER READY PRIOR TO CALLING
FOR RECYCLING INFORMATION, PLEASE CONTACT CUSTOMER SERVICE.
CUSTOMER SERVICE - 1-888-582-8870
Before operating the unit, please read this manual thoroughly.
 Contents
Safety and warnings...................................................................................... |
1-3 |
Introduction................................................................................... .............. |
4 |
Installation................................................................................................... |
5-8 |
Wall Mount................................................................................................... |
9 |
General Description............................................................................ .......... |
10-13 |
External Connection...................................................................................... |
14-17 |
Basic Operations........................................................................................... |
18-19 |
Menu System Instruction................................................................................ |
20-37 |
Digital Media Player....................................................................................... |
38 |
Trouble Shooting........................................................................................... |
39-40 |
Reference..................................................................................................... |
41 |
 SAFETY AND WARNINGS
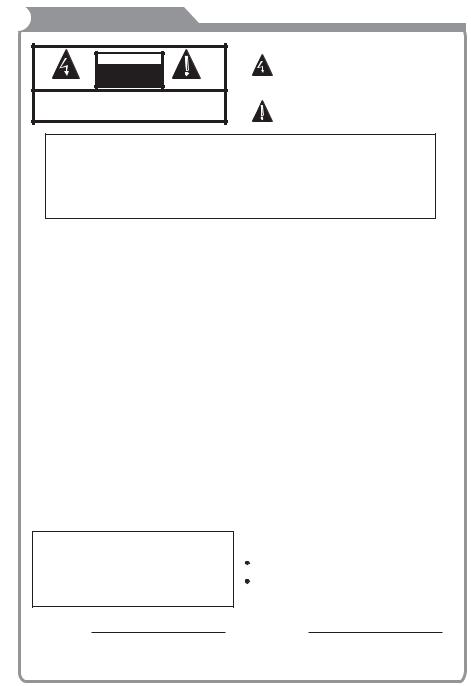
CAUTION
RISKOFELECTRICSHOCK!
DONOTOPEN!
ATTENTION
RISQUEDECHOCELECTRIQUE!
NEPASOUVRIR!
CAUTION TO REDUCE THE RISK OF ELECTRIC SHOCK, DO NOT
REMOVE COVER (OR BACK).NO USER SERVICEABLE
PARTS INSIDE. REFER SERVICING TO QUALIFIED
SERVICE PERSONNEL.
The lightning flash with arrowhead symbol,within an equilateral triangle is intended to alert the user to the presence of uninsulated dangerous voltage within the product’s enclosure that may be of sufficient magnitude to constitute a risk of electric shock.
The exclamation point within an equilateral triangle is intended to alert the user to the presence of important operating and maintenance (servicing) instructions in the literature accompanying the appliance.
WARNING:TO PREVENT FIRE OR SHOCK HAZARD, DO NOT EXPOSE THISAPPLIANCE TO RAIN OR MOISTURE.
TO PREVENT THE SPREAD OF FIRE, KEEP CANDLES OR OPEN FLAMES AWAY FROM THIS PRODUCTATALL TIMES.
CAUTION: TO PREVENT ELECTRIC SHOCK. DO NOT USE THIS POLARIZED PLUG WITH AN EXTENSION CORD, RECEPTACLE OR OTHER OUTLET UNLESS THE BLADES CAN BE FULLY INSERTED TO PREVENT BLADE EXPOSURE.
WARNING: This equipment has been tested and found to comply with the limits for a Class B digital device, pursuant to Part 15 of the FCC Rules. These limits are designed to provide reasonable protection against harmful interference in a residential installation. This equipment generates, uses and can radiate radio frequency energy and, if not installed and used in accordance with the instructions, may cause harmful interference to radio communications.
However, there is no guarantee that interference will not occur in a particular installation. If this equipment does cause harmful interference to radio or television reception, which can be determined by turning the equipment off and on, the user is encouraged to try to correct the interference by one or more of the following measures:
-Reorient or relocate the receiving antenna.
-Increase the separation between the equipment and receiver.
-Connect the equipment into an outlet on a circuit different from that to which the receiver is connected.
-Consult the dealer or an experienced radio/TV technician for help.
CAUTION: Changes or modifications not expressly approved by the party responsible for compliance with the FCC Rules could void the user’s authority to operate this equipment.
THIS DEVICE COMPLIES WITH PART 15 OF THE FCC RULES. OPERATION IS SUBJECTTO THE FOLLOWING TWO CONDITIONS:
(1) THIS DEVICE MAY NOT CAUSE HARMFULINTERFERENCE, AND (2) THIS DEVICE MUSTACCEPTANY INTERFERENCE RECEIVED, INCLUDING INTERFERENCE THAT MAY CAUSE UNDESIRED OPERATION.
Important Note:
In the spaces below, enter the model and serial number of your television (located at the rear of the television cabinet). Staple your sales receipt or invoice to the inside cover of this guide. Keep this user’s guide in a convenient place for future reference. Keep the carton and original packaging for future use.
Location of the required marking
The rating sheet and the safety caution are on the rear of the unit.
BATTERY PRECAUTIONS:
 Batteries should not be exposed to excessive heat such as sunshine,fire or the like.
 The remote control unit uses infrared beams to transmit signals, so sunlight or fluorescent light on the remote sensor may shorten operating
 distance.
Incorrect use of batteries may cause them to leak or burst. Read the battery warnings and use the  batteries
properly.
Do not mix old and new batteries.
Do not mix alkaline, standard (carbon-zinc), or rechargeable, (Ni-Cd, Ni-MH, etc.) batteries. Remove batteries if the remote control will not be operated for an extended period of time.
Serial number: |
Model number: |
-1-
 SAFETY AND WARNINGS
IMPORTANT SAFETY INSTRUCTIONS
Important Safety Instructions
1)Read these instructions.
2)Keep these instructions.
3)Heed all warnings.
4)Follow all instructions.
5)Do not use this apparatus near water.
6)Clean only with non abrasive dry cloth.
7)Do not block any ventilation openings, install in accordance with the instructions.
8)Do not install near any heat sources such as radiators, heat registers, stoves, or other apparatus (including amplifiers) that produce heat.
9)Do not defeat the safety purpose of the polarized plug. If the provided plug does not fit into your outlet, consult an electrician for replacement of the obsolete outlet.
10)Protect the power cord from being walked on or pinched particularly at plugs, convenience receptacles, and the point where they exit from the apparatus.
11)Only use attachments/accessories specified by the manufacturer.
12)Unplug this apparatus during lighting storms or when unused for long periods of time.
13)Refer all servicing to qualified service personnel. Servicing is required when the apparatus has been damaged in any way, such as when power-supply cord or plug is damaged, liquid has been spilled or objects have fallen into the apparatus, the apparatus has been exposed to rain or moisture, does not operate normally, or has been dropped.
14)Mains plug is used as the disconnect device, the disconnect device shall remain readily operable.
15)Do not cover the ventilation openings with items such as newspapers, table-cloth, curtains, etc.
16)No naked flame sources, such as lighted candles, should be placed on the apparatus.
17)Attention should be drawn to the environmental aspects of battery disposal.
18)Use apparatus in moderate climate.
19)The apparatus shall not be exposed to dripping or splashing and that no objects filled with liquids, such as vases, shall be placed on the apparatus.
20)Use only with a cart , stand, tripod, bracket, or table specified by the manufacturer, or sold with the apparatus. When a cart is used, use caution when moving the cart/apparatus combination to avoid injury from tip-over.
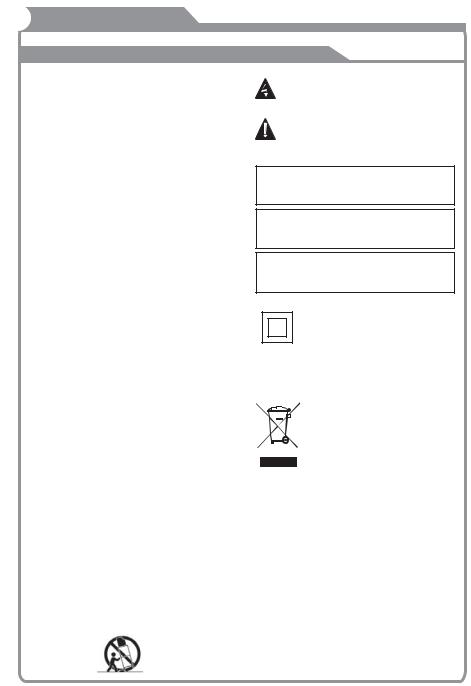
The symbol indicates that dangerous voltages constituting a risk of electric shock are present within this unit.
The symbol indicates that there are important operating and maintenance instructions in the literature accompanying this unit.
WARNING:
To reduce the risk of fire or electric shock, do not expose this apparatus to rain or moisture.
WARNING:
The batteries shall not be exposed to excessive heat such as, fire or the like.
WARNING:
The excessive sound pressure from earphones and headphones can cause hearing loss.
This symbol indicates that this product incorporates double insulation between hazardous mains voltage and user accessible parts. When servicing use only
identical replacement parts.
This marking indicates that this product should not be disposed with other household wastes. To prevent possible harm to the environment or human health from uncontrolled waste disposal, recycle it responsibly to promote the sustainable reuse of material resources. To return your used device, please use the return and collection systems or contact the retailer where the product was purchased. They can take this product for environmental safe recycling.
-2-

 SAFETY AND WARNINGS
High voltages are used in the operation of this television receiver. Do not remove the cabinet back from your set. Refer servicing to qualified service personnel.
To prevent fire or electrical shock hazard, do not expose the television receiver to rain or moisture.
Do not drop or push objects into the television cabinet slots or openings. Never spill any kind of liquid on the television receiver.
Do not block the ventilation holes in the back cover. Adequate ventilation is essential to prevent failure of electrical components.
Do not trap the power supply cord under the television receiver.
Never stand on, lean on, or suddenly push the television or its stand. You should pay special attention to children. Serious injury may result if it falls.
Do not place your television on an unstable cart, stand, shelf or table. Serious injury to an individual , and damage to the television, may result if it falls. Recommended to utilize rear mount screw holes for anti-tipping (hardware not included).
When the television receiver is not used for an extended period of time, it is advisable to disconnect theAC power cord from the AC outlet.
Avoid exposing the television receiver to direct sunlight and other sources of heat. Do not stand the television receiver directly on other products which give off heat, e.g. video cassette players and audio amplifiers. Do not place naked flame sources, such as lighted candles on the television.
If the television is to be built into a compartment or similar enclosure, the minimum distances must be maintained. Heat build-up can reduce the service life of your television, and can also be dangerous.
-3-
 INTRODUCTION
Antenna
Main features
 55" wide screen for a complete home theater experience
 Super slim LCD TV with LED backlight
 3840 x 2160 native resolution for UHD performance
 IntegratedATSC TV tuner for HDTV broadcast reception
 Beautiful color depth with a contrast ratio of 1200:1
  HDMI® inputs for true digital connections
Accessories |
|
Infrared Remote Control................... |
1 |
User s Manual ............................... |
1 |
Battery(AAA) .................................. |
2 |
Screws........................................... |
4 |
Base stand...................................... |
2 |
Component adaptor cable................. |
2 |
Specifications
Viewing PictureSize(diagonal) |
55"class (54.64"diagonal) |
Resolution: |
3840 x 2160 |
AspectRatio: |
16:9 |
|
|
TV System: |
ATSC Digital system and NTSC Analog system |
Video Signal System: |
NTSC |
Receiving Channel: |
Cable :1-135/ Air: 2-69(ATV&DTV) |
|
|
Maximum Power Consumption: |
150W |
|
|
Input Power Voltage: |
AC 100-240V 50/60Hz |
Audio OutputPower(THD 7%): |
2 x 10W |
High-DefinitionMultimediaInterface(HDMI)Input |
x 3 |
|
|
YCb(Pb)Cr(Pr)Input |
x 1 |
|
|
Composite VideoInput |
x 1 |
|
|
Audio Input |
x 1 |
|
|
Headphone Output |
x 1 |
|
|
Coaxial |
x 1 |
|
|
LAN |
x 1 |
USB 2.0 Input |
x 2 |
Dimensions (approx) |
1239 x 260.5 x 777 mm |
with stand fitted(WxDxH) |
48.77 x 10.25 x 30.59 inch |
|
|
Net weight |
13.4 kg (29.54 lbs) with STAND |
|
|
The terms HDMI and HDMI High-Definition Multimedia Interface, and the HDMI Logo are trademarks or registered trademarks of HDMI Licensing Administrator, Inc. in the United States and other countries.
Manufactured under license from Dolby Laboratories. Dolby, Dolby Audio, and the double-D symbol are trademarks of Dolby Laboratories.
“This product is manufactured, distributed, serviced and warranted exclusively by SHENZHEN MTC CO., LTD.. “JVC” is the trademark of JVC KENWOOD Corporation, used by such company under license.”
-4-
 INSTALLATION
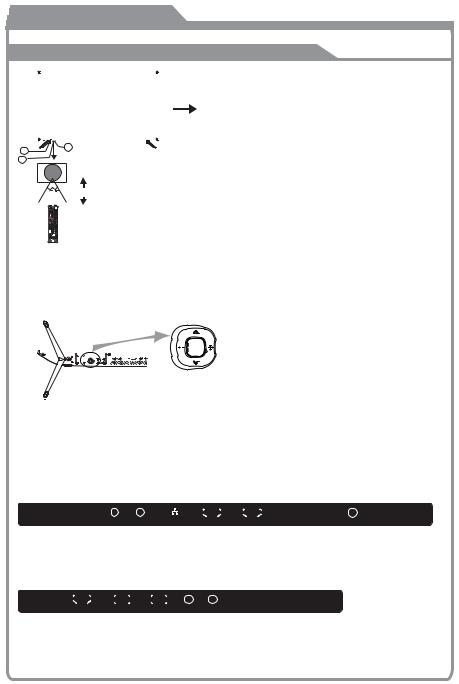
Front panel
1: Remote control sensor.
2: Indicator LED: RED  STANDBY.
3: Key board
|
1 |
3 |
|
2 |
|
≤8m
KEYBOARD
The keyboard is located at the bottom left near the right side of signal indicator.
Rocker
Bottom
1.Middle Button: press longtime for “power” function; press once for “source” function
2.Up/Down: CH+/-
3.Left/Righ: VOL-/+
REAR Connections
HEADPHONE COAXIAL |
LAN |
HDMI3 |
HDMI2 |
OPTICAL |
RFVIDEO |
L |
R |
All the terminals are(from left to right): HEADPHONE, COAXIAL, LAN, HDMI3, HDMI2, RF.
SIDE Connections
HDMI1(ARC) |
USB2.0 |
USB2.0 |
V/YPbPr AUDIO |
All the terminals are (from left to right):
HDMI1(ARC), USB2.0, VIDEO/YPbPr, AUDIO.
-5-
 INSTALLATION
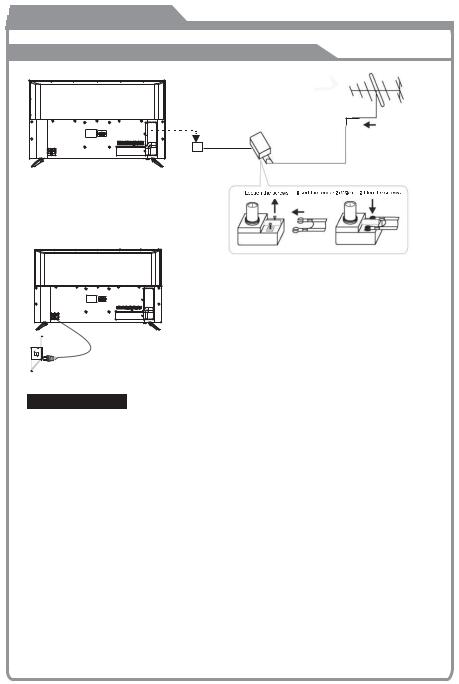
Antenna
ADAPTER (NOTSUPPLIED)
OUTDOOR OR INDOORANTENNA
(NOT SUPPLIED)
PLUG 

75Ω CABLE ANTENNAOR CABLETV
TWIN-LEADER FEEDER (300Ω)
Note:
Aerial connections:F connector.
Input impendance:75  unbalanced
Power connection
Please note:After unpacking, allow the TV to reach ambient room temperature before connection the TV to the mains power socket.
Connect the power cord plug to the mains power socket.
PRESET MODE (HDMI)
|
RESOLUTION |
V.Freq.(Hz) |
H.Freq.(KHz) |
1 |
800*600 |
60 |
37.88 |
|
|
|
|
2 |
1024*768 |
60 |
48.36 |
|
|
|
|
3 |
1366*768 |
60 |
47.7 |
|
|
|
|
4 |
1280*768 |
60 |
47.3 |
|
|
|
|
5 |
1920*1080 |
60 |
67.5 |
|
|
|
|
6 |
3840*2160 |
30 |
67.5 |
|
|
|
|
7 |
3840*2160 |
50 |
112.5 |
|
|
|
|
8 |
3840*2160 |
60 |
135 |
|
|
|
|
CABLE
When shipped from the factory, the Signal Type option is for the RF connector (F-type) set to the"AIR" (Over-the air antenna) mode.
-6-

 INSTALLATION
Base Stand Assembly Instruction
The base stand
Prepare to place the TV with the display side down on a flat surface. Due to the size and weight of this TV, the use of 2 people is recommended when moving it. Ensure the table or desk you use provides a flat, totally clean surface, and use a soft cloth between the face of the TV and the table to protect the TV's screen.
1. Locate the 2PCS of the base stand and insert it into the gap in the bottom of the TV , and check that it is securely held in place as per a) below.
a)
2.Lock 4 screws in the designated location as per b) below and check each screw is firmly tightened
4 x Screws(M4X14MM)
b)
-7-

 INSTALLATION
AV Equipment
You can use the rear input terminals as follows.
HDMI1(ARC) |
USB2.0 |
USB2.0 |
V/YPbPr |
AUDIO |
|
R |
B |
G |
R |
W |
|
|
|
|
HDMI |
|
|
|
|
|
|
|
|
|
|
R |
B |
G |
R |
W |
|
|
|
|
|
|
|
|
|
|
VIDEOEQUIPMENTwithYPbPr |
|
||
|
|
|
|
|
R |
W |
G |
B |
R |
4 |
3 |
2 |
1 |
WAN |
||
|
|
|
|
|
|
|
|
|
|
|
|
|
|
|
|
|
|
|
|
|
HEADPHONE COAXIAL |
LAN |
HDMI3 |
HDMI2 |
RF |
HDMI
Video Equipments: VCR, Multi Disc Player, DVD Player, Camcorder, Video Game, etc. Video format that YPbPr supports: 480i, 576i, 480p, 720p, 1080i, 1080p, 2160p.
-8-
 Wall Mount
Instruction for Wall Mount
A wall mount kit (purchased separately) would allow you to mount your JVC TV on the wall. For detailed information on installing the wall mount, refer to the instructions provided by the wall mount manufacturer. It is strongly
recommended to contact a technician for professional assistance for wall mount installation. JVC is not responsible for any damage to the product or injury to yourself or others resulting from the wall-mounting.
Dimensions for Mounting Hole Pattern
61.5 |
400 |
200 |
This JVC TV is compatible with a 400mm x 200mm mounting hole pattern.
-4 pcs of type M6 screws are required for installing the wall mount bracket to your JVC TV. Do not use screws that are longer than 10 mm. Screws that are too long may cause damag e to the inside of the TV set.
-Do not fasten the screws too tight for this may damage the TV or cause the TV to fall, resulting in personal injury. JVC is not liable for these kinds of incidents.
-Do not mount your JVC TV at more than a 15 degree tilt.
-Always use two people to mount the TV to a wall.
-Do not install your Wall Mount Kit while your TV is turned on. It may result in personal injury due to electric shock.
-9-
 General Description
 Overview of remote control


1 2 3
4 5 6
6
7 8 9
0 |
CH |

INFO
OK
EXIT
VOL |
CH |
PICTURE |
CC/SUBTITLE  MTS/AUDIO
ASPECT TTS SOUND
Loading batteries:
1)Remove the lid of the battery compartment.
2)Insert 2 size AAA batteries with polarities as indicated inside the compartment.
3)Replace the lid.
Note:
1)A loading of batteries should be last one year under normal use.
2)If you don't intend to use the remote control for a long period of time, remove batteries to avoid damage due to leakage.
3)Do not mix old and new batteries or different types.
4)Do not throw batteries into fire or water.
5)The batteries (battery pack or batteries installed) should not be exposed to excessive heat such as sunshine, fire or the like.
-10-
 General Description
 Overview of remote control
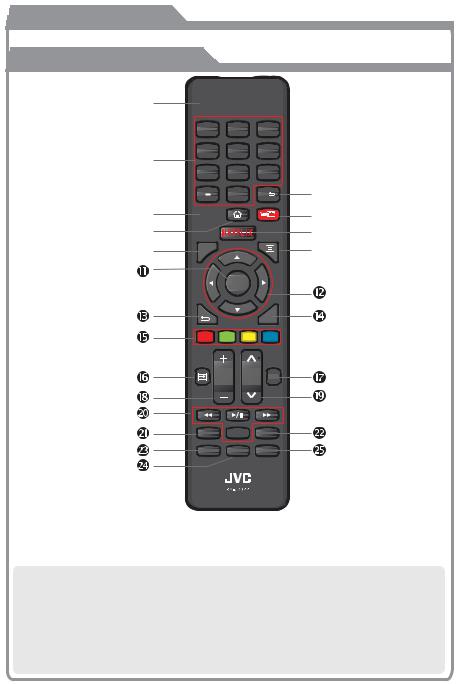
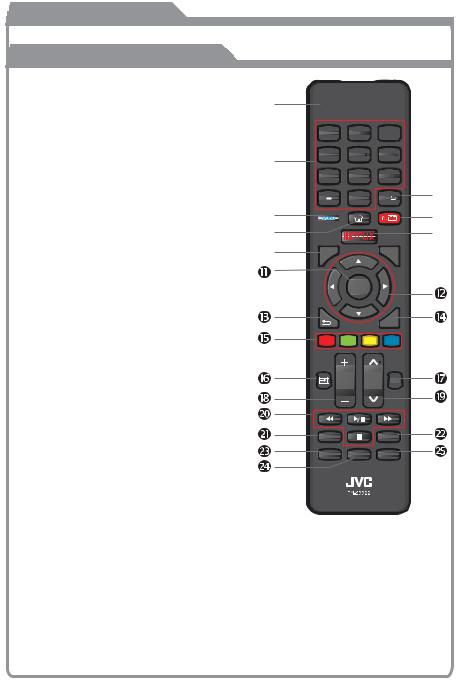
1. POWER: Turn the TV on and off.
2. MUTE: Press this button to cut off the sound of |
|
|
|
|
|
|
|
the TV set temporarily, press again to resume. |
1 |
2 |
3 |
|
3. Digital Buttons(0-9, -): Directly select channel |
|
4 |
5 |
6 |
with digital buttons. |
7 |
8 |
9 |
|
|
|
4.CH  : Switch to the previous program.
5.YouTube: If network connects, press this key to view YouTube directly.
6.VUDU: Press it to show channel list and favorite list on screen.
7. : Press it to go to App home page.
8.NETFLIX: If network connects, press this key to view NETFLIX directly.
9.INFO: Display the program information.
10. : Display the main menu or exit the current menu.
11. OK: Validation key.
0 |
CH |
|

INFO
OK
EXIT
VOL |
CH |
PICTURE |
12.Arrow buttons pqtu: Use o select on-screen menu items and change menu values.
13. : Return.
14.EXIT: Exit the menu.
15.COLOR BUTTONS: It's used as it's showed in the EPG or Program Edit menu.
16.

 : This button is used to switch among different sources, Select a source and press
OK button to confirm
CC/SUBTITLE  MTS/AUDIO
ASPECT TTS SOUND
-11-
 General Description
 Overview of remote control
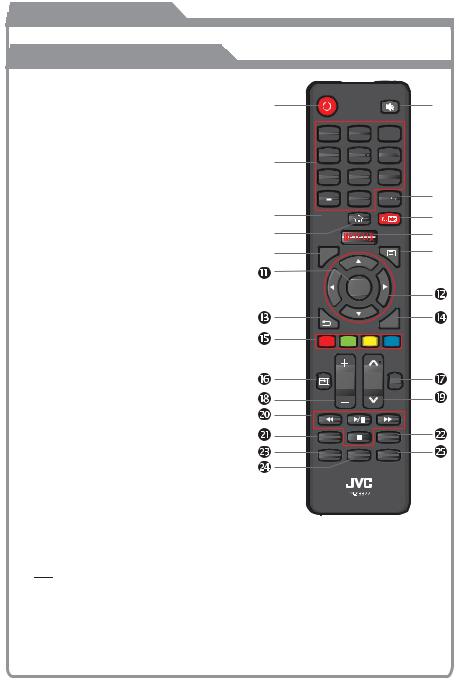
17.PICTURE: Select picture mode.
18.VOL+/-: Press these buttons to adjust the volume.
19.CH˄/˅: Press these buttons to change channel upward or downward.
20.DIGITAL MEDIA PLAYER CONTROL BUTTON: Include play/pause, stop, backward, forward is used in USB mode . Please refer to relevnat instructions in the section of multimed player.
21.CC/SUBTITLE: In USB mode, press this button to switch subtitles when movie is playing.
22.MTS/AUDIO: In USB mode, press this button to switch audio track when movie is playing. In TV mode, press this button to switch MTS or Audio Language.
23.ASPECT: Press this button to set aspect, such as 16:9,4:3,native,ect.
24.TTS: Press this button to set TTS on or off.
25.SOUND: Press this button to select sound mode.


1 |
2 |
3 |
|
4 |
5 |
6 |
|
7 |
8 |
9 |
|
|
0 |
CH |
|
|
|
|
|
|
|
|
|
|
|
|
|
INFO 

OK
EXIT
VOL |
CH |
PICTURE |
CC/SUBTITLE  MTS/AUDIO
ASPECT TTS SOUND
-12-
 Loading...