


 Loading...
MICRO COMPONENT SYSTEM
UX-QD9S
Consists of CA-UXQD9S and SP-UXQD9S
For hiding the demonstration display, refer to page 15.
INSTRUCTIONS
LVT1220-005A [A]
Warnings, Cautions and Others
CAUTION
To reduce the risk of electrical shocks, fire, etc.:
1.Do not remove screws, covers or cabinet.
2.Do not expose this appliance to rain or moisture.
CAUTION — Fbutton!
Disconnect the mains plug to shut the power off completely. The F button in any position does not disconnect the mains line. The power can be remote controlled.
CAUTION
•Do not block the ventilation openings or holes.
(If the ventilation openings or holes are blocked by a newspaper or cloth, etc., the heat may not be able to get out.)
•Do not place any naked flame sources, such as lighted candles, on the apparatus.
•When discarding batteries, environmental problems must be considered and local rules or laws governing the disposal of these batteries must be followed strictly.
•Do not expose this apparatus to rain, moisture, dripping or splashing and that no objects filled with liquids, such as vases, shall be placed on the apparatus.
IMPORTANT FOR LASER PRODUCTS
1.CLASS 1 LASER PRODUCT
2.CAUTION: Do not open the top cover. There are no user serviceable parts inside the unit; leave all servicing to qualified service personnel.
3.CAUTION: Visible and invisible laser radiation when open and interlock failed or defeated. Avoid direct exposure to beam.
4.REPRODUCTION OF LABEL: CAUTION LABEL, PLACED INSIDE THE UNIT.
G-1
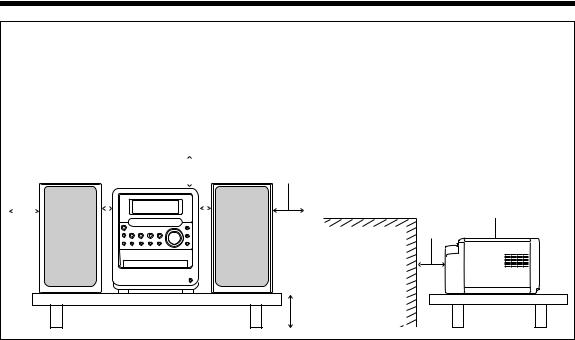
CAUTION — Proper Ventilation
To avoid risk of electric shock and fire and to protect from damage, locate the apparatus as follows: Top/Front/Back/Sides: No obstructions should be placed in the areas shown by the dimensions below. Bottom: Place on the level surface. Maintain adequate air path for ventilation by placing on
a stand with a height of 10 cm more.
In addition, maintain the best possible air circulation.
Front view
|
|
|
|
|
|
|
|
Main unit |
||||||
15cm |
|
1cm |
|
15cm |
1cm |
|||||||||
|
|
|
|
|
|
|
|
|
|
|
|
|
|
|
|
|
|
|
|
|
|
|
|
|
|
|
|
|
|
|
|
|
|
|
|
|
|
|
|
|
|
|
|
|
|
|
|
|
|
|
|
|
|
|
|
|
|
|
|
Side view
15cm
|
Main unit |
Wall or |
15cm |
|
|
obstructions |
|
|
Front |
10cm |
|
G-2
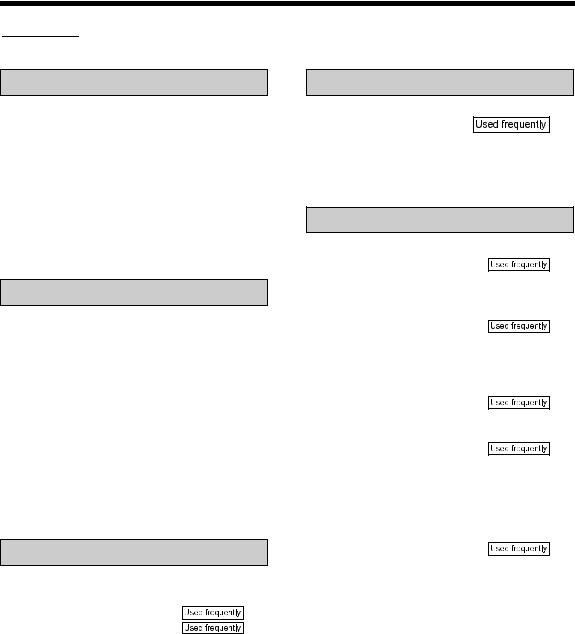
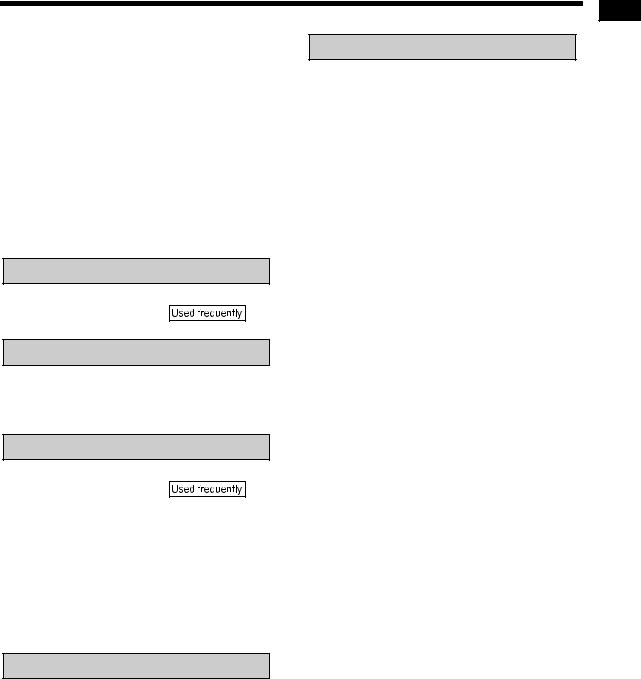
Table of Contents
 marks refer to operation used frequently. You can quickly learn the general usage of this product by reading those parts only.
Introduction |
|
Notes on Operation ............................. |
3 |
Suitable Locations for the Main Unit ................. |
3 |
Condensation.................................................... |
3 |
Cleaning the Main Unit ..................................... |
3 |
Listener’s Etiquette ........................................... |
3 |
Playable Disc Types ......................................... |
4 |
Disc Structure ................................................... |
5 |
Selecting the Color System .............................. |
6 |
Special Cautions.................................. |
7 |
Notes on Handling ............................................ |
7 |
Supplied Accessories ....................................... |
7 |
Preparation |
|
Part Description ................................... |
8 |
Remote Control ................................... |
9 |
Inserting Batteries into the Remote |
|
Control................................................... |
9 |
Operating the TV Using the Remote |
|
Control................................................... |
10 |
Connections......................................... |
11 |
Connecting the Antennas .......................... |
11 |
Connecting the Speakers .......................... |
13 |
Connecting Other Equipment .................... |
14 |
Connecting with a TV................................. |
14 |
When a Clearer Picture Is Desired ............ |
15 |
Connecting the Power Plug ....................... |
15 |
Basic Operations |
|
Basic Operations ................................. |
16 |
Setting the Clock........................................ |
16 |
Turning On/Off the Main Unit. |
17 |
Adjusting the Volume............. |
17 |
Temporarily Turning Off the Sound |
|
(FADE MUTING) ................................... |
17 |
Emphasizing Heavy Bass Sound |
|
(AHB PRO)............................................ |
17 |
Adjusting the Sound Quality ...................... |
17 |
Changing the Color Patterns for |
|
the Display Window and Disc Tray........ |
18 |
Listening to Radio Broadcasts |
|
Listening to Radio Broadcasts |
|
.............................................. |
19 |
Setting the AM Tuner Spacing................... |
19 |
Selecting a Radio Station .......................... |
20 |
Storing Radio Stations (Preset) ................. |
20 |
Tuning In to a Preset Radio Station........... |
20 |
Listening to Discs |
|
Basic Operations of the DVD Player ... |
21 |
Playback ................................ |
21 |
Playing Back from a Position 10 Seconds |
|
Before (One Touch Replay)................... |
23 |
Stopping Playback ................. |
24 |
Resuming Playback (RESUME) ................ |
24 |
Pausing Playback ...................................... |
24 |
Advancing Picture Frame by Frame .......... |
24 |
Fast Reverse/Fast Forward |
|
Search ............................... |
24 |
Slow Motion Playback................................ |
25 |
Skipping to the Beginning of |
|
a Track............................... |
25 |
Skipping to the Beginning of a Track with |
|
the Number Buttons............................... |
25 |
Selecting a Track from the Menu Screen .. |
25 |
Convenient Functions of the DVD |
|
Player ................................................ |
26 |
Selecting the Audio................ |
26 |
Selecting the Subtitle ................................. |
27 |
Selecting a View Angle .............................. |
27 |
Magnifying the Picture (ZOOM) ................. |
27 |
Adjusting the Picture Quality (VFP) ........... |
28 |
Creating Realistic Sound (3D PHONIC) .... |
28 |
Adjusting Playback Level (DVD LEVEL).... |
29 |
Enjoying Better Pictures |
|
(PROGRESSIVE) .................................. |
29 |
Playing Back the Bonus Group.................. |
30 |
Browsable Still Pictures (B.S.P.)................ |
30 |
Playing Back the Disc in the Desired Order |
|
(Program Playback)............................... |
31 |
Random Playback...................................... |
32 |
Repeat Playback........................................ |
33 |
Status Bar and Menu Bar .................... |
34 |
Using the Status Bar and Menu Bar .......... |
34 |
Playing Back the Designated Part |
|
Repeatedly (A-B Repeat Playback)....... |
35 |
Designate the Time (Time Search)............ |
35 |
1
Playing Back MP3/WMA and JPEG |
|
Discs.................................................. |
36 |
Playback .................................................... |
36 |
Repeat Playback........................................ |
37 |
Preferences ......................................... |
38 |
Basic Operations ....................................... |
38 |
LANGUAGE............................................... |
38 |
PICTURE ................................................... |
38 |
AUDIO ....................................................... |
39 |
OTHERS.................................................... |
39 |
Country/Area Codes ............................ |
40 |
Language Codes ................................. |
41 |
Listening to Cassette Tapes |
|
Listening to Cassette Tapes |
|
.............................................. |
42 |
Listening to Other Equipment |
|
Listening to Other Equipment .............. |
43 |
Adjusting the Sound Input Level from |
|
Other Equipment ................................... |
43 |
Recording Sound |
|
Recording Sound to Cassette Tapes |
|
.............................................. |
44 |
Quitting Recording ..................................... |
45 |
Recording Only One Track from a Disc ..... |
45 |
Recording the Second or Subsequent |
|
Track to the Last Track from a Disc....... |
45 |
Program Recording from a Disc ................ |
45 |
Recording with No Blank Time between |
|
Tracks.................................................... |
45 |
Erasing Recorded Sound from |
|
a Cassette Tape .................................... |
45 |
Convenient Functions |
|
Using the Timers ................................. |
46 |
Sleep Timer ............................................... |
46 |
Recording Timer ........................................ |
47 |
Playback Timer .......................................... |
48 |
Auto Standby ....................................... |
50 |
Disc Ejection Lock ............................... |
50 |
Using AV COMPU LINK ...................... |
51 |
Connection and Setting ............................. |
51 |
Operations ................................................. |
51 |
Reference |
|
Handling Discs/Cassette Tapes .......... |
52 |
Disc Messages .................................... |
53 |
Troubleshooting................................... |
53 |
Specifications ...................................... |
54 |
Introduction
2

Notes on Operation
Suitable Locations for the Main Unit
To minimize the need for servicing and maintain the high quality of this product, do not place the main unit in the following locations:
•In a position subject to high humidity or considerable dust
•On an uneven or unstable surface
•Near a heat source
•Near a computer, fluorescent light or other electric appliance
•In a small room with insufficient ventilation
•In a position exposed to direct sunlight
•In a position exposed to excessive cold
•In a position exposed to strong vibration
•Near a TV, other amplifier, or tuner
•Near a magnetic source
CAUTION
•The operating temperature of this product is 5°C to 35°C. Use in temperatures outside this range may cause a malfunction or damage the product.
Condensation
Under the following conditions, you may not be able to operate this product properly due to condensation formed on the lens of the main unit:
•When you have just started an air conditioner to warm your room
•When you have placed the main unit at an area with high humidity
•When you have moved the main unit from a cold place to a warm place
When condensation forms, leave the main unit turned on, wait for approximately 1 or 2 hours, and then operate the main unit.
Cleaning the Main Unit
When the operation panel becomes dirty, dust it with a soft dry cloth. When the operation panel is very dirty, wipe it with a cloth dampened with a small amount of a neutral detergent, and then wipe it with a soft dry cloth.
CAUTION
•Do not wipe the operation panel with thinners, benzenes or other chemical agents. Do not spray insecticides onto the operation panel. These may cause discoloration and damage to the surface.
Listener's Etiquette
When using headphones, keep the volume at a moderate level so as not to over-stimulate your ears.
■When enjoying sound from the speakers, adjust the volume to a suitable level to avoid disturbing your neighbors.
Even low-volume sound carries a long way, especially at night. Show consideration to your neighbors by closing windows or using headphones.
•Manufactured under license from Dolby Laboratories. "Dolby", "MLP Lossless", and the double-D symbol are trademarks of Dolby Laboratories.
•"DTS" and "DTS 2.0+DIGITAL OUT" are registered trademarks of Digital Theater Systems, Inc.
•This product incorporates copyright protection technology that is protected by method claims of certain U.S. patents and other intellectual property rights owned by Macrovision Corporation and other rights owners. Use of this copyright protection technology must be authorized by Macrovision Corporation, and is intended for home and other limited viewing uses only unless otherwise authorized by Macrovision Corporation. Reverse engineering or disassembly is prohibited.
3
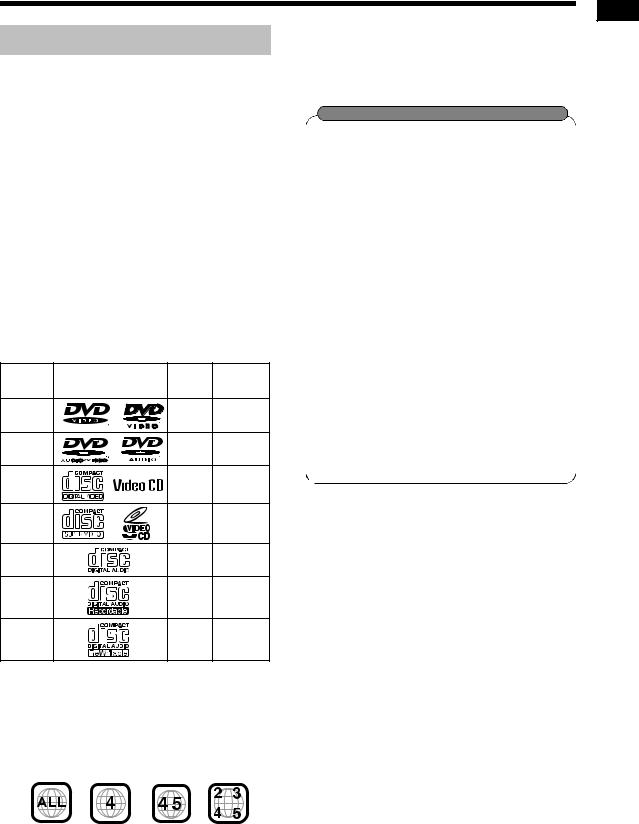
Playable Disc Types
This product has been designed to play back the following discs:
DVD VIDEO, DVD AUDIO, VCD, SVCD, CD This product can also play back the following discs:
•Finalized DVD-R/RW discs recorded in the DVD VIDEO format.
•CD-R/RW discs recorded in the following formats
-Music CDs (finalized discs)
-VCDs
-SVCDs
-MP3/WMA/JPEG discs recorded in ISO 9660 (for details, refer to "About MP3/WMA/JPEG discs") However, some discs may not be played back because of their disc characteristics, recording conditions, or damage or stain on them.
Only sounds can be played back from the following discs:
MIX-MODE CD |
CD-G |
|
||
CD-EXTRA |
|
CD TEXT |
||
Discs you can play: |
|
|
||
Disc Type |
Mark (Logo) |
Video |
Region |
|
Code |
||||
Format |
||||
|
|
Number* |
||
DVD |
|
PAL/ |
4/ALL |
|
VIDEO |
|
NTSC |
||
|
|
|||
DVD |
|
— |
— |
|
AUDIO |
|
|||
|
|
|
||
VCD |
|
PAL/ |
— |
|
|
NTSC |
|||
|
|
|
||
SVCD |
|
PAL/ |
— |
|
|
NTSC |
|||
|
|
|
||
CD |
|
— |
— |
|
CD-R |
|
— |
— |
|
CD-RW |
|
— |
— |
|
DVD Logo is a trademark of DVD Format/Logo Licensing Corporation.
*Note on Region Code
DVD players and DVD VIDEOs have their own region code numbers. This product can only play back a DVD VIDEO recorded with the region code number and video format mentioned above.
Examples:
If a DVD VIDEO with an improper region code number is loaded, "REGION CODE ERROR!" appears on the TV screen and playback cannot start.
•On some DVD VIDEOs, DVD AUDIOs, VCDs or SVCDs, their actual operation may be different from what is explained in this manual. This is due to the disc programming and disc structure, not a malfunction of this product.
About CD-Rs/CD-RWs
You can play back a CD-R/CD-RW only when the disc is finalized.
•You can play back a CD-R/CD-RW which has been recorded in the audio CD format and a CD-R/CD-RW to which audio data (MP3/WMA) or a still picture data (JPEG) file is recorded.
However, playback is impossible in some cases due to the disc characteristics, recording condition, scratches or dirt on the disc, or dirt or condensation on the lens.
•Before using a CD-R/CD-RW, carefully read the cautions regarding the disc.
•This product does not support playback or CD text display of sound files such as MP3s.
•To play back a CD-RW on this product, erase all tracks if the CD-RW was recorded in a format other than the audio CD format. Using the CD-RW without erasing all tracks may result in damage to the speakers or other parts caused by sudden loud volume.
Discs that cannot be played back
•The following discs cannot be played back: DVD-ROM, DVD-RAM, DVD-RW (recorded in VR format), CD-ROM, CD-I (CD-I Ready), Photo CD, SACD, etc.
Playing back these discs will generate noise and damage the speakers.
•Damaged discs and discs in an extraordinary shape (other than a disc of 12 cm or 8 cm in diameter) cannot be played back.
•JVC do not guarantee the operation and sound quality of discs not authorized by CD-DA, which is a CD specification.
Before playback, confirm that the disc complies with this CD specification by checking the marks and reading notes printed on the package.
Introduction
4
(Continued)
Notes on Operation
About MP3/WMA/JPEG discs
Playable MP3/WMA/JPEG discs and files
•Discs recorded in the ISO 9660 format are playable (except discs recorded in the "packet write" format (UDF format)).
•Discs recorded in the multi-session format are also playable.
•Files with an extension of ".mp3", ".wma", ".jpg" or ".jpeg" (extensions with uppercase and lowercase letters mixed are also acceptable) are playable.
Notes on MP3/WMA/JPEG discs and files
•A disc may not be played back, or reading it may take a long time depending on its recording conditions or properties.
•The time needed for reading varies with the number of groups or tracks (files) recorded on the disc.
•If a character other than single byte English characters is used in the file name of an MP3/ WMA/JPEG file, the track/file name will not be displayed correctly.
•The order of tracks/groups displayed on the MP3/WMA Control screen, and the order of files/ groups displayed on the JPEG Control screen may be different from that of files/folders displayed on PC's monitor screen.
•In the case of MP3/WMA discs, since groups/ tracks are played back in alphabetical order, an off-the-shelf MP3/WMA disc may be played back in an order different from that indicated on the label attached to the disc.
•Playing back an MP3/WMA file including a still image may take a long time. The elapsed time is not displayed until playing back starts. If playing back starts, the elapsed time may not be displayed correctly.
•For an MP3/WMA file, a disc with a sampling frequency of 44.1 kHz and transmission rate of 128 kbps is recommended.
•This product is not compatible with MP3i or MP3PRO.
•This product can play back a baseline JPEG file, excluding monochromatic JPEG files.
•This product can play back JPEG data taken with a digital camera conforming to the DCF (Design Rule for Camera File System) standard (when a function is applied such as the automatic rotation function of a digital camera, data goes beyond the DCF standard, so the image may not be displayed).
•If data has been processed, edited and restored with PC image editing software, the data may not be displayed.
•This product cannot play back animations such as MOTION JPEG, or still pictures (TIFF etc.) other than JPEG, and image data with sound.
•The resolution of 640 x 480 pixels is recommended for JPEG files. If a file has been recorded at a resolution of more than 640 x 480 pixels, display may take a long time. An image with a resolution of more than 8 192 x 7 680 pixels cannot be displayed.
•Files recorded on DVD-R/RW discs cannot be played back.
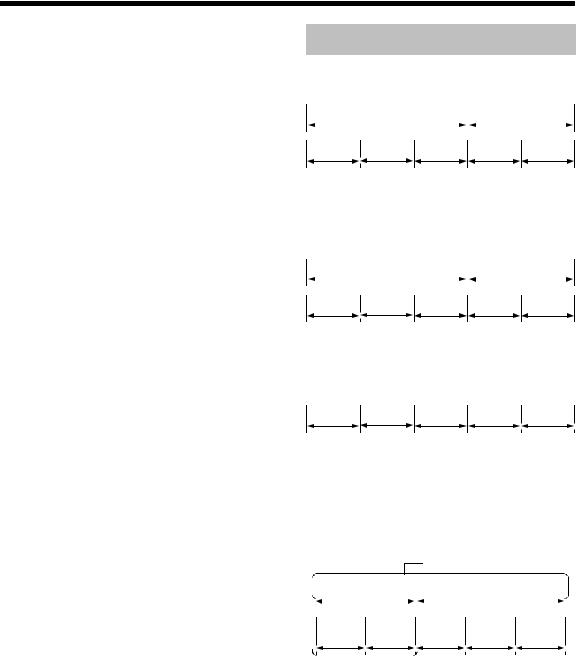
Disc Structure
DVD VIDEO
A DVD VIDEO consists of "titles" and each title may be divided into "chapters".
Title 1 |
|
Title 2 |
|
|
|
|
|
|
|
|
|
Chapter 1 |
Chapter 2 |
Chapter 3 |
Chapter 1 |
Chapter 2 |
DVD AUDIO
A DVD AUDIO consists of "groups" and each group may be divided into "tracks".
Some discs include a "bonus group" that requires a password for playing ( page 30).
Group 1 |
|
Group 2 |
|
|
|
|
|
|
|
|
|
Track 1 |
Track 2 |
Track 3 |
Track 1 |
Track 2 |
VCD/SVCD/CD
VCD, SVCD and CD consist of "tracks".
In general, each track has its own track number. (On some discs, each track may also be further divided by indexes.)
Track 1 |
Track 2 |
Track 3 |
Track 4 |
Track 5 |
MP3/WMA [JPEG] discs
On an MP3/WMA [JPEG] disc, each still picture (material) is recorded as a track [file]. Tracks [Files] are usually grouped into a folder. Folders can also include other folders, creating hierarchical folder layers.
This unit simplifies the hierarchical construction of a disc and manages folders by "groups".
Up to 99 groups
|
|
Group 1 |
|
Group 2 |
|
||
|
|
|
|
|
|
|
|
|
|
|
|
|
|
|
|
Track 1 |
Track 2 |
Group 3 |
Group 4 |
Group 5 |
|
[File 1] |
[File 2] |
||||
|
|
|
 Up to 150 files
This product can recognize up to 1 000 tracks [files] in a disc. Also, the product can recognize up to 150 tracks [files] per group and up to 99 groups in a disc. Since the unit ignores the tracks [files] whose numbers are exceeding 150 and the groups whose numbers are exceeding 99, they cannot be played back.
•If there is any type of files other than MP3/WMA [JPEG] files in a disc, those tracks [files] are also counted in the total file number.
5
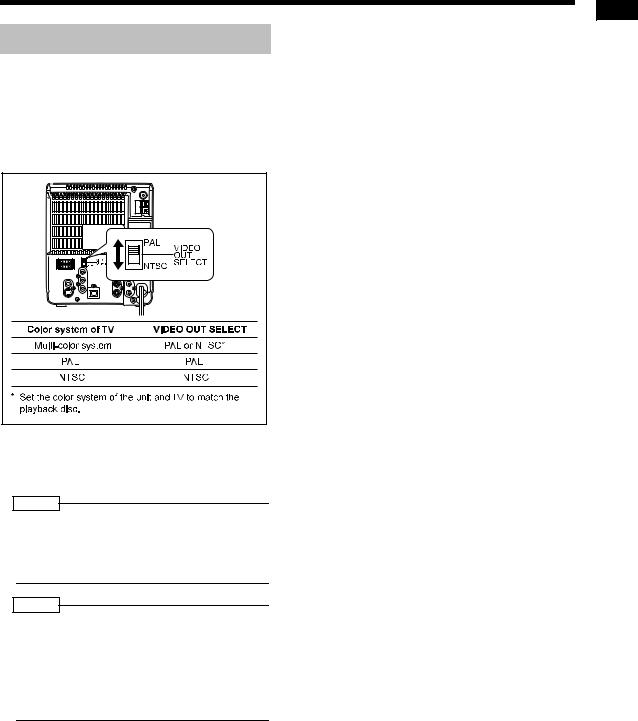
Selecting the Color System
This product is compatible with PAL and NTSC color systems.
In standby mode, select PAL or NTSC to match your TV.
If the VIDEO OUT SELECT switch is switched over when the power is on, turn off the power, and then turn it on again.
•Before playing back a disc, it is also required to select the correct MONITOR TYPE in the PICTURE menu according to the aspect ratio of your TV ( page 38).
NOTE
•If you play back an NTSC disc with this setting set to "PAL", you can watch the playback pictures (the disc will be reproduced using "PAL 60" format), but the TV screen may rolls over upward and downward rapidly.
NOTE
•If you play back a PAL disc with this setting set to "NTSC", you can watch the playback pictures, but the following symptoms may occur:
•The items on the disc menu will be blurred, and be shown slightly shifted when highlighted.
•The aspect ratio of the picture may differ from the original aspect ratio.
•The picture movement is not smooth.
Introduction
6
Special Cautions
Notes on Handling
■Important cautions
Installation of the system
•Select a place which is level, dry and neither too hot nor too cold; between 5°C and 35°C.
•Leave sufficient distance between the system and the TV.
•Do not use the system in a place subject to vibration.
Power cord
•Do not handle the power cord with wet hands!
•A small amount of power is always consumed while the power cord is connected to the wall outlet.
•When unplugging the power cord from the wall outlet, always pull on the plug, not the power cord.
To prevent malfunctions of the system
•There are no user-serviceable parts inside. If anything goes wrong, unplug the power cord and consult your dealer.
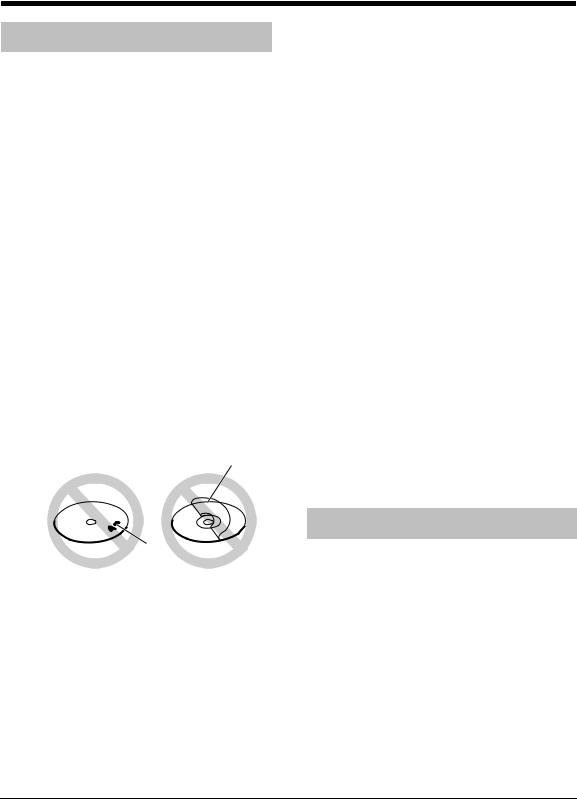
•Do not insert any metallic object into the system.
•Do not use any non-standard shape disc (like a heart, flower or credit card, etc.) available on the market, because it may damage the system.
•Do not use a disc with tape, stickers, or paste on it, because it may damage the system.
Label sticker
Sticker


Paste
Note about copyright laws
Check the copyright laws in your country before recording from CDs. Recording of copyrighted material may infringe copyright laws.
■Safety precautions
Avoid moisture, water and dust
Do not place the system in moist or dusty places.
Avoid high temperatures
Do not expose the system to direct sunlight and do not place it near a heating equipment.
When you are away
When away on travel or for other reasons for an extended period of time, disconnect the power cord plug from the wall outlet.
Do not block the vents
Blocking the vents may damage the system.
Care of the cabinet
When cleaning the system, use a soft cloth and follow the relevant instructions on the use of chemi- cally-coated cloths. Do not use benzene, thinner or other organic solvents including disinfectants. These may cause deformation or discoloring.
If water gets inside the system
Turn the system off and disconnect the power cord plug from the wall outlet, then call the store where you made your purchase. Using the system in this condition may cause fire or electrical shock.
■When condensation or water drops adhere to the lens
In any of the following cases, condensation or water drops may adhere to the lens to prevent the system from working properly:
•Immediately after roomheating starts
•When the system is installed in a steamy or damp space
•When the system is suddenly moved from a cold
place to a warm space
In any of these cases, leave the system turned on for 1 or 2 hours before use.
Supplied Accessories
Check to be sure you have all of the supplied accessories.
The number in parentheses is the quantity of the pieces supplied. If anything is missing, contact your dealer immediately.
Remote control (1)
Batteries (2)
FM antenna (1)
AM loop antenna (1)
Video cord (1)
•This product incorporates copyright protection technology that is protected by method claims of certain U.S. patents and other intellectual property rights owned by Macrovision Corporation and other rights owners. Use of this copyright protection technology must be authorized by Macrovision Corporation, and is intended for home and other limited viewing uses only unless otherwise authorized by Macrovision Corporation. Reverse engineering or disassembly is prohibited.
7
Part Description The numbers refer to the pages in which the parts are explained.
|
18 |
|
Introcution/Preparation |
|
|
|
|
20 |
|
|
|
21 |
|
|
|
22 |
|
17 |
|
|
|
|
|
42, 44 |
|
28 |
|
|
|
|
30 |
46-49 17 |
50 |
31-33 |
21 20
42 43
Cassette holder: 42
 PUSH-OPEN
17 |
|
44 |
15, 18 |
|
28 |
|
|
21 |
Remote control sensor: 9 |
|
17 |
|
|
* |
25, 30, 37, 45 |
24, 42 |
Disc tray: 21 |
*This terminal is for connecting a pair of headphones equipped with a stereo mini plug (not supplied). While the headphones are connected, the speakers do not produce any sound.
8

Remote Control The numbers refer to the pages in which the parts are explained.
|
28 |
17 |
|
|
|
17 |
17 |
|
|
18 |
17 |
10 |
43 |
|
18 |
10 |
|||
21 |
42 |
|||
24 |
20 |
|||
10 |
17 |
|||
|
|
|||
|
10 |
|
10, 16 |
Inserting Batteries into the Remote Control
24, 42 |
|
24, 42, |
|
24, 42, |
|||
47-49 |
|||
25, 30,47-49 |
|||
24, 25, 42 |
|||
37, 45 |
25 |
25 |
|
22, 25-28, |
22, 25-28, |
|||
30 |
|
|||
|
|
30 |
|
|
|
38 |
34 |
|
|
46 |
|
50 |
||
16, 47 |
|
|
||
|
16 |
|
|
|
|
23 |
16, 20, 25, |
||
20, 47-49 |
31, 35 |
|
||
|
32 |
42, 44 |
|
|
20, 31 |
|
|||
|
|
33 |
|
|
17 |
|
|
17 |
|
27 |
26 |
27 |
27 |
|
23 |
28, 29 |
|||
30 |
29 |
|||
|
|
|||
R6P (SUM-3) /AA (15F) type dry-cell batteries (2)
CAUTION
•Do not use a used battery and a new battery together.
•Do not use different types of batteries at the same time.
•Take out the batteries if the remote control is not to be used for a long time. Otherwise it may cause a leakage.
|
Remote control operation |
Opening the cover |
• When operating the remote control, point it at |
the front panel of the main unit. |
• The effective distance between the remote control and the remote control sensor on the main unit is approximately 5 m maximum.
• When the effective distance decreases, replace the batteries.
• Do not drop the remote control or subject it to excessive shock.
9
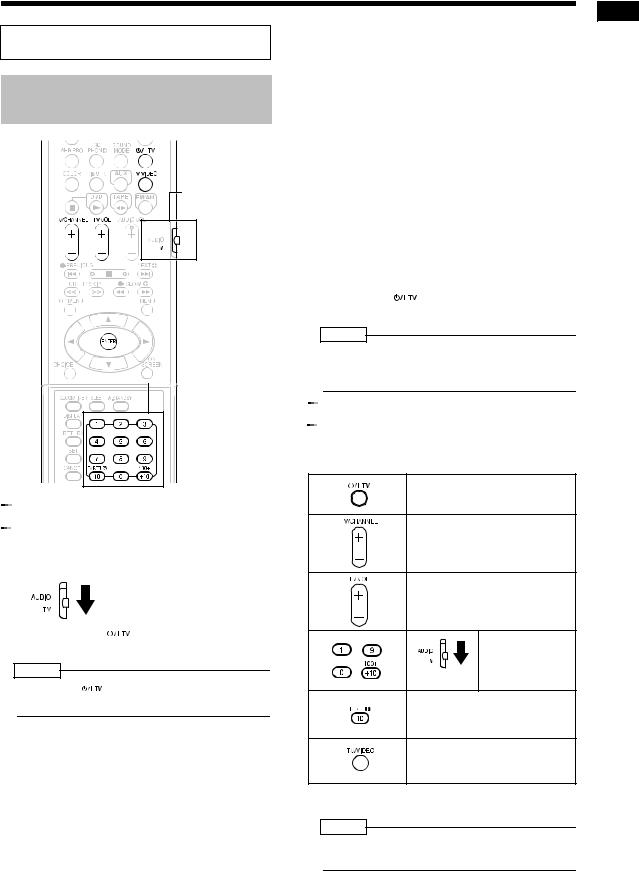
This page is for when operating your TV using the remote control of this product.
Operating the TV Using the
Remote Control
Remote control mode selector
 Number buttons


 Setting the manufacturer's code
1 Slide the remote control mode selector to the TV side.
2 Hold down  .
.
NOTE
• Hold down  until step 4 is completed.
3 Press  and release.
4 Press number buttons (1-9, 0).
Examples:
For a Hitachi TV: Press 1, then 0. For a Toshiba TV: Press 0, then 8.
If there are two or more manufacturer's codes, try them in turn and select the one that causes the product to work properly.
Manufacturer |
Code |
Manufacturer |
Code |
|
|
|
|
JVC |
01 |
Samsung |
12 |
|
|
|
|
Hitachi |
10 |
Sanyo |
13 |
|
|
|
|
Magnavox |
02 |
Sharp |
06 |
|
|
|
|
Mitsubishi |
03 |
Sony |
07 |
|
|
|
|
Panasonic |
04, 11 |
Toshiba |
08 |
|
|
|
|
Philips |
14 |
Zenith |
09 |
|
|
|
|
RCA |
05 |
|
|
|
|
|
|
5 Release  .
.
NOTE
•The manufacturer's codes may be changed without notice. You may not be able to operate a TV produced by the manufacturer shown above.


 For TV operation
Operate the remote control by pointing it towards the TV.
|
Turn on/off the power. |
|
|
Change channels. |
|
|
Adjust volume. |
|
- |
/ |
|
/ |
Select channels. |
|
*1 |
||
|
||
|
Change between the previously |
|
|
selected channel and the cur- |
|
|
rent channel. |
|
|
Change between TV and video |
|
|
input. |
*1 Make sure to slide the remote control mode selector to the TV side in advance.
NOTE
•When the batteries are replaced, perform the manufacturer's code setting again.
Preparation
10
Connections |
Connect all necessary parts before connecting the power plug. |
|
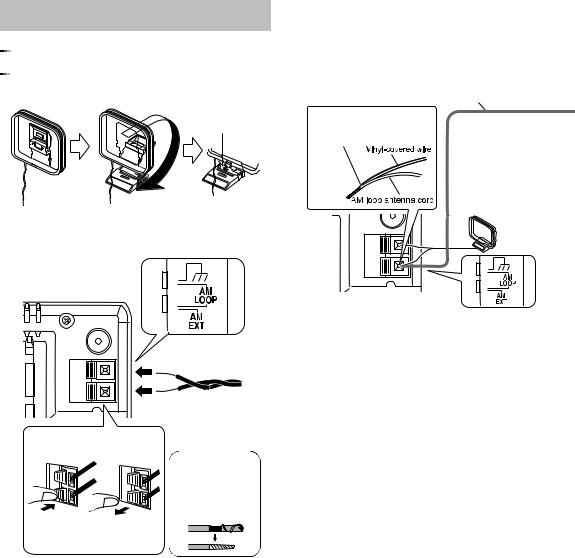
Connecting the Antennas


 Connecting the AM antenna
1 Set up the AM antenna (supplied).
Insert the tab into the slot.
■When radio reception with the supplied AM loop antenna is poor
Vinyl-covered wire: 3 - 5 m (not supplied)
Twist together vinylcovered wire and the AM loop antenna cord.
Stretch out the vinylcovered wire horizontally, preferably in a high place such as above a window or outdoors.
Connect the AM loop antenna cord to the main unit together with the vinyl-covered wire.
2 Connect the antenna cord.
Main unit (side view)
Main unit (rear view)
Main unit (rear view)
Connecting the antenna cord
When insulation covers the tips of the antenna cord,
twist and pull off
the insulation.
Connect the ends of the antenna cord as shown above.
3 Turn the AM loop antenna to find
the best position for radio reception.
Place the AM loop antenna as far from the main unit as possible.
•Do not place the AM loop antenna on a metallic table or close to a TV, computer, or other electric appliances. Doing so may affect radio reception.
When positioning the antennas, find the best position for reception while listening to an actual radio program (refer to "Listening to Radio Broadcasts" ( page 19)).
11
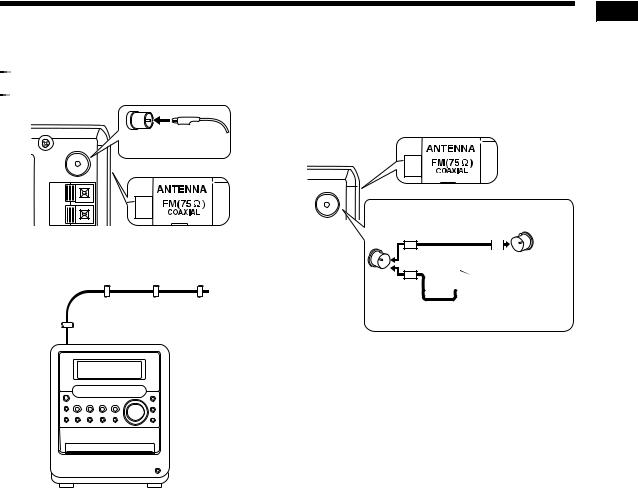


 Connecting the FM antenna
Main unit (rear view)
FM antenna  (supplied)
Main unit (side view)
Stretch out the FM antenna to the best position for radio reception, and then fix it with adhesive tape.
■When radio reception with the supplied FM antenna is poor, or when using a communal antenna
Main unit (side view)
Main unit (rear view)
Communal Antenna cord antenna terminal (not supplied)
or
Outdoor FM antenna  (not supplied)
 Coaxial cable (not supplied)
When using an antenna other than those supplied with this product, refer to the operation manuals for the antenna for details of connection.
Preparation
When positioning the antennas, find the best position for reception while listening to an actual radio program (refer to "Listening to Radio Broadcasts" ( page 19)).
12
(Continued) |
Connect all necessary parts before connecting the power plug. |
|
Connections |
||
|
||
|
|
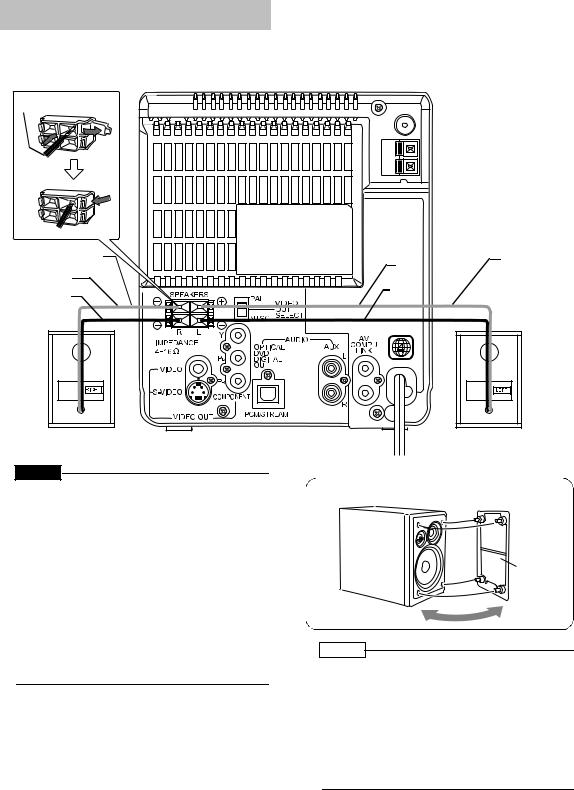
Connecting the Speakers
Main unit (rear view)
Speaker cord
Speaker cord
Red
Black
Right speaker (rear view)
CAUTION
•Do not short-circuit the  and
and  speaker terminals. Doing so may damage the speakers.
•Do not connect other speakers together with the supplied speakers. The change in impedance may damage the main unit and the speakers.
•The speakers of this product are magnetically shielded, but color irregularities may occur on the TV depending on how the speakers are installed. Keep in mind the following.
1.Turn off the main power of your TV before installing the speakers. Wait for about 30 minutes before turning on the TV again.
2.If color irregularity occurs in pictures, keep a distance of more than 10 cm between the TV and the speakers.
After connecting the speakers, gently pull on the speaker cords to make sure the cords are firmly connected and do not pull out.
Red |
Speaker cord |
|
|
Black |
|
Left speaker (rear view)
NOTE
•Improper speaker cord connection spoils the stereo effect and sound quality.
•The impedance of speakers connected to this product must be within the range of 4 Ω to 16 Ω.
•Cooling fan is built into the main unit for emitting generated heat. When you turn on the main unit, the internal cooling fan automatically starts rotating. To ensure sufficient cooling, leave a space of more than 1 cm between the main unit and the speakers or other objects.
13
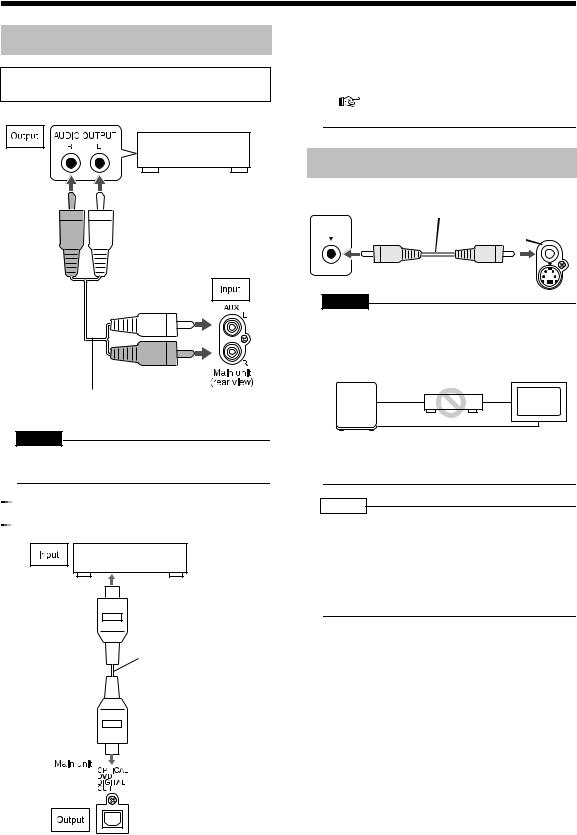
Connecting Other Equipment
Read this section when connecting other audio equipment to this product.
Other audio equipment
Audio cord (not supplied)
CAUTION
•Before connecting other equipment, turn off both the main unit and the equipment.


 Connecting with digital equipment
AV amplifier with a built-in decoder (not supplied)
To an optical digital input terminal
Optical digital cable (not supplied)
|
|
|
|
|
|
|
|
|
|
|
|
CAUTION |
|
|
Preparation |
||
|
|||||
• For details of signals to be output, refer to page 39. |
|||||
|
|||||
• If connecting the main unit to equipment that has |
|
||||
the function of a Dolby Digital decoder, the set- |
|
||||
ting in "D. RANGE COMPRESSION" of "AUDIO" |
|
||||
( |
page 39) will be invalid regarding sound |
|
|||
from the digital audio output of the main unit.
Connecting with a TV
TV |
Supplied video cord |
VIDEO IN |
Main unit |
|
VIDEO |
CAUTION
•Connect the main unit directly with a TV (or a monitor) without routing through a VCR. Otherwise it may cause picture distortion while playing back. (Such picture distortion is caused by a copy protection system, and thus it is not a malfunction.)
Main unit |
VCR |
TV |
(or monitor) |
Connecting directly
Also, if the main unit is connected to a TV with a built-in VCR, there may be picture distortion during playback.
NOTE
•Please check that the setting for VIDEO OUT SELECT (PAL/NTSC) on the rear panel of the main unit and the color system on your TV set are the
same. ( page 6)
You need to set "MONITOR TYPE" in the "PICTURE" menu correctly according to the aspect
ratio of your TV. ( page 38)
14
(Continued) |
Connect all necessary parts before connecting the power plug. |
|
Connections |
||
|
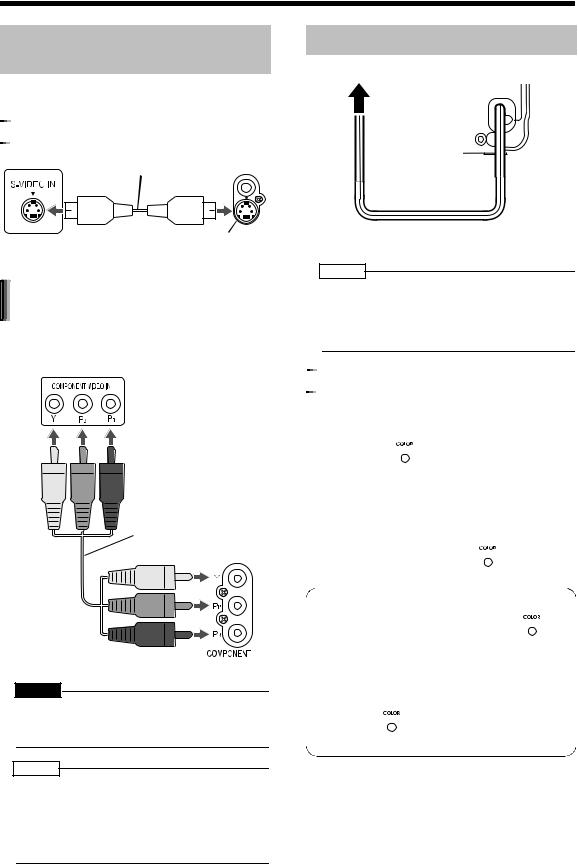
When a Clearer Picture Is
Desired
You can enjoy pictures of better quality using the following cord instead of the supplied video cord.


 Connecting by using the S-video cord
TV |
S-video cord |
Main unit |
|
(not supplied) |
|||
|
Connect the ends of S-video cord making S-VIDEO sure that each end matches its compatible
terminal.
Connecting by using the component video cord
You can enjoy better quality pictures than when using the S-video cord.
TV
Component video cord (not supplied)
Main unit
CAUTION
•Use one of either the S-video cord or the component video cord. If both cords are used, pictures may not be played back properly.
NOTE
•In order to enjoy pictures with the progressive
mode ( page 29), the TV is required to have progressive video input.
•If the component video input jacks of your TV are BNC type, use a plug adapter (not supplied) to convert the plugs.
Connecting the Power Plug
AC outlet |
Main unit (rear view) |
•After making all other necessary connections, connect in the power plug.
NOTE
•The preset setting such as preset channels and sound adjustment may be erased in a few days in the following cases:
-When you disconnect the power plug.
-When a power failure occurs.


 Demonstration display function
When you connect the power plug into the AC outlet, "DEMO START!" appears in the display window and the demonstration display starts.
When you press 
 on the main unit, "DEMO
OFF" appears in the display window and the demonstration display is canceled.
Turning on the main unit automatically cancels the demonstration display.
Resuming the demonstration display
With the power turned off, press 
 on the main unit.
Hiding the demonstration display
With the power turned off, hold down 

until "DEMO CLEAR" appears. Disconnecting and then reconnecting the power plug does not start the demonstration display.
To activate the demonstration display again,
hold down 
 until "DEMO START!" appears.
15
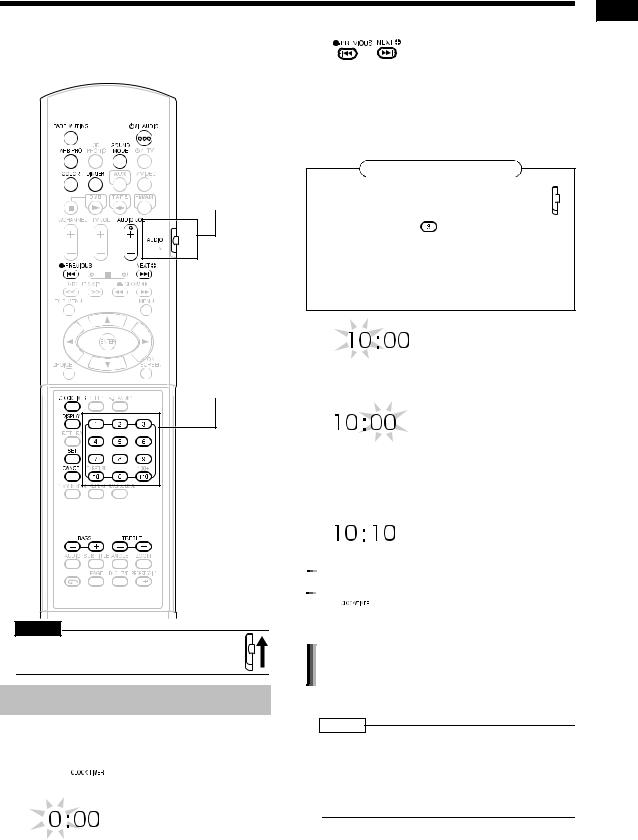
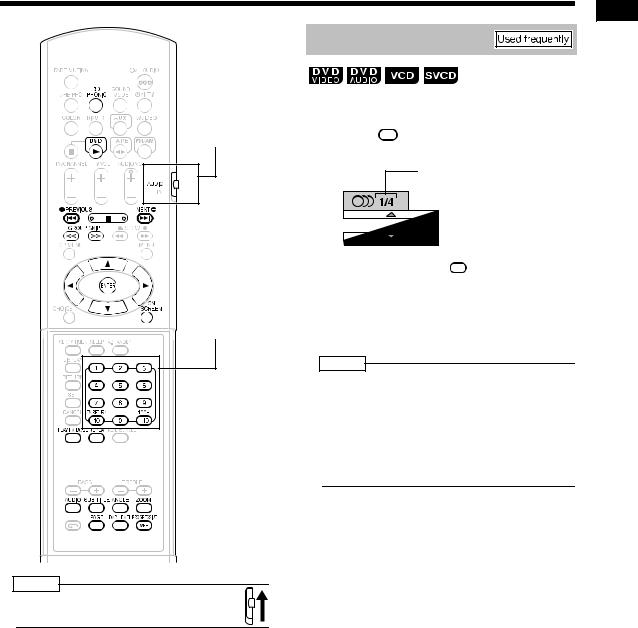
Basic Operations
This manual explains the operations assuming that you will use the remote control. Some buttons on the main unit are the same as those on the remote control. You can use either button in this case.
Remote control mode selector
Number buttons
CAUTION
•Set the remote control mode selector to 
 AUDIO before using the number buttons.
Setting the Clock
You can set the clock while the main unit is turned either on or off.
Example: To set the clock to 10:10 a.m.
1 Press  .
.
2 Set the hour.
Back Next
•Holding down the button causes the hour to increment.
•You can use the number buttons to specify the hour.
Refer to "Using the number buttons" shown below.
Using the number buttons
Set the remote control mode selector to  AUDIO before using the number buttons.


Examples: 3:
13:  →
→ 20:
20:  →
→ 23:
23:  →
→ →
→
3 Press  .
.
• To return to step 2, press 

 .
.
4 Set the minute in the same manner as steps 2 and 3.


 Adjusting the clock
Press  four times to display the clock, and then adjust the clock starting from step 2.
Displaying the clock while using the main unit
Press 

 repeatedly.
NOTE
•The time display on the main unit is a 24-hour clock.
•The clock will gain or lose approximately 1 minute per month.
•Set the clock again after you have disconnected the power plug or a power cut has occurred.
Preparation/Basic Operations
16
(Continued) Basic Operations
Turning On/Off the Main Unit
Press  (or
(or  on the main unit).
•With the power off, pressing either button also turns on the main unit. The function assigned to the button starts working at the same time.
Remote control: 


Main unit:
NOTE
•Cooling fan is built into the main unit for emitting generated heat. When you turn on the main unit, the internal cooling fan automatically starts rotating.
Adjusting the Volume
Press .
•You can also adjust the volume by turning the VOLUME control on the main unit.
NOTE
•You can adjust the volume within the range of 0 to 40.
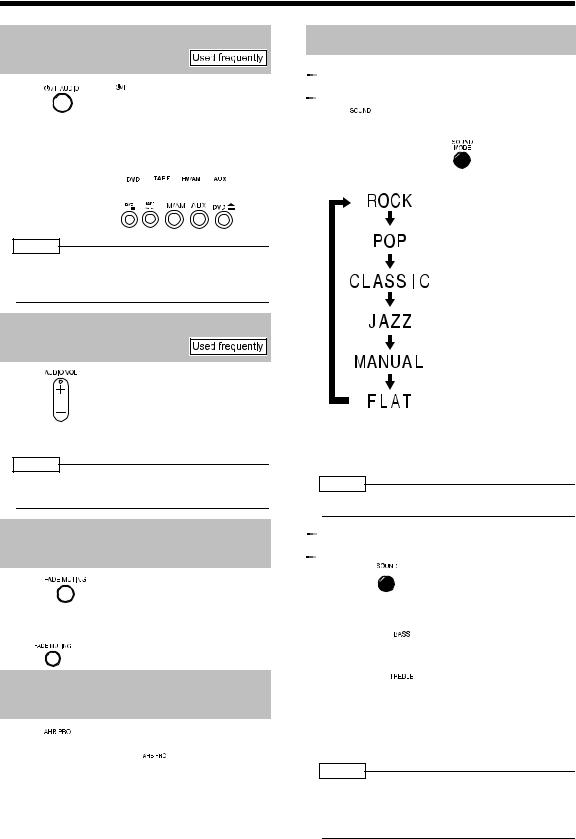
Adjusting the Sound Quality


 Selecting the sound mode
Press  .
.
•Each time you press  , the display toggles as follows.
:For emphasizing treble and bass sounds.
:Adequate for songs and narrations.
:For emphasizing treble sound.
: For uplifting a feeling of being at a live performance.
: For adjusting treble and bass sounds of your choice (shown below).
:Cancels the sound mode (initial setting).
•While the sound mode is set to an item other
than "FLAT", 


 is displayed in the display window.
NOTE
• This function does not affect recording sound.
Temporarily Turning Off the
Sound (FADE MUTING)
Press .
•"FADE MUTING" appears and the volume reduces to "0".
•To return to the previous volume, press
again.
Emphasizing Heavy Bass
Sound (AHB PRO)
Press  .
.
•Each time you press  , AHB PRO function toggles between "ON" and "OFF".
•While AHB PRO function is activated,
 is displayed in the display window.
•"AHB PRO" stands for "Active Hyper Bass PRO".


 Adjusting bass/treble sound
1 Press 
 repeatedly to display "MANUAL".
2 For adjusting bass sound;
Press 
 .
.
For adjusting treble sound; Press 
 .
.
•You can adjust the sound quality within the range of -5 to +5.
•The display returns to the sound source display in a few seconds.
NOTE
•While the sound mode is set to an item other than "MANUAL", "NO OPERATE" is displayed in the display window and you cannot adjust bass/treble sound.
17
For the locations of remote control buttons, refer to page 16.
Changing the Color Patterns for the Display Window and Disc Tray
Press  (or
(or 
 on the main unit).
•Each time you press  , the display toggles as follows.
:For a rainbow-like pattern.
:For a flower-image pattern.
:Gradually changes the color pattern in a cycle of approximately 20 seconds.
:For an ocean-image pattern.
: For a fantasy pattern.
: For the color of your choice. (The setting shown on the left is initial setting.)
Setting your favorite color for the display window and disc tray
1 Press repeatedly to display "MANUAL".
2 Press 


 or
or 


 to select a component color.
•Numerical value of the selected component color flashes.
3 Press |
to adjust the intensity |
of the component color.
•You can also adjust the color intensity by turning the VOLUME control on the main unit.
•You can adjust the color intensity within the range of "0" to "3".
You cannot set all three component colors (red, green, and blue) to "0" at the same time.
NOTE
•After you have adjusted each component color, the display returns to the sound source display in approximately 8 seconds.
•You cannot set different colors for the display window and disc tray.
•When you operate a button on the main unit or remote control, the display window and disc tray light in pale blue for approximately 2 seconds.
•When recording finishes, the color of the display window and disc tray switches to the color set in "MANUAL" to inform you that recording has finished. (With an item other than "MANUAL" selected)
When you operate the main unit after recording finishes, the color pattern for the display window and disc tray returns to the selected pattern.
Changing the brightness of the display window and disc tray (DIMMER)
Press |
|
|
. |
|
|
|
||
|
• Each time you press |
|
, the display toggles |
|||||
|
|
|||||||
|
as follows. |
|
|
|
||||
|
|
|
|
|
|
: Color pattern becomes |
||
|
|
|
|
|
|
|||
|
|
|
|
|
|
|
dimmer. |
|
|
|
|
|
|
|
|
||
|
|
|
|
|
|
: Color pattern |
||
|
|
|
|
|
|
|||
|
|
|
|
|
|
|
becomes darker, and |
|
|
|
|
|
|
|
|
switches to blue. |
|
|
|
|
|
|
|
: DIMMER 2 is automat- |
||
|
|
|
|
|
|
|||
|
|
|
|
|
|
|
ically selected during |
|
|
|
|
|
|
|
|
||
|
|
|
|
|
|
|
video playback, and is |
|
|
|
|
|
|
|
|
canceled when the |
|
|
|
|
|
|
|
|
playback stops. |
|
|
|
|
|
|
|
: Cancels the brightness |
||
|
|
|
|
|
|
|
adjustment |
|
|
|
|
|
|
|
|
(initial setting). |
|
|
|
|
|
|
|
|
|
|
|
NOTE |
|
|
|
|
|||
|
|
|
|
|||||
•Once you press  to change the color pattern, the brightness returns to the initial setting. (except for DIMMER AUTO)
•When you turn off the main unit, the brightness also returns to the initial setting.
•You cannot turn off the color pattern.
Basic Operations
18
Listening to Radio Broadcasts
This product can receive FM and AM radio broadcasts.
Remote control mode selector
Number buttons
CAUTION
•Set the remote control mode selector to 
 AUDIO before using the number buttons.
Setting the AM Tuner Spacing
Some countries space AM stations 9 kHz apart, and other countries use 10 kHz spacing.
On the main unit ONLY:
■When the main unit is turned off
To select 10 kHz spacing, while holding down 
on the main unit, press  on the main unit to turn
on the power. "AM 10 kHz" appears in the display window.
To select 9 kHz spacing, while holding down  on
on
the main unit, press  on the main unit to turn on
the power. "AM 9 kHz" appears in the display window.
NOTE
•If the spacing is switched, the memory in which the radio stations were stored will be erased.
19

Selecting a Radio Station
1 Press  repeatedly to select "FM" or "AM".
Example: Display while an FM radio broadcast is received
Stereo indicator Preset number ( |
on the right) |
Frequency
2 Press 

 or
or 
 repeatedly to select a radio station (frequency).
•You can also select a radio station using the automatic tuning.
Automatic tuning:
Hold down

 or
or
 until the fre-
quency starts changing, and then release the button.
When the main unit has received a broadcast, the frequency automatically stops changing.
To quit the function while searching for a broadcast, press

 or
or .
.
•When the main unit has received an FM stereo broadcast, "STEREO" lights up.
NOTE
•If an FM stereo broadcast is difficult to hear because of noise, you may be able to hear more easily by pressing 


 to switch the sound to monaural reception. In this case, "MONO" lights up. To return the sound to stereo reception, press


 again or select another FM radio station.
•This product is not compatible with AM stereo broadcasts.
Storing Radio Stations (Preset)
You can store up to 30 FM radio stations and up to 15 AM radio stations.
■While the broadcast from the radio station you want to preset is being received
1 Set the remote control mode selector to AUDIO.
2 Press  .
.
•The preset number flashes for approximately 5 seconds.
3 While the preset number is flashing, press the number buttons (
- 


 or
or  ) to select the preset number you want to use.
•Refer to "Using the number buttons" ( page 16).
4 While the selected number is flashing, press  .
.
•"STORED" appears and the selected radio station is stored.
NOTE
•When you store a radio station to a preset number to which another radio station has previously been stored, the newly set radio station replaces the previously stored radio station.
Tuning In to a Preset Radio Station
■While an FM or AM broadcast is being received
1 Set the remote control mode selector to AUDIO.
2 Use the number buttons to select
the preset number of the radio station to which you want to tune in.
•Refer to "Using the number buttons" ( page 16).
Listening to Radio Broadcasts
20
Basic Operations of the DVD Player
How to read this manual
•Operations are described by mainly using the remote control buttons. If there are the same marks on the main unit, the buttons on the main unit can also be used.
•The following marks tell you for which type of the discs the operation can be made.
•The illustrations and TV screens may be different between the actual case and the description.
•"VCD" stands for "Video CD".
•"SVCD" stands for "Super Video CD".
Remote control mode selector
Number buttons
NOTE
•Set the remote control mode selector to 
 AUDIO before using the number buttons.
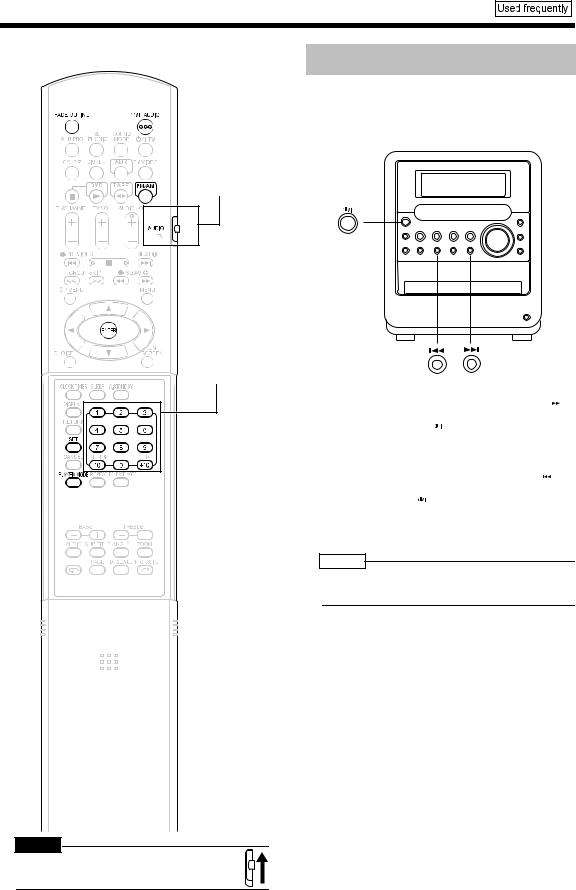
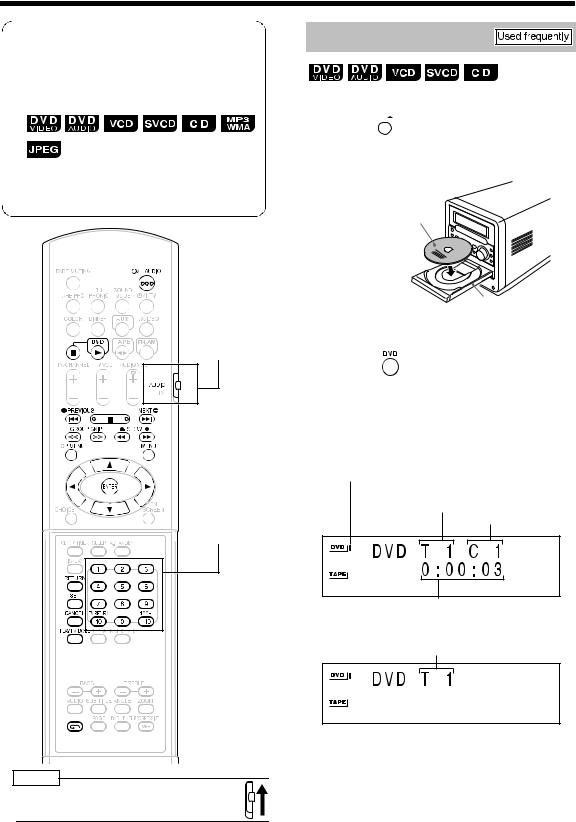
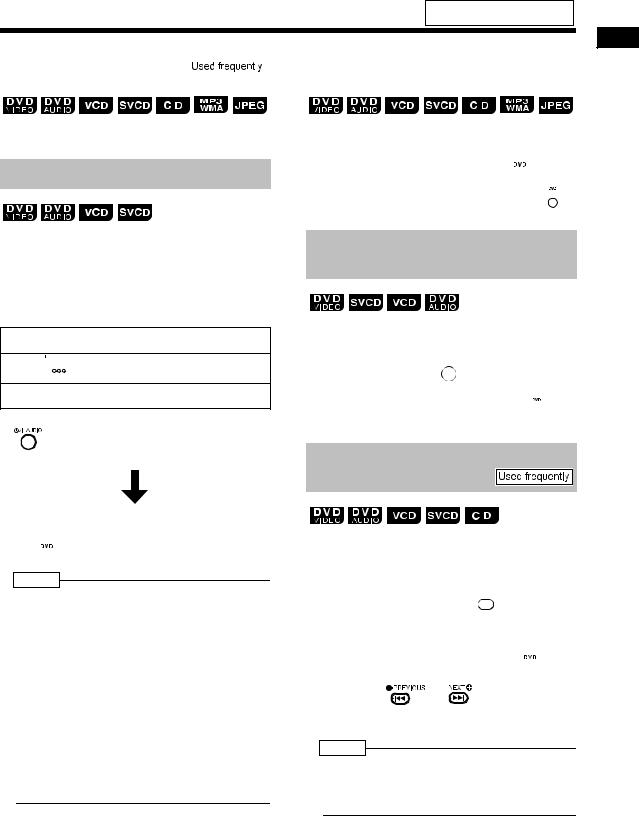
Playback
(Refer to page 36 for playing back MP3/WMA and JPEG.)
1 Press 
 on the main unit.
• The disc tray comes out.
2 Place a disc on the disc tray.
Letter-printed surface
Disc tray
•When you want to listen to an 8 cm disc, place it on the inner hollow of the disc tray.
3 Press  .
.
■Display for DVD VIDEO
Display while a DVD VIDEO is being played back:
DVD indicator
(The DVD indicator lights up while the DVD VIDEO is stopped. The DVD indicator flashes while the DVD VIDEO is being played back or paused.)
Title number
Chapter number
Elapsed playing time
Display while the DVD VIDEO is stopped:
Total number of titles
21
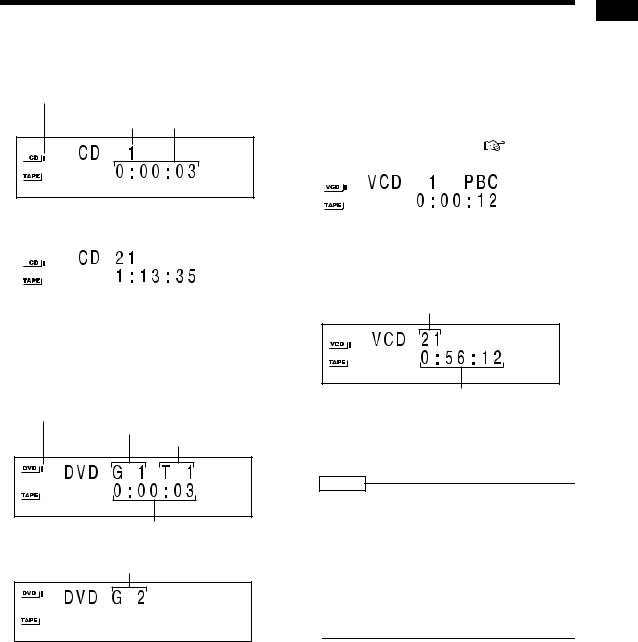
■Display for CD
Display while a CD is being played back:
CD indicator
(The CD indicator lights up while the CD is stopped. The CD indicator flashes while the CD is being played back or paused.)
Track number Elapsed playing time
Display while the CD is stopped:
Total number of tracks |
Total playing time |
||||||||
|
|
|
|
|
|
|
|
|
|
|
|
|
|
|
|
|
|
|
|
|
|
|
|
|
|
|
|
|
|
|
|
|
|
|
|
|
|
|
|
|
|
|
|
|
|
|
|
|
|
■Display for DVD AUDIO
Display while a DVD AUDIO is being played back:
DVD indicator
(The DVD indicator lights up while the DVD AUDIO is stopped. The DVD indicator flashes while the DVD AUDIO is being played back or paused.)
Group number
Track number
Elapsed playing time
Display while the DVD AUDIO is stopped:
Total number of groups
•"G1" and "T1" will appear after the total number of groups is displayed.
■Display for VCD/SVCD
Display while a VCD/SVCD is being played back:
VCD indicator
(The VCD indicator lights up while the VCD/SVCD is stopped. The VCD indicator flashes while the VCD/SVCD is being played back or paused.)
|
Track number |
|
PBC indicator |
|||||
|
( |
page 23) |
||||||
|
|
|
|
|
||||
|
|
|
|
|
|
|
|
|
|
|
|
|
|
|
|
|
|
|
|
|
|
|
|
|
|
|
|
|
|
|
|
|
|
|
|
|
|
|
|
|
|
|
|
|
|
|
|
|
|
|
|
|
|
|
|
|
|
|
|
|
|
|
|
|
|
|
|
|
|
|
|
Elapsed playing time
•PBC indicator is displayed while PBC is activated.
Display while the VCD/SVCD is stopped:
Total number of tracks (*1, *2)
Total playing time
*1 "1" will appear after the total number of tracks is displayed.
*2 "PBC" will appear when the disc is PBCcompatible.
NOTE
•The menu may appear in the display window after DVD playback starts. In such a case, select the desired menu item by using the following buttons on the remote control.
•Select a menu item with  ,
,  or
or 
 , and then press
  .
.
•Select a menu item with the number buttons.
•Operation may differ from the explanation given here, depending on the disc type.
Listening to Discs
(Continued on next page)
22

(Continued)
Basic Operations of the DVD Player
Messages displayed on the TV screen
While a DVD is selected as the sound source, the messages shown below are displayed, depending on the status.
NOW READING
The main unit is reading the disc. Wait for a while.
REGION CODE ERROR!
The disc cannot be played back because its region code is not compatible. ( page 4)
NO DISC
No disc is loaded.
OPEN
The disc tray is opening.
CLOSE
The disc tray is closing.
CANNOT PLAY
You are trying to play back an unplayable disc.
Guide icons temporarily displayed on the TV screen (on-screen guide)
:Play
( page 21)
:Pause
( page 24)
:Fast reverse/Fast forward search ( page 24)
:Slow motion playback (reverse/ forward directions)( page 25)
:Containing multi-angle views
( page 27)
:Containing multi-audio ( page 26)
:Containing multi-subtitle
( page 27)
:The disc cannot accept the operation you have attempted.
PBC (Playback control)
•PBC is a signal recorded in a VCD (version 2.0) for controlling VCD playback. You can operate software that has interactive or search functions using the menu display recorded in a PBC-compatible VCD. To play back a VCD without PBC, follow the operation below.
•Select the desired track number with the number buttons while playback is stopped.
•While playback is stopped, press


 or
or to select the desired track number, and then press
  .
.
•While a VCD or SVCD is being played
back, press
 to return to the higher menu group.
Playing Back from a Position 10 Seconds Before
(One Touch Replay)
■While a disc is being played back
Press  .
.
NOTE
•This operation may not be carried out for some discs.
•You cannot return to the previous title.
23
For the locations of remote control buttons, refer to page 21.
Stopping Playback |
|
|
|
|
Pausing Playback |
|
|
|
|||
|
|
|
|||
|
|
|
|
|
|
■While a disc is being played back
Press  .
.
Resuming Playback (RESUME)
When playback is stopped in the middle, playback can be started from the stopped scene.
How to suspend playback
■While a disc is being played back
Perform any of the following operations during playback.
Press  once.*
Press 

 to turn off the power.
Change the source to FM/AM or AUX.*
* Even if the power is turned off by pressing
 after this, the position where playback has been stopped will be stored.
How to start playback from the stored position
Press  .
.
NOTE
•This function does not work in program playback or random playback.
•The position where playback starts again may be a little different from the stopped position.
•When a disc menu is displayed, the resume function may not work.
•The audio, the subtitle and the angle at that time are stored as well as the stopped position.
•The stored position will be cleared if the disc tray is opened. Further, if  is pressed during
playback, "RESUME" appears. If  is pressed at this time, "RESUME" will disappear and the stored information will be cleared.
•Resume function is set to on as the initial preset. You can set the function to off
( page 39).
■While a disc is being played back
Press  .
.
To resume normal playback, press  .
.
•Playback cannot be paused by pressing  on the main unit during JPEG disc slide-show.
Advancing Picture Frame by Frame
(only for moving image)
■While a disc is paused
Press  .
.
•Each time you press 
 , picture will be advanced frame by frame.
•You cannot operate this function with  on the main unit.
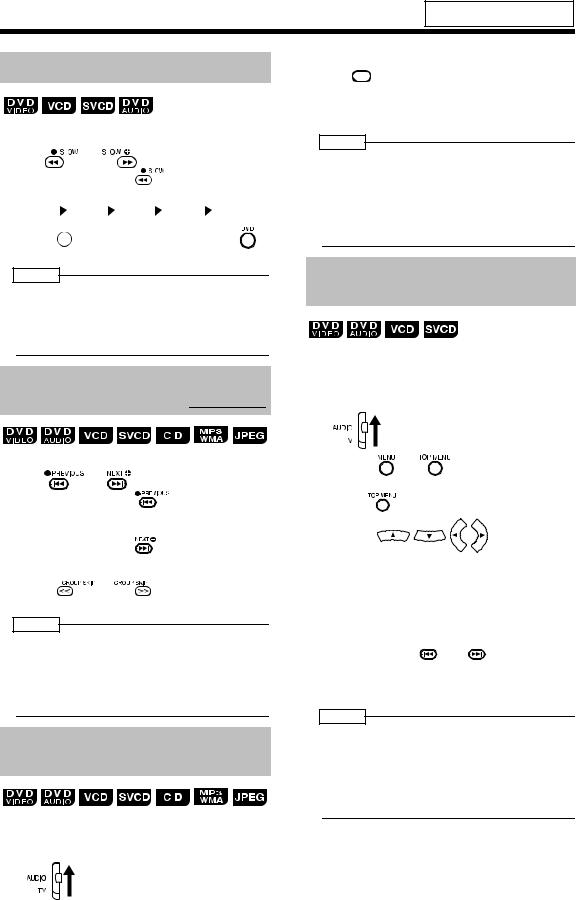
Fast Reverse/Fast Forward
Search
There are two methods.
■While a disc is being played back
Press  or
or  .
.
•Each time you press  or
or  , the speed increases as shown below.
×2  ×5
×5  ×10
×10  ×20
×20 
 ×60
×60
• To restore the normal speed, press  .
.
Hold down |
or |
. |
• Fast reverse/fast forward search can be carried out only while the button is pressed.
NOTE
•For a DVD VIDEO, SVCD or VCD, no sound comes out during fast reverse/fast forward search.
•For a CD or DVD AUDIO, sound is intermittent during fast reverse/fast forward search.
Listening to Discs
24
(Continued)
Basic Operations of the DVD Player
For the locations of remote control buttons, refer to page 21.
Slow Motion Playback
(only for moving image)
■While a disc is paused
Press |
|
or |
. |
|
|
|
|
|
||
• Each time you press |
|
|
|
, the speed |
||||||
increases as shown |
|
|
|
|
|
|
||||
below. |
|
|
|
|||||||
1 / 32 |
|
1 / 16 |
|
1 / 8 |
|
|
1 / 4 |
|
1 / 2 |
|
|
|
|
|
|||||||
|
|
|
|
|||||||
•Press 
 to pause playback, and press
  to resume normal playback.
NOTE
•No sound will be produced.
•The picture motion in the reverse direction may not be smooth.
•For a VCD or SVCD, slow motion playback can be carried out in the forward direction only.
Skipping to the Beginning of a Track 
■While a disc is being played back*
Press |
or |
. |
• Each time you press |
, the current |
|
chapter/track/file skips to the beginning of the previous chapter/track/file.
• Each time you press |
, the current chapter/ |
|
track/file skips to the beginning of the next |
||
chapter/track/file. |
|
|
• Press |
or |
to select a title or |
group. |
|
|
NOTE
* For a VCD or SVCD, this operation can be carried out only during playback without the PBC function.
•Except for a DVD VIDEO, this operation can also be carried out while the disc is stopped.
•This operation may not be carried out for some discs.
Skipping to the Beginning of a Track with the Number Buttons
■While a disc is being played back
1 Set the remote control mode selector to AUDIO.
2 Press the number buttons ( -
-
or  ) to select the track/chapter you want to listen to.
•Refer to "Using the number buttons" ( page 16).
NOTE
•You can operate a VCD or SVCD while the disc is stopped or played back with PBC off.
•You can operate a DVD AUDIO, CD, MP3, WMA, or JPEG while the disc is either played back or stopped.
•This operation may not be carried out for some discs.
Selecting a Track from the Menu Screen
■While a disc is stopped or being played back*
1 Set the remote control mode selector to AUDIO.
2 |
Press |
or |
. |
|
• A menu screen of the disc appears. |
||
|
• Only |
can be used for DVD AUDIOs. |
|
3 |
Press |
|
(only for a |
DVD VIDEO or a DVD AUDIO) or the number buttons to select a track you want to listen to.
•Refer to "Using the number buttons" ( page 16).
•If there are two or more pages of menu screen, press 


 or
or 

 to change the pages (only for a VCD or SVCD).
4 Press  .
.
NOTE
* You can operate a VCD or SVCD while PBC is set to off.
•You cannot perform this function with discs to which a menu screen is not recorded.
•Some disc may start playback even if you do not press  .
.
25
Convenient Functions of the DVD Player
Remote control mode selector
Number buttons
Selecting the Audio
■While a disc containing two or more audio is being played back
1 Press AUDIO.
Example: TV screen
Selected audio/Total number of audio


 Selected audio
•Each time you press AUDIO , the audio will be changed. The audio can also be changed by pressing 
 .
.
2 Wait for a few seconds or press
 .
.
NOTE
•You can also operate this function by using the menu bar ( page 34).
•For a language code such as "AA", refer to "Language Codes" ( page 41).
•When 2 channel sounds are recorded in 1/2 and multi channel sounds with down-mix prohibited are recorded in 2/2 in a DVD AUDIO, you can select 1/2 only.
Listening to Discs
NOTE
•Set the remote control mode selector to 
 AUDIO before using the number buttons.
26
(Continued)
Convenient Functions of the DVD Player
Selecting the Subtitle
(only for moving image)
■While a disc containing two or more subtitles is being played back
1 Press |
|
. |
|
||
|
Example: TV screen
Selected subtitle/Total number of subtitles (When no subtitle is set in the disc, "--"  appears.)
Selected subtitle


 (When no
subtitle is set in the disc, "OFF" appears.)
2 Press 
 to select a subtitle.
3 Wait for a few seconds or press
 .
.
NOTE
•You can also operate this function by using the menu bar ( page 34).
•For an SVCD, each time you press 


 in step 1, the subtitle type and ON/OFF will be changed.
•For a language code such as "AA", refer to "Language Codes" ( page 41).
•The manner of displaying subtitles may be different depending on the disc.


 Canceling the subtitle
Press 


 to select "OFF".
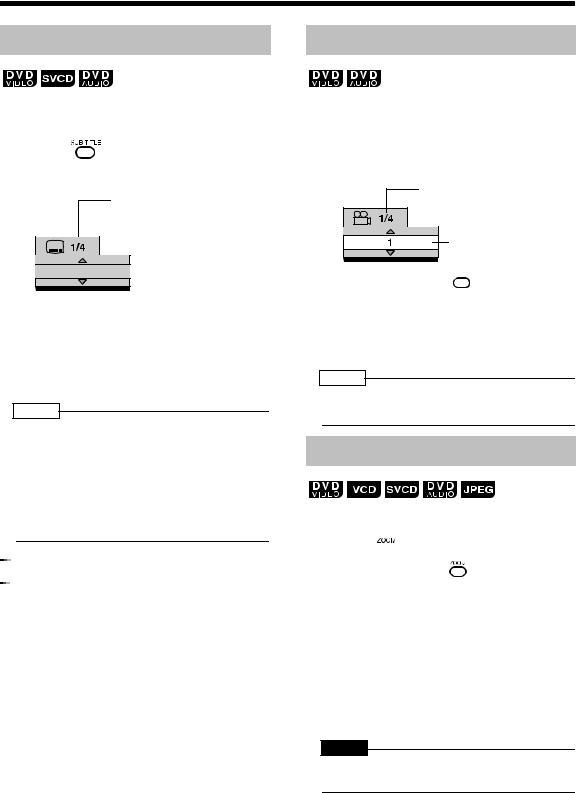
Selecting a View Angle
(only for moving image)
■While a disc containing two or more view angles is being played back
1 Press 

 .
.
Example: TV screen
Selected view angle/ Total number of view 
 angles
Selected view angle
•Each time you press 
 , the angle will be changed. The angle can also be changed by pressing
 .
.
2 Wait for a few seconds or press
 .
.
NOTE
•You can also operate this function by using the menu bar ( page 34).
Magnifying the Picture (ZOOM)
(only for moving image)
■While a disc is played back or paused
1 Press  .
.
• Each time you press , the picture magnification will be changed (OFF, ZOOM1 - 6).
•When a JPEG disc is used, the picture magnification changes through "ZOOM 1", "ZOOM 2" to "OFF". You cannot change the picture magnification during slide-show playback.
2 Select the portion you want to see by pressing 


 .
.
CAUTION
•When you magnify a picture, image quality may be deteriorated or image may be distorted.
27
Loading...