


 Loading...
USER MANUAL
DLP PROJECTOR
LX-WX50
Table of contents |
|
Safety precautions................. |
3 |
Important safety instructions |
|
.............................................. |
4 |
Overview ............................... |
7 |
Shipping contents........................ |
7 |
Projector exterior view................. |
8 |
Controls and functions................. |
9 |
Control panel ...................................... |
9 |
Remote control ................................. |
10 |
Installation ........................... |
12 |
Choosing a location................... |
12 |
Obtaining a preferred projected |
|
image size ................................. |
13 |
Projection dimensions ...................... |
13 |
Shifting the projection lens vertically |
|
.......................................................... |
14 |
Connection .......................... |
15 |
Operation............................. |
16 |
Starting up the projector ............ |
16 |
Shutting down the projector....... |
16 |
Selecting an input source .......... |
17 |
Adjusting the projected image ... |
18 |
Adjusting the projection angle .......... |
18 |
Auto-adjusting the image.................. |
18 |
Fine-tuning the image size and clarity |
|
.......................................................... |
18 |
Correcting keystone.......................... |
19 |
Correcting image corners ................. |
19 |
Menu Functions................... |
20 |
About the OSD Menus .............. |
20 |
Using the OSD menu ................ |
20 |
DISPLAY menu ................................ |
21 |
PICTURE menu................................ |
23 |
SOURCE menu ................................ |
25 |
SYSTEM SETUP: Basic menu ........ |
25 |
SYSTEM SETUP: Advanced menu 26 |
|
INFORMATION menu ...................... |
28 |
OSD menu structure ........................ |
29 |
Controlling the projector |
|
remotely............................... |
31 |
Configuring the LAN Settings......... |
31 |
Controlling the projector using a web |
|
browser (e-Control™) ...................... |
32 |
Controlling the projector |
|
using PJLink™................................. |
34 |
Maintenance........................ |
36 |
Care of the projector ................. |
36 |
Lamp information ...................... |
37 |
Getting to know the lamp hour......... |
37 |
Extending lamp life .......................... |
37 |
Timing of replacing the lamp............ |
38 |
Replacing the lamp .......................... |
39 |
Indicators .................................. |
42 |
Troubleshooting ........................ |
43 |
Specifications............................ |
44 |
Projector specifications.................... |
44 |
Dimensions ...................................... |
45 |
Timing chart ..................................... |
46 |
Warranty and Copyright |
|
information........................... |
51 |
Warranty ................................... |
51 |
Copyright .................................. |
51 |
Disclaimer ................................. |
51 |
2 Table of contents

Safety precautions
This product has a High Intensity Dis-charge (HID) lamp that contains mercury. Manage in accord with disposal laws. Disposal of these materials may be regulated in your community due to environmental considerations. For disposal or recycling information, please contact your local authorities or for USA, the Electronic Industries Alliance: http://www.eiae.org. or call 1-800-252- 5722(For USA) or 1-800-964-2650(For Canada).
FCC INFORMATION (U.S.A. only)
CAUTION:
Changes or modification not approved by JVC could void the user’s authority to operate the equipment.
NOTE:
This equipment has been tested and found to comply with the limits for Class B digital devices, pursuant to Part 15 of the FCC Rules. These limits are designed to provide reasonable protection against harmful interference in a residential installation. This equipment generates, uses, and can radiate radio frequency energy and, if not installed and used in accordance with the instructions, may cause harmful interference to radio communications. However, there is no guarantee that interference will not occur in a particular installation. If this equipment does cause harmful interference to radio or television reception, which can be determined by turning the equipment off and on, the user is encourage to try to correct the interference by one or more of the following measures:
•Reorient or relocate the receiving antenna.
•Increase the separation between the equipment and receiver.
•Connect the equipment into an outlet on a circuit different from that to which the receiver is connected.
•Consult the dealer or an experienced radio/TV technician for help.
Declaration of Conformity
Model Number: LX-WX50 Trade Name: JVC
Responsible party: JVCKENWOOD USA Corporation Address: 1700 Valley Road Wayne, N. J. 07470 Telephone Number: 973-317-5000
This device complies with Part 15 of FCC Rules. Operation is subject to the following two conditions:
(1) This device may not cause harmful interference, and (2) this device must accept any interference received, including interference that may cause undesired operation.
NOISE EMISSION DECLARATION
The sound pressure level at the operator position is equal or less than 60dB(A) according to ISO7779.
Safety precautions |
3 |
Dear Customer,
This apparatus is in conformance with the valid European directives and standards regarding electromagnetic compatibility and electrical safety.
European representative of JVC KENWOOD Corporation is: JVC Technical Services Europe GmbH Konrad-Adenauer-Allee 1-11 61118 Bad Vilbel Germany
Information for Users on Disposal of Old Equipment and Batteries
|
|
|
|
[European Union only] |
|
|
|
|
These symbols indicate that equipment with these symbols should not |
|
|
|
|
be disposed of as general household waste. If you want to dispose of |
|
|
|
|
the product or battery, please consider the collection systems or |
|
|
|
Battery |
facilities for appropriate recycling. |
|
|
|
Notice: The sign Pb below the symbol for batteries indicates that this |
|
Products |
|
|||
|
battery contains lead. |
|||
|
|
|
|
|
Important safety instructions
Your projector is designed and tested to meet the latest standards for safety of information technology equipment. However, to ensure safe use of this product, it is important that you follow the instructions mentioned in this manual and marked on the product.
1.Please read this user manual before you operate your projector. Keep this manual in a safe place for future reference.
2.Always place the projector on a level, horizontal surface during operation.
-Do not place the projector on an unstable cart, stand, or table as it may fall and be damaged.
-Do not place inflammables near the projector.
-Do not use if tilted at an angle of more than 10 degrees left to right, nor at angle of more than 15 degrees front to back.
3.Do not store the projector on end vertically. Doing so may cause the projector to fall over, causing injury or resulting in damage.
4.Do not place the projector in any of the following environments:
-Space that is poorly ventilated or confined. Allow at least 50 cm clearance from walls and free flow of air around the projector.
-Locations where temperatures may become excessively high, such as the inside of a car with all windows closed.
-Locations where excessive humidity, dust, or cigarette smoke may contaminate optical components, shorten the projector’s lifespan and darken the screen.
-Locations near fire alarms.
-Locations with conditions beyond those listed in "Projector specifications".
5.Do not block the vents while the projector is on (even in standby mode).
-Do not cover the projector with any item.
-Do not place the projector on a blanket, bedding or any other soft surface.
6.In areas where the mains power supply voltage may fluctuate by ±10 volts, it is recommended that you connect the projector through a power stabilizer, surge protector or uninterruptible power supply (UPS) as appropriate to your situation.
7.Do not step on the projector or place any objects upon it.
8.Do not place liquids near or on the projector. Liquids spilled into the projector will void your warranty. If the projector does become wet, disconnect it from the power outlet and contact JVC to have the projector repaired.
4 |
Important safety instructions |
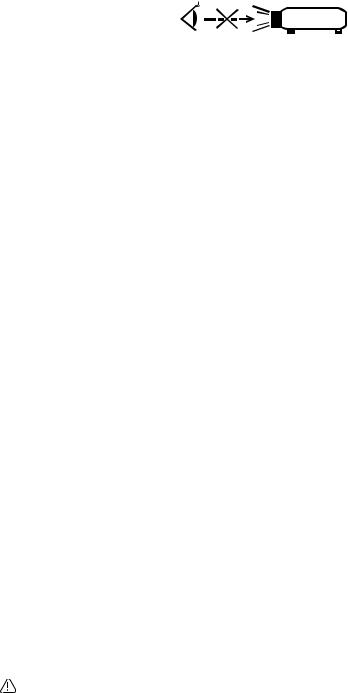
9. Do not look straight into the projector lens during operation. It may harm your sight.
RG2 IEC 62471-5:2015
10.Do not operate the projector lamp beyond the rated lamp life. Excessive operation of lamps beyond the rated life could cause a lamp to break on rare occasions.
11.The lamp becomes extremely hot during operation. Allow the projector to cool for approximately 45 minutes prior to removing the lamp assembly for replacement.
12.Never attempt to replace the lamp assembly until the projector has cooled down and is unplugged from the power supply.
13.This projector is capable of displaying inverted images for ceiling mount installation. Use only a proper ceiling mount kit for mounting.
14.THIS APPARATUS MUST BE EARTHED.
15.When installing the unit, incorporate a readily accessible disconnect device in the fixed wiring, or connect the power plug to an easily accessible socket-outlet near the unit. If a fault should occur during operation of the unit, operate the disconnect device to switch the power supply off, or disconnect the power plug.
High temperature Caution
The temperature of the cabinet around and above the exhaust vents can become hot during projector operation. Touching these areas during operation could cause burns to the hands. Do not touch these areas. Doing so may cause burns. Pay particular attention in preventing young children from touching these parts. Additionally, do not place any metal objects on these areas. Due to the heat from the projector, doing so could cause an accident or personal injury.
Ceiling mounting the projector
If you intend to mount your projector on the ceiling, we strongly recommend that you use a proper fitting projector ceiling mount kit and ensure it is securely and safely installed.
If not, there is a safety risk that the projector may fall from the ceiling due to an improper attachment through the use of the wrong gauge or length screws.
You can purchase a proper projector ceiling mount kit from the place you purchased your projector. We recommend that you also purchase a separate Kensington lock compatible security cable and attach it securely to both the Kensington lock slot on the projector and the base of the ceiling mount bracket. This will perform the secondary role of restraining the projector should its attachment to the mounting bracket become loose.
Do not attempt to disassemble this projector. There are dangerous high voltages inside which may cause death if you should come into contact with live parts. The only user serviceable part is the lamp. See page 39.
Under no circumstances should you ever undo or remove any other covers. Refer servicing only to suitably qualified professional service personnel.
Please keep the original packing for possible future shipment. If you need to pack your projector after use, adjust the projection lens to an appropriate position, put the lens cushion around the lens, and fit the lens cushion and projector cushion together to prevent damage during transportation.
When you think service or repair is required, take the projector only to a suitably qualified technician.
Important safety instructions |
5 |
Moisture condensation
Never operate the projector immediately after moving it from a cold location to a hot location. When the projector is exposed to such a change in temperature, moisture may condense on the crucial internal parts. To prevent the projector from possible damage, do not use the projector for at least 2 hours when there is a sudden change in temperature.
Avoid volatile liquids
Do not use volatile liquids, such as insecticide or certain types of cleaner, near the projector. Do not have rubber or plastic products touching the projector for a long time. They will leave marks on the finish. If cleaning with a chemically treated cloth, be sure to follow the cleaning product’s safety instructions.
Disposal
This product contains the following materials which are harmful to human bodies and environment.
•Lead, which is contained in solder.
•Mercury, which is used in the lamp.
To dispose of the product or used lamps, consult your local environment authorities for regulations.
6 |
Important safety instructions |
Overview
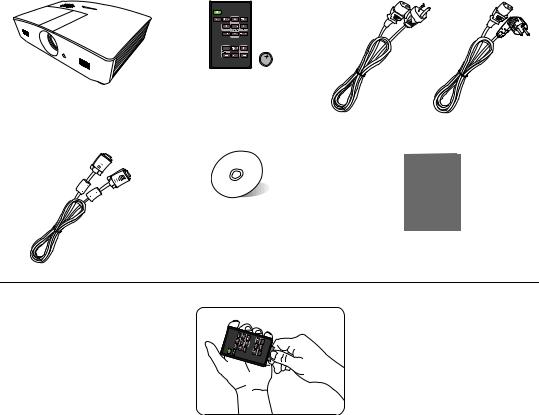
Shipping contents
Carefully unpack and verify that you have the items below. Some of the items may not be available depending on your region of purchase. Please check with your place of purchase.
 Some of the accessories may vary from region to region.
(US) |
(EU) |
Projector |
Remote control with battery* |
Power cable |
|
|
|
|
|
|
|
|
|
|
|
|
|
VGA cable |
User manual CD |
Quick start guide |
*Pull the tab before using the remote control.
Overview 7

Projector exterior view
Front and upper side view
1
2 |
7 |
|
|
3 |
8 |
|
|
4 |
|
|
9 |
5
6
4
Rear/bottom view
10 11 |
12 |
13 |
14 |
15 |
16 |
17 |
18 |
19 |
20 |
21 |
22 |
|||||||||||
|
|
|
|
|
|
|
|
|
|
|
|
|
|
|
|
|
|
|
|
|
|
|
|
|
|
|
|
|
|
|
|
|
|
|
|
|
|
|
|
|
|
|
|
|
|
|
25 |
26 27 28 |
23 |
2429 |
29 |
|
|
30 |
29 |
29 |
30 |
1.Control panel (See "Control panel" for details.)
2.Vent (heated air exhaust)
3.Lamp cover
4.Speaker grill
5.Projection lens
6.Front IR remote sensor
7.LED indicator
8.Lens adjustment panel cover (See "Control panel" for details.)
9.Vent (cool air intake)
10.AC Power cable inlet
11.RJ45 LAN input jack
12.RS-232 control port
13.Mini USB port
Used for service.
14.USB Type-A port
Used for charging external device.
15.HDMI-2 port
16.HDMI-1 port
17.RGB signal output jack
18.RGB (PC)/Component video (YPbPr/ YCbCr) signal input jack
19.S-Video input jack
20.Audio (R) input jack
21.Audio input jack
22.12VDC output terminal
Used to trigger external devices such as an electric screen or light control, etc. Consult your dealer for how to connect these devices.
23.Security bar
24.Kensington lock slot
25.Video input jack
26.Audio (L) input jack
27.Microphone jack
28.Audio output jack
29.Ceiling mount holes
30.Adjuster feet
8 Overview

Controls and functions
Control panel
1 |
11 |
12 |
13 |
|
|||
2 |
7 |
|
|
3 |
8 |
|
14 |
|
9 |
|
|
|
10 |
|
15 |
|
12 |
|
|
|
|
|
|
4 |
|
|
16 |
5 |
|
|
|
6 |
|
|
|
1.Focus ring
Adjusts the focus of the projected image.
2.Zoom ring
Adjusts the size of the image.
3.Lens shift ring
Adjusts the position of the projected image.
4.TEMPerature warning light
Lights up red if the projector's temperature becomes too high.
5.POWER indicator light
Lights up or flashes when the projector is under operation.
6.LAMP indicator light
Indicates the status of the lamp. Lights up or flashes when the lamp has developed a problem.
7.Top IR remote sensor
8. POWER
POWER
Toggles the projector between standby mode and on.
9.BLANK
Used to hide the screen image. Press most of the keys on the projector or remote control to restore the picture.
10.MODE
Selects an available picture setup mode.
ENTER
Activates the selected On-Screen Display (OSD) menu item.
11. MENU
•Accesses the On-Screen Display (OSD) menu.
•Goes back to previous OSD menu, exits and saves menu settings.
EXIT
Goes back to previous OSD menus, exits and saves any changes made using the On-Screen Display (OSD) menu.
12.Keystone keys ( ,
,  )
)
Launches the Keystone window. Use  ,
,  ,
,  ,
,  to manually correct distorted images resulting from an angled projection.
13.AUTO
Automatically determines the best picture timings for the displayed image.
14.
Activates panel key lock. To unlock the keys,
press and hold  for 3 seconds or setting OSD menu using the remote control.
15.SOURCE
Displays the source selection bar.
16.Arrow keys ( ,
,  ,
,  ,
,  )
)
When the On-Screen Display (OSD) menu is activated, these keys are used as directional arrows to select the desired menu items and to make adjustments.
Overview 9
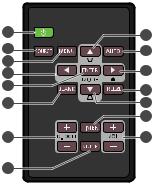
Remote control
1 |
9 |
2 |
10 |
3 |
11 |
4 |
|
5 |
12 |
|
|
6 |
9 |
|
13 |
7 |
14 |
8 |
|
1. POWER
POWER
Toggles the projector between standby mode and on.
2.SOURCE
Displays the source selection bar.
3.MENU
•Accesses the On-Screen Display (OSD) menu.
•Goes back to previous OSD menu, exits and saves menu settings.
4.Arrow keys ( Left,
Left,  Right,
  Up,
Up,  Down)
Down)
When the On-Screen Display (OSD) menu is activated, these keys are used as directional arrows to select the desired menu items and to make adjustments.
5.ENTER
Activates the selected On-Screen Display (OSD) menu item.
MODE
Selects an available picture mode.
6.BLANK
Used to blank the screen picture. Press most of the keys on the projector or remote control to restore the picture.
7.D. ZOOM-/D. ZOOM-
Displays the Zoom bar.
•D. ZOOM+: After the Zoom bar displays, magnifies the projected picture size. After
the image is magnified, use  /
/ /
/ /
/ to navigate the image.
•D. ZOOM-: After the image is magnified, reduces the projected picture size. To quickly restore the picture to its original size, press AUTO.
8.MUTE
Temporarily mutes the audio.
9.Keystone keys (  ,
,  )
)
Launches the Keystone window. Use  ,
,  ,
,
 ,
,  to manually correct distorted images resulting from an angled projection.
10.AUTO
Automatically determines the best picture timings for the displayed image.
11.
Activates panel key lock. To unlock the keys,
press and hold  for 3 seconds or setting OSD menu using the remote control.
12.FREEZE
Freezes the projected image.
13.TIMER
Activates or inactivates an on-screen timer based on your own timer setting.
14.VOL+
Increases the projector audio volume.
VOL-
Decreases the projector audio volume.
10 Overview
Installing/replacing the remote control battery
1. Pull out the battery holder, as illustrated. Push and hold the locking arm whilst pulling out the battery holder.
2. Insert the new battery in the holder. Note the positive polarity should face outward.
3. Push the holder into the remote control.
• Avoid leaving the remote control and battery in an excessive heat or humid environment like the kitchen, bathroom, sauna, sunroom or in a closed car.
• Replace only with the same or equivalent type recommended by the battery manufacturer.
•Dispose of the used batteries according to the manufacturer's instructions and local environment regulations for your region.
•Never throw the batteries into a fire. There may be danger of an explosion.
•If the batteries are drained or if you will not be using the remote control for an extended period of time, remove the batteries to avoid damage to the remote control from possible battery leakage.
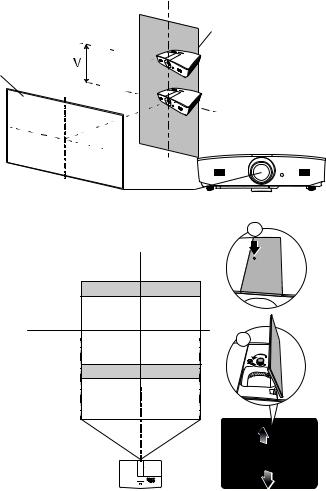
Remote control effective range
The remote control must be held at an angle within 30 degrees perpendicular to the projector's IR remote control sensor(s) to function correctly. The distance between the remote control and the sensor(s) should not exceed 8 meters (~ 26 feet).
Make sure that there are no obstacles between the remote control and the IR sensor(s) on the projector.
• Operating the projector from the front • |
Operating the projector from the top |
|||
|
|
|
A |
|
|
|
|
p |
|
|
|
|
pr |
|
|
|
|
o |
|
A |
|
|
x.+ |
|
|
|
3 |
||
p |
|
|
0º |
|
|
pr |
|
|
|
|
|
o |
|
|
|
|
x.+ |
|
|
|
|
3 |
|
|
|
|
0º |
|
|
Overview 11

Installation
Choosing a location
Before choosing an installation location for your projector, take the following factors into consideration:
•Size and position of your screen
•Electrical outlet location
•Location and distance between the projector and the rest of your equipment
You can install your projector in the following ways.
1. Front Table: |
|
|
|
3. Front Ceiling: |
|
|
|
|
|
|
|
|
|
||
Select this location with the |
|
|
|
Select this location with |
|
|
|
projector placed near the floor |
|
|
|
the projector suspended |
|
|
|
in front of the screen. |
|
|
|
from the ceiling in front of |
|
|
|
This is the most common way |
|
|
|
the screen. |
|
|
|
|
|
|
|
|
|
|
|
to position the projector for |
|
|
|
Turn on the projector and |
|
|
|
quick setup and portability. |
|
|
|
make the following |
|
|
|
|
|
|
|
|
|
||
Turn on the projector and |
|
|
|
settings: |
|
|
|
|
|
|
SYSTEM SETUP: Basic |
|
|
|
|
make the following settings: |
|
|
|
|
|
|
|
SYSTEM SETUP: Basic > |
|
|
|
> Projector Position > |
|
|
|
|
|
|
Front Ceiling |
|
|
|
|
Projector Position > Front |
|
|
|
|
|
|
|
|
|
|
|
|
|
|
|
Table |
|
|
|
|
|
|
|
|
|
|
|
Purchase the proper ceiling mount kit from |
|||
|
|
|
|
your dealer to mount your projector on the |
|||
|
|
|
|
ceiling. |
|||
|
|
|
|
|
|
|
|
2. Rear Table: |
|
|
|
4. Rear Ceiling: |
|
|
|
|
|
|
|
|
|
||
Select this location with the |
|
|
|
Select this location with |
|
|
|
projector placed near the floor |
|
|
|
the projector suspended |
|
|
|
behind the screen. |
|
|
|
from the ceiling behind |
|
|
|
Turn on the projector and |
|
|
|
the screen. |
|
|
|
|
|
|
|
|
|
|
|
make the following settings: |
|
|
|
Turn on the projector and |
|
|
|
SYSTEM SETUP: Basic > |
|
|
|
make the following |
|
|
|
|
|
|
|
|
|
||
|
|
|
settings: |
|
|
|
|
Projector Position > Rear |
|
|
|
|
|
|
|
|
|
|
|
|
|
|
|
Table |
|
|
|
SYSTEM SETUP: Basic |
|
|
|
|
|
|
|
> Projector Position > |
|
|
|
|
|
|
|
Rear Ceiling |
|
|
|
|
|
|
|
|
|
|
|
A special rear projection screen is required. |
A special rear projection screen and a |
||||||
|
|
|
|
proper ceiling mount kit are required. |
|||
|
|
|
|
|
|
|
|
12 Installation
Obtaining a preferred projected image size
The projected image size is determined by the distance from the projector lens to the screen, the zoom setting, and the video format.
Projection dimensions
Use the illustration and the table below to help you determine the projection distance.
16:10 Screen diagonal
|
|
Screen |
H |
|
Center of lens |
|
|
|
|
W |
• |
|
|
|
|
Vertical offset |
Projection distance |
|
|
The screen aspect ratio is 16:10 and the projected picture is in 16:10 aspect ratio
Display size (16:10) |
|
Projection distance |
Vertical Offset |
||
Screen diagonal (inch) |
W (inch) |
H (inch) |
Wide (feet) |
Tele (feet) |
(inch) |
|
|||||
|
|
|
|
|
|
60 |
50.9 |
31.8 |
4.8 |
7.6 |
1.6 |
|
|
|
|
|
|
70 |
59.4 |
37.1 |
5.6 |
8.9 |
1.9 |
|
|
|
|
|
|
80 |
67.8 |
42.4 |
6.4 |
10.2 |
2.1 |
|
|
|
|
|
|
90 |
76.3 |
47.7 |
7.2 |
11.5 |
2.4 |
|
|
|
|
|
|
100 |
84.8 |
53.0 |
8.0 |
12.7 |
2.6 |
|
|
|
|
|
|
110 |
93.3 |
58.3 |
8.8 |
14.0 |
2.9 |
|
|
|
|
|
|
120 |
101.8 |
63.6 |
9.5 |
15.3 |
3.2 |
|
|
|
|
|
|
130 |
110.2 |
68.9 |
10.3 |
16.6 |
3.4 |
|
|
|
|
|
|
140 |
118.7 |
74.2 |
11.1 |
17.8 |
3.7 |
|
|
|
|
|
|
150 |
127.2 |
79.5 |
11.9 |
19.1 |
4.0 |
|
|
|
|
|
|
160 |
135.7 |
84.8 |
12.7 |
20.4 |
4.2 |
|
|
|
|
|
|
170 |
144.2 |
90.1 |
13.5 |
21.6 |
4.5 |
|
|
|
|
|
|
180 |
152.6 |
95.4 |
14.3 |
22.9 |
4.8 |
|
|
|
|
|
|
190 |
161.1 |
100.7 |
15.1 |
24.2 |
5.0 |
|
|
|
|
|
|
200 |
169.6 |
106.0 |
15.9 |
25.5 |
5.3 |
|
|
|
|
|
|
210 |
178.1 |
111.3 |
16.6 |
26.6 |
5.6 |
|
|
|
|
|
|
220 |
186.6 |
116.6 |
17.4 |
27.9 |
5.8 |
|
|
|
|
|
|
230 |
195.0 |
121.9 |
18.2 |
29.1 |
6.1 |
|
|
|
|
|
|
240 |
203.5 |
127.2 |
19.0 |
30.4 |
6.4 |
|
|
|
|
|
|
 All measurements are approximate and may vary from the actual sizes. If you want a permanent installation of the projector, we recommend that you use the actual projector to physically test the projection size, distance, and the projector's optical characteristics prior to the installation. This helps you determine the exact mounting position which best suits your installation.
Installation 13
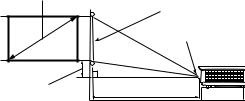
Shifting the projection lens vertically
The vertical lens shift control provides flexibility for installing your projector. It allows the projector to be positioned slightly above or below the top level of the projected images.
The lens shift (offset) is expressed as a percentage of the projected image height. It is measured as an offset from the projected image's vertical center. Use the lever to shift the projection lens upwards or downwards within the allowable range depending on your desired image position.
To shift the lens:
1.Press down lightly on the lens adjustment panel cover switch (indicated by a dot) to click it open.
2.Lift the lens adjustment panel cover up.
3.Turn the lens shift ring to adjust the projected image position.
4.When done, press down and click close the lens adjustment panel cover.
•When the screen position is fixed
Range of placement
Screen
•When the projector position is fixed
a
b
 • Do not over-tighten the lever.
•Lens shift adjustment does not result in a degraded picture quality. In the unlikely event that the image distortion is produced, see "Adjusting the projected image" for details.
14 Installation

Connection
When connecting a signal source to the projector, be sure to:
1.Turn all equipment off before making any connections.
2.Use the correct signal cables for each source.
3.Make sure the cables are firmly inserted.
 • In the connection illustrations shown below, some cables may not be included with the projector (see "Shipping contents"). They are commercially available from electronics stores.
The illustrations below are for reference only. The rear connecting jacks available on the projector vary with each projector model.
Notebook or desktop computer
A/V device
Speakers
(VGA) |
or |
(DVI) |
|
|
|
|
|
|
|
|
|
|
|
|
|
|
|
|
|
|
|
8 |
9 |
1 |
2 |
1 |
3 |
8 |
4 |
5 |
6 |
8 |
8 |
7 |
|
or
1. |
VGA cable |
5. |
HDMI cable |
2. |
VGA to DVI cable |
6. |
S-Video cable |
3. |
USB cable |
7. |
Video cable |
4. |
Component Video to VGA (D-Sub) |
8. |
Audio cable |
|
adapter cable |
9. |
Microphone |
Connection 15
Operation
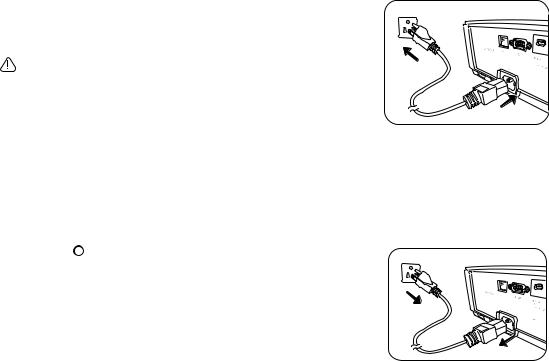
Starting up the projector
1. Plug the power cable into the projector and a power outlet. Turn on the power outlet switch (where fitted). The POWER indicator light on the projector lights orange after power has been applied.
Please use the supplied power cable to avoid possible dangers such as electric shock and fire.
2. Press  to start the projector. The POWER indicator light flashes green and stays green when the projector is on.
The fans start operating, and a start-up image displays on
the screen while it warms up. The projector does not respond to further commands while it is warming up.
Shutting down the projector
1.Press  . The projector displays a shutdown confirmation message.
2.Press  a second time. The POWER indicator light flashes
orange and the fans run for about two minutes to cool the
lamp. The projector doesn’t respond to any commands during the cooling process.
3. When the cooling process ends, the POWER indicator light will show a solid orange.
If the projector will not be used for an extended period, unplug the power cable from the power outlet.
 Avoid turning on the projector immediately after turning it off as excessive heat may shorten lamp life. The actual lamp life may vary due to different environmental conditions and usage.
16 Operation
Loading...