

Page 1

TOUCH-SCREEN DISPLAY
AND JAGUARVOICE
Publication Part No. JJM 18 42 26 701
Page 2

This handbook forms part of the Owner literature supplied with your vehicle. Left hand
drive and right hand drive conditions may be shown in the graphics and where
information is specific to a particular country, it is indicated as such.
The Quick start section designed to rapidly familiarise the driver with the initial set up
and also explain some of the unique features. Please take the time to study the operating
instructions with your vehicle as soon as you can.
Important
The information contained in this handbook covers all vehicle derivatives and optional equipment.
Some of the options may not be fitted to your vehicle unless they formed part of the original vehicle
specification. Therefore some parts of this handbook may not apply to your vehicle. Furthermore,
due to printing cycles, it may include descriptions of options before they become generally available.
The information contained in this publication was correct when it went to print. Vehicle
design changes may have been made after this handbook was printed. When this occurs
a handbook supplement is added to the literature pack. Subsequent updates can be
viewed on the Jaguar Internet site at; www.ownerinfo.jaguar.com.
In the interest of development, the right is reserved to change specifications, design or
equipment at any time without notice and without incurring any obligations. This
publication, or part thereof, may not be reproduced nor translated without our approval.
Errors and omissions excepted.
©Jaguar Cars Ltd, 2006
All rights reserved.
Published by Jaguar Technical Communications.
2
Page 3

Handbook Contents
Quick Overview
Quick Overview . . . . . . . . . . . . . . . . . . . 7
Owner Information
Introduction . . . . . . . . . . . . . . . . . . . . . 13
Touch-screen Display . . . . . . . . . . . . . 16
Climate Control
Climate Control . . . . . . . . . . . . . . . . . . 21
Audio System
Steering Wheel Controls . . . . . . . . . . . 31
Cassette Tape . . . . . . . . . . . . . . . . . . . 32
Single CD Player . . . . . . . . . . . . . . . . . 34
Compact Disc (CD) Changer. . . . . . . . 36
Rear Multimedia . . . . . . . . . . . . . . . . . 38
Radio . . . . . . . . . . . . . . . . . . . . . . . . . . 40
Audio System Source . . . . . . . . . . . . . 47
Audio System Care . . . . . . . . . . . . . . . 49
Navigation System
Navigation - Overview . . . . . . . . . . . . . 51
Basic Screen Displays. . . . . . . . . . . . . 57
Screen Types . . . . . . . . . . . . . . . . . . . 63
Navigation Menu . . . . . . . . . . . . . . . . . 64
Route Setting . . . . . . . . . . . . . . . . . . . 65
Route Options . . . . . . . . . . . . . . . . . . . 69
Set Up Menu . . . . . . . . . . . . . . . . . . . . 72
Destination Entry . . . . . . . . . . . . . . . . . 76
Points of Interest (POI) . . . . . . . . . . . . 83
Stored Locations . . . . . . . . . . . . . . . . . 89
Route Calculation . . . . . . . . . . . . . . . . 95
Storing Way Points . . . . . . . . . . . . . . . 96
Route Guidance . . . . . . . . . . . . . . . . . 98
End User Licence Agreements . . . . . 101
JaguarVoice
General Information. . . . . . . . . . . . . . 105
Using the System . . . . . . . . . . . . . . . 107
How to Say Numbers . . . . . . . . . . . . 113
Voice Command List. . . . . . . . . . . . . 114
Voice Training . . . . . . . . . . . . . . . . . . 122
Trouble-shooting. . . . . . . . . . . . . . . . 124
3
Page 4

4
Page 5

Quick Start
Quick Overview
Climate Control . . . . . . . . . . . . . . . . . . . 7
Audio . . . . . . . . . . . . . . . . . . . . . . . . . . 8
Navigation . . . . . . . . . . . . . . . . . . . . . . . 9
JaguarVoice . . . . . . . . . . . . . . . . . . . . 11
5
Page 6

6
Page 7
Quick Overview
Quick Overview
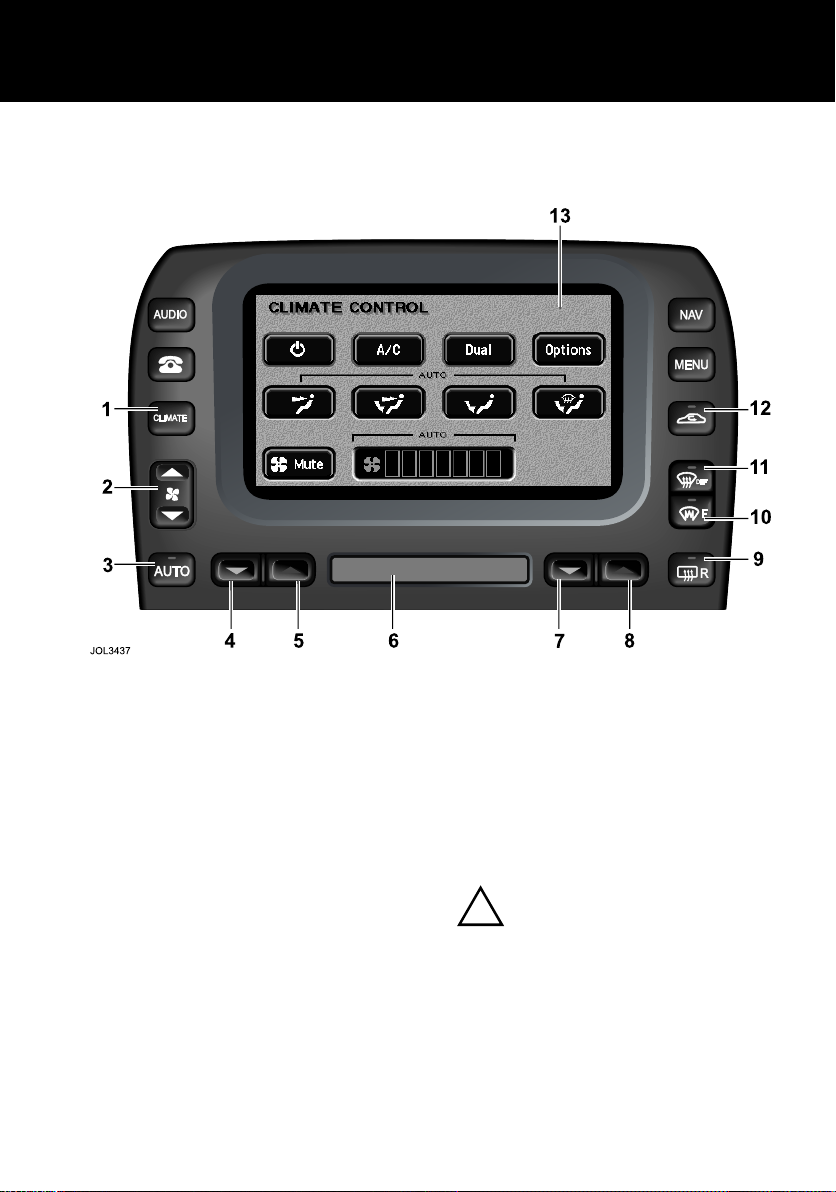
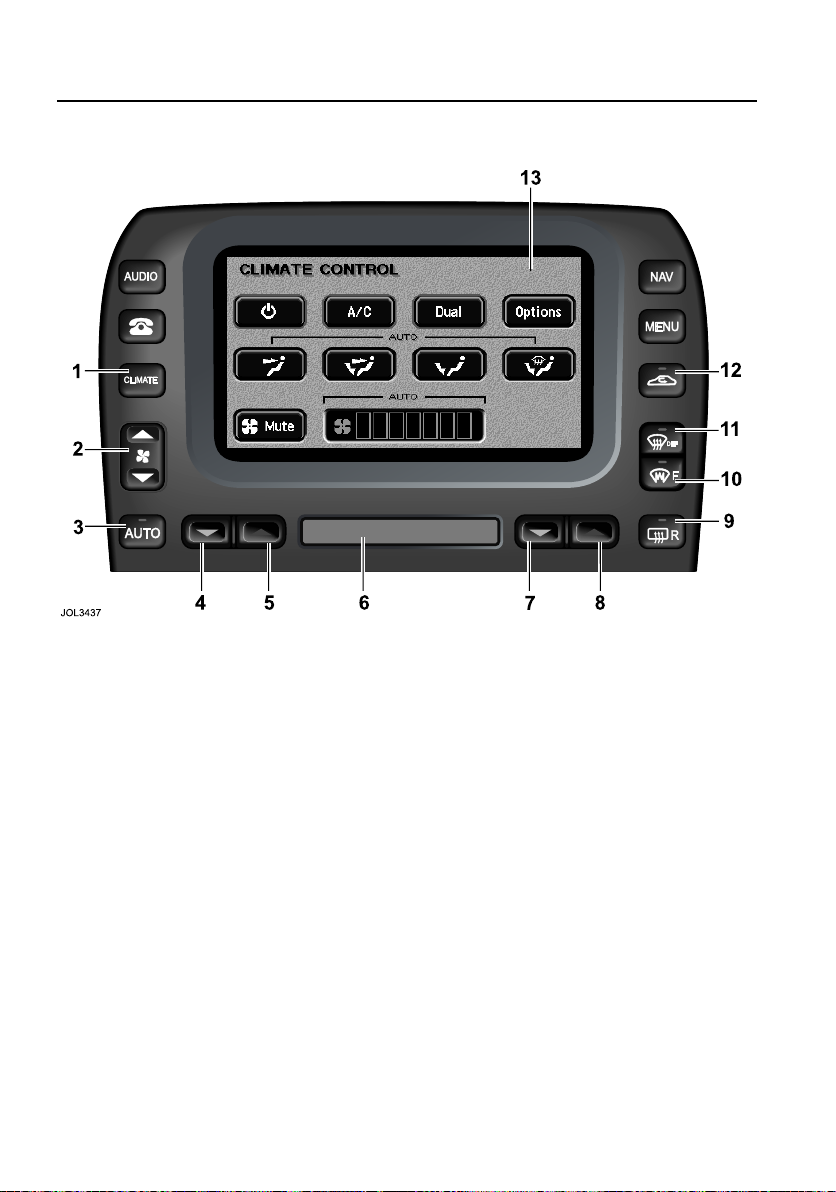
Climate Control
(XJ and S-TYPE panel shown)
1. Select climate control touch-screen.
2. Adjust blower speed.
3. Select automatic operation.
4. Decrease left-hand zone temperature.
5. Increase left-hand zone temperature.
6. LCD screen: interior and exterior
temperatures.
7. Decrease right-hand zone
temperature.
8. Increase right-hand zone
temperature.
9. Heated rear screen/door mirrors.
10. Heated front screen.
11. Defrost operation.
12. Select air recirculation.
13. Touch-screen.
For more information on climate control
for all Jaguar models with touch-screen
controls, see page 21 onwards.
Recommended Operation
It is recommended that automatic control
(AUTO) is selected as the normal
operating mode.
!
WARNING:
To prevent humidity build-up inside the
vehicle and possible screen misting,
avoid driving with the air conditioning
system off or with manual air
recirculation selected for prolonged
periods.
7
Page 8
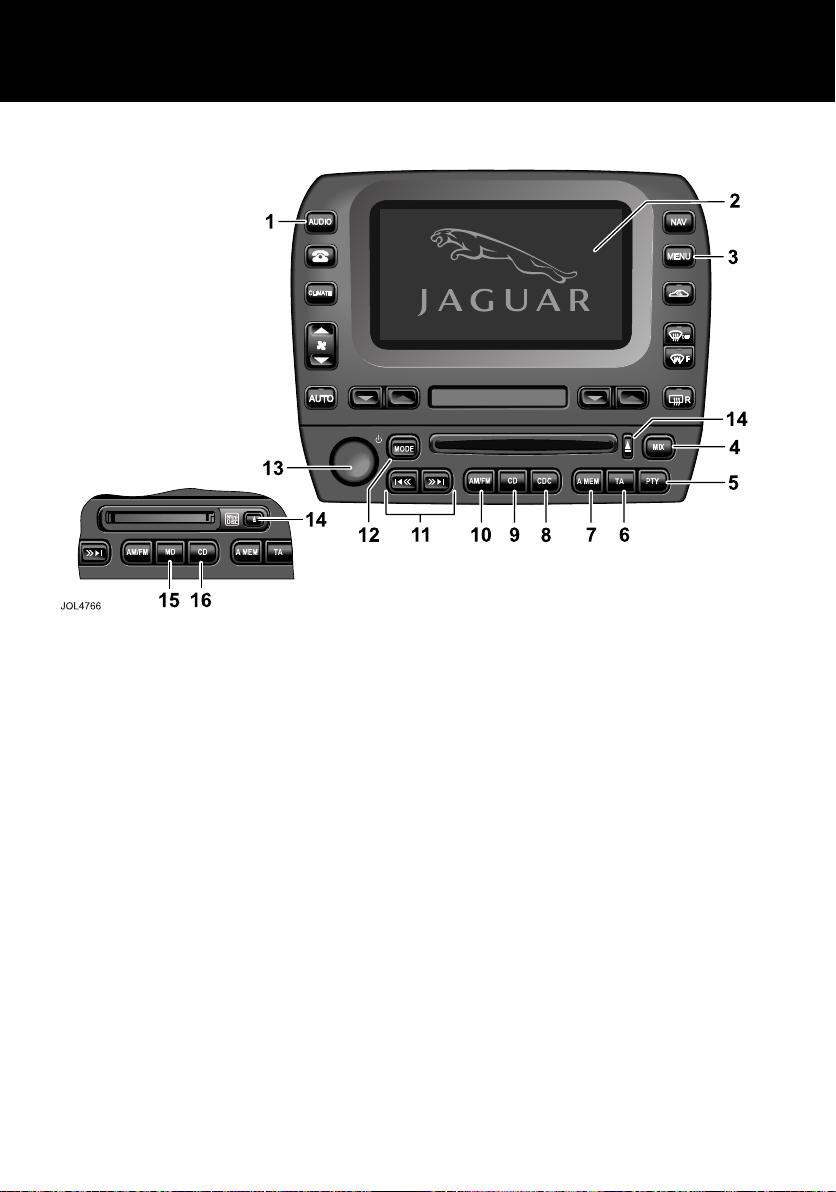
Audio
Quick Overview
1. AUDIO. Press to turn audio system
ON, or to display relevant audio
screen and associated touch-screen
buttons.
2. Touch-screen display.
3. MENU. Press to access
touch-screen options.
4. MIX. Mix CDs or CD tracks.
5. PTY. Priority programme type (where
broadcast).
6. TA. Traffic announcement and Radio
Data System (where broadcast).
7. A MEM. Automatically set station
presets.
8. CDC. Select CD changer.
9. CD (or TAPE). Select compact disc
play when in other audio mode, or CD
pause (when a CD is inserted and
playing).
10. AM/FM. Radio waveband select.
11. Seek AM/FM station, cue/review
CD/MD.
12. MODE. Scroll to select sound
settings.
13. ON/OFF and volume control.
14. Eject CD or MD.
For more information on the audio
system, see page 31 onwards.
8
Page 9

Quick Overview
Navigation
The starting position for all these
functions is the map screen showing the
current position of the vehicle. If any other
screen is shown, push the NAV button to
display the map screen.
Getting started
Entering a destination by address:
• Nav Menu → Destination Entry →
Address → enter the address details
required → Dest. → Start.
Entering a destination to a town centre:
• Nav Menu → Destination Entry →
Address → enter the town name
required → Town Centre → Dest. →
Start.
Using a point of interest as a destination:
• Nav Menu → Destination Entry →
Point of Interest → select the point
required → Dest. → Start.
Storing a location as the home position
• Nav Menu → Stored Locations →
Home → Add → enter the address
details required → OK.
Adding a memory point.
• Nav Menu → Stored Locations →
Memory Point → Add → enter the
address details required → OK.
Options available while driving:
Setting a destination to the home
position:
• Touch the screen → Home. (Only
available when a home position is set.)
Storing a map location as a memory
point:
• Scroll the screen → Store → OK.
Displaying point of interest icons:
• Touch the screen → POI → select a
POI category.
Changing the map heading (north
up/heading up):
• Touch the Map Orientation button.
Note: Heading up is not available if scale
is greater than 2 miles or 4 kilometres.
Options Available Only With a Route
Set
Cancelling guidance:
• Nav Menu → Route Options → Cancel
Guidance.
Repeating voice guidance:
• Touch the Repeat button.
Changing route preferences:
• Touch the screen → Chg. Route →
Route Preferences → select the
preferences required → Calculate.
For further information on the navigation
system, see page 51 onwards.
9
Page 10

Quick Overview
Navigation Menu Structure
Menu screens are provided to select various functions. To select a menu item, use the
touch button for the option required. After selecting a menu item, the next sub-menu
or screen will be displayed. If a menu item cannot be currently selected, the button will
be displayed in a light tint only.
Navigation Menu (page 64)
Destination
Entry
(page 76)
Address Detour Average Speed
Memory Point Route
Home Display Whole
Point of
Interest
Previous
Destination
Postcode Cancel
Select from
Map
Freeway
Entry/Exit
Intersection
Change
Search Area
Route Option
(page 69)
Preferences
Route
Dest & Way
Point
Calculate Map Version Dest & Way Pt
Guidance
Delete Next
Way Point
Navigation Set
Up (page 72)
Settings
Quick POI
Selection
Restore
System
Defaults
Calibration Previous dest.
Display
Options
(page 74)
Guidance
Options
Map Options Home
Stored
Locations
(page 89)
Memory Points
Avoid Area
10
Page 11
Quick Overview
JaguarVoice
Press and release the steering wheel
voice button (A), wait for the end of the
beep and say: ‘Voice Help’.
• The voice system will then give you a
list of the help menus available.
• To cancel the dialogue, press and
release the voice button.
• If you hear a double beep when you
give a command, press the voice
button and try again.
Next - try some commands
• Press and release the voice button
before each command, and try the
following:
‘Radio Tune 97.4 FM’
‘Changer Play Track 4’
‘Climate Control Temperature 21’
‘Phone On’
Operating tips
1. After pressing the voice button (A),
wait for the end of the single listening
beep before giving the command.
A single beep denotes when the voice
system is listening for a command. A
double beep denotes when the
system has stopped listening, due to
an error or when an incorrect
command has been given.
‘LISTENING’ will be displayed on the
message centre in the instrument
pack.
2. Face forward and speak naturally, as
if you were talking to a passenger or
on the phone.
3. Note the structure of the commands;
remember this rather than trying to
remember all the commands.
Device Function Setting
Radio Tune 97.4
The voice system will repeat the
command back to you and display it on
the message centre in the instrument
pack. The command will then be
performed.
See a list of useful commands on the next
page. Have a go!
11
Page 12
Quick Overview
Some Useful Voice Commands
Radio Commands
RADIO (ON/OFF)
RADIO TUNE <frequency> FM
RADIO STORE NAME
You can store nametags to all your
favourite stations using this command.
The system responds to this command
by asking: ‘NAME PLEASE’.
Press the voice button and give a name
of your choice.
Confirm the nametag by pressing the
voice button and saying ‘YES’ to save
or ‘NO’ to cancel.
RADIO TUNE <nametag>
As stored in the command above.
Single CD Commands
(CD) PLAY
(CD) PLAY TRACK <track number>
CD Changer Commands
CHANGER PLAY DISC <disc number>
TRACK <track number>
Automatic Climate Control
Commands
CLIMATE CONTROL TEMPERATURE
<temperature>
Telephone Commands
PHONE ENTER <phone digits>
(2 – 16 digits)
The system responds by repeating the
phone number back to you and then
giving you the options below.
Press the voice button and continue
with one of these options:
<more digits>
DIAL
STORE (give a nametag when
prompted as in Radio Store)
CORRECTION
CANCEL
PHONE REDIAL
PHONE DIAL<nametag>
Navigation Commands
DISPLAY SHOW NAVIGATION
NAVIGATION ZOOM OUT <zoom level>
(1 – 12)
NAVIGATION STORE NAME
NAVIGATION DESTINATION
<nametag>
NAVIGATION MINIMISE DISTANCE
< > indicates a number or stored
nametag to be inserted.
For the full list of commands, see the
Chapter JaguarVoice, in this handbook.
12
Page 13

Introduction
Owner Information
General Information
The touch-screen provides touch-control
of vehicle climate, audio, navigation and
telephone systems, as fitted. A small
Liquid Crystal Display (LCD) screen below
the touch-screen provides a digital
display of the ambient temperature and
vehicle cabin set temperature and, for
X-TYPE, a clock.
Screen Cleaning
Caution: Care must be taken to avoid
spilling or splashing drinks onto the
touch-screen. In the event of such an
occurrence advise your Jaguar
Retailer.
Do not use any abrasive cleaners to clean
your touch-screen. For approved screen
cleaners, see your Jaguar Retailer.
This Handbook describes every option
and model variant available and
therefore some of the items covered
may not apply to your particular
vehicle.
The touch-screen setup and user menus,
clock setting, headlight setting, door
locking mode and auto-fold door mirrors
information is described within this
Chapter of this handbook
Note: Remember to pass on the vehicle
handbooks when reselling the vehicle.
Handbooks are integral parts of the
vehicle.
Note: Where the screen displays Dealer
or Dealership this refers to the vehicle
Retailer.
Pop-up messages
The operation of certain functions will
cause a small message to appear
overlaying the touch-screen display. This
‘pop-up’ is for information only and will
disappear automatically after a few
seconds.
Automatic Climate Control
The climate control system can be
controlled from the touch-screen buttons
(accessed via the CLIMATE button to the
left of the touch-screen) and is described
in the climate control chapter, page 21, of
this handbook.
Audio Systems
The vehicle audio system interacts with
the JaguarVoice, Navigation, In-car
Telephone and Climate Control systems
via data on the multiplex communications
vehicle network.
The audio system can be controlled from
the radio front panel buttons, the
touch-screen buttons accessed via the
AUDIO button on the left of the
touch-screen and from multi-function
controls on the left-hand side of the
steering wheel, where fitted. These
controls are described in ‘Audio System’,
page 31 of this handbook.
The sound system antenna is an integral
part of the vehicle rear screen and serves
both FM and AM radio wavebands.
13
Page 14

Introduction
Navigation System
This Jaguar navigation system assists the
driver by providing a route to a selected
destination. Guidance is given by means
of audible instructions (voice guidance),
complemented by map and turn
information, which is displayed on the
touch-screen. Digital map information is
held on the Navigation System Digital
Versatile Disc (DVD), which is loaded into
the navigation control unit housed in the
luggage compartment.
The system has an extremely
comprehensive range of features, yet is
easy to use. Some time spent reading the
Navigation System chapter in this
handbook will ensure that the best results
are obtained.
The touch-screen is used to control the
system by means of menus, text screens
and map displays.
!
WARNING:
1. The navigation Database reflects
reality as existing before you
received the Database and it
comprises data and information
from government and other
sources, which may contain errors
and omissions. Accordingly, the
Database may contain inaccurate
or incomplete information due to
the passage of time, changing
circumstances, and due to the
nature of the sources used. The
Database does not include or
reflect information on – amongst
other things – neighbourhood
safety; law enforcement;
emergency assistance;
construction work; road or lane
closures; vehicle or speed
restrictions; road slope or grade;
bridge height, weight or other
limits; road or traffic conditions;
special events; traffic congestion;
or travel time.
2. Only operate, adjust or view the
system when it is safe to do so.
In-Car Telephone
In this handbook, some features shown
are only available when the vehicle is
fitted with a Jaguar in-car telephone
installation. These features include the
display of the telephone button, the end
call button and one-touch dialling of
points of interest (POI) numbers or
memory points.
The telephone is described in the
separate In-car Telephone Handbook.
14
Page 15

Introduction
JaguarVoice
JaguarVoice provides a safe and
convenient way for the driver and/or rear
occupants to control the following vehicle
systems (where fitted):
• Sound system (radio, cassette tape
player, CD player and CD changer –
as applicable).
• In-car telephone.
• Climate control system (front user
only unless 4-zone climate control is
fitted).
• Display screen (front user only).
• Navigation (front user only).
The system is controlled in the front of the
vehicle by the steering wheel voice
button, and, when fitted in the XJ, in the
rear of the vehicle by the rear multimedia
switchpack voice buttons, see the
JaguarVoice chapter in this handbook.
Rear Multimedia (XJ only)
For details of this system, see the
separate Rear Multimedia handbook.
Note: The operation of certain functions
from the rear multimedia system will
cause a pop-up to appear on the
touch-screen. This is for information only;
the pop-up will disappear automatically
after a few seconds (it does not allow
control of the rear multimedia system).
Window Tinting
!
WARNING:
Do not have your vehicle windows
tinted with a metal oxide tinting (for
maximum heat reduction from sun
load) if you have a Navigation system
fitted to your vehicle.
Metal oxide tinting prevents the reception
of the Global Positioning Satellite (GPS)
signals by the antenna causing the
navigation system to stop functioning.
A non-metal tinting should be used if you
require window tinting and if in doubt,
contact your Jaguar Retailer for advice.
About this Handbook
This handbook shows the on-screen
menus, explains how to operate the
controls, and gives an example showing
how to set a destination. After becoming
familiar with the controls, follow the
on-screen menus and prompts, to
operate the system as required.
Throughout the handbook, the expression
‘Select an item’ (or similar wording),
means ‘Touch the on-screen button
adjacent to the item required’.
The buttons surrounding the
touch-screen display are referred to as
‘hard buttons’ and should be pressed not
touched. The screen buttons are ‘soft
buttons’ and only require to be touched to
function.
15
Page 16
Touch-screen Display
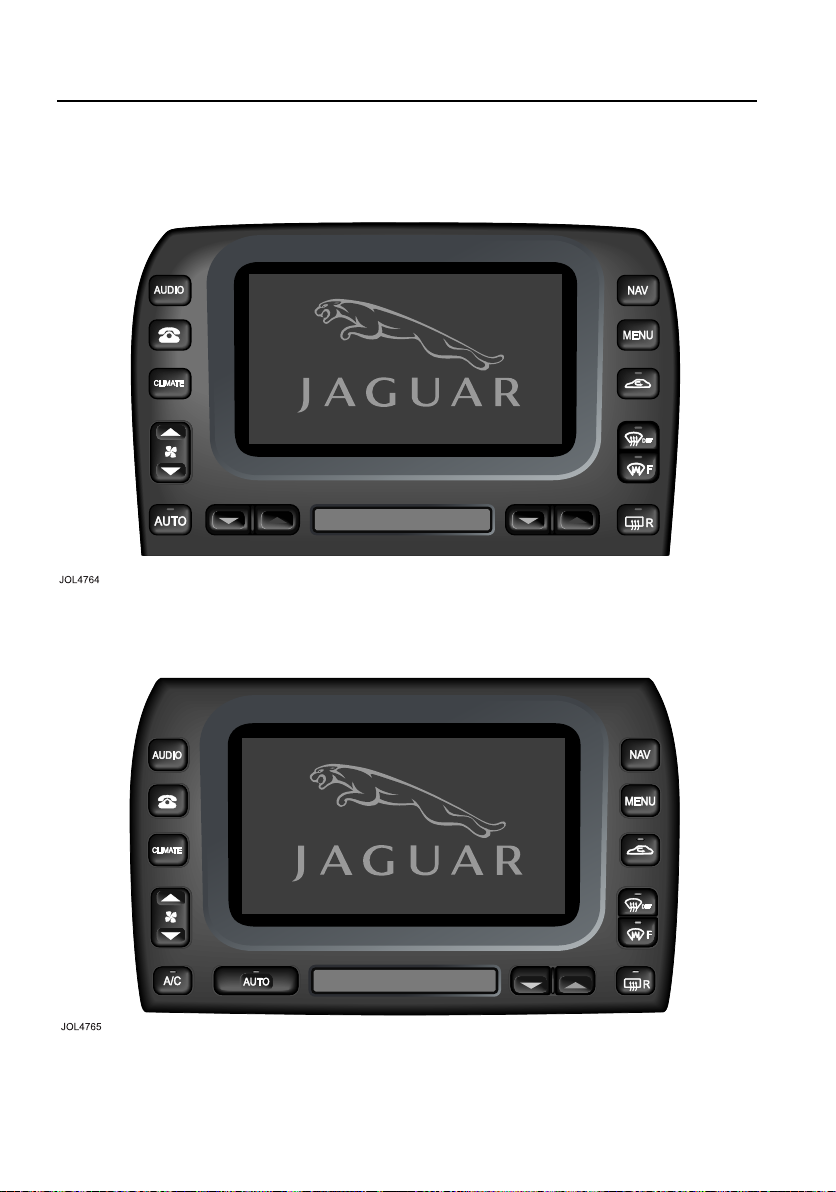
Touch-screen Display
XJ and S-TYPE Touch-screen
Display
X-TYPE Touch-screen Display
16
Page 17
Touch-screen Display
Vehicle Differences
Vehicle differences
The main differences between Jaguar
model touch-screens are:
• Climate control:
X-TYPE has a single cabin
temperature control.
S-TYPE has dual-zone temperature
control.
The XJ has dual-zone or four-zone
controls.
• Clock:
X-TYPE and S-TYPE have the clock
displayed on the touch-screen.
The XJ has an analogue clock on the
centre fascia.
• Rear Multimedia:
Only the XJ has the rear multimedia
option.
Touch-screen use and care
When the ignition switch is initially turned
to position ‘I’ or ‘II’, the touch-screen will
display the Jaguar logo screen followed
by activation and display of the mode
previously used. Display of buttons for
other systems can be obtained by
pressing the appropriate perimeter
button. Functions of the MENU button are
described on the following pages.
Note: When operating touch-screen
buttons, always extend the tip of one
finger, and withhold the thumb and
remaining fingers from the screen.
Touching the screen with more than one
finger at a time may cause false inputs.
The touch-screen and inner bezel must be
kept clean to maintain optimum
performance. Finger marks and attracted
dust should be regularly removed using a
soft cloth and a Jaguar approved cleaning
agent.
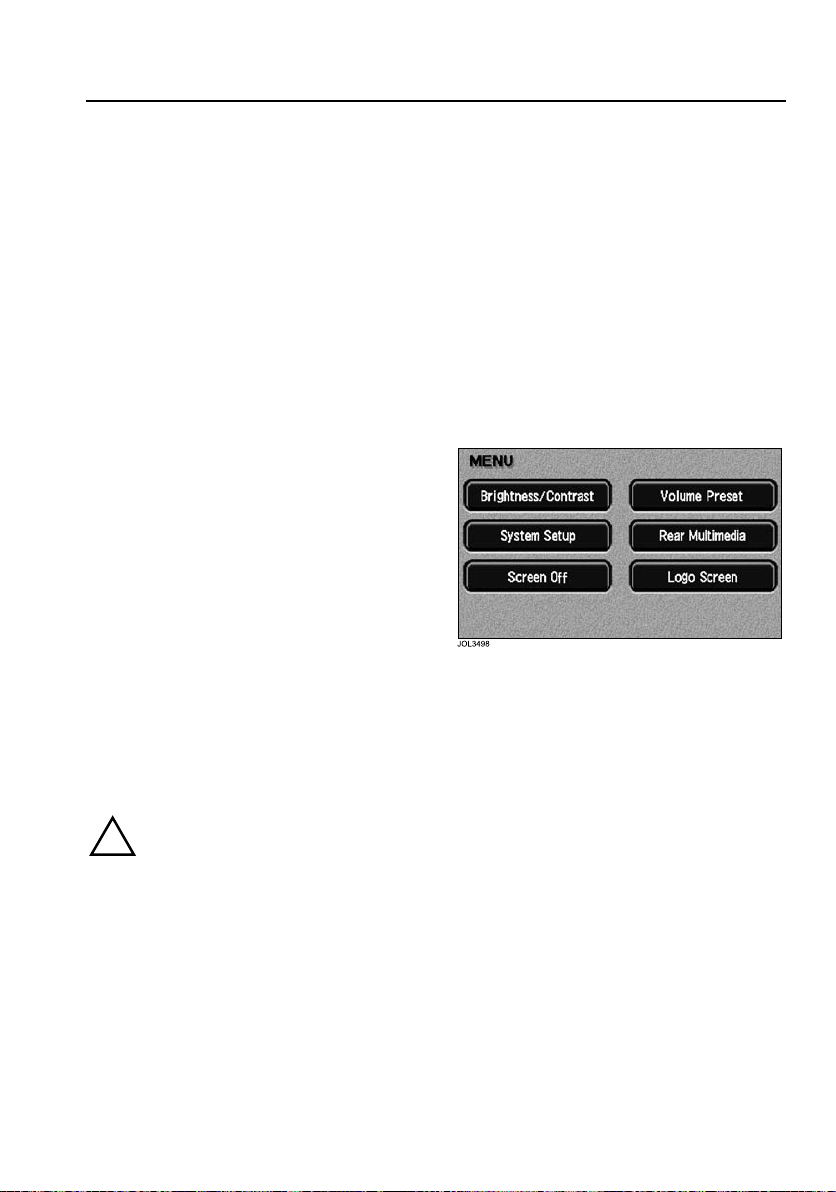
Menu
Pressing the MENU perimeter button will
display the system menu screen.
The screen display can be blanked out by
touching the Screen Off button.
Touch the screen, or press any of the
perimeter buttons, to restore the display.
!
WARNING:
In the interests of road safety, only
operate, adjust or view the system
when it is safe to do so.
Caution: Care must be taken to avoid
spilling or splashing drinks onto the
screen. In the event of such an
occurrence advise your Jaguar
Retailer.
17
Page 18
Touch-screen Display
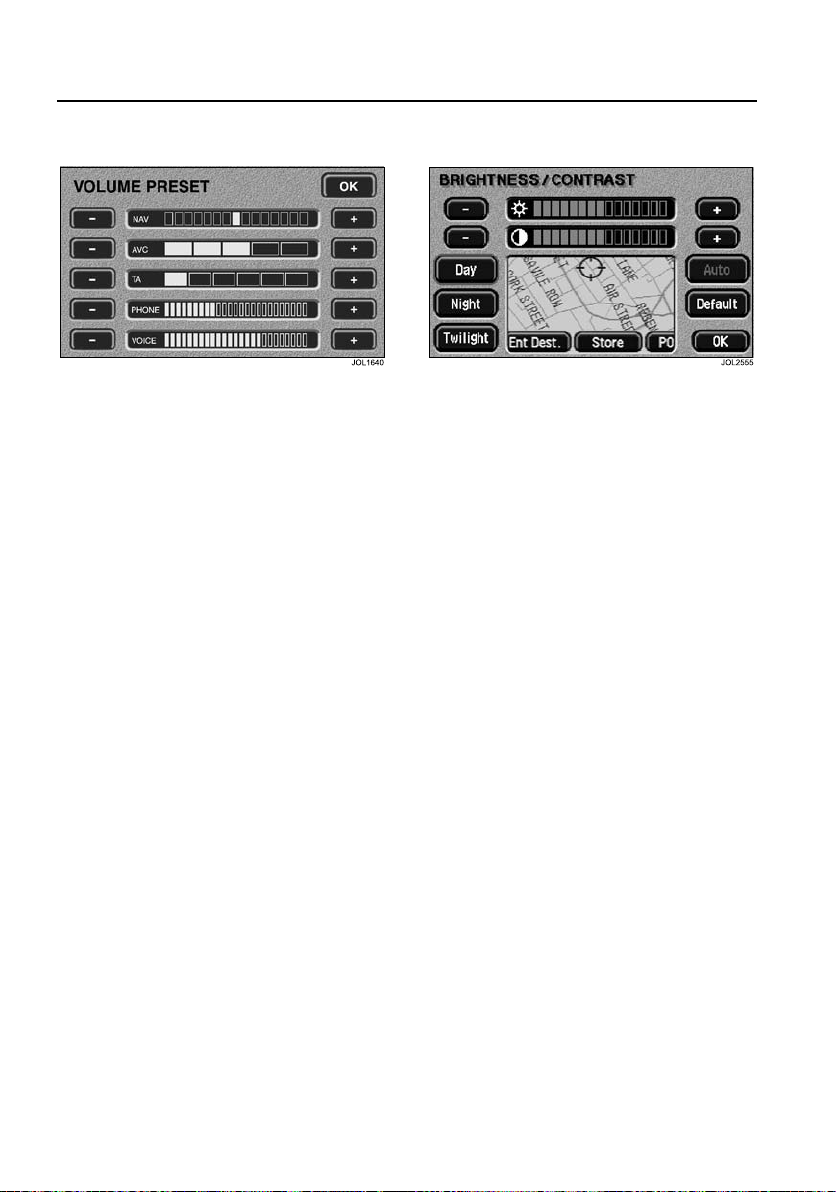
Volume Preset
After touching the Volume button, the
screen displays the buttons for
adjustment of volume associated with the
navigation system, JaguarVoice,
telephone, traffic announcements and
automatic volume control (AVC).
Adjustment of AVC varies the rate at
which volume is increased or decreased
relative to vehicle speed.
Touch or hold the ‘+’ or ‘-’ button to adjust
the volume of the selected function.
Note: If any of the volume slides are
adjusted to the fully ‘–’ position, then the
volume is turned fully off.
Confirm your selection by touching OK
and the system menu screen will once
again be displayed.
Brightness/Contrast
After touching the Brightness/Contrast
button, the screen displays the buttons
for adjustment of the screen display
characteristics. The centre window shows
the currently selected navigation view.
Touch the ‘+’ or ‘–’ button to adjust the
selected function.
Screen brightness and contrast can also
be dimmed for night driving. This is
achieved either manually via the Day,
Night or Twilight buttons (independent of
the exterior light switch position), or
automatically via the Auto button
(controlled by the exterior light switch
position).
Touch the Default button to restore the
default settings.
Confirm your selection by touching OK.
18
Page 19
Touch-screen Display
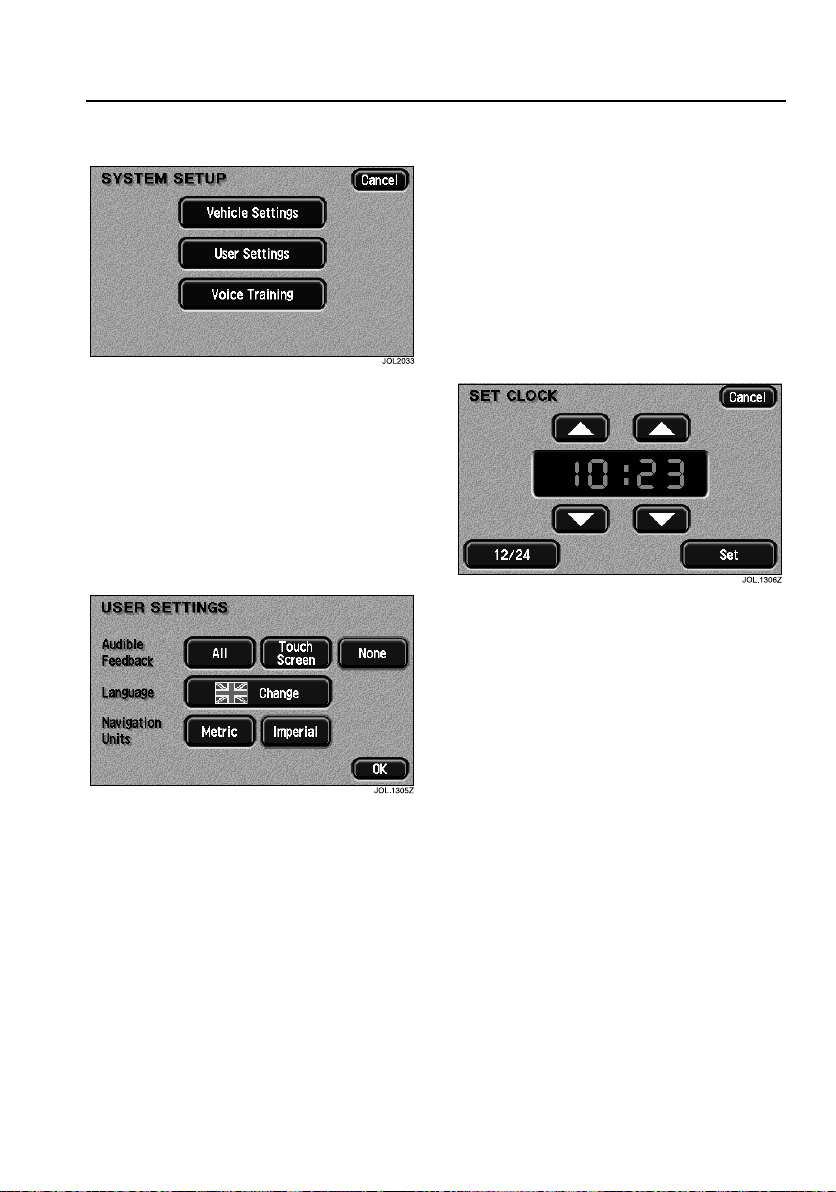
System Setup
After touching the System Setup button,
the screen displays the buttons for
selecting user settings or vehicle settings.
Note: Vehicles which have the
JaguarVoice system fitted will have an
additional button on the system setup
screen for voice training.
User settings
To select another language, touch the
Change button and, if the language is not
shown, scroll the screen as required. To
select a language, touch the flag of the
country required.
Navigation Units provides either imperial
or metric units for use with the navigation
system.
Confirm your selection by touching OK.
Set clock
Clock adjustment on S-TYPE and X-TYPE
is made by touching the hour or minute up
or down arrow button.
Touch the ‘12/24’ button to select twelve
or twenty-four hour display.
Confirm your settings by touching SET.
The XJ clock adjustment is described in
the XJ Owner’s Handbook.
After touching the User Settings button,
the screen displays the buttons for the
selection of audible feedback, language,
and units of measurement.
All selects audible feedback on the
perimeter buttons and touch-screen
buttons. Touch Screen selects audible
feedback on the touch-screen buttons
only. None selects no audible feedback.
19
Page 20

Touch-screen Display
The XJ vehicle settings
After touching the Vehicle Settings
button, the screen displays the buttons
that switch certain functions on or off.
Two-stage unlock
If this function is switched on, the first
press of the key transmitter ‘unlock’
button will only unlock the driver’s door.
Press the unlock button a second time to
unlock the remaining doors.
If the function is switched off, pressing the
unlock button once will unlock all of the
doors.
Auto fold door mirrors
When this function is switched on, the
door mirrors will automatically fold flat
when global closing is performed (refer to
Security and Locks Section of the
Owner’s Handbook).
Daytime running lamps
Where fitted, daytime running lamps will
be activated. It is particularly useful when
visiting countries where daytime running
lamps are compulsory.
20
Page 21

Climate Control
Climate Control
Information
A general introduction to the climate
control system is given in the Owner’s
Handbook. The operating information
given here refers to the touch-screen and
other controls.
Both the XJ and S-TYPE have driver and
passenger (dual zone) red and blue
temperature control arrow buttons.
X-TYPE has only one set of red and blue
arrow buttons for interior temperature
control.
Refer to The XJ Owner’s Handbook for
information on the rear climate control
panel fitted with the optional 4-zone
system.
Controls and displays
The climate control system has its own
menu on the touch-screen. A number of
other buttons are also used for climate
control and are located around the
perimeter of the touch-screen. When a
perimeter button is pressed, selection of
the function is confirmed by a beep and,
on most buttons, illumination of a Light
Emitting Diode (LED).
An LCD screen below the touch-screen
shows the interior temperatures set by the
driver and passenger and the external
(EXT) ambient temperature.
Note: Using other systems and
touch-screen displays, such as audio or
navigation, does not affect the climate
control settings.
Panel illumination
With the exterior lighting switched on, the
graphics on the panel controls are
illuminated by low level backlighting.
The illumination level is adjusted by the
common instrument panel dimmer
control.
21
Page 22
Climate Control
Controls (XJ and S-TYPE)
1. Select climate control touch-screen.
2. Adjust blower speed.
3. Select automatic operation.
4. Decrease left-hand zone temperature.
5. Increase left-hand zone temperature.
6. LCD screen: interior and exterior
temperatures.
7. Decrease right-hand zone
temperature.
8. Increase right-hand zone
temperature.
9. Heated rear screen/door mirrors.
10. Heated front screen.
11. Defrost operation.
12. Select air recirculation.
13. Touch-screen.
22
Page 23
Climate Control
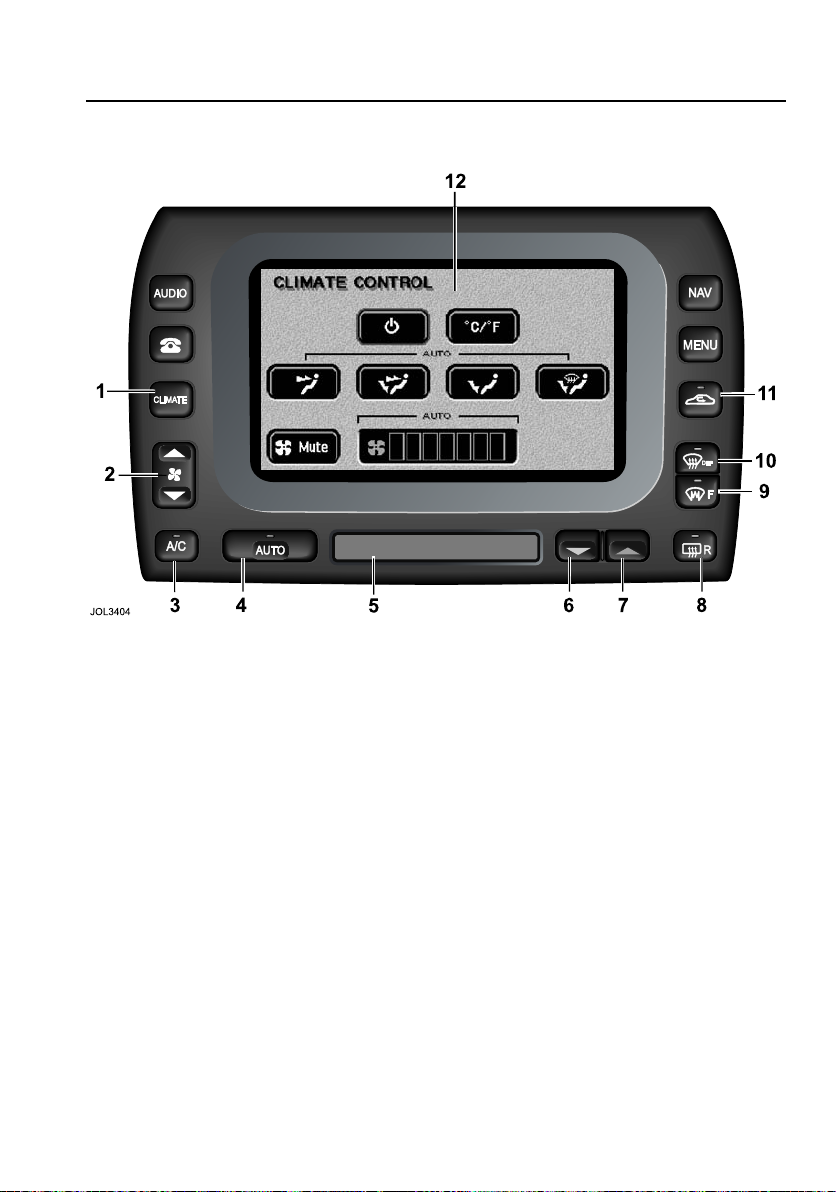
Controls (X-TYPE)
1. Select climate control touch-screen.
2. Adjust blower speed.
3. Air conditioner on/off.
4. Automatic operation.
5. LCD screen: interior and exterior
temperatures and clock.
6. Decrease set temperature.
7. Increase set temperature.
8. Heated rear screen/door mirrors.
9. Heated front screen.
10. Defrost operation.
11. Select air recirculation.
12. Touch-screen.
23
Page 24
Climate Control
Ignition On
The climate control system operates in
position ‘II’ (run) of the ignition switch.
Wh en th e ig nit ion i s swi tch ed to run or t he
engine is started, the Jaguar logo will be
displayed briefly followed by the last
touch-screen selected (e.g. radio).
The climate control system will be set to
the climate operating mode selected
previously.
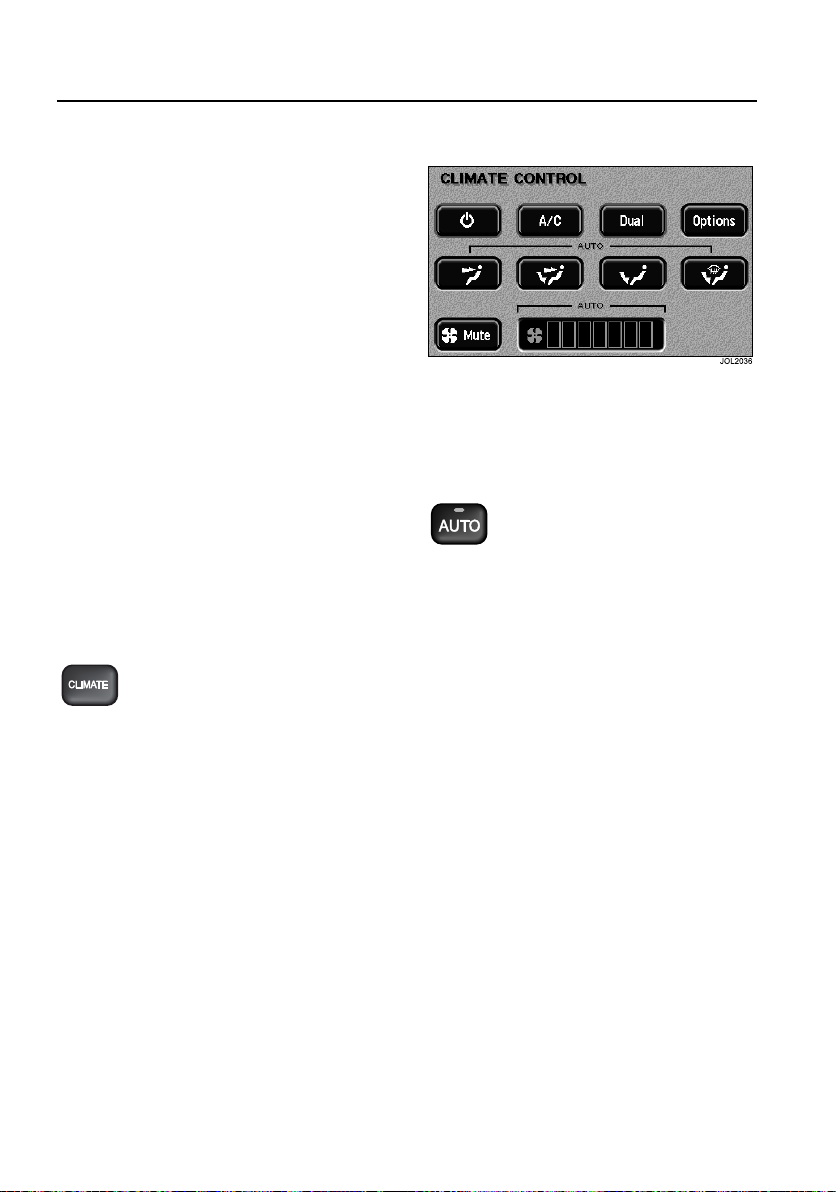
Climate Control Displays
There are two climate control
touch-screen displays, one for the system
‘ON’ state and the other for system
‘OFF’/ram air mode. Smaller pop-up
displays appear briefly when selecting air
recirculation or adjusting the blower
speed.
Most climate functions can be selected
using the perimeter buttons without
displaying the climate touch-screen
buttons.
To select the touch-screen
display, press the CLIMATE
button.
To exit the climate control screen, select
another system function, e.g. AUDIO.
AUTO Mode
Automatic operation provides a
controlled environment over a
temperature range of 61°F to 89°F
(17°C to 31°C) and should be regarded as
the normal operating mode.
To select automatic climate
control press the AUTO button
and select the required
temperature.
The AUTO mode touch-screen is shown
above. If the touch-screen is not
displayed, press the CLIMATE button.
Front and rear screen heating and timed
air recirculation may be selected while
remaining in AUTO mode. Selecting any
other climate control perimeter button or
touch-screen button will cancel AUTO
operation.
Automatic operation cannot be
deselected using the AUTO button. To
exit AUTO mode, select another climate
mode or touch the system ON/
OFF button to switch the system off.
24
Page 25
Climate Control
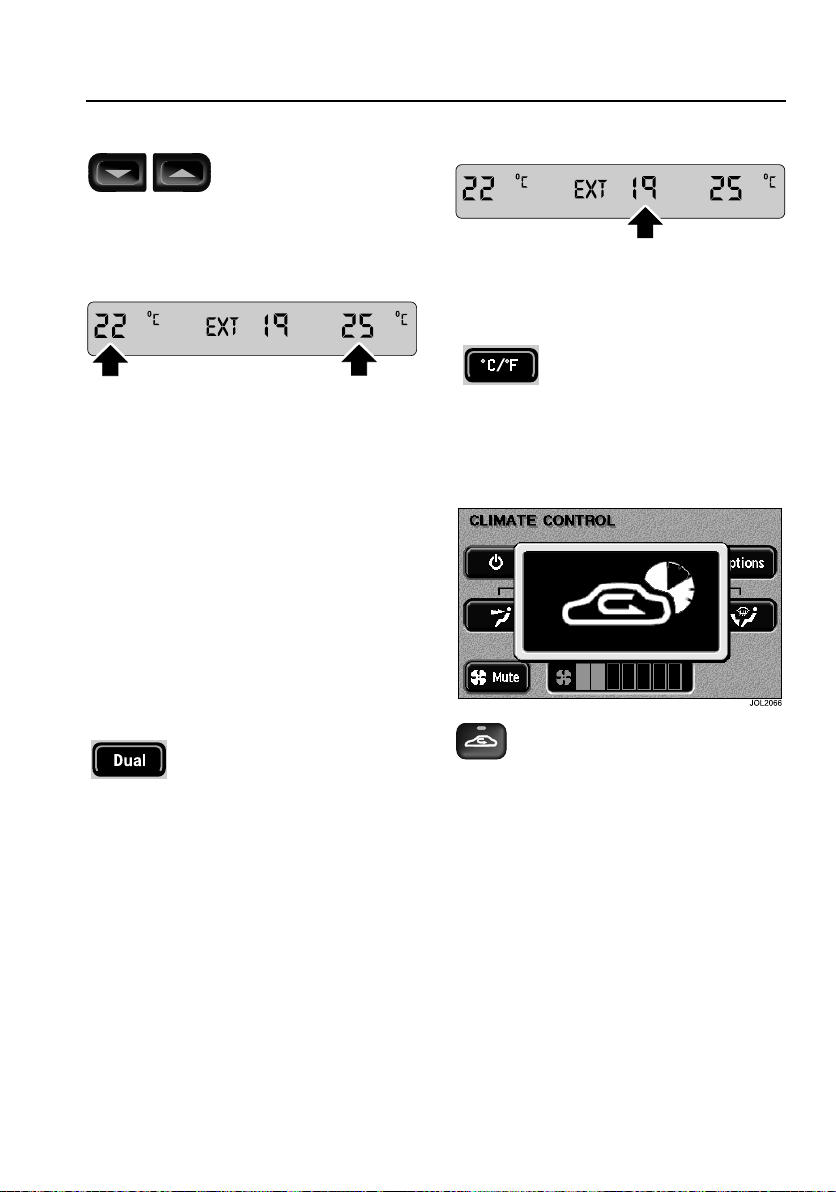
Temperature Selection
Set the required interior
temperature with the
red or blue arrowed
buttons. Press the red buttons to increase
temperature and the blue buttons to
decrease temperature.
The selected temperatures (right-hand
side only for X-TYPE) will appear on the
LCD screen below the touch-screen.
Pressing the driver’s buttons to select the
maximum or minimum temperature
settings causes the LCD screen to
change to HI or LO respectively and
cancel AUTO mode.
To quickly jump from HI or LO to a
convenient midrange temperature of
73°F (23°C), press and hold AUTO for a
few seconds.
Dual Temperature Zones
(The XJ and S-TYPE)
With the Dual button
illuminated, the system
provides separate
temperature control of the driver and
passenger zones.
Touch Dual to deselect dual temperature
control; the passenger temperature will
change to that of the driver side. Using
the driver side temperature control
buttons will now change both zone
temperatures together.
To select dual temperature control, either
touch Dual or press one of the passenger
side temperature control buttons.
External Temperature
The external (EXT) temperature is
displayed on the LCD screen.
Celsius/Fahrenheit Selection
Touch the button to change
the scale between degrees
Celsius (°C) and degrees
Fahrenheit (°F) for the displayed interior
and external temperatures.
Timed Air Recirculation
Press the button briefly to select
air recirculation for a timed
period only; the pop-up shown
above will appear for a few seconds on
top of the currently selected
touch-screen.
The fresh air intake is opened and the
button LED extinguished at the end of the
timed period.
Latched fresh air
Pressing the air recirculation button when
the button LED is illuminated will cancel
recirculation and allow fresh air into the
vehicle.
25
Page 26

Climate Control
Deselecting air recirculation cancels
AUTO mode.
Latched Air Recirclation
To latch air recirculation (so that
it remains selected), press and
hold the air recirculation button
until the pop-up changes from the timed
to the latched recirculation symbol.
Selection is also indicated by two beeps
and the button LED flashing four times
then remaining illuminated.
Selecting latched recirculation cancels
AUTO mode.
!
WARNING:
Prolonged operation with recirculation
selected in cold, damp conditions
could result in interior condensation.
Windscreen Defrost/Demist
Frost and heavy misting
To remove frost or heavy
misting from the windscreen,
press the DEF button.
• The blower switches on automatically
at a high speed but the speed can be
increased or decreased manually if
required.
• Air conditioning switches on
automatically and cannot be
deselected.
• Recirculation is cancelled and cannot
be selected.
• The front screen heater and the rear
screen heater/door mirror heaters
switch on automatically, provided the
engine is running.
To deselect defrost mode, press DEF
again, or press AUTO (recommended
operating mode).
Light misting
To prevent or remove light
windscreen misting, select
manual air distribution to
windscreen and feet (see
‘Manual Air Distribution’,
page 27).
Heated Screens and Door
Mirrors
The front screen heater (F) and
the rear screen heater (R) may
be switched on and off in any
mode, including system off, but
only operate when the engine is
running. The door mirror heaters
are also controlled by the rear screen
heater button.
The front screen heater (where fitted)
switches off automatically after 4 minutes.
The rear screen and door mirror heaters
switch off automatically after 10 minutes.
The windscreen heaters may be manually
deselected during the time out period
using the buttons.
26
Page 27
Climate Control
In cold ambient conditions, at the start of
a journey, the front and rear screen
heaters will switch on automatically for
the timed period.
Where a front screen heater is not fitted,
the windscreen has a wiper park zone
heater which operates automatically with
no manual control.
Note: The top three lines of the rear
screen pattern are a concealed antenna
and do not defrost the rear screen.
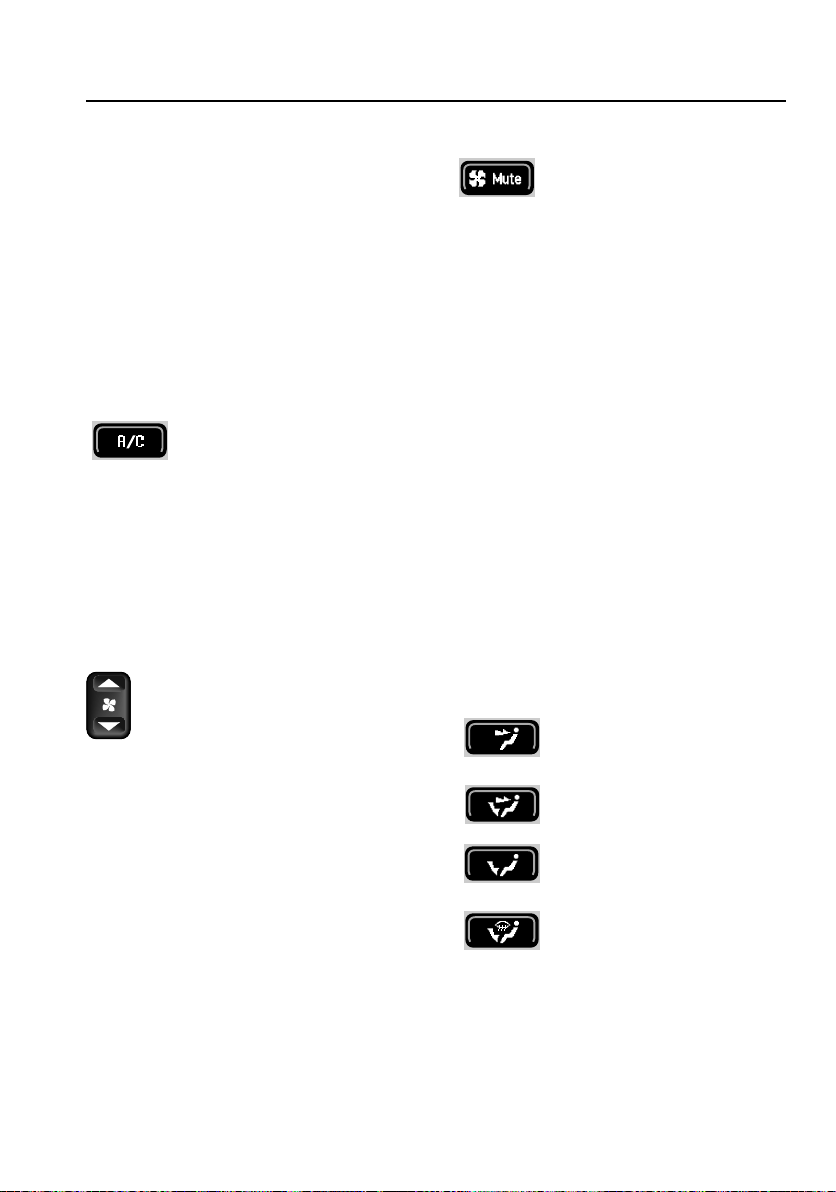
Air Conditioning
Touch the A/C button to
switch the air conditioning on
or off.
The air conditioning system is controlled
automatically in AUTO mode. Deselecting
A/C cancels AUTO mode.
The air conditioning system is also
switched on automatically in defrost
mode (DEF) but cannot be deselected.
Blower Speed
Set the blower speed as required
using the rocker button. Blower
speed is shown as a series of bars
on the touch-screen.
If the blower speed is changed while a
non-climate control touch-screen is
displayed, a pop-up display showing the
blower speed bars will appear for a short
period.
When operating in AUTO mode, blower
speed is controlled automatically (but not
displayed) and any adjustment of the
button will cancel AUTO mode.
Note: In AUTO mode, the blower will only
operate at low speed until the engine is
warm, if heating is required in the vehicle.
Blower Mute
To reduce the interior noise
level, the blower speed may
be quickly reduced to a
preset level by touching the Mute button.
Selecting Mute will cancel AUTO mode
but touching the Mute button again will
return operation to the previous state.
When JaguarVoice is fitted, the climate
control system will automatically prevent
any increase in blower speed while
speech commands are given.
Note: The Mute function should only be
used for short periods, as it reduces the
efficiency of the climate control system.
Manual Air Distribution
Air distribution is automatically controlled
in AUTO and defrost modes.
Touch one of the four air distribution
buttons on the screen to cancel the
current mode and select manual
operation.
The air distribution options are:
Airflow directed at face
level only; select to cool
the interior.
Airflow distributed to the
face and feet.
Airflow directed to feet
level; select to heat the
interior.
Airflow distributed to the
windscreen and feet;
select to prevent or
remove light misting and
when heating the interior.
27
Page 28
Climate Control
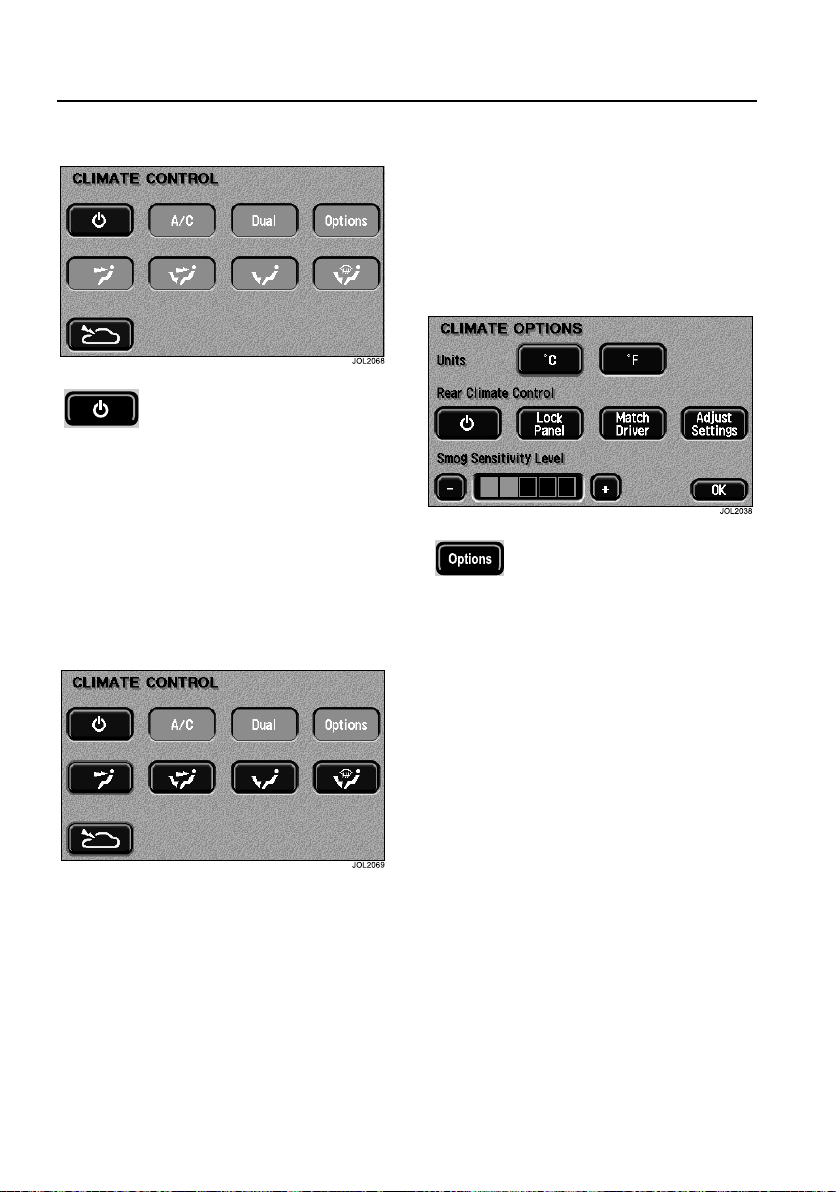
Switching Climate Control Off
To switch the system off,
touch the system ON/OFF
button on the CLIMATE
CONTROL screen. The touch-screen will
change to the system off/ram air climate
control screen above.
Pressing the system On/Off button will
return the system to the previous state.
It is recommended that AUTO is selected
to switch the system on again.
Ram Air
Any of the other air distribution modes
may be selected manually using the
touch-screen.
With the blower switched off, the fresh
airflow results from the forward motion of
the vehicle (ram air mode).
Climate Options
The Options button is
displayed in place of the
°C/°F button if the optional
smog sensor and/or rear climate control
panel (4-zone system) are fitted (The XJ
only).
Touching Options displays the Celsius
(°C) and Fahrenheit (°F) selection buttons.
The display also shows either the rear
control panel buttons or the smog sensor
setting or both.
With the climate control system switched
off, air recirculation is automatically
selected (intake flap closed).
To select fresh air with the system off,
touch the ram air button (bottom left on
illustration). The intake flap will open with
air distribution to face level automatically
selected.
28
Page 29
Climate Control
Items Relevant to the XJ Only
Smog sensing
Where fitted, the smog sensor detects
road traffic pollutants and automatically
selects air recirculation when the level of
pollution outside the vehicle reaches a
certain level. The level of pollution at
which the smog sensor will respond can
be adjusted on the Options screen.
Once the level of pollutants decreases, air
recirculation will switch off (subject to the
normal operation of the automatic climate
control system).
To adjust smog sensitivity: Touch the
‘+’ button to increase sensitivity to low
smog levels. Touch the ‘–’ button to
decrease sensitivity.
Caution: Don’t set the smog sensor to
a needlessly high level in cold and
damp conditions: this could result in
interior condensation.
Controlling the rear climate panel from
the touch-screen
On the ‘Climate Options’ screen, see
page 28, the ‘Rear Climate Control’
buttons provide control of the rear
system:
• Touch the left-hand button to switch
the rear control panel on or off.
• Touch Lock Panel to lock the rear
climate control panel. This prevents
rear passengers from altering the rear
climate settings, until the next time
the ignition is switched on.
• Touching Match Driver causes the
rear zones to adopt the same settings
as the driver’s zone. Any adjustments
made directly on the rear panel will
override these settings.
• Touch Adjust Settings to alter the
settings of the rear zones. A
simulation of the rear control panel
will be displayed on the touch-screen.
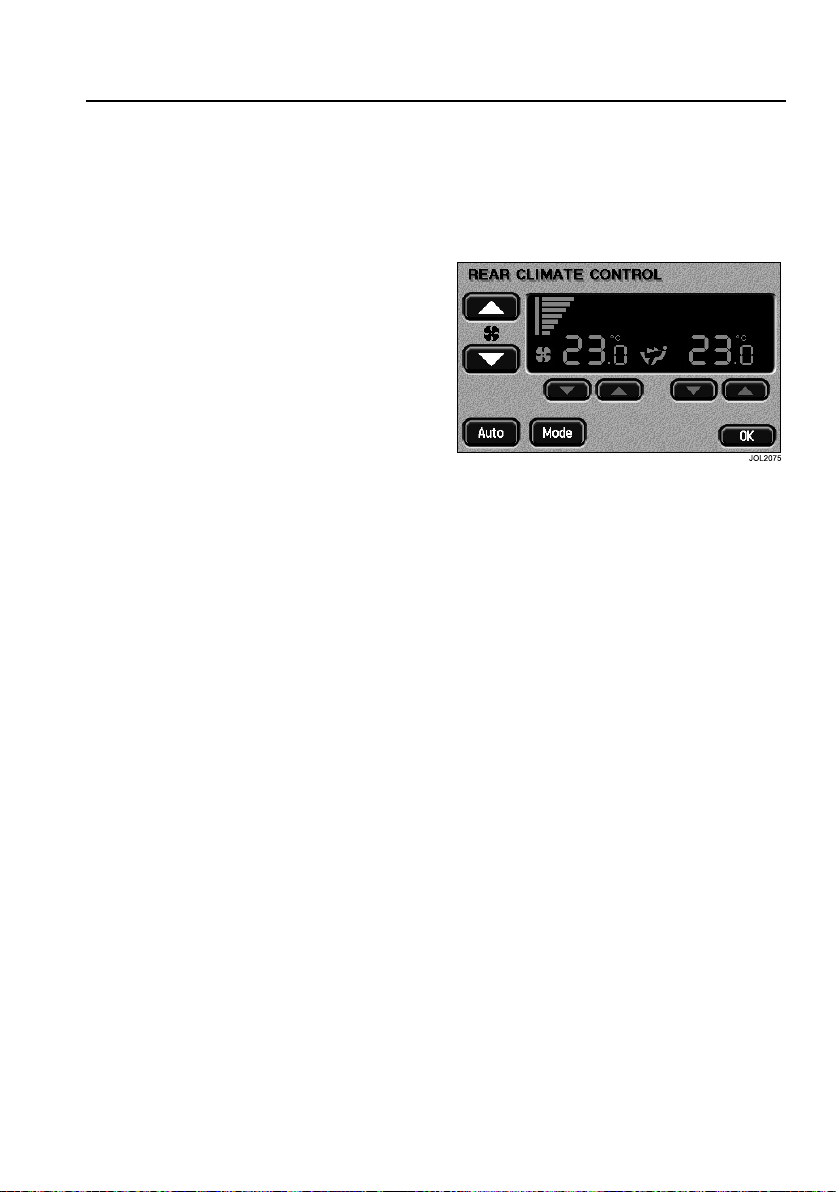
Simulated rear control panel
The simulation of the rear climate control
panel allows all of the rear climate
functions to be controlled via the
touch-screen.
Operation of these touch-screen buttons
is as described for the rear panel itself in
the Owner’s Handbook.
Note: It is not possible to make
adjustments on the actual rear panel while
the touch-screen simulation of the panel
is displayed. The touch-screen display will
revert to the main climate screen
30 seconds after the last touch.
29
Page 30

30
Page 31

Audio System
XJ and S-TYPE
X-TYPE
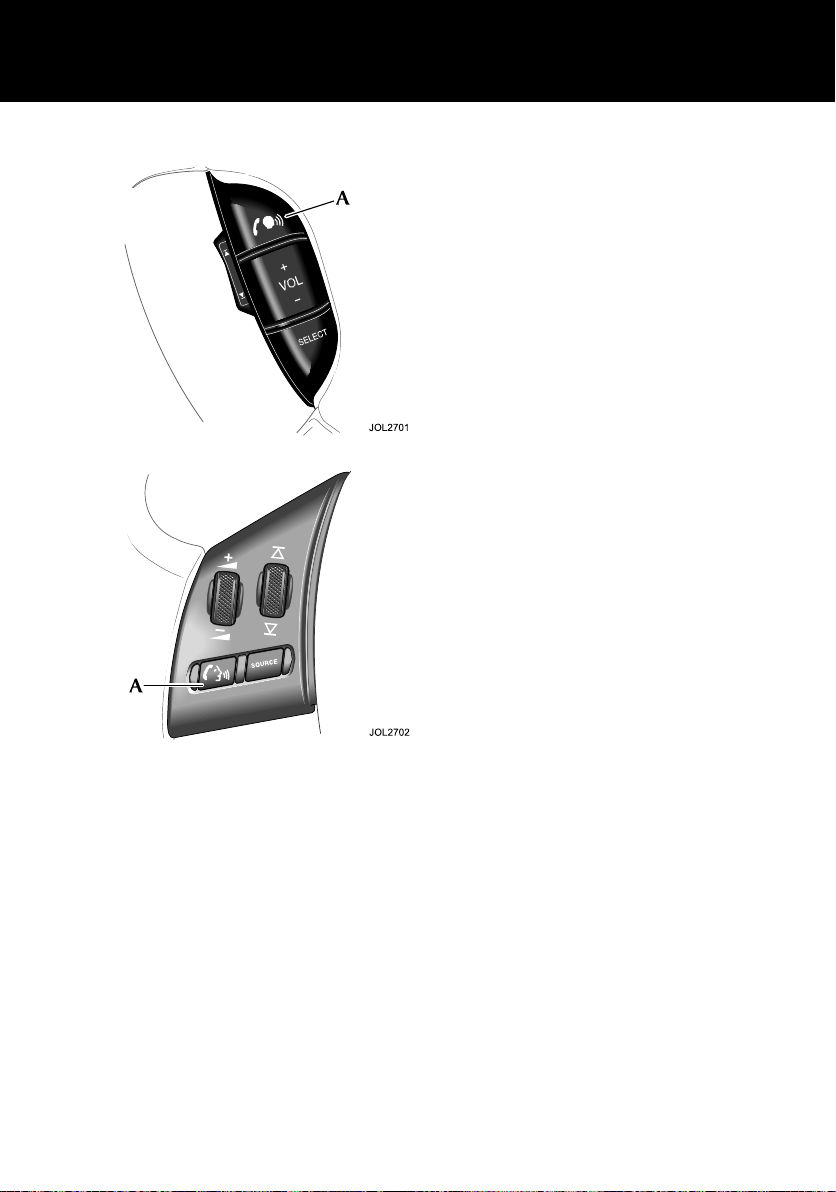
Steering Wheel Controls
Note: Switches illustrated as 2 and 4 are:
•
The XJ and S-TYPE - rocker switches.
•
X-TYPE - part rotating switches which
self-centre when released.
1. Press to start a voice session, or mute
when JaguarVoice is not fitted.
Answer phone call when ringing.
Send/End when in phone mode.
2. Press/rotate as required to increase or
decrease volume.
3. Press and release to cycle through
Radio FM, AM, Cassette, CD or MD
and CD Changer, or press and hold
for at least two seconds to select
Phone Ready mode.
4. Press/rotate as required and release
to cycle through preset radio stations,
the next CD/MD track or tape AMS
(Automatic Music Search).
Press/rotate and hold for at least two
seconds to cycle to next strong
station, next CD or change tape side.
Four audio system control switches are
situated on the left-hand side of the
steering wheel. Duplicating the functions
of buttons on the audio panel, these
provide finger-tip control of audio and
telephone systems whilst driving.
31
Page 32

Cassette Tape
Cassette Tape
1. AUDIO. Press to turn audio system
ON, or to display relevant audio
screen and associated touch-screen
buttons.
2. Touch-screen display.
3. MENU. Press to access
touch-screen options.
4. MIX. Mix CDs or CD tracks playing
order.
5. PTY. Priority programme type (where
broadcast).
6. TA. Traffic announcement and Radio
Data System (where broadcast).
7. A MEM. Automatically set station
presets.
8. CDC. Select CD changer.
9. TAPE. Select cassette tape play when
in other audio mode, or tape side
change (when a tape is inserted and
playing).
10. AM/FM. Radio waveband select.
11. Seek AM/FM station, seek tape or
cue/review CD.
12. MODE. Scroll to select sound
settings.
13. ON/OFF and volume control.
14. Eject cassette tape.
32
Page 33

Cassette Tape
Cassette Player Operation
In TAPE mode, touch-screen buttons
(shown above) provide for selection of
cassette tape track, Dolby and change
sides.
The display will show the cassette screen
and indicate SIDE 1. The cassette symbol
will be displayed until the tape is ejected,
regardless of the selected audio source.
When loaded, a tape immediately plays
and after playing one side, auto-reverses
and plays the other. Equalisation of
non-ferric tapes is automatically adjusted.
Eject
Press to eject the cassette.
TAPE button
If you are playing the radio or CD
changer, pressing TAPE will play
any cassette in the player.
This function can also be controlled by a
button on the steering wheel
(see page 31).
Dolby B
When using a cassette with a
‘Dolby’ recording, the noise
reduction system can be
selected by pressing the DOLBY button.
DOLBY will be displayed to indicate the
system is active.
Dolby noise reduction system is
manufactured under licence from Dolby
Laboratories Licensing Corporation.
‘Dolby’ and the double-D symbol are
trademarks of Dolby Licensing Corp.
Changing tape side
Touch and release to change
to other side of cassette tape.
This function can also be
controlled by a button on the steering
wheel (see page 31) or the TAPE button.
Fast forward and rewind
These controls have two
functions, to seek a track,
and tape fast forward or
rewind. Momentarily pressing the
right-hand button will locate the
beginning of the next track. Similarly
pressing the left-hand button, will return
to the beginning of the current track.
Pressing and holding the appropriate
button for 2 seconds will activate
continuous fast forward or rewind of the
tape. This can be cancelled by pressing
either button again.
33
Page 34

Single CD Player
Single CD Player
1. AUDIO. Press to turn audio system
ON, or to display relevant audio
screen and associated touch-screen
buttons.
2. Touch-screen display.
3. MENU. Press to access
touch-screen options.
4. MIX. Mix CDs or CD tracks playing
order.
5. PTY. Priority programme type (where
broadcast).
6. TA. Traffic announcement and Radio
Data System (where broadcast).
7. A MEM. Automatically set station
presets.
8. CDC. Select CD changer.
9. CD. Select compact disc pla y when in
other audio mode, or CD pause (when
a CD is inserted and playing).
10. AM/FM. Radio waveband select.
11. Seek AM/FM station, cue/review
CD/MD.
12. MODE. Scroll to select sound
settings.
13. ON/OFF and volume control.
14. Eject CD or MD.
Single CD Player Operation
34
Page 35

Single CD Player
In CD mode, touch-screen buttons
(shown above) provide for selection of CD
tracks.
The display will show the CD screen. The
CD symbol will be displayed until the CD
is ejected, regardless of the selected
audio source.
Inserting a CD into the aperture will start it
playing.
Eject
Press to eject the CD.
Mix
To play random tracks from the
disc, press and release the Mix
button. MIX will be displayed.
To cancel, press the Mix button again
Repeat
Press and release Repeat
button to repeat the current CD
track being played.
To cancel, press the Repeat button
again.
Seek up and down
Touch and release to seek
tracks up or down.
Momentarily press the
right-hand button to skip to the next track.
Repeated pressing will select further
tracks.
The left-hand button returns to the
beginning of the current track. Repeated
pressing selects previous tracks.
Pushing and holding either button selects
cue and review of the CD.
Note: Sound level is reduced when
cueing and reviewing a CD.
Pause
Touch the pause button to
pause CD play.
Note: Pause button function
changes to a play button, a subsequent
press will resume CD play.
CD button
If you are playing the radio or CD
changer, pressing CD will play
the CD in the player. This
function can also be controlled from the
appropriate button on the steering wheel
(see page 31).
35
Page 36

Compact Disc (CD) Changer
Compact Disc (CD) Changer
Loading the CD changer
A CD changer (where fitted) is installed in
the luggage compartment and will
accommodate up to six discs, each
mounted in a tray.
Caution: The 8 cm diameter discs and
associated adaptors available in some
countries must not be installed in the
CD changer magazine. Any attempt to
install these items can result in
permanent damage to the CD changer
mechanism.
CD check sequence
When the CD Player is switched on, a
check is performed on each disc tray in
the CD changer magazine. When the six
trays have been checked the player
returns to the first disc in the magazine.
Loading discs and inserting magazine
Loading a disc into the magazine tray:
Slide the magazine door to the right (1).
Press the eject button (2), the magazine
will then partly eject from the CD changer.
Pull the disc tray from the magazine (3).
Ensuring the playing surface is not
touched, load a selected disc into the tray
with the label facing upwards (4).
Push the tray back into the magazine until
it clicks. Tray slots are numbered 1
(bottom) to 6 (top).
Inserting the magazine:
With the arrow mark facing upwards and
pointing towards the CD changer, insert
the loaded magazine into the CD changer
(5) ensuring that it clicks into position.
Keep the sliding door closed to prevent
dust entering the playing mechanism.
36
Page 37

Compact Disc (CD) Changer
CD Changer Operation
CD changer mode
In CD changer mode, touch-screen
buttons (shown above) provide for track
and disc selection. Discs present in the
magazine are highlighted in the display.
A disc is selected by touching the
appropriate disc button which when
playing, has a red active surround.
The track and track duration are
displayed during play.
CDC button
Press CDC to select CD
changer mode.
Note: Button labelled as CD for
cassette models.
This function can also be controlled from
the appropriate button on the steering
wheel (see page 31).
Mix and CD mix
To play random tracks from a
selected disc, press and
release the Mix button. MIX
TRACKS will be displayed. To cancel,
touch the Mix button again.
To play random tracks from all discs
present in the magazine, touch and hold
the Mix button for more than 2 seconds.
MIX ALL will be displayed. To cancel,
touch and hold the Mix button.
Seek up and down
Touch and release to seek
tracks up or down.
Momentarily press the
right-hand button to skip to the next track.
Repeated pressing will select further
tracks.
The left-hand button returns to the
beginning of the current track. Repeated
pressing selects previous tracks.
Pushing and holding either button selects
cue and review of the CD.
Note: Sound level is reduced when
cueing and reviewing a CD.
Repeat
Momentarily press the Repeat
button to repeat the current
CD track being played.
REPEAT TRACK will be displayed. To
cancel, momentarily press the Repeat
button again.
Press and hold the Repeat button for 2
seconds to repeat the current CD.
REPEAT DISC will be displayed. To
cancel, press and hold the Repeat button
again for 2 seconds.
Pause
Touch the pause button to
pause CD play.
Note: Pause button function
changes to a play button, a subsequent
press will resume CD play.
37
Page 38

Rear Multimedia
Rear Multimedia
Rear Multimedia Operation
(The XJ only)
In REAR MULTIMEDIA mode, when the
rear multimedia system is using one of its
own audio sources to play through the
cabin speakers in the car, the front screen
above is displayed. The possible audio
sources from the rear multimedia are,
DVD, AUX1, AUX2 (when selected from
the rear multimedia system and not from
the front).
This feature will allow the front occupants
to turn on the rear speakers if the rear
occupants have turned them off using the
rear multimedia system.
The front user can turn the rear speakers
on by pressing the ‘rear speakers on’
button. If the button is disabled, then the
rear speakers are already on.
Note: When the rear occupants turn the
speakers on or off, a pop-up will appear
on the front screen showing either REAR
SPK ON or REAR SPK OFF.
In the example above the AUX1 is being
used and, for driver information, TP, TA or
PTY is set on the radio.
The ‘rear speakers on’ button is shown on
this page with the REAR SOURCE display
screen but applies also to the FM screen
display, the Tape display, the CD display,
the MD display and the CDC display.
38
Page 39

Rear Multimedia
Rear Multimedia Settings
The XJ driver or front seat passenger can
inhibit the Rear Multimedia System
Controls.
Press the MENU button, followed by the
Rear Multimedia button on the
touch-screen, then select one of three
options:
!
WARNING:
With the rear multimedia system turned
on, the rear seat passengers have the
ability to control the audio system
functions including the adjustment of
volume through the cabin speakers.
1. On - The rear switch pack is fully
enabled allowing control of cabin
speakers and phone.
2. Headphone only - The rear switch
pack control of cabin speakers is
inhibited. Control using headphones
is still available.
3. Off – This fully inhibits the rear switch
pack controls.
Note: When the telephone or
JaguarVoice is being used these buttons
will be disabled.
Balance and tone adjustment
Bass, Treble, Balance (left to right), Fade
(front to rear). Subwoofer level is also
adjustable on Premium Audio Systems.
Adjustments are made by pressing and
releasing the MODE button on the audio
panel and adjusting the required
touch-screen ‘slides’ (see illustration
above) by repeatedly pressing the ‘+’ or
‘–’ buttons.
If the MODE button is pressed again the
display will automatically progress to the
next function on the mode menu.
If no adjustment is made within 5
seconds, the audio system will revert to
radio, tape or CD/MD play as previously
selected.
Source tone memory
Bass and Treble positions are
automatically memorised for AM Radio,
FM Radio, Cassette Tape, CD/MD
allowing individual settings for each
mode.
39
Page 40

Radio
Radio
Radio Operation
Reception
FM reception offers the advantages of low
noise interference, minimal distortion,
wide dynamic range, extended frequency
response, and is usually broadcast in
stereo. FM frequency waves are however
relatively short and travel in a straight line
and can therefore be impeded by
obstructions, which may adversely affect
reception in certain parts of the country.
This is a condition known as Multipath
Interference.
Whilst FM reception generally provides
better quality sound, AM reception or
Medium Waveband (MW) and Long
Waveband (LW) (United Kingdom and
Europe) may prove superior in remote
areas not covered by the shorter range
FM transmitters.
When experiencing poor FM reception,
background noise can be reduced by
pressing the MODE button, selecting
TREBLE and reducing the treble setting.
On/Off control
Press the control knob to
switch the radio on, press
again to switch off.
Volume control
Turn the control knob clockwise to
increase or counter-clockwise to
decrease volume, across a range of
settings (0 – 35) to be displayed during
and momentarily after adjustment.
When using the rotary control knob to
adjust volume the touch-screen will show
the above display (shown in Tape mode)
to assist setting. The ‘pop-up’ volume
control ‘slide’ will disappear from the
display after 5 seconds or can be
removed by touching it.
Any volume setting made whilst in audio,
telephone or navigation mode or
JaguarVoice, will be memorised for that
system.
Pressing the AUDIO button
can also turn on the radio.
When using the
touch-screen in other
operating modes, such as
Navigation, Climate Control or any of the
setup screens, pressing the AUDIO
button will revert to the relevant audio
screen.
40
Page 41

Radio
Automatic volume control
This maintains radio volume at a level
sufficient to overcome road noise as
vehicle speed increases or decreases. To
activate AVC, press the MENU button,
followed by the VOLUME PRESET
button on the touch-screen. Once in the
volume preset screen, AVC level can be
adjusted (from OFF to 5) by repeatedly
pressing the ‘+’ or ‘–’ buttons adjacent to
the AVC volume indicator.
When AVC is ON, manual adjustment of
volume will override the AVC setting.
Volume preset adjustments
Volume for Telephone, JaguarVoice, TA
and Navigation can also be adjusted by
using the MENU button on the right of the
screen and selecting the volume preset
button as appropriate.
Audio Setup
This function enables the radio to be set
to user operating preferences. By
selecting SETUP and using the buttons
on the touch-screen, the owner or Jaguar
Retailer can adjust certain radio functions.
When in SETUP, pressing the relevant
button will display the facility selected
and its state. The state of that facility can
be changed by pressing the button again.
To enter SETUP: Press Eject and
AM/FM buttons simultaneously.
The display will show AUDIO SETUP. The
preferences shown on the next page can
then be selected or changed in any order.
After 15 seconds the display will clear and
exit SETUP.
41
Page 42

Radio
Country During initial factory installation, this is used to set the radio to one
of the following regions: Europe, Australia or Japan. Regional
settings determine the correct frequency increments required for
seeking stations, automatic tuning etc.
Note: The regions are preset at the factory. Should you require a
regional change, consult your Jaguar Retailer.
RDS/RBDS Press ON/OFF buttons to enable or disable RDS, depending upon
RDS availability in the user’s country.
FM Volume FM volume high or low (compensate for poor signal strength).
Note: This feature is not available in Australia and Japan.
Key Off Eject Cassette Models only:
Sets the cassette tape to automatically eject when the ignition key
is turned to 0.
Tape Clean Cassette Models only:
This controls the Tape Clean reminder facility. Press ON/OFF
buttons to enable or disable this reminder.
42
Page 43

Radio
Digital Signal Processing
DSP (premium audio system only)
facilitates optimisation of sound for
specific seating positions and is accessed
via the DSP button shown on the
touch-screen (audio screens only). The
chosen setting can then be selected by
touching the appropriate zone.
Options available are:
• Front left.
• Front right.
• Front centre.
• Rear seats.
• All seats.
Radio Data Systems
Radio Data Systems (RDS) and Traffic
Announcements (TA)
Jaguar sound systems are equipped with
Radio Data System (RDS) which assists in
locating and remaining tuned to a
selected radio station. When tuned to
certain stations on the FM waveband, the
radio decodes signals transmitted, to
provide the following functions
(dependent upon the service available):
• When RDS is selected the station
name is displayed in eight characters.
• Automatic re-tuning to follow network
stations:
RDS provides fully automatic radio
tuning for network stations. It tunes to
a signal not a frequency. RDS will
locate the strongest signal available
for a given station.
• RDS will automatically switch
frequencies (AF Switching) as
necessary. This function can be
toggled off and on by pressing and
holding the AM/FM button.
• RDS Station/Programme type display
and search:
RDS displays information on the type
of material broadcast by the station or
programme that is on e.g. News,
Classical, Rock etc. In addition to
this function, the radio can search for
a selected programme type.
• RDS Priority programme type auto
re-tuning (where broadcast):
Similar to Traffic Announcement this
can be selected to interrupt and
switch to the selected programme
type e.g. News, for its duration.
• Local radio station Traffic Information
(where broadcast):
RDS provides travel information
relevant to the vehicle location. On
learning of a traffic problem, the
authorities inform the nearest local
radio station.
The traffic announcement (TA) is then
broadcast by transmitters in the
relevant area.
Provided TA has been selected, traffic
announcements will interrupt radio,
cassette tape or CD/MD play, on all
equipment with the RDS feature. If the
volume control is set at minimum it will
automatically increase to an audible level
for the duration of the traffic news flash.
When the traffic announcement has been
completed, the system reverts to the
driver’s original listening choice and
volume setting.
43
Page 44

Radio
RDS Operation
To activate RDS, press the TA
button and hold for at least 2
seconds until RDS ON is
displayed.
To deactivate RDS, press the TA button
and hold until RDS OFF is displayed.
With the radio tuned to an RDS station
and RDS activated, the radio gathers RDS
information and displays the service
name/data.
If the radio is not tuned to an RDS station,
it will remain on that station and display
the frequency, and RDS will remain on in
readiness for a signal.
When listening to a national network
station, or a station that broadcasts on
more than one frequency, the radio will
re-tune to the strongest available signal
(AF Switching). This ‘network following’
will continue throughout the journey.
(Unselected presets will also receive new
frequency information, if appropriate.)
When RDS data is lost and no alternative
frequency signal is available, the radio will
stay on station, the display shows the
frequency only and RDS remains on in
readiness for the signal to recover.
If the RDS function does not respond
correctly, see ‘RDS Trouble-shooting
Guide’, page 45.
TA operation
To activate TA: Press the TA button
momentarily (less than 2 seconds).
TA will appear at the top of the display.
The radio then checks that the station has
RDS TP (Traffic Programme); indicated by
TP at the top of the display. If TP is not
available on the current station, the radio
will perform a TP SEEK while it searches
for a station.
If a TA station is not available, a beep is
sounded and TA is removed from the
display.
With TA activated, traffic announcements
will interrupt radio, tape or CD/MD play. If
set at a minimum, the volume will increase
for the announcement, returning to
normal setting afterwards. When
receiving, the display will show TRAFFIC.
To deactivate TA: Momentarily press TA.
Preset TA volume
When the radio is set to minimum volume
and a traffic announcement occurs, the
volume is raised to a preset level. This
level can be adjusted by pressing the
MENU button followed by touching the
VOLUME PRESET button on the
touch-screen. Once in the volume preset
screen, TA volume level can be adjusted
by repeatedly pressing the ‘+’ or
‘–’ buttons adjacent to the TA volume
indicator.
44
Page 45

Radio
RDS Trouble-shooting Guide
Incorrect response from RDS Reason and reaction
Radio does not display programme
name.
Station name is lost and displays
frequency only.
Upon operating A MEM NO FM is
displayed when most or all of the
preset positions are selected.
Upon pressing the TA button the
radio re-tunes to another station
and displays TP SEEK.
Radio sound goes off and the
display shows PI SEEK.
Radio ‘beeps’ and the display
shows NO TA/TP and turns off TA.
Check that RDS is turned on by pressing and
holding the TA button until the display confirms
RDS ON. If the radio does not display a
programme service name, it is not broadcasting
RDS data, or you are in a poor reception area.
Try re-tuning to another station with RDS.
Radio has lost reception of the RDS data due to
vehicle moving out of transmitter range, loss of
signal in a tunnel, under a garage forecourt
canopy, or similar screening. If the latter is the
case, when the vehicle is clear of the screening,
the station name will return after a short delay.
The radio cannot locate nine FM, RDS FM or TP
stations dependent upon the mode selected. If
this occurs, switch off RDS or TA and reselect A
MEM.
The station selected does not have TP/TA
facility, the radio will re-tune to one that does.
The RDS radio station selected is unable to
confirm that the frequency tuned to has the
correct RDS data – programme identification
(PI). It will then seek for a frequency that has the
correct data.
The vehicle is in an area where TA broadcasts
cannot be received from any FM stations. The
radio will automatically deselect the TA feature.
45
Page 46

Radio
Programme Type (PTY)
This has two functions; to
display current station
programme type and to select a
programme type and re-tune to
it.
Momentarily press the PTY button to
display the current station programme
type. Use the tuning buttons to cycle
through the available programme types,
press the PTY button again to activate a
search for the selected programme type.
If there is a station with the correct PTY
then the radio will re-tune to it. If not, the
radio will indicate NO PTY and return to
the current station.
Priority programme type
Functions as an interrupt or as a ‘PTY
Following’.
Press and hold the PTY button to activate
the selected priority programme type,
PPTY. The radio will now wait for RDS
information to indicate that a station has
changed its programme type, e.g. to
NEWS. The radio will now re-tune to the
new station for the duration that it remains
on that programme type.
If the current station is already on the
selected priority programme type, then
when this station is lost, the radio will
attempt to find another with the correct
programme type.
To cancel priority programme type, press
and hold the PTY button, the PTY
indicator will clear from the display.
Note: TA and PPTY interrupt feature is
also available in tape, CD/MD audio
modes.
TA and priority PTY interrupt skip
Interruptions for Traffic Announcements,
NEWS or other selected priority PTY, can
be skipped by pressing TA during the
interrupt. The radio returns to the
previously selected audio source.
Note:
•
Interrupt skip will not cancel activation
of TA or PPTY and it will remain ready
for the next interrupt.
•
TA, PTY and PPTY features are reliant
upon the broadcast information from
radio stations, and may be much
better in some areas than others.
PTY31-Alarm (where broadcast)
When using the radio with RDS selected,
a PTY31-Alarm service will operate, to
alert on any crises of major national
importance. When such a broadcast is
made, ALARM will appear in the audio
display.
46
Page 47

Audio System Source
Audio System Source
Change the Audio Source
Press the desired audio system source
button.
AM/FM mode
In AM/FM mode, touch-screen buttons
provide for station selection and
re-tuning. In addition, the upper panel
displays waveband, TA and PTY as
selected using the buttons on the radio
panel.
Band switch AM/FM
Pressing AM/FM repeatedly will cycle the
radio through FM, Medium and Long
wavebands (as applicable). When a tape
or CD/MD is being played, pressing the
band switch will select radio operation.
Presetting memorised radio stations
!
WARNING:
In the interests of road safety, do not
attempt to preset a radio station while
driving.
On each waveband, nine stations can be
stored in the bank of nine buttons
displayed on the touch-screen. To store a
radio station as a preset, touch the
selected button until a beep sounds to
acknowledge the station has been stored.
A station can be recalled from the preset
memory by momentarily pressing any of
the preset buttons. The selected preset is
highlighted by a red halo around the
appropriate button.
Pressing the steering wheel preset
selector button will cycle through the
preset stations.
Seek and manual tuning
In AM/FM mode, touch
and release to
activate the radio in seek
mode, tuning through the frequency
range to the next available station.
Pressing either button for more than 2
seconds will enter manual tuning mode.
47
Page 48

Audio System Source
Auto memory (A MEM)
The automatic memory function
programmes the nine strongest
stations on a selected waveband
to presets 1 to 9.
Note: These are additional to the preset
stations described earlier.
To activate this function, press and hold
A MEM button for at least 2 seconds.
The radio will be briefly muted while it
searches the waveband for the nine
strongest stations. When programming is
complete the radio will default to preset
number 1 and audio volume is restored.
If stations cannot be located for all preset
positions, those that are found will be
allocated positions commencing with
number 1, leaving the remainder not
programmed. The display will show NO
FM or NO AM as appropriate.
To switch between the A MEM preset
stations and your own presets, press and
immediately release the A MEM button.
A MEM with radio data system (RDS)
selected
If the A MEM function is operated while in
RDS mode, the radio will be muted briefly,
while a search is made for the nine
strongest RDS stations.
48
Page 49

Audio System Care
Audio System Care
Radio
Do not use gas, solvents or abrasive
cleaners on the radio. Wipe the surface of
the radio with a lint-free cloth to remove
dust. Slightly moisten the cloth with clean
water to remove any finger marks from
the outside surface of the radio.
If the radio is to be removed or the battery
disconnected, first ensure that the radio
code is recorded. The number will be
required for re-insertion following radio
installation or battery reconnection.
Cassettes
Always use good quality cassettes.
Inferior quality tapes can jam the player
mechanisms, adversely affect sound
quality, and accelerate the build-up of
deposits on the playback head.
Before playing a cassette, ensure that the
tape is not loose on the spools. If
necessary, take up the slack by gently
turning the spools with the end of a pencil.
A jammed or sticking tape will cause the
auto-reverse mechanism to operate
continuously.
It is advisable not to use a tape longer
than 45 minutes playing time each side
(C90). Cassettes should be stored in their
library cases away from direct sunlight.
Do not store cassettes in door pockets
where magnets in loudspeakers can
impair sound reproduction. Never insert a
cassette that has a torn or loose label, it
may cause the mechanism to jam.
After approximately 15 hours playing
time, the audio screen will display
‘CLEAN TAPE’. Clean the tape
mechanism itself using a proprietary
cassette cleaning kit available from any
good Hi-Fi stockist.
Caution: Do not use abrasive type
cleaners as they can cause excessive
wear of the playback head.
Compact discs (CDs)
When handling CDs, do not touch the
playing surface. CDs should be stored in
their cases away from direct sunlight,
heat and dust. Scratches, finger-marks or
dust on the surface of a disc can cause
the optical pick-up to skip tracks. If the
surface of a CD is dirty, use an
appropriate CD cleaner.
Do not attempt to play discs that are
damaged, warped, cracked or of
incorrect size. They can seriously damage
the playback mechanism.
49
Page 50

Audio System Care
50
Page 51

Navigation - Overview
Navigation System
Introduction
The navigation system will guide the
driver to a specific location on a map. The
location can be selected in a number of
ways, from entering an address to
touching the location on the touch-screen
map.
The area covered by the navigation
system depends on which version of the
Navigation System DVD is loaded. The
driver is directed to the destination by
voice guidance and/or the on-screen
instructions.
A navigation system DVD can cover many
countries, or for larger countries, contain
several search areas. To ensure you are
using the correct country or search area,
see ‘Search Area/Country Change’, page
75.
Loading the Navigation DVD
Note: The ignition must be switched on
(position ‘I’).
1. In the luggage compartment, pull the
top of the access cover forward and
fold it down to the fully open position.
2. Identify the navigation unit
(highlighted above) which is
positioned above the sound system
CD player (where fitted).
3. If a DVD is already loaded, push the
eject button (A).
4. Load the Navigation System DVD with
the printed side upwards. Do not
allow moisture or foreign objects to
enter the slot.
5. Fold the access cover to the fully
closed position.
51
Page 52

Navigation - Overview
Errors in Vehicle Position
Under certain driving conditions, it is
possible that the vehicle position shown
on the map display may be incorrect.
Some examples are shown below:
• When the vehicle is transported by
ferry or train.
• Driving on steep roads.
• After vehicle battery removal or
supply fuse failure.
• When using snow chains.
• After the tyres have been replaced.
• After the vehicle has been rotated on
a turntable.
• Where there are two roads parallel to
each other.
• Elevated roads in proximity to other
roads.
• Driving up or down circular ramps in
car parks.
The position will usually be corrected
automatically. If the problem persists, see
‘Calibration’, page 73, or consult your
Jaguar Retailer.
Safety Information
IMPORTANT: Do not use the system
until you have familiarised yourself with
its operation.
The road safety caution is displayed each
time the ignition is switched on, and the
navigation system is selected.
The caution screen gives the following
information:
Most functions are inhibited whilst the
vehicle is in motion.
Please read the handbook for
operating instructions.
Always obey traffic regulations.
• To use the system, read the caution
and touch Agree.
Using the System
Caution: If the system is used for an
extended period of time with the
vehicle stationary, ensure that the
engine is running, to avoid draining the
battery.
For best results, always use the latest
version of the Navigation System DVD
(navigable map database).
52
Page 53

Navigation - Overview
Map information is regularly updated, but
all areas are not necessarily covered to
the same level of detail. Some areas, in
particular private roads, may not be
included on the database (non-digitised
roads).
While driving under route guidance, follow
an instruction only when it is safe to do so,
as the system cannot be aware of
changing conditions, for example turn
restrictions, roadworks or diversions. Use
voice guidance as much as possible, and
only view the display when driving
conditions permit.
In-car telephone features
In this handbook, some features shown
are only available when the vehicle is
fitted with the Jaguar in-car telephone
installation. These features include the
display of the telephone button, the end
call button and one-touch dialling of POI
(point of interest) numbers or memory
points.
Road Junction Layouts
The layout of complex road junctions may
sometimes be shown in a simplified form.
Some small roundabouts may not be
shown.
53
Page 54

Navigation - Overview
How the System Works
The system uses signals from the Global
Positioning System (GPS) satellites,
which allow the approximate position of
the vehicle to be calculated. This is
combined with information from vehicle
sensors and data from the Navigation
System DVD to establish the true vehicle
position.
GPS signals are highly directional and
reception may occasionally be
interrupted.
Some examples of situations likely to
cause problems are shown below:
• Inside tunnels.
• Inside buildings.
• Roads under raised highways.
• Densely tree-lined roads.
• Forest roads between mountains.
• Between tall buildings.
• Roads under cliffs.
• Metal objects placed on the rear
parcel shelf.
• Having the vehicle windows tinted
using metal oxide tinting. Non-metal
tinting should be used.
54
Page 55

Navigation - Overview
Route Guidance Position
Under certain driving conditions, it is
possible that the route guidance may be
inaccurate. Some examples are shown
below:
• Route guidance may occasionally be
given where no turn is required.
• Deviation from a route may cause
incorrect guidance until the route has
been recalculated.
• If there is no road or only a narrow
track to the final destination, guidance
will be given to the nearest point
possible.
• No guidance is given while reversing.
• If driving at high speed or on very
dense road networks, it may not be
possible to recalculate the route in
time for the next instruction.
• On familiar roads, personal route
preferences may not always be
followed.
Time and Distance to
Destination
When a route is calculated, the estimated
time required to drive the route and the
total distance to the destination are
determined. The time is based on the
vehicle travelling at the current speed
settings for each type of road (residential,
main road and freeway). The distance is
based on the current route preference
settings, e.g. Use Toll Roads Yes/No, see
‘Route Preferences’, page 69.
While driving under guidance, the
estimated time (if selected) and distance
remaining to the end of the route are
shown on the screen.
Alternative Routes
During route calculation, up to three
possible routes are calculated. The first
route is calculated using the current route
preference settings. The second route is
also calculated using the preference
settings, except that for Minimise
Time/Dist., the alternative setting is used.
For example, if Minimise Time is currently
selected, then the second route will be
calculated based on Minimise Distance,
with the other settings as selected. For
the third route, the system tries to find
another alternative using different
combinations of the preference settings.
If a suitable alternative is not possible,
only the first and second routes will be
shown.
Languages and Distance Units
The screen text and voice guidance are
available in a number of different
languages. For the list of available
languages, See ‘Changing the Display
Language’, page 74.
Distances are shown on the screen and
given in voice guidance, either in miles or
Metric units (kilometres and metres). For
information on changing the selection,
see ‘User settings’, page 19.
City Name Lists
After entering a street name, the matching
city entries found in the database are
shown. Each entry includes some or all of
the following: district name, city name,
and county name.
55
Page 56

Navigation - Overview
Control Panel (the XJ shown)
1. Touch-screen.
2. NAV (Navigation) button
Navigation forms part of the overall
vehicle telematics system, having a
combined front panel and LCD screen (1).
Navigation is selected by pushing the
NAV button (2). The ignition must be
switched on (position ‘I’).
Note: The navigation system is operated
by using the buttons displayed on the
screen. For an explanation of the basic
navigation buttons, see ‘Function of
On-screen Control Icons’, page 61.
56
Page 57

Basic Screen Displays
Basic Screen Displays
Screen Displays
NAV button
Press the NAV button to select
the navigation system.
The road safety caution will be displayed.
Touch Agree to acknowledge this
information (See ‘Safety Information’,
page 52).
Note: While the navigation system is
selected, the NAV button has the
following additional functions:
• Selects the initial map display from
any other screen.
• After scrolling, returns the map
display to show the current vehicle
position again.
Initial Map Screen
After touching Agree, the initial map
screen showing the vehicle location is
displayed, with the current road name
shown in the text area at the bottom of the
screen.
‘Setting a Route’ on page 65 gives an
example of how to use the system to
navigate to your chosen destination.
Initial Map Display
The initial map screen shows the current
vehicle position. A key to the main
features is given below:
1. Nav Menu button - Touch button to
select the Navigation menu.
2. Zoom button - Control and indication
of the current map zoom level.
The scale length represents a
distance of from 1/32 mile to 128
miles (50 metres to 256 kilometres).
3. Map orientation - Touch button to
change the map orientation (north or
vehicle heading to the top of the
screen).
Above the 2 miles (4 kilometres) zoom
level, only north orientation is
available.
4. GPS icon - Indicates that insufficient
GPS satellite signals are being
received for accurate map
positioning. The icon is not displayed
under normal operation.
5. Navigation icon - The map normally
indicates the current vehicle position.
While the system is in use various
icons are displayed, see ‘Function of
On-screen Control Icons’, page 61.
57
Page 58

Basic Screen Displays
6. Lower text area - Shows the current
street name (present vehicle location).
While operating the system, this text
area is replaced by additional buttons.
In certain locations (e.g. private roads)
no road name will appear.
Note: For an explanation of the basic
navigation buttons, see ‘Function of
On-screen Control Icons’, page 61.
Scrolling the Map
To scroll the map, use the touch-screen
as follows:
• Touch the screen twice within 5
seconds. The cross-wire icon (1) is
displayed, and the map scrolls until
the point being touched is under the
cross-wire icon. The address below
the cross-wire is displayed in the
upper text area (2).
Continuous scrolling
• Touch and hold at any point on the
screen. The map continues to scroll
while the screen is being touched.
Zoom button operation
When the zoom button is
touched, the scale indicator is
shown on the screen.
The scale markings shown on the
indicator are: 1/32, 1/2, 4, 128 miles
(50 m, 1 km, 8 km, 256 km).
The zoom button can be used in a number
of ways as follows:
• Touch and hold one of the arrow
buttons. The map is displayed at each
zoom level in turn.
• Touch one of the arrow buttons
repeatedly. The map is only displayed
at the final zoom level.
• Touch one of the segments of the
scale indicator. The map is displayed
at the zoom level selected.
Function of the On-screen
Buttons
This is a summary of the basic navigation
buttons. Buttons specific to a particular
screen or function are explained in the
appropriate chapter of this handbook.
All the navigation buttons, except the
NAV button, are touch buttons displayed
on the screen.
Note: For information on how to operate
the buttons, see the Owner Information
chapter of this handbook.
Nav Menu button
Displays the Navigation
menu, see ‘Navigation
Menu’, page 64.
Cancel button
Returns to the previous
menu, text screen, or to the
map display.
58
Page 59

Basic Screen Displays
NAV button
The NAV button has the
following functions:
• Selects the navigation system.
• While the navigation system is
selected, selects the initial map
display from any other screen.
• After scrolling, returns to the map
display of current vehicle position.
Note:
1. If the navigation system was selected
when the ignition was switched off, it
will be selected automatically when
the ignition is switched on again.
2. When switching back to navigation
from another touch-screen system,
pushing NAV will return to the
particular screen being displayed
before.
Map orientation buttons
These buttons select the
desired map orientation
(north or vehicle heading
to the top of the screen). The current
selection is shown on the map.
Note: Above the 2 miles (4 kilometres)
zoom level, only north orientation is
available.
Audible repeat button
While under guidance, repeats
the last audible instruction and
shows the relevant junction
diagram (if in range).
Note:
1. If the manoeuvre point has been
passed, the audible instruction for the
next manoeuvre point will be heard.
2. Repeat is also available while one of
the other touch-screen systems is
selected (but not during a telephone
call).
Telephone button
Calls the telephone number
currently shown on the
screen. Only available when a
Jaguar telephone is fitted.
Additional Buttons
After touching the screen once, additional
buttons are displayed.
Home button
Sets a route to the home
position. (Only displayed when a
home position is set.)
Chg. Route button
Displays the Route
Options menu for
changing the route
preference settings. (Only displayed when
a route is set.)
Ent. Dest. button
Stores a selected map
location as a destination.
see ‘Confirm Destination’,
page 67. (Displayed in place of the Chg.
Route button, after touching the screen
twice within 5 seconds.)
Store button
Stores a selected map
location as a memory
point.
59
Page 60

Basic Screen Displays
POI/POI Off buttons
POI - Selects the quick points of interest
function to display POI icons on the map.
POI Off - Deselects the display of icons.
Note: For more information see Points of
Interest (POI) on page 83.
Volume Adjustment
The volume level of the audible
instructions can be adjusted if required.
For information on making volume
adjustments, see the Owner Information
chapter of this handbook.
Note: The radio must be switched on to
adjust the volume of the audio
instructions. When the radio is switched
off, the volume ‘+’ and ‘–’ buttons are
disabled.
Menus
Menu screens are provided to select the
various system functions. The Route
Options menu is shown above as an
example.
• To select a menu item, use the button
(1) for the option required.
After selecting a menu item, the next
sub-menu or screen will be displayed. If a
menu item cannot currently be selected, it
will be disabled, as shown (2).
Note: To find a particular menu, see
Navigation Menu Structure on page 10.
Name Lists
Lists of names (for example streets, cities
or points of interest), are displayed as
shown in the example above. The number
of items in the list is displayed (1), and the
indicator (2) shows the current position in
the list.
• To scroll through the list, one item at a
time, touch one of the single arrow
buttons (3). (The double arrow buttons
[4] scroll one page at a time.)
• To view the remainder of a long entry,
touch anywhere on the text. The
symbol (5) at the start or end of the
line indicates more text.
• To make a selection from the list, use
the button for the item required (6).
60
Page 61

Basic Screen Displays
Character Input
• Enter the desired name by touching
each button in turn (1).
The characters entered are displayed on
the screen (2). As characters are entered,
only the characters available to complete
names stored in the database are shown
highlighted.
It is not necessary to enter all the
characters. The number of possible
names from the characters entered is
shown (3). When greater than ‘9999’ then
‘****’ is shown.
• To delete the last character, touch
Delete (4).
• Touch List (5) (when active) to view
the available names.
• To enter special characters, touch
Sym (6).
• To enter accented characters, touch
Others (7).
• To enter a space, touch Space (8).
Number Input
• Enter the desired number by touching
each button in turn (1).
The digits entered are displayed on the
screen (2).
• To delete the last digit, touch
Delete (3).
• When all the digits have been entered,
touch OK (4). The next screen will be
displayed.
IMPORTANT: Further information on
using these screens for specific
functions, e.g. destination entry, is
given in the appropriate sections of this
handbook.
Function of On-screen Control
Icons
The screen icons used by the system are
explained below:
Navigation icon - indicates the
current vehicle position and
heading.
Cross-wire icon- This icon is
displayed when the map is
scrolled to select a destination or
point (map cursor location).
Destination icon -Indicates the
current route destination
61
Page 62

Basic Screen Displays
Next manoeuvre point -
Indicates the location of the next
instruction on the route ahead.
Next turn icon - Shows the action
to be taken at the next manoeuvre
point on the route ahead.
(A typical example is shown.)
Roundabout icon - Shows the
direction to be taken at the next
roundabout. The number in the
centre of the arrows shows the route
direction; a ‘2’ indicates the second exit
should be taken, a ‘3’ indicates the third
exit, etc.
North up icon - Indicates that the
map is displayed with north to the
top of the screen.
Heading up icon - Indicates that
the map is displayed with the
vehicle heading to the top of the
screen. The position of the pointer
indicates the direction of north on the
map.
Avoid area or point - The
left-hand icon indicates an
area to be avoided in route
calculations. The right-hand icon
indicates an avoid point.
Way point icon - Indicates the
location of a way point on the
map.
Home position icon - Indicates
the location on the map that is
currently stored as the home
position.
Stored location icon - Indicates
the location of a memory point.
This is the default icon used when
the point is stored. (If required an icon of
your own choice can be selected from the
15 icons available.)
GPS icon - Indicates that
insufficient GPS satellite signals
are being received for accurate
map positioning. The icon is not displayed
under normal operation.
62
Page 63

Screen Types
Map Screen
Screen Types
Guidance Screen (Turn Arrows)
• Choose Display Options from the
Navigation menu and select split
screen or full screen.
Split screen
When set to split screen, the map display
always shows the guidance screen
overlay while a route is set.
Full screen
When set to full screen, the screen
normally shows the map display, with the
next turn icon in the top right-hand
corner. Before each manoeuvre point, the
guidance screen overlay is displayed
automatically. (The overlay can also be
displayed manually by touching the
Guidance Screen button.)
The guidance screen overlay is always
displayed while the Split Screen option is
selected, and is also displayed when
selected manually while the Full Screen
option selected.
Two guidance screen options are
available: Turn Arrows and Turn List.
• To select an option, choose Display
Options from the Navigation menu.
When set to Turn Arrows, before each
manoeuvre point, the guidance screen
overlay shows the next junction diagram.
Guidance Screen (Turn List)
When set to Turn List, the guidance
screen overlay shows the current portion
of the route turn list. Before each
manoeuvre point, the next junction
diagram is displayed.
63
Page 64

Navigation Menu
Navigation Menu
Navigation Menu
The Navigation menu is the top level
menu of the system, showing the
functions that are available:
Destination Entry - see page 76.
Route Options - see page 69.
Navigation Set Up - see page 72.
Display Options - see page 74.
Stored Locations - see page 89.
• Select the menu item required.
Audible instructions
The highlighted
button shows whether
the setting for voice
guidance is currently On or Off.
• To change the voice guidance setting,
touch the button required.
Functions available on the move
For safety reasons, only certain functions
are available while the vehicle is on the
move.
Menu structure
The menu structure is shown in the Quick
Overview at the front of this handbook,
see page 10.
64
Page 65

Route Setting
Route Setting
Setting a Route
This is a simple example showing how to
use the basic features of the system to set
a route. It describes each screen in turn
and explains how to use the controls. For
information relating to the other features
of the system, see the relevant chapter in
this handbook.
Note: Before using the system, check that
the correct Navigation System DVD is
loaded, see ‘Loading the Navigation
DVD’, page 51.
Selecting the System
Map Display
The initial map screen showing the
current vehicle position is displayed.
• Touch Nav Menu to select the
Navigation Menu.
Navigation Menu
Note: The ignition must be switched on
(position ‘I’)
To select the navigation system (if
necessary), push the NAV button on the
perimeter of the touch-screen panel. The
road safety caution will be displayed. To
use the system, read the caution and
touch Agree.
The Navigation menu is the top level
menu of the system, and shows the main
functions that are available.
• Touch Destination Entry to select the
Destination Entry menu.
65
Page 66

Route Setting
Destination Entry Menu
The Destination Entry menu shows the
options available for setting a route. The
map inset shows the currently selected
area, which the system will use when
searching for destination addresses.
• Touch Address to enter the
destination details for the desired
route.
Note: If your route destination is not
within the area highlighted on the map,
another search area must be selected, see
‘Search Area/Country Change’, page 75.
Enter Street Name
The list of possible streets from the
characters entered is displayed.
• Select the street required.
Note: In this example the street name is
entered first. Addresses can be entered in
other ways, e.g. city name first.
Select City
The screen shows the list of cities where
the street name entered occurs.
• Select the citytrequired.
Note:
1. If there is only one city match, this
step is omitted.
2. If more than 100 matches are found,
the alpha keyboard screen is
displayed automatically, to allow the
desired city name to be entered.
3. If less than 100 matches are found, the
alpha keyboard screen may be
displayed manually by touching the
A-Z button.
Enter the street name by touching the
buttons required.
For more information, see ‘Character
Input’, page 61.
• When sufficient characters have been
entered, touch List.
66
Page 67

Route Setting
Enter House Number
• Enter the house number by touching
the buttons required.
For more information, see ‘Number Input’,
page 61.
• When all the digits have been entered,
touch OK.
Note:
1. If a list of house number ranges is
displayed, select the range applicable.
2. If the street does not have house
numbers, or the house number is not
known, just touch OK. The mid-point
of the street will be used as the
destination.
Confirm Destination
The map screen showing the destination
details, and the current route settings is
displayed.
• Touch Dest. to confirm as a
destination.
The screen shows ‘Calculating Route’
while the route is calculated.
Note: For information on using way
points, see ‘Destination and Way Point’,
page 93.
Start Guidance
When the route calculation has been
completed, the map display shows the
entire route and the route information at
the top of the screen.
• Touch Start (or commence driving).
67
Page 68

Route Setting
Alternative routes
The system will also calculate at least one
alternative route (where possible). The
alternative route(s) can be viewed and
selected in place of the original route if
required.
• To view an alternative route, touch
Next.
Route Guidance
!
WARNING:
Only operate, adjust or view the system
when it is safe to do so.
After touching Start, the initial map
screen while under guidance is displayed.
The route is shown highlighted, with the
current road name shown in the text area
at the bottom of the screen.
Drive away, following the voice guidance
given by the system. Continue to follow
the voice guidance until the end of the
route is reached.
Arrival at Destination
When the vehicle reaches the end of the
route, the screen shows the destination
address details. Arrival at the destination
is also confirmed by voice guidance.
The system is now ready for further use.
Toll roads and ferries
The following small icons will be
displayed in the top text area when their
function has been set by the user:
Shown when a route has been set
which includes toll payment areas.
Shown when a route has
been set which includes a
ferry.
68
Page 69

Route Options
Route Options
Route Options Menu
The menu shows the route options
available:
Detour
Route Preferences
Display Whole Route
Calculate
Cancel Guidance
Delete Next Way Pt.
• Select the menu item, or touch the
button for the option required.
These options are described as follows:
Detour
While driving under guidance, this feature
allows you to make a detour from the
calculated route for a specified distance.
The screen shows the detour distance
settings available for residential roads and
freeways. The current selections are
shown highlighted.
Residential:
1, 2, 3, 4, 5, 10, 15 miles (or kilometres).
Freeways:
5, 10, 15, 20, 25, 50, 100 miles
(or kilometres).
• Touch the appropriate buttons to
change the detour settings as
required.
Route detour
• Touch the Detour button.
The route ahead is recalculated using the
current detour distance settings.
Alternative route
• Touch the New Route button.
The system uses different combinations
of the route preference settings to
calculate an alternative route (where
possible).
Note: The detour settings are only used
when you touch Detour and only apply to
the current route.
Route Preferences
The screen shows the route preferences
available, with the current settings
highlighted.
Minimise Time/Dist. - Time/Dist.
Use Major Roads - Yes/No.
Use Toll Roads - Yes/No.
Use Ferries - Yes/No.
• To select a route preference, touch
the button for the setting required.
• Touch Store Setting to apply the new
settings (this is only available if no
route was set previously).
• Touch Calculate to apply the new
settings to an existing route.
• Touch Cancel to keep the old
settings.
69
Page 70

Route Options
Note: The system will use your route
preference settings wherever possible.
However in some circumstances, to
calculate a satisfactory route, one or more
of the alternatives may have to be used.
Display Whole Route
After selecting Display Whole Route, the
screen shows the whole route, with the
total route distance, and estimated
travelling time displayed at the top of the
screen. Where the route includes a ferry
crossing, a ferry icon is shown.
• To view the destination, touch Dest
Map.
• To view the turn list, touch Turn List.
End of route display
After touching Dest Map, the screen
shows the last portion of the route, with
the destination address displayed at the
top of the screen.
• To return to the whole route display,
touch Route.
• To view the turn list, touch Turn List.
Turn list
After touching Turn List, the first portion
of the route turn list is displayed.
• To view the rest of the entries, scroll
the list as required.
• To recalculate the route, touch
Reroute.
70
Page 71

Route Options
Avoid point/area
Any point on the route can be avoided if
required.
• Touch the Avoid button next to the
required entry in the turn list.
The map screen is displayed showing the
location and address of the selected
point.
• Scroll the map to adjust the location if
required
• Use the Enlarge and Reduce buttons
to create an avoid area if required.
• Touch OK to confirm.
Note:
1. The selected points or areas will not
be avoided until the route is
recalculated (touch Reroute).
2. The points or areas selected in this
way are only avoided for the current
route. Permanent avoid areas are
created from the Store Avoid Area
menu, see ‘Avoid Area’, page 92.
3. In some circumstances, to calculate a
satisfactory route, it may not be
possible to avoid all the selected
points or areas.
Calculate
This is a quick way to start a route
calculation after making changes to the
route preferences. For more information,
see ‘Calculating the Route’, page 95.
Note: The route will be calculated using
the destination and/or way point
addresses previously entered.
Cancel Guidance
The map showing the whole route is
displayed.
• Touch Yes to cancel the route.
Delete Next Way Pt.
Deletes the next way point (if way points
have been chosen) from the route which is
currently being followed.
71
Page 72

Set Up Menu
Set Up Menu
Navigation Set Up Menu
The menu shows the setup options
available:
Average Speed Settings
Quick POI Selection
Restore System Defaults
Calibration
Map Version
• Select the menu item required.
Average Speed Settings
The screen shows the current average
speed settings. Speeds can be selected
in the range from 5 mph (8 km/h) to
150 mph (240 km/h). The default settings
are:
Residential Road: 20 mph (30 km/h).
Main Road: 40 mph (60 km/h).
Freeway: 60 mph (100 km/h).
• Select the average speeds required
using the arrow buttons.
• Touch OK to apply the new settings.
• Touch Default to apply the default
settings if required.
Note: These settings do not affect route
calculation, they are only used in
displaying the time to destination. Choose
your own usual speeds, so that the time
shown matches your own driving style as
closely as possible.
Restore System Defaults
The default settings are as follows:
Guidance Voice: On.
Search Area: US9.
Route Preferences:
- Minimise Time/Dist.: Time.
- Use Major Roads: Yes.
- Use Toll Roads: Yes.
- Use Ferries: No.
Detour:
- Residential Road: 4 miles (4 km).
- Freeway 20 miles (20 km).
Average Speed Settings:
- Residential Road: 20 mph (30 km/h).
- Main Road: 40 mph (60 km/h).
- Freeway 60 mph (100 km/h).
Quick POI categories:
- Gas station.
- Parking.
- All Restaurant.
- Hotel.
- Shopping Centre.
- Golf Course.
Guidance options:
- Map Screen: Split Screen.
- Guidance Screen: Turn Arrows.
72
Page 73

Set Up Menu
Map Options
- Memory Point Icons: Show.
- Time To Destination: Show.
- Message Centre Guidance: Off.
- Low Fuel Warning: On.
• To select the complete set of default
settings, touch OK.
Map version
The screen shows the issue date of the
Navigation System DVD currently loaded.
Calibration
Sometimes the vehicle position may not
be correct. This can occur, for example, if
the vehicle has been moved on a trailer or
by ferry. If the new position is not found
automatically by the system, it can be
corrected by using the calibration
procedures (Position first).
• Touch Position to adjust the vehicle
position.
• Touch Distance to recalibrate the
system.
The screen briefly shows ‘Distance
Calibration is in Progress’. Calibration is
carried out during normal driving. No
notification is given that distance
calibration has been completed.
Position procedure
The map showing the current vehicle
position is displayed.
• Scroll the map until the navigation
symbol (vehicle position) is in the
correct geographical location.
• Touch OK to confirm the new position
and display the map screen for
heading adjustment.
Note: If a route is set, a new route
calculation will be carried out.
Position heading
The map screen showing the heading
adjustment arrows is displayed.
• Adjust the vehicle heading using the
arrows (clockwise or anticlockwise),
until the navigation symbol is shown
in the correct alignment.
• Touch OK to confirm the new
heading.
73
Page 74

Set Up Menu
Display Options
The screen shows the display options
available, with the current selections
highlighted.
Guidance options:
Turn Arrows - When set to Turn Arrows,
the guidance screen overlay shows the
on-route arrow and next turn icon. Before
each manoeuvre point, the next junction
diagram is displayed automatically.
Turn List - When set to Turn List, the
guidance screen overlay shows the
current portion of the route turn list.
Before each manoeuvre point, the next
junction diagram is displayed
automatically.
Map options:
Time To Destination - Show/Hide.
Message Centre Guidance - On/Off -
provides supplementary information,
displayed on the vehicle message centre.
Low Fuel Warning -
On/Off -displays the gas station
icons automatically, when the fuel
level is down to the normal low
level warning.
Changing the Display Language
The screen text and
voice guidance are
available in a number of
languages. See ‘User
settings’, page 19.
• Switch the ignition OFF and then ON,
to display the initial Jaguar logo on the
touch-screen.
• To select a different language, press
the NAV button, then touch the
language button.
• On the User Settings screen, touch
the change button and, if the
language is not shown, scroll the
screen as required.
• To select a language touch the flag of
the country required and then touch
the OK button.
• A pop-up will ask you to confirm your
selection. Touch YES to continue or
NO to return to the User Settings
screen.
This procedure changes the on-screen
language for all the touch-screen
systems.
The options that can be set are:
Memory Point Icons - Show/Hide.
74
Page 75

Set Up Menu
Search Area/Country Change
To reduce the time taken to calculate a
route, some map databases are divided
into countries, or in the case of some
larger countries, into areas of countries,
called Search Areas. When setting a
route, the destination (or way point) being
entered must be in the currently selected
search area.
The first time that the navigation system is
used, the driver should confirm that the
correct country/area has been selected.
Once set, it will remain correct for all
future use; unless the battery is
disconnected.
The search area is changed at the
Destination Entry screen.
The procedure is briefly as follows:
• Switch ON the Ignition and press the
NAV button located on the perimeter
of the touch-screen panel.
Area States/Countries Display
1 Idaho, Oregon, Washington ID, OR, WA
2 California, Nevada CA, NV
3 Arizona, Colorado, Montana, New Mexico, Utah,
Wyoming
4 Iowa, Kansas, Minnesota, Missouri, North Dakota,
Nebraska, South Dakota
5 Oklahoma, Texas OK, TX
6 Illinois, Indiana, Kentucky, Michigan, Ohio, Wisconsin IL, IN, KY, MI, OH, WI
7 Alabama, Arkansas, Louisiana, Mississippi,
Tennessee
8 Connecticut, Massachusetts, Maine, New Hampshire,
New Jersey, New York, Rhode Island, Vermont
9 Delaware, Maryland, Pennsylvania, Virginia,
Washington, West Virginia
10 Florida, Georgia, North Carolina, South Carolina FL, GA, NC, SC
11 Canada CANADA
• Touch Agree on the Caution screen,
touch the Nav Menu button on the
Initial Map screen, press Destination
Entry on the Nav Menu screen.
The currently selected area is shown
highlighted on the map.
To change the search area, press
Change.
• From the list displayed, select the
button required for the desired
country or area of a country.
• Touch the OK button to confirm your
selection, or CANCEL to make no
change to the search area.
The new selected country or area will now
be shown highlighted.
AZ, CO, MT, NM, UT,
WY
IA, KS, MN, MO, ND,
NE, SD
AL, AR, LA, MS, TN
CT, MA, ME, NH, NJ,
NY, RI, VT
DE, MD, PA, VA, WA,
WV
75
Page 76

Destination Entry
Destination Entry
Destination Entry Menu
The menu shows all the methods
available for route setting:
Address
Memory Point
Home
Point of Interest
Previous Dest.
Postcode
The Destination Entry menu consists of
two pages.
• To select a menu item that is not
being displayed, touch Next Page or
Prev. Page.
The second page contains the following
methods available for route setting:
Select from Map
Freeway Entrance/Exit
Intersection
All these methods are described in this
Chapter.
Search area
To reduce the time taken to calculate a
route, the map database is divided into a
number of regions. When setting a route,
the destination (or way point) being
entered must be in the currently selected
search area.
Using the destination entry menu
The Destination Entry menu is used for
both destination and way point entry.
(Way points and the destination can be
entered in any order.)
• Select an item from the menu.
(For example, to use a point of interest
as the destination, select Point of
Interest.)
Enter by Address
The steps for address entry are:
• Street Entry.
• Select City.
• Enter House Number.
Street entry
After selecting Address from the
Destination Entry menu, the alpha
keyboard screen is displayed, showing
‘Input Street Name’.
76
Page 77

Destination Entry
• Enter the street name required.
• Touch List to display the list of
possible streets.
The list of possible streets from the
characters entered is displayed.
• Select the street required.
Select city
The screen shows the list of cities where
the street name entered occurs.
• Select the city required.
Note:
1. If there is only one city match, this
step is omitted.
2. If a large number (more than 100) of
matches is found, the alpha keyboard
screen is displayed automatically, to
allow the desired city name to be
entered.
3. If less than 100 matches are found, the
alpha keyboard screen may be
displayed manually by touching the
A-Z button.
House number entry
The number pad screen is displayed,
showing the house number range for the
street selected.
• Enter the house number required and
touch OK.
The destination details are displayed for
confirmation of the address.
Note:
1. If a list of house number ranges is
displayed, select the range applicable.
2. If the street does not have house
numbers, or the house number is not
known, just touch OK. The mid-point
of the street will be used.
77
Page 78

Destination Entry
Order of Address Entry
The example just described shows how to
enter an address with the street name
first, followed by selecting the city, and
finally the house number. You should find
this the best method in most cases,
however other methods are possible.
Entering city name first
In the following example, the city name is
entered first.
• From the Destination Entry menu,
select Address.
The alpha keyboard screen is displayed,
showing ‘Input Street Name’.
• Touch the City button.
The screen now shows ‘Input City Name’.
• Enter the city (or district) name
required.
• Touch the List button.
The list of cities possible from the
characters entered is displayed.
• Select the city required.
The alpha keyboard screen is displayed,
showing ‘Input Street Name’.
• Enter the street name required.
• Touch the List button.
The list of streets possible from the
characters entered is displayed.
• Select the street required.
The number pad screen is displayed,
showing the possible house number
range for the street selected.
• Enter the house number required.
• Touch the OK button.
The destination details are displayed for
confirmation of the address.
Entering city names
When entering the name of a citycity in
another country, the name must be
entered according to the usual spelling in
the country concerned.
City centre button
When displayed after a city
name, this button selects
the city centre as a
destination.
List button
The button becomes active
when the characters entered
reduces the possible entries
to a small enough number.
(The list is displayed automatically when
the number of entries reduces to four or
less.)
Address Entry Messages
While entering an address, you may
encounter one of the following messages:
1. ‘House Number not Found. Show
Mid-Point of Street? Yes/No.’
2. ‘The address does not exist. Show
centre of this street? Yes/No.’
3. ‘Street Found in Many Cities. Please
Input the City Name.’
• Select one of the buttons (Yes or No)
or enter a city name, as required.
78
Page 79

Destination Entry
Using a Memory Point
After selecting Memory Point from the
Destination Entry menu, the screen
shows the list of stored memory points.
• Select the item required.
The destination details are displayed for
confirmation of the address.
Note:
1. The list can be sorted by Date, Name,
Distance or Icon by touching the
button required.
2. When sorting by Icon, the icons are
listed in the order they appear on the
icon selection screen (left to right, top
row first). See ‘Icon list’, page 90.
3. While driving, the list scrolling function
is not active. You can only choose
from the items shown at the top of the
list.
4. To assist selection of memory points
while driving, frequently used points
can be given names starting with the
letter ‘A’. If the list is then sorted by
Name, these points will appear at the
top.
Using the Home Position
After selecting Home from the
Destination Entry menu, a route is
calculated to the stored home position.
The location of the home position is
displayed, and the screen shows
‘Calculating Route’ while the route is
being calculated.
Note: If a home position has not been
entered, this function cannot be selected
(See ‘Home’, page 91 for instructions on
how to set a home position).
Using a Previous Destination
After selecting Previous Dest. from the
Destination Entry menu, the screen
shows the list of stored previous
destinations.
• Select the item required.
The destination details are displayed for
confirmation of the address.
79
Page 80

Destination Entry
Note: While driving, the list scrolling
function is not active. You can only
choose from the items shown at the top of
the list.
Previous starting point
If the Previous Starting Point button is
selected, the location used for the
destination will be the starting point of
your last journey, irrespective of whether
you were driving under guidance or not.
Using a Map Location
Select from map
After selecting Select from Map from the
second page of the Destination Entry
menu, the map screen showing the
current vehicle location is displayed.
• Scroll the map until the required
location is under the cross-wire
marker.
The location can be stored as a
destination or as a way point.
Using a Freeway Entrance/Exit
Enter a freeway name
After selecting Freeway Entrance/Exit
from the second page of the Destination
Entry menu, the alpha keyboard screen is
displayed showing ‘Input Freeway Name’.
• Enter the freeway name required and
touch List.
The list of possible freeways from the
characters entered is displayed.
• Select the freeway required.
Note: To enter numbers in the freeway
name, touch Sym. to select the special
characters keyboard screen.
80
Page 81

Destination Entry
Select entrance/exit
• Touch Entrance if you wish to join the
freeway at this junction.
• Touch Exit if you wish to leave the
freeway at this junction.
Select junction
Using an Intersection
Enter first street name
After selecting Intersection from the
Destination Entry menu, the alpha
keyboard screen is displayed showing
‘Input First Street Name’.
• Enter the name required for the first
street and touch List.
The list of possible streets from the
characters entered is displayed.
• Select the street required.
Enter second street name
The screen shows the list of junction
entrances (or exits, if chosen on the
previous screen) on the freeway.
• Select the entrance (or exit) required.
The destination details are displayed for
confirmation of the address.
The alpha keyboard screen is displayed
showing the name of the first street and
‘Input Second Street Name’.
• Enter the name required for the
second street and touch List.
81
Page 82

Destination Entry
The list of possible streets from the
characters entered is displayed.
• Select the street required.
Note: Not all the possible streets listed
will have an intersection with the first
street. A pop-up will notify you if you
inadvertently select two streets that do
not intersect.
Select city
The screen shows the list of cities where
the selected intersection occurs.
• Select the city required.
The destination details are displayed for
confirmation of the address.
82
Page 83

Points of Interest (POI)
Points of Interest (POI)
Introduction
The Navigation System DVD contains
information about a large number of
points of interest (POI). There are many
categories of POI, including gas stations,
restaurants, railway stations and
hospitals.
This chapter explains how to select a
specific POI. A selected POI can be set as
a destination, or can be telephoned
directly if the Jaguar telephone is fitted
(see the In-Car Telephone Handbook).
Selecting a Quick POI Category
• Touch the Initial Map screen, then
touch the POI button. The screen
shows the six categories currently
selected for quick points of interest.
Note: The POI button will not be active if
the zoom level is below 1 km (½ mile).
• Select a Quick POI category.
The map screen is displayed with POI
icons.
Other categories
You can also select from the complete list
of POI categories.
• Touch List Categories and select a
category from the list displayed.
Local POI search
This selects the points of interest in all
categories within 20 miles (32 kilometres)
of the vehicle.
• Touch the All Local POI’s button.
POI Icon Display
After selecting a category, the map
display shows the location of each POI in
the selected category, indicated by the
appropriate POI icon.
• For information about a particular
POI, touch the desired POI icon.
Note: POI icons can only be displayed up
to the ½ mile (1 km) zoom level.
Next button
If some POI locations are very close to
one another, it may not be possible to
select a particular icon to display the
information.
• Touch Next (when active) to select
one of the icons in a group and display
its information. Repeat for the other
icons as required.
83
Page 84

Points of Interest (POI)
POI Information
After touching a POI icon, the name of the
selected POI is displayed at the top of the
screen.
POI details
• Touch Info. to display the details of
the selected POI.
The details include Name, Address, City
and Telephone number.
The telephone number can be called by
touching the telephone button (if a Jaguar
telephone is fitted).
Destination entry
• From the POI icon map display, touch
ENT. Dest. to store the POI location
as a destination.
The destination details are displayed for
confirmation of the address.
Cancelling POI Icon Display
If the display of POI icons is no longer
required, they can be turned off as
follows:
• Touch the map screen to display the
additional buttons.
• Touch POI Off to cancel the display of
POI icons on the map.
Jaguar Retailer Locations
Details of Jaguar Retailers (Dealers) are
held on the Navigation System DVD as a
points of interest (POI) category. Certain
Retailers may be located in areas that are
not fully mapped on the DVD. If a route is
set to one of these Retailers, guidance will
only be possible to the nearest city centre;
a warning message will be displayed.
If Jaguar Retailers (or certain other
categories, such as airports) are selected,
they will be displayed across all search
areas.
Entry by POI Name
Changing the Categories
Any of the six categories can be changed
from the Navigation Set Up menu, See
‘Changing the Quick POI Categories’,
page 87.
After selecting Point of Interest from the
Destination Entry menu, the alpha
keyboard screen is displayed, showing
‘Input POI Name’.
• Enter the POI name required.
• Touch List to display the list of
matching points of interest.
84
Page 85

Points of Interest (POI)
• Select the POI required.
The map location of the POI is displayed.
Note: If entering a POI name results in too
many matches being listed, try entering
the city name first. If you do not know the
name of the POI you want, try selecting a
POI category.
Entry by City
If a city name is entered first, the points of
interest listed will be restricted to that city.
• From the Input POI Name screen,
touch City.
The screen now shows ‘Input City Name’.
• Enter the city name required.
• Touch List to display the list of
possible cities.
• Select the city required.
The Input POI screen is displayed again.
• Enter the POI name required.
Entry by Category
If a POI category is selected first, the
points of interest listed will be restricted to
that category.
• From the Input POI Name screen,
touch Category.
The screen shows the list of main POI
categories.
• Select the category required.
The screen now shows the list of
sub-categories under the selected main
category.
• Select the sub-category required.
The Input POI Name screen is displayed
again.
• Enter the POI name required.
Other Selection Methods
The previous examples show the three
basic methods of searching the POI
database, i.e. POI name only, city before
POI name, and category before POI
name. You can refine the search even
further, as described in the following
examples:
85
Page 86

Points of Interest (POI)
City followed by category
In this example the order is: city, followed
by category, then POI name.
• From the Input POI Name screen,
touch City.
• Enter the city name required.
The Input POI Name screen is displayed
again.
• From the Input POI Name screen,
touch Category.
• Select the category and sub-category
required.
The Input POI Name screen is displayed
again.
• Enter the POI name.
Category followed by city
In this example the order is: category,
followed by city, then POI name.
• From the Input POI Name screen,
touch Category.
• Select the category and sub-category
required.
The Input POI Name screen is displayed
again.
• From the Input POI Name screen,
touch City.
The screen now shows ‘Input City Name’.
• Enter the city name required.
The Input POI Name screen is displayed
again.
• Enter the POI name required.
City centres
The POI database also holds city centre
locations. To select a city centre, proceed
as follows:
• From the Input POI Name screen,
enter the city name required in the
Name text area. (Do not select the
City button.)
• Touch List to display the list of
matches.
• For the city centre, select the entry
showing the city name only.
The map is displayed showing the city
centre location.
Note: In some cases, more than one city
centre location may be listed.
POI List
The screen shows a list of points of
interest found in the database search.
• Select the POI required.
Note: A number in the POI button
indicates that more than one POI exists
with the same name. Touch the button to
list them and select the POI required.
The map showing the location of the
selected POI is displayed.
Note: Some entries in the list may have a
further sub-list following.
86
Page 87

Points of Interest (POI)
POI details
• To view the details of the selected
POI, touch Info. from the map display.
The details include Name, Address, City
and Tel.
Telephone number
The telephone number can be called by
touching the telephone button (if a Jaguar
telephone is fitted).
List sorting
The list can be sorted by Name or
Distance, but is always sorted by name
when first displayed.
The illustration currently shows the list
sorted by distance.
• Touch the Name button at the lower
right-hand corner of the screen,
to sort the list by name. This button
toggles between the Name and
Distance (Dist.) function depending
on which list is displayed.
Note: When the list is sorted by distance,
the distance shown is the straight line
distance from the current vehicle location.
Categories/Sub-categories
The POI database is divided into a
number of categories. Each main
category is further divided into a number
of sub-categories.
The first entry in the list of Restaurant
sub-categories, is ‘All’. This selects all of
the Restaurant sub-categories.
To narrow the search, touch the City
button. This will display the alpha
keyboard, to allow the desired city name
to be entered.
Search area
When searching the database, only points
of interest in the current search area are
included, except for the sub-categories
marked ‘All search areas’ in the POI
category list.
List button
The List button becomes
active, when the characters
entered reduce the possible
entries to a small enough number. (The list
is displayed automatically when the
number of entries reduces to four or less.)
You can also select List (when active)
without entering a POI name. All the
relevant points of interest will be
displayed, e.g. in a selected city or
category.
All button
The All button returns to
searching all categories after
selecting one category.
POI Entry Messages
While searching for points of interest, you
may encounter one of the following
messages:
1. ‘There are no POI’s in this Category.’
2. ‘No POI’s Found in this City.’
Changing the Quick POI
Categories
The six default Quick POI categories can
be changed as required.
• At the Initial Map screen, touch Nav
Menu.
• Touch Navigation Set Up.
• Select the POI category that you wish
to replace.
87
Page 88

Points of Interest (POI)
The screen shows the full list of POI
categories.
• Select the new category required from
the list.
The screen shows the new selection of
category icons.
• Repeat for another category icon if
required.
• Touch OK to apply the new settings.
Memory Points
The procedure for using memory points is
functionally the same as for using the
Quick Points of Interest.
The map display shows the location of all
stored memory points in view.
• For information about a particular
memory point, touch the desired
memory point icon.
After touching the memory point icon, the
name of the selected memory point is
displayed at the top of the screen.
Note: Unlike POI’s, memory points are
displayed at all zoom levels.
Memory point details
• Touch Info. to display the details of
the selected memory point.
The details include Icon, Name, Position
and Tel.
The telephone number can be called by
touching the telephone button, if a Jaguar
telephone is fitted.
The memory point details can be edited,
see ‘Memory Points’, page 89.
Cancelling Icon Display
If the display of Memory Point icons is no
longer required, they can be turned off as
follows:
• Touch the map screen to display the
additional buttons.
• Touch Nav Menu.
• Touch Display Options.
• Touch Map Options.
• Touch Memory Point Hide to cancel
the display of icons on the map.
88
Page 89

Stored Locations
Stored Locations
Stored Locations Menu
In the upper portion of the menu, the
various types of stored location are
shown:
Memory Points
Home
Avoid Area
Previous Dest.
Dest. & Way Pt.
• Select the type of stored location
required.
In the lower portion of the screen, the
current number of stored locations of the
selected type/maximum number, is now
displayed.
Stored location actions
The four buttons (Add, List, Delete,
Del. All), operate in a similar manner for
all types of stored location.
• Touch the button required.
These actions are described in the
following pages for each type of stored
point.
Note: If an action is not available for the
stored location you have chosen, its
button will be disabled. For example, if a
home position has already been stored,
another one cannot be added.
Calculate
If required, a new
route calculation can
be made.
Memory Points
Add a memory point
After touching Add, the Store Memory
Point menu is displayed.
• Select the menu item you wish to use.
• Enter or select the details required.
The new point is added to the list of
stored memory points.
Note:
1. The Store Memory Point menu is used
in the same way as the Destination
Entry menu. For more information, see
‘Destination Entry Menu’, page 66.
2. To identify the new memory point,
select it from the list, touch Name,
and enter the name required.
89
Page 90

Stored Locations
List
After touching List, the list of stored
memory points is displayed showing
‘Edit Points’ at the top of the screen.
• Select an entry to view its location
details.
List sorting
• Touch Date, Name, Dist. or Icon to
sort the list as required.
Note:
1. Dist. lists the points by distance from
the vehicle’s current location.
2. Icon lists the points in the order they
appear on the icon selection screen
(left to right, top row first).
Location details
The location details include Icon, Name,
Position and Tel.
• Touch the appropriate button to
change or enter any of the location
details.
• Touch the telephone button to call the
telephone number (if a Jaguar
telephone is fitted).
Navigation nametags
This feature is part of JaguarVoice.
• Touch the Add nametag or Play
Nametag button as required. For
more information see the JaguarVoice
chapter in this handbook.
Icon list
After touching Icon, the 15 normal icons,
and three audible icons are displayed.
• To select, touch the icon required.
Normal icon
This is the icon displayed on the map to
indicate the map location of the memory
point. It replaces the default icon, used
when the point is stored.
Audible icon
When an audible icon is selected, a
distinctive chime will be heard when the
vehicle is approaching the map location
of the memory point.
90
Page 91

Stored Locations
Delete
After touching Delete, the list of memory
points is displayed showing ‘Delete
Points’ at the top of the screen.
• Select the entry to be deleted.
The screen shows the details of the
selected point and ‘Delete this Memory
Point? Yes/No’.
• Touch Yes to confirm.
The screen briefly shows ‘Memory Point
Deleted’.
Del. All
After touching Del. All, the screen shows
‘Delete all Memory Points? Yes/No’.
• Touch Yes to confirm.
The screen briefly shows ‘All Memory
Points Deleted’.
Home
Add
After touching Add, the Set Home menu
is displayed.
• Select the menu item you wish to use.
• Enter or select the details required.
The home position is stored.
Note: The Set Home menu is used in the
same way as the Destination Entry menu.
For more information, see ‘Destination
Entry Menu’, page 76.
List
After touching List, the map screen is
displayed, showing the location and
address of the stored home position.
• Scroll the map to adjust the location if
required.
• Touch OK to continue.
91
Page 92

Stored Locations
Delete
The screen shows the location of the
current home position and ‘Delete Home
Position? Yes/No’.
• Touch Yes to confirm.
The screen briefly shows ‘Home Deleted’.
Del. All
The Del. All button cannot be used with
home position.
Avoid Area
Add
Note:
1. The Store Avoid Area menu is used in
the same way as the Destination Entry
menu. For more information, see
‘Destination Entry Menu’, page 76.
2. In some circumstances, to calculate a
satisfactory route, it may not be
possible to avoid all the selected
areas.
List
After touching List, the list of stored avoid
areas is displayed.
• Select the item required.
The map screen is displayed, showing the
location and address of the selected area.
• To adjust the size of the area, touch
the Enlarge or Reduce button.
• To adjust the position of the area,
scroll the map as required.
• When finished, touch OK.
After touching Add, the Store Avoid Area
menu is displayed.
• Select the menu item you wish to use.
• Enter or select the details required.
The new area is added to the list of stored
avoid areas.
Delete
After touching Delete, the list of avoid
areas is displayed, showing ‘Delete Avoid
Area’ at the top of the screen.
• Select the item to be deleted.
The screen shows ‘Delete this Avoid
Area? Yes/No’.
• Touch Yes to confirm.
92
Page 93

Stored Locations
The screen briefly shows ‘Avoid Area
Deleted’.
Del. All
After touching Del. All, the screen shows
‘Delete all Avoid Areas? Yes/No’.
• Touch Yes to confirm.
The screen briefly shows ‘All Avoid Areas
Deleted’.
Previous Destination
Add
The Add button cannot be used with
previous destinations. These are added
automatically to the list of previous
destinations when the destination is
entered.
List
The List button cannot be used with
previous destinations. These can only be
viewed by using the Delete button.
Delete
After touching Delete, the list of previous
destinations is displayed showing ‘Delete
Prev Dest’ at the top of the screen.
• Select the entry to be deleted.
The screen shows ‘Delete this Previous
Destination? Yes/No’.
• Touch Yes to confirm.
The screen briefly shows ‘Previous
Destination Deleted’.
Del. All
After touching Del. All, the screen shows
‘Delete all Previous Destinations?
Yes/No’.
• Touch Yes to confirm.
The screen briefly shows ‘All Previous
Destinations Deleted’.
Destination and Way Point
Add
After touching Add, the Store Dest. & WP
menu is displayed.
• Select the menu item you wish to use.
• Enter or select the details required.
If a destination was entered, it will be
stored as the current destination. If a way
point was entered, it will be added to the
list of way points.
Note:
1. The Store Dest. & Way Point menu is
used in the same way as the
Destination Entry menu. For more
information, see ‘Destination Entry
Menu’, page 76.
93
Page 94

Stored Locations
2. The Store Dest. & Way Point menu is
used after a destination or way point
has been entered for the first time
using the Destination Entry menu.
List
After touching List, the list showing the
stored way points and destination (if
entered) is displayed. The first way point
to be visited is at the bottom of the list and
the destination at the top.
• Select an entry to view its map
location.
On the map, the location details for the
selected way point (or the destination),
are displayed at the top of the screen.
• To adjust the position of the way point
(or destination), scroll the map as
required.
• When finished, touch OK.
Way point order
If required, the order in which the way
points are visited can be changed.
• Select the Chg. Order button.
• Touch the button against each way
point in turn, to select the new order
required, starting with the first way
point to be visited.
• When finished, touch OK.
• To return to the previous screen,
touch Chg. Location.
The Undo button can be pressed to clear
the new selected order (made using the
Chg. Order button) and allow the order to
be reset.
Delete
After touching Delete, the list of way
points and the destination (if entered) is
displayed, showing ‘Delete Dest. & WP’ at
the top of the screen.
• Select the entry to be deleted.
The screen shows ‘Delete Destination?
Yes/No’, or ‘Delete this Way Point?
Yes/No’.
• Touch Yes to confirm.
The screen briefly shows ‘Destination
Deleted’, or ‘Way Point Deleted’.
Del. All
After touching Del. All, the screen shows
‘Delete all Way Points? Yes/No’.
• Touch Yes to confirm.
The screen briefly shows ‘All Way Points
Deleted’.
94
Page 95

Route Calculation
Route Calculation
Confirm Destination
After entering an address, or selecting a
map location, the map screen is displayed
showing its location. The address details
are shown at the top of the screen. The
address can be stored as a destination or
as a way point.
• If required, scroll the map to adjust the
location.
• To store as a destination touch Dest.
• To store as a way point, touch Way
Pt. (see ‘Additional Way Points’, page
96).
Route settings
• To change the route settings, touch
Change. See ‘Route Preferences’,
page 69.
Calculating the Route
After storing the destination (or final way
point), the map screen shows ‘Calculating
Route’ while the route is calculated.
• To change route settings, touch Chg.
Route. See ‘Route Preferences’, page
69.
Confirm Route
Following calculation, the screen shows
the whole route, with the total route
distance, and estimated travelling time
displayed at the top of the screen. Up to
three possible routes are calculated.
• To view an alternative route, touch
Next.
• To change route settings, touch Chg.
Route. See ‘Route Preferences’, page
69.
• To accept a route, touch Start (or
commence driving). See ‘Route
Guidance’, page 98.
Note: Only one route is calculated if the
route has way points set, or if the route is
over 1000 miles (1000 km) long.
95
Page 96

Storing Way Points
Storing Way Points
First way Point
A way point is a stop-off or mid-point
between your current location and your
destination.
After selecting Way Pt. for the first time
from the Confirm Destination screen, the
address entered is stored as the first way
point, and the Route Information screen is
displayed, as shown above. This screen
also shows details of the destination (if
entered).
• To enter another way point (or the
destination), touch Dest Entry. The
Destination Entry menu is displayed,
see ‘Destination Entry Menu’, page
76.
Editing way points
For information on using the List, Delete
and Del. All buttons, see ‘Destination and
Way Point’, page 93.
Additional Way Points
After selecting Way Pt. again from the
Confirm Destination screen, the Add Way
Point screen is displayed. This screen
lists the way points already entered, and
the destination (if entered).
• Choose the position required in the
list for the way point you are about to
add, and touch the appropriate Add
button.
The Route Information screen is
displayed again, showing the number of
way points entered. From this screen you
can enter another way point, the
destination, or start the route calculation.
Map location
• To view the map location of a way
point or destination, touch the
appropriate Map button.
96
Page 97

Storing Way Points
Calculate Route
If the destination has been entered, then,
after storing the final way point, the route
calculation can be started from the Route
Information screen. This screen should
now show details of the destination, and
the number of way points entered.
• To start the route calculation, touch
Calculate. See ‘Calculating the
Route’, page 95.
Note: If the destination has not been
entered at this stage, touch Dest Entry.
When the destination has been entered,
the route will be calculated after touching
Dest. from the Confirm Destination
screen. See ‘Confirm Destination’, page
95.
97
Page 98

Route Guidance
Route Guidance
Following Guidance
!
WARNING:
Only operate, adjust or view the system
when it is safe to do so.
After touching Start, the initial map
screen while under guidance is displayed.
The route is shown highlighted, with the
current road name shown in the text area
at the bottom of the screen.
Drive away, following the voice guidance
given by the system. Continue to follow
the voice guidance until the end of the
route is reached.
The touch-screen buttons, types of
guidance screen and other guidance
features are described in the following
pages.
Distance units
Distances are shown on the screen, and
given in voice guidance, either in miles or
in Metric units (kilometres and metres).
For information on changing the unit
selection, see ‘User settings’, page 19.
Time/distance to destination
While driving under guidance, the
estimated time (if selected) and distance
remaining to the end of the route are
shown on the screen.
While far-out – Before the vehicle
reaches the start of the highlighted route,
and during route recalculation, the
straight line distance and direction to the
destination are shown.
Message centre guidance
(where fitted)
Route guidance information can be
displayed on the instrument panel
message centre. The display of this
information on the message centre can be
selected or deselected as required, see
‘Guidance options:’, page 74.
Breaks in journey
While driving under guidance, the journey
can be broken without affecting the
stored route. When the journey is
continued, the route guidance will resume
automatically.
Whole route display
The map screen showing the entire route
can be displayed. This is selected from
the Route Options menu, see ‘Display
Whole Route’, page 70. From this screen
the display of the last portion of the route
and the route turn list can be selected.
Avoiding points and areas
At any time while a route is set, you can
select a point to be avoided on the current
route. This can be enlarged into an avoid
area if required. When the route is
recalculated, the points or areas selected
will be avoided (where possible), see
‘Turn list’, page 70.
98
Page 99

Route Guidance
Avoid areas can also be set up to be
avoided permanently in all route
calculations. See ‘Avoid Area’, page 92.
Touch buttons
The buttons displayed on the guidance
map screen are as follows:
Nav Menu button Displays the Navigation
menu, see ‘Navigation
Menu’, page 64.
Audible repeat button Repeats the last audible
instruction. If the manoeuvre
point has been passed, the audible
instruction for the next manoeuvre point
will be heard.
End call button - Ends a
telephone call. Displayed in
place of the Repeat button,
while a telephone conversation is in
progress (if a Jaguar telephone is fitted).
Zoom button - Selects the
desired map zoom level by
touching one of the arrow
buttons. The currently selected
scale is shown. See ‘Zoom button
operation’, page 58.
Guidance screen button -
Displays the guidance screen
overlay in place of the next turn
arrow icon. ‘Map Screen’, page 63.
- Displays the next turn arrow
icon in place of the guidance
screen overlay. See ‘Map
Screen’, page 63.
Map orientation
buttons - These buttons
select the desired map
orientation (north or vehicle heading to
the top of the screen). The current
selection is shown on the map.
Note: Above the 2 miles (4 kilometres)
zoom level, only north orientation is
available.
Additional buttons
These buttons are displayed after
touching the map display.
Chg. Route button -
Selects the Route
Options menu, to make
changes to the route preference settings.
See ‘Route Preferences’, page 69.
Ent. Dest. button - Stores
a selected map location as
a destination. (Displayed
in place of the Chg. Route button, after
touching the screen twice within 5
seconds.)
Store button - Stores a
selected map location as
a memory point.
POI button - Selects the
quick points of interest
function to display
POI icons on the map. For more
information, see ‘Points of Interest (POI)’,
page 83.
Home button - Sets a route to
the home position.
(Only displayed when a home
position is set.)
Note: If the Ent. Dest. button or the
Home button is touched, the current
route will be cancelled and a new route
calculated.
99
Page 100

Route Guidance
Arrival Guidance
When the vehicle arrives at the
destination, the screen shows the
destination location details. This is
confirmed by voice guidance. The system
is now ready for further use.
Auto Reroute
Way Points
When the vehicle arrives at a way point,
the screen shows ‘You have arrived at
your Way Point’. When the journey is
resumed, route guidance continues
automatically, either to the next way point
or to the final destination.
After way points have been visited (or the
route cancelled), they will be deleted from
the way points list.
Note: As way points are entered, they are
automatically added to the list of previous
destinations.
While under guidance, if the vehicle
deviates from the route, a new route will
be calculated automatically. While the
route is being recalculated the screen
shows ‘Calculating Route’ and the time
and distance to destination information is
replaced by the straight-line distance and
direction to the destination.
Note: If the vehicle is within 40 metres
(¼ mile) of the destination or next way
point, the route recalculation will not
occur.
100
 Loading...