


 Loading...
User’s Guide
EasyCoder PX4i
Bar Code Label
Printer
(IPL Version)

User’s Guide
EasyCoder PX4i
Bar Code Label
Printer
(IPL Version)
Intermec Technologies Corporation Corporate Headquarters
6001 36th Ave. W.
Everett, WA 98203 U.S.A. www.intermec.com
The information contained herein is proprietary and is provided solely for the purpose of allowing customers to operate and service Intermecmanufactured equipment and is not to be released, reproduced, or used for any other purpose without written permission of Intermec.
Information and speciÞcations contained in this document are subject to change without prior notice and do not represent a commitment on the part of Intermec Technologies Corporation.
© 2004 by Intermec Technologies Corporation. All rights reserved.
The word Intermec, the Intermec logo, Norand, ArciTech, CrossBar, Data Collection Browser, dcBrowser, Duratherm, EasyCoder, EasyLAN, Enterprise Wireless LAN, EZBuilder, Fingerprint, i-gistics, INCA (under license), InterDriver, Intermec Printer Network Manager, IRL, JANUS, LabelShop, Mobile Framework, MobileLAN, Nor*Ware, Pen*Key, Precision Print, PrintSet, RoutePower, TE 2000, Trakker Antares, UAP, Universal Access Point, and Virtual Wedge are either trademarks or registered trademarks of Intermec Technologies Corporation.
Throughout this manual, trademarked names may be used. Rather than put a trademark (ª or ¨) symbol in every occurrence of a trademarked name, we state that we are using the names only in an editorial fashion, and to the beneÞt of the trademark owner, with no intention of infringement.
There are U.S. and foreign patents pending.
Kimdura is a registered trademark of Kimberly Clark. Microsoft is a registered trademark of Microsoft Corporation.
Valeron is a registered trademark of ValŽron Strength Films, an ITW Company.
Windows is a trademark of Microsoft Corporation.
ii |
EasyCoder PX4i User’s Guide (IPL version) |

Document Change Record
This page records changes to this document. The document was originally released as version -00.
Version |
Date |
Description of Change |
-00 |
May 2004 |
For preproduction printers (Intermec internal use only) |
-01 |
Sept. 2004 |
First ofÞcial release. Supports IPL v2.30. |
|
|
|
EasyCoder PX4i User’s Guide (IPL version) |
iii |
iv |
EasyCoder PX4i User’s Guide (IPL version) |
Contents
Contents
1
2
3
4
Before You Begin........................................................................... |
ix |
Safety Summary.............................................................. |
ix |
Safety Icons ..................................................................... |
x |
Global Services and Support ........................................... |
xi |
Warranty Information ...................................... |
xi |
Web Support.................................................... |
xi |
Telephone Support ........................................... |
xi |
Who Should Read This Document .................. |
xi |
Related Documents.......................................... |
xi |
Introduction |
|
Description of EasyCoder PX4i Printer.......................................... |
2 |
Safety Summary ............................................................................. |
3 |
Product IdentiÞcation .................................................................... |
3 |
Installation |
|
Unpacking the Printer.................................................................... |
6 |
Front View..................................................................................... |
7 |
Rear View ...................................................................................... |
8 |
Media Compartment ..................................................................... |
9 |
Print Mechanism.......................................................................... |
10 |
Connections................................................................................. |
11 |
Power ............................................................................ |
11 |
Computer...................................................................... |
11 |
Controls and Indicators ............................................................... |
12 |
Indicator Lamps ............................................................ |
12 |
Display .......................................................................... |
13 |
Keyboard ....................................................................... |
13 |
Beeper ........................................................................... |
14 |
Starting Up |
|
Switching On the Printer ............................................................. |
16 |
Media Load |
|
Tear-Off (Straight-through) ......................................................... |
18 |
EasyCoder PX4i User’s Guide (IPL version) |
v |
Contents
Cut-Off........................................................................................ |
22 |
Peel-Off (Self-strip) ...................................................................... |
27 |
Internal Batch Takeup (Roll-to-roll) ............................................. |
32 |
External Supply (Fan-fold) ........................................................... |
38 |
5
6
Thermal Transfer Printing |
|
Ribbon Load................................................................................ |
42 |
Setting Up the Printer |
|
Description. ................................................................................. |
48 |
Default Setup............................................................................... |
49 |
Setup Parameters.......................................................................... |
50 |
Serial Communication................................................... |
50 |
Baud Rate ....................................................... |
50 |
Character Length ............................................ |
50 |
Parity............................................................... |
50 |
Stop Bits.......................................................... |
51 |
Protocol .......................................................... |
51 |
Test/Service ................................................................... |
53 |
Testprint.......................................................... |
53 |
Data Dump..................................................... |
54 |
Memory Reset................................................. |
54 |
Media ............................................................................ |
55 |
Media Type ..................................................... |
55 |
Paper Type....................................................... |
55 |
Label Length ................................................... |
55 |
Sensitivity (Media sensitivity number)............. |
55 |
Darkness ......................................................... |
56 |
Label Rest Point .............................................. |
56 |
Form Adj Dots X ............................................ |
56 |
Form Adj Dots Y............................................. |
56 |
Ribbon Low .................................................... |
56 |
Paper Low ....................................................... |
56 |
ConÞguration................................................................ |
57 |
Emulation ....................................................... |
57 |
Print Speed...................................................... |
57 |
Cutter (option)................................................ |
57 |
Label Taken Sensor (option)............................ |
57 |
Returning to Factory Default Setup ............................................. |
58 |
vi |
EasyCoder PX4i User’s Guide (IPL version) |
7
8
|
Contents |
Setup Mode |
|
Navigating in Setup Mode |
...........................................................60 |
Setup Mode Overviews ................................................................ |
62 |
Options |
|
Introduction ................................................................................ |
68 |
Liner/Batch Takeup Unit ............................................................. |
69 |
Paper Cutter................................................................................. |
69 |
Fan-Fold Guides .......................................................................... |
70 |
Media Roll Retainer ..................................................................... |
70 |
3-inch Adapter ............................................................................. |
70 |
Label Taken Sensor ...................................................................... |
70 |
Interface Boards ........................................................................... |
71 |
9
10
Troubleshooting |
|
Intermec Readiness Indicator ....................................................... |
74 |
Troubleshooting List .................................................................... |
77 |
Maintenance |
|
Printhead Cleaning ...................................................................... |
80 |
External Cleaning ........................................................................ |
83 |
Cleaning the Label Stop Sensor.................................................... |
84 |
Printhead Replacement ................................................................ |
85 |
Media Jams .................................................................................. |
88 |
Adjustments |
|
11 Narrow Media.............................................................................. |
90 |
Printhead Pressure........................................................................ |
91 |
Label Stop Sensor......................................................................... |
92 |
EasyCoder PX4i User’s Guide (IPL version) |
vii |
Contents
A B
Technical Specifications |
|
Technical Data ............................................................................. |
96 |
Media Specifications |
|
Media Roll Size .......................................................................... |
100 |
Media ........................................................................................ |
101 |
Non-Adhesive Strip ..................................................... |
101 |
Self-Adhesive Strip....................................................... |
102 |
Self-Adhesive Labels..................................................... |
103 |
Tickets with Gap ......................................................... |
105 |
Tickets with Black Mark.............................................. |
107 |
|
Interfaces |
|
C |
RS-232 Interface........................................................................ |
110 |
|
USB Interface ............................................................................ |
111 |
|
Optional Interfaces .................................................................... |
112 |
|
Intermec Supplies |
|
D |
Setting the Media Sensitivity Number ....................................... |
116 |
viii |
EasyCoder PX4i User’s Guide (IPL version) |
Before You Begin
Before You Begin
This section provides you with safety information, technical support information, and sources for additional product information.
Safety Summary
Your safety is extremely important. Read and follow all warnings and cautions in this document before handling and operating Intermec equipment. You can be seriously injured, and equipment and data can be damaged if you do not follow the safety warnings and cautions.
Do not repair or adjust alone
Do not repair or adjust energized equipment alone under any circumstances. Someone capable of providing Þrst aid must always be present for your safety.
First aid
Always obtain Þrst aid or medical attention immediately after an injury. Never neglect an injury, no matter how slight it seems.
Resuscitation
Begin resuscitation immediately if someone is injured and stops breathing. Any delay could result in death. To work on or near high voltage, you should be familiar with approved industrial Þrst aid methods.
Energized equipment
Never work on energized equipment unless authorized by a responsible authority. Energized electrical equipment is dangerous. Electrical shock from energized equipment can cause death. If you must perform authorized emergency work on energized equipment, be sure that you comply strictly with approved safety regulations.
EasyCoder PX4i User’s Guide (IPL version) |
ix |

Before You Begin
Safety Icons
This section explains how to identify and understand dangers, warnings, cautions, and notes that are in this document. You may also see icons that tell you when to follow ESD procedures.
A warning alerts you of an operating procedure, practice, condition, or statement that must be strictly observed to avoid death or serious injury to the persons working on the equipment.
A caution alerts you to an operating procedure, practice, condition, or statement that must be strictly observed to prevent equipment damage or destruction, or corruption or loss of data.
This icon appears at the beginning of any procedure in this manual that could cause you to touch components (such as printed circuit boards) that are susceptible to damage from 


 electrostatic discharge (ESD). When you see this icon, you


 must follow standard ESD guidelines to avoid damaging the equipment you are servicing.
Note: Notes either provide extra information about a topic or contain special instructions for handling a particular condition or set of circumstances.
x |
EasyCoder PX4i User’s Guide (IPL version) |
Before You Begin
Global Services and Support
Warranty Information
To understand the warranty for your Intermec product, visit the Intermec web site at http://www.intermec.com and click Service & Support. The Intermec Global Sales & Service page appears. From the Service & Support menu, move your pointer over Support, and then click Warranty.
Web Support
Visit the Intermec web site at http://www.intermec.com to download our current documents in PDF format. To order printed versions of the Intermec manuals, contact your local Intermec representative or distributor.
Visit the Intermec technical knowledge base (Knowledge Central) at http://intermec.custhelp.com to review technical information or to request technical support for your Intermec product.
Telephone Support
Contact your local Intermec representative. To search for your local representative, from the Intermec web site, click Contact.
Who Should Read This Document?
This UserÕs Guide provides you with information about the features of the EasyCoder PX4i printer and how to install, conÞgure, operate, maintain, and troubleshoot it.
Related Documents
The Intermec web site at http://www.intermec.com contains our current documents that you can download in PDF format. To order printed versions of the Intermec manuals, contact your local Intermec representative or distributor.
EasyCoder PX4i User’s Guide (IPL version) |
xi |
Before You Begin
xii |
EasyCoder PX4i User’s Guide (IPL version) |

1 Introduction
This chapter introduces the EasyCoder PX4i printer. The chapter covers the following topics:
¥Description of EasyCoder PX4i
¥Safety summary
¥Product identiÞcation
EasyCoder PX4i User’s Guide (IPL version) |
1 |
Chapter 1 — Introduction
Description of EasyCoder PX4i Printer
The EasyCoder PX4i is a high-volume thermal transfer printer with a printhead resolution of 8 dots/mm = 203.2 dots/inch and a maximum print width of 112 mm (4.5 inches).
The EasyCoder PX4i offers a large number of useful features, such as:
¥High speed printing up to 300 mm/sec. (12 inches/sec.)
¥Flash memory SIMMs for Þrmware, fonts, and bar codes
¥Built-in CompactFlash memory card adapter
¥Built-in RS-232 and USB interfaces
¥Provision for one or two extra interface boards including wired or wireless EasyLAN connections and parallel interface
¥Keyboard and display with backlight
¥Support for network monitoring through optional software tools
A large number of factory-installed or Þeld-installable options are available, so the printer can be conÞgured for a wide range of applications. See Chapter 8 and Appendix A for more information.
The printer is designed to work with the Intermec InterDriver and Intermec LabelShop. The InterDriver allows you to print labels from standard MS Windows applications, for example Microsoft OfÞce. Intermec LabelShop is a series of label-design programs that work under various versions of MS Windows.
The EasyCoder PX4i supports the Intermec Programming Language (IPL) v2.30. A version of EasyCoder PX4i, that supports Intermec Fingerprint v8.30, is described in a special UserÕs Guide.
2 |
EasyCoder PX4i User’s Guide (IPL version) |
Chapter 1 — Introduction
Safety Summary
Intermec assumes no responsibility regarding the CE Directive if the printer is handled, modiÞed, or installed in any way other than that described in IntermecÕs manuals.
¥Read this manual carefully before connecting the printer.
¥Moving parts are exposed when the side doors are open, so ensure that the doors are closed before you operate the printer.
¥Do not remove the left-hand cover. Dangerous voltage!
¥Do not remove the bottom plate. Dangerous voltage!
¥Do not put your Þngers inside the print mechanism when the power is on.
¥Place the printer on an even surface which can support its weight of approximately 13 kg (28.5 pounds) plus supplies.
¥Do not spray the printer with water. If you are using a hose to clean the premises in an industrial environment, remove the printer or protect it carefully from spray and moisture.
¥Carefully read the warning text on the envelope before using a cleaning card.
Product Identification
The machine label is attached to the printerÕs rear plate and contains information on type, model, and serial number as well as AC voltage. It also contains various signs of approval.
EasyCoder PX4i User’s Guide (IPL version) |
3 |
Chapter 1 — Introduction
4 |
EasyCoder PX4i User’s Guide (IPL version) |

2 Installation
This chapter explains how to unpack and install the EasyCoder PX4i and also describes the printerÕs various parts in detail. It covers the following topics:
¥Unpacking the printer
¥Parts on the printerÕs front
¥Parts on the printerÕs rear plate
¥Parts in the media compartment
¥Parts in the print mechanism
¥Connecting the printer
¥Using the controls and understanding the indicators
EasyCoder PX4i User’s Guide (IPL version) |
5 |
Chapter 2 — Installation
Unpacking the Printer
Before you install the printer, examine the package for possible damage or missing parts:
¥Open the box and lift the printer out.
¥Check that the printer has not been visibly damaged during transportation. Keep the packing materials in case you need to move or reship the printer.
¥Check the label on the printerÕs rear plate, which gives the voltage, the part number, and the serial number.
¥Check that any options you ordered are included.
¥Check that all the accessories are included. As standard, the box contains:
-Intermec EasyCoder PX4i printer
-Adapter for 3-inch media roll core
-Power cord
-Quality check card
-Cleaning card
-This UserÕs Guide
-Compact disk (CD) with supporting software, additional manuals, and product information.
¥Check that the type of power cord is appropriate for the local standard. The printer works within 90 to 265 VAC, 50 to 60 Hz.
If the printer has been damaged in any way during transportation, complain to the carrier immediately.
If the delivery is incorrect or any parts are missing, report it immediately to the distributor.
6 |
EasyCoder PX4i User’s Guide (IPL version) |
Chapter 2 — Installation
Front View
At the front of the printer are the display window, the indicator lamps, and the keyboard. These features allow the operator to control and set up the printer manually.
The front door is held by a snap-lock. Open the front door to view the various parts on the printerÕs front.
Refer to Chapter 8 ÒOptionsÓ for information on possible optional devices Þtted on the printerÕs front.
Indicator lamps
Display window
Keyboard
Connector for optional cutter
Print mechanism
Front door
Side door
EasyCoder PX4i User’s Guide (IPL version) |
7 |
Chapter 2 — Installation
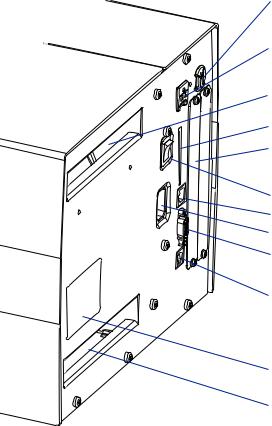
Rear View
The rear plate contains the On/Off switch, the AC power cord socket, and various interface connectors and slots.
Provision for EasyLAN Wireless antenna (option)
Provision for EasyLAN Ethernet connection (option)
Intake slot for external media supply
Memory card slot
Provision for IEEE 1284 interface board (option)
On/O Switch
(not used)
AC Power cord socket
RS-232 serial interface
USB interface
Machine label
Intake slot for external media supply
8 |
EasyCoder PX4i User’s Guide (IPL version) |
Chapter 2 — Installation
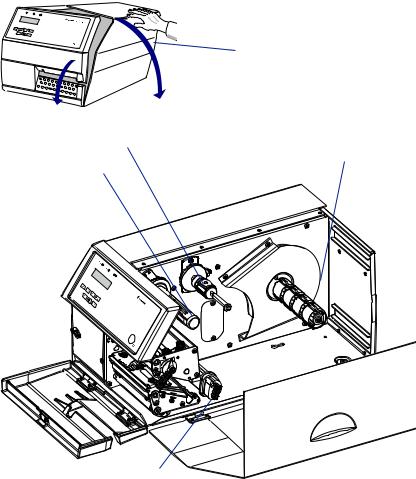
Media Compartment
The media compartment is covered by the side door which can be opened 180¡ downwards to provide full access for media and ribbon load. The door is held in closed position by a magnetic lock. It can be completely removed by pushing it rearwards.
The media can be supplied from a rotating hub or from an external supply of fan folds behind the printer. Also see Chapter 8, ÒOptions.Ó
Side door
Media supply Ribbon supply hub roll hub
Ribbon rewind hub
& BTZ$ PEFS1 9J
Slack absorber
EasyCoder PX4i User’s Guide (IPL version) |
9 |

Chapter 2 — Installation
Print Mechanism
The print mechanism features a high-performance thermal printhead with quick-mount Þttings to facilitate replacement.
Pressure arm locking knob
Printhead pressure adjustment knob
Edge guide
Pressure arm
Thermal printhead
Tear bar
Upper label stop sensor
guide (removable) Printhead lift lever
Lower label stop sensor guide (removable)
Label stop sensor position adjustment screw
10 |
EasyCoder PX4i User’s Guide (IPL version) |
Chapter 2 — Installation
Connections
Power
1Place the printer on a level surface, near an AC outlet. You should be able to access the printer to load supplies and to remove the printout.
2Check that the printer is switched off.
3Connect the power cord from the socket on the rear plate to an electrical outlet (90 to 265 VAC).
Computer
The EasyCoder PX4i is Þtted with one 9-pin D-style subminiature (DB9) socket for the RS-232 serial interface port and one class B connector for the USB interface port (see Appendix C).
RS-232 Serial Interface
Before you can use the serial interface, you may need to set up the communication parameters, such as baud rate, parity, etc. as described in Chapter 6, ÒSetting Up the Printer.Ó
USB Interface
The printer supports USB v1.1. There is no communication setup for USB. For more information, refer to Appendix C.
Optional Interface and Network Boards
Several types are available (see Chapter 8, ÒOptionsÓ). Refer to Chapter 6, Chapter 7, and Appendix C for connection and setup instructions.
The printer can be set to scan all communication ports. When it detects incoming data on a port, the printer automatically switches to use that port for both input and output. Press the <i> key to get information on the active communication channels.
Switch off both PC and printer before connecting them together.
EasyCoder PX4i User’s Guide (IPL version) |
11 |

Chapter 2 — Installation
Controls and Indicators
The EasyCoder PX4i has several ways of communicating directly with its operator: three colored indicator lamps, a display window, a membraneswitch keyboard with 8 keys and buttons on the printerÕs front, and a beeper.
Indicator Lamps
The indicators are colored LEDs (Light Emitting Diodes) and are used for the following purposes:
Power (solid green) indicates that the power is on.
Status (solid green) indicates that the printer is ready for use. Status (ßashing green) indicates that the printer is communicating. Status (solid red) indicates an error condition (see Chapter 9).
 Intermec Readiness Indicator (blue; on, blink, or off). Represented by a blue light on Intermec handheld computers, access points, and printers, the Intermec Readiness Indicator is part of an exclusive monitoring system from Intermec. The Intermec Readiness Indicator helps users quickly determine the readiness of the Intermec device individually and as part of a solution. The Intermec Readiness Indicator has three different states: On, Blinking, and Off. When the Indicator is off, the device is not ready to operate individually or as part of a solution. When the Indicator is blinking, the device may be initializing, waiting for external resources, or in need of user attention. And when the Indicator is On, the device is ready for use as part of a solution. Also see Chapter 9.
12 |
EasyCoder PX4i User’s Guide (IPL version) |

Chapter 2 — Installation
Display
The display window contains an LCD (Liquid Crystal Display) with background illumination and two lines of text, each with 16 characters. It shows a message when certain errors occur and guides the operator through upgrading, startup, and setup. The following errors are reported:
Error |
Displayed message |
Empty/Paused |
PAUSE |
Out of media |
PAPER OUT |
Out of ribbon |
RIBBON OUT |
Printhead lifted |
PRINT HEAD UP/PRESS FEED |
Cutter error |
OPEN&SHUT CUTTER |
Ribbon Þtted |
RIBBON FITTED |
Paper fault |
PAPER FAULT |
Power supply error |
PSU ERROR |
Power supply too hot |
PSU OVER TEMP |
Printhead too hot |
PRINTHEAD HOT |
Keyboard
The keyboard is of the membrane-switch type and has 7 keys. The keyboard is supplemented by a large ÒFeed/PauseÓ button. Some keys have hard-coded functions in the startup and setup modes.
Feed/Pause button Feed/Pause a print job. Repeat last printed label.
Enter the Setup Mode (see Chapter 7).
Display error messages and communication channel information.
Scroll between various types of information after pressing the <i> key. Possible error messages and information on active communication channels are shown in a loop.
Keyboard Color Code
Yellow |
Operation of the printer (operator level) |
Green |
Setup or service (site or service technician level) |
White |
Data input to printer (operator or technician level) |
EasyCoder PX4i User’s Guide (IPL version) |
13 |
Chapter 2 — Installation
Beeper
The beeper acknowledges that a key has been pressed. Optionally, an audible alarm can be enabled using an IPL command. It will start beeping at paper out and ribbon our and will continue beeping until the start of reload.
14 |
EasyCoder PX4i User’s Guide (IPL version) |

3 Starting Up
This chapter explains how to start up the printer after installation or after having been switched off.
EasyCoder PX4i User’s Guide (IPL version) |
15 |

Chapter 3 — Starting Up
Switching On the Printer
Before switching on the printer, make the necessary connections, and check that the printhead is engaged.
Switch on the power using the On/Off switch on the rear plate. The ÒPowerÓ control lamp on the front panel lights up when the power is on. Wait for a few moments, while the printer loads the program and runs some self-diagnostic tests:
Starting
After a short time, the printer is initialized. The progress of the initialization is indicated by an increasing number of colons on the lower line in the display:
Initializing
:::
When the initialization is completed, a label is fed out. The following message appears, indicating that the printer is ready for operation.
IPL 2.30
The message indicates the IPL version number.
16 |
EasyCoder PX4i User’s Guide (IPL version) |
Loading...