


 Loading...
PD41 | PD42
Commercial Printer
User’s Manual
Intermec Technologies Corporation
Worldwide Headquarters
6001 36th Ave.W.
Everett, WA 98203
U.S.A.
www.intermec.com
The information contained herein is provided solely for the purpose of allowing customers to operate and service Intermec-manufactured equipment and is not to be released, reproduced, or used for any other purpose without written permission of Intermec Technologies Corporation.
Information and specifications contained in this document are subject to change without prior notice and do not represent a commitment on the part of Intermec Technologies Corporation.
© 2009 by Intermec Technologies Corporation. All rights reserved.
The word Intermec, the Intermec logo, Norand, ArciTech, Beverage Routebook, CrossBar, dcBrowser, Duratherm, EasyADC, EasyCoder, EasySet, Fingerprint, i-gistics, INCA (under license), Intellitag, Intellitag Gen2, JANUS, LabelShop, MobileLAN, Picolink, Ready-to-Work, RoutePower, Sabre, ScanPlus, ShopScan, Smart Mobile Computing, SmartSystems, TE 2000, Trakker Antares, and Vista Powered are either trademarks or registered trademarks of Intermec Technologies Corporation.
There are U.S. and foreign patents as well as U.S. and foreign patents pending.
Wi-Fi is a registered certification mark of the Wi-Fi Alliance.
Microsoft, Windows, and the Windows logo are registered trademarks of Microsoft Corporation in the United States and/or other countries.
This product includes software developed by the OpenSSL Project for use in the OpenSSL Toolkit (www.openssl.org).
This product includes cryptographic software written by Eric Young (EAY@cryptsoft.com).
ii |
PD41 and PD42 Commercial Printer User’s Manual |
Contents
Contents
Before You Begin. . . . . . . . . . . . . . . . . . . . . . . . . . . . . . . . . . . . . . . . . . . . . . . . . . . . . . . . . . . . . . . . . ix Safety Information . . . . . . . . . . . . . . . . . . . . . . . . . . . . . . . . . . . . . . . . . . . . . . . . . . . . . . . ix Global Services and Support . . . . . . . . . . . . . . . . . . . . . . . . . . . . . . . . . . . . . . . . . . . . . . ix Warranty Information. . . . . . . . . . . . . . . . . . . . . . . . . . . . . . . . . . . . . . . . . . . . ix Web Support . . . . . . . . . . . . . . . . . . . . . . . . . . . . . . . . . . . . . . . . . . . . . . . . . . . . . x Telephone Support . . . . . . . . . . . . . . . . . . . . . . . . . . . . . . . . . . . . . . . . . . . . . . . x Service Location Support . . . . . . . . . . . . . . . . . . . . . . . . . . . . . . . . . . . . . . . . . . x
Who Should Read This Manual . . . . . . . . . . . . . . . . . . . . . . . . . . . . . . . . . . . . . . . . . . . xi Related Documents . . . . . . . . . . . . . . . . . . . . . . . . . . . . . . . . . . . . . . . . . . . . . . . . . . . . . . xi
1 Using the Printer . . . . . . . . . . . . . . . . . . . . . . . . . . . . . . . . . . . . . . . . . . . . . . . . . . . . . . . . |
1 |
Learning About the Printers . . . . . . . . . . . . . . . . . . . . . . . . . . . . . . . . . . . . . . . . . . . . . . . . . . . . . . . 2
What’s New?. . . . . . . . . . . . . . . . . . . . . . . . . . . . . . . . . . . . . . . . . . . . . . . . . . . . . . . . . . . . . . 2
Identifying the Parts of the Printer . . . . . . . . . . . . . . . . . . . . . . . . . . . . . . . . . . . . . . . . . 3
Selecting the Printer Command Language . . . . . . . . . . . . . . . . . . . . . . . . . . . . . . . . . . 4
Understanding the Front Panel . . . . . . . . . . . . . . . . . . . . . . . . . . . . . . . . . . . . . . . . . . . . 6
Understanding the Print Button and LEDs. . . . . . . . . . . . . . . . . . . . . . . . . . 6
Understanding the PD42 Screen and Soft Keys . . . . . . . . . . . . . . . . . . . . . . 8
Understanding Printer States . . . . . . . . . . . . . . . . . . . . . . . . . . . . . . . . . . . . . . . . . . . . . 10
Loading Media. . . . . . . . . . . . . . . . . . . . . . . . . . . . . . . . . . . . . . . . . . . . . . . . . . . . . . . . . . . . . . . . . . . 11 Loading Media for Tear-Off Printing . . . . . . . . . . . . . . . . . . . . . . . . . . . . . . . . . . . . . . 12 Loading Media for Peel-Off (Self-Strip) Printing . . . . . . . . . . . . . . . . . . . . . . . . . . . . 13
Loading Thermal Transfer Ribbon. . . . . . . . . . . . . . . . . . . . . . . . . . . . . . . . . . . . . . . . . . . . . . . . . 17
Printing a Test Label . . . . . . . . . . . . . . . . . . . . . . . . . . . . . . . . . . . . . . . . . . . . . . . . . . . . . . . . . . . . .20
Creating and Printing Labels . . . . . . . . . . . . . . . . . . . . . . . . . . . . . . . . . . . . . . . . . . . . . . . . . . . . . . 21
2 Connecting the Printer . . . . . . . . . . . . . . . . . . . . . . . . . . . . . . . . . . . . . . . . . . . . . . . . |
23 |
Connecting the Printer to Your PC . . . . . . . . . . . . . . . . . . . . . . . . . . . . . . . . . . . . . . . . . . . . . . . . 24 Connecting the Printer to a PC Through the USB Device Port . . . . . . . . . . . . . . . 24 Connecting the Printer to a PC Through the Serial Port . . . . . . . . . . . . . . . . . . . . . 24 Connecting the Printer to a PC Through the IEEE 1284 Port . . . . . . . . . . . . . . . . 25
Connecting the Printer to Your Network . . . . . . . . . . . . . . . . . . . . . . . . . . . . . . . . . . . . . . . . . . . 26 Setting Up Ethernet Communications . . . . . . . . . . . . . . . . . . . . . . . . . . . . . . . . . . . . . 26 Manually Configuring IP Settings . . . . . . . . . . . . . . . . . . . . . . . . . . . . . . . . . . . . . . . . .27
PD41 and PD42 Commercial Printer User’s Manual |
iii |
Contents
Setting Up 802.11 Radio Communications . . . . . . . . . . . . . . . . . . . . . . . . . . . . . . . . . 29 Configuring 802.11 Wireless Security Using IPL . . . . . . . . . . . . . . . . . . . . 31 Configuring 802.11 Wireless Security Using Fingerprint . . . . . . . . . . . . 34
Connecting Peripherals to the USB Host Port . . . . . . . . . . . . . . . . . . . . . . . . . . . . . . . . . . . . . . 37
Using a USB Mass Storage Device . . . . . . . . . . . . . . . . . . . . . . . . . . . . . . . . . . . . . . . . . . . . . . . . . 38 Connecting a Keyboard to the USB Host Port . . . . . . . . . . . . . . . . . . . . . . . . . . . . . . 38 Connecting a Bar Code Scanner to the USB Host Port. . . . . . . . . . . . . . . . . . . . . . . 39 Connecting a USB Hub to the USB Host Port . . . . . . . . . . . . . . . . . . . . . . . . . . . . . . 39
3 Configuring the Printer. . . . . . . . . . . . . . . . . . . . . . . . . . . . . . . . . . . . . . . . . . . . . . . . 41
Configuring the Printer . . . . . . . . . . . . . . . . . . . . . . . . . . . . . . . . . . . . . . . . . . . . . . . . . . . . . . . . . .42 Configuring the PD42 Printer from the Screen . . . . . . . . . . . . . . . . . . . . . . . . . . . . . 42 Configuring the Printer From the Home Page . . . . . . . . . . . . . . . . . . . . . . . . . . . . . .44 Configuring Communications Settings . . . . . . . . . . . . . . . . . . . . . . . . . . . . 45 Configuring Media Settings . . . . . . . . . . . . . . . . . . . . . . . . . . . . . . . . . . . . . . 45 Configuring Print Engine Settings (Fingerprint only) . . . . . . . . . . . . . . . 46 Configuring Web Shell Settings . . . . . . . . . . . . . . . . . . . . . . . . . . . . . . . . . . .46 Configuring Alerts . . . . . . . . . . . . . . . . . . . . . . . . . . . . . . . . . . . . . . . . . . . . . . . 47 Configuring General Network Settings . . . . . . . . . . . . . . . . . . . . . . . . . . . . 49 Configuring Mail Settings . . . . . . . . . . . . . . . . . . . . . . . . . . . . . . . . . . . . . . . .50 Configuring SNMP Settings . . . . . . . . . . . . . . . . . . . . . . . . . . . . . . . . . . . . . . 51 Configuring TCP/IP Settings . . . . . . . . . . . . . . . . . . . . . . . . . . . . . . . . . . . . . 52 Configuring the Network Type. . . . . . . . . . . . . . . . . . . . . . . . . . . . . . . . . . . . 54 Configuring Avalanche Settings . . . . . . . . . . . . . . . . . . . . . . . . . . . . . . . . . . .54 Configuring Wireless LAN Settings. . . . . . . . . . . . . . . . . . . . . . . . . . . . . . . . 55 Configuring 802.1x Settings . . . . . . . . . . . . . . . . . . . . . . . . . . . . . . . . . . . . . . 56 Configuring SmartSystems Settings . . . . . . . . . . . . . . . . . . . . . . . . . . . . . . . 58 Configuring the Printer Using PrintSet . . . . . . . . . . . . . . . . . . . . . . . . . . . . . . . . . . . . 58 Configuring the Printer Using Commands Sent From Your PC . . . . . . . . . . . . . . 59 Configuring the Printer Using SmartSystems Foundation . . . . . . . . . . . . . . . . . . . 59
Choosing an Ethernet or Wireless Network. . . . . . . . . . . . . . . . . . . . . . . . . . . . . . . . . . . . . . . . .60 Using the PD42 Screen to Choose the Network Type . . . . . . . . . . . . . . . . . . . . . . . . 60 Using Printer Commands to Choose the Network Type . . . . . . . . . . . . . . . . . . . . . 60
Upgrading the Firmware. . . . . . . . . . . . . . . . . . . . . . . . . . . . . . . . . . . . . . . . . . . . . . . . . . . . . . . . . . 61
Downloading Fonts and Graphics . . . . . . . . . . . . . . . . . . . . . . . . . . . . . . . . . . . . . . . . . . . . . . . . . 63
iv |
PD41 and PD42 Commercial Printer User’s Manual |
Contents
4 Troubleshooting and Maintaining the Printer. . . . . . . . . . . . . . . . . . . . . . 65
Troubleshooting the Printer . . . . . . . . . . . . . . . . . . . . . . . . . . . . . . . . . . . . . . . . . . . . . . . . . . . . . . 66 Contacting Product Support. . . . . . . . . . . . . . . . . . . . . . . . . . . . . . . . . . . . . . . . . . . . . . 66 Understanding Error Messages on the PD42 . . . . . . . . . . . . . . . . . . . . . . . . . . . . . . . 67 Troubleshooting Printer Problems and Finding Solutions . . . . . . . . . . . . . . . . . . . 69 Troubleshooting Communication Problems . . . . . . . . . . . . . . . . . . . . . . . . . . . . . . . 72
Using the Line Analyzer in Fingerprint. . . . . . . . . . . . . . . . . . . . . . . . . . . . . 72 Using Dump Mode . . . . . . . . . . . . . . . . . . . . . . . . . . . . . . . . . . . . . . . . . . . . . . 73 Using Testmode and Extended Testmode to Troubleshoot. . . . . . . . . . . . . . . . . . . 74 Using Testmode . . . . . . . . . . . . . . . . . . . . . . . . . . . . . . . . . . . . . . . . . . . . . . . . . 74 Using Extended Testmode . . . . . . . . . . . . . . . . . . . . . . . . . . . . . . . . . . . . . . . .75
Adjusting the Printer . . . . . . . . . . . . . . . . . . . . . . . . . . . . . . . . . . . . . . . . . . . . . . . . . . . . . . . . . . . . . 76
Preventing Ribbon Wrinkling . . . . . . . . . . . . . . . . . . . . . . . . . . . . . . . . . . . . . . . . . . . . . 76
Clearing Media Jams . . . . . . . . . . . . . . . . . . . . . . . . . . . . . . . . . . . . . . . . . . . . . . . . . . . . . 78
Adjusting the Printhead . . . . . . . . . . . . . . . . . . . . . . . . . . . . . . . . . . . . . . . . . . . . . . . . . . 79
Adjusting Printhead Balance . . . . . . . . . . . . . . . . . . . . . . . . . . . . . . . . . . . . . . 79
Adjusting Printhead Pressure . . . . . . . . . . . . . . . . . . . . . . . . . . . . . . . . . . . . .80
Adjusting Printhead Dot Line . . . . . . . . . . . . . . . . . . . . . . . . . . . . . . . . . . . . .81
Adjusting the Label Stop Sensor. . . . . . . . . . . . . . . . . . . . . . . . . . . . . . . . . . . . . . . . . . .83
Maintaining the Printer . . . . . . . . . . . . . . . . . . . . . . . . . . . . . . . . . . . . . . . . . . . . . . . . . . . . . . . . . .87
Cleaning the Printhead . . . . . . . . . . . . . . . . . . . . . . . . . . . . . . . . . . . . . . . . . . . . . . . . . . . 88
Cleaning the Media Compartment . . . . . . . . . . . . . . . . . . . . . . . . . . . . . . . . . . . . . . . .88
Cleaning the Exterior of the Printer. . . . . . . . . . . . . . . . . . . . . . . . . . . . . . . . . . . . . . . .89
A Specifications . . . . . . . . . . . . . . . . . . . . . . . . . . . . . . . . . . . . . . . . . . . . . . . . . . . . . . . . . |
91 |
Printer Specifications . . . . . . . . . . . . . . . . . . . . . . . . . . . . . . . . . . . . . . . . . . . . . . . . . . . . . . . . . . . . 92
Interfaces. . . . . . . . . . . . . . . . . . . . . . . . . . . . . . . . . . . . . . . . . . . . . . . . . . . . . . . . . . . . . . . . . . . . . . . . 94
RS-232 Serial Interface . . . . . . . . . . . . . . . . . . . . . . . . . . . . . . . . . . . . . . . . . . . . . . . . . . . 94
USB Interface. . . . . . . . . . . . . . . . . . . . . . . . . . . . . . . . . . . . . . . . . . . . . . . . . . . . . . . . . . . . 95
USB Host Interface. . . . . . . . . . . . . . . . . . . . . . . . . . . . . . . . . . . . . . . . . . . . . . . . . . . . . . . 96
Ethernet Interface. . . . . . . . . . . . . . . . . . . . . . . . . . . . . . . . . . . . . . . . . . . . . . . . . . . . . . . . 96
Parallel IEEE 1284 Interface . . . . . . . . . . . . . . . . . . . . . . . . . . . . . . . . . . . . . . . . . . . . . .97
Media Specifications . . . . . . . . . . . . . . . . . . . . . . . . . . . . . . . . . . . . . . . . . . . . . . . . . . . . . . . . . . . . . 98
Accessories for the Printer . . . . . . . . . . . . . . . . . . . . . . . . . . . . . . . . . . . . . . . . . . . . . . . . . . . . . . .107
PD41 and PD42 Commercial Printer User’s Manual |
v |
Contents |
|
B Default Settings . . . . . . . . . . . . . . . . . . . . . . . . . . . . . . . . . . . . . . . . . . . . . . . . . . . . . . |
109 |
Default Configuration . . . . . . . . . . . . . . . . . . . . . . . . . . . . . . . . . . . . . . . . . . . . . . . . . . . . . . . . . .110
IPL Default Configuration. . . . . . . . . . . . . . . . . . . . . . . . . . . . . . . . . . . . . . . . . . . . . . .110
Fingerprint Default Configuration . . . . . . . . . . . . . . . . . . . . . . . . . . . . . . . . . . . . . . .112
ESim Default Configuration . . . . . . . . . . . . . . . . . . . . . . . . . . . . . . . . . . . . . . . . . . . . .115
C Fingerprint, IPL, and ESim Setup Menus. . . . . . . . . . . . . . . . . . . . . . . . . . . 119
Fingerprint Setup Menus . . . . . . . . . . . . . . . . . . . . . . . . . . . . . . . . . . . . . . . . . . . . . . . . . . . . . . . .120
Fingerprint Ser-Com, UART1 Menu . . . . . . . . . . . . . . . . . . . . . . . . . . . . . . . . . . . . . .120
Fingerprint Net-Com, NET1 Menu . . . . . . . . . . . . . . . . . . . . . . . . . . . . . . . . . . . . . . .120
Fingerprint Com Menu. . . . . . . . . . . . . . . . . . . . . . . . . . . . . . . . . . . . . . . . . . . . . . . . . .121
Fingerprint Network Menu . . . . . . . . . . . . . . . . . . . . . . . . . . . . . . . . . . . . . . . . . . . . . .121
Fingerprint Emulation Menu . . . . . . . . . . . . . . . . . . . . . . . . . . . . . . . . . . . . . . . . . . . .121
Fingerprint Feedadjust Menu . . . . . . . . . . . . . . . . . . . . . . . . . . . . . . . . . . . . . . . . . . . .122
Fingerprint Media Menu . . . . . . . . . . . . . . . . . . . . . . . . . . . . . . . . . . . . . . . . . . . . . . . .122
Fingerprint Print Defs Menu. . . . . . . . . . . . . . . . . . . . . . . . . . . . . . . . . . . . . . . . . . . . .123
IPL Setup Menus. . . . . . . . . . . . . . . . . . . . . . . . . . . . . . . . . . . . . . . . . . . . . . . . . . . . . . . . . . . . . . . .123
IPL Ser-Com Menu. . . . . . . . . . . . . . . . . . . . . . . . . . . . . . . . . . . . . . . . . . . . . . . . . . . . . .123
IPL COM Menu. . . . . . . . . . . . . . . . . . . . . . . . . . . . . . . . . . . . . . . . . . . . . . . . . . . . . . . . .123
IPL Network Menu. . . . . . . . . . . . . . . . . . . . . . . . . . . . . . . . . . . . . . . . . . . . . . . . . . . . . .124
IPL Test/Service Menu . . . . . . . . . . . . . . . . . . . . . . . . . . . . . . . . . . . . . . . . . . . . . . . . . .124
IPL Media Menu . . . . . . . . . . . . . . . . . . . . . . . . . . . . . . . . . . . . . . . . . . . . . . . . . . . . . . . .125
IPL Configuration Menu . . . . . . . . . . . . . . . . . . . . . . . . . . . . . . . . . . . . . . . . . . . . . . . .125
ESim Setup Menus . . . . . . . . . . . . . . . . . . . . . . . . . . . . . . . . . . . . . . . . . . . . . . . . . . . . . . . . . . . . . .126
ESim Serial-Com Menu. . . . . . . . . . . . . . . . . . . . . . . . . . . . . . . . . . . . . . . . . . . . . . . . . .126
ESim Net-Com, NET1 Menu. . . . . . . . . . . . . . . . . . . . . . . . . . . . . . . . . . . . . . . . . . . . .126
ESim Com Menu . . . . . . . . . . . . . . . . . . . . . . . . . . . . . . . . . . . . . . . . . . . . . . . . . . . . . . .126
ESim Network Menu . . . . . . . . . . . . . . . . . . . . . . . . . . . . . . . . . . . . . . . . . . . . . . . . . . . .127
ESim Feedadjust Menu . . . . . . . . . . . . . . . . . . . . . . . . . . . . . . . . . . . . . . . . . . . . . . . . . .127
ESim Media Menu . . . . . . . . . . . . . . . . . . . . . . . . . . . . . . . . . . . . . . . . . . . . . . . . . . . . . .128
ESim Print Defs Menu . . . . . . . . . . . . . . . . . . . . . . . . . . . . . . . . . . . . . . . . . . . . . . . . . .128
ESim Charset Menu . . . . . . . . . . . . . . . . . . . . . . . . . . . . . . . . . . . . . . . . . . . . . . . . . . . . .129
ESim Date Time Menu . . . . . . . . . . . . . . . . . . . . . . . . . . . . . . . . . . . . . . . . . . . . . . . . . .129
D Advanced Configuration. . . . . . . . . . . . . . . . . . . . . . . . . . . . . . . . . . . . . . . . . . . . . 131
Printer File System (Fingerprint) . . . . . . . . . . . . . . . . . . . . . . . . . . . . . . . . . . . . . . . . . . . . . . . . .132
Device Tree Structure . . . . . . . . . . . . . . . . . . . . . . . . . . . . . . . . . . . . . . . . . . . . . . . . . . .132
Devices and Directories. . . . . . . . . . . . . . . . . . . . . . . . . . . . . . . . . . . . . . . . . . . . . . . . . .132
vi |
PD41 and PD42 Commercial Printer User’s Manual |
Contents
Customing the Printer Home Page . . . . . . . . . . . . . . . . . . . . . . . . . . . . . . . . . . . . . . . . . . . . . . .134
Web Style Guide Files . . . . . . . . . . . . . . . . . . . . . . . . . . . . . . . . . . . . . . . . . . . . . . . . . . .134
Content of a Web Style Guide File . . . . . . . . . . . . . . . . . . . . . . . . . . . . . . . . . . . . . . . .135
Required Environment Variables . . . . . . . . . . . . . . . . . . . . . . . . . . . . . . . . .135
Optional Environment Variables . . . . . . . . . . . . . . . . . . . . . . . . . . . . . . . . .135
x-www-url-Encoding Syntax Rules. . . . . . . . . . . . . . . . . . . . . . . . . . . . . . . .137
Memory and Storage . . . . . . . . . . . . . . . . . . . . . . . . . . . . . . . . . . . . . . . . . . . .137
Creating a Web Style Guide File . . . . . . . . . . . . . . . . . . . . . . . . . . . . . . . . . . . . . . . . . .137
I Index . . . . . . . . . . . . . . . . . . . . . . . . . . . . . . . . . . . . . . . . . . . . . . . . . . . . . . . . . . . . . . . . . . . . |
139 |
PD41 and PD42 Commercial Printer User’s Manual |
vii |
Contents
viii |
PD41 and PD42 Commercial Printer User’s Manual |

Before You Begin
Before You Begin
This section provides you with safety information, technical support information, and sources for additional product information.
Safety Information
Your safety is extremely important. Read and follow all warnings and cautions in this document before handling and operating Intermec equipment. You can be seriously injured, and equipment and data can be damaged if you do not follow the safety warnings and cautions.
This section explains how to identify and understand dangers, warnings, cautions, and notes that are in this document. You may also see icons that tell you when to follow ESD procedures and when to take special precautions for handling optical parts.
A caution alerts you to an operating procedure, practice, condition, or statement that must be strictly observed to prevent equipment damage or destruction, or corruption or loss of data.
Note: Notes either provide extra information about a topic or contain special instructions for handling a particular condition or set of circumstances.
Global Services and Support
Warranty Information
To understand the warranty for your Intermec product, visit the
Intermec web site at www.intermec.com and click Support >
Returns and Repairs > Warranty.
Disclaimer of warranties: The sample code included in this document is presented for reference only. The code does not necessarily represent complete, tested programs. The code is provided “as is with all faults.” All warranties are expressly disclaimed, including the implied warranties of merchantability and fitness for a particular purpose.
PD41 and PD42 Commercial Printer User’s Manual |
ix |
Before You Begin
Web Support
Visit the Intermec web site at www.intermec.com to download our current manuals (in PDF). To order printed versions of the Intermec manuals, contact your local Intermec representative or distributor.
Visit the Intermec technical knowledge base (Knowledge Central) at www.intermec.com and click Support > Knowledge Central to review technical information or to request technical support for your Intermec product.
Telephone Support
In the U.S.A. and Canada, call 1-800-755-5505.
Outside the U.S.A. and Canada, contact your local Intermec representative. To search for your local representative, from the Intermec web site, click About Us > Contact Us.
Service Location Support
For the most current listing of service locations, go to
www.intermec.com and click Support >Returns and Repairs >
Repair Locations.
For technical support in South Korea, use the after service locations listed below:
AWOO Systems
102-1304 SK Ventium
522 Dangjung-dong
Gunpo-si, Gyeonggi-do Korea, South 435-776 Contact: Mr. Sinbum Kang
Telephone: +82-31-436-1191 E-mail: mjyun@awoo.co.kr
IN Information System PTD LTD
6th Floor
Daegu Venture Center Bldg 95 Shinchun 3 Dong
Donggu, Daegu City, Korea
E-mail: jmyou@idif.co.kr or korlim@gw.idif.co.kr
x |
PD41 and PD42 Commercial Printer User’s Manual |
Before You Begin
Who Should Read This Manual
This user’s guide is written for the person who is responsible for installing, configuring, and maintaining the PD41 or PD42 printer.
This user’s guide provides you with information about the features of the printer, and how to install, configure, operate, maintain, and troubleshoot it.
Before you work with the printer, you should be familiar with your network and general networking terms, such as IP address.
Related Documents
The Intermec web site at www.intermec.com contains our documents (as PDF files) that you can download for free.
To download documents
1 Visit the Intermec web site at www.intermec.com.
2 Click Support > Manuals.
3Use the Product Category field, the Product Family field, and the Product field to help you locate the product whose documentation you want to download.
PD41 and PD42 Commercial Printer User’s Manual |
xi |
Before You Begin
xii |
PD41 and PD42 Commercial Printer User’s Manual |

1
Using the Printer
In this chapter, you will find these sections:
•Learning About the Printers
•Loading Media
•Loading Thermal Transfer Ribbon
•Printing a Test Label
•Creating and Printing Labels
1

Chapter 1 — Using the Printer
Learning About the Printers
The PD41 and PD42 Commercial Printers are dependable and versatile printers suitable for medium-duty applications in manufacturing, transportation, and warehousing environments. With all-metal chassis and covers, proven printing mechanics and powerful electronics, they provide the sturdiness and performance your business depends on. The PD42 features an intuitive user interface with a large graphical screen and programmable buttons.
Throughout this manual, both models of the printer are referred to as “printer” unless the information is specific to one model.
What’s New?
There have been many updates to the PD41 and PD42 printers. This version of the printer user’s guide contains these changes:
•Ability to choose between these command languages: IPL, ESim, ZSim, DSim, Fingerprint, and Direct Protocol.
•Support for IPv6.
•Ethernet is now standard on both printers.
•802.11 option is available on both printers.
•USB mass storage device support for booting the printer and downloading fonts.
The PD41 and PD42 Commercial Printers with an RC11 802.11b/g radio installed are Wi-Fi® certified for interoperability with other 802.11b/g wireless LAN devices.
2 |
PD41 and PD42 Commercial Printer User’s Manual |
Chapter 1 — Using the Printer
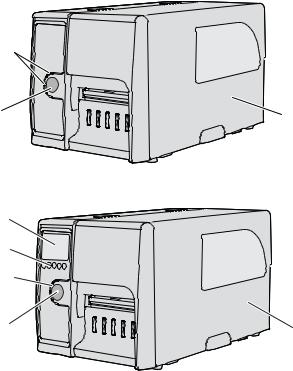
Identifying the Parts of the Printer
Use this section to familiarize yourself with the parts of the PD41 and PD42 printers.
Control LEDs (4) |
|
Print button |
Media cover |
|
Front View of the PD41 Printer
Display
Soft keys (5)
Control LEDs (4)
Print button
Media cover
Front View of the PD42 Printer
PD41 and PD42 Commercial Printer User’s Manual |
3 |
Chapter 1 — Using the Printer
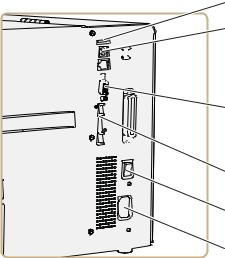
USB host port
USB port


 Wireless 802.11 port


 Ethernet RJ-45
RS-232 serial port


 IEEE 1284 parallel port
CompactFlash
Power On/Off switch
AC power cord socket
Rear View of the PD41 and PD42 Printers
Selecting the Printer Command Language
The PD41 and PD42 printers come loaded with five different printer command languages. On the PD42 printer, you select the command language the first time you power up the printer. For more information see the following procedure.
The PD41 printer always starts up using the Fingerprint printer language because it does not have a screen to select the command language. You will need to use the printer home page or PrintSet to choose a printer command language. For help, see “Configuring the Printer From the Home Page” on page 44 or “Configuring the Printer Using PrintSet” on page 58.
The language you select automatically runs each time you turn on your printer. The printer language you choose affects the functionality of the printer and how you interact with it.
4 |
PD41 and PD42 Commercial Printer User’s Manual |
|
Chapter 1 — Using the Printer |
Printer Command Language Descriptions |
|
|
|
Command |
Description |
Language |
|
Fingerprint |
Intermec Fingerprint is a BASIC-inspired programming |
|
language that lets you design label formats and write |
|
custom printer application software. |
|
|
IPL |
Intermec Printer Language (IPL) is an easy-to-use |
|
programming language that lets you design, download, |
|
and modify formats. |
|
|
ZSim |
ZSim is a Zebra™ interpreter program that interprets ZPL |
|
II or later programs. To set up, configure, and use ZSim, |
|
see the ZSim User’s Guide. |
|
|
DSim |
DSim is a Datamax™ simulation program that runs |
|
Datamax programs. To set up, configure, and use DSim, |
|
see the DSim User’s Guide. |
|
|
ESim |
ESim is a built-in protocol for use with Intermec bar code |
|
label printer. To set up, configure, and use ESim, see the |
|
ESim Programmer’s Reference Manual. |
|
|
To select the printer command language on the PD42 printer
•Press the soft key that corresponds to the printer language you want to run on your printer.
Choose command
language
FP IPL ZSIM DSIM ESIM
PD42 Startup Screen: This screen appears the first time you turn on the PD42.
PD41 and PD42 Commercial Printer User’s Manual |
5 |

Chapter 1 — Using the Printer
Once your printer is running a particular printer language, you can change the printer language from the Setup menu.
To change the printer command language from the PD42 Setup menu
1 |
Press the Setup ( ) button. |
|
2 |
Press |
until you see PRINT DEFS and then press . |
3 |
Press |
until you see CMD LANGUAGE and then press . |
4Press  until you reach the command language you want to use, and then press
  .
.
5 Press ( ) to exit the Setup menu.
You can also use the printer home page or PrintSet to choose a printer command language. For help, see “Configuring the Printer From the Home Page” on page 44 or “Configuring the Printer Using PrintSet” on page 58.
Understanding the Front Panel
The PD41 control panel consists of one button and four LEDs. The PD42 control panel consists of one button, four LEDs, a screen, and five soft keys. Use the next two sections to understand how to use the front panel on each printer.
Understanding the Print Button and LEDs
The blue button on the front panel is the Print button. The main function of the Print button is to feed media and pause print jobs. When the printer is in a different state such as Testmode, the Print button performs other functions. For more information, see
“Understanding Printer States” on page 10. There are four LEDs surrounding the Print button.
6 |
PD41 and PD42 Commercial Printer User’s Manual |

Chapter 1 — Using the Printer
The Print Button and Four Surrounding LEDs
The four LEDs can be on, off, or flashing depending on the state of the printer.
Understanding the Printer LEDs
Symbol LED |
Color |
Description |
|
|
|
|
|
|
Power |
Green |
The printer is powered on. |
|
|||
|
‘ |
|
|
|
|
|
|
|
Ready/Data |
Green |
The printer is ready to receive data. |
|
|
|
|
|
|
Flashing |
The printer is transferring data. |
|
|
green |
|
|
|
|
|
|
Error |
Solid or |
There is an error condition with the |
|
|
flashing |
printer. Most causes of an error |
|
|
red |
condition are hardware related. For |
|
|
|
help, see “Printer Problems and |
|
|
|
Possible Solutions” on page 69. |
|
|
|
|
PD41 and PD42 Commercial Printer User’s Manual |
7 |
Chapter 1 — Using the Printer
Understanding the Printer LEDs (continued)
Symbol LED |
Color |
Description |
|
|
|
Ready-to-Work™ |
Blue |
Turns on when the printer is |
|
|
operational. |
|
|
|
|
Flashing |
The printer is not fully operational |
|
blue |
because: |
|
|
• the printer is waiting for an IP |
|
|
address. |
• an error condition has occurred.
• the printer is in Testmode or Extended Testmode. For more information, see “Using
Testmode and Extended Testmode to Troubleshoot” on page 74.
Off |
The printer is in Setup or Info |
|
mode. |
|
The printhead temperature is too |
|
high. |
|
|
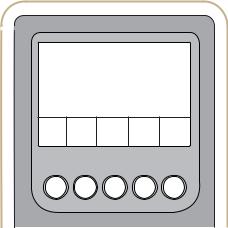
Understanding the PD42 Screen and Soft Keys
The PD42 screen communicates detailed information about the current state of the printer. The printer can tell you if a specific error has occurred or if it is waiting for input from you.
Fingerprint 10.6.0


 Test
Test
The PD42 Screen and Soft Keys
8 |
PD41 and PD42 Commercial Printer User’s Manual |
Chapter 1 — Using the Printer
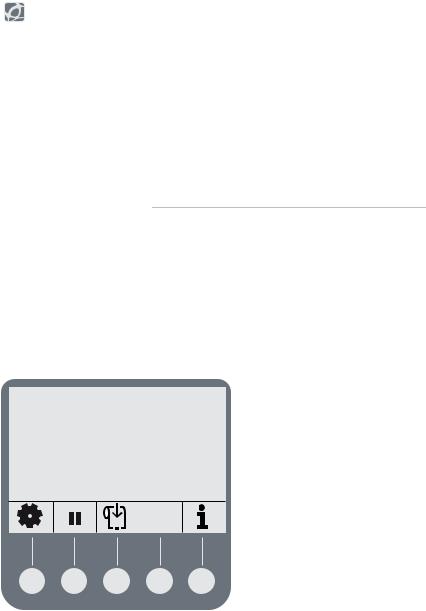
Below the display screen, there are five buttons that act as “soft keys.” The function of the buttons depends on the state of the printer. The function of the button is indicated with a small icon in the screen right above the associated button.
Understanding the Soft Key Functions
Soft Key
F1 to F5


 Test
Test
Function
The function of these keys is defined by the Fingerprint application.
Enters or exits Setup mode.
Pauses the printer.
Feeds out media.
Performs a testfeed.
Enters or exits Information mode.
Moves to the left or the previous option.
Moves to the right or the next option.
Moves up a level in the menu system.
Applies a setting or selects a command.
Allows you to edit a value.
Decreases the selected number.
Increases the selected number.
Exits or cancels editing, test mode, and dump mode.
Continue.
Saves to file.
|
|
|
|
|
|
|
|
|
|
PD41 and PD42 Commercial Printer User’s Manual |
9 |
|||

Chapter 1 — Using the Printer
Note: If the printer is running a Fingerprint application, access to
Setup mode is controlled by the application.
Understanding Printer States
The printers can enter various states which indicate the current mode of operation.
PD41 and PD42 Printer States
State |
Explanation |
|
|
PUP |
Power-UP (starting up) |
|
|
Power off |
The printer is turned off. |
|
|
Idle |
The printer is operational and is waiting for print |
|
jobs. |
|
|
Running application |
The printer is running a Fingerprint application. |
|
|
Setup mode |
(PD42 only) You can access Setup mode through |
|
the soft keys associated with the screen. Use Setup |
|
mode to change some of the printer settings. |
|
|
Information mode |
(PD42 only) You can access Information mode |
(i-mode) |
from the soft keys when the printer is idle. In |
|
Information mode, the printer cycles through |
|
some of the interface settings in 5 second intervals. |
|
|
Printing |
The printer is printing labels. |
|
|
Printing (wait for LTS) |
The printer is waiting for the label taken sensor to |
|
indicate that a label has been taken. |
|
|
Paused |
The printer is paused during a print job. |
|
|
Testmode |
The printer is in Testmode. For more information, |
|
see “Using Testmode” on page 74. |
|
|
Extended Testmode |
The printer is in Extended Testmode. For more |
|
information, see “Using Extended Testmode” on |
|
page 75. |
|
|
Dumpmode |
The printer is in Dumpmode, which means it is |
|
listening on all communication ports and prints |
|
incoming characters. |
|
|
Upgrading |
Firmware is being upgraded. |
|
|
Error |
The printer is in an error state. |
|
|
10 |
PD41 and PD42 Commercial Printer User’s Manual |

Chapter 1 — Using the Printer
The state of the printer also determines the functions and icons that are active in the screen.
Fingerprint |
Idle |
10.2.0 |
|
|
|
|
|
|
Running application |
|
|
|
|
|
Setup, navigation |
|
|
Test |
|
|
Setup, edit value |
|
|
|
|
i-mode |
|
F1 |
F2 |
F3 |
F4 |
F5 |
|
|
|
|
|
|
Printing |
Paused
 TEST
TEST
Testmode
Extended Testmode
|
TEST |
|
|
|
|
|
Dumpmode |
||
|
|
|
|
|
|
||||
|
|
|
|
|
|
|
|||
|
|
|
|
|
|
|
|
|
Upgrading |
|
|
|
|
|
|
|
|
|
|
|
|
|
|
|
|
|
|
|
|
|
|
|
|
|
|
|
|
|
|
|
|
|
|
|
|
|
|
|
|
|
|
|
|
|
|
|
|
|
|
Active Soft Keys in Different Printer States
Loading Media
The printers can print on labels, tickets, tags, and continuous stock. For more information on media types, media dimensions, and media specifications, see “Media Specifications” on page 98.
PD41 and PD42 Commercial Printer User’s Manual |
11 |

Chapter 1 — Using the Printer
Loading Media for Tear-Off Printing
Use this section to load media when you are manually tearing off labels against the tear bar on the printer. You can use these types of media for tear-off printing:
•Non-adhesive continuous stock
•Self-adhesive continuous stock with liner
•Self-adhesive labels with liner
•Tickets with gaps, with or without perforations
•Tickets with black marks, with or without perforations
To load media for tear-off printing
1 Open the media cover.
2Pull out the printhead lever and turn it counterclockwise. Lift up on the label feed guide.
3Load a media roll onto the media supply hub. Be sure to push the roll all the way against the inner wall of the printer and adjust the edge guide.
12 |
PD41 and PD42 Commercial Printer User’s Manual |
Chapter 1 — Using the Printer
4 Route the media through the print mechanism.
5If you are using fanfold media, load it through the external media slot at the rear of the printer and route it the same way as you would a media roll.
6 Reset the label feed guide and the printhead lever.
7 Close the media cover.
8 Press the Print button to advance the media. If you are switching
to a new type of media, you must run a Testfeed ( |
Test |
) to |
calibrate the sensors on the printer. |
|
|
|
|
Loading Media for Peel-Off (Self-Strip) Printing
Use the procedure in this section when you are using self-adhesive labels that are separated from the liner immediately after printing. Peel-off printing is also called self-strip printing. With peel-off printing, you use the label taken sensor to sense when a label has been removed. After a label is removed, the sensor lets the printer know it is okay to print another label. Peel-off printing only supports selfadhesive labels with a liner.
You can also use this procedure to load media for batch takeup. For batch takeup, both the label and liner are rewound and the label taken sensor is not used.
PD41 and PD42 Commercial Printer User’s Manual |
13 |
Chapter 1 — Using the Printer
Peel-off printing and batch takeup printing require you to install the internal rewinder kit. For more information on the internal rewinder kit, see “Accessories for the Printer” on page 107.
To load media for peel-off printing
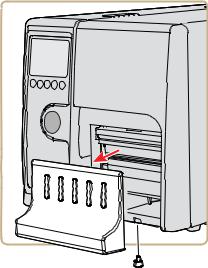
1Remove the thumbscrew that attaches the front cover and remove it.
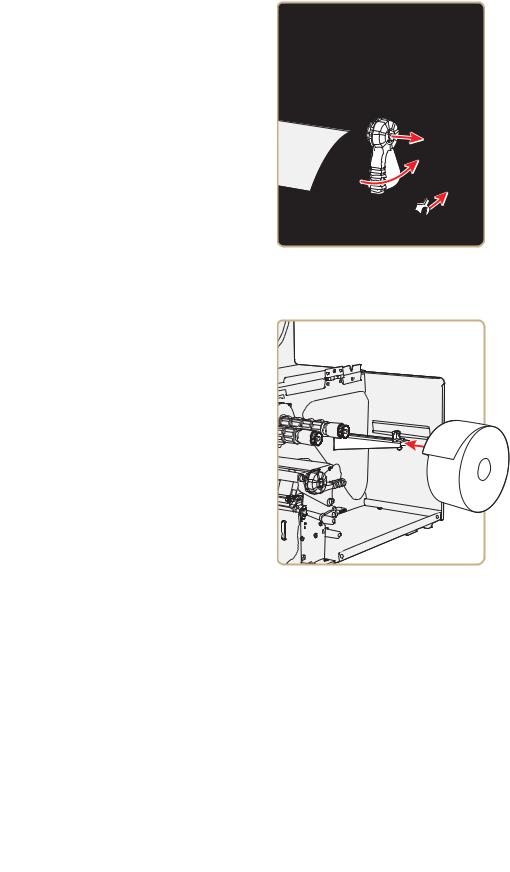
2Open the media cover, pull out the printhead lever and turn it counterclockwise. Lift up on the label feed guide.
14 |
PD41 and PD42 Commercial Printer User’s Manual |
Chapter 1 — Using the Printer
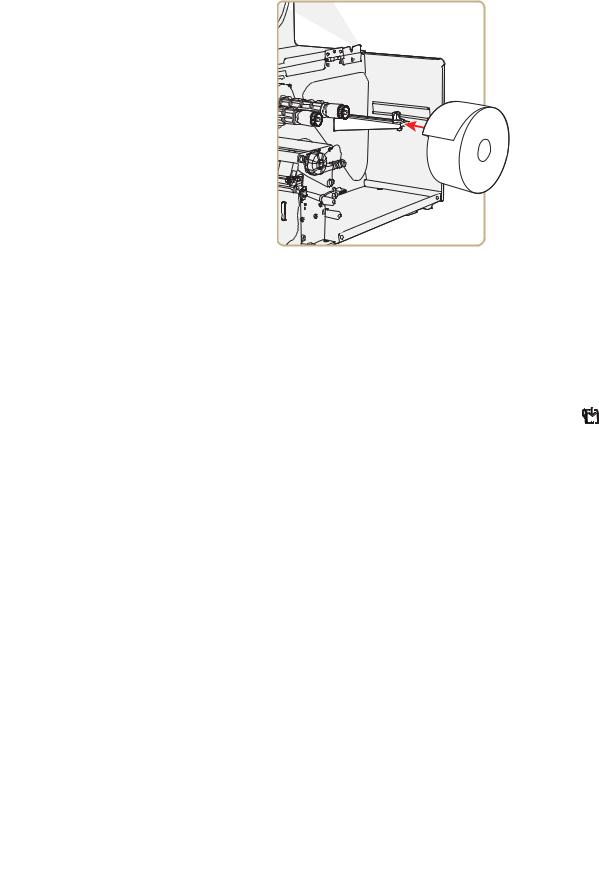
3Load a media roll onto the media supply hub. Be sure to push the roll all the way against the inner wall of the printer and adjust the edge guide.
4Route the media through the print mechanism and back into the media compartment.
5Wrap the liner around the internal rewinder takeup roll and lock it in place.
PD41 and PD42 Commercial Printer User’s Manual |
15 |

Chapter 1 — Using the Printer
6 Reset the label feed guide and the printhead lever.
7 Reattach the front cover and secure with the thumbscrew.
16 |
PD41 and PD42 Commercial Printer User’s Manual |
Chapter 1 — Using the Printer
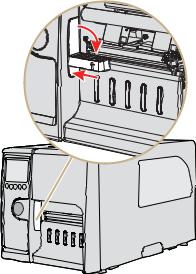
8Push in on the lower part of the label taken sensor and bring it out to a fully horizontal position.
9 Close the media cover.
10 Press the Print button to advance the media.
Loading Thermal Transfer Ribbon
Thermal transfer printing gives you a durable printout that is less vulnerable to chemicals, heat, sunlight and so on than direct thermal printing. Make sure you select a ribbon type that matches the media you are using and configure the printer for thermal transfer paper.
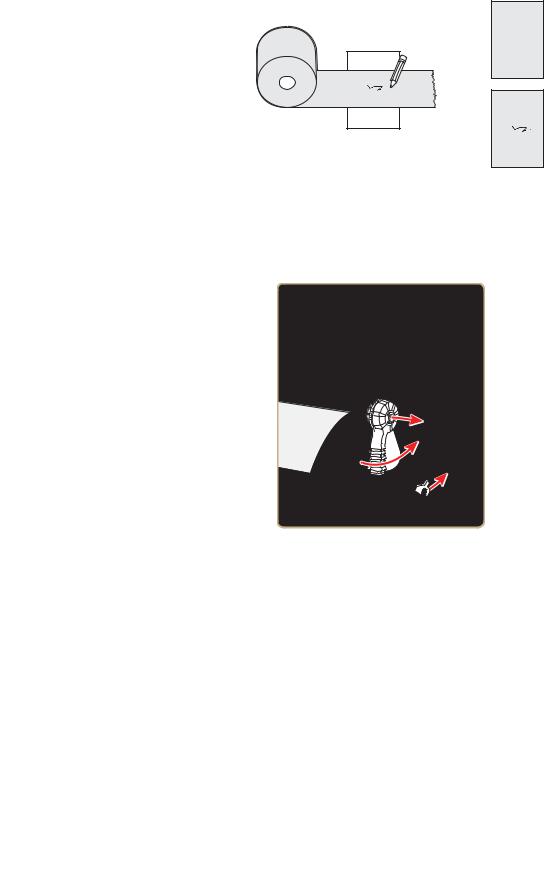
The printer supports thermal transfer ribbon rolls with the ink-coated side facing either inward or outward. To determine which type of ribbon you have, use a pen or other sharp object to scratch through the ribbon against a piece of paper. If you see a mark on the paper, your ribbon is wound ink out.
PD41 and PD42 Commercial Printer User’s Manual |
17 |
Chapter 1 — Using the Printer
= Ink in
= Ink out
Determining Whether Your Ribbon is Wound Ink In or Ink Out
To load thermal transfer ribbon
1 Open the media cover.
2 Pull out the printhead lever and turn it counterclockwise.
3Slide the ribbon roll onto the ribbon hub closest to the media roll holder and slide the empty ribbon core onto the hub closest to the front of the printer.
18 |
PD41 and PD42 Commercial Printer User’s Manual |
Loading...