


CV60
Table of contents
 Loading...
User’s Manual
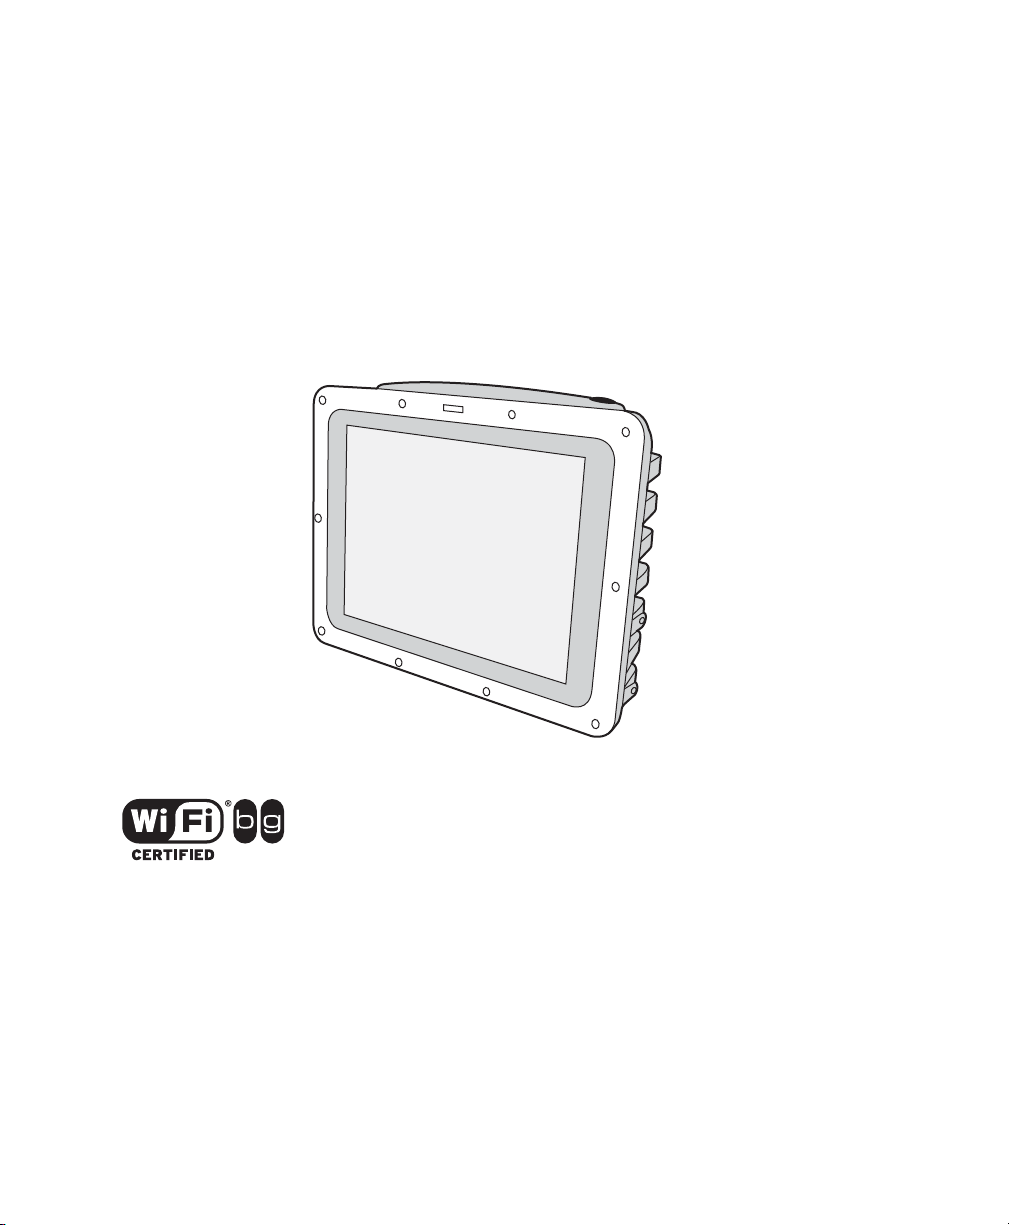
CV60 Vehicle Mount
Computer With
Windows CE
User’s Manual
CV60 Vehicle Mount
Computer With
Windows CE

Intermec Technologies Corporation
Worldwide Headquarters
6001 36th Ave.W.
Everett, WA 98203
U.S.A.
www.intermec.com
The information contained herein is provided solely for the purpose of allowing customers to
operate and service Intermec-manufactured equipment and is not to be released, reproduced, or
used for any other purpose without written permission of Intermec Technologies Corporation.
Information and specifications contained in this document are subject to change without prior
noticed and do not represent a commitment on the part of Intermec Technologies Corporation.
© 2007 by Intermec Technologies Corporation. All rights reserved.
The word Intermec, the Intermec logo, Norand, ArciTech, Beverage Routebook, CrossBar,
dcBrowser, Duratherm, EasyADC, EasyCoder, EasySet, Fingerprint, INCA (under license), igistics, Intellitag, Intellitag Gen2, JANUS, LabelShop, MobileLAN, Picolink, Ready-to-Work,
RoutePower, Sabre, ScanPlus, ShopScan, Smart Mobile Computing, SmartSystems, TE 2000,
Trakker Antares, and Vista Powered are either trademarks or registered trademarks of Intermec
Technologies Corporation.
There are U.S. and foreign patents as well as U.S. and foreign patents pending.
Wi-Fi is a registered certification mark of the Wi-Fi Alliance.
Microsoft, Windows, and the Windows logo are registered trademarks of Microsoft Corporation
in the United States and/or other countries.
Bluetooth is a trademark of Bluetooth SIG, Inc., U.S.A.
This product includes software developed by the OpenSSL Project for use in the OpenSSL
Toolkit (www.openssl.org).
This product includes cryptographic software written by Eric Young (EAY@cryptsoft.com).
This product uses Regex++, Index software during its operational phases. The owner of Regex++
has granted use of the software to anyone provided such use is accompanied by the following
copyright and permission notice:
Regex++, Index. (Version 3.31, 16th Dec 2001)
Copyright © 1998-2001 Dr John Maddock
Permission to use, copy, modify, distribute and sell this software and its documentation for any
purpose is hereby granted without fee, provided that the above copyright notice appear in all
copies and that both that copyright notice and this permission notice appear in supporting
documentation. Dr John Maddock makes no representations about the suitability of this
software for any purpose. It is provided "as is" without express or implied warranty.
ii CV60 Vehicle Mount Computer With Windows CE User’s Manual

Document Change Record
This page records changes to this document. The document was
originally released as Revision 001.
Version
Number
003 03/07 Revised Chapter 3 to add information on
004 07/07 Revised to support 802.11 a/b/g radio
005 09/09 Separate manuals were created for Windows
Date Description of Change
how to use the CV60 association label to
communicate with wireless scanners.
functionality. Updates to this document
included:
• Adding a section in Chapter 3 on how to
change 802.11 radio bands.
• Removed sections on configuring the
BIOS and editing registry settings.
• Added new graphics to Chapter 1,
“Using the CV60 Vehicle Mount
Computer.
• Removed information on the Odyssey
Client Manager support for Windows
CE, since it only supports Windows XP/
XPE.
CE and XP/XPE.
CV60 Vehicle Mount Computer With Windows CE User’s Manual iii

iv CV60 Vehicle Mount Computer With Windows CE User’s Manual

Contents
Before You Begin. . . . . . . . . . . . . . . . . . . . . . . . . . . . . . . . . . . . . . . . . . . . . . . . . . . viii
Safety Information . . . . . . . . . . . . . . . . . . . . . . . . . . . . . . . . . . . . . . . . . . viii
Global Services and Support. . . . . . . . . . . . . . . . . . . . . . . . . . . . . . . . . . . viii
Warranty Information . . . . . . . . . . . . . . . . . . . . . . . . . . . . . . . . viii
Web Support . . . . . . . . . . . . . . . . . . . . . . . . . . . . . . . . . . . . . . . viii
Telephone Support . . . . . . . . . . . . . . . . . . . . . . . . . . . . . . . . . . . ix
Who Should Read This Manual . . . . . . . . . . . . . . . . . . . . . . . . . . . . . . . . . ix
Related Documents . . . . . . . . . . . . . . . . . . . . . . . . . . . . . . . . . . . . . . . . . . . x
Patent Information. . . . . . . . . . . . . . . . . . . . . . . . . . . . . . . . . . . . . . . . . . . . x
Using the CV60 Vehicle Mount Computer . . . . . . . . . . . . . . . . . . 1
1
Introducing the CV60 Vehicle Mount Computer . . . . . . . . . . . . . . . . . . . . . . . . . . . . 2
Understanding the Features of CV60 . . . . . . . . . . . . . . . . . . . . . . . . . . . . . . 2
Using the Touch Screen . . . . . . . . . . . . . . . . . . . . . . . . . . . . . . . . . . . . . . . . 4
Navigating and Using the Touch Screen . . . . . . . . . . . . . . . . . . . . 5
Adjusting the Volume. . . . . . . . . . . . . . . . . . . . . . . . . . . . . . . . . . . . . . . . . . 6
Adjusting the Screen Brightness . . . . . . . . . . . . . . . . . . . . . . . . . . . . . . . . . . 6
Mounting the CV60. . . . . . . . . . . . . . . . . . . . . . . . . . . . . . . . . . . . . . . . . . . . . . . . . .7
Contents
Connecting the CV60 to Power . . . . . . . . . . . . . . . . . . . . . . . . . . . . . . . . . . . . . . . . . 7
Understanding the Status Lights . . . . . . . . . . . . . . . . . . . . . . . . . . . . . . . . . . . . . . . . .8
Installing an External Antenna . . . . . . . . . . . . . . . . . . . . . . . . . . . . . . . . . . . . . . . . . 10
Attaching an External Keyboard . . . . . . . . . . . . . . . . . . . . . . . . . . . . . . . . . . . . . . . .11
Connecting a Tethered Scanner. . . . . . . . . . . . . . . . . . . . . . . . . . . . . . . . . . . . . . . . . 11
Understanding Windows CE . . . . . . . . . . . . . . . . . . . . . . . . . . . . . . . . . 15
2
Understanding Windows CE . . . . . . . . . . . . . . . . . . . . . . . . . . . . . . . . . . . . . . . . . . 16
Finding Information in Windows CE. . . . . . . . . . . . . . . . . . . . . . . . . . . . .16
Learning the Basic Skills . . . . . . . . . . . . . . . . . . . . . . . . . . . . . . . . . . . . . . . 16
Using the Desktop Screen . . . . . . . . . . . . . . . . . . . . . . . . . . . . . . 16
Accessing Programs . . . . . . . . . . . . . . . . . . . . . . . . . . . . . . . . . . . 17
Using the Taskbar . . . . . . . . . . . . . . . . . . . . . . . . . . . . . . . . . . . . 17
Using Pop-Up Menus . . . . . . . . . . . . . . . . . . . . . . . . . . . . . . . . . 17
Entering Information . . . . . . . . . . . . . . . . . . . . . . . . . . . . . . . . . . 17
CV60 Vehicle Mount Computer With Windows CE User’s Manual v

Contents
Finding and Organizing Information . . . . . . . . . . . . . . . . . . . . . 18
To open Windows Explorer . . . . . . . . . . . . . . . . . . . . . . . . . . . . 18
Customizing the CV60 . . . . . . . . . . . . . . . . . . . . . . . . . . . . . . . . 19
Using Microsoft ActiveSync. . . . . . . . . . . . . . . . . . . . . . . . . . . . . . . . . . . . . . . . . . . 19
Using Internet Explorer . . . . . . . . . . . . . . . . . . . . . . . . . . . . . . . . . . . . . . . . . . . . . . 20
Configuring the CV60 . . . . . . . . . . . . . . . . . . . . . . . . . . . . . . . . . . . . . . . . 21
3
Configuring CV60 Parameters. . . . . . . . . . . . . . . . . . . . . . . . . . . . . . . . . . . . . . . . . 22
Configuring the CV60 Using Intermec Settings . . . . . . . . . . . . . . . . . . . . 22
Remotely Configuring the CV60 Using SmartSystems Foundation. . . . . . 23
Setting Up Serial Communications . . . . . . . . . . . . . . . . . . . . . . . . . . . . . . . . . . . . . 23
Setting Up Ethernet Communications. . . . . . . . . . . . . . . . . . . . . . . . . . . . . . . . . . . 23
Setting Up Bluetooth Communications . . . . . . . . . . . . . . . . . . . . . . . . . . . . . . . . . . 24
Configuring the CV60 to Communicate With a Wireless Scanner . . . . . . 26
Configuring for Wireless Printing inWindows. . . . . . . . . . . . . . . . . . . . . . 28
Using the Wireless Printing Applet to Select a Printer. . . . . . . . . 28
Selecting the Current Wireless Printer on the CV60. . . . . . . . . . 29
Setting Up 802.11 Radio Communications . . . . . . . . . . . . . . . . . . . . . . . . . . . . . . . 30
Configuring the Network Parameters for a TCP/IP Network . . . . . . . . . . 30
Configuring the Network Parameters for a UDP Plus Network. . . . . . . . . 31
Configuring Security on the CV60 . . . . . . . . . . . . . . . . . . . . . . . . . . . . . . . . . . . . . 32
Understanding the Wireless Network . . . . . . . . . . . . . . . . . . . . . . . . . . . . 32
Using WPA Security . . . . . . . . . . . . . . . . . . . . . . . . . . . . . . . . . . . . . . . . . 33
Using 802.1x Security . . . . . . . . . . . . . . . . . . . . . . . . . . . . . . . . . . . . . . . . 34
Using LEAP Security. . . . . . . . . . . . . . . . . . . . . . . . . . . . . . . . . . . . . . . . . 34
Using Static WEP Security . . . . . . . . . . . . . . . . . . . . . . . . . . . . . . . . . . . . 35
Choosing Between Funk and Microsoft Security . . . . . . . . . . . . . . . . . . . . 35
Configuring Funk Security Using Intermec Settings . . . . . . . . . . 35
Configuring Funk Security Using the Profile Wizard . . . . . . . . . 41
Configuring EAP-FAST with Profile Wizard . . . . . . . . . . . . . . . 50
Configuring Microsoft Security . . . . . . . . . . . . . . . . . . . . . . . . . 51
Loading a Certificate . . . . . . . . . . . . . . . . . . . . . . . . . . . . . . . . . . . . . . . . . 54
Disabling Security . . . . . . . . . . . . . . . . . . . . . . . . . . . . . . . . . . . . . . . . . . . 57
Developing and Installing Applications. . . . . . . . . . . . . . . . . . . 59
4
vi CV60 Vehicle Mount Computer With Windows CE User’s Manual

Developing Applications for the CV60 . . . . . . . . . . . . . . . . . . . . . . . . . . . . . . . . . . . 60
Developing a New Application. . . . . . . . . . . . . . . . . . . . . . . . . . . . . . . . . . 60
Developing a Web-Based Application. . . . . . . . . . . . . . . . . . . . . . . . . . . . . 61
Converting a Trakker Antares Application for the CV60 . . . . . . . . . . . . . .61
Installing Applications on the CV60. . . . . . . . . . . . . . . . . . . . . . . . . . . . . . . . . . . . . 61
Installing Applications Using SmartSystems Server . . . . . . . . . . . . . . . . . . .62
Installing Applications Using Microsoft ActiveSync . . . . . . . . . . . . . . . . . . 62
Installing Applications Using Wavelink Avalanche . . . . . . . . . . . . . . . . . . . 63
Upgrading, Troubleshooting, and Cleaning the CV60 . . 65
5
Upgrading the CV60 . . . . . . . . . . . . . . . . . . . . . . . . . . . . . . . . . . . . . . . . . . . . . . . . 66
Increasing Hard Drive Space. . . . . . . . . . . . . . . . . . . . . . . . . . . . . . . . . . . . 66
Increasing Memory. . . . . . . . . . . . . . . . . . . . . . . . . . . . . . . . . . . . . . . . . . . 68
Troubleshooting the CV60 . . . . . . . . . . . . . . . . . . . . . . . . . . . . . . . . . . . . . . . . . . . . 69
Calling Product Support . . . . . . . . . . . . . . . . . . . . . . . . . . . . . . . . . . . . . . . . . . . . . . 74
Cleaning the CV60 Screen . . . . . . . . . . . . . . . . . . . . . . . . . . . . . . . . . . . . . . . . . . . . 75
Specifications. . . . . . . . . . . . . . . . . . . . . . . . . . . . . . . . . . . . . . . . . . . . . . . . . . 77
A
Specifications . . . . . . . . . . . . . . . . . . . . . . . . . . . . . . . . . . . . . . . . . . . . . . . . . . . . . .78
Contents
Accessories for the CV60 . . . . . . . . . . . . . . . . . . . . . . . . . . . . . . . . . . . . . . . . . . . . . 79
Index . . . . . . . . . . . . . . . . . . . . . . . . . . . . . . . . . . . . . . . . . . . . . . . . . . . . . . . . . . . . . . . . 81
CV60 Vehicle Mount Computer With Windows CE User’s Manual vii

Before You Begin
Before You Begin
This section provides you with safety information, technical
support information, and sources for additional product
information.
Safety Information
Your safety is extremely important. Read and follow all warnings
and cautions in this document before handling and operating
Intermec equipment. You can be seriously injured, and
equipment and data can be damaged if you do not follow the
safety warnings and cautions.
This section explains how to identify and understand cautions
and notes that are in this document.
A caution alerts you to an operating procedure, practice,
condition, or statement that must be strictly observed to
prevent equipment damage or destruction, or corruption or
loss of data.
Note: Notes either provide extra information about a topic or
contain special instructions for handling a particular condition or
set of circumstances.
Global Services and Support
Warranty Information
To understand the warranty for your Intermec product, visit the
Intermec web site at www.intermec.com and click Service &
Support > Warranty.
Web Support
Visit the Intermec web site at www.intermec.com to download
our current manuals (in PDF). To order printed versions of the
Intermec manuals, contact your local Intermec representative or
distributor.
Visit the Intermec technical knowledge base (Knowledge
Central) at intermec.custhelp.com to review technical
information or to request technical support for your Intermec
product.
viii CV60 Vehicle Mount Computer With Windows CE User’s Manual

Telephone Support
These services are available from Intermec.
Services Description
Order Intermec
products
Order Intermec
media
Order spare
parts
Te c h n i ca l
Support
• Place an order.
• Ask about an existing
order.
Order printer labels and
ribbons.
Order spare parts. 1 or 2 and then
Talk to technical support
about your Intermec
product.
Before You Begin
In the USA and
Canada call 1-800755-5505 and
choose this option
1 and then choose 2
1 and then choose 1
choose 4
2 and then choose 2
Service • Get a return authorization
Service contracts • Ask about an existing
Outside the U.S.A. and Canada, contact your local Intermec
representative. To search for your local representative, from the
Intermec web site, click Contact.
Who Should Read This Manual
This manual is for the person who is responsible for installing,
configuring, and maintaining the CV60.
This manual provides you with information about the features of
the CV60, and how to install, configure, operate, maintain, and
troubleshoot it.
number for authorized
service center repair.
• Request an on-site repair
technician.
contract.
•Renew a contract.
• Inquire about repair
billing or other service
invoicing questions.
2 and then choose 1
1 or 2 and then
choose 3
CV60 Vehicle Mount Computer With Windows CE User’s Manual ix

Before You Begin
Related Documents
Patent Information
Before you work with the CV60, you should be familiar with
your network and general networking terms, such as IP address.
The Intermec web site at www.intermec.com contains our
documents (as PDF files) that you can download for free.
To d ownloa d docume nts
1 Visit the Intermec web site at www.intermec.com.
2 Click Service & Support > Manuals.
3 In the Select a Product field, choose the product whose
documentation you want to download.
To order printed versions of the Intermec manuals, contact your
local Intermec representative or distributor.
Product is covered by one or more of the following patents:
4912309; 4940974; 5216233; 5289378; 5345146; 5349678;
5401591;5404493; 5416463; 5440315; 5457629; 5465207;
5473242; 5487161;5500516; 5534684; 5536124; 5554822;
5568645; 5576981; 5592512;5598082; 5625555; 5671436;
5694318; 5726937; 5736725; 5747748;5796359; 5805474;
5818027; 5873070; 5878395; 5889818; 5892971;5895431;
5896214; 5914481; 5928292; 5962837; 5987499; 5996080;
6003773; 6026027; 6042414; 6049813; 6058000; 6061155;
6112206;6113047; 6124800; 6135810; 6149063; 6163359;
6164545; 6174180;6204825; 6212401; 6213400; 6229408;
6234393; 6259044; 6292437;6295461; 6356949; 6398105;
6424542; 6488209; 6539064; 6694359;6701361; 6731713;
6857013; 6897776; 6944446; 6967280; 6970459;6976062;
7027037; 7034659
There may be other U.S. and foreign patents pending.
x CV60 Vehicle Mount Computer With Windows CE User’s Manual

1
Using the CV60 Vehicle Mount Computer
Use this chapter to familiarize yourself with the CV60 Vehicle
Mount Computer. In this chapter, you will find these sections:
• Introducing the CV60 Vehicle Mount Computer
• Connecting the CV60 to Power
• Understanding the Status Lights
• Installing an External Antenna
• Installing an External Keyboard
• Connecting a Tethered Scanner
CV60 Vehicle Mount Computer With Windows CE User’s Manual 1
Chapter 1 — Using the CV60 Vehicle Mount Computer
Introducing the CV60 Vehicle Mount Computer
The CV60 is a rugged Vehicle Mount computer designed for
real-time data collection applications in warehousing,
distribution, work-in-process, time and attendance, and
stationary applications. The CV60 is highly configurable and can
be used with either Microsoft Windows CE.NET or Microsoft
Windows XP/XPE operating systems. The CV60 supports the
use of terminal emulation applications, browser-based
applications, or custom applications. This manual covers the
Windows CE based operating system for the CV60.
CV60 Vehicle Mount Computer
CV60 vehicle mount computers comes with an optional IEEE
802.11 b/g or a/b/g radio installed are Wi-Fi
interoperability with other 802.11 b/g or a/b/g wireless LAN
devices.
®
certified for
Understanding the Features of CV60
The CV60 includes these standard features:
• 12.1” color SVGA display with optional heated display, and
optional sunlight readable display
• Two USB ports, two COM ports, an Ethernet port, a
headphone jack, and a microphone jack
2 CV60 Vehicle Mount Computer With Windows CE User’s Manual
Chapter 1 — Using the CV60 Vehicle Mount Computer
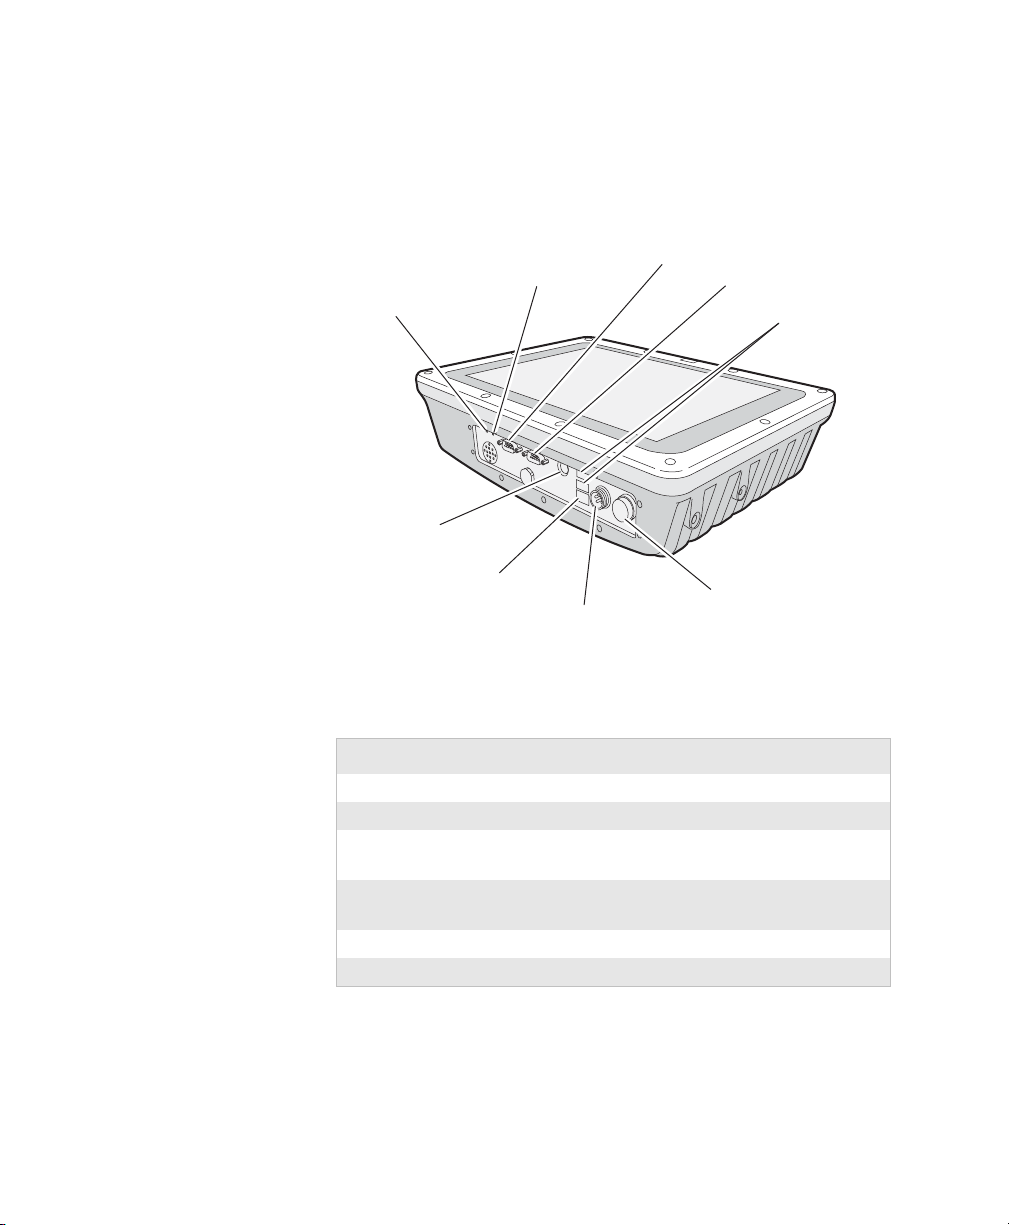
COM 2
Keyboard
Ethernet port
USB port
Power connector
Power button
Headphone jack
COM 1
Microphone jack
• Optional 802.11 b/g or a/b/g radio
• Bluetooth radio
• 256 MB SDRAM with 512KB flash memory
®
•Intel
P-III Ultra Low Power 800MHz embedded processor
Understanding the Ports and Buttons on the CV60.
CV60 Port and Button Descriptions
Port and Buttons Description
Microphone jack Connects a microphone to the CV60.
Headphone jack Connects headphones to the CV60.
CV60 Vehicle Mount Computer With Windows CE User’s Manual 3
COM2 Connects the CV60 to other RS-232 devices
COM1 Connects the CV60 to other RS-232 devices
such as PCs or printers.
such as PCs or printers.
USB ports Connects USB devices to the CV60.
Keyboard Connects a PS/2 type keyboard to the CV60.

Chapter 1 — Using the CV60 Vehicle Mount Computer
CV60 Port and Button Descriptions
Port and Buttons Description
Ethernet port Connects the CV60 to 10BaseT/100BaseT full
duplex standard Ethernet interfaces.
Power connector Connects the CV60 to an AC or DC/DC power
supply.
Power button Turns the CV60 on or off.
Use this manual to understand how to use the features and
options available on the CV60. For a complete list of accessories
available on the CV60, see “Accessories for the CV60” on
page 79.
Using the Touch Screen
The CV60 has a 12.1 inch color SVGA touch screen display. The
touch screen has an optional heater to reduce condensation on
the external surface of the display when moving between subfreezing temperatures and normal temperatures.
If you are going to use the CV60 in extreme conditions
(-30
° to 50° C or -22° to 122° F) for an extended period of time,
you should turn on the power at room temperature for at least 15
minutes prior to using it. This process of “warming up” the
CV60 helps preserve the lighting on the display.
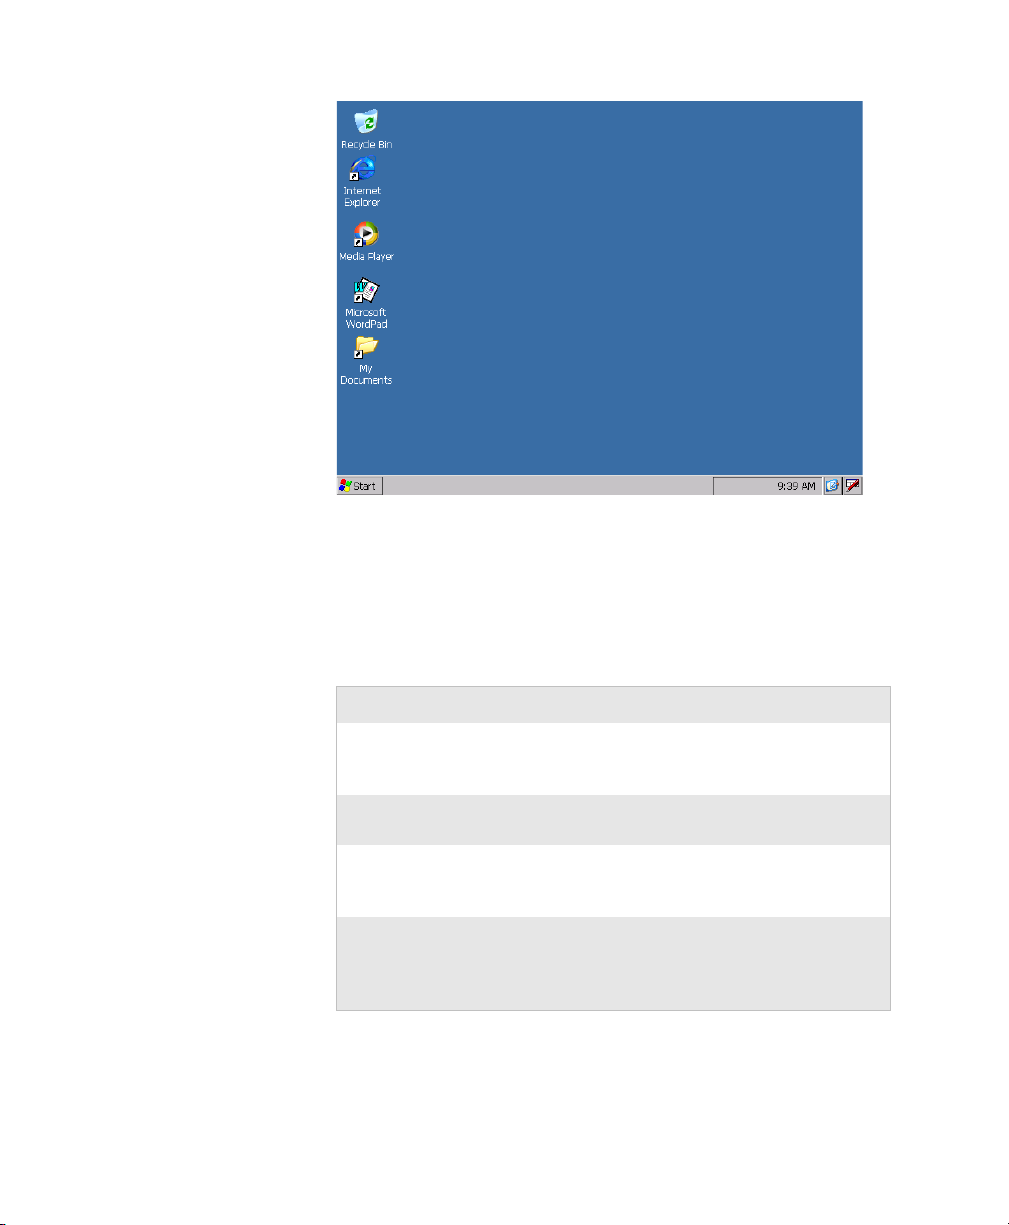
The default screen that appears on the display when you turn on
the CV60 is the Windows CE Start screen. This screen appears
unless you have the TE 2000 application installed on the CV60.
If you have the TE 2000 application installed, it launches after
the initial boot sequence.
4 CV60 Vehicle Mount Computer With Windows CE User’s Manual
Chapter 1 — Using the CV60 Vehicle Mount Computer
CV60 with Windows CE Start Screen
Navigating and Using the Touch Screen
You can use the stylus accessory to navigate the touch screen. The
next table describes how to use the touch screen on the CV60.
Touch Screen Navigation
Action Description
Tap Touch the screen once with the stylus or finger
to select options, open or close applications, or
launch menus.
Double-tap Double-tap the screen with the stylus or finger
to launch applications.
Drag Hold the stylus or your finger on the screen and
drag across the screen to select text, icons, and
images.
Tap an d ho ld Tap and hold the stylus or your fingers on an
item to see a menu of actions available for that
item. On the pop-up menu that appears, tap
the action you want to perform.
CV60 Vehicle Mount Computer With Windows CE User’s Manual 5

Chapter 1 — Using the CV60 Vehicle Mount Computer
Adjusting the Volume
You can change the CV60 volume, for sounds you hear when you
tap the screen or scan bar codes with a scanner, to adjust your
needs and the environment. You can set the volume to off, low,
medium, high, and very high. Use the following table to
understand the different ways to adjust the volume.Use the
following table to understand the different ways to adjust the
volume.
Changing the Beeper Volume
Ways to Adjust Volume Description
Use the Control Panel From the Start menu, choose,
Settings,select the Control Panel, and
then double-tap Volume & Sounds.
Using Intermec Settings From the Start menu, choose,
Settings,select the Control Panel, and
then double-tap Intermec Settings. Go
to Device Settings > Beeper > Volume.
Adjusting the Screen Brightness
You may want to adjust the brightness of the screen depending
on the location of the CV60.
Changing the Screen Brightness
Ways to Adjust Volume Description
Use the Control Panel From the Start menu, choose,
Settings,select the Control Panel,
and then tap the Display tab. Use the
slider to adjust the brightness of the
screen.
Using Intermec Settings From the Start menu, choose,
Settings,select the Control Panel,
and then double-tap Intermec
Settings. Go to Device Settings >
Backlight.
6 CV60 Vehicle Mount Computer With Windows CE User’s Manual

Mounting the CV60
To properly mount the CV60 to a desktop or vehicle, you must
order a RAM Mount kit.
Note: Intermec rugged testing for shock and vibration on a
mobile application has been conducted with the RAM Mount
Company vehicle accessory kits which are listed in the Price
Guide. The use of these kits allows the reliability of our vehicle
mount rugged computers to be characterized, clearly understood
and fully supported. Incorrect mounting and/or use of nonauthorized mounting accessories for your computer may
prematurely damage the computer and/or accessories and runs
the risk of voiding the product warranty. Additional mounting
instructions are contained in the DC-DC Installation Guides.
Further questions can be answered by your Intermec Field
Representative.
There are four mounting kit options sold separately:
• Standard Vehicle Mounting Kit (P/N 203-784-001)
• Desktop Mounting Kit (P/N 203-785-001)
Chapter 1 — Using the CV60 Vehicle Mount Computer
• Stubby Vehicle Mounting Kit (203-783-001)
• Stubby Extra Duty Vehicle Mounting Kit (203-857-001)
For more information on installing the mounting kit, see the
CV60 Ram Mount Installation Instructions (P/N 932-002-xxx).
Connecting the CV60 to Power
For the CV60 to operate, you must provide power to the CV60
through a DC/DC power supply or an AC/DC power supply.
You must have a power supply connected to the CV60 for it to
operate.
Use the AC power supply and power cord when you are using the
CV60 with a desk mounting kit.
There are four power options for the CV60. You must order one
of these power options separately:
• DC/DC Converter Kit, non-heated (15-96V)
(P/N 203-780-001)
CV60 Vehicle Mount Computer With Windows CE User’s Manual 7
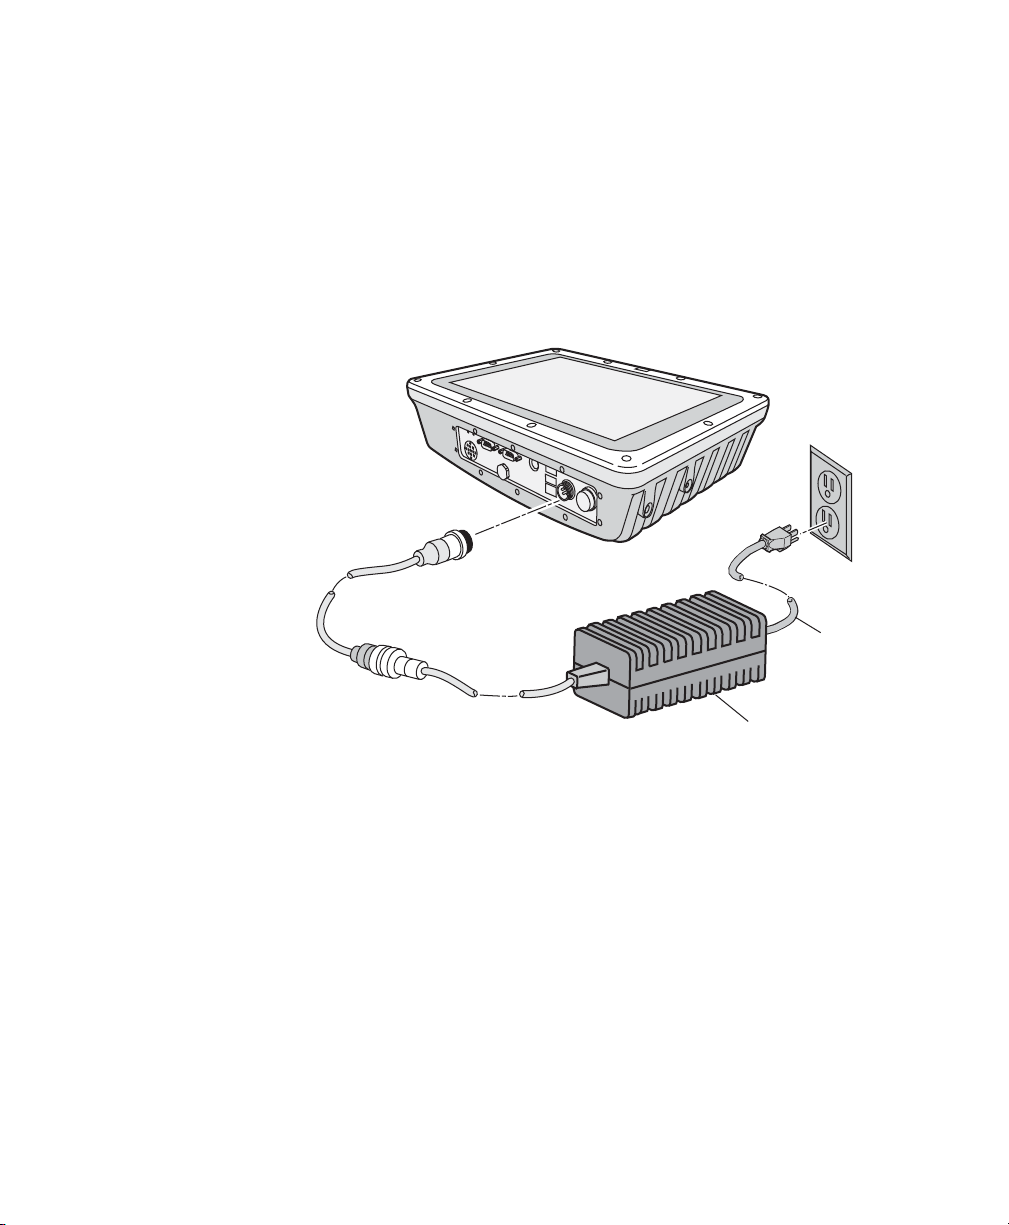
Chapter 1 — Using the CV60 Vehicle Mount Computer
• DC/DC Converter Kit, heated (18-96V)
(P/N 203-780-002)
• DC/DC Power Supply Kit (6-60V)
(P/N 203-779-001)
•CV60C AC Wall Charger Kit
(P/N 203-787-001)
For more information on installing the DC power options, see
the Vehicle Power Supply Installation Guide (P/N 932-003-xxx).
Power
cord
AC power
supply
Attaching the CV60 to Power Using an AC Power Supply
Understanding the Status Lights
The status lights on the CV60 turn on to indicate the status of
the network connection, a successful decode of a bar code, or a
user-defined function.
8 CV60 Vehicle Mount Computer With Windows CE User’s Manual
Chapter 1 — Using the CV60 Vehicle Mount Computer
Good read light
CV60 Status Lights
Ready-to-Work Indicator
Use the table below to understand the different colors of the
status lights.
Understanding the CV60 Status Lights
Light Name Color Description
Good read light Green This light comes on when the CV60
successfully decodes a bar code with
an attached scanner.
Ready-to-Work
indicator
Blue The blue light indicates when the
CV60 is ready to use in your
application, typically TE 2000. If
you have problems using the
application, see the TE 2000
Terminal Emulation Programmer’s
Guide (P/N 977-055-xxx).
The Ready-to-Work Indicator has three states: off, blinking, and
on. Use the next table to understand the different states of the
light.
CV60 Vehicle Mount Computer With Windows CE User’s Manual 9
Chapter 1 — Using the CV60 Vehicle Mount Computer
Ready-to-Work Light States
Light State What It Means
Off The TE 2000 application has not loaded successfully,
or you are not running a Ready-to-Work application.
Blinking The CV60 is not connected to the host.
On A connection to the server has been established and
all network connections are active.
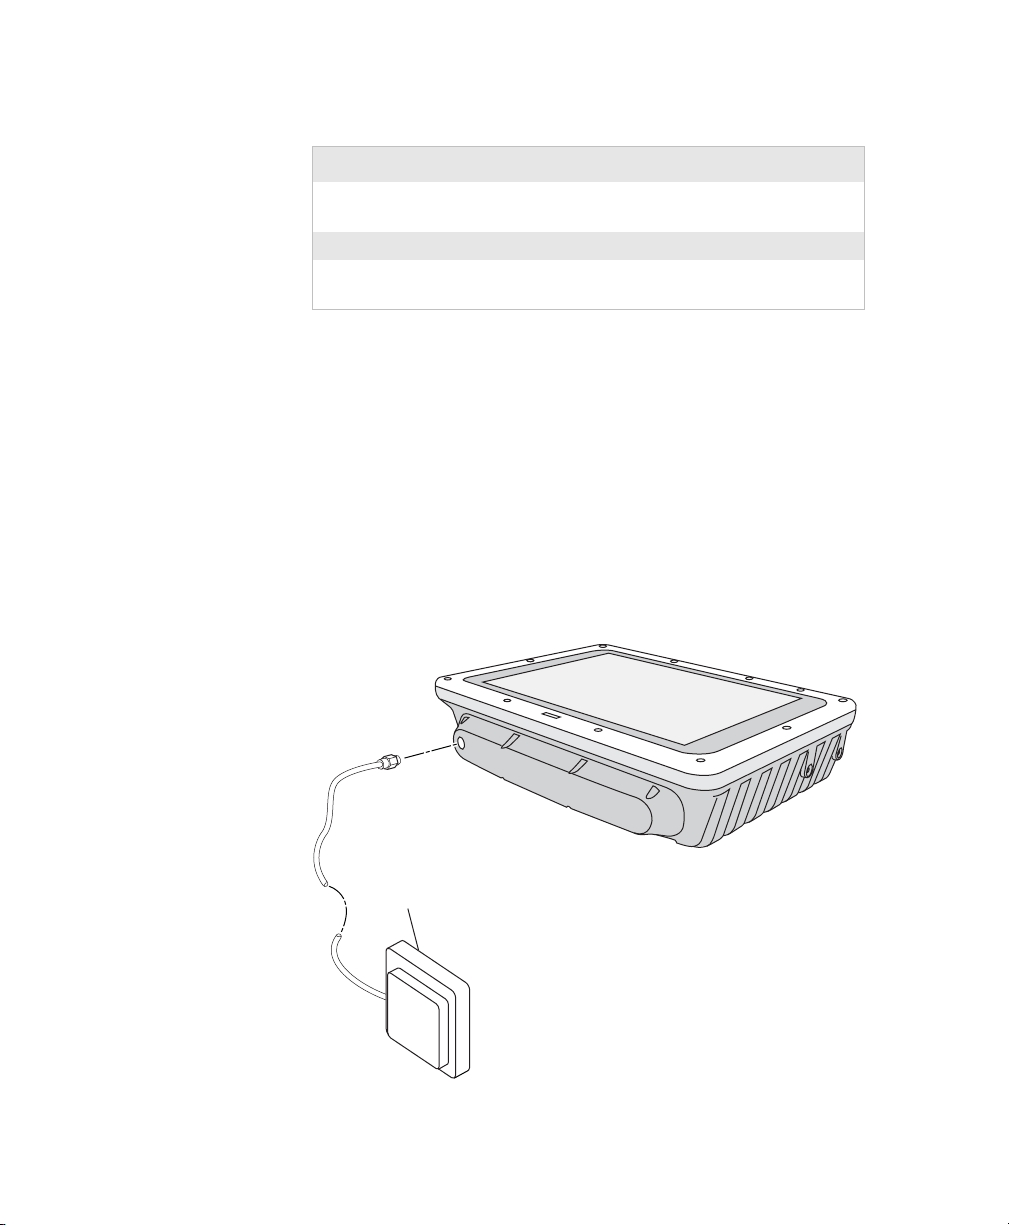
Installing an External Antenna
You can purchase a 2.4 GHz “patch” antenna to mount on a wall,
fork lift, or other flat surface using either screws or small patches
of adhesive-backed hook and loop fastener material.
Since system performance and antenna polarization are sitedependent, a permanent mounting location and orientation may
require some experimentation. In most fixed installations, you
should mount the antenna initially in a vertically-polarized
position, with the cable from the antenna parallel to the floor/
ceiling.
Antenna
Attaching an External Antenna
10 CV60 Vehicle Mount Computer With Windows CE User’s Manual
Chapter 1 — Using the CV60 Vehicle Mount Computer
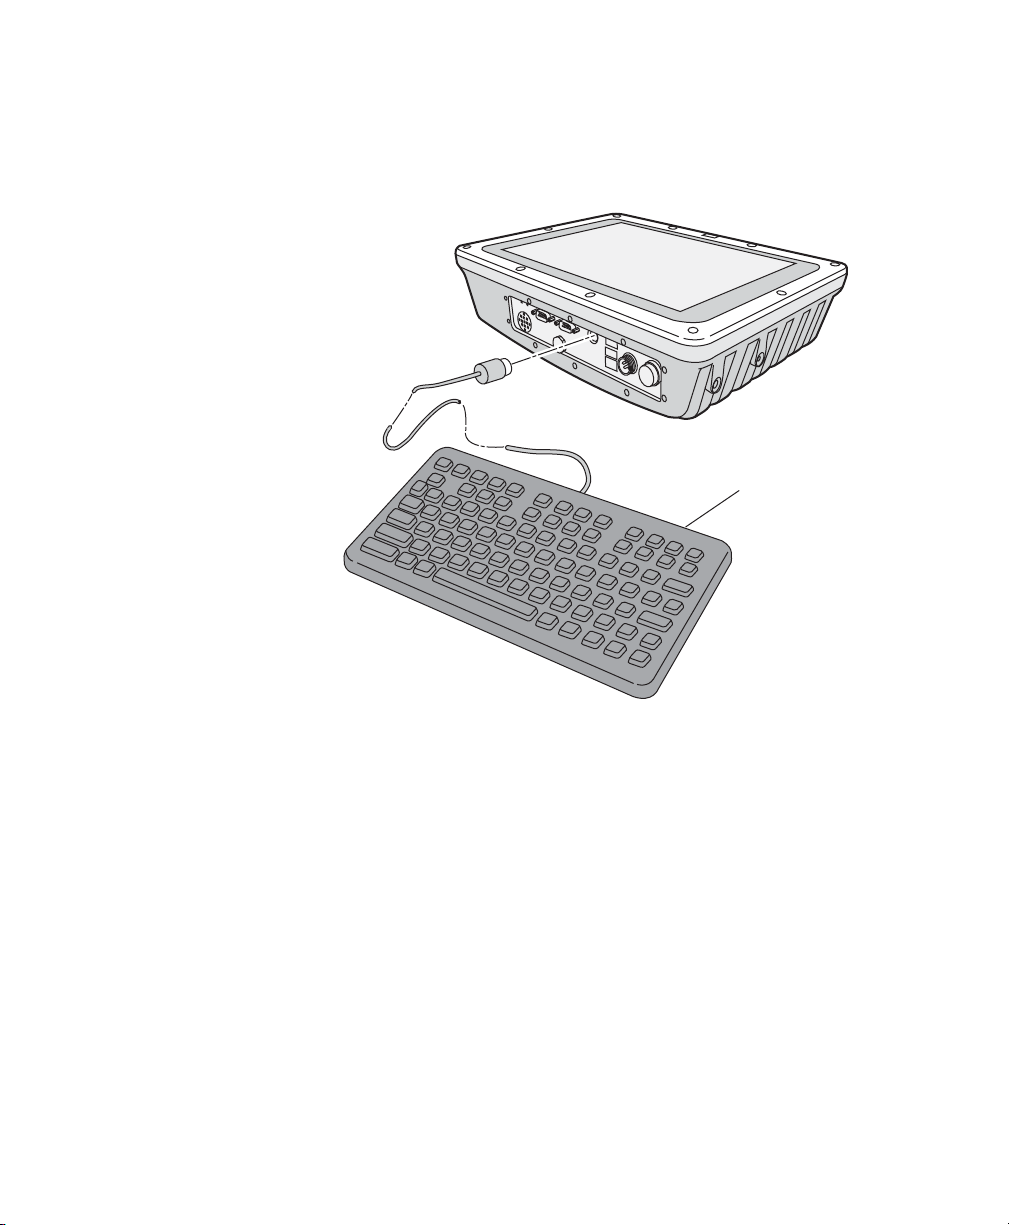
Attaching an External Keyboard
You can attach an external keyboard (P/N 850-551-00x) to your
CV60.
Keyboard
Attaching a Rugged QWERTY Keyboard
Connecting a Tethered Scanner
You can attach a tethered scanner to one of the serial (COM1 or
COM2) connectors on the CV60 if you order the appropriate
RS-232 cable. Contact your local Intermec representative for
more information.
You can also attach Bluetooth scanners to the CV60. For more
information, see “Configuring the CV60 to Communicate With
a Wireless Scanner” on page 26.
To connect a tethered scanner
1 Attach the RS-232 cable to one of the COM ports on the
CV60.
2 Attach the other end of the cable to the tethered scanner.
CV60 Vehicle Mount Computer With Windows CE User’s Manual 11
Chapter 1 — Using the CV60 Vehicle Mount Computer
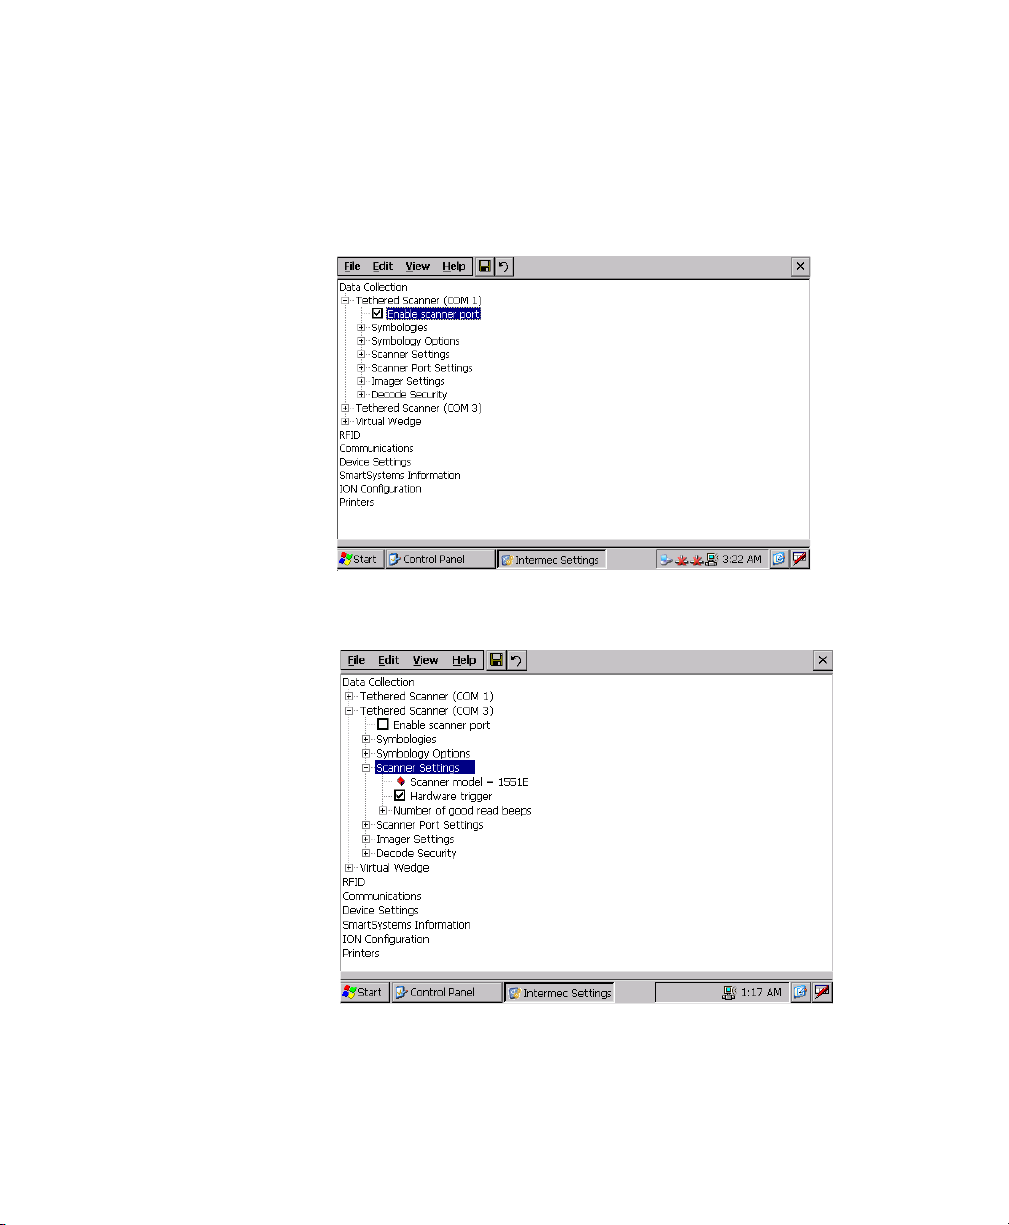
3 On the CV60, go to Start > Settings > Control Panel >
Intermec Settings.
4 Go to Data Collection > Tethered Scanner (COM1) or
(COM2).
5 Make sure Enable scanner port is checked.
6 Go to Scanner Settings > Scanner model and select your
scanner from the list.
If you are configuring an ASCII scanner, you need to select
ASCII from the Scanner model list and then configure
12 CV60 Vehicle Mount Computer With Windows CE User’s Manual

Chapter 1 — Using the CV60 Vehicle Mount Computer
scanner port settings to match the scanner after Intermec
Settings refreshes.
7 If you are in Windows CE Tap File > Save Settings or tap the
disk icon ( ).
8 Depending on the scanner you are attaching, you may hear a
series of beeps and the Good Read light may flash. You are
now ready to use the scanner.
CV60 Vehicle Mount Computer With Windows CE User’s Manual 13

Chapter 1 — Using the CV60 Vehicle Mount Computer
14 CV60 Vehicle Mount Computer With Windows CE User’s Manual

2
This chapter introduces the Microsoft Windows operating
system. In this Chapter you will find these sections:
• Understanding Windows CE
• Using Microsoft ActiveSync
• Using Microsoft Internet Explorer
Understanding Windows CE
CV60 Vehicle Mount Computer With Windows CE User’s Manual 15

Chapter 2 — Understanding Windows CE
Understanding Windows CE
This section introduces you to Microsoft Windows CE. While
using your CV60, keep these key points in mind:
•Tap Start on the navigation bar, located at the bottom of the
screen, to quickly move to programs, files, and settings. Use
the taskbar at the bottom of the screen to perform tasks in
programs. The command bar includes menus, icons, and the
onscreen keyboard.
• Tap and hold an item to see a pop-up menu containing a list
of actions you can perform. Pop-up menus give you quick and
easy access to the most common actions.
Ta p Start > Help, then select a topic on your CV60 to find
additional information on Windows CE components.
Finding Information in Windows CE
This section describes your CV60 hardware, provides an
overview of the programs on your CV60, and explains how to
connect your CV60 to a desktop, a network, or the Internet. Use
the following table to understand more about the CV60.
Finding Information in Windows CE
For Information On: See This Source:
Programs on the CV60. This chapter and the CV60 Help. To view Help, tap
Start > Help and then select a topic.
Connecting to and synchronizing with
a desktop.
Up-to-date information on Windows
CE devices.
This chapter and the ActiveSync Help on your
desktop. To view help, click Help > Microsoft
ActiveSync Help.
http://msdn2.microsoft.com/en-us/embedded/
default.aspx
Learning the Basic Skills
Learning to use the CV60 is easy. This section describes the basic
concepts of using and customizing your CV60 Computer.
Using the Desktop Screen
When you turn on your CV60 for the first time each day, you see
the Desktop Screen.
16 CV60 Vehicle Mount Computer With Windows CE User’s Manual

Chapter 2 — Understanding Windows CE
To customize what displays on the desktop
•Tap Start > Settings > Control Panel > the Display icon.
Status icons display information such as when the CV60 is
connected to the network or to the Internet. You can tap an icon
to open the associated setting or program.
Accessing Programs
You can switch from one program to another by selecting it from
the Start menu. (You can customize which programs you see on
this menu).
To access programs
•Tap Start > Programs and then the program name.
The following is a partial list of programs that are on your CV60,
in the order they appear in the Start menu.
• Internet Explorer
• Windows Media
•Microsoft WordPad
Using the Taskbar
The taskbar is located at the bottom of the screen. It displays the
Start menu icon, the current time, the Desktop icon, and the
Input Panel icon. Use the taskbar to switch programs and close
screens.
Windows CE Taskbar
Using Pop-Up Menus
Use pop-up menus to quickly perform an action on an item. For
example, you can use a pop-up menu to delete or make a copy of
an item. To access a pop-up menu, tap and hold the item on
which you want to perform the action. When the menu appears,
tap the action you want to perform, or tap anywhere outside the
menu to close the menu without performing the action.
Entering Information
You can enter information on your CV60 in several ways
depending on the program you are using:
CV60 Vehicle Mount Computer With Windows CE User’s Manual 17

Chapter 2 — Understanding Windows CE
Understanding the Ways to Enter Information
Enter Information By: Description
Typing Enter typed text into the CV60 by tapping keys on the onscreen
keyboard or by using the handwriting recognition software.
Writ ing Use the stylus to write directly on the screen.
Drawing Use the stylus to draw directly on the screen.
Use the input panel to enter information in any program on your
CV60 Computer. You can either type using the onscreen
keyboard or use the optional external keyboard.
To show or hide the input panel
1 Tap th e Input Panel ( ) icon. The Input Panel menu
appears.
2 Choose Keyboard for the standard size keyboard, or choose
LargeKB for the large keyboard.
On the soft keyboard that displays, tap the keys with your
stylus.The soft keyboard works just like a standard qwerty
keyboard. Here are a few tips using the soft keyboard:
• To type in lowercase letters, tap the keys with the stylus.
• To type a single uppercase letter or symbol, tap the Shift key.
To tap multiple uppercase letters or symbols, tap the Caps
Lock key.
• To add a space, tap the Space bar.
• To backspace one character, tap the BS key.
• To insert a carriage return, tap return.
Finding and Organizing Information
You can use Windows Explorer to find files on your CV60 and
organize these files into folders.
To open Windows Explorer
•Select Start > Programs > Windows Explorer.
18 CV60 Vehicle Mount Computer With Windows CE User’s Manual

Customizing the CV60
You can customize the CV60 by adjusting settings and installing
additional software. Programs added to your CV60 at the factory
are stored in Read Only Memory (ROM). You cannot remove
this software. All other programs and files added to the CV60
after factory installation are are stored in Random Access
Memory (RAM).
You can install any program created for the CV60, as long as the
computer has enough memory available.
Using Microsoft ActiveSync
Use Microsoft ActiveSync to synchronize the information on
your desktop with the information on the CV60.
Synchronization compares the data on the CV60 with your
desktop PC and updates both computers with the most recent
information.
Note: By default, ActiveSync does not automatically synchronize
all types of information. Use ActiveSync options to turn
synchronization on or off for specific information types.
Chapter 2 — Understanding Windows CE
You can also perform these functions with ActiveSync:
• Copy files between the CV60 and the desktop.
• Back up and restore the CV60 data.
• Control when synchronization occurs by selecting a
synchronization mode.
• Select which information types are synchronized and control
how much data is synchronized.
To u se ActiveSy nc
1 Connect the CV60 to your desktop PC with a serial cable
(P/N 321-563-003).
2 Install ActiveSync on your desktop. ActiveSync is available
from the Microsoft web site. ActiveSync is already installed on
the CV60.
After installation, ActiveSync automatically launches the
ActiveSync Setup Wizard.
CV60 Vehicle Mount Computer With Windows CE User’s Manual 19
Loading...