


User’s Guide
EasyCoder® PD42
Printer
Intermec Technologies Corporation
Worldwide Headquarters
6001 36th Ave.W.
Everett, WA 98203
U.S.A.
www.intermec.com
The information contained herein is provided solely for the purpose of allowing customers to operate and service Intermec-manufactured equipment and is not to be released, reproduced, or used for any other purpose without written permission of Intermec Technologies Corporation.
Information and specifications contained in this document are subject to change without prior notice and do not represent a commitment on the part of Intermec Technologies Corporation.
© 2007 by Intermec Technologies Corporation. All rights reserved.
The word Intermec, the Intermec logo, Norand, ArciTech, Beverage Routebook, CrossBar, dcBrowser, Duratherm, EasyADC, EasyCoder, EasySet, Fingerprint, INCA (under license), i- gistics, Intellitag, Intellitag Gen2, JANUS, LabelShop, MobileLAN, Picolink, Ready-to-Work, RoutePower, Sabre, ScanPlus, ShopScan, Smart Mobile Computing, SmartSystems, TE 2000, Trakker Antares, and Vista Powered are either trademarks or registered trademarks of Intermec Technologies Corporation.
There are U.S. and foreign patents as well as U.S. and foreign patents pending.
ii |
EasyCoder PD42 Printer User’s Guide |
Contents
1
2
Before You Begin. . . . . . . . . . . . . . . . . . . . . . . . . . . . . . . . . . . . . . . . . . . . . . . . . . . . vii Safety Information . . . . . . . . . . . . . . . . . . . . . . . . . . . . . . . . . . . . . . . . . . . vii Global Services and Support . . . . . . . . . . . . . . . . . . . . . . . . . . . . . . . . . . . . vii Warranty Information . . . . . . . . . . . . . . . . . . . . . . . . . . . . . . . . . vii Web Support . . . . . . . . . . . . . . . . . . . . . . . . . . . . . . . . . . . . . . . viii Telephone Support . . . . . . . . . . . . . . . . . . . . . . . . . . . . . . . . . . viii
Who Should Read This Manual . . . . . . . . . . . . . . . . . . . . . . . . . . . . . . . . . ix Related Documents . . . . . . . . . . . . . . . . . . . . . . . . . . . . . . . . . . . . . . . . . . ix
Using the Printer. . . . . . . . . . . . . . . . . . . . . . . . . . . . . . . . . . . . . . . . . . . . . . . . 1
Introducing the EasyCoder PD42 Printer . . . . . . . . . . . . . . . . . . . . . . . . . . . . . . . . . . 2
Features of the Printer . . . . . . . . . . . . . . . . . . . . . . . . . . . . . . . . . . . . . . . . . . . . . . . . . 2
Front View of the Printer . . . . . . . . . . . . . . . . . . . . . . . . . . . . . . . . . . . . . . . 2
Back View of the Printer. . . . . . . . . . . . . . . . . . . . . . . . . . . . . . . . . . . . . . . . 3
Media Compartment and Print Mechanism . . . . . . . . . . . . . . . . . . . . . . . . . 4
Firmware . . . . . . . . . . . . . . . . . . . . . . . . . . . . . . . . . . . . . . . . . . . . . . . . . . . 5
Working With the Print Button and LED Indicators . . . . . . . . . . . . . . . . . . . . . . . . . 6
Working With the Display and the Soft Keys . . . . . . . . . . . . . . . . . . . . . . . . . . . . . . . 7
Installing the Printer . . . . . . . . . . . . . . . . . . . . . . . . . . . . . . . . . . . . . . . . . . . 9
Connecting the Printer to Your System . . . . . . . . . . . . . . . . . . . . . . . . . . . . . . . . . . . 10 Connecting the Printer Through the USB Interface . . . . . . . . . . . . . . . . . . 10 Connecting the Printer Through the Serial Port . . . . . . . . . . . . . . . . . . . . . 11 Connecting the Printer Through the Parallel Port. . . . . . . . . . . . . . . . . . . . 11 Connecting the Printer to a Network . . . . . . . . . . . . . . . . . . . . . . . . . . . . . 11
Connecting Peripherals Through USB Host . . . . . . . . . . . . . . . . . . . . . . . . . . . . . . . 12
Connecting a Mass Storage Device . . . . . . . . . . . . . . . . . . . . . . . . . . . . . . . 12
Connecting a Keyboard . . . . . . . . . . . . . . . . . . . . . . . . . . . . . . . . . . . . . . . 12
Connecting a Bar Code Scanner . . . . . . . . . . . . . . . . . . . . . . . . . . . . . . . . . 13
Connecting a USB Hub . . . . . . . . . . . . . . . . . . . . . . . . . . . . . . . . . . . . . . . 14
Loading Media . . . . . . . . . . . . . . . . . . . . . . . . . . . . . . . . . . . . . . . . . . . . . . . . . . . . . 14 Loading Media for Tear-Off (Straight-Through) Operation . . . . . . . . . . . . 14 Loading Media for Peel-Off (Self-Strip) Operation . . . . . . . . . . . . . . . . . . . 17
EasyCoder PD42 Printer User’s Guide |
iii |
3
4
Loading Thermal Transfer Ribbon. . . . . . . . . . . . . . . . . . . . . . . . . . . . . . . . . . . . . . 19
Plugging in the Printer. . . . . . . . . . . . . . . . . . . . . . . . . . . . . . . . . . . . . . . . . . . . . . . 22
Printing Test Labels . . . . . . . . . . . . . . . . . . . . . . . . . . . . . . . . . . . . . . . . . . . . . . . . . 23
Creating and Printing a Label . . . . . . . . . . . . . . . . . . . . . . . . . . . . . . . . . . . . . . . . . 24
Configuring the Printer . . . . . . . . . . . . . . . . . . . . . . . . . . . . . . . . . . . . . . 25
Understanding Printer States . . . . . . . . . . . . . . . . . . . . . . . . . . . . . . . . . . . . . . . . . . 26
Understanding the Printer Startup Sequence . . . . . . . . . . . . . . . . . . . . . . . . . . . . . . 30
Changing Configuration Settings. . . . . . . . . . . . . . . . . . . . . . . . . . . . . . . . . . . . . . . 31 Changing Configuration Settings From the Display . . . . . . . . . . . . . . . . . 31 Changing Configuration Settings With PrintSet 4. . . . . . . . . . . . . . . . . . . 33 Changing Configuration Settings From the Printer Home Page . . . . . . . . 33 Changing Configuration Settings Using the Command Line. . . . . . . . . . . 33
Running Testmode and Extended Testmode . . . . . . . . . . . . . . . . . . . . . . . . . . . . . . 34
Running Testmode . . . . . . . . . . . . . . . . . . . . . . . . . . . . . . . . . . . . . . . . . . 34
Running Extended Testmode . . . . . . . . . . . . . . . . . . . . . . . . . . . . . . . . . . 36
Upgrading the Firmware . . . . . . . . . . . . . . . . . . . . . . . . . . . . . . . . . . . . . . . . . . . . . 38
Troubleshooting and Maintaining the Printer . . . . . . . . . . . 39
Printer Operation Problems . . . . . . . . . . . . . . . . . . . . . . . . . . . . . . . . . . . . . . . . . . . 40
Print Quality Problems . . . . . . . . . . . . . . . . . . . . . . . . . . . . . . . . . . . . . . . . . . . . . . 44
Troubleshooting Communication Problems. . . . . . . . . . . . . . . . . . . . . . . . . . . . . . . 45
Using the Line Analyzer (Fingerprint) . . . . . . . . . . . . . . . . . . . . . . . . . . . . 45
Using Dumpmode (IPL) . . . . . . . . . . . . . . . . . . . . . . . . . . . . . . . . . . . . . . 46
Contacting Product Support . . . . . . . . . . . . . . . . . . . . . . . . . . . . . . . . . . . . . . . . . . 47
Adjusting the Printer . . . . . . . . . . . . . . . . . . . . . . . . . . . . . . . . . . . . . . . . . . . . . . . . 47
Preventing Ribbon Wrinkling . . . . . . . . . . . . . . . . . . . . . . . . . . . . . . . . . . 47
Clearing Media Jams . . . . . . . . . . . . . . . . . . . . . . . . . . . . . . . . . . . . . . . . . 49
Adjusting the Printhead. . . . . . . . . . . . . . . . . . . . . . . . . . . . . . . . . . . . . . . 49
Adjusting Printhead Balance . . . . . . . . . . . . . . . . . . . . . . . . . . . . 50
Adjusting Printhead Pressure . . . . . . . . . . . . . . . . . . . . . . . . . . . 51
iv |
EasyCoder PD42 Printer User’s Guide |
Adjusting Printhead Dot Line . . . . . . . . . . . . . . . . . . . . . . . . . . . 51
Adjusting the Label Gap Sensor . . . . . . . . . . . . . . . . . . . . . . . . . . . . . . . . . 53
Maintaining the Printer. . . . . . . . . . . . . . . . . . . . . . . . . . . . . . . . . . . . . . . . . . . . . . . 56
Cleaning the Printhead . . . . . . . . . . . . . . . . . . . . . . . . . . . . . . . . . . . . . . . . 57
Cleaning the Media Compartment . . . . . . . . . . . . . . . . . . . . . . . . . . . . . . . 58
Cleaning the Exterior of the Printer . . . . . . . . . . . . . . . . . . . . . . . . . . . . . . 58
A Specification, Interfaces, and Options. . . . . . . . . . . . . . . . . . . . . 59
Printer Specifications. . . . . . . . . . . . . . . . . . . . . . . . . . . . . . . . . . . . . . . . . . . . . . . . . 60
Interfaces . . . . . . . . . . . . . . . . . . . . . . . . . . . . . . . . . . . . . . . . . . . . . . . . . . . . . . . . . 63
RS-232 Serial Interface . . . . . . . . . . . . . . . . . . . . . . . . . . . . . . . . . . . . . . . . 63
Protocol . . . . . . . . . . . . . . . . . . . . . . . . . . . . . . . . . . . . . . . . . . . . 63
Interface Cable. . . . . . . . . . . . . . . . . . . . . . . . . . . . . . . . . . . . . . . 63
USB Interface . . . . . . . . . . . . . . . . . . . . . . . . . . . . . . . . . . . . . . . . . . . . . . . 64
USB Host Interface . . . . . . . . . . . . . . . . . . . . . . . . . . . . . . . . . . . . . . . . . . 65
EasyLAN Ethernet Interface . . . . . . . . . . . . . . . . . . . . . . . . . . . . . . . . . . . . 65
Parallel IEEE 1284 Interface. . . . . . . . . . . . . . . . . . . . . . . . . . . . . . . . . . . . 66
Interface Cable. . . . . . . . . . . . . . . . . . . . . . . . . . . . . . . . . . . . . . . 66
Options. . . . . . . . . . . . . . . . . . . . . . . . . . . . . . . . . . . . . . . . . . . . . . . . . . . . . . . . . . . 66
EasyLAN Ethernet Interface . . . . . . . . . . . . . . . . . . . . . . . . . . . . . . . . . . . . 66
Parallel IEEE 1284 Interface. . . . . . . . . . . . . . . . . . . . . . . . . . . . . . . . . . . . 67
Cutter Kit. . . . . . . . . . . . . . . . . . . . . . . . . . . . . . . . . . . . . . . . . . . . . . . . . . 67
Internal Rewinder. . . . . . . . . . . . . . . . . . . . . . . . . . . . . . . . . . . . . . . . . . . . 67
Printhead Kit . . . . . . . . . . . . . . . . . . . . . . . . . . . . . . . . . . . . . . . . . . . . . . . 67
Real Time Clock. . . . . . . . . . . . . . . . . . . . . . . . . . . . . . . . . . . . . . . . . . . . . 67
B Media Specifications. . . . . . . . . . . . . . . . . . . . . . . . . . . . . . . . . . . . . . . . . . 69
Media Roll Sizes . . . . . . . . . . . . . . . . . . . . . . . . . . . . . . . . . . . . . . . . . . . . . . . . . . . . 70
Core . . . . . . . . . . . . . . . . . . . . . . . . . . . . . . . . . . . . . . . . . . . . . . . . . . . . . . 70
Internal Roll . . . . . . . . . . . . . . . . . . . . . . . . . . . . . . . . . . . . . . . . . . . . . . . . 70
Ribbon Size . . . . . . . . . . . . . . . . . . . . . . . . . . . . . . . . . . . . . . . . . . . . . . . . 71
Paper Types and Sizes . . . . . . . . . . . . . . . . . . . . . . . . . . . . . . . . . . . . . . . . . . . . . . . . 72
Non-Adhesive Strip . . . . . . . . . . . . . . . . . . . . . . . . . . . . . . . . . . . . . . . . . . 72
Self-Adhesive Strip . . . . . . . . . . . . . . . . . . . . . . . . . . . . . . . . . . . . . . . . . . . 73
Self-Adhesive Labels . . . . . . . . . . . . . . . . . . . . . . . . . . . . . . . . . . . . . . . . . . 74
Tickets With Gaps . . . . . . . . . . . . . . . . . . . . . . . . . . . . . . . . . . . . . . . . . . . 76
Tickets With Black Mark . . . . . . . . . . . . . . . . . . . . . . . . . . . . . . . . . . . . . . 78
EasyCoder PD42 Printer User’s Guide |
v |
C Setup Parameters (Fingerprint) . . . . . . . . . . . . . . . . . . . . . . . . . . . . |
81 |
Setup Description . . . . . . . . . . . . . . . . . . . . . . . . . . . . . . . . . . . . . . . . . . . . . . . . . . 82
Navigating the Setup Tree . . . . . . . . . . . . . . . . . . . . . . . . . . . . . . . . . . . . . . . . . . . . 82
Serial Communication Setup . . . . . . . . . . . . . . . . . . . . . . . . . . . . . . . . . . . . . . . . . . 87
Com Setup . . . . . . . . . . . . . . . . . . . . . . . . . . . . . . . . . . . . . . . . . . . . . . . . . . . . . . . 89
Emulation Setup . . . . . . . . . . . . . . . . . . . . . . . . . . . . . . . . . . . . . . . . . . . . . . . . . . . 89
Feed Adjust Setup . . . . . . . . . . . . . . . . . . . . . . . . . . . . . . . . . . . . . . . . . . . . . . . . . . 90
Media Setup . . . . . . . . . . . . . . . . . . . . . . . . . . . . . . . . . . . . . . . . . . . . . . . . . . . . . . 91
Print Defs Setup . . . . . . . . . . . . . . . . . . . . . . . . . . . . . . . . . . . . . . . . . . . . . . . . . . . 96
Network Setup. . . . . . . . . . . . . . . . . . . . . . . . . . . . . . . . . . . . . . . . . . . . . . . . . . . . . 97
D Setup Parameters (IPL) . . . . . . . . . . . . . . . . . . . . . . . . . . . . . . . . . . . . . . 99
Setup Description . . . . . . . . . . . . . . . . . . . . . . . . . . . . . . . . . . . . . . . . . . . . . . . . . 100 Printing Test Labels With IPL Commands. . . . . . . . . . . . . . . . . . . . . . . . . . . . . . . 100 Navigating the Setup Tree . . . . . . . . . . . . . . . . . . . . . . . . . . . . . . . . . . . . . . . . . . . 100 Serial Communication Setup . . . . . . . . . . . . . . . . . . . . . . . . . . . . . . . . . . . . . . . . . 104 Com Setup . . . . . . . . . . . . . . . . . . . . . . . . . . . . . . . . . . . . . . . . . . . . . . . . . . . . . . 106 Test/Service Setup . . . . . . . . . . . . . . . . . . . . . . . . . . . . . . . . . . . . . . . . . . . . . . . . . 107 Media Setup . . . . . . . . . . . . . . . . . . . . . . . . . . . . . . . . . . . . . . . . . . . . . . . . . . . . . 109 Configuration Setup . . . . . . . . . . . . . . . . . . . . . . . . . . . . . . . . . . . . . . . . . . . . . . . 112 Network Setup. . . . . . . . . . . . . . . . . . . . . . . . . . . . . . . . . . . . . . . . . . . . . . . . . . . . 113 Returning to Factory Default Setup . . . . . . . . . . . . . . . . . . . . . . . . . . . . . . . . . . . . 113
vi |
EasyCoder PD42 Printer User’s Guide |

Before You Begin
Before You Begin
This section provides you with safety information, technical support information, and sources for additional product information.
Safety Information
Your safety is extremely important. Read and follow all warnings and cautions in this document before handling and operating Intermec equipment. You can be seriously injured, and equipment and data can be damaged if you do not follow the safety warnings and cautions.
This section explains how to identify and understand warnings, cautions, and notes that are in this document.
A warning alerts you of an operating procedure, practice, condition, or statement that must be strictly observed to avoid death or serious injury to the persons working on the equipment.
A caution alerts you to an operating procedure, practice, condition, or statement that must be strictly observed to prevent equipment damage or destruction, or corruption or loss of data.
Note: Notes either provide extra information about a topic or contain special instructions for handling a particular condition or set of circumstances.
Global Services and Support
Warranty Information
To understand the warranty for your Intermec product, visit the
Intermec web site at www.intermec.com and click Service &
Support > Warranty.
EasyCoder PD42 Printer User’s Guide |
vii |
Before You Begin
Disclaimer of warranties: The sample code included in this document is presented for reference only. The code does not necessarily represent complete, tested programs. The code is provided “as is with all faults.” All warranties are expressly disclaimed, including the implied warranties of merchantability and fitness for a particular purpose.
Web Support
Visit the Intermec web site at www.intermec.com to download our current manuals (in PDF). To order printed versions of the Intermec manuals, contact your local Intermec representative or distributor.
Visit the Intermec technical knowledge base (Knowledge Central) at intermec.custhelp.com to review technical information or to request technical support for your Intermec product.
Telephone Support
These services are available from Intermec.
|
|
In the USA and |
|
|
Canada call 1-800- |
|
|
755-5505 and |
Services |
Description |
choose this option |
|
|
|
Order Intermec |
• Place an order. |
1 and then choose 2 |
products |
• Ask about an existing |
|
|
order. |
|
Order Intermec |
Order printer labels and |
1 and then choose 1 |
media |
ribbons. |
|
Order spare |
Order spare parts. |
1 or 2 and then |
parts |
|
choose 4 |
Technical |
Talk to technical support |
2 and then choose 2 |
Support |
about your Intermec product. |
|
viii |
EasyCoder PD42 Printer User’s Guide |

|
|
Before You Begin |
|
|
|
|
|
In the USA and |
|
|
Canada call 1-800- |
|
|
755-5505 and |
Services |
Description |
choose this option |
|
|
|
Service |
• Get a return authorization |
2 and then choose 1 |
|
number for authorized |
|
|
service center repair. |
|
|
• Request an on-site repair |
|
|
technician. |
|
Service |
• |
Ask about an existing |
contracts |
|
contract. |
|
• |
Renew a contract. |
• Inquire about repair billing or other service invoicing questions.
1 or 2 and then choose 3
Outside the U.S.A. and Canada, contact your local Intermec representative. To search for your local representative, from the Intermec web site, click Contact.
Who Should Read This Manual
This user’s guide is for the person who is responsible for installing, using, configuring, and maintaining the PD42 printer.
This document provides you with information about the features of the PD42, and how to install, configure, operate, maintain, and troubleshoot it.
Related Documents
This table contains a list of related Intermec documents and their part numbers.
Document Title |
Part Number |
|
937-005-xxx |
Intemec Fingerprint Programmer’s Reference Manual |
|
|
066396-xxx |
IPL Programmer’s Reference Manual |
|
EasyLAN User’s Guide |
1-960590-xx |
|
|
The Intermec web site at www.intermec.com contains our documents (as PDF files) that you can download for free.
EasyCoder PD42 Printer User’s Guide |
ix |
Before You Begin
To download documents
1 Visit the Intermec web site at www.intermec.com.
2 Click Service & Support > Manuals.
3In the Select a Product field, choose the product whose documentation you want to download.
To order printed versions of the Intermec manuals, contact your local Intermec representative or distributor.
x |
EasyCoder PD42 Printer User’s Guide |
1 Using the Printer
This chapter includes the following sections:
•Introducing the EasyCoder PD42 Printer
•Features of the Printer
•Working With the Print Button and LED Indicators
•Working With the Display and the Soft Keys
EasyCoder PD42 Printer User’s Guide |
1 |
Chapter 1 — Using the Printer
Introducing the EasyCoder PD42 Printer
The EasyCoder PD42 printer is a dependable and versatile printer suitable for medium-duty applications in manufacturing, transportation and warehouse environments. It has all-metal chassis and covers, proven printing mechanics, and powerful electronics providing sturdiness, performance, and reliability. It features an intuitive user interface with a large graphical display and programmable buttons.
Features of the Printer
This section describes the exterior of the printer, connectors, and the media compartment.
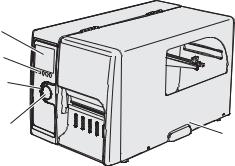
Front View of the Printer
Display
Soft keys (5)
Control LEDs (4)
Print button
Side door
Front View
2 |
EasyCoder PD42 Printer User’s Guide |
Chapter 1 — Using the Printer
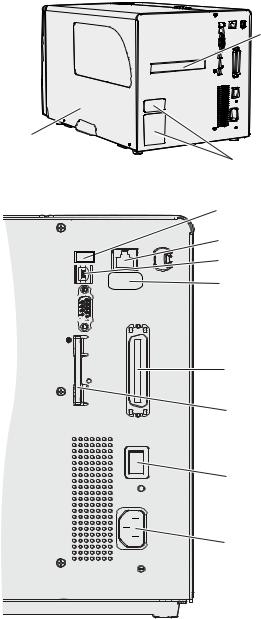
Back View of the Printer
Intake for external media supply
Side door
Machine labels
Back View
USB host port
Ethernet RJ-45 port |
USB port |
MAC address label |


 RS-232 serial port
IEEE 1284 parallel port
CompactFlash socket
I
O
Power switch
AC power cord socket
Back View: Connectors
EasyCoder PD42 Printer User’s Guide |
3 |
Chapter 1 — Using the Printer
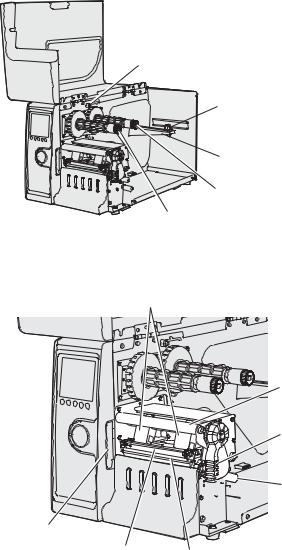
Media Compartment and Print Mechanism
Ink position lever
 Edge guide
 Media supply post
Ribbon supply shaft
Ribbon rewind shaft
Media Compartment
Printhead balance boxes
Ribbon rod
Printhead lever


 Media
Media 

 feed rods
Label taken |
|
|
sensor |
Thermal |
Tear bar |
|
||
|
printhead |
|
|
|
|
Print Mechanism |
|
|
4 |
EasyCoder PD42 Printer User’s Guide |

Chapter 1 — Using the Printer
Firmware
Your PD42 printer comes with either Fingerprint or IPL (Intermec Printer Language) firmware. The choice of firmware affects the functionality of the printer and how you interact with it. This manual contains information that applies exclusively to the type of firmware, so it is strongly recommended that you familiarize yourself enough with your PD42 to know whether it runs Fingerprint or IPL.
The current firmware type and version is displayed on the printer’s LCD, when the printer is fully operational and in “idle” mode (awaiting print jobs).
Fingerprint 10.1.0


 Test
Test
The display window of a PD42 running Fingerprint firmware.
EasyCoder PD42 Printer User’s Guide |
5 |
Chapter 1 — Using the Printer
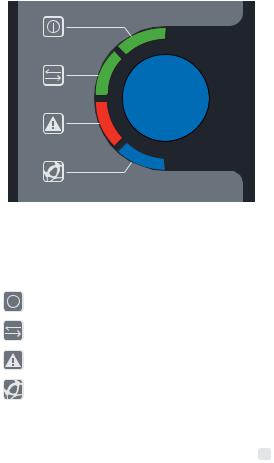
Working With the Print Button and LED Indicators
The blue button on the front panel is the Print button. The primary function of the Print button is to feed media and pause print jobs. However, the functionality varies depending on which state the printer is in, and which firmware it is running. All this is explained in detail in “Understanding Printer States” on
page 26.
There are four LEDs (Light Emitting Diodes) surrounding the
Print button.
LEDs and the Print Button
Control LEDs
Symbol |
LED |
Color |
Function |
||
|
|
|
|
|
|
|
|
|
Power |
Green |
Power indicator |
|
|
|
|||
|
|
|
|
|
|
|
|
|
Ready/Data |
Green |
Printer ready |
|
|
|
|
|
|
|
|
|
Error |
Red |
Error indicator |
|
|
|
|
|
|
|
|
|
Ready-to-Work™ |
Blue |
Intermec Ready-to-Work™ |
|
|
|
|
|
indicator |
|
|
|
|
|
|
|
|
|
|
|
|
The four LED indicators are on, off, or flashing depending on which state the printer is in. The Power LED ( ) is always on for all states except Power Off.
6 |
EasyCoder PD42 Printer User’s Guide |
Chapter 1 — Using the Printer
The blue Ready-to-Work LED ( )shows the operational status of the printer. In simple terms, it is turned on when the printer is operational. The indicator is set to flash when the printer is receiving data or under certain “mild” error conditions, for example when the printer is awaiting an IP address from the network, when the printhead is lifted, or when media is loaded incorrectly. It also flashes when the printer is in Setup mode, Testmode, and Extended Testmode (see Chapter 3, “Configuring the Printer.”).
When more serious errors occur, the indicator turns off completely, and the red Error LED ( ) turns on or flashes. There are a number of conditions that can cause this behavior; for help, see Chapter 4, “Troubleshooting and Maintenance.”
The green Ready/Data LED ( ) turns on, off, or flashes depending on the current state of the printer. A more thorough description of this behavior can be found in “Understanding Printer States” on page 26.
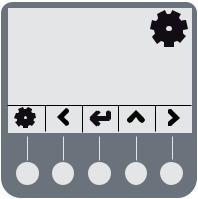
Working With the Display and the Soft Keys
The display communicates detailed information about the current state of the printer. Using the display, the printer tells you if a specific error has occurred or if it is waiting for input from you.
Current state (Setup)
Text or error messages
Active soft keys
The different areas of the display and the soft keys.
EasyCoder PD42 Printer User’s Guide |
7 |
Chapter 1 — Using the Printer
Below the display are five buttons that act as “soft keys,” which means that the function of each button depends on the state of the printer. The function is indicated with a small icon in the display just above the key itself.
You can use the buttons for things like pausing a print job, running a testfeed or changing setup parameters.
Note: If the printer is running a Fingerprint application, access to
Setup mode is controlled by the application.
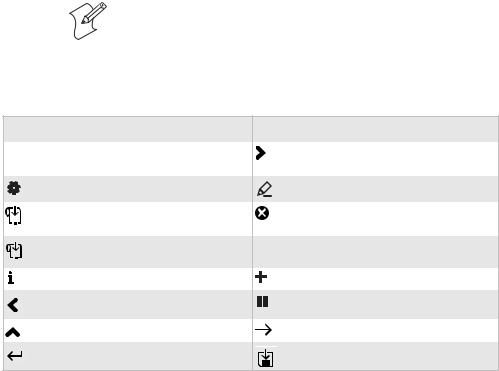
The function of each soft key is described below.
Soft Key Functions
Soft Key Function |
Soft Key |
F1 to F5 Defined by Fingerprint application
Enter/Exit setup |
Feed
Test |
Testfeed |
|
|
||
|
|
Enter/Exit i-mode
Left/previous state
Up
apply/acknowledge/select
Function
Right/next state
Edit value
Exit editing/cancel/exit test mode/exit dumpmode
Decrease selected digit
Increase selected digit
Pause
Continue
Save to file
8 |
|
EasyCoder PD42 Printer User’s Guide |

2 Installing the Printer
This chapter contains the following sections:
•Connecting the Printer to Your System
•Connecting Peripherals Through USB Host
•Loading Media
•Loading Thermal Transfer Ribbon
•Plugging in the Printer
•Printing Test Labels
•Creating and Printing a Label
EasyCoder PD42 Printer User’s Guide |
9 |

Chapter 2 — Installing the Printer
Connecting the Printer to Your System
There are a number of ways you can connect the PD42 to your system. As a standard, the printer is equipped with:
•one USB Type B connector for the USB interface port.
•one USB Type A connector for the USB host interface port.
•one 9-pin D-style subminiature (DB9) socket for the RS-232 serial interface port.
Optional interfaces include:
•one 36-pin socket for the parallel (IEEE 1284) port.
•one RJ-45 socket for the Ethernet network connection.
Information on the socket and connector types can be found in
Appendix A, “Specification, Interfaces, and Options.”
Note: USB and Parallel IEEE 1284 cannot be used at the same time. Select the active interface in Setup (see “Changing Configuration Settings” on page 31).
There are advantages and disadvantages associated with each of these interfaces, which are described in the following sections. Your current system setup will most likely tell you what connection method is most suitable.
Connecting the Printer Through the USB Interface
To use the USB connection, you need to install the Intermec InterDriver software on your computer. To ensure you get the latest version, check the Intermec web site first. This software can also be found on the PrinterCompanion CD along with instructions on how to install it. The USB interface is not suitable for terminal connections and thus not for programming.
10 |
EasyCoder PD42 Printer User’s Guide |
Chapter 2 — Installing the Printer
Connecting the Printer Through the Serial Port
You can use the serial connection with either LabelShop or the Intermec InterDriver. You can also use it to send commands directly to the printer through a terminal connection, for instance with Telnet. The printer’s default serial communication settings are: baud rate 9600, 8 data bits, no parity, 1 stop bit and no flow control. Appendixes C and D contain information about serial communication setup parameters for IPL and Fingerprint, respectively.
Connecting the Printer Through the Parallel Port
You can use the parallel connection with LabelShop or the Intermec InterDriver. The parallel port supports Windows plug- n-play and additional status reporting through IEEE 1284 nibble ID mode. Cable is not included with the kit.
Connecting the Printer to a Network
With an optional EasyLAN Ethernet card installed in your PD42, you can set it up as a network printer. The printer is set to automatically retreive an IP number from the network (DHCP) once it is turned on. You can use the network connection either with LabelShop or the Intermec InterDriver. You can also use it to directly send commands to the printer through a terminal connection (Telnet), or you can send instructions via FTP. For terminal connections, it utilizes the Raw TCP protocol through port 9100.
To connect the PD42 to your network
1Plug a connected Ethernet cable into the Ethernet port in the rear of the printer.
2Turn the printer on. Wait for the blue Ready-to-Work LED to stop blinking, and for the message “IP configuration error” to disappear from the screen.
3Enter i-mode by pressing (  ).
).
i-mode cycles through the interfaces installed on the printer in five-second intervals and displays them on the screen. The IP address is displayed under net1: in Fingerprint and net in IPL.
EasyCoder PD42 Printer User’s Guide |
11 |
Chapter 2 — Installing the Printer
4Enter the printer’s IP address in the address field of your web browser (for example http://255.255.255.001). This brings up the printer’s home page, where it is possible to check and modify various printer settings. Modifying settings requires a login name and a password: by default, these are set to “admin” and “pass” respectively.
Please refer to the EasyLAN User’s Guide (P/N 1-960590-xx) for more information on how to set up and operate the PD42 in your network environment.
If your network does not assign IP numbers automatically, or the Ready-to-Work indicator is flashing to indicate a network error, you can use PrintSet 4 (available on the PrinterCompanion CD) to correct the network settings. Alternatively, set up a terminal connection through the serial interface and use the Fingerprint Setup command. See “Changing Configuration Settings” on page 31, or refer to the Intermec Fingerprint Programmer’s Reference Manual (P/N 937-005-xxx).
Connecting Peripherals Through USB Host
The USB host interface supports the following external devices:
•Mass storage device
•Keyboard
•Bar code scanner
•USB hub
Connecting a Mass Storage Device
You can use a USB mass storage device (the “thumbdrive” or “dongle” type) to store additional fonts and images. You can also use the device to upgrade your firmware (see “Upgrading the Firmware” on page 38).
Connecting a Keyboard
You can use an external USB keyboard to:
•input data in Fingerprint applications. Some applications may require more complex input from users than the simple push of a button.
12 |
EasyCoder PD42 Printer User’s Guide |

Chapter 2 — Installing the Printer
•manage setup in Fingerprint/Direct Protocol and IPL. In the installed keyboard layouts, the arrow keys on the keyboard are mapped to the up/down/right/left functions in the Setup menu. The five function keys F1-F5 correspond to the five soft keys on the front panel, starting from the left. The Enter key will have the same apply/acknowledge function.
The printer comes with four keyboard layouts installed (US,
Swedish, French, and German).
To change keyboard layout
1Plug your USB-keyboard into the USB connector in the back of the printer.
2 |
Turn the printer on. |
3 |
Press Setup ( ). |
4 |
Navigate to COM > USB KEYBOARD. |
5 |
Choose a keyboard layout. |
6 |
Exit Setup by pressing ( ). |
Fingerprint users can create their own custom keyboard layouts. For help, see the Fingerprint Programmer’s Reference Manual (P/N 937-005-xxx).
Connecting a Bar Code Scanner
Note: Only printers running Fingerprint firmware can use a bar code scanner.
You can connect a bar code scanner of HID (Human Interface Device) type to the printer. The scanner will send data to the “console:” device in the same way as a USB keyboard. This data can then be used in a Fingerprint application.
The keyboard map chosen in setup (see above) applies for connected scanners as well.
EasyCoder PD42 Printer User’s Guide |
13 |

Chapter 2 — Installing the Printer
Connecting a USB Hub
A USB hub makes it possible to connect several USB devices to the printer at the same time.
Note: Only one of the devices connected to the USB hub can be a mass storage device, and only one device can be a Human Interface Device (keyboard or bar code scanner).
Loading Media
The EasyCoder PD42 can print on labels, tickets, tags, and continuous stock in various formats. Refer to Appendix B, “Media Specifications” for more detailed information about media types, media dimensions and other media specifications.
Loading Media for Tear-Off (Straight-Through) Operation
This section describes the case when media is torn off manually against the printer’s tear bar. This method is also known as “straight-through” printing. You can use different types of media in Tear-Off operation:
•Non-adhesive continuous stock
•Self-adhesive continuous stock with liner
•Self-adhesive labels with liner
•Tickets with gaps, with or without perforations
•Tickets with black marks, with or without perforations
To load media for tear-off operation
1 Open the printer’s side door.
14 |
EasyCoder PD42 Printer User’s Guide |
Chapter 2 — Installing the Printer
2Pull out the printhead lever and turn it counterclockwise. Lift the label feed guide.
Label feed guide
 Printhead lever
3Load a media roll onto the media supply hub. Be sure to push it all the way in.
EasyCoder PD42 Printer User’s Guide |
15 |

Chapter 2 — Installing the Printer
4 Route the media through the print mechanism.
5If you are using fan-fold media, load it through the rear intake and route the it the same way as you would a media roll.
6 Reset the label feed guide and the printhead lever.
7 Close the side door.
16 |
EasyCoder PD42 Printer User’s Guide |
Chapter 2 — Installing the Printer
8Press the Print button to advance the media (“Feed”). If you are switching to a new type of media, for instance going from tickets with gaps to ticket with black marks, you must run a “Testfeed” ( 
 Test) to calibrate the printer’s sensors.
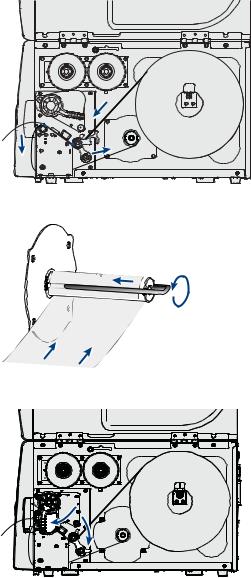
Loading Media for Peel-Off (Self-Strip) Operation
This section describes the case when self-adhesive labels are separated from the liner immediately after printing. This method is also known as self-strip operation. The label-taken sensor can hold the printing of the next label in a batch until the present label has been removed. You can only use self-adhesive labels with liner in peel-off operation. Use the same procedure when installing media for Batch Takeup, with the difference that both label and liner is rewound, and the label-taken sensor is not used.
Note: These modes of operation require an internal rewinder unit, for more information see Appendix A, “Specification,
Interfaces, and Options.”
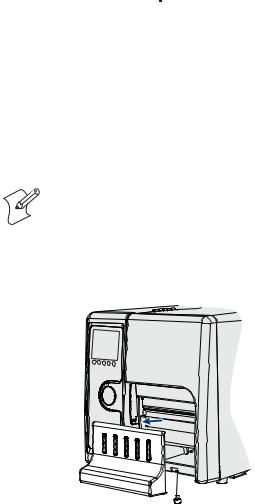
To load media for peel-off operation
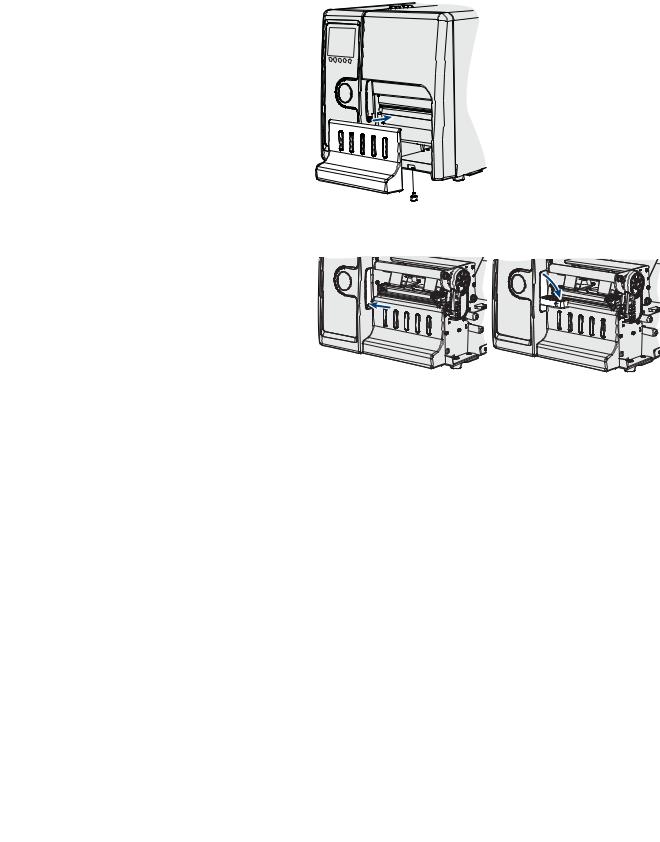
1 Remove the thumbscrew to remove the front cover.
2Open the side door, mount the media roll, and route the media through the media feed rods (refer to Steps 1-4 in “To
load media for tear-off operation” on page 14).
EasyCoder PD42 Printer User’s Guide |
17 |
Chapter 2 — Installing the Printer
3Route the label liner through the print mechanism and back into the media compartment.
4 Wrap the liner around the takeup roll and lock it in place.
5 Reset the label feed guide and the printhead lever.
18 |
EasyCoder PD42 Printer User’s Guide |
Chapter 2 — Installing the Printer
6 Reattach the front cover.
7Push in on the lower part of the label-taken sensor and bring it out to a fully horizontal position.
8 Close the side door.
9 Press the Print button to advance the media.
Loading Thermal Transfer Ribbon
Thermal transfer printing makes it possible to use a wide range of receiving face materials and gives a durable printout that is less vulnerable to fat, chemicals, heat, sunlight and so on than direct thermal printing. Make sure to select a ribbon type that matches the type of receiving material and set up the printer accordingly.
The ribbon is normally loaded at the same time as a new media roll. For clarity, the following illustrations do not show the media roll. See the previous sections for information on how to load media for your type of operation.
EasyCoder PD42 Printer User’s Guide |
19 |
Chapter 2 — Installing the Printer
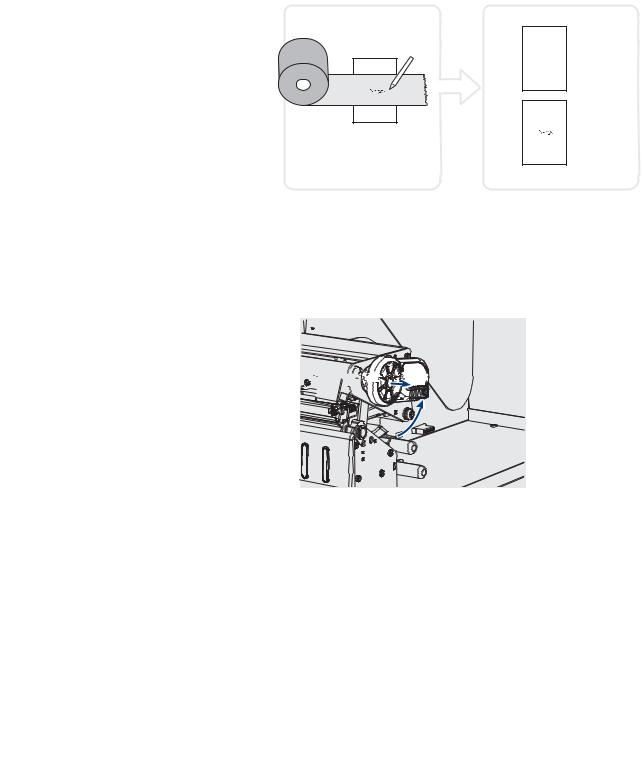
The EasyCoder PD42 can use transfer ribbon rolls wound with the ink-coated side facing either outward or inward. To determine which type of ribbon you have, use a pen or another sharp object to scratch through the ribbon against a piece of paper. If it leaves a mark, your ribbon is wound ink in or ink out according to the following model.
= Ink in
= Ink out
Test to determine whether your transfer ribbon is wound ink-in or ink-out.
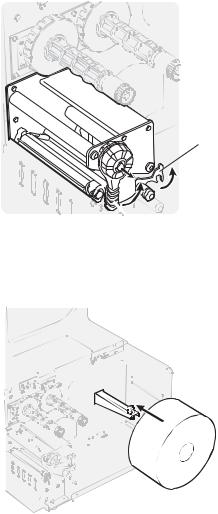
To load thermal transfer ribbon
1 Open the side door of the printer.
2Pull out the printhead lever (1) and turn it counterclockwise
(2) to raise the printhead.


 1
1 
2
20 |
EasyCoder PD42 Printer User’s Guide |
 Loading...