


WIXE127

1
GB
English,1
Contents
Installation, 2-3
Unpacking and levelling
Electric and water connections
The first wash cycle
Technical details
Washing machine description, 4-5
Control panel
Display
MEMO Programme
Starting and Programmes, 6
Briefly: how to start a programme
Programme table
Personalisations, 7
Setting the spin cycle
Setting the delay timer
Setting the temperature
Functions
Detergents and laundry, 8
Detergent dispenser
Bleach cycle
Preparing your laundry
Special items
Precautions and advice, 9
General safety
Disposal
Saving energy and respecting the environment
Care and maintenance, 10
Cutting off the water or electricity supply
Cleaning your appliance
Cleaning the detergent dispenser
Caring for your appliance door and drum
Cleaning the pump
Checking the water inlet hose
Troubleshooting, 11
Service, 12
Before calling for Assistance
WASHING MACHINE
WIXE 127
Instructions for use
GB
DE
Deutsch,25
Românã,13
RO
Español,37
ES
ЕЛЛЗНЙКБ,49
GR
2
GB
Keep this instruction manual in a safe place for
future reference. Should the appliance be sold,
transferred or moved, make sure the instruction
manual accompanies the washing machine to inform
the new owner as to its operation and features.
Read these instructions carefully: they contain vital
information on installation, use and safety.
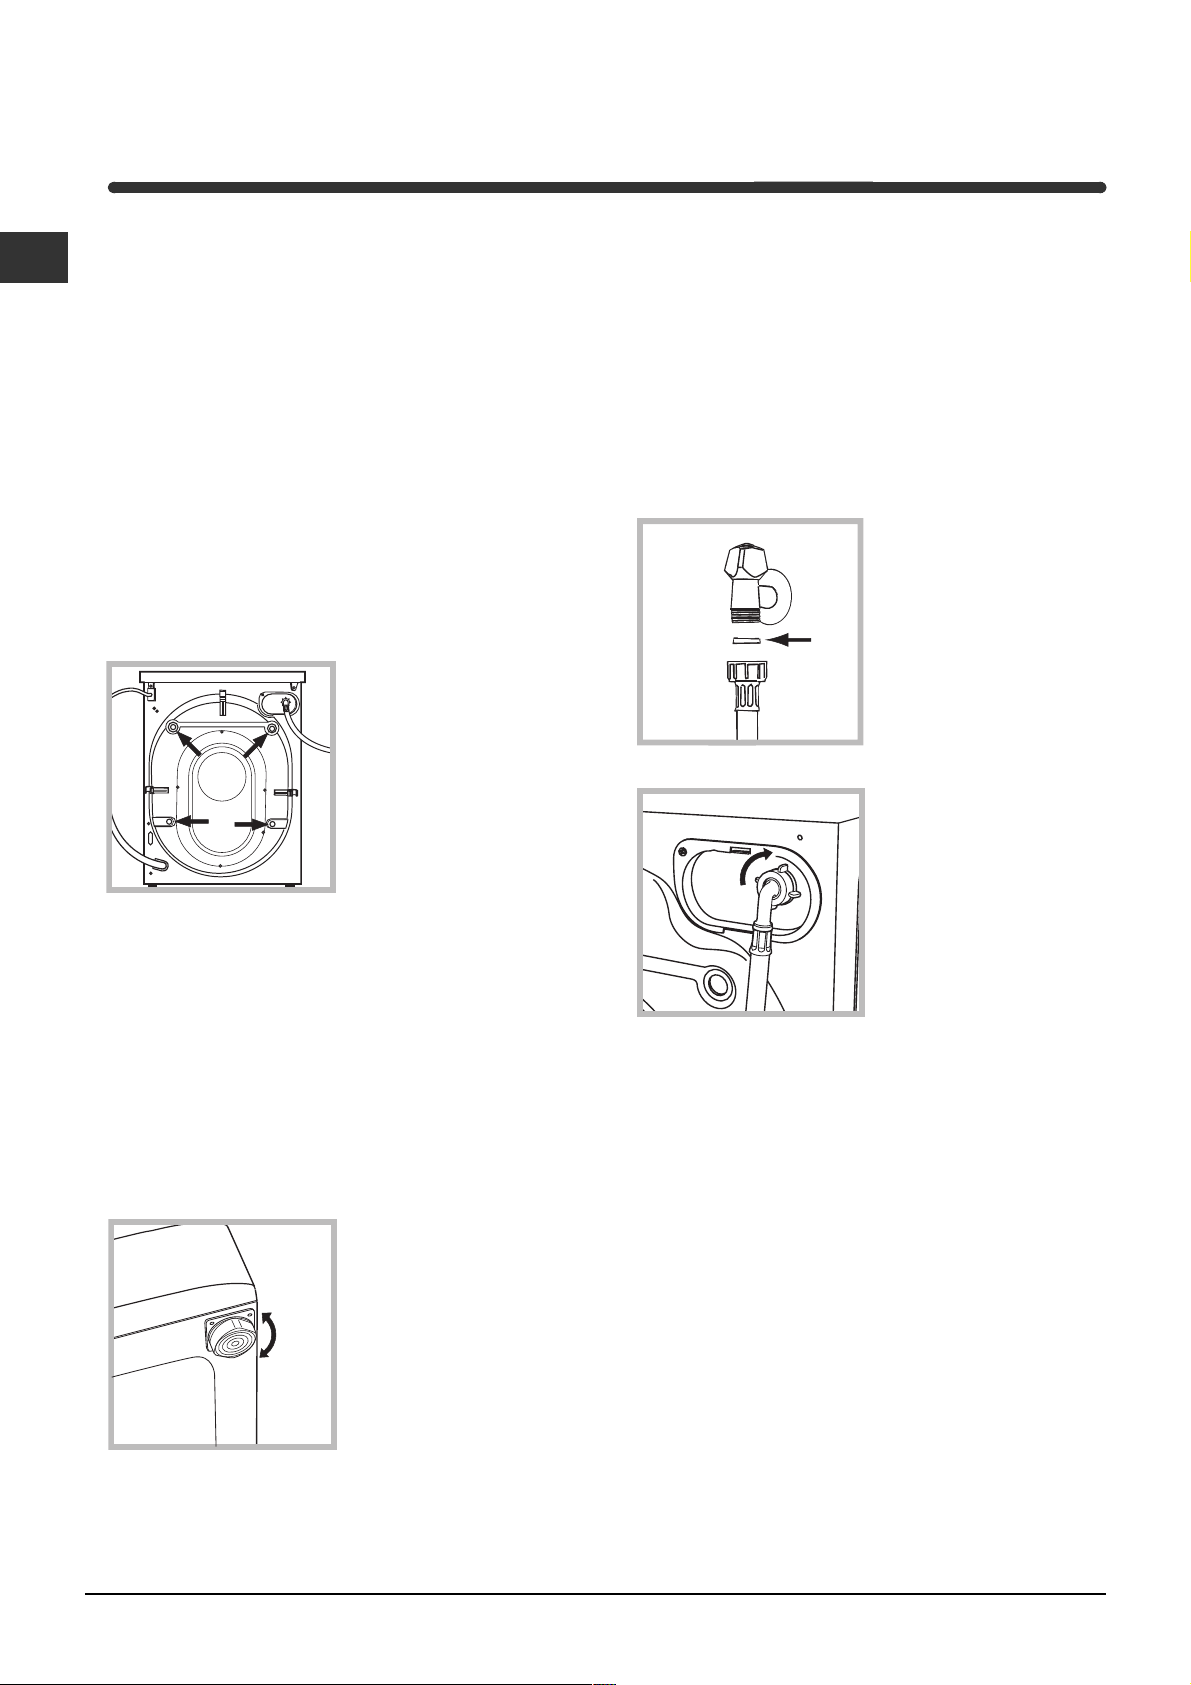
Unpacking and levelling
Unpacking
1. Unpack the washing machine.
2. Check whether the washing machine has been
damaged during transport. If this is the case, do not
install it and contact your retailer.
3. Remove the 4
protective screws and
the rubber washer with
the respective spacer,
situated on the rear of
the appliance (see
figure).
4. Seal the gaps using the plastic plugs provided.
5. Keep all the parts: you will need them again if the
washing machine needs to be moved to another
location.
Packaging materials are not children's toys.
Levelling
1. Install the washing machine on a flat sturdy floor,
without resting it up against walls, furniture cabinets
or other.
2. If the floor is not
perfectly level, compen-
sate for any unevenness
by tightening or
loosening the adjustable
front feet (see figure);
the angle of inclination,
measured according to
the worktop, must not
exceed 2°.
Levelling your appliance correctly will provide it with
stability and avoid any vibrations, noise and shifting
during operation. If it is placed on a fitted or loose
carpet, adjust the feet in such a way as to allow
enough room for ventilation beneath the washing
machine.
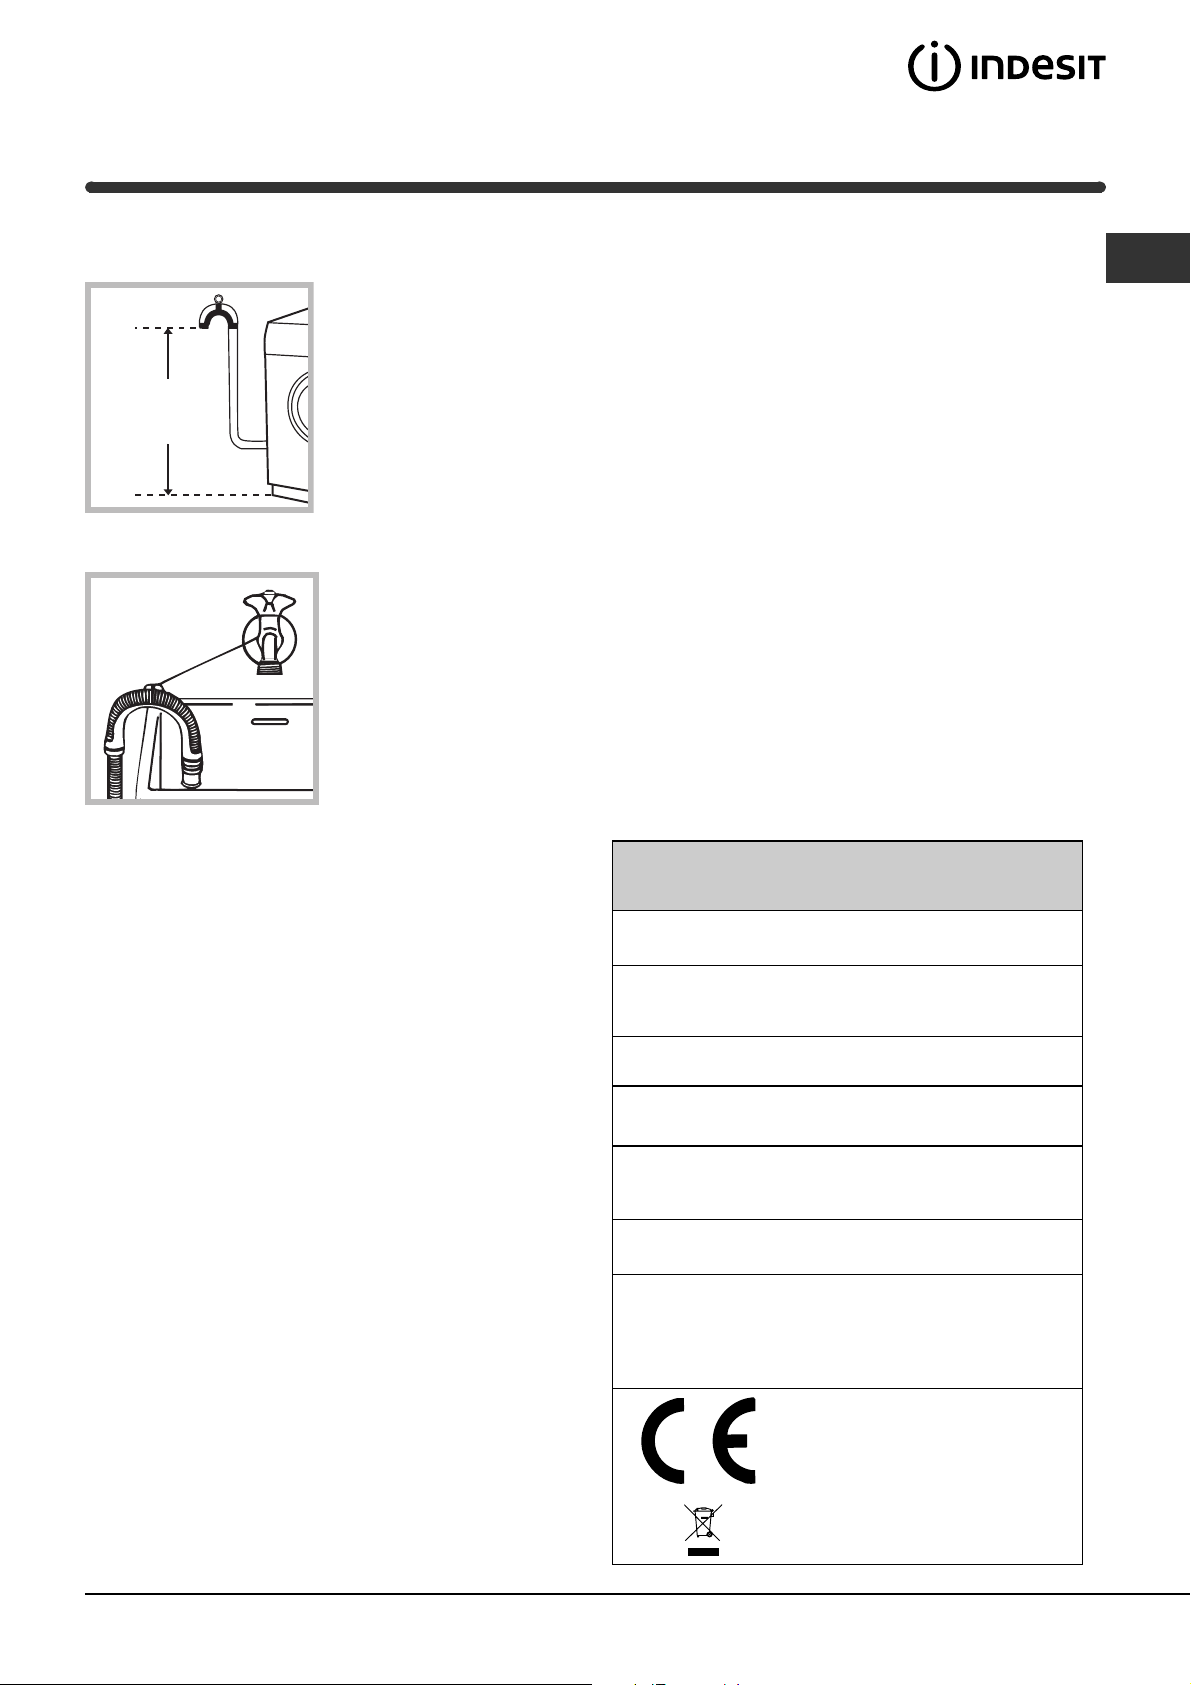
Electric and water connections
Connecting the water inlet hose
1. Insert seal A into the
end of the inlet hose
and screw the latter
onto a cold water tap
with a 3/4 gas threaded
mouth (see figure).
Before making the
connection, allow the
water to run freely until
it is perfectly clear.
2. Connect the other end
of the water inlet hose to
the washing machine,
screwing it onto the
appliance's cold water
inlet, situated on the top
right-hand side on the
rear of the appliance
(see figure).
3. Make sure there are no kinks or bends in the
hose.
The water pressure at the tap must be within the
values indicated in the Technical details table
(on the next page).
If the water inlet hose is not long enough, contact
a specialist store or an authorised serviceman.
Never use hoses that have already been used.
Installation
A
3
GB
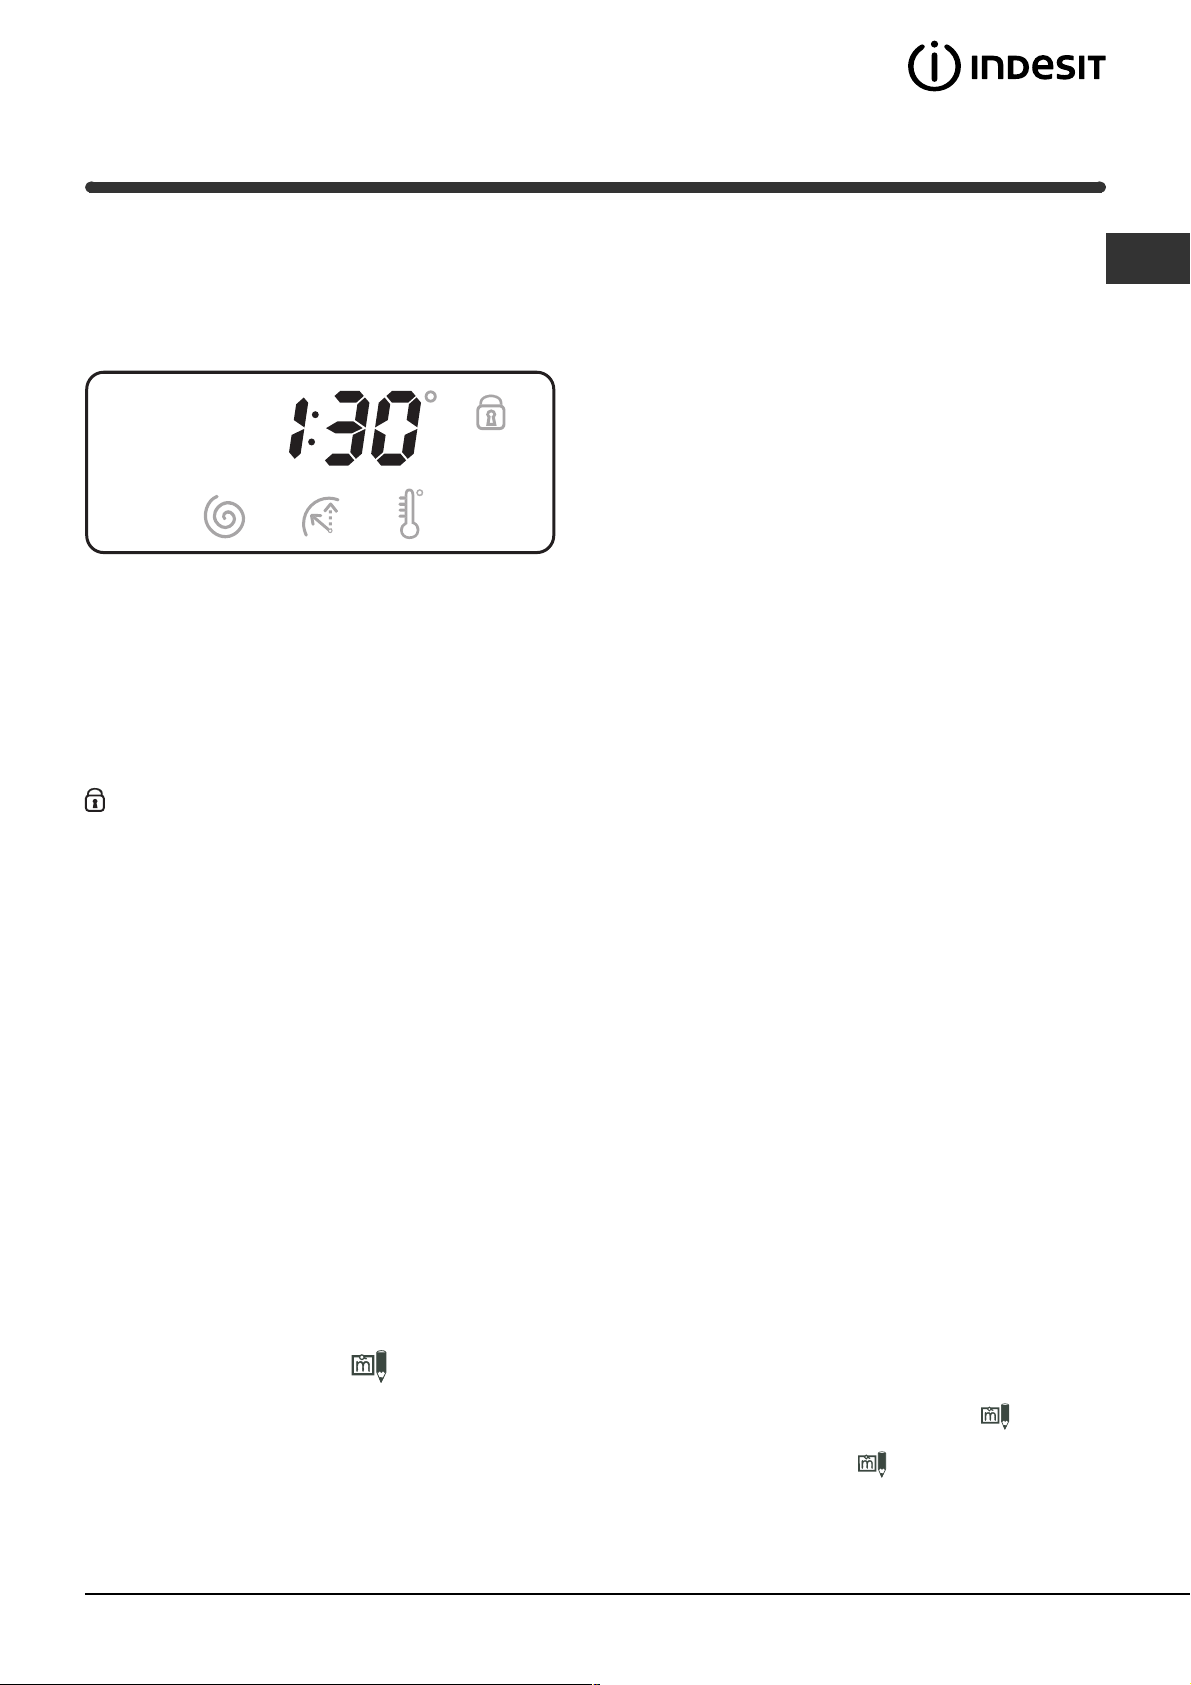
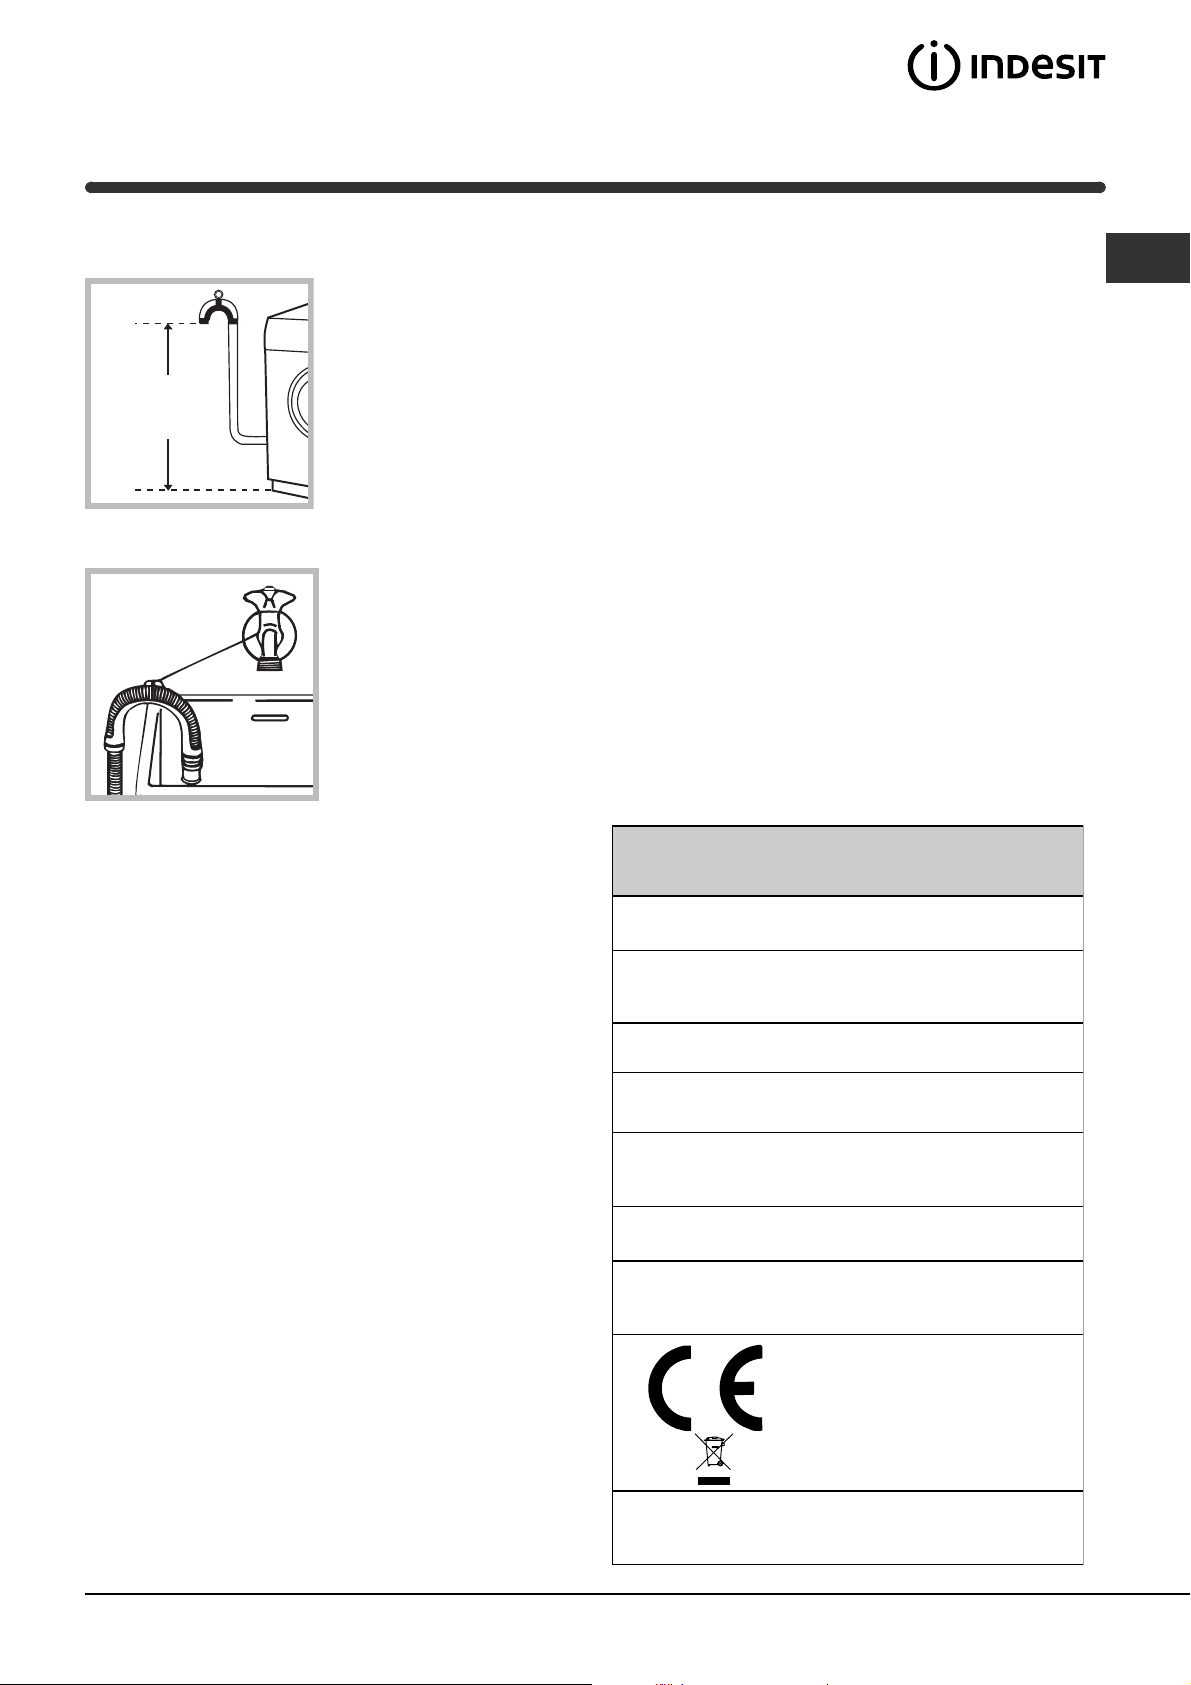
Connecting the drain hose
Connect the drain hose,
without bending it, to a
draining duct or a wall
drain situated between
65 and 100 cm from
the floor;
alternatively, place it
over the edge of a
basin, sink or tub,
fastening the duct
supplied to the tap (see
figure). The free end of
the hose should not be
underwater.
We advise against the use of hose extensions; in
case of absolute need, the extension must have the
same diameter as the original hose and must not
exceed 150 cm in length.
Electric connection
Before plugging the appliance into the mains
socket, make sure that:
the socket is earthed and in compliance with the
applicable law;
the socket is able to sustain the appliance's
maximum power load indicated in the Technical
details table (on the right);
the supply voltage is included within the values i
ndicated on the Technical details table
(on the right);
the socket is compatible with the washing
machine's plug. If this is not the case, replace
the socket or the plug.
The washing machine should not be installed in an
outdoor environment, not even when the area is
sheltered, because it may be very dangerous to
leave it exposed to rain and thunderstorms.
When the washing machine is installed, the mains
socket must be within easy reach.
Do not use extensions or multiple sockets.
The power supply cable must never be bent or
dangerously compressed.
The power supply cable must only be replaced by
an authorised serviceman.
Warning! The company denies all liability if and when
these norms are not respected.
The first wash cycle
Once the appliance has been installed, and before
you use it for the first time, run a wash cycle with
detergent and no laundry, setting the 90°C
programme without a pre-wash cycle.
65 - 100 cm
Technical details
Model
WIXE 127
Dimensions
59.5 cm wide
85 cm high
53,5 cm deep
Capacity
from 1 to 6 kg
Electric
connections
please refer to the technical data plate
fixed to the machine
Wat er
connections
maximum pressure 1 MPa (10 bar)
minimum pressure 0.05 MPa (0.5 bar)
drum capacity 52 litres
Spin speed
up to 1200 rpm
Control
programmes
according to
EN 60456
directive
programme 2; temperature 60°C;
run with a load of 6 kg.
This appliance is compliant with the
following European Community
Directives:
- 89/336/CEE of 03/05/89
(Electromagnetic Compatibility) and
subsequent amendments
- 2002/96/CE
- 2006/95/CE (Low Voltage)

4
GB
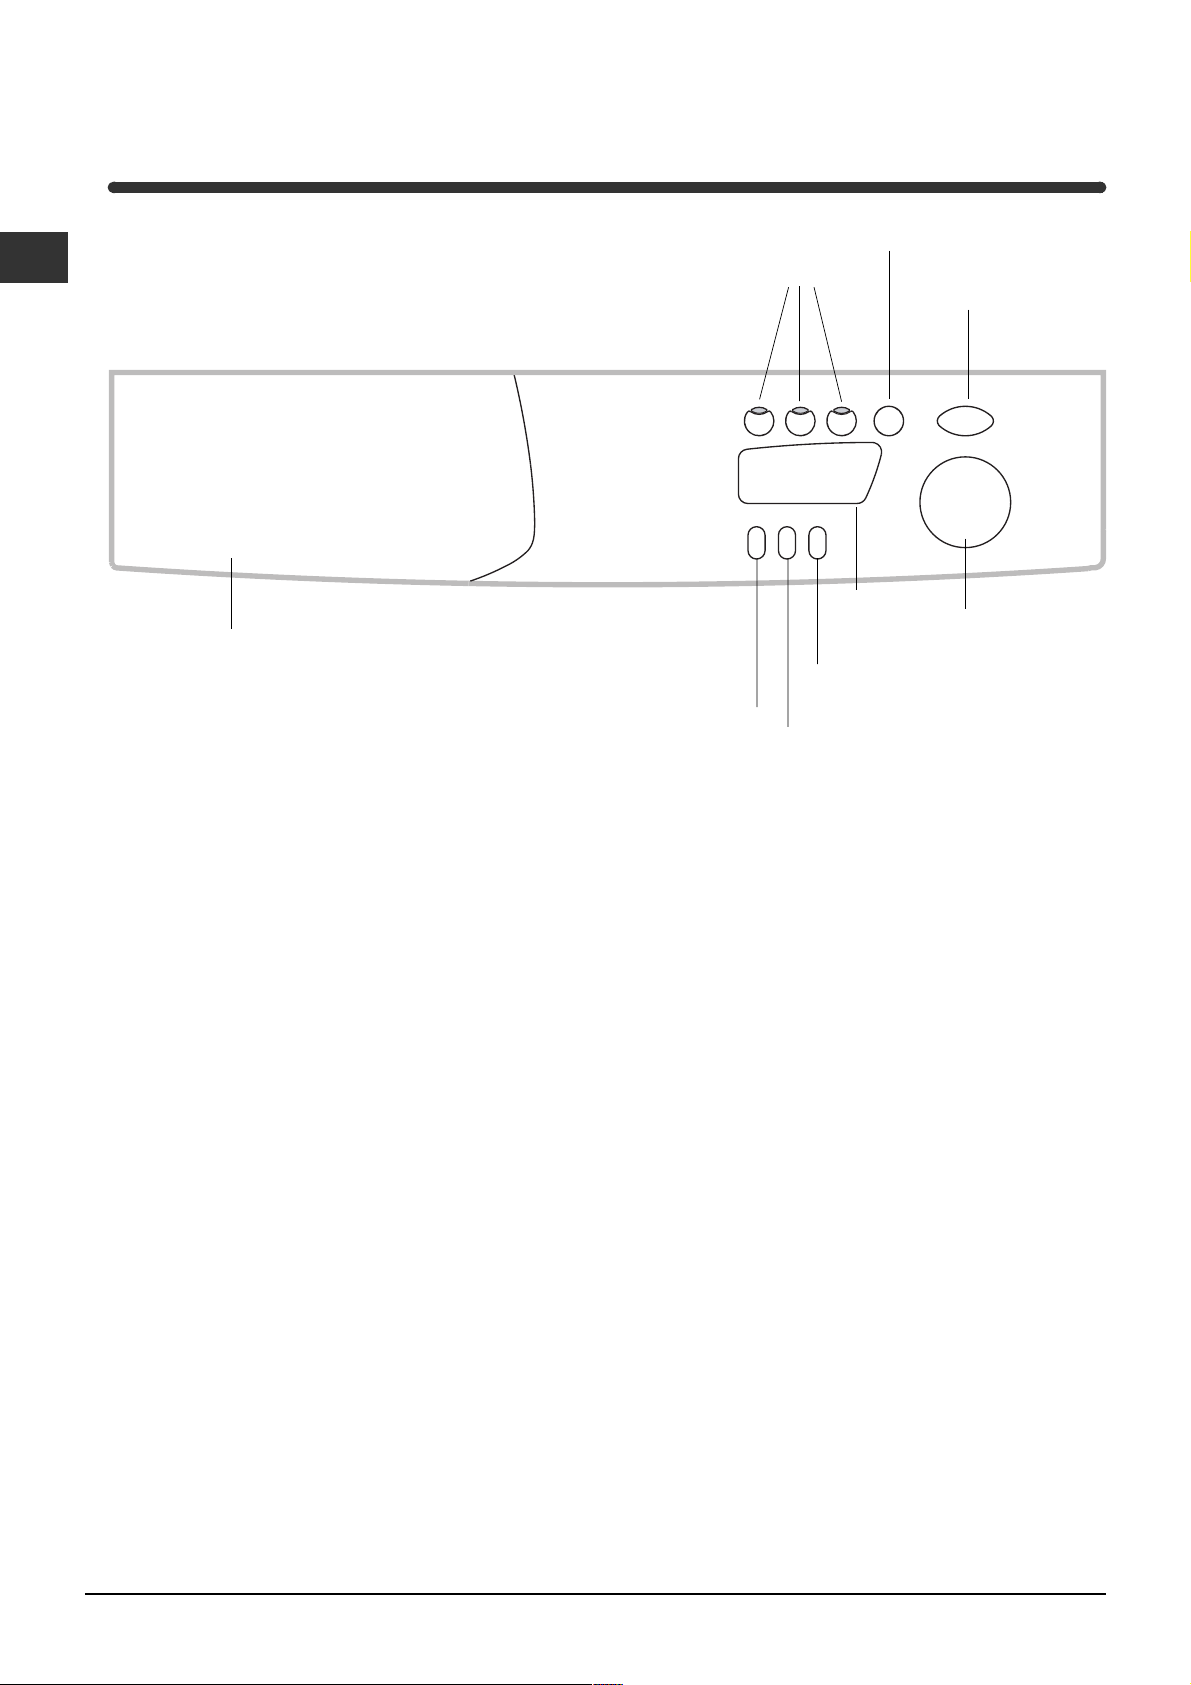
Control panel
Washing machine description
Control knob
Display
Detergent dispenser
SPIN
button
TEMPERATURE
button
START/STOP
button
START/RESET
button
Detergent dispenser to add detergent and fabric
softener (see page 8).
SPIN button to adjust the spin speed or exclude it
altogether (see page 7).
DELAY TIMER button to delay the start of the set
programme for a maximum period of 24 hours
(see page 7).
TEMPERATURE button to adjust the wash tempe-
rature (see page 7).
Display to programme the washing machine and
follow the wash cycle progress (see opposite page).
FUNCTION buttons: to select the functions
available. The button corresponding to the function
selected will remain on.
START/RESET button to start the programmes or
cancel any incorrect settings.
START/STOP button to turn the washing machine
on and off.
Control knob to select the wash programmes.
The knob stays still during the cycle.
DELAY TIMER
button
FUNCTION
Buttons
Note: to avoid excessive vibrations, before every spin cycle the machine distributes the load in a uniform manner
by continuously rotating the drum at a speed which is slightly faster than the normal washing speed.
When, despite repeated attempts, the load is still not evenly distributed, the machine spins at a lower speed than
the set frequency.
If the load is excessively unbalanced, the machine attempts to distribute it instead of spinning.
The balancing attempts may extend the total duration of the cycle, up to a maximum of 10 minutes.
5
GB
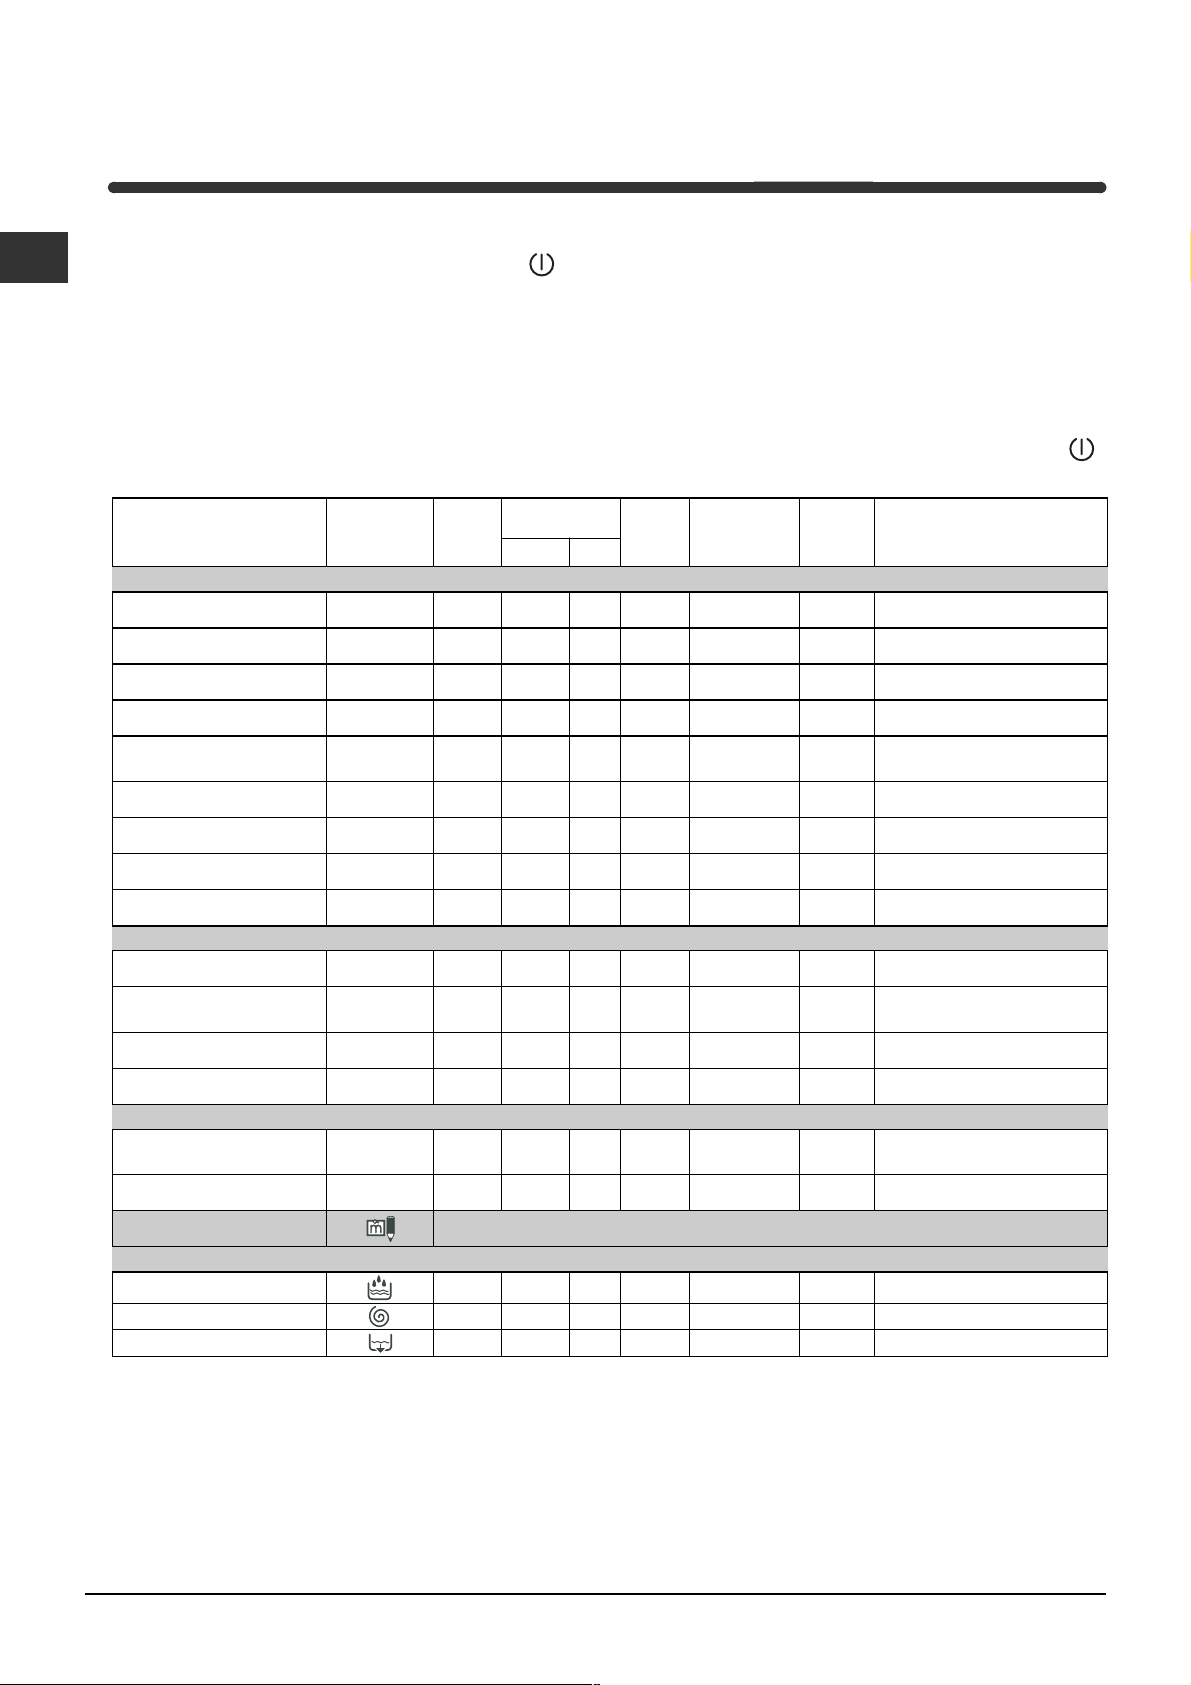
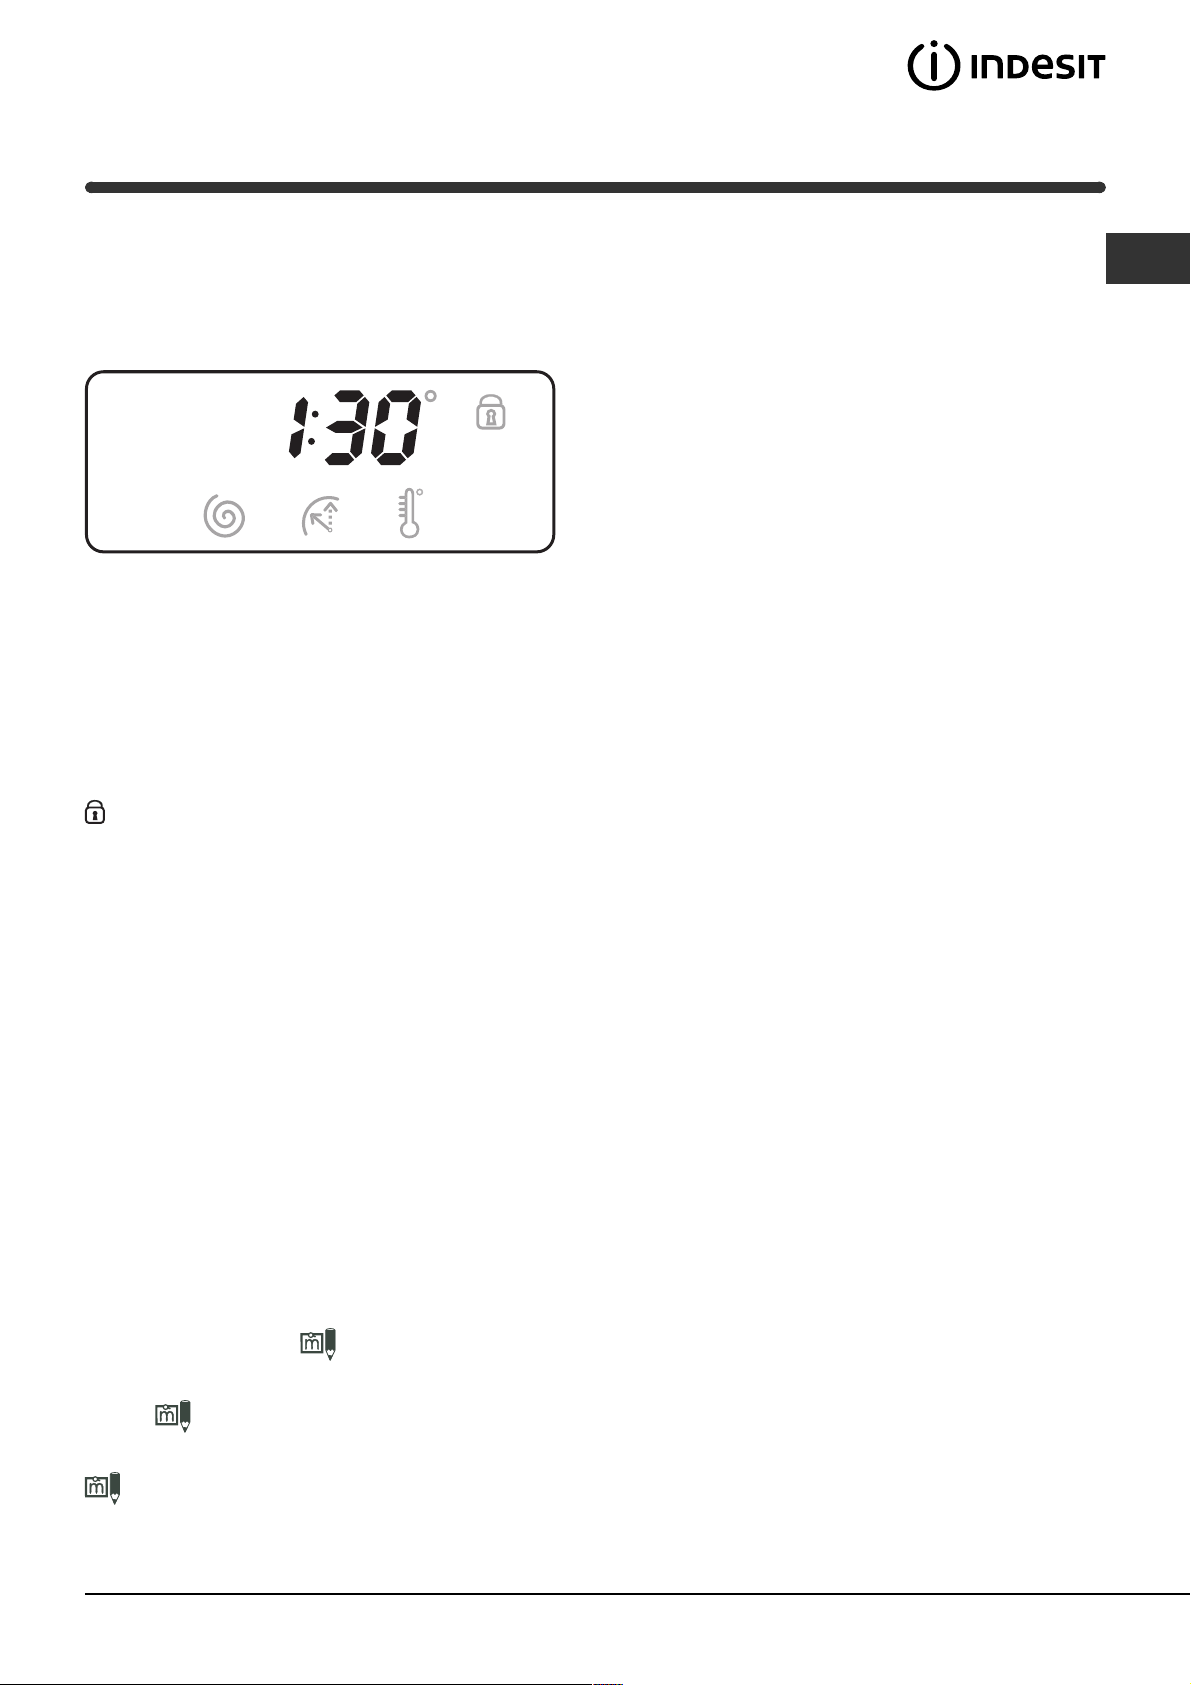
Display
In addition to being a practical tool to programme your appliance (see page 7), the display provides useful
information concerning the wash cycle.
Once you have pressed the START/RESET button to
start the programme, the display will indicate the
amount of time left until the end of the wash cycle. If
a delayed start has been set (using the Delay Timer,
see page 7), the delay time will be indicated on the
display.
Door lock:
If the symbol is on, the washing machine door is locked to prevent it from being opened accidentally. To avoid
any damages, wait for the symbol to switch itself off before you open the appliance door.
At the end of the programme, the word END is displayed.
In the event of an anomaly, an error code will appear, such as: F-01, (see page 11).
"MEMO" Programme
This programme allows you to store your favourite or most-used wash cycle.
All you have to do is set the desired programme and, once it has started, turn the KNOB to position
; the
wash cycle will be stored automatically and the word MEMO appears on the display, flashing for a few seconds.
Subsequently, you can start the "MEMO" cycle by simply turning the KNOB to position
; you will be able to
see the temperature/spin cycle/delay timer values by pressing the corresponding buttons; you will also be able to
modify them but this variation will only be valid for the programme in progress and it will not be stored in the
"MEMO" cycle.
If you want to store a new wash cycle, repeat the above-mentioned operations.
6
GB
Type of fab ric and
degree of soil
Progr am me s
Te m p e -
rature
Detergent
Fabr ic
softener
Stain removal
option/b leac h
Cycle
length
(m in ute s)
Descrip tion of wash cycle
pre-
wash
wash
Standard
Cottons:
Extremely soiled whites
(sheets, tablecloths, etc.)
1
90°C
155
Pre-wash, wash cycle, rinse cycles,
intermediate and final spin cycles
Cottons:
Extremely soiled whites
(sheets, tablecloths, etc.)
2
90°C
Delicate/
Traditional
150
Wash cycle, rinse cycles,
intermediate and final spin cycles
Cottons:
Heavily soiled whites
and fast colours
2
60°C
Delicate/
Traditional
140
Wash cycle, rinse cycles,
intermediate and final spin cycles
Cottons:
Heavily soiled whites
and delicate colours
2
40°C
Delicate/
Traditional
125
Wash cycle, rinse cycles,
intermediate and final spin cycles
Cottons:
Slightly soiled w hites
and delicate colours (shirts,
jum pers, etc.)
3
40°C
Delicate/
Traditional
85
Wash cycle, rinse cycles,
intermediate and final spin cycles
Synthetics:
Heavily soiled fast
colours (baby linen, etc.)
4
60
°C
Delicate
83
Wash cycle, rinse cycles, anti-
crease or delicate spin cycle
Synthetics:
Heavily soiled fast
colours (baby linen, etc.)
4
40°C Delicate
70
Wash cycle, rinse cycles, anti-
crease or delicate spin cycle
Wool
5
40°C
50
Wash cycle, rinse cycles
,
delicate spin cycle
Very delicate fabrics
(curtains, silk, viscose, etc.)
6
30°C
45
Wash cycle, rinse cycles, anti-
crease or draining cycle
Tim e 4 you
Cottons:
Heavily soiled whites
and fast colours
7
60°C
60
Wash cycle, rinse cycles,
intermediate and final spin cycles
Cottons:
Slightly soiled w hites
and delicate colours (shirts,
jum pers, etc.)
8
40°C
50
Wash cycle, rinse cycles,
intermediate and final spin cycles
Synthetics:
Delicate colours (all
types of slightly soiled garments)
9
40
°C
40
Wash cycle, rinse cycles,
delicate spin cycle
Synthetics:
Delicate colours (all
types of slightly soiled garments)
10
30°C 30
Wash cycle, rinse cycles and
delicate spin cycle
Sport
Sports shoes
(MAX. 2 pairs)
11
30
°C
50
Cold was h (without detergen ts),
wash cycle, rinse cycles, and
delicate spin cycle
Fabrics for sportswear
(Tracksuits, shorts, etc.)
12
30°C 60
Wash cycle, rinse cycles,
intermediate and final spin cycles
MEMO
Allows for any wash cycle to be stored
PARTIAL PROGRAMMES
Rinse
Delicate/
Traditional
Rinse cycles and spin cycle
Spin Draining and spin cycle
Drain Draining
Starting and Programmes
Programme table
Notes
-For programmes 7 and 8, we advise against exceeding a wash load of 3.5 kg.
-For programme 12 we advise against exceeding a wash load of 2 kg.
-For the anti-crease function: see Easy iron, opposite page. The information contained in the table is purely indicative.
Special programme
Daily (programme 10 for Synthetics) is designed to wash lightly soiled garments in a short amount of time: it only lasts
30 minutes and allows you to save on both time and energy. By setting this programme (10 at 30°C), you can wash
different fabrics together (except for woollen and silk items), with a maximum load of 3 kg.
We recommend the use of liquid detergent.
Briefly: starting a programme
1. Turn the washing machine on by pressing button .
2. Load your laundry into the washing machine and
shut the appliance door.
3. Set the knob to the desired programme. The
estimated duration of the selected programme is
displayed. The temperature and spin speed are
automatically set according to the programme
(to change them, see page 7).
4. Select any functions (see page 7).
5. Add the detergent and any fabric softener
(see page 8).
6. Start he programme by pressing the START/RESET
button.
To cancel it, keep the START/RESET button
pressed for at least 2 seconds.
7. When the programme has ended, the word END is
displayed. Take out your laundry and leave the
appliance door ajar to allow the drum to dry
thoroughly.
8. Turn the washing machine off by pressing button
.
(see page 5).

7
GB
Function Effect C omments
Enabled with
program mes:
Stain
rem o val
Bleaching cycle
designed to
remove the
toughest stains.
Please remember to pour the bleach into extra compartment 4
(se
e page 8)
.
This function is incompatible with the EASY IRON function.
2, 3, 4,
Rinse cycle.
Ex tra R i n s e
Increases the
efficiency of the
rinse.
Recommended when the appliance has a full load or with large
quantities of detergent.
1, 2, 3, 4, 7,
8, 9, 11, 12,
Rinse cycle.
Ea s y ir o n
This option
reduces the
amount of
creasing on
fabrics, making
them easier to
iron.
When this function is set, programmes 4 and 6 will end, with the
laundry left to soak (Anti-crease), and the relative button flashes:
- to conclude the cycle, press the START/RESET button or the
EASY IRON button;
- to run the draining cycle alone, set the knob to the relative
symbol and press the START/RESET button.
This function is incompatible with the STAIN REMOVAL function.
3, 4, 6, 7, 8, 9,
Rinse cycle.
Personalisations
Setting the spin cycle
If, when the appliance is switched on, the KNOB is positioned on
a programme with a spin cycle, a fixed
appears. Press button
and the maximum spin speed allowed for the programme set
will be displayed, and the
icon flashes. Press it again and the
values lower until they reach OFF, which indicates that the spin
cycle has been excluded (press it again to go back to the
maximum value); stop on the desired speed, after approximately
2 seconds the setting is accepted: the symbol
remains fixed.
The spin cycle setting is enabled with all the programmes except
for 6 and the Draining cycle.
Setting the delay timer
Press the button and you will see the word OFF on the
display, while the relative symbol flashes.
Press the button again and "1h" appears, that is, a delay of one
hour (this can reach up to 24h); stop on the "desired" delay; after
approximately 2 seconds the setting is accepted, following which,
the time for the set programme appears on the display and the
symbol
remains on.
If you now press the START/RESET button, the set "delay"
appears; this decreases every hour until the start of the cycle. In
this phase, the "delay" can only be modified by decreasing it.
The Delay Timer regulation is enabled with all programmes.
Setting the temperature
If, when the appliance is switched on, the KNOB is positioned on a programme for which the temperature needs
to be regulated, a fixed
appears. Press button and the maximum temperature allowed for the programme set
will be displayed and the
icon flashes. Press it again and the temperature lowers until it reaches OFF, which
indicates a cold wash cycle (press it again to go back to the maximum value); stop on the desired value, after
approximately 2 seconds the setting is accepted: the symbol
remains fixed.
The temperature adjustment is enabled with all wash programmes.
Functions
To enable a function:
1. press the button corresponding to the desired function, according to the table below;
2. the function is enabled when the corresponding button is illuminated.
Note: The rapid flashing of the button indicates that the corresponding function cannot be selected for the
programme set.
If you set a function that is incompatible with another function you selected previously, only the last one selected
will be enabled.
FUNCTION buttons

8
GB
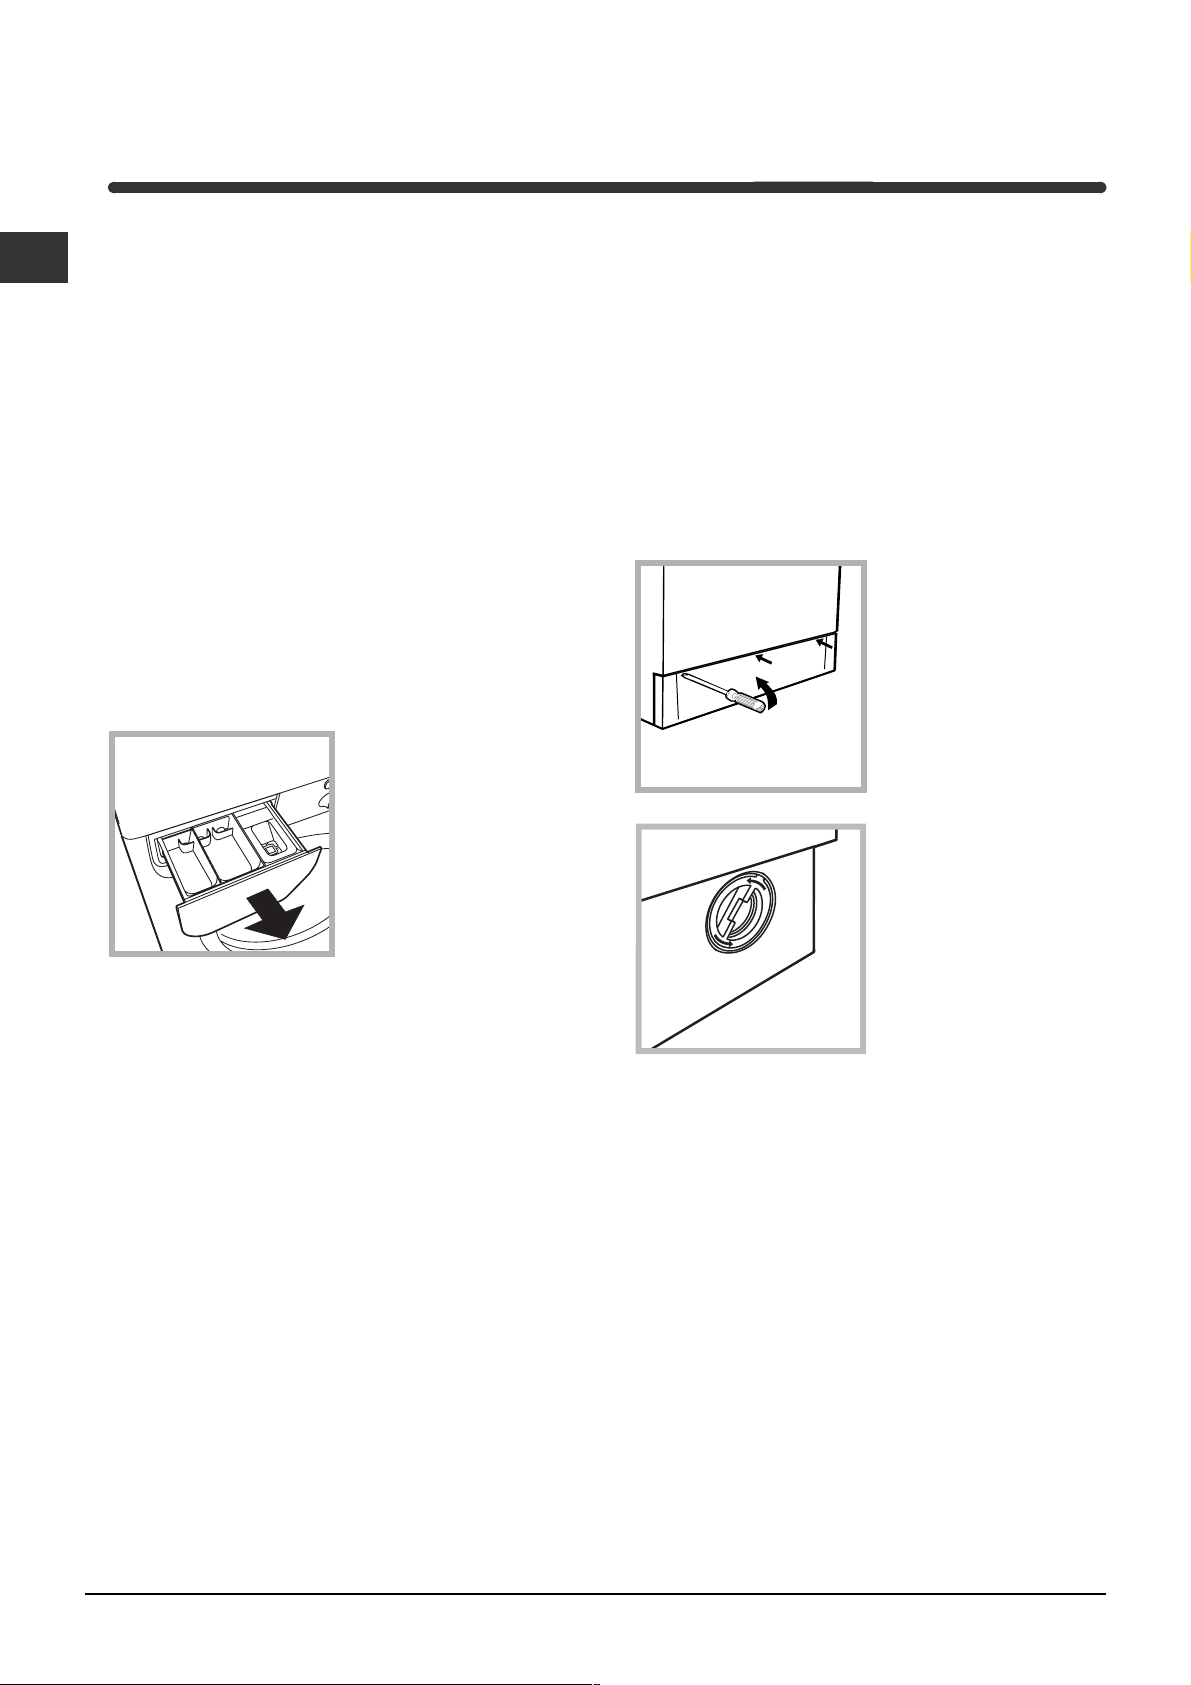
Detergent dispenser
Good washing results also depend on the correct
dose of detergent: adding too much detergent won't
necessarily make for a more efficient wash, and may
in fact cause build up on the interior of your
appliance and even pollute the environment.
Open up the detergent
dispenser and pour in
the detergent and fabric
softener, as follows.
compartment 1: Detergent for pre-wash
(powder)
Before pouring in the detergent, make sure that
extra compartment 4 has been removed.
compartment 2: Detergent for the wash cycle
(powder or liquid)
Liquid detergent should only be poured in
immediately prior to the wash cycle start.
compartment 3: Additives (fabric softeners, etc.)
The fabric softener should not overflow from the grid.
extra compartment 4: Bleach
Do not use hand wash detergent because it may
form too much foam.
Bleach cycle
Traditional bleach should be used on sturdy
white fabrics, and delicate bleach for coloured
fabrics, synthetics and for wool.
Place extra
compartment 4,
provided, into
compartment 1.
When pouring in the
bleach, be careful not to
exceed the "max" level
indicated on the central
pivot (see figure).
To run the bleach cycle alone, pour the bleach into extra
compartment 4, set the Rinse programme
and
enable the Stain removal function (see page 7).
To bleach during a wash cycle, pour in the detergent
and fabric softener, set the desired programme and
enable the Stain removal function (see page 7).
The use of extra compartment 4 excludes the
possibility of using the pre-wash cycle.
Preparing your laundry
Divide your laundry according to:
- the type of fabric/the symbol on the label.
- the colours: separate coloured garments from
whites.
Empty all pockets and check for loose buttons.
Do not exceed the weight limits stated below,
which refer to the weight when dry:
Sturdy fabrics: max 6 kg
Synthetic fabrics: max 2.5 kg
Delicate fabrics: max 2 kg
Wool: max 1,5 kg
How much does your laundry weigh?
1 sheet 400-500 g
1 pillow case 150-200 g
1 tablecloth 400-500 g
1 bathrobe 900-1200 g
1 towel 150-250 g
Special items
Curtains: fold curtains and place them in a pillow
case or mesh bag. Wash them separately without
exceeding half the appliance load. Use programme 6
which excludes the spin cycle automatically.
Quilted coats and windbreakers: if they are
padded with goose or duck down, they can be
machine-washed. Turn the garments inside out and
load a maximum of 2-3 kg, repeating the rinse cycle
once or twice and using the delicate spin cycle.
Wool: for best results, use a specific detergent,
taking care not to exceed a load of 1,5 kg.
Detergents and laundry
1
2
3
4

9
GB
Precautions and advice
The washing machine was designed and built in
compliance with the applicable international safety
regulations. The following information is provided for
your safety and should consequently be read carefully.
General safety
This appliance has been designed for non-
professional, household use and its functions must
not be changed.
This washing machine should only be used by
adults and in accordance with the instructions
provided in this manual.
Never touch the washing machine when barefoot
or with wet or damp hands or feet.
Do not pull on the power supply cable to unplug
the appliance from the electricity socket. Pull the
plug out yourself.
Do not open the detergent dispenser while the
appliance is in operation.
Do not touch the drain water as it could reach
very high temperatures.
Never force the washing machine door: this could
damage the safety lock mechanism designed to
prevent any accidental openings.
In the event of a malfunction, do not under any
circumstances touch internal parts in order to
attempt repairs.
Always keep children well away from the
appliance while in operation.
The appliance door tends to get quite hot during
the wash cycle.
Should it have to be moved, proceed with the
help of two or three people and handle it with the
utmost care. Never try to do this alone, because
the appliance is very heavy.
Before loading your laundry into the washing
machine, make sure the drum is empty.
Disposal
Disposing of the packaging material:
observe local regulations, so the packaging can
be re-used.
The European Directive 2002/96/EC on Waste
Electrical and Electronic Equipment, requires that
old household electrical appliances must not be
disposed of in the normal unsorted municipal waste
stream. Old appliances must be collected
separately in order to optimise the recovery and
recycling of the materials they contain and reduce
the impact on human health and the environment.
The crossed out "wheeled bin" symbol on the
product reminds you of your obligation, that when
you dispose of the appliance it must be separately
collected.
Consumers should contact their local authority or
retailer for information concerning the correct
disposal of their old appliance.
Saving energy and respecting the
environment
Environmentally-friendly technology
If you only see a little water through your appliance
door, this is because thanks to the latest Indesit
technology, your washing machine only needs less
than half the amount of water to get the best results:
an objective reached to respect the environment.
Saving on detergent, water, energy and time
To avoid wasting resources, the washing machine
should be used with a full load. A full load instead
of two half loads allows you to save up to 50% on
energy.
The pre-wash cycle is only necessary on
extremely soiled garments. Avoiding it will save on
detergent, time, water and between 5 and 15%
energy.
Treating stains with a stain remover or leaving
them to soak before washing will cut down the
need to wash them at high temperatures. A
programme at 60°C instead of 90°C or one at
40°C instead of 60°C will save up to 50% on
energy.
Use the correct quantity of detergent depending
on the water hardness, how soiled the garments
are and the amount of laundry you have, to avoid
wastage and to protect the environment: despite
being biodegradable, detergents do contain
ingredients that alter the natural balance of the
environment. In addition, avoid using fabric
softener as much as possible.
If you use your washing machine from late in the
afternoon until the early hours of the morning, you
will help reduce the electricity board's peak load.
The Delay Timer option (see page 7) helps to
organise your wash cycles accordingly.
If your laundry has to be dried in a tumble dryer,
select a high spin speed. Having the least water
possible in your laundry will save you time and
energy in the drying process.
10
GB
Care and maintenance
Cutting off the water or electricity
supply
Turn off the water tap after every wash. This will
limit the wear of your appliance's water system
and also prevent leaks.
Unplug your appliance when cleaning it and
during all maintenance operations.
Cleaning your appliance
The exterior and rubber parts of your appliance can
be cleaned with a soft cloth soaked in lukewarm
soapy water. Do not use solvents or abrasives.
Cleaning the detergent dispenser
Remove the dispenser
by pulling it out (see
figure).
Wash it under running
water; this operation
should be repeated
frequently.
Caring for your appliance door and
drum
Always leave the appliance door ajar to prevent
unpleasant odours from forming.
Cleaning the pump
The washing machine is fitted with a self-cleaning
pump that does not require any maintenance.
Sometimes, small items (such as coins or buttons)
may fall into the pre-chamber that protects the
pump, situated in the lower part of the same.
Make sure the wash cycle has ended and unplug
the appliance.
To access the pre-chamber:
1. using a screwdriver,
remove the cover panel
on the lower front of the
washing machine (see
figure);
2. unscrew the lid
rotating it anti-
clockwise (see figure): a
little water may trickle
out. This is perfectly
normal;
3. clean the interior thoroughly;
4. screw the lid back on;
5. reposition the panel, making sure the hooks are
securely in place before you push it onto the
appliance.
Checking the water inlet hose
Check the water inlet hose at least once a year. If
you see any cracks, replace it immediately: during
the wash cycles, water pressure is very strong and
a cracked hose could easily split open.
Never use hoses that have already been used.

11
GB
Your washing machine could fail to work. Before calling for Assistance (see page 12), make sure the problem
can't easily be solved by consulting the following list.
Troubleshooting
Problem
The washing machine won't
start.
The wash cycle won't start.
The washing machine fails to
load water (The wording H2O is
displayed).
The washing machine
continuously loads and unloads
water.
The washing machine does not
drain or spin.
The washing machine vibrates
too much during the spin cycle.
The washing machine leaks.
In the event of an anomaly, an
error code will appear, such as:
F-01.
There is too much foam.
Possible causes/Solution:
The appliance is not plugged into the socket, or not enough to
make contact.
There has been a power failure.
The appliance door is not shut properly (the word DOOR is
displayed).
The
button has not been pressed.
The START/RESET button has not been pressed.
The water tap is not turned on.
A delayed start has been set (using the Delay Timer, see page 7).
The water inlet hose is not connected to the tap.
The hose is bent.
The water tap is not turned on.
There is a water shortage.
The water pressure is insufficient.
The START/RESET button has not been pressed.
The drain hose is not fitted between 65 and 100 cm from the floor
(see page 3).
The free end of the hose is underwater (see page 3).
The wall drainage system doesn't have a breather pipe.
If the problem persists even after these checks, turn off the water tap,
switch the appliance off and call for Assistance. If the dwelling is on one of
the upper floors of a building, there may be drain trap problems causing the
washing machine to load and unload water continuously. In order to avoid
such an inconvenience, special anti-drain trap valves are available in shops.
The programme does not foresee the draining: some programmes
require enabling the draining manually (see page 6).
The Easy iron option is enabled: to complete the programme, press
the START/RESET button (see page 7).
The drain hose is bent (see page 3).
The drain duct is clogged.
The drum was not unblocked correctly during installation (see page 2).
The washing machine is not level (see page 2).
The washing machine is closed in between furniture cabinets and
the wall (see page 2).
The water inlet hose is not screwed on correctly (see page 2).
The detergent dispenser is obstructed (to clean it, see page 10).
The drain hose is not secured properly (see page 3).
Switch off the machine and unplug the appliance; wait for
approximately 1 minute then switch it on again.
If the problem persists, contact Assistance.
The detergent is not suitable for machine washing (it should bear the definition
"for washing machines" or "hand and machine wash", or the like).
You used too much detergent.

12
GB
Before calling for Assistance:
Check whether you can solve the problem on your own (see page 11);
Restart the programme to check whether the problem has been solved;
If this is not the case, contact an authorised Technical Service Centre on the telephone number
provided on the guarantee certificate.
Always request the assistance of authorised servicemen.
Notify the operator of:
the type of problem;
the appliance model (Mod.);
the serial number (S/N).
This information can be found on the data plate situated on the rear of the washing machine.
Service

13
RO
Românã
Sumar
Instalare, 14-15
Scoaterea din ambalaj ºi nivelarea
Legãturi hidraulice ºi electrice
Primul program de spãlare
Date tehnice
Descrierea maºinii de spãlat, 16-17
Panoul de control
Display-ul
Program MEMO
Pornire ºi Programe, 18
Pe scurt: pornirea unui program
Tabel de programe
Personalizãri, 19
Reglarea turaþiei de centrifugare
Reglarea delay timerului
Reglarea temperaturii
Funcþii
Detergenþi ºi rufe albe, 20
Sertarul detergenþilor
Program de albire
Sortarea rufelor
Rufe deosebite
Precauþii ºi sfaturi, 21
Protecþie generalã
Aruncarea reziduurilor
Protecþia ºi respectarea mediului înconjurãtor
Întreþinere ºi îngrijire, 22
Oprirea apei ºi a curentului electric
Curãþarea maºinii de spãlat
Curãþarea sertarului pentru detergenþi
Îngrijirea hubloului ºi a cuvei
Curãþarea pompei
Controlarea furtunului de alimentare cu apã
Anomalii ºi remedii, 23
Asistenþã, 24
Înainte de a lua legãtura cu Asistenþa
RO
MAªINÃ DE SPÃLAT RUFE
WIXE 127
INSTRUCÞIUNI DE FOLOSIRE

14
RO
Este important sã se pãstreze acest manual
pentru a-l putea consulta în orice moment. În caz de
vânzare, cesiune sau schimbare a locuinþei, acesta
trebuie pãstrat împreunã cu maºina de spãlat
pentru a informa noul proprietar cu privire la
funcþionare ºi la respectivele avertismente.
Citiþi cu atenþie instrucþiunile: veþi gãsi informaþii
importante cu privire la instalare, folosire ºi
siguranþã.
Scoaterea din ambalaj ºi nivelarea
Scoaterea din ambalaj
1. Scoateþi din ambalaj maºina de spãlat.
2. Controlaþi ca maºina sã nu fii fost deterioratã pe
durata transportului. Dacã este deterioratã, nu o
conectaþi ºi luaþi legãtura cu cine v-a vândut-o.
3. Scoateþi cele 4
ºuruburi de protecþie
pentru transport ºi
cauciucul cu
respectivul distanþator,
situate în partea
posterioarã (a se vedea
figura).
4. Închideþi orificiile cu dopurile de plastic din dotare.
5. Pãstraþi toate piesele: pentru cazul în care
maºina de spãlat va trebui sã fie transportatã,
piesele vor trebui montante din nou.
Ambalajele nu constituie jucãrii pentru copii.
Nivelare
1. Instalaþi maºina de spãlat pe un plan rigid, fãrã a o
sprijini de ziduri, mobilã sau altceva.
2. Dacã podeaua nu este
perfect orizontalã,
compensaþi neregularitãþile
deºurubând sau
înºurubând picioruºele
anterioare (a se vedea
figura); unghiul de
înclinare, mãsurat pe
planul de lucru, nu trebuie
sã depãºeascã 2°.
O nivelare precisã conferã stabilitate maºinii ºi
evitã vibraþii, zgomote ºi deplasãri pe durata
funcþionãrii. În cazul mochetelor sau a unui covor,
reglaþi picioruºele astfel încât sã menþineþi sub
maºina de spãlat un spaþiu suficient pentru
ventilare.
Legãturi hidraulice ºi electrice
Conectarea furtunului de alimentare cu apã
1. Introduceþi garnitura A
în extremitatea
furtunului de alimentare
ºi înºurubaþi-l la un
robinet filetat de apã
rece(a se vedea figura).
Înainte de conectare,
lãsaþi apa sã curgã
pentru a se limpezi.
2. Conectaþi furtunul de
alimentare la maºina
de spãlat,
înºurubându-l la
respectiva prizã de
apã, în partea
posterioarã, sus, în
dreapta (a se vedea
figura).
3. Fiþi atenþi ca furtunul sã nu fie nici curbat, nici
îndoit.
Presiunea apei trebuie sã fie cuprinsã în valorile
tabelului Date tehnice (a se vedea pagina
alãturatã).
Dacã lungimea furtunului de alimentare nu este
suficientã, adresaþi-vã unui magazin specializat sau
unui tehnician autorizat.
Nu folosiþi furtunuri deja folosite.
Instalare
A
15
RO
Conectarea furtunului de evacuare
Conectaþi furtunul de
evacuare, fãrã a-l îndoi,
la o conductã de
evacuare sau la o gurã
de evacuare a apei,
situate între 65 ºi 100
cm de pãmânt;
sau sprijiniþi-l pe
marginea unei chiuvete
sau a unei cãzi, legând
ghidajul aflat în dotare,
de robinet (a se vedea
figura). Extremitatea
liberã a furtunului de
evacuare nu trebuie sã
rãmânã cufundatã în
apã.
Nu este recomandabilã folosirea furtunurilor de
prelungire; dacã este indispensabil, furtunul de
prelungire trebuie sã aibã acelaºi diametru cu furtunul
original ºi nu trebuie sã depãºeascã 150 cm.
Legãtura electricã
Înainte de a introduce ºtecherul în priza de curent,
asiguraþi-vã ca:
priza sã fie cu împãmântare ºi conform
prevederilor legale;
priza sã poatã suporta sarcina maximã de
putere a maºinii, indicatã în tabelul cu date
tehnice (a se vedea alãturi);
tensiunea de alimentare sã fie cuprinsã în
valorile indicate în tabelul cu date tehnice (a se
vedea alãturi);
priza sã fie compatibilã cu ºtecherul maºinii de
spãlat. În caz contrar, înlocuiþi priza sau
ºtecherul.
Maºina de spãlat nu trebuie instalatã afarã, nici
chiar în cazul în care spaþiul este adãpostit, deoarece
este foarte periculoasã expunerea maºinii la ploi ºi
furtuni.
Dupã instalarea maºinii de spãlat, priza de curent
trebuie sã fie uºor accesibilã.
Nu folosiþi prelungitoare ºi prize multiple.
Maºina nu funcþioneazã la temperaturi mai mici
de 16 grade.
Cablul nu trebuie sã fie îndoit sau comprimat.
Cablul de alimentare trebuie sã fie înlocuit doar
de tehnicieni autorizaþi.
Atenþie! Producãtorul îºi declinã orice
responsabilitate pentru cazul în care aceste norme
nu se respectã.
Primul program de spãlare
Dupã instalare, înainte de folosire, efectuaþi un
program de spãlare cu detergent ºi fãrã rufe,
selectând programul la 90°C, fãrã prespãlare.
65 - 100 cm
Date tehnice
Model
WIXE 127
Dimensiuni
lãrgime: 59,5 cm
înãlþime: 85 cm
profunzime: 53,5 cm
Capacitate
de la 1 la 6 kg
Legãturi electrice
vezi eticheta cu caracteristicile tehnice,
aplicatã pe maºinã
Legãturi hidrice
presiune maximã: 1 MPa (10 bari)
presiune minimã: 0,05 MPa (0,5 bari)
capacitatea cuvei: 52 litri
Turaþia de
centrifugare
pânã la 1200 de rotaþii pe minut
Programe de control
în baza normei
EN 60456
programul 2; temperatura 60°
C;
efectuatã cu 6 kg de rufe.
Acest aparat este conform cu
urmãtoarele Directive Comunitare:
- 89/336/CEE din data de 03/05/89
(Compatibilitate Electromagneticã) ºi
modificãri succesive
- 2002/96/CE
- 2006/95/CE (Tensiuni Joase)
Zgomot
(dB(A) re 1 pW)
Spãlare: 66
Turaþie de centrifugare: 77
16
RO
Panoul de control
Descrierea maºinii de spãlat
Selectorul
Display-ul
Sertarul detergenþilor
Butonul
Turaþie
CENTRIFUGARE
Butonul
TEMPERATURÃ
Butonul
PORNIRE/OPRIRE
Butonul
START/RESET
Sertarul detergenþilor este folosit pentru a încãrca
detergenþi ºi aditivi (a se vedea pag. 20).
Butonul Turaþie CENTRIFUGARE este folosit
pentru reglarea turaþiei de centrifugare pânã la
excluderea acesteia (a se vedea pag. 19).
Butonul DELAY TIMER este folosit pentru a
întârzia pornirea programului selectat cu maxim 24
de ore (a se vedea pag. 19).
Butonul TEMPERATURÃ este folosit pentru
modificarea temperaturii de spãlare (a se vedea
pag. 19).
Display-ul este folosit pentru programarea maºinii
de spãlat ºi efectuarea avansãrii programelor de
spãlare (a se vedea pagina alãturatã).
Taste FUNCÞIONARE: sunt folosite pentru a
selecta funcþiile disponibile. Butonul corespunzãtor
funcþiei selectate va rãmâne aprins.
Butonul START/RESET este folosit pentru pornirea
programelor sau anularea a ceea a fost selectat
greºit.
Butonul PORNIRE/OPRIRE este folosit pentru
pornirea ºi oprirea maºinii de spãlat.
Selectorul este folosit pentru alegerea
programelor.
Pe durata programului, selectorul rãmâne ferm.
Butonul
DELAY TIMER
Taste
FUNCÞIONARE
Note: Pentru a evita vibrarea excesivã, înainte de stoarcere, maºina va distribui cantitatea de rufe în mod
uniform, efectuând câteva rotaþii complete la o turaþie mai mare în raport cu turaþia de spãlare.
Dacã, dupã numeroase încercãri, maºina nu reuºeºte sã echilibreze încãrcãtura, stoarcerea rufelor se va
face la o turaþie mai micã decât cea prevãzutã de program.
Dacã dezechilibrul este prea mare (în cazul încãrcãrilor excesive), maºina va încerca sã redistribuie
încãrcãtura înainte de a efectua stoarcerea.
Aceste încercãri pot prelungi durata totalã a unui program cu maxim 10 minute.
17
RO
Display-ul
Acesta este un instrument util pentru programarea maºinii (a se vedea pag. 19), furnizând totodatã informaþii
cu privire la programul de spãlare.
Dupã apãsarea butonului START/RESET pentru a
porni programul, pe display este cronometratã
durata rezidualã pânã la iniþierea programului de
spãlare ales. În cazul în care aþi optat pentru
iniþierea programului de spãlare dupã un anumit
interval de timp (Delay Timer, a se vedea pag. 19),
aceasta va fi vizualizatã.
Hublou blocat:
Simbolul aprins indicã faptul cã hubloul este blocat pentru a împiedica deschideri accidentale.
Pentru a evita daunele ce pot deriva dintr-o funcþionare defectuoasã, este necesar sã aºteptaþi ca simbolul sã
se stingã înainte de a deschide hubloul.
La încheierea programului se vizualizeazã cuvântul END.
În caz de anomalie apare un cod de eroare, de exemplu: F-01, (a se vedea pag. 23).
Program MEMO
Acest program permite memorarea programului de spãlare preferat sau a celui mai utilizat.
Este suficient sã se selecteze programul dorit ºi, dupã pornire sã se roteascã SELECTORUL în dreptul
poziþiei
; automat programul va fi memorat iar pe display va apãrea scris MEMO intermitent timp de
câteva secunde.
Dupã aceea va fi posibilã pornirea unui program MEMO doar prin rotirea SELECTORULUI în dreptul poziþiei
; se vor putea vizualiza valorile de temperaturã/turaþie centrifugare/delay timer apãsând butoanele
corespunzãtoare; se vor putea chiar ºi modifica, însã aceastã variaþie va fi valabilã doar pentru programul în
curs ºi nu va fi memoratã în programul MEMO.
Dacã se doreºte memorarea unui nou program de spãlare, repetaþi operaþiile indicate mai sus.

18
RO
Tipul de þesãturã ºi gradul de
murdãrie
Programe
Tempe-
raturã
Detergent
Aditiv
înm uiere
Opþiune
An tipatã /
Decolorant
Durata
progra-
mului
(minute)
Descrierea programului de
spãlare
presp. spãl.
Standard
Bumbac:
Albe extrem de murdare
(cearceafuri, feþe de masã, etc.)
1
90°C
155
Presp ãlare, spãlare, clãtiri,
stoarce ri intermediare ºi finale
Bumbac:
Albe extrem de murdare
(cearceafuri, feþe de masã, etc.)
2
90°C
Delicatã /
Tradiþionale
150
Spãlare, clãtiri, stoarceri
intermediareºi
finale
Bumbac:
Albe ºi colorate rezistente
foarte murdare
2
60°C
Delicatã /
Tradiþionale
140
Spãlare, clãtiri, stoarceri
intermediareºi fin ale
Bumbac:
Albe ºi colorate rezistente
foarte murdare
2
40°C
Delicatã /
Tradiþionale
125
Spãlare, clãtiri, stoarceri
intermediareºi fin ale
Bumbac:
Albe puþin murdare ºi
culori delicate (cãmãºi, bluze, etc.)
3
40°C
Delicatã /
Tradiþionale
85
Spãlare, clãtiri, stoarceri
intermediareºi fin ale
Sintetice:
Culori rezistente foarte murdare
(
articole
pentru noi nãscuþi, etc.)
4
60
°C
Delicatã
83
Spãlare, clãtiri, antiºifonare sau
turaþie de
centrifugare delicatã
Sintetice:
Culori rezistente foarte murdare
(
articole
pentru noi nãscuþi, etc.)
4
40°C
Delicatã
70
Spãlare, clãtiri, antiºifonare sau
turaþie de
centrifugare delicatã
Lânã
5
40°C
50
Spãlare, clãtiri
,
ºi
turaþie de
centrifugare delicatã
Þesãturi foarte delicate
(perdele, mãtase, vâscozã, etc.)
6
30°C
45
Spãlare, clãtiri, antiºifonare sau
evacuare
Time 4 you
Bumbac:
Albe
ºi colorate rezistente
foarte murdare
7
60°C
60
Spãlare, clãtiri, stoarceri
intermediareºi fin ale
Bumbac:
Albe puþin
murdare ºi
culori delicate (cãmãºi, bluze, etc.)
8
40°C
50
Spãlare, clãtiri, stoarceri
intermediareºi fin ale
Sintetice:
Culori delicate (rufe de
toate tip urile puþin murd are)
9
40
°C
40
Spãlare, clãtiri
ºi
turaþie de
centrifugare delicatã
Sintetice:
Culori delicate (rufe de
toate tip urile puþin murd are)
10
30°C
30
Spãlare, clãtiri
ºi
turaþie de
centrifugare delicatã
Sport
Încãlþãminte sportiv ã
(
MAX 2 perechi.
)
11
30
°C
50
Spãlare la rece (fãrã detergent),
spãlare, clãti
r
i
ºi
turaþie de
centrifugare delicatã
Î
mbrãcãminte sportivã (Treninguri,
costume
gimnasticã, etc).
12
30°C
60
Spãlare, clãtiri,
turaþii de
centrifugare
intermediareºi fin ale
MEMO
Permite memorarea oricãrui tip de spãlare
PROGRAME PARÞIALE
Clãtire
Delicatã /
Tradiþionale
Clãtiri
ºi
turaþie de
centrifugare
Turaþia de c
entrifug are
Evacuare apã
ºi
turaþie de
centrifugare
Evacuare Evacuare
Pornire ºi Programe
Tabel de programe
Pe scurt: pornirea unui program
1. Porniþi maºina de spãlat apãsând butonul .
2. Introduceþi rufele ºi închideþi hubloul.
3. Selectaþi cu ajutorul selectorului programul dorit.
Pe display va apãrea durata estimatã.
Temperatura ºi turaþia de centrifugare se
selecteazã automat în baza programului (pentru
a le modifica, a se vedea pag. 19).
4. Selectaþi eventuale funcþii (a se vedea pag. 19).
5. Vãrsaþi detergenþii ºi aditivii(a se vedea pag. 20).
6. Porniþi programul apãsând butonul START/
RESET.
Pentru a-l anula, þineþi apãsat butonul START/
RESET timp de cel puþin 2 secunde.
7. La încheierea programului va apãrea scris END.
Scoateþi rufele ºi lãsaþi hubloul întredeschis
pentru a se putea usca cuva.
8. Opriþi maºina de spãlat apãsând butonul
.
Note
-Pentru programele 7 - 8 este recomandabil sã nu se depãºeascã o cantitate de rufe de 3,5 kg.
-Pentru programul 12 este recomandabil sã nu se depãºeascã o cantitate de rufe de 2 kg.
-Antiºifonare-a se vedea calcã mai uºor, pagina alãturatã. Datele specificate în tabel au valoare indicativã.
Program special
Zilnic 30 (programul 10 pentru materiale sintetice) este studiat pentru a spãla rufe puþin murdare într-un
interval scurt de timp: dureazã doar 30 de minute, economisindu-se totodatã energie ºi timp. Selectând
programul (10 la 30°C) este posibilã spãlarea împreunã a þesãturilor de diverse tipuri (excluse lâna ºi
mãtasea) cu o încãrcãturã maximã de 3 kg. Se recomandã folosirea detergentului lichid.
(vezi pag. 17).
 Loading...