


Instructions for use
Washer-dryer
GB ES HU
English,1 Español,13 Magyar,25
BG CIS UA
Български,37 Русский,49 Українська,61
KZ
ҚАЗАҚША,73
!  This symbol reminds you to read this GB instruction manual.
Contents
Installation, 2-3
Unpacking and levelling
Connecting the electricity and water supplies
The first wash cycle
Technical data
Care and maintenance, 4
Cutting off the water or electricity supply
Cleaning the Washer-dryerCleaning the detergent dispenser drawer
Caring for the door and drum of your appliance Cleaning the pump
Checking the water inlet hose
XWDA 751680
Precautions and tips, 5
General safety
Load balancing system
Disposal
Description of the Washer-dryer and starting a wash cycle, 6-7
Control panel Indicator lights Starting a wash cycle
Wash cycles, 8
Push&Wash+Dry
Table of wash cycles
Personalisation, 9
Setting the temperature
Setting the drying cycle
Wash options
Detergents and laundry, 10
Detergent dispenser drawer
Bleach cycle
Preparing the laundry
Garments requiring special care
Troubleshooting, 11
Service, 12
1

Installation
! This instruction manual should be kept in a GB safe place for future reference. If the Washerdryer is sold, transferred or moved, make sure
that the instruction manual remains with the machine so that the new owner is able to familiarise himself/herself with its operation and features.
! Read these instructions carefully: they contain vital information relating to the safe installation and operation of the appliance.
Unpacking and levelling
Unpacking
1.Remove the Washer-dryer from its packaging.
2.Make sure that the Washer-dryer has not been damaged during the transportation process. If it has been damaged, contact the retailer and do not proceed any further with the installation process.
3.Remove the 4 pro-
tective screws (used during transportation) and the rubber washer with the corresponding spacer, located on the rear part of the appliance (see figure).
4.Close off the holes using the plastic plugs provided.
5.Keep all the parts in a safe place: you will need them again if the Washer-dryer needs to be moved to another location.
! Packaging materials should not be used as toys for children.
Levelling
1. Install the Washer-dryer on a flat sturdy floor, without resting it up against walls, furniture cabinets or anything else.
2. If the floor is not perfectly level, compensate for any unevenness by tightening or loosening the adjustable front feet (see figure); the angle of inclination, measured in relation to the worktop, must not exceed 2°.
Levelling the machine correctly will provide it with stability, help to avoid vibrations and excessive noise and prevent it from shifting
while it is operating. If it is placed on carpet or a rug, adjust the feet in such a way as to allow a sufficient ventilation space underneath the Washer-dryer.
Connecting the electricity and water supplies
Connecting the water inlet hose
1. Connect the inlet hose by screwing it to a cold water tap using a 3/4 gas threaded connection (see figure).
Before performing the connection, allow the water to run freely until it is perfectly clear.
2. Connect the inlet hose to the Washerdryer by screwing it onto the corresponding water inlet of the appliance, which is situated on the top right-hand side of the rear part of the appliance (see figure).
3. Make sure that the hose is not folded over or bent.
!The water pressure at the tap must fall within the range of values indicated in the Technical data table (see next page).
!If the inlet hose is not long enough, contact a specialised shop or an authorised technician.
!Never use second-hand hoses.
!Use the ones supplied with the machine.
2
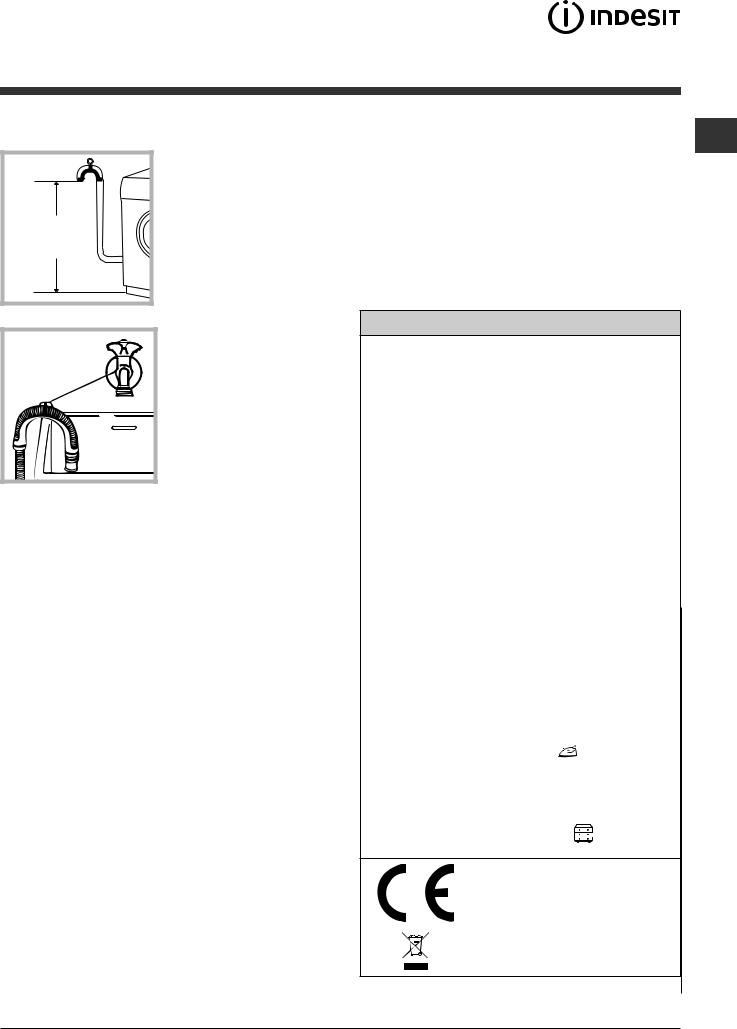
Connecting the drain hose
65 - 100 cm |
Connect the drain hose, without bending it, to a drain duct or a wall drain situated between 65 and 100 cm from the floor;
alternatively, placed it over the edge of a basin, sink or tub, fastening the duct supplied to the tap (see figure). The free end of the hose should not be underwater.
! We advise against the use of hose extensions; if it is absolutely necessary, the extension must have the same diameter as the original hose and must not exceed 150 cm in length.
Electrical connections
Before plugging the appliance into the electricity socket, make sure that:
•the socket is earthed and complies with all applicable laws;
•the socket is able to withstand the maximum power load of the appliance as indicated in the Technical data table (see opposite);
•the power supply voltage falls within the values indicated in the Technical data table (see
opposite);
• the socket is compatible with the plug of the Washer-dryer. If this is not the case, replace the socket or the plug.
!The Washer-dryer must not be installed outdoors, even in covered areas. It is extremely dangerous to leave the appliance exposed to rain, storms and other weather conditions.
!When the Washer-dryer has been installed, the electricity socket must remain within easy reach.
!Do not use extension cords or multiple sockets.
!The cable should not be bent or compressed.
!The power supply cable must only be replaced by authorised technicians.
Warning! The company shall not be held responsible in the event that these standards are GB not observed.
The first wash cycle
Once the appliance has been installed, and before you use it for the first time, run a wash cycle with detergent and no laundry, using the wash cycle “Auto Clean” (see “Cleaning the Washer-dryer”).
Technical data
Model |
XWDA 751680 |
||
|
width 59.5 cm |
|
|
Dimensions |
height 85 cm |
|
|
|
depth 54 cm |
|
|
|
from 1 to 7 kg for wash |
||
Capacity |
programme |
|
|
from 1 to 5 kg for the drying |
|||
|
|||
|
programme |
|
|
Electrical |
please refer to the technical |
||
connections |
data plate fixed to the machine |
||
|
|
||
|
maximum pressure |
||
Water con- |
1 MPa (10 bar) |
||
minimum pressure |
|||
nections |
0.05 MPa (0.5 bar) |
||
|
drum capacity 52 litres |
||
Spin speed |
up to 1600 rotations per |
||
minute |
|
||
|
wash: programme 8; tem- |
||
|
perature 60°C; using a load |
||
|
of 7 kg. |
|
|
Energy ra- |
drying: the smaller load |
||
ted |
(2kg) must be dried by se- |
||
programmes |
lecting the “ |
” dryness le- |
|
according to |
vel. The load must consist of |
||
regulation |
2 sheets, 1 pillowcase and 2 |
||
EN 50229 |
hand towels; the remainder |
||
|
of the load must be dried by |
||
|
selecting the “ |
” dryness |
|
|
level. |
|
|
This appliance conforms to the following EC Directives:
-2004/108/EC (Electromagnetic Compatibility)
-2006/95/EC (Low Voltage)
- 2012/19/EU
3
Care and maintenance
|
Cutting off the water and electricity |
|
GB |
||
supplies |
||
|
• Turn off the water tap after every wash cycle. |
|
|
This will limit wear on the hydraulic system |
|
|
inside the Washer-dryer and help to prevent |
|
|
leaks. |
|
|
• Unplug the Washer-dryer when cleaning it |
|
|
and during all maintenance work. |
Cleaning the Washer-dryer
•The outer parts and rubber components of the appliance can be cleaned using a soft cloth soaked in lukewarm soapy water. Do not use solvents or abrasives.
•The Washer-dryer has a “Auto Clean” programme for its internal parts that must be run
with no load in the drum.
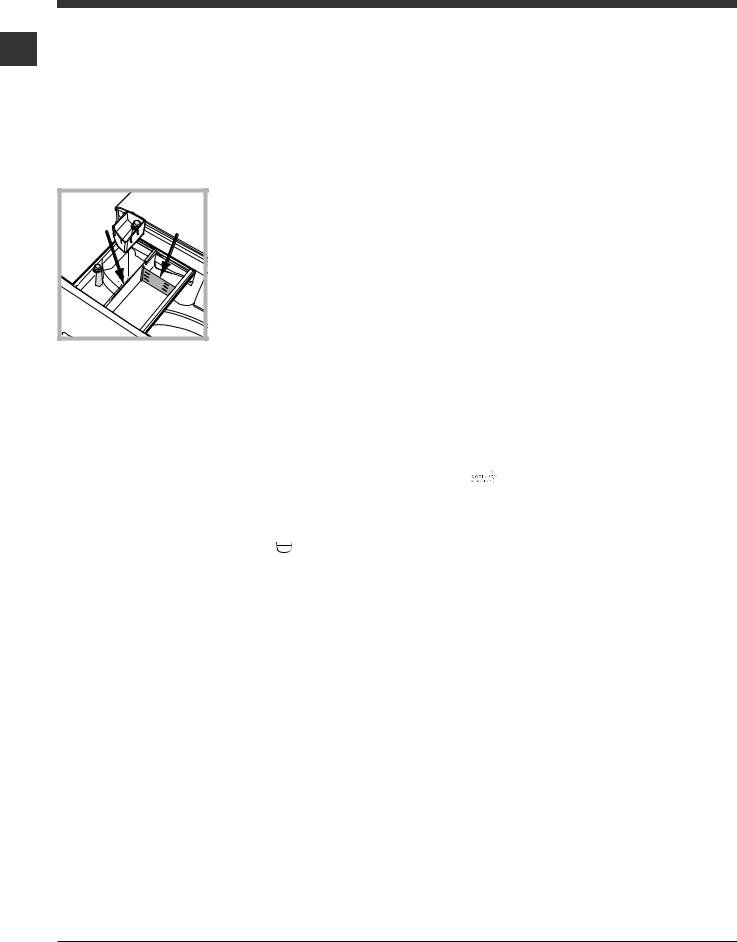
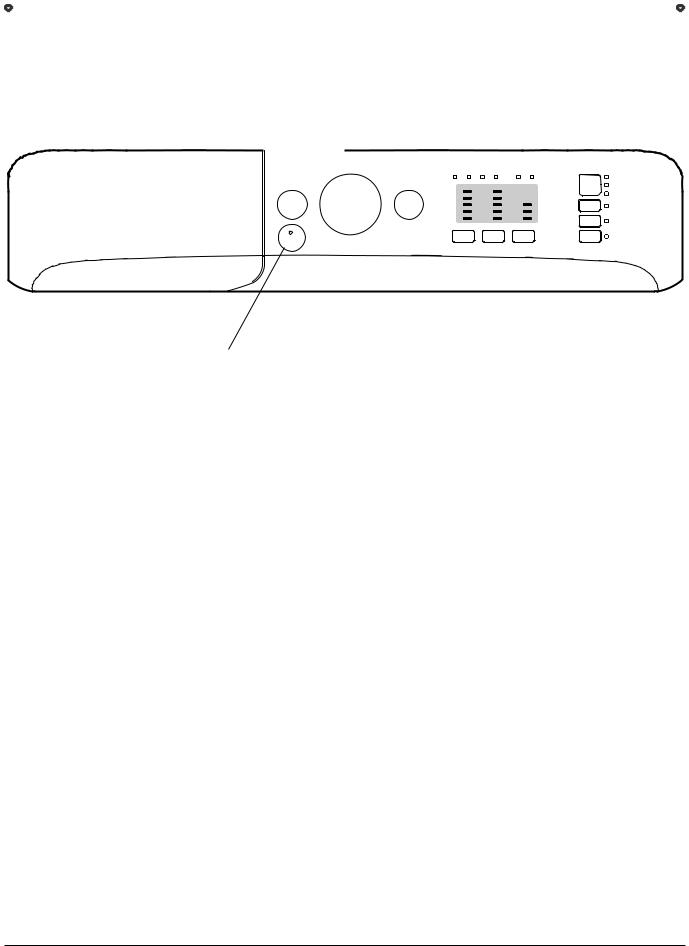
For maximum performance you may want to use either the detergent (i.e. a quantity 10% the quantity specified for lightly-soiled garments) or special additives to clean the Wa- sher-dryer. We recommend running a cleaning programme every 40 wash cycles.
To start the programme press buttons A and B simultaneously for 5 seconds (see figure). The programme will start automatically and will last approximately 70 minutes. To stop the cycle press the START/PAUSE button.
A
B
Caring for the door and drum of your appliance
•Always leave the porthole door ajar in order to prevent unpleasant odours from forming.
Cleaning the pump
The Washer-dryer is fitted with a self-cleaning pump which does not require any maintenance. Sometimes, small items (such as coins or buttons) may fall into the protective pre-cham- ber at the base of the pump.
! Make sure the wash cycle has finished and unplug the appliance.
To access the pre-chamber:
1 |
|
2 |
3 |
|
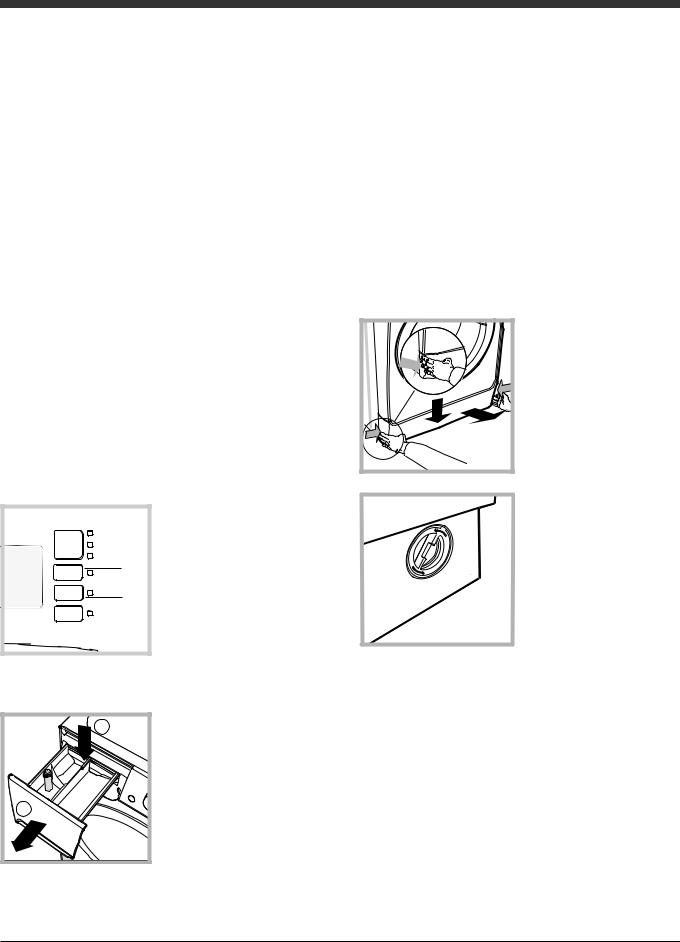
1. Take off the cover panel on the front of the machine by first pressing it in the centre and then pushing downwards on both sides until you can remove it (see figures).
2. Unscrew the lid by rotating it anticlockwise (see figure): a little water may trickle out. This is perfectly normal.
Cleaning the detergent dispenser drawer
|
1 |
To remove the drawer, |
|
press lever (1) and pull |
|
|
|
|
|
|
the drawer outwards |
|
|
(2) (see figure). |
|
|
Wash it under running |
2 |
|
water; this procedure |
|
should be repeated |
|
|
|
|
|
|
frequently. |
3.Clean the inside thoroughly.
4.Screw the lid back on.
5.Reposition the panel, making sure the hooks are securely in place before you push it onto the appliance.
Checking the water inlet hose
Check the inlet hose at least once a year. If there are any cracks, it should be replaced immediately: during the wash cycles, water pressure is very strong and a cracked hose could easily split open.
! Never use second-hand hoses.
4

Precautions and tips
! This washer-dryer was designed and constructed in accordance with international safety regulations. The following information is provided for safety reasons and must therefore be read carefully.
General safety
•This appliance was designed for domestic use only.
•This appliance can be used by children aged
from 8 years and above and persons with reduced physical, sensory or mental capabilities or lack of experience and knowledge if they have been given supervision or instruction concerning use of the appliance in a safe way and understand the hazards involved. Children shall not play with the appliance. Cleaning and user maintenance shall not
be made by children without supervision.
–Do not dry unwashed items in the tumble dryer.
–Items that have been soiled with substances such as cooking oil, acetone, alcohol, petrol, kerosene, spot removers, turpentine, waxes and wax removers should be washed in hot water with an extra amount of detergent before being dried in the tumble dryer.
–Items such as foam rubber (latex foam), shower caps, waterproof textiles, rubber backed articles and clothes or pillows fitted with foam rubber pads should not be dried in the tumble dryer.
–Fabric softeners, or similar products, should be used as specified by the fabric softener instructions.
–The final part of a tumble dryer cycle occurs without heat (cool down cycle) to ensure that the items are left at a temperature that ensures that the items will not be damaged.
WARNING: Never stop a tumble dryer before the end of the drying cycle unless all items are quickly removed and spread out so that the heat is dissipated.
•Do not touch the machine when barefoot or with wet or damp hands or feet.
•Do not pull on the power supply cable when unplugging the appliance from the electricity socket. Hold the plug and pull.
•Do not open the detergent dispenser drawer while the machine is in operation.
•Do not touch the drained water as it may reach extremely high temperatures.
•Never force the porthole door. This could damage the safety lock mechanism designed to prevent accidental opening.
•If the appliance breaks down, do not under any circumstances access the internal mechanisms in an attempt to repair it yourself.
• Always keep children well away from the appliance while |
GB |
|
it is operating. |
||
|
•The door can become quite hot during the wash cycle.
•If the appliance has to be moved, work in a group of two or three people and handle it with the utmost care. Never try to do this alone, because the appliance is very heavy.
•Before loading laundry into the washer-dryer, make sure the drum is empty.
•During the drying phase, the door tends to get quite hot.
•Do not use the appliance to dry clothes that have been washed with flammable solvents (e.g. trichlorethylene).
•Do not use the appliance to dry foam rubber or similar elastomers.
•Make sure that the water tap is turned on during the drying cycles.
•Children of less than 3 years should be kept
away from the appliance unless continuously supervised.
•Remove all objects from pockets such as lighters and matches.
Load balancing system
Before every spin cycle, to avoid excessive vibrations and to distribute the load in a uniform manner, the drum rotates continuously at a speed which is slightly greater than the washing rotation speed. If, after several attempts, the load is not balanced correctly, the machine spins at a reduced spin speed. If the load is excessively unbalanced, the Washer-dryer performs the distribution process instead of spinning. To encourage improved load distribution and balance, we recommend small and large garments are mixed in the load.
Disposal
•Disposing of the packaging materials: observe local regulations so that the packaging may be re-used.
•The European Directive 2012/19/EU on Waste Electrical and Electronic Equipment, requires that old household electrical appliances must not be disposed of in the normal unsorted municipal waste stream. Old appliances must be collected separately in order to optimise the recovery and recycling of the materials they contain and reduce the impact on human health and the environment. The crossed out “wheeled bin” symbol on the product reminds you of your obligation, that when you dispose of the appliance it must be separately collected.
Consumers should contact their local authority or retailer for information concerning the correct disposal of their old appliance.
5

Description of the Washer-dryer and starting a wash cycle
|
|
|
|
|
|
|
|
|
|
|
|
|
|
|
|
|
|
|
Control panel |
|
|
|
|
|
|
|
|
|
|
|
|
|
|
GB |
|
|
WASH CYCLE PROGRESS |
OPTION |
||||||||||||
|
|
|
|
|
||||||||||||
|
|
|
|
|
|
indicator lights |
|
|
|
|
||||||
|
|
|
|
|
|
|
|
|
|
|||||||
|
|
|
|
|
|
|
buttons with |
|||||||||
|
|
|
|
|
|
|
|
|
|
|
|
|
|
|||
|
|
|
|
|
|
|
|
|
|
|
|
|
|
indicator lights |
||
|
|
ON/OFF |
START/PAUSE |
|
|
|
|
|
|
|
DOOR |
|
|
|
||
|
|
|
|
|
|
|
|
|
|
|
|
|||||
|
|
|
|
|
|
|
|
|
|
|
|
|||||
|
|
button with indicator |
|
|
|
|
|
|
|
LOCKED |
|
|
|
|||
|
|
button |
|
light |
|
|
|
|
|
|
|
indicator light |
|
|
|
|
|
|
|
|
|
|
|
|
|
|
|
|
|
|
|
||
|
|
|
|
|
|
|
|
|
|
|
|
|
|
|
|
|
|
|
|
|
|
|
|
|
|
|
|
|
|
|
|
|
|
|
|
|
|
|
|
|
|
|
|
|
|
|
|
|
|
|
|
|
|
|
|
|
|
|
|
|
|
|
|
|
|
|
|
|
|
|
|
|
|
|
|
|
|
|
|
|
|
|
|
|
|
|
|
|
|
|
|
|
|
|
|
|
|
|
|
|
|
|
|
|
|
|
|
|
|
|
|
|
|
|
|
|
|
|
|
|
|
|
|
|
|
|
|
|
|
|
|
|
|
|
|
|
|
WASH CYCLE |
|
|
|
|
LEVEL-BASED |
|
|
|
|
|
|
||
Detergent dispenser drawer |
|
TEMPERATURE |
|
|
DRYING |
||
|
|
knob |
|
button |
|
|
button |
|
|
|
|
||||
|
PUSH&WASH+DRY |
|
|
|
TIME-BASED |
||
|
button |
|
|
|
|
DRYING |
|
|
|
|
|
|
|
button |
|
Detergent dispenser drawer: used to dispense detergents and washing additives (see “Detergents and laundry”).
ON/OFF button: switches the Washer-dryer on and off.
PUSH&WASH+DRY button: (see “Wash cycles”).
WASH CYCLE knob: programmes the wash cycles. During the wash cycle, the knob does not move.
OPTION buttons with indicator light: used to select the available functions. The indicator light corresponding to the selected function will remain lit.
TEMPERATURE button: sets the temperature or the cold wash cycle (see “Personalisation”).
TIME-BASED DRYING button: press to select the desired drying time. The selected drying time is shown bythe indicator lights above.
LEVEL-BASED DRYING button: press to select the desired drying level. The selected drying level is shown by the indicator lights above.
WASH CYCLE PROGRESS indicator lights: used to monitor the progress of the wash cycle.
The illuminated indicator light shows which phase is in progress.
DOOR LOCKED indicator light: indicates whether the door may be opened or not (see next page).
START/PAUSE button with indicator light: starts or temporarily interrupts the wash cycles.
N.B. To pause the wash cycle in progress, press this button; the corresponding indicator light will flash orange, while the indicator light for the current wash cycle phase will remain lit in a fixed manner. If the DOOR LOCKED  indicator light is switched off, the door may be opened (wait approximately 3 minutes).
To start the wash cycle from the point at which it was interrupted, press this button again.
Standby mode
This Washer-dryer, in compliance with new energy saving regulations, is fitted with an automatic standby system which is enabled after about 30 minutes if no activity is detected. Press the ON-OFF button briefly and wait for the machine to start up again.
Consumption in off-mode: 0,5 W Consumption in Left-on: 8 W
6
Indicator lights
The indicator lights provide important information. This is what they can tell you:
Wash cycle phase indicator lights
Once the desired wash cycle has been selected and has begun, the indicator lights switch on one by one to indicate which phase of the cycle is currently in progress.
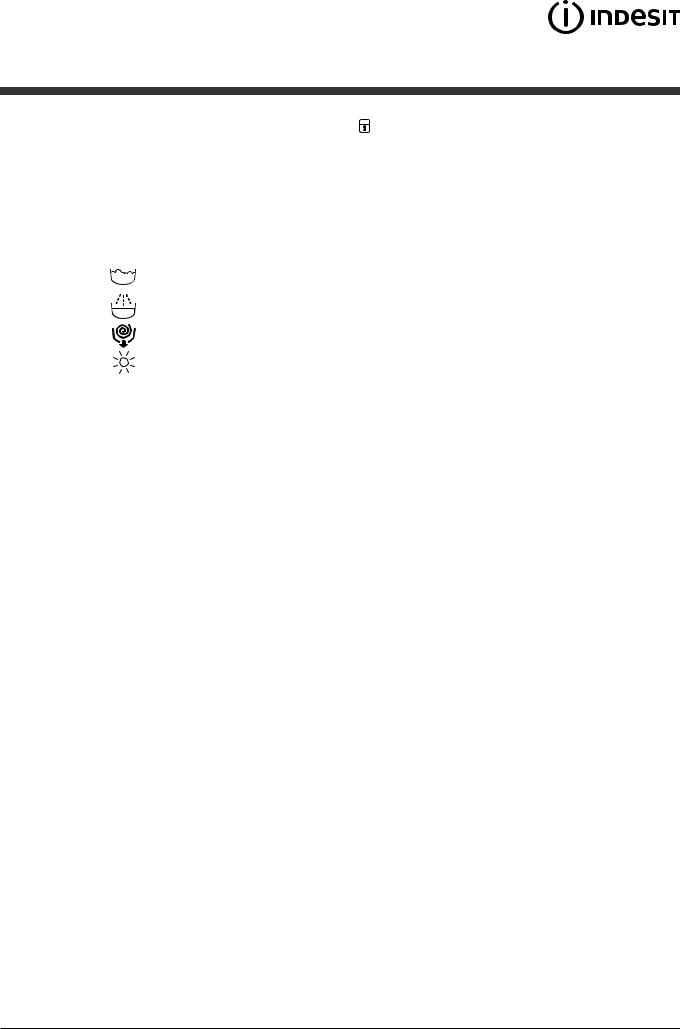
Wash
Rinse
Spin/Drain
Drying
End of wash cycle END
Function buttons and corresponding indicator lights
When a function is selected, the corresponding indicator light will illuminate.
If the selected function is not compatible with the programmed wash cycle, the corresponding indicator light will flash and the function will not be activated.
If the selected option is not compatible with another previously selected option, the indicator light will flash accompanied by a buzzer (3 beeps), and only the latter option will be activated; the indicator light corresponding to the activated option will turn on.
Starting a wash cycle
Rapid programming
1.LOAD THE LAUNDRY. Open the porthole door. Load the laundry, making sure you do not exceed the maximum load value indicated in the table of programmes and wash cycles on the following page.
2.ADD THE DETERGENT. Pull out the detergent dispenser drawer and pour the detergent into the relevant compartments as described in “Detergents and laundry”.
3.CLOSE THE DOOR.
4.Press the “Push&Wash+Dry” button to start the programme.
Traditional programming
1. Turn the Washer-dryer on by pressing the ON/OFF button. All the indicator lights will turn on for a few seconds, then only the indicator lights relative to the selected programme settings will remain lit and the START/PAUSE indicator light will flash.
Door locked indicator light |
GB |
|
When the indicator light is on, the porthole door is locked |
||
|
||
to prevent it from being opened; make sure the indicator |
|
|
light is off before opening the door (wait approximately 3 |
|
|
minutes). |
|
|
To open the door during a running wash cycle, press the |
|
|
START/PAUSE button; the door may be opened once the |
|
|
DOOR LOCKED indicator light turns off. |
|
2.Load the laundry and close the door.
3.Set the WASH CYCLE knob to the desired programme.
4.Set the washing temperature (see “Personalisation”).
5.Set the drying cycle if necessary (see “Personalisation”).
6.Measure out the detergent and washing additives (see “Detergents and laundry”).
7.Select the desired functions.
8.Start the wash cycle by pressing the START/PAUSE button and the corresponding indicator light will remain lit in a fixed manner in green. To cancel the set wash cycle, pause the machine by pressing the START/PAUSE button and select a new cycle.
9.At the end of the wash cycle the END indicator light
will switch on. The door can be opened once the DOOR LOCK  indicator light turns off (wait approximately 3 minutes). Take out your laundry and leave the appliance door ajar to make sure the drum dries completely. Switch the Washer-dryer off by pressing the ON/OFF button.
7
Wash cycles
|
|
|
|
|
|
Push&Wash+Dry |
|
GB |
|||
|
This function makes it possible to start an automatic wash and drying cycle either when the machine is off without having to |
||
|
|
||
|
|
press the ON/OFF button in advance, or after switching on the machine without having activated any button and/or selector |
|
|
|
(otherwise the Push&Wash+Dry function will be deactivated). To start the Push&Wash+Dry cycle press and hold the button |
|
|
|
for 2 seconds. The indicator lights up to show that the cycle has started. The wash and drying cycle is ideal for cotton or |
|
|
|
synthetic fabrics, as it washes them at a temperature of 30° and a maximum spin speed of 1000 rpm. During the drying |
|
|
|
cycle the maximum temperature is 60°C. At the end of the cycle the residual humidity will be the same as for the “ ” level. |
|
|
|
Max recommended load 2,5 kg. (Cycle duration 210’). |
How does it work?
1.Load the laundry (cotton and/or synthetic garments) and close the door.
2.Pour the detergent and/or additives.
3.Start the cycle by pressing and holding the Push&Wash+Dry button for 2 seconds. The relevant indicator light will turn green and the door will lock (the DOOR LOCKED symbol is lit).
NB: starting the cycle through the Push&Wash+Dry button activates an automatic non-customisable wash and drying cycle recommended for cotton and synthetic fabrics.
4.The automatic cycle can be used only for washing, excluding the drying phase. Press the Push&Wash+Dry button and
then the drying button  : the drying icon of the “
 ” level will switch off. Maximum load for washing-only is 3,5 kg (Cycle duration 50’). The cycle cannot be customised further.
To open the door while an automatic cycle is under way, press the START/PAUSE button. If the DOOR LOCKED symbol is off, the door may be opened only during the washing phase. Press the START/PAUSE button again to restart the wash cycle from the point at which it was interrupted.
5.Once the programme is finished, the END indicator light turns on.
Table of wash cycles
cycles |
Description of the wash cycle |
|
Wash |
||
|
||
|
Special |
|
|
||
1 |
Sport |
|
2 |
Dark |
3Anti-odour (Cotton)
3Anti-odour (Synthetic)
4 |
Delicate |
5 |
Wool: for wool, cashmere, etc. |
6 |
Rapid 30’ |
Standard
Max. |
Max. |
Drying |
Maximumload dryingfor(Kg) |
temp. |
speed |
|
|
(°C) |
(rpm) |
|
|
|
|
|
|
30° |
600 |
|
3 |
30° |
800 |
|
2,5 |
60° |
1000 |
|
3,5 |
40° |
1000 |
|
3 |
30° |
0 |
|
1 |
40° |
800 |
|
1,5 |
30° |
800 |
|
3 |
|
Detergents |
|
Maximum load for washing (Kg) |
Duration of wash cycle |
||
|
|
|
|
|
||
Prewash |
Wash |
Fabric softener |
|
Bleach |
||
- |
|
|
- |
|
55’ |
|
|
|
|
3,5 |
|||
- |
|
|
|
- |
4 |
70’ |
- |
|
|
|
- |
3,5 |
110’ |
- |
|
|
|
- |
3,5 |
100’ |
- |
|
|
|
- |
1 |
80’ |
- |
|
|
|
- |
1,5 |
70’ |
- |
|
|
|
- |
3 |
30’ |
7 |
Cottons with Pre-wash: extremely soiled whites. |
90° |
1600 |
|
5 |
|
|
|
- |
7 |
170’ |
8 |
Cotton Standard 60° (1): heavily soiled whites and resistant colours. |
60° |
1600 |
|
5 |
- |
|
|
- |
7 |
170’ |
(Max. 90°) |
|||||||||||
9 |
Synthetic: heavily soiled resistant colours. |
60° |
800 |
|
3 |
- |
|
|
- |
3,5 |
110’ |
10 |
Coloured (2) |
40° |
1600 |
|
5 |
- |
|
|
- |
7 |
100’ |
11 |
Eco Cotton 20°: lightly soiled whites and delicate colours. |
20° |
1600 |
|
5 |
- |
|
|
- |
7 |
170’ |
12 |
Eco Synthetic |
20° |
800 |
|
5 |
- |
|
|
- |
7 |
120’ |
|
Automatic |
|
|
|
|
|
|
|
|
|
|
13 |
Wash&Dry 45’ |
30° |
1600 |
|
1 |
- |
|
|
- |
1 |
45’ |
14 |
AirFresh |
- |
- |
|
1,5 |
- |
- |
- |
- |
- |
30’ |
|
Partials |
|
|
|
|
|
|
|
|
|
|
|
Rinse/Bleach |
- |
1600 |
|
5 |
- |
- |
|
|
7 |
50’ |
|
Spin + Drain |
- |
1600 |
|
5 |
- |
- |
- |
- |
7 |
10’ |
|
|
|
|
|
|
|
|
|
|
|
|
The length of cycle shown on the display or in this booklet is an estimation only and is calculated assuming standard working conditions. The actual duration can vary according to factors such as water temperature and pressure, the amount of detergent used, the amount and type of load inserted, load balancing and any wash options selected.
For all Test Institutes:
1)Test wash cycle in compliance with regulation EN 50229: select wash cycle 8 with a temperature of 60°C.
2)Long wash cycle for cottons: select wash cycle 10 with a temperature of 40.
8

Personalisation
|
|
|
|
Setting the temperature |
|
||
GB |
|||
Press the TEMPERATURE button to set the wash temperature (see Table of wash cycles). |
|||
|
|||
The temperature may be lowered, or even set to a cold wash . The Washer-dryer will automatically prevent you from selec- |
|
||
ting a temperature which is higher than the maximum value set for each wash cycle. |
|
||
! Exception: if the 8 programme is selected, the temperature can be increased up to a value of 90°C. |
|
||
Setting the drying cycle
Table of drying times (guideline values)
Two different types of drying are possible: time-based and |
|
|
|
|
|
|
|||
|
|
Max. |
Cupboard |
Hanger |
Iron |
||||
level-based. |
|
Fabric |
Load type |
||||||
Press the TIME-BASED DRYING button |
to set the desired |
type |
load |
|
|
|
|||
|
(kg) |
|
|
|
|||||
drying duration: 40’- 90’- 120’ - 150’- 180’. |
|
|
|
|
|
||||
|
|
|
|
|
|
||||
|
Clothing of different |
|
|
|
|
||||
When the button is pressed for the first time, the selected time |
Cotton |
5 |
250 |
210 |
190 |
||||
sizes, Terry towels |
|||||||||
will be the minimum time allowed for the set cycle. |
|
|
|
|
|
||||
|
|
|
|
|
|
||||
Synthe- |
Sheets, Shirts, Py- |
|
|
|
|
||||
When the machine has started the drying phase, press the TI- |
3 |
180 |
130 |
115 |
|||||
ME-BASED DRYING button again to reduce the drying duration |
tics |
jamas, socks, etc. |
|||||||
|
|
|
|
||||||
that was set previously. The indicator lights will show the new |
Wool |
Knitwear, Pullovers. |
1,5 |
155 |
135 |
115 |
|||
drying duration selected and the time remaining will consider |
etc. |
||||||||
|
|
|
|
|
|||||
the time that has elapsed. |
|
|
|
|
|
|
|
||
Press the LEVEL-BASED DRYING button |
to set the desired drying level: |
|
|
|
|
||||
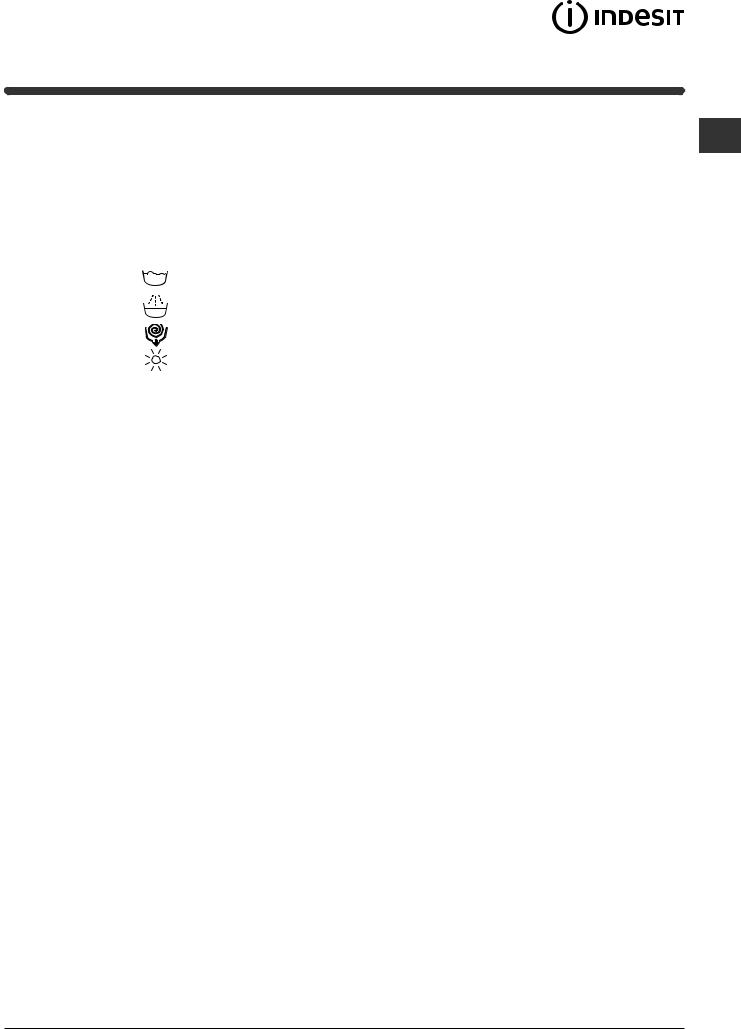
Cupboard |
: suitable for laundry which can be put back in a cupboard without being ironed. |
|
|
|
|||||
Hanger |
: ideal for clothes which do not need to be dried fully. |
|
|
|
|
|
|
||
Iron  : suitable for clothes which will need ironing afterwards. the remaining dampness softens creases, making them easier to remove.
If your laundry load to be washed and dried is much greater than the maximum stated load (see adjacent table of wash cycles), perform the wash cycle, and when the cycle is complete, divide the garments into groups and put some of them back in the drum. At this point, follow the instructions provided for a “Drying only” cycle. Repeat this procedure for the remainder of the load. A cooling-down period is always added to the end of each drying cycle.
Note: if all the drying indicator lights are off, the machine will not perform the drying cycle.
Drying only
Press button 
 to perform the drying-only cycle. After selecting the desired cycle (compatible with the type of garments), press button
 to exclude the washing phase and start the drying phase at the maximum level for the selected cycle. The drying level and duration can be set and changed by pressing the drying buttons
  ,
, 
 .
.
(Not compatible with cycles 13 and 14).
Wash options
The various wash options available with this Washer-dryer will help to achieve the desired results, every time. To activate the functions:
1.Press the button corresponding to the desired function;
2.the function is enabled when the corresponding indicator light is illuminated.
Note:
-If the selected function is not compatible with the programmed wash cycle, the corresponding indicator light will flash and the function will not be activated.
-- If the selected option is not compatible with another previously selected option, the indicator light will flash accompanied by a buzzer (3 beeps), and only the latter option will be activated; the indicator light corresponding to the activated option will turn on.
 Stain removal
This option allows for selecting the type of dirt so as to optimally adjust the cycle for removing the stains. The following types of dirt can be selected:
- Food, for stains caused by foodstuffs and beverages, for example.
- Work, for grease and ink stains, for example.
-  Outdoor, for mud and grass stains, for example.
! The wash cycle duration varies according to the type of selected dirt.
Press this button to reduce the spin speed.
 Extra Rinse
By selecting this option, the efficiency of the rinse is increased and optimal detergent removal is guaranteed. It is particularly useful for sensitive skin.
9
Detergents and laundry
Detergent dispenser drawer
GB Successful washing results also depend on the correct dose of detergent: adding too much detergent will not necessarily result in a more efficient wash, and may in fact cause build up on the inside of your appliance and contribute to environmental pollution.
!Do not use hand washing detergents because these create too much foam.
!Use powder detergent for white cotton garments, for prewashing, and for washing at temperatures over 60°C.
!Follow the instructions given on the detergent packaging.
|
|
|
Open the detergent dispen- |
|
|
|
ser drawer and pour in the |
B 4 |
|
A |
detergent or washing additi- |
|
|
|
ve, as follows. |
|
1 |
|
Compartment 1: Pre-wa- |
3 |
|
|
sh detergent (powder) |
2 |
|
Before pouring in the deter- |
|
|
|
gent, make sure that extra |
|
|
|
|
compartment 4 has been |
|
|
|
removed. |
Compartment 2: Washing detergent (powder or liquid)
If liquid detergent is used, it is recommended that the removable plastic partition A (supplied) be used for proper dosage. If powder detergent is used, place the partition into slot B.
Compartment 3: Additives (fabric softeners, etc.)
The fabric softener must not exceed the “max” level indicated on the central pin.
Extra compartment 4: Bleach
Bleach cycle
Insert the additional compartment 4 (provided) into compartment 1. In pouring the bleach do not exceed the “max” level indicated on the central pin.
Perform bleaching by pouring the bleach into additional compartment 4 and set the programme 

 .
.
! Traditional bleach should be used on resistant white fabrics, and delicate bleach for coloured and synthetics fabrics and for wool.
Preparing the laundry
•Divide the laundry according to:
-the type of fabric/the symbol on the label
-the colours: separate coloured garments from whites.
•Empty all garment pockets and check the buttons.
•Do not exceed the values listed in the “Table of wash cycles”, which refer to the weight of the laundry when dry.
How much does your laundry weigh?
1 sheet 400-500 g
1 pillow case 150-200 g
1 tablecloth 400-500 g
1 bathrobe 900-1.200 g
1 towel 150-250 g
Garments requiring special care
Sport (programme 1) is designed for washing lightly soiled sports clothing (tracksuits, shorts, etc.); for best results, we recommend not exceeding the maximum load indicated in the “Table of wash cycles”. We recommend using liquid detergent, and adding the amount suitable for a half-load. Dark: use programme 2 to wash dark-coloured garments. This programme is designed to maintain dark colours over time. We recommend using a liquid detergent for the best results when washing dark-coloured garments.
When you select the drying function, at the end of the washing cycle the machine will automatically perform a delicate drying cycle that preserves the colours of the garments. The display will show the level “ ”.
”.
Max. load: 2,5 kg.
Anti-odour: use programme 3 for washing garments with bad odours (e.g. smoke, sweat, fried food). The programme is designed to remove bad odours while preserving the fabric fibres. Synthetics fabrics or mixed loads should be washed at 40°, and resistant cotton fabrics at 60°. Delicate: use programme 4 to wash very delicate garments. It is advisable to turn the garments inside out before washing them. For best results, use liquid detergent on delicate garments.
When selecting an exclusively time-based drying function, a drying cycle is performed at the end of the wash cycle that is particularly delicate, thanks to light handling and appropriate temperature control of the water jet.
The recommended durations are:
1 kg of synthetic garments --> 150 min
1 kg of synthetic and cotton garments --> 180 min 1 kg of cotton garments --> 180 min
The degree of dryness depends on the load and fabric composition.
Wool: the wool wash programme of this machine has been tested and approved by The Woolmark Company for the washing of wool containing garments labelled as “hand wash” provided that the garments are washed according to the instructions on the garment label and those issued by the manufacturer of this washer-dryer. (M1126) 
In UK, Eire, Hong Kong and India the Woolmark trade mark is a Certification trade mark.
Rapid 30’ (programme 6) this programme is designed to wash lightly soiled garments at 30° (excluding wool and silk) with a 3 kg maximum load in a short time: it only lasts 30 minutes and allows for saving time and energy Coloured: use this programme 10 to wash bright coloured clothes. The programme is designed to maintain bright colours over time.
Eco Cotton 20° (programme 11) ideal for lightly soiled cotton loads. The effective performance levels achieved at cold temperatures, which are comparable to washing at 40°, are guaranteed by a mechanical action which operates at varying speed, with repeated and frequent peaks.
Eco Synthetic (programme 12) ideal for mixed loads (cotton and synthetics) with a normal soil level. The effective performance levels achieved at cold temperatures are guaranteed by a mechanical action which operates at varying speed, across set average intervals.
Wash&Dry 45’ select programme 13 for washing and drying lightly soiled garments (Cotton and Synthetic) in a short time. This cycle may be used to wash and dry a laundry load of up to 1 kg in just 45 minutes. To achieve optimum results, use liquid detergent and pre-treat cuffs, collars and stains.
AirFresh (programme 14) ideal cycle to refresh garments and remove bad odours, in particular smoke, from cotton and synthetic items in 30’ (max 1.5kg) without the washing phase.
10
Troubleshooting
|
|
|
|
Your Washer-dryer could fail to work. Before contacting the Technical Assistance Centre (see “Assistance”), make sure that |
|
||
GB |
|||
the problem cannot be solved easily using the following list. |
|||
|
|||
|
|
|
|
Problem:
The Washer-dryer does not switch on.
The wash cycle does not start.
The Washer-dryer does not take in water (the indicator light for the first wash cycle stage flashes rapidly).
The Washer-dryer continuously takes in and drains water.
The Washer-dryer does not drain or spin.
The Washer-dryer vibrates a lot during the spin cycle.
The Washer-dryer leaks.
The “Options” indicator lights and the “start/pause” indicator light flash, while one of the “phase in progress” indicator lights and the “door locked” indicator light will remain lit in a fixed manner.
There is too much foam.
Push&Wash+Dry does not activate.
The washer-dryer does not dry.
Possible causes / Solutions:
•The appliance is not plugged into the socket fully, or is not making contact.
•There is no power in the house.
•The Washer-dryer door is not closed properly.
•The ON/OFF button has not been pressed.
•The START/PAUSE button has not been pressed.
•The water tap has not been opened.
•The water inlet hose is not connected to the tap.
•The hose is bent.
•The water tap has not been opened.
•There is no water supply in the house.
•The pressure is too low.
•The START/PAUSE button has not been pressed.
•The drain hose is not fitted at a height between 65 and 100 cm from the floor (see “Installation”).
•The free end of the hose is under water (see “Installation”).
•The wall drainage system is not fitted with a breather pipe.
If the problem persists even after these checks, turn off the water tap, switch the appliance off and contact the Assistance Service. If the dwelling is on one of the upper floors of a building, there may be problems relating to water drainage, causing the Washer-dryer to fill with water and drain continuously. Special antidraining valves are available in shops and help to avoid this inconvenience.
•The wash cycle does not include draining: some wash cycles require the drain phase to be started manually.
•The drain hose is bent (see “Installation”).
•The drainage duct is clogged.
•The drum was not unlocked correctly during installation (see “Installation”).
•The Washer-dryer is not level (see “Installation”).
•The Washer-dryer is trapped between cabinets and walls (see “Installation”).
•The water inlet hose is not screwed on properly (see “Installation”).
•The detergent dispenser drawer is blocked (for cleaning instructions, see “Care and maintenance”).
•The drain hose is not fixed properly (see “Installation”).
•Switch off the machine and unplug it, wait for approximately 1 minute and then switch it back on again.
If the problem persists, contact the Technical Assistance Service.
•The detergent is not suitable for machine washing (it should display the text “for Washer-dryers” or “hand and machine wash”, or the like).
•Too much detergent was used.
•After switching on the machine a control other than Push&Wash+Dry was activated. Switch the machine off and press the Push&Wash+Dry button.
•The appliance is not plugged into the socket, or not enough to make contact.
•There has been a power failure.
•The appliance door is not shut properly.
•All the drying indicator lights are off.
11

Service
|
|
|
|
|
|
Before calling for Assistance: |
|
GB |
|||
|
• Check whether you can solve the problem alone (see “Troubleshooting”); |
||
|
|
• Restart the programme to check whether the problem has been solved; |
|
|
|||
|
|
• If this is not the case, contact an authorised Technical Assistance Centre using the telephone number provided on the |
|
|
|
guarantee certificate. |
|
|
|
! Always request the assistance of authorised technicians. |
Have the following information to hand:
•the type of problem;
•the appliance model (Mod.);
•the serial number (S/N).
This information can be found on the data plate applied to the rear of the Washer-dryer, and can also be found on the front of the appliance by opening the door.
12

Manual de instrucciones
Lavasecadora
ES
Español
! Este símbolo te recuerda que debes leer este
manual de instrucciones. |
ES |
|
Sumario
Instalación, 14-15
Desembalaje y nivelación
Conexiones hidráulicas y eléctricas
Primer ciclo de lavado
Datos técnicos
XWDA 751680
Mantenimiento y cuidados, 16
Interrumpir el agua y la corriente eléctrica Limpiar la lavasecadora
Limpiar el cajón de detergentes Cuidar la puerta y el cesto Limpiar la bomba
Controlar el tubo de alimentación de agua
Precauciones y consejos, 17
Seguridad general
Sistema de equilibrado de la carga Eliminaciones
Descripción de la lavasecadora y comienzo de un programa, 18-19
Panel de control Pilotos
Poner en marcha un programa
Programas, 20
Push&Wash+Dry
Tabla de programas
Personalizaciones, 21
Seleccionar la temperatura
Seleccione el secado
Opciones de lavado
Detergentes y ropa, 22
Contenedor de detergentes
Ciclo de blanqueo
Preparar la ropa
Prendas especiales
Anomalías y soluciones, 23
Asistencia, 24
13

Instalación
! Es importante conservar este manual para ES poder consultarlo en cualquier momento. En caso de venta, de cesión o de traslado, verifique que permanezca junto con la lavasecadora para informar al nuevo propietario sobre el funcionamiento y brindar las correspondientes
advertencias.
! Lea atentamente las instrucciones: ellas contienen importante información sobre la instalación, el uso y la seguridad.
Desembalaje y nivelación
Desembalaje
1.Desembale la lavasecadora.
2.Controle que la lavasecadora no haya sufrido daños durante el transporte. Si estuviera dañada no la conecte y llame al revendedor.
3.Quite los 4 tornillos
de protección para el transporte y la arandela de goma con el correspondiente
distanciador ubicados en la parte posterior (ver la figura).
4.Cubra los orificios con los tapones de plástico suministrados con el aparato.
5.Conserve todas las piezas: cuando la lavasecadora deba ser transportada nuevamente, deberán volver a colocarse.
! Los embalajes no son juguetes para los niños.
Nivelación
1. Instale la lavasecadora sobre un piso plano y rígido, sin apoyarla en las paredes, muebles ni en ningún otro aparato.
2. Si el piso no está perfectamente horizontal, compense las irregularidades desenroscando o enroscando las patas delanteras (ver la figura); el ángulo de inclinación medido sobre la superficie de trabajo, no debe superar los 2º. Una cuidadosa nive-
lación brinda estabilidad a la máquina y evita vibraciones, ruidos y desplazamientos durante el funcionamiento. Cuando se instala sobre moquetas o alfombras, regule los pies para conservar debajo de la lavasecadora un espacio suficiente para la ventilación.
Conexiones hidráulicas y eléctricas
Conexión del tubo de alimentación de agua
1. Conectar el tubo de tubo enroscándolo a un grifo de agua fría con la boca roscada de 3/4 gas (ver la figura).
Antes de conectarlo, haga correr el agua hasta que esté límpida.
2. Conecte el tubo de alimentación a la lavasecadora enroscándolo en la toma de agua correspondiente ubicada en la parte posterior derecha (arriba) (ver la figura).
3. Controle que en el tubo no hayan pliegues ni estrangulaciones.
! La presión de agua del grifo debe estar comprendida dentro de los valores contenidos en la tabla de Datos técnicos (ver la página correspondiente).
!Si la longitud del tubo de alimentación no es la suficiente, diríjase a un negocio especializado o a un técnico autorizado.
!No utilice nunca tubos ya usados.
!Utilice los suministrados con la máquina.
14

Conexión del tubo de desagüe
|
|
|
|
Conecte el tubo de |
|
|
|
|
|
||
|
|
|
|
desagüe, sin plegar- |
|
|
|
|
|
lo, a un conducto de |
|
|
|
|
|
||
|
|
|
|
desagüe o a una de- |
|
|
|
|
|
sagüe de pared ubi- |
|
|
|
|
|
||
65 |
- 100 cm |
cados a una distancia |
|||
del piso comprendida |
|||||
|
|
|
|
||
|
|
|
|
entre 65 y 100 cm.; |
|
|
|
|
|
||
|
|
|
|
o apóyelo en el |
|
|
|
|
|
||
|
|
|
|
||
|
|
|
|
||
|
|
|
|
||
|
|
|
|
borde de un lavama- |
|
|
|
|
|
nos o de una bañe- |
|
|
|
|
|
ra, uniendo la guía |
|
|
|
|
|
suministrada con el |
|
|
|
|
|
aparato, al grifo (ver |
|
|
|
|
|
la figura). El extre- |
|
|
|
|
|
mo libre del tubo de |
|
|
|
|
|
desagüe no debe |
|
|
|
|
|
permanecer sumer- |
|
|
|
|
|
gido en el agua. |
|
! No se aconseja utilizar tubos de prolonga- |
|||||
ción, si fuera indispensable hacerlo, la prolongación debe tener el mismo diámetro del tubo original y no superar los 150 cm.
Conexión eléctrica
Antes de enchufar el aparato, verifique que:
•la toma tenga la conexión a tierra y haya sido hecha según las normas legales;
•latomaseacapazdesoportarlacargamáxima de potencia de la máquina indicada en la tabla de Datos técnicos (ver al costado);
•la tensión de alimentación esté comprendida dentro de los valores indicados en la tabla de Datos técnicos (ver al costado);
•la toma sea compatible con el enchufe de la lavasecadora. Si no es así, sustituya la toma o el enchufe.
!La lavasecadora no debe ser instalada al aire libre, ni siquiera si el lugar está reparado, ya que es muy peligroso dejarla expuesta a la lluvia o a las tormentas.
!Una vez instalada la lavasecadora, la toma de corriente debe ser fácilmente accesible.
!No utilice prolongaciones ni conexiones múltiples.
!El cable no debe estar plegado ni sufrir compresiones.
!El cable de alimentación debe ser sustituido
sólo por técnicos autorizados.
¡Atención! La empresa fabricante declina toda responsabilidad en caso de que estas normas ES no sean respetadas.
Primer ciclo de lavado
Después de la instalación y antes del uso, realice un ciclo de lavado con detergente y sin ropa, seleccionando el programa “Auto Limpieza” (ver “Limpiar la lavasecadora”).
Datos técnicos
Modelo |
XWDA 751680 |
|||
|
|
|
|
|
Dimensio- |
ancho 59.5 cm |
|||
altura 85 cm |
||||
nes |
||||
profundidad 54 cm |
||||
|
|
|
||
Capacidad |
de 1 a 7 kg para el lavado |
|||
de 1 a 5 kg para el secado |
||||
|
|
|
||
Conexiones |
ver la placa de característi- |
|||
cas técnicas aplicada en la |
||||
eléctricas |
máquina |
|||
|
|
|
||
|
|
|
presión máxima 1 MPa |
|
Conexiones |
(10 bar) |
|||
presión mínima 0,05 MPa |
||||
hídricas |
(0,5 bar) |
|||
|
|
|
capacidad del cesto 52 litros |
|
Velocidad |
|
|||
de |
máxima 1600 r.p.m. |
|||
centrifuga- |
||||
do |
|
|||
|
|
|
lavado: programa 8; tempe- |
|
|
|
|
ratura 60ºC; efectuado con |
|
|
|
|
7 kg. de carga. |
|
Programas |
secado: el secado de la |
|||
carga menor (2kg) debe rea- |
||||
de prueba |
lizarse seleccionando el nivel |
|||
según la |
||||
de secado ““ ”, la carga de |
||||
directiva |
||||
ropa se debe componer de 2 |
||||
EN 50229 |
||||
sábanas, 1 funda y 2 toallas; |
||||
|
|
|
||
|
|
|
el secado de lacarga queque- |
|
|
|
|
dadeberealizarseseleccionan- |
|
|
|
|
do elnivel de secado “ ”. |
|
|
|
|
Esta máquina cumple con lo |
|
|
|
|
establecido por las siguientes |
|
|
|
|
Directivas de la Comunidad: |
|
|
|
|
- 2004/108/CE (Compatibili- |
|
|
|
|
dad Electromagnética) |
|
|
|
|
- 2012/19/EU |
|
|
|
|
- 2006/95/CE (Baja Tensión) |
|
|
|
|
||
15

Mantenimiento y cuidados
|
Interrumpir el agua y la corriente |
|
ES |
||
eléctrica |
||
|
• Cierre el grifo de agua después de cada lavado. |
|
|
De este modo se limita el desgaste de la |
|
|
instalación hidráulica de la lavasecadora y |
|
|
se elimina el peligro de pérdidas. |
|
|
• Desenchufe la máquina cuando la debe |
|
|
limpiar y durante los trabajos de manteni- |
|
|
miento. |
Limpiar la lavasecadora
•La parte externa y las partes de goma se pueden limpiar con un paño embebido en agua tibia y jabón. No use solventes ni productos abrasivos.
•La lavasecadora posee un programa de “Auto Limpieza” de su interior que se debe realizar sin ningún tipo de carga en el cesto.
El detergente (en un 10% de la cantidad aconsejada para prendas poco sucias) o algunos aditivos específicos para la limpieza de la ropa se podrán utilizar como coadyuvantes en el programa de lavado. Se aconseja efectuar el programa de limpieza cada 40 ciclos de lavado. Para activar el programa pulse simultáneamente los botones A y Bdurante 5 segundos (ver la figura). El programa comenzará automáticamente y tendrá una duración de 70 minutos aproximadamente. Para detener el ciclo presione el botón START/PAUSE.
Limpiar la bomba
La lavasecadora posee una bomba autolimpiante que no necesita mantenimiento. Pero puede suceder que objetos pequeños (monedas, botones) caigan en la precámara que protege la bomba, situada en la parte inferior de la misma.
! Verifique que el ciclo de lavado haya terminado y desenchufe la máquina.
Para acceder a la precámara:
1 |
|
2 |
3 |
|
1. quite el panel de cobertura delantero de la máquina presionando hacia el centro, luego empuje hacia abajo desde ambos costados y extráigalo (ver las figuras).
2. desenrosque la tapa girándola en sentido antihorario (ver la figura): es normal que se vuelque un poco de agua;
A
B
Limpiar el cajón de detergentes
1 |
2 |
Para extraer el cajón, presione la palanca (1) y tire hacia afuera (2)
(ver la figura).
Lávelo debajo del agua corriente, esta limpieza se debe realizar frecuentemente.
Cuidar la puerta y el cesto
•Deje siempre semicerrada la puerta para evitar que se formen malos olores.
3.limpie con cuidado el interior;
4.vuelva a enroscar la tapa;
5.vuelva a montar el panel verificando, antes de empujarlo hacia la máquina, que los ganchos se hayan introducido en las correspondientes ranuras.
Controlar el tubo de alimentación de agua
Controle el tubo de alimentación al menos una vez al año. Si presenta grietas o rajaduras debe ser sustituido: durante los lavados, las fuertes presiones podrían provocar roturas imprevistas.
! No utilice nunca tubos ya usados.
16

Precauciones y consejos
! La lavasecadora fue proyectada y fabricada en conformidad con las normas internacionales de seguridad. Estas advertencias se suministran por razones de seguridad y deben ser leídas atentamente.
Seguridad general
• Este aparato ha sido fabricado para un uso de tipo
doméstico exclusivamente.
• Este aparato puede ser utilizado por niños de 8 años o más y por personas con capacidades físicas, sensoriales o mentales disminuidas o con experiencia y conocimientos insuficientes siempre que sean supervisados o que hayan recibido una adecuada formación sobre el uso del aparato en forma segura y conozcan los peligros derivados del mismo. Los niños no deben jugar con el aparato. El mantenimiento y la limpieza no deben ser realizados por niños sin supervisión.
-No secar prendas no lavadas.
-Las prendas sucias con sustancias como aceite de cocina acetona, alcohol, gasolina, kerosén, quitamanchas, trementina, cera o sustancias para quitarlas, deben lavarse con agua caliente con una cantidad mayor de detergente antes de secarlas en la secadora.
-Objetos como la goma expandida (látex), las gorras de ducha, los materiales textiles impermeables, los artículos con un lado de goma y las prendas o cojines que tienen partes de látex no deben secarse en la secadora.
-Suavizantes o productos similares deben emplearse de acuerdo con las instrucciones del fabricante.
-La parte final de un ciclo de la secadora se realiza sin calor (ciclo de enfriamiento) para garantizar que los artículos no se dañen.
ATENCIÓN: Nunca detener una secadora antes que finalice el programa de secado. En este caso, sacar con rapidez todas las prendas y colgarlas para enfriarlas con celeridad.
•No toque la máquina con los pies desnudos ni con las manos o los pies mojados o húmedos.
•No desenchufe la máquina tirando el cable, sino tomando el enchufe.
•No toque el agua de descarga porque puede alcanzar temperaturas elevadas.
•Nunca fuerce la puerta: podría dañarse el mecanismo de seguridad que la protege de aperturas accidentales.
•En caso de avería, no acceda nunca a los mecanismos internos para intentar una reparación.
•Controle siempre que los niños no se acerquen a la máquina cuando está en funcionamiento.
•Si debe ser trasladada, deberán intervenir dos o más personas, procediendo con el máximo cuidado. La
máquina no debe ser desplazada nunca por una sola |
ES |
persona ya que es muy pesada. |
•Antes de introducir la ropa controle que el cesto esté vacío.
•Durante el secado la puerta tiende a calentarse.
•No seque ropa lavada con solventes inflamables (por ej. tricloroetileno).
•No seque gomaespuma o elastómeros análogos.
•Verifique que, durante las fases de secado, el grifo de agua esté abierto.
•Los niños de edad inferior a 3 años deben
mantenerse alejados de la secadora en au sencia de vigilancia constante.
•Vaciar los bolsillos de todos los objetos, como encende dores o fósforos.
Sistema de equilibrado de la carga
Antes de cada centrifugado, para evitar vibraciones excesivas y para distribuir la carga de modo uniforme, el cesto realiza rotaciones a una velocidad ligeramente superior a la del lavado. Si después de varios intentos, la carga todavía no está correctamente equilibrada, la máquina realiza el centrifugado a una velocidad inferior a la prevista. Cuando existe un excesivo desequilibrio, la lavasecadora realiza la distribución antes que el centrifugado. Para obtener una mejor distribución de la carga y su correcto equilibrado, se aconseja mezclar prendas grandes y pequeñas.
Eliminaciones
•Eliminación del material de embalaje:
respete las normas locales, de ese modo, los embalajes podrán volver a ser utilizados.
•La norma Europea 2012/19/EU sobre la eliminación de aparatos eléctricos y electrónicos, indica que los electrodomésticos no deben ser eliminados de la misma manera que los desechos sólidos urbanos.
Los aparatos en desuso se deben recoger separadamente para optimizar el porcentaje de recuperación y reciclaje de los materiales que los componen e impedir potenciales daños para la salud y el medio ambiente. El símbolo de la papelera tachada se encuentra en todos los productos para recordar la obligación de recolección separada. Para mayor información sobre la correcta eliminación de los electrodomésticos, los poseedores de los mismos podrán dirigirse al servicio público responsable o a los revendedores.
17
Descripción de la lavasecadora y comienzo de un programa
|
|
|
|
|
|
|
|
|
|
|
|
|
|
|
|
|
|
Panel de control |
|
|
|
|
|
|
|
|
|
|
|
|
|
||
ES |
|
Pilotos DE AVANCE DEL CICLO |
||||||||||||||
|
|
|
|
|||||||||||||
|
|
|
|
|
||||||||||||
|
|
|
|
|
|
|
|
|
|
|
|
|
Botones con pilotos |
|||
|
|
|
|
|
|
|
|
|
|
|
|
|
||||
|
|
|
|
|
|
|
|
|
|
|
|
|
OPCIÓN |
|||
|
|
|
|
|
Botón con |
|
|
|
|
|
|
|
Piloto PUERTA |
|
||
|
|
|
|
|
|
|
|
|
|
|
|
|
|
|||
|
|
Botón ON/OFF |
|
piloto |
|
|
|
|
|
|
|
BLOQUEADA |
|
|||
|
|
|
|
|
|
|
|
|
|
|||||||
|
|
|
|
START/PAUSE |
|
|
|
|
|
|
|
|
|
|
|
|
|
|
|
|
|
|
|
|
|
|
|
|
|
|
|
|
|
|
|
|
|
|
|
|
|
|
|
|
|
|
|
|
|
|
|
|
|
|
|
|
|
|
|
|
|
|
|
|
|
|
|
|
|
|
|
|
|
|
|
|
|
|
|
|
|
|
|
|
|
|
|
|
|
|
|
|
|
|
|
|
|
|
|
|
|
|
|
|
|
|
|
|
|
|
|
|
|
|
|
|
|
|
|
|
|
|
|
|
|
|
|
|
|
|
|
|
|
|
|
|
|
|
|
|
|
|
|
|
|
|
|
|
|
|
|
|
|
|
|
|
|
|
Botón |
|
|
|
|
|
|
|
|
|
Mando de |
|
|
|
SECADO POR |
Contenedor de detergentes |
|
|
|
|||
PROGRAMAS |
|
|
|
NIVELES |
||
|
|
|
||||
|
|
|
|
|
|
|
|
Botón |
|
Botón |
Botón |
||
|
PUSH&WASH+DRY |
TEMPERATURA |
||||
|
|
|
|
|
SECADO |
|
|
|
|
|
|
TEMPORIZADO |
|
Contenedor de detergentes: para cargar detergentes y aditivos (ver “Detergentes y ropa”).
Botón de ON/OFF: para encender y apagar la lavasecadora.
Botón PUSH&WASH+DRY: (ver “Programas”).
Mando de PROGRAMAS: para elegir los programas. Durante el funcionamiento del programa el mando no se mueve.
Botones con pilotos de OPCIÓN: para seleccionar las funciones disponibles. El piloto correspondiente a la función seleccionada permanecerá encendido.
Botón TEMPERATURA: para seleccionar la temperatura o el lavado en frío (ver “Personalizaciones”).
Botón SECADO TEMPORIZADO: pulsar para seleccionar el tiempo de secado; el tiempo de secado seleccionado es indicado por los testigos al lado.
Botón SECADO POR NIVELES: pulsar para seleccionar los niveles de secado; el nivel de secado seleccionado es indicado por los testigos al lado.
Pilotos DE AVANCE DEL CICLO: para seguir el estado de avance del programa de lavado.
El piloto encendido indica la fase en curso.
Piloto PUERTA BLOQUEADA: para saber si la puerta se puede abrir (ver la página correspondiente).
Botón con piloto START/PAUSE: se utiliza para poner en marcha los programas o interrumpirlos momentáneamente. Nota: Presione este botón para poner en pausa el lavado en curso, el piloto correspondiente centelleará con color anaranjado mientras que el de la fase en curso permanecerá encendido en forma fija. Si el piloto PUERTA BLOQUEADA  está apagado, se podrá abrir la puerta (espere 3 minutos aproximadamente).
Para que el lavado se reanude a partir del momento en el cual fue interrumpido, presione nuevamente este botón.
Modalidad de stand by
Esta lavasecadora está en conformidad con las nuevas normativas vinculadas al ahorro energético. Está dotada de un sistema de auto-apagado (stand by) que, en caso de no funcionamiento, se activa aproximadamente 30 minutos. Presionar brevemente el botón ON-OFF y esperar que la máquina se active.
Consumo en off-mode: 0,5 W Consumo en Left-on: 8 W
18
Pilotos
Los pilotos suministran información importante. He aquí lo que nos dicen:
Pilotos fase en curso
Una vez seleccionado y puesto en marcha el ciclo de lavado deseado, las luces testigo se encenderán progresivamente para indicar su estado de avance:
Lavado
Aclarado
Centrifugado/Descarga
Secado |
|
Fin del Lavado |
END |
Botones de función y pilotos correspondientes
Seleccionando una función, el piloto correspondiente se iluminará. Si la función seleccionada no es compatible con el programa elegido, el piloto correspondiente centelleará y la función no se activará. Si la opción seleccionada no es compatible con otra opción elegida anteriormente, la incompatibilidad se indicará con el centelleo del piloto y una señal sonora (3 sonidos) y se activará sólo la segunda opción, el piloto de la opción activada se iluminará.
Poner en marcha un programa
Programación rápida
1.CARGAR LA ROPA. Abra la puerta. Cargue la ropa, cuidando no superar la cantidad de carga indicada en la tabla de programas de la página siguiente.
2.DOSIFICAR EL DETERGENTE. Extraiga el cajón y vierta el detergente en las cubetas correspondientes como se explica en “Detergentes y ropa”.
3.CERRAR LA PUERTA.
4.Pulsar el botón “Push&Wash+Dry” para poner en marcha el programa.
Programación tradicional
1.Encienda la lavasecadora pulsando el botón ON-OFF. Todos los pilotos se encenderán durante algunos segundos, luego permanecerán encendidos sólo los pilotos correspondientes a las configuraciones para el programa seleccionado y centelleará el piloto START/PAUSE.
2.Cargue la ropa y cierre la puerta.
3.Seleccione el programa deseado con el mando de PROGRAMAS.
 Piloto puerta bloqueada
El piloto encendido indica que la puerta está bloqueada ES impidiendo su apertura; para poder abrir la puerta es ne-
cesario que dicho piloto esté apagado (espere 3 minutos aproximadamente). Para abrir la puerta mientras un ciclo está en curso, presione el botón START/PAUSE; si el piloto PUERTA BLOQUEADA está apagado, será posible abrir la puerta.
4.Fije la temperatura de lavado (ver “Personalizaciones”).
5.Seleccione el secado, si es necesario (ver “Personalizaciones”).
6.Vierta detergente y aditivos (ver “Detergentes y ropa”).
7.Seleccione las funciones deseadas.
8.Ponga en marcha el programa presionando el botón START/PAUSE y el piloto correspondiente permanecerá encendido, fijo y de color verde. Para anular el ciclo seleccionado ponga en pausa la máquina presionando el botón START/PAUSE y elija un nuevo ciclo.
9.Al final del programa se iluminará el piloto
 . Cuando
el piloto PUERTA BLOQUEADA  se apague, será posible abrir la puerta (espere 3 minutos aproximadamente). Extraiga la ropa y deje la puerta semicerrada para permitir que el cesto se seque. Apague la lavasecadora presionando el botón ON/OFF.
19

Programas
|
|
|
|
|
Push&Wash+Dry |
||
ES |
|||
Esta función permite lanzar un ciclo automático de lavado y secado, incluso con la máquina apagada, sin tener que pulsar |
|||
|
|||
|
la tecla ON/OFF o, después de encender la máquina, sin accionar ninguna otra tecla o selector (de lo contrario, el programa |
||
|
Push&Wash+Dry se desactiva). Para poner en marcha el ciclo Push&Wash+Dry, pulsar la tecla 2 segundos. El testigo encen- |
||
|
dido indica que el ciclo está en marcha. El ciclo de lavado y secado es ideal para prendas de algodón y sintéticas; funciona |
||
|
a una temperatura de lavado de 30° y una velocidad máxima de centrifugado de 1000 revoluciones al minuto. Durante el |
||
|
secado, la temperatura máxima alcanzada es 60°C. Al finalizar el programa, la humedad residual es adecuada para el “ ”. |
||
|
Carga máxima recomendada 2,5 kg. (Duración del ciclo 210’). |
||
¿Cómo funciona?
1.Cargar la ropa (prendas de algodón y/o sintéticas) y cerrar la puerta.
2.Verter el detergente y los aditivos.
3.Lanzar el programa pulsando 2 segundos la tecla Push&Wash+Dry. El testigo correspondiente se enciende en verde y la puerta se bloquea (símbolo de puerta bloqueada encendido).
Nota: El lanzamiento del programa con la tecla Push&Wash+Dry activa un ciclo automático de lavado y secado recomendado para algodón y sintéticos no personalizable.
4.Es posible utilizar el programa automático para el solo lavado excluyendo el secado. Después de pulsar la tecla
Push&Wash+Dry, pulsar la tecla de secado  . El icono de secado nivel “
 ” se apaga. La carga máxima para el solo lavado es 3,5 kg (Duración del ciclo 50’). No es posible personalizar ulteriormente el programa.
Para abrir la puerta mientras el ciclo automático está en curso, pulsar la tecla START/PAUSE; si el símbolo de puerta bloqueada está apagado, será posible abrir la puerta exclusivamente durante la fase de lavado. Pulsar nuevamente la tecla START/PAUSE para reanudar el programa desde el punto en que se había interrumpido.
5.Al final del programa se iluminará el piloto END.
Tabla de programas
Programas |
|
Temp. |
Velo- |
|
|
cidad |
|
|
Descripción del Programa |
max. |
|
|
máx. |
||
|
|
(°C) |
|
|
|
(r.p.m.) |
|
|
|
|
|
|
Programas Especiales |
|
|
|
|
|
|
1 |
Sport |
30° |
600 |
2 |
Oscuro |
30° |
800 |
3 |
Antiolor (Algodón) |
60° |
1000 |
3 |
Antiolor (Sintético) |
40° |
1000 |
4 |
Delicados |
30° |
0 |
5 |
Lana: para lana, cachemira, etc. |
40° |
800 |
6 |
Rápido 30’ |
30° |
800 |
|
Standard |
|
|
7 |
Prelavado Algodón: blancos sumamente sucios. |
90° |
1600 |
8 |
Algodón Standard 60° (1): blancos y colores resistentes muy sucios. |
60° |
1600 |
(Max. 90°) |
|||
9 |
Sintético: colores resistentes muy sucios. |
60° |
800 |
10 |
De color (2) |
40° |
1600 |
11 |
Eco Algodón 20°: blancos poco sucios y colores delicados. |
20° |
1600 |
12 |
Eco Sintético |
20° |
800 |
Automático
Secado |
máximaCarga secadoelpara (Kg) |
lavado-Pre |
|
Lavado |
|
Suavizante |
Blanque |
máximaCarga lavadoelpara (Kg) |
delDuración lavadodeciclo |
|
|
|
Detergentes |
|
|
||||
|
|
|
|
|
|
|
|
|
|
|
|
|
|
|
|
|
- |
|
|
|
|
|
|
|
|
|
ador |
|
|
|
|
|
|
|
|
|
|
|
55’ |
|
|
|
|
|
|
||||
3 |
- |
|
|
- |
3,5 |
||||
|
2,5 |
- |
|
|
|
|
- |
4 |
70’ |
|
3,5 |
- |
|
|
|
|
- |
3,5 |
110’ |
|
3 |
- |
|
|
|
|
- |
3,5 |
100’ |
|
1 |
- |
|
|
|
|
- |
1 |
80’ |
|
1,5 |
- |
|
|
|
|
- |
1,5 |
70’ |
|
3 |
- |
|
|
|
|
- |
3 |
30’ |
|
|
|
|
|
|
|
|
|
170’ |
5 |
|
|
- |
7 |
|||||
|
5 |
- |
|
|
|
|
- |
7 |
170’ |
|
3 |
- |
|
|
|
|
- |
3,5 |
110’ |
|
5 |
- |
|
|
|
|
- |
7 |
100’ |
|
5 |
- |
|
|
|
|
- |
7 |
170’ |
|
5 |
- |
|
|
|
|
- |
7 |
120’ |
13 |
Lava y Seca 45’ |
30° |
1600 |
|
1 |
- |
|
|
- |
1 |
45’ |
14 |
AirFresh |
- |
- |
|
1,5 |
- |
- |
- |
- |
- |
30’ |
|
Programas Parciales |
|
|
|
|
|
|
|
|
|
|
|
Aclarado/Blanqueador |
- |
1600 |
|
5 |
- |
- |
|
|
7 |
50’ |
|
Centrifugado + Descarga |
- |
1600 |
|
5 |
- |
- |
- |
- |
7 |
10’ |
La duración del ciclo que se indica en el visor o en el manual es una estimación calculada en base a condiciones estándar. El tiempo efectivo puede variar en función de numerosos factores como la temperatura y la presión del agua de entrada, la temperatura ambiente, la cantidad de detergente, la cantidad y el tipo de carga, el equilibrado de la carga y las opciones adicionales seleccionadas.
Para todos los Test Institutes:
1)Programa de control según la norma EN 50229: seleccione el programa 8 con una temperatura 60°C.
2)Programa algodón largo: seleccione el programa 10 con una temperatura de 40ºC.
20
Personalizaciones
|
|
|
|
|
|
|
|
|
|
|
|
|
|
Seleccionar la temperatura |
|
|
|
|
|
|
|
|
|
|
|
||
|
|
|
|
|
|
|
|
|
|
ES |
|||
Presionando el botón TEMPERATURA se selecciona la temperatura de lavado (ver la Tabla de programas). |
|
|
|
|
|||||||||
|
|
|
|
|
|||||||||
La temperatura se puede disminuir hasta el lavado en frío ( ). |
|
|
|
|
|
|
|
|
|
|
|||
La máquina impedirá automáticamente seleccionar una temperatura mayor que la máxima prevista para cada programa. |
|||||||||||||
! Excepción: cuando se selecciona el programa 8, la temperatura se puede aumentar hasta 90°. |
|
|
|
|
|
|
|||||||
Seleccione el secado |
|
Tabla de tiempos de Secado (Valores indicativos) |
|
|
|
|
|||||||
Se han previsto dos tipos de secado, temporizado o por |
|
|
|
|
|
|
|
|
|
|
|||
|
Tipo de |
|
Carga |
Doblar |
Colgar |
Planchar |
|
|
|||||
niveles. |
|
|
|
|
|
||||||||
|
|
|
Tipo de carga |
máx. |
|
|
|
|
|
|
|||
Pulsando la tecla SECADO TEMPORIZADO |
se programa |
|
tela |
|
(kg) |
|
|
|
|
|
|
||
|
|
|
|
|
|
|
|
|
|||||
la duración de secado deseada: 40’- 90’- 120’ - 150’- 180’. |
|
|
Ropa de distintas |
|
|
|
|
|
|
|
|||
La primera vez que se pulsa la tecla, el tiempo será el mínimo |
|
Algodón |
dimensiones, |
5 |
250 |
210 |
190 |
|
|
|
|||
permitido para el programa. |
|
|
|
toallas |
|
|
|
|
|
|
|
||
Cuando la máquina ha comenzado la fase de secado, de- |
|
Sintéti- |
Sábanas, Ca- |
3 |
180 |
130 |
115 |
|
|
|
|||
spués de pulsar la tecla SECADO TEMPORIZADO, será posi- |
|
cos |
misas, Pijamas, |
|
|
|
|||||||
ble reducir la duración del secado programada. Los testigos |
|
calcetines, etc. |
|
|
|
|
|
|
|
||||
|
|
|
|
|
|
|
|
|
|||||
luminosos indicarán la nueva duración del secado seleccio- |
|
Lana |
Suéteres, etc, |
1,5 |
155 |
135 |
115 |
|
|
|
|||
nada y el tiempo residual de secado considerará el tiempo ya |
|
etc. |
|
|
|
||||||||
|
|
|
|
|
|
|
|
|
|||||
transcurrido. |
|
|
|
|
|
|
|
|
|
|
|
||
Pulsando la tecla SECADO POR NIVELES |
se programa el nivel de secado deseado: |
|
|
|
|
|
|
|
|||||
Doblar |
: se adapta para la ropa que se coloca en el armario sin necesidad de planchar. |
|
|
|
|
|
|
|
|||||
Colgar |
: ideal para aquellas prendas que no requieren el secado completo. |
|
|
|
|
|
|
|
|||||
Planchar |
: especial para prendas que después deben plancharse. El nivel de humedad residual atenúa las arrugas y |
||||||||||||
facilita su eliminación.
Si excepcionalmente la carga de ropa para lavar y secar es superior al máximo previsto, realice el lavado, y una vez finalizado el programa, divida la carga y coloque una parte en el cesto. A partir de ese momento, siga las instrucciones para efectuar “Sólo el secado”. Repita las mismas operaciones para la carga restante. Al finalizar el secado continúa siempre un período de enfriamiento.
Nota: si todos los testigos de secado están apagados, la máquina no efectuará el secado.
Sólo el secado
Pulsar la tecla 
 para ejecutar sólo el secado. Después de seleccionar un programa compatible con el tipo de prenda, al pulsar
 se excluye el lavado y se activa el secado con el nivel máximo previsto para el programa seleccionado. Es posible cambiar el nivel o la duración del secado pulsando las teclas de secado
  ,
, 
 . (No compatible con los programas 13 y 14).
Opciones de lavado
Las distintas funciones de lavado previstas por la lavasecadora permiten obtener la limpieza y el blanco deseados. Para activar las funciones:
1.presione el botón correspondiente a la función deseada;
2.el encendido del piloto correspondiente indica que la función está activa.
Nota:
-Si la función seleccionada no es compatible con el programa elegido, el piloto correspondiente centelleará y la función no se activará.
-Si la opción seleccionada no es compatible con otra opción elegida anteriormente, la incompatibilidad se indicará con el centelleo del piloto y una señal sonora (3 sonidos) y se activará sólo la segunda opción, el piloto de la opción activada se iluminará.
 Antimancha
Esta opción permite seleccionar el tipo de suciedad para adaptar el ciclo de la manera mejor para eliminar las manchas. Los tipos de suciedad son:
- Alimentos, por ejemplo para manchas de alimentos y bebidas.
- Trabajo, por ejemplo para manchas de grasa y tinta.
-  Aire libre, por ejemplo para manchas de barro y hierba.
! La duración del ciclo de lavado varía en función del tipo de suciedad seleccionado.
Presionando este botón se disminuye la velocidad de centrifugado.
 Aclarado Extra
Al elegir esta opción aumentará la eficacia del aclarado y se asegurará la máxima eliminación del detergente. Es útil para pieles particularmente sensibles.
21

Detergentes y ropa
ES |
Contenedor de detergentes |
|||
El buen resultado del lavado depende también de la correcta |
||||
|
||||
|
dosificación del detergente: si se excede la cantidad, no se |
|||
|
lava de manera más eficaz, sino que se contribuye a enco- |
|||
|
strar las partes internas de la lavasecadora y a contaminar |
|||
|
el medio ambiente. |
|
|
|
|
!No use detergentes para el lavado a mano porque producen |
|||
|
demasiada espuma. |
|
|
|
|
!Utilice detergentes en polvo para prendas de algodón blan- |
|||
|
cas, para el prelavado y para lavados con una temperatura |
|||
|
mayor que 60ºC. |
|
|
|
|
! Respete las indicaciones que se encuentran en el envase |
|||
|
de detergente. |
|
Extraiga el contenedor de |
|
|
|
|
||
|
B 4 |
|
detergentes e introduzca el |
|
|
A |
detergente o el aditivo de la |
||
|
|
|
siguiente manera: |
|
|
1 |
Compartimento 1: Deter- |
3 |
|
gente para prelavado (en |
2 |
polvo) |
|
|
Antes de verter el detergente, |
|
|
|
verifique que no esté colocada |
|
|
la cubeta adicional 4. |
Compartimento 2: Detergente para lavado (en polvo o líquido)
Si se utiliza detergente líquido, se aconseja colocar el tabique divisorio A suministrado con la máquina, para una correcta dosificación. Cuando utilice detergente en polvo, vuelva a colocar el tabique divisorio en la cavidad B.
Compartimento 3: Aditivos (suavizante, etc.)
El suavizante no debe superar el nivel “máx” indicado en el perno central.
cubeta adicional 4: Blanqueador
Ciclo de blanqueo
Introduzca la cubeta adicional 4 suministrada con el aparato en el compartimento 1. Al verter el blanqueador no debe superar el nivel “máx” indicado en el perno central.
Para realizar el blanqueo, vierta el blanqueador en la cubeta adicional 4 y seleccione el programa 

 .
.
! El blanqueador tradicional debe utilizarse para los tejidos resistentes blancos, mientras que el delicado debe utilizarse para los tejidos coloreados y sintéticos, y para la lana.
Preparar la ropa
•Subdivida la ropa según:
-el tipo de tejido / el símbolo en la etiqueta.
-los colores: separe las prendas de color y las blancas.
•Vacíe los bolsillos y controle los botones.
•No supere los valores indicados, referidos al peso de la ropa seca: ver “Tabla de programas”.
¿Cuánto pesa la ropa?
1 sábana 400/500 g
1 funda 150/200 g
1 mantel 400/500 g
1 albornoz 900/1.200 g
1 toalla 150/250 g
Prendas especiales
Sport (programa 1) ha sido estudiado para lavar tejidos usados en prendas deportivas (chándales, pantalones cortos, etc.) poco sucios; para obtener los mejores resultados es aconsejable no superar la carga máxima indicada en la “Tabla de programas”. Se recomienda utilizar detergente líquido y la dosis correspondiente a la media carga.
Oscuro: utilice el programa 2 para el lavado de prendas de color oscuro. El programa ha sido estudiado para mantener los colores oscuros. Para obtener mejores resultados, cuando laveprendasoscurasserecomiendautilizardetergentelíquido. Si se selecciona la función de secado, al finalizar el lavado se ejecutará automáticamente un secado delicado que preserva los colores de las prendas. La pantalla mostrará el nivel “ ”. Carga máx.: 2,5 kg
Antiolor: utilice el programa 3 para el lavado de las prendas para eliminar los olores desagradables (por ej. humo, sudor, fritos). El programa ha sido estudiado para eliminar los malos olores protegiendo las fibras de los tejidos. Se recomienda lavar a 40° las prendas sintéticas o las cargas mixtas y a 60° los tejidos en algodón resistente.
Delicados: utilice el programa 4 para el lavado de prendas muy delicadas. Se aconseja dar la vuelta a las prendas antes del lavado. Para obtener mejores resultados, se recomienda el uso de detergente líquido para prendas delicadas.
Seleccionando la función de secado exclusivamente con tiempo, al finalizar el lavado se realizará un secado de particular delicadeza gracias a un movimiento suave y a un chorro de aire con temperatura controlada.
Los tiempos aconsejados son: 1 kg de sintético --> 150 min.
1 kg de sintético y algodón --> 180 min. 1 kg de algodón --> 180 min.
El grado de secado dependerá de la carga y de la composición del tejido.
Lana: el ciclo de lavado “Lana” de esta lavasecadora ha sido probado y aprobado por la Woolmark Company para el lavado de prendas que contienen lana clasificadas como “lavables a mano”, siempre que el lavado se realice respetando las instrucciones contenidas en la etiqueta de la prenda y las indicaciones suministradas por el fabricante de esta lavasecadora. (M1126) 
Rápido 30’ (programa 6) este ciclo ha sido estudiado para lavar prendas ligeramente sucias a 30° (excepto por lana y seda) con una carga máxima de 3 kg en poco tiempo: dura sólo 30 minutos y permite ahorrar energía y tiempo
De color: utilice el programa 10 para el lavado de prendas de color claro. El programa ha sido estudiado para mantener la vivacidad de los colores.
Eco Standard 20º (programa 11) ideal para cargas de prendas de algodón sucias. Los buenos rendimientos aún en frío, comparables con los de un lavado a 40º, están garantizados por una acción mecánica que trabaja con variación de velocidad con picos repetidos y cercanos.
Eco Sintético (programa 12) ideal para cargas mixtas (algodón y sintéticos) de prendas medianamente sucias. Los buenos rendimientos de lavado aún en frío están garantizados por una acción mecánica que trabaja con variación de velocidad en intervalos medios y determinados.
Lava y Seca 45’ (programa 13): utilice este programa para lavarysecarprendas(AlgodónySintéticos)ligeramentesucias en poco tiempo Seleccionando este ciclo se puede lavar y secar hasta 1 kg de ropa en sólo 45 minutos.
Para alcanzar los mejores resultados utilizar detergente líquido; pre-tratar puños, cuellos y manchas.
AirFresh (programma 14) ciclo ideal para refrescar y eliminar los malos olores, especialmente de humo, de las prendas de algodón y sintéticas (máx. 1,5kg) en sólo 30 minutos, sin fase de lavado.
22

Anomalías y soluciones
Puede suceder que la lavasecadora no funcione. Antes de llamar al Servicio de Asistencia Técnica (ver “Asistencia”),controle |
ES |
que no se trate de un problema de fácil solución utilizando la siguiente lista. |
Anomalías:
La lavasecadora no se enciende.
El ciclo de lavado no comienza.
La lavasecadora no carga agua (centellea rápidamente el piloto de la primera fase de lavado).
La lavasecadora carga y descarga agua continuamente.
La lavasecadora no descarga o no centrifuga.
La lavasecadora vibra mucho durante la centrifugación.
La lavasecadora pierde agua.
Los pilotos de las “opciones” y el piloto de “START/PAUSE” parpadean y uno de los pilotos de la “fase en curso” y de “puerta bloqueada” quedan encendidos con la luz fija.
Se forma demasiada espuma.
No se activa la función
Push&Wash+Dry.
La Lavasecadora no seca.
Posibles causas / Solución:
•El enchufe no está introducido en la toma de corriente, o no hace contacto.
•En la casa no hay corriente.
•La puerta no está correctamente cerrada.
•El botón ON/OFF no ha sido presionado.
•El botón START/PAUSE no ha sido presionado.
•El grifo de agua no está abierto.
•El tubo de alimentación de agua no está conectado al grifo.
•El tubo está plegado.
•El grifo de agua no está abierto.
•En la casa no hay agua.
•No hay suficiente presión.
•El botón START/PAUSE no ha sido presionado.
•El tubo de descarga no está instalado entre los 65 y 100 cm. del suelo (ver “Instalación”).
•El extremo del tubo de descarga está sumergido en el agua (ver “Instalación”).
•La descarga de pared no posee un respiradero.
Si después de estas verificaciones, el problema no se resuelve, cierre el grifo de agua, apague la lavasecadora y llame a la Asistencia. Si la vivienda se encuentra en uno de los últimos pisos de un edificio, es posible que se verifiquen fenómenos de sifonaje, por ello la lavasecadora carga y descarga agua de modo continuo. Para eliminar este inconveniente se encuentran disponibles en el comercio válvulas especiales que permiten evitar el sifonaje.
•El programa no prevé la descarga: con algunos programas es necesario ponerla en marcha manualmente.
•El tubo de descarga está plegado (ver “Instalación”).
•El conducto de descarga está obstruido.
•El cesto, en el momento de la instalación, no fue desbloqueado correctamente (ver “Instalación”).
•La máquina no está instalada en un lugar plano (ver “Instalación”).
•Existe muy poco espacio entre la máquina, los muebles y la pared (ver “Instalación”).
•El tubo de alimentación de agua no está bien enroscado (ver “Instalación”).
•El contenedor de detergentes está obstruido (para limpiarlo ver “Mantenimiento y cuidados”).
•El tubo de descarga no está bien fijado (ver “Instalación”).
•Apague la máquina y desenchúfela, espere aproximadamente 1 minuto y luego vuelva a encenderla.
Si la anomalía persiste, llame al Servicio de Asistencia Técnica.
•El detergente no es específico para la lavasecadora (debe contener algunas de las frases “para lavasecadora”, “a mano o en lavasecadora” o similares).
•La dosificación fue excesiva.
•Tras encender la máquina se ha accionado un mando diferente de Push&Wash+Dry. Apague la máquina y presione el botón Push&Wash+Dry.
•El enchufe no está introducido en la toma de corriente, o no hace contacto.
•En la casa no hay corriente.
•La puerta no está bien cerrada.
•Todos los testigos de secado están apagados.
23

Asistencia
|
|
|
|
|
|
Antes de llamar al Servicio de Asistencia Técnica: |
|||
ES |
||||
• Verifique si la anomalía la puede resolver Ud. solo (ver “Anomalías y soluciones”); |
||||
|
||||
|
• Vuelva a poner en marcha el programa para controlar si el inconveniente fue resuelto; |
|||
|
||||
|
• Si no es así, llame al Servicio de Asistencia técnica autorizado, al número de teléfono indicado en el certificado de garantía. |
|||
|
! No recurra nunca a técnicos no autorizados. |
|||
Comunique:
•el tipo de anomalía;
•el modelo de la máquina (Mod.);
•el número de serie (S/N ).
Esta información se encuentra en la placa aplicada en la parte posterior de la lavasecadora y en la parte delantera abriendo la puerta.
La siguiente información es válida solo para España.
Para otros países de habla hispana consulte a su vendedor.
Ampliación de garantía
Llame al 902.363.539 y le informaremos sobre el fantástico plan de ampliación de garantía hasta 5 años. Consiga una cobertura total adicional de
•Piezas y componentes
•Mano de obra de los técnicos
•Desplazamiento a su domicilio de los técnicos Y NO PAGUE AVERIAS NUNCA MAS
Servicio de asistencia técnica (SAT)
Llame al 902.133.133 y nuestros técnicos intervendrán con rapidez y eficacia, devolviendo el electrodoméstico a sus condiciones óptimas de funcionamiento.
En el SAT encontrará recambios, accesorios y productos específicos para la limpieza y mantenimiento de su electrodoméstico a precios competitivos.
ESTAMOS A SU SERVICIO
24

Használati utasítás
MOSÓGÉP
HU
Magyar
! |
Ez a szimbólum arra figyelmeztet, hogy ol- |
HU |
vassa el ezt a használati utasítást. |
|
|
|
||
Összefoglalás
Üzembe helyezés, 26–27
Kicsomagolás és vízszintbe állítás Vízés elektromos csatlakozás Első mosási ciklus
Műszaki adatok
Karbantartás és ápolás, 28
A víz elzárása és az elektromos áram kikapcsolása A mosógép tisztítása
A mosószer-adagoló fiók tisztítása Az ajtó és a forgódob ápolása
A szivattyú tisztítása
A vízbevezető cső ellenőrzése
XWDA 751680
Óvintézkedések és tanácsok, 29
Általános biztonság
A bepakolt ruhák kiegyensúlyozására szolgáló rendszer Hulladékelhelyezés
A mosógép leírása és program elindítása, 30-31
Kezelőpanel
Jelzőlámpák Program elindítása
Programok, 32
Push&Wash+Dry
Programtáblázat
Egyéni beállítások, 33
A hőmérséklet beállítása
Helyezze be a szárítanivalót
Mossa lehetőségek
Mosószerek és mosandók, 34
Mosószer-adagoló fiók Fehérítő ciklus
A mosandó ruhák előkészítése
Különleges bánásmódot igénylő ruhadarabok
Rendellenességek és elhárításuk, 35 Szerviz, 36
25
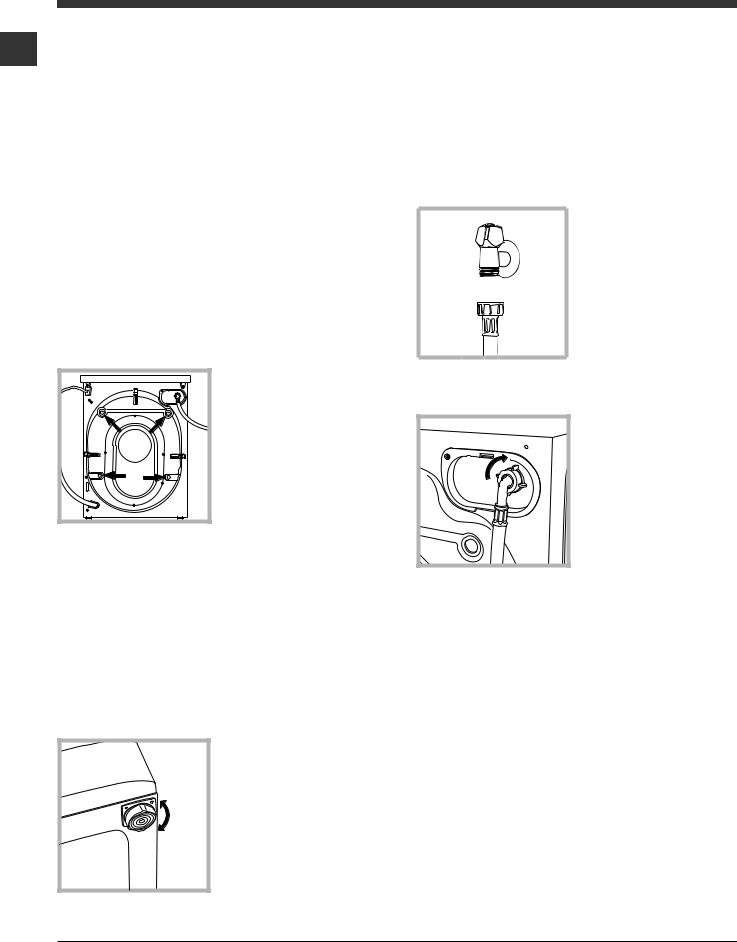
Üzembe helyezés
HU |
! E kézikönyv megőrzése azért fontos, hogy |
|
bármikor elővehesse, és megnézhesse. Ha |
|
a mosógépet eladná, átadná vagy másnál |
|
helyezné el, gondoskodjon arról, hogy e |
|
kézikönyv a mosógéppel együtt maradjon, |
|
hogy az új tulajdonos is megismerhesse a |
|
készülék funkcióit és az ezekre vonatkozó |
|
figyelmeztetéseket. |
|
! Figyelmesen olvassa el az utasításokat: |
|
fontos információkat tartalmaznak az üzembe |
|
helyezésről, a használatról és a biztonságról. |
|
Kicsomagolás és vízszintbe állítás |
|
Kicsomagolás |
|
1. Csomagolja ki a mosógépet. |
|
2. Ellenőrizze, hogy a mosógép nem sérült- |
|
e meg a szállítás során. Ha a készüléken |
|
sérülést talál, ne csatlakoztassa, és forduljon |
|
a viszonteladóhoz. |
|
3. Csavarozza ki |
|
a készülék hátsó |
|
részén található, a |
|
szállításhoz szüksé- |
|
ges 4 védőcsavart, |
|
és távolítsa el a |
|
gumibakot a távtar- |
|
tójával együtt (lásd |
|
ábra). |
4.Zárja le a furatokat a mellékelt műanyag dugókkal.
5.Minden darabot őrizzen meg: ha a mosógépet szállítani kell, előtte ezeket vissza kell szerelni.
! A csomagolóanyag nem gyermekjáték.
Vízszintbe állítás
1. A mosógépet sík és kemény padlóra állítsa, úgy, hogy ne érjen falhoz, bútorhoz vagy máshoz.
2. Ha a padló nem tökéletesen vízszintes, az első lábak be-, illetve kicsa-
varásával kompenzálhatja azt (lásd ábra). A dőlés a gép felső burkolatán mérve nem lehet több, mint 2°.
A pontos vízszintezés biztosítja a gép stabilitását, így az a működés során nem fog vibrálni, zajt okozni vagy elmozdulni. Szőnyegpadló vagy szőnyeg esetén a lábakat úgy állítsa be, hogy a mosógép alatt elegendő hely maradjon a szellőzésre.
Vízés elektromos csatlakozás
A vízbevezető cső csatlakoztatása
1. A vízbevezető cső csatlakoztatásához csavarozza fel a csövet egy 3/4”-
os külső menettel
rendelkező hidegvízcsapra (lásd ábra).
A csatlakoztatás előtt eressze meg a csapot, és folyassa a
vizet addig, amíg az teljesen átlátszóvá nem válik!
2. A vízbevezető cső csatlakoztatásához csavarozza a csövet
a mosógép hátol-
dalán jobbra fent található vízbemeneti
csonkra (lásd ábra).
3. Ügyeljen arra, hogy a csövön ne legyen törés vagy szűkület.
!A csap víznyomásának a műszaki adatok táblázatában szereplő határértékek között kell lennie (lásd a szemben lévő oldalt).
!Amennyiben a vízbevezető cső nem elég hosszú, forduljon szaküzlethez vagy engedéllyel rendelkező szakemberhez.
!Soha ne alkalmazzon már használt csöveket.
!Használja a készülékhez mellékelteket.
26
 Loading...