


P O R T A B L E
USER‘S GUIDE
THANK YOU
Thank you for choosing Humminbird Piranha, manufactured by Techsonic Industries, for your sonar fishfinder and depthsounder. Techsonic has built its reputation by designing and manufacturing top-quality, thoroughly reliable marine equipment. Techsonic has designed your Humminbird Piranha unit to be trouble free even in the harshest marine environments.
In the unlikely event that your Humminbird Piranha product does require repairs, Techsonic offers an exclusive Service Guarantee - free of charge during the first year after purchase, and available at a reasonable rate after the one-year period. Complete details are included at the end of this manual.
We encourage you to read this operations manual carefully in order to get full benefit from all the features and uses of your Humminbird Piranha product.
WARNING! This device should not be used as a navigational aid to prevent collision, grounding, boat damage, or personal injury. When the boat is moving, water depth may change too quickly to allow time for you to react. Always operate the boat at very slow speeds if you suspect shallow water or submerged objects.
WARNING: Disassembly and repair of this electronic unit should only be performed by authorized service personal. Any modification of the serial number or attempt to repair the original equipment or accessories by unauthorized individuals will void the warranty. Handling and/or opening this unit may result in exposure to lead, in the form of solder.
Warning: This product contains lead, a chemical known to the State of California to cause cancer and birth defects and other reproductive harm.
¨2002 Techsonic Industries
TABLE OF CONTENTS
Section 1: CASE ASSEMBLY |
2 |
Introduction . . . . . . . . . . . . . . . . . . . . . . . . . . . . . . . . . |
.2 |
Portable Case Assembly . . . . . . . . . . . . . . . . . . . . . . . . . . |
2 |
Attaching the Control Head . . . . . . . . . . . . . . . . . . . . |
3 |
Assembling the Transducer Mount . . . . . . . . . . . . . . . |
3 |
Attaching the Transducer Cable . . . . . . . . . . . . . . . . . |
4 |
Installing the Batteries . . . . . . . . . . . . . . . . . . . . . . . . |
5 |
Section 2: MOUNTING . . . . . . . . . . . . . . . . . . . . . . . . . . . . . . . . .5 Mounting the Transducer . . . . . . . . . . . . . . . . . . . . . . . . .5 Mounting the Case . . . . . . . . . . . . . . . . . . . . . . . . . . . . .6 Surface Mount . . . . . . . . . . . . . . . . . . . . . . . . . . . . . .6 Nylon Web Strap . . . . . . . . . . . . . . . . . . . . . . . . . . . .7 Removing the Case after Use . . . . . . . . . . . . . . . . . . . . . .7
Section 3: MAINTENANCE AND WARRANTY . . . . . . . . . . . . . . . . .8
Maintenance . . . . . . . . . . . . . . . . . . . . . . . . . . . . . . . . . .8
Replacing the Battery Power Cable . . . . . . . . . . . . . . .8
Warranty . . . . . . . . . . . . . . . . . . . . . . . . . . . . . . . . . . . .9
Service Policy . . . . . . . . . . . . . . . . . . . . . . . . . . . . . . . .10
Section 4: SPECIFICATIONS . . . . . . . . . . . . . . . . . . . . . . . . . . . . .11
pn531128-1 r30221F
CASE ASSEMBLY
INTRODUCTION / ATTACHING THE CONTROL HEAD
INTRODUCTION TO CASE ASSEMBLY
The Piranha Portable is available in several different configurations. You may have purchased the portable case complete with a Piranha unit ready for operation.
A Piranha control head you already own may also be used with the portable case.
The Piranha Portable contains the portable case, a removable power cable, transducer with 15 feet of
cable, the suction cup transducer mounting kit, and various connecting hardware.
This manual serves for all applications, so there may be some minor differences between the manual and the actual hardware included, depending on the configuration you purchased.
Piranha Portables are sold with the Piranha 1, 2, 2x, 4, 4x Control heads. The PTC Portable Piranha kit is adaptable to all Piranha fishfinders.
PIRANHA PORTABLE CASE ASSEMBLY
Case Assembly Overview
In the following step-by-step procedures the following portable case assembly tasks are described, and must be
performed in order:
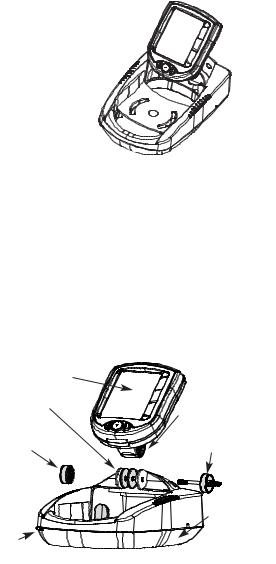
1. Attaching the control head
Pivot Knuckle
2. Assembling the transducer mount
Thumbknob
3. Attaching the transducer cable
4. Installing the batteries.
|
Cable Cover |
|
and |
|
Non-skid |
Rubber Cable Cover tab |
base. |
|
2

CASE ASSEMBLY
ATTACHING THE CONROL HEAD / ASSEMBLING THE TRANSDUCER MOUNT
Attaching the Control Head
1.Remove the pivot bolt, gimbal knob, and rubber washers from the hardware bags.
2.Place the rubber washers between the control head’s pivot knuckle and the arms from the portable case. Make sure that the control head screen is facing the case.
3.Slide the pivot bolt through the left side and screw the gimbal knob onto it using only 2-3 turns. The gimbal knob has two alignment pins that will seat into holes in the case arm holding the Piranha control head. Make sure these pins are seated and then tighten the assembly to a snug tension.
 Suction Cup
|
Plastic Bracket |
Star Lock |
|
Washers |
Phillips |
|
Head |
Phillips |
Bolt |
|
|
Head |
Washer & |
Bolt |
Wing nut |
|
Transducer |
Piranha 1 thru 4 Transducer
Thumb knob Battery Compartment
Gimbal knob
Cable Clip
Cable Holes
Washer &
Wing nut
Bolt
Star Lock
Washers 
Piranha 5 and 5x Transducer
Assembling the Transducer Mount
Note: Depending on your transducer type, you will use only one of the two mounting brackets included (see illustrations).
1. With a #2 Phillips screwdriver, attach the suction cup to the mounting bracket using the ¹⁄ -20 x ³⁄ " machine screw. Hand tighten only; do not use power tools.
2. Connect the transducer body to the mounting arm using a #2 Phillips screwdriver
and the hardware shown. Hand tighten only; do not use power tools.
3
 Loading...