


Pavilion DM4-1150
HP Pavilion DM4-1150, Pavilion DM4-1062, Pavilion DM4-1160, Pavilion DM4-1162, Pavilion DM4-1164 User Manual
...
HP Pavilion Notebook PC
User Guide

© Copyright 2010 Hewlett-Packard
Development Company, L.P.
Microsoft and Windows are U.S. registered
trademarks of Microsoft Corporation.
Bluetooth is a trademark owned by its
proprietor and used by Hewlett-Packard
Company under license. SD Logo is a
trademark of its proprietor.
The information contained herein is subject
to change without notice. The only
warranties for HP products and services are
set forth in the express warranty statements
accompanying such products and services.
Nothing herein should be construed as
constituting an additional warranty. HP shall
not be liable for technical or editorial errors
or omissions contained herein.
Second Edition: August 2010
First Edition: April 2010
Document Part Number: 609891-002
Product notice
This user guide describes features that are
common to most models. Some features
may not be available on your computer.
To obtain the latest information in the
User
Guide
, go to the HP Web site at
http://www.hp.com/support.

Safety warning notice
WARNING! To reduce the possibility of heat-related injuries or of overheating the computer, do not
place the computer directly on your lap or obstruct the computer air vents. Use the computer only on
a hard, flat surface. Do not allow another hard surface, such as an adjoining optional printer, or a soft
surface, such as pillows or rugs or clothing, to block airflow. Also, do not allow the AC adapter to
contact the skin or a soft surface, such as pillows or rugs or clothing, during operation. The computer
and the AC adapter comply with the user-accessible surface temperature limits defined by the
International Standard for Safety of Information Technology Equipment (IEC 60950).
iii

iv Safety warning notice

Table of contents
1 Features ........................................................................................................................................................... 1
Identifying the hardware ....................................................................................................................... 1
Top components .................................................................................................................. 1
TouchPad ............................................................................................................ 1
Lights ................................................................................................................... 2
Power button and fingerprint reader .................................................................... 3
Keys .................................................................................................................... 4
Front components ................................................................................................................ 5
Right-side components ........................................................................................................ 5
Left-side components .......................................................................................................... 6
Display components ............................................................................................................ 7
Bottom components ............................................................................................................. 8
Wireless antennas ............................................................................................................... 8
Additional hardware components ...................................................................................... 10
Labels ................................................................................................................................................. 10
2 Networking .................................................................................................................................................... 12
Using wireless devices ....................................................................................................................... 12
Identifying wireless and network status icons .................................................................... 12
Using the wireless controls ................................................................................................ 13
Using the wireless action key ............................................................................................ 13
Using HP Wireless Assistant software ............................................................................... 13
Using operating system controls ........................................................................................ 14
Using a WLAN .................................................................................................................................... 14
Setting up a WLAN ............................................................................................................ 15
Protecting your WLAN ....................................................................................................... 15
Connecting to a WLAN ...................................................................................................... 16
Roaming to another network .............................................................................................. 17
Using HP Mobile Broadband (select models only) ............................................................................. 17
Inserting a SIM ................................................................................................................... 17
Removing a SIM ................................................................................................................ 18
Using Bluetooth wireless devices ....................................................................................................... 19
Bluetooth and Internet Connection Sharing (ICS) ............................................................. 19
Troubleshooting wireless connection problems ................................................................................. 20
Cannot connect to a WLAN ............................................................................................... 20
Cannot connect to a preferred WLAN network .................................................................. 20
Network icon is not displayed ............................................................................................ 21
Current WLAN network security codes are unavailable .................................................... 21
v

WLAN connection is very weak ......................................................................................... 22
Cannot connect to the wireless router ............................................................................... 22
Connecting to a local area network (LAN) .......................................................................................... 22
3 Pointing devices and keyboard ................................................................................................................... 24
Using pointing devices ....................................................................................................................... 24
Setting pointing device preferences ................................................................................... 24
Using the TouchPad .......................................................................................................... 24
Turning the TouchPad on and off ...................................................................... 24
Navigating ......................................................................................................... 24
Selecting ........................................................................................................... 25
Using TouchPad gestures ................................................................................. 26
Scrolling ............................................................................................ 26
Pinching/Zooming ............................................................................. 26
Connecting an external mouse .......................................................................................... 27
Using the action keys ......................................................................................................................... 27
Using the hotkeys ............................................................................................................................... 28
Cleaning the TouchPad and keyboard ............................................................................................... 29
4 Multimedia ..................................................................................................................................................... 31
Multimedia features ............................................................................................................................ 31
Identifying your multimedia components ........................................................................... 31
Using the media activity functions ..................................................................................... 33
Using the media activity action keys ................................................................. 33
Multimedia software ........................................................................................................................... 33
Opening preinstalled multimedia software ......................................................................... 34
Using HP MediaSmart software ......................................................................................... 34
Using other multimedia software ....................................................................................... 34
Installing multimedia software from a disc ......................................................................... 35
Audio .................................................................................................................................................. 35
Connecting external audio devices .................................................................................... 35
Checking your audio functions ........................................................................................... 35
Using the audio-out (headphone) jack ............................................................................... 36
Using the audio-in (microphone) jack ................................................................................ 36
Video .................................................................................................................................................. 36
Using the external monitor port .......................................................................................... 36
Connecting an HDMI device .............................................................................................. 37
Configuring audio for HDMI (select models only) .............................................. 38
Optical drive ....................................................................................................................................... 38
Identifying the installed optical drive .................................................................................. 38
Using optical discs (CDs, DVDs, and BDs) ....................................................................... 39
Selecting the right disc (CDs, DVDs, and BDs) ................................................................. 39
CD-R discs ........................................................................................................ 39
vi

CD-RW discs ..................................................................................................... 40
DVD±R discs ..................................................................................................... 40
DVD±RW discs ................................................................................................. 40
LightScribe DVD+R discs .................................................................................. 40
Blu-ray Discs (BDs) ........................................................................................... 40
Playing a CD, DVD, or BD ................................................................................................. 40
Configuring AutoPlay ......................................................................................................... 41
Changing DVD region settings .......................................................................................... 41
Observing the copyright warning ....................................................................................... 42
Copying a CD or DVD ........................................................................................................ 42
Creating (burning) a CD, DVD, or BD ................................................................................ 42
Removing an optical disc (CD, DVD, or BD) ..................................................................... 43
Troubleshooting ................................................................................................................. 44
The optical disc tray does not open for removal of a CD, DVD, or BD ............. 44
The computer does not detect the optical drive ................................................ 44
Preventing playback disruptions ....................................................................... 45
A disc does not play .......................................................................................... 45
A disc does not play automatically .................................................................... 46
A movie stops, skips, or plays erratically .......................................................... 46
A movie is not visible on an external display ..................................................... 47
The process of burning a disc does not begin, or it stops before completion .. . 47
A device driver must be reinstalled ................................................................... 47
Obtaining the latest HP device drivers ............................................. 48
Obtaining the latest Windows device drivers .................................... 48
Webcam ............................................................................................................................................. 48
Adjusting webcam properties ............................................................................................. 49
5 Power management ...................................................................................................................................... 50
Setting power options ......................................................................................................................... 50
Using power-saving states ................................................................................................. 50
Initiating and exiting Sleep ................................................................................ 50
Initiating and exiting Hibernation ....................................................................... 51
Using the battery meter ..................................................................................................... 51
Using power plans ............................................................................................................. 51
Viewing the current power plan ......................................................................... 51
Selecting a different power plan ........................................................................ 52
Customizing power plans .................................................................................. 52
Setting password protection on wakeup ............................................................................ 52
Using external AC power .................................................................................................................... 52
Connecting the AC adapter ............................................................................................... 53
Testing an AC adapter ....................................................................................................... 54
Using battery power ........................................................................................................................... 54
Identifying batteries ............................................................................................................ 54
vii

Finding battery information in Help and Support ............................................................... 55
Using Battery Check .......................................................................................................... 55
Displaying the remaining battery charge ........................................................................... 55
Inserting or removing the battery ....................................................................................... 55
Charging a battery ............................................................................................................. 57
Maximizing battery discharge time .................................................................................... 57
Managing low battery levels .............................................................................................. 57
Identifying low battery levels ............................................................................. 58
Resolving a low battery level ............................................................................. 58
Resolving a low battery level when external power is available ....... 58
Resolving a low battery level when a charged battery is
available ........................................................................................... 58
Resolving a low battery level when no power source is available .... 58
Resolving a low battery level when the computer cannot exit
Hibernation ....................................................................................... 58
Calibrating a battery ........................................................................................................... 58
Step 1: Fully charge the battery ........................................................................ 59
Step 2: Disable Hibernation and Sleep ............................................................. 59
Step 3: Discharge the battery ............................................................................ 60
Step 4: Fully recharge the battery ..................................................................... 60
Step 5: Reenable Hibernation and Sleep .......................................................... 60
Conserving battery power .................................................................................................. 61
Storing a battery ................................................................................................................ 61
Disposing of a used battery ............................................................................................... 61
Replacing the battery ......................................................................................................... 61
Switching between graphics modes (select models only) .................................................................. 61
Shutting down the computer ............................................................................................................... 62
6 Drives ............................................................................................................................................................. 63
Identifying installed drives .................................................................................................................. 63
Handling drives ................................................................................................................................... 63
Improving hard drive performance ..................................................................................................... 64
Using Disk Defragmenter ................................................................................................... 64
Using Disk Cleanup ........................................................................................................... 64
Using HP ProtectSmart Hard Drive Protection ................................................................................... 64
Identifying HP ProtectSmart Hard Drive Protection status ................................................ 65
Using HP ProtectSmart Hard Drive Protection software .................................................... 65
Replacing the hard drive .................................................................................................................... 66
7 External devices ............................................................................................................................................ 71
Using a USB device ........................................................................................................................... 71
Connecting a USB device .................................................................................................. 71
Removing a USB device .................................................................................................... 71
viii

Using an eSATA device ..................................................................................................................... 72
Connecting an eSATA device ............................................................................................ 72
Removing an eSATA device .............................................................................................. 72
8 External media cards .................................................................................................................................... 74
Using Digital Media Slot cards ........................................................................................................... 74
Inserting a digital card ........................................................................................................ 74
Removing a digital card ..................................................................................................... 75
9 Memory modules .......................................................................................................................................... 76
Adding or replacing memory modules ................................................................................................ 76
Adding or replacing a memory module in the expansion memory module slot ................. 76
Upgrading a memory module in the primary memory module slot .................................... 79
10 Security ........................................................................................................................................................ 83
Protecting the computer ..................................................................................................................... 83
Using passwords ................................................................................................................................ 83
Setting passwords in Windows .......................................................................................... 84
Setting passwords in Setup Utility ..................................................................................... 84
Administrator password ..................................................................................... 85
Managing an administrator password ............................................... 85
Entering an administrator password ................................................. 86
Power-on password .......................................................................................... 86
Managing a power-on password ...................................................... 86
Entering a power-on password ......................................................... 86
Using antivirus software ..................................................................................................................... 86
Using firewall software ....................................................................................................................... 87
Installing critical security updates ....................................................................................................... 87
Installing an optional security cable .................................................................................................... 87
Using the fingerprint reader ................................................................................................................ 88
Locating the fingerprint reader ........................................................................................... 88
Registering fingerprints ...................................................................................................... 89
Using your registered fingerprint to log on to Windows ..................................................... 90
11 HP QuickWeb .............................................................................................................................................. 91
Disabling and enabling QuickWeb ..................................................................................................... 91
12 Setup Utility ................................................................................................................................................. 92
Starting Setup Utility ........................................................................................................................... 92
Using Setup Utility .............................................................................................................................. 92
Changing the language of Setup Utility ............................................................................. 92
Navigating and selecting in Setup Utility ............................................................................ 93
ix

Displaying system information ........................................................................................... 93
Restoring default settings in Setup Utility .......................................................................... 93
Exiting Setup Utility ............................................................................................................ 94
Setup Utility menus ............................................................................................................................ 94
Main menu ......................................................................................................................... 94
Security menu .................................................................................................................... 94
System Configuration menu .............................................................................................. 94
Diagnostics menu .............................................................................................................. 95
13 Software updates ........................................................................................................................................ 96
Updating the BIOS ............................................................................................................................. 96
Determining the BIOS version ........................................................................................... 96
Downloading a BIOS update ............................................................................................. 97
Updating programs and drivers .......................................................................................................... 97
14 Backup and Recovery ................................................................................................................................ 99
Creating recovery discs ...................................................................................................................... 99
Backing up your information ............................................................................................................. 100
Using Windows Backup and Restore .............................................................................. 101
Using system restore points ............................................................................................ 101
When to create restore points ......................................................................... 101
Create a system restore point ......................................................................... 101
Restore to a previous date and time ............................................................... 102
Performing a recovery ...................................................................................................................... 102
Recovering from the recovery discs ................................................................................ 102
Recovering from the dedicated recovery partition (select models only) .......................... 102
Index ................................................................................................................................................................. 104
x
1Features
Identifying the hardware
Components included with the computer may vary by region and model. The illustrations in this
chapter identify the standard features on most computer models.
To see a list of hardware installed in the computer:
1. Select Start > Control Panel > System and Security.
2. In the System area, click Device Manager.
You can also add hardware or modify device configurations using Device Manager.
Top components
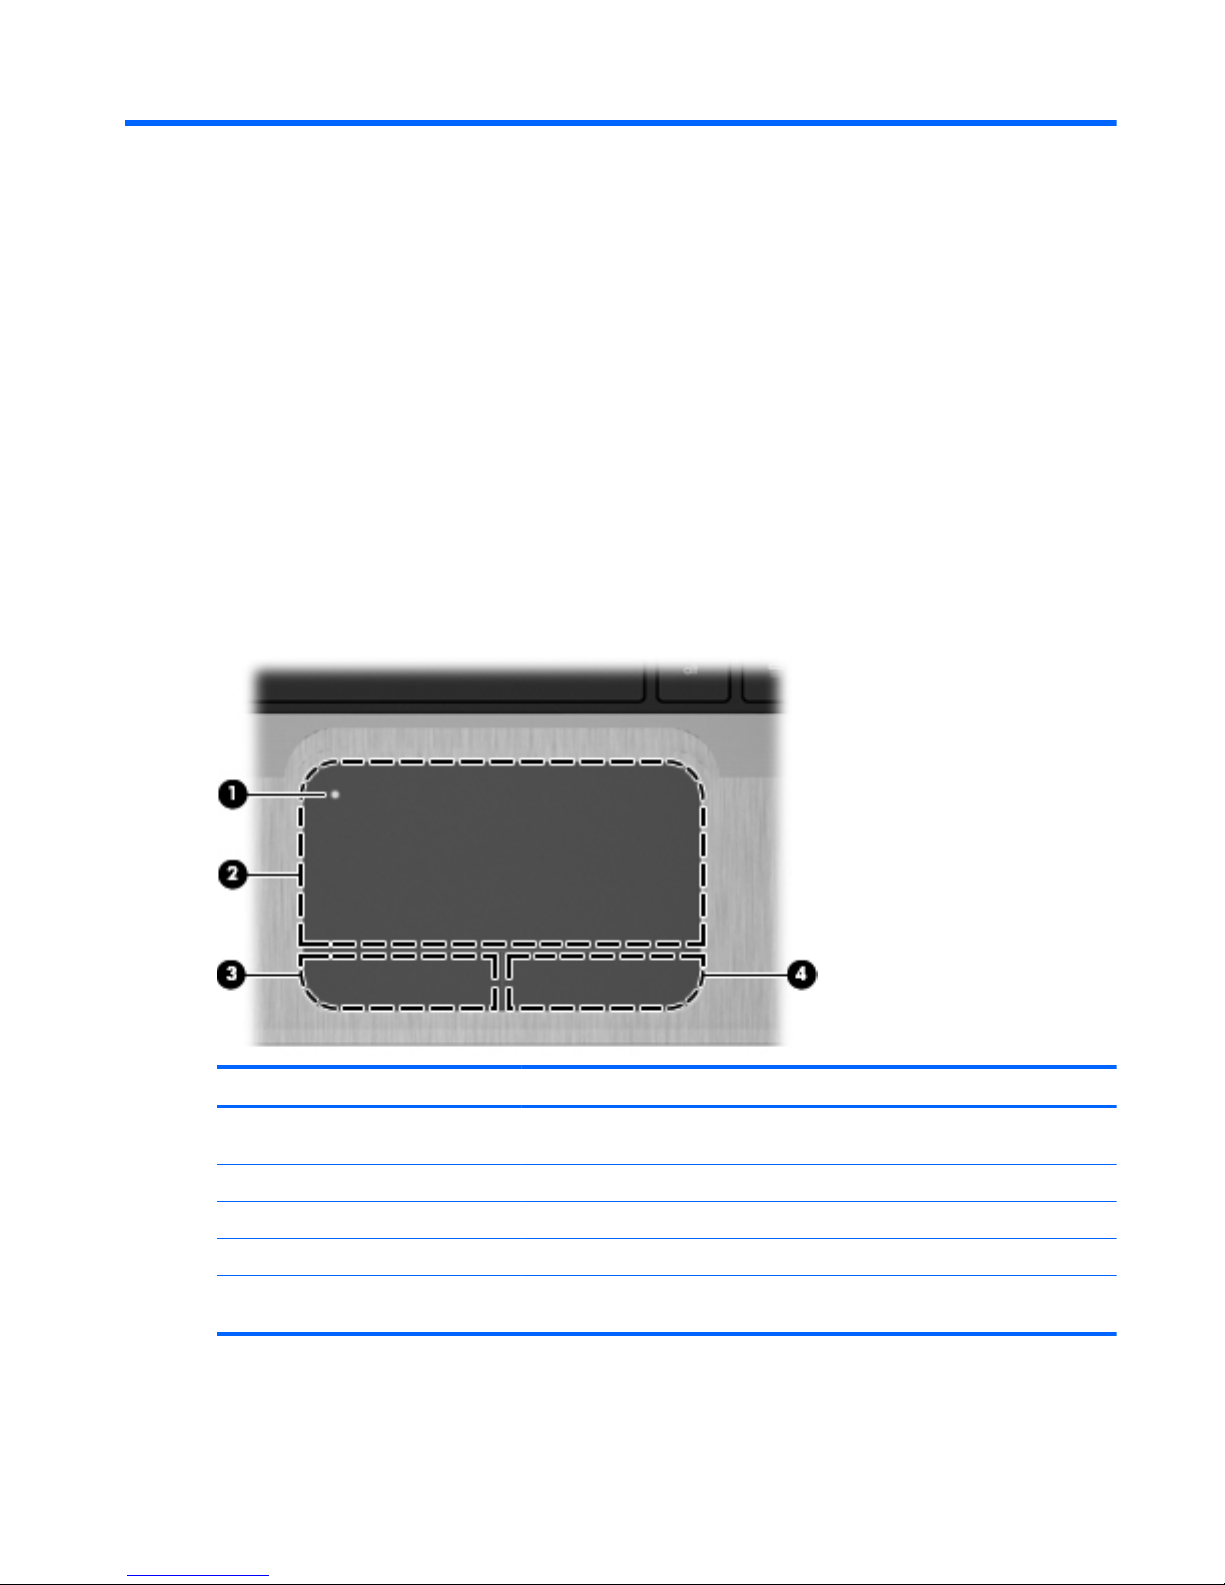
TouchPad
Component Description
(1) TouchPad on/off button Turns the TouchPad on and off. Quickly double-tap the button to turn the
TouchPad on and off.
(2) TouchPad* Moves the pointer and selects or activates items on the screen.
(3) Left TouchPad button* Functions like the left button on an external mouse.
(4) Right TouchPad button* Functions like the right button on an external mouse.
*This table describes factory settings. To view or change pointing device preferences, select Start > Devices and Printers.
Then, right-click the icon representing your device, and select Mouse settings.
Identifying the hardware 1

Lights
Component Description
(1)
Power light
●
White: Power is on.
●
Blinking White: The computer is in the Sleep state.
NOTE: Another power light is located on the left side of the computer.
(2)
Mute light Amber: Speaker sound is off.
(3) Wireless light
●
White: An integrated wireless device, such as a wireless local area
network (WLAN) device and/or a Bluetooth® device, is on.
NOTE: Wireless devices are enabled at the factory.
●
Amber: All wireless devices are off.
(4) Caps lock light White: Caps lock is on.
(5)
TouchPad light Amber: TouchPad is disabled.
(6) Fingerprint reader light
●
White: Fingerprint read is good.
●
Amber: Fingerprint read is bad.
2 Chapter 1 Features

Power button and fingerprint reader
Component Description
(1) Power button*
●
When the computer is off, press the button to turn on the
computer.
●
When the computer is on, press the button briefly to initiate
Sleep.
●
When the computer is in the Sleep state, press the button
briefly to exit Sleep.
●
When the computer is in Hibernation, press the button
briefly to exit Hibernation.
If the computer has stopped responding and Windows®
shutdown procedures are ineffective, press and hold the power
button for at least 5 seconds to turn off the computer.
To learn more about your power settings, select Start > Control
Panel > System and Security > Power Options.
(2) Fingerprint reader Allows a fingerprint logon to Windows, instead of a password
logon.
*This table describes factory settings. For information about changing factory settings, refer to the user guides located in
Help and Support.
Identifying the hardware 3

Keys
Component Description
(1) esc key Displays system information when pressed in combination with
the fn key.
(2) fn key Displays system information when pressed in combination with
the esc key.
(3) Windows logo key Displays the Windows Start menu.
(4) Windows applications key Displays a shortcut menu for items beneath the pointer.
(5) Action keys Execute frequently used functions.
4 Chapter 1 Features

Front components
Component Description
(1) Digital Media Slot Supports the following optional digital card formats:
●
Memory Stick (MS)
●
Memory Stick Pro (MSP)
●
MultiMediaCard (MMC)
●
Secure Digital (SD) Memory Card
●
Secure Digital High Capacity (SDHC) Memory Card
(standard and large size)
●
xD-Picture Card (XD)
(2) Speakers (2) Produce sound.
Right-side components
Component Description
(1) Optical drive light
●
On: The optical drive is being accessed.
●
Off: The optical drive is idle.
(2) Optical drive Reads/writes optical discs.
(3)
USB ports (2) Connect optional USB devices.
(4) Battery light
●
White: The computer is connected to external
power and the battery is fully charged.
●
Amber: The computer is connected to external
power and the battery is charging.
●
Blinking: A battery that is the only available
power source has reached a low battery level.
When the battery reaches a critical battery
level, the battery light continues to blink.
(5)
Power connector Connects an AC adapter.
Identifying the hardware 5

Left-side components
Component Description
(1)
Security cable slot Attaches an optional security cable to the
computer.
NOTE: The security cable is designed to act as
a deterrent, but it may not prevent the computer
from being mishandled or stolen.
(2)
External monitor port Connects an optional external display, such as a
monitor or projector, to the computer.
(3)
Audio-in (microphone) jack Connects an optional computer headset
microphone, stereo array microphone, or
monaural microphone.
(4)
Audio-out (headphone) jack Produces sound when connected to optional
powered stereo speakers, headphones, ear buds,
a headset, or television audio.
(5)
Drive light
●
White: The hard drive is being accessed.
●
Amber: HP ProtectSmart Hard Drive
Protection has temporarily parked the hard
drive.
(6)
Power light
●
On: Power is on.
●
Blinking: The computer is in the Sleep state.
NOTE: Another power light is located next to the
power button.
(7) Vents (3) Enable airflow to cool internal components.
NOTE: The computer fan starts up automatically
to cool internal components and prevent
overheating. It is normal for the internal fan to
cycle on and off during routine operation.
(8) RJ-45 (network) lights
●
White: The network is connected.
●
Amber: The network is showing activity.
(9)
RJ-45 (network) jack Connects a network cable.
6 Chapter 1 Features
Component Description
(10) HDMI port Connects an optional HDMI device.
(11) Combo eSATA/USB port Connects an optional USB device or high-
performance eSATA component, such as an
eSATA external hard drive.
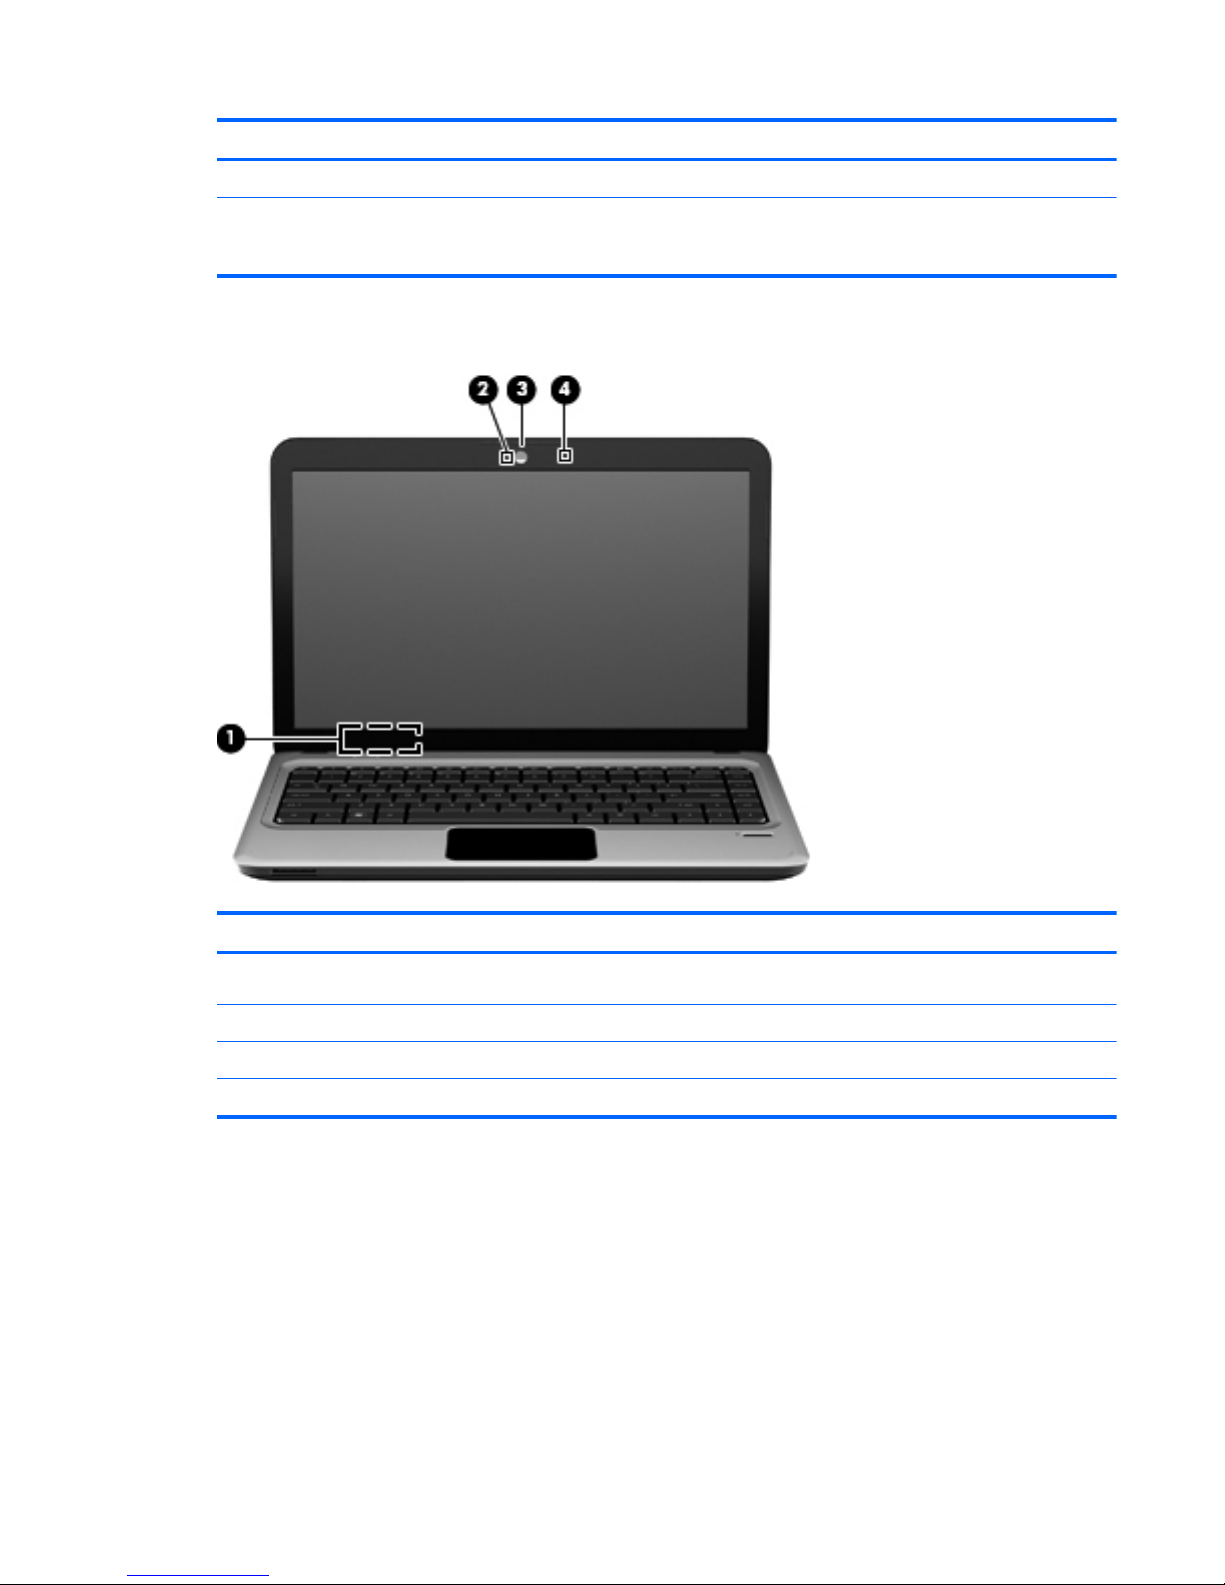
Display components
Component Description
(1) Internal display switch Turns off the display if the display is closed while the power is on.
(2) Webcam light White: The webcam is in use.
(3) Webcam Records video and captures still photographs.
(4) Internal microphone Records sound.
Identifying the hardware 7
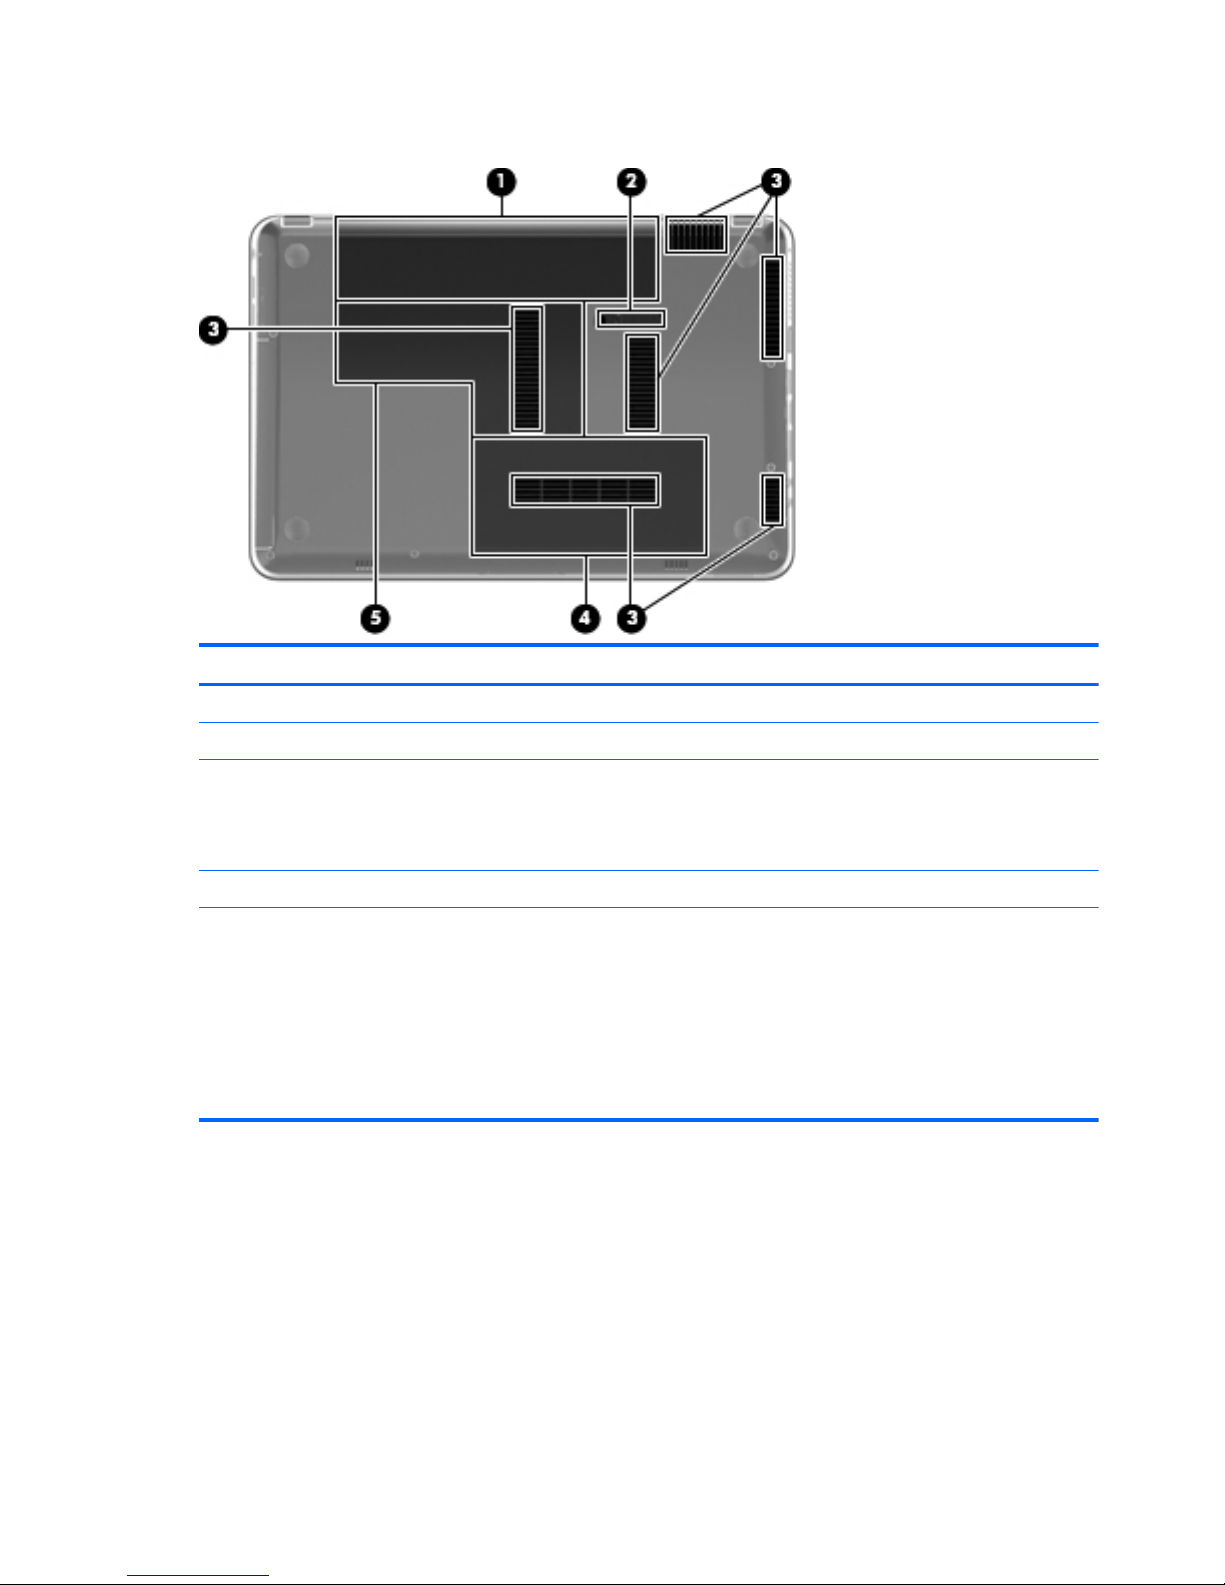
Bottom components
Component Description
(1) Battery bay Holds the battery.
(2) Battery release latch Releases the battery from the battery bay.
(3) Vents (6) Enable airflow to cool internal components.
NOTE: The computer fan starts up automatically to cool internal
components and prevent overheating. It is normal for the internal
fan to cycle on and off during routine operation.
(4) Hard drive bay Holds the hard drive.
(5) Memory/wireless module compartment Holds a wireless LAN module, a wireless WAN module, and
memory modules.
NOTE: To prevent an unresponsive system, replace the
wireless module only with a wireless module authorized for use in
the computer by the governmental agency that regulates wireless
devices in your country or region. If you replace the module and
then receive a warning message, remove the module to restore
computer functionality, and then contact technical support
through Help and Support.
Wireless antennas
On select computer models, at least two antennas send and receive signals from one or more
wireless devices. These antennas are not visible from the outside of the computer.
8 Chapter 1 Features

Component Description
(1) WLAN antennas (2)* Send and receive wireless signals to communicate with wireless
local area networks (WLANs).
(2) WWAN antennas (2) (select models only)* Send and receive wireless signals to communicate with wireless
wide-area networks (WWANs).
*The antennas are not visible from the outside of the computer. For optimal transmission, keep the areas immediately
around the antennas free from obstructions.
To see wireless regulatory notices, refer to the section of the
Regulatory, Safety and Environmental
Notices
that applies to your country or region. These notices are located in Help and Support.
Identifying the hardware 9
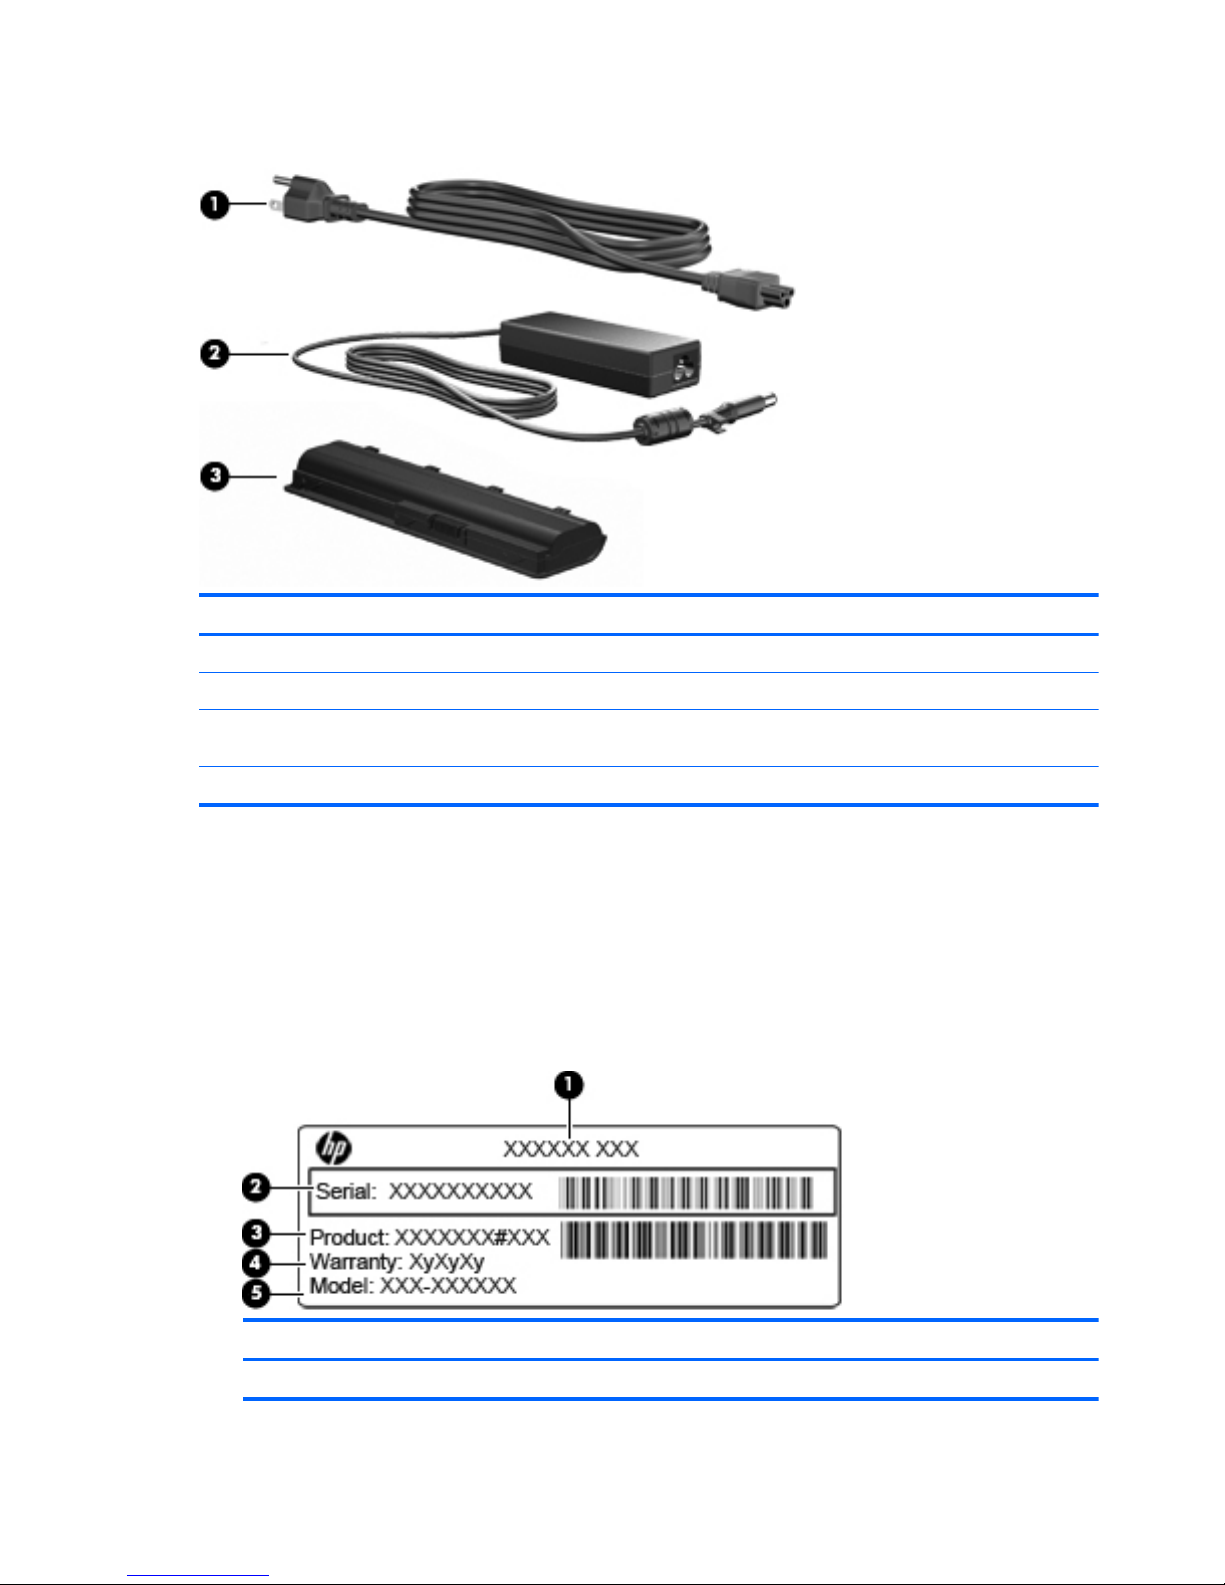
Additional hardware components
Component Description
(1) Power cord* Connects an AC adapter to an AC outlet.
(2) AC adapter Converts AC power to DC power.
(3) Battery* Powers the computer when the computer is not plugged into
external power.
*Batteries and power cords vary in appearance by region and country.
Labels
The labels affixed to the computer provide information needed when troubleshooting system
problems or traveling internationally with the computer.
●
Service tag—Provides important information including:
The service tag label is affixed to the bottom of the computer. When contacting technical
support, have this information available.
Item Component Description
(1) Product name This is the product name affixed to the front of the computer.
10 Chapter 1 Features

Item Component Description
(2) Serial number This is an alphanumeric identifier that is unique to each
product.
(3) Product number This is an alphanumeric identifier that provides specific
information about the hardware components. The product
number helps a service technician to determine what
components and parts are needed.
(4) Warranty period The duration (in years) of the warranty period for this
computer.
(5) Model description (select
models only)
This is an alphanumeric identifier that you use to locate
documents, drivers, and support for your computer.
●
Microsoft Certificate of Authenticity—Contains the Windows Product Key. You might need the
Product Key to update or troubleshoot the operating system. This certificate is affixed to the
bottom of the computer.
●
Regulatory label—Provides regulatory information about the computer. The regulatory label is
affixed inside the battery bay.
●
Wireless certification label(s) (select models only)—Provides information about optional wireless
devices and the approval markings of some of the countries or regions where the devices have
been approved for use. An optional device might be a wireless local area network (WLAN)
device or an optional Bluetooth device. If the computer model includes one or more wireless
devices, one or more certification labels are included with the computer. You might need this
information when traveling internationally. Wireless certification labels are affixed inside the
battery bay.
●
SIM (subscriber identity module) label (select models only)—Provides the ICCID (Integrated
Circuit Card Identifier) of the SIM. This label is located inside the battery bay.
●
HP Mobile Broadband Module serial number label (select models only)—Provides the serial
number of the HP Mobile Broadband Module. This label is located inside the battery bay.
Labels 11

2Networking
Using wireless devices
Wireless technology transfers data across radio waves instead of wires. Your computer may be
equipped with one or more of the following wireless devices:
●
Wireless local area network (WLAN) device—Connects the computer to wireless local area
networks (commonly referred to as Wi-Fi networks, wireless LANs, or WLANs) in corporate
offices, your home, and public places such as airports, restaurants, coffee shops, hotels, and
universities. In a WLAN, each mobile wireless device communicates with a wireless router or a
wireless access point.
●
HP Mobile Broadband Module—A wireless wide area network (WWAN) device that provides
access to information wherever mobile network operator service is available. In a WWAN, each
mobile device communicates to a mobile network operator’s base station. Mobile network
operators install networks of base stations (similar to cell phone towers) throughout large
geographic areas, effectively providing coverage across entire states, regions, or even countries.
●
Bluetooth device—Creates a personal area network (PAN) to connect to other Bluetoothenabled devices such as computers, phones, printers, headsets, speakers, and cameras. In a
PAN, each device communicates directly with other devices, and devices must be relatively
close together—typically within 10 meters (approximately 33 feet) of each other.
Computers with WLAN devices support one or more of the following IEEE industry standards:
●
802.11b, the first popular standard, supports data rates of up to 11 Mbps and operates at a
frequency of 2.4 GHz.
●
802.11g supports data rates of up to 54 Mbps and operates at a frequency of 2.4 GHz. An
802.11g WLAN device is backward compatible with 802.11b devices, so they can operate on the
same network.
●
802.11a supports data rates of up to 54 Mbps and operates at a frequency of 5 GHz.
NOTE: 802.11a is not compatible with 802.11b and 802.11g.
●
802.11n supports data rates of up to 450 Mbps and may operate at 2.4 GHz or 5 GHz, making it
backward compatible with 802.11a, b, and g.
For more information on wireless technology, refer to the information and Web site links provided in
Help and Support.
Identifying wireless and network status icons
Icon Name Description
Wireless (connected) Identifies the location of the wireless light and the wireless
action key on the computer. Also identifies the Wireless
Assistant software on the computer and indicates that one
or more of the wireless devices are on.
Wireless (disconnected) Identifies the Wireless Assistant software on the computer
and indicates that all of the wireless devices are off.
12 Chapter 2 Networking

Icon Name Description
Wired network (connected) Indicates that one or more of your network drivers are
installed and one or more network devices are connected
to the network.
Wired network (disabled/disconnected) Indicates that one or more of your network drivers are
installed, all network devices or all wireless devices are
disabled in Windows Control Panel, and no network
devices are connected to a wired network.
Network (disabled/disconnected) Indicates that one or more of your network drivers are
installed, no wireless connections are available or all
wireless network devices are disabled by the wireless
action key or Wireless Assistant, and no network devices
are connected to a wired network.
Network (connected) Indicates that one or more of your network drivers are
installed, one or more network devices are connected to a
wireless network, and one or more network devices are
connected to a wired network.
Network (disconnected) Indicates that one or more of your network drivers are
installed and wireless connections are available, but no
network devices are connected to a wired or wireless
network.
Using the wireless controls
You can control the wireless devices in your computer using these features:
●
Wireless action key
●
HP Wireless Assistant software
●
Operating system controls
Using the wireless action key
The computer has a wireless action key, one or more wireless devices, and a wireless light. All of the
wireless devices on your computer are enabled at the factory, so the wireless light is on (white) when
you turn on the computer.
The wireless light indicates the overall power state of your wireless devices, not the status of
individual devices. If the wireless light is white, at least one wireless device is on. If the wireless light
is amber, all wireless devices are off.
Because the wireless devices are enabled at the factory, you can use the wireless action key to turn
on or turn off the wireless devices simultaneously. Individual wireless devices can be controlled
through HP Wireless Assistant software.
Using HP Wireless Assistant software
A wireless device can be turned on or off using HP Wireless Assistant software. If a wireless device is
disabled in Setup Utility, it must be reenabled in Setup Utility before it can be turned on or off using
Wireless Assistant.
NOTE: Enabling or turning on a wireless device does not automatically connect the computer to a
network or a Bluetooth-enabled device.
Using wireless devices 13

To view the state of the wireless devices, click the Show hidden icons icon, the arrow at the left of
the notification area, and position the mouse pointer over the wireless icon.
If the wireless icon is not displayed in the notification area, complete the following steps to change
Wireless Assistant properties:
1. Select Start > Control Panel > Hardware and Sound > Windows Mobility Center.
2. Click the wireless icon in the Wireless Assistant tile, which is located in the bottom row of
Windows Mobility Center.
3. Click Properties.
4. Select the check box next to HP Wireless Assistant icon in notification area.
5. Click Apply.
6. Click Close.
For more information, refer to the Wireless Assistant software Help:
1. Open Wireless Assistant by clicking the wireless icon in Windows Mobility Center.
2. Click the Help button.
Using operating system controls
Some operating systems also offer a way to manage integrated wireless devices and the wireless
connection. For example, Windows provides the Network and Sharing Center that allows you to set
up a connection or network, connect to a network, manage wireless networks, and diagnose and
repair network problems.
To access the Network and Sharing Center, select Start > Control Panel > Network and Internet >
Network and Sharing Center.
For more information, select Start > Help and Support.
Using a WLAN
With a WLAN device, you can access a wireless local area network (WLAN), which is composed of
other computers and accessories that are linked by a wireless router or a wireless access point.
NOTE: The terms
wireless router
and
wireless access point
are often used interchangeably.
●
A large-scale WLAN, such as a corporate or public WLAN, typically uses wireless access points
that can accommodate a large number of computers and accessories and can separate critical
network functions.
●
A home or small office WLAN typically uses a wireless router, which allows several wireless and
wired computers to share an Internet connection, a printer, and files without requiring additional
pieces of hardware or software.
To use the WLAN device in your computer, you must connect to a WLAN infrastructure (provided
through a service provider or a public or corporate network).
14 Chapter 2 Networking
Setting up a WLAN
To set up a WLAN and connect to the Internet, you need the following equipment:
●
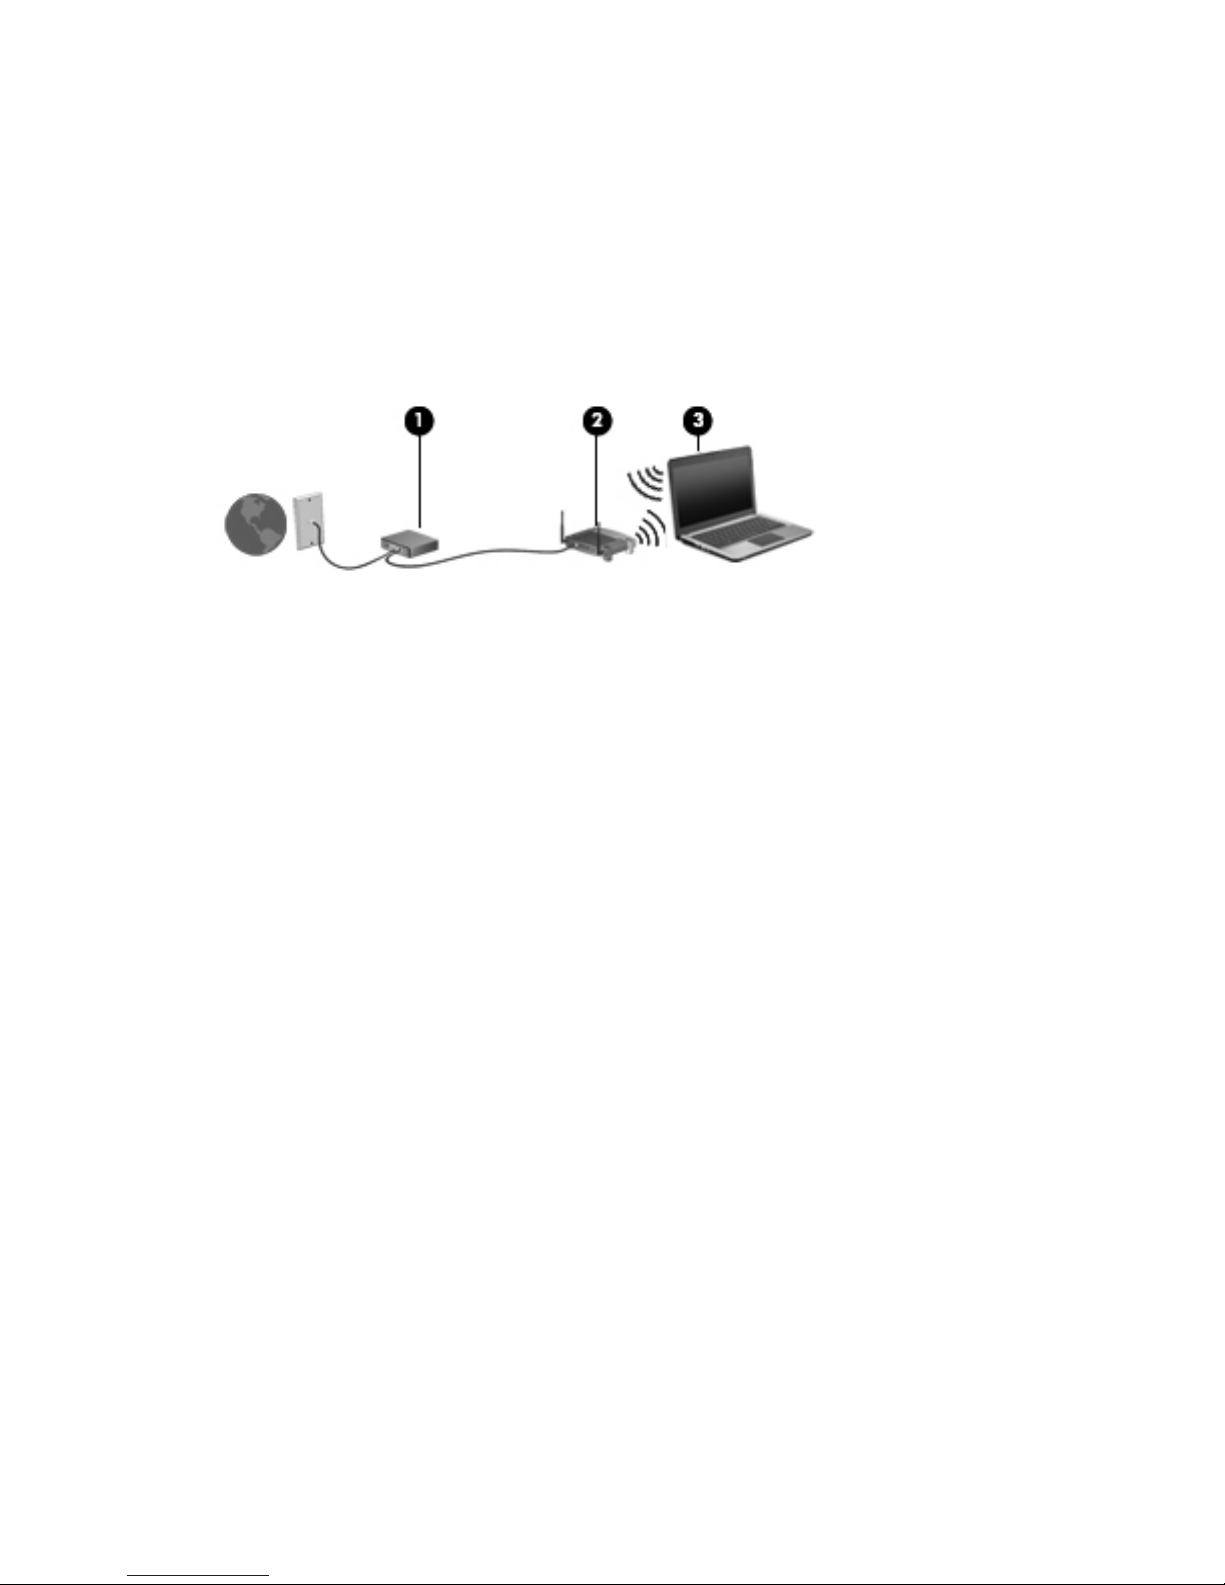
A broadband modem (either DSL or cable) (1) and high-speed Internet service purchased from
an Internet service provider (ISP)
●
A wireless router (purchased separately) (2)
●
The wireless computer (3)
The following illustration shows an example of a wireless network installation that is connected to the
Internet.
As your network grows, additional wireless and wired computers can be connected to the network to
access the Internet.
For help in setting up your WLAN, refer to the information provided by your router manufacturer or
your ISP.
Protecting your WLAN
Because the WLAN standard was designed with only limited security capabilities—basically to foil
casual eavesdropping rather than more powerful forms of attack—it is essential to understand that
WLANs are vulnerable to well-known and well-documented security weaknesses.
WLANs in public areas, or “hotspots,” like coffee shops and airports may not provide any security.
New technologies are being developed by wireless manufacturers and hotspot service providers that
make the public environment more secure and anonymous. If you are concerned about the security of
your computer in a hotspot, limit your network activities to noncritical e-mail and basic Internet surfing.
When you set up a WLAN or access an existing WLAN, always enable security features to protect
your network from unauthorized access. The common security levels are Wi-Fi Protected Access
(WPA)-Personal and Wired Equivalent Privacy (WEP). Because wireless radio signals travel outside
the network, other WLAN devices can pick up unprotected signals and either connect to your network
(uninvited) or capture information being sent across it. However, you can take precautions to protect
your WLAN:
●
Use a wireless transmitter with built-in security
Many wireless base stations, gateways, or routers provide built-in security features, such as
wireless security protocols and firewalls. With the correct wireless transmitter, you can protect
your network from the most common wireless security risks.
●
Work behind a firewall
A firewall is a barrier that checks both data and requests for data that are sent to your network,
and discards any suspicious items. Firewalls are available in many varieties, both software and
hardware. Some networks use a combination of both types.
●
Use wireless encryption
Using a WLAN 15

A variety of sophisticated encryption protocols is available for your WLAN. Find the solution that
works best for your network security:
◦
Wired Equivalent Privacy (WEP) is a wireless security protocol that encodes or encrypts
all network data before it is transmitted using a WEP key. Usually, you can allow the
network to assign the WEP key. Alternatively, you can set up your own key, generate a
different key, or choose other advanced options. Without the correct key, others will not be
able to use the WLAN.
◦
WPA (Wi-Fi Protected Access), like WEP, uses security settings to encrypt and decrypt
data that is transmitted over the network. However, instead of using one static security key
for encryptions as WEP does, WPA uses “temporal key integrity protocol” (TKIP) to
dynamically generate a new key for every packet. It also generates different sets of keys for
each computer on the network.
Connecting to a WLAN
To connect to the WLAN, follow these steps:
1. Be sure that the WLAN device is on. If it is on, the wireless light is white. If the wireless light is
amber, press the wireless action key.
2. Click the network icon in the notification area, at the far right of the taskbar.
3. Select your WLAN from the list.
4. Click Connect.
If the network is a security-enabled WLAN, you are prompted to enter a network security key,
which is a security code. Type the code, and then click OK to complete the connection.
NOTE: If no WLANs are listed, you are out of range of a wireless router or access point.
NOTE: If you do not see the network you want to connect to, click Open Network and
Sharing Center, and then click Set up a new connection or network. A list of options is
displayed. You can choose to manually search for and connect to a network or to create a new
network connection.
After the connection is made, place the mouse pointer over the network icon in the notification area,
at the far right of the taskbar, to verify the name and status of the connection.
NOTE: The functional range (how far your wireless signals travel) depends on WLAN
implementation, router manufacturer, and interference from other electronic devices or structural
barriers such as walls and floors.
More information about using a WLAN is available through the following resources:
●
Information from your ISP and the manufacturer's instructions included with your wireless router
and other WLAN equipment
●
Information and Web site links provided in Help and Support
For a list of public WLANs near you, contact your ISP or search the Web. Web sites that list public
WLANs include Cisco Internet Mobile Office Wireless Locations, Hotspotlist, and Geektools. Check
with each public WLAN location for cost and connection requirements.
For additional information on connecting your computer to a corporate WLAN, contact your network
administrator or IT department.
16 Chapter 2 Networking

Roaming to another network
When you move your computer within range of another WLAN, Windows attempts to connect to that
network. If the attempt is successful, your computer is automatically connected to the new network. If
Windows does not recognize the new network, follow the same procedure you used initially to
connect to your WLAN.
Using HP Mobile Broadband (select models only)
HP Mobile Broadband enables your computer to use wireless wide area networks (WWANs) to
access the Internet from more places and over larger areas than it can by using WLANs. Using
HP Mobile Broadband requires a network service provider (called a
mobile network operator
), which
in most cases is a mobile phone network operator. Coverage for HP Mobile Broadband is similar to
mobile phone voice coverage.
When used with mobile network operator service, HP Mobile Broadband gives you the freedom to
stay connected to the Internet, send e-mail, or connect to your corporate network whether you are on
the road or outside the range of Wi-Fi hotspots.
HP Mobile Broadband supports UNDP (Universal Notebook Data Platform), which enables data
connectivity for notebook computers.
You may need the HP Mobile Broadband Module serial number to activate mobile broadband service.
The serial number is printed on a label inside the battery bay of your computer.
Some mobile network operators require the use of a subscriber identity module (SIM). A SIM contains
basic information about you, such as a personal identification number (PIN), as well as network
information. Some computers include a SIM that is preinstalled in the battery bay. If the SIM is not
preinstalled, it may be provided in the HP Mobile Broadband information provided with your computer,
or the mobile network operator may provide it separately from the computer.
For information on inserting and removing the SIM, refer to the “Inserting a SIM” and “Removing a
SIM” sections in this chapter.
For information on HP Mobile Broadband and how to activate service with a preferred mobile network
operator, refer to the HP Mobile Broadband information included with your computer. For additional
information, see the HP Web site at
http://www.hp.com/go/mobilebroadband (United States only).
Inserting a SIM
CAUTION: When inserting a SIM, position the card with the slanted corner as shown in the
illustration. If a SIM is inserted backwards or upside down, the battery may not snap into place
properly and could damage the SIM and the SIM connector.
To prevent damage to the connectors, use minimal force when inserting a SIM.
To insert a SIM:
1. Shut down the computer. If you are not sure whether the computer is off or in Hibernation, turn
the computer on by pressing the power button. Then, shut down the computer through the
operating system.
2. Close the display.
3. Disconnect all external devices connected to the computer.
4. Unplug the power cord from the AC outlet.
5. Turn the computer upside down on a flat surface, with the battery bay toward you.
Using HP Mobile Broadband (select models only) 17

6. Remove the battery.
7. Insert the SIM card into the slot.
8. Replace the battery.
NOTE: HP Mobile Broadband will be disabled if the battery is not replaced.
9. Turn the computer right-side up, and then reconnect external power and external devices.
10. Turn on the computer.
Removing a SIM
To remove a SIM:
1. Shut down the computer. If you are not sure whether the computer is off or in Hibernation, turn
the computer on by pressing the power button. Then, shut down the computer through the
operating system.
2. Close the display.
3. Disconnect all external devices connected to the computer.
4. Unplug the power cord from the AC outlet.
5. Turn the computer upside down on a flat surface, with the battery bay toward you.
6. Remove the battery.
18 Chapter 2 Networking
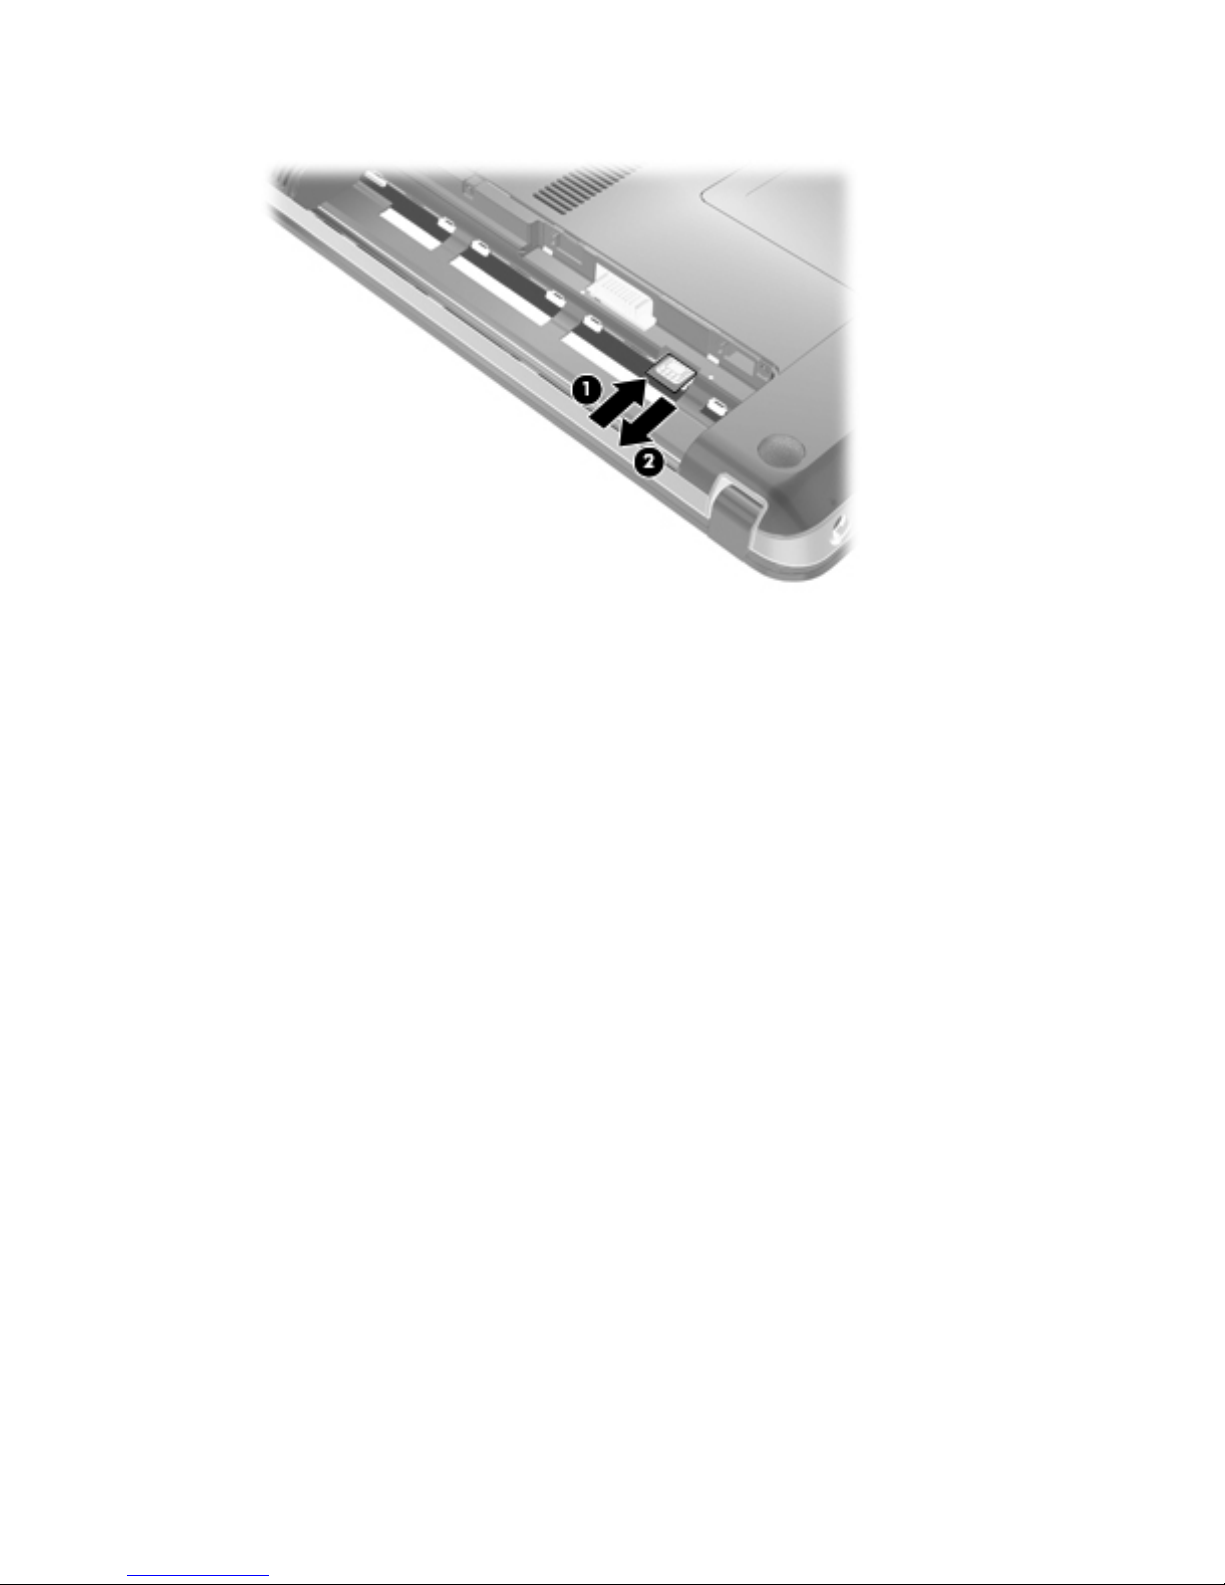
7. Push in on the SIM card (1) to release it, and then remove the SIM card (2).
8. Replace the battery.
9. Turn the computer right-side up, and then reconnect external power and external devices.
10. Turn on the computer.
Using Bluetooth wireless devices
A Bluetooth device provides short-range wireless communications that replace the physical cable
connections that traditionally link electronic devices such as the following:
●
Computers (desktop, notebook, PDA)
●
Phones (cellular, cordless, smart phone)
●
Imaging devices (printer, camera)
●
Audio devices (headset, speakers)
Bluetooth devices provide peer-to-peer capability that allows you to set up a personal area network
(PAN) of Bluetooth devices. For information on configuring and using Bluetooth devices, refer to the
Bluetooth software Help.
Bluetooth and Internet Connection Sharing (ICS)
HP does not recommend setting up one computer with Bluetooth as a host and using it as a gateway
through which other computers may connect to the Internet. When two or more computers are
connected using Bluetooth, and Internet Connection Sharing (ICS) is enabled on one of the
computers, the other computers may not be able to connect to the Internet using the Bluetooth
network.
The strength of Bluetooth is in synchronizing information transfers between your computer and
wireless devices including cellular phones, printers, cameras, and PDAs. The inability to consistently
connect two or more computers to share the Internet through Bluetooth is a limitation of Bluetooth
and the Windows operating system.
Using Bluetooth wireless devices 19

Troubleshooting wireless connection problems
Some possible causes for wireless connection problems include the following:
●
Network configuration (SSID or security) has been changed.
●
Wireless device is not installed correctly or has been disabled.
●
Wireless device or router hardware has failed.
●
Wireless device encountered interference from other devices.
NOTE: Wireless networking devices are included with select computer models only. If wireless
networking is not listed in the feature list on the side of the original computer package, you may add
wireless networking capability to the computer by purchasing a wireless networking device.
Before working your way through the sequence of possible solutions to your network connection
problem, be sure that device drivers are installed for all wireless devices.
Use the procedures in this chapter to diagnose and repair a computer that does not connect to the
network you want to use.
Cannot connect to a WLAN
If you have a problem connecting to a WLAN, confirm that the integrated WLAN device is properly
installed on your computer:
NOTE: Windows includes the User Account Control feature to improve the security of your
computer. You may be prompted for your permission or password for tasks such as installing
software, running utilities, or changing Windows settings. Refer to Help and Support for more
information.
1. Select Start > Control Panel > System and Security.
2. In the System area, click Device Manager.
3. Click the arrow next to Network adapters to expand the list and show all adapters.
4. Identify the WLAN device from the Network adapters list. The listing for a WLAN device may
include the terms
wireless, wireless LAN, WLAN, Wi-Fi
, or
802.11
.
If no WLAN device is listed, either your computer does not have an integrated WLAN device, or
the driver of the WLAN device is not properly installed.
For more information on troubleshooting WLANs, refer to the Web site links provided in Help and
Support.
Cannot connect to a preferred WLAN network
Windows can automatically repair a corrupted WLAN connection:
●
If there is a network icon in the notification area, at the far right of the taskbar, right-click the
icon, and then click Troubleshoot problems.
Windows resets your network device and attempts to reconnect to one of the preferred
networks.
●
If there is no network icon in the notification area, follow these steps:
1. Select Start > Control Panel > Network and Internet > Network and Sharing Center.
2. Click Troubleshoot problems and select the network you wish to repair.
20 Chapter 2 Networking
 Loading...