

HP NetServer E 30 Installation Manual
Notice
The information contained in this document is subject to change
without notice.
Hewlett-Packardmakes no warrantyofanykindwith
regardto this material, including, but not limited to, the
implied warrantiesof merchantabilityandfitnessfor a
particular purpose. Hewlett-Packardshall not be liable for
errors contained hereinorfor incidental or consequential
damages in connection with the furnishing, performance, or use
of this material.
Hewlett-Packardassumes no responsibilityforthe use or
reliabilityofits software on equipment that is not furnished by
Hewlett-Packard.
This document contains proprietaryinformationthatis protected
bycopyright.Allrightsarereserved.Nopartof this document
maybephotocopied,reproduced,ortranslatedtoanother
languagewithoutthepriorwrittenconsentofHewlett-Packard
Company.
NetworkServer Division\TechnicalMarketing
P.O. Box 58059
Santa Clara, CA 95052-8059USA
© Copyright1996,Hewlett-PackardCompany
Hewlett-Packard Company
Road Map contains
Hardwareinstallationsteps
Instructions for accessing Navigator CD Release
History
HP NetServer Navigator CD-ROM contains
Readme file
ConfigurationAssistant: express or custom
NetworkOperatingSystem(NOS)installation
utilities
Utilityfor creation of a diskette with NOS hardware
drivers
Utilityfor creation of a hard disk partition for utilities
Diagnostic Assistant for verifying system
Complete HP NetServer user and service
documentation
contains
Instructions for accessing your HP NetServer
documentation
UPS software installation steps
Instructions for installing additional IDE drives and
non-Plug-and-PlayISAcards
Troubleshootingandgettinghelp
Warrantyandregulatoryinformation
HP Drivers Diskette is created by HP Configuration
Assistant if installing NOS using vendor installation
process.
!
!
!
!
!
!
!
!
!
!
!
!
!
!
!
HP NetServer E 30 User Guide
5965-2314
Printed on recycledpaper.
Contents of Navigator Kit
E30
INSTALLATION
ROADMAP
HPNetServer
,
Testyourconfigured hardware using
Diagnostic Assistant (optional)
Installation Overview
!
!
!
Verifycontents
Ensure that yoursoftwareisthelatest revision
ViewtheReadmeFile
Install all accessories except non-Plug-andPlayISA boards
,
Configure yourHPNetServer
,
Select Network Operating System(NOS)
,
Install non-Plug-and-PlayISAboardswhen
instructed byConfigurationAssistant
,
,
,
Install NOS
For certain versions of Novell NetWareand
MS Windows NT, you mayuse the HP
automated installation process. Follow the
HP-guidedinstallation process
For all NOSs using vendor installation
process, view and print HP NOS
Installation Tips,andusevendor-supplied
installation utility and instructions
,
Install UPS software using the
(optional)
HP
NetServer E 30 User Guide
Install Hardware
Using this Road Map
Configure
Hardware Using
Configuration
Install NOS
Install UPS
This Road Map is for the person who installs, administers, and
troubleshoots LAN servers. Hewlett-Packard Companyassumes
youarequalifiedintheservicing of computer equipment and trained
in recognizing hazards in products with hazardous energylevels.
Audience Assumptions
1
VerifyContents
Toobtaindriversandutilitiesfornon-HPcomponentsofyoursystem,followtheappropriateInternet, BBS, orCompuServeprocedurespecifiedbythe
component and networkoperatingsystemmanufacturers.
1. Press the power-on button. Open the NetServer front door and press the CD-ROM drive eject button. Place the HP NetServer Navigator CD-ROM in
the drive and press the eject button again to close the drive. If the NetServer doesn't boot from the Navigator CD-ROM, turn the power off, wait 10
seconds and turn the poweronagain.If the system fails to boot, follow the diagnostic instructions on the screen.
2. Go to the HP NetServer Navigator Main Menu. If the language needs to be changed, select "Set Preferences."
3. Select "Readme File."
YoucanrunDiagnosticAssistantnowfromtheNavigatorCD-ROMifyouwanttoverifysystemoperationas shipped.
4. If you are installing additional hardware,suchas memory,accessoryboards,ormassstoragedevices, you will need to remove the cover.
Go to Step 4: "Remove the Cover."
If youarenotinstalling additional hardware,gotoStep8:"ConfiguretheHPNetServer."
The Readme file contains the latest information to help you install your HP NetServer. Read it carefully before
beginning your installation.
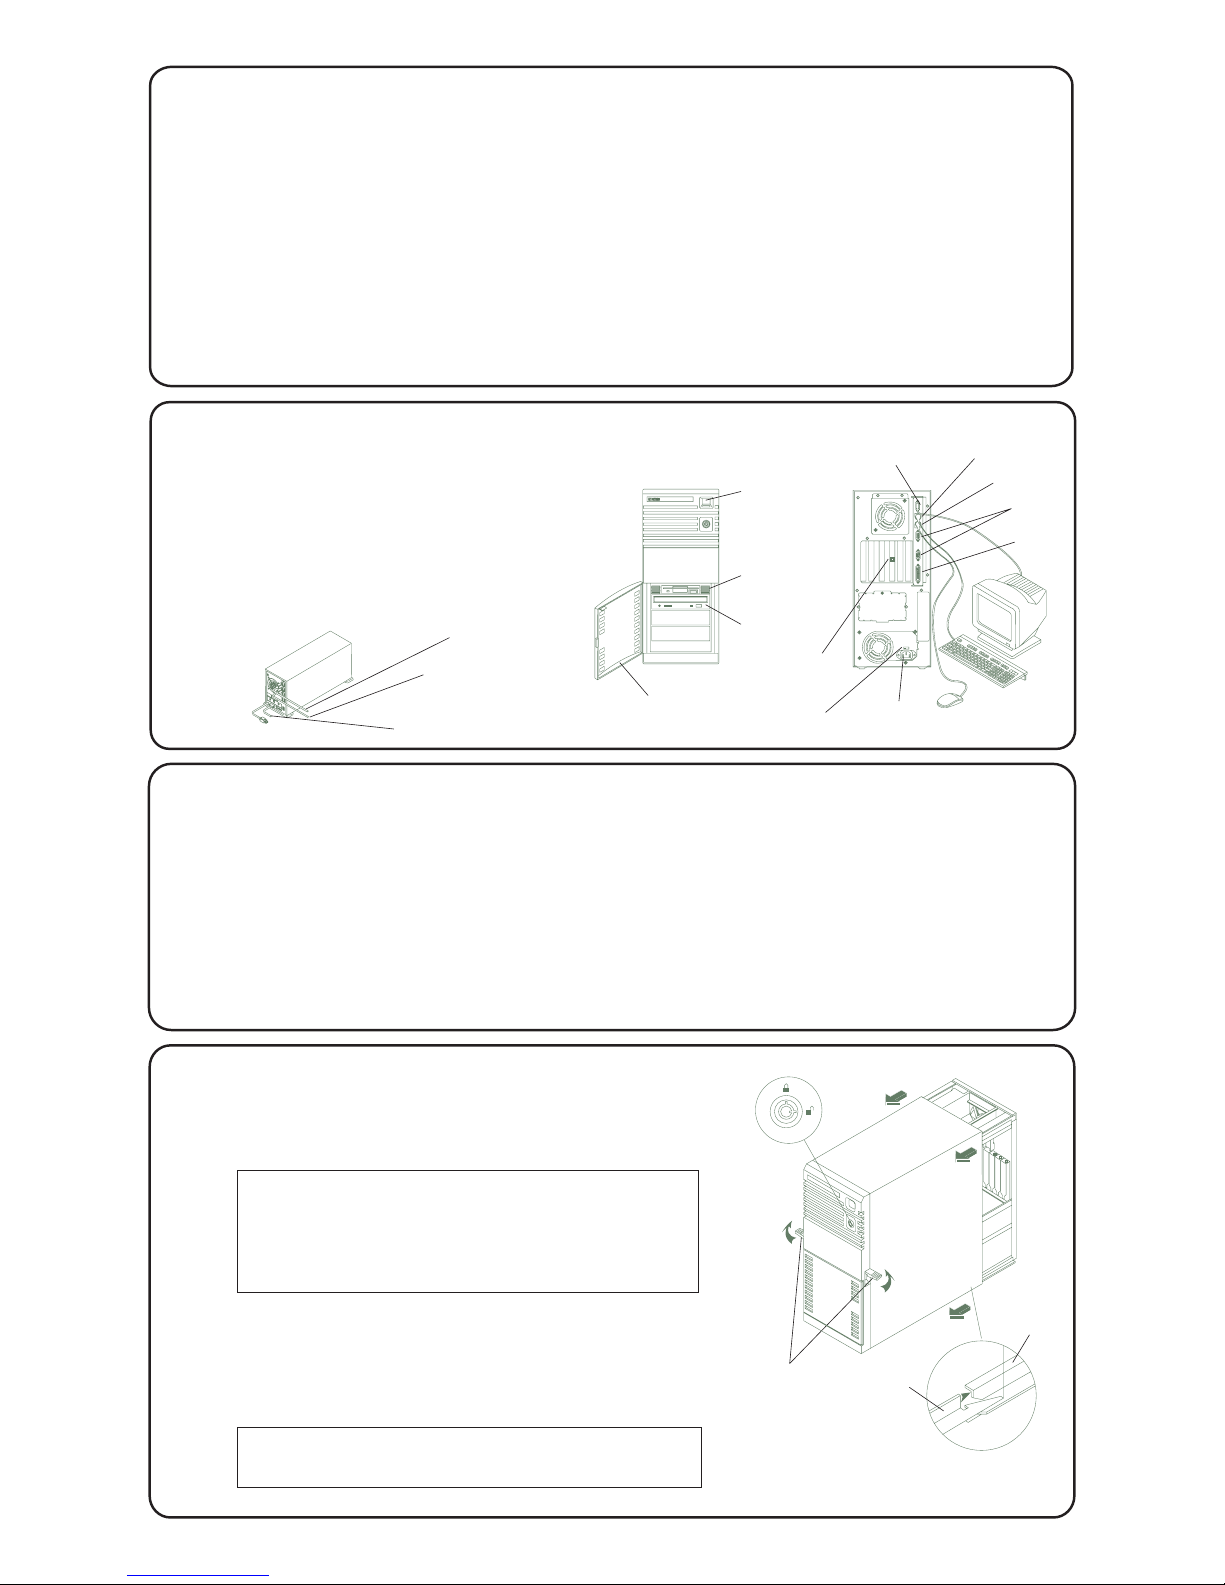
1. Check that the correct voltage is set for your country.(Thevoltage
is set during manufacturing and should alreadybecorrect.)
2. Connect the monitor,keyboardandmousetotheHPNetServer
and plug in the powercords to the NetServer and to the monitor.
3. If you have a UPS (Uninterruptible Power Supply),installandturn
on the UPS. Use thesuppliedserialcabletoconnecttheUPSto
the HP NetServer. Refer to the user’s guide included with the
UPS for additional information.
4. Plug in both the NetServer and monitor power cords to the power
supply.
3
2
ViewtheReadmeFile
Set Voltage Switch, Connect Monitor, Keyboard, and Mouse
4
Remove the Cover
If youareinstalling options, youwillneedtoremovethecover.To install options, you
will need a flat 1/4-inch screwdriver and T15 TORX®driver;youdonotneedtoolsto
remove the cover.
1. TurnofftheNetServeranddisconnectthepowercord.
2. Check if the NetServer is locked (see figure). If locked, unlock the
cover using the key in the key bag located on the rear of the
NetServer.
3. Lift up the two release latches on the sides of the front bezel.
WARNING Before removing the cover,always disconnect the
power cord and unplug telephone cables. Disconnect
telephone cables to avoid exposure to shock hazard
from telephone ringing voltages. Disconnect the
power cord to avoid exposure to high energy levels
that may cause burns when parts are short-circuited
by metal objects such as tools or jewelry.
CAUTION Wearawriststrapanduseastatic-dissipativework
surface connected to the chassis when handling
components.
Unpack and verify the contents of the shipping box against the Contents Checklist included with your NetServer. If anything is missing or damaged,
call yourreseller.
Toensurethatyouhave the latest versionsofthesoftware,obtainthecurrentReleaseHistory. This report describes m
Obtain the Release Historyinoneofthese ways:
HP NetServer Navigator CD Release History
ajorsoftwareupdatestoeach
release of the HP Navigator CD-ROM and instructions for obtaining a current release.
!
!
!
!
!
Fax:
Internet WWW:
Internet FTP:
BBS:
CompuServe:
Call HP’sfax systemat 1-800-333-1917(or1-208-344-4809fromyourfaxmachine)andrequestDocumentNumber6005
http://www.hp.com/go/netserver
ftp.netserver.hp.com;logon:anonymous;password:<youre-mailaddress>cdNSNAVCD; get 6005.txt
Call 1-408-553-3500;download6005.txtfromNSNAVCDlibrary
GO HPPC; download6005.txt from the NetServer library
Power cord from
HP NetServer
Power cord
from Monitor
ToSerialPortof
HP NetServer
UPS
Key
Lock
Release
Latches
When replacing the
cover,ensurethatthe
bottom rear corners of
the covermatewith the
grooveson the chassis
Voltage
Setting
Monitor
Mouse
Serial
Ports
Parallel
Port
Network
Connection
Power
Keyboard
On/Off
Switch and
Power/
ActivityLED
CD-ROM
Drive
Flexible
Disk Drive
Door
Chassis
Cover
 Loading...