

Page 1
HP
Printer User's Manual
True laser printing for your business.
6P/6MP
Page 2

Page 3

Take a look at all HP Support has to offer.
Hewlett-Packard SupportsYou To Get The Job Done!
Thank you for your purchase. Along with your product, you receive a variety of support services from
Hewlett-Packard and our support partners designed to give you the resultsyou need, anytime, anywhere, quickly and
professionally.
24 Hour Support Information
(800) 333-1917
Audio-Tipsprovides information on other resources within HP to get you the help you need, fast!
HP FIRST Fax will deliver detailed support information on common software applications, and troubleshooting tips
for your HP product. Call from any touch tone phone and request up to three documents per call. These documents
will be sent to the fax of your choice within minutes.
Electronic InformationServices
For 24 hour access to information over your modem, we suggest these services:
• HP Bulletin Board Service - (208) 344-1691 - Our electronic download service provides convenient access to
HP printer drivers, updated HP printer software, product information, and troubleshooting hints. Set your
communication software to N,8,1. Baud rate is between 300 to 14,400.
• America On-Line - (800) 827-6364 - Printer drivers, updated HP printer software, and support documentation is
available to help you answer your HP product questions. To subscribe and receive 10 hours of free on-line time
call and ask for representative 1118. If you are already a member, type Keyword HP to start your tour.
• CompuServe - (800) 524-3388 - Printer drivers, updated HP printer software, and interactive sharing of technical
information with other members is available on CompuServe’s HP forum (GO HP). To subscribe and receive one
month of free access, call and ask for representative #51.
• Internet - Printer drivers, updated HP printer software, and product and support information may be obtained
from HP’s anonymous FTP site at 192.6.71.2 or ftp-boi.external.hp.com which is available to anyone with FTP
access to the Internet. Access through the World-Wide Web is available at URL http://www.hp.com.
Printer Drivers by Mail
(970) 339-7009
Printer drivers for your new Hewlett-Packardproduct should be obtained by contacting the manufacturer of your
software application. For your convenience,HP distributes printer drivers for a few of the most popular software
applications. Updates of Hewlett-Packard’s printer software are also available. Call six days a week, 24 hours a day
(closed Sundays). Shipping and handling charges apply.
Telephone Assistance - In Warranty
(208) 323-2551
Our highly skilled, responsive supportstaffisdedicated to helping you get your new product up and running. Our
support staff is available Monday - Friday 6am to 10pm (MT), Saturday 9am to 4pm (MT). This service is availableat
no charge during the warranty of your product. Please have your serial number ready when calling.
Telephone Assistance - Out of Warranty
Post-warranty telephone assistanceis availabletoansweryourproduct questions. AvailableMonday - Friday 6am to
6pm (MT). Call (900) 555-1500 ($2.50* per minute, US only). Charges begin only when you connect with a support
technician. Or call (800) 999-1148 ($25* per call Visaor Master Card) (US and Canada). Please have the printer’s
serial number ready when calling. *Prices subject to change without notice.
Hardware Repair Services
Reseller and HP repair services are available in the US and Canada. To find a local authorized dealer or HP service
center, call (800) 243-9816 or (800) 387-3867 (Canada). ExpressExchangeisavailable in the US only. Call
(208) 323-2551 before 3 pm MST and HP will have a permanent remanufacturedto new printer on your doorstep the
next working day.
Parts and Warranty Upgrades
Additional manuals or parts for your HP products may be obtained by calling HP’sSupportMaterials group at
(800) 227-8164 (US) or (800) 387-3154 (Canada). For service contracts, contact your local reseller or HP directly at
(800) 743-8308 (US) or (800) 268-1221 (Canada).
Page 4

HP LaserJet 6P/6MP Printer
User’s Manual
Page 5

© Copyright Hewlett-Packard
Company 1996
All Rights Reserved.
Reproduction, adaptation, or
translation without prior written
permission is prohibited, except
as allowed under the copyright
laws.
Publication number
C3980-90968
First edition, October 1996
Warranty
The information contained in
this document is subject to
change without notice.
Hewlett-Packard makes no
warranty of any kind with
regard to this material,
including, but not limited to,
the implied warranties or
merchantability and fitness for
a particular purpose.
Hewlett-Packard shall not be
liable for errors contained herein
or for incidental or consequential
damage in connection with the
furnishing, performance, or use
of this material.
TrademarkCredits
HPLaserJet, Hewlett-Packard,
PCL, Resolution Enhancement,
Memory Enhancement,
EconoMode, HP-GL/2,
Bi-Tronics, and HP FontSmart
are trademarks of
Hewlett-Packard Company.
Microsoft is a U.S. registered
trademark and Windows is a
trademark of Microsoft Corp.
Adobe, PostScript, and the
PostScript Logo are trademarks
of Adobe Systems Incorporated
or it’s subsidiaries which may be
registered in certain
jurisdictions.
Apple, the Apple logo,
LocalTalk, TrueType,
LaserWriter, and Macintosh are
trademarks of Apple Computer,
Inc.
Hewlett-Packard Company
11311 Chinden Boulevard
Boise, Idaho 83714
Page 6

Table of Contents
1 Printer Setup
Installation Checklist . . . . . . . . . . . . . . . . . . . . . . . . . . 1-1
Step 1. Review Printer Parts and Locations . . . . . . . . . . . . . . 1-2
Step 2. Prepare a Location for the Printer . . . . . . . . . . . . . . . 1-4
Step 3. Remove the Internal Packaging . . . . . . . . . . . . . . . . 1-5
Step 4. Install the Toner Cartridge . . . . . . . . . . . . . . . . . . . 1-6
Step 5. Load Paper into Tray 2 . . . . . . . . . . . . . . . . . . . . . 1-7
Step 6. Attach Printer Cables . . . . . . . . . . . . . . . . . . . . . 1-8
Choosing a Printer Connection . . . . . . . . . . . . . . . . . . . 1-9
Attaching a Parallel Printer Cable . . . . . . . . . . . . . . . . 1-10
Attaching a Macintosh Printer Cable . . . . . . . . . . . . . . . 1-11
Step 7. Attach the Power Cord . . . . . . . . . . . . . . . . . . . . 1-12
Step 8. Install Printer Software . . . . . . . . . . . . . . . . . . . 1-13
Installing the Windows Printing Software . . . . . . . . . . . . 1-14
Installing the DOS Printing Software . . . . . . . . . . . . . . 1-17
Installing the Macintosh Printing Software . . . . . . . . . . . . 1-18
2 Printer Basics
Getting to Know the Printer . . . . . . . . . . . . . . . . . . . . . . 2-1
Printer Features . . . . . . . . . . . . . . . . . . . . . . . . . . . . 2-2
Top and Front Status Panels . . . . . . . . . . . . . . . . . . . . . . 2-4
Button Usage . . . . . . . . . . . . . . . . . . . . . . . . . . . . . . 2-5
Light Patterns . . . . . . . . . . . . . . . . . . . . . . . . . . . . . 2-6
Top Status Panel Light Messages . . . . . . . . . . . . . . . . . . 2-6
Front Status Panel Light Messages . . . . . . . . . . . . . . . . . 2-7
Printer Test Pages . . . . . . . . . . . . . . . . . . . . . . . . . . . 2-8
PCL Test Pages . . . . . . . . . . . . . . . . . . . . . . . . . . . 2-8
PostScript Test Pages . . . . . . . . . . . . . . . . . . . . . . . . 2-8
How to Print Test Pages . . . . . . . . . . . . . . . . . . . . . . 2-9
Example of a Self Test Page . . . . . . . . . . . . . . . . . . . 2-10
Example of a PostScript Configuration Page . . . . . . . . . . . 2-12
Printer Software . . . . . . . . . . . . . . . . . . . . . . . . . . . 2-14
Windows Printing System Components . . . . . . . . . . . . . 2-15
DOS Remote Control Panel . . . . . . . . . . . . . . . . . . . 2-18
Macintosh Printing Software Components . . . . . . . . . . . . 2-19
Accessories and Ordering Information . . . . . . . . . . . . . . . 2-20
EN Table of Contents-1
Page 7

3 PrintingTasks
Overview . . . . . . . . . . . . . . . . . . . . . . . . . . . . . . . . 3-1
Preparing for Printing . . . . . . . . . . . . . . . . . . . . . . . . . 3-2
Purchasing Paper and Other Media . . . . . . . . . . . . . . . . 3-2
Media Input Options . . . . . . . . . . . . . . . . . . . . . . . . 3-3
Media Output Options . . . . . . . . . . . . . . . . . . . . . . . 3-4
Loading Media into Tray 1 . . . . . . . . . . . . . . . . . . . . . 3-5
Changing Paper Size in Tray 2 . . . . . . . . . . . . . . . . . . . 3-6
Printing Tasks . . . . . . . . . . . . . . . . . . . . . . . . . . . . . 3-8
Stopping a Print Job . . . . . . . . . . . . . . . . . . . . . . . . 3-8
Manual Feed Printing (Pausing between Pages) . . . . . . . . . . 3-9
Printing on Both Sides of Media (Duplexing) . . . . . . . . . . 3-10
Printing on Special Media . . . . . . . . . . . . . . . . . . . . . . 3-11
Printing on Letterhead and Preprinted Forms . . . . . . . . . . 3-11
Printing on Envelopes . . . . . . . . . . . . . . . . . . . . . . 3-12
Printing on Labels . . . . . . . . . . . . . . . . . . . . . . . . 3-13
Printing on Transparencies . . . . . . . . . . . . . . . . . . . . 3-14
Printing on Custom-Sized Media . . . . . . . . . . . . . . . . 3-15
Printing with the Infrared Port (Wireless Printing) . . . . . . . . . 3-16
Printing Instructions for the Infrared Port . . . . . . . . . . . . 3-17
4 Printer Tips and Maintenance
Overview . . . . . . . . . . . . . . . . . . . . . . . . . . . . . . . . 4-1
Producing Better Looking Documents . . . . . . . . . . . . . . . . 4-2
Enhancing Printer Resolution (REt Setting) . . . . . . . . . . . . 4-2
Adjusting Print Density . . . . . . . . . . . . . . . . . . . . . . 4-2
Using Watermarks . . . . . . . . . . . . . . . . . . . . . . . . . 4-2
Saving Money with the Printer . . . . . . . . . . . . . . . . . . . . 4-3
Printing on Both Sides of Paper (Duplexing) . . . . . . . . . . . 4-3
Printing Multiple Pages on a Sheet (N-up Printing) . . . . . . . . 4-3
Extending the Life of the Toner Cartridge . . . . . . . . . . . . . 4-4
Toner Cartridge Maintenance . . . . . . . . . . . . . . . . . . . . . 4-6
Life Expectancy . . . . . . . . . . . . . . . . . . . . . . . . . . 4-6
Storing Toner Cartridges . . . . . . . . . . . . . . . . . . . . . . 4-6
Recycling Toner Cartridges . . . . . . . . . . . . . . . . . . . . 4-6
Using Non-HP Toner Cartridges . . . . . . . . . . . . . . . . . . 4-6
Printer Maintenance . . . . . . . . . . . . . . . . . . . . . . . . . . 4-7
Cleaning the Printer . . . . . . . . . . . . . . . . . . . . . . . . 4-7
Internal Cleaning Procedure . . . . . . . . . . . . . . . . . . . . 4-8
Table of Contents-2 EN
Page 8

5 Problem Solving
Overview . . . . . . . . . . . . . . . . . . . . . . . . . . . . . . . . 5-1
Clearing Paper Jams . . . . . . . . . . . . . . . . . . . . . . . . . . 5-2
Paper Jam: Tray 2 Paper Feed Area . . . . . . . . . . . . . . . . 5-3
Paper Jam: Toner Cartridge Area . . . . . . . . . . . . . . . . . . 5-4
Paper Jam: Output Areas . . . . . . . . . . . . . . . . . . . . . . 5-5
Paper Jam: Removing Torn Pieces of Paper . . . . . . . . . . . . 5-6
Solving Print Quality Problems . . . . . . . . . . . . . . . . . . . . 5-7
Print Quality Checklist . . . . . . . . . . . . . . . . . . . . . . . 5-7
Image Defect Examples . . . . . . . . . . . . . . . . . . . . . . . 5-7
Troubleshooting Checklist . . . . . . . . . . . . . . . . . . . . . . 5-10
Troubleshooting Error Messages . . . . . . . . . . . . . . . . . 5-12
Troubleshooting General Printing Problems . . . . . . . . . . . 5-15
Troubleshooting Infrared Printing Problems . . . . . . . . . . . 5-17
Troubleshooting Macintosh Problems . . . . . . . . . . . . . . 5-18
Troubleshooting PostScript Errors . . . . . . . . . . . . . . . . 5-21
6 Warranties/Licenses
Overview . . . . . . . . . . . . . . . . . . . . . . . . . . . . . . . . 6-1
Limited Printer Warranty . . . . . . . . . . . . . . . . . . . . . . . 6-2
Exclusions . . . . . . . . . . . . . . . . . . . . . . . . . . . . . . 6-2
Warranty Limitations . . . . . . . . . . . . . . . . . . . . . . . . 6-3
Limit of Liability . . . . . . . . . . . . . . . . . . . . . . . . . . 6-3
Service During the Warranty Period . . . . . . . . . . . . . . . . 6-4
Service After the Warranty Period . . . . . . . . . . . . . . . . . 6-4
Repackaging Guidelines . . . . . . . . . . . . . . . . . . . . . . . . 6-5
Toner Cartridge Warranty . . . . . . . . . . . . . . . . . . . . . . . 6-5
HP Software Product License . . . . . . . . . . . . . . . . . . . . . 6-7
Sales and Service Offices . . . . . . . . . . . . . . . . . . . . . . . 6-8
Calling for Help . . . . . . . . . . . . . . . . . . . . . . . . . . . 6-8
EN Table of Contents-3
Page 9

A Printer Specifications
Environmental Specifications . . . . . . . . . . . . . . . . . . . . . A-1
Regulatory Information . . . . . . . . . . . . . . . . . . . . . . . . A-2
FCC Regulations . . . . . . . . . . . . . . . . . . . . . . . . . . A-2
VCCI Statement (Japan) . . . . . . . . . . . . . . . . . . . . . . A-3
Laser Safety Statement . . . . . . . . . . . . . . . . . . . . . . . A-3
Ozone Emission . . . . . . . . . . . . . . . . . . . . . . . . . . A-4
NERGY STAR Computers Compliance . . . . . . . . . . . . . . . A-4
E
LED Safety . . . . . . . . . . . . . . . . . . . . . . . . . . . . . A-4
Laser Statement for Finland . . . . . . . . . . . . . . . . . . . . A-5
Declaration of Conformity . . . . . . . . . . . . . . . . . . . . . A-6
B Media Specifications
Overview . . . . . . . . . . . . . . . . . . . . . . . . . . . . . . . . B-1
Paper and Preprinted Forms . . . . . . . . . . . . . . . . . . . . . B-3
Adhesive Labels . . . . . . . . . . . . . . . . . . . . . . . . . . . . B-5
Overhead Transparencies . . . . . . . . . . . . . . . . . . . . . . . B-6
Envelopes . . . . . . . . . . . . . . . . . . . . . . . . . . . . . . . B-7
Card Stock . . . . . . . . . . . . . . . . . . . . . . . . . . . . . . . B-9
C Connect Printer to a LocalTalk Network
Connect to the End of a Network . . . . . . . . . . . . . . . . . . . C-1
Connect to the Middle of a Network . . . . . . . . . . . . . . . . . C-2
D Memory Installation
Overview . . . . . . . . . . . . . . . . . . . . . . . . . . . . . . . . D-1
Installing SIMMs . . . . . . . . . . . . . . . . . . . . . . . . . . . D-2
Checking SIMM Installation . . . . . . . . . . . . . . . . . . . . D-4
E PCL Printer Commands
PCL Printer Commands (Escape Sequences) . . . . . . . . . . . . . E-1
PCL Printer Command Syntax . . . . . . . . . . . . . . . . . . E-2
Using PCL Printer Commands . . . . . . . . . . . . . . . . . . . E-3
PCL Font Selection . . . . . . . . . . . . . . . . . . . . . . . . . E-3
Common PCL Printer Commands . . . . . . . . . . . . . . . . . E-4
Index
Table of Contents-4 EN
Page 10

Printer Setup
Installation Checklist
Congratulations on your purchase of the HP LaserJet 6P/6MP Printer!
This Chapter will help you set up and install the new printer. After
unpacking the printer, complete the steps in the checklist in order. Each
step is detailed with easy-to-follow directions.
Unpack the printer and accessories.
Step 1 Reviewprinter parts and locations Page 1-2
Step 2 Prepare a location for the printer Page 1-4
Step 3 Remove the internal packaging Page 1-5
Step 4 Install the toner cartridge Page 1-6
1
Step 5 Load paper into Tray 2 Page 1-7
Step 6 Attach printer cables Page 1-8
Step 7 Attach the power cord Page 1-12
Step 8 Install printer software Page 1-13
EN Printer Setup 1-1
Page 11
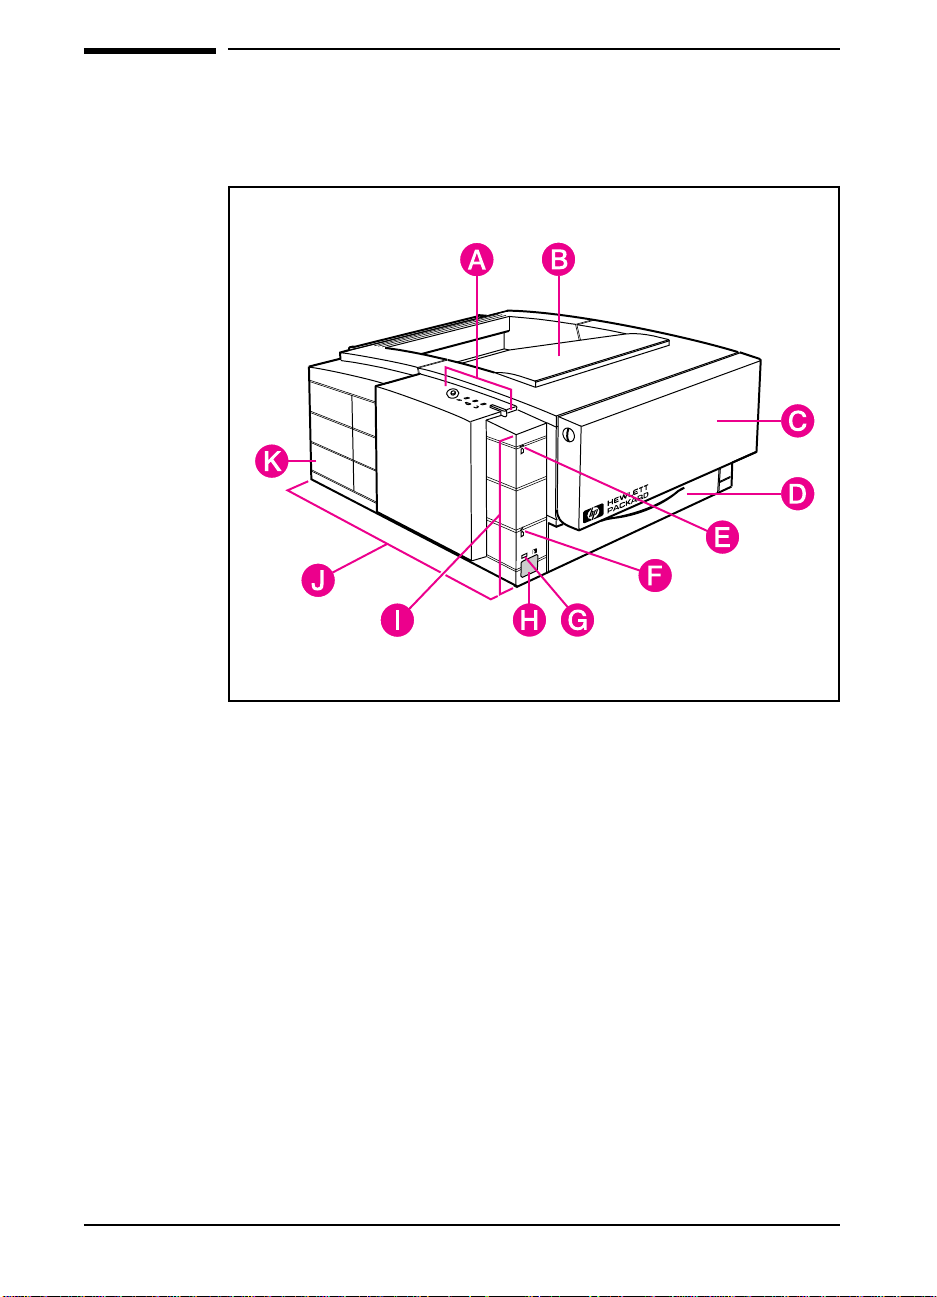
Figure 1-1
Step 1. Review Printer Parts and Locations
Front/left sides of the printer
A Top status panel
B Top output tray
C Tray 1 (multi-purpose tray, fold down to use)
D Tray 2 (paper cassette)
E Tray 1 status light
F Tray 2 empty light
G IR (infrared) status light
H Infrared port
I Front status panel
J Removable side panel (for installing memory or language
SIMMs)
K Interface cable door
1-2 Printer Setup EN
Page 12
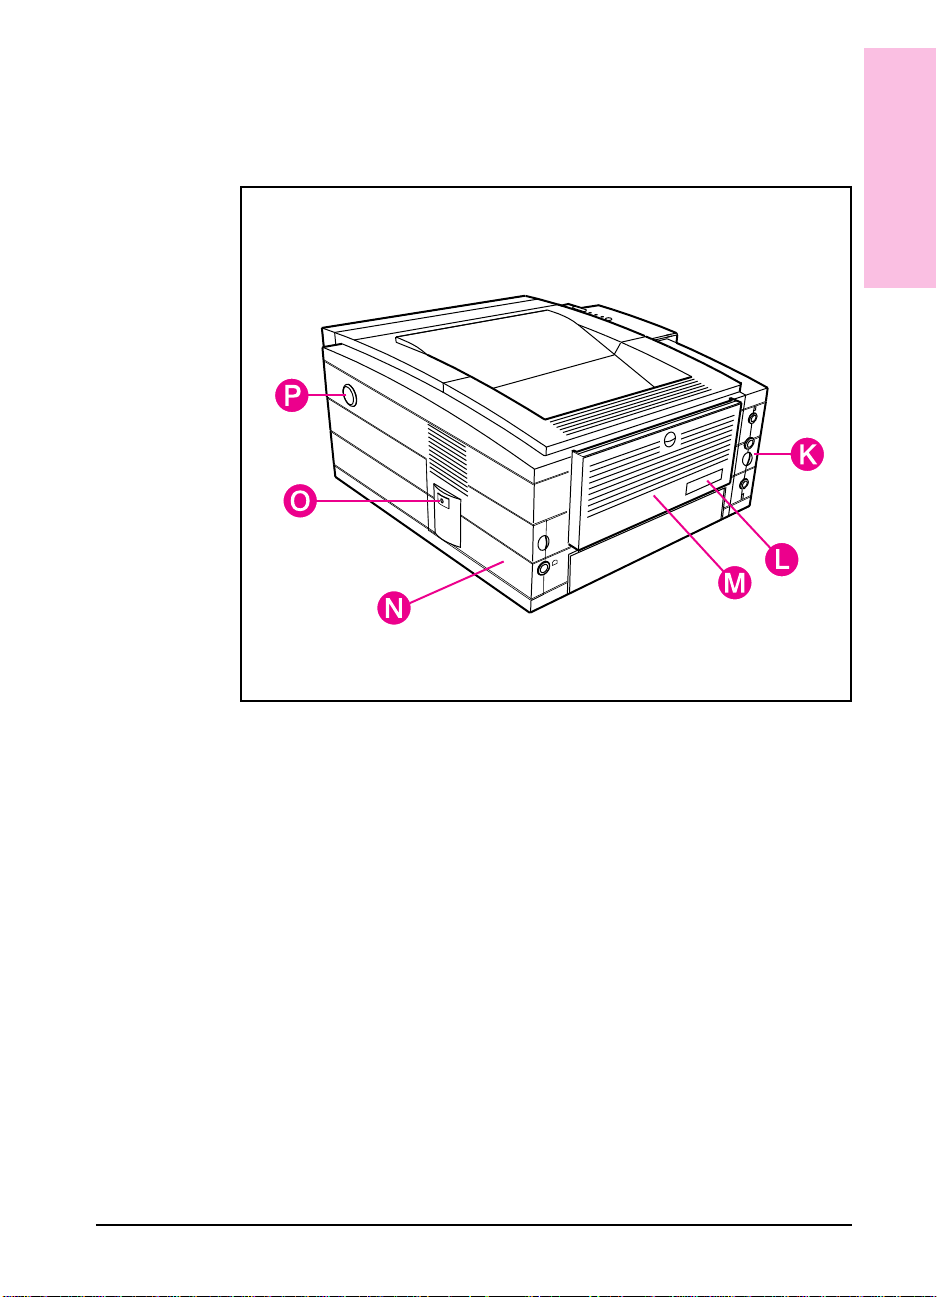
Figure 1-2
1
Printer Setup
Back/right sides of the printer
K Interface cable door
L Serial and model numbers
M Rear output tray (fold down to use)
N Power cord door
O On/Off button
P Top cover release button
EN Printer Setup 1-3
Page 13
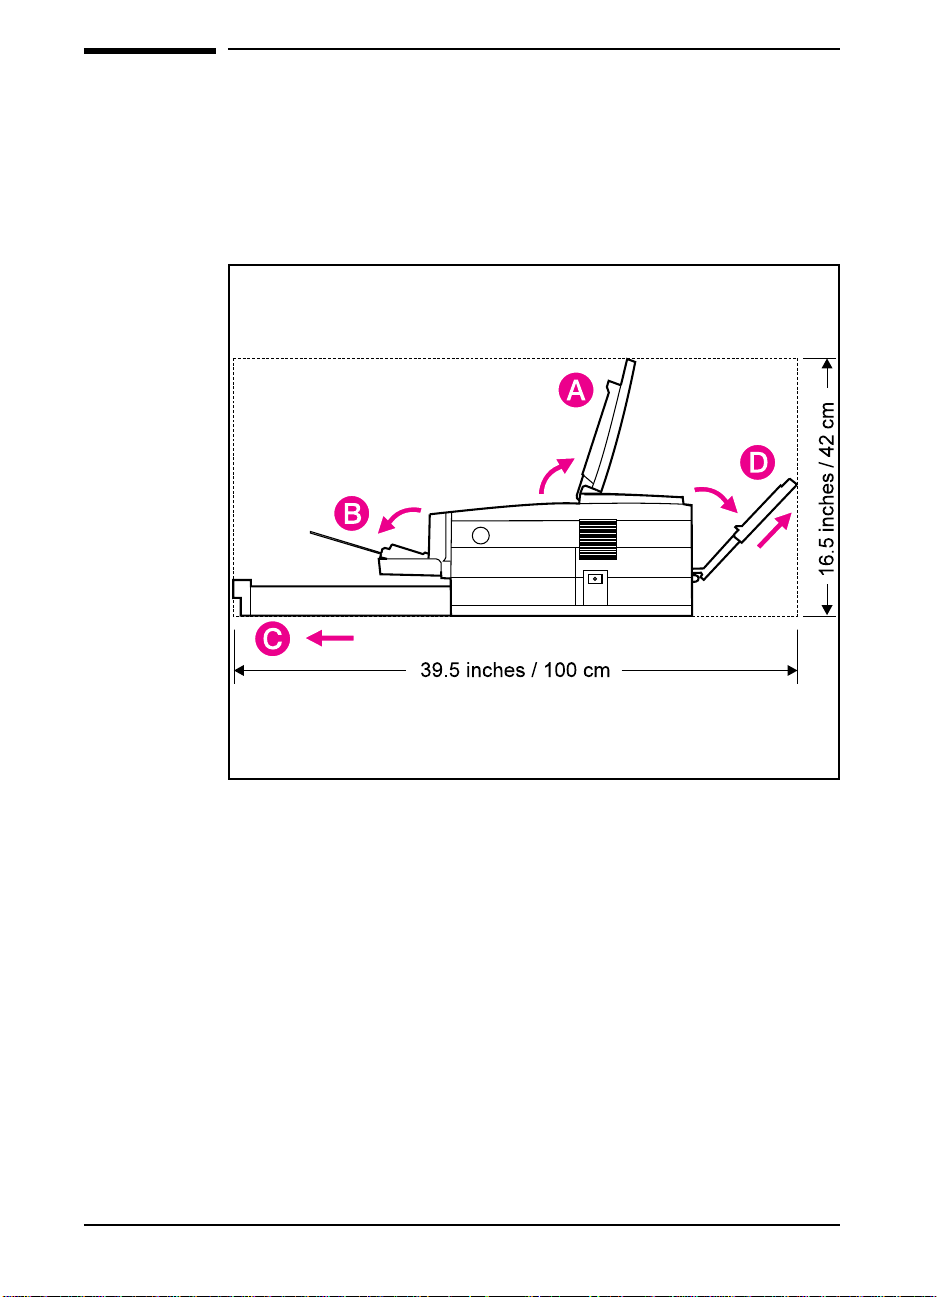
Figure 1-3
Step 2. Prepare a Location for the Printer
Place your printer on a sturdy, level surface in a well ventilated room.
The environment should be stable, with no abrupt changes in
temperature or humidity and no exposure to direct sunlight or chemicals.
See the figure below for the suggested amount of space to leave around
the printer.
Printer space requirements
Make sure there is adequate space for:
• Opening top cover (A)
• Opening Tray 1 (B)
• Loading Tray 2 (C)
• Extending rear output tray (D)
• Accessing On/Off button
• Opening cable and power cord doors
• Removing the side panel for installation of memory or language
SIMMs
1-4 Printer Setup EN
Page 14
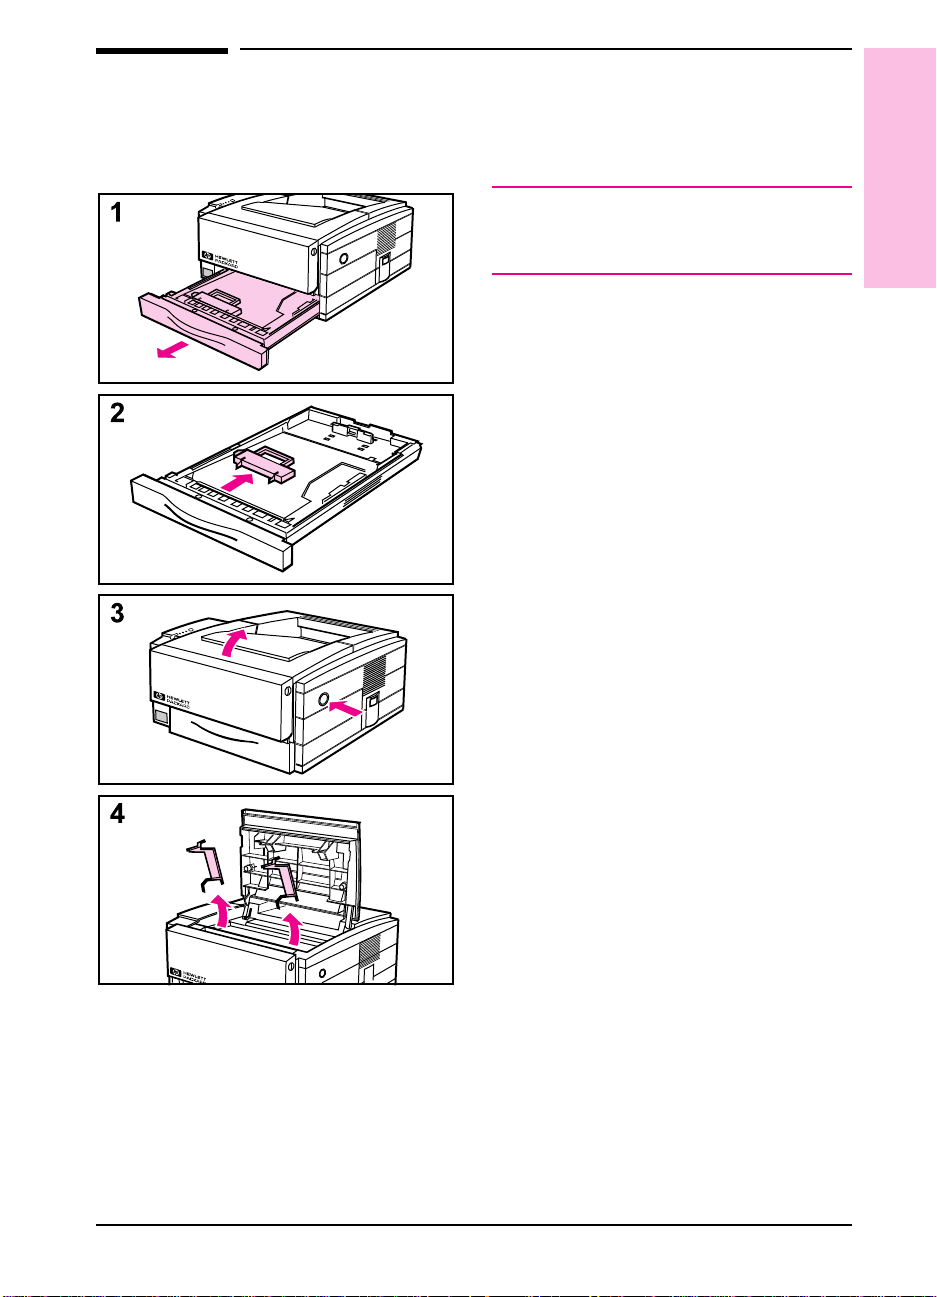
Step 3. Remove the Internal Packaging
Note
Save all packing material. You may need
to repack the printer at a later date.
1 Slide Tray 2 out of the printer.
2 Remove the orange shipping retainer
inside Tray 2 by pressing the retainer
down and straight back. (If it is
difficult to remove, try rotating the
retainer while pulling backwards.)
Slide Tray 2 back into the printer.
3 Open the top cover by pressing the
top cover release button.
4 Remove the two orange shipping
retainers in the toner cartridge area.
You do not need to close the top cover if
you are installing the toner cartridge next.
(See the following page.)
1
Printer Setup
EN Printer Setup 1-5
Page 15
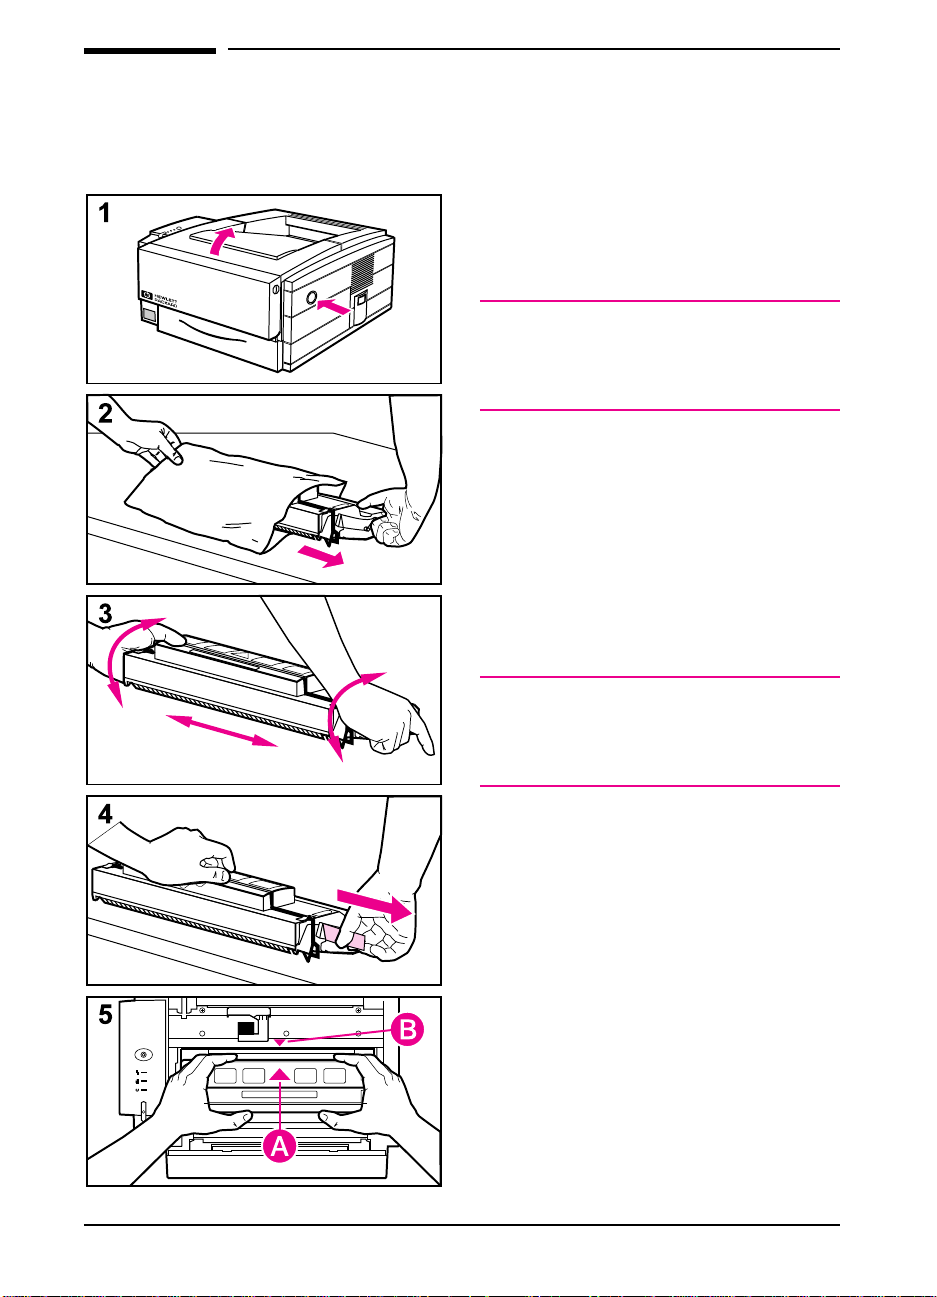
Step 4. Install the Toner Cartridge
1 Open the top cover by pressing the
top cover release button.
2 Remove the toner cartridge from its
packaging.
Caution
To prevent damage, do not expose the
toner cartridge to light for more than a
few minutes.
3 Shake the cartridge to distribute the
toner evenly inside the cartridge.
Avoid tipping the cartridge on end.
4 Locate the clear plastic sealing tape
on the right end of the cartridge. Pull
the entire length of the tape out of the
cartridge (12-15 in/30-35cm) and
discard. Avoid touching any black
toner on the tape.
Note
If toner gets on your clothing, wipe it off
with a dry cloth and wash clothing in cold
water.
5 Insert the toner cartridge into the
printer lining up the arrow on the
cartridge (A) with the arrow in the
printer (B). Close the top cover.
1-6 Printer Setup EN
Page 16
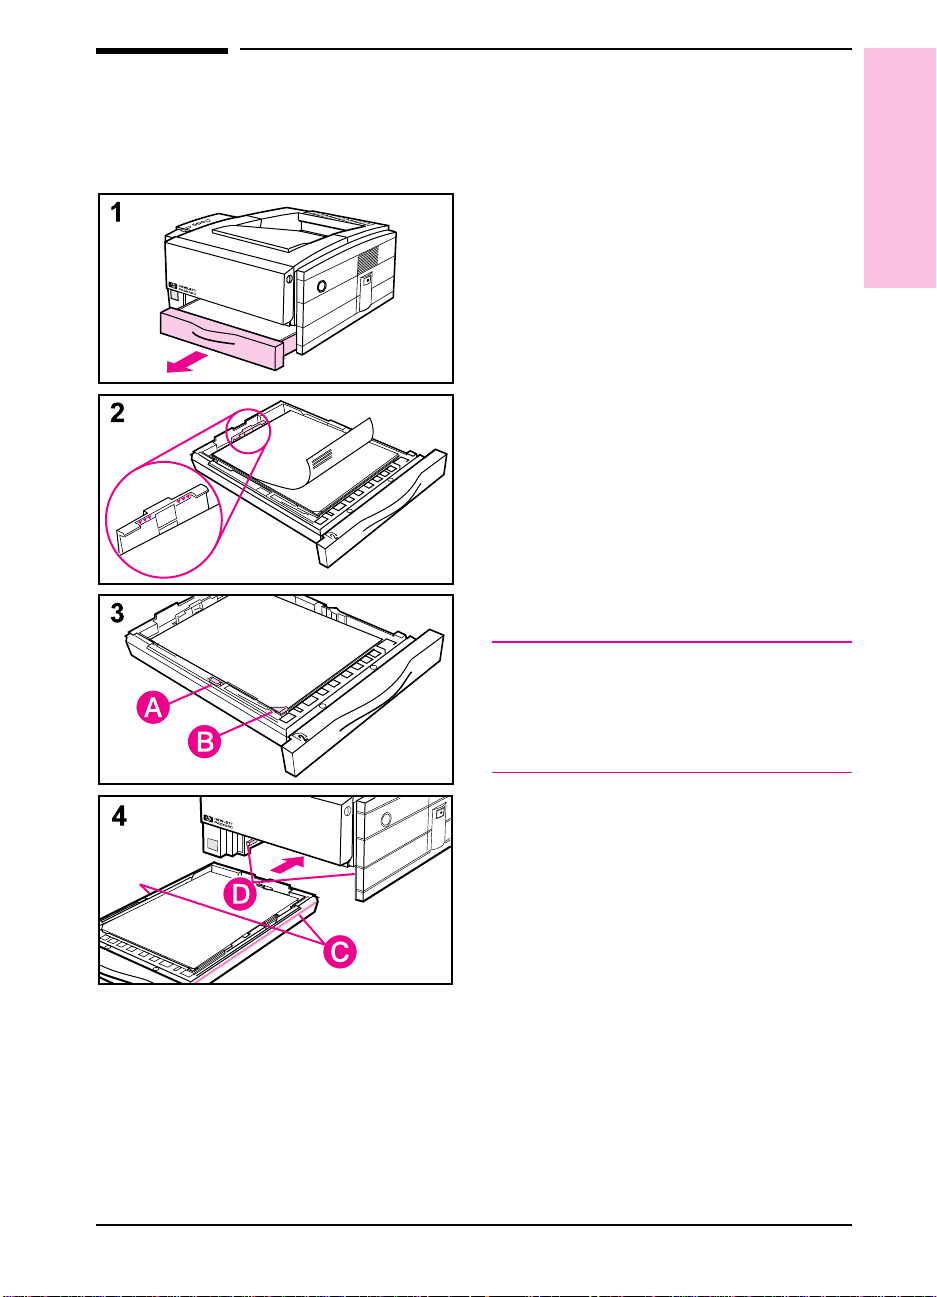
Step 5. Load Paper into Tray 2
1 Slide Tray 2 (paper cassette) out of
the printer.
2 Load paper up to the arrows on the
paper length spacer in the rear of the
tray (approximately 250 sheets of
Letter, A4, Executive, B5, or Legal
paper).
3 Make sure the paper is flat in the tray
at all four corners. If needed, press on
the clip lever (A) to raise the front left
metal holder (B) so the paper will fit
underneath.
4
Align the slots (C) on the sides of
Tray 2 with the rails (D) inside the
Tray 2 cavity. Slide Tray 2
completely back into the printer.
1
Printer Setup
Caution
Tray 2 is designed for paper use only. Use
Tray 1 to print envelopes, adhesive labels,
transparencies, cardstock, or custom sized
media.
Tray 2 hints
• To adjust Tray 2 for other paper sizes,
see page 3-6.
• For letterhead orientation in Tray 2,
see page 3-11.
• For paper and other media
specifications, see Appendix B.
EN Printer Setup 1-7
Page 17
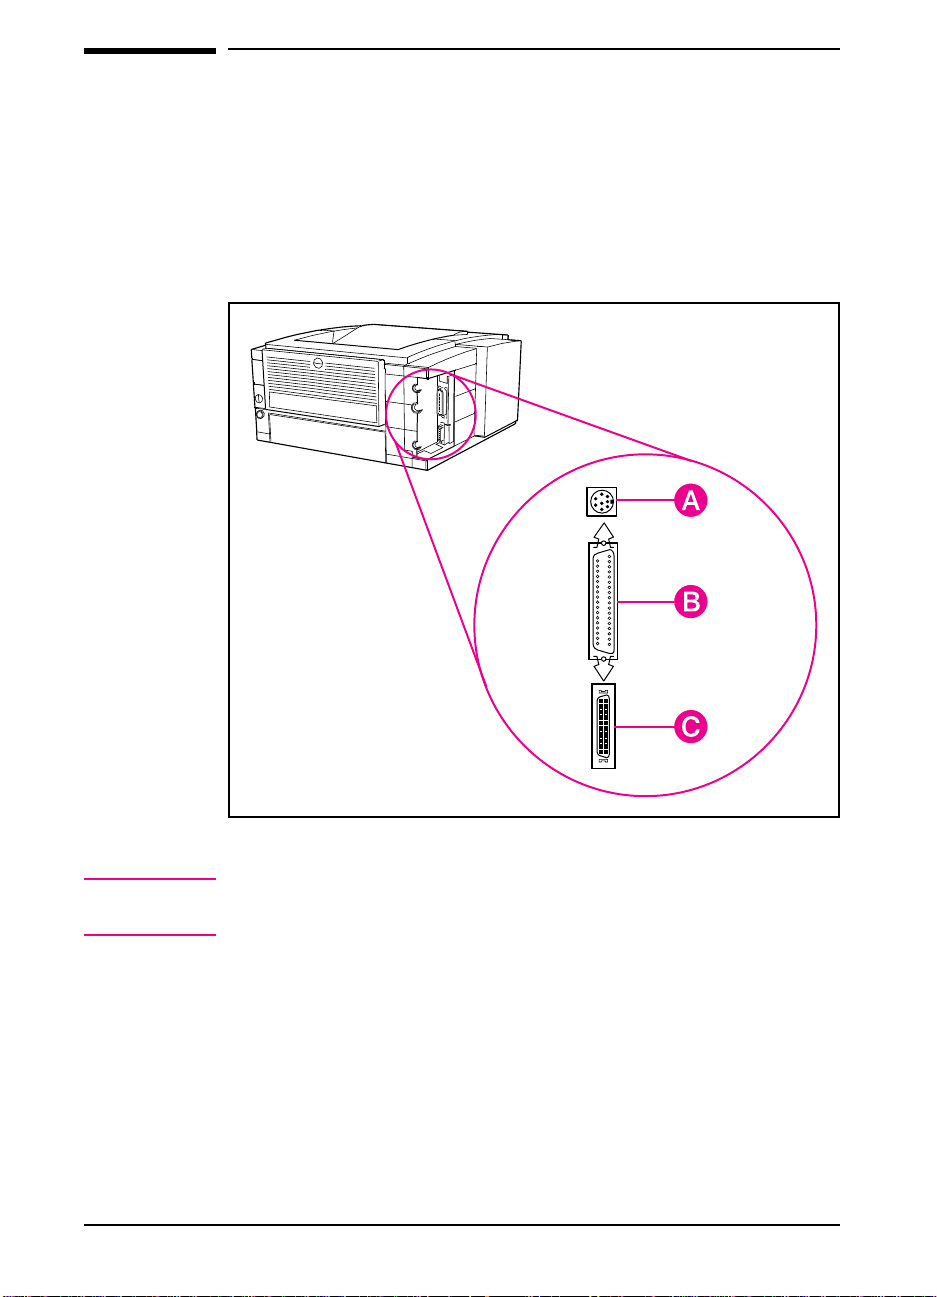
Figure 1-4
Step 6. Attach Printer Cables
The HP LaserJet 6P/6MP Printer supports three different interfaces that
require cable connections:
• LocalTalk port (A) for Macintosh computers and LocalTalk networks
• Large B-type Parallel Port (B)
• Small C-type Parallel Port (C)
Printer interface connections
Note The printer also supports wireless connection with the infrared port.
(See page 3-16 for instructions on how to print with the infrared port.)
1-8 Printer Setup EN
Page 18

Choosing a Printer Connection
The following descriptions will help you choose the correct connection
to use between the computer and printer.
Note No printer cables are included in the package contents. See ordering
information starting on page 2-20 for HP recommended printer cables.
Large Parallel Port (B on preceding page)
Use this port when:
• Connecting to an IBM, or IBM-compatible, computer.
• Your parallel cable has a standard length (up to three meters) with a
B-type (large) end.
See page 1-10 for installation instructions.
Small Parallel Port (C on preceding page)
Use this port when:
• Connecting to an IBM, or IBM-compatible, computer.
• Your parallel cable is longer than three meters (up to ten meters) with
a C-type (small) end.
See page 1-10 for installation instructions.
1
Printer Setup
LocalTalk Port (A on preceding page)
Use this port when:
• Connecting to a Macintosh, or Macintosh-compatible, computer. See
page 1-11 for installation instructions.
• Connecting to a LocalTalk network. See Appendix C for installation
instructions.
Infrared Port
Use this port when:
• Printing from an IrDA-compliant device, such as a laptop or
notebook computer. For more information on infrared printing, see
page 3-16.
EN Printer Setup 1-9
Page 19
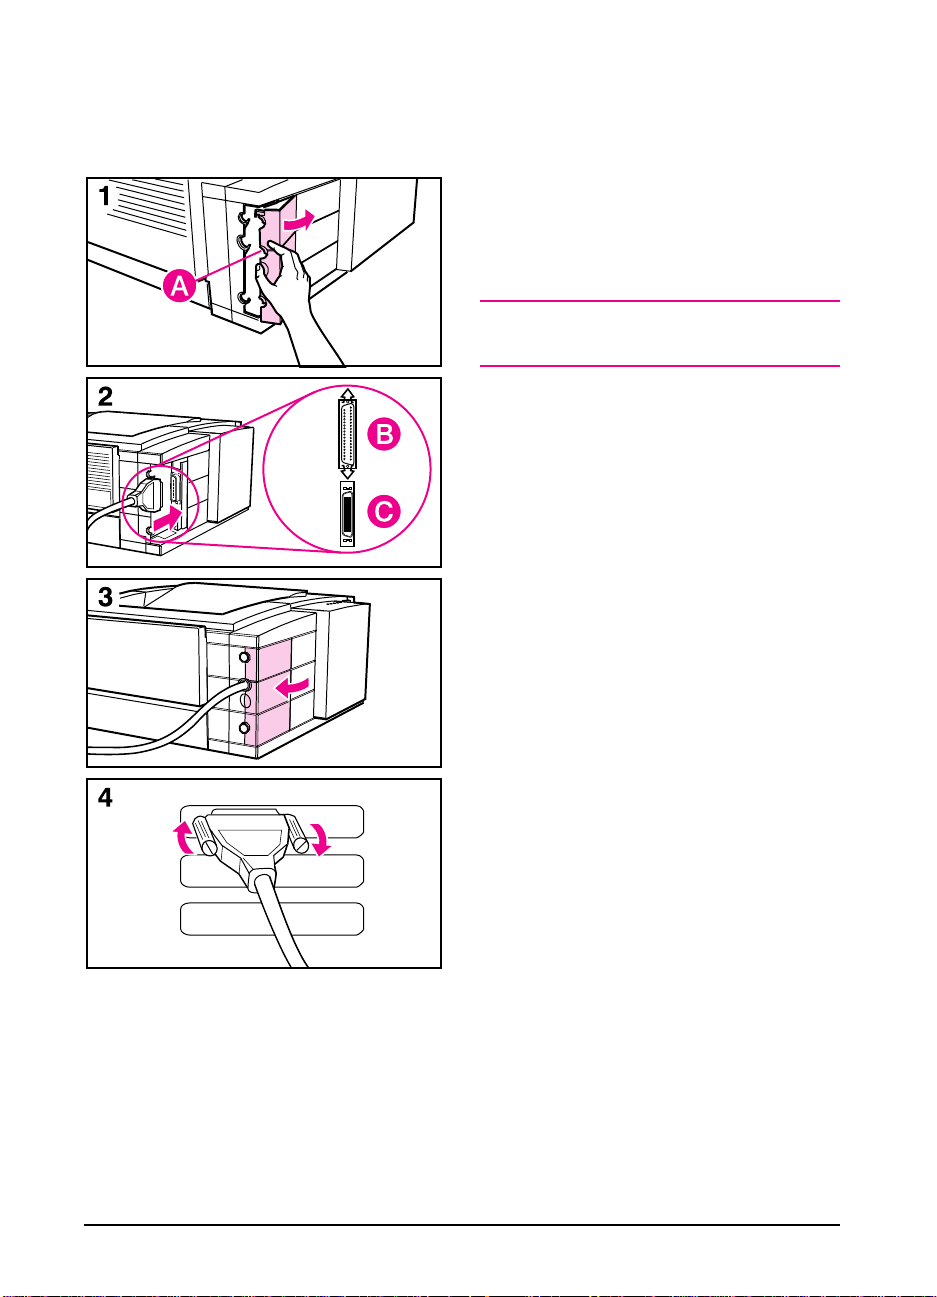
Attaching a Parallel Printer Cable
To ensure reliability use an IEEE-1284
compliant parallel cable (these cables are
clearly marked with “IEEE-1284”). Only
IEEE-1284 cables support all of the
printer’s advanced functions.
Caution
Make sure power is off.
1
Locate the interface cable door (A) at
the back of the printer. Pull the door
out using the finger tab for leverage.
2 If using a parallel cable with a large
B-type end, connect the cable into
port (B). Snap the wire clips in place
to secure the cable to the printer.
If using a parallel cable with a small
C-type end, connect the cable into
port (C).
The cables should install easily. If
installation is difficult, check the
cable orientation.
3 Replace the interface cable door
while allowing the cable to feed
through its appropriate hole.
4 Connect the other end of the cable to
the proper connector on the computer.
Go to Step 7. Attach the Power Cord,
on page 1-12.
1-10 Printer Setup EN
Page 20

Attaching a Macintosh Printer Cable
You can directly connect the printer to a
Macintosh (or Macintosh-compatible)
computer using either a LocalTalk or
Macintosh serial cable.
Note
To connect the printer to a LocalTalk
Network, see Appendix C.
Caution
Make sure power is off.
1
Locate the interface cable door (A) at
the back of the printer.
2 Pull the door out using the finger tab
for leverage.
3 Plug the cable into the printer’s
LocalTalk port. If the cable does not
slip on easily, make sure the pin
orientation matches the illustration.
1
Printer Setup
4 Replace the interface cable door
while allowing the cable to feed
through the top hole.
5 Connect the other end of the cable to
the proper connector on the computer.
EN Printer Setup 1-11
Page 21
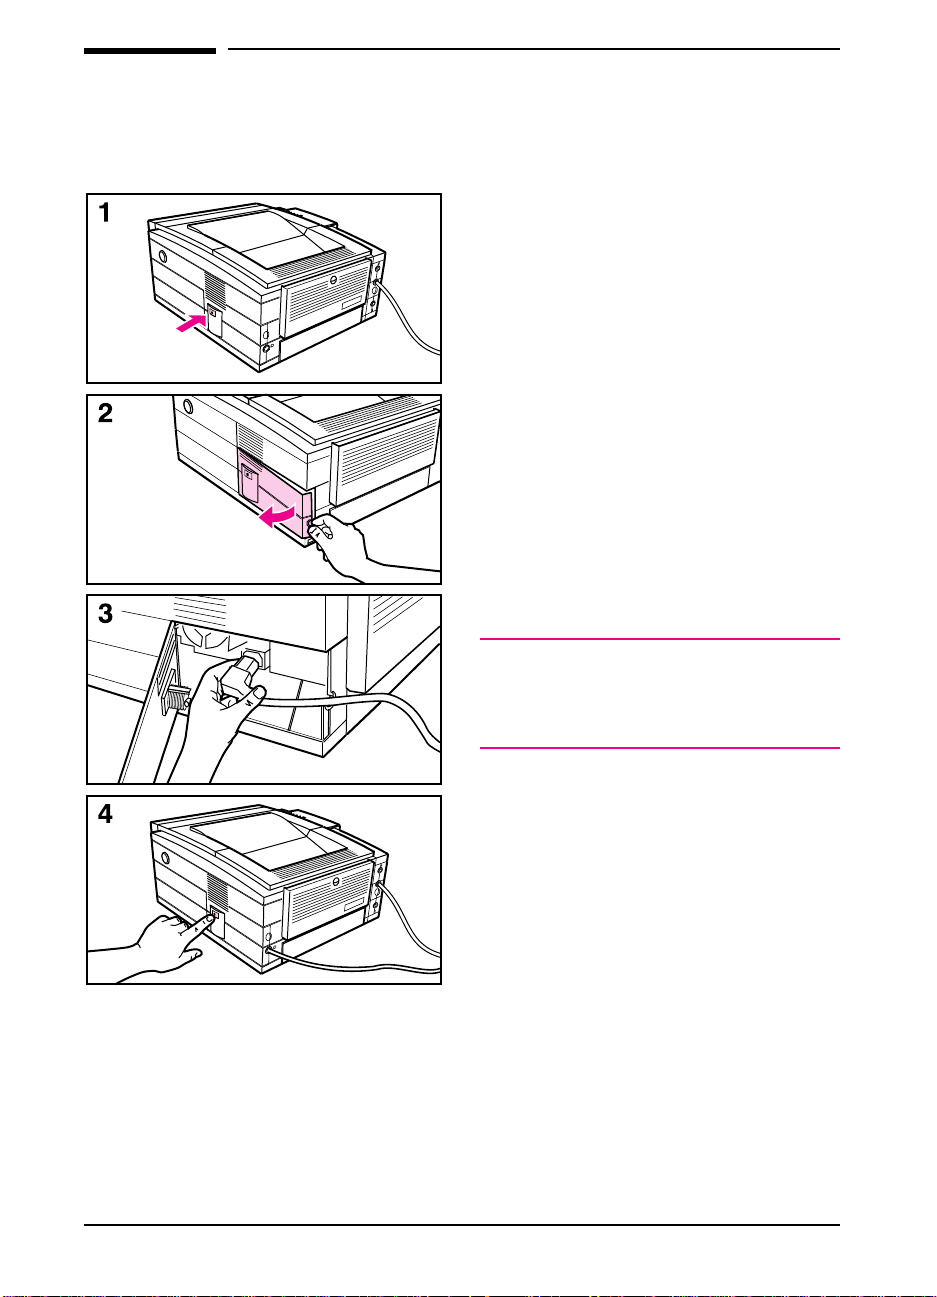
Step 7. Attach the Power Cord
1 Locate the power On/Off button on
the right side of the printer. Make
sure the power is not On (button
should be in the out position).
2 Open the power cord door at the
back/right corner of the printer using
the finger tab for leverage.
3 Connect the power cord securely to
the printer. Close the power cord
door, while allowing the power cord
to feed through the hole in the door.
Connect the other end of the power
cord to a grounded power strip or a
power outlet.
4 Switch the printer on by pressing the
On/Off button.
Note
Before printing you must install printer
software. Go to Step 8. Install Printer
Software on the following page.
1-12 Printer Setup EN
Page 22

Step 8. Install Printer Software
The printer is packaged with the software you need to take full
advantage of the printer’s features in Windows environments. The
HP LaserJet 6MP also comes with software you need to use the
PostScript language in both Macintosh and Windows environments.
You must install printing software before you can use this printer with
your software applications. (Please review the “HP Software Product
License” on page 6-7.)
The following descriptions will help you determine the correct software
to install.
Windows Printing System
Install this software when using Windows 3.1, Windows 3.11 for
Workgroups, or Windows 95 operating system on your IBM or
IBM-compatible computer.
• See page 1-14 for installation instructions.
• See page 2-15 for descriptions of the Windows Printing System
components.
DOS Remote Control Panel
Install this software if you will be printing from DOS-based software
applications.
• See page 1-17 for installation instructions.
• See page 2-18 for a description of the DOS Remote Control Panel.
1
Printer Setup
Macintosh Printing Software
Install this software when using the printer with a Macintosh or
Macintosh-compatible computer.
• See page 1-18 for installation instructions.
• See page 2-19 for descriptions of the Macintosh Printing Software
components.
EN Printer Setup 1-13
Page 23

Installing the Windows Printing Software
The installation program for the WindowsPrinting System will install all
of the components needed for printing in a Windows environment. See
page 2-15 for descriptions of the Windows Printing System components.
Locate either the CD ROM or the diskette and insert into the appropriate
drive:
For Windows 3.1 and Windows 3.11 for Workgroups
CD ROM Installation Instructions
1 Close all running applications.
2 In the Windows Program Manager screen, click the File menu.
3 Click Run.
4 Type D:\DISK1\SETUP (or the appropriate drive directory letter) in
the command line box and click OK.
5 Follow the instructions on the screen.
The printer setup is complete!
Diskette Installation Instructions
1 Close all running applications.
2 In the Main Menu, click Control Panel.
3 Click Printer icon.
4 Click Add Printer.
5 Click Install Unlisted.
6 Click Install.
7 Type A:\SETUP (or the appropriate drive directory letter) in the
command line box and click OK.
8 Follow the instructions on the screen.
Note For additional Windows software not available on the diskette(s) see
page 1-16.
The printer setup is complete!
1-14 Printer Setup EN
Page 24

For Windows 95
CD ROM Installation Instructions
1 Close all running applications.
2 Click Start.
3 Click Run.
4 Type D:\SETUP (or the appropriate drive directory letter) in the
command line box and click OK.
5 Follow the instructions on the computer screen.
The printer setup is complete!
Diskette Installation Instructions
1 Close all running applications.
2 Click Start.
3 Click Settings.
4 Click Printers.
1
Printer Setup
5 Double click Add Printer.
6 Click Next.
7 Click Have Disk.
8 Type A:\SETUP (or the appropriate drive directory letter) in the
command line box and click OK.
9 Follow instructions on the screen.
Note For additional Windows software not available on the diskette(s) see
page 1-16.
The printer setup is complete!
EN Printer Setup 1-15
Page 25

Note to Windows users installing from diskettes
All of the necessary printer drivers are provided on the software diskette. However,
additional Windowssoftware is also available for the HP LaserJet 6P/6MP printer. See the
instructions below on how to obtain the additional software:
• If you can get access to a CD ROM drive, make a set of software installation disks with
the full set of available software. You will need six blank disks.
For Windows 3.1 and Windows 3.11 for Workgroups
1. Insert the CD into the CD ROM drive.
2. Click
3. Click
4. Type D:\MAKEDISK\MAKEDISK.EXE (or the appropriate drivedirectory letter) in the
5. Follow the instructions on the computer screen.
For Windows 95
1. Insert the CD into the CD ROM drive.
2. Click Start.
3. Click
4. Type D:\MAKEDISK\MAKEDISK.EXE (or the appropriate drivedirectory letter) in the
5. Follow the instructions on the computer screen.
• Download the full software solution from the HP software homepage on the internet:
http://www.software.hp.com.
• Call the HP Driver Distribution Center at (970) 339-7009 to receive a full set of
software installation disks through the mail.
File.
Run.
command line box and click OK.
Run.
command line box and click OK.
1-16 Printer Setup EN
Page 26

Installing the DOS Printing Software
The DOS printing software consists of the Remote Control Panel (RCP).
The RCP enables you to change printer settings if the DOS software
application does not support the printer feature you want to use. See
page 2-18 for RCP instructions.
Each DOS software application also requires a separate printer driver.
Please contact your DOS application vendor to obtain a printer driver.
Note If you are waiting to receive a driver for the HP LaserJet 6P/6MP
printer, you can substitute a printer driver from another HP LaserJet
Printer (use the latest version available). These substitute drivers allow
you to use the HP LaserJet 6P/6MP printer but may not support all of
the printer’s features.
To install the DOS Remote Control Panel:
CD ROM Installation Instructions
1 Insert the CD into the CD ROM drive:
2 At the DOS prompt, type D: (this assumes that the CD ROM drive is D)
and press [Enter] on the computer keyboard .
3 At the D:> type INSTALL and press [Enter].
1
Printer Setup
4 Follow the instructions on the computer screen.
The printer setup is complete!
Diskette Installation Instructions
1 Insert the diskette into the disk drive.
2 At the DOS prompt, type A: (this assumes that the disk drive is A) and
press [Enter] on the computer keyboard .
3 At the A:> type INSTALL and press [Enter].
4 Follow the instructions on the computer screen.
The printer setup is complete!
EN Printer Setup 1-17
Page 27

Installing the Macintosh Printing Software
The installation program for the Macintosh Printing Software will install all
of the components needed for printing in a Macintosh environment. See
page 2-19 for descriptions of the Macintosh Printing Software components.
1 Close all running applications.
2 Insert the CD or disketteinto the appropriate drive.
3 Double-click the HP logo icon that appears on the desktop.
4 Double-click the Installer icon and follow the instructions on the screen.
Note The remaining installation instructions are based on whether or not
QuickDraw GX is installed on the Macintosh computer. If QuickDraw GX
is installed, skip to page 1-19. If you do not know if QuickDraw GX is
installed, follow the directions for the non-GX environment.
Completing Macintosh Installation in a Non-GX Environment
(most Macintosh users)
1 Make sure the printer is turned on and the ready (front) light is on.
2 Open the Chooser from the Apple menu.
3 Click the HP LaserJet icon.
4 If you are on a network with multiple zones, select the zone in the
AppleTalk Zones box where the printer is located. If this is unknown,
ask your network administrator.
5 Click on the HP LaserJet 6MP printer in the Select an HP LaserJet
Printer box.
6 Click Setup.
7 Choose a Background Printing option. Select On if you want to work on
the computer at the same time a job is being printed.
8 Close the Chooser by clicking the go-away (close) box in the upper left
corner.
The printer setup is complete!
1-18 Printer Setup EN
Page 28

Completing Macintosh Installation in a GX Environment
1 Make sure the printer is turned on and the Ready (front) light is on.
2 Open the Chooser from the Apple menu.
3 Click the HP LaserJet 6MP GX icon.
4 If you are on a network with multiple zones, select the zone in the
AppleTalk Zones box where the printer is located. If this is unknown,
ask the network administrator.
5 Click on the HP LaserJet 6MP printer in the list:box.
6 Click Create.
7 Close the Chooser by clicking the go-away box in the upper left corner.
8 Click on the new Desktop Printer icon to select it. A new Printing menu
is added to the Finder.
9 Choose Input Trays from the Printing menu.
10 Select the paper types loaded in the printer’s trays. If the tray is not
loaded, select Unknown.
1
Printer Setup
11 Click OK.
The printer setup is complete!
EN Printer Setup 1-19
Page 29

1-20 Printer Setup EN
Page 30

Printer Basics
Getting to Know the Printer
This Chapter provides information in the following areas:
2
• Printer features
• Top and front status panels
• Button usage
• Light patterns
Top panel status Page 2-6
Front panel status Page 2-7
• Printer test pages
Example of a self test page Page 2-10
Example of a PostScript configuration page Page 2-12
• Printer software
Windows Printing system components Page 2-15
DOS Remote Control Panel Page 2-18
Macintosh printing software components Page 2-19
• Accessories and ordering information
Page 2-2
Page 2-4
Page 2-5
Page 2-6
Page 2-8
Page 2-14
Page 2-20
EN Printer Basics 2-1
Page 31

Printer Features
Fast Print
Speed
High Print
Quality
Easy Paper
Handling
Updated PCL
Printer
Language and
Fonts
Up to 8 pages-per-minute printing (with Intel 80960JF RISC-based
formatter).
• True 600 x 600 dots per inch (dpi) text and graphics.
• Resolution Enhancement technology (REt) adjusts the size and placement
of each dot on the page to produce smooth angles, curves, and edges.
• Sharper appearance of text and graphics with Microfine toner provided
in HP toner cartridges.
• Adjustable settings to optimize print quality. See page 4-2.
• Adjustable Tray 1 for letterhead, envelopes, labels, transparencies,
custom sized media, postcards, and heavy paper. See page 3-3.
• Adjustable Tray 2 with a 250 sheet capacity for standard sizes of paper.
See page 3-3.
• Select either the top output tray or the rear output tray for the most
convenient output location. See page 3-4.
• Straight-through paper path capability from Tray 1 through the rear
output tray. See page 3-4.
Faster printing performance, built-in Intellifont and TrueType scaling
technologies, built-in HP-GL/2 vector graphics, and advanced imaging
capabilities are benefits of the new PCL 6 printer language. This also
includes 45 scalable TrueType fonts and one bitmapped Line Printer
Font.
PostScript
Language and
Fonts
Automatic
Language
Switching
The HP LaserJet 6MP printer also includes the Adobe PostScript Level
2 printer language with 35 built-in PostScript language fonts.
When optional printer languages (such as PostScript) are installed, the
printer automatically determines and switches to the appropriate
language for the print job.
2-2 Printer Basics EN
Page 32

Enhanced
Memory and
Memory
Expansion
Energy
Savings
The HP LaserJet 6P printer comes with 2 MBytes of memory and can
be expanded to 50 MBytes with the 3 available memory (SIMM) slots.
Most documents can be printed using the standard amount of printer
memory through the aid of Memory Enhancement technology (MEt).
MEt automatically compresses data, virtually doubling the printer’s
memory and allowing more complex printing with available memory.
The HP LaserJet 6MP printer comes with 3 MBytes of memory and
can be expanded to 35 MBytes with the 2 available memory (SIMM)
slots. The third memory slot is used for the PostScript language SIMM.
The PostScript SIMM includes Adobe Memory Booster Technology
(Adobe MBT), which allows more complex printing at 600 dpi with
available memory.
The printer automatically conserves electricity by substantially
reducing power consumption when not printing.
2
Printer Basics
Economical
Printing
Wireless
Infrared
Printing
Interface
Connections
As an E
that this product meets E
NERGY STAR partner, Hewlett-Packard Company has determined
NERGY STAR guidelines for energy efficiency.
For tips on reducing the amount of paper use, see page 4-3.
For tips on extending the life of the toner cartridge, see page 4-4.
Improved, faster infrared (IR) printing when printing from an
IrDA-compliant device, such as a laptop or notebook computer.
• Large ECP type-B parallel port
• Small ECP type-C parallel port
• LocalTalk port
• Infrared (wireless) port
EN Printer Basics 2-3
Page 33

Figure 2-1
Top and Front Status Panels
Top status panel buttons and lights
A [Job[Cancel] button
B Error (back) light
C Data (middle) light
D Ready (front) light
E [Go] button
Figure 2-2
Front status panel lights
F Tray 1 (top) status light
G Tray 2 empty light
H IR (bottom) status light
2-4 Printer Basics EN
Page 34

Button Usage
The printer has two buttons: [Job[Cancel] (A) and [Go] (B).
[Job[Cancel]
[Go]
Figure 2-3
•Press [Job[Cancel] to cancel a job that the printer is currently printing. The
top status panel lights will cycle while the printer memory is being cleared,
and then return to a ready state (front light on). This may take a while,
depending on the size of the print job.
•If [Job[Cancel] is accidentally pushed, the job must be reprinted. There is
no undo function.
•If [Job[Cancel] is pushed when the printer is idle, the top panel status lights
will cycle, but nothing else will happen.
•Press [Go] to resume printing when the printer is paused or when unprinted
data is still in the printer (Data [middle] and Ready [front] lights on).
•Press [Go] to print a demo page. The printer must be in the ready state
(front light on).
•Press [Go] to clear some printer errors (Error [back] light on).
2
Printer Basics
Top panel buttons
Note Briefly press [Go] and [Job[Cancel] at the same time to print a self test.
See page 2-8 for self-test descriptions.
EN Printer Basics 2-5
Page 35

Light Patterns
Light patterns provide both status and error messages. The lights can be
in one of the following states:
Off On Blinking
Top Status Panel Light Messages
The following top panel status messages indicate various conditions
of the printer in preparation for, or during printing. If the Error (back)
light is on, the printer is experiencing an error. Error messages begin on
page 5-12 in the “Problem Solving” chapter.
Ready state: printer is ready for printing
If the Ready (front) light is on, the printer is ready to print.
No action is needed.
Processing state: printer is processing print job
If the Data (middle) light is on and the Ready (front) light is blinking,
the printer is receiving or processing data.
No action is needed.
Data is in the printer memory (form feed)
If the Data (middle) light and the Ready (front) light both remain on,
there is unprinted data in the printer.
Press [Go] to start printing.
Busy state
If each light briefly turns on and off, in sequence, the printer is
warming up, processing a self test, or canceling a print job.
No action is needed.
2-6 Printer Basics EN
Page 36

Front Status Panel Light Messages
The following front panel status messages indicate various conditions of
the paper trays and the IR port.
Tray 1 empty
If the Tray 1 status light is on, a job has been sent to Tray 1, and the
tray is out of media.
Add desired media into Tray 1 (see page 3-5). The printer will
automatically begin printing.
Manual Feed with Pause request
If the Tray 1 status light blinks, a print job has been sent to the printer
with a “Manual Feed with Pause” request. (See page 3-9.)
Put desired media into Tray 1 (see page 3-5), and press [Go] to begin
printing.
Tray 2 empty
If the Tray 2 empty light is on, there is no paper in Tray 2.
Load paper into Tray 2 (see page 1-7).
2
Printer Basics
Infrared connection is established
If the IR status light is on, a job is being sent from an IrDA-compliant
device, such as a laptop or notebook computer, to the printer.
No action is needed.
EN Printer Basics 2-7
Page 37

Printer Test Pages
The following PCL test pages are available for the HP LaserJet 6P/6MP
printers. The PostScript test pages are only available for the
HP LaserJet 6MP printer, unless the optional PostScript SIMM has been
installed in the HP LaserJet 6P printer.
PCL Test Pages
PCL Self Test
Page
The self test page provides a list of the printer’s current settings and
options. The print density and Resolution Enhancement settings can be
useful when adjusting print quality.
An example of the self test is located on page 2-11.
PCL Font List The PCL Font List is a printout of the available fonts that are currently
installed in the printer.
PCL Demo
Page
The demo (or demonstration) page can be printed to quickly check that
the printer is set up and printing correctly.
PostScript Test Pages
PostScript
Configuration
Page
PostScript Font
List
PostScript
Demo Page
The PostScript Configuration page shows a list of settings that are
important when printing with PostScript.
An example of the PostScript Configuration Page is located on page 2-12.
The PostScript Font List is a printout of the 35 built-in PostScript
language fonts.
The demo (or demonstration) page can be printed to quickly check that
the printer is set up and printing correctly.
2-8 Printer Basics EN
Page 38

How to Print Test Pages
Printing Test Pages from the Printer
The PCL test pages will be printed for the HP LaserJet 6P printer. The
PostScript test pages will be printed for the HP LaserJet 6MP printer
(and the HP LaserJet 6P printer, if the optional PostScript SIMM has
been installed).
• PCL self test/PostScript configuration page
Briefly press [Go] and [Job[Cancel] at the same time when the printer is
in ready state (Ready [front] light on).
• PCL demo page/PostScript demo page
Press [Go] while the printer is in ready state (Ready [front] light on).
• Font lists can only be printed from software. See the following section.
Printing Test Pages from Software
All of the test pages that are available for the printer can be accessed
from software. The instructions vary depending on the computer or
operating system that is being used on your computer.
• For Windows 95:
1 Right click on the toolbox icon
2 Select Properties to open the HP LaserJet Utility.
3 Click the Test Pages tab.
4 Click the desired test page.
• For Windows 3.1 or Windows 3.11 for Workgroups:
1 Open the LaserJet Printers group.
2 Double click the HP LaserJet Utility icon.
3 Click the Test Pages tab.
4 Click the desired test page.
2
Printer Basics
Continued on the following page.
EN Printer Basics 2-9
Page 39

• For Macintosh or Macintosh-compatible computers:
1 Click the Test Pages panel in the HP LaserJet Utility.
2 Select the desired test page.
3 Click the Print button.
• From the DOS Remote Control Panel:
1 Under “Options,” select Print Test Page.
2 Select the desired test page.
Example of a Self Test Page
A Printer Information:
Lists the Formatter Number, Firmware Datecode, Page Count,
and LocalTalk Network information for the printer.
B Memory:
Lists printer memory, I/O Buffering data, and Resource Saving
data.
C Installed Personalities and Options:
Lists all personalities, such as PCL and PostScript that are
installed, and the status of each SIMM slot.
D REt block:
This block is used when adjusting the Resolution Enhancement
technology (REt) setting.
E Settings:
Current printer default settings and product-specific information.
2-10 Printer Basics EN
Page 40

2
Printer Basics
Figure 2-4 Self test page
EN Printer Basics 2-11
Page 41

Example of a PostScript Configuration Page
A Settings:
Current printer default settings and product-specific information,
such as Printer Name and PostScript version. PostScript-specific
settings, include (but are not limited to):
• HalftoneType: The current halftone type.
• Wait Timeout: The PostScript timeout.
• Printer Name: Name set by user (a network name, for
instance).
• Print Errors: Value set on a job by job basis through the
printer driver.
• PostScript Version: The version of PostScript installed.
• System Password/Job Password: Values are either “0”
(default) or “Not Default” (a password is present).
• Jam Recovery: Indicates whether Jam Recovery is ON or OFF.
B Printable Area:
Gives the dimensions within the margins of the image area.
Printable area is dependent on the amount of memory installed.
The current default is shown in the hollow box.
C Memory:
The value shows how PostScript uses printer memory. This may be
useful for more experienced users, since PostScript Level 2 allows
users to configure memory parameters. (See the PostScript Level 2
“Red Book” for specific information about these values.)
D Page Count:
Shows how many pages have been printed by the printer in all
printer languages. You can use the page count to track printer use.
2-12 Printer Basics EN
Page 42

2
Printer Basics
Figure 2-5 PostScript configuration page
EN Printer Basics 2-13
Page 43

Printer Software
Printer software allows the computer to communicate with the printer
and enables software applications to use all of the available printer
features.
The printer is packaged with the software you need to take full
advantage of the printer’s features in Windows 3.1, Windows 3.11 for
Workgroups, Windows 95, and some DOS environments.
The HP LaserJet 6MP also comes with software you need to use the
PostScript language in both Macintosh and Windows environments.
Note Network and Switch Box Users
Some of the printer’s software components require a direct cable
connection between the printer and computer to support bi-directional
communication (such as status messages). Most devices, including
switchboxes, connected between the printer and the computer interrupt
the messages being sent from the printer back to the computer.
If you use a mechanical switch box, follow these guidelines:
• Do not switch while the printer is printing or receiving data (when
the Data [middle] light is on and the Ready [front] light is blinking).
• Do not switch to a host computer that is off and then switch that computer
on. The computer can appear to be sending data. If the Error (back) light is
blinking, clear the printer memory by pressing [Job[Cancel].
• Use a surge protector.
2-14 Printer Basics EN
Page 44

Windows Printing System Components
Printer Drivers
Printer drivers allow access to printer settings. The drivers can be
accessed through software applications, the toolbox (Windows 95), or
the Control Panel (Windows 3.1 & 3.11).
Note Changes made to the printer settings through software applications will
override the settings in the toolbox (Windows 95) or the Control Panel
(Windows 3.1 and 3.11).
• Software applications in Windows 95
1 Select Print or Print Setup in a software application.
2 Access the printer driver by clicking on the Properties button.
3 Click the Device Options tab.
4 Click the Configure Printer button.
5 Make the desired changes to the printer settings.
• Software applications in Windows 3.1 and Windows 3.11
1 Select Print or Print Setup in a software application.
2 Access the printer driver by clicking on the Options button (in
some software applications you must first click on Printer button
before you can select the printer driver’s Options button).
3 Click the Features tab.
4 Make the desired changes to the printer settings.
• Windows 95 toolbox
1 Click on the printer icon in the Windows 95 taskbar with the
right button on the mouse.
2 Make the desired changes to the printer settings.
• In Windows 3.1 and Windows 3.11 Control Panel
1 In the Main program group double-click on the Control Panel
icon.
2 Double-click on the Printers icon.
3 Highlight the desired printer and click the Setup button.
4 Make the desired changes to the printer settings.
2
Printer Basics
EN Printer Basics 2-15
Page 45

Windows 95 Users
If the Windows Printing System was loaded during printer setup (see
page 1-14), an icon of a printer will be placed on the computer screen’s
task bar. Click on the printer to access the following software utilities
and helps:
• Printer Status
The Printer Status displays a pop-up message on the computer’s screen
each time the printer status changes. The Printer Status will report any
problem, error condition, or other status message directly to the
computer screen when the printer is connected directly to a computer
through one of the parallel ports.
• HP LaserJet Utility
The HP LaserJet Utility provides access to printer settings. Print test
pages from here.
• HowDoI?
The How Do I? section provides suggestions on performing common
tasks with the printer.
• Troubleshooting
The Troubleshooting section provides suggestions on solving common
printer/printing problems.
• HP FontSmart
HP FontSmart is a font management tool that allows easy control of the
fonts that come with the printer.
2-16 Printer Basics EN
Page 46

Windows 3.1 and Windows 3.11 for Workgroups Users.
If the Windows Printing System was loaded during printer setup (see
page 1-14), software utilities and help were added to the LaserJet
Printing Group on your computer. Double-click on the following icons
to access the following utilities and helps.
• How Do I?
This icon accesses suggestions on performing common tasks with the
printer.
• Troubleshooting
This icon accesses suggestions on solving common printing problems.
• Status Window
This icon accesses the Status Window. This utility displays a pop-up
message on the computer’s screen each time the printer status changes.
The Status Window will report any problem, error condition, or other
status message directly to the computer screen when the printer is
connected directly to a computer through one of the parallel ports.
• HP Font Smart
This icon accesses a font management tool that allows easy control of
the fonts that come with the printer.
• HP LaserJet Utility
The HP LaserJet Utility provides access to printer settings. Print test
pages from here.
• Sound Deinstaller
This icon removes any sound components installed with the HP Status
Window.
• Uninstaller
The Uninstaller will remove the HP LaserJet 6P/6MP software from the
computer.
2
Printer Basics
EN Printer Basics 2-17
Page 47

DOS Remote Control Panel
Note Configuring the Parallel Ports
If DOS applications will be used with the printer and the DOS Remote
Control Panel was not installed, the AUTOEXEC.BAT file needs to be
modified to prevent communication timeout errors. To modify the
AUTOEXEC.BAT file, use any DOS editor, or any word-processing
program that edits ASCII text files, and follow the instructions below.
For DOS versions 4.0 and later, add:
MODE LPT1:,,B
For DOS versions earlier than 4.0, add:
MODE LPT1:,,P
The preceding examples assume that you are using printer port LPT1. If
you are using LPT2 or LPT3, replace LPT1 in the preceding examples
with the appropriate printer port number.
• Remote Control Panel
The Remote Control Panel (RCP) enables you to change printer settings
if the DOS software application does not support the printer feature you
want to use. To start the RCP from DOS, follow these steps:
1 Make sure that the RCP is in the computer’s path statement. This
can be checked by typing PATH at a DOS prompt at the root
directory and pressing [Enter]. If the Remote Control Panel
directory is not in the path statement, change to the default
directory C:\HPLJUTIL.
2 At the DOS prompt, type RCP and press [Enter].
For additional information, select Help.
2-18 Printer Basics EN
Page 48

Macintosh Printing Software Components
If the Macintosh Printing Software was loaded during printer setup (see
page 1-18), the following software components are available:
• HP LaserJet Printer Driver and 6MP PPD File
This PostScript printer driver is for non-GX Macintosh system 7.5 or
newer.
• HP LaserJet 6MP QuickDraw GX Printer Driver
This PostScript printer driver is for Macintosh System 7.5 (or newer)
with QuickDraw GX installed.
• HP LaserJet Utility
This utility allows you to view or send printer settings to the printer
from the computer screen. To access the HP LaserJet Utility:
1 Open the HP LaserJet Folder located on the hard disk.
2 Double-click the HP LaserJet Utility icon.
For additional information, refer to the on-line help in the HP LaserJet
Utility.
• Bitmapped Screen Fonts to match the PostScript fonts in the printer.
2
Printer Basics
EN Printer Basics 2-19
Page 49

Accessories and Ordering Information
The following list of accessories was current at the time of printing.
Ordering information and availability of the accessories may change
during the life of the printer.
Option Description or Use Part Number
Toner Cartridge
Toner Cartridge Replacement tonercartridges. C3903A or C3903F
Memory and Language
Memory upgrades The HP LaserJet 6P printer comes with 2 MBytes of
Adobe’s PostScript Level 2
printer language
Cable and Interface Accessories
Parallel Cables (IEEE-1284) A=host computer connector (A-type)
LocalTalk Network Kitfor
Macintosh
Serial printer cablefor
Macintosh
HP JetDirect EX print
servers (external)- LAN
connectivity formost
network operatingsystems
Paper Handling Accessories
Tray 2replacement Universaltray (for Letter, A4, Legal, Executive,and B5
memory and can be expandedto 50 MBytes withthe 3
available memory (SIMM) slots.
The HP LaserJet 6MP printer comes with 3 MBytes of
memory and can be expandedto 35 MBytes withthe 2
available memory (SIMM) slots.
The PostScriptSIMM includes 1 Mbyte of memory.This
comes installed in the HP LaserJet 6MP printer.
B=large printer connector(B-type)
C=small printer connector(C-type)
Connect to a LocalTalk Network. 92215N
Directly connect to a Macintosh computer. 92215S
Ethernet (1 parallelport)
Ethernet (3 parallelports)
TokenRing (3 parallelports)
Ethernet/100VG(3 parallel ports)
paper sizes).
‘1 MByte—C3130A
2 MByte—C3131A
4 MByte—C3132A
8 MByte—C3133A
16 MByte—C3146A
C3152A
2 Meter A to B—C2950A
3 Meter A to B—C2951A
3 Meter A to C—C2946A
10 Meter A to C—C2947A
J2591A
J2593A
J2594A
J2590A
R75-4000-000CN
Continued on following page.
2-20 Printer Basics EN
Page 50

Option Description or Use Part Number
Media Accessories
LaserJet Labels Letter (8 1/2 x 11 in) size sheets, whitelabels,
Transparency Film Letter(8 1/2 x 11 in) transparency film
Supplementary Documentation
PCL/PJLTechnical
The
ReferencePackage
the followingdocuments:
HP LaserJet Printer Family
PaperSpecification Guide
contains
Letter (8 1/2 x 11 in) size sheets, clearlabels
A4 (210 x 297 mm) size sheets, white labels
A4 (210 x 297 mm) size sheets, clear labels
A4 (210 x 297 mm) transparencyfilm
PCL 5 Printer LanguageTechnicalReference Manual
explains thePCL 5 printer language for experienced
users and programmers.
Printer Job LanguageTechnicalReference Manual
explains HP’s Printer Job Language(PJL) for experienced
users and programmers.
PCL/PJL Technical QuickReference Guide
PCL Comparison Guide
implementationofcommands andextensions across the
printer familysupporting PJL and PCL 5.
This manual focuses onthe paper manufacturing process
and how it relates to HP LaserJet paper specifications.
describes the different
To order HP LaserJet 6P/6MP accessories and options:
• Call HP Direct Ordering at (800) 227-8164.
• To find a dealer near you (or if your dealer is temporarily out of
stock), call the HP Customer Information Center (800) 752-0900.
Call an authorized HP
dealer forlabel sizes and
availablity.
92296T
92296U
5010-3994
5010-3990
2
Printer Basics
EN Printer Basics 2-21
Page 51

2-22 Printer Basics EN
Page 52

Printing Tasks
Overview
This Chapter explains your printing options and gives common printing
tasks:
3
• Preparing for printing
Purchasing paper and other media Page 3-2
Media input options Page 3-3
Media output options Page 3-4
Loading Media into Tray 1 Page 3-5
Changing paper size in Tray 2 Page 3-6
• Printing Tasks
Stopping a print job Page 3-8
Manual feed printing (pausing between pages) Page 3-9
Printing on both sides of media (duplexing) Page 3-10
• Printing on special media
Printing on letterhead and preprinted forms Page 3-11
Printing on envelopes Page 3-12
Printing on labels Page 3-13
Printing on transparencies Page 3-14
Printing on custom-sized media Page 3-15
• Printing with the infrared port (wireless printing)
Page 3-2
Page 3-8
Page 3-11
Page 3-16
EN Printing Tasks 3-1
Page 53

Preparing for Printing
Purchasing Paper and Other Media
HP LaserJet printers produce documents of excellent print quality. You
can print on a variety of print media, such as paper (including recycled
paper), envelopes, labels, overhead transparencies, and custom-sized
media. Properties such as weight, grain, and moisture content are
important factors affecting printer performance and output quality.
To achievethe best possible print quality,use only high-quality ,
copier-grade paper.See Appendix B for more detailed media specifications.
Note Always test a sample of paper before purchasing large quantities.
Your paper supplier should understand the requirements specified in the
HP LaserJet Printer Family Paper Specifications Guide (HP part
number 5002-1801). See “Accessories and Ordering Information”
starting on page 2-20.
Hewlett-Packard Company neither warrants nor recommends the use of
a particular brand of print media. Media properties are subject to change
by the manufacturer, and HP has no control over these changes.
3-2 Printing Tasks EN
Page 54

Figure 3-1
Media Input Options
The printer comes with two paper trays. By default, the printer draws first
from Tray 1 (A). If Tray 1 is empty,the printer draws from Tray2 (B).
Media input options
Tray 1 (multi-purpose) Media Sizes
Tray 1 adjusts for sizes from 3 x 5 in (76 x 127 mm) to a legal-size
sheet, 8.5 x 14 in (216 x 356 mm).
Tray 1 should be used when printing:
• Envelopes (see page 3-12)
• Labels (see page 3-13)
• Transparencies (see page 3-14)
• Custom-sized media (see page 3-15)
• Postcards (see page 3-15)
• Heavy paper (see page B-9)
Tray 2 (paper cassette) Media Sizes
Tray 2 has settings for the following paper sizes:
• Legal (8 1/2 x 14 in)
• A4 (210 x 297 mm)
• Letter (8 1/2 x 11 in)
• Executive (7 1/4 x 10 1/2 in)
• B5 (176 x 250 mm)
See page 3-6 to change the paper size in Tray 2.
3
PrintingTasks
EN Printing Tasks 3-3
Page 55

Figure 3-2
Media Output Options
The printer comes with two output options, the rear output tray (A) and
the top output tray (B). The printer will output to the rear output tray if it
is in the open position. If the rear output tray is closed, the media will be
sent to the top output tray.
Media output options
Rear Output Tray
The rear output tray provides the straightest paper path. This helps
reduce paper curl. Always use the rear output tray when printing on:
• Labels
• Envelopes
• Heavy paper
• Postcards
To open the rear output tray, grasp the center finger tab and pull the top
backward. Pull the tray extender up until it snaps into place.
Top Output Tray
The top output tray provides the flattest paper tray. Always use the top
output tray when printing:
• Transparencies
• A large print job (over 50 pages)
3-4 Printing Tasks EN
Page 56

Loading Media into Tray 1
Tray 1 (multi-purpose) holds up to
100 sheets of paper or up to 10 envelopes.
1 Grasp Tray 1 by the two finger tabs
and pull the top down.
2 Pull out the plastic tray extender by
grasping the center finger tab. If the
media being loaded is longer than
9 inches (229 mm), also pull out the
wire tray extender.
3 Slide the paper width guide to the far
right side of the tray.
4 Place media into the tray (short-edge
in, print-side up). The media should
be flush left, under the tab on the left
paper guide.
5 Slide the paper width guide to the left
until it lightly touches the media
without bending it. Make sure the
media fits under the tab on the paper
width guide.
3
PrintingTasks
Note
Do not add media to Tray 1 while the
printer is printing. This could cause a
paper jam.
Tray 1 hint
• For letterhead orientation in Tray 1,
see page 3-11.
EN Printing Tasks 3-5
Page 57

Changing Paper Size in Tray 2
1 Pull Tray 2 straight out of the printer
and remove any paper.
2 Press the top of the green paper width
guide toward the center of the tray.
The guide should detach from the
tray.
3 Align the pointer on the end of the
guide with the desired paper size.
4 Insert the two left side tabs into the
appropriate holes (A) and push back
on the guide to the upright position
(B), snapping the center tab into place.
For A4, Letter, Executive and B5 paper
sizes, skip to step 7 on the following
page. For Legal paper size continue with
step 5 below.
5 Locate the green subtray at the back
of Tray 2. Grasp the front corners of
the subtray and pull straight up to
remove.
Continue with step 6 on the following
page.
3-6 Printing Tasks EN
Page 58

6 Move the subtray to the rear position
(C), aligning the tabs on the front
sides of the subtray with the rear
grooves. Press the subtray down until
it snaps into place (D).
Continue here if not using Legal paper
size.
7 Press the top of the paper length
guide toward the center of the tray.
The guide should detatch from the
tray.
8 Align the pointer on the left of the
guide (E) with the desired paper size.
Insert the two front side tabs into the
appropriate holes (F) and push back
on the guide to the upright position,
snapping the center tab into place (G).
9 Load up to 250 sheets of paper in the
tray. Keep the paper below the arrows
on the paper length guide (H) in the
rear of the tray. Make sure the paper
is flat in the tray at all four corners. If
needed, press on the clip lever (I) to
raise the front left metal holder (J) so
the paper will fit underneath.
3
PrintingTasks
10 Slide Tray 2 back into the printer.
EN Printing Tasks 3-7
Page 59

Figure 3-3
Printing Tasks
Stopping a Print Job
A print job can be stopped from a software application, a print queue, or the
[Job[Cancel] button.
• If the printer has not started printing, first try to cancel the job within the
software application that sent the print job.
• If the print job is waiting in a print queue or print spooler (such as the
Print Manager in Windows 3.1), delete the job there.
• If the print job is already printing, press the printer [Job[Cancel] button.
The printer will finish printing any pages that are already moving
through the printer and delete the rest of the print job.
If the top panel status lights continue to cycle after a job has been canceled
the computer is still sending the job to the printer. Either delete the job from
the print queue or wait until the computer has finished sending data. The
printer will return to a ready state (Ready [front] light on).
Job Cancel button
Job Cancel Tips
Pressing [Job[Cancel] cancels only the current job in the printer. If
more than one print job is in printer memory, [Job[Cancel] must be
pressed once for each job.
3-8 Printing Tasks EN
Page 60

Figure 3-4
Manual Feed Printing (Pausing between Pages)
The manual feed feature allows you to feed paper from Tray 1 rather
than automatically feeding from Tray 2.
Manual Feed and Manual Feed with Pause are available in most
software applications under the Print or Printer Setup options. Locate
the Paper Source choices and select the desired Manual Feed option.
Manual Feed
If the Manual Feed option is turned on, the printer will automatically
print on the media loaded in Tray 1. If Tray 1 is empty, the Tray 1 status
light will remain on until media has been loaded. The printer will
automatically print once the media is in place.
Manual Feed with Pause
If the Manual Feed with Pause option is turned on, the printer will pause
between each page in the print job. When the Tray 1 status light blinks,
make sure the correct media is loaded in Tray 1 and press [Go] to print
each page.
3
PrintingTasks
Printing with the “Manual Feed with Pause” option
EN Printing Tasks 3-9
Page 61

Figure 3-5
Printing on Both Sides of Media (Duplexing)
1 Print the first side of the media as you normally would.
2 To print the second side from Tray 1, make sure the printed side is
facing down with the top-edge towards the printer (A).
3 To print the second side from Tray 2, make sure the printed side is
facing up with the top-edge facing you (B).
Media orientation for duplex printing
Tips for Duplex Printing
• Some software applications include “odd pages” and “even pages”
printing. If this option is available, print the even pages first using the
top output tray, then put the stack right side up in Tray 2 (B) and print
the odd pages.
• Use the “Manual Feed with Pause” option in your software application to
pause the printer between sheets of paper, allowing you to insert the pages
one at a time. (See “Manual Feed Printing (Pausing between Pages)” on
page 3-9.)
Note When the second side is printing, you may experience a higher
frequency of paper misfeeds, paper jams, and multi-feeds. The print
quality may be different on the second side of the media.
3-10 Printing Tasks EN
Page 62

Figure 3-6
Printing on Special Media
Printing on Letterhead and Preprinted Forms
Tray 1 Letterhead/3-Hole Punch Orientation
Figure 3-7
Tray 1 letterhead orientation: print-side up, top-edge toward the printer
Tray 2 Letterhead/3-Hole Punch Orientation
Tray 2 letterhead orientation: print-side down, top-edge facing you
3
PrintingTasks
EN Printing Tasks 3-11
Page 63

Printing on Envelopes
Before you load envelopes in Tray 1,
make sure they are undamaged and are
not stuck together.
Caution
Never use envelopes with clasps, snaps,
windows, coated linings, self-stick
adhesives, or other synthetic materials.
See Appendix B for media specifications.
1 Grasp Tray 1 by the two finger tabs
and pull the top down. Pull out the
plastic tray extender with the center
finger tab.
2 Open the rear output tray by grasping
the center finger tab and pulling the top
down. Pull out the tray extender until it
snaps into place. (This reduces
envelope curling.)
3 Place envelopes against the left side
of the tray, print-side up, with the
postage-end in. Slide the envelopes
into the printer as far as they will go
without forcing them.
4 Slide the paper width guide to the left
until it lightly touches the right side
of the envelope stack.
5 Make sure the envelopes fit under the
plastic tabs on the paper width guide
and the left side of the tray.
3-12 Printing Tasks EN
Page 64

Figure 3-8
Printing on Labels
Label Guidelines
Only use labels recommended for laser printers, such as HP LaserJet
labels. (See page 2-21 for ordering information.) See Appendix B for
media specifications.
• Print labels from Tray 1.
• Load labels print-side up.
• Use the rear output tray for labels.
• Remove labels from the output tray before printing another sheet.
3
PrintingTasks
Printing on labels
• Do not use labels that are separating from the backing sheet or are
wrinkled or damaged in any way.
• Do not use label sheets with the backing sheet exposed.
• Do not feed a sheet of labels through the printer more than once. The
adhesive backing is designed for one pass through the printer.
Caution If a sheet of labels becomes jammed in the printer, turn off the printer
and remove the toner cartridge. See the “Paper Jams” section starting on
page 5-2 to remove the jammed labels.
EN Printing Tasks 3-13
Page 65

Figure 3-9
Printing on Transparencies
Transparency Guidelines
Only use transparencies recommended for use in laser printers, such as
HP transparency film. (See page 2-21 for ordering information.) See
Appendix B for media specifications.
• Print transparencies from Tray 1.
• Use the top output tray to reduce curling (this is for transparencies only,
for other media use back output tray to reduce curling).
• To avoid transparencies from sticking together, remove any
transparencies in the output tray before printing another transparency.
• Place transparencies on a flat surface after removing from the printer.
Printing on Transparencies
3-14 Printing Tasks EN
Page 66

Figure 3-10
Printing on Custom-Sized Media
Postcards, 3 x 5 (index) cards, and other custom-sized media can be
printed from Tray 1.
• Minimum media size 3 x 5 in (76 x 127 mm)
• Maximum media size 8.5 x 14 in (216 x 356 mm)
Custom-Sized Media Guidelines
• Always insert the short-edge first into Tray 1. If you want to print in
landscape mode, make this selection through your software. Inserting
paper long-edge first may cause a paper jam.
• Use the rear output tray to reduce excessive curl.
• Do not print on media smaller than 3 inches wide (76 mm) or 5 inches
tall (127 mm).
• Set margins at least .14 inch (6.4 mm) away from the edges of the media.
See Appendix B for media specifications.
3
PrintingTasks
Printing on custom-sized media
EN Printing Tasks 3-15
Page 67

Figure 3-11
Printing with the Infrared Port
(Wireless Printing)
The infrared (IR) port (A) is located on the lower left corner of the
printer. This port is compliant with the specifications determined by the
Infrared Data Association (IrDA). Just above the port is a status light
(B) that indicates when the port is active. The IR port works by
transmitting data at speeds of up to 4 Megabits per second. When the IR
connection is established, the IR status light comes on. If the connection
is broken, or when the print job is complete, the IR status light goes off.
IR port and IR status light
To use the IR port, you need the following:
• A computer equipped with an IrDA-compliant infrared port. The
computer should also include an infrared port driver that allows printing
from the computer to the printer using the infrared port and the IrDA
communication protocol. Ask the computer manufacturer if you have a
question.
• A printer driver for the software application on the computer that allows
you to generate data that the printer can print.
• The computer must be within 3 feet (1 meter) of the printer when
attempting to print. See the following page for printing instructions
when using the IR Port.
3-16 Printing Tasks EN
Page 68

Figure 3-12
Printing Instructions for the Infrared Port
1 Make sure the printer is in ready state (Ready [front] light on).
2 Align an IrDA-compliant computer within 3 feet (1 meter) of the IR
Port. Ensure that the ports are facing each other with no more than
15 degrees angle to either the left or right.
3
PrintingTasks
IR port alignment
3 Send the print job from the computer. The IR status light will turn on
when the connection has been made.
EN Printing Tasks 3-17
Page 69

3-18 Printing Tasks EN
Page 70

Printer Tips and Maintenance
Overview
This Chapter provides suggestions for high quality and economical
printing. It also lists special maintenance tasks for the toner cartridge
and the printer.
4
• Producing better looking documents
Enhancing printer resolution (REt setting) Page 4-2
Adjusting print density Page 4-2
Using Watermarks Page 4-2
• Saving money with the printer
Printing on both sides of paper (duplexing) Page 4-3
Printing multiple pages on a sheet (n-up printing) Page 4-3
Extending the life of the toner cartridge Page 4-4
• Toner cartridge maintenance
Toner cartridge life expectancy Page 4-6
Storing toner cartridges Page 4-6
Recycling toner cartridges Page 4-6
Using non HP toner cartridges Page 4-6
• Printer maintenance
Cleaning the printer Page 4-7
Internal cleaning procedure Page 4-8
Page 4-2
Page 4-3
Page 4-6
Page 4-7
EN Printer Tips and Maintenance 4-1
Page 71

Producing Better Looking Documents
The print quality settings described in this section can be changed
through the following software:
• Windows printer drivers (see page 2-15)
• DOS Remote Control Panel (see page 2-18)
• Macintosh printer drivers (see page 2-19)
Refer to help screens in the software for specific information on each
setting and how to adjust them.
Enhancing Printer Resolution (REt Setting)
Resolution Enhancement technology (REt) adjusts the size and placement
of dots on the page to produce smooth angles, curves, and edges. Print a
self test (see page 2-9) and examine the REt block (see letter D,
page 2-10) on the printout. The block should be a uniform gray with no
vertical lines, or with vertical lines tending toward dark rather than light.
If the REt setting needs to be adjusted, access the printer driver (or DOS
Remote Control Panel) and find the Resolution Enhancement option.
Print another self test and examine the REt block. If needed, change the
setting again.
Adjusting Print Density
Print density is a measure of the darkness of print on the page.
To lighten or darken the print density, access the HP LaserJet Utility (or
DOS Remote Control Panel) and find the Print Density option.
Using Watermarks
A watermark is a light image printed in the background on a page. For
instance the word “Confidential” could be watermarked in the
background on an important document.
Watermark controls are located in the printer driver. Some printer
drivers may not have this feature. Check your printer driver for
availability.
4-2 Printer Tips and Maintenance EN
Page 72

Figure 4-1
Saving Money with the Printer
Printing on Both Sides of Paper (Duplexing)
Paper expense can be reduced by printing on both sides of paper when
appropriate. See page 3-10 for tips and guidelines when duplexing a
print job.
Printing Multiple Pages on a Sheet
(N-up Printing)
Paper expense can also be reduced by printing more than one page on a
single sheet of paper. This feature provides a cost-effective way to print
draft pages.
To print more than one page on a sheet of paper, look for the Layout or
Pages Per Sheet option in the printer driver. If you are unable to find
this feature, check the printer driver help screens for availability. Some
printer drivers may not have this option.
Layout options for printing multiple pages on a sheet
EN Printer Tips and Maintenance 4-3
4
Printer
Maintenance
Page 73

Extending the Life of the Toner Cartridge
Using EconoMode
EconoMode creates draft-quality printing by reducing the amount of
toner on the printed page by 50%. This lowers printing costs by
extending the life of the toner cartridge. (However, this does not extend
the toner cartridge warranty.)
To turn EconoMode On/Save Toner or Off/High Quality, access the
EconoMode option in the printer driver (or DOS Remote Control
Panel).
Finishing Print Jobs When Running Out of Toner
When faded or light areas appear on a printed page the toner supply is
low. Youcan temporarily improve print quality by redistributing the
toner. The following procedure allows you to finish the current print
job(s) before replacing the toner cartridge.
4-4 Printer Tips and Maintenance EN
Page 74

Extending the Life of the Toner Cartridge (continued)
1 Open the top cover by pressing the
top cover release button.
2 Remove the toner cartridge from the
printer.
3 Rotate the toner cartridge back and
forth to redistribute toner. Avoid
tipping the cartridge on end.
Note
If toner gets on your clothing, wipe it off
with a dry cloth and wash clothing in
cold water.
4 Reinsert the toner cartridge into the
printer lining up the arrow on the
cartridge (A) with the arrow in the
printer (B). Close the top cover.
If the print remains light, install a new
toner cartridge.
4
Printer
Maintenance
EN Printer Tips and Maintenance 4-5
Page 75

Toner Cartridge Maintenance
Life Expectancy
The life of the toner cartridge depends on the amount of toner that print
jobs require. When you print text, a toner cartridge lasts an average of
4,400 pages, printed at 5% coverage. (A typical business letter is about
5% coverage.) This assumes that the print density is set to 3 (default
setting) and the EconoMode feature is turned off\highest quality (default
setting).
Storing Toner Cartridges
Do not remove the toner cartridge from its packaging until you are ready
to use it. The shelf life of a cartridge in an unopened package is
approximately 2 1/2 years. The shelf life of a cartridge in an opened
package is 6 months.
Caution To prevent damage, do not expose the toner cartridge to light for more
than a few minutes.
Recycling Toner Cartridges
Follow the instructions in the Recycling Instruction Guide included in
the HP toner cartridge box.
Using Non-HP Toner Cartridges
Hewlett-Packard Company cannot recommend use of non-HP toner
cartridges, either new or remanufactured. Because they are not HP
products, HP cannot influence or control their quality.
4-6 Printer Tips and Maintenance EN
Page 76

Printer Maintenance
Cleaning the Printer
To maintain print quality, follow the cleaning procedure (on the
following page) every time the toner cartridge is changed or whenever
print quality problems occur. As much as possible, keep the printer free
from dust and debris.
• Clean the outside of the printer with a lightly water-dampened cloth.
• Clean the inside with a dry, lint-free cloth.
• Clean the internal mirror with the cleaning brush. (See the following
page.)
Caution Do not use ammonia-based cleaners on or around the printer.
While cleaning the printer, be careful not to touch the transfer roller
(located underneath the toner cartridge). Skin oils on the roller can cause
print quality problems.
Figure 4-2
Do not touch the transfer roller
EN Printer Tips and Maintenance 4-7
4
Printer
Maintenance
Page 77

Internal Cleaning Procedure
Over time, tiny dust particles will begin to
accumulate inside the printer. This can
cause vertical white streaks during
printing. Cleaning the internal mirror will
return printing to normal.
WARNING!
Before cleaning the printer, turn the
printer off and unplug the power cable.
1 Open the top cover by pressing the
top cover release button.
2 Remove the toner cartridge.
Caution
To prevent damage, do not expose the
toner cartridge to light for more than a
few minutes.
3 With a dry, lint-free cloth, wipe any
residue from the paper path area and
the toner cartridge cavity.
4 Remove the cleaning brush, located
above the toner cartridge cavity. (This
is used to clean the internal mirror.)
5 With the bristles facing up, insert the
cleaning brush onto the shoulder.
Lightly move the brush from side to
side to clean the mirror.
Replace the brush and toner cartridge,
close the top cover, plug in the power
cable, and turn the printer on.
4-8 Printer Tips and Maintenance EN
Page 78

Problem Solving
Overview
This Chapter helps you troubleshoot printer problems in the following
areas:
5
• Clearing paper jams
Tray 2 paper feed area Page 5-3
Toner cartridge area Page 5-4
Output areas Page 5-5
Removing torn pieces of paper Page 5-6
• Solving print quality problems
Print quality checklist Page 5-7
Image defect examples Page 5-7
• Troubleshooting checklist
Error messages Page 5-12
General printing problems Page 5-15
Infrared printing problems Page 5-17
Macintosh problems Page 5-18
PostScript errors Page 5-21
Page 5-2
Page 5-7
Page 5-10
EN Problem Solving 5-1
Page 79

Figure 5-1
Clearing Paper Jams
Occasionally paper can become jammed during a print job. Some of the
causes include:
• Paper trays loaded improperly or overfilled.
• Tray 2 is removed during a print job.
• Top cover is opened during a print job
• Printing on media that does not meet HP specifications. (See
Appendix B.)
• Printing on media that is under the minimum required size.
Find and remove the jammed paper using the instructions on the
following pages. If the location of the paper jam is not obvious, look
first in the toner cartridge area.
Paper jams can occur at three locations:
• Tray 2 paper feed area (A). See page 5-3.
• Toner cartridge area (B). See page 5-4.
• Output areas (C). See page 5-5.
Paper jam areas
Note Loose toner may remain in the printer after a paper jam. This will clear
after a few sheets have printed.
5-2 Problem Solving EN
Page 80

Paper Jam: Tray 2 Paper Feed Area
1 Slide Tray 2 out of the printer.
2 Remove any misfed paper in Tray 2.
Make sure all paper is underneath the
metal corner clip.
3 If paper has entered the toner
cartridge area, follow the instructions
on the following page. It is easier to
remove paper from the toner cartridge
area than the paper feed area.
4 If the paper is jammed in the paper
feed area and cannot be accessed
from the toner cartridge area, grasp
the paper at position (A) and carefully
pull the paper to the right to release it
from the paper rollers, then pull it
straight out of the printer.
5 Slide Tray 2 back into the printer.
Note
If the Error light does not clear, there is
still jammed paper inside the printer.
EN Problem Solving 5-3
5
Problem Solving
Page 81

Paper Jam: Toner Cartridge Area
1 Open the top cover by pressing the
top cover release button.
2 Remove the toner cartridge.
Caution
To prevent damage, do not expose the
toner cartridge to light for more than a
few minutes.
3 If the leading edge of the paper is
visible, gently pull the paper out of
the printer.
4 If the paper is too difficult to remove
or has already entered the output area,
open the rear output tray and locate
the green paper release lever.
5 Firmly push and hold the green paper
release lever up while pulling the
paper out of the toner cartridge area.
When the jammed paper has been
removed, shut the rear output tray, replace
the toner cartridge, and shut the top door.
Note
If the Error light does not clear, there is still
jammed paper inside the printer.
5-4 Problem Solving EN
Page 82

Paper Jam: Output Areas
1 Open the rear output tray by grasping
the center finger tab and pulling the
top down.
2 Push in the two hinges to release the
output tray to its lowest position.
3 If the leading edge of the paper is in
the top output tray, push the green
paper release lever up while pulling
the paper firmly out through the top
output tray.
4 If the paper has not reached the top
output tray, push and hold the green
paper release lever up while pulling
the paper firmly out the back of the
printer.
Close the rear output tray.
Note
If the Error light does not clear, there is
still jammed paper inside the printer.
EN Problem Solving 5-5
5
Problem Solving
Page 83

Paper Jam: Removing Torn Pieces of Paper
Sometimes a piece of jammed paper can
tear when being removed. Use the
following procedure to remove any small
pieces of paper left in the printer.
1 Make sure the toner cartridge is
installed, the top cover is closed, and
Tray 2 is completely pushed into the
printer.
2 Turn the printer off and then back on.
As the printer restarts, the rollers will
advance the piece(s) of paper.
3 Open the top cover and remove the
toner cartridge.
4 Remove the piece(s) of paper.
If the paper can not be removed by hand,
repeat steps 1 through 4.
5-6 Problem Solving EN
Page 84

Solving Print Quality Problems
Print Quality Checklist
General print quality problems can be solved by following the checklist
below.
Redistribute the toner in the toner cartridge. Seepage 4-4
Clean the inside of the printer. See page 4-8
Check the paper type and quality. See Appendix B
Adjust the print density. See page 4-2
Check to make sure EconoMode is off. See page 4-4
Install a new toner cartridge, then check print
quality again.
Go to “Troubleshooting General Printing
Problems”.
Image Defect Examples
Vertical Fade
Page 5-8
Background Gray
Page 5-9
Dropouts
Page 5-8
Repetitive Defects
Page 5-9
See instructions
provided with toner
cartridge
See page 5-15
Vertical Lines
Page 5-8
Wavy Characters
Page 5-9
Toner Smear
Page 5-9
5
Problem Solving
EN Problem Solving 5-7
Page 85

Vertical Fade
If a vertical white streak or faded area appears on the page:
• The toner supply is low. See page 4-4 to temporarily extend the
toner cartridge life. If this does not improve the print quality,
install a new toner cartridge.
• The print density adjustment is too light. See page 4-2 to adjust
print density.
• EconoMode may be on. See page 4-4 to turn EconoMode off.
• The internal mirror may need to be cleaned. See page 4-8 for the
internal cleaning procedure.
• The paper may not meet HP’s paper specifications (for example,
too moist or too rough). See Appendix B for media specifications.
Dropouts
If faded-out areas, generally rounded, occur randomly on the page:
• A single sheet of paper may be defective. Try reprinting the job.
• The moisture content of the paper is uneven or the paper has moist
spots on its surface. Try paper from a different source. See
Appendix B for media specifications.
• The paper lot is bad. The manufacturing processes can cause some
areas to reject toner. Try a different kind or brand of paper. See
Appendix B for media specifications.
If these steps do not correct the problem, see an HP authorized
dealer or service representative.
Vertical Lines
If black or white vertical streaks appear on the page:
• The photosensitive drum inside the toner cartridge has probably
been scratched. Install a new toner cartridge.
• The internal mirror may need to be cleaned. See page 4-8 for the
internal cleaning procedure.
5-8 Problem Solving EN
Page 86

Toner Smear
If toner smears appear on the leading edge of the paper:
• The paper guides are dirty. See page 4-8 for the internal cleaning
procedure.
If toner on the paper is loose or can be wiped off easily:
• The fuser may be damaged. See an HP authorized dealer or service
representative (see page 6-4 for warranty options).
Background Gray Toner Shading
If the amount of background toner shading becomes unacceptable,
the procedures described below may help to clear the condition:
• Increase the density setting (see page 4-2 to adjust print density).
This will decrease the amount of background shading.
• Change the paper to a lighter basis weight. See Media
Specifications in Appendix B.
• Check the printer’s environment; very dry (low humidity)
conditions can increase the amount of background shading.
• Install a new toner cartridge.
Vertical Repetitive Defects
If marks repeatedly appear on the printed side of the page:
• The toner cartridge is damaged. The circumference of the toner
cartridge drum is 3 inches (76 mm). If a repetitive mark occurs
every 3 inches (76 mm) on the page, install a new toner cartridge.
• The transfer roller has toner on it. If the defects occur on the back
of the page, the problem will likely correct itself after a few more
pages.
Improperly Formed/Wavy Characters
If characters are improperly formed, producing hollow images:
• The paper stock may be too slick. Try a different paper.
If characters are improperly formed, producing a wavy effect:
• The laser scanner needs service. Call your authorized HP dealer or
HP service representative. (See page 6-4 for warranty options.)
EN Problem Solving 5-9
5
Problem Solving
Page 87

Troubleshooting Checklist
If the printer is not responding properly, complete the following
checklist in order. If the printer does not pass a step, follow the
corresponding troubleshooting suggestions.
Make sure the printer Ready (front) light is on.
• If no lights are on:
• Check the power cord connections.
• Check the On/Off switch.
• Check the power source.
• If the Error (back) light is on, go to page 5-12.
• If any other light sequences are on, check the status
messages starting on page 2-6.
Press [Go] to print a demo page to verify that the printer is
feeding paper correctly.
• If a demo page does not print:
• Check the paper supply in Tray 2. (See page 1-7.)
• Check the print queue or print spooler to see if the printer
has been paused.
• If the page jams in the printer, go to page 5-2.
Check the demo page to see if it printed correctly.
• If there is a print quality problem, go to page 5-7.
Print a short document from a software application to verify
the computer and printer are connected and are
communicating correctly.
• If the page does not print:
• Check the cable connection between the printer and
computer.
• Make sure you are using the proper cable. (See page 1-8.)
• Check the software application to make sure you are
using the proper printer driver and port.
• If the page is interrupted during printing, go to “Blank,
Distorted, or Incomplete Printing” on page 5-15.
5-10 Problem Solving EN
Page 88

If completing the checklist did not diagnose the problem with the
printer, check the following troubleshooting sections:
• Error messages
Data error messages Page 5-13
• General printing problems
Tray selection Page 5-15
Print speed Page 5-15
Blank, distorted, or incomplete printing Page 5-15
Font problems Page 5-16
Network issues Page 5-16
• Infrared printing problems
• Macintosh problems
Solving problems in the Chooser Page 5-18
Solving Macintosh printing errors Page 5-19
Selecting an alternate PPD Page 5-20
Renaming the printer Page 5-20
• PostScript errors
Page 5-12
Page 5-15
Page 5-17
Page 5-18
Page 5-21
EN Problem Solving 5-11
5
Problem Solving
Page 89

Troubleshooting Error Messages
When the Error (back) light is on, the printer has experienced an error.
Find the light pattern below (using top panel and front panel lights) that
matches the printer and follow the recommendations to clear the error.
Recoverable Error
• The top cover is open. Close the cover.
• The toner cartridge is missing or not installed correctly. Check the
toner cartridge, being careful to position it correctly.
• There is media jammed in the printer. See the “Clearing Paper Jams”
section starting on page 5-2.
Data Error
When the Error (back) light and Data (middle) light are simultaneously
lit, the printer has experienced a data error.
• See the descriptions of data errors on the following page.
SIMM Error (two different light patterns are possible)
A problem has been detected concerning an installed SIMM.
• Check to make sure the SIMM is installed correctly (see Appendix
D).
• Replace the SIMM if it is defective or press [Go] to continue
printing. Any good banks of memory on the SIMM will be
configured.
Fatal Error
The printer has experienced a serious error.
• Reset the printer by briefly turning the printer off and back on. If the
same light pattern appears, turn the printer off for 10 minutes. If the
light pattern appears again, contact your dealer or HP service
representative.
5-12 Problem Solving EN
Page 90

Troubleshooting Data Error Messages
When the Error (back) light and Data (middle) light are simultaneously
lit the printer has experienced a data error. To determine the cause of
the data error, simultaneously press and hold [Go] and [Job[Cancel].
A secondary light pattern (using top panel and front panel lights) will
indicate the specific error. Find the secondary light pattern that matches
the printer and follow the recommendations to clear the error.
Data Error
Secondary Light Patterns
Memory Overflow
The printer memory is full.
• Press [Go] to resume printing. If you lose some data try to free some
printer memory by removing any unnecessary fonts, macros, or any
data currently in printer memory. If you continue to lose data you
may need to add more printer memory. For a temporary solution
simplify the image or print at a 300 dpi resolution.
Print Overrun
The print job was too complex for available printer memory.
• Press [Go] to resume printing. If you lose some data you may need to
add more printer memory. For a temporary solution simplify the
image or print at a 300 dpi resolution.
IO Error
The cable between the printer and computer has a bad connection or the
cable is of poor quality.
• Check the cable connections to see if they are secure. Make sure you
are using a high-quality cable. See the section in Chapter 1 for
attaching printer cables beginning on page 1-8.
Temporary Connection Break
An abnormal break during transmission of the data from the computer
to the printer.
• Press [Go] to clear the error message and print the job again.
5
Problem Solving
EN Problem Solving 5-13
Page 91

Secondary Light Patterns
Continuable Error (three different light patterns are possible)
A temporary error occurred during printing.
• Press [Go]. The page will automatically reprint.
Temporary Error (three different light patterns are possible)
The printer detected a temporary error condition.
• Reset the printer by briefly turning the printer off and back on. If the
problem persists, contact your dealer or HP service representative.
NVRAM Error (two different light patterns are possible)
The nonvolatile memory (NVRAM) is temporarily full.
• Press [Go] to clear the message. Check the printer settings to ensure
they are correct. If the problem persists contact your dealer or HP
service representative.
Service Error
The printer detected a problem requiring service.
• Call your dealer or HP service representative.
5-14 Problem Solving EN
Page 92

Troubleshooting General Printing Problems
Tray Selection
• Printer selects media from the wrong tray.
• Make sure the tray selection in the software application is set
correctly.
• Remove any media in Tray 1 to make Tray 2 the priority tray.
Print Speed
• Slow print speed is caused by the software application and complexity
of the print job.
• For faster printing, reduce the complexity of the page or install more
memory.
Blank, Distorted, or Incomplete Printing
• Pages print but are totally blank.
• The sealing tape may still be in the toner cartridge. See page 1-6.
• Pages print but are garbled, images overprint on a page, or only a
portion of the page prints.
• A PostScript job was sent to the printer while the printer was set to
receive a PCL job.
• Make sure the software application is using the correct printer driver.
• The data file sent to the printer may be corrupt. Try printing a self
test to see if it prints correctly (see page 2-9).
• Replace the printer cable with a cable you know works to see
whether or not the cable is bad.
EN Problem Solving 5-15
5
Problem Solving
Page 93

Font Problems
• The print job has incorrect fonts or formatting.
• Make sure the software application is using the correct printer driver.
• The font is not in the printer and must be downloaded by the software
application.
• To verify the availability of a font, print a font list (see page 2-9).
• The software application may be substituting a font for one that is not
available. See your software application manual for information on
font selection.
• Make sure the desired personality (such as PostScript) is installed in
the printer. Print a self test (see page 2-9) and check the “Installed
Personalities and Option” (see item C on page 2-10).
Network Issues
• You are experiencing shared printer problems.
• To verify if a printer works with a computer, connect one computer
directly to the printer at a time. Print a document from an application
that has printed correctly in the past.
• Contact your network administrator for assistance.
5-16 Problem Solving EN
Page 94

Troubleshooting Infrared Printing Problems
• The connection cannot be established or the transmission seems to be
taking longer than usual.
• Make sure the computer you are using is IrDA-compliant; look for an
IrDA symbol on the device or refer to the computer’s manual.
• Make sure that the operating system on the computer includes an IR
driver and your application is using an HP LaserJet 6P/6MP Printer
driver. (Note - complex pages also take longer to print.)
• Make sure you have positioned the device within the range of
operation and that no objects, such as a finger, paper, books, or bright
light, are interfering with the connection. Also make sure the two IR
ports are clean (free from dirt and grease).
• Bright light of any kind (sunlight, incandescent light, fluorescent
light, or light from an infrared remote control, such as those used for
TVs and VCRs) shining directly into one of the IR ports may cause
interference. Make sure that no bright light is shining directly into
either IR port.
• Position the device closer to the IR port on the printer.
• The printer prints only part of a page or document.
• The connection has been interrupted during transmission.
IrDA-compliant devices are designed to recover from temporary
connection interruptions. Re-establish the connection. (Depending
on the device you are using, you can have anywhere from 3 to
40 seconds to re-establish the connection.)
• The print job has been properly sent to the printer, but the printer will
not print.
• If the connection is broken before the print job has started, the printer
may not print any of the job. If the Data (middle) light is on, press
[Job[Cancel] to clear the printer memory. Position the device within
the range of operation and print the job again.
• The IR status light turns off during transmission.
• The connection may have been broken. If the Data (middle) light is
on, press [Job[Cancel] to clear the printer memory. Position the
device within the range of operation and print the job again.
EN Problem Solving 5-17
5
Problem Solving
Page 95

Troubleshooting Macintosh Problems
Solving Problems in the Chooser
• Printer driver icon does not appear in the Chooser.
Reinstall the printer software. See software installation instructions
beginning on page 1-13.
• Printer name does not appear in the “Select an HP LaserJet Printer” box
in the Chooser or list box.
• Make sure the cables are connected correctly, the printer is on, and
the Ready (front) light is on.
• Make sure the printer cable is connected to the computer’s printer
port.
• Make sure the correct printer driver has been selected in the Chooser.
• If the printer resides on a network with multiple zones, make sure the
correct zone is selected in the “AppleTalk Zones” box in the Chooser.
• Make sure the printer has been chosen in the Chooser by printing a
self test. (Simultaneously press [Go] and [Job[Cancel].) Check the
name of the printer displayed on the self test page.
• Make sure the AppleTalk is on. (The button next to Active is selected
in the Chooser.)
• Make sure you are using a high-quality cable.
• Make sure the printer is on the correct network. Select the Network
control panel from Control Panels in the Apple menu and then
choose the correct network.
• The printer driver does not automatically set up your selected printer
even though you clicked Auto Setup in the Chooser. (This is a
non-GX-environment.)
1 Reinstall the printer software. (See software installation
instructions beginning on page 1-13.)
2 Select an alternate PPD. (See page 5-20.)
3 Your PPD may have been renamed. If so, select the renamed PPD.
(See page 5-20.)
5-18 Problem Solving EN
Page 96

Solving Macintosh Printing Errors
• A print job was not sent to your desired printer.
Another printer with the same or similar name may have received your
print job. Rename the printer using the HP LaserJet Utility (see
page 5-20), making sure that all devices have unique names.
• You cannot use the computer while the printer is printing. (This is a
non-GX-environment.)
Turn Background Printing on in the Chooser. Status messages will
now be redirected to the Print Monitor allowing you to continue
working while the printer is printing.
• An encapsulated PostScript (EPS) file does not print with the correct
fonts.
This problem occurs with some software applications. Try downloading
the fonts contained in the EPS file to the printer before printing.
• Your document is not printing with New York, Geneva, or Monaco.
(This is a non-GX-environment.)
Select Options in the Page Setup dialog box to deselect substituted
fonts.
EN Problem Solving 5-19
5
Problem Solving
Page 97

Selecting an Alternate PPD (PostScript Printer
Description)
1 Open the Chooser from the Apple menu.
2 Click the HP LaserJet icon.
3 If you are on a network with multiple zones, select the zone in the
AppleTalk Zones box where the printer is located.
4 Click the printer name you want to use in the Select an HP LaserJet
Printer box.
5 Click Setup....
6 Click Select PPD....
7 Select the desired PPD from the list and click Select. If the desired PPD
is not listed, choose one of the following options:
• Select a PPD for a printer with similar features.
• Select a PPD from another folder.
• Select the generic PPD by clicking USE Generic. The generic PPD
allows you to print, but limits your access to printer features.
8 Click OK in the Setup dialog box to return to the chooser.
Note If you manually select a PPD, an icon may not appear next to the
selected printer in the Select an HP LaserJet Printer box. Click Setup
in the Chooser, click Printer Info, and then click Update Info to bring
up the icon.
9 Close the Chooser.
Renaming the Printer
If you are going to rename the printer, do this before selecting the
printer in the chooser. If you rename the printer after selecting it in the
Chooser, you will have to go back into the Chooser and re-select it (or
create a new desktop printer icon if you are using QuickDraw GX).
Use the Set Printer Name feature in the HP LaserJet Utility to rename
the printer.
5-20 Problem Solving EN
Page 98

Troubleshooting PostScript Errors
The following situations are PostScript language specific and may occur
when several printer languages are being used.
Note To receive a printed or screen displayed message when PostScript errors
occur (in a non-GX environment) open the Print Options dialog box
and click the desired selection next to the PostScript Errors section.
• The job prints in Courier (the printer’s default typeface) instead of the
typeface you requested.
The requested typeface is not downloaded. A personality switch may
have been performed to print a PCL job just before the PostScript
printing job was received. Download the desired font and send the print
job again.
• A legal page prints with clipped margins.
You may need to print your job at 300 dots per inch, reduce the
complexity of the page, or install more memory.
• A PostScript error page prints.
Make sure the print job is a PostScript job. Check to see whether the
software application expected a setup or PostScript header file to be sent
to the printer.
EN Problem Solving 5-21
5
Problem Solving
Page 99

5-22 Problem Solving EN
Page 100

Warranties/Licenses
Overview
This chapter provides information on the printer and toner cartridge
warranties, software license, and Hewlett-Packard service and support
locations.
6
• Limited printer warranty
Exclusions Page 6-2
Warranty limitations Page 6-3
Limit of liability Page 6-3
Service during the warranty period Page 6-4
Service after the warranty period Page 6-4
• Repacking guidelines
• Toner cartridge warranty
• HP Software Product License
• Sales and Service Offices
Calling for help Page 6-8
Page 6-2
Page 6-5
Page 6-5
Page 6-7
Page 6-8
EN Warranties/Licenses 6-1
 Loading...