

Page 1
hp color LaserJet 5500
5500dn, 5500dtn, 5500hdn
start
memulai
start
Page 2
Copyright Information
Warranty
© Copyright Hewlett-Packard Company 2002
All Rights Reserved. Reproduction, adaptation, or translation without prior
written permission is prohibited, except as allowed under the copyright
laws.
Part number: C9656-90942
Second Edition: October 2002
FCC Regulations
This equipment has been tested and found to comply with the limits for a
Class B digital device, pursuant to Part 15 of the FCC rules. These limits
are designed to provide reasonable protection against harmful
interference in a residential installation. This equipment generates, uses,
and can radiate radio frequency energy. If this equipment is not installed
and used in accordance with the instructions, it may cause harmful
interference to radio communications. However, there is no guarantee that
interference will not occur in a particular installation. If this equipment
does cause harmful interference to radio or television reception, which can
be determined by turning the equipment off and on, the user is
encouraged to try to correct the interference by one or more of the
following measures:
Reorient or relocate the receiving antenna.
Increase separation between equipment and receiver.
Connect equipment to an outlet on a circuit different from that to which the
receiver is located.
Consult your dealer or an experienced radio/TV technician.
Any changes or modifications to the printer that are not expressly
approved by HP could void the user’s authority to operate this equipment.
The information contained in this document is subject to change without
notice.
Hewlett-Packard makes no warranty of any kind with respect to this
information.
HEWLETT-PACKARD SPECIFI CALLY DISCLAIMS THE IMPLI ED
WARRANTY OF MERCHANTABILITY AND FITNESS FOR A
PARTICULAR PURPOSE.
Hewlett-Packard shall not be liable for any direct, indirect, incidental,
consequential, or other damage alleged in connection with the furnishing
or use of this information.
Use of a shielded interface cable is required to comply with the Class B
limits of Part 15 of FCC rules.
For more regulatory information, see the HP LaserJet 5500 electronic
user guide.
Trademark Credits
®
Microsoft
, Windows®, and Windows NT® are U.S. registered trademarks
of Microsoft Corporation. All other products mentioned herein may be
trademarks of their respective companies.
Page 3
1
Models
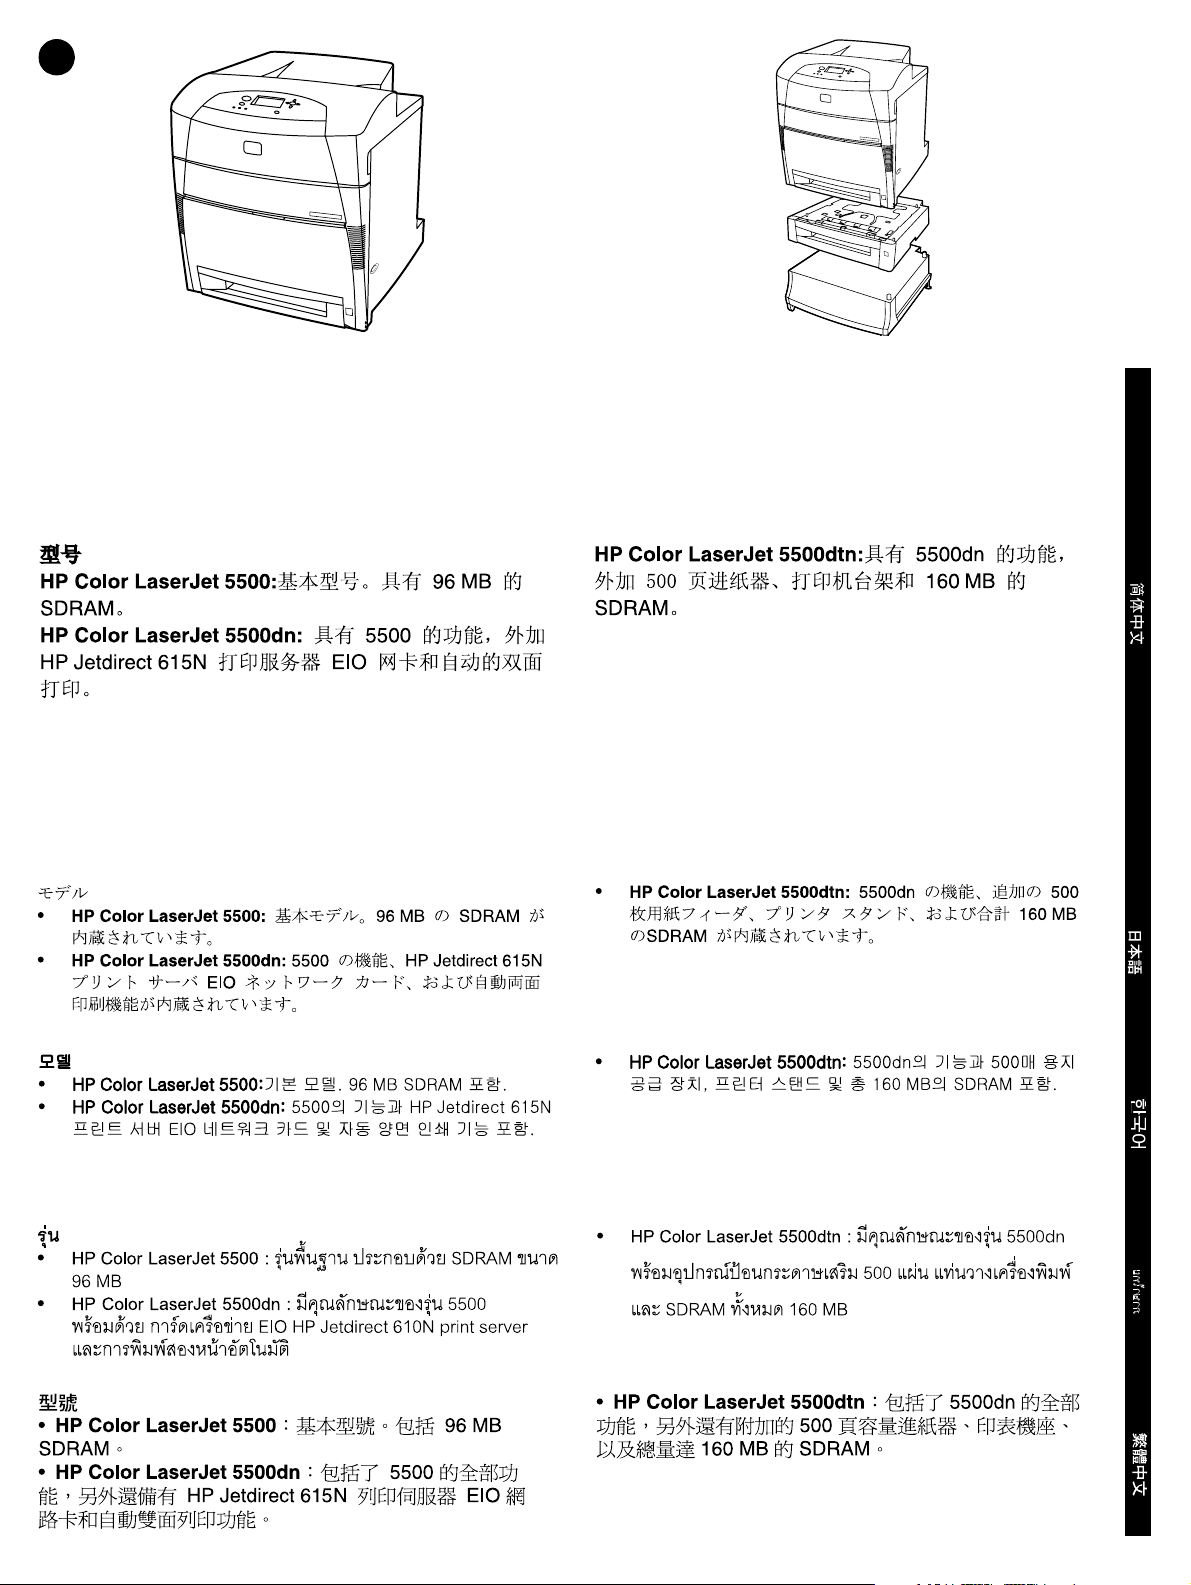
• HP Color LaserJet 5500: base model. Includes 96 MB of
SDRAM.
• HP Color LaserJet 5500dn: includes the features of 5500,
plus a HP Jetdirect 615N print server EIO network card and
automatic 2-sided printing.
Jenis Model.
• HP Color LaserJet 5500: model dasar. Termasuk SDRAM
sebesar 96 MB.
• HP Color LaserJet 5500dn: memiliki fitur-fitur model 5500,
plus sebuah kartu jaringan EIO server cetak HP Jetdirect 615N dan
kemampuan mencetak bolak-balik secara otomatis.
• HP Color LaserJet 5500dtn: includes the features of
5500dn, additional 500-sheet paper feeder, a printer stand,
and a total of 160 MB of SDRAM.
• HP Color LaserJet 5500dtn: memiliki fitur-fitur model
5500dn, pengumpan kertas berkapasitas 500-lembar tambahan,
alas printer, dan SDRAM total sebesar 160 MB.
Bahasa IndonesiaEnglish
3
Page 4
2
627.50 mm (25 inches)
940 mm (37 inches)
1090 mm (43 inches)
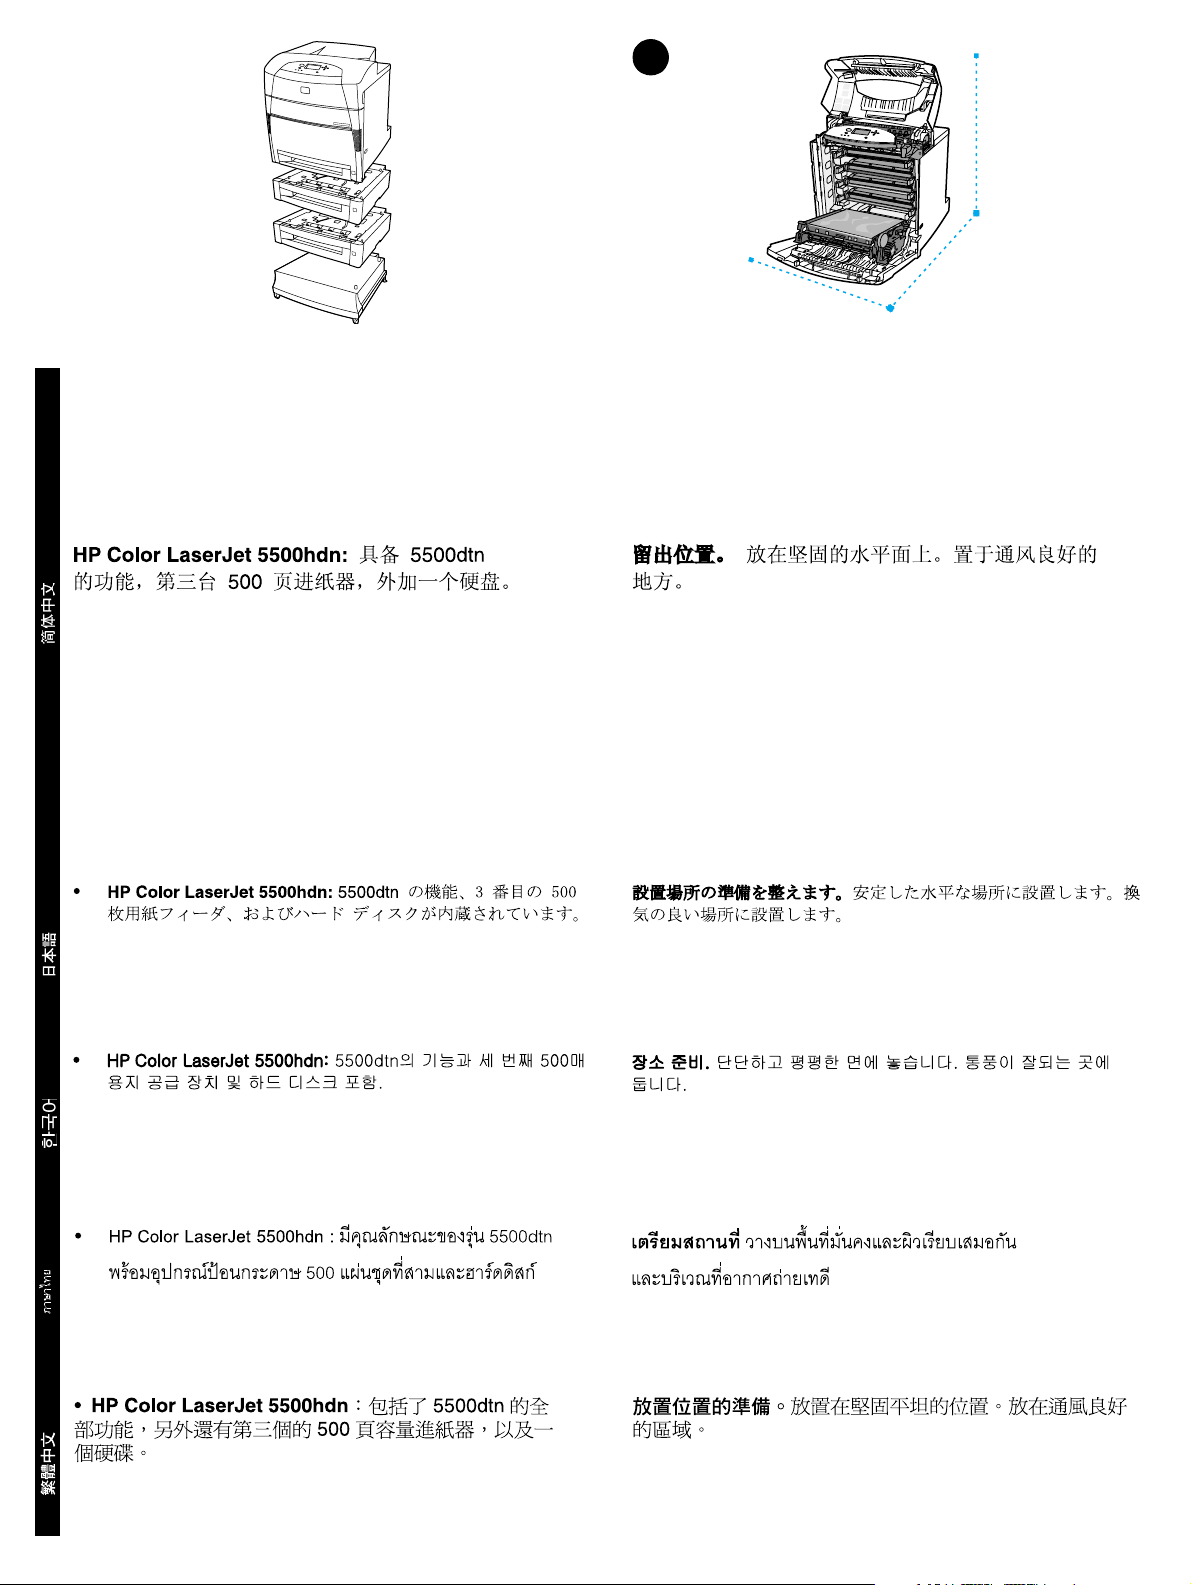
• HP Color LaserJet 5500hdn: includes the features of
5500dtn, a third 500-sheet paper feeder, plus a hard disk.
• HP Color LaserJet 5500hdn: termasuk fitur-fitur yang
dimiliki 5500dtn, pengumpan kertas berkapasitas 500-lembar
yang ketiga, ditambah sebuah hard-disk.
Bahasa Indonesia English
Prepare the location. Place on a sturdy, level surface. Locate in
a well-ventilated area.
Siapkan lokasi penempatan. Tempatkan printer pada
permukaan yang kuat dan datar. Tempatkan di ruangan
berventilasi baik.
4
Page 5
3 4
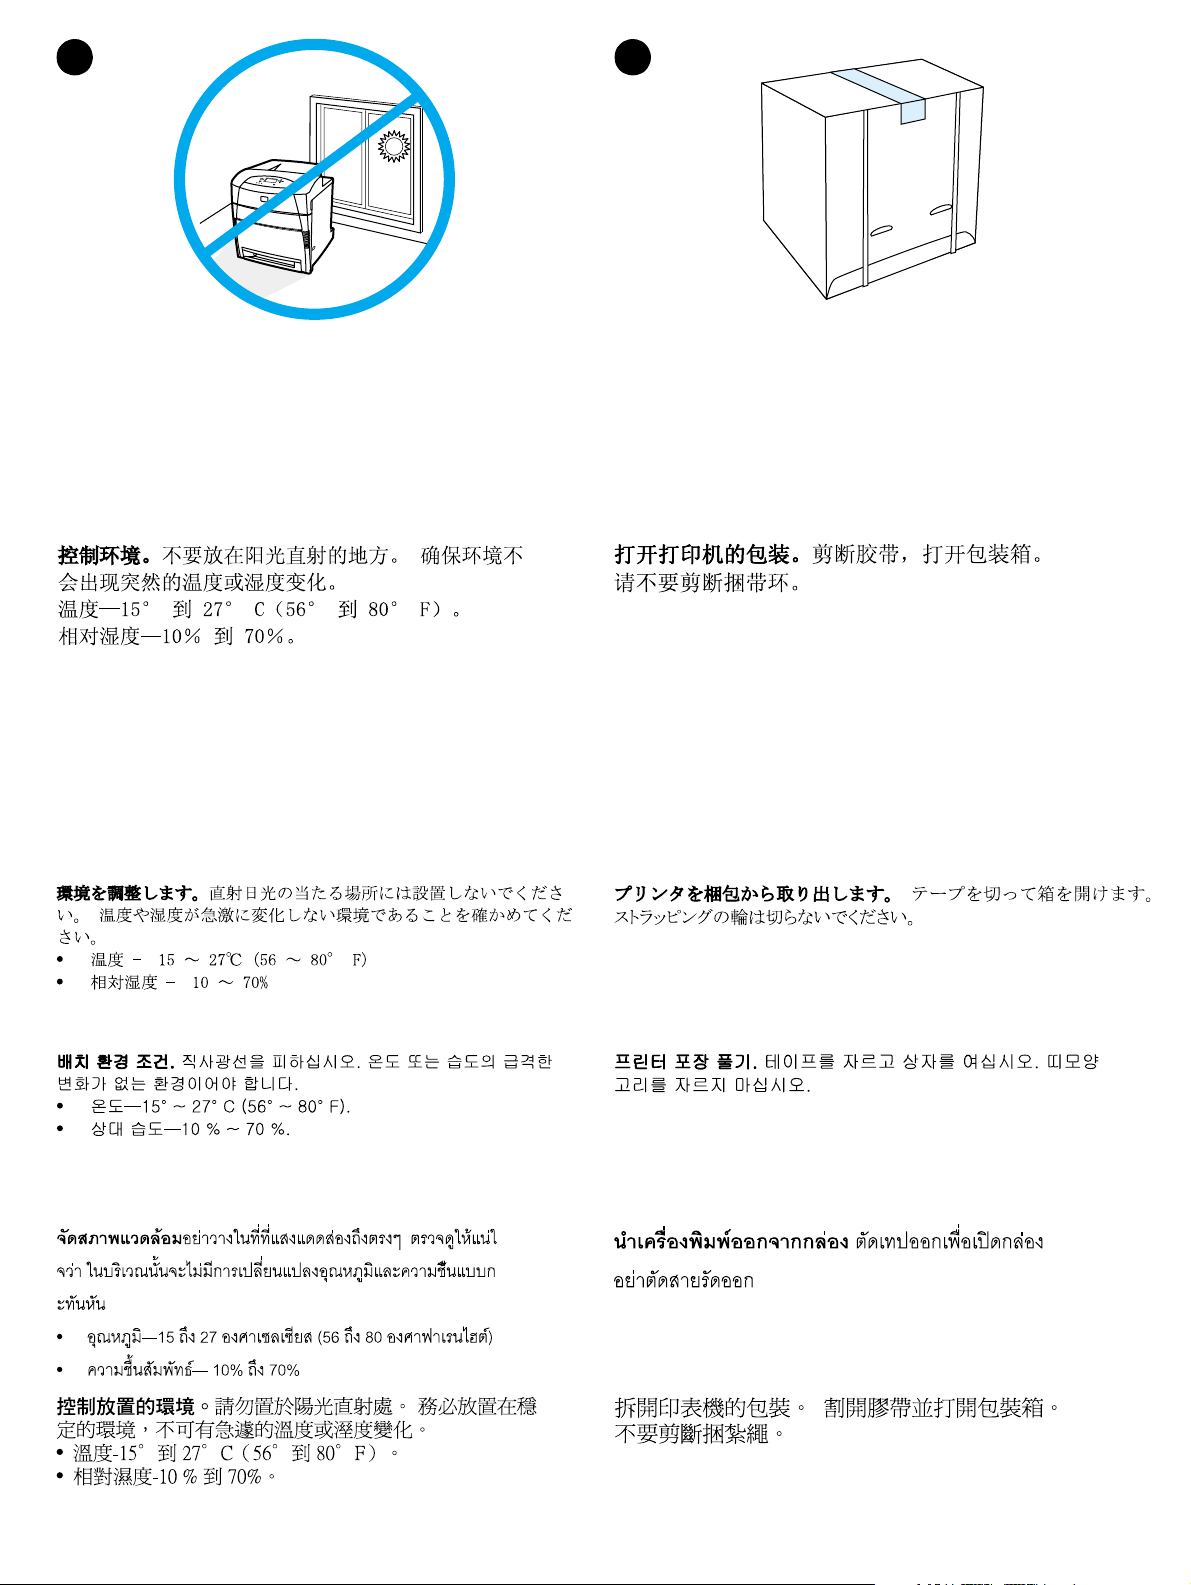
Regulate the environment. Do not place in direct sunlight.
Ensure the environment is free from abrupt temperature or humidity
changes.
• Temperature—15° to 27° C (56° to 80° F).
• Relative humidity—10 percent to 70 percent.
Atur keadaan ruangan. Jangan menempatkan di tempat yang
terkena sinar matahari secara langsung. Pastikan bahwa tidak ada
perubahan mendadak dalam suhu atau kelembapan ruangan.
• Suhu—15° sampai 27° C (56° sampai 80° F).
• Kelembapan relatif—10 persen sampai 70 persen.
Unpack the printer. Cut the tape to open the box. Do not cut the
strapping loops.
Buka kemasan printer. Potong pita perekat untuk membuka
kotak kardus. Jangan memotong tali pengikat kemasan.
5
Page 6
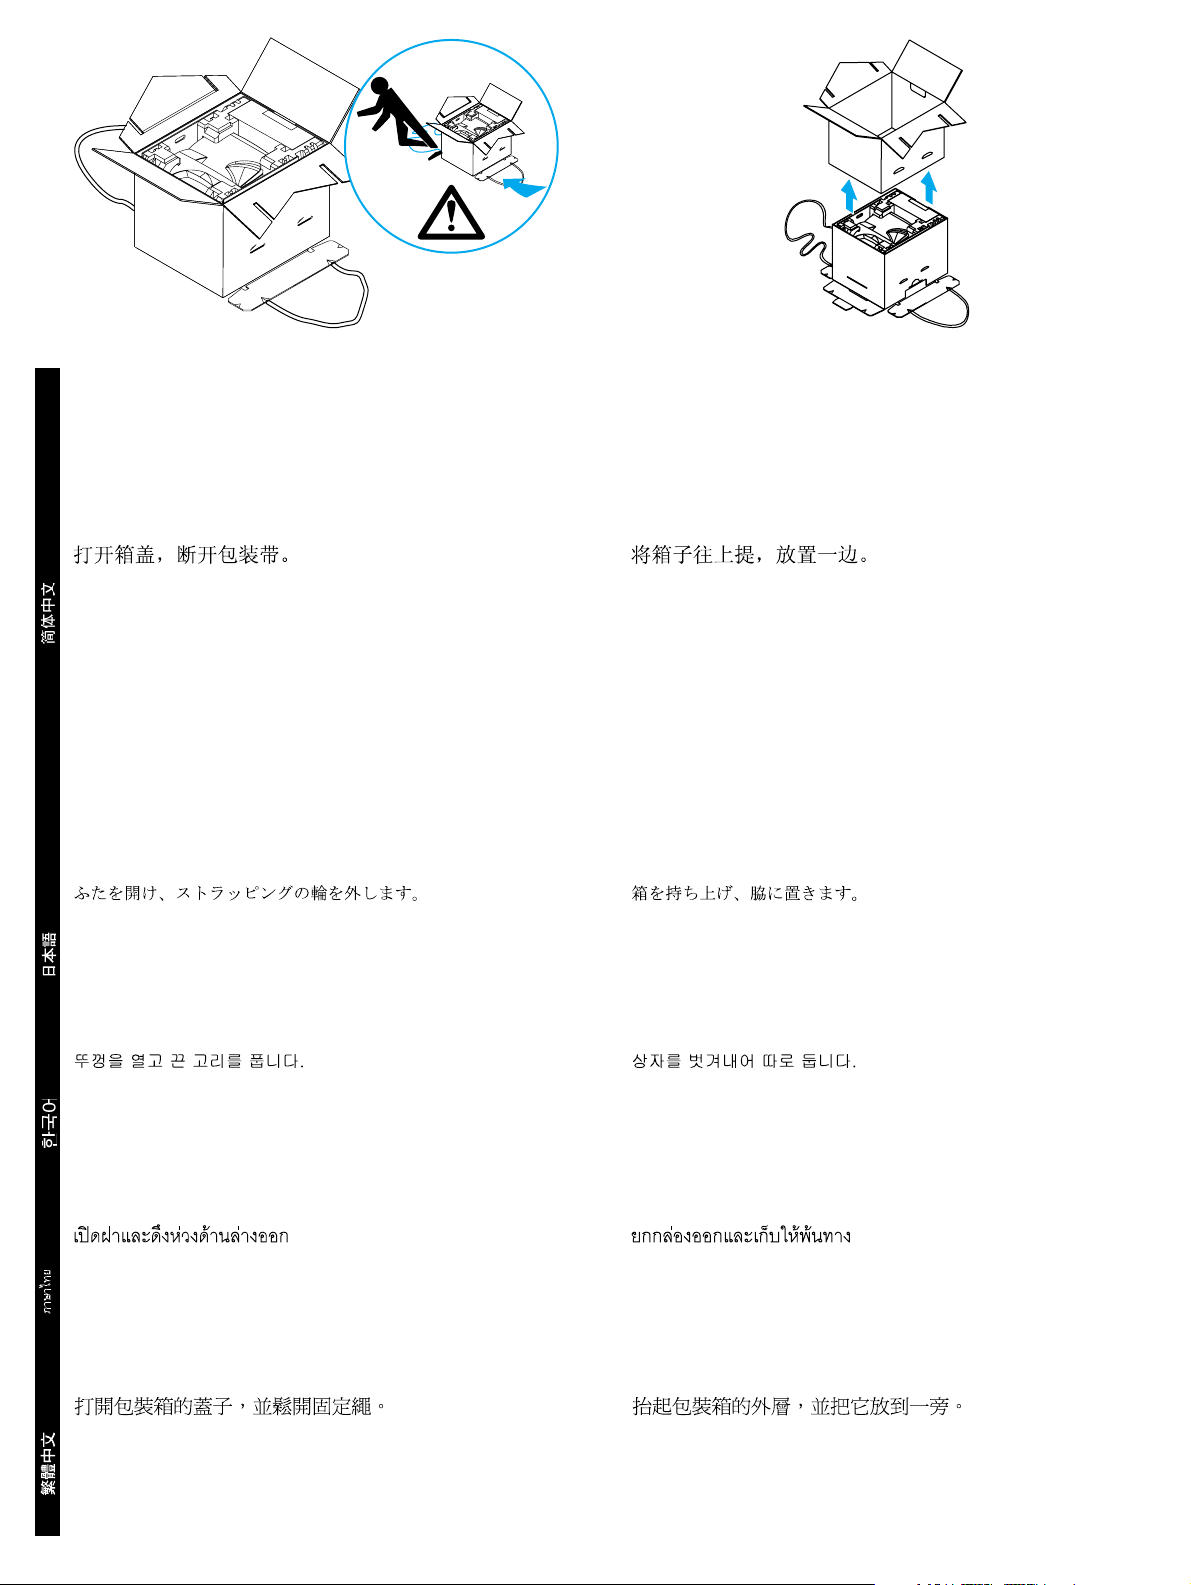
Open the flaps and disconnect the strapping loops. Lift the box off and set it aside.
Buka kelepak penutup kardus dan lepaskan tali pengikat. Angkat kardus dan sisihkan.
Bahasa Indonesia English
6
Page 7
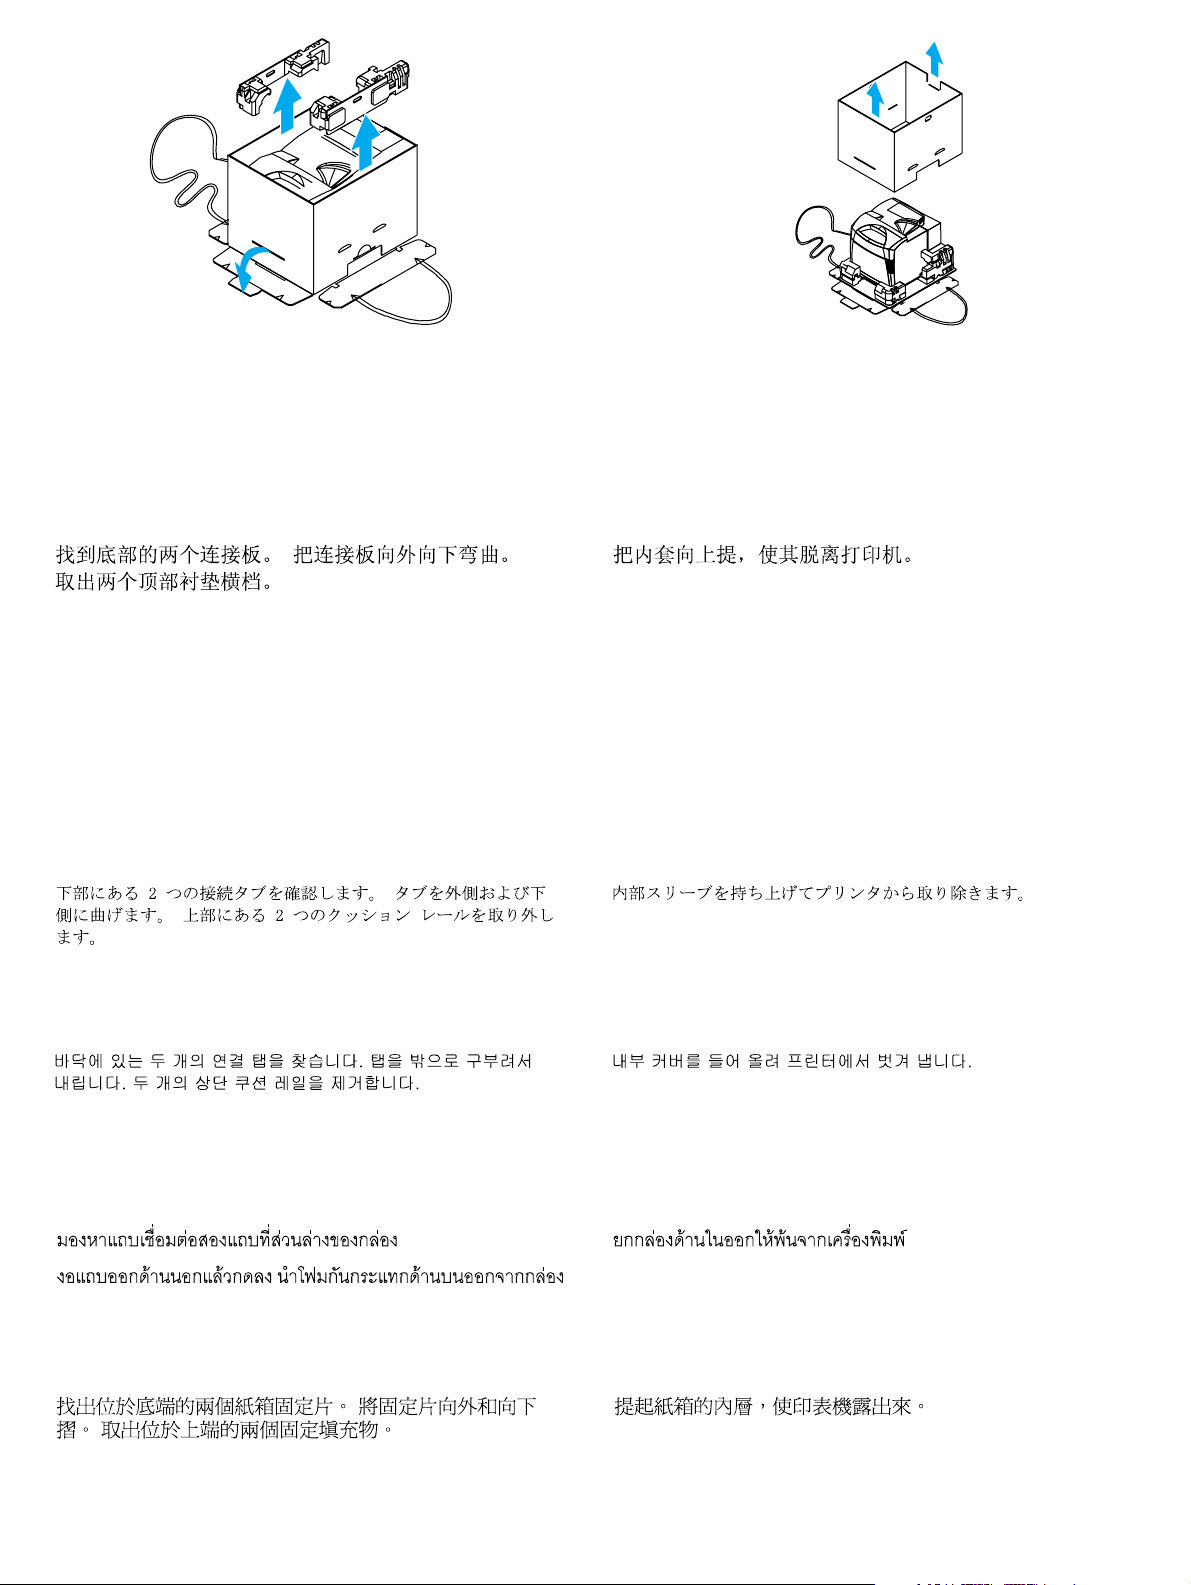
Locate the two connecting tabs on the bottom. Bend the tabs out
and down. Remove the two top cushion rails.
Lift the inner sleeve up and off of the printer.
Cari kedua tonjolan kelepak penghubung yang terdapat di bagian
bawah kardus. Tekuk tonjolan ke arah luar kemudian ke bawah.
Lepaskan kedua bantalan kemasan bagian atas.
Angkat ke atas kardus bagian dalam sampai terlepas dari printer.
7
Page 8
5
1
2
3
5
4
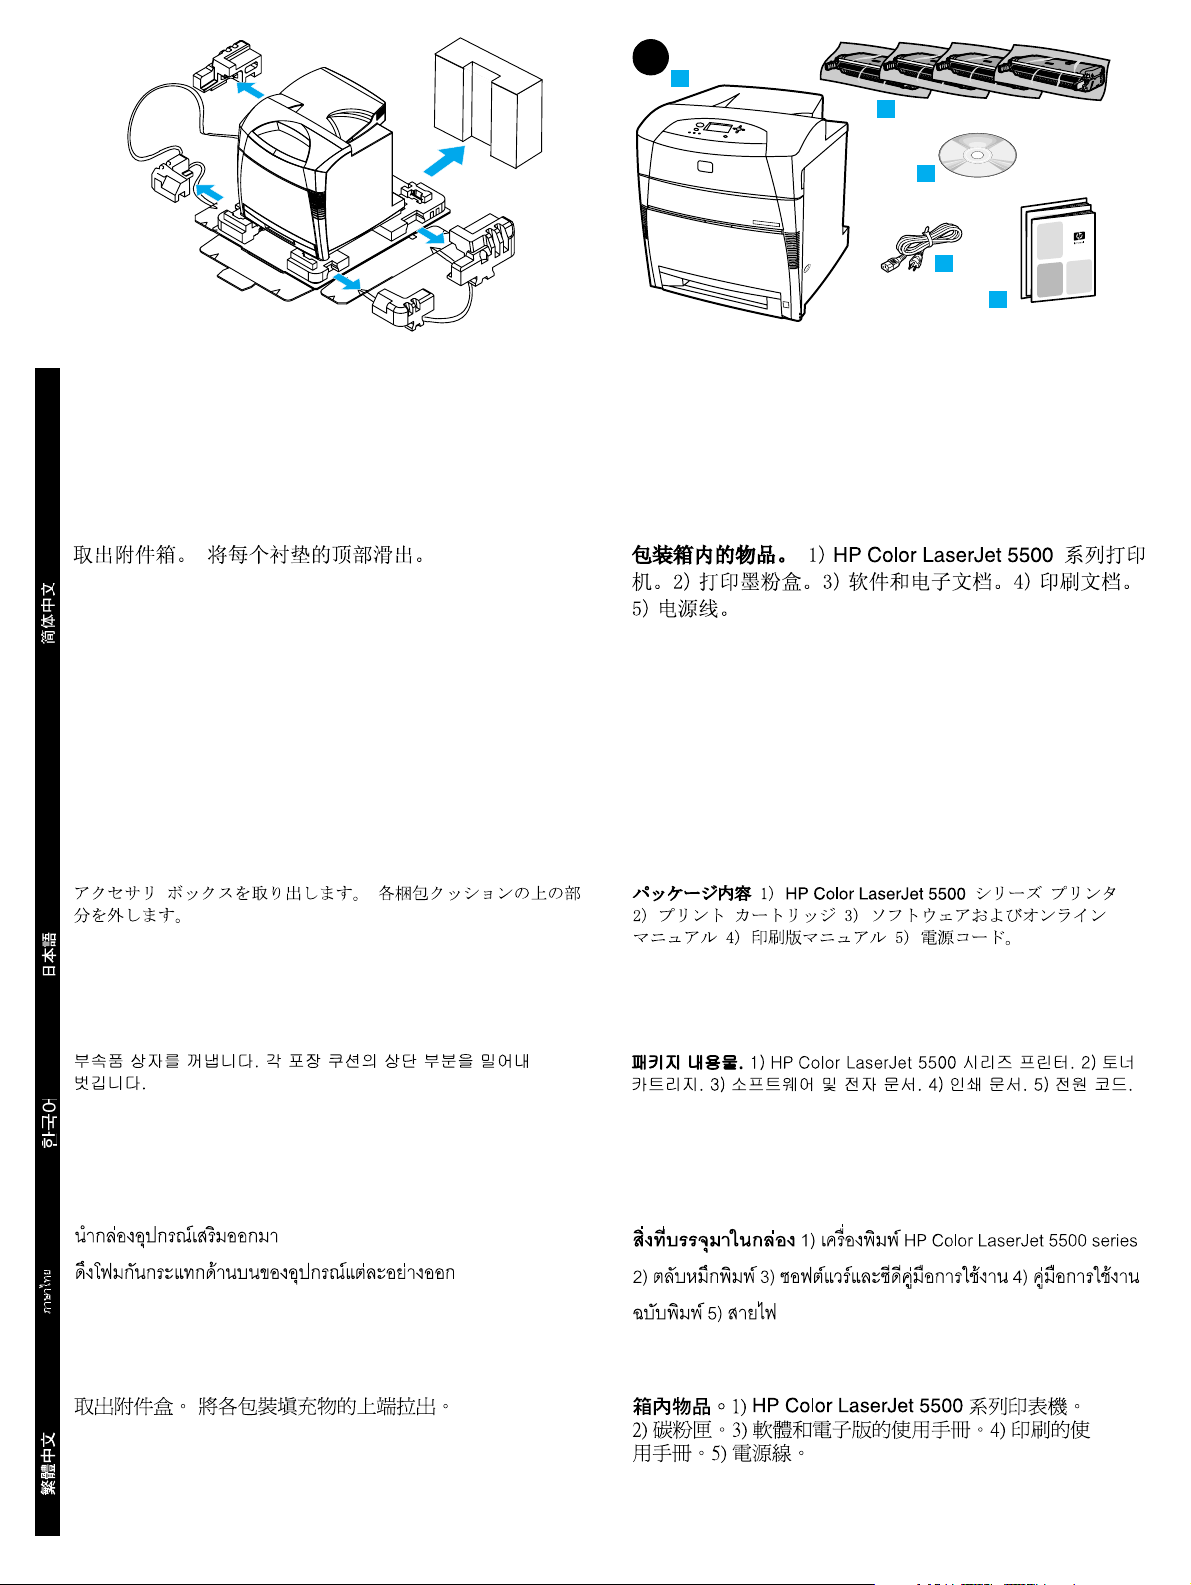
Remove the accessory box. Slide the top sections of each packing
cushion off.
Lepaskan kotak aksesori. Geser semua bagian atas dari bantalan
pengemas sampai terlepas.
Bahasa Indonesia English
Package contents. 1) HP Color LaserJet 5500 series printer.
2) Print cartridges. 3) Software and electronic documentation.
4) Printed documentation. 5) Power cord.
Isi kemasan. 1) Printer HP Color LaserJet seri 5500.
2) Kartrid cetak. 3) Perangkat lunak dan dokumentasi elektronik.
4) Dokumentasi cetak. 5) Kabel listrik.
8
Page 9
6
10
9
7
8
6
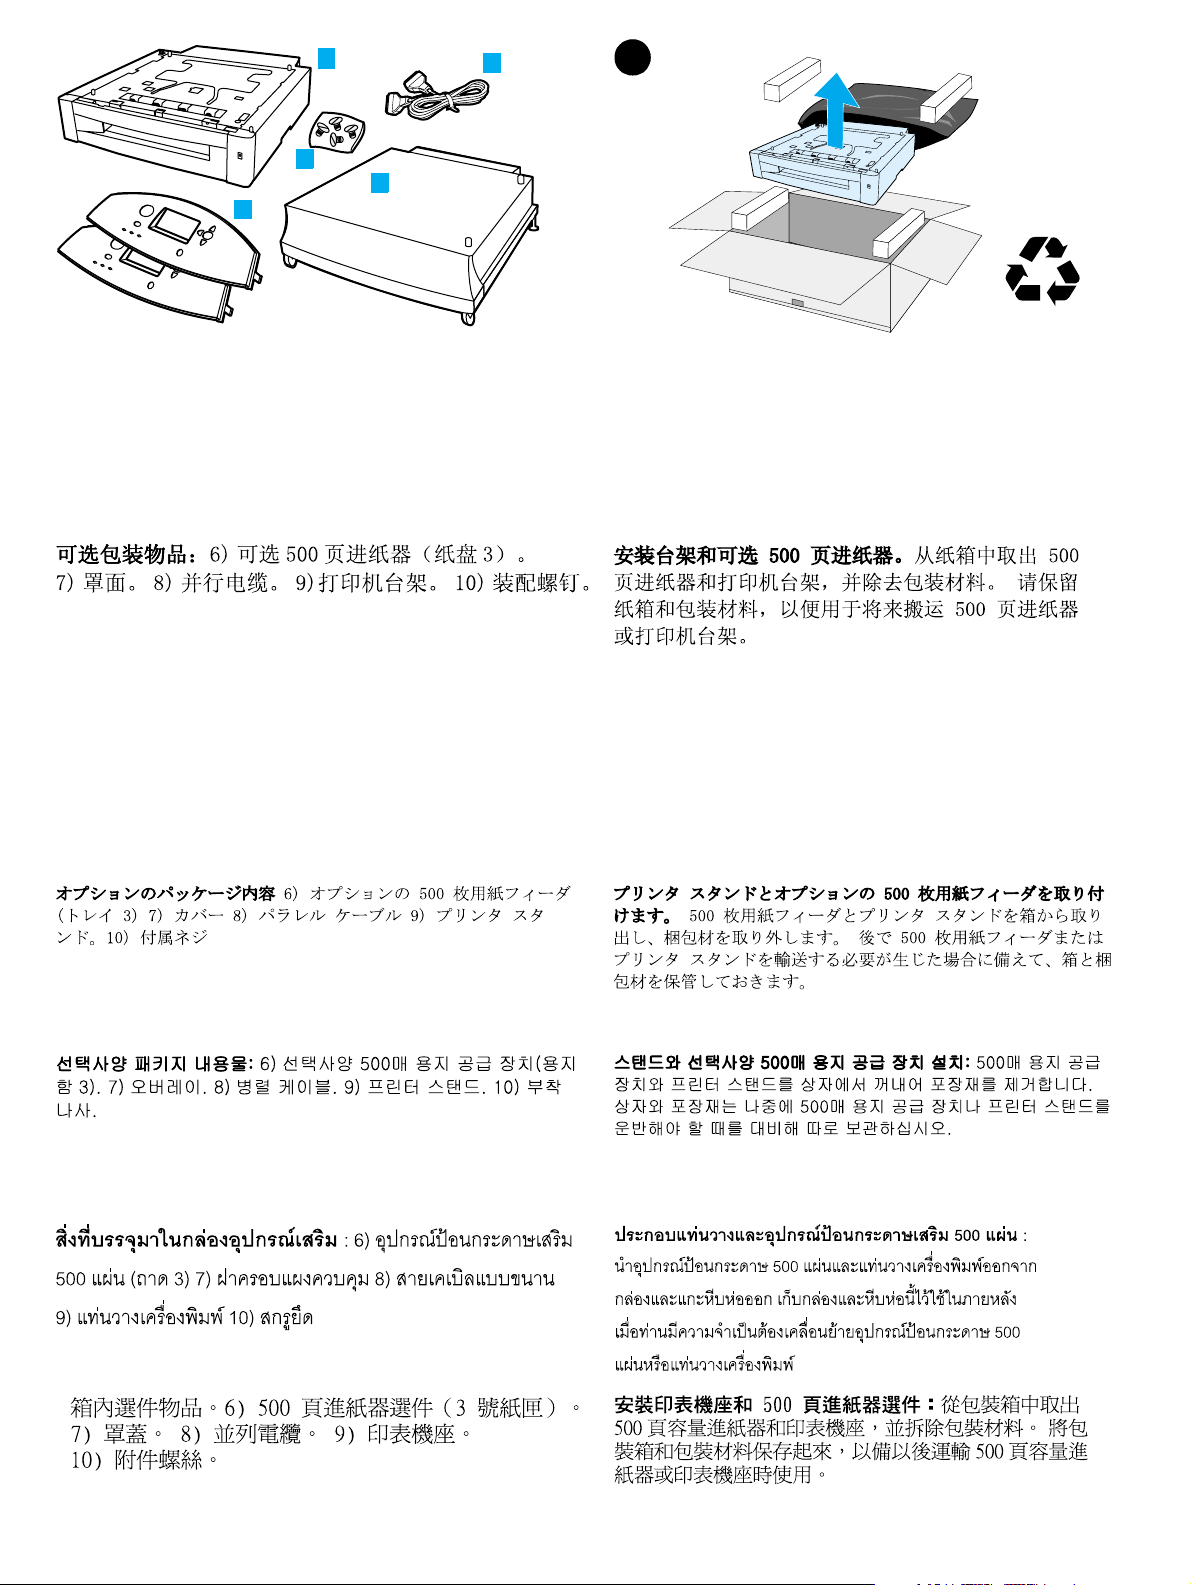
Optional package contents: 6) Optional 500-sheet paper
feeder (Tray 3). 7) Overlays. 8) Parallel cable. 9) Printer stand.
10) Attachment screws.
Isi kemasan opsional: 6) Pengumpan kertas berkapasitas
500-lembar opsional (Baki 3). 7) Hamparan pelapis (overlay).
8) Kabel paralel. 9) Alas printer. 10) Sekrup pemasangan.
Install the stand and optional 500-sheet paper feeder:
Remove the 500-sheet paper feeder and the printer stand from their
boxes and remove the packing materials. Save the boxes and the
packing materials in case you need to transport the 500-sheet
paper feeder or printer stand later.
Pasang alas dan pengumpan kertas berkapasitas
500-lembar. Lepaskan pengumpan kertas berkapasitas
500-lembar dari kotak kardus kemudian lepaskan bahan-bahan
pengemasnya. Simpanlah semua kotak kardus dan bahan
pengemas untuk dipergunakan jika printer atau pengumpan
kertas 500-lembar ini perlu dipindahkan kelak.
9
Page 10
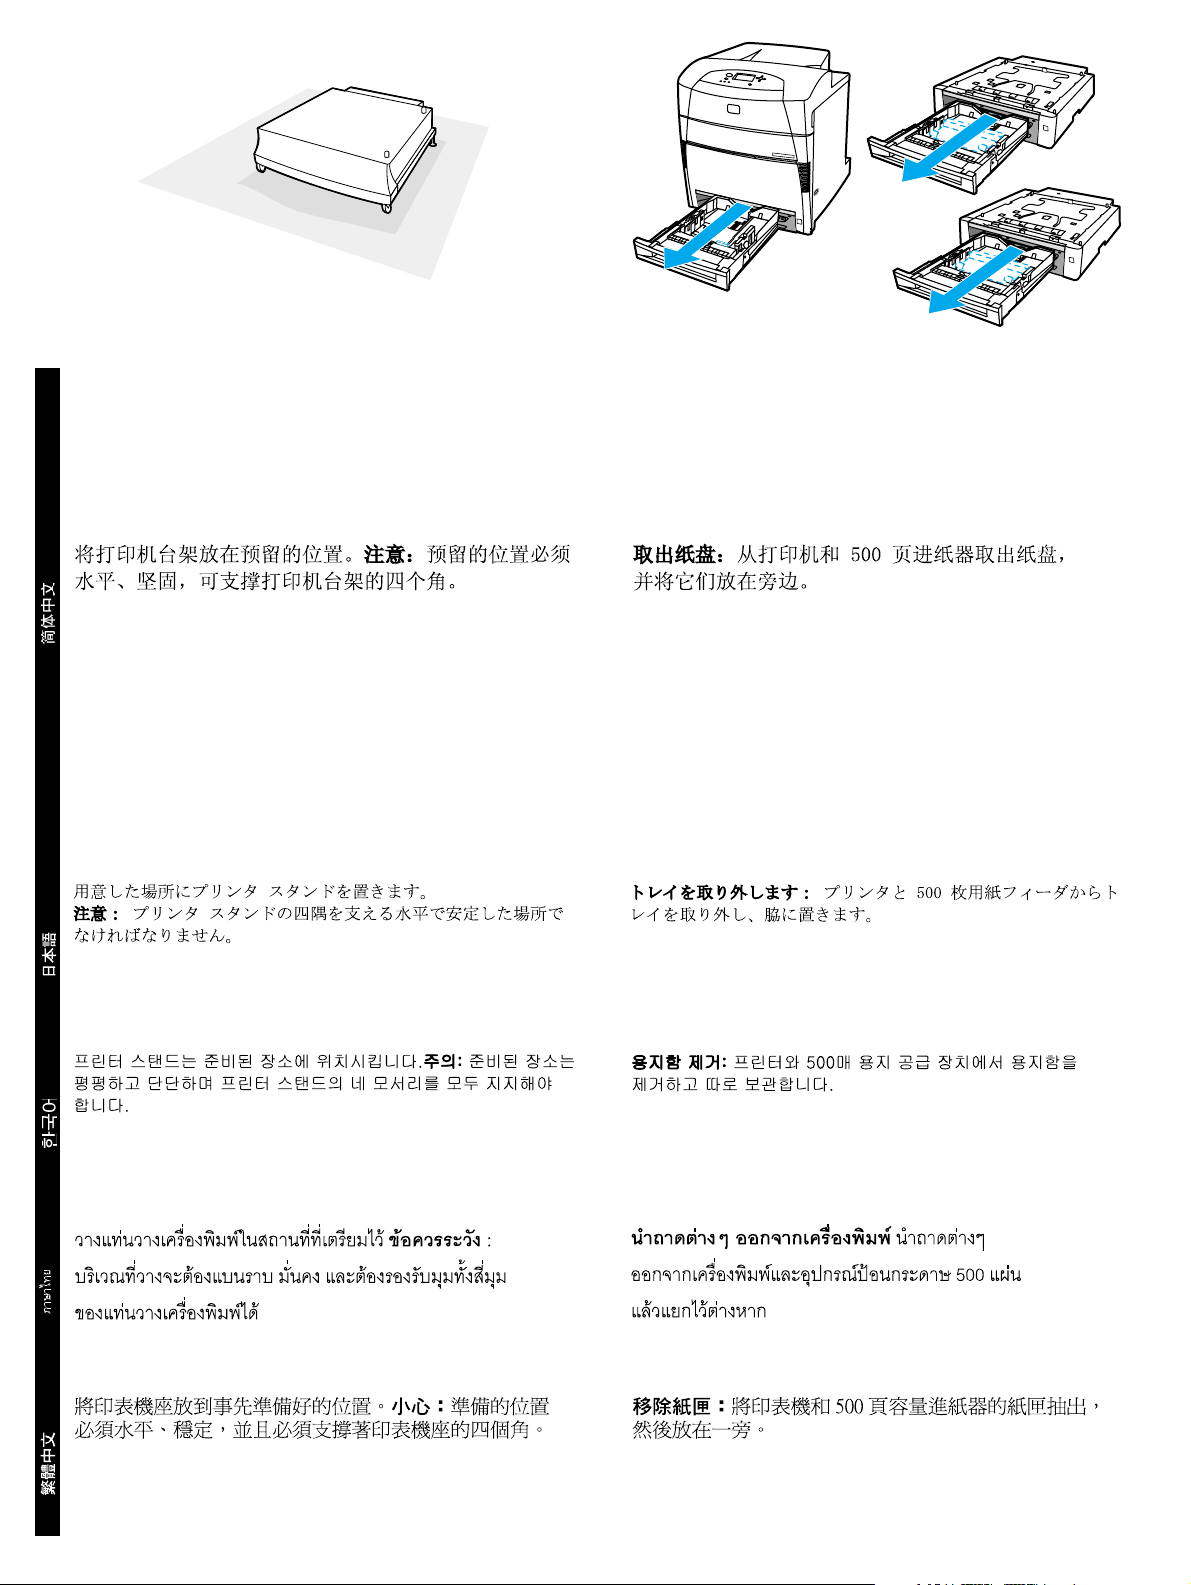
Place the printer stand in the prepared location. CAUTION: The
prepared location must be level, sturdy, and must support all four
corners of the printer stand.
Remove trays: Remove the trays from the printer and 500-sheet
paper feeders and set them aside.
Tempatkan printer pada tempat yang sudah disediakan.
AWAS: Lokasi tersebut harus datar, kuat, dan harus mampu
mendukung keempat sudut alas printer.
Bahasa Indonesia English
Lepaskan baki-baki: Lepaskan semua baki dari printer dan
dari pengumpan kertas berkapasitas 500-lembar, kemudian
sisihkan.
10
Page 11
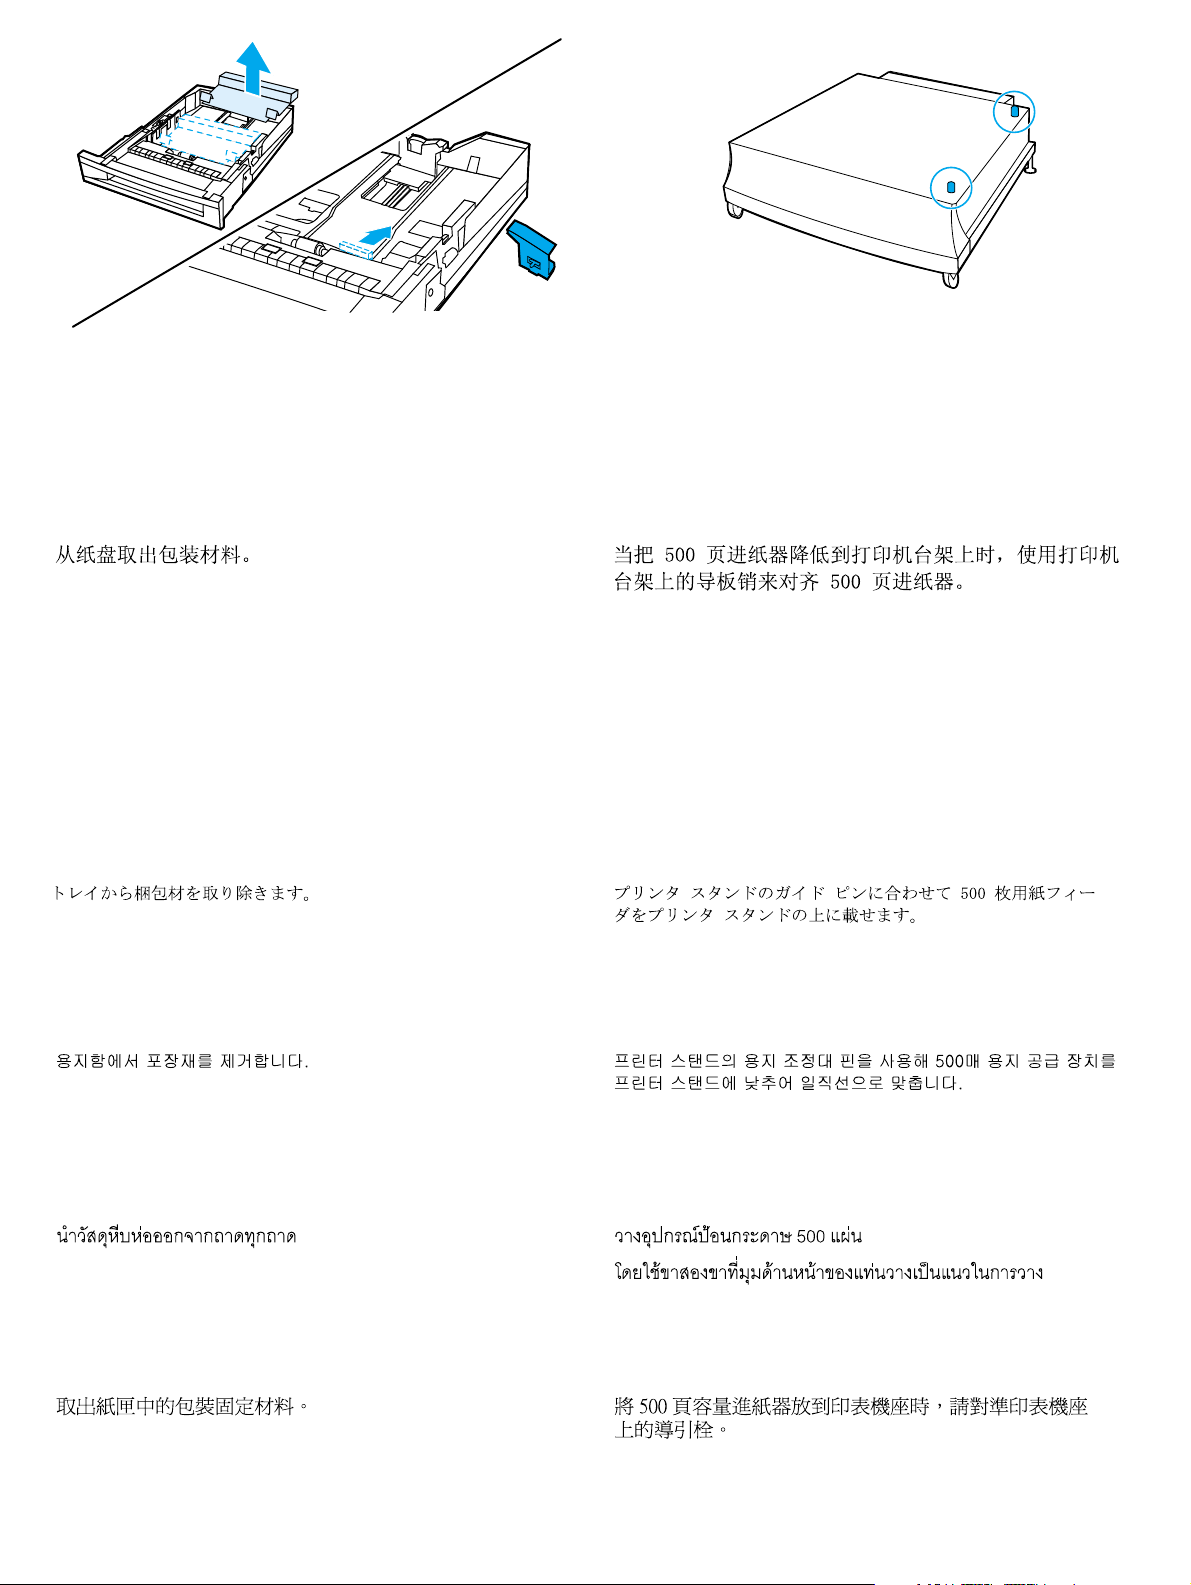
Remove the packing material from the trays. Use the guide pins on the printer stand to align the 500-sheet paper
feeder as you lower it onto the printer stand.
Lepaskan bahan pengemas dari semua baki. Gunakan pasak-pasak pemandu pada alas printer untuk
mengarahkan pengumpan kertas berkapasitas 500-lembar
ketika ditempatkan ke atas alas printer tersebut.
11
Page 12

If you are installing another 500-sheet paper feeder, align the
second paper feeder with the guide pins on the first paper feeder.
Note: If you already have one optional 500-sheet paper feeder
and you are adding a second one, you will need to unplug the
printer and detach the printer from the first 500-sheet paper feeder
to install the second one.
Jika Anda memasang pengumpan kertas berkapasitas 500-lembar
yang lain, arahkan pengumpan kertas kedua ini dengan pasak
pemandu yang terdapat pada pengumpan kertas pertama.
Bahasa Indonesia English
Perhatikan: Jika pada printer sudah terdapat pengumpan kertas
berkapasitas 500-lembar dan Anda akan menambah pengumpan
kertas yang lain, terlebih dahulu Anda perlu memutuskan
sambungan listrik ke printer dan melepaskan printer dari
pengumpan kertas berkapasitas 500-lembar yang pertama
sebelum memasang pengumpan kertas yang kedua.
12
Page 13

7
WARNING! If the printer is already set up, turn the printer off and
unplug the power cord from both the printer and the power outlet.
PERINGATAN! Jika printer sudah dinyalakan, matikan printer dan
cabut kabel listrik dari stopkontak dan dari printer.
Set up the printer: It takes four people to lift and move the
printer. Grip the printer at the four corners and move it to the
prepared location.
Persiapkan printer: Diperlukan empat orang untuk mengangkat
dan memindahkan printer. Pegang printer pada keempat sudutnya
dan pindahkan ke lokasi yang sudah disiapkan.
13
Page 14

Use the guide pins on the 500-sheet paper feeder to align the
printer as you lower it onto the paper feeder.
Gently lower the printer onto the 500-sheet paper feeder.
CAUTION: Avoid bending the guide pins while lowering the
printer.
Gunakan pasak-pasak pemandu pada pengumpan kertas
berkapasitas 500-lembar untuk mengarahkan printer ketika
ditempatkan ke atas pengumpan kertas tersebut.
Bahasa Indonesia English
Dengan pelahan, turunkan printer ke atas pengumpan kertas
berkapasitas 500-lembar. AWAS: Jangan membengkokkan pasak
pemandu ketika menurunkan printer.
14
Page 15

8
Use caution when stacking the 500-sheet paper feeders and the
printer. Avoid tipping.
Berhati-hatilah ketika menumpuk pengumpan kertas berkapasitas
500-lembar dan printer. Jangan memiringkan perangkat tersebut.
Secure the units: Insert an attachment screw into each of the four
alignment holes. Using your fingers or a coin, tighten the screws to
attach the printer to the 500-sheet paper feeder.
Kencangkan tumpukan perangkat: Pasang sekrup
pengencang ke setiap lubang penjajaran yang berjumlah empat
buah. Dengan menggunakan jari atau koin, kencangkan sekrup
untuk menguatkan printer pada pengumpan kertas berkapasitas
500-lembar.
15
Page 16

9
Install paper trays: Adjust the rear guide by squeezing the
guide adjustment latch and sliding the back of the tray to the size
of the paper being loaded.
Pasang baki kertas: Ubah letak pemandu panjang-media
bagian belakang dengan menekan kunci pemandu kemudian
dorong bagian belakang baki sampai sesuai dengan panjang
kertas yang digunakan.
Bahasa Indonesia English
Slide the side guides to the desired size.
Sesuaikan letak pemandu samping dengan ukuran yang
diinginkan.
16
Page 17

Load paper face-up. Load up to 500 sheets of 75 g/m2 (20 lb)
stock in the 500-sheet feeder trays. Capacity may vary with other
paper types.
Insert the trays into the printer and the 500-sheet paper feeder.
Muat kertas dengan sisi cetak menghadap ke atas.
Anda dapat memuat sampai 500 lembar kertas berukuran 75
2
(20 lb) pada pengumpan kertas berkapasitas 500 lembar
g/m
tersebut. Kapasitas ini dapat bervariasi untuk jenis kertas lainnya.
Sisipkan semua baki ke printer dan ke pengumpan kertas
berkapasitas 500-lembar.
17
Page 18

10
1
2
5
1
4
3
4
6
Locate the printer parts: Front 1) Control panel. 2) Top cover.
3) Front cover (access to Tray 1). 4) 500-sheet input tray (Tray 2).
5) 250-sheet output bin. 6) On/off switch.
Kenali bagian-bagian printer: Bagian depan 1) Panel
kendali. 2) Penutup atas. 3) Penutup depan (akses ke Baki 1).
4) Baki masukan berkapasitas 500-lembar (Baki 2). 5) Wadah
keluaran berkapasitas 250-lembar. 6) Saklar on/off.
5
2
6
3
7
Rear 1) 250-sheet output bin. 2) On/off switch. 3) Optional
500-sheet paper feeder. 4) EIO port (total of 3). 5) Fast InfraRed
(FIR) connection. 6) Parallel cable connection. 7) Power cord
connection.
Bagian belakang 1) Wadah keluaran berkapasitas 250-lembar.
2) Saklar on/off. 3) Pengumpan kertas berkapasitas 500-lembar
opsional. 4) Gerbang EIO (semuanya ada 3). 5) Koneksi Fast
InfraRed (FIR). 6) Koneksi kabel paralel. 7) Koneksi kabel listrik.
Bahasa Indonesia English
18
Page 19

11
12
1
2
Using the side handles, open the top cover. Remove the orange
packing tape from the printer. Remove the orange shipping locks
(5500, 5500n, 5500dn only). Close the top cover. Remove the
clear plastic film from the control panel.
Dengan menggunakan pegangan samping, buka penutup atas.
Lepaskan pita pengemas berwarna jingga dari printer. Lepaskan
juga kunci-kunci kemasan yang berwarna jingga (hanya 5500,
5500n, 5500dn saja). Pasang penutup atas. Lepaskan lapisan
plastik bening dari panel kendali.
Install a new overlay (optional): Position the new overlay
over the top of the control panel. 1) Insert the left tab of the overlay
into the slot on the printer face. 2) Line up the tab on the right side
with the slot. 3) Set the overlay by pushing down on the overlay
near the blue V button.
Pasang hamparan pelapis (overlay) yang baru
(opsional): Tempatkan hamparan pelapis yang baru di atas
panel kendali. 1) Sisipkan tonjolan sebelah kiri dari hamparan
pelapis ke celah yang terdapat pada permukaan printer.
2) Arahkan tonjolan di sebelah kanan dengan celah yang sesuai.
3) Pasang hamparan dengan menekan hamparan di dekat
tombol V yang berwarna biru.
19
Page 20

13
14
4
1
2
1
2
Connect Power.
1) Plug the AC power cord into the printer and into the power outlet.
2) Turn the printer on.
Pasang sambungan listrik.
1) Pasang kabel listrik AC ke printer dan ke stopkontak.
2) Nyalakan printer.
3
Using the control panel menus: 1) Press or to scroll
through menus. 2) Press
✔ to select an item. 3) Press to go back
to the previous menu. 4) Press Pause/Resume to exit all menus.
Menggunakan menu panel kendali: 1) Tekan atau
untuk menjelajahi menu. 2) Tekan ✔ untuk menentukan pilihan
menu. 3) Tekan untuk kembali ke menu sebelumnya. 4) Tekan
Pause/Resume untuk keluar dari semua menu.
Bahasa Indonesia English
20
Page 21

15
2
1
Change display language (optional):
If the control panel displays LANGUAGE= in English, go to the next
column. Otherwise, turn the printer off and then back on. When
XXXMB**** appears, press and hold
panel lights are lit, release
✔. When SELECT LANGUAGE appears in
✔. When all three control
English, press ✔, and wait. Continue with the next column.
Ganti bahasa tampilan (opsional):
Jika panel kendali menampilkan LANGUAGE= dalam bahasa Inggris,
lanjutkan ke kolom berikutnya. Jika tidak, matikan printer kemudian
nyalakan lagi. Ketika muncul XXXMB****, tekan dan tahan
✔.
Setelah ketiga lampu panel kendali menyala, lepaskan ✔. Ketika
SELECT LANGUAGE muncul dalam bahasa Inggris, tekan
✔,
kemudian tunggu. Lanjutkan ke kolom berikutnya.
The control panel displays LANGUAGE= in English. 1) Press until
the preferred language appears. 2) Press
✔ to save the preferred
language.
Panel kendali akan menampilkan LANGUAGE= dalam bahasa
Inggris. 1) Tekan sampai muncul bahasa yang diinginkan.
2) Tekan
✔ untuk menggunakan bahasa yang diinginkan tersebut.
21
Page 22

16
1
2
Install print cartridges:
After a short while, the control panel displays INSTALL SUPPLIES.
1) Using the side handles, open the top cover.
Pasang kartrid cetak:
Setelah beberapa saat, panel kendali akan menampilkan
INSTALL SUPPLIES. 1) Dengan menggunakan pegangan
samping, buka penutup atas.
Bahasa Indonesia English
2) Grasp the top edge of the front cover and pull to open the front
cover.
2) Pegang ujung atas penutup depan dan tariklah sampai terbuka.
22
Page 23

4
5
3
3) Grasp the green handles on either side of the transfer unit and
pull down. CAUTION: Do not place anything on the transfer unit
while it is open.
3) Pegang pegangan berwarna hijau pada kedua sisi unit transfer
kemudian tariklah ke bawah. AWAS: Jangan menempatkan
apapun pada unit transfer ketika unit tersebut dalam keadaan
terbuka.
4) Remove the print cartridge from the plastic bag. 5) Grasp both
sides of the cartridge and distribute the toner by gently rocking the
cartridge from side to side.
4) Keluarkan kartrid cetak dari kantong plastik. 5) Pegang kedua
sisi kartrid dan ratakan toner dengan mengguncangkan kartrid
secara pelahan dari kiri ke kanan.
23
Page 24

6
7
6) Remove the orange shipping tape. Remove and discard the
orange shipping locks.
6) Lepaskan pita pengemas berwarna jingga. Lepaskan dan buang
kunci-kunci pengemas berwarna jingga.
Bahasa Indonesia English
7) Remove the inside sealing tape by pulling the orange loop on the
end of the cartridge and pulling the tape completely out. Discard
tape.
7) Lepaskan pita penyekat bagian dalam dengan menarik
lingkaran jingga di ujung kartrid kemudian tarik pita sampai
keluar seluruhnya. Buang pita.
24
Page 25

K
M
Y
C
8
8) Grasp the blue handles on the sides of the print cartridge. Insert
the print cartridges in the position shown (C = cyan, Y = yellow,
M = magenta, K = black). Push each cartridge in firmly until it clicks
into place.
8) Pegang pegangan biru di di kedua sisi kartrid cetak. Masukkan
kartrid cetak dalam posisi sebagaimana ditunjukkan (C = biru,
Y = kuning, M = magenta, K = hitam). Dorong setiap kartrid
dengan kuat sampai terdengar bunyi klik.
9
9) Using the green handles on either side of the transfer unit, close
the transfer unit.
9) Pegang pegangan berwarna hijau pada kedua sisi unit transfer,
kemudian tutup unit transfer.
25
Page 26

10 11
10) Close the front cover. 11) Close the top cover.
10) Tutup penutup depan. 11) Tutup penutup atas.
Bahasa Indonesia English
26
Page 27

17
INFORMATION
After a short while, the control panel should display READY. Print a configuration page to ensure that the printer is
Setelah beberapa saat, panel kendali akan menampilkan READY. Cetak lembar konfigurasi untuk memastikan printer
working properly. Press
appears. Press ✔. Press until PRINT CONFIGURATION appears.
✔ to print the page. If the configuration page does not print,
Press
consult the CD User Guide.
berfungsi baik. Tekan ✔. Tekan sampai muncul
✔. Press until INFORMATION
INFORMATION. Tekan ✔. Tekan sampai muncul PRINT
CONFIGURATION. Tekan ✔ untuk mencetak lembar konfigurasi.
Jika lembar konfigurasi tidak tercetak, lihat CD User Guide
(petunjuk pemakaian).
27
Page 28

18
On the configuration page, verify that the installed tray appears in
the list of Paper Trays and Options.
Pada lembar konfigurasi, periksa apakah baki-baki yang sudah
dipasang tercantum pada daftar Paper Trays and Options (Baki
Kertas dan Opsi-opsi).
Bahasa Indonesia English
Connections:
Direct to network. Connect one end of the network cable to the
RJ-45 port. Connect the other end to the network.
Koneksi:
Langsung ke jaringan. Hubungkan salah satu ujung kabel
jaringan ke gerbang RJ-45. Hubungkan ujung lainnya ke jaringan.
28
Page 29

Network print server. Connect one end of a network cable into
the server. Connect the other end to the network. Connect one end
of another network cable to the printer and the other end to the
network.
Peer to peer (direct to network). Connect one end of a
network cable to your computer. Connect the other end to the
network. Connect one end of another network cable to the printer
and the other end to the network.
Server cetak jaringan. Hubungkan salah satu ujung kabel
jaringan ke server. Hubungkan ujung lainnya ke jaringan. Dengan
menggunakan kabel lain, hubungkan salah satu ujungnya ke printer
dan ujung lainnya ke jaringan.
Peer to peer (langsung ke jaringan). Hubungkan salah satu
ujung kabel jaringan ke komputer anda. Hubungkan ujung lainnya
ke jaringan. Dengan menggunakan kabel lain, hubungkan salah
satu ujungnya ke printer dan ujung lainnya ke jaringan.
29
Page 30

Peer to peer (parallel). Connect two or more computers to the
network hub using network cables. Connect one end of a parallel
cable to the printer. Connect the other end to a computer.
Parallel connection. Connect the parallel cable to the proper
port on the printer. Connect the other end of the cable to the
computer.
Peer to peer (paralel). Hubungkan dua komputer atau lebih ke
hub jaringan dengan menggunakan kabel jaringan. Hubungkan
salah satu ujung kabel paralel ke printer. Hubungkan ujung lainnya
ke salah satu komputer.
Bahasa Indonesia English
Koneksi paralel. Hubungkan kabel paralel ke gerbang yang
sesuai pada printer. Hubungkan ujung kabel lainnya ke komputer.
30
Page 31

19
Install the printer software. Place the compact disc shipped
with the printer in the CD-ROM drive on the computer.
Instal perangkat lunak printer. Masukkan compact disc
yang dikirimkan bersama printer ke dalam penggerak CD-ROM
pada komputer.
Windows. If the CD browser starts automatically, select Install
Printer. Otherwise, click Start then Run. Type X:\SETUP, where x
represents the letter of the CD-ROM drive. Follow the instructions on
the screen.
Windows. Jika CD browser langsung jalan secara otomatis, pilih
Install Printer. Jika tidak, klik Start kemudian Run. Ketikkan
X:\SETUP, di mana x adalah huruf pengenal penggerak CD-ROM.
Ikuti petunjuk pada layar.
31
Page 32

20
Macintosh. Run the LaserJet installer. Or, from the Chooser, select
the HP Color LaserJet 5500 printer.
Macintosh. Jalankan LaserJet installer. Atau, dari Chooser, pilih
HP Color LaserJet 5500 printer.
Bahasa Indonesia English
On all computers that print to the printer, configure the printer
drivers to show that the 500-sheet paper feeder is installed.
Pada semua komputer yang menggunakan printer ini untuk
mencetak, konfigurasikan penggerak printer (printer driver)
sehingga menunjukkan bahwa pengumpan kertas berkapasitas
500-lembar sudah terpasang.
32
Page 33

33
Page 34

34
Page 35

35
Page 36

copyright © 2002
Hewlett-Packard Company
www.hp.com
*C9656-90942*
*C9656-90942*
C9656-90942
 Loading...