

Page 1
HP LaserJet 1320nw
Wireless
Start
Démarrage
Page 2

Page 3

HP LaserJet 1320nw Printer
Wireless
English
Getting Started Guide
Page 4

Copyright and License
© 2005 Copyright Hewlett-Packard
Development Company, L.P.
Reproduction, adaptation, or translation
without prior written permission is
prohibited, except as allowed under the
copyright laws.
The only warranties for HP products and
services are set forth in the express
warranty statements accompanying such
products and services. Nothing herein
should be construed as constituting an
additional warranty. HP shall not be liable
for technical or editorial errors or omissions
contained herein.
The information contained herein is subject
to change without notice.
Part number: Q5929-90915
Edition 1, 5/2005
FCC Regulations
This equipment has been tested and found
to comply with the limits for a Class B
digital device, pursuant to Part 15 of the
FCC rules. These limits are designed to
provide reasonable protection against
interference when the equipment is
operated in a residential installation. This
equipment generates, uses, and can
radiate radio frequency energy and, if it is
not installed and used in accordance with
the instructions, it may cause harmful
interference to radio communications.
However, there is no guarantee that
interference will not occur in a particular
installation. If this equipment does cause
harmful interference to radio or television
reception, which can be determined by
turning the equipment off and on, the user
is encouraged to try to correct the
interference by one or more of the following
measures:
Reorient or relocate the receiving antenna.
Increase separation between the
equipment and receiver.
Connect equipment into an outlet on a
circuit different from that to which the
receiver is connected.
Consult your dealer or an experienced
radio/TV technician.
Any changes or modifications to the printer
that are not expressly approved by HP
could void the user's authority to operate
the equipment.
Use of a shielded interface cable is
required to comply with the Class B limits
of Part 15 of FCC rules.
This device complies with Part 15 of FCC
Rules. Operation is subject to the following
two conditions: (1) this device may not
cause harmful interference, and (2) this
device must accept any interference
received, including interference that may
cause undesired operation.
Trademark Credits
Microsoft®, Windows®, and Windows NT®
are U.S. registered trademarks of Microsoft
Corporation.
All other devices mentioned herein may be
trademarks of their respective companies.
Page 5

Table of contents
1 Introduction
Device overview .......................................................................................................................2
Preparing the location ..............................................................................................................3
Package contents ....................................................................................................................4
Locating the device parts .........................................................................................................5
2 Setting up the printer
Remove the tape ......................................................................................................................8
Prepare the print cartridge .......................................................................................................9
Load Tray 2 ............................................................................................................................12
Select a connection method ...................................................................................................13
Connect the printer to a wired network ..................................................................................14
Connect the printer to a wireless network ..............................................................................16
Network components and procedure for Windows infrastructure network
installation (recommended) ..........................................................................................16
Network components and procedure for Windows ad hoc (peer-to-peer) network
installation (for advanced users) ..................................................................................19
Procedure for connecting to a Macintosh wireless network ............................................22
Direct connect using the USB port .........................................................................................24
English
ENWW Table of contents iii
Page 6

iv ENWW
Page 7

Introduction
This chapter contains the following sections:
●
Device overview
●
Preparing the location
●
Package contents
●
Locating the device parts
English
ENWW 1
Page 8

Device overview
NOTE
The HP LaserJet 1320nw printer is part of the HP LaserJet 1160 and HP LaserJet 1320
series printer family. For information about using the printers in this series, see the
HP LaserJet 1160 and HP LaserJet 1320 User Guide located on the CD-ROM.
The HP LaserJet 1320nw printer contains all the features of the HP LaserJet 1320 printer. In
addition, the HP LaserJet 1320nw printer includes integrated 802.11b/g wireless connectivity
and an internal HP Jetdirect network port, instead of an IEEE-1284B parallel port.
2 Chapter 1 Introduction ENWW
Page 9

Preparing the location
Place the printer on a sturdy, level surface in a well-ventilated area. Make sure there is
enough space around the printer to allow air to flow through the vents.
Do not place the printer in direct sunlight or in an area that has abrupt temperature and
humidity changes. The recommended temperature range is 10°C to 32.5°C (50°F to 90.5°F).
English
ENWW Preparing the location 3
Page 10
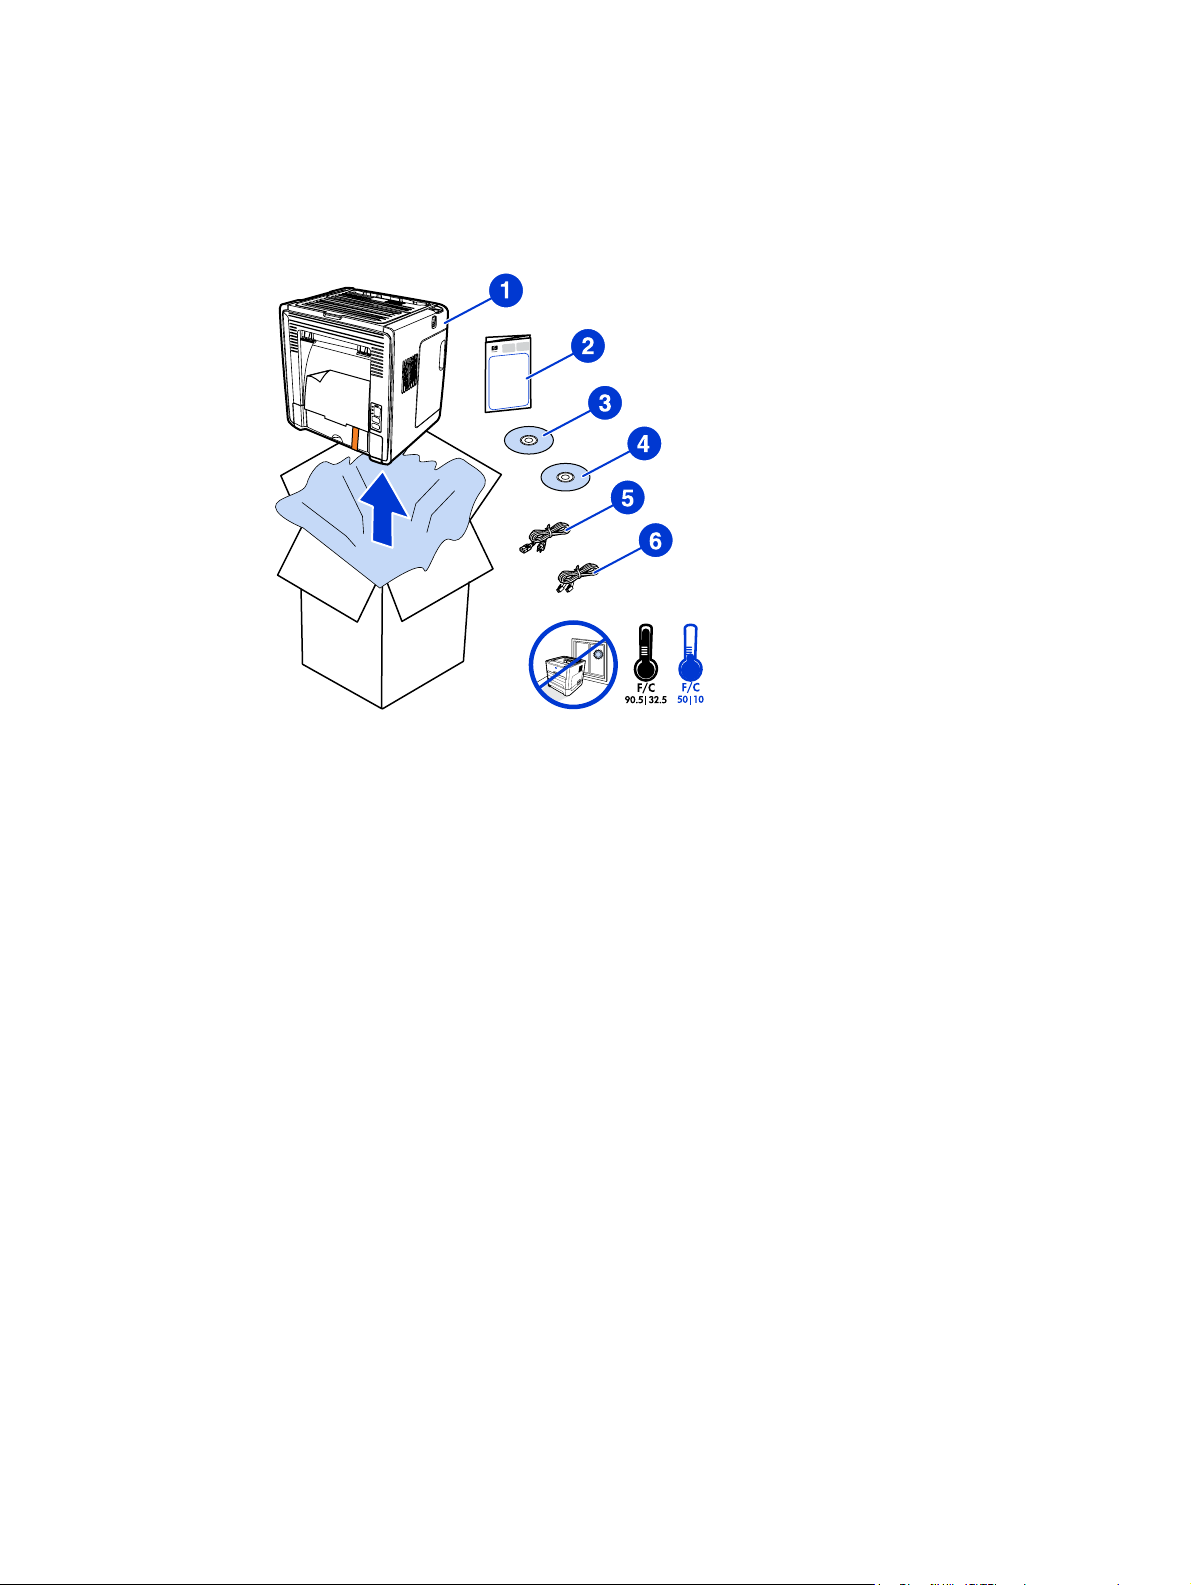
Package contents
The printer package contains the following hardware, software, and documentation.
1 HP LaserJet 1320nw printer
2 Documentation (this manual)
3 CD-ROM containing the installation software (provided with the printer)
4 CD-ROM containing the HP LaserJet 1320nw printer Wireless User Guide (provided with the
printer)
5 Power cord
6 Network cable
4 Chapter 1 Introduction ENWW
Page 11
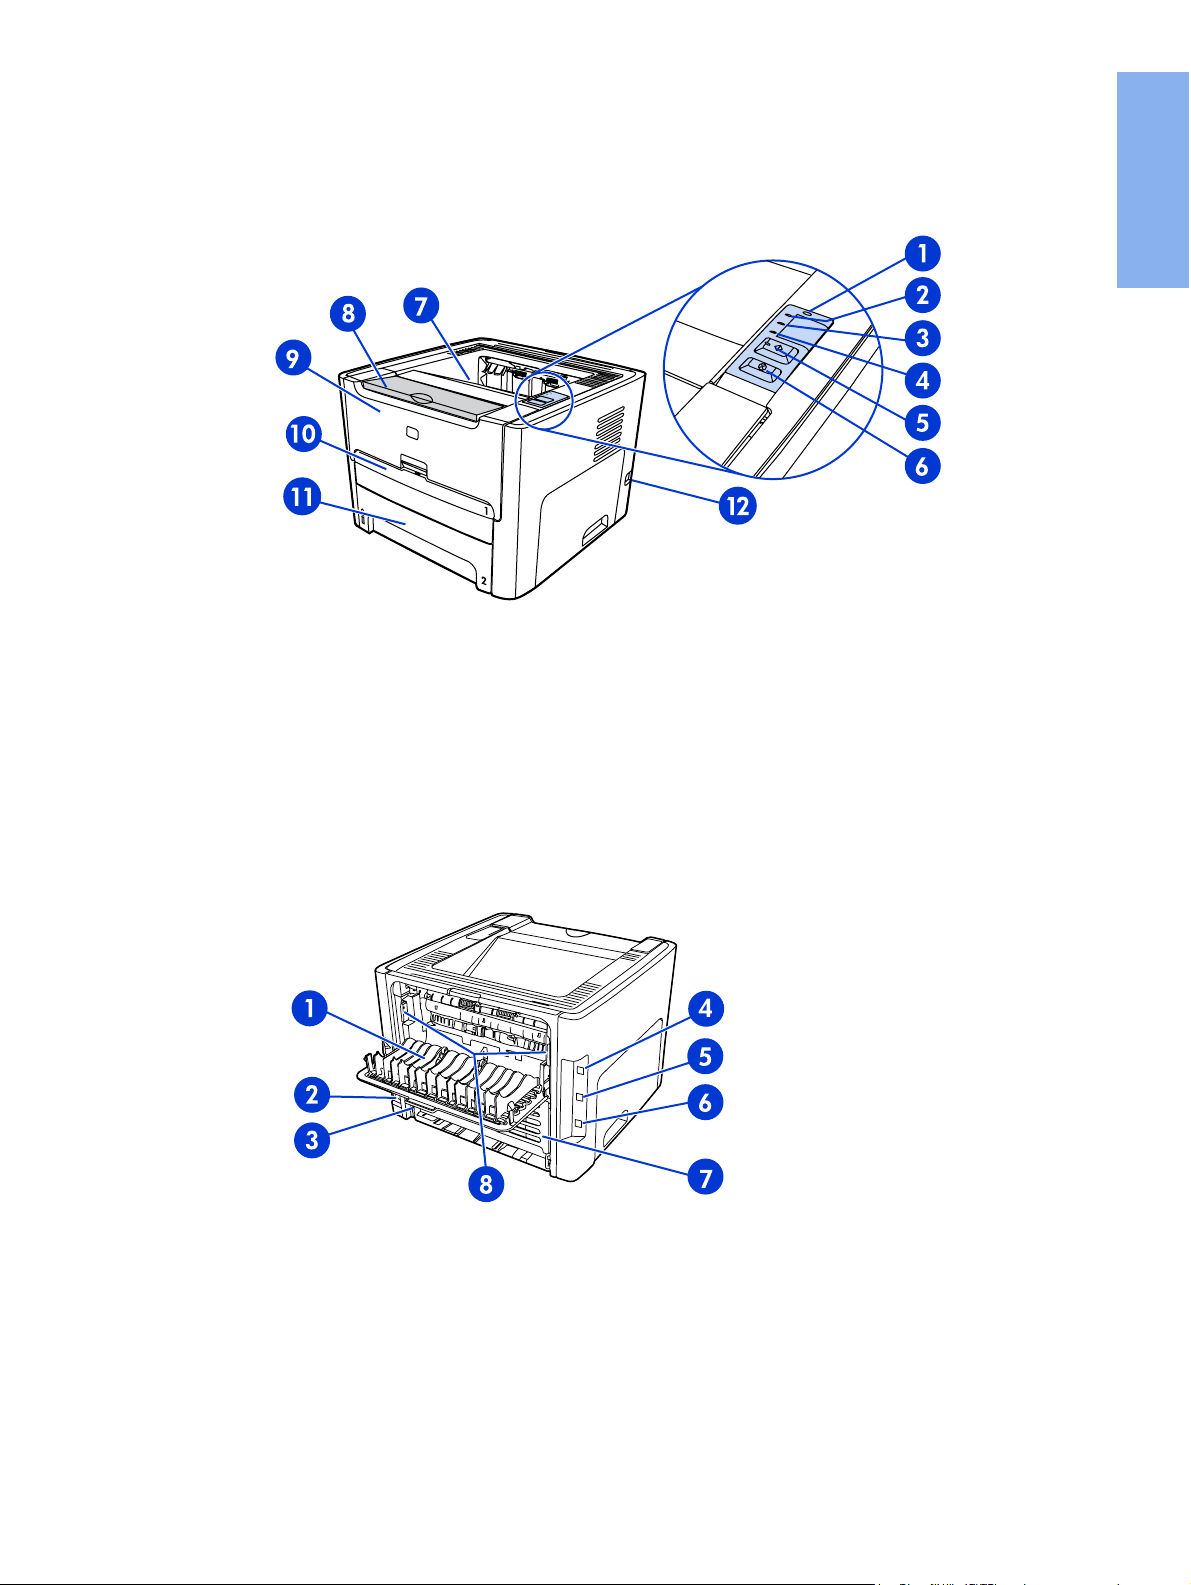
Locating the device parts
1 Wireless light
2 Toner light
3 Attention light
4 Ready light
O
button and light
5 G
ANCEL
6 C
7 Output bin
8 Media support
9 Print cartridge door
10 Single-sheet priority input slot (Tray 1)
11 Main input tray (Tray 2)
12 On/off switch
button
English
1 Straight-through output door
2 Power receptacle
3 Automatic two-sided printing media-size selector
4 USB port
5 Network reset button
6 Internal HP Jetdirect network port
7 Rear automatic two-sided path door
8 Jam clearing levers
ENWW Locating the device parts 5
Page 12

6 Chapter 1 Introduction ENWW
Page 13

Setting up the printer
This chapter contains the following sections:
●
Remove the tape
●
Prepare the print cartridge
●
Load Tray 2
●
Select a connection method
●
Connect the printer to a wired network
●
Connect the printer to a wireless network
●
Direct connect using the USB port
English
ENWW 7
Page 14
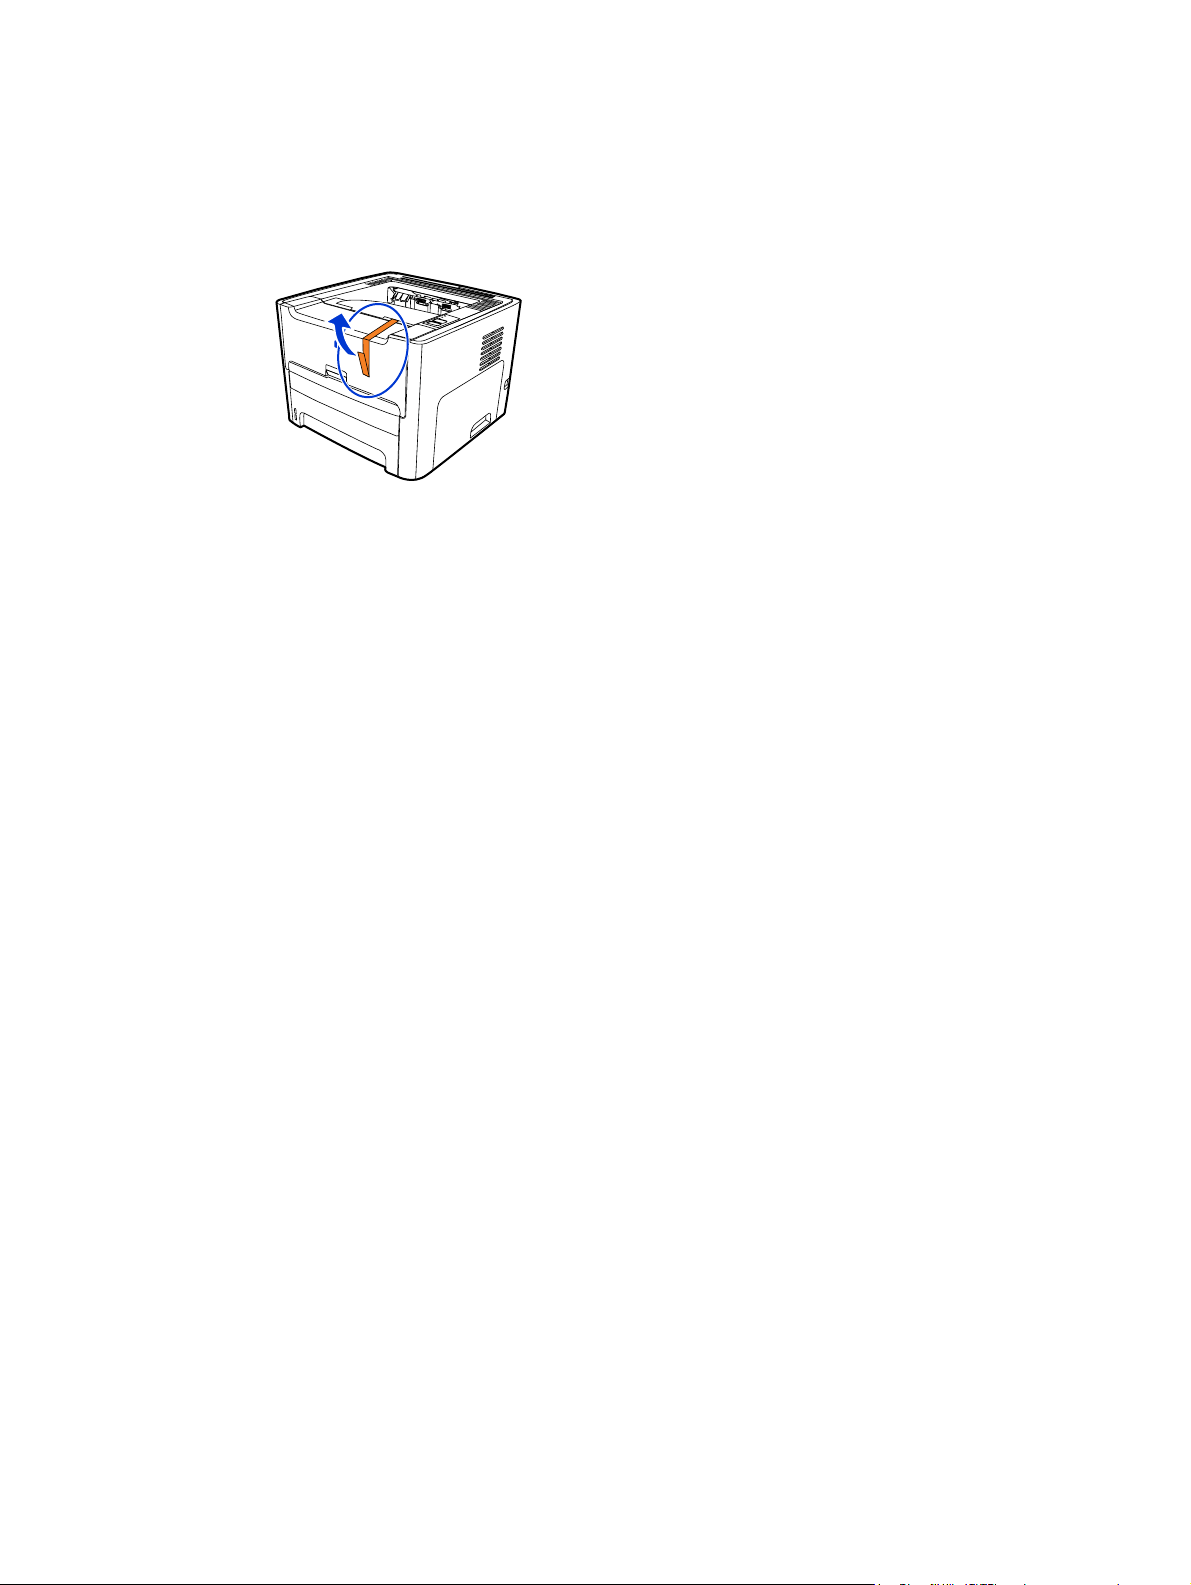
Remove the tape
1. Remove the orange tape from the front of the printer.
8 Chapter 2 Setting up the printer ENWW
Page 15
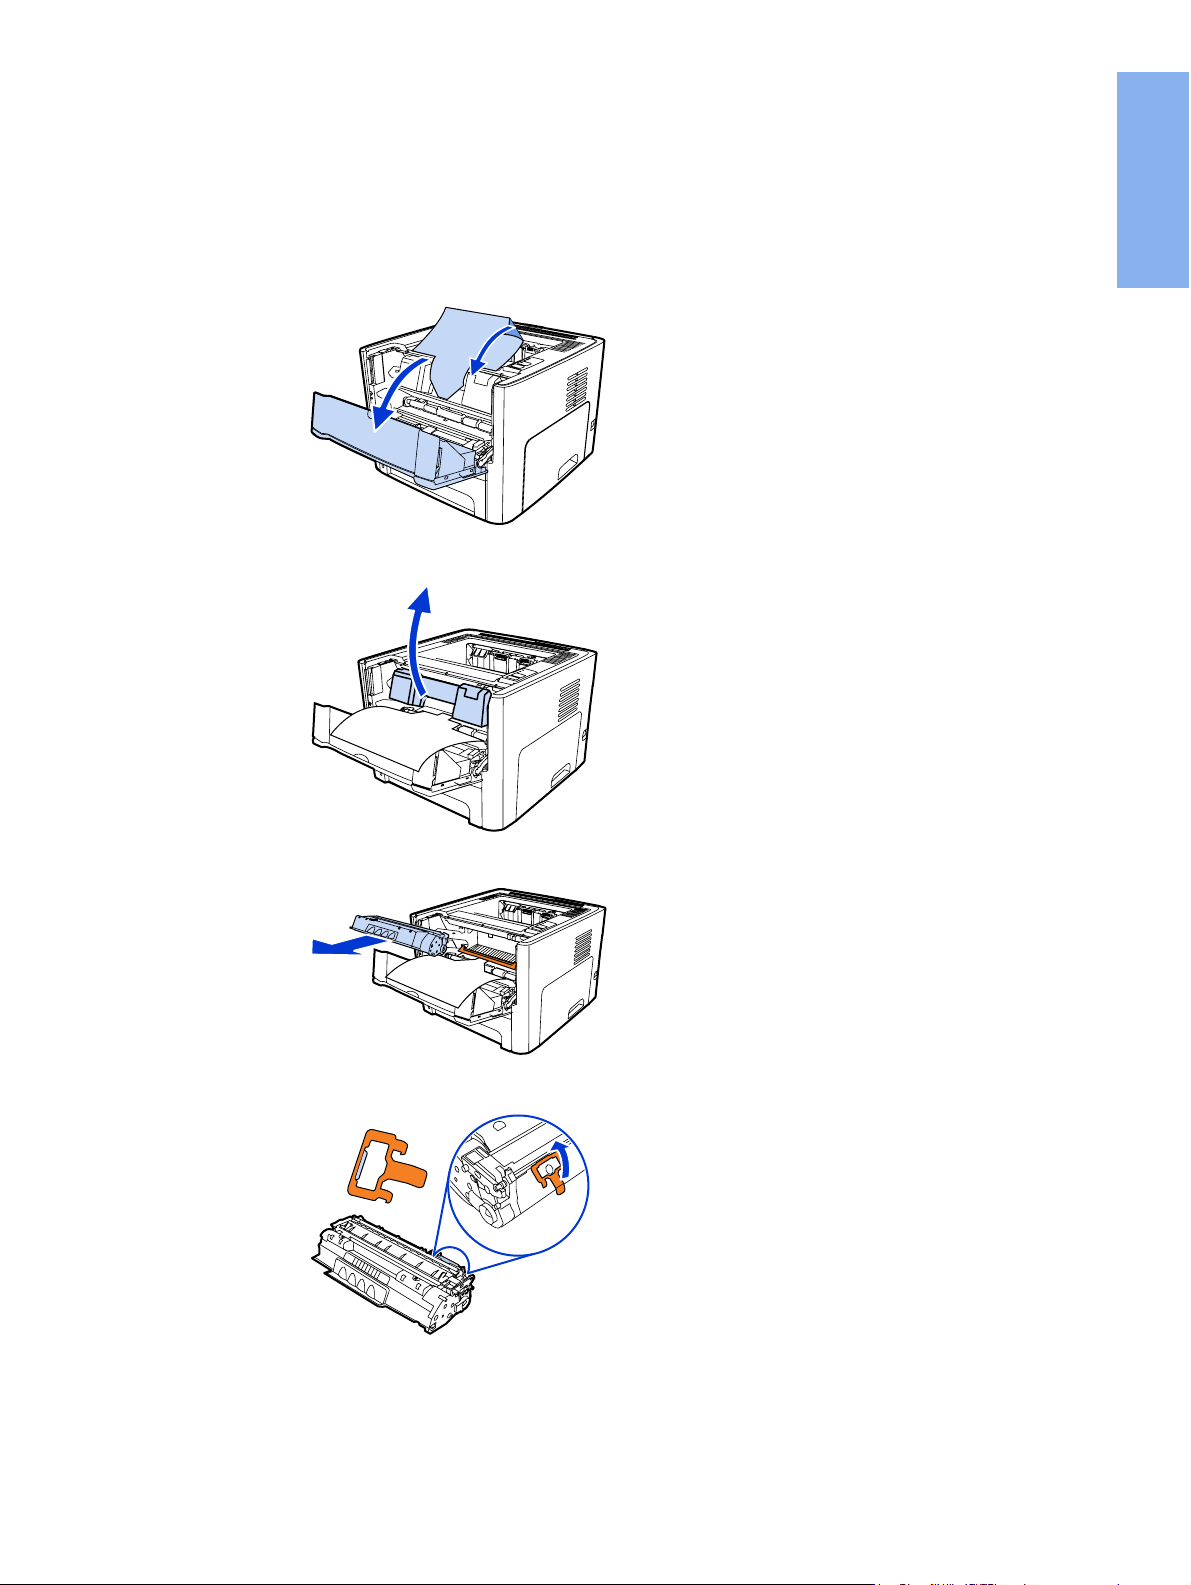
Prepare the print cartridge
1. Open the print cartridge door.
2. Flip the paper back.
3. Remove the foam packaging.
English
4. Remove the print cartridge.
5. Remove the orange clip on the print cartridge.
ENWW Prepare the print cartridge 9
Page 16
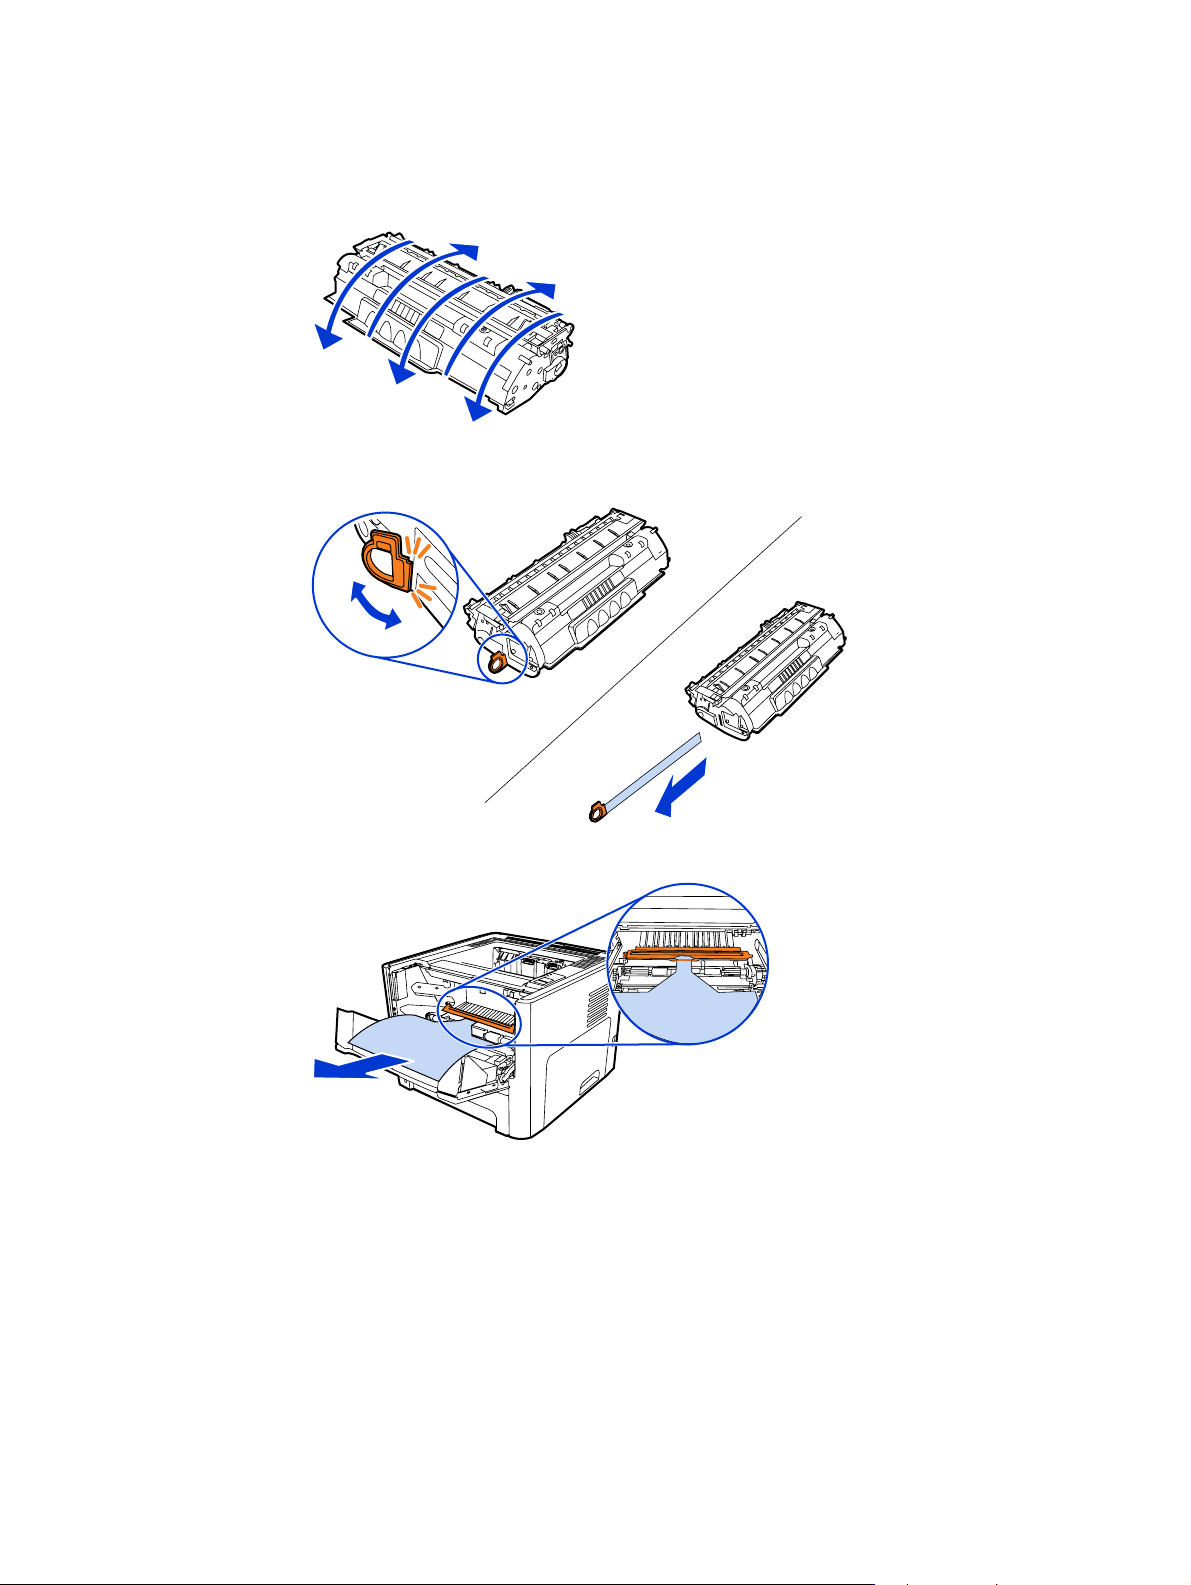
6. Grasp both sides of the cartridge and gently rock the cartridge forward and backward
five times. This action distributes the toner.
5x
7. Remove the inside sealing tape by breaking the tab on the end of the cartridge and
pulling the tape completely out.
8. Remove the paper and the orange transfer roller spacer. (They should be connected.)
10 Chapter 2 Setting up the printer ENWW
Page 17
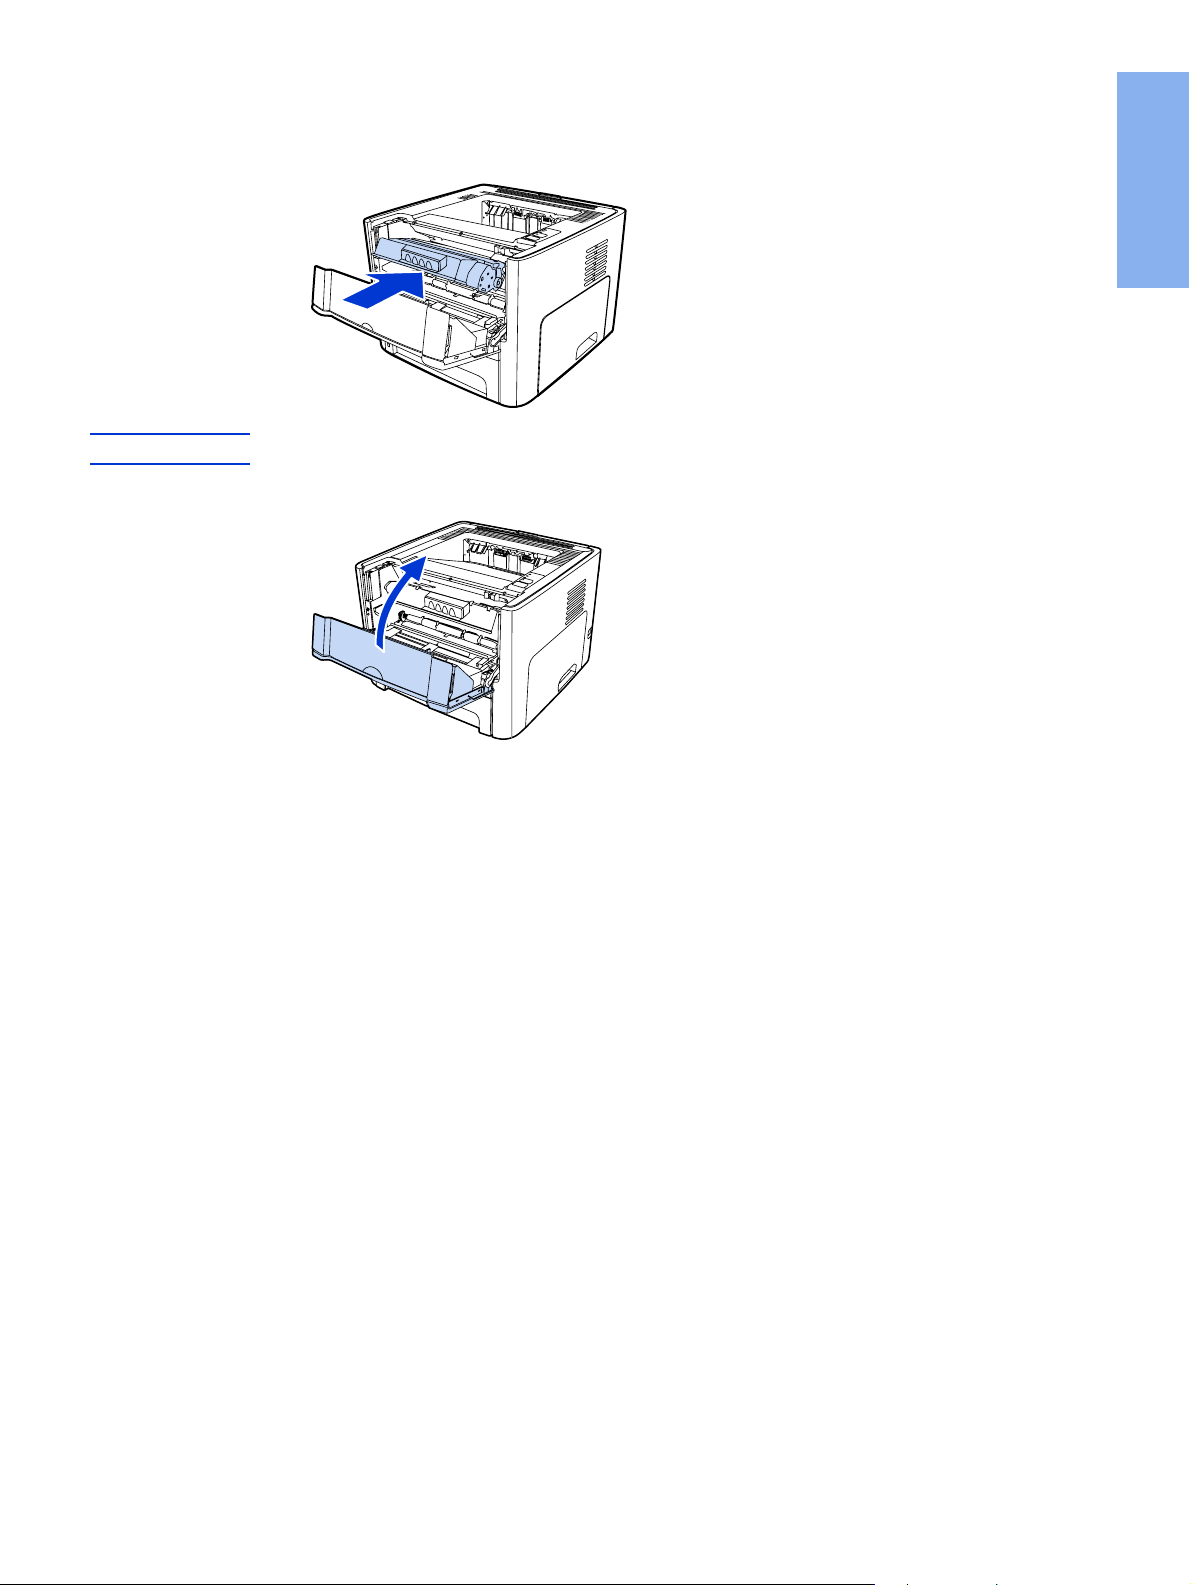
9. Insert the print cartridge.
English
NOTE
To prevent damage to the print cartridge, minimize its exposure to direct light.
10. Close the print cartridge door.
ENWW Prepare the print cartridge 11
Page 18
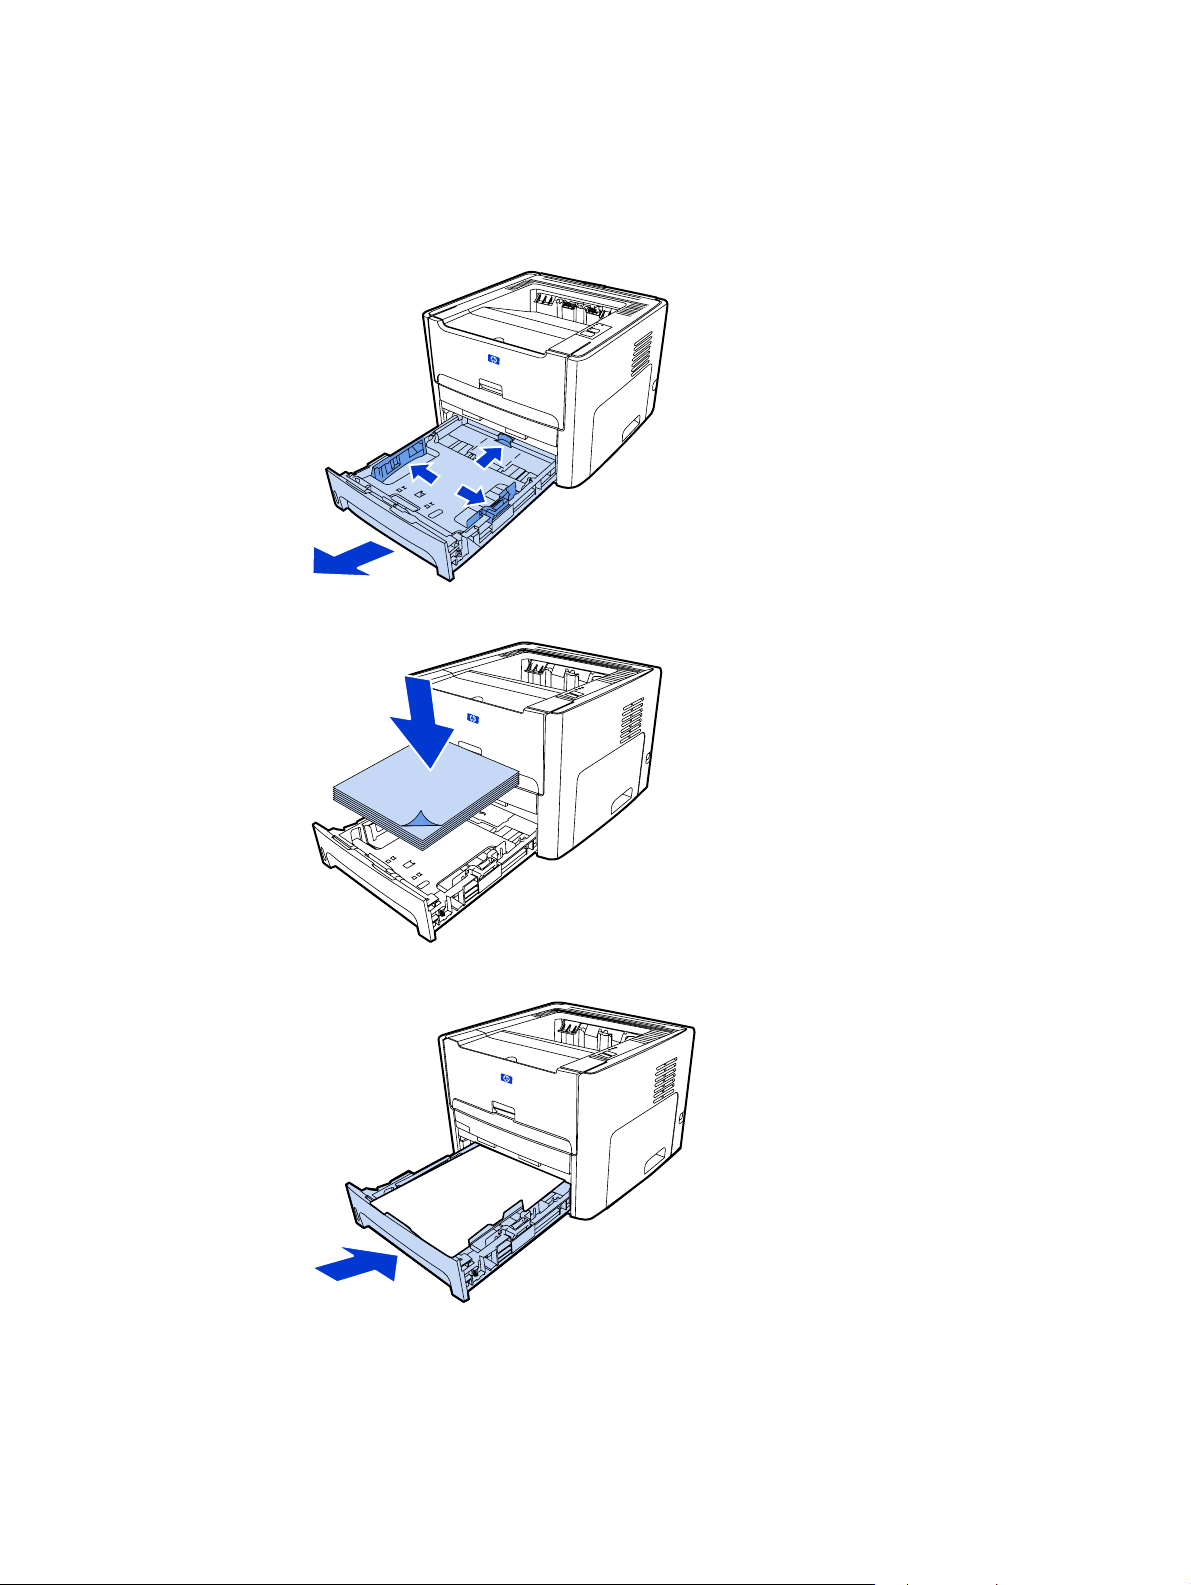
Load Tray 2
1. Open the tray and move the media guides to the correct media size settings.
2. Insert the paper with the top forward and the side to be printed facing down.
3. Close the tray.
12 Chapter 2 Setting up the printer ENWW
Page 19

Select a connection method
Select one of the following methods for connecting the printer:
● Wired network: To connect to a wired network, see
network
-or-
● Wireless network: To connect to a wireless network, see
wireless network
-or-
● USB: To perform a USB direct connect, see
The following sections contain additional information about each of the connection options.
Direct connect using the USB port
Connect the printer to a wired
Connect the printer to a
English
ENWW Select a connection method 13
Page 20
Connect the printer to a wired network
1. Plug the power cord into the printer and then plug the cord into the power outlet.
2. Connect the Ethernet cable between the HP Jetdirect network port on the printer and the
network hub.
3. Turn the printer on.
14 Chapter 2 Setting up the printer ENWW
Page 21

4. Insert the software CD into the computer CD-ROM drive. Follow the on-screen
installation instructions.
English
NOTE
To obtain additional information about the network configuration settings, print a
configuration page. When the printer is in the Ready state, press and hold G
O
for 5 seconds.
ENWW Connect the printer to a wired network 15
Page 22

Connect the printer to a wireless network
This section contains information about connecting the printer to a wireless network. For
more information about wireless networking, see the HP LaserJet 1320nw printer Wireless
User Guide.
NOTE
NOTE
The printer cannot be connected to a wired and wireless network at the same time.
It is highly recommended that you implement a wireless security scheme (either Wired
Equivalent Privacy [WEP] or Wi-Fi protected access [WPA]) prior to setup. In addition, use
an antivirus program to protect against computer viruses, and follow basic security rules.
Other network components, including firewalls, intrusion-detection systems, and segmented
networks, should also be considered as part of the network design.
Select one of the following wireless printer installation methods:
● Windows wireless network infrastructure method. See
procedure for Windows infrastructure network installation (recommended).
● Windows wireless network ad hoc (peer-to-peer) method. See
procedure for Windows ad hoc (peer-to-peer) network installation (for advanced users).
● Macintosh wireless network infrastructure method (for Macintosh users). See
for connecting to a Macintosh wireless network.
Network components and
Network components and
Procedure
Network components and procedure for Windows infrastructure network installation (recommended)
This section contains information about the required networking components and a
procedure for installing to a wireless network using the infrastructure method.
NOTE
HP recommends the infrastructure network mode installation.
Network information
Obtain the following information from the system administrator or the person who installed
the network:
● The network's name (SSID): the SSID identifies a particular wireless network. In order to
operate on a network, any connecting device must know the network name.
● The network's security settings (if used): WEP and the WEP key used, authentication
method (Open, Shared Key, or Preshared Key [PSK]), and Encryption (none, WEP, or
WPA).
● The network's communication mode must be infrastructure network mode.
In infrastructure mode, the printer communicates with network computers through a
wireless access point (WAP) or a base station. The access point acts as a central hub or
gateway connecting wireless and, optionally, wired devices.
16 Chapter 2 Setting up the printer ENWW
Page 23

Network components for a Windows infrastructure installation
You will need the following components and network information to perform an infrastructure
installation:
English
1 Functioning infrastructure wireless network
2 HP LaserJet 1320nw printer Wireless Start Guide (this document)
3 Power cord
4 Ethernet cable (provided with the printer)
5 Installation software CD (provided with the printer)
6 CD containing the HP LaserJet 1320nw printer Wireless User Guide
7 HP LaserJet 1320nw printer
ENWW Connect the printer to a wireless network 17
Page 24

Procedure for a Windows infrastructure network installation
NOTE
If you experience problems during the wireless installation process, see the Problem
solving section of the HP LaserJet 1320nw printer Wireless User Guide.
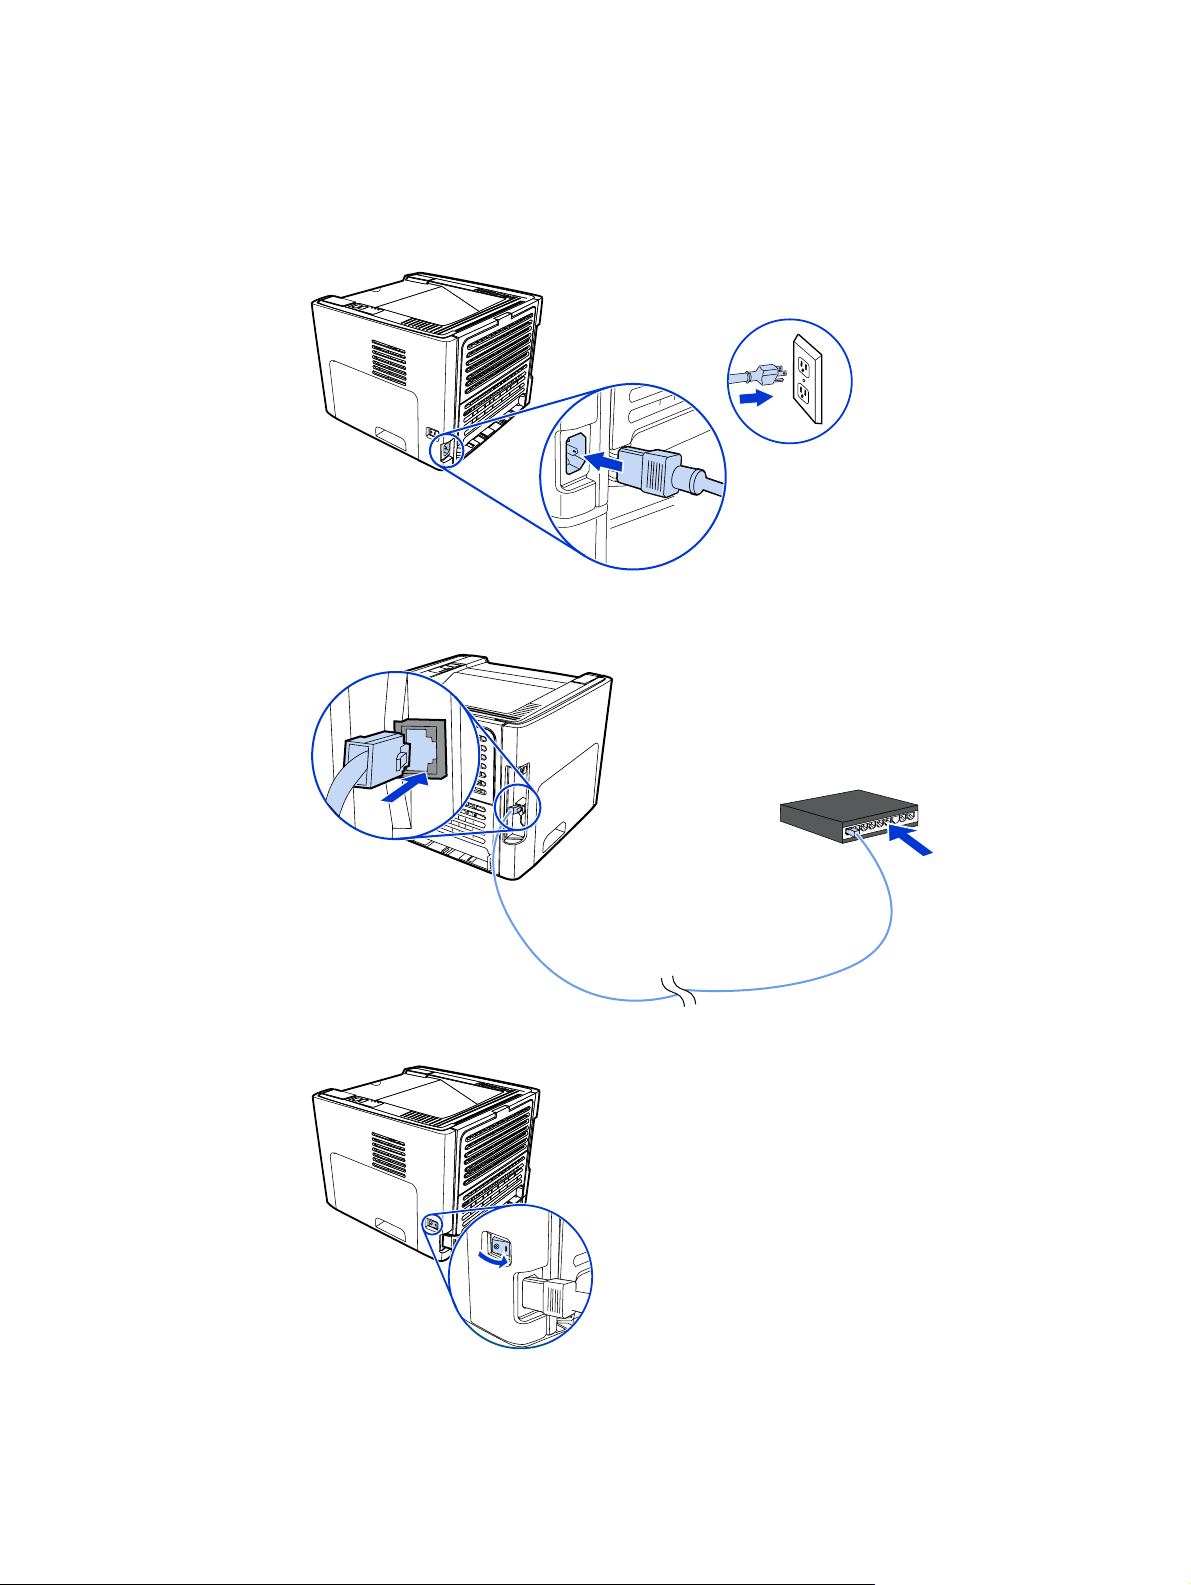
1. Plug the power cord into the printer and then plug the cord into the power outlet.
2. Connect the cable from the HP Jetdirect network port on the printer to the network hub/
router. This cable connection is temporary. At the end of the installation process, you will
disconnect the cable. The printer will then operate wirelessly. (Use the cable that is
packaged with the printer.)
18 Chapter 2 Setting up the printer ENWW
Page 25

3. Turn the printer on.
The green light on the network port illuminates.
4. Insert the CD into a computer that is linked to the network. Follow the on-screen
installation prompts.
English
NOTE
To obtain additional information about the network configuration settings, print a
configuration page. When the printer is in the Ready state, press and hold G
O
for 5 seconds.
Network components and procedure for Windows ad hoc
(peer-to-peer) network installation (for advanced users)
This section contains information about the required networking components and provides a
procedure for installing to a wireless network using the ad hoc method.
Network information
Obtain the following information from the system administrator or the person who installed
the network:
● The network's name (SSID): the SSID identifies a particular wireless network. In order to
operate on a network, any connecting device must know the network name.
● The network's security settings (if used): WEP and the WEP key used, authentication
method (Open, Shared Key, or Preshared Key [PSK]), and Encryption (none, WEP, or
WPA).
● The network's communication mode must be ad hoc network mode.
In ad hoc mode, which is sometimes called peer-to-peer mode, the printer
communicates with the computer directly, rather than through a WAP or base station.
Each device on an ad hoc network must have a wireless network adapter.
ENWW Connect the printer to a wireless network 19
Page 26

Network components for a Windows ad hoc (peer-to-peer) network
installation
You will need the following components and network information to perform an ad hoc
installation:
NOTE
1 Functioning ad hoc wireless network
2 HP LaserJet 1320nw printer Wireless Start Guide (this document)
3 Installation software CD (provided with the printer)
4 CD containing the HP LaserJet 1320nw printer Wireless User Guide
5 Power cord
Procedure for a Windows ad hoc (peer-to-peer) network installation
Please read the entire procedure before starting an ad hoc wireless network installation. For
best results, follow the instructions in the order listed.
HP highly recommends that you have an existing ad hoc network or that you configure one
before starting this installation method.
1. Preparing the printer
a. Close all applications on your computer.
b. Plug the printer into a power outlet and turn it on (power on the printer).
c. Wait a few minutes and then print a network configuration page by pressing the
black button on the network card on the back of the printer.
d. If the IP address on the network configuration page is 0.0.0.0, then wait a few
minutes and repeat Step b. Do this until the IP address is not 0.0.0.0. The printer will
have an automatic IP address (Auto IP) which should look like 169.254.x.y, where x
and y can be any numbers between 0 and 255.
20 Chapter 2 Setting up the printer ENWW
Page 27

e. On the network configuration page, confirm that there is a Network Name (SSID),
such as hpsetup.
2. Preparing your computer
a. Unplug any network cable connected to your computer. This will disable any wired
network. Only the wireless network should be active during the installation. To verify
that your wired network is disabled, click Start, Control Panel, and Network
Connections. (The unplugged cables should be reconnected after the installation is
complete.)
b. In the configuration properties for your computer's wireless network card, verify that
the hpsetup network is available and connect to it. (For example, in Windows XP, to
connect to the hpsetup wireless network, click Start, Control Panel, Network
Connections, and Wireless Network Connection. Then click Properties and
select the Wireless Networks tab. In the Available networks box, select hpsetup
and click Configure. Click OK. The network name, hpsetup, should now be
available in the Preferred networks section. Click Refresh if the hpsetup network
is not listed.) If you are using a wireless card or wireless adapter, use the utility that
came with your wireless card or wireless adapter to add hpsetup to your network
options. The network name, hpsetup, should only be used to configure the printer.
c. Ensure that your computer has an automatic IP address before starting the software
installation. Your computer may take a few moments to acquire an automatic IP
address. (For example, in Windows XP, to check whether your computer has an
automatic IP address, click Start, All programs, Connect To or click Start,
Connect To and Show all connections. Then select Wireless Network
Connection. In the Details section, verify that the IP address is of the form
169.254.x.y, where x and y are any numbers between 0 and 255.) Also, verify that
the peer-to-peer network name is hpsetup. If the computer has not yet acquired a
valid automatic IP address, wait a few minutes. The Details section of the Network
Connections box will change to show the new IP address when it is valid. Now you
are ready to start the software installation.
English
3. Installing the Software
a. Insert the software CD into your computer's CD-ROM drive. Start the software
installation, and follow the on-screen instructions.
b. If one or more printers are found and displayed on the Printers Found page, select
the printer that has the same IP address as the one you are installing, and then click
Next.
c. HP highly recommends that you select Change Settings on the Confirm Settings
page to configure your device’s network to match the settings of the existing ad hoc
network on your computer. If you do not have an existing ad hoc network, then
accept the default settings.
d. Accept the settings on the Confirm Settings page.
e. Continue with the installation until the process is complete.
f. After the software installation is complete and your computer has been rebooted,
reconnect any network cables that you may have unplugged during the installation.
ENWW Connect the printer to a wireless network 21
Page 28

Procedure for connecting to a Macintosh wireless network
NOTE
This installation method is for Macintosh users.
1. Start the Macintosh in OSX 10.2 or higher (not supported in v10.1).
2. Plug the power cord into the printer and then plug the cord into the power outlet.
3. Turn the printer on.
4. Insert the CD into a computer that is linked to the network. Drag-and-drop the HP WPS
Assistant X (ver. 2.1) from the CD to the computer desktop. If the computer is not set up
as wireless, go to Step 5. If the computer is set up as wireless, go to Step 9.
5. Open the System Preferences Network settings panel and create a custom Location
setting. Type a name for the network (for example, MyHomeNetwork).
6. Select Show and then Network Port Configurations. Deselect Internal Modem and
Built-In Ethernet. Click Apply Now.
22 Chapter 2 Setting up the printer ENWW
Page 29

7. Select AirPort from the Show drop-down menu and select the AirPort tab.
8. Select Join a Specific Network and add the wireless network name in the Network
box. Verify that the Allow this computer to create networks and Show AirPort status
in menu bar options are checked. Click Apply Now. The AirPort process launches. (If
the AirPort icon does not become activated, verify that the AirPort is turned on. To turn
on AirPort, select the icon, and then select Turn AirPort On.)
9. Launch the HP WPS Assistant X program from the desktop and follow the on-screen
instructions. Select hp LaserJet 1320 series from the Printer selection list.
English
NOTE
Multiple printers may be listed.
10. Click Configure Print Server to launch the default browser.
11. Click Continue if any error messages are displayed.
12. On the Network Settings page, click the 802.11b/g tab.
13. Click Infrastructure (Using an access point gateway or Base Station …) in the
Communication Mode section.
14. In the Network Name (SSID) section, type the name of the network in the Network
Name box.
15. Click Apply at the bottom of the browser page, and click OK if a dialog message box
appears.
16. A Configuration Result message will appear and the browser will try to access the
hp LaserJet 1320 series again. This will fail because the hp LaserJet 1320 series
WPS has changed to network name your network name and IP address. Close the
browser.
17. Click the Right Arrow button on the HP WPS Assistant X to close the program.
18. Open Print Center and add the printer using the Rendezvous network drop-down
menu. From the list of printers, select the printer and then click Add.
19. Click Configure in Print Center to launch the browser and display the printer’s current
settings.
20. The printer is ready for wireless use.
ENWW Connect the printer to a wireless network 23
Page 30

Direct connect using the USB port
1. Plug the power cord into the printer and then plug the cord into the power outlet.
2. Turn the printer on.
3. Insert the software CD into the computer CD-ROM drive. Follow the on-screen
installation instructions.
24 Chapter 2 Setting up the printer ENWW
Page 31

4. When prompted, connect the USB cable between the printer and the computer.
English
ENWW Direct connect using the USB port 25
Page 32

26 Chapter 2 Setting up the printer ENWW
Page 33

Imprimante HP LaserJet 1320nw
sans fil
Français
Guide de mise en route
Page 34

Copyright et Licence
© 2005 Copyright Hewlett-Packard
Development Company, L.P.
Il est interdit de reproduire, adapter ou
traduire ce manuel sans autorisation
expresse par écrit, sauf dans les cas
permis par les lois régissant les droits
d'auteur.
Les seules garanties concernant les
produits et services HP sont énoncées
dans la garantie qui accompagne ces
produits et services. Rien en ceci ne devra
être interprété comme constituant une
garantie supplémentaire. HP ne pourra être
tenue pour responsable des erreurs
techniques et rédactionnelles ou des
omissions présentes dans ce document.
Les informations contenues dans ce
document sont sujettes à modification sans
préavis.
Numéro de référence : Q5929-90915
Edition 1, 5/2005
Conformité FCC
Cet équipement a été testé et trouvé
conforme aux limites d'un appareil de
classe B, conformément à la section 15 de
la notice FCC relative aux interférences
radioélectriques. Ces limites sont conçues
pour fournir une protection raisonnable
contre les interférences nuisibles dans une
installation résidentielle. Ce matériel
génère, utilise et peut émettre de l'énergie
haute fréquence. S'il n'est pas installé et
utilisé en accord avec les instructions, il
peut provoquer des interférences et
perturber les communications radio.
L'absence d'interférences n'est toutefois
pas garantie dans une installation
particulière. Si ce matériel provoque des
interférences et perturbe la réception radio
ou télévisée, ce qui peut être vérifié en
mettant le matériel sous et hors tension,
nous encourageons l'utilisateur à y
remédier en appliquant l'une des mesures
suivantes :
Modifier l'orientation de l'antenne de
réception ou la déplacer.
Augmenter la distance séparant le matériel
du récepteur.
Brancher le matériel sur une prise située
sur un circuit différent de celui où se trouve
le récepteur.
Contacter votre revendeur ou un technicien
radio/TV expérimenté.
Toute modification apportée à l'imprimante
et non approuvée expressément par
Hewlett-Packard peut annuler l'autorisation
donnée à l'utilisateur de se servir de ce
matériel.
L'utilisation d'un câble d'interface blindé est
nécessaire pour se conformer aux limites
de la classe B de la section 15 de la notice
FCC relative aux interférences
radioélectriques.
Ce produit est conforme à l’article 15 des
règles FCC. Son fonctionnement est
soumis aux deux conditions suivantes :
(1) cet appareil ne peut pas provoquer
d’interférences et (2) cet appareil doit
accepter toute interférence reçue, y
compris les interférences susceptibles de
provoquer une opération indésirable.
Marques citées
Microsoft®, Windows® et Windows NT®
sont des marques déposées aux EtatsUnis de Microsoft Corporation.
Tous les autres produits mentionnés
peuvent être des marques de leurs
sociétés respectives
Page 35

Sommaire
1 Introduction
Présentation du périphérique ...................................................................................................2
Préparation de l’emplacement .................................................................................................3
Contenu du carton ...................................................................................................................4
Emplacement des pièces du périphérique ...............................................................................5
2 Installation de l’imprimante
Retrait de la bande ...................................................................................................................8
Préparation de la cartouche d’impression ................................................................................9
Chargement du bac 2 ............................................................................................................12
Sélection d’une méthode de connexion .................................................................................13
Connexion de l’imprimante à un réseau câblé .......................................................................14
Connexion de l’imprimante à un réseau sans fil ....................................................................16
Composants réseau et procédure pour installation réseau d’infrastructure
Windows (recommandé) ..............................................................................................16
Composants réseau et procédure pour installation ad hoc (homologue)
Windows (pour utilisateurs expérimentés) ...................................................................19
Procédure de connexion à un réseau sans fil Macintosh ................................................22
Connexion directe via le port USB .........................................................................................25
Français
FRWW Sommaire iii
Page 36

iv FRWW
Page 37

Introduction
Ce chapitre contient les sections suivantes :
●
Présentation du périphérique
●
Préparation de l’emplacement
●
Contenu du carton
●
Emplacement des pièces du périphérique
Français
FRWW 1
Page 38

Présentation du périphérique
Remarque
L’imprimante HP LaserJet 1320nw fait partie de la gamme d’imprimantes HP LaserJet 1160
et HP LaserJet 1320. Pour plus d’informations sur l’utilisation des imprimantes de cette
gamme, reportez-vous au guide de l’utilisateur de l’imprimante HP LaserJet 1160 ou
HP LaserJet 1320 disponible sur le CD-ROM.
L’imprimante HP LaserJet 1320nw présente toutes les caractéristiques de l’imprimante
HP LaserJet 1320. En outre, l’imprimante HP LaserJet 1320nw inclut une connexion sans fil
802.11b/g intégrée et un port réseau HP Jetdirect interne, au lieu d’un port parallèle
IEEE-1284B.
2 Chapitre 1 Introduction FRWW
Page 39

Préparation de l’emplacement
Placez l’imprimante sur une surface plane et stable dans un local correctement ventilé.
Assurez-vous qu’un espace suffisant autour de l’imprimante permet la circulation de l’air au
travers des ouvertures de ventilation.
N’exposez pas l’imprimante à la lumière directe du soleil et ne la placez pas dans un local
sujet à des changements brusques de température et d’humidité. La plage de température
recommandée est 10 à 32,5 °C.
Français
FRWW Préparation de l’emplacement 3
Page 40

Contenu du carton
Le carton de l’imprimante contient le matériel, le logiciel et la documentation ci-dessous.
1 Imprimante HP LaserJet 1320nw
2 Documentation (ce manuel)
3 CD-ROM contenant le logiciel d’installation (fourni avec l’imprimante)
4 CD-ROM contenant le guide d’utilisation de l’imprimante sans fil HP LaserJet 1320nw (fourni avec
l’imprimante)
5 Cordon d’alimentation
6 Câble réseau
4 Chapitre 1 Introduction FRWW
Page 41

Emplacement des pièces du périphérique
1 Voyant Sans fil
2 Voyant Encre
3 Voyant Attention
4 Voyant Prêt
5 Bouton et voyant E
6 Bouton A
7 Bac de sortie
8 Prise en charge de supports
9 Panneau d’accès à la cartouche d’impression
10 Bac d’alimentation prioritaire d'une feuille (bac 1)
11 Bac d'alimentation principal (bac 2)
12 Interrupteur marche/arrêt
NNULER
XÉCUTER
Français
1 Porte du circuit papier direct
2 Bloc d’alimentation
3 Sélecteur de format de support d’impression recto verso automatique
4 Port USB
5 Bouton de réinitialisation du réseau
6 Port réseau HP Jetdirect interne
7 Porte arrière du circuit recto verso automatique
8 Leviers d’élimination des bourrages
FRWW Emplacement des pièces du périphérique 5
Page 42

6 Chapitre 1 Introduction FRWW
Page 43

Installation de l’imprimante
Ce chapitre contient les sections suivantes :
●
Retrait de la bande
●
Préparation de la cartouche d’impression
●
Chargement du bac 2
●
Sélection d’une méthode de connexion
●
Connexion de l’imprimante à un réseau câblé
●
Connexion de l’imprimante à un réseau sans fil
●
Connexion directe via le port USB
Français
FRWW 7
Page 44

Retrait de la bande
1. Retirez la bande orange de l’avant de l’imprimante.
8 Chapitre 2 Installation de l’imprimante FRWW
Page 45

Préparation de la cartouche d’impression
1. Ouvrez le panneau d’accès à la cartouche d’impression.
2. Retournez le dos du support de papier.
3. Retirez l’emballage en mousse.
Français
4. Retirez la cartouche d’impression.
5. Retirez le clip orange sur la cartouche d’impression.
FRWW Préparation de la cartouche d’impression 9
Page 46

6. Saisissez la cartouche par les deux côtés et secouez-la délicatement cinq fois de l’avant
vers l’arrière. Cette action distribue le toner.
5x
7. Retirez la bande adhésive de scellage interne en brisant l’onglet situé à l’extrémité de la
cartouche et en tirant entièrement la bande.
8. Retirez le papier et le bloc d’espacement du rouleau de transfert orange. (Ils doivent être
connectés.)
10 Chapitre 2 Installation de l’imprimante FRWW
Page 47

9. Introduisez la cartouche d’impression.
Remarque
Pour ne pas risquer d’endommager la cartouche, ne l’exposez pas directement à la lumière.
10. Fermez le panneau d’accès à la cartouche d’impression.
Français
FRWW Préparation de la cartouche d’impression 11
Page 48

Chargement du bac 2
1. Ouvrez le bac et réglez les guides de support sur les paramètres de format de support
corrects.
2. Placez le papier sommet vers l’avant et face à imprimer vers le bas.
3. Fermez le bac.
12 Chapitre 2 Installation de l’imprimante FRWW
Page 49

Sélection d’une méthode de connexion
Sélectionnez une des méthodes suivantes pour connecter l’imprimante :
● Réseau câblé : Pour connecter l’imprimante à un réseau câblé, reportez-vous à la
section.
-ou-
● Réseau sans fil : Pour connecter l’imprimante à un réseau sans fil, reportez-vous à la
section.
-ou-
● USB : Pour réaliser une connexion USB directe, reportez-vous à la section.
directe via le port USB
Les sections suivantes contiennent des informations supplémentaires sur chacune des
options de connexion.
Connexion de l’imprimante à un réseau câblé
Connexion de l’imprimante à un réseau sans fil
Connexion
Français
FRWW Sélection d’une méthode de connexion 13
Page 50

Connexion de l’imprimante à un réseau câblé
1. Branchez le cordon d’alimentation sur l’imprimante, puis sur une source de tension.
2. Connectez le câble Ethernet entre le concentrateur réseau et le port réseau HP Jetdirect
sur l’imprimante.
3. Mettez l’imprimante sous tension.
14 Chapitre 2 Installation de l’imprimante FRWW
Page 51

4. Introduisez le CD du logiciel dans le lecteur de CD-ROM de l’ordinateur. Suivez les
instructions d’installation qui s’affichent à l’écran.
Remarque
Pour obtenir des informations supplémentaires sur les paramètres de configuration réseau,
imprimez une page de configuration. Une fois l’imprimante à l’état Prêt, appuyez sur le
bouton E
XÉCUTER
et maintenez-le enfoncé pendant 5 secondes.
Français
FRWW Connexion de l’imprimante à un réseau câblé 15
Page 52

Connexion de l’imprimante à un réseau sans fil
Cette section contient des informations sur la connexion de l’imprimante à un réseau sans
fil. Pour plus d’informations sur la mise en réseau sans fil, reportez-vous au guide
d’utilisation sans fil de l’imprimante HP LaserJet 1320nw.
Remarque
Remarque
L’imprimante ne peut pas être connectée simultanément à un réseau sans fil et à un réseau
câblé.
Il est fortement recommandé de mettre en œuvre un modèle de sécurité sans fil (WEP
[Wired Equivalent Privacy] ou WPA [Wi-Fi protected access]) avant de procéder à
l’installation. En outre, utilisez un logiciel antivirus pour protéger les ordinateurs des attaques
virales et suivez les règles de sécurité élémentaires. D’autres composants réseau, y compris
des pare-feux, des systèmes de détection d’intrusion et des réseaux segmentés, peuvent
également être envisagés dans la conception du réseau.
Sélectionnez une des méthodes d’installation d’imprimante sans fil ci-dessous :
● Méthode d’infrastructure réseau sans fil Windows. Reportez-vous à la section
Composants réseau et procédure pour installation réseau d’infrastructure Windows
(recommandé).
● Méthode ad hoc (homologue) de réseau sans fil Windows. Reportez-vous à la section
Composants réseau et procédure pour installation ad hoc (homologue) Windows (pour
utilisateurs expérimentés).
● Méthode d’infrastructure réseau sans fil Macintosh (pour utilisateurs Macintosh).
Reportez-vous à la section
Procédure de connexion à un réseau sans fil Macintosh.
Composants réseau et procédure pour installation réseau d’infrastructure Windows (recommandé)
Cette section contient des informations sur les composants réseau requis et fournit une
procédure pour l’installation sur un réseau sans fil à l’aide de la méthode d’infrastructure.
Remarque
16 Chapitre 2 Installation de l’imprimante FRWW
HP recommande l’installation en mode réseau d’infrastructure.
Page 53

Informations de mise en réseau
Obtenez les informations suivantes auprès de l’administrateur du système ou de la personne
qui a installé le réseau :
● Nom du réseau (SSID) : le SSID identifie un réseau sans fil spécifique. Afin de
fonctionner sur un réseau, tout périphérique se connectant doit connaître le nom du
réseau.
● Paramètres de sécurité du réseau (si utilisée) : WEP et clé WEP utilisée, méthode
d’authentification (système ouvert, clé partagée ou clé pré-partagée [PSK]) et chiffrage
(aucun, WEP ou WPA).
● Le mode de communication du réseau doit être le mode réseau d’infrastructure.
Dans le mode infrastructure, l’imprimante communique avec les ordinateurs du réseau
via un point d’accès sans fil (WAP) ou une borne d’accès. Le point d’accès agit comme
une passerelle ou un concentrateur central qui relie des périphériques sans fil et,
facultativement, câblés.
Composants réseau pour une installation d’infrastructure Windows
L’exécution d’une installation d’infrastructure requiert les composants et informations réseau
ci-dessous :
Français
1 Réseau sans fil d’infrastructure fonctionnel
2 Guide de démarrage de l’imprimante sans fil HP LaserJet 1320nw (ce document)
3 Cordon d’alimentation
4 Câble Ethernet (fourni avec l’imprimante)
5 CD du logiciel d’installation (fourni avec l’imprimante)
6 CD contenant le guide d’utilisation de l’imprimante sans fil HP LaserJet 1320nw
7 Imprimante HP LaserJet 1320nw
FRWW Connexion de l’imprimante à un réseau sans fil 17
Page 54

Procédure d’installation réseau d’infrastructure Windows
Remarque
Si vous rencontrez des problèmes durant la procédure d’installation sans fil, reportez-vous à
la section Résolution de problèmes du guide d’utilisation de l’imprimante sans fil
HP LaserJet 1320nw.
1. Branchez le cordon d’alimentation sur l’imprimante, puis sur une source de tension.
2. Connectez le câble Ethernet entre le concentrateur/routeur réseau et le port réseau
HP Jetdirect de l’imprimante. Cette connexion de câble est temporaire. A la fin de la
procédure d’installation, vous déconnecterez le câble. L’imprimante fonctionnera alors
sans fil. (Utilisez le câble livré avec l’imprimante.)
18 Chapitre 2 Installation de l’imprimante FRWW
Page 55

3. Mettez l’imprimante sous tension.
Le voyant vert sur le port réseau s’allume.
4. Introduisez le CD dans le lecteur d’un ordinateur relié au réseau. Suivez les invites
d’installation qui s’affichent à l’écran.
Français
Remarque
Pour obtenir des informations supplémentaires sur les paramètres de configuration réseau,
imprimez une page de configuration. Une fois l’imprimante à l’état Prêt, appuyez sur le
bouton E
XÉCUTER
et maintenez-le enfoncé pendant 5 secondes.
Composants réseau et procédure pour installation ad hoc
(homologue) Windows (pour utilisateurs expérimentés)
Cette section contient des informations sur les composants réseau requis et fournit une
procédure pour l’installation sur un réseau sans fil à l’aide de la méthode ad hoc.
FRWW Connexion de l’imprimante à un réseau sans fil 19
Page 56

Informations de mise en réseau
Obtenez les informations suivantes auprès de l’administrateur du système ou de la personne
qui a installé le réseau :
● Nom du réseau (SSID) : le SSID identifie un réseau sans fil spécifique. Afin de
fonctionner sur un réseau, tout périphérique se connectant doit connaître le nom du
réseau.
● Paramètres de sécurité du réseau (si utilisée) : WEP et clé WEP utilisée, méthode
d’authentification (système ouvert, clé partagée ou clé pré-partagée [PSK]) et chiffrage
(aucun, WEP ou WPA).
● Le mode de communication du réseau doit être le mode réseau ad hoc.
En mode ad hoc, parfois appelé mode homologue, l’imprimante communique
directement avec l’ordinateur plutôt que par un point d’accès ou une borne d’accès.
Chaque périphérique sur un réseau ad hoc doit être doté d’une carte réseau sans fil.
Composants réseau pour une installation ad hoc (homologue) Windows
L’exécution d’une installation ad hoc requiert les composants et informations réseau cidessous :
1 Réseau sans fil ad hoc fonctionnel
2 Guide de démarrage de l’imprimante sans fil HP LaserJet 1320nw (ce document)
3 CD du logiciel d’installation (fourni avec l’imprimante)
4 CD contenant le guide d’utilisation de l’imprimante sans fil HP LaserJet 1320nw
5 Cordon d’alimentation
Procédure d’installation réseau ad hoc (homologue) Windows
Veuillez lire intégralement la procédure avant de démarrer une installation réseau sans fil
ad hoc. Pour obtenir des résultats optimaux, suivez les instructions dans l’ordre affiché.
20 Chapitre 2 Installation de l’imprimante FRWW
Page 57

Remarque
HP recommande vivement de disposer d’un réseau ad hoc existant ou de le configurer
avant de commencer cette méthode d’installation.
1. Préparation de l’imprimante
a. Fermez toutes les applications sur l’ordinateur.
b. Branchez l’imprimante sur une source d’alimentation et mettez-la sous tension
(allumez l’imprimante).
c. Patientez quelques minutes, puis imprimez une page de configuration réseau en
appuyant sur le bouton noir situé sur la carte réseau à l’arrière de l’imprimante.
d. Si l’adresse IP sur la page de configuration réseau est 0.0.0.0, patientez quelques
minutes, puis répétez l’étape b. Poursuivez cette procédure jusqu’à ce que l’adresse
IP ne soit plus 0.0.0.0. L’imprimante obtiendra une adresse IP automatique (Auto IP)
qui aura le format 169.254.x.y, où x et y peuvent être tout nombre compris entre 0 et
255.
e. Sur la page de configuration réseau, vérifiez la présence d’un nom réseau (SSID),
tel que hpsetup.
2. Préparation de l’ordinateur
a. Débranchez tout câble réseau connecté à l’ordinateur. Ceci désactive tout réseau
câblé. Seul le réseau sans fil doit être actif durant l’installation. Pour vérifier que le
réseau câblé est désactivé, cliquez sur Démarrer, Panneau de configuration, puis
Connexions réseau. (Les câbles débranchés doivent être reconnectés une fois
l’installation terminée.)
Français
b. Dans les propriétés de configuration de la carte réseau sans fil de l’ordinateur,
vérifiez que le réseau hpsetup est disponible, puis connectez-vous à celui-ci. (Par
exemple, sous Windows XP, pour vous connecter au réseau sans fil hpsetup,
cliquez sur Démarrer, Panneau de configuration, Connexions réseau, puis
Connexion réseau sans fil. Cliquez ensuite sur Propriétés et sélectionnez l’onglet
Réseaux sans fil. Dans la section Réseaux disponibles, sélectionnez hpsetup,
puis cliquez sur Configurer. Cliquez sur OK. Le nom du réseau, hpsetup, doit
maintenant être disponible dans la section Réseaux préférés. Cliquez sur
Actualiser si le réseau hpsetup ne figure pas dans la liste.) Si vous utilisez un
adaptateur ou une carte sans fil, employez l’utilitaire livré avec ce composant pour
ajouter hpsetup aux options de réseau. Le nom du réseau, hpsetup, doit
uniquement être utilisé pour configurer l’imprimante.
c. Assurez-vous que l’ordinateur possède une adresse IP automatique avant de
démarrer l’installation du logiciel. L’acquisition d’une adresse IP automatique par
l’ordinateur peut prendre quelques instants. (Par exemple, sous Windows XP, pour
vérifier si l’ordinateur possède une adresse IP automatique, cliquez sur Démarrer,
Programmes, puis Connecter à ou cliquez sur Démarrer, Connecter à, puis
Afficher toutes les connexions. Sélectionnez ensuite Connexion réseau sans fil.
Dans la section Détails, vérifiez que l’adresse IP a le format 169.254.x.y, où x et y
peuvent être tout nombre compris entre 0 et 255.) Vérifiez également que le nom du
réseau homologue est hpsetup. Si l’ordinateur n’a pas encore acquis une adresse
IP automatique valide, patientez quelques minutes. La section Détails de la zone
Connexions réseau change pour afficher la nouvelle adresse IP une fois celle-ci
valide. Vous êtes maintenant prêt à démarrer l’installation du logiciel.
3. Installation du logiciel
FRWW Connexion de l’imprimante à un réseau sans fil 21
Page 58

a. Introduisez le CD du logiciel dans le lecteur de CD-ROM de l’ordinateur. Démarrez
l’installation du logiciel, puis suivez les instructions affichées à l’écran.
b. Si une ou plusieurs imprimantes sont détectées et affichées sur la page
Imprimantes trouvées, sélectionnez celle qui a la même adresse IP que celle que
vous installez, puis cliquez sur Suivant.
c. HP recommande vivement de sélectionner Modifier les paramètres sur la page
Confirmation des paramètres afin de configurer le réseau du périphérique pour
refléter les paramètres du réseau ad hoc existant sur l’ordinateur. Si vous ne
disposez pas d’un réseau ad hoc existant, acceptez les paramètres par défaut.
d. Acceptez les paramètres sur la page Confirmation des paramètres.
e. Poursuivez l’installation jusqu’à la fin du processus.
f. Une fois l’installation du logiciel terminée et l’ordinateur redémarré, reconnectez tous
les câbles réseau que vous pouvez avoir débranchés durant l’installation.
Procédure de connexion à un réseau sans fil Macintosh
Remarque
Cette méthode d’installation est destinée aux utilisateurs Macintosh.
1. Démarrez le Macintosh sous OSX 10.2 ou version ultérieure (prise en charge non
disponible sous v10.1).
2. Branchez le cordon d’alimentation sur l’imprimante, puis sur une source de tension.
3. Mettez l’imprimante sous tension.
22 Chapitre 2 Installation de l’imprimante FRWW
Page 59

4. Introduisez le CD dans le lecteur d’un ordinateur relié au réseau. Faites glisser et
déposez l’utilitaire HP WPS Assistant X (ver. 2.1) du CD vers le bureau de l’ordinateur.
Si l’ordinateur n’est pas configuré pour un fonctionnement sans fil, passez à l’étape 5.
S’il est configuré pour un fonctionnement sans fil, passez à l’étape 9.
Remarque
5. Ouvrez le tableau de paramètres de préférences réseau du système et créez un
Français
paramètre d’emplacement personnalisé. Entrez un nom pour le réseau (par exemple,
MonRéseau).
6. Sélectionnez Affichage, puis Configurations de port réseau. Désélectionnez Modem
interne et Ethernet intégré. Cliquez sur Appliquer maintenant.
7. Sélectionnez AirPort dans le menu local Affichage, puis sélectionnez l’onglet AirPort.
8. Sélectionnez Joindre un réseau spécifique, puis ajoutez le nom du réseau sans fil
dans la zone Réseau. Vérifiez que les options Autoriser cet ordinateur à créer des
réseaux et Afficher l’état AirPort dans la barre de menus sont sélectionnées. Cliquez
sur Appliquer maintenant. Le processus AirPort démarre. (Si l’icône AirPort ne
devient pas active, vérifiez que AirPort est activé. Pour activer AirPort, sélectionnez
l’icône, puis choisissez Activer AirPort.)
9. Démarrez l’utilitaire HP WPS Assistant X à partir du bureau, puis suivez les instructions
affichées à l’écran. Sélectionnez HP LaserJet 1320 series dans la liste de sélection
d’imprimante.
Plusieurs imprimantes peuvent figurer dans la liste.
10. Cliquez sur Configurer le serveur d’impression pour ouvrir le navigateur par défaut.
11. Cliquez sur Continuer si des messages d’erreur s’affichent.
12. Sur la page Paramètres réseau, cliquez sur l’onglet 802.11b/g.
13. Cliquez sur Infrastructure (utilisation d’une passerelle de point d’accès ou d’une
borne d’accès) dans la section Mode de communication.
14. Dans la section Nom réseau (SSID), entrez le nom du réseau dans la zone Nom du
réseau.
15. Cliquez sur Appliquer au bas de la page du navigateur, puis cliquez sur OK si une zone
de message s’affiche.
16. Un message Résultat de configuration s’affiche et le navigateur tente d’accéder à
nouveau à l’imprimante HP LaserJet 1320. Cet essai échoue car l’utilitaire WPS
HP LaserJet 1320 series a modifié en nom de réseau votre nom réseau et
l’adresse IP. Fermez le navigateur.
17. Cliquez sur le bouton de flèche vers la droite de l’utilitaire HP WPS Assistant X pour
fermer ce dernier.
FRWW Connexion de l’imprimante à un réseau sans fil 23
Page 60

18. Ouvrez le Centre d’impression et ajoutez l’imprimante à l’aide du menu local du réseau
Rendezvous. Dans la liste d’imprimantes, sélectionnez l’imprimante, puis cliquez sur
Ajouter.
19. Dans le Centre d’impression, cliquez sur Configurer pour ouvrir le navigateur et
afficher les paramètres actuels de l’imprimante.
20. L’imprimante est prête à une utilisation sans fil.
24 Chapitre 2 Installation de l’imprimante FRWW
Page 61

Connexion directe via le port USB
1. Branchez le cordon d’alimentation sur l’imprimante, puis sur une source de tension.
2. Mettez l’imprimante sous tension.
Français
3. Introduisez le CD du logiciel dans le lecteur de CD-ROM de l’ordinateur. Suivez les
instructions d’installation qui s’affichent à l’écran.
FRWW Connexion directe via le port USB 25
Page 62

4. Lorsque vous y êtes invité, connectez le câble USB entre l’imprimante et l’ordinateur.
26 Chapitre 2 Installation de l’imprimante FRWW
Page 63

Page 64

© 2005 Hewlett-Packard Development Company, L.P.
*Q5929-90915*
*Q5929-90915*
www.hp.com
Q5929-90915
 Loading...