

Page 1
HP LaserJet 1320nw
Wireless
Start
Page 2

Page 3

HP LaserJet 1320nw Printer
Wireless
English
Getting Started Guide
Page 4

Copyright and License
© 2005 Copyright Hewlett-Packard
Development Company, L.P.
Reproduction, adaptation, or translation
without prior written permission is
prohibited, except as allowed under the
copyright laws.
The only warranties for HP products and
services are set forth in the express
warranty statements accompanying such
products and services. Nothing herein
should be construed as constituting an
additional warranty. HP shall not be liable
for technical or editorial errors or omissions
contained herein.
The information contained herein is subject
to change without notice.
Part number: Q5929-90917
Edition 1, 5/2005
FCC Regulations
This equipment has been tested and found
to comply with the limits for a Class B
digital device, pursuant to Part 15 of the
FCC rules. These limits are designed to
provide reasonable protection against
interference when the equipment is
operated in a residential installation. This
equipment generates, uses, and can
radiate radio frequency energy and, if it is
not installed and used in accordance with
the instructions, it may cause harmful
interference to radio communications.
However, there is no guarantee that
interference will not occur in a particular
installation. If this equipment does cause
harmful interference to radio or television
reception, which can be determined by
turning the equipment off and on, the user
is encouraged to try to correct the
interference by one or more of the following
measures:
Reorient or relocate the receiving antenna.
Increase separation between the
equipment and receiver.
Connect equipment into an outlet on a
circuit different from that to which the
receiver is connected.
Consult your dealer or an experienced
radio/TV technician.
Any changes or modifications to the printer
that are not expressly approved by HP
could void the user's authority to operate
the equipment.
Use of a shielded interface cable is
required to comply with the Class B limits
of Part 15 of FCC rules.
This device complies with Part 15 of FCC
Rules. Operation is subject to the following
two conditions: (1) this device may not
cause harmful interference, and (2) this
device must accept any interference
received, including interference that may
cause undesired operation.
Trademark Credits
Microsoft®, Windows®, and Windows NT®
are U.S. registered trademarks of Microsoft
Corporation.
All other devices mentioned herein may be
trademarks of their respective companies.
Page 5

Table of contents
1 Introduction
Device overview .......................................................................................................................2
Preparing the location .............................................................................................................. 3
Package contents ....................................................................................................................4
Locating the device parts ......................................................................................................... 5
2 Setting up the printer
Remove the tape ......................................................................................................................8
Prepare the print cartridge .......................................................................................................9
Load Tray 2 ............................................................................................................................12
Select a connection method ...................................................................................................13
Connect the printer to a wired network ..................................................................................14
Connect the printer to a wireless network ..............................................................................16
Network components and procedure for Windows infrastructure network
installation (recommended) ..........................................................................................16
Network components and procedure for Windows ad hoc (peer-to-peer) network
installation (for advanced users) ..................................................................................19
Procedure for connecting to a Macintosh wireless network ............................................22
Direct connect using the USB port .........................................................................................24
English
ENWW Table of contents iii
Page 6

iv ENWW
Page 7

Introduction
This chapter contains the following sections:
●
Device overview
●
Preparing the location
●
Package contents
●
Locating the device parts
English
ENWW 1
Page 8

Device overview
NOTE
The HP LaserJet 1320nw printer is part of the HP LaserJet 1160 and HP LaserJet 1320
series printer family. For information about using the printers in this series, see the
HP LaserJet 1160 and HP LaserJet 1320 User Guide located on the CD-ROM.
The HP LaserJet 1320nw printer contains all the features of the HP LaserJet 1320 printer. In
addition, the HP LaserJet 1320nw printer includes integrated 802.11b/g wireless connectivity
and an internal HP Jetdirect network port, instead of an IEEE-1284B parallel port.
2 Chapter 1 Introduction ENWW
Page 9

Preparing the location
Place the printer on a sturdy, level surface in a well-ventilated area. Make sure there is
enough space around the printer to allow air to flow through the vents.
Do not place the printer in direct sunlight or in an area that has abrupt temperature and
humidity changes. The recommended temperature range is 10°C to 32.5°C (50°F to 90.5°F).
English
ENWW Preparing the location 3
Page 10
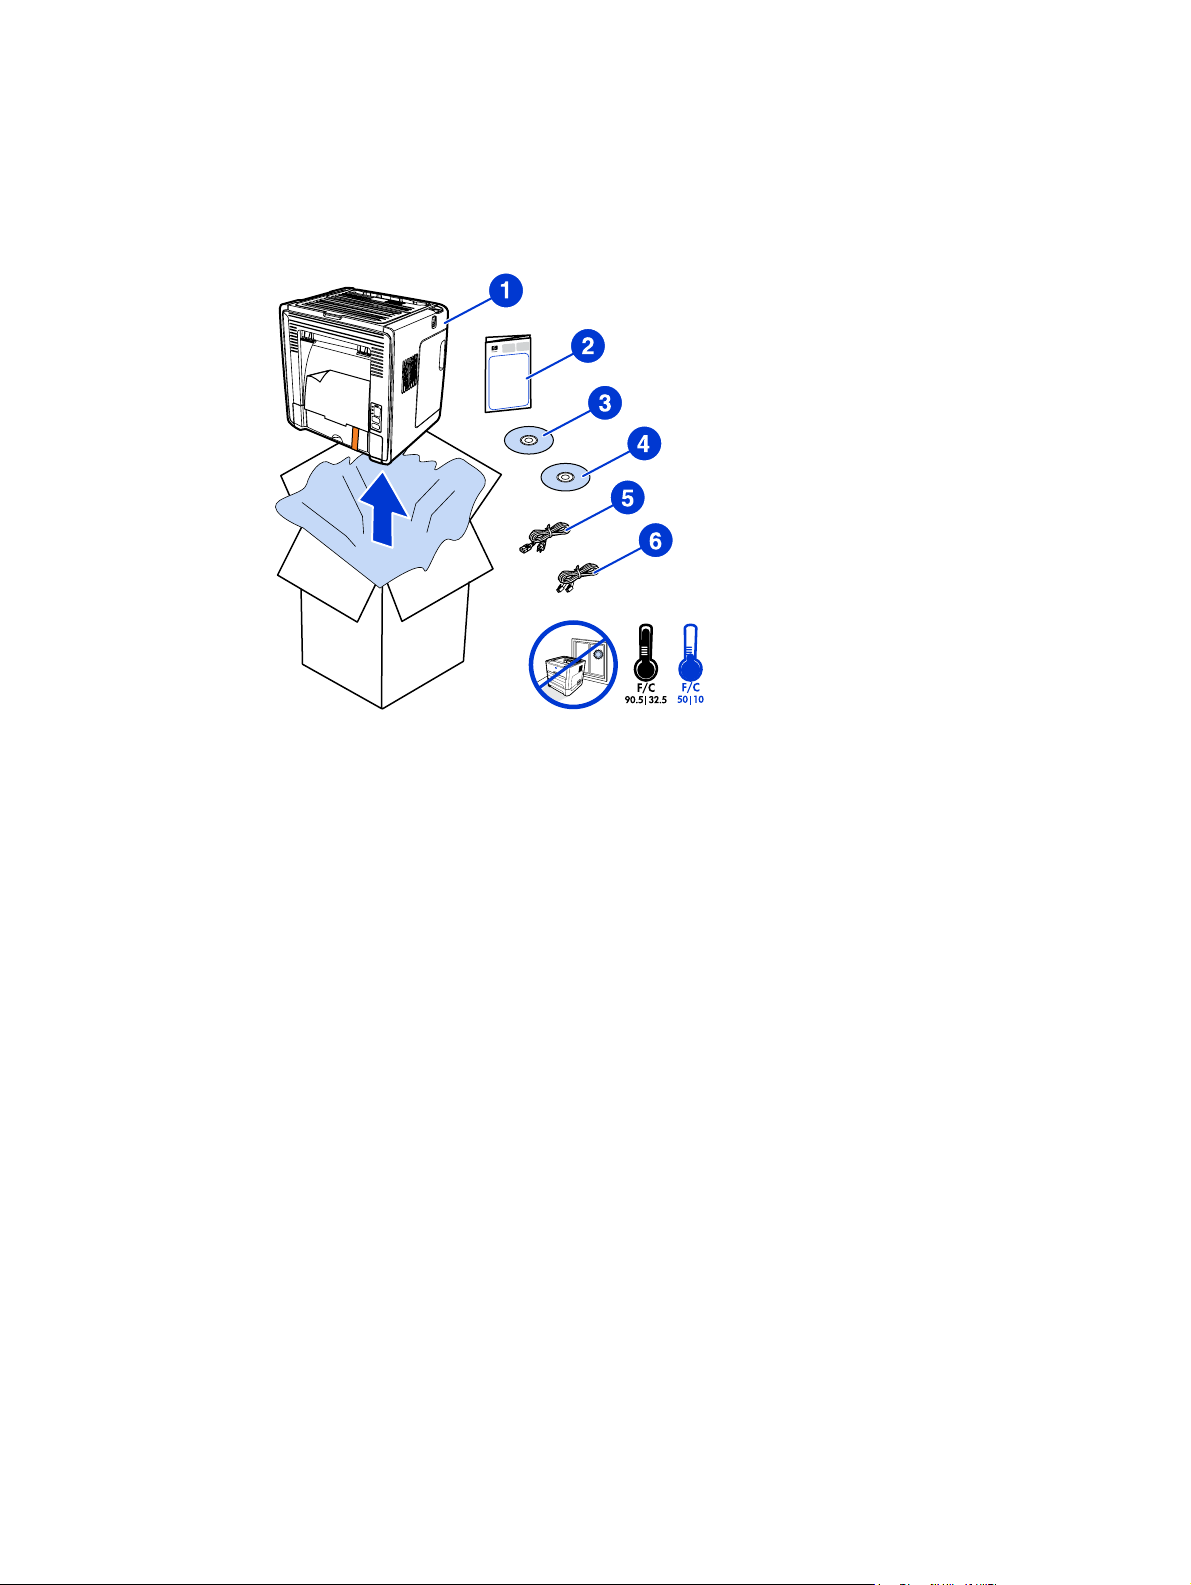
Package contents
The printer package contains the following hardware, software, and documentation.
1 HP LaserJet 1320nw printer
2 Documentation (this manual)
3 CD-ROM containing the installation software (provided with the printer)
4 CD-ROM containing the HP LaserJet 1320nw printer Wireless User Guide (provided with the
printer)
5 Power cord
6 Network cable
4 Chapter 1 Introduction ENWW
Page 11
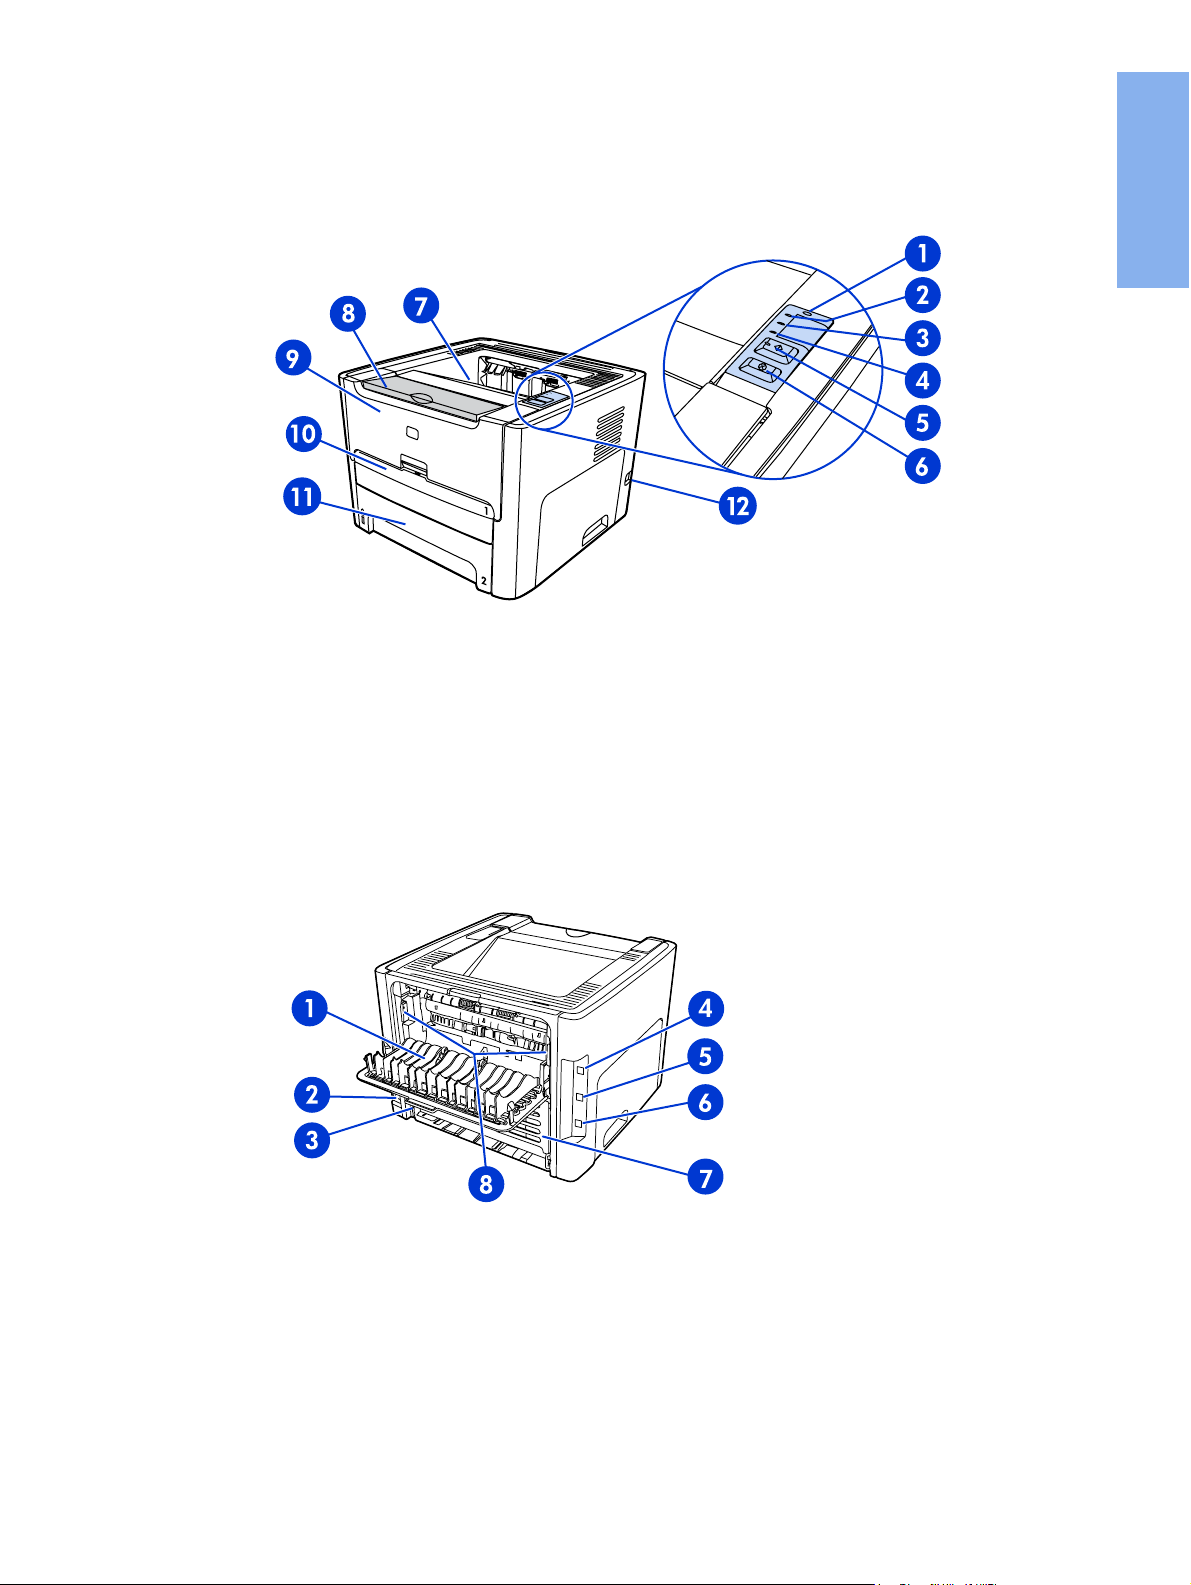
Locating the device parts
1 Wireless light
2 Toner light
3 Attention light
4 Ready light
O
button and light
5 G
ANCEL
6 C
7 Output bin
8 Media support
9 Print cartridge door
10 Single-sheet priority input slot (Tray 1)
11 Main input tray (Tray 2)
12 On/off switch
button
English
1 Straight-through output door
2 Power receptacle
3 Automatic two-sided printing media-size selector
4 USB port
5 Network reset button
6 Internal HP Jetdirect network port
7 Rear automatic two-sided path door
8 Jam clearing levers
ENWW Locating the device parts 5
Page 12

6 Chapter 1 Introduction ENWW
Page 13

Setting up the printer
This chapter contains the following sections:
●
Remove the tape
●
Prepare the print cartridge
●
Load Tray 2
●
Select a connection method
●
Connect the printer to a wired network
●
Connect the printer to a wireless network
●
Direct connect using the USB port
English
ENWW 7
Page 14
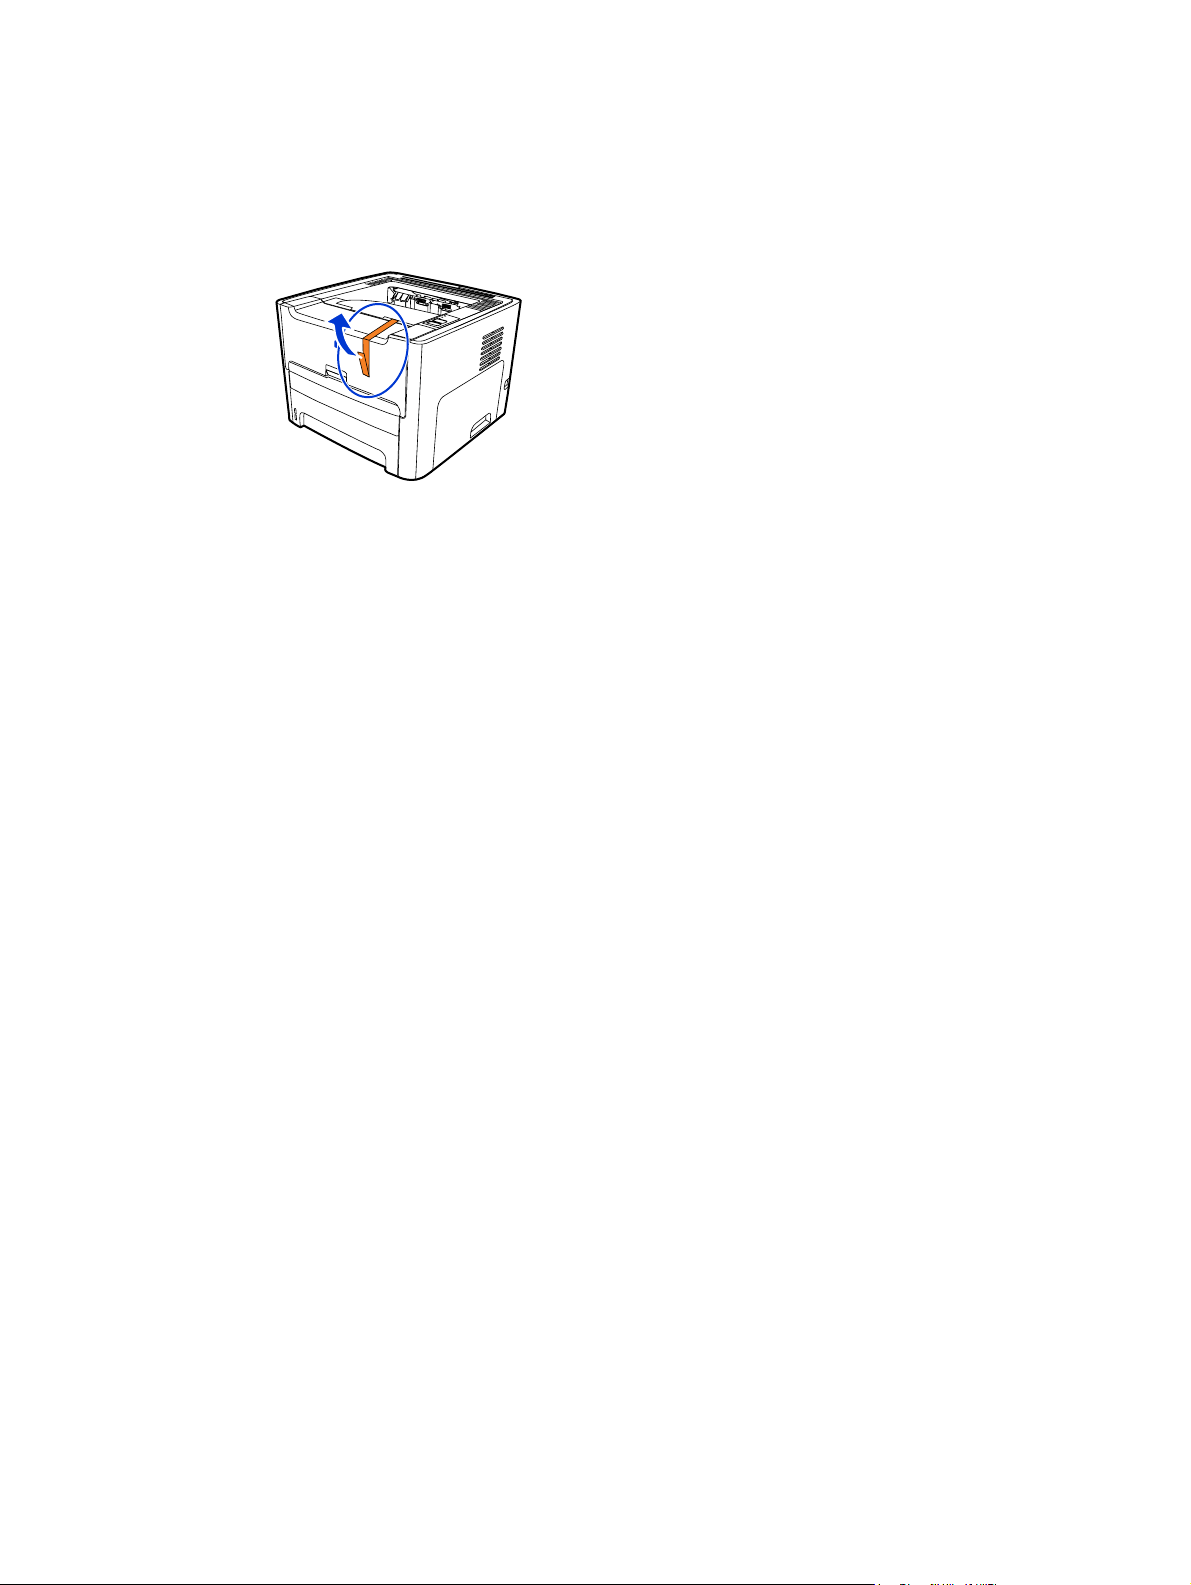
Remove the tape
1. Remove the orange tape from the front of the printer.
8 Chapter 2 Setting up the printer ENWW
Page 15

Prepare the print cartridge
1. Open the print cartridge door.
2. Flip the paper back.
3. Remove the foam packaging.
English
4. Remove the print cartridge.
5. Remove the orange clip on the print cartridge.
ENWW Prepare the print cartridge 9
Page 16
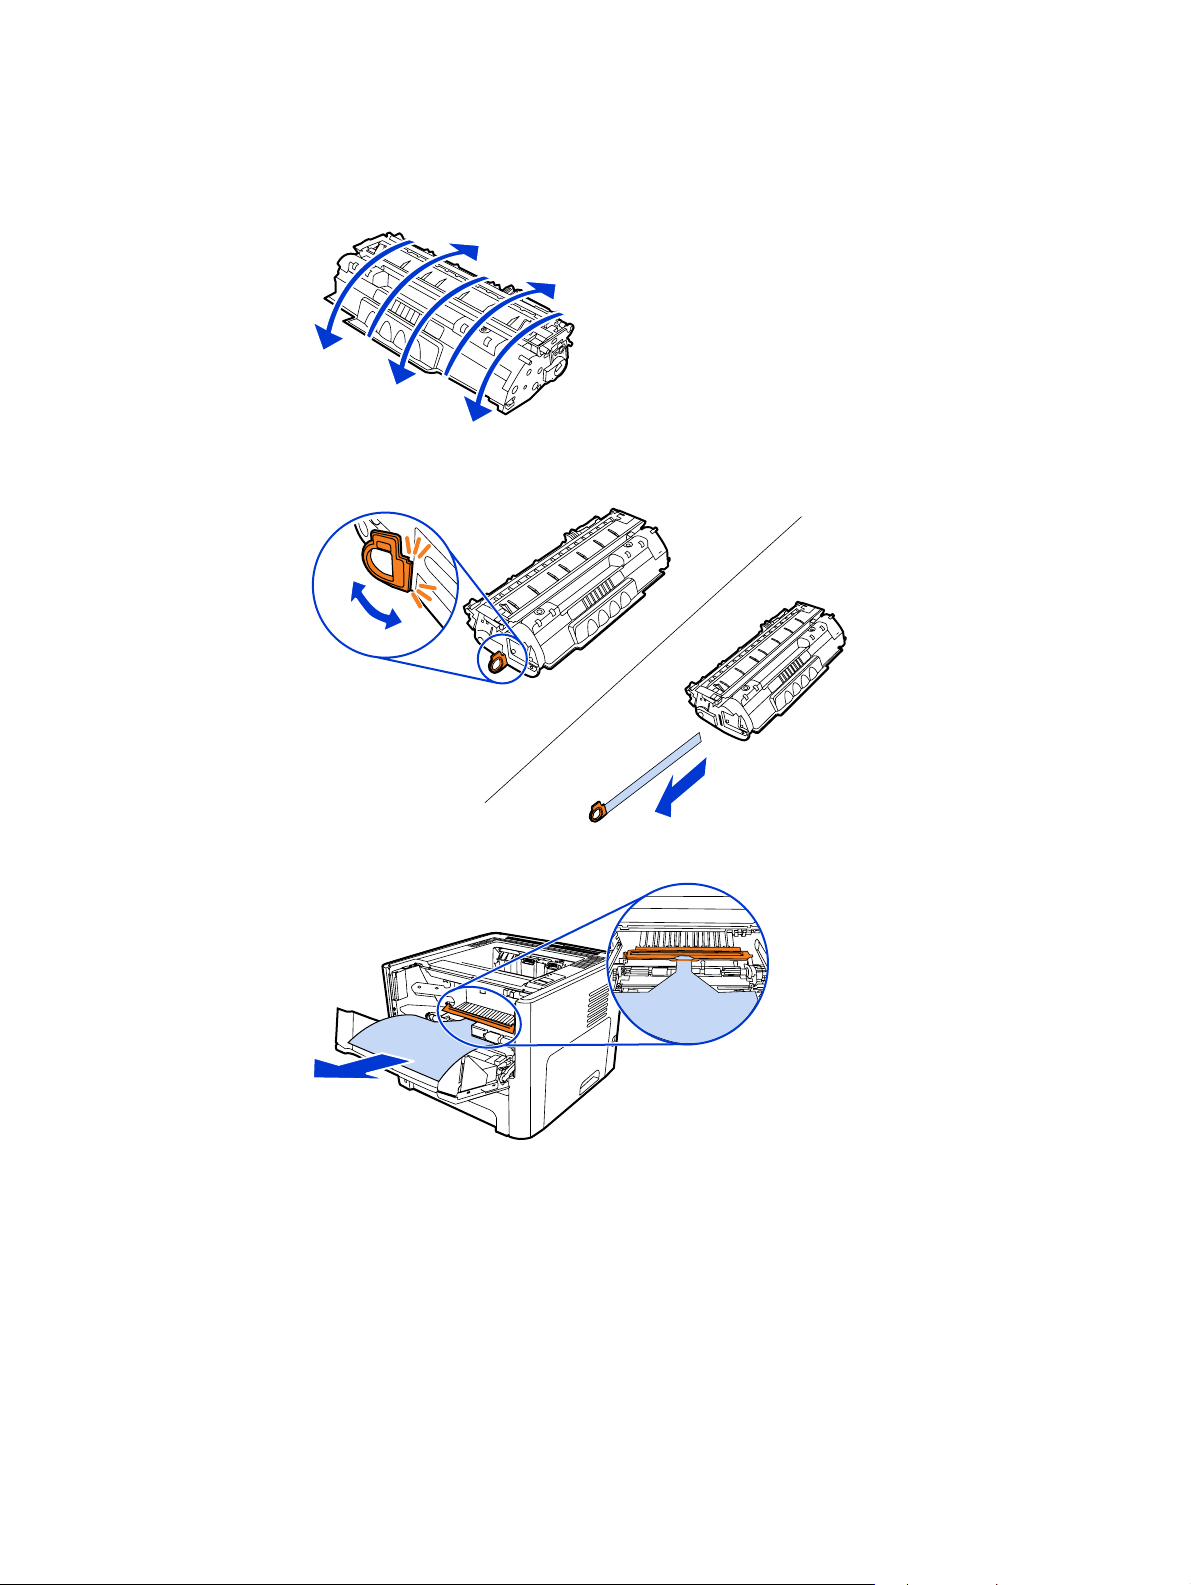
6. Grasp both sides of the cartridge and gently rock the cartridge forward and backward
five times. This action distributes the toner.
5x
7. Remove the inside sealing tape by breaking the tab on the end of the cartridge and
pulling the tape completely out.
8. Remove the paper and the orange transfer roller spacer. (They should be connected.)
10 Chapter 2 Setting up the printer ENWW
Page 17

9. Insert the print cartridge.
English
NOTE
To prevent damage to the print cartridge, minimize its exposure to direct light.
10. Close the print cartridge door.
ENWW Prepare the print cartridge 11
Page 18
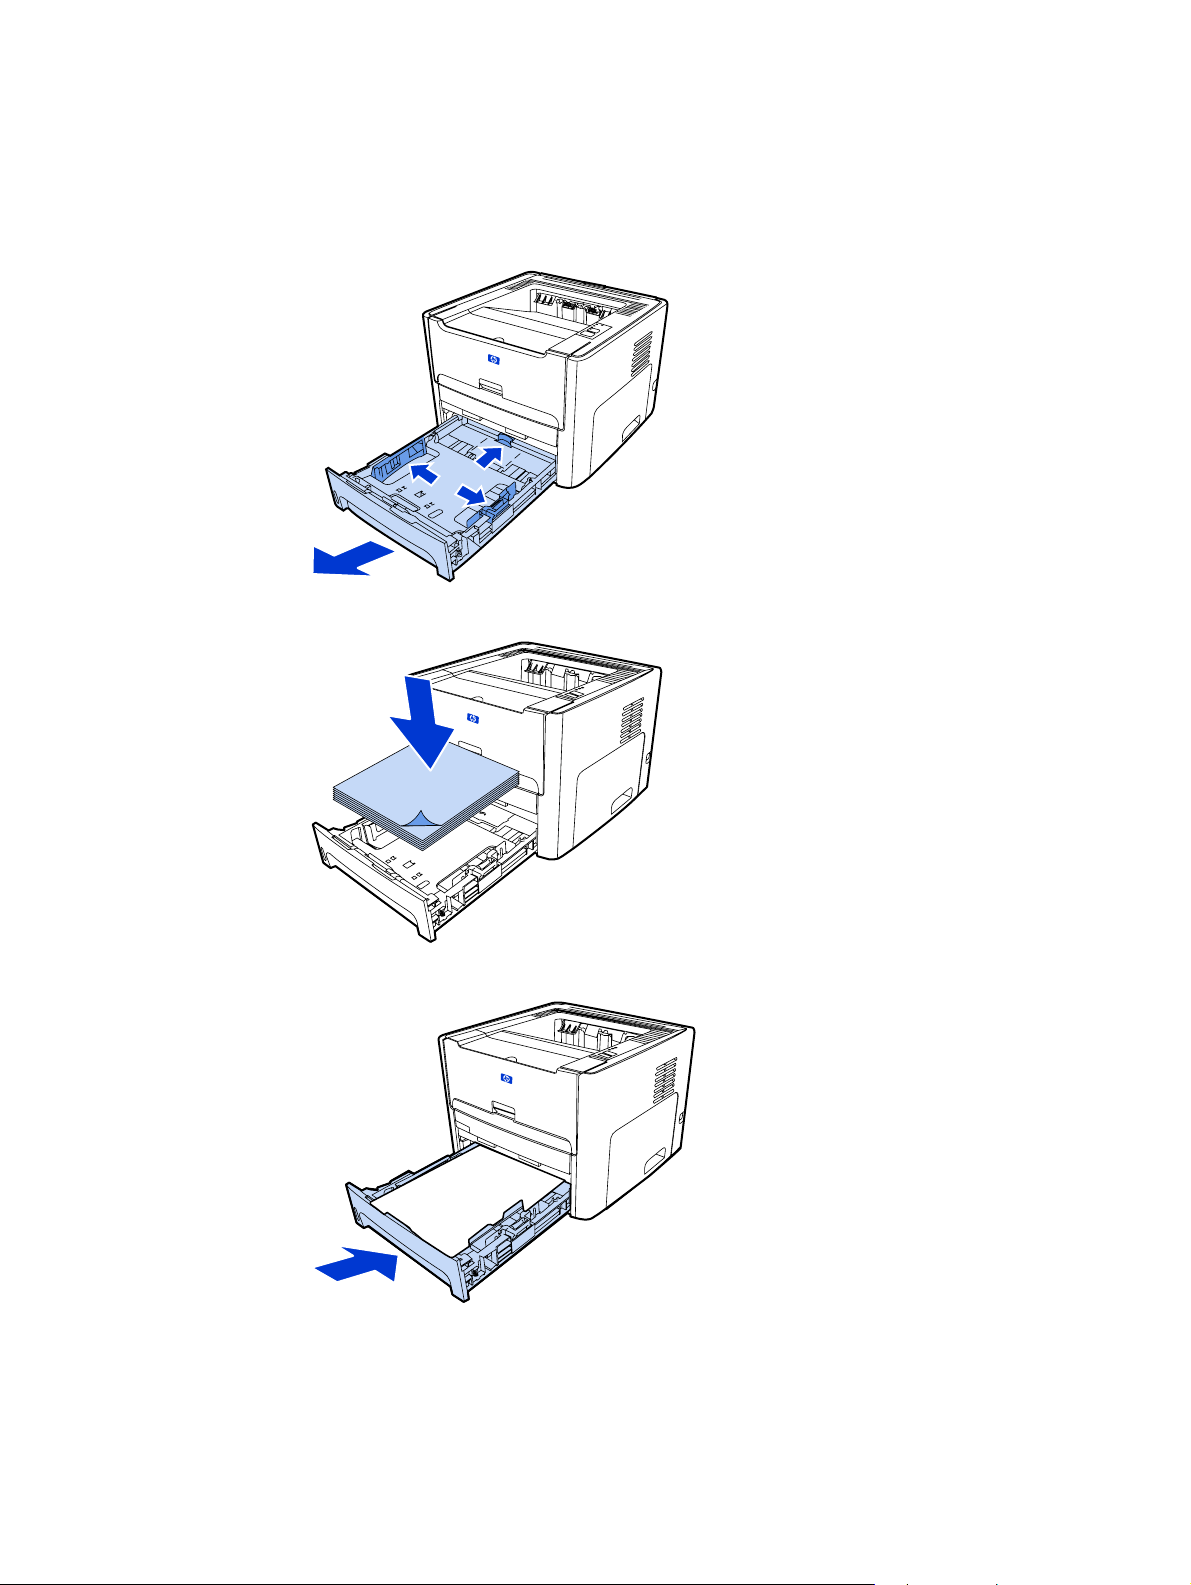
Load Tray 2
1. Open the tray and move the media guides to the correct media size settings.
2. Insert the paper with the top forward and the side to be printed facing down.
3. Close the tray.
12 Chapter 2 Setting up the printer ENWW
Page 19

Select a connection method
Select one of the following methods for connecting the printer:
● Wired network: To connect to a wired network, see
network
-or-
● Wireless network: To connect to a wireless network, see
wireless network
-or-
● USB: To perform a USB direct connect, see
The following sections contain additional information about each of the connection options.
Direct connect using the USB port
Connect the printer to a wired
Connect the printer to a
English
ENWW Select a connection method 13
Page 20
Connect the printer to a wired network
1. Plug the power cord into the printer and then plug the cord into the power outlet.
2. Connect the Ethernet cable between the HP Jetdirect network port on the printer and the
network hub.
3. Turn the printer on.
14 Chapter 2 Setting up the printer ENWW
Page 21

4. Insert the software CD into the computer CD-ROM drive. Follow the on-screen
installation instructions.
English
NOTE
To obtain additional information about the network configuration settings, print a
configuration page. When the printer is in the Ready state, press and hold G
O
for 5 seconds.
ENWW Connect the printer to a wired network 15
Page 22

Connect the printer to a wireless network
This section contains information about connecting the printer to a wireless network. For
more information about wireless networking, see the HP LaserJet 1320nw printer Wireless
User Guide.
NOTE
NOTE
The printer cannot be connected to a wired and wireless network at the same time.
It is highly recommended that you implement a wireless security scheme (either Wired
Equivalent Privacy [WEP] or Wi-Fi protected access [WPA]) prior to setup. In addition, use
an antivirus program to protect against computer viruses, and follow basic security rules.
Other network components, including firewalls, intrusion-detection systems, and segmented
networks, should also be considered as part of the network design.
Select one of the following wireless printer installation methods:
● Windows wireless network infrastructure method. See
procedure for Windows infrastructure network installation (recommended).
● Windows wireless network ad hoc (peer-to-peer) method. See
procedure for Windows ad hoc (peer-to-peer) network installation (for advanced users).
● Macintosh wireless network infrastructure method (for Macintosh users). See
for connecting to a Macintosh wireless network.
Network components and
Network components and
Procedure
Network components and procedure for Windows infrastructure network installation (recommended)
This section contains information about the required networking components and a
procedure for installing to a wireless network using the infrastructure method.
NOTE
HP recommends the infrastructure network mode installation.
Network information
Obtain the following information from the system administrator or the person who installed
the network:
● The network's name (SSID): the SSID identifies a particular wireless network. In order to
operate on a network, any connecting device must know the network name.
● The network's security settings (if used): WEP and the WEP key used, authentication
method (Open, Shared Key, or Preshared Key [PSK]), and Encryption (none, WEP, or
WPA).
● The network's communication mode must be infrastructure network mode.
In infrastructure mode, the printer communicates with network computers through a
wireless access point (WAP) or a base station. The access point acts as a central hub or
gateway connecting wireless and, optionally, wired devices.
16 Chapter 2 Setting up the printer ENWW
Page 23

Network components for a Windows infrastructure installation
You will need the following components and network information to perform an infrastructure
installation:
English
1 Functioning infrastructure wireless network
2 HP LaserJet 1320nw printer Wireless Start Guide (this document)
3 Power cord
4 Ethernet cable (provided with the printer)
5 Installation software CD (provided with the printer)
6 CD containing the HP LaserJet 1320nw printer Wireless User Guide
7 HP LaserJet 1320nw printer
ENWW Connect the printer to a wireless network 17
Page 24

Procedure for a Windows infrastructure network installation
NOTE
If you experience problems during the wireless installation process, see the Problem
solving section of the HP LaserJet 1320nw printer Wireless User Guide.
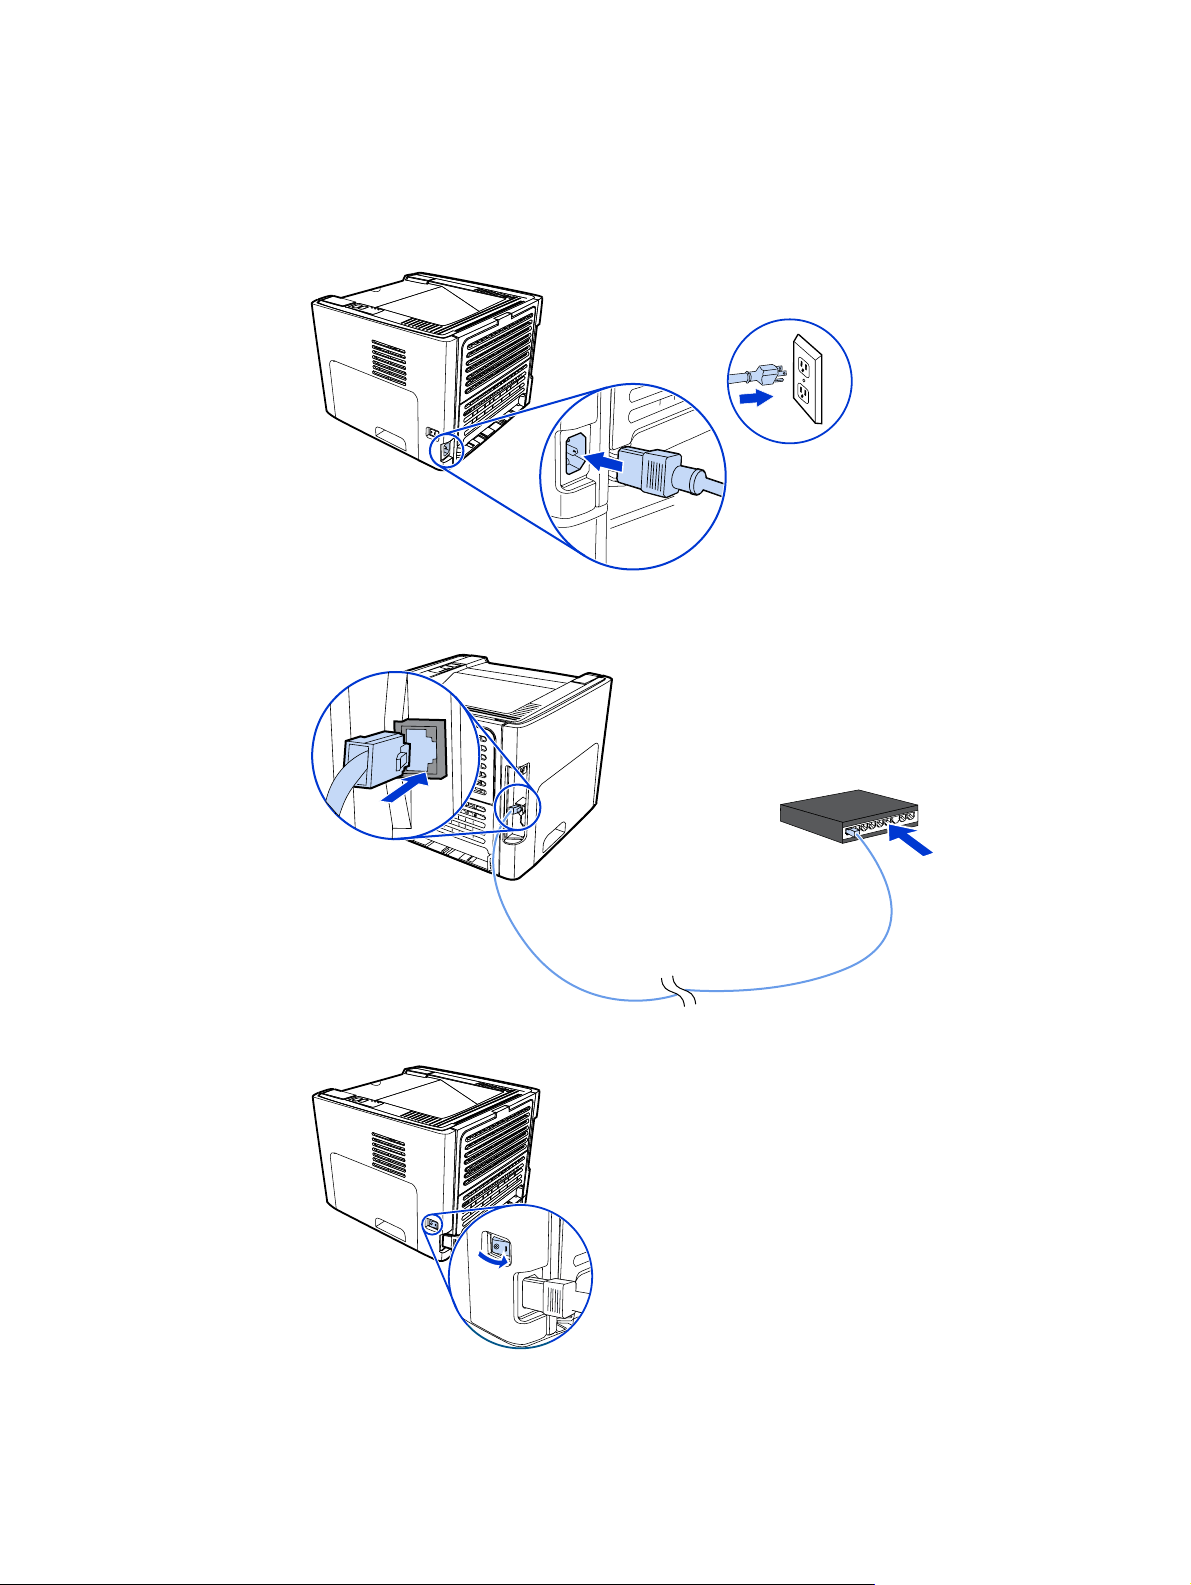
1. Plug the power cord into the printer and then plug the cord into the power outlet.
2. Connect the cable from the HP Jetdirect network port on the printer to the network hub/
router. This cable connection is temporary. At the end of the installation process, you will
disconnect the cable. The printer will then operate wirelessly. (Use the cable that is
packaged with the printer.)
18 Chapter 2 Setting up the printer ENWW
Page 25

3. Turn the printer on.
The green light on the network port illuminates.
4. Insert the CD into a computer that is linked to the network. Follow the on-screen
installation prompts.
English
NOTE
To obtain additional information about the network configuration settings, print a
configuration page. When the printer is in the Ready state, press and hold G
O
for 5 seconds.
Network components and procedure for Windows ad hoc
(peer-to-peer) network installation (for advanced users)
This section contains information about the required networking components and provides a
procedure for installing to a wireless network using the ad hoc method.
Network information
Obtain the following information from the system administrator or the person who installed
the network:
● The network's name (SSID): the SSID identifies a particular wireless network. In order to
operate on a network, any connecting device must know the network name.
● The network's security settings (if used): WEP and the WEP key used, authentication
method (Open, Shared Key, or Preshared Key [PSK]), and Encryption (none, WEP, or
WPA).
● The network's communication mode must be ad hoc network mode.
In ad hoc mode, which is sometimes called peer-to-peer mode, the printer
communicates with the computer directly, rather than through a WAP or base station.
Each device on an ad hoc network must have a wireless network adapter.
ENWW Connect the printer to a wireless network 19
Page 26

Network components for a Windows ad hoc (peer-to-peer) network
installation
You will need the following components and network information to perform an ad hoc
installation:
NOTE
1 Functioning ad hoc wireless network
2 HP LaserJet 1320nw printer Wireless Start Guide (this document)
3 Installation software CD (provided with the printer)
4 CD containing the HP LaserJet 1320nw printer Wireless User Guide
5 Power cord
Procedure for a Windows ad hoc (peer-to-peer) network installation
Please read the entire procedure before starting an ad hoc wireless network installation. For
best results, follow the instructions in the order listed.
HP highly recommends that you have an existing ad hoc network or that you configure one
before starting this installation method.
1. Preparing the printer
a. Close all applications on your computer.
b. Plug the printer into a power outlet and turn it on (power on the printer).
c. Wait a few minutes and then print a network configuration page by pressing the
black button on the network card on the back of the printer.
d. If the IP address on the network configuration page is 0.0.0.0, then wait a few
minutes and repeat Step b. Do this until the IP address is not 0.0.0.0. The printer will
have an automatic IP address (Auto IP) which should look like 169.254.x.y, where x
and y can be any numbers between 0 and 255.
20 Chapter 2 Setting up the printer ENWW
Page 27

e. On the network configuration page, confirm that there is a Network Name (SSID),
such as hpsetup.
2. Preparing your computer
a. Unplug any network cable connected to your computer. This will disable any wired
network. Only the wireless network should be active during the installation. To verify
that your wired network is disabled, click Start, Control Panel, and Network
Connections. (The unplugged cables should be reconnected after the installation is
complete.)
b. In the configuration properties for your computer's wireless network card, verify that
the hpsetup network is available and connect to it. (For example, in Windows XP, to
connect to the hpsetup wireless network, click Start, Control Panel, Network
Connections, and Wireless Network Connection. Then click Properties and
select the Wireless Networks tab. In the Available networks box, select hpsetup
and click Configure. Click OK. The network name, hpsetup, should now be
available in the Preferred networks section. Click Refresh if the hpsetup network
is not listed.) If you are using a wireless card or wireless adapter, use the utility that
came with your wireless card or wireless adapter to add hpsetup to your network
options. The network name, hpsetup, should only be used to configure the printer.
c. Ensure that your computer has an automatic IP address before starting the software
installation. Your computer may take a few moments to acquire an automatic IP
address. (For example, in Windows XP, to check whether your computer has an
automatic IP address, click Start, All programs, Connect To or click Start,
Connect To and Show all connections. Then select Wireless Network
Connection. In the Details section, verify that the IP address is of the form
169.254.x.y, where x and y are any numbers between 0 and 255.) Also, verify that
the peer-to-peer network name is hpsetup. If the computer has not yet acquired a
valid automatic IP address, wait a few minutes. The Details section of the Network
Connections box will change to show the new IP address when it is valid. Now you
are ready to start the software installation.
English
3. Installing the Software
a. Insert the software CD into your computer's CD-ROM drive. Start the software
installation, and follow the on-screen instructions.
b. If one or more printers are found and displayed on the Printers Found page, select
the printer that has the same IP address as the one you are installing, and then click
Next.
c. HP highly recommends that you select Change Settings on the Confirm Settings
page to configure your device’s network to match the settings of the existing ad hoc
network on your computer. If you do not have an existing ad hoc network, then
accept the default settings.
d. Accept the settings on the Confirm Settings page.
e. Continue with the installation until the process is complete.
f. After the software installation is complete and your computer has been rebooted,
reconnect any network cables that you may have unplugged during the installation.
ENWW Connect the printer to a wireless network 21
Page 28

Procedure for connecting to a Macintosh wireless network
NOTE
This installation method is for Macintosh users.
1. Start the Macintosh in OSX 10.2 or higher (not supported in v10.1).
2. Plug the power cord into the printer and then plug the cord into the power outlet.
3. Turn the printer on.
4. Insert the CD into a computer that is linked to the network. Drag-and-drop the HP WPS
Assistant X (ver. 2.1) from the CD to the computer desktop. If the computer is not set up
as wireless, go to Step 5. If the computer is set up as wireless, go to Step 9.
5. Open the System Preferences Network settings panel and create a custom Location
setting. Type a name for the network (for example, MyHomeNetwork).
6. Select Show and then Network Port Configurations. Deselect Internal Modem and
Built-In Ethernet. Click Apply Now.
22 Chapter 2 Setting up the printer ENWW
Page 29

7. Select AirPort from the Show drop-down menu and select the AirPort tab.
8. Select Join a Specific Network and add the wireless network name in the Network
box. Verify that the Allow this computer to create networks and Show AirPort status
in menu bar options are checked. Click Apply Now. The AirPort process launches. (If
the AirPort icon does not become activated, verify that the AirPort is turned on. To turn
on AirPort, select the icon, and then select Turn AirPort On.)
9. Launch the HP WPS Assistant X program from the desktop and follow the on-screen
instructions. Select hp LaserJet 1320 series from the Printer selection list.
English
NOTE
Multiple printers may be listed.
10. Click Configure Print Server to launch the default browser.
11. Click Continue if any error messages are displayed.
12. On the Network Settings page, click the 802.11b/g tab.
13. Click Infrastructure (Using an access point gateway or Base Station …) in the
Communication Mode section.
14. In the Network Name (SSID) section, type the name of the network in the Network
Name box.
15. Click Apply at the bottom of the browser page, and click OK if a dialog message box
appears.
16. A Configuration Result message will appear and the browser will try to access the
hp LaserJet 1320 series again. This will fail because the hp LaserJet 1320 series
WPS has changed to network name your network name and IP address. Close the
browser.
17. Click the Right Arrow button on the HP WPS Assistant X to close the program.
18. Open Print Center and add the printer using the Rendezvous network drop-down
menu. From the list of printers, select the printer and then click Add.
19. Click Configure in Print Center to launch the browser and display the printer’s current
settings.
20. The printer is ready for wireless use.
ENWW Connect the printer to a wireless network 23
Page 30

Direct connect using the USB port
1. Plug the power cord into the printer and then plug the cord into the power outlet.
2. Turn the printer on.
3. Insert the software CD into the computer CD-ROM drive. Follow the on-screen
installation instructions.
24 Chapter 2 Setting up the printer ENWW
Page 31

4. When prompted, connect the USB cable between the printer and the computer.
English
ENWW Direct connect using the USB port 25
Page 32

26 Chapter 2 Setting up the printer ENWW
Page 33

Принтер HP LaserJet 1320nw
Для беспроводной сети
Русский
Руководство по началу работы
Page 34

Авторское право и лицензия
© 2005 Copyright Hewlett-Packard
Development Company, L.P.
Размножение, использование или
перевод без предварительного
письменного разрешения запрещен, за
исключением случаев, разрешенных
законом об авторских правах.
Все гарантии на изделия и услуги
компании HP описываются в разделах о
гарантийных обязательствах, которые
поставляются совместно с изделиями
или услугами. Ни один из пунктов
данного документа не может быть
использован как дополнительное
гарантийное обязательство. HP не несет
ответственности за технические или
редакторские ошибки, а также
пропущенные условия, содержащиеся в
данном документе.
Информация, содержащаяся в
настоящем документе, может быть
изменена без предварительного
уведомления.
Номер детали
Edition 1, 5/2005
: Q5929-90917
Регламентации FCC
Данное устройство проверено и
признано соответствующим
требованиям, предъявляемым к
цифровым устройствам класса B,
согласно Части 15 Правил FCC. Эти
ограничения разработаны с целью
обеспечения защиты от вредного
излучения устройства в жилой зоне.
Данное изделие генерирует, использует
и излучает электромагнитные волны в
радиодиапазоне. Если данное
оборудование не устанавливать и не
использовать в соответствии с
инструкциями, оно может создавать
недопустимые помехи для
беспроводной связи. Однако нет
гарантии, что такие помехи не могут
возникнуть вследствие тех или иных
конкретных условий установки. Если
устройство вызывает помехи теле- и
радиоприема, наличие которых
определяется путем включения и
выключения устройства, пользователь
может попытаться уменьшить влияние
помех, выполнив следующие действия:
Изменить направление или
местоположение приемной антенны.
Увеличить расстояние между
оборудованием и приемником.
Подключить оборудование и приемник к
сетевым розеткам разных цепей питания.
Обратиться к продавцу или опытному
радио/телевизионному технику.
Любые изменения или модификации
устройства принтера, не одобренные
компанией HP, могут привести к
лишению пользователя права на
использование данного оборудования.
Чтобы соответствовать требованиям,
предъявляемым к цифровым
устройствам класса B, согласно Части
15 Правил FCC, необходимо
использовать экранированный
интерфейсный кабель.
Данное устройство соответствует
правилам FCC, части 15. Работа должна
отвечать двум следующим условиям: (1)
данное устройство не должно создавать
помехи, и (2) данное устройство должно
работать в условиях любых помех,
включая те, которые могут вызывать
сбои в работе.
Информация о товарных знаках
Microsoft®, Windows®, и Windows NT®
являются зарегистрированными в США
товарными знаками Microsoft Corporation.
Все остальные упомянутые здесь
продукты могут являться товарными
знаками соответствующих компаний.
Page 35

Содержание
1 Введение
Обзор устройства ...................................................................................................................2
Подготовка места установки .................................................................................................3
Содержимое упаковки ............................................................................................................4
Определение узлов устройства ............................................................................................ 5
2 Установка принтера
Снятие ленты ..........................................................................................................................8
Подготовка картриджа ...........................................................................................................9
Загрузка лотка 2 ...................................................................................................................12
Выбор способа подключения ..............................................................................................13
Подключение принтера к проводной сети ..........................................................................14
Подключение принтера к беспроводной сети ....................................................................16
Сетевые компоненты и процедура установки в сети инфраструктуры
Windows (рекомендуется) ..........................................................................................16
Сетевые компоненты и процедура для установки в сети "Ad Hoc"
(одноранговая связь) Windows (для опытных пользователей) ...............................20
Процедура подключения к беспроводной сети Macintosh ..........................................24
Прямое подключение с помощью порта USB ....................................................................26
Русский
RUWW Содержание iii
Page 36

iv RUWW
Page 37

Введение
В данной главе приведены следующие разделы:
●
Обзор устройства
●
Подготовка места установки
●
Содержимое упаковки
●
Определение узлов устройства
Русский
RUWW 1
Page 38

Обзор устройства
Примечание
Принтер HP LaserJet 1320nw является частью семейства принтеров серии HP LaserJet
1160 и HP LaserJet 1320. Для получения информации об использовании принтеров
этой серии см. соответствующие руководства пользователей для HP LaserJet 1160 и
HP LaserJet 1320, расположенные на компакт-диске.
Принтер HP LaserJet 1320nw обладает всеми функциями принтера HP LaserJet 1320.
Кроме того, принтер HP LaserJet 1320nw имеет встроенную возможность
беспроводного взаимодействия 802.11b/g и внутренний сетевой порт HP Jetdirect
вместо параллельного порта IEEE-1284B.
2 Глава 1 Введение RUWW
Page 39

Подготовка места установки
Принтер необходимо устанавливать на твердую ровную поверхность в хорошо
вентилируемом помещении. Для циркуляции воздуха необходимо оставить
достаточное пространство вокруг принтера.
Не устанавливайте принтер в прямых солнечных лучах или в помещении с резкими
перепадами температуры и влажности. Рекомендуемый температурный диапазон: от
10°C до 32,5°C.
Русский
RUWW Подготовка места установки 3
Page 40

Содержимое упаковки
В коробке с принтером находится описанное ниже оборудование, программное
обеспечение и документация.
1 Принтер HP LaserJet 1320nw.
2 Документация (данное руководство).
3 Компакт-диск, содержащий программное обеспечение для установки (прилагается к
принтеру).
4 Компакт-диск, содержащий Руководство пользователя по беспроводному принтеру
HP LaserJet 1320nw (прилагается к принтеру).
5 Шнур питания.
6 Сетевой кабель.
4 Глава 1 Введение RUWW
Page 41

Определение узлов устройства
1 Индикатор беспроводного соединения.
2 Индикатор тонера.
3 Индикатор внимания.
4 Индикатор готовности.
ПУСКА
5 Индикатор и клавиша
ОТМЕНЫ
6 Клавиша
7 Выходной приемник.
8 Поддон для носителя.
9 Дверца доступа к картриджу.
10 Гнездо первоочередной подачи одного листа (лоток 1).
11 Основной подающий лоток (лоток 2).
12 Выключатель питания.
.
.
Русский
1 Дверца для прямого вывода носителя.
2 Разъем питания.
3 Переключатель формата носителя при автоматической двусторонней печати.
4 Порт USB.
5 Клавиша сброса сети.
6 Внутренний сетевой порт HP Jetdirect.
7 Задняя дверца вывода при автоматической двусторонней печати.
8 Рычаги для устранения замятия.
RUWW Определение узлов устройства 5
Page 42

6 Глава 1 Введение RUWW
Page 43

Установка принтера
В данной главе приведены следующие разделы:
●
Снятие ленты
●
Подготовка картриджа
●
Загрузка лотка 2
●
Выбор способа подключения
●
Подключение принтера к проводной сети
●
Подключение принтера к беспроводной сети
●
Прямое подключение с помощью порта USB
Русский
RUWW 7
Page 44

Снятие ленты
1. Снимите оранжевую ленту спереди принтера.
8 Глава 2 Установка принтера RUWW
Page 45

Подготовка картриджа
1. Откройте дверцу доступа к картриджу.
2. Переверните лист бумаги назад.
3. Извлеките пенопластовый упаковочный материал.
Русский
4. Извлеките картридж.
5. Снимите с картриджа оранжевый фиксатор.
RUWW Подготовка картриджа 9
Page 46

6. Возьмитесь за обе стороны картриджа и слегка встряхните его вперед и назад
пять раз. При этом тонер распределится внутри картриджа.
5x
7. Извлеките герметизирующую ленту из картриджа. Для этого сломайте петлю на
его конце и полностью вытяните ленту.
8. Извлеките бумагу и оранжевую роликовую распорку. Они должны быть соединены.
10 Глава 2 Установка принтера RUWW
Page 47

9. Вставьте картридж.
Примечание
Во избежание повреждения картриджа старайтесь поменьше держать его на свету.
10. Закройте дверцу доступа к картриджу.
Русский
RUWW Подготовка картриджа 11
Page 48

Загрузка лотка 2
1. Откройте лоток и передвиньте направляющие в позиции нужного формата носителя.
2. Положите стопку бумаги верхним краем вперед и стороной для печати вверх.
3. Закройте лоток.
12 Глава 2 Установка принтера RUWW
Page 49

Выбор способа подключения
Выберите один из следующих способов подключения принтера:
● Проводная сеть. Для подключения к проводной сети см.
проводной сети
-или-
● Беспроводная сеть. Для подключения к беспроводной сети см.
принтера к беспроводной сети
-или-
● USB. Для подключения с помощью USB см.
порта USB
В следующих разделах приводится дополнительная информация о каждом из этих
способов подключения.
Прямое подключение с помощью
Подключение принтера к
Подключение
Русский
RUWW Выбор способа подключения 13
Page 50

Подключение принтера к проводной сети
1. Подключите шнур питания к принтеру и к розетке питания.
2. Подключите кабель Ethernet к сетевому порту HP Jetdirect принтера и к сетевому
концентратору.
3. Включите питание принтера.
14 Глава 2 Установка принтера RUWW
Page 51

4. Вставьте компакт-диск с программным обеспечением в устройство чтения компакт-
дисков компьютера. Следуйте инструкциям по установке, отображаемым на экране.
Примечание
Для получения дополнительной информации о настройке сетевых параметров
распечатайте страницу конфигурации. После перехода принтера в состояние
готовности нажмите клавишу
ПУСКА
и удерживайте ее нажатой в течение 5 секунд.
Русский
RUWW Подключение принтера к проводной сети 15
Page 52

Подключение принтера к беспроводной сети
В этом разделе приведена информация о подключении принтера к беспроводной сети.
Для получения дополнительной информации о беспроводном взаимодействии см.
Руководство пользователя по беспроводному принтеру HP LaserJet 1320nw.
Примечание
Примечание
Нельзя подключать принтер одновременно к проводной и беспроводной сети.
Настоятельно рекомендуется для установки использовать какую-либо схему защиты
беспроводного соединения (либо Wired Equivalent Privacy [WEP], либо защищенный
доступ Wi-Fi [WPA]). Кроме того, для защиты от вирусов используйте антивирусную
программу и следуйте основным правилам безопасности. Необходимо также
рассмотреть возможность использования в сетевой среде таких сетевых компонентов,
как брандмауэры, системы обнаружения нарушителей и сегментирования сетей.
Выберите один из предлагаемых ниже способов установки беспроводного принтера.
● Способ инфраструктуры беспроводной сети Windows. См. раздел
компоненты и процедура установки в сети инфраструктуры Windows (рекомендуется).
● Способ "Ad Hoc" (одноранговая связь) беспроводной сети Windows. См. раздел
Сетевые компоненты и процедура для установки в сети "Ad Hoc" (одноранговая
связь) Windows (для опытных пользователей).
● Способ инфраструктуры беспроводной сети Macintosh (для пользователей
Macintosh). См. раздел
Процедура подключения к беспроводной сети Macintosh.
Сетевые
Сетевые компоненты и процедура установки в сети инфраструктуры Windows (рекомендуется)
В данном разделе содержится информация о требуемых сетевых компонентах для
установки в беспроводной сети с помощью способа инфраструктуры.
Примечание
16 Глава 2 Установка принтера RUWW
Специалисты HP рекомендуют при установке использовать сетевой режим
инфраструктуры.
Page 53

Информация о сети
Следующую информацию необходимо получить у администратора системы или у
лица, выполнявшего установку сети:
● Имя сети (SSID). Имя SSID идентифицирует конкретную беспроводную сеть. Для
функционирования в сети каждое подключаемое устройство должно "знать" имя
сети.
● Параметры защиты сети (если используются). Протокол WEP и ключи WEP,
различные способы аутентификации (открытая система, общий ключ или общий
ключ по умолчанию [PSK]) и шифрование (нет, WEP или WPA).
● В качестве сетевого режима взаимодействия необходимо установить режим
сетевой инфраструктуры.
В режиме инфраструктуры принтер взаимодействует с сетевыми компьютерами с
помощью беспроводной точки доступа (WAP) или базовой станции. Точка доступа
функционирует как центральный концентратор или шлюз для соединения
беспроводных и, необязательно, проводных устройств.
Русский
RUWW Подключение принтера к беспроводной сети 17
Page 54

Сетевые компоненты для установки инфраструктуры Windows
Для выполнения установки инфраструктуры потребуются следующие сетевые
компоненты и информация о сети:
1 Функционирующая беспроводная сеть инфраструктуры.
2 Руководство по началу работы с беспроводным принтером HP LaserJet 1320nw (данный
документ).
3 Шнур питания.
4 Кабель Ethernet (прилагается к принтеру).
5 Компакт-диск, содержащий программное обеспечение для установки (прилагается к
принтеру).
6 Компакт-диск, содержащий Руководство пользователя по беспроводному принтеру
HP LaserJet 1320nw.
7 Принтер HP LaserJet 1320nw.
18 Глава 2 Установка принтера RUWW
Page 55

Процедура установки в сети инфраструктуры Windows
Примечание
При возникновении проблем с установкой принтера в беспроводной сети см. раздел
Решение проблем в документе Руководство пользователя беспроводного принтера
HP LaserJet 1320nw.
1. Подключите шнур питания к принтеру и к розетке питания.
Русский
2. Подключите кабель к сетевому порту HP Jetdirect принтера и к сетевому
концентратору/маршрутизатору. Это кабельное соединение является временным.
По окончании процесса установки этот кабель будет отсоединен. Принтер затем
будет взаимодействовать с сетью по беспроводному соединению. Используйте
кабель, который прилагается к принтеру.
RUWW Подключение принтера к беспроводной сети 19
Page 56

3. Включите питание принтера.
Должен загореться зеленый индикатор сетевого порта.
4. Вставьте компакт-диск в компьютер, подключенный к сети. Следуйте инструкциям
по установке, отображаемым на экране.
Примечание
Для получения дополнительной информации о настройке сетевых параметров
распечатайте страницу конфигурации. После перехода принтера в состояние
готовности нажмите клавишу
ПУСКА
и удерживайте ее нажатой в течение 5 секунд.
Сетевые компоненты и процедура для установки в сети
"Ad Hoc" (одноранговая связь) Windows (для опытных
пользователей)
В данном разделе содержится информация о требуемых сетевых компонентах и
процедуре для установки в беспроводной сети с помощью способа "Ad Hoc".
20 Глава 2 Установка принтера RUWW
Page 57

Информация о сети
Следующую информацию необходимо получить у администратора системы или у
лица, выполнявшего установку сети:
● Имя сети (SSID). Имя SSID идентифицирует конкретную беспроводную сеть. Для
функционирования в сети каждое подключаемое устройство должно "знать" имя
сети.
● Параметры защиты сети (если используются). Протокол WEP и ключи WEP,
различные способы аутентификации (открытая система, общий ключ или общий
ключ по умолчанию [PSK]) и шифрование (нет, WEP или WPA).
● В качестве сетевого режима взаимодействия необходимо установить сетевой
режим "Ad Hoc".
В режиме "Ad-hoc", который иногда называется одноранговым режимом, принтер
взаимодействует с компьютером напрямую, минуя WAP или базовую станцию. В
каждом устройстве в сети "Ad-hoc" должен быть установлен беспроводной сетевой
адаптер.
Сетевые компоненты для установки в сети "Ad Hoc" (одноранговая
связь) Windows
Для выполнения установки "Ad Hoc" потребуются следующие сетевые компоненты и
информация о сети:
Русский
1 Функционирующая беспроводная сеть "Ad Hoc".
2 Руководство по началу работы с беспроводным принтером HP LaserJet 1320nw (данный
документ).
3 Компакт-диск, содержащий программное обеспечение для установки (прилагается к
принтеру).
4 Компакт-диск, содержащий Руководство пользователя по беспроводному принтеру
HP LaserJet 1320nw.
5 Шнур питания.
RUWW Подключение принтера к беспроводной сети 21
Page 58

Процедура установки в сети "Ad Hoc" (одноранговая связь) Windows
Перед началом установки в беспроводной сети "Ad Hoc" прочитайте данную
процедуру полностью. Для достижения наилучших результатов следуйте инструкциям
в указанном порядке.
Примечание
Специалисты HP настоятельно рекомендуют, чтобы установка выполнялась в
существующей сети "Ad Hoc" или чтобы перед началом процедуры установки была
выполнена настройка такой сети.
1. Подготовка принтера
a. Закройте все приложения на своем компьютере.
b. Подключите принтер к розетке питания и включите его (питание принтера).
c. Подождите несколько минут, а затем распечатайте страницу конфигурации
сети, нажав черную кнопку на сетевой плате сзади принтера.
d. Если на странице конфигурации сети адрес IP равен 0.0.0.0, подождите еще
несколько минут и повторите действие Делайте это до тех пор, пока адрес IP
не будет равным 0.0.0.0. Принтеру должен быть автоматически присвоен
адрес IP (Авто IP), который должен выглядеть так: 169.254.x.y, где x и y могут
быть любыми числами от 0 до 255.
e. На странице конфигурации сети также должно присутствовать имя сети (SSID),
например, hpsetup.
2. Подготовка компьютера
a. Отсоедините сетевой кабель от компьютера. При этом компьютер будет
отключен от проводной сети. Во время установки должна быть активной только
беспроводная сеть. Для проверки отключения проводной сети щелкните на
Пуск, Панель управления и Сетевые подключения. После завершения
установки отсоединенные кабели необходимо снова подключить.
b.
b. В свойствах беспроводной сетевой платы компьютера проверьте, чтобы сеть
hpsetup была доступной и с ней установлено соединение. Например, в
Windows XP для установки соединения с беспроводной сетью hpsetup
щелкните на Пуск, Панель управления, Сетевые подключения и
Беспроводное сетевое соединение. Затем щелкните на Свойства и
выберите вкладку Беспроводные сети. В поле Доступные сети выберите
hpsetup и щелкните на Настройка. Нажмите на кнопку OK. Теперь имя сети
hpsetup должно стать доступным в разделе Сети предпочтения. Щелкните на
Обновить, если имени сети hpsetup нет в списке. При использовании
беспроводной платы или беспроводного адаптера для добавления сети
hpsetup в список воспользуйтесь утилитой, прилагаемой к беспроводной плате
или адаптеру. Имя сети hpsetup необходимо использовать только для
настройки принтера.
22 Глава 2 Установка принтера RUWW
Page 59

c. Перед запуском программы установки проверьте, чтобы компьютеру
автоматически был назначен адрес IP. Для автоматического назначения
адреса IP компьютеру может потребоваться несколько секунд. Например, в
Windows XP для проверки автоматического назначения адреса IP компьютеру
щелкните на Пуск, Программы, Подключение или щелкните на Пуск,
Подключение и Отобразить все подключения. Затем выберите
Беспроводное сетевое соединение. В разделе Сведения проверьте, чтобы
адрес IP присутствовал в форме 169.254.x.y, где x и y являются любыми
числами от 0 до 255. Кроме того, проверьте, чтобы имя одноранговой сети
было hpsetup. Если компьютер автоматически не получил адрес IP, подождите
несколько минут. Новый назначенный адрес IP должен появиться в разделе
Сведения окна Сетевые подключения. Теперь можно запускать программу
установки.
3. Установка программного обеспечения
a. Вставьте компакт-диск с программным обеспечением в устройство чтения
компакт-дисков компьютера. Запустите программу установки и следуйте
инструкциям на экране.
b. Если на странице Обнаруженные принтеры будет отображено несколько
принтеров, выберите принтер с адресом IP, который был только что назначен,
а затем щелкните на Далее.
c. Специалисты HP настоятельно рекомендуют для настройки параметров
сетевого устройства, которые соответствовали бы параметрам существующей
беспроводной сети "Ad Hoc" компьютера, использовать Изменить параметры
на странице Подтверждение параметров. Если настроенной сети "Ad Hoc" не
имеется, примите параметры по умолчанию.
Русский
d. Примите параметры на странице Подтверждение параметров.
e. Продолжите установку до завершения процесса.
f. После установки программного обеспечения и перезагрузки компьютера снова
подсоедините сетевой кабель, который был отсоединен во время процедуры
установки.
RUWW Подключение принтера к беспроводной сети 23
Page 60

Процедура подключения к беспроводной сети Macintosh
Примечание
Данный способ установки предназначен для пользователей Macintosh.
1. Запустите Macintosh OSX 10.2 или выше (версия 10.1 не поддерживается).
2. Подключите шнур питания к принтеру и к розетке питания.
3. Включите питание принтера.
4. Вставьте компакт-диск в компьютер, подключенный к сети. Переместите значок HP
WPS Assistant X (версия 2.1) с компакт-диска на рабочий стол компьютера. Если
данный компьютер не является беспроводным компьютером, перейдите к пункту
5. Если компьютер является беспроводным, перейдите к пункту 9.
5. Откройте панель параметров "System Preferences Network" (Сетевые параметры
системы) и создайте настраиваемый параметр Location (Местоположение).
Введите имя сети (например, MyHomeNetwork).
24 Глава 2 Установка принтера RUWW
Page 61

6. Выберите Show (Показать), а затем Network Port Configurations (Настройки
сетевых портов). Отмените выбор Internal Modem (Внутренний модем) и Built-In
Ethernet (Встроенный Ethernet). Нажмите на Apply Now (Применить сейчас).
7. Выберите AirPort (Протокол AirPort) из меню Show (Показать) и выберите вкладку
AirPort.
8. Выберите Join a Specific Network (Подключиться к конкретной сети) и добавьте
имя беспроводной сети в поле Network (Сеть). Проверьте, чтобы были отмечены
флажки Allow this computer to create networks (Разрешить данному компьютеру
создавать сети) и Show AirPort status in menu bar (Показывать состояние AirPort
в строке меню). Нажмите на Apply Now (Применить сейчас). Будет выполнена
загрузка процесса AirPort. Если значок AirPort не станет активным, проверьте
включение AirPort. Для включения AirPort выберите этот значок, а затем
выберите Turn AirPort On (Включить AirPort).
9. С рабочего стола запустите программу "HP WPS Assistant X" и следуйте
инструкциям на экране. Выберите HP LaserJet 1320 series из списка Printer
selection list (Список выбора принтеров).
Русский
Примечание
В списке может быть несколько принтеров.
10. Для запуска веб-браузера по умолчанию выберите Configure Print Server
(Настройка сервера печати).
11. При отображении каких-либо сообщений об ошибках выберите Continue
(Продолжить).
12. На странице Network Settings (Параметры сети) выберите вкладку 802.11b/g.
13. В разделе Communication Mode (Режим взаимодействия) выберите Infrastructure
(Using an access point gateway or Base Station …) (Инфраструктура (с помощью
точки доступа или базовой станции)).
14. В разделе Network Name (SSID) (Имя сети) в поле Network Name (Имя сети)
введите имя сети.
15. Щелкните на Apply (Применить) внизу страницы, а затем, если появится
диалоговое окно, щелкните на OK.
16. Появится сообщение Configuration Result (Результат настройки) и веб-браузер
снова попытается обратиться к принтеру HP LaserJet 1320 series. При этом
соединение не будет установлено, так как точка доступа WPS принтера
HP LaserJet 1320 series была настроена на установленное пользователем имя
сети и адрес IP. Закройте веб-браузер.
17. Для закрытия программы "HP WPS Assistant X" щелкните на кнопке со стрелкой
вправо.
18. Откройте Print Center (Центр печати) и добавьте принтер с помощью сетевого
меню Rendezvous. В списке принтеров выберите принтер и щелкните на Add
(Добавить).
19. Для загрузки веб-браузера и просмотра текущих параметров принтера в
программе Print Center (Центр печати) выберите Configure (Настройка).
20. Принтер готов к использованию в беспроводной сети.
RUWW Подключение принтера к беспроводной сети 25
Page 62

Прямое подключение с помощью порта USB
1. Подключите шнур питания к принтеру и к розетке питания.
2. Включите питание принтера.
3. Вставьте компакт-диск с программным обеспечением в устройство чтения компакт-
дисков компьютера. Следуйте инструкциям по установке, отображаемым на экране.
26 Глава 2 Установка принтера RUWW
Page 63

4. При соответствующем запросе подключите кабель USB к принтеру и компьютеру.
Русский
RUWW Прямое подключение с помощью порта USB 27
Page 64

28 Глава 2 Установка принтера RUWW
Page 65

Page 66

© 2005 Hewlett-Packard Development Company, L.P.
*Q5929-90917*
*Q5929-90917*
www.hp.com
Q5929-90917
 Loading...