

Page 1

getting started guide
petunjuk untuk
memulai penggunaan
hp LaserJet 1220
print copy scan
••
Page 2

Copyright Information
© Copyright Hewlett-Packard Company 2002
All Rights Reserved. Reproduction, adaptation, or translation without prior
written permission is prohibited, except as allowed under the copyright
laws.
Warranty
The information contained in this document is subject to change without
notice.
Hewlett-Packard makes no warranty of any kind with respect to this
information.
Part number: C7045-90922
First Edition: March 2002
FCC Regulations
This equipment has been tested and found to comply with the limits for a
Class B digital device, pursuant to Part 15 of the FCC rules. These limits
are designed to provide reasonable protection against harmful
interference in a residential installation. This equipment generates, uses,
and can radiate radio frequency energy. If this equipment is not installed
and used in accordance with the instructions, it may cause harmful
interference to radio communications. However, there is no guarant ee that
interference will not occur in a particular installation. If this equipment
does cause harmful interference to radio or television reception, which can
be determined by turning the equipment off and on, the user is
encouraged to try to correct the interference by one or more of the
following measures:
Reorient or relocate the receiving antenna.
Increase separation between equipment and receiver.
Connect equipment to an outlet on a circuit different from that to which the
receiver is located.
Consult your dealer or an experienced radio/TV technician.
Any changes or modifications to the printer that are not expressly
approved by HP could void the user’s authority to operate this equipment.
Use of a shielded interface cable is required to comply with the Class B
limits of Part 15 of FCC rules.
For more regulatory information, see the HP LaserJet 1220 electronic
user guide.
HEWLETT-PACKARD SPECI FI C ALLY DISCLAIMS THE IMPLI ED
WARRANTY OF MERCHANTABILITY AND FITNESS FOR A
PARTICULAR PURPOSE.
Hewlett-Packard shall not be liable for any direct, indirect, incidental,
consequential, or other damage alleged in connection with the furnishing
or use of this information.
Trademark Credits
Microsoft
®
, Windows®, and Windows NT® are U.S. registered
trademarks of Microsoft Corporation. All other products mentioned
herein may be trademarks of their respective companies.
Page 3
Preparation
1
2
3
4
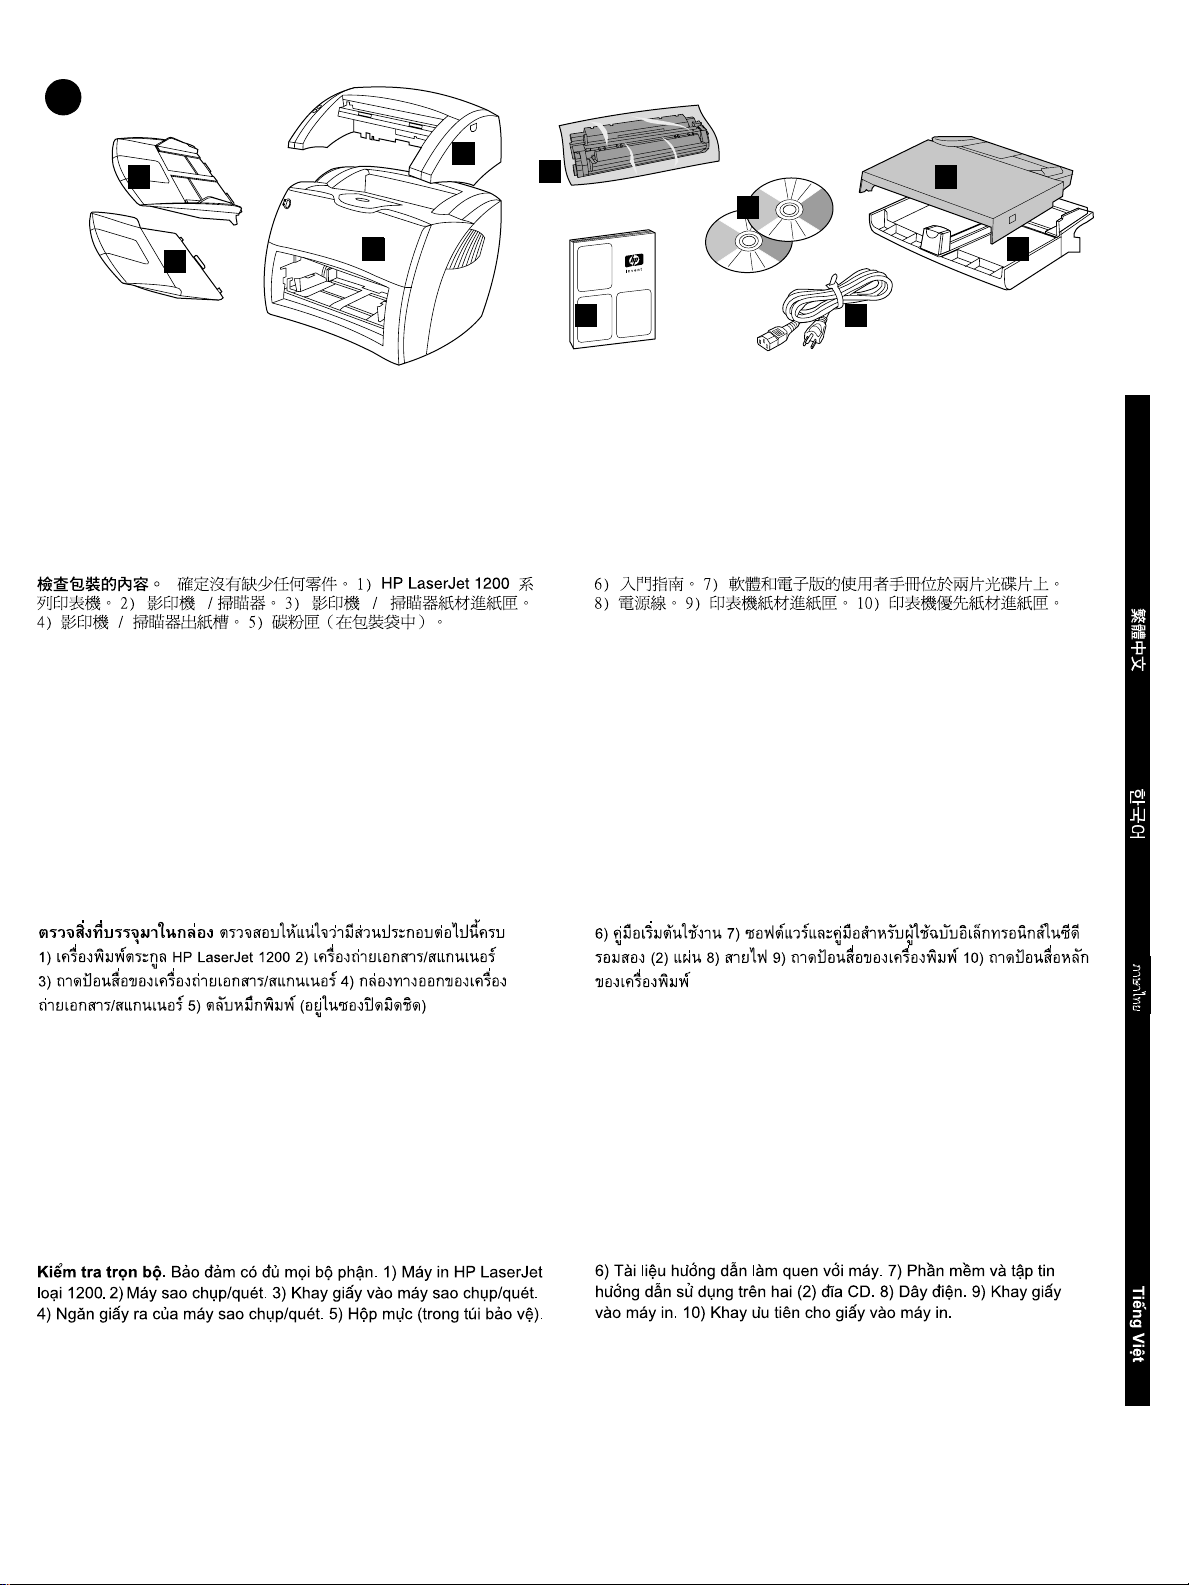
Review package contents. Make sure all parts are included.
1) HP LaserJet 1200 series printer. 2) Copier/scanner. 3) Copier/scanner
media input tray. 4) Copier/scanner output bin. 5) Toner cartridge (in
protective bag).
1
5
7
6
6) Getting Started Guide. 7) Software and electronic user guide on two (2)
CD-ROMs. 8) Power cord. 9)Printer media input tray. 10) Printer priority
media input tray.
8
10
9
English
포장
포장 내용물
내용물 확인
포장포장
1200 시리즈 프린터 . 2) 복사기 / 스캐너 . 3) 복사기 / 스캐너 입력 트레이 .
4) 복사기 / 스캐너 출력함 . 5) 토너 카트리지 ( 보호 백에 들어 있음 ).
Periksa isi kemasan. Pastikan semua bagian sudah lengkap.
1) Printer seri HP LaserJet 1200. 2) Perangkat penyalin (copier)/
perangkat penelusur (scanner). 3) Baki masukan untuk perangkat
penyalin/ penelusur. 4) Keranjang keluaran untuk perangkat
penyalin/penelusur. 5) Kar tr i d toner (dalam kantung pelindung).
확인 . 부품이 모두 들어 있는지 확인합니다 . 1) HP LaserJet
내용물내용물
확인확인
6) 입문 설명서 . 7) 소프트웨어 및 온라인 사용 설명서 CD-ROM 두 장 .
8) 전원 코드 . 9) 프린터 용지함 . 10) 프린터 우선 용지함 .
6) Pedoman untuk Memulai Penggunaan. 7) Perangkat lunak dan
petunjuk pemakaian elektronik (berbahasa Inggris) dalam dua (2)
CD-ROM. 8) Kabel daya. 9) Baki masukan untuk printer. 10) Baki
masukan prioritas utama untuk printer.
Bahasa Indonesia
Page 4
2
416 mm (16.4 in.)
402 mm (15.8 in.)
3
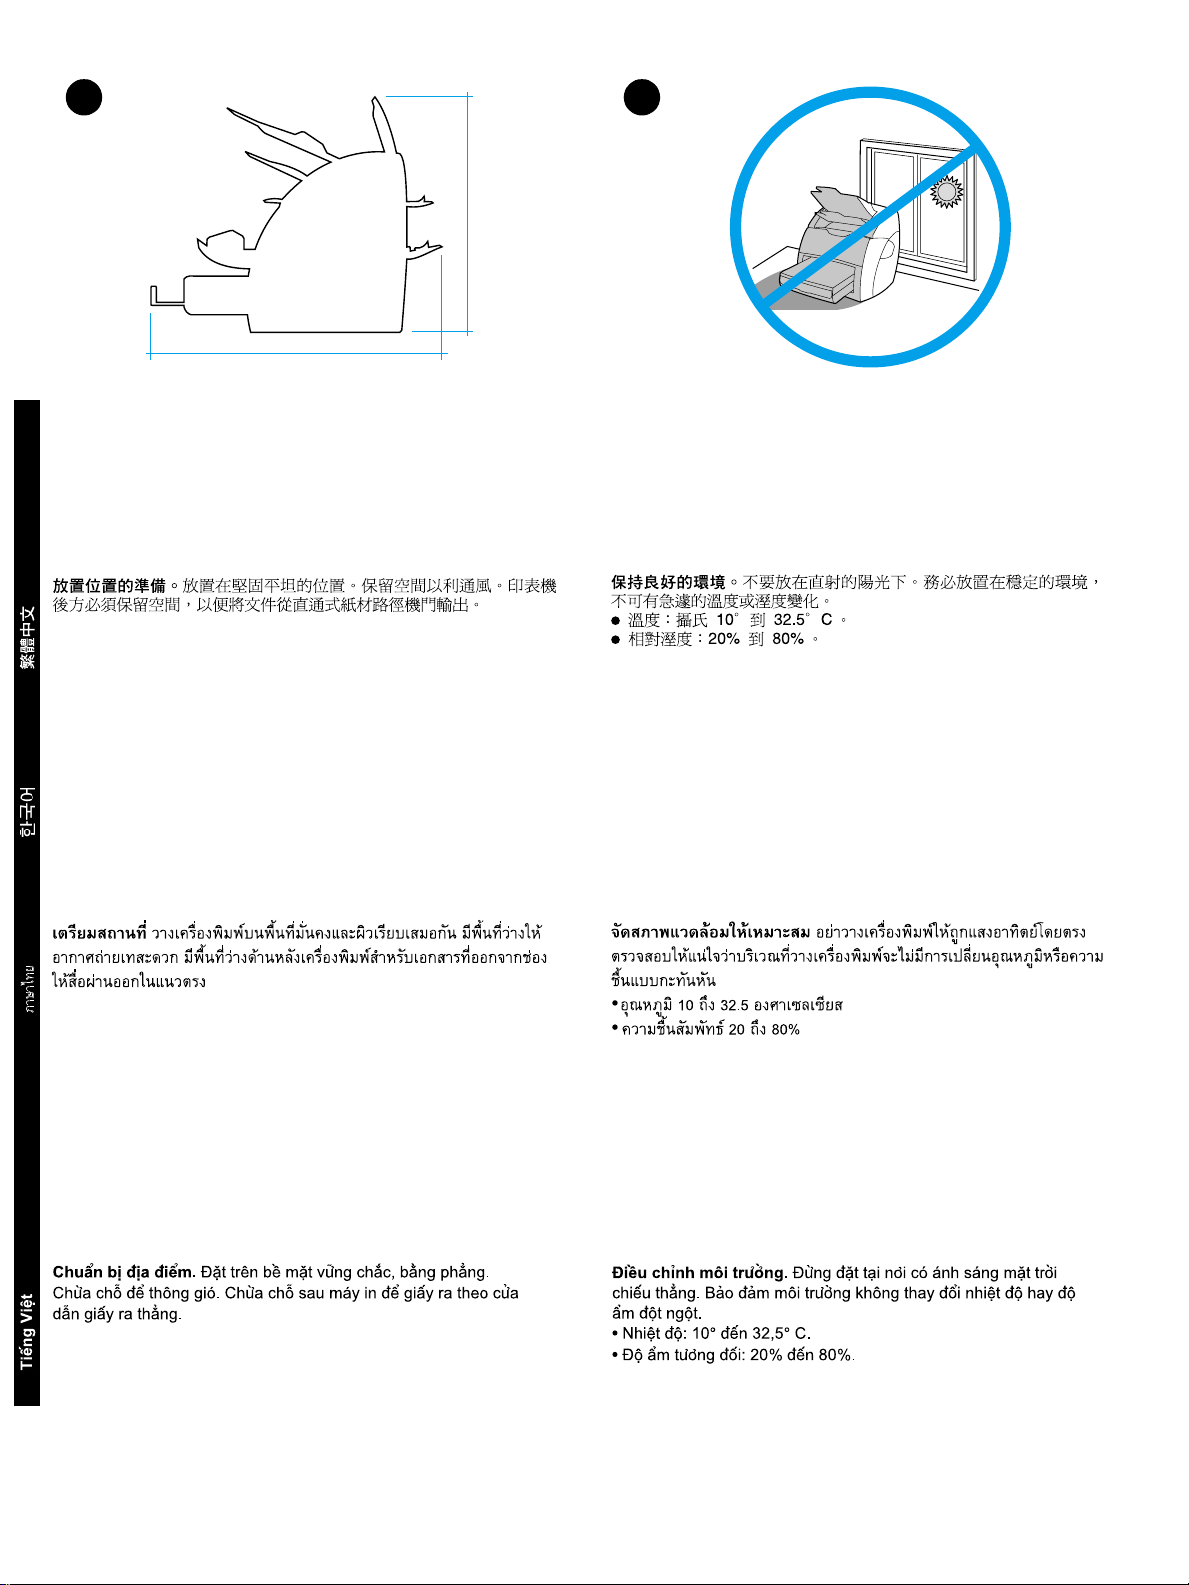
Prepare the location. Place on a sturdy, level surface. Allow space for
ventilation. Allow space behind the printer for output from the
straight-through media doors.
English
설치할
설치할 장소를
장소를 준비합니다
설치할설치할
환기가 잘 될 수 있도록 합니다 . 고속 출력 배출구로부터 용지가 출력될 수
있도록 프린터 뒤쪽 공간을 비워 둡니다 .
준비합니다 . 견고하고 평평한 장소에 프린터를 놓습니다 .
장소를장소를
준비합니다준비합니다
Regulate the environment. Do not place in direct sunlight. Ensure the
environment is free from abrupt temperature or humidity changes.
• Temperature—10° to 32.5 ° C (50° to 91° F).
• Relative humidity—20% to 80%.
배치
배치 환경
환경 선택
배치배치
격한 변화가 없는 환경이어야 합니다 .
• 온도 —10 ~ 32.5° C.
• 상대 습도 —20 ~ 80%
선택 . 직사광선에 노출되지 않도록 합니다 . 습도 또는 온도의 급
환경환경
선택선택
Siapkan lokasi penempatan. Tempatkan printer pada permukaan yang
kuat dan datar. Sediakan cukup ruang untuk ventilasi. Sediakan juga
cukup ruang di belakang printer untuk menampung hasil cetak dari pintu
saluran-langsung keluaran.
Bahasa Indonesia
Atur keadaan ruangan. Jangan menempatkan perangkat sehingga
terkena sinar matahari secara langsung. Pastikan bahwa tidak ada
perubahan mendadak dalam suhu atau kelembapan ruangan.
• Suhu—10° sampai 32.5° C.
• Kelembapan relatif—20% sampai 80%.
Page 5

Assembly
1 2
1
2
Open the toner door. Pull the sides of the door forward until the door
locks in its open position. Leave the door open until step 10.
토너
토너 덮개
덮개 열기
토너토너
당깁니다 . 10 단계까지 덮개를 연채로 둡니다 .
열기 . 덮개가 열린 위치에 고정될 때까지 덮개 양쪽을 앞쪽으로
덮개덮개
열기열기
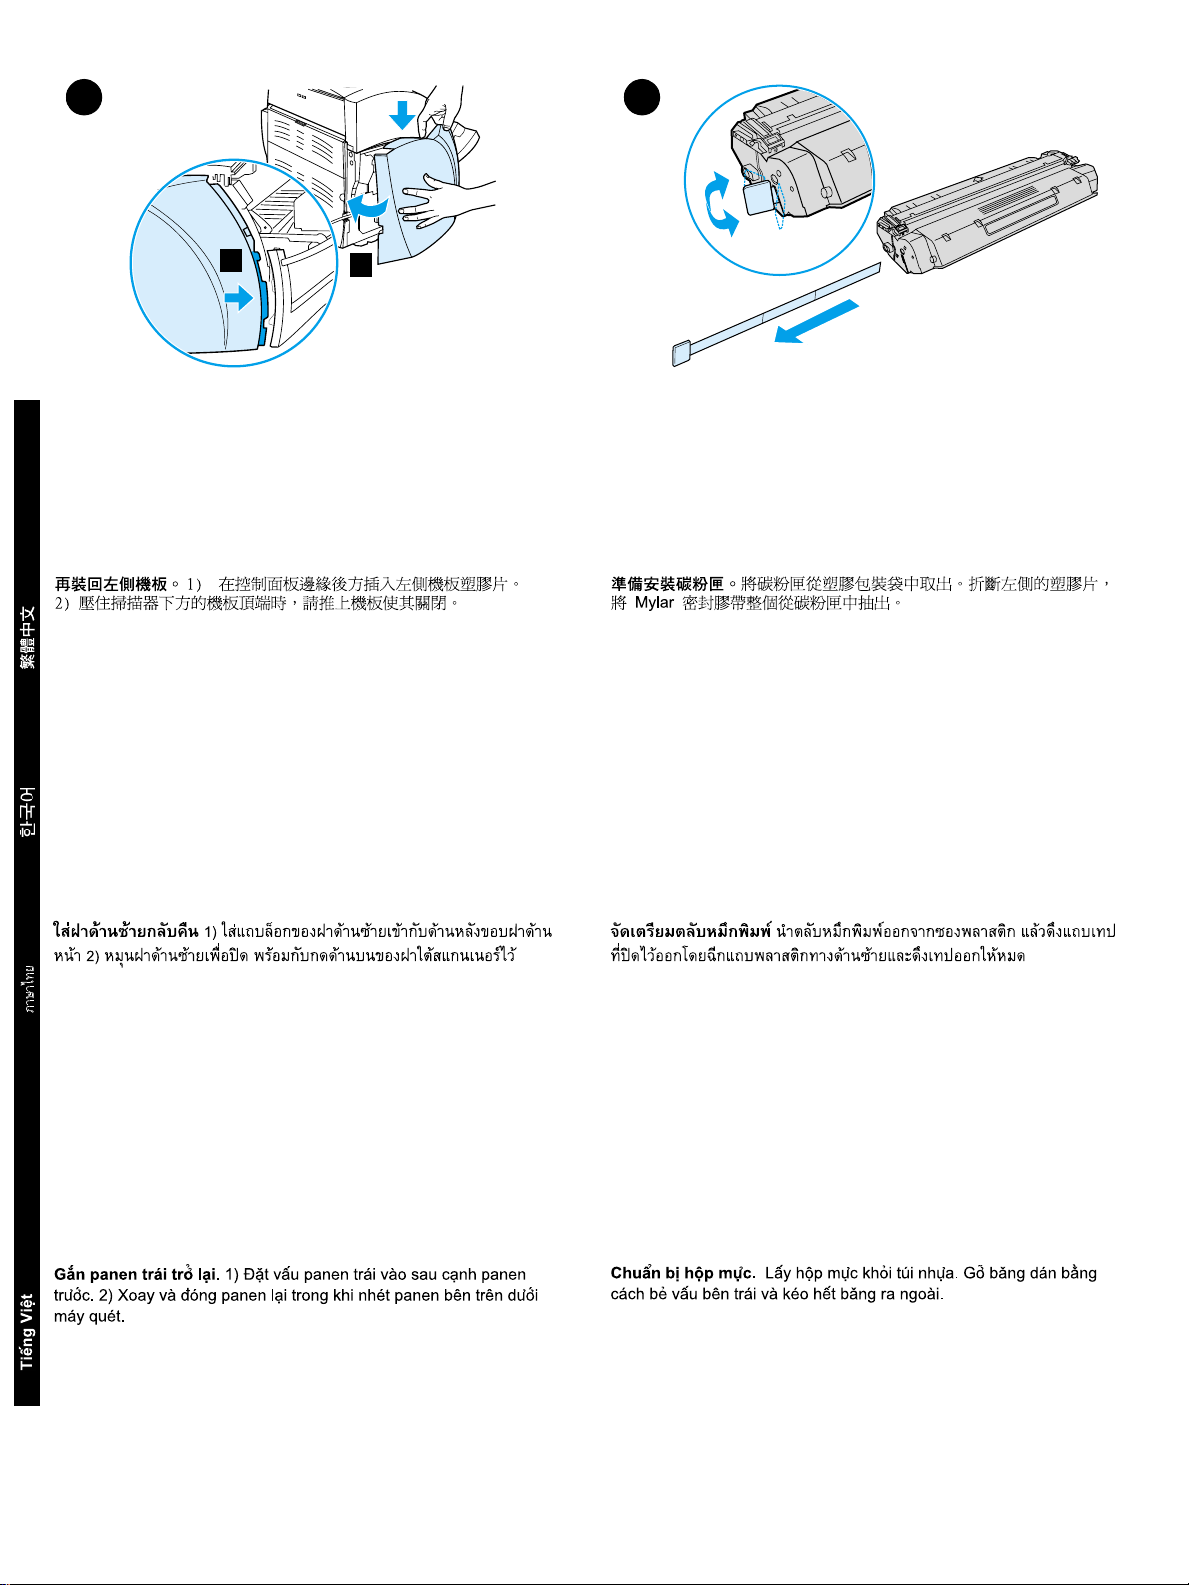
Remove the left side panel. 1) Grasp the left side panel using the finger
hole. 2) Pull out and remove the panel.
왼쪽
왼쪽 덮개를
덮개를 분리합니다
왼쪽왼쪽
2) 덮개를 당겨 분리합니다 .
분리합니다 . 1) 구멍을 사용하여 왼쪽 덮개를 잡습니다 .
덮개를덮개를
분리합니다분리합니다
Buka pintu toner. Tarik ke depan bagian samping pintu sampai pintu
tertahan pada posisi terbuka. Biarkan pintu terbuka sampai langkah 10.
Lepaskan panel sebelah kiri. 1) Pegang panel dengan menggunakan
lubang untuk jari. 2) Tarik ke arah keluar kemudian lepaskan panel.
Page 6
3 4
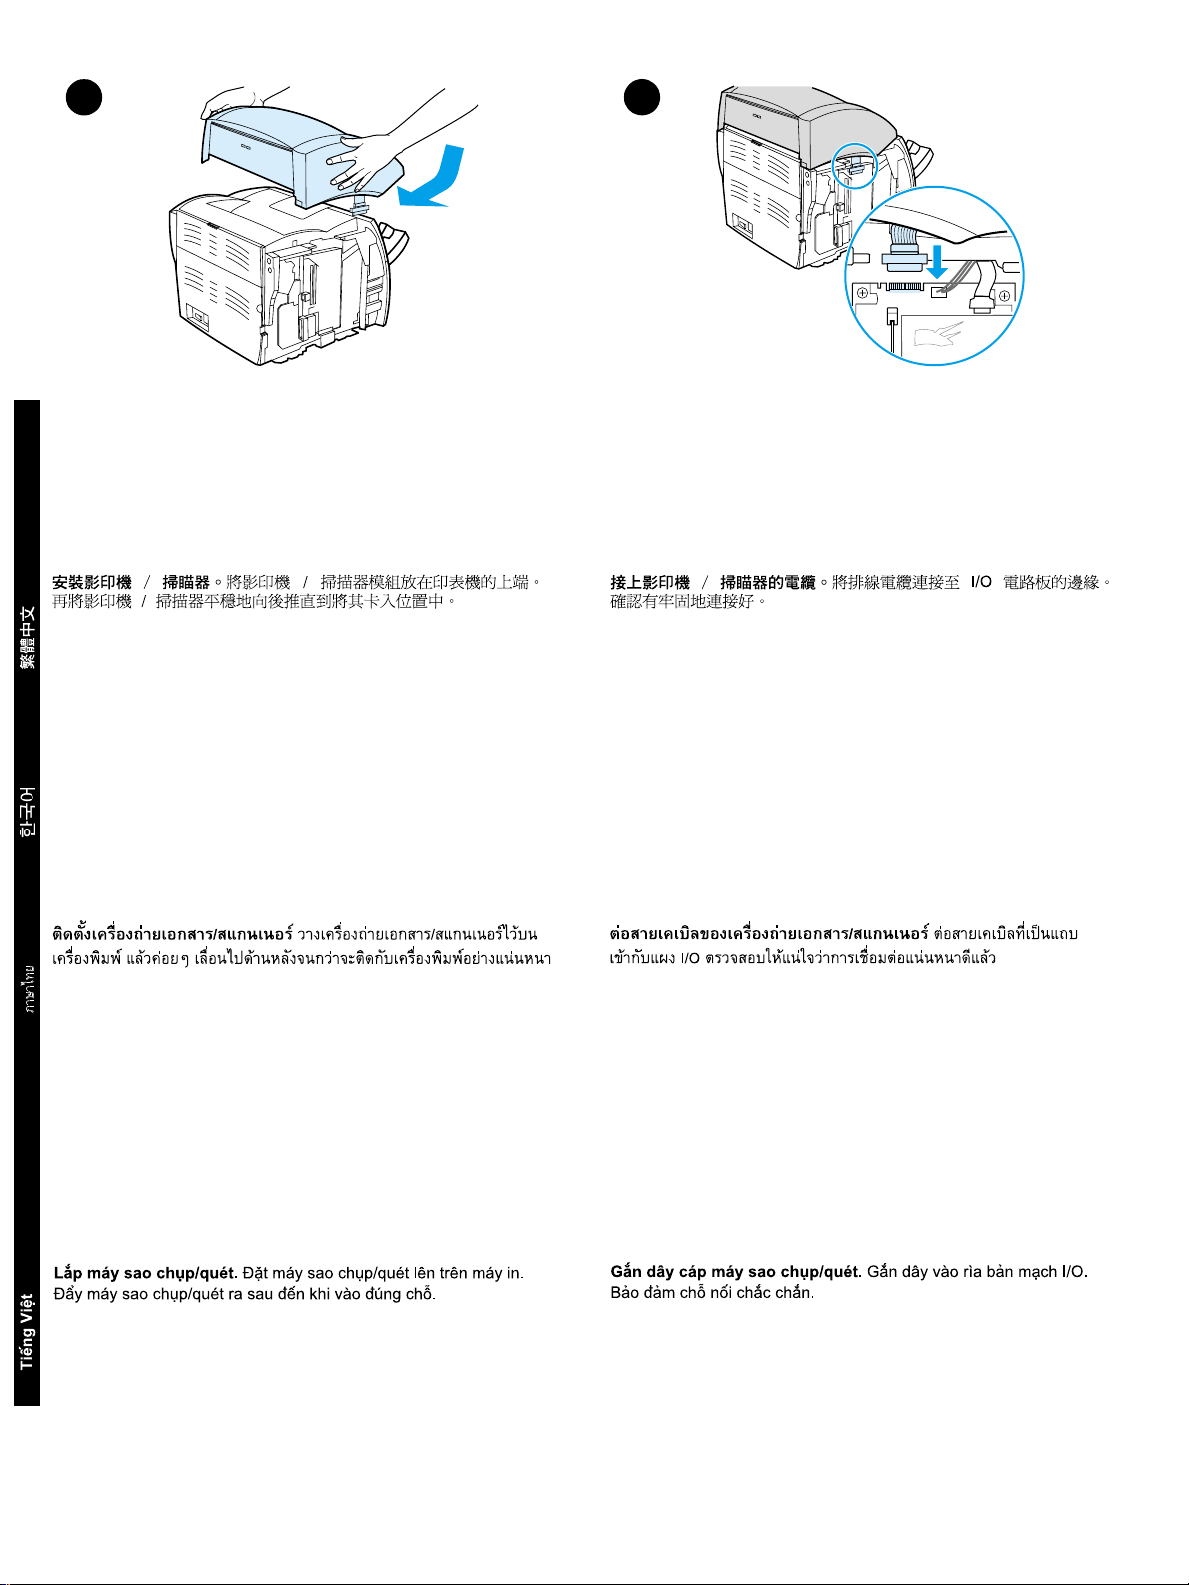
Install the copier/scanner. Place the copier/scanner unit on top of the
printer. Firmly slide the copier/scanner towards the rear until it snaps into
place.
English
복사기
복사기 / 스캐너
복사기복사기
놓은 복사기 / 스캐너가 제자리에 고정될 때까지 뒤쪽으로 밉니다 .
스캐너 케이블
케이블 연결
스캐너스캐너
케이블케이블
연결 . 복사기 /스캐너 장치를 프린터 위에 올려
연결연결
Attach the copier/scanner cable. Attach the ribbon cable to the edge of
the I/O board. Make sure that the connection is secure.
복사기
복사기 / 스캐너
복사기복사기
다 . 연결이 제대로 되었는지 확인합니다 .
스캐너 케이블
케이블 연결
스캐너스캐너
케이블케이블
연결 . 리본 케이블을 I/O 보드 가장자리에 연결합니
연결연결
Pasang unit penyalin/penelusur. Tempatkan unit penyalin/penelusur
di atas printer. Doronglah dengan kuat unit penyalin/penelusur ke arah
belakang sampai terpasang baik pada tempatnya.
Bahasa Indonesia
Pasang kabel unit penyal in/penelusur . Sambungkan kabel pita ke ujung
papan I/O. Pastikan kabel terpasang dengan kuat.
Page 7
5 6
1
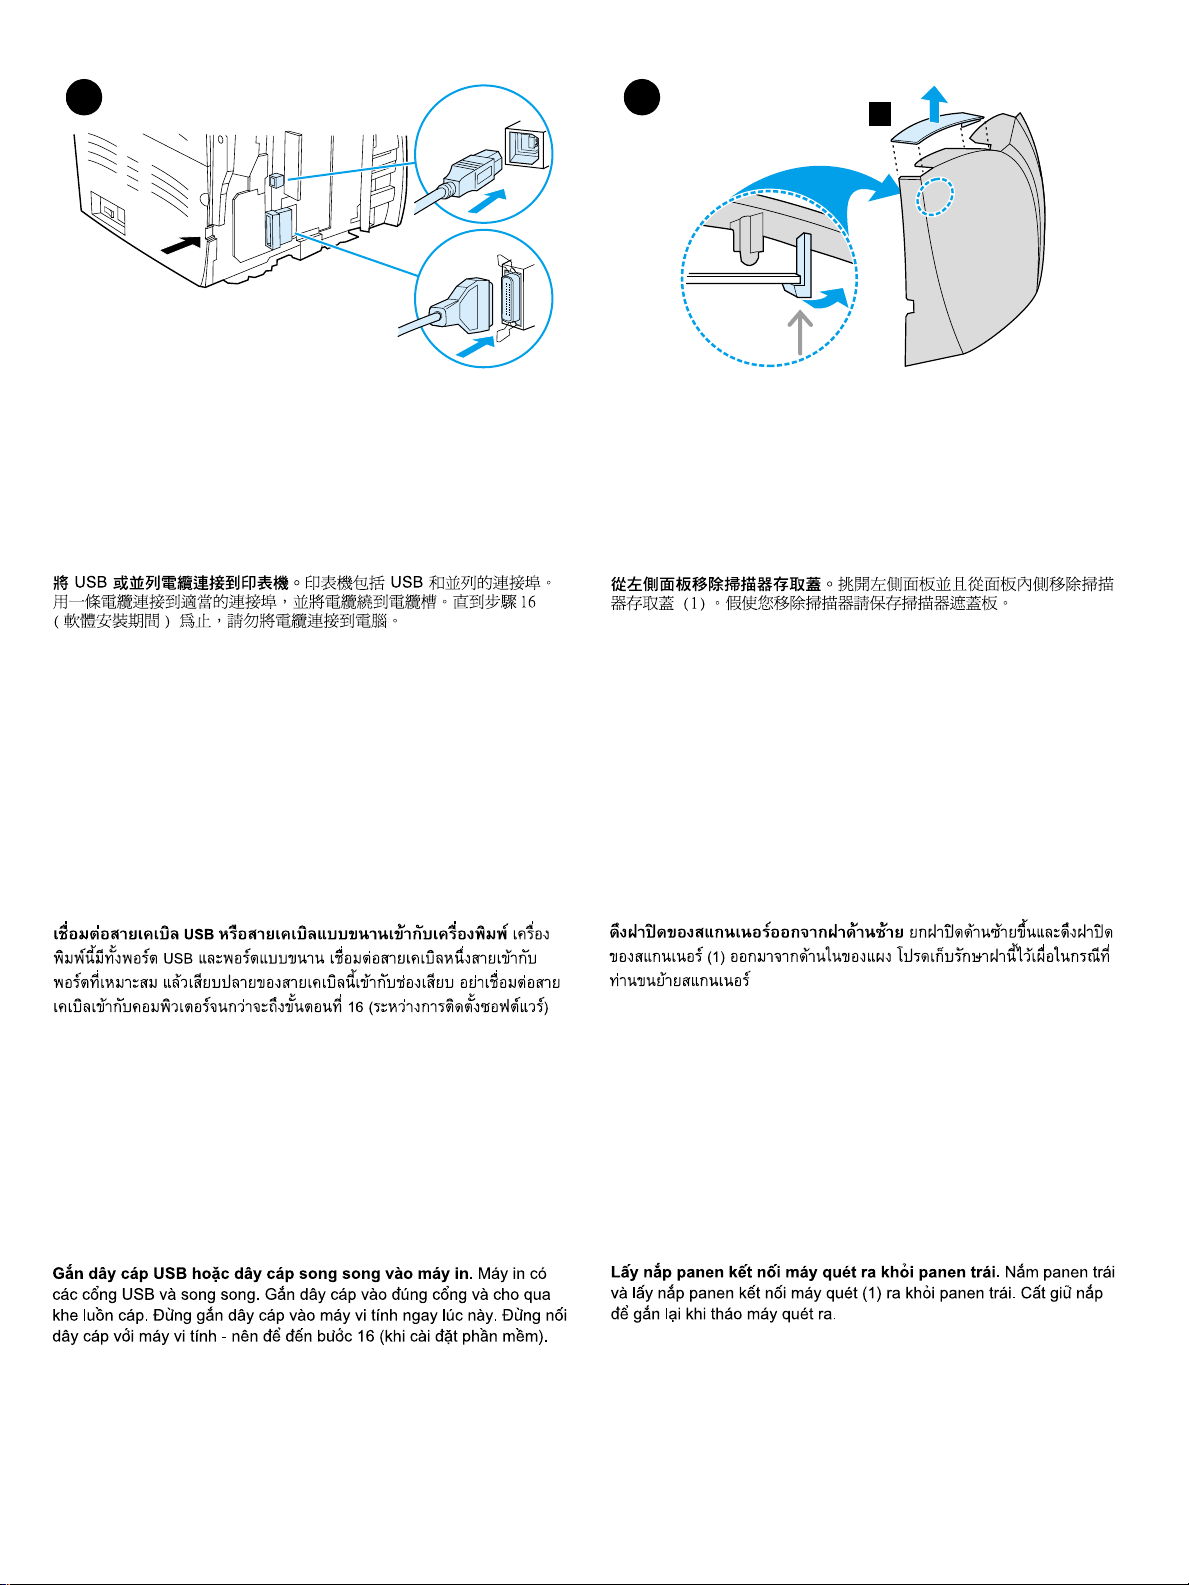
Connect USB or parallel cable to printer. The printer includes USB and
parallel ports. Connect one cable to the proper port and run the cable
through the cable slot. Do not connect the cable to the computer until
step 16 (during software installation).
USB 또는
또는 병렬
병렬 케이블을
또는또는
포트가 포함되어 있습니다 . 케이블을 알맞은 포트에 연결하고 케이블 슬롯
을 따라 케이블을 빼놓습니다 . 단계 16 ( 소프트웨어를 설치하는 동안 ) 까
지는 케이블을 컴퓨터에 연결하지 마십시오 .
케이블을 프린터에
병렬병렬
케이블을케이블을
프린터에 연결합니다
프린터에프린터에
연결합니다 . 프린터에는 USB 및 병렬
연결합니다연결합니다
Remove the scanner access cover from the left side panel. Pick up
the left side panel and remove the scanner access cover (1) from the
inside of the panel. Save the scanner access cover in case you remove
the scanner.
왼쪽
왼쪽 패널에서
패널에서 스캐너
왼쪽왼쪽
패널에서패널에서
패널 안쪽에서 스캐너 액세스 덮개 (1) 을 제거합니다 . 스캐너를 분리할 경
우를 위해 스캐너 액세스 덮개를 잘 보관합니다 .
스캐너 액세스
액세스 덮개를
스캐너스캐너
액세스액세스
덮개를 제거합니다
제거합니다. 왼쪽 패널을 들어 올리고
덮개를덮개를
제거합니다제거합니다
Hubungkan USB atau kabel paralel ke printer. USB dan gerbang
paralel tersedia pada printer ini. Sambungkan salah satu kabel ke
gerbang yang sesuai dan tempatkan kabel melalui celahnya. Dilarang
menghubungkan kabel ini ke komputer sebelum langkah ke 16 (dalam
instalasi perangkat lunak) dilaksanakan.
Lepaskan penutup akses scanner pada panel kiri. Ambil panel bagian
kiri dan lepaskan penutup akses scanner (1) dari bagian dalam panel.
Simpanlah penutup ini untuk digunakan jika anda ingin memindahkan
perangkat ini.
Page 8
7
8
1
Reattach the left side panel. 1) Insert the left side panel tabs behind the
edge of the front panel. 2) Swing the panel shut while pressing the top of
the panel under the scanner.
English
왼쪽
왼쪽 덮개를
덮개를 다시
다시 부착합니다
왼쪽왼쪽
덮개를덮개를
밀어 넣습니다 . 2) 스캐너 아래 덮개 윗부분을 누르면서 덮개를 닫습니다 .
부착합니다 . 1) 왼쪽 덮개 탭을 전면 덮개 가장 자리 뒤로
다시다시
부착합니다부착합니다
2
Prepare the toner cartridge. Remove the toner cartridge from the plastic
bag. Remove the mylar tape by breaking the tab on the left and pulling the
tape completely out.
토너
토너 카트리지
카트리지 준비
토너토너
카트리지카트리지
탭을 떼어 마일라 테이프를 분리하여 테이프를 완전히 떼어냅니다 .
준비 . 토너 카트리지를 플라스틱 백에서 꺼냅니다 . 왼쪽의
준비준비
Pasang kembali panel sebelah kiri. 1) Sisipkan tonjolan-tonjolan
panel ke belakang ujung panel depan. 2) Tutup panel dengan cara
mengayunkannya sambil menekan bagian atas panel yang berada
di bawah perangkat penelusur.
Bahasa Indonesia
Siapkan kartrid toner. Keluarkan kartrid toner dari kantung plastik.
Lepaskan pita mylar dengan cara mematahkan tonjolan di sebelah
kiri kemudian tariklah pita sampai keluar seluruhnya
Page 9

9 10
Install the toner cartridge. Insert the cartridge into the printer, making
sure that the toner cartridge is in position.
토너
토너 카트리지
카트리지 설치
토너토너
카트리지카트리지
는지 확인합니다 .
설치 . 토너 카트리지를 프린터에 삽입하고 올바로 장착되었
설치설치
Close the toner door. The toner cartridge engages when the door is
closed.
토너
토너 덮개를
덮개를 닫습니다
토너토너
닫습니다 . 덮개가 닫히면 토너 카트리지가 맞물립니다 .
덮개를덮개를
닫습니다닫습니다
Pasang kartrid toner. Sisipkan kartrid ke dalam printer, pastikan kartrid
toner terletak dengan baik di tempatnya.
Tutup pintu toner. Kartrid toner akan terkunci jika pintu ditutup.
Page 10

11
12
2
1
Install the copier/scanner trays. 1) Insert the copier/scanner media
output bin into the copier/scanner. 2) Insert the copier/scanner media
input tray above the output bin.
English
복사기
복사기/스캐너
복사기복사기
스캐너에 삽입합니다
니다
스캐너 용지함을
스캐너스캐너
.
용지함을 설치합니다
용지함을용지함을
설치합니다
설치합니다설치합니다
. 2)
복사기/스캐너 입력 트레이를 출력함 위에 삽입합
.
1)
복사기/스캐너 출력함을 복사기
2
4
Install the printer trays. 1) Leave the printer media input trays taped
together. 2) Slide the complete assembly in at an angle and then down
until it fits securely in the printer. 3) Remove the tape and lift off the printer
priority media input tray (top tray). 4) Slide the media guides out and back
to accommodate the media.
/
프린터
프린터 용지함을
용지함을 설치합니다
프린터프린터
용지함을용지함을
로 두십시오 . 2) 전체 조립품을 비스듬히 밀어 넣은 다음 프린터에 단단히
고정될 때까지 아래로 내립니다 . 3) 테이프를 제거하고 프린터 우선 용지함
( 상단 용지함 ) 을 들어 올립니다 . 4) 용지에 맞도록 용지 가이드를 조절합
니다 .
설치합니다 . 1) 프린터 용지함은 테이프로 함께 고정된 채
설치합니다설치합니다
Pasang baki-baki perangkat penyalin/penelusur. 1) Sisipkan keranjang
keluaran media ke unit penyalin/penelusur. 2) Sisipkan keranjang
masukan media ke unit penyalin/penelusur.
Bahasa Indonesia
Pasang baki printer. 1) Biarkan baki-baki masukan media (kertas) printer
terisolasi menjadi satu. 2) Selipkan masuk rakitan yang lengkap dalam
posisi menyudut dan kemudian tekan ke bawah hingga tepat pada
posisinya di printer. 3) Lepaskan isolasi dan angkat baki masukan media
(kertas) prioritas utama printer (baki atas). 4) Gerakkan pemandu media
cetak ke arah luar atau ke arah belakang agar media dapat ditempatkan
dalambaki.
Page 11

13
14
1
2
Load the media. 1) Place the media into the media input tray. Slide the
guides until they are flush with the media. 2) Install the printer priority
media input tray. 3) Connect the power cord. (220V models only: Turn on
the switch.)
용지를
용지를 넣습니다
넣습니다 . 1) 용지를 용지함에 넣습니다 . 용지에 맞도록 가이드를
용지를용지를
넣습니다넣습니다
조절합니다 . 2) 프린터 우선 용지함을 설치합니다 . 3) 전원
니다
니다 (220V 모델은 스위치를 켭니다 ).
니다니다
전원 코드를
코드를 연결합
전원전원
코드를코드를
연결합
연결합연결합
Test the printer. Wait until the ready light is illuminated and press the Go
button. A configuration page, showing the printer’s current configuration,
should print in 10 seconds. If a configuration page does not print, go to
step 22. Refer to the User’s Manual on the CD for more information.
프린터
프린터 테스트
테스트 . 준비등이 켜지기를 기다렸다가 진행
프린터프린터
테스트테스트
린터의 현재 구성을 보여 주는 구성 페이지가 10 초 후에 인쇄됩니다 . 구성
페이지가 인쇄되지 않으면 단계 22로 이동하십시오 . 자세한 정보를 보려면
CD 의 사용 설명서를 참조하십시오 .
진행 단추를 누릅니다 . 프
진행진행
Masukkan media (kertas). 1) Tempatkan media pada baki masukan
tersebut. Dorong kembali pemandu media sampai rata dengan media.
2) Pasang baki masukan media (kertas) prioritas utama printer.
3) Sambungkan kabel daya. (Hanya untuk model 220V: Nyalakan
saklarnya.)
Lakukan pengujian perangk a t penyalin. Tunggu sampai lampu siap
(ready) menyala, kemudian tekan tombol Go. Satu halaman konfigurasi,
yang menunjukkan konfigurasi yang berlaku pada printer, harus tercetak
dalam waktu 10 detik. Apabila halaman konfigurasi tidak tercetak,
lanjutkan ke langkah 22. Aculah pada Buku Panduan Pengguna yang
terdapat pada CD untuk memperoleh keterangan lebih lanjut.
Page 12

15 16
Test the copier. Place a document in the copier/scanner input tray, and
press the Copy button. The document should feed into the copier/scanner.
A copy should appear in the printer output bin. If no copy appears, go to
step 23 (Troubleshooting the copier).
English
복사기
복사기 테스트
테스트 . 복사기 / 스캐너 입력 트레이에 문서를 놓고 복사
복사기복사기
테스트테스트
릅니다
.
문서가 복사기/스캐너로 들어가고, 복사본이 프린터 출력함으로 출
력되어야
로 이동하십시오 .
합니다. 복사본이 나타나지 않으면 단계
23(
복사 단추를 누
복사복사
복사기 문제 해결)으
Install the printer software. Choose and install the appropriate CD for
your software installation or go to the Plug and Pla y section. Use CD #1 f or
Windows (step 17) or CD #2 for Macintosh (step 18). Make sure to select
the correct model number during installation (HP 1220 for printer with
copier/scanner; HP 1200 for printer only).
프린터
프린터 소프트웨어
소프트웨어 설치
프린터프린터
소프트웨어소프트웨어
치하거나 플러그 앤 플레이 섹션으로 이동합니다 . Windows 용 CD #1( 단
계17) 또는 Macintosh 용 CD #2 ( 단계 18) 를 사용하십시오 . 설치시 반드
시 올바른 모델 번호를 선택해야 합니다 ( 복사기 / 스캐너 기능을 가진 프린
터의 경우 HP 1220, 프린터 전용인 경우 HP 1200).
설치 . 소프트웨어 설치를 위해 해당 CD를 선택하여 설
설치설치
Lakukan pengujian perangk a t penyalin. Tempatkan dokumen pada
baki masukan perangkat penyalin/penelusur kemudian tekan tombol
Copy. Dokumen akan masuk ke dalam perangkat penyalin/penelusur.
Salinannya akan muncul di keranjang keluaran printer. Apabila tidak ada
salinan yang ke luar, lanjutkan ke langkah 23 (Penelusuran Masalah
copier).
Bahasa Indonesia
Instal perangkat lunak printer. Pilih dan masukkan CD yang tepat untuk
instalasi perangkat lunak anda atau baca pada bab Plug and Play.
Gunakan CD nomor 1 untuk Windows (langkah 17) atau CD nomor 2
untuk Macintosh (langkah 18). Pastikan untuk memilih nomor model yang
sesuai ketika melakukan instalasi (HP 1220 untuk printer dengan
copier/scanner; HP 1200 untuk printer saja).
Page 13

17
Installing on Windo ws. 1)Select Software Installation from the autorun
screen. If autorun does not occur, select Start, select Run, and type
x:\setup (where x is the letter of your CD-ROM drive).
Windows
자동 실행이
CD-ROM 드라이브 문자 ) 을 입력합니다 .
상의
상의 설치
설치
.
상의상의
1)자동 실행
설치설치
시작 되지 않으면 시 작
화면에서 소프트웨어
시작 , 실행
시작시작
소프트웨어 설치
소프트웨어소프트웨어
실행을 선택한 다음 x:\setup (x 는
실행실행
설치
설치설치
를 선택합니다
2) Follow the instructions on the screen. Click Finish to complete th e
installation. 3) After the installation is complete, connect the I/O cable to
the computer and reboot the computer.
.
2)
화면에 나타나는 지시 사항을 따릅니다. 종료
3)
설치를 완료한 후
다
.
I/O
케이블을 컴퓨터에 연결하고 컴퓨터를 재부팅합니
종료
를 눌러 설치를 완료합니다
종료종료
.
Instalasi pada Windows. 1) Pilih Instalasi Perangkat Lunak dari layar
yang diperintah secara otomatis. Jika layar autorun tidak muncul, pilih
Start, pilih Run, kemudian k etikkan x:\setup (di mana x adalah huruf
pengenal penggerak CD-ROM anda).
2) Ikuti petunjuk pada layar. Klik Finish untuk menyelesaikan instalasi
3) Setelah instalasi selesai, sambungkan kabel I/O ke komputer dan boot
ulang komputer.
Page 14

18
Installing on Macintos h (USB). 1) Connect the I/O cable to the
computer. 2) Insert CD #2. 3) Double-click the HP All-in-One Installer.
4) Select a language. 5) Click Install, and follow the screen instructions.
English
Macintosh 에에에에 설치하기
2) CD #2 를 삽입합니다 . 3} HP All-in-One 설치기를 두 번 누릅니다 . 4) 언
어를 선택합니다 . 5) 설치
설치하기 (USB). 1) I/O 케이블을 컴퓨터에 연결합니다 .
설치하기설치하기
설치를 누른 다음 화면에 나타나는 지침을 따릅니다 .
설치설치
6) When the installation is complete, click Restart. 7) When the computer
restarts, follow the onscreen instructions for the HP All-in-One Setup
Utility. 8) Click Finish to complete the setu p.
6) 설치가 완료 되면 다시
HP All-in-One 설치 유틸리티 화면에 나타나는 지시를 따르십시오 . 8) 설치
를 끝내려면 완료
완료를 누릅니다 .
완료완료
다시 시작
시작 을 누릅니다 . 7 ) 컴퓨터가 재시작 되면
다시다시
시작시 작
Melakukan Instalasi pada Macintosh (USB). 1) Sambungkan kabel I/O
ke komputer. 2) Masukkan CD nomor 2. 3) Klik dua kali HP All-in-One
Installer (Pemasang HP Lengkap). 4) Pilih bahasa yang dikehendaki.
5) Klik Install kemudian ikuti petunjuk pada layar.
Bahasa Indonesia
6) Bilamana instalasi telah selesai, klik Restart. 7) Ketika komputer
memulai lagi, ikuti petunjuk-petunjuk yang ada pada layar untuk
HPAll-in-One Setup Utility (Perangkat Penyetelan HP Lengkap).
8) Klik Finish untuk mengakhiri penyetelan
Page 15

19 20
Test the scanner. 1) Place a document in the copier/scanner input tray
and press the Scan button. The HP LaserJet Director appears on your
screen. Note: NT 4.0 users can access HP LaserJet Director through
Start\Programs\HP 1220\HP LaserJet Director.
스캐너
스캐너 테스트
테스트 . 복사기 /스캐너 입력 트레 이에 문서를 놓고 스캔
스캐너스캐너
테스트테스트
릅니다 . HP LaserJet Director 가 화면에 나타납니다 . 주 : NT 4.0 사용자는
시작 \ 프로그램 \HP 1220\ HP LaserJet 디렉터를 통하여 HP LaserJet 디렉
터에 액세스할 수 있습니다 .
스캔 단추를 누
스캔스캔
1) Click Scan, and select your printer from the Destination field. 2) Click
OK. The document should feed into the copier/scanner. The copy should
appear in the printer output bin. If no copy appears, go to Step 23
(Troubleshooting the copier).
1) 스캔
스캔을 누른 다음 대상 필드에서 사용할 프린 터를 선택합니다 . 2) 확인
스캔스캔
을 누릅니다 . 문서가 복 사기 / 스캐너로 들어가고 , 복사본이 프린터 출 력
함으로 출력되어야 합니다 . 복사본이 나타나지 않으면 단계 23 ( 복사기 문
제 해결 ) 으로 이동하십시오 .
확인
확인확인
Lakukan pengujian perangk a t penelusur. Tempatkan dokumen pada
baki masukan perangkat penyalin/penelusur kemudian tekan tombol
Scan. Pada layar akan muncul HP LaserJet Director. Catatan: Para
pengguna NT 4.0 dapat mengakses HP LaserJet Director melalui
Start\Programs\HP 1220\HP LaserJet Director.
1) Klik Scan, kemudian pilih printer anda dari field Destination. 2) Klik OK.
Dokumen akan masuk ke dalam perangkat penyalin/penelusur.
Salinannya akan muncul di keranjang keluaran printer. Apabila tidak ada
salinan yang ke luar, lanjutkan ke Langkah 23 (Penelusuran Masalah
copier).
Page 16

21 22
No lights are on.
Congratulations! Your HP LaserJet 1220 product is ready to use. If you
had any problems, refer to the electronic user guide for troubleshooting
information as well as service and support information.
English
축하합니다
축하합니다 ! HP LaserJet 1220 을 사용할 준비가 되었습니다 . 문제가 발생
축하합니다축하합니다
할 경우 서비스 및 지원 정보 는 물론 문제 해결 정보에 관해 온라인 사용 설
명서를 참조하십시오 .
Troubleshooting the pr inter. 1) If no lights are on, check the power cord,
and then press the Go button.
프린터
프린터 문제
문제 해결
프린터프린터
단추를 누릅니다 .
해결 . 1) 표시등이 켜지지 않으면 전원 코드를 확인하고 진행
문제문제
해결해결
Selamat! Product HP LaserJet 1220 anda kini sudah siap digunakan.
Apabila anda mempunyai masalah apapun, aculah pada buku panduan
pengguna elektronis untuk memperoleh keterangan tentang penelusuran
masalah dan juga keterangan tentang servis dan dukungan.
Bahasa Indonesia
Jika printer tida k b erf ungsi ba ik. 1) Jika tidak ada lampu yang menyala,
periksa kabel daya, kemudian tekan tombol Go.
Page 17

Bottom light is blinking.
All lights are blinking.
All lights are on.
2) If the bottom light is blinking, check the toner cartridge for proper
installation, put media in the input tray, make sure all doors are closed,
or check for media jams.
2) 아래쪽 표시등이 깜빡이면 토너 카트리지 가 올바로 설치되었는지 확인
하고 , 용지를 용지함에 넣은 다음 , 모든 덮개가 닫혀 있는지 확인하고 , 용
지 걸림을 확인합니다 .
3) If all lights are blinking, remove the DIMM and replace it with a new
DIMM, if necessary. 4) If all lights are on, unplug the printer, wait
5 minutes, plug it back in, and retry. If errors still exist, call HP Customer
Support.
3) 모든 표시등이 깜빡이면 DIMM을 분리하고 필요한 경우 새로운 DIMM으
로 교체합니다 . 4) 모든 표시등이 켜지면 프린터의 코드를 뽑고 5 분 정도
기다렸다가 다시 코드를 꽂고 재시도해 봅니다 . 오류가 지속되면 HP 고객
지원으로 문의합니다 .
2) Jika lampu bawah berkedip-kedip, periksa apakah kartrid toner sudah
terpasang dengan baik, apakah media cetak sudah tersedia di baki
masukan, apakah semua pintu sudah tertutup dengan baik, atau apakah
ada kemacetan media cetak.
3) Jika semua lampu berkedip-kedip, lepaskan DIMM dan gantilah dengan
DIMM yang baru jika perlu. 4) Jika semua lampu menyala, lepaskan kabel
daya dari printer, tunggu 5 menit, pasang kembali kabel daya ke printer,
kemudian ulangi pengujian. Jika masalah masih belum hi lang, hubungi
Layanan Bantuan HP.
Page 18

23
Tr oubl eshooting t he copier . 1) Check the configurati on page (step 14) to
verify that the copier/scanner is recognized. 2) If it is recognized, retry the
copier test (step 15).
English
복사기
복사기 문제
문제 해결
해결 . 1
)
복사기복사기
문제문제
지
(단계 14)를
15)를
재시도합니다 .
해결해결
복사기/스캐너가 인식되었는지 점검하려면 구성 페이
확인하십시오
. 2)
복사기가 인식되었으면 복사기 검사(단계
3) If the copier/scanner is not recognized, verify that the copier/scanner
cable is firmly connected. 4) Unplug the printer, plug the printer back in,
and retry the test. If errors still exist, call HP Customer Support.
3)
복사기/스캐너가 인식되지 않았으며 복사기
결되었는지 확인합니다 . 4) 프린터의 플러그를 뽑았다가 다시 꽂고 테스트
를 재시도합니다 . 오류가 지속되면 HP 고객 지원으로 문의합니다 .
/
스캐너 케이블이 제대로 연
Jika perangkat penyalin tidak berfungsi baik. 1) Periksa halaman
konfigurasi (langkah 14) untuk memastikan bahwa copier/scanner
dikenali. 2) Apabila tidak dikenali, coba ulangi uji copier (langkah 15).
Bahasa Indonesia
3) Jika unit penyalin/penelusur tersebut belum dikenali, periksa apakah
kabel unit tersebut sudah tersambung dengan baik. 4) Lepaskan
kabel daya dari printer, pasang kembali, kemudian ulangi pengujian.
Jika masalah masih belum hilang, hubungi Layanan Bantuan HP .
Page 19

Plug & Play
1
Installing on Windows 98 and Millennium (USB). 1) Connect the
I/O cable to the computer. 2) Reboot the computer. 3) In the Add
New Hardware wizard, click Next.
Windows 98/Millennium 에에에에 설치
니다 . 2) 컴퓨터를 재시동합니다 . 3) 새 하드웨어 추가 마법사에서 다음
누릅니다 .
설치 (USB). 1) I/O 케이블을 컴퓨터에 연결합
설치설치
다음을
다음다음
4) Select Search for the best driver for your device (recommended),
and click Next. 5) Select Specify a location, and type x:\98Me_USB\
(where x is the letter of your CD-ROM drive). 6) Follow the instructions on
your screen.
4)
장치에
장치에 가장
가장 알맞은
알맞은 드라이버
장치에장치에
5)
자
가장가장
검색할
검색할 위치
위치 지정
검색할검색할
위치위치
)를
입력합니다 . 6)화면에 나타나는 지시 사항을 따릅니다 .
알맞은알맞은
지정
을 선택하고
지정지정
드라이버 검색
드라이버드라이버
검색(권장
권장)을 선택하고 다음
검색검색
권장권장
x:\98Me_USB\ (x는 CD-ROM
다음
다음다음
을 누릅니다
드라이브 문
.
Melakukan Instalasi pada Windows 98 dan Millennium (USB).
1) Hubungkan kabel I/O ke komputer. 2) Reboot komputer anda.
3) Pada wizar Add New Hardware, klik Next.
4) Pilih Search for the best driver for your device (recommended)
kemudian klik Next. 5) Beri tanda pada Specify a location, kemudian
ketikkan x:\98Me_USB\ (di mana x adalah penggerak CD-ROM anda).
6) Ikuti petunjuk pada layar.
Page 20

2
Installing on Windows 2000 (USB). 1) Connect the I/O cable to the
computer. 2) Reboot the computer. 3) In the Found New Hardware wizard,
click Next. 4) Select Search for a suitable driver for my device
(recommended), and click Next.
English
Windows 2000에에에에 설치
퓨터를 재시동합니다 . 3) 새 하드웨어 발견 마법사에서 다음
4) 장치에
장치에 적절한
장치에장치에
설치 (USB). 1) I/O 케이블을 컴퓨터에 연결합니다. 2) 컴
설치설치
적절한 드라이버
적절한적절한
드라이버 검색
드라이버드라이버
검색 ( 권장
권장 ) 을 선택하고 다음
검색검색
권장권장
다음을 누릅니다 .
다음다음
다음을 누릅니다 .
다음다음
5) Select Specify a location. 6) Under Copy manufacturer’s files from,
type x:\2000\ (where x is the letter of your CD-ROM drive), and click OK.
7) Click Next. 8) Follow the instructions on your screen.
5) 위치
위치 지정
지정을 선택합니다 . 6) 복사할
위치위치
지정지정
(x 는 CD- ROM 드라이브 문자 ) 를 입력하고 , 확인
누릅니다 . 8) 화면에 나타나는 지시 사항을 따릅니다 .
복사할 제조업체
제조업체 파일
복사할복사할
제조업체제조업체
파일 위치
위치 : 에서 x:\2000\
파일파일
위치위치
확인을 누릅니다 . 7) 다음
확인확인
다음을
다음다음
Melakukan Instalasi pada Windows 2000 (USB). 1) Hubungkan kabel
I/O ke komputer. 2) Reboot komputer anda. 3) Pada wizar Found New
Hardware, klik Next. 4) Pilih Search for a suitable driver for my device
(recommended) kemudian klik Next.
Bahasa Indonesia
5) Beri tanda pada Specify a location. 6) Di bawah Copy
manufacturer’s files from, ke tik kan x:\2000\ (di mana x adalah
penggerak CD-ROM anda) kemudian klik OK. 7) Klik Next.
8) Ikuti petunjuk pada layar.
Page 21

3
Installing on Windows 9X and Millennium (Parallel). 1) Connect the I/O
cable to the computer. 2) Reboot the computer. 3) When the Installation
wizard appears, click Next.
Windows 9X /M il len niu m 에에에에 설치
합니다 . 2) 컴퓨터를 재시동합니다 . 3) 설치 마법사가 나타나면 다음
르십시오 .
설치 ( 병렬
병렬 ). 1) I/O 케이블을 컴퓨터에 연결
설치설치
병렬병렬
다음을 누
다음다음
4) Select Search for the best driver for your device (recommended),
and click Next. 5) Select Specify a location, then type x:\9xMe_LPT\
(where x is the letter of your CD-ROM drive). 6) Follow the instructions on
your screen.
4)
장치에
장치에 가장
가장 알맞은
알맞은 드라이버
장치에장치에
검색할
검색할
검색할검색할
가장가장
위치
위치 지정
위치위치
5)
자 ) 를 입력합니다 . 6) 화면에 나타나는 지시 사항을 따릅니다 .
드라이버 검색
알맞은알맞은
드라이버드라이버
지정을 선택하고 x:\9xMe_LPT\ (x 는 CD-ROM 드라이브 문
지정지정
검색(권장
권장)을 선택하고 다음
검색검색
권장권장
다음
을 누릅니다
다음다음
.
Melakukan Instalasi pada Windows 98 dan Millennium (Paralel).
1) Hubungkan kabel I/O ke komputer. 2) Reboot komputer anda.
3) Bilamana petunjuk Instalasi muncul, klik Next.
4) Pilih Search for the best driver for your device (recommended)
kemudian klik Next. 5) Beri tanda pada Specify a location, kemudian
ketikkan x:\9xMe_LPT\ (di mana x adalah penggerak CD-ROM anda).
6) Ikuti petunjuk pada layar.
Page 22

4 5
Installing on Windo ws NT (P arallel). (Note: You must have Administrator
privileges.) 1) When the Installation wizard appears, click Software
Installation. 2) Follow the instructions on your screen.
English
Windows NT 에에에에 설치
치 마법사가 나타나면 소프트웨어
지시 사항을 따릅니다 .
설치 ( 병렬
병렬 ). ( 참고 : 관리자 권한이 있어야 합니다 .) 1) 설
설치설치
병렬병렬
소프트웨어 설치
소프트웨어소프트웨어
설치를 누르십시오 . 2) 화면에 나타나는
설치설치
Installing on Windows 2000 (Parallel). 1) Connect the I/O cable to the
computer. 2) Reboot the computer. 3) In the Found New Hardware wizard,
click Next. 4) Select Search for a suitable driver for my device
(recommended), and click Next.
Windows 2000에에에에 설치
퓨터를 재시동합니다 . 3) 새 하드웨어 발견 마법사에서 다음
4) 장치에
장치에 적절한
적절한 드라이버
장치에장치에
적절한적절한
설치(병렬
병렬). 1) I/O 케이블을 컴퓨터에 연결합니다 . 2) 컴
설치설치
병렬병렬
드라이버 검색
드라이버드라이버
검색 ( 권장
검색검색
권장 ) 을 선택하고 다음
권장권장
다음을 누릅니다 .
다음다음
다음을 누릅니다 .
다음다음
Melakukan Instalasi pada Windows NT (Paralel). (Perhatikan: Anda
harus memiliki hak (privilege) sebagai administrator ) 1) Bilamana
petunjuk Instalasi muncul, klik Software Installation. 2) Ikuti petunjuk
pada layar .
Bahasa Indonesia
Melakukan Instalasi pada Windows 2000 (Paralel). 1) Hubungkan
kabel I/O ke komputer. 2) Reboot komputer anda. 3) Pada wizar Found
New Hardware, klik Next. 4) Pilih Search for a suitable driver for my
device (recommended) kemudian klik Next.
Page 23

5) Select Specify a location. 6) Under Copy manufacturer’s files from,
type x:\2000\ (where x is the letter of your CD-ROM drive), and click OK.
7) Click Next. 8) Follow the instructions on your screen.
5) 위치
위치 지정
지정을 선택합니다 . 6) 복사할
위치위치
지정지정
(x 는 CD-ROM 드라이브 문자 ) 를 입력하고 , 확인
복사할 제조업체
제조업체 파일
복사할복사할
제조업체제조업체
파일 위치
위치 : 에서 x:\2000\
파일파일
위치위치
확인을 누릅니다 . 7) 다음
확인확인
다음을
다음다음
누릅니다 . 8) 화면에 나타나는 지시 사항을 따릅니다 .
5) Beri tanda pada Specify a location. 6) Di bawah Copy
manufacturer’s files from, ketikkan x:\2000\ (di mana x adalah
penggerak CD-ROM anda) kemudian klik OK. 7) Klik Next.
8) Ikuti petunjuk pada layar.
Page 24

printed on
recycled paper
copyright© 2002
Hewlett-Packard Co.
www.hp.com/support/lj1220
*C7045-90922*
*C7045-90922*
C7045-90922
 Loading...