

Page 1
HP DesignJet Z6810 42-in
Production Printer
EN
Assembly Instructions
JA
組み立ておよびセットアッ
プ手順
ZHCN
组装说明
ZHTW
組裝說明
KO
조립 지시사항
ID
Petunjuk pemasangan
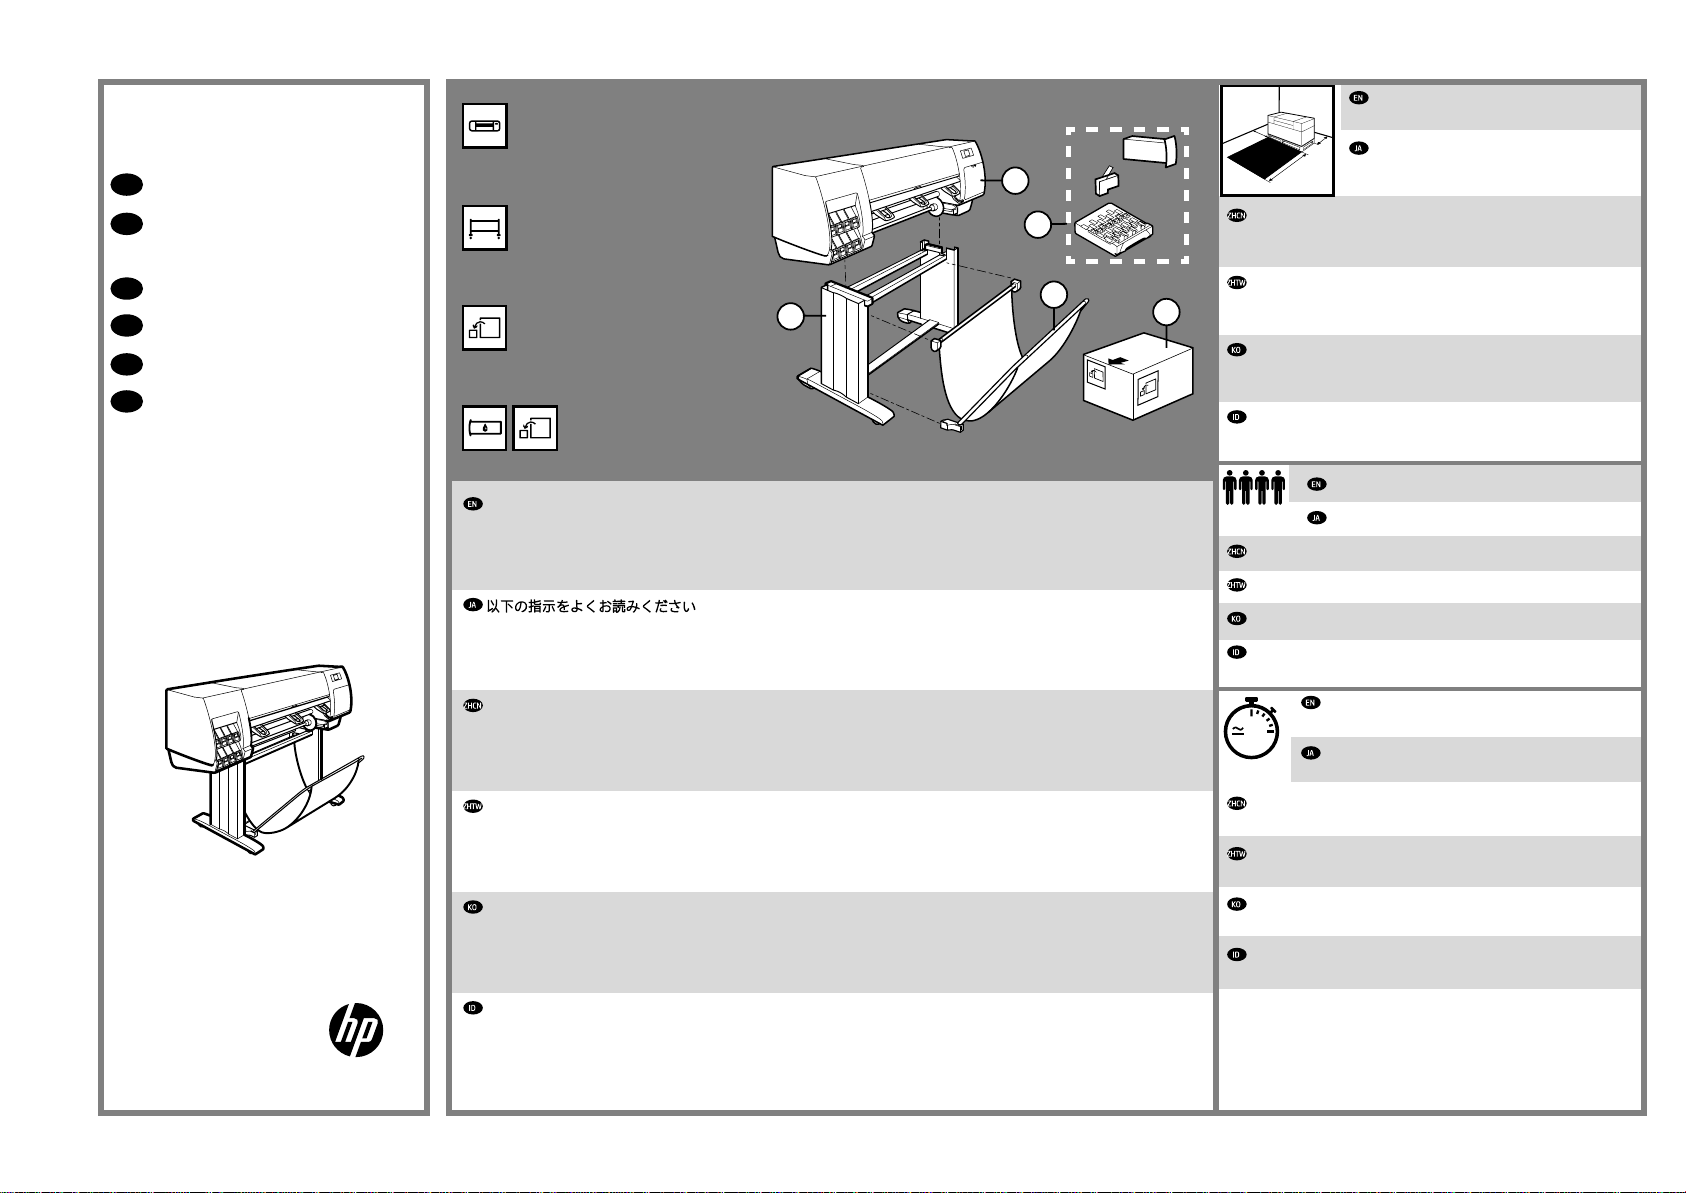
1. Printer engine / プリンタエンジン / 打印机引擎
/印表機引擎/프린터 엔진 / Mesin printer
2. Stand / スタンドと用紙スタッカ
/ 支架/機架/스탠드
/ Dudukan dan nampan
3. Spare box / 予備の箱 / 备件箱
/備用盒/예비 상자 / Boks suku cadang
4. Supplies / サプライ品 / 耗材
/耗材/소모품 / Persediaan
2
1m
3.5ft
1
4
2
3
米(3.5英尺)的空间。
1公尺(3.5英呎)以進行組裝。
정도의 공간이 필요합니다.
depan dan 1 m (3,5 kaki) di samping dan belakang.
1m
3.5ft
3m
10ft
组装时需要打印机前面有3米(10英尺)、侧面和后面各有1
印表機前面必須騰出3公尺(10英呎)且兩側與後面必須騰出
조립을 하려면 프린터 측면과 뒤쪽에 3m(10피트)와 1m(3.5피트)
Ruang yang diperlukan untuk pemasangan adalah 3 m (10 kaki) di
The space required for assembly is 3m (10 feet)
in front and 1m (3.5 feet) at the sides and rear.
組み立てにはプリンタ前面に3m(10フィー
ト)、側面および背面に1m(3.5フィート)のス
ペースが必要です。
*2QU12-90011*
2QU12-90011
© Copyright 2018 HP Development Company, L.P.
Large Format Division
Camí de Can Graells 1-21 · 08174
Sant Cugat del Vallès
Barcelona · Spain
All rights reserved
Printed in XXX
Please read these instructions carefully. These assembly instructions explain how to assemble the printer. Notice that the
icons used in this document are also located on the printer packaging. The icons help you locate the parts needed at each stage of
the assembly. Because spare screws are supplied, some screws will remain unused after assembly of the printer.
以下の指示をよくお読みください。-以下の手順では、プリンタを組み立てる方法について説明します。このマニ
ュアルで使用されているアイコンは、プリンタのパッケージにも表示されています。アイコンにより、組み立ての各
段階で必要な部品を確認できます。予備のネジが同梱されているため、プリンタの組み立て後、何本かのネジが使用
されないまま残ります。
请仔细阅读这些说明。这些组装说明对如何组装打印机进行了介绍。请注意,在打印机包装上也可以找到本文档使用
的图标。这些图标可帮助您找到每个组装阶段所需的部件。由于提供了备用螺钉,因此组装完打印机后,会剩下一些未
用的螺钉。
請仔細閱讀下列說明。這些組裝說明將解釋如何組裝印表機。請注意,本文件中使用的圖示也可以在印表機的包裝上
找到。這些圖示可協助您找出每個組裝過程所需的零件。由於我們有提供備用螺絲,因此完成印表機組裝後仍會有多餘
的未用螺絲。
이 지침을 잘 검토해 보십시오.이 조립 설명서에서는 프린터 조립 방법에 대해 설명합니다.이 문서에 사용된 아이콘은 프린
터 포장재에서도 찾을 수 있습니다.아이콘을 사용하면 각 조립 단계에서 필요한 부품을 찾을 수 있습니다.여분의 나사가 제공되
므로 프린터 조립 후에도 일부 나사는 사용하지 않은 상태로 남게 됩니다.
Bacalah petunjuk ini dengan cermat Petunjuk pemasangan ini menjelaskan cara memasang printer. Perhatikan bahwa ikon
yang digunakan dalam dokumen ini juga terdapat pada kemasan printer. Ikon membantu Anda menemukan komponen yang diperlukan dalam setiap tahap pemasangan. Karena tersedia sekrup cadangan, beberapa sekrup tidak digunakan setelah pemasangan
printer.
4 people are required to perform certain tasks
特定の作業を行うために、4名必要です。
部分任务需要4人完成
某些工作需要4個人才能執行
특정 작업을 수행할 때는 네 명이 필요합니다.
Diperlukan 4 orang untuk menjalankan tugas tertentu.
Time required for assembly of the printer is approxi-
mately 132 minutes.
2h
プリンタの組み立て所要時間は約132分です。
组装打印机大约需要132分钟的时间。
印表機組裝需要費時大約132分鐘。
프린터를 조립하는 데에는 132분 정도 걸립니다.
Wakt u yang diperlukan untuk pemasangan printer adalah sekitar
132 m enit.
1
Page 2
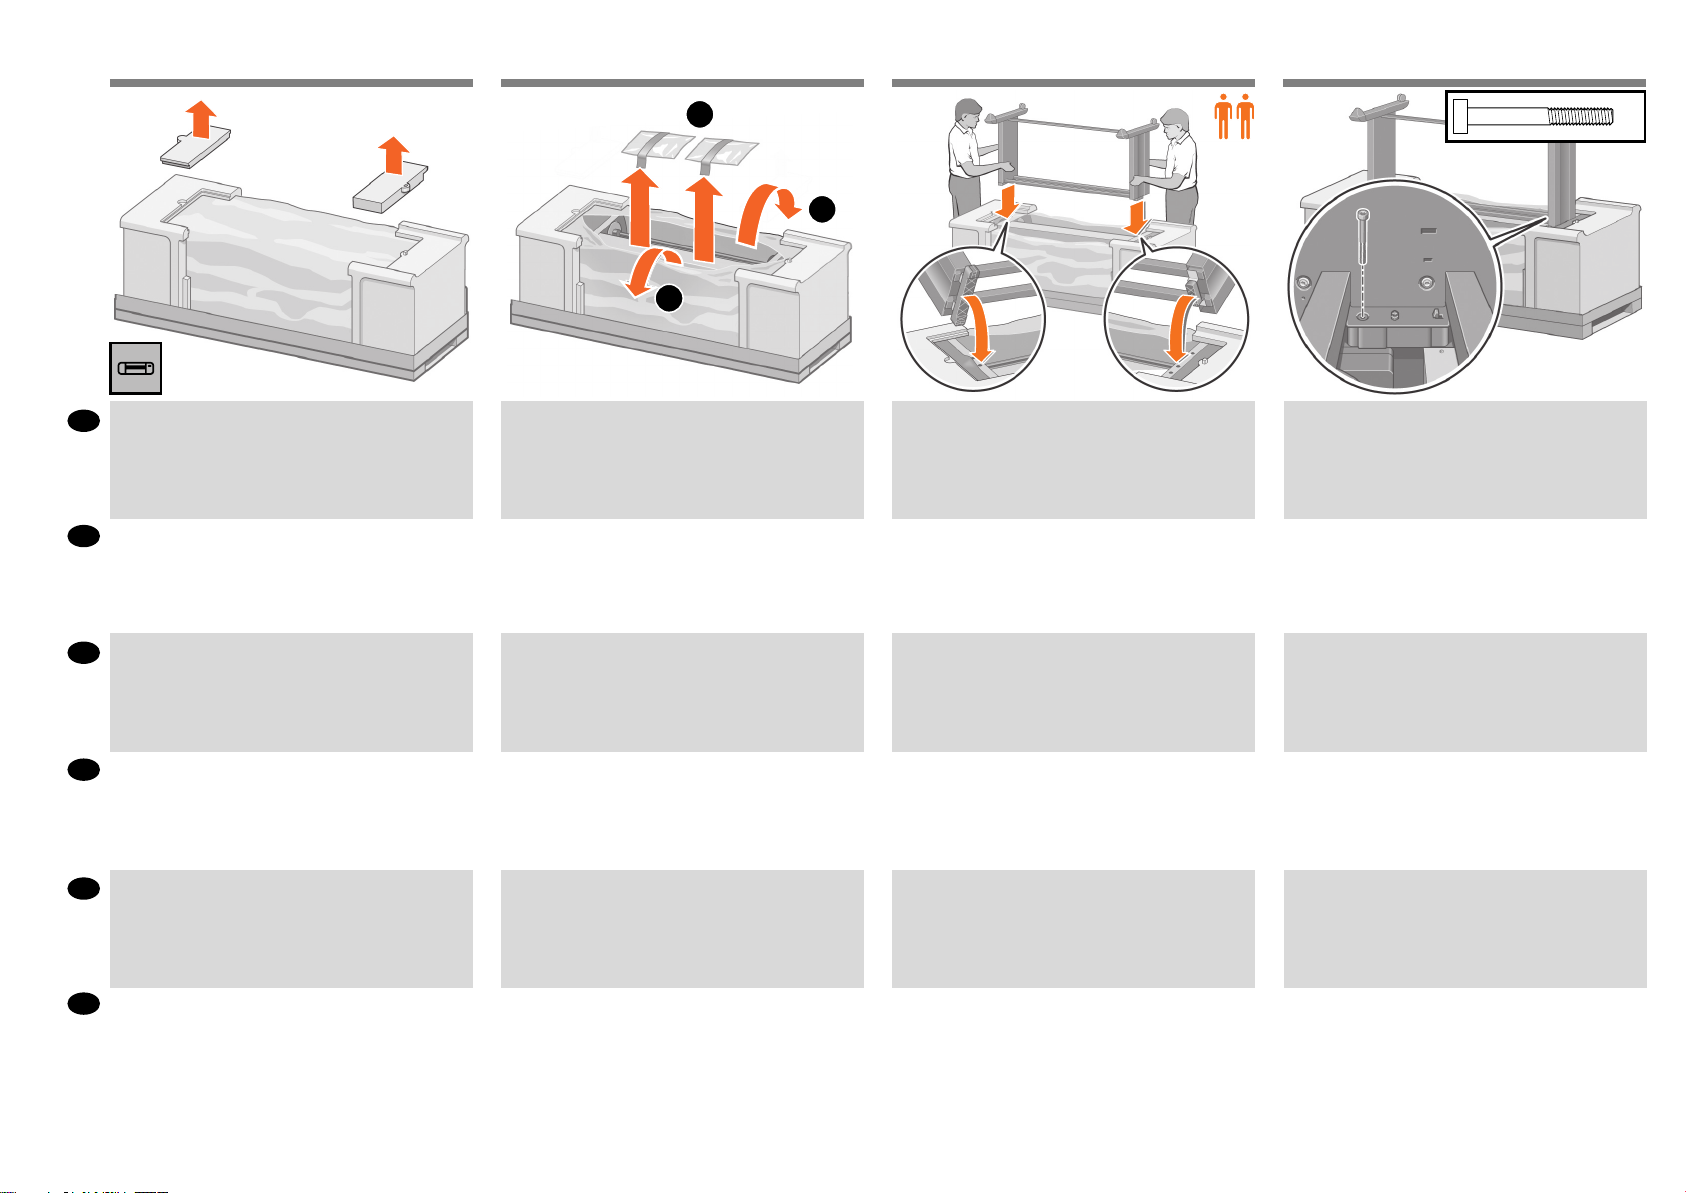
EN
Remove the packaging
JA
パッケージの開梱
取下包装
從包裝中取出
KO
포장재 제거
ID
Lepaskan kemasan
1 2 3
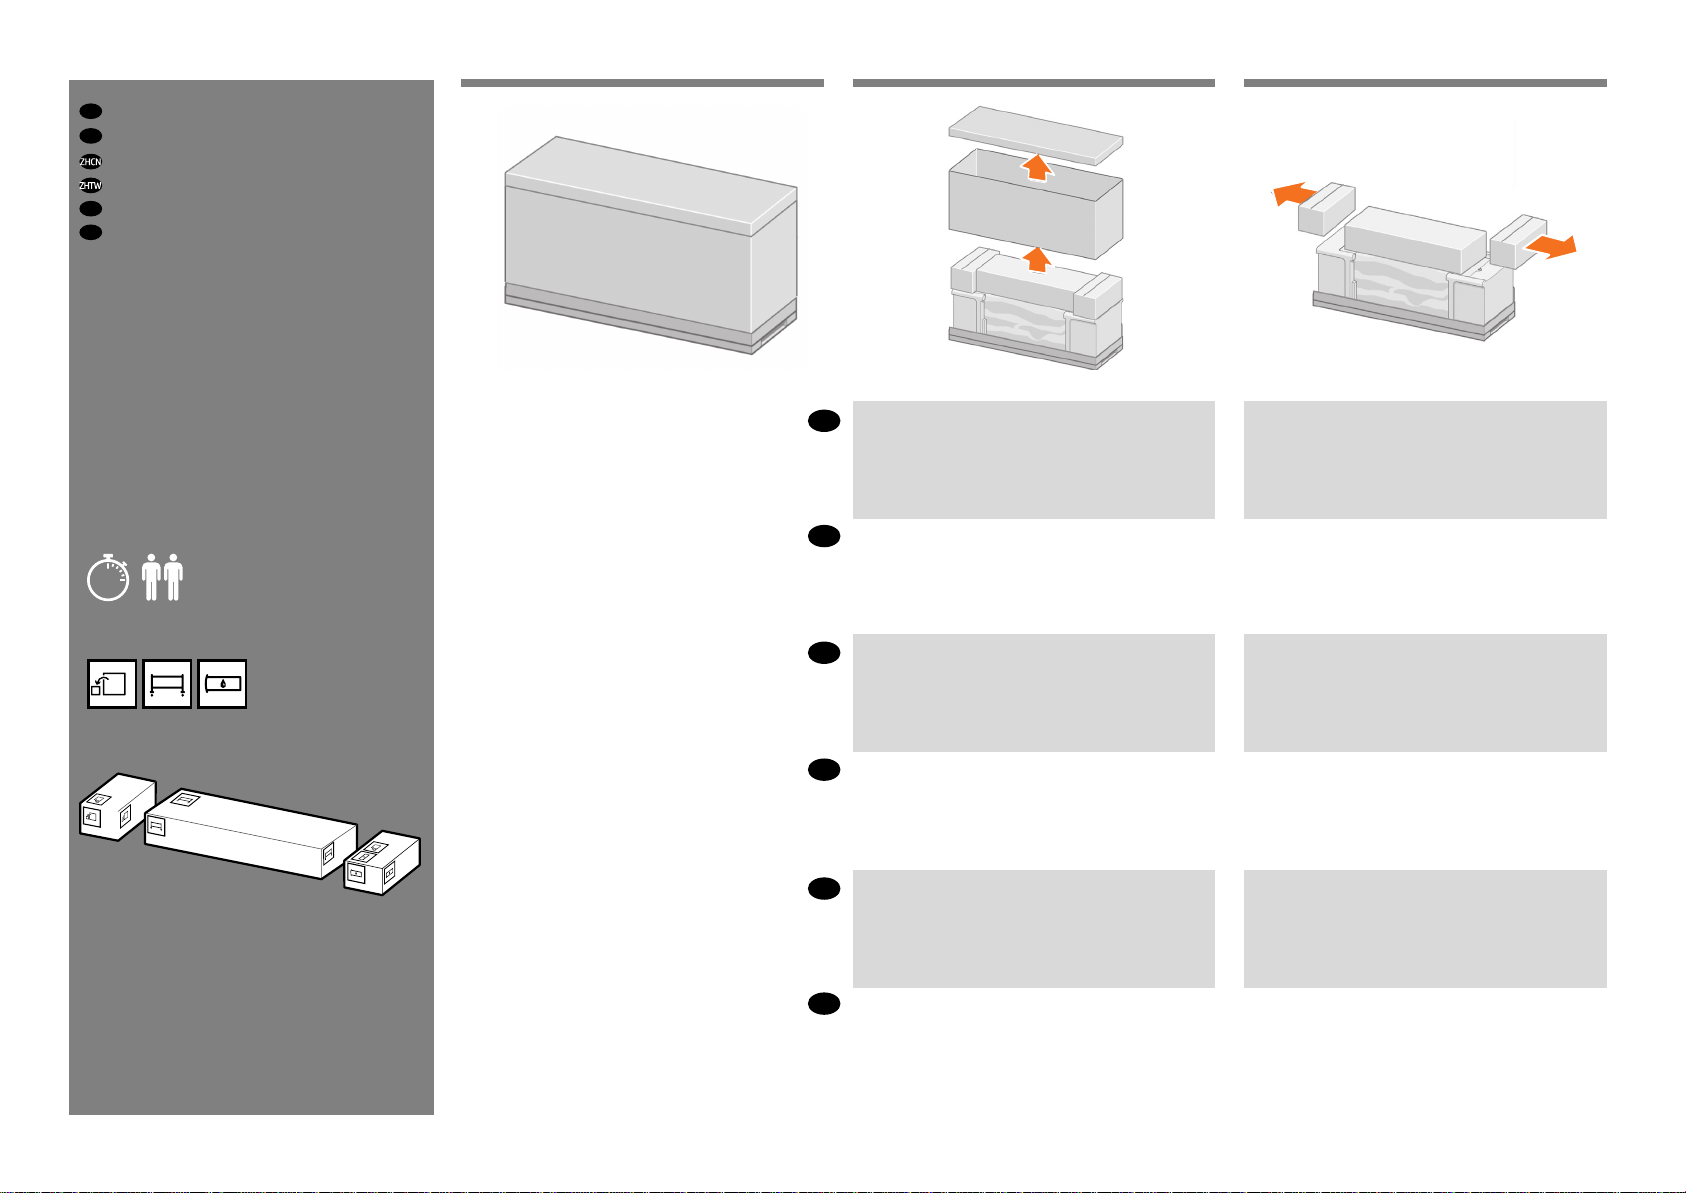
Remove the boxes shown.
EN
図のように箱を取り除きます。
JA
Remove the boxes shown.
図のように箱を取り除きます。
5’
如图所示,取下包装箱。
ZHCN
ZHTW
取下包裝盒,如圖中所示。
표시된 상자를 들어냅니다.
KO
如图所示,取下包装箱。
取下包裝盒,如圖中所示。
표시된 상자를 들어냅니다.
ID
Keluarkan boks yang ditunjukkan.
2
Keluarkan boks yang ditunjukkan.
Page 3
4 5 6
EN
Assemble the stand
JA
スタンドの組み立て
装配支架
組裝機架
KO
스탠드 조립하기
ID
Memasang dudukan
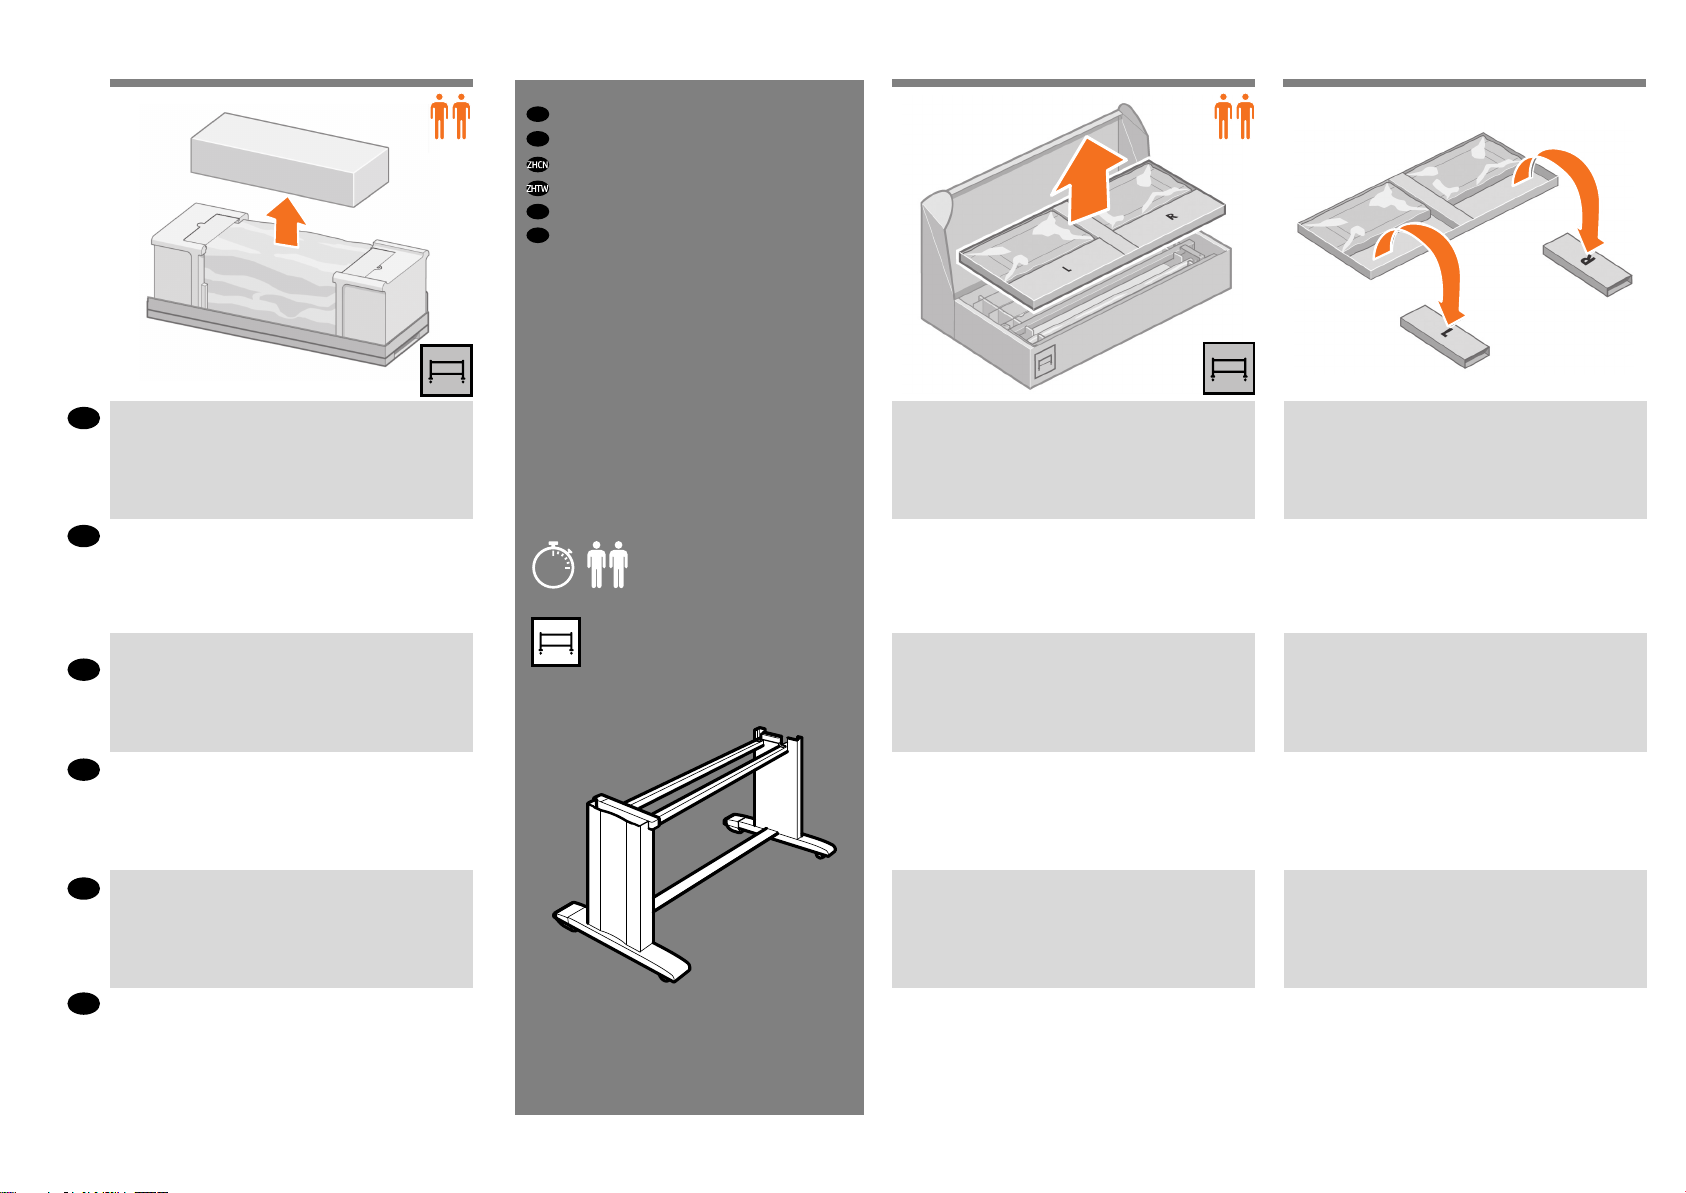
Remove the box shown.
EN
図のように箱を取り除きます。
JA
如图所示取下包装箱。
IT
取下包裝盒,如圖中所示。
ZHTW
표시된 상자를 들어냅니다.
KO
20’
Remove the rst tray from the box shown.
図のように、箱から一番上のトレイを取り出します。
如图所示从包装箱中取出第一个托盘。
從包裝盒中取出第一個托架。
표시된 상자에서 첫 번째 용지함을 제거합니다.
Remove the two boxes marked L and R from the rst tray.
取り出したトレイから、L(左)およびR(右)という文字
が書かれている2つの箱を取り出します。
从第一个托盘上取下标记有L和R的两个盒子。
取出第一個托架上標示L和R的兩個包裝盒。
L과 R이라고 표시된 상자 두 개를 첫 번째 용지함에서
제거합니다.
Keluarkan boks yang ditunjukkan.
ID
3
Keluarkan baki pertama dari boks yang ditunjukkan.
Keluarkan dua kotak yang bertanda L dan R dari baki
pertama.
Page 4
87 9 10
Lower the left side of the cross-brace onto the box marked
EN
L and the right side of the cross-brace onto the box
marked R.
クロスブレイスの左側をL(左)という文字が書かれて
JA
いる箱の上に下ろし、クロスブレイスの右側をR(右)
という文字が書かれている箱の上に下ろします。
将支撑横梁的左侧放到标记有L的盒子上,支撑横梁
ZHCN
的右侧放到标记有R的盒子上。
ZHTW
將橫撐桿左側放在標示L的包裝盒上,右側則放在標
示R的包裝盒上。
버팀대 왼쪽은 L 표시 상자 위로 내리고 버팀대 오른쪽은
KO
R 표시 상자 위로 내립니다.
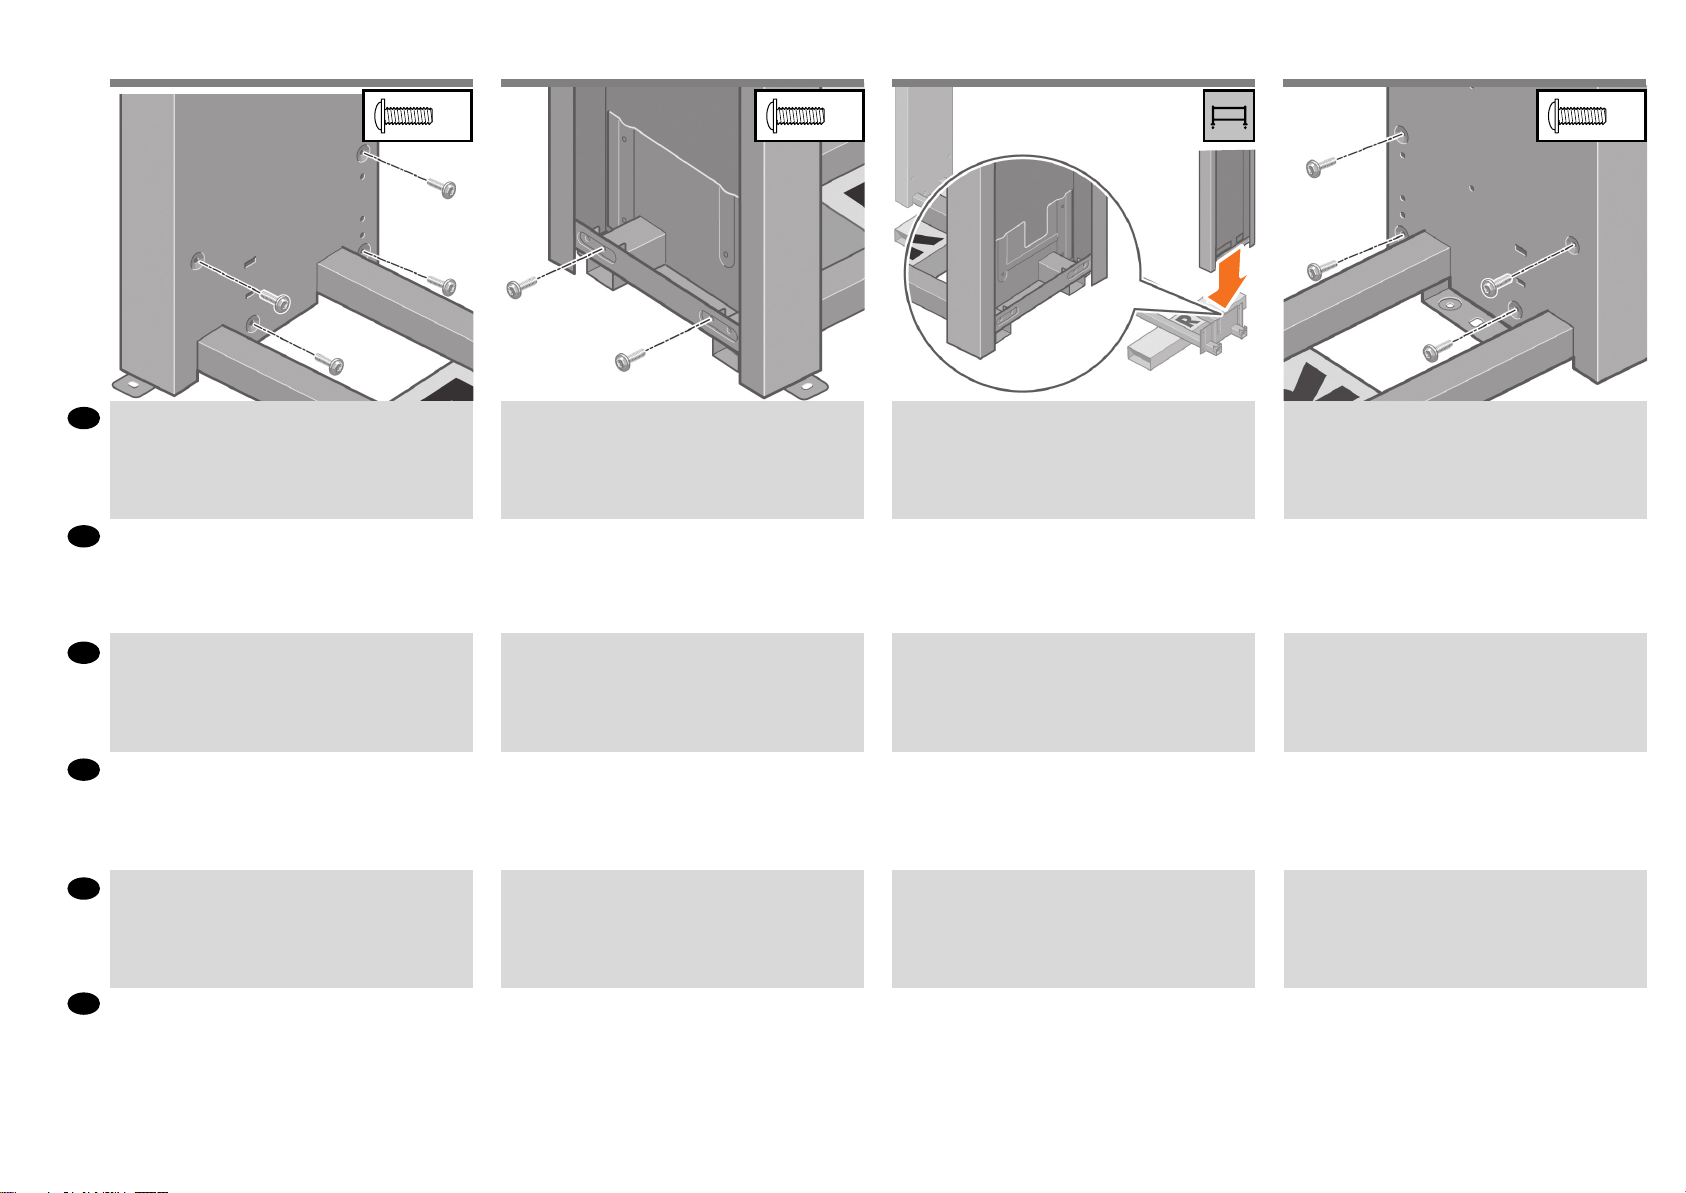
Locate the bag of screws and the screwdriver provided.
Notice that the screwdriver is slightly magnetic. Because
spare screws are supplied, some screws will remain
unused after assembly of the printer.
付属のネジとドライバを用意します。このドライバ
は磁石になっています。予備のネジが含まれている
ため、何本かのネジは使用されないまま残ります。
找到随附的装有螺钉和螺丝刀的袋子。请注意,螺丝
刀带有轻微的磁性。由于提供了备用螺钉,因此组装
完打印机后,会剩下一些未用的螺钉。
找出裝有螺絲和螺絲起子的袋子。請注意,螺絲起子
具有微弱的磁性。由於我們有提供備用螺絲,因此完
成印表機組裝後仍會有多餘的未用螺絲。
나사가 들어 있는 봉지와 드라이버를 꺼냅니다.
드라이버는 약간 자성을 갖고 있습니다.여분의 나사가
제공되므로 프린터 조립 후에도 일부 나사는 사용하지
않은 상태로 남게 됩니다.
Remove the left leg from the box, and then remove the two
pieces inside the leg.
箱から左脚部を取り出し、次に、脚部内にある2つの
梱包材を取り除きます。
从包装箱取出左支柱,然后卸下支柱里面的两块衬
板。
從包裝盒中取出左側腳架,然後取出腳架中的兩塊包
裝材。
상자에서 왼쪽 다리를 꺼낸 후 다리 안쪽의 조각 두 개를
제거합니다.
Lower the left leg onto the left side of the cross-brace. The
left leg will t only on the left side of the cross-brace.
左脚部を、クロスブレイスの左側に差し込みます。
左脚部は、クロスブレイスの左側にのみ取り付ける
ことができます。
将左支柱安装到支撑横梁的左侧。左支柱将只能安装
到支撑横梁的左侧。
將左側腳架放到橫撐桿左側。左側腳架只能裝在橫撐
桿左側。
왼쪽 다리를 버팀대 왼쪽 위로 내립니다.왼쪽 다리는
가로대 왼쪽에만 맞습니다.
ID
Turunkan sisi kiri penahan silang di atas kotak bertanda L
dan sisi kanan penahan silang di atas kotak bertanda R
Temukan kantong sekrup dan obeng yang tersedia.
Perhatikan bahwa obeng sedikit bersifat magnet. Karena
tersedia sekrup cadangan, beberapa sekrup tidak
digunakan setelah pemasangan printer.
Keluarkan kaki kiri dari boks, kemudian keluarkan kedua
bagian di dalam kaki.
4
Turunkan kaki kiri ke sebelah kiri penahan silang. Kaki kiri
hanya akan pas di sebelah kiri penahan silang.
Page 5
1211 13 14
Use four screws on the inside of the left leg to attach the left
EN
leg to the cross-brace.
左脚部の内側にある4本のネジを使用して、左脚部を
JA
クロスブレイスに取り付けます。
在左支柱的内侧用四个螺钉将其固定到支撑横梁。
ZHCN
x4
Use two screws on the outside of the left leg to attach the
left leg to the cross-brace.
左脚部の外側にある2本のネジを使用してクロスブ
レイスに取り付けます。
在左支柱的外侧用两个螺钉将其固定到支撑横梁。
Lower the right leg onto the right side of the cross-brace.
The right leg will t only on the right side of the cross-brace.
右脚部を、クロスブレイスの右側に差し込みます。
右脚部は、クロスブレイスの右側にのみ取り付ける
ことができます。
将右支柱安装到支撑横梁的右侧。右支柱将只能安装
到支撑横梁的右侧。
Use four screws on the inside of the right leg to attach the
right leg to the cross-brace.
右脚部の内側にある4本のネジを使用して、右脚部を
クロスブレイスに取り付けます。
在右支柱的内侧用四个螺钉将其固定到支撑横梁。
x4x2
ZHTW
使用四顆螺絲從左側腳架內側將它裝到橫撐桿上。
왼쪽 다리 안쪽에 있는 나사 네 개를 사용하여 왼쪽 다리를
KO
버팀대에 연결합니다.
ID
Gunakan empat sekrup di bagian dalam kaki kiri untuk
memasang kaki kiri ke penahan silang.
使用兩顆螺絲從左側腳架外側將它裝到橫撐桿上。
왼쪽 다리 바깥쪽에 있는 나사 두 개를 사용하여 왼쪽
다리를 버팀대에 연결합니다.
Gunakan dua sekrup di bagian luar kaki kiri untuk
memasang kaki kiri ke penahan silang.
5
將右側腳架放到橫撐桿右側。右側腳架只能裝在橫撐
桿右側。
오른쪽 다리를 버팀대 오른쪽 위로 내립니다.오른쪽
다리는 가로대 오른쪽에만 맞습니다.
Turunkan kaki kanan ke sebelah kanan penahan silang. Kaki
kanan hanya akan pas di sebelah kanan penahan silang.
使用四顆螺絲從右側腳架內側將它裝到橫撐桿上。
오른쪽 다리 안쪽에 나사 네 개를 사용하여 오른쪽 다리를
버팀대에 연결합니다.
Gunakan empat sekrup di bagian dalam kaki kanan untuk
memasang kaki kanan ke penahan silang.
Page 6
1615 17 18
Use two screws on the outside of the right leg to attach the
EN
right leg to the cross-brace.
右脚部の外側にある2本のネジを使用して、右脚部を
JA
クロスブレイスに取り付けます。
在右支柱的外侧用两个螺钉将其固定到支撑横梁。
ZHCN
x2
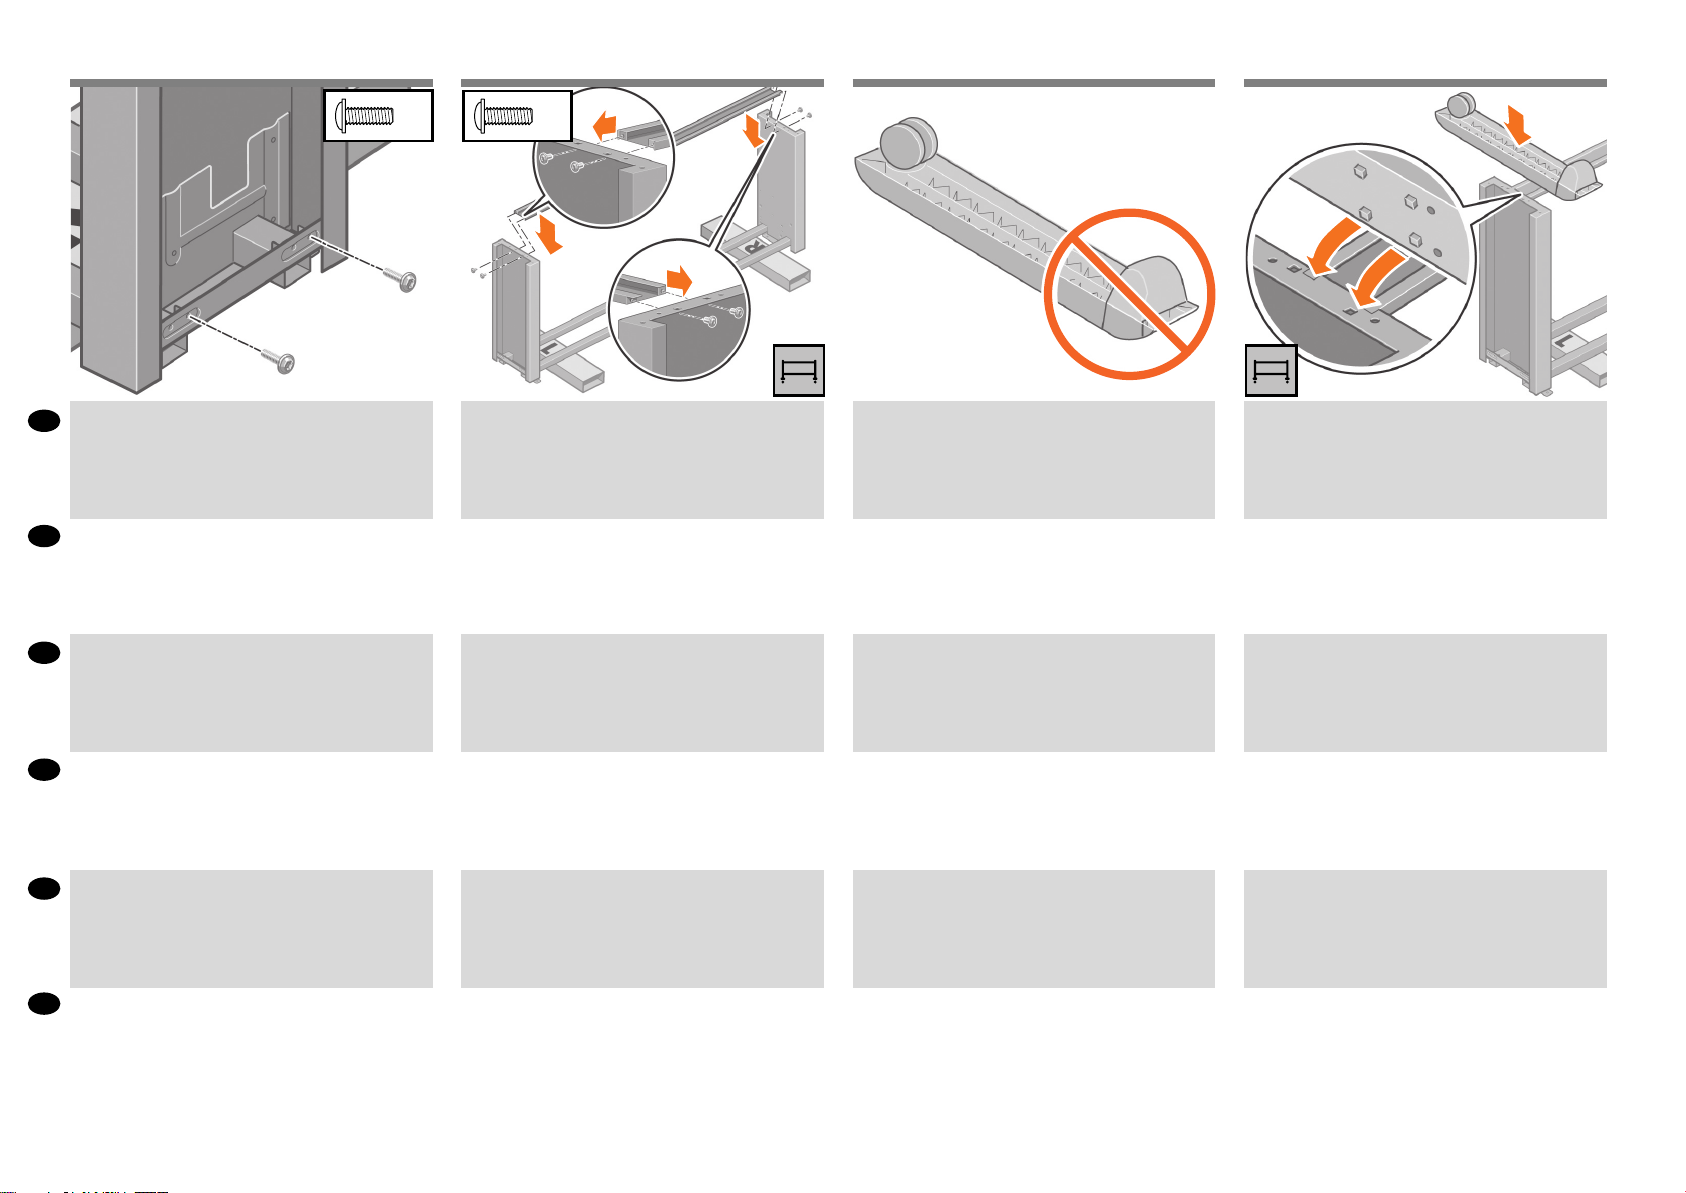
Use four screws to attach the cross-bar to the legs.
4本のネジで、クロスバーを脚部に取り付けます。
用四个螺钉将横杆固定到支柱上。
x4
Notice that there is anti-slip material around two of the
wheels on the feet. DO NOT REMOVE this material yet.
足部の一方のキャスターに滑り止めが付いているこ
とを確認してください。この滑り止めは、この時点
ではまだ取り外さないでください。
请注意,在两个脚滚轮的外面装有防滑外壳。先不要
卸下此材料。
Place a foot on the left leg. There are pins to help you
correctly position the foot. Do not remove the anti-slip
material from the wheel.
足部の一方を、左脚部の所定の位置に合わせます。
足部のピンを利用して、正しい位置に合わせてくだ
さい。キャスターに付いている滑り止めは取り外さ
ないでください。
将一个脚架放在左支柱上。利用脚架上的定位销正确
定位脚架。不要从滚轮上卸下防滑材料。
ZHTW
使用兩顆螺絲從右側腳架外側將它裝到橫撐桿上。
오른쪽 다리 바깥쪽에 있는 나사 두 개를 사용하여 오른쪽
KO
다리를 버팀대에 연결합니다.
ID
Gunakan dua sekrup di bagian luar kaki kanan untuk
memasang kaki kanan ke penahan silang.
使用四顆螺絲將橫撐桿裝到腳架上。
나사 네 개를 사용하여 버팀대를 다리에 연결합니다.
Gunakan empat sekrup untuk memasang palang silang ke
kaki-kaki.
請注意,腳座的兩個腳輪上都有防滑材質。請先不要
取下這些防滑材質。
발 끝의 바퀴 두 개에 미끄럼 방지재가 붙어 있습니다.
아직 이것을 제거하지 마십시오.
Perhatikan bahwa ada bahan anti selip di antara kedua roda
pada kaki. JANGAN LEPASKAN bahan ini pada tahap ini.
6
將腳座放到左側腳架。腳座上有定位卡榫可以協助您
正確地固定腳座。請勿取下腳輪上的防滑材質。
왼쪽 다리에 발을 놓습니다.발의 위치를 바로 잡을 수
있는 핀이 있습니다.미끄럼 방지재를 바퀴에서 제거하지
마십시오.
Pasang pijakan di kaki kiri. Tersedia pin untuk membantu
Anda memasang kaki dengan benar. Jangan lepaskan
bahan anti selip dari roda.
Page 7
2019 21 22
Use four screws to attach the foot to the left leg. Tighten
EN
each screw half-way, and then gradually tighten each screw
completely.
4本のネジで、足部を左脚部に取り付けます。各ネジ
JA
を緩めに締め、次に、完全に締まるまで徐々に締め
ます。
用四个螺钉将脚架固定到左支柱上。先将每个螺钉拧
ZHCN
到一半,然后逐渐拧紧每个螺钉,直到所有螺钉都完
全拧紧。
x4
Position the other foot on the right leg. There are pins to
help you correctly position the foot. Do not remove the
anti-slip material from the wheel.
足部のもう一方を、右脚部の所定の位置に合わせま
す。足部のピンを利用して、正しい位置に合わせてく
ださい。キャスターに付いている滑り止めは取り外さ
ないでください。
将另一个脚架放在右支柱上。利用脚架上的定位销正
确定位脚架。不要从滚轮上卸下防滑材料。
Use four screws to attach the foot to the right leg. Tighten
each screw half-way, and then gradually tighten each screw
completely.
4本のネジで、足部を右脚部に取り付けます。各ネ
ジを緩めに締め、次に、完全に締まるまで徐々に締
めます。
用四个螺钉将脚架固定到右支柱上。先将每个螺钉拧
到一半,然后逐渐拧紧每个螺钉,直到所有螺钉都完
全拧紧。
x4
Roll the stand assembly into its upright position.
組み立てたスタンドを垂直に立てます。
翻转支架组件,使其直立放置。
ZHTW
使用四顆螺絲將腳座裝到左側腳架上。先將各個螺絲鎖
半緊,然後再慢慢地逐一全部鎖緊。
나사 네 개를 사용하여 발을 왼쪽 다리에 연결합니다.모든
KO
나사를 절반 정도 조인 다음 차례대로 완전히 조입니다.
ID
Gunakan empat sekrup untuk memasang pijakan ke kaki
kiri. Kencangkan setiap sekrup setengah penuh, kemudian
kencangkan perlahan sampai terkunci sepenuhnya.
將另一個腳座放到右側腳架上。腳座上有定位卡榫可
以協助您正確地固定腳座。請勿取下腳輪上的防滑材
質。
다른 쪽 발을 오른쪽 다리에 놓습니다.발의 위치를 바로
잡을 수 있는 핀이 있습니다.미끄럼 방지재를 바퀴에서
제거하지 마십시오.
Pasang pijakan yang lain di kaki kanan. Tersedia pin untuk
membantu Anda memasang kaki dengan benar. Jangan
lepaskan bahan anti selip dari roda.
7
使用四顆螺絲將腳座裝到右側腳架上。先將各個螺絲
鎖半緊,然後再慢慢地逐一全部鎖緊。
나사 네 개를 사용하여 발을 오른쪽 다리에 연결합니다.
모든 나사를 절반 정도 조인 다음 차례대로 완전히
조입니다.
Gunakan empat sekrup untuk memasang pijakan
ke kaki kanan. Kencangkan setiap sekrup setengah
penuh, kemudian kencangkan perlahan sampai terkunci
sepenuhnya.
將機架組件轉為直立放置。
스탠드 어셈블리를 위쪽으로 굴려 넣습니다.
Putar rakitan dudukan ke posisi tegak.
Page 8
2423 25
EN
x1
x1
Attach the printer engine to the stand
JA
スタンドへのプリンタエンジンの
取り付け
将打印机引擎连接到底座
將印表機引擎裝到機架上
KO
스탠드에 프린터 엔진 연결
ID
Pasang mesin printer ke dudukan
Attach the left stand spacer to the top of the left leg. It will
EN
“click” into place.
左側のスタンドスペーサを左脚部の上部に取り付け
JA
ます。所定の位置にカチッと音がするまで押し込み
ます。
将左支架衬垫固定到左支柱上面。听到喀哒声表明卡
ZHCN
入到位。
ZHTW
將左側機架墊裝到左側腳架上方。它會喀嚓一聲卡入
定位。
왼쪽 스탠드 스페이서를 왼쪽 다리 위쪽에 연결합니다.
KO
딸깍 소리가 나야 합니다.
Attach the right stand spacer to the top of the right leg. It
will “click” into place.
右側のスタンドスペーサを右脚部の上部に取り付け
ます。所定の位置にカチッと音がするまで押し込み
ます。
将右支架衬垫固定到右支柱上面。听到喀哒声表明卡
入到位。
將右側機架墊裝到右側腳架上方。它會喀嚓一聲卡入
定位。
오른쪽 스탠드 스페이서를 오른쪽 다리 위쪽에
연결합니다.딸깍 소리가 나야 합니다.
Position the left and right leg covers on the front of the legs
(1), and then clip the rear edge (2) into place.
左脚部および右脚部のカバーを各脚部の前面の側
にわせ(1)、後ろ側の端を所定の位置にはめ込みま
す(2)。
将左右支柱的盖板定位到支柱前面(1),然后用力将后
缘(2)卡入到位。
將左側與右側腳架護蓋置於腳架前緣(1),然後把後緣
(2)卡入定位。
쪽 및 오른쪽 다리 덮개를 다리 앞쪽(1)에 놓은 후 뒤쪽
모서리(2)를 제 위치에 맞춥니다.
15’
ID
Pasang bantalan dudukan kiri di atas kaki kiri. Bantalan akan
‘terkunci’ pada tempatnya.
Pasang bantalan dudukan kanan di atas kaki kanan.
Bantalan akan ‘terkunci’ pada tempatnya.
Pasang penutup kaki kiri dan kanan di depan kaki (1), lalu
jepitkan tepi belakang (2) pada tempatnya.
8
Page 9
2726 28 29
Remove the two packing pieces shown.
EN
図のように、2つある梱包材を取り除きます。
JA
取下两个填塞片,如图所示。
ZHCN
2
1
1
Pull open the protective plastic from the base of the printer
(1), and then remove the two desiccant bags (2).
保護用ビニールシートを引っ張って開き(1)、2つあ
る乾燥剤の袋を取り除きます(2)。
从打印机底部拉开防护塑料(1),然后将两袋干燥剂
(2)取出。
Lift the stand assembly onto the printer engine. The antislip material should face the rear of the printer.
組み立てたスタンドを、プリンタエンジンの上に載
せます。滑り止めが、プリンタの背面側を向くよう
にしてください。
将支架组件抬起,放到打印机引擎上。防滑材料应朝
向打印机背面。
x1
Use one screw to attach the right side of the stand to the
printer engine. Make sure that the screw is fully tightened.
スタンドの右側を、ネジ1本でプリンタエンジンに固
定します。ネジはしっかり締めてください。
用一个螺钉将支架右侧固定到打印机引擎。确保完全
拧紧螺钉。
取出圖中所示的兩塊包裝材。
ZHTW
그림과 같이 조립용 막대 두 개를 제거합니다.
KO
Keluarkan kedua materi kemasan yang ditunjukkan.
ID
拉開印表機底座的保護塑膠(1),然後取出裡面的兩包
乾燥劑(2)。
보호용 플라스틱을 프린터 바닥(1)에서 당겨 연 다음
건조제 봉지(2) 두 개를 제거합니다.
Tarik keluar plastik pelindung dari dasar printer (1),
kemudian keluarkan dua kantong pengering (2).
9
將機架組件提起,放到印表機引擎上方。防滑材質此
時應面向印表機後方。
스탠드 어셈블리를 프린터 엔진 위로 들어 옮깁니다.
미끄럼 방지재가 프린터 뒤쪽을 향하도록 해야 합니다.
Angkat rakitan dudukan ke atas mesin printer. Bahan anti
selip harus menghadap ke belakang printer.
使用一顆螺絲將機架右側裝到印表機引擎上。確定將
螺絲完全鎖緊。
나사 하나를 사용하여 스탠드 오른쪽을 프린터 엔진에
연결합니다.나사가 완전히 고정되었는지 확인합니다.
Gunakan satu sekrup untuk memasang sisi kanan
dudukan ke mesin printer. Pastikan sekrup dikencangkan
sepenuhnya.
Page 10
3130 32 33
x2
Use two screws to attach the left side of the stand to the
EN
printer. Make sure that the screws are fully tightened.
スタンドの左側を、ネジ2本でプリンタに固定しま
JA
す。ネジはしっかり締めてください。
使用两枚螺钉将支架左侧连接到打印机。如图所示,连
ZHCN
接金属板。确保完全拧紧螺钉。
使用兩個螺絲將支架的左側固定至印表機。如圖所示固
ZHTW
定金屬板。請確認螺絲已完全鎖緊。
나사 두 개를 사용하여 받침대 왼편을 프린터에
KO
부착합니다. 금속판을 그림과 같이 부착합니다. 나사가
완전히 고정되었는지 확인하십시오.
Place the spare box and the comsumables box against
the rear of the printer box. The arrows on the boxes must
point towards the printer box. Make sure that the anti-slip
material is attached to the two rear wheels.
予備の箱とサプライ品の箱を、プリンタの箱の背面
側に密着させて置きます。箱に記載されている矢印
が、プリンタの側を向くようにしてください。左右
の後部キャスターに滑り止めが付いていることを確
認します。
将备件箱和耗材箱倚靠在打印机包装箱的背面。箱子
上的箭头必须指向打印机包装箱。确保将防滑材料连
接到两个后轮上。
將備用盒及耗材盒放到印表機包裝盒後方。這些盒子
上的箭頭應該指向印表機包裝盒。確定兩個後腳輪上
都有防滑材質。
예비 부품 상자와 소모품 상자를 프린터 상자를 향해
놓습니다.상자 위의 화살표가 프린터 상자를 가리켜야
합니다.뒤쪽 바퀴 두 개에 미끄럼 방지재가 붙어 있는지
확인합니다.
Rotate the printer onto the spare box and the consumables
box. HP recommends four people to complete this task.
予備の箱とサプライ品の箱の上にプリンタを載せて
回転させます。この作業は、4名で行うことをお勧め
します。
将打印机翻转到备件箱和耗材箱上。HP建议由四个人
完成此任务。
將印表機轉放到備用盒及耗材盒上。HP建議由四個人
來完成這項工作。
프린터를 예비 부품 상자와 소모품 상자 위로
회전시킵니다.이 작업은 네 사람이 함께 하는 것이
좋습니다.
Rotate the printer until the back of the printer rests on the
spare box and the consumables box, and the wheels with
the anti-slip material touch the oor.
プリンタの背面を2つの箱の上に完全に載せます。次
に、プリンタを滑り止めの付いたキャスターが床に
着くまで起こします。
翻转打印机,直到打印机背面搁在备件箱和耗材箱上
并且包有防滑材料的滚轮接触到地面。
旋轉印表機,直到將印表機後側放到備用盒及耗材盒
上,且有防滑材質的腳輪碰到地板為止。
프린터 뒤쪽이 예비 부품 상자와 소모품 상자 위로
오고 미끄럼 방지재가 달린 바퀴가 바닥에 닿을 때까지
프린터를 회전시킵니다.
Gunakan dua sekrup untuk memasang sisi kiri dudukan ke
ID
printer. Pastikan sekrup dikencangkan sepenuhnya.
Letakkan boks suku cadang dan boks persediaan sekali
pakai menempel di bagian belakang boks printer. Tanda
panah pada boks harus mengarah ke boks printer. Pastikan
bahan anti selip terpasang pada kedua roda belakang.
Putar printer ke atas boks suku cadang dan boks
persediaan sekali pakai. HP menganjurkan empat orang
untuk menyelesaikan tugas ini.
10
Putar printer sampai bagian belakang printer bersandar
pada boks suku cadang dan boks persediaan sekali pakai,
dan roda dengan bahan anti selip menyentuh lantai.
Page 11

3534 36 37
Remove the pallet before lifting the printer to its upright
EN
position.
プリンタを垂直に立たせる前に、パレットを取り除
JA
きます。
在将打印机抬起到直立位置之前,先取下包装纸壳。
ZHCN
在將印表機立起來之前,先將托架移除。
ZHTW
프린터를 수직으로 세우기 전에 팔레트를 제거합니다.
KO
Use the hand holds at the rear of the printer engine
to carefully lift the printer to its upright position. HP
recommends four people to complete this task.
手でプリンタエンジンの背面を押さえながら、プリ
ンタを慎重に持ち上げます。この作業は、4名で行う
ことをお勧めします。
抓住打印机引擎背面的扶手,小心抬起打印机使其直立
放置。HP建议由四个人完成此任务。
用手托住印表機引擎後面,小心地將印表機立起
來。HP建議由四個人來完成這項工作。
프린터 엔진 뒤쪽에 있는 손잡이를 사용하여 프린터를
조심스럽게 수직으로 세웁니다.이 작업은 네 사람이 함께
하는 것이 좋습니다.
Remove the two foam end-packs, and then remove the
plastic covering from the printer engine.
2つの梱包用発泡スチロールと、プリンタエンジンを
覆っているシートを取り除きます。
取下两端的泡沫包装,然后从打印机引擎上取下塑料
遮盖。
拿開兩塊泡棉包裝,然後將印表機引擎上的塑膠套移
除。
폼 엔드팩 두 개를 제거한 후 프린터 엔진에서 플라스틱
덮개를 제거합니다.
Remove the anti-slip material from the two rear wheels on
the stand assembly.
組み立てたスタンドの左右の後部キャスターに付い
ている滑り止めを取り外します。
从支架组件的两个后滚轮上卸下防滑材料。
移除機架組件兩個後腳輪上的防滑材質。
스탠드 어셈블리의 뒤쪽 바퀴 두 개에서 미끄럼 방지재를
제거합니다.
Lepaskan palet sebelum mengangkat printer ke posisi tegak.
ID
Pegang bagian belakang mesin printer untuk mengangkat
printer dengan hati-hati ke posisi tegak. HP menganjurkan
empat orang untuk menyelesaikan tugas ini.
11
Lepaskan kedua gabus bantalan ujung, lalu lepaskan
penutup plastik dari mesin printer.
Lepaskan bahan anti selip dari kedua roda belakang rakitan
dudukan.
Page 12

EN
Assemble the bin
JA
用紙スタッカを取り付ける
组装纸盒
組裝紙槽
KO
용지함 조립
ID
Memasang nampan
38 39 40
x4
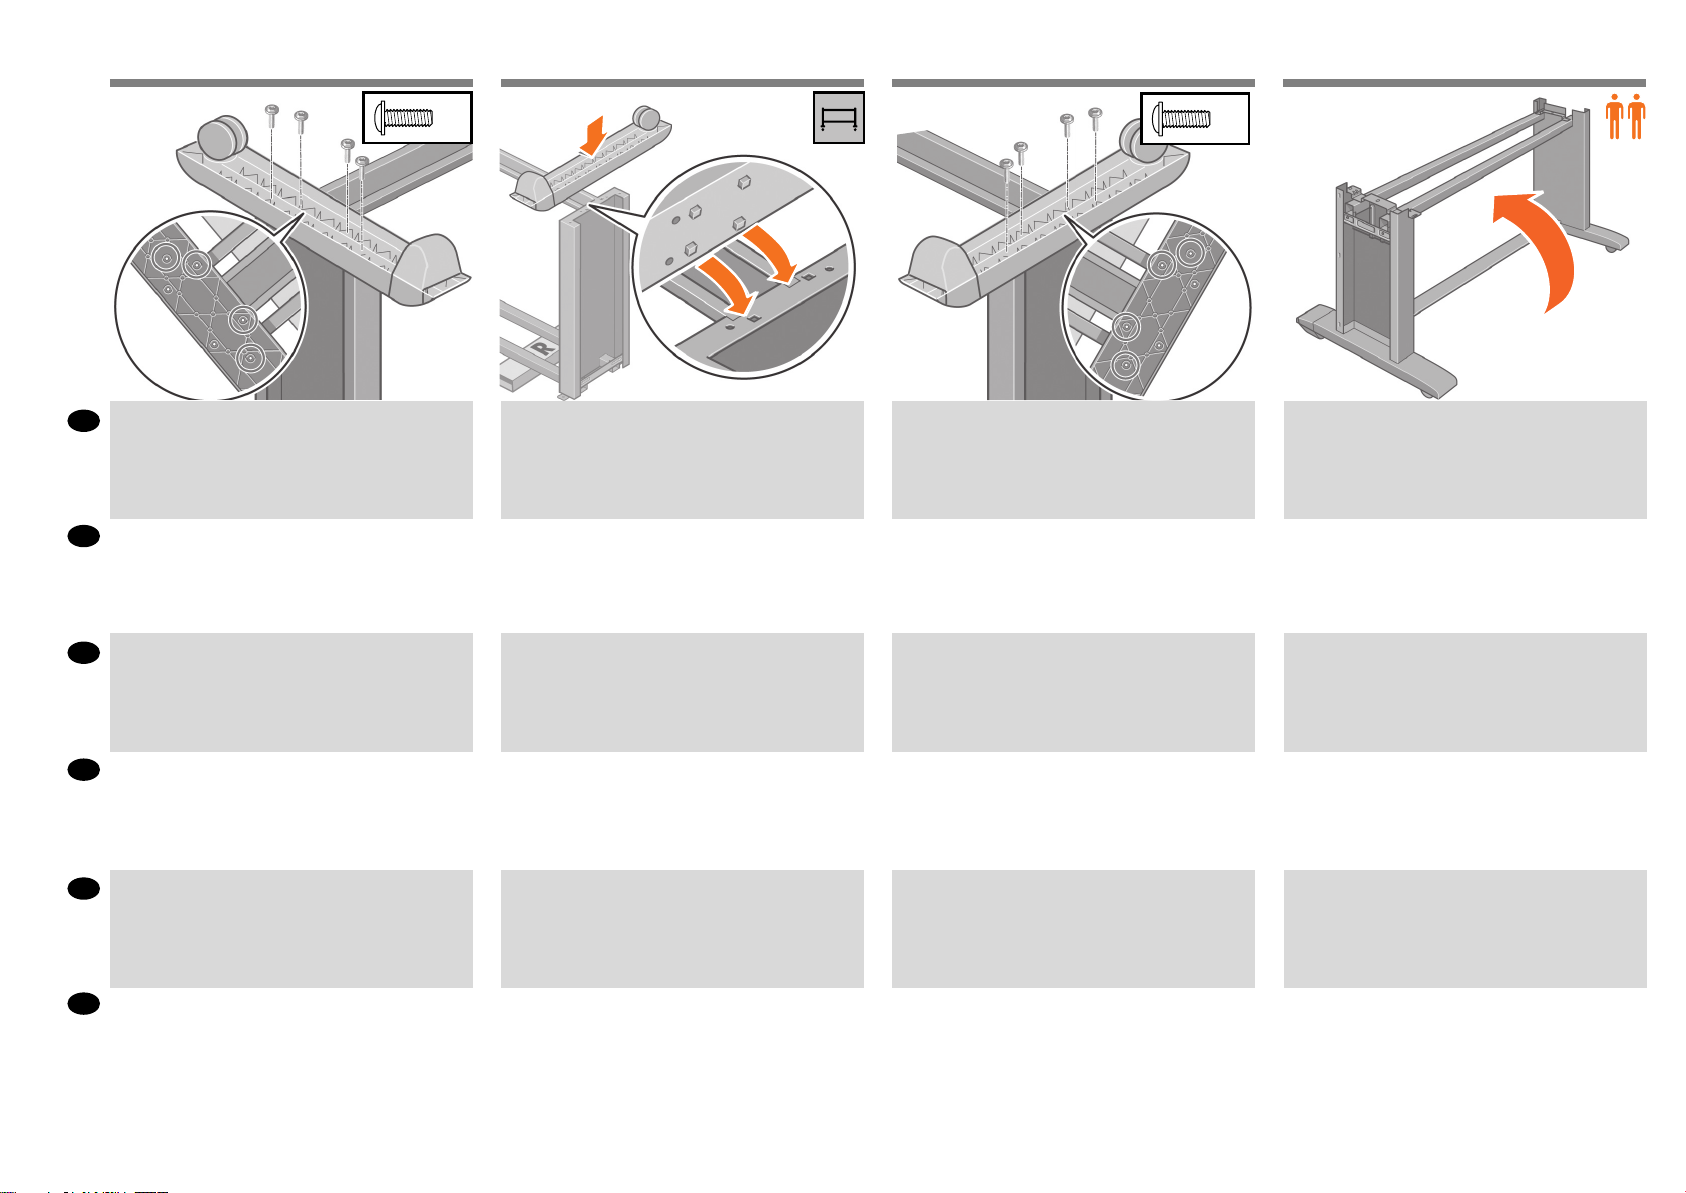
Remove the two brackets from the box that contains the
EN
stand and the bin.
Note: The brackets are marked L and R.
スタンドと用紙スタッカが入っている箱から、ブラ
JA
ケットを2つ取り外します。
注記:ブラケットにはそれぞれL(左)およびR(右)
という文字が書かれています。
Use four screws to attach the brackets to the lower part of
the printer legs. (Each bracket requires two screws.)
ブラケットを4本のネジでプリンタ脚部の下部に取
り付けます(各ブラケットにはそれぞれ2本のネジが
必要です)。
Attach the two plastic brackets to the top part of the printer
legs. Insert the tab at the bottom of the bracket into the
leg, and then ‘click’ the top of the bracket into place.
2つのプラスチックのブラケットをプリンタ脚部の上
部に取り付けます。ブラケット底部にあるタブを脚
部に挿入し、ブラケット上部を所定の位置にカチッ
と音がするまで押し込みます。
7’
从装有底座和纸盒的包装箱中取出两个托架。
ZHCN
注:托架分别标记有L和R。
ZHTW
從包含機架和紙槽的包裝盒中取出兩個托座。
註:托座標示為L和R。
스탠드와 용지대가 들어 있는 상자에서 브래킷 두 개를
KO
제거합니다.
참고:브래킷에는 각각L과R표시가 되어 있습니다.
用四个螺钉将托架固定到打印机支柱的下部。(每个
托架需要两个螺钉。)
使用四顆螺絲將托座裝到印表機腳架下方(每個托座
需要用到兩顆螺絲)。
나사 네 개를 사용하여 브래킷을 프린터 다리의 아래쪽에
연결합니다.(각 브래킷에는 나사가 두 개씩 필요합니다.)
将另外两个塑料托架固定到打印机支柱上部。将托架
底部的卡舌插入支柱,直至支柱顶部发出喀哒声表明
卡入到位。
將兩個塑膠托座裝到印表機腳架上方。將托座下方的
卡榫插入腳架,然後將托座頂端喀嚓一聲卡入定位。
플라스틱 브래킷 두 개를 프린터 다리의 위쪽에
연결합니다.브래킷 아래쪽에 있는 탭을 다리 안쪽에 끼운
후 브래킷 위쪽을 딸깍 소리가 나게 넣습니다.
ID
Keluarkan dua braket dari boks yang berisi dudukan dan
nampan.
Catatan: Braket ini diberi tanda L dan R.
Gunakan empat sekrup untuk memasang braket ke
bagian bawah kaki printer. (Setiap braket memerlukan dua
sekrup.)
12
Pasang kedua braket plastik di bagian atas kaki printer.
Masukkan tonjolan di bagian bawah braket ke dalam kaki,
kemudian ‘klik’ bagian atas braket pada tempatnya.
Page 13

4241 43 44
Remove the bin assembly from the box that contains the
EN
stand and the bin. Note: unfold the bin.
スタンドと用紙スタッカが入っている箱から、用紙
JA
スタッカを取り外します。注記:用紙スタッカを開
きます。
从装有底座和纸盒的包装箱中取出纸盒组件。注:请
ZHCN
展开纸盒。
從包含機架和紙槽的包裝盒中取出紙槽組件。註:展
ZHTW
開接紙器。
스탠드와 용지대가 들어 있는 상자에서 용지대
KO
어셈블리를 제거합니다.참고:용지함을 펼칩니다.
Insert the two bin arms into the bin cross-bar.
用紙スタッカの2本のアームを用紙スタッカのクロス
バーに挿入します。
将两个纸盒撑臂插入纸盒横杆。
將兩個紙槽臂插入紙槽橫撐桿。
용지대 암 두 개를 용지대 버팀대에 끼웁니다.
Insert the bin cross-bar into the two plastic brackets.
用紙スタッカのクロスバーを2つのプラスチック製
ブラケットに挿入します。
将纸盒的另一个横杆的两端分别挂在两个塑料托架
上。
將紙槽橫撐桿插入兩個塑膠托座中。
용지대 버팀대를 플라스틱 브래킷 두 개에 끼웁니다.
Click the ends of both bin arms into the metal brackets.
用紙スタッカの両方のアームの端を金属製のブラケ
ットにカチッと音がするまで押し込みます。
将两个纸盒撑臂的末端卡入金属托架。
將紙槽臂兩端卡入金屬托座中。
용지대 암 두 개의 끝부분을 금속 브래킷 안에 끼워
넣습니다.
Keluarkan rakitan nampan dari boks yang berisi dudukan
ID
dan nampan. Catatan: buka nampan.
Masukkan kedua lengan nampan ke dalam palang silang
nampan.
13
Masukkan palang silang nampan ke dalam kedua braket
plastik.
Klik ujung kedua lengan nampan ke dalam braket logam.
Page 14

2
1
3
4
5
6
7
45 46 47
EN
Unpack more components
JA
その他のコンポーネントの開梱
打开其他组件的包装
取出其他組件
KO
추가 구성 요소 포장 풀기
ID
Membuka kemasan komponen lain
Use the blue handle to open the bin.
EN
HP recommends that you leave the bin in the closed
position while completing the printer assembly procedures.
青いハンドルを使用して、用紙スタッカを開きま
JA
す。HPは、プリンタの組み立てが完了するまで、
用紙スタッカを閉じた状態にしておくことをお勧め
します。
使用蓝色手柄打开纸盒。
ZHCN
HP建议在完成打印机组装过程时将纸盒保留为闭合
位置。
ZHTW
用藍色把手打開紙槽。
HP建議您在完成印表機組裝程序後將紙槽保持在關
閉位置。
파란색 손잡이를 잡고 용지대를 엽니다.
KO
프린터 조립 절차를 완료하는 동안 용지대를 닫아 두는
것이 좋습니다.
Remove the protective covering from the printer window
and the front panel screen.
ウィンドウとフロントパネルの保護カバーを剥がし
ます。
Remove the packing tapes marked 1 to 7 from the exterior
of the printer, also remove the two rear ones.
梱包テープ(1)~(7)をプリンタの外側から剥がしま
す。また、背面の2つも取り除きます。
5’
从打印机护盖和前面板屏幕上取下防护膜。
移除印表機上蓋和前控制面板螢幕上的保護貼。
프린터 창과 전면 패널 화면에서 보호용 덮개를
제거합니다.
撕下打印机表面标有1到7的包装胶带,还有后面的
两个。
拆掉印表機外部標示1到7的包裝膠帶,以及後方的
兩條膠帶。
프린터 바깥쪽에서 1에서 7까지 번호가 붙은 포장
테이프를 떼고 뒤에 있는 두 개도 뗍니다.
ID
Gunakan tangkai biru untuk membuka nampan. HP
menganjurkan Anda untuk meninggalkan nampan
dalam posisi tertutup selama menyelesaikan prosedur
pemasangan printer.
Lepaskan lapisan pelindung dari jendela printer dan layar
panel depan.
14
Lepaskan pita pengiriman bertanda 1 s.d 7 dari bagian luar
printer, kemudian turunkan deektor, lepaskan juga dua
item di bagian belakang.
Page 15

3
4948 50 51
1
Open the printer window, and then remove the packing
EN
items 1 to 4 from the interior of the printer.
プリンタのウィンドウを開き、次に、梱包材1~4をプ
JA
リンタの内側から取り除きます。
打开打印机护盖,从打印机内部取出填塞物1至4。
ZHCN
2
2
1
4
Remove the packing tape (1), then remove the packing
piece (2). Then close the printer window.
梱包テープを取り除き(1)、それから梱包材を取り除
きます(2)。ウィンドウを閉じます。
取下胶带(1),然后取下填塞块(2)。然后关闭打印机
护盖。
Plug the Gigabit Ethernet cable into the Gigabit Ethernet
connection.
ギガビットイーサネットケーブルをギガビットイー
サネット接続部に接続します。
将千兆位以太网电缆插入千兆位以太网接口。
Pass the Gigabit Ethernet cable through the hook at the rear
of the printer.
ギガビットイーサネットケーブルは、プリンタ背面
のフックにかけます。
让以太网电缆穿过打印机背面的挂钩。
ZHTW
開啟印表機窗蓋,然後從印表機內部移除包裝物1至4
。接著關閉印表機窗蓋。
프린터 창을 연 다음 프린터 내부에서 1에서 4까지 표시된
KO
포장 항목을 제거합니다.
ID
Buka jendela printer, lalu lepaskan materi kemasan 1 hingga
4 dari bagian dalam printer.
移除包裝標籤(1),然後移除包裝紙(2)。그리고 프린터
창을 닫습니다.
포장용 테이프(1)를 제거한 다음 포장 부분(2)을
제거합니다.
Lepaskan pita kemasan (1), lalu lepaskan lapisan pengemas
(2). Setelah itu, tutup jendela printer.
15
將Gigabit乙太網路纜線插入Gigabit乙太網路孔中。
기가비트 이더넷 케이블을 기가비트 이더넷 연결 장치에
꽂습니다.
Tancapkan kabel Gigabit Ethernet ke koneksi Gigabit
Ethernet.
將Gigabit乙太網路纜線繞過印表機後方的掛勾。
기가비트 이더넷 케이블을 프린터 뒤쪽에 있는 고리에
통과시킵니다.
Lewatkan kabel Gigabit Ethernet melalui kait di bagian
belakang printer.
Page 16

EN
Install the ink supplies
JA
インクサプライ品の取り付け
安装墨水耗材
安裝墨水耗材
KO
잉크 소모품 설치
ID
Memasang persediaan tinta
52 53 54
40’
Plug the power cable into the rear of the printer, and then
EN
plug the other end into the AC power outlet.
電源ケーブルをプリンタ背面に差し込み、反対側を
JA
AC電源コンセントに差し込みます。
将电源线插入打印机后面的电源接口,将另一端接至
ZHCN
交流电源插座。
ZHTW
將電源線插入印表機後方,然後將電源線另一端插入
電源插座中。
전원 케이블을 프린터 뒤쪽에 꽂은 다음 한쪽 끝을 AC
KO
전원 소켓에 끼웁니다.
Turn the Power switch to the On position at the rear of the
printer.
プリンタ背面の電源スイッチをオンにします。
将打印机后面的“电源”开关按至“打开”位置。
將印表機背面的電源開關切換到「開啟」位置。
프린터 뒤쪽의 전원 스위치를 켭니다.
If the power light on the front panel remains o, press the
Power button to switch on the printer. Note: This printer is
Energy Star compliant and can be left on without wasting
energy. Leaving it on improves response time and overall
system reliability.
フロントパネルの電源ランプが点灯しない場合は、
電源ボタンを押してプリンタの電源を入れます。
注:このプリンタはEnergyStarに準拠しており、エ
ネルギーを浪費することなく使用できます。これを
オンにすると、応答時間とシステム全体の信頼性が
向上します。
如果前面板上的电源指示灯不亮,按下“电源”按钮
可以打开打印机。注:本打印机符合能源之星标准,
可以一直处于开机状态而不会浪费能源。让打印机始
终处于开机状态可以减少响应时间并提高系统的整体
可靠性。
如果前控制面板上的電源燈是熄滅的,請按下電源按
鈕開啟印表機電源。註:本印表機符合「能源之星」
標準,可隨時保持開啟而不會浪費電源。隨時保持開
啟既可縮短印表機的回應時間,也能改善系統整體的
可靠性。
전면 패널의 전원 표시등이 꺼져 있으면 프린터 위의
전원 버튼을 눌러 켭니다.참고:이 프린터는 Energy Star
호환 프린터이므로 전원을 켠 상태에서도 에너지가
낭비되지 않습니다.프린터의 전원을 켠 상태로 두면 응답
시간 및 전체 시스템 안정성이 향상됩니다.
ID
Tancapkan kabel listrik ke bagian belakang printer,
kemudian tancapkan ujung yang lain ke stopkontak listrik
AC.
Hidupkan saklar Daya di bagian belakang printer ke posisi
On [Aktif].
16
Jika lampu daya di panel depan tetap mati, tekan tombol
Daya untuk menghidupkan printer. Catatan: Printer ini
memenuhi persyaratan Energy Star dan dapat terus
dihidupkan tanpa membuang energi. Membiarkan printer
ini hidup akan meningkatkan waktu respon dan keandalan
sistem secara keseluruhan.
Page 17

5655 57 58
1’
Wait until this message appears on the front panel (~1
EN
EN
minute). Use the Up and Down buttons to highlight the
language you want, and then press the OK button.
しばらくすると、フロントパネルに図のようなメッセ
JA
ージが表示されます(所要時間最長1分)。[上矢印]ボ
タンと[下矢印]ボタンを使用して使用する言語をハイ
ライトし、[OK]ボタンを押します。
等待前面板上显示此消息(大约1分钟)。使用向上
ZHCN
或向下按钮高亮显示您需要的语言,然后按“确定”
按钮。
ZHTW
請等候直到此訊息顯示在前控制面板上(約1分鐘)
。使用向上和向下按鈕反白顯示所要的語言,然後按
下OK按鈕。
이 메시지가 전면 패널에 나타날 때까지 1분 정도
KO
기다립니다.위아래 화살표 버튼을 사용하여 원하는
언어를 강조한 후 확인 버튼을 누릅니다.
Wait until the Customer Involvement Program information
appears.
顧客の貢献プログラムの情報が表示されるまで待ち
ます。
请等待,直至显示客户参与计划信息。
請等候直到客戶參與計畫資訊顯示。
고객 참여 프로그램 정보가 나타날 때까지 기다립니다.
Use the Up and Down buttons to highlight your answer, then
press the OK button.
[上矢印]ボタンと[下矢印]ボタンを使用して回答をハ
イライトし、[OK]ボタンを押します。
使用向上或向下按钮高亮显示您的回答,然后按“确
定”按钮。
使用向上和向下按鈕反白您的答覆,然後按下OK按
鈕。
위 아래 버튼을 사용하여 답변을 강조 표시한 후 확인
버튼을 누릅니다.
Select your region and press OK to continue.
続行する場合は、地域を選択して[OK]を押してく
ださい。
选择您所在的区域,按“确定”继续。
選擇國家/地區,然後按下「OK」以繼續。
지역을 선택하고 계속하려면 OK를 누르십시오.
ID
Tunggu sampai pesan ini ditampilkan pada panel depan (~1
menit). Gunakan tombol Naik dan Turun untuk menyorot
bahasa yang dikehendaki, lalu tekan tombol OK.
Tunggu hingga informasi Program Keterlibatan Pelanggan
ditampilkan.
17
Gunakan tombol Atas dan Bawah untuk menyorot jawaban
Anda, lalu tekan tombol OK.
Pilih negara/kawasan Anda, lalu tekan OK untuk
melanjutkan.
Page 18

6059 61 62
Your region appears highlighted on the map for
EN
EN
conrmation. Press OK to continue.
確認するために、マップ上の地域が強調表示されま
JA
す。[OK]を押して続行します。
您的区域将在地图上高亮显示以便确认。按“确定”
ZHCN
继续。
ZHTW
您選擇的國家/地區會在地圖上反白顯示,供您確認。
按下「OK」以繼續。
확인을 위해 지역이 지도에 강조 표시되어 있습니다.
KO
계속하려면 OK를 누르십시오.
ID
Negara/kawasan Anda akan disorot pada peta untuk
konrmasi. Tekan OK untuk melanjutkan.
A message appears to inform you about supported ink
cartridges. Note: what appears where ‘X’ is marked will
depend on your region.
Press OK to continue.
サポートされているインクカートリッジについて知
らせるメッセージが表示されます。注記:「X」で記
されている部分は地域によって異なります。
[OK]を押して続行します。
将显示一条消息通知您支持的墨盒。注意:标记“X”
的地方所显示的实际内容取决于您所在的区域。
按“确定”继续。
隨即出現訊息通知您支援的墨水匣。注意:出現的項
目是否標有「X」要視您的國家/地區而定。
按下「OK」以繼續。
지원되는 잉크 카트리지에 대해 알려주는 메시지가
나타납니다. 참고: ‘X’가 표시된 곳은 지역에 따라
다릅니다.
계속하려면 OK를 누르십시오.
Pesan akan ditampilkan untuk memberitahukan Anda
tentang kartrid tinta yang didukung. Catatan: nilai yang
akan menggantikan tanda ‘X’ tergantung pada negara/
kawasan Anda.
Tekan OK untuk melanjutkan.
Wait until this message appears. The front panel guides
you through the procedures for inserting the ink supplies.
Follow strictly step by step.
しばらくすると図のようなメッセージが表示されま
す。フロントパネルに、インクサプライ品の取り付
け手順が表示されます。必ず手順の順番に従って
ください。
等待显示此消息。前面板将引导您完成插入墨水耗材
的过程。严格地一步一步执行操作。
請等候直到顯示此訊息。前控制面板會帶領您進行插
入墨水耗材的程序。請完全依照指示逐步進行。
이 메시지가 나타날 때까지 기다립니다.전면 패널에 잉크
소모품 삽입 절차가 표시됩니다.각 단계별 지침을 정확히
따라야 합니다.
Tunggu sampai pesan ini ditampilkan. Panel depan
memandu Anda menjalankan prosedur untuk memasukkan
persediaan tinta. Lakukan setiap langkah dengan benar.
To release the ink cartridge drawer, gently pull down on the
blue handle, and then slide out the ink cartridge drawer.
青いタブを静かに下げ、インクカートリッジ用の引
き出しを引き出します。
要取出墨盒抽屉,请轻轻向下拉蓝色手柄,然后滑出
墨盒抽屉。
如果要鬆開墨水匣抽屜,請將藍色把手輕輕向下拉,
然後拉出墨水匣抽屜。
잉크 카트리지를 꺼내려면 파란색 핸들을 부드럽게
아래로 당긴 후 잉크 카트리지 함을 밖으로 밉니다.
Tarik tangkai biru dengan perlahan ke bawah lalu geser
keluar laci kartrid tinta.
18
Page 19

6463 65 66
Shake the ink cartridge vigorously for about 15 seconds. Be
EN
EN
careful not to strike it against any surface because this can
damage the cartridge.
インクカートリッジを15秒間よく振ります。破損の原
JA
因となるため、カートリッジを振る時は物にぶつけな
いようにしてください。
用力摇动墨盒大约15秒钟。注意不要碰到任何物体,
ZHCN
否则可能损坏墨盒。
ZHTW
用力搖晃墨水匣大約15秒。請小心不要撞到任何東
西,否則會損壞墨水匣。
약 15초 동안 잉크 카트리지를 잘 흔들어 줍니다.
KO
카트리지를 흔드는 동안 다른 물체에 부딪치지 않도록
조심하십시오. 손상될 수 있습니다.
Place the ink cartridge in the ink cartridge drawer. The
arrow on the front of the ink cartridge should point
upwards. Note that there are marks on the drawer to show
the correct location to place the cartridge.
インクカートリッジをインクカートリッジ用の引き
出しの上に置きます。インクカートリッジの正面の
矢印が上を向いているかどうかを確認します。引き
出しには、カートリッジを取り付ける位置が示され
ています。
将墨盒放入墨盒抽屉。墨盒前面的箭头应指向上方。
请注意,抽屉上的标记显示了墨盒的正确放置位置。
將墨水匣插入墨水匣抽屜。墨水匣前方的箭頭應該向
上。請注意,墨水匣抽屜上有記號顯示正確的墨水匣
裝入位置。
잉크 카트리지를 잉크 카트리지 함에 삽입합니다.잉크
카트리지 전면의 화살표는 위를 향해야 합니다.카트리지
함 위에 올바른 카트리지 위치를 나타내는 표시가
있습니다.
Push the ink cartridge drawer back into the printer until the
drawer locks into position.
インクカートリッジ用の引き出しを、所定の位置に
固定されるまでプリンタの中に押し込みます。
将墨盒抽屉推回打印机,直到抽屉锁定到位。
將墨水匣抽屜推入印表機,直到鎖至定位。
잉크 카트리지 함을 프린터 안으로 완전히 밀어
넣습니다.
Do not to open the printer window until the ink cartridges
have correctly installed.
インクカートリッジが正しく取り付けられるまでプ
リンタのウィンドウを開かないでください。
在墨盒正确安装好之前,请不要打开打印机护盖。
請勿在墨水匣正確安裝之前打開印表機上蓋。
잉크 카트리지가 제대로 설치될 때까지 프린터 창을
열지 마십시오.
ID
Kocok kartrid tinta dengan keras selama sekitar 15 detik.
Berhati-hatilah jangan sampai menabrak permukaan apa
pun karena dapat merusak kartrid.
Masukkan kartrid tinta ke dalam laci kartrid tinta. Tanda
panah di depan kartrid tinta harus mengarah ke atas.
Perhatikan bahwa laci diberi tanda untuk menunjukkan
lokasi penempatan kartrid yang benar.
19
Dorong masuk laci kartrid tinta kembali ke dalamprinter
sampai laci terkunci pada tempatnya.
Jangan buka jendela printer hingga kartrid tinta telah
dipasang dengan benar.
Page 20

6867 69 70
The printer “beeps” when the cartridge is correctly installed.
EN
EN
カートリッジが正しく取り付けられると、プリンタ
JA
のブザー音が鳴ります。
如果正确安装了墨盒,打印机将发出哔声。
ZHCN
每當正確裝入墨水匣,印表機就會發出嗶聲。
ZHTW
카트리지가 제대로 설치되면 프린터에서 삐 소리가
KO
납니다.
Follow the same instructions to insert the other seven ink
cartridges.
同様の手順で、残りの7つのインクカートリッジを挿
入します。
按照相同方法插入其他七个墨盒。
依照相同指示裝入其他的七個墨水匣。
나머지 일곱 개 잉크 카트리지를 삽입할 때도 동일한
절차를 따릅니다.
Open the printer window, and then remove the packing
foam from the top of the printhead carriage.
プリンタのウィンドウを開き、次に、梱包材をプリ
ントヘッドキャリッジから取り除きます。
打开打印机护盖,从打印头托架上取下包装泡沫。
打開印表機上蓋,然後取出印字頭托架上方的包裝泡
棉。
프린터 창을 열고 프린트 헤드 캐리지 상단에서 포장용
폼을 제거합니다.
Remove the packing tape that is holding down the
printhead carriage latch.
プリントヘッドキャリッジラッチを固定している梱
包テープを剥がします。
取下向下压住打印头托架栓锁的包装带。
拆掉固定印字頭托架閂鎖的包裝膠帶。
프린트 헤드 캐리지 걸쇠를 누르고 있는 포장 테이프를
제거합니다.
ID
Printer akan berbunyi ‘bip’ bila kartrid dimasukkan dengan
benar.
Ikuti petunjuk yang sama untuk memasukkan ketujuh
kartrid tinta lainnya.
Buka jendela printer, kemudian keluarkan gabus kemasan
dari bagian atas carriage printhead.
20
Lepaskan pita kemasan yang menahan kait carriage
printhead ke bawah.
Page 21

7271 73 74
2
1
Pull up and release the blue latch on top of the carriage
EN
assembly.
Lift the blue latch to open the printhead cover.
キャリッジ上部の青いラッチを引き上げて、ロックを
JA
解除します。
青いラッチを持ち上げて、プリントヘッドカバーを
開きます。
向上拉以释放托架组件上面的蓝色栓锁。
ZHCN
提起蓝色栓锁即可打开打印头遮盖。
拉出並鬆開托架組件頂端的藍色閂鎖。
ZHTW
提起藍色閂鎖以掀開印字頭護蓋。
캐리지 어셈블리 상단의 파란색 걸쇠를 들어올려 풉니다.
KO
파란색 걸쇠를 들어올려 프린트 헤드 덮개를 엽니다.
Remove the big yellow label that covers the setup purgers.
Ensure Setup purgers are installed. Close printhead cover
and window.
除去用キャップを覆っている黄色のラベルを取り外
します。除去用キャップが取り付けられていること
を確認してください。プリントヘッドカバーとウィ
ンドウを閉じます。
撕下盖在设置冲洗器上的较大黄色标签覆盖物。确保
已安装设置冲洗器。合上打印头遮盖和护盖。
移除遮蓋設定清除器的大型黃色標籤。確定已安裝設
定清除器。合上印字頭護蓋與窗蓋。
셋업 설정된 퍼저에 붙어 있는 큰 노란색 레이블을
제거한다. 설정된 퍼저가 설치되었는지 확인하십시오.
프린트헤드 덮개와 창을 닫으십시오.
Open the window.
ウィンドウを開きます。
打开护盖。
開啟窗蓋。
창을 엽니다.
When the above question on the front panel of your printer,
you must follow steps 75 to 76 in order to answer the
question.
プリンタのフロントパネルに上の質問が表示された
ら、手順75から手順76に従って質問に答えてくだ
さい。
当您看到打印机前面板的上述问题时,必须按照步骤
75至76来回答问题。
當您看到印表機前控制面板出現上述問題時,必須依
照步驟75至76進行,以回答問題。
전면 패널에 위와 같은 질문이 표시되는 경우 75~76
단계를 수행하여 질문에 답해야 합니다.
ID
Tarik ke atas dan lepaskan kait biru di atas rakitan carriage.
Angkat kait biru untuk membuka penutup printhead.
Lepaskan label besar berwarna kuning yang menutupi
Pembersih pemasangan. Pastikan Pembersih pemasangan
telah terpasang. Tutup penutup dan jendela printhead.
21
Buka jendela.
Bila Anda melihat pertanyaan di atas pada panel depan
printer, ikuti langkah 75 hingga 76 untuk menjawab
pertanyaan.
Page 22

7675 77 78
Open window and printhead cover to access printheads.
EN
EN
Look at each setup purger and verify that each setup purger
contains ink.
ウィンドウとプリントヘッドカバーを開けて、プリ
JA
ントヘッドにアクセスしてください。各除去用キャ
ップにインクが残っているかどうかを確認してくだ
さい。
打开护盖和打印头遮盖以检查打印头。请检查每个设
ZHCN
置冲洗器是否包含墨水。
1
2
Lower the blue latch to close the printhead cover.
Pull down to lock the blue latch on top of the carriage
assembly.
青いラッチを下げてプリントヘッドカバーを閉じ
ます。
キャリッジ上部の青いラッチを引き下げて、ロック
します。
放下蓝色栓锁以关闭打印头护盖。
向下拉以使蓝色栓锁在托架组件顶部锁定。
Select:
P All with some ink
選択:
Pすべてにインクが入っています
选择:
P全都充满墨水
2’
Wait until this message appears on the front panel.
しばらくすると、フロントパネルに図のようなメッ
セージが表示されます。
等待前面板上显示此消息。
打開窗蓋與印字頭護蓋以接觸印字頭。請先檢查各個
ZHTW
设置冲洗器,並確認每個设置冲洗器都含有墨水。
창 및 프린트헤드 덮개를 열어
KO
프린트헤드에 액세스하십시오. 설정된
퍼져에잉크가들어있는지확인합니다.
ID
Buka jendela dan penutup printhead untuk mengakses
printhead. Periksa apakah setiap Pembersih pemasangan
berisi tinta.
放低藍色閂鎖,以關閉印字頭護蓋。拉下以鎖定托架
組件上方的藍色閂鎖。
프린트헤드 덮개에 가깝게 파란색 걸쇠를 내립니다.
파란색 걸쇠를 아래로 내려 캐리지 어셈블리 상단에
고정시킵니다.
Turunkan kait biru untuk menutup penutup printhead. Tarik
ke bawah hingga kait biru terkunci di bagian atas rakitan
media.
精選:
P全部都裝填了一些墨水
추려낸.
P전부 잉크 표시되어 있음
Memilih:
P Semua diisi sedikit tinta
22
請等候直到此訊息顯示在前控制面板上。
이 메시지가 전면 패널에 나타날 때까지 기다립니다.
Tunggu sampai pesan ini ditampilkan pada panel depan.
Page 23

8079 81 82
1’
Pull open the maintenance cartridge door, which is located
EN
on the right side of the printer.
プリンタの右側にある保守カートリッジのドアを開
JA
きます。
拉开打印机右侧的维护墨盒盖。
ZHCN
拉開維護油墨匣擋門,該擋門位於印表機右側。
ZHTW
프린터 오른쪽에 있는 유지보수 카트리지 도어를 당겨
KO
엽니다.
Remove the transparent shipping tray.
Insert the maintenance cartridge, pushing it in and down
until it clicks into place, and then close the maintenance
cartridge door.
透明の出荷用トレイを取り外します。
保守カートリッジを奥まで挿入し、所定の位置にカ
チッと音がするまで上から押し込みます。次に、保
守カートリッジのドアを閉めます。
取下透明装运盖盘。插入维护墨盒,向下按直到其卡
入到位,然后合上维护墨盒盖。
取出運送用的透明托盤。插入維護油墨匣,將它推入
到定位,然後關上維護油墨匣擋門。
투명 용지함을 제거합니다.유지보수 카트리지를
삽입했으면 딸깍 소리가 날 때까지 완전히 누른 다음
유지보수 카트리지 도어를 닫습니다.
Wait until this message appears on the front panel (about
1 minute).
しばらくすると、フロントパネルに図のようなメッ
セージが表示されます(所要時間約1分)。
等待前面板上显示此消息(大约1分钟)。
請等候直到此訊息顯示在前控制面板上(約1分鐘)。
이 메시지가 전면 패널에 나타날 때까지 1분 정도
기다립니다.
Remove all the setup purgers.
除去用キャップをすべて取り外します。
卸下所有安装设置冲洗器。
卸下所有的設定清除器
모든 설정 퍼저가 설치를 제거합니다.
ID
Tarik untuk membuka pintu kartrid perawatan, yang
terdapat di sebelah kanan printer.
Keluarkan baki pengiriman transparan. Masukkan kartrid
perawatan, dorong ke dalam dan ke bawah sampai
‘terkunci’ pada tempatnya, lalu tutup pintu kartrid
perawatan.
23
Tunggu sampai pesan ini ditampilkan pada panel depan
(sekitar 1 menit).
Keluarkan semua Pembersih pemasangan kongurasi.
Page 24

8483 85 86
Remove the two protective covers on the new printhead.
EN
プリントヘッドから、2個ある保護カバーを取り外
JA
します。
取下新打印头上的两个防护盖。
ZHCN
拿掉新印字頭上的兩個保護蓋。
ZHTW
새 프린트 헤드에 있는 두 개의 보호용 덮개를
KO
제거합니다.
Lower all of the printheads vertically into their correct
positions. The printer “beeps” when each printhead is
correctly inserted.
すべてのプリントヘッドを、正しい位置に垂直に差
し込みます。各プリントヘッドが正しく取り付けら
れると、プリンタのブザー音が鳴ります。
将所有打印头竖直向下放入正确位置。每个打印头都
正确插入时,打印机会发出哔声。
將所有的印字頭垂直放入其正確位置。每當正確裝入
印字頭,印表機就會發出嗶聲。
모든 프린트 헤드를 수직으로 내려 제 위치에 맞춥니다.각
프린트 헤드가 올바로 삽입되면 프린터에서 삐 소리가
납니다.
Make sure that the printheads are correctly seated. When
all of the printheads are inserted, the front panel prompts
you to “Close printhead cover and window”.
プリントヘッドが正しく取り付けられていることを
確認します。すべてのプリントヘッドを挿入する
と、フロントパネルに「プリントヘッドカバーとウ
ィンドウを閉じます」というメッセージが表示され
ます。
确保正确安装打印头。在插入所有打印头后,前面板
会提示您“合上打印头遮盖和护盖”。
確定印字頭已正確放入。當所有印字頭都已放入後,
前控制面板會提示您「合上印字頭護蓋與上蓋」。
프린트 헤드가 제대로 설치되었는지 확인합니다.모든
프린트 헤드가 삽입되면 전면 패널에 “프린트 헤드
덮개와 창을 닫으십시오.”라는 메시지가 나타납니다.
If a “Reseat” message appears on the front panel, check
that all of the protective tape has been removed, and then
rmly reseat the printheads. If the problem persists, refer
to the User Guide. If the problem still persists, contact HP
support.
フロントパネルに「交換します」というメッセージが表
示される場合は、保護テープがすべて剥がされているこ
とを確認してから、プリントヘッドをもう一度しっかり
と取り付け直してください。問題が解決しないときは、
ユーザーガイドを参照してください。それでも問題が
解決されない場合は、HPサポートに連絡してください。
如果在前面板上显示“重新安装”消息,请检查是否
已取下所有防护胶带,然后重新牢固地安装打印头。
如果问题依然存在,请参阅《用户指南》。如果问题
仍然存在,请与HP支持部门联系。
如果前控制面板上顯示「重新插接」訊息,請檢查是
否已拆掉所有的保護膠帶,然後確實地重新裝置印字
頭。如果問題仍然存在,請參閱《使用指南》。如果
問題仍然存在,請聯絡HP支援中心。
전면 패널에 “재장착” 메시지가 나타나면 보호용 덮개를
모두 제거했는지 확인한 후 프린트 헤드를 재장착합니다.
문제가 지속되면 사용자 설명서를 참조하십시오. 문제가
지속될 경우 HP 지원센터에 문의하십시오.
ID
Lepaskan kedua lapisan pelindung pada printhead baru.
Turunkan semua printhead secara vertikal ke posisi yang
benar. Printer akan berbunyi ‘bip’ setiap kali printhead
dimasukkan dengan benar.
Pastikan printhead dipasang dengan benar. Setelah semua
printhead dimasukkan, panel depan akan meminta Anda
untuk “Close printhead cover and window” [Tutup penutup
dan jendela printhead].
24
Jika pesan “Reseat” [Atur ulang dudukan] muncul di
panel depan, periksa apakah semua pita pelindung telah
dilepaskan, kemudian pasang kembali printhead dengan
kuat. Jika masalah berlanjut, lihat Panduan Pengguna. Jika
masalah terus berlanjut, hubungi dukungan HP.
Page 25

8887 89 90
Close the carriage assembly cover.
EN
キャリッジカバーを閉じます。
JA
盖上托架组件护盖。
ZHCN
蓋上托架組件蓋。
ZHTW
캐리지 어셈블리 덮개를 닫습니다.
KO
Make sure that the blue latch is correctly engaged, and
then lower the latch.
青いラッチが正しくはめ込まれていることを確認
し、次にラッチを下げます。
确保蓝色栓锁正确咬合,然后放下栓锁。
確定藍色閂鎖已正確固定,然後放下閂鎖。
파란색 걸쇠가 올바로 걸려 있는지 확인한 후 걸쇠를
내립니다.
Close the printer window.
ウィンドウを閉じます。
盖上打印机护盖。
蓋上印表機上蓋。
프린터 창을 닫습니다.
Wait until the Ready for paper message appears on the
front panel.
フロントパネルに「用紙をセットできます」という
メッセージが表示されるまでお待ちください。
等待前面板上显示“准备装入纸张”消息。
請等候直到「等待裝入紙張」的訊息顯示在前控制面
板上。
용지 준비 메시지가 전면 패널에 나타날 때까지
기다립니다.
ID
Tutup penutup rakitan carriage.
Pastikan kait biru terpasang dengan benar, kemudian
turunkan kait tersebut.
25
Tutup jendela printer.
Tunggu sampai pesan Ready for paper [Siap untuk kertas]
ditampilkan pada panel depan.
Page 26

91 92 93
EN
Load the paper
88
JA
用紙の取り付け
装入纸张
裝入紙張
KO
용지 넣기
ID
Isikan kertas
1
2
Select the altitude where the printer is located. To select
EN
altitude go to: Menu > Setup> Printing Preferences > Select
altitude
プリンタを取り付ける高さを選択してください。高さ
JA
を選択するには、[メニュー]>[セットアップ]>[印刷
設定]から高さを選択します。
选择打印机所处的海拔高度。要选择海拔高度,请转
ZHCN
至“菜单”>“设置”>“打印首选项”>“选择海拔
高度”
選擇印表機所在的海拔高度。要選擇海拔高度,請移
ZHTW
至:「功能表」>「設定」>「列印喜好設定>「選擇海
拔高度」
25’
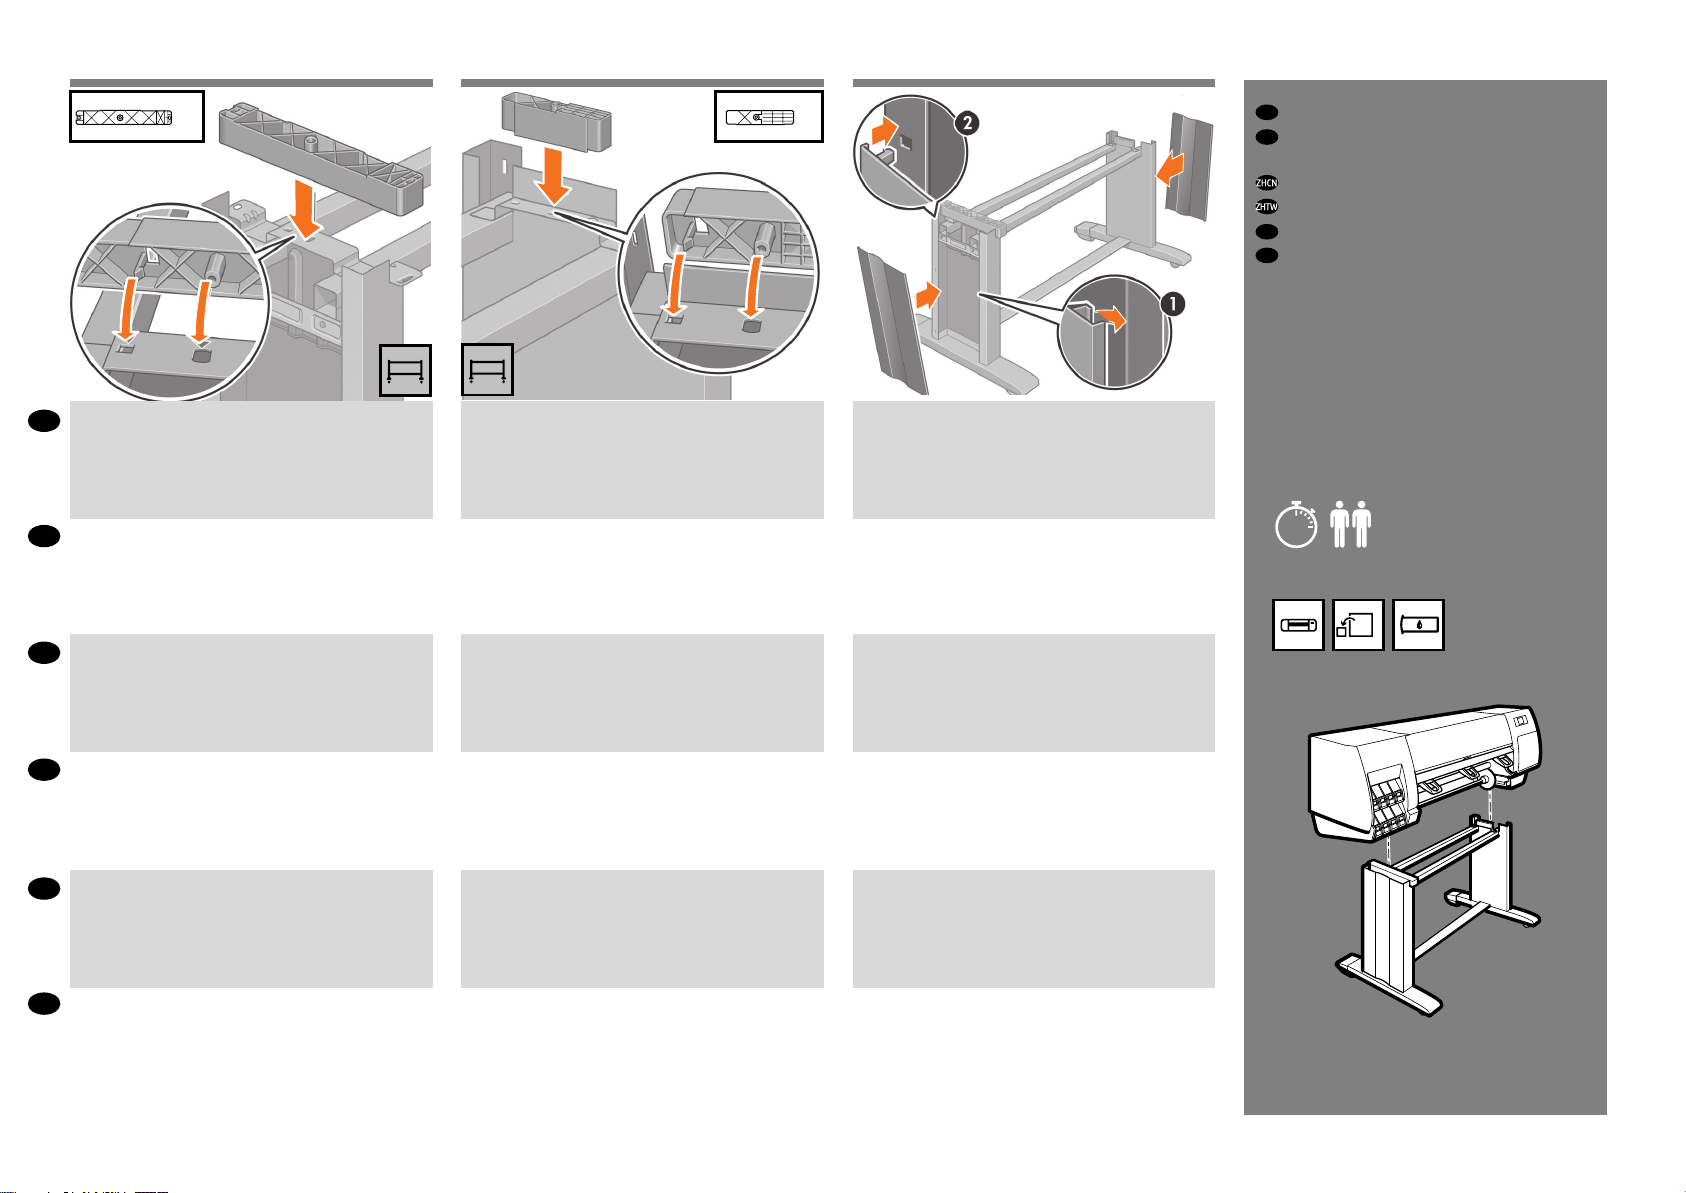
1. Lift the spindle lock lever.
2. Remove the spindle from the printer; rst from the right.
3. Then, from the left.
1.スピンドルのロックレバーを上げます。
2.スピンドルの右側をプリンタから取り外してくだ
さい。
3.次に左側を取り外します。
1.提起卷轴锁定手柄。
2.从打印机上取下卷轴,先取下右端。
3.然后取下左端。
1.拉高捲軸固定手柄。
2.從印表機移除捲軸;先從右邊開始。
3.接著,再從左邊開始。
2
1
Unlock and remove the blue hub from the left end of the
spindle. Keep the spindle horizontal.
青いハブのロックを解除し、スピンドルの左端から
取り外します。スピンドルは水平のままにしておき
ます。
解除对卷轴左端蓝色轮毂的锁定,然后将其取下。保
持卷轴水平。
解除鎖定並卸下捲軸左邊的藍色輪軸。保持捲軸水平
放置。
프린터가 위치한 곳의 고도를 선택하십시오. 고도를
KO
선택하려면 메뉴 > 설정 > 인쇄 기본 설정 > 고도 선택으로
이동하십시오.
Pilih ketinggian lokasi printer. Untuk memilih ketinggian,
ID
buka: Menu > Kongurasi > Preferensi Cetak > Pilih
ketinggian
1. 스핀들 잠금 레버를 들어 올립니다.
2. 프린터 맨 오른쪽에 있는 스핀들을 제거합니다.
3. 그런 다음 왼쪽에 있는 스핀들을 제거합니다.
1. Angkat tuas pengunci penggulung.
2. Lepaskan penggulung dari printer; dari kanan terlebih dulu.
3. Lalu, dari kiri.
26
스핀들 왼쪽 끝에서 파란색 허브를 풀어서 제거합니다.
스핀들은 수평을 유지하도록 해야 합니다.
Buka kunci dan lepaskan hub biru dari ujung kiri penggulung.
Jaga agar penggulung tetap horisontal.
Page 27

9594 96 97
Slide a roll of paper onto the spindle. Make sure that the
EN
paper is oriented as shown.
ロール紙をスピンドルにスライドさせて取り付けま
JA
す。用紙の向きは、図のようになるように注意して
ください。
将卷筒纸张滑到卷轴上。请确保纸张的方向如图所示。
ZHCN
將捲筒紙滑入捲軸。請確認紙張的放置方向如下所
ZHTW
示。
Make sure that the black hub on the right side of the spindle
is fully inserted into the roll of paper. (No gap should exist
between the spindle hub and the roll.)
スピンドル右側の黒いハブがロール紙に完全に挿入
されていることを確認します。(スピンドルハブとロ
ール紙の間に隙間がないことを確認してください。)
确保卷轴右侧的黑色轮毂完全插入卷筒纸张。(在卷
轴轮毂和卷筒纸张之间不得有间隙。)
確定捲軸右邊的黑色輪軸完全插入紙張捲筒中(捲軸
輪軸和捲筒中間不應留下任何空隙)。
1
2
Slide the blue hub onto the spindle. Make sure that the blue
hub is fully inserted into the roll of paper (no gap should
exist between the hub and the roll), and then lock the hub.
青いハブをスピンドルに取り付けます。青いハブがロ
ール紙に完全に挿入され、スピンドルハブとロール
紙の間に隙間がないことを確認してから、ハブをロ
ックします。
将蓝色轮毂滑动安装到卷轴上。确保蓝色轮毂完全插入
卷筒纸张(在轮毂和卷筒纸张之间不得有间隙),然
后锁定轮毂。
將藍色輪軸推入捲軸中。確定藍色輪軸完全插入紙張
捲筒中(輪軸和捲筒中間不應留下任何空隙),然後
鎖上輪軸。
With the blue hub on the left, lower the spindle into the
printer.
青いハブが左側に来るように、スピンドルを下げて
プリンタに取り付けます。
确保蓝色轮毂在左边,将卷轴向下放入打印机。
藍色輪軸在左邊,將捲軸放入印表機。
스핀들 위에 롤 용지를 밀어 넣습니다. 용지가 표시된
KO
방향을 향해야 합니다.
ID
Geser salah satu gulungan kertas pada penggulung.
Pastikan orientasi kertas sesuai dengan arah yang
ditunjukkan.
스핀들 오른쪽의 검정색 허브가 용지 롤에 완전히
삽입되었는지 확인합니다.스핀들 허브와 롤 사이에 빈
공간이 없어야 합니다.
Pastikan hub hitam di sebelah kanan penggulung
dimasukkan sepenuhnya ke dalam gulungan kertas.
(Tidak boleh ada celah di antara hub penggulung dan
gulungan.)
27
파란색 허브를 스핀들 위로 밉니다.파란색 허브가 용지
롤에 완전히 삽입되었는지 확인한 후(허브와 롤 사이에는
빈 공간이 없어야 함) 허브를 잠급니다.
Pasang hub biru pada penggulung. Pastikan hub biru
dimasukkan sepenuhnya ke dalam gulungan kertas (tidak
boleh ada celah di antara hub penggulung dan gulungan),
kemudian kunci hub.
파란색 허브를 왼쪽에 놓고 스핀들을 프린터 안쪽으로
낮춥니다.
Dengan hub biru di sebelah kiri, turunkan penggulung ke
dalam printer.
Page 28

9998 100 101
From the front panel, select the paper icon and then press
EN
the OK button.
フロントパネルで、用紙アイコンをハイライトさ
JA
せ、[OK]ボタンを押します。
在前面板上,选择纸张图标,然后按“确定”按钮。
ZHCN
在前控制面板上,選擇紙張圖示,然後按下OK按鈕。
ZHTW
전면 패널에서 용지 아이콘을 선택한 후 확인 버튼을
KO
누릅니다.
Select Load roll and then press the OK button.
[ロール紙の取り付け]を選択し、[OK]ボタンを押し
ます。
选择“装入卷筒纸张”,然后按“确定”按钮。
選擇裝入捲筒紙,然後按下OK按鈕。
롤 넣기를 선택한 후 확인 버튼을 누릅니다.
Insert the lead-edge of the paper into the printer, above
the black roller.
用紙の先端を、黒いローラーの上からプリンタ内に
挿入します。
将纸张前缘插入打印机,放在黑色辊子上。
將紙張前緣插入印表機的黑色捲軸中。
용지의 시작 가장자리를 프린터의 검정색 롤러 위로
밀어 넣습니다.
Conm the type and length of the paper roll that you
loaded into the printer. This information is included on the
packaging label.
プリンタに取り付けたロール紙の種類と長さを確認
します。この情報はパッケージラベルに記載され
ています。
确认装入打印机的卷筒纸张的类型和长度。此信息为
于包装标签上。
確認您裝入印表機的捲筒紙類型與長度。此資訊包含
在包裝標籤上。
프린터에 넣은 용지 롤의 종류와 길이를 인하십시오. 이
정보는 포장 레이블에 나와 있습니다.
Di panel depan, pilih ikon kertas lalu tekan tombol OK.
ID
Pilih Load roll [Isikan gulungan] kemudian tekan tombol
OK.
Masukkan tepi depan kertas ke dalam printer, di atas roller
hitam.
28
Konrmasikan jenis dan panjang gulungan kertas yang
Anda masukkan ke printer. Informasi ini terdapat pada
label kemasan.
Page 29

103102 104
20'
Macintosh*
Windows**
20'
On the front panel, select the paper type and paper length of
EN
the roll that you loaded into the printer, and then press the
OK button.
フロントパネルで、プリンタに取り付けたロール紙の
JA
種類と長さを選択し、[OK]ボタンを押します。
在前面板上,为您装入打印机的卷筒纸张选择纸张类型
ZHCN
和纸张长度,然后按“确定”按钮。
在前控制面板上選擇您裝入印表機之捲筒紙的紙張類型
ZHTW
及長度,然後按下OK按鈕。
전면 패널에서 프린터에 넣은 용지 종류와 롤 길이를
KO
선택한 후 확인 버튼을 누릅니다.
The printer automatically aligns the printheads and
performs a color calibration for the paper that you loaded
into the printer. During the process, the printer advances the
paper up to 3 m (~10 feet) before printing.
* wait for the printhead alignment.
** proceed with software installation.
自動的に用紙送りおよびプリントヘッドの軸合わせ
が実行されます。この処理中、実際の印刷を開始す
る前に、最大で3m(10フィート)の用紙が排出され
ます。
*をお使いの場合は、プリントヘッドの軸合わせが完
了するまで待ちます。
**をお使いの場合は、ソフトウェアのインストール
に進みます。
打印机自动对齐打印头,然后为装入打印机的纸张执行
颜色校准。在此过程中,打印机会在打印之前先向前移
动纸张(最多3米,大约10英尺)。
*等待打印头对齐。
**继续软件安装。
印表機會自動針對您所裝入印表機的紙張執行印字頭校
正和色彩校準。在過程之中,印表機會先將紙張前移最
多3公尺(約10英呎),然後再列印。
*等候印字頭校正完成。
**繼續執行軟體安裝。
프린트 헤드가 자동으로 정렬되고 프린터에 넣은 용지의
색상 보정이 자동으로 이루어집니다.이 과정에서
프린터는 인쇄하기 전에 용지를3m까지 미리 내보냅니다.
* 프린트헤드가 정렬될 때까지 기다립니다.
** 소프트웨어 설치를 진행합니다.
Please do not try to stop the paper advance; it is necessary
to ensure successful printhead alignment.
The alignment and calibration process will take about
twenty minutes; while it is taking place, you can proceed to
the next step.
プリントヘッドの軸合わせを正常に行うために必要
ですので、この用紙送りは停止しないでください。
軸合わせとキャリブレーションの処理には約20分
かかります。この間に次の手順に進むことができま
す。
请不要尝试停止进纸,这对于确保打印头成功对齐是
非常必要的。对齐和校准过程需要大约20分钟,在此
过程中,您可以继续执行下一个步骤。
請勿嘗試阻止紙張前移,這是成功執行印字頭校正的
必要程序。印字頭校正和色彩校準需要費時約20分
鐘,在進行期間,您可以先進行下一個步驟。
용지가 나오는 것을 멈추려고 하지 마십시오. 이것은
프린트 헤드 정렬에 필요한 과정입니다.정렬 및 보정은
20분 정도 걸립니다. 정렬 및 보정되는 동안 다음 단계로
갈 수 있습니다.
Di panel depan, pilih jenis kertas dan panjang kertas
ID
gulungan yang Anda masukkan ke dalam printer, lalu tekan
tombol OK.
Printer akan memajukan kertas dan menjalankan
pengaturan printhead secara otomatis. Selama
proses ini printer akan memajukan kertas hingga
3 m (~10 kaki) sebelum mencetak.
* harus menunggu pengaturan printhead.
** dapat melanjutkan dengan instalasi perangkat lunak.
Jangan hentikan gerak maju kertas; Anda perlu memastikan
keberhasilan pengaturan printhead.
Proses pengaturan dan kalibrasi akan memakan waktu
sekitar dua puluh menit; sementara itu, Anda dapat
melanjutkan ke langkah berikutnya.
29
Page 30

ZHCN
ZHTWJAEN
Note for MAC & Windows:
Make sure your computer is connected to the Internet.
Do not connect the computer to the printer yet. You must rst
install the printer driver software on the computer.
Install the software from:
http://hp.com/go/Z6810/software
KO ID
Mac 및 Windows 참고:
컴퓨터가 인터넷에 연결되어 있는지 확인합니다.
아직 컴퓨터를 프린터에 연결하지 마십시오. 먼저 프린터
드라이버 소프트웨어를 컴퓨터에 설치합니다.
다음 위치에서 소프트웨어를 설치하십시오:
http://hp.com/go/Z6810/software
Mac および Windows
コンピュータがインターネットに接続されていることを
確認します。
この時点ではまだコンピュータをプリンタに接続しない
でください。最初に、プリンタドライバソフトウェアを
インストールする必要があります。
次の場所からソフトウェアをインストールします:
http://hp.com/go/Z6810/software
Catatan untuk MAC & Windows:
Pastikan komputer Anda tersambung ke Internet.
Jangan sambungkan dulu komputer ke printer. Anda harus terlebih dulu menginstal perangkat lunak driver printer di komputer.
Instal perangkat lunak dari:
http://hp.com/go/Z6810/software
MAC 和 Windows
请确保您的电脑已连接到Internet。
刚开始时,不要立即将计算机连接到打印机。必须首先在
计算机上安装打印机驱动程序软件。将HPStartUpKitDVD
插入计算机。
从以下位置安装软件:
http://hp.com/go/Z6810/software
MAC 和 Windows 的注意事項:
您必須先在電腦上安裝印表機驅動程式軟體。(確定電腦
已經連線到網際網路。):
請不要急著將電腦連接到印表機。您必須先在電腦上安裝
印表機驅動程式軟體。
從以下位置安裝軟件 :
http://hp.com/go/Z6810/software
30
Page 31

31
Page 32

EN
© Copyright 2018 HP Development Company, L.P.
The information contained herein is subject to change without
notice. The only warranties for HP products and services are set
forth in the express warranty statements accompanying such
products and services. Nothing herein should be construed as
constituting an additional warranty. HP shall not be liable for
technical or editorial errors or omissions contained herein.
JA
© Copyright 2018 HP Development Company, L.P.
ここに記載した内容は、予告なしに変更することがあ
ります。HP製品およびサービスに対する保証は、当
該製品およびサービスに付属の限定的保証規定に明
示的に記載されているものに限られます。本書中の
いかなる記載も、付加的な保証を構成するものとして
解釈されないものとします。弊社は、本書に含まれ
る技術上または編集上の誤りおよび欠落について、一
切責任を負うものではありません。
ZHCN
© Copyright 2018 HP Development Company, L.P.
本文档中包含的信息如有更改,恕不另行通知。有关
HP产品和服务的全部保修和保证条款,均已在相关产
品和服务所附带的保修声明中进行了明确的规定。
本文中的任何内容都不应被引伸为补充保证。HP对
本文档中出现的技术错误、编辑错误或遗漏之处概不
负责。
ZHTW
© Copyright 2018 HP Development Company, L.P.
此文件所包含資訊如有更改,恕不另行通知。HP產品
與服務的保固範圍,僅限於產品與服務隨附的保固聲
明中所提供的保固項目。本文件的任何部分都不可構
成任何額外的保固。HP不負責本文件在技術上或編輯
上的錯誤或疏失。
KO
© Copyright 2018 HP Development Company, L.P.
여기에 수록된 정보는 조건에 따라 예고 없이 변경될 수 있습니다.
HP 제품 및 서비스에 대한 유일한 보증은 해 당 제품 및 서비스에
동봉된 보증서에 명시되어 있습니 다. 이 문서의 어떠한 내용도 추
가 보증으로 간주되어서 는 안 됩니다. HP는 이 문서에 포함된 기
술 또는 편집상 의 오류나 누락된 내용에 대해 책임지지 않습니다.
ID
© Copyright 2018 HP Development Company, L.P.
Informasi yang terdapat dalam dokumen ini dapat berubah tanpa
pemberitahuan sebelumnya. Satu-satunya jaminan bagi produk
dan layanan HP ditetapkan dalam pernyataan jaminan tersurat
yang diberikan bersama produk dan layanan tersebut. Tidak ada
pernyataan apa pun dalam dokumen ini yang dapat dianggap
sebagai jaminan tambahan. HP tidak bertanggung jawab atas
kesalahan teknis atau editorial maupun kekurangan yang terdapat
dalam dokumen ini.
32
 Loading...