

Page 1

DESIGNJET T120 and T520 ePrinter
Series
User’s Guide
Page 2

© 2012 Hewlett-Packard Development
Company, L.P.
2nd edition
Legal notices
The information contained herein is subject
to change without notice.
The only warranties for HP products and
services are set forth in the express warranty
statement accompanying such products and
services. Nothing herein should be
construed as constituting an additional
warranty. HP shall not be liable for technical
or editorial errors or omissions contained
herein.
Hi-Speed USB certified
IPv6-ready
Wi-Fi certified
Trademarks
Adobe®, Acrobat®, and Adobe
Photoshop® are trademarks of Adobe
Systems Incorporated.
Corel® is a trademark or registered
trademark of Corel Corporation or Corel
Corporation Limited.
ENERGY STAR and the ENERGY STAR mark
are registered U.S. trademarks.
Microsoft® and Windows® are U.S.
registered trademarks of Microsoft
Corporation.
Page 3

Table of contents
1 Introduction ...................................................................................................................... 1
Safety precautions .................................................................................................................... 2
HP Start-Up Kit ......................................................................................................................... 2
Using this guide ....................................................................................................................... 2
Printer models .......................................................................................................................... 4
The printer’s main features ........................................................................................................ 4
The printer’s main components ................................................................................................... 5
The front panel ........................................................................................................................ 7
Printer software ........................................................................................................................ 9
Web Services .......................................................................................................................... 9
Turn the printer on and off ....................................................................................................... 10
The printer’s internal prints ...................................................................................................... 11
2 Connecting the printer .................................................................................................... 13
Choose which connection method to use ................................................................................... 14
Connect the printer to your network .......................................................................................... 14
Connect a computer to the printer by network (Windows) ........................................................... 15
Connect a computer to the printer by USB cable (Windows) ........................................................ 16
Uninstall the printer software (Windows) ................................................................................... 17
Connect a computer to the printer by network (Mac OS X) .......................................................... 17
Connect a computer to the printer by USB cable (Mac OS X) ...................................................... 19
Uninstall the printer software (Mac OS X) .................................................................................. 20
3 Setting up the printer ...................................................................................................... 21
Introduction ........................................................................................................................... 22
Automatic firmware update ..................................................................................................... 22
Turn email notifications on and off ........................................................................................... 22
Turn alerts on and off ............................................................................................................. 22
Control access to the Embedded Web Server ............................................................................ 24
Set Windows driver preferences .............................................................................................. 24
Set up Web Services .............................................................................................................. 24
4 Personalizing the printer ................................................................................................ 25
Change the language of the front-panel display ......................................................................... 26
ENWW iii
Page 4

Access the Embedded Web Server ........................................................................................... 26
Change the language of the Embedded Web Server .................................................................. 26
Access the HP Utility ............................................................................................................... 27
Change the language of the HP Utility ...................................................................................... 27
Change the sleep mode setting ................................................................................................ 27
Change the auto-off setting ...................................................................................................... 27
Change the front-panel display brightness ................................................................................. 27
Configure network settings ...................................................................................................... 28
Manage ePrinter security ........................................................................................................ 30
Change your printer’s email address ........................................................................................ 30
5 Paper handling ............................................................................................................... 31
General paper-loading advice ................................................................................................. 32
Load a roll onto the spindle ..................................................................................................... 33
Load a roll into the printer ....................................................................................................... 34
Unload a roll ......................................................................................................................... 36
Load a single sheet ................................................................................................................ 36
Unload a single sheet ............................................................................................................. 38
Use the multi-sheet tray ........................................................................................................... 38
View information about the paper ............................................................................................ 39
Maintain paper ...................................................................................................................... 40
Change the drying time .......................................................................................................... 40
Turn the automatic cutter on and off ......................................................................................... 40
Form feed with or without cutting ............................................................................................. 41
6 Printing .......................................................................................................................... 42
Print from a computer using a printer driver ............................................................................... 43
Advanced print settings ........................................................................................................... 43
Color management ................................................................................................................ 48
7 Web-connected printing .................................................................................................. 50
Print remotely with HP Designjet ePrint & Share .......................................................................... 50
Print by email ........................................................................................................................ 51
Print from a smartphone or tablet ............................................................................................. 51
View and print from the HP Designjet ePrint & Share website ...................................................... 53
Print from HP Designjet ePrint & Share using the printer’s front panel ............................................ 54
View and print from other content repositories ........................................................................... 55
Create your Online Print History ............................................................................................... 55
Share files in your Online Print History ...................................................................................... 55
HP Designjet ePrint & Share security ......................................................................................... 55
8 Practical printing examples ............................................................................................ 57
Print from Adobe Acrobat ....................................................................................................... 58
iv ENWW
Page 5

Print from Autodesk AutoCAD .................................................................................................. 61
Print from Adobe Photoshop .................................................................................................... 65
Print and scale from Microsoft Office ........................................................................................ 67
9 Handling ink cartridges and printhead ........................................................................... 74
About the ink cartridges .......................................................................................................... 75
Storage of anonymous usage information ................................................................................. 75
Check ink cartridge status ....................................................................................................... 75
Replace an ink cartridge ......................................................................................................... 76
About the printhead ............................................................................................................... 77
10 Maintaining the printer ................................................................................................. 78
Check printer status ................................................................................................................ 79
Take care of the printer ........................................................................................................... 79
Clean the exterior of the printer ............................................................................................... 79
The Print Quality Diagnostic Report .......................................................................................... 79
Clean the printhead ................................................................................................................ 80
Align the printhead ................................................................................................................ 81
Replace the printhead ............................................................................................................. 82
Clean the encoder strip ........................................................................................................... 86
Recalibrate the paper advance ................................................................................................ 87
Move or store the printer ......................................................................................................... 88
Firmware update .................................................................................................................... 88
Software update .................................................................................................................... 89
Printer maintenance kits .......................................................................................................... 89
11 Accessories ................................................................................................................... 90
How to order supplies and accessories ..................................................................................... 91
Introduction to the accessories ................................................................................................. 94
12 Troubleshooting paper issues ....................................................................................... 95
The paper cannot be loaded successfully .................................................................................. 96
The paper type is not in the driver ............................................................................................ 98
The printer printed on the wrong paper type .............................................................................. 99
Paper mismatch ..................................................................................................................... 99
The roll has jammed ............................................................................................................. 100
The multi-sheet tray has jammed ............................................................................................. 101
A strip stays on the output tray and generates jams .................................................................. 103
The printer displays out of paper when paper is available ......................................................... 104
Prints do not fall neatly into the bin ......................................................................................... 104
The sheet stays in the printer when the print has been completed ............................................... 104
The paper is cut when the print has been completed ................................................................. 104
The cutter does not cut well ................................................................................................... 104
ENWW v
Page 6

The roll is loose on the spindle ............................................................................................... 105
13 Troubleshooting print-quality issues ............................................................................ 106
General printing advice ........................................................................................................ 107
Horizontal lines across the image (banding) ............................................................................ 107
Lines are too thick, too thin or missing .................................................................................... 108
Lines appear stepped or jagged ............................................................................................ 108
Lines print double or in the wrong colors ................................................................................. 109
Lines are discontinuous ......................................................................................................... 109
Lines are blurred .................................................................................................................. 110
Line lengths are inaccurate .................................................................................................... 110
The whole image is blurry or grainy ....................................................................................... 111
The paper is not flat ............................................................................................................. 111
The print is scuffed or scratched ............................................................................................. 112
Ink marks on the paper ......................................................................................................... 112
Black ink comes off when you touch the print ........................................................................... 113
Edges of objects are stepped or not sharp ............................................................................... 113
Edges of objects are darker than expected .............................................................................. 114
Vertical lines of different colors .............................................................................................. 114
White spots on the print ........................................................................................................ 114
Colors are inaccurate ........................................................................................................... 114
Colors are fading ................................................................................................................. 115
The image is incomplete (clipped at the bottom) ....................................................................... 115
The image is clipped ............................................................................................................ 115
Some objects are missing from the printed image ..................................................................... 116
A PDF file is clipped or objects are missing ............................................................................. 117
If you still have a problem ..................................................................................................... 117
14 Troubleshooting ink cartridge and printhead issues .................................................... 118
Cannot insert an ink cartridge ............................................................................................... 119
Ink cartridge status messages ................................................................................................. 119
Cannot insert the printhead ................................................................................................... 119
15 Troubleshooting data communication issues ............................................................... 120
Communication failures between computer and printer ............................................................. 121
Wired network issues ........................................................................................................... 122
Wireless network issues ........................................................................................................ 123
Web Services issues ............................................................................................................. 126
The network configuration page ............................................................................................. 126
16 Troubleshooting general printer issues ........................................................................ 128
The printer does not start ....................................................................................................... 129
The printer does not print ...................................................................................................... 129
vi ENWW
Page 7

The printer seems slow .......................................................................................................... 129
The front panel is frozen ....................................................................................................... 130
Cannot access the Embedded Web Server .............................................................................. 130
Alerts .................................................................................................................................. 130
17 Front-panel error messages ........................................................................................ 132
18 HP Customer Care ...................................................................................................... 134
Introduction ......................................................................................................................... 135
HP Professional Services ....................................................................................................... 135
HP Proactive Support ............................................................................................................ 136
Customer Self Repair ............................................................................................................ 137
Contact HP Support .............................................................................................................. 137
19 Printer specifications ................................................................................................... 139
Functional specifications ....................................................................................................... 140
Physical specifications .......................................................................................................... 141
Memory specifications .......................................................................................................... 142
Power specifications ............................................................................................................. 142
Ecological specifications ....................................................................................................... 142
Environmental specifications .................................................................................................. 142
Acoustic specifications .......................................................................................................... 142
Glossary ........................................................................................................................... 143
Index ............................................................................................................................... 146
ENWW vii
Page 8

viii ENWW
Page 9

1 Introduction
●
Safety precautions
●
HP Start-Up Kit
●
Using this guide
●
Printer models
●
The printer’s main features
●
The printer’s main components
●
The front panel
●
Printer software
●
Web Services
●
Turn the printer on and off
●
The printer’s internal prints
ENWW 1
Page 10

Safety precautions
The following precautions ensure the proper use of the printer and prevent the printer from being
damaged. Follow these precautions at all times.
●
Use the power supply voltage specified on the label. Avoid overloading the printer's electrical
outlet with multiple devices.
●
Do not disassemble or repair the printer yourself. Contact your local HP Service Representative for
service, see
Contact HP Support on page 137.
●
Use only the electrical cord supplied by HP with the printer. Do not damage, cut or repair the
power cord. A damaged power cord can cause fire or electric shock. Replace a damaged power
cord with an HP-approved power cord.
●
Do not allow metal or liquids (except those used in HP Cleaning Kits) to touch the internal parts of
the printer. Doing so may cause fire, electric shock or other serious hazards.
●
Power off the printer and unplug the power cord from the power outlet in any of the following
cases:
◦
When placing your hands inside the printer
◦
If there is smoke or an unusual smell coming from the printer
◦
If the printer is making an unusual noise not heard during normal operation
◦
A piece of metal or a liquid (not part of cleaning and maintenance routines) touches internal
parts of the printer
◦
During an electrical (thunder/lightning) storm
◦
During a power failure
HP Start-Up Kit
The HP Start-Up Kit is the DVD that comes with your printer; it contains the printer's software and
documentation.
Using this guide
This guide can be downloaded from the HP Support Center (see HP Support Center on page 135).
Introduction
This chapter provides a brief introduction to the printer and its documentation for new users.
Use and maintenance
These chapters help you carry out normal printer procedures and include the following topics.
●
Connecting the printer on page 13
●
Setting up the printer on page 21
2 Chapter 1 Introduction ENWW
Page 11

●
Personalizing the printer on page 25
●
Paper handling on page 31
●
Printing on page 42
●
Web-connected printing on page 50
●
Practical printing examples on page 57
●
Handling ink cartridges and printhead on page 74
●
Maintaining the printer on page 78
Troubleshooting
These chapters help you solve problems that may occur while printing and include the following topics.
●
Troubleshooting paper issues on page 95
●
Troubleshooting print-quality issues on page 106
●
Troubleshooting ink cartridge and printhead issues on page 118
●
Troubleshooting data communication issues on page 120
●
Troubleshooting general printer issues on page 128
●
Front-panel error messages on page 132
Accessories, support and specifications
These chapters, Accessories on page 90, HP Customer Care on page 134 and Printer specifications
on page 139, contain reference information, including customer care, the printer specifications and
part numbers for paper types, ink supplies and accessories.
Glossary
The Glossary on page 143 contains definitions of printing and HP terms used in this documentation.
Index
In addition to the table of contents, there is an alphabetical index to help you to find topics quickly.
Warnings and Cautions
The following symbols are used in this manual to ensure the proper use of the printer and to prevent the
printer from being damaged. Follow the instructions marked with these symbols.
WARNING! Failure to follow the guidelines marked with this symbol could result in serious personal
injury or death.
CAUTION: Failure to follow the guidelines marked with this symbol could result in minor personal
injury or damage to the printer.
ENWW
Using this guide
3
Page 12

Printer models
This guide covers the following printer models, normally referring to them by their short names for
brevity.
Full name Short name
HP Designjet T120 24-in ePrinter T120
HP Designjet T520 24-in ePrinter T520-24
HP Designjet T520 36-in ePrinter T520-36
The printer’s main features
Your printer is a color inkjet printer designed for printing high-quality images on paper up to 610 mm
(24 in) or 914 mm (36 in) wide. Some major features of the printer are shown below:
●
Print resolution of up to 2400 × 1200 dpi (T520) or 1200 × 1200 dpi (T120), using the Best
print-quality option, the Maximum Detail option and photo paper
●
The printer can be controlled from its front panel or from a remote computer using the Embedded
Web Server or the HP Utility
NOTE: Throughout this manual, “HP Utility” refers to the HP Utility for Mac OS X and the HP
Designjet Utility for Windows.
●
Touch-sensitive front panel in color, with an intuitive graphical user interface
●
Supports USB, Ethernet, or Wi-Fi connection
●
Includes Web-connected features such as automatic firmware upgrades, HP Designjet ePrint &
Share, and HP ePrint
●
Handles roll and cut-sheet paper, with a multi-sheet tray
●
Color emulations, see
Printer emulation on page 48
●
Economode for printing economically
●
Ink and paper usage information available from the Embedded Web Server, see
Access the
Embedded Web Server on page 26
●
Supplies information, troubleshooting, and firmware updates available from the HP Utility, see
Access the HP Utility on page 27
●
Access to the online HP Support Center (see
HP Support Center on page 135)
4 Chapter 1 Introduction ENWW
Page 13
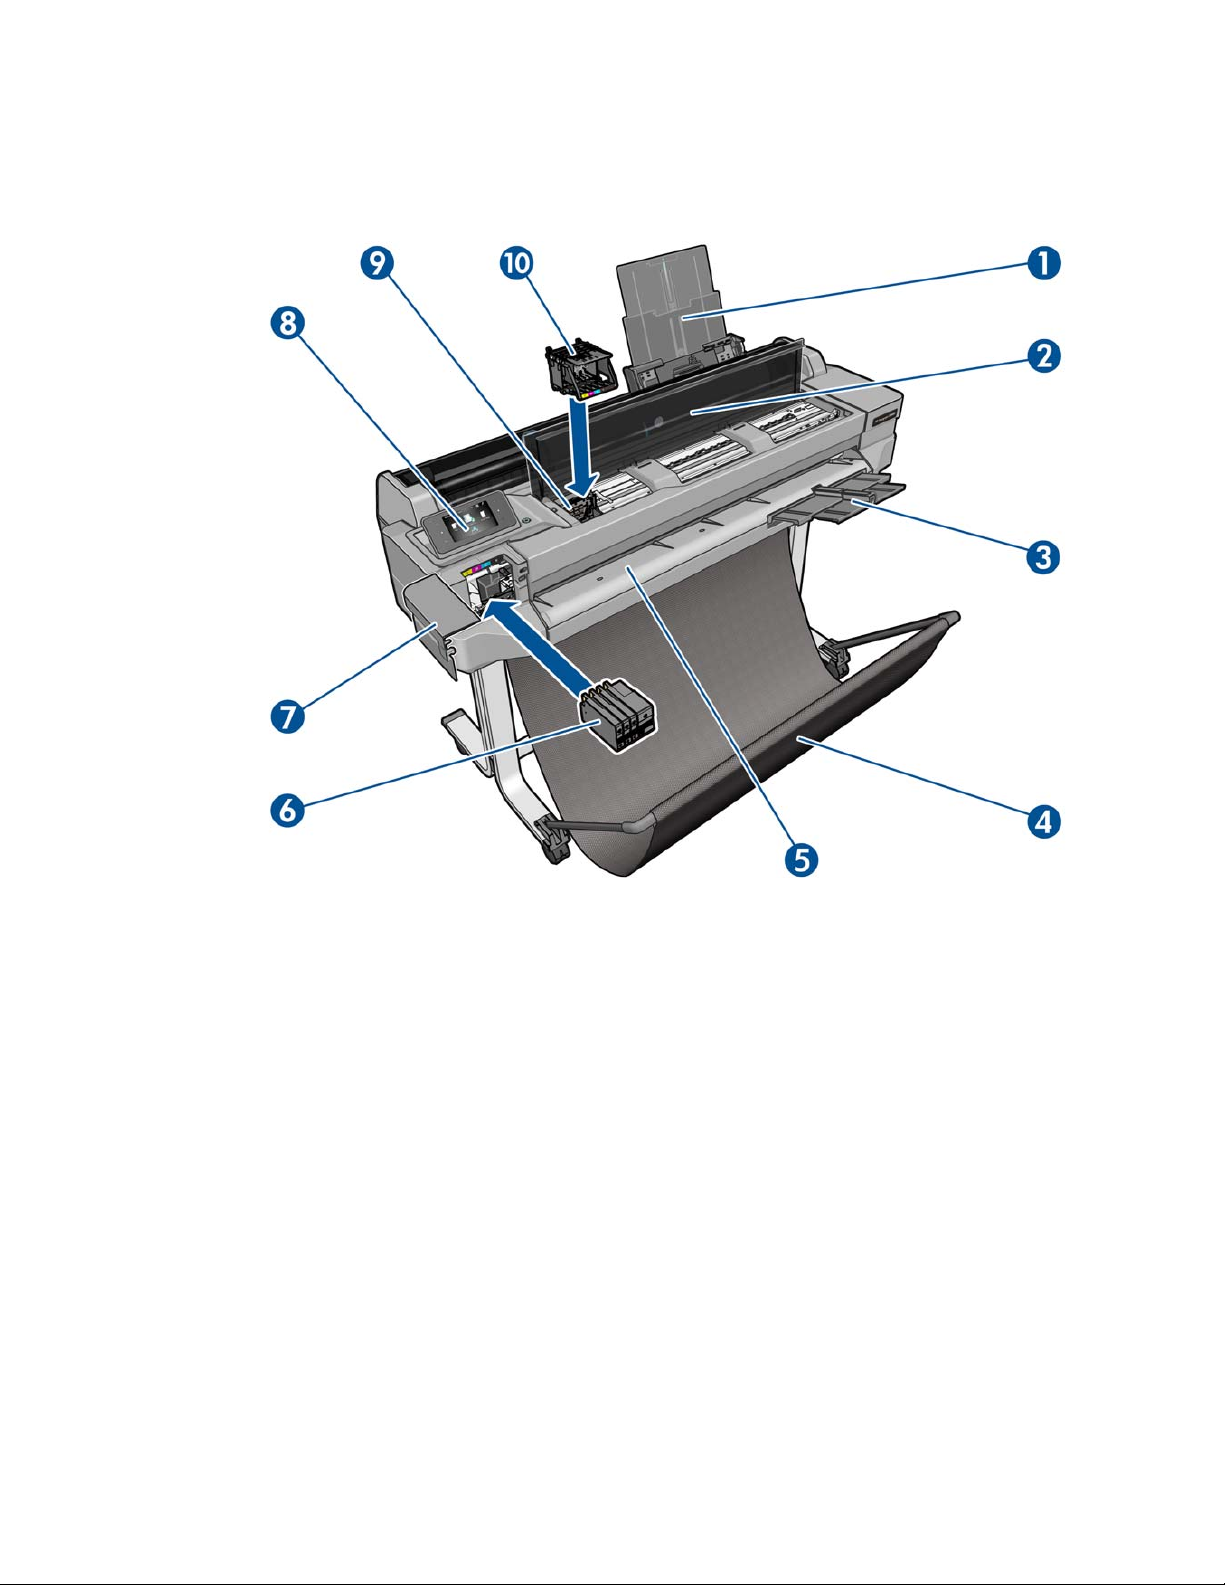
The printer’s main components
Front view (T520)
1. Multi-sheet tray extenders
2. Top cover
3. Output tray extenders
4. Bin
5. Output platen
6. Ink cartridges
7. Ink cartridge cover
8. Front panel
9. Printhead carriage
10. Printhead
ENWW
The printer’s main components
5
Page 14
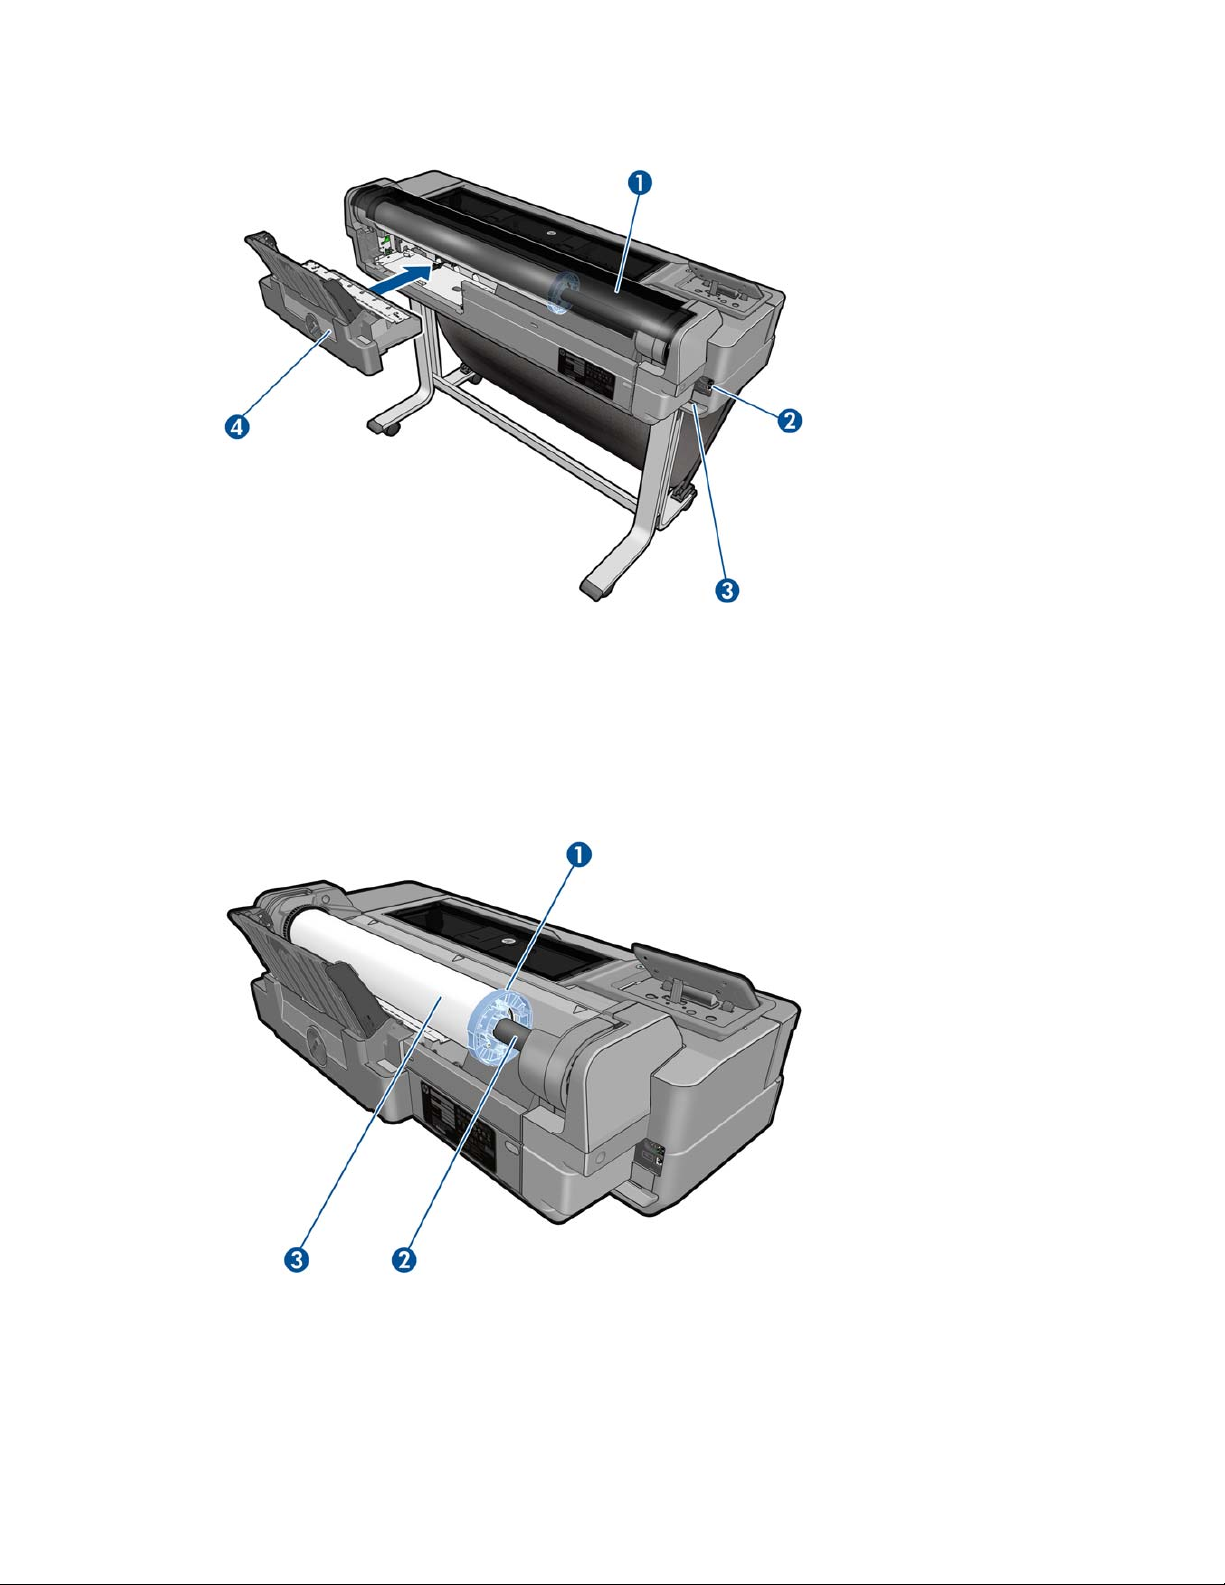
Rear view (T520)
1. Roll cover
2. Communication ports
3. Power socket
4. Multi-sheet tray
Rear view (T120)
1. Blue stop
2. Spindle
3. Paper roll
6 Chapter 1 Introduction ENWW
Page 15

Communication ports
1. Hi-Speed USB device port, to connect a computer
2. Fast Ethernet port, to connect to a network
The front panel
The front panel is a touch-sensitive screen with a graphical user interface; it is located on the front left of
the printer. It gives you complete control of your printer: from the front panel, you can print, view
information about the printer, change printer settings, perform calibrations and tests, and so on. The
front panel also displays alerts (warning and error messages) when needed.
The front panel has a large central area to display dynamic information and icons. On the left and right
sides you can see up to six fixed icons at different times. Normally they are not all displayed at the
same time.
To the right of the front panel is the Power key, with which you can turn the printer on or off. The key is
illuminated when the printer is on. It flashes when the printer is in transition between on and off.
ENWW
The front panel
7
Page 16
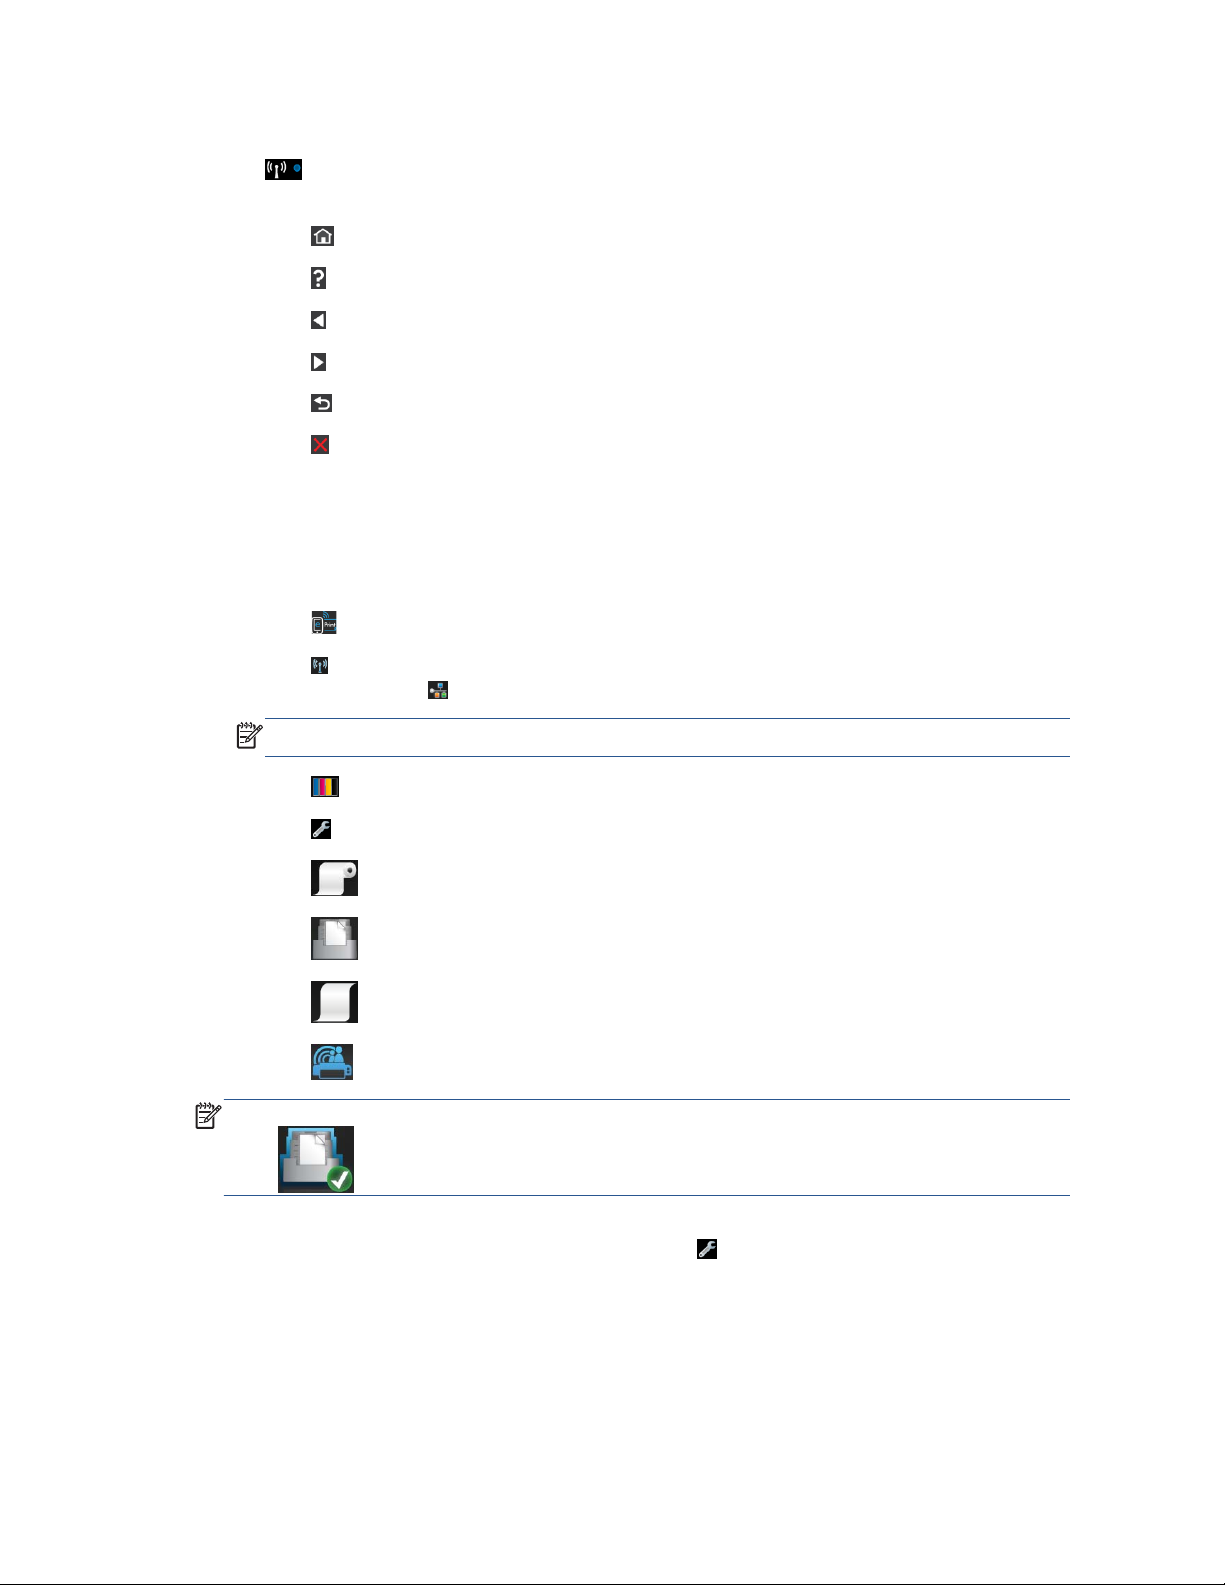
Left and right fixed icons
●
shows the status of the wireless connection: if the blue light is shining, the wireless connection
is active.
●
Press
to return to the home screen.
●
Press
to view help about the current screen.
●
Press
to go to the previous item.
●
Press
to go to the next item.
●
Press
to go back to the previous screen.
●
Press
to cancel the current process.
Home screen dynamic icons
The following items are displayed only on the home screen.
●
At the top left of the home screen is a message telling you which paper source is active.
●
Press to view Web Services status and display your printer’s email address.
●
Press
to view connectivity status information and to perform network configuration. If a network
cable is connected,
is displayed instead.
NOTE: It is not possible to use wireless and wired network connections simultaneously.
●
Press
to view ink information.
●
Press
to change printer settings.
●
Press
to load, unload, and change options for roll paper.
●
Press
to change options for the multi-sheet tray, or to activate it.
●
Press
to load, unload, and change options for single sheets.
●
Press
to access HP Designjet ePrint & Share.
NOTE: The active paper source is indicated by a slightly larger icon, with a white tick in a green
circle:
.
If the printer is left idle for some time, it goes into sleep mode and switches off the front-panel display.
To change the time that elapses before sleep mode, press
, then Printer preferences > Sleep.
You can set a time between 5 and 240 minutes.
The printer wakes from sleep mode and switches on the front-panel display whenever there is some
external interaction with it.
Information about specific uses of the front panel can be found throughout this guide.
8 Chapter 1 Introduction ENWW
Page 17

Printer software
The following software is provided with your printer:
●
The HP-GL/2 and HP RTL driver for Windows (T520 only)
●
The PCL3GUI raster driver for Windows (T120 only)
●
The PCL3GUI raster driver for Mac OS X
●
HP Designjet Preview
●
The Embedded Web Server allows you to:
◦
Manage the printer from a remote computer
◦
View the status of the ink cartridges, the printhead, and the paper
◦
Access the HP Support Center, see
HP Support Center on page 135
◦
Update the printer's firmware, see
Firmware update on page 88
◦
Perform alignments and troubleshooting
◦
Change various printer settings
◦
Manage e-mail notifications
See
Access the Embedded Web Server on page 26.
●
The HP Utility allows you to:
◦
Manage the printer from a remote computer
◦
View the status of the ink cartridges, the printhead, and the paper
◦
Access the HP Support Center, see
HP Support Center on page 135
◦
Update the printer's firmware, see
Firmware update on page 88
◦
Launch the Embedded Web Server
See
Access the HP Utility on page 27.
NOTE: New versions of all printer software can be expected to appear from time to time. In some
cases, when you receive your printer there may already be later versions available on HP's website of
some of the software provided with it.
Web Services
Your printer can be connected to the Internet and the Web, providing various benefits:
●
Automatic firmware updates (see
Firmware update on page 88)
●
Print on HP ePrinters from almost anywhere
●
Print on HP ePrinters from almost any device, including smartphones and tablet computers
To take advantage of these benefits, your printer must be connected to the Internet.
ENWW
Printer software
9
Page 18

For the latest information, see http://www.hp.com/go/designjeteprinters.
HP Designjet ePrint & Share
With HP Designjet ePrint & Share you can print from a conference room, job site, or even home. This
free Web service makes it easy to access and print large-format documents using your tablet,
smartphone, laptop, or printer touchscreen.
Print from virtually anywhere
Use your tablet, smartphone, laptop, or printer touchscreen to print where and when you need.
●
Plot to print seamlessly from AutoCAD® WS.
●
Send files to print by email to your HP Designjet ePrinter.
Save your files online in the cloud
Every time you print using HP Designjet ePrint & Share, a copy of your file is saved in your HP
Designjet ePrint & Share account, so finding files for reprints becomes a breeze.
●
Access files saved to the cloud using your online print history.
●
Keep your projects safeguarded with trusted HP security features.
Collaborate with ease
Whether your files are stored in your HP Designjet ePrint & Share account or an FTP site, HP Designjet
ePrint & Share makes it easy to view, share, and print files.
●
Share files using an automatically generated hyperlink.
●
Access all your FTP sites in one place.
Turn the printer on and off
If you wish to turn the printer on or off, the normal and recommended method is to use the Power key
on the front panel.
However, if you plan to store the printer for a long period or the Power key does not seem to work, you
are recommended to unplug the power cord.
10 Chapter 1 Introduction ENWW
Page 19

To turn it back on, plug in the power cord.
When the printer is powered back on, it takes about three minutes to initialize and check and prepare
the printhead. Preparing the printhead takes about 75 seconds.
NOTE: When the printer has not been used for a certain period of time (the default time is
determined by Energy Star), it saves power by going into sleep mode. However, any interaction with
the printer's front-panel display, or sending a new job to print, returns it to active mode, and it can
resume printing immediately. To change the sleep mode time, see
Change the sleep mode setting
on page 27.
The printer’s internal prints
The internal prints give various kinds of information about your printer. They can be requested from the
front panel.
Before requesting any internal print, check that the printer and the paper are ready for printing. The
loaded paper should be at least A4 portrait—210 mm (8.27 in) wide—otherwise the print may be
clipped.
ENWW
The printer’s internal prints
11
Page 20

To print any internal print, press , then scroll down to Internal prints and press it, then select the
internal print you want. The following internal prints are available.
●
Demo prints: show some of the capabilities of the printer
◦
Print drawing demo
◦
Print rendering demo
◦
Print GIS map
●
User info prints
◦
Print printer-status report
◦
Print print-quality report
◦
Print network report
12 Chapter 1 Introduction ENWW
Page 21

2 Connecting the printer
●
Choose which connection method to use
●
Connect the printer to your network
●
Connect a computer to the printer by network (Windows)
●
Connect a computer to the printer by USB cable (Windows)
●
Uninstall the printer software (Windows)
●
Connect a computer to the printer by network (Mac OS X)
●
Connect a computer to the printer by USB cable (Mac OS X)
●
Uninstall the printer software (Mac OS X)
ENWW 13
Page 22

Choose which connection method to use
The following methods can be used to connect your printer.
Connection
type
Speed Cable length Other factors
Wireless Moderate; varies according to
conditions (distance to router,
interference, number of wireless clients,
network topology, etc.)
N/A Sensitive to interference over longer
distances; requires extra equipment
(wireless access point or wireless router)
Fast Ethernet Fast; varies according to network traffic Long: 100 m (328
ft)
Requires extra equipment (switches)
Hi-Speed USB Very fast Short: 3 m (10 ft) A certified Hi-Speed USB cable is
necessary for reliable communication.
NOTE: The speed of any network connection depends on all components used in the network, which
can include network interface cards, routers, switches and cables. If any one of these components
cannot operate at high speed, you will have a low-speed connection. The speed of your network
connection can also be affected by the total amount of traffic from other devices on the network.
Connect the printer to your network
The printer is able to configure itself automatically for most networks, in a similar way to any computer
in the same network. The first time you connect it to a network, this process may take a few minutes.
Once the printer has a working network configuration, you can check its network address from the front
panel: press
or .
To connect to a wireless network, the easiest way is to go to the front panel and press
, then
Connectivity > Wireless setup wizard.
When a network device automatically configures itself by receiving an IP address from the DHCP
service, this IP address may change from the last time the device is powered off to the next time it is
powered on, which may lead to the device being shown as "offline" when driver port settings are
configured with the original IP address. There are at least three possible ways to avoid this:
●
Increase the lease time of your DHCP server device.
●
Set a fixed IP address for your printer that will not be changed by DHCP (see
Communication
failures between computer and printer on page 121).
●
Configure the printer and driver to refer to the hostname instead of the numeric IP address (see
Communication failures between computer and printer on page 121).
See the Assembly Instructions for more details about Internet setup, and how to connect to and register
with the cloud to enable Web Services.
14 Chapter 2 Connecting the printer ENWW
Page 23

Connect a computer to the printer by network
(Windows)
The following instructions apply if you intend to print from software applications using a printer driver.
See
Printing on page 42 for alternative ways of printing.
Before you begin, check your equipment:
●
The printer should be set up and on.
●
The Ethernet switch or router should be on and functioning correctly.
●
The printer and the computer should be connected to the network (see
Connect the printer to your
network on page 14). The printer can be connected by Ethernet or Wi-Fi.
Now you can proceed to install the printer software and connect to your printer.
Printer software installation
1. Make a note of the printer's IP address from the front panel (see
Access the Embedded Web
Server on page 26).
2. Insert the HP Start-up Kit DVD into your computer. If the DVD does not start automatically, run the
setup.exe program in the root folder of the DVD.
3. Navigate to the Software Installation button and press it.
4. Press the Install Software button, and choose your printer from the list of networked printers
that appears, identifying it by its IP address if necessary.
If your computer fails to find any printers on the network, the Printer Not Found window is
displayed, which helps you to try to find your printer. If you have a firewall in operation; you may
have to disable it temporarily in order to find the printer. You also have the options of searching
for the printer by its hostname, IP address, or MAC address.
In some cases, when the printer is not in the same sub-net as the computer, specifying the printer's
IP address may be the only successful option.
5. Follow the instructions on your screen to install the printer drivers and other HP software, such as
the HP Utility, HP Designjet Preview, and connections to HP Designjet ePrint & Share.
HP Designjet ePrint & Share allows you to create a copy of your document any time you print,
securely in the cloud, in your private online print history. This means that you can reprint your
documents from anywhere. To use HP Designjet ePrint & Share, you must create a passwordprotected account to protect your documents.
If you have enabled Web Services on your printer, you can print to your printer by email. Just
check the Web Services menu for the email address of your printer, then send the file you want to
print to that email address as an attachment.
ENWW
Connect a computer to the printer by network (Windows)
15
Page 24

Connect a computer to the printer by USB cable
(Windows)
You can connect your printer directly to a computer without going through a network, by using the
printer's built-in Hi-Speed USB device port. A USB connection may be faster than a network connection,
but it has some disadvantages that you should bear in mind:
●
The cable is of limited length.
●
It is more difficult to share the printer.
●
You cannot use Web Services.
●
You cannot use automatic firmware updates.
NOTE: The use of non-certified USB cables can lead to connectivity problems. Only cables certified
by the USB Implementor's Forum (
http://www.usb.org/) should be used with this printer.
Printer software installation
The following instructions apply if you intend to print from software applications using a printer driver.
See
Printing on page 42 for alternative ways of printing.
1. Do not connect the computer to the printer yet. You must first install the printer software
on the computer, as follows.
2. Insert the HP Start-up Kit DVD into your DVD drive. If the DVD does not start automatically, run the
setup.exe program in the root folder of the DVD.
3. Navigate to the Software Installation button and press it.
4. Press the Install Software button.
5. In some cases, you may see a message warning you that the installer would need to communicate
through the firewall in order to search the network for printers. As you have no need to do this,
you can check the box Continue installation without searching the network.
6. If you see a list of networked printers, select Help me find my printer (including network
and USB connected printers).
7. Select USB Cable.
NOTE: You can connect your printer and complete the installation later if you prefer. To do so,
check the box marked I want to connect my printer after completing the setup
wizard.
8. When prompted to do so, connect your computer to the printer with a certified USB cable. Ensure
that the printer is turned on.
9. Follow the instructions on your screen to install the printer drivers and other HP software, such as
the HP Utility.
10. If during the process you have not been prompted to connect the printer, connect the printer now,
and let the wizard install the device automatically.
16 Chapter 2 Connecting the printer ENWW
Page 25

Printer sharing considerations
Any other users sharing your USB-connected printer will be able to send print jobs, but will not be able
to receive information from the printer—which affects status reports, administration and troubleshooting.
TIP: The best way to share the printer over a network is to connect the printer not to any computer,
but to the network. See
Connect a computer to the printer by network (Windows) on page 15.
Uninstall the printer software (Windows)
1. Insert the HP Start-up Kit DVD into your DVD drive. If the DVD does not start automatically, run the
setup.exe program in the root folder of the DVD.
2. Navigate to the Software Installation button and press it.
3. Press the Install Software button, and follow the instructions on your screen to uninstall the
printer software.
Connect a computer to the printer by network (Mac
OS X)
You can connect your printer to a network under Mac OS X by using the following methods:
●
Bonjour
●
TCP/IP
The following instructions apply if you intend to print from software applications using a printer driver.
See
Printing on page 42 for alternative ways of printing.
Before you begin, check your equipment:
●
The printer should be set up and on.
●
The Ethernet switch or router should be on and functioning correctly.
●
The printer and the computer should be connected to the (wired or wireless) network. See
Connect
the printer to your network on page 14.
Now you can proceed to install the printer software and connect to your printer.
Bonjour connection
1. Go to the front panel and press or . Note the mDNS service name of your printer.
2. Insert the HP Start-up Kit DVD into your DVD drive.
3. Open the DVD icon on your desktop.
4. Open the Mac OS X HP Designjet Installer.
5. Follow the instructions on your screen.
ENWW
Uninstall the printer software (Windows)
17
Page 26

6. The printer software is installed, including the printer drivers and other HP software, such as the
HP Utility, HP Designjet Preview, and connections to HP Designjet ePrint & Share.
HP Designjet ePrint & Share allows you to create a copy of your document any time you print,
securely in the cloud, in your private online print history. This means that you can reprint your
documents from anywhere. To use HP Designjet ePrint & Share, you must create a passwordprotected account to protect your documents.
If you have enabled Web Services on your printer, you can print to your printer by email. Just
check the Web Services menu for the email address of your printer, then send the file you want to
print to that email address as an attachment.
7. When the software has been installed, the HP Printer Setup Assistant starts automatically, to set up
a connection to your printer. Follow the instructions on your screen.
8. When you reach the Select Printer screen, look for your printer's mDNS service name (which you
noted in step 1) in the Printer Name column.
●
If you find the right name, scroll sideways if necessary to see the Connection Type column,
and check that it shows Bonjour. Then highlight that line. Otherwise, continue searching
further down the list.
●
If you cannot find your printer's name with a Bonjour connection type, check the box My
printer is not in the list.
Click Continue.
9. Continue following the instructions on the screen. When you reach the Printer Queue Created
screen, click Quit to exit, or Create New Queue if you want to connect another printer to the
network.
10. When the HP Printer Setup Assistant has finished, you can remove the DVD from the DVD drive.
If the printer driver is already installed, the HP Printer Setup Assistant can be run at any time from the
DVD.
TCP/IP connection
1. Go to the front panel and make a note of the printer's URL (see Access the Embedded Web Server
on page 26).
2. Insert the HP Start-up Kit DVD into your DVD drive.
3. Open the DVD icon on your desktop.
4. Open the Mac OS X HP Designjet Installer.
5. Follow the instructions on your screen.
6. The printer software is installed, including the printer drivers and other HP software, such as the
HP Utility, HP Designjet Preview, and connections to HP Designjet ePrint & Share.
HP Designjet ePrint & Share allows you to create a copy of your document any time you print,
securely in the cloud, in your private online print history. This means that you can reprint your
documents from anywhere. To use HP Designjet ePrint & Share, you must create a passwordprotected account to protect your documents.
18 Chapter 2 Connecting the printer ENWW
Page 27

If you have enabled Web Services on your printer, you can print to your printer by email. Just
check the Web Services menu for the email address of your printer, then send the file you want to
print to that email address as an attachment.
7. When the software has been installed, the HP Printer Setup Assistant starts automatically, to set up
a connection to your printer. Follow the instructions on your screen.
8. When you reach the Select Printer screen, look for your printer's URL (which you noted in step 1)
in the Printer Name column.
●
If you find the right name, scroll sideways if necessary to see the Connection Type column,
and check that it shows IP Printing. Then highlight that line. Otherwise, continue searching
further down the list.
●
If you cannot find your printer's name with an IP Printing connection type, check the box
My printer is not in the list.
Click Continue.
9. Continue following the instructions on the screen. When you reach the Printer Queue Created
screen, click Quit to exit, or Create New Queue if you want to connect another printer to the
network.
10. When the HP Printer Setup Assistant has finished, you can remove the DVD from the DVD drive.
If the printer driver is already installed, the HP Printer Setup Assistant can be run at any time from the
DVD.
Connect a computer to the printer by USB cable
(Mac OS X)
You can connect your printer directly to a computer without going through a network, by using the
printer's built-in Hi-Speed USB device port. A USB connection may be faster than a network connection,
but it has some disadvantages that you should bear in mind:
●
The cable is of limited length.
●
It is more difficult to share the printer.
●
You cannot use Web Services.
●
You cannot use automatic firmware updates.
NOTE: The use of non-certified USB cables can lead to connectivity problems. Only cables certified
by the USB Implementor's Forum (
http://www.usb.org/) should be used with this printer.
Printer software installation
The following instructions apply if you intend to print from software applications using a printer driver.
See
Printing on page 42 for alternative ways of printing.
1. Make sure the printer is either turned off, or disconnected from the computer.
2. Insert the HP Start-up Kit DVD into your DVD drive.
3. Open the DVD icon on your desktop.
4. Open the Mac OS X HP Designjet Installer.
ENWW
Connect a computer to the printer by USB cable (Mac OS X)
19
Page 28

5. Follow the instructions on your screen.
6. The printer software is installed, including the printer driver and the HP Utility.
7. Make sure that the printer is turned on and connected to the computer with a certified USB cable.
NOTE: The use of non-certified USB cables can lead to connectivity problems. Only cables
certified by the USB Implementor's Forum (
http://www.usb.org/) should be used with this printer.
8. Shortly afterwards, a print queue is created automatically for your printer.
Sharing the printer
If your computer is connected to a network, you can make your directly connected printer available to
other computers on the same network.
1. Double-click the System Preferences icon on the Dock menu bar on your desktop.
2. To enable printer sharing, go Sharing, select Printer Sharing, and then check the printer(s)
that you want to share.
3. Your printer now automatically appears in the list of shared printers displayed by any other
computer running Mac OS X and connected to your local network.
Please bear in mind the following considerations.
●
Any other users wishing to share your printer must install the printer software on their own
computers.
●
Anyone sharing your directly connected printer will be able to send print jobs, but will not be able
to receive information from the printer—which affects alerts, status reports, paper management,
administration and troubleshooting.
●
You may find that sharing your directly connected printer with other users will slow down your
computer unacceptably.
TIP: The best way to share the printer over a network is to connect the printer not to any computer,
but to the network. See
Connect a computer to the printer by network (Mac OS X) on page 17.
Uninstall the printer software (Mac OS X)
1. Insert the HP Start-up Kit DVD into your DVD drive.
2. Open the DVD icon on your desktop.
3. Open the Mac OS X HP Designjet Uninstaller, and follow the instructions on your screen to
uninstall the printer software..
To delete the print queue, select the Print & Fax dialog from the system preferences. Select the name
of the printer and click the – button.
20 Chapter 2 Connecting the printer ENWW
Page 29

3 Setting up the printer
●
Introduction
●
Automatic firmware update
●
Turn email notifications on and off
●
Turn alerts on and off
●
Control access to the Embedded Web Server
●
Set Windows driver preferences
●
Set up Web Services
ENWW 21
Page 30

Introduction
This chapter describes various printer settings that the printer administrator may wish to control as soon
as a new printer is assembled and ready for use.
Automatic firmware update
The printer can automatically check for a firmware update periodically (see Firmware update
on page 88). Without an update, some Web Services may not be available. The Enable Web
Services process includes the option to turn on automatic firmware updates from the printer's front panel
or Embedded Web Server.
Turn email notifications on and off
In order to receive email notifications from the printer, you must have configured the email server. To
configure the email server using the Embedded Web Server, select Settings > Email server, and fill
in the following fields:
●
SMTP server: the IP address or hostname of the outgoing mail server (SMTP) that will process all
email messages from the printer. If the mail server requires authentication, email notifications will
not work.
●
Printer email address: each email message sent by the printer must include a return address,
which does not need to be a real, functional email address, but it should be unique, so that
recipients of the message can identify the printer that sent it.
You can turn specific email notifications on or off by selecting Notifications from the Tools tab of the
Embedded Web Server.
Turn alerts on and off
Printer alerts warn you when there is a printer problem that you can correct by taking action, or when
one of your printing jobs changes its status. The alerts are displayed by the printer's front panel, by the
HP Utility, by the printer driver and by the Embedded Web Server.
You can change the alert settings in various ways to display all, some, or none of the available alerts.
To access alert settings under Windows
●
Select Alert Settings in the Tools menu of the HP Designjet Utility.
●
Select Alert Settings in any alert page displayed by the HP Designjet Utility.
●
Right-click the system tray icon of the HP Designjet Utility, and select Alert Settings.
In the Alert Settings window, you can use the Alerting slider to turn off alerts completely.
22 Chapter 3 Setting up the printer ENWW
Page 31
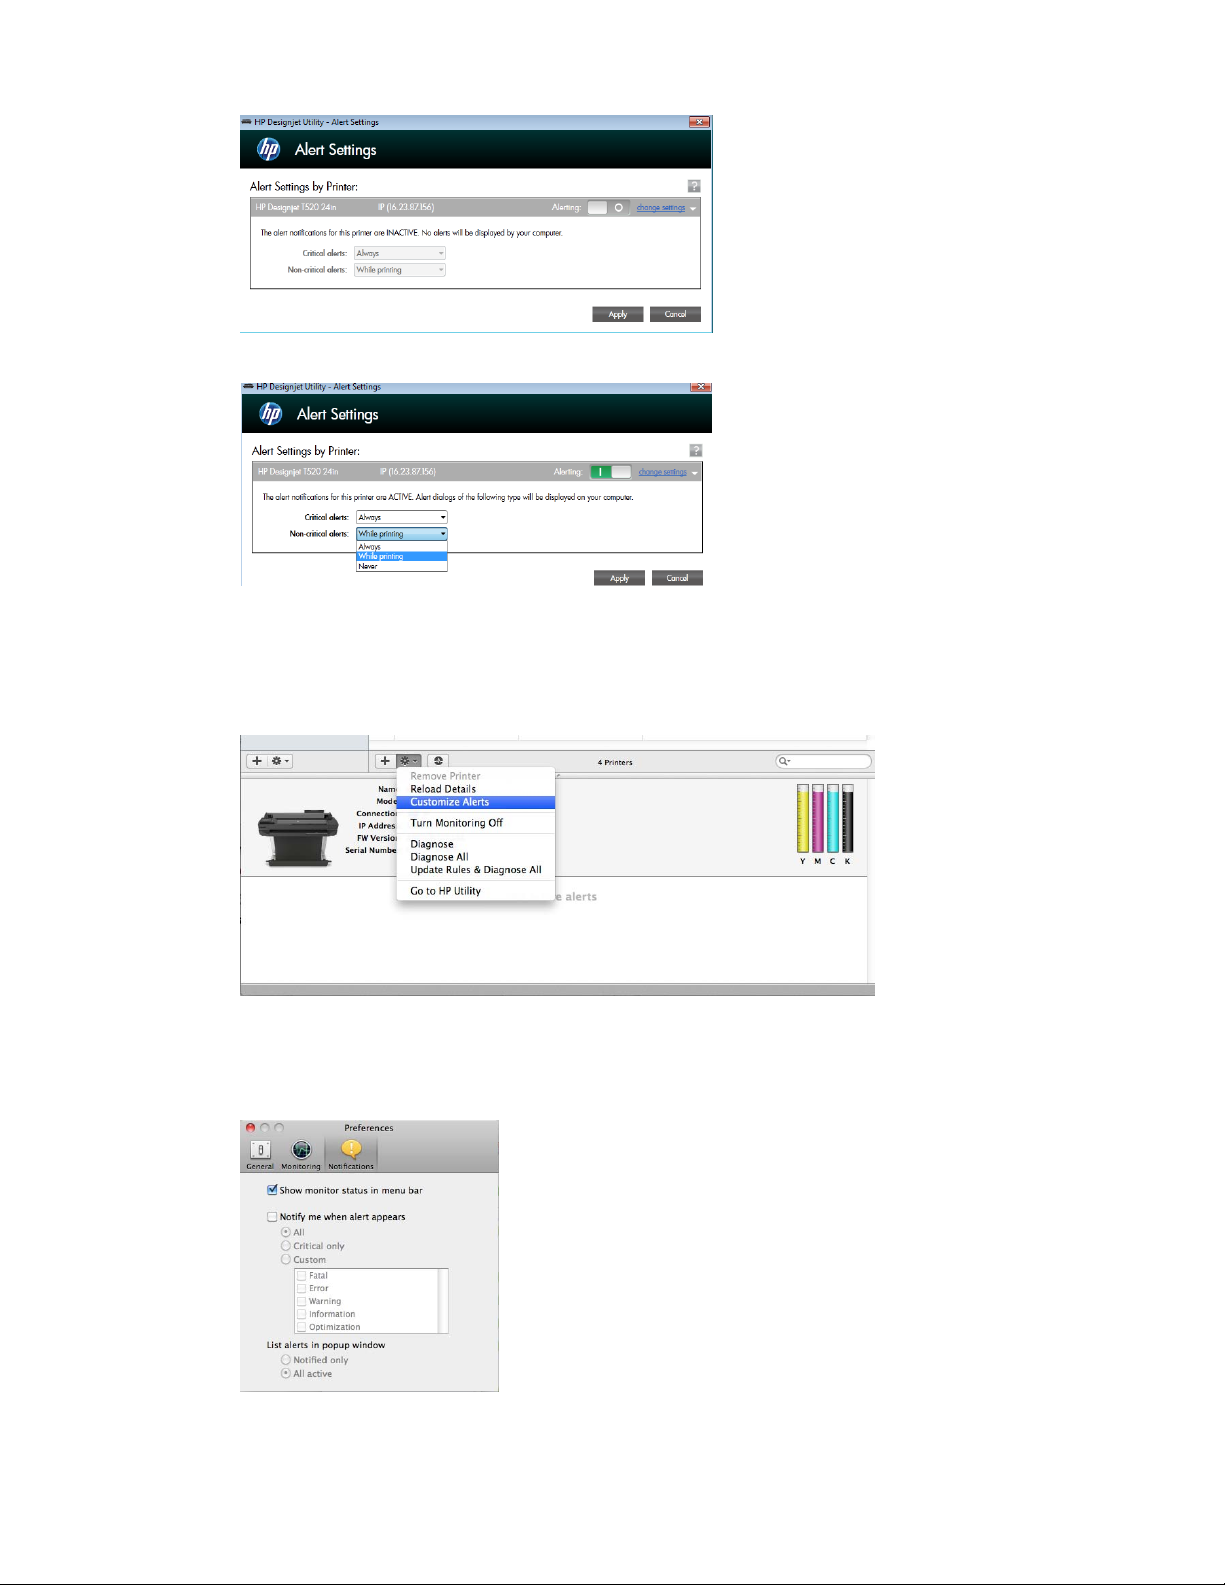
Alternatively, you can choose when, if ever, to display critical or non-critical alerts.
To access alert settings under Mac OS X
●
Open HP Printer Monitor preferences, select your printer, and then Customize Alerts, so that
you can set each individual alert to appear in specific cases and with a specific time interval.
You can turn off alerts completely by unchecking the “Show monitor status in menu bar” box in the
Notifications tab of the HP Printer Monitor preferences. If you leave that box checked but uncheck the
“Notify me when alert appears” box (as below), the alerts will be available in the HP Printer Monitor,
but will not pop up in the Dock screen.
ENWW
Turn alerts on and off
23
Page 32

Control access to the Embedded Web Server
To prevent users from modifying important device settings, you can set a password in the Embedded
Web Server, so that users without the password can see only the Information tabs. Once set, the
password is required to view or change any parameters in the other tabs.
Set Windows driver preferences
You can change some default settings in your printer driver according to your own preferences, for
instance to set color emulation or paper-saving options. To do this under Windows 7, for example,
press the Start button on your computer's screen, then click Devices and printers, then right-click
your printer's icon and select Printing preferences. Any settings you change in the Printing
Preferences window will be saved as default values.
Set up Web Services
Before using Web Services, some setup is required on your printer and your computer.
1. Make sure that your printer is correctly connected to the Internet.
2.
Enable Web Services during initial setup of the printer, or later by pressing
on the home
screen and following the instructions on the front panel. The printer may need to restart if it has
updated its firmware.
3. Install the printer software (drivers and other software to enhance your experience) in your
computer from the HP Start-up Kit DVD, or from the Web. You can also find documentation and
support information on the DVD and on the Web.
4. Create an HP Designjet ePrint & Share account when prompted, or later, at
http://www.hp.com/
go/eprintandshare. HP Designjet ePrint & Share saves copies of all your print jobs in the cloud so
that you can reprint and share them from almost anywhere, even from smartphones and tablet
computers.
5. Activate your account by clicking the activation link that you will receive by email.
TIP: If you don’t see the message, remember to check your junk email folder.
6. This is an optional step: If you are the printer administrator, log in at the HP ePrint Center
(
http://www.hp.com/go/eprintcenter) to customize your printer’s email address or manage
eprinter security for remote printing.
Congratulations, you now have completed Web Services setup. HP ePrint and HP Designjet ePrint &
Share are ready to use.
For the latest information, support, and terms of use of the HP ePrint Center and HP Designjet ePrint &
Share, see their respective websites,
http://www.hp.com/go/eprintcenter and http://www.hp.com/
go/eprintandshare.
24 Chapter 3 Setting up the printer ENWW
Page 33

4 Personalizing the printer
●
Change the language of the front-panel display
●
Access the Embedded Web Server
●
Change the language of the Embedded Web Server
●
Access the HP Utility
●
Change the language of the HP Utility
●
Change the sleep mode setting
●
Change the auto-off setting
●
Change the front-panel display brightness
●
Configure network settings
●
Manage ePrinter security
●
Change your printer’s email address
ENWW 25
Page 34

Change the language of the front-panel display
There are two possible ways to change the language of the front-panel menus and messages.
●
If you can understand the current front-panel display language, press
, then Printer
preferences > Select language.
●
If you cannot understand the current front-panel display language, start with the printer powered
off. Press the Power key to turn it on. When you see icons appear on the front panel, press
,
then
, then , then . If you cannot see those icons on the front panel, press where they should
appear (see
The front panel on page 7).
Whichever method you used, the language selection menu should now appear on the front-panel
display. Press your preferred language.
Access the Embedded Web Server
The Embedded Web Server enables you to manage your printer remotely using an ordinary Web
browser running on any computer.
To access the Embedded Web Server, you must have a TCP/IP connection to your printer. You can
access the Embedded Web Server indirectly through the HP Utility, if you connect to your printer with a
TCP/IP connection (wired or wireless).
The following browsers are known to be compatible with the Embedded Web Server:
●
Internet Explorer 7 and later
●
Opera 8 and later
●
Mozilla Firefox 2 and later
●
Safari 3 and later
●
Google Chrome 3 and later
To access the Embedded Web Server on any computer, open your Web browser and type the IP
address of your printer.
You can see your printer's IP address on the front panel by pressing
or .
If you have followed these instructions but failed to get through to the Embedded Web Server, see
Cannot access the Embedded Web Server on page 130.
Change the language of the Embedded Web Server
The default language in which the Embedded Web Server first appears is the language you have
selected for your browser. If this language is not supported by the Embedded Web Server, the
Embedded Web Server will appear in English; however, you can change it to any supported language.
The languages supported by the Embedded Web Server are English, Portuguese, Spanish, French,
Italian, German, Polish, Russian, Simplified Chinese, Traditional Chinese, Korean, and Japanese. There
is a tab at the top right of the window to select language.
26 Chapter 4 Personalizing the printer ENWW
Page 35

Access the HP Utility
The HP Utility enables you to manage your printer from a computer with a USB, TCP/IP, or Wi-Fi
connection.
●
Under Windows, start the HP Utility from your desktop shortcut or from Start > All Programs
> Hewlett-Packard > HP Designjet Utility > HP Designjet Utility. This launches the HP
Designjet Utility, showing the HP Designjet printers installed on your computer.
●
Under Mac OS X, launch the HP Utility from your dock shortcut or by selecting
STARTUP_DISK > Library > Printers > hp > Utilities > HP Utility. This launches the HP
Utility, showing the HP Designjet printers installed on your computer.
When you select your printer in the left pane, everything that appears in the right pane is specific
to that printer.
Change the language of the HP Utility
The HP Utility can work in the following languages: English, Portuguese, Spanish, Catalan (Windows
only), French, Italian, German, Russian, Simplified Chinese, Traditional Chinese, Korean, and
Japanese.
●
Under Windows, the language will be adjusted to your regional language settings as defined
in the Windows Control Panel.
●
Under Mac OS X, the language is changed as for any other application. In System
Preferences, select International and re-launch the application.
Change the sleep mode setting
If the printer is left switched on but unused for a certain period of time, it goes automatically into sleep
mode to save power. To change the time the printer waits before it goes into sleep mode, go to the
front panel and press
, then Printer preferences > Sleep. Select the wait time you want and then
press OK; you can set the time from 5 to 240 minutes. The default time is 30 minutes.
Change the auto-off setting
You can use the printer's auto-off feature to turn the printer off automatically. For example, setting it to 2
hours would turn the printer off after 2 hours of inactivity. In this way, you can save more energy.
However, the auto-off feature is automatically disabled when the printer is connected to a network, to
avoid inconveniencing network users.
If you are using a USB connection, you can set the printer to turn itself off completely after 2 to 12
hours of inactivity. At the front panel, press
, then Printer preferences > Auto-off.
Change the front-panel display brightness
To change the brightness of the front-panel display, press , then Printer preferences > Display
brightness, and select a value you want. Press OK to set the value. The default brightness is set to
50.
ENWW
Access the HP Utility
27
Page 36

Configure network settings
You can view and configure the network settings from the Embedded Web Server, the HP Utility or the
front panel.
●
From the Embedded Web Server: Select the Setup tab, then Networking.
●
From the HP Utility: You can access the Embedded Web Server through the HP Utility.
●
From the front panel: press
, then Connectivity.
The following options are available:
●
Enable/Disable wireless turns the wireless connection on or off.
●
Wireless setup wizard provides an easy way to connect to a wireless network.
●
Wi-Fi protected setup allows you to set up a connection with a wireless network using WPS
(pushbutton or pin) encryption.
●
Network summary displays information about the wired or wireless network
●
Print wireless network test runs diagnostic tests of wireless connectivity
●
Print network configuration
●
Advanced setup
◦
Select I/O timeout sets the time that the printer will wait for the driver to send a job to the
printer once the connection has been opened. Values range from half a minute to half an
hour.
◦
Link speed sets the speed at which data are transmitted over the network. The default is
Automatic.
◦
IP settings allows you to view or change the IP address, subnet mask, default gateway, and
DNS address.
◦
Hostname allows you to change the hostname.
●
Restore network defaults
Configure firewall settings
Firewall features provide network-layer security on both IPv4 and IPv6 networks. The firewall provides
simple control of IP addresses that are allowed access.
NOTE: In addition to firewall protection at the network layer, the printer also supports open secure
sockets layer (SSL) standards at the transport layer for secure client-server applications, such as clientserver authentication or HTTPS Web browsing.
For firewall operation on the printer, you must configure a firewall policy to apply to specified IP traffic.
Firewall policy pages are accessed through the Embedded Web Server and displayed by your Web
browser. After a policy is configured, it is not activated until you click Apply in the Embedded Web
Server.
28 Chapter 4 Personalizing the printer ENWW
Page 37

Creating and using firewall rules
Firewall rules allow you to control IP traffic. Use firewall rules to allow or drop IP traffic based on IP
addresses and services.
Enter up to ten rules, each rule specifying the host addresses, services, and the action to take for those
addresses and services.
Create a firewall rule
1. Open the Embedded Web Server.
2. Click the Settings tab, then Firewall Rules.
3. Click New, and then follow the onscreen instructions.
NOTE: After you click Apply, the connection to the Embedded Web Server might be temporarily
disrupted for a short period of time. If the IP address was unchanged, the Embedded Web Server
connection will be enabled again. However, if the IP address was changed, use the new IP address to
open the Embedded Web Server.
Change the priority of firewall rules
1. Open the Embedded Web Server.
2. Click the Settings tab, then Firewall Rules Priority.
3. Select the priority from the Rule Precedence list, with 10 having the highest priority and 1 having
the lowest priority.
4. Click Apply.
Change firewall options
1. Open the Embedded Web Server.
2. Click the Settings tab, then Firewall Options.
3. Change whatever options you wish, then click Apply.
NOTE: After you click Apply, the connection to the Embedded Web Server might be temporarily
disrupted for a short period of time. If the IP address was unchanged, the Embedded Web Server
connection will be enabled again. However, if the IP address was changed, use the new IP address to
open the Embedded Web Server.
Reset firewall settings
To reset the firewall settings to the factory defaults, restore the printer’s network settings.
Limitations to rules, templates, and services
When creating firewall rules, note the following limitations to rules, templates, and services.
Item Limit
Maximum number of rules 10 (one default rule)
Maximum number of Address Templates 12
ENWW
Configure network settings
29
Page 38
Item Limit
Maximum number of user-defined address templates 5
Maximum number of services you can add to a user-defined service template
NOTE: The predefined All Services template is not subject to this limitation and includes all
services supported by the print server.
40
Maximum number of services you can add to the policy
NOTE: For a given rule, only one address template and one service template can be added.
40
Maximum number of service templates in the policy 10
Maximum number of user-defined custom service templates 5
Reset network settings
To reset the administrator password and network settings, go to the front panel and press , then
Connectivity > Restore network defaults.
NOTE: Print the network configuration page and check that the network settings have been reset.
NOTE: Resetting the printer’s network settings also resets the printer’s firewall settings.
Manage ePrinter security
When you have set up Web Services, the printer is in unlock mode. In unlock mode, anyone who
knows your printer's email address can print to your printer by just sending a file to it. Although HP
provides a spam filtering service, you should be careful about giving out your printer's email address,
as everything sent to that address may be printed on your printer.
If you are the printer administrator, you can manage ePrinter security or change your printer status to
lock mode by visiting the HP ePrint Center at
http://www.hp.com/go/eprintcenter. You can also
customize your printer's e-mail address and manage print jobs from there. At your first visit, you will
need to create an account in the HP ePrint Center.
Change your printer’s email address
You can change your printer's email address at the HP ePrint Center: .
30 Chapter 4 Personalizing the printer ENWW
Page 39

5 Paper handling
●
General paper-loading advice
●
Load a roll onto the spindle
●
Load a roll into the printer
●
Unload a roll
●
Load a single sheet
●
Unload a single sheet
●
Use the multi-sheet tray
●
View information about the paper
●
Maintain paper
●
Change the drying time
●
Turn the automatic cutter on and off
●
Form feed with or without cutting
ENWW 31
Page 40
General paper-loading advice
You can load paper into the printer in three different ways: from a roll, as a single sheet, or as a stack
of single sheets from the multi-sheet tray. Only one of these methods can be used at a time, and
switching from one to another is manual: it is not done automatically.
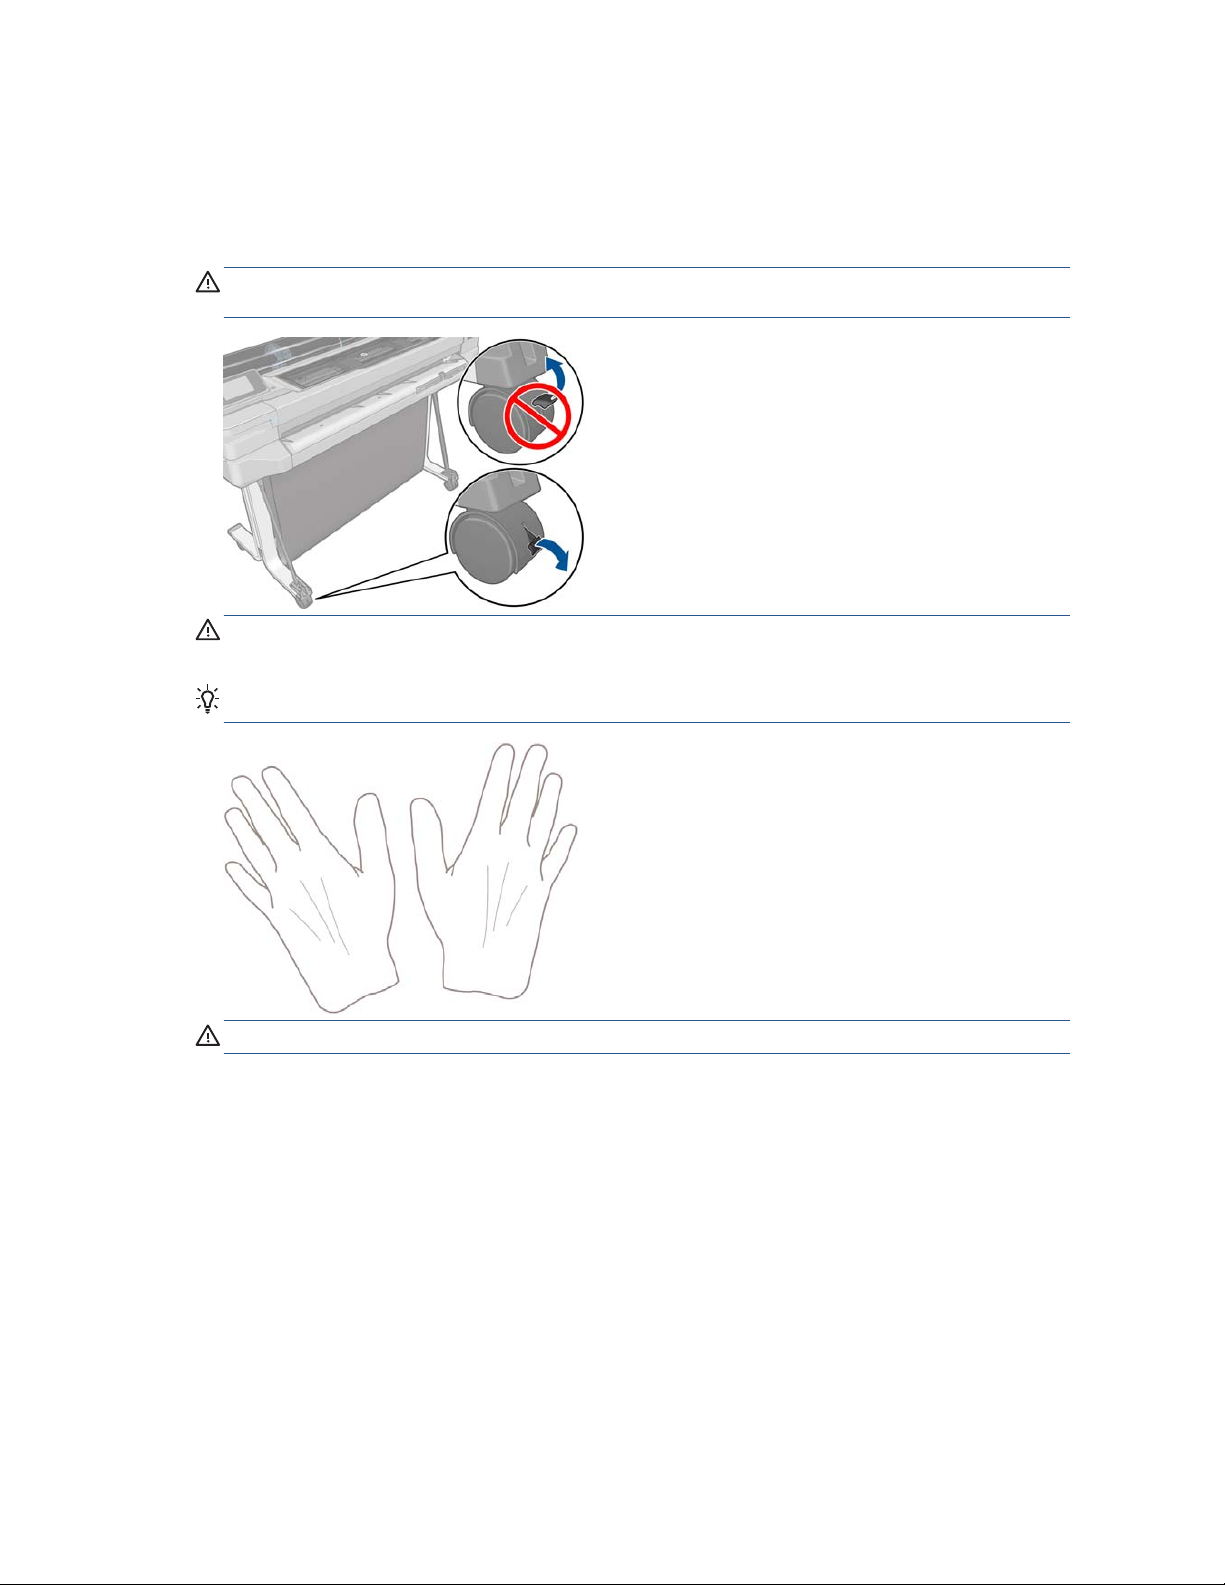
CAUTION: Make sure the printer wheels are locked (the brake lever is pressed down) to prevent the
printer from moving.
CAUTION: All paper must be 280 mm (11 in) or wider. A4 and letter paper should not be loaded in
landscape orientation.
TIP: For photo paper wear cotton gloves to avoid transferring oils onto the paper.
CAUTION: Keep the bin closed throughout the loading process.
32 Chapter 5 Paper handling ENWW
Page 41
Load a roll onto the spindle
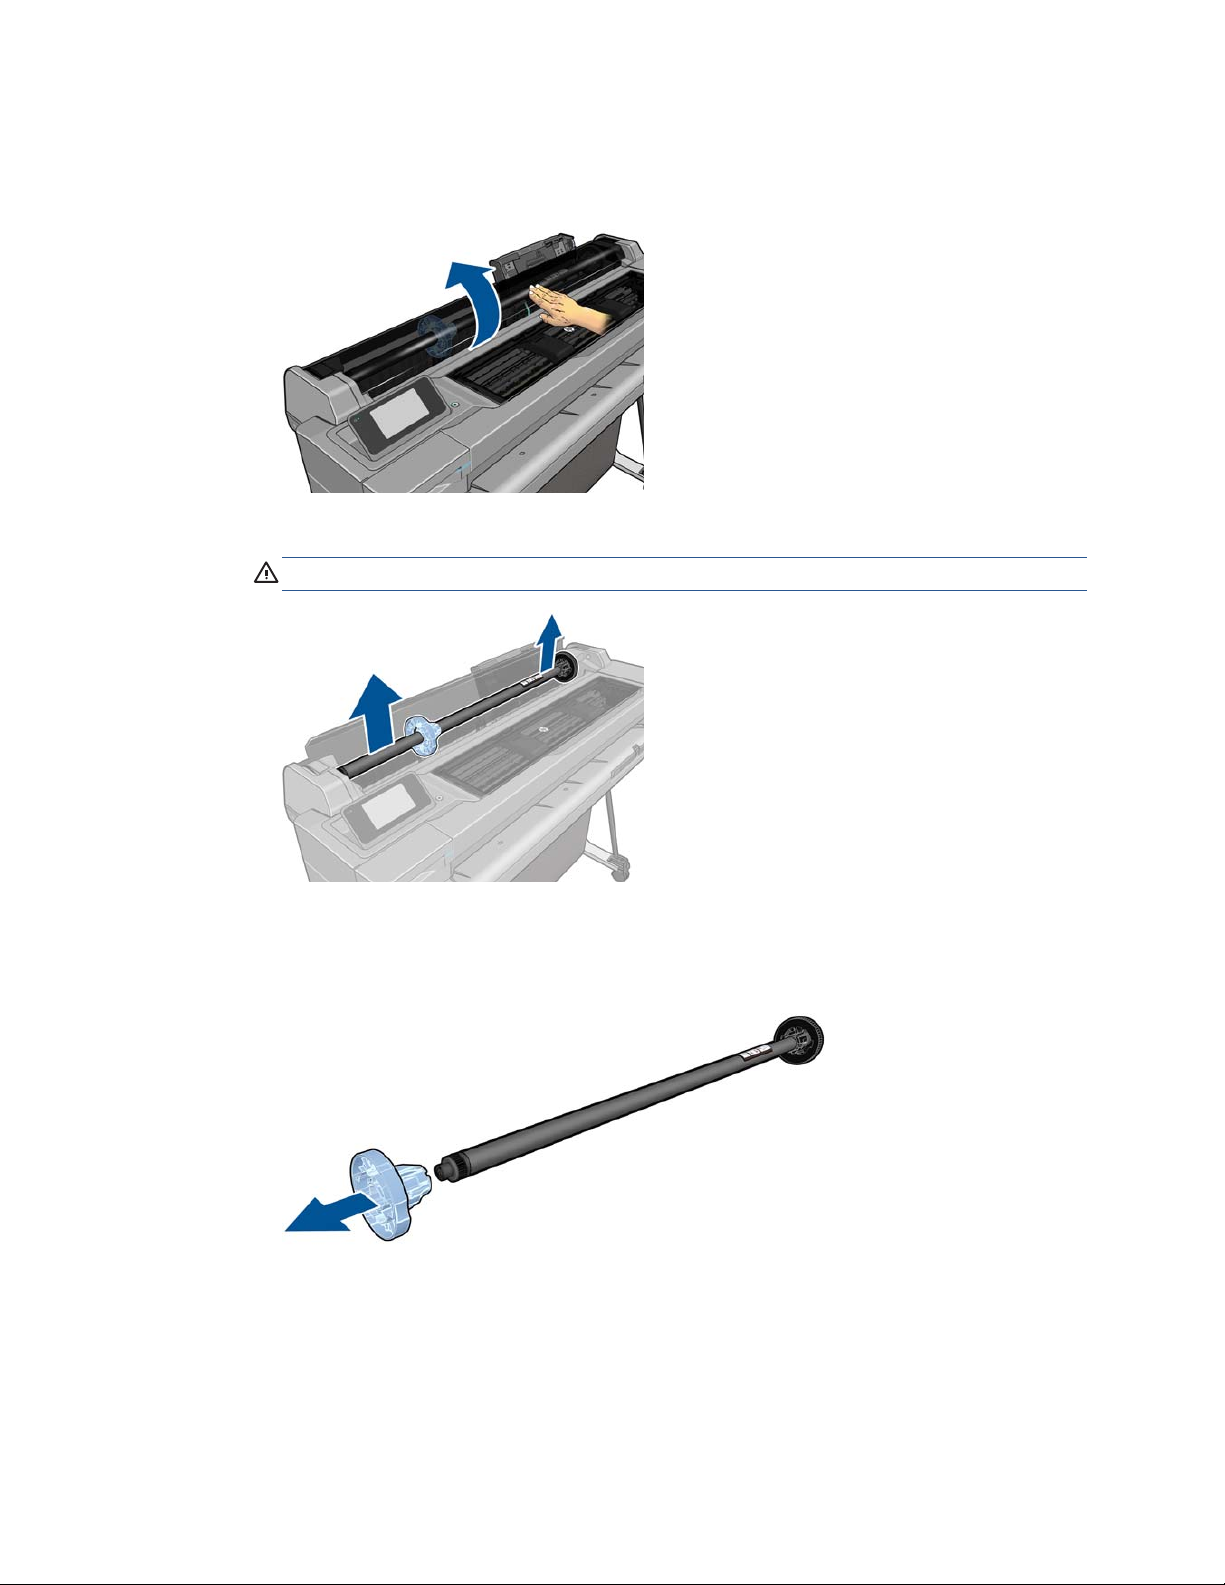
1. If your printer is a T520, open the roll cover.
2. Remove the spindle from the printer.
WARNING! Do not insert your fingers into the spindle supports during the removal process.
3. The spindle has a stop at each end to keep the roll in position. The blue stop can be removed to
mount a new roll; it slides along the spindle to hold rolls of different widths. Remove the blue
paper stop from the end of the spindle.
4. If the roll is long, rest the spindle horizontally on a table and load the roll on the table.
ENWW
Load a roll onto the spindle
33
Page 42
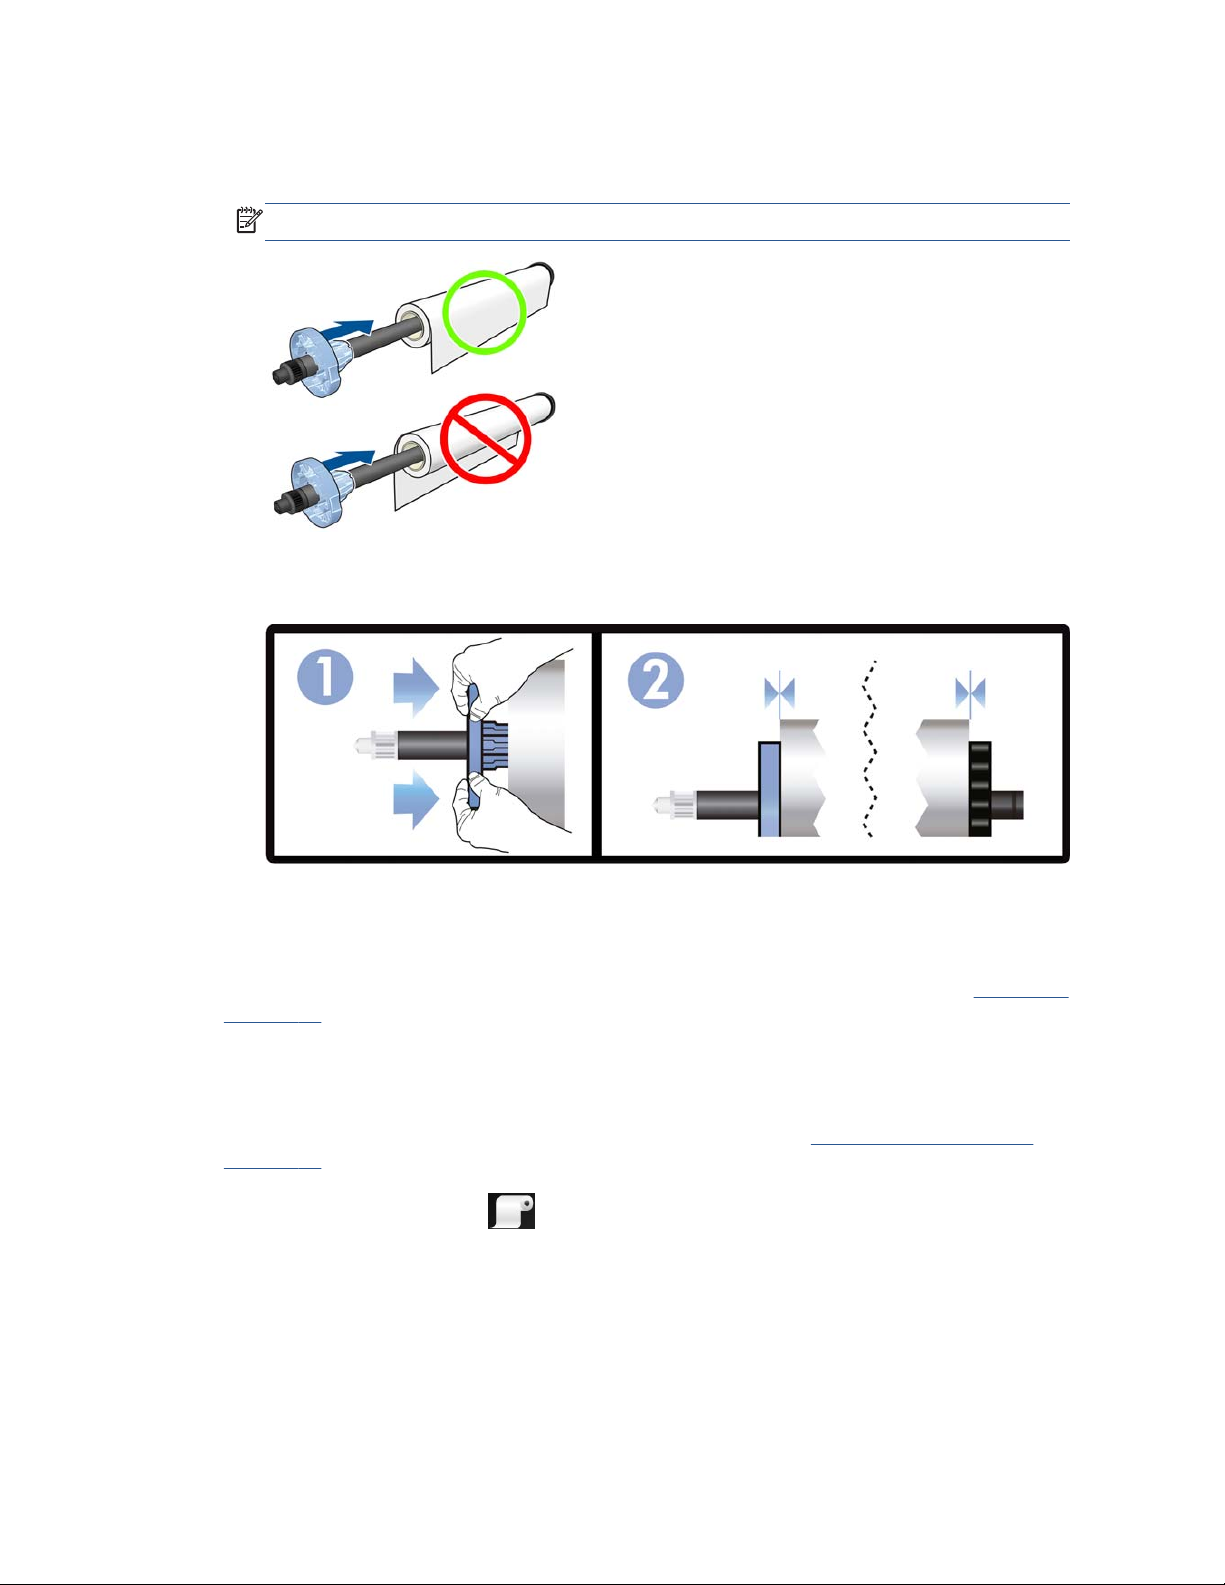
5. Slide the new roll onto the spindle. Make sure the paper type is oriented as shown. If it is not,
remove the roll, turn it 180 degrees and slide it back on to the spindle. There are labels on the
spindle showing the correct orientation.
NOTE: From the back of the printer, the blue stopper is inserted into the right-side holder.
Ensure both ends of the roll are as close to the spindle stops as possible.
6. Put the blue paper stop on to the open end of the spindle, and push it towards the end of the roll.
7. Ensure the blue paper stop is pushed in as far as it goes. Check that there is no space between the
roll and the stops at both ends.
If you are a regular user of different paper types, you can change rolls more quickly if you preload rolls
of different paper types on different spindles. Extra spindles are available for purchase, see
Accessories
on page 90.
Load a roll into the printer
To start this procedure, you must have a roll loaded on the spindle. See Load a roll onto the spindle
on page 33.
1.
From the front panel, press
, then Load roll.
This step is optional: if you just start feeding in roll paper, the printer recognizes that you want to
load a roll.
34 Chapter 5 Paper handling ENWW
Page 43
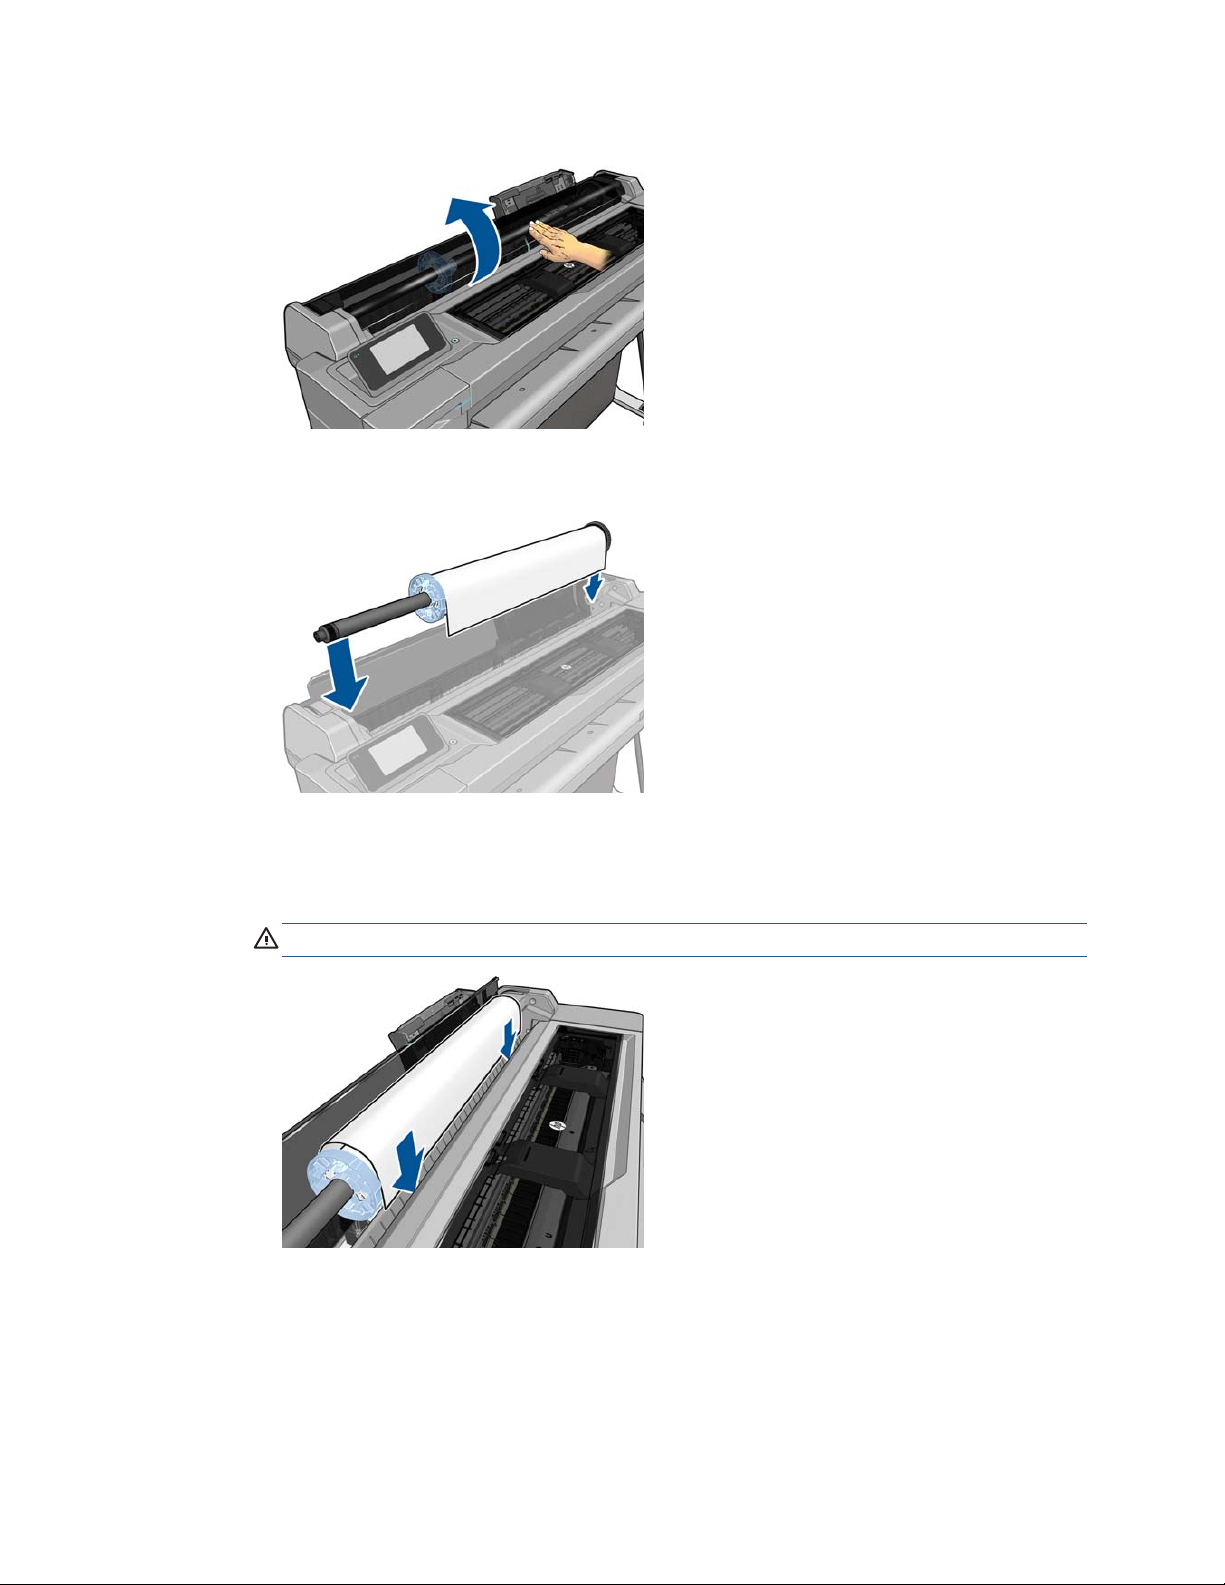
2. If your printer is a T520, open the roll cover.
3. Insert the spindle into the printer, holding it by both ends. The blue hub should be on the left, as
viewed from the front of the printer.
4. If the edge of the roll is not straight or torn (sometimes due to tape used to hold end of the roll),
pull the paper slightly and cut a straight edge.
5. Insert the edge of the paper into the printer.
WARNING! Do not push your fingers inside the printer's paper path.
ENWW
Load a roll into the printer
35
Page 44
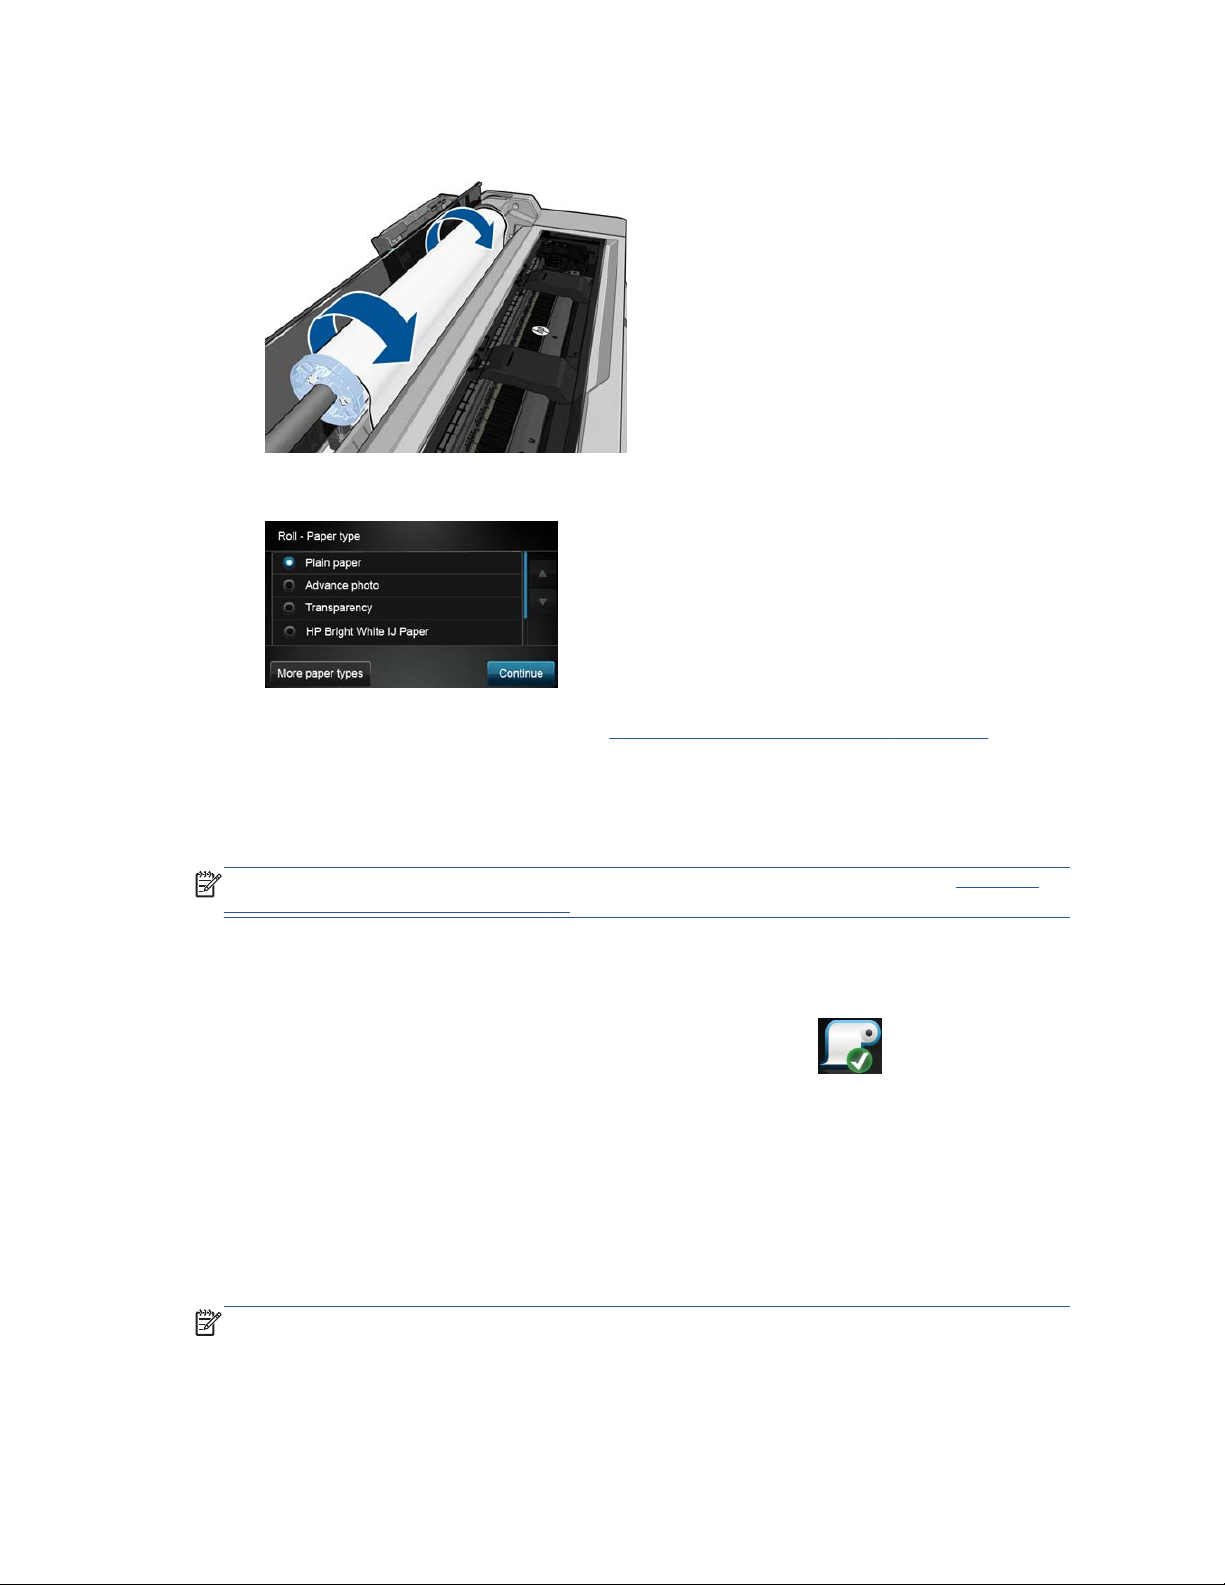
6. Roll the paper into the printer until you feel resistance and the paper flexes slightly. When the
printer detects the paper, it beeps, and feeds in the paper automatically.
7. The front panel prompts you to select the paper category and type.
If you do not see your paper type in the front panel, press More paper types. If you still cannot
find your paper type in the whole list, see
The paper type is not in the driver on page 98.
8. The printer checks the alignment and measures the width. If the roll is not correctly aligned, follow
the instructions on the front-panel display.
9. If your printer is a T520, close the roll cover.
NOTE: If you have an unexpected issue at any stage of the paper loading process, see The paper
cannot be loaded successfully on page 96.
Unload a roll
If there is paper on the roll, you can unload it from the front panel: press , then Unload roll.
Afterwards, the multi-sheet tray will become the default active paper source.
If the end of the paper is no longer attached to the core, the front panel asks you to unload the roll
manually.
After unloading, the multi-sheet tray is the default active paper source.
Load a single sheet
NOTE: Roll paper and single sheets use the same input slot in the printer.
36 Chapter 5 Paper handling ENWW
Page 45
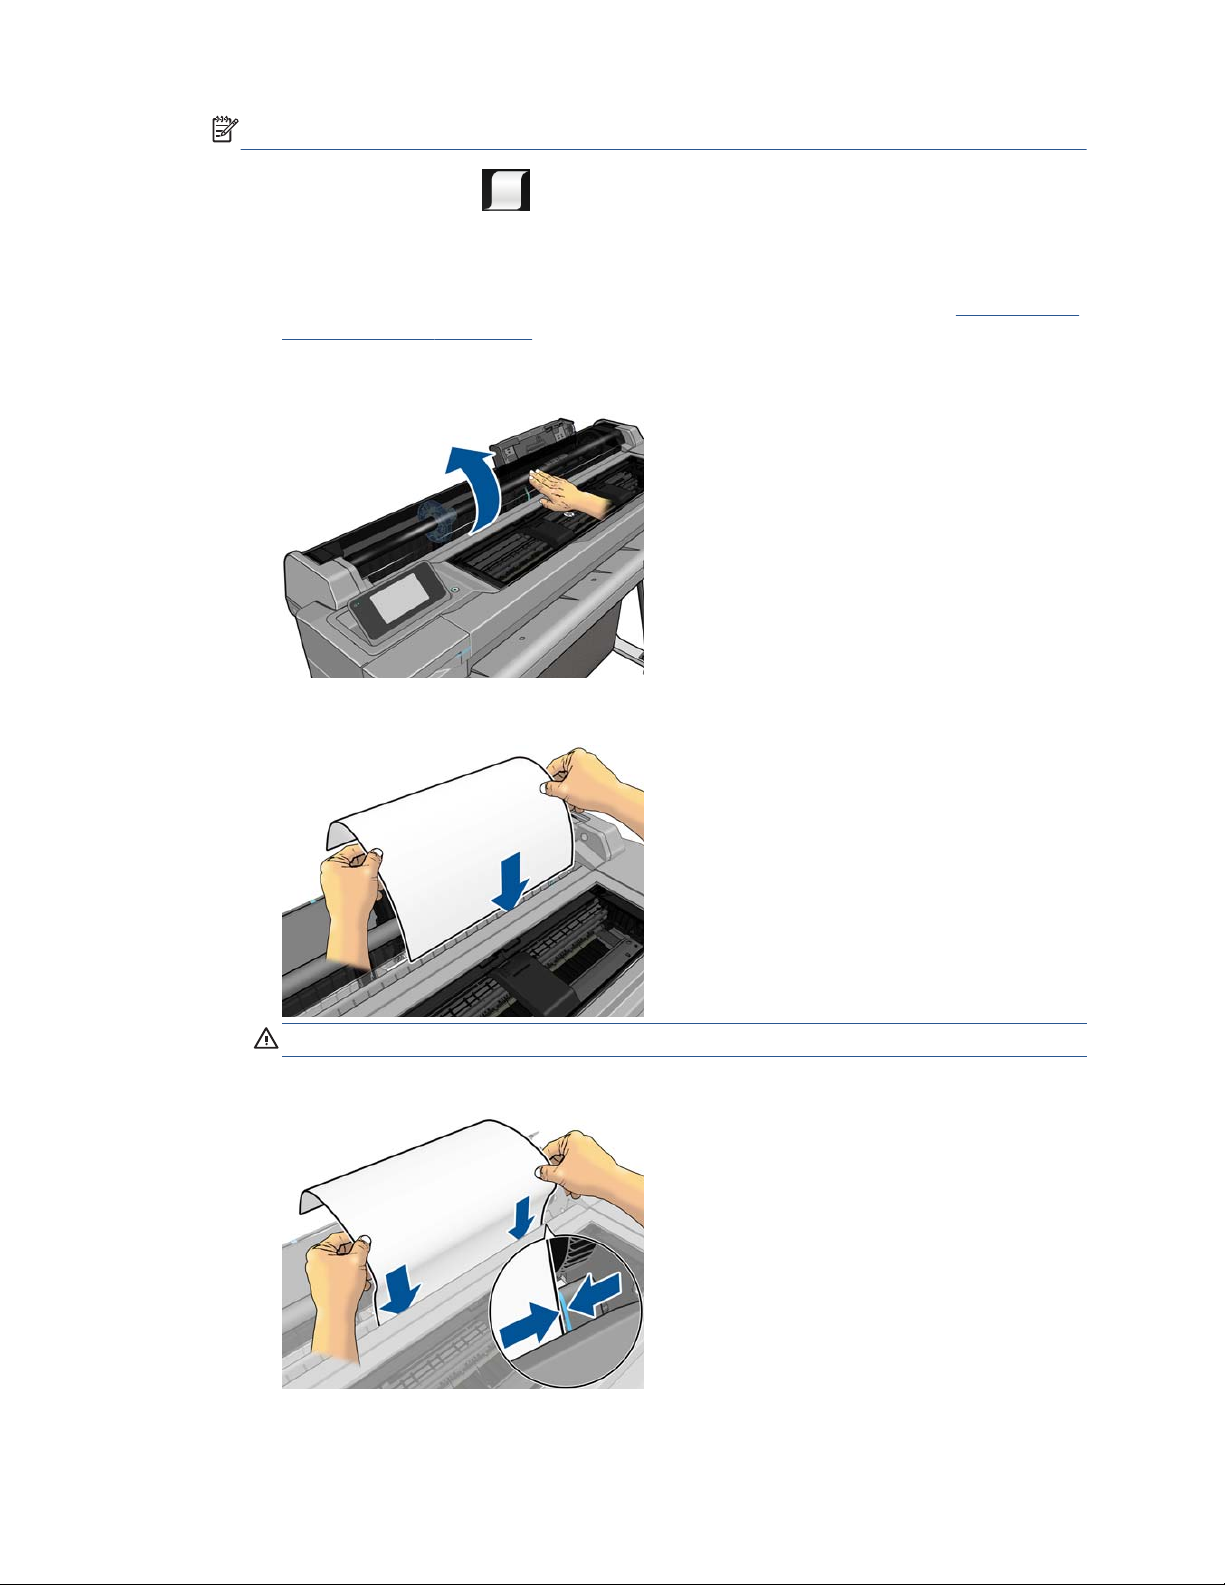
NOTE: Sheets of width 329 mm (12.95 in) or less should be loaded from the multi-sheet tray.
1.
At the front panel, press
, then Load single sheet.
2. If a roll is already loaded, you have to wait while it is automatically unloaded.
3. Select your paper category and type. If you do not see your paper type in the front panel, press
More paper types. If you still cannot find your paper type in the whole list, see
The paper type
is not in the driver on page 98.
4. If your printer is a T520, open the roll cover.
5. When prompted by the front panel, insert the sheet into the right-hand side of the input slot.
WARNING! Do not push your fingers inside the printer's paper path.
6. Align the sheet with the blue line.
ENWW
Load a single sheet
37
Page 46
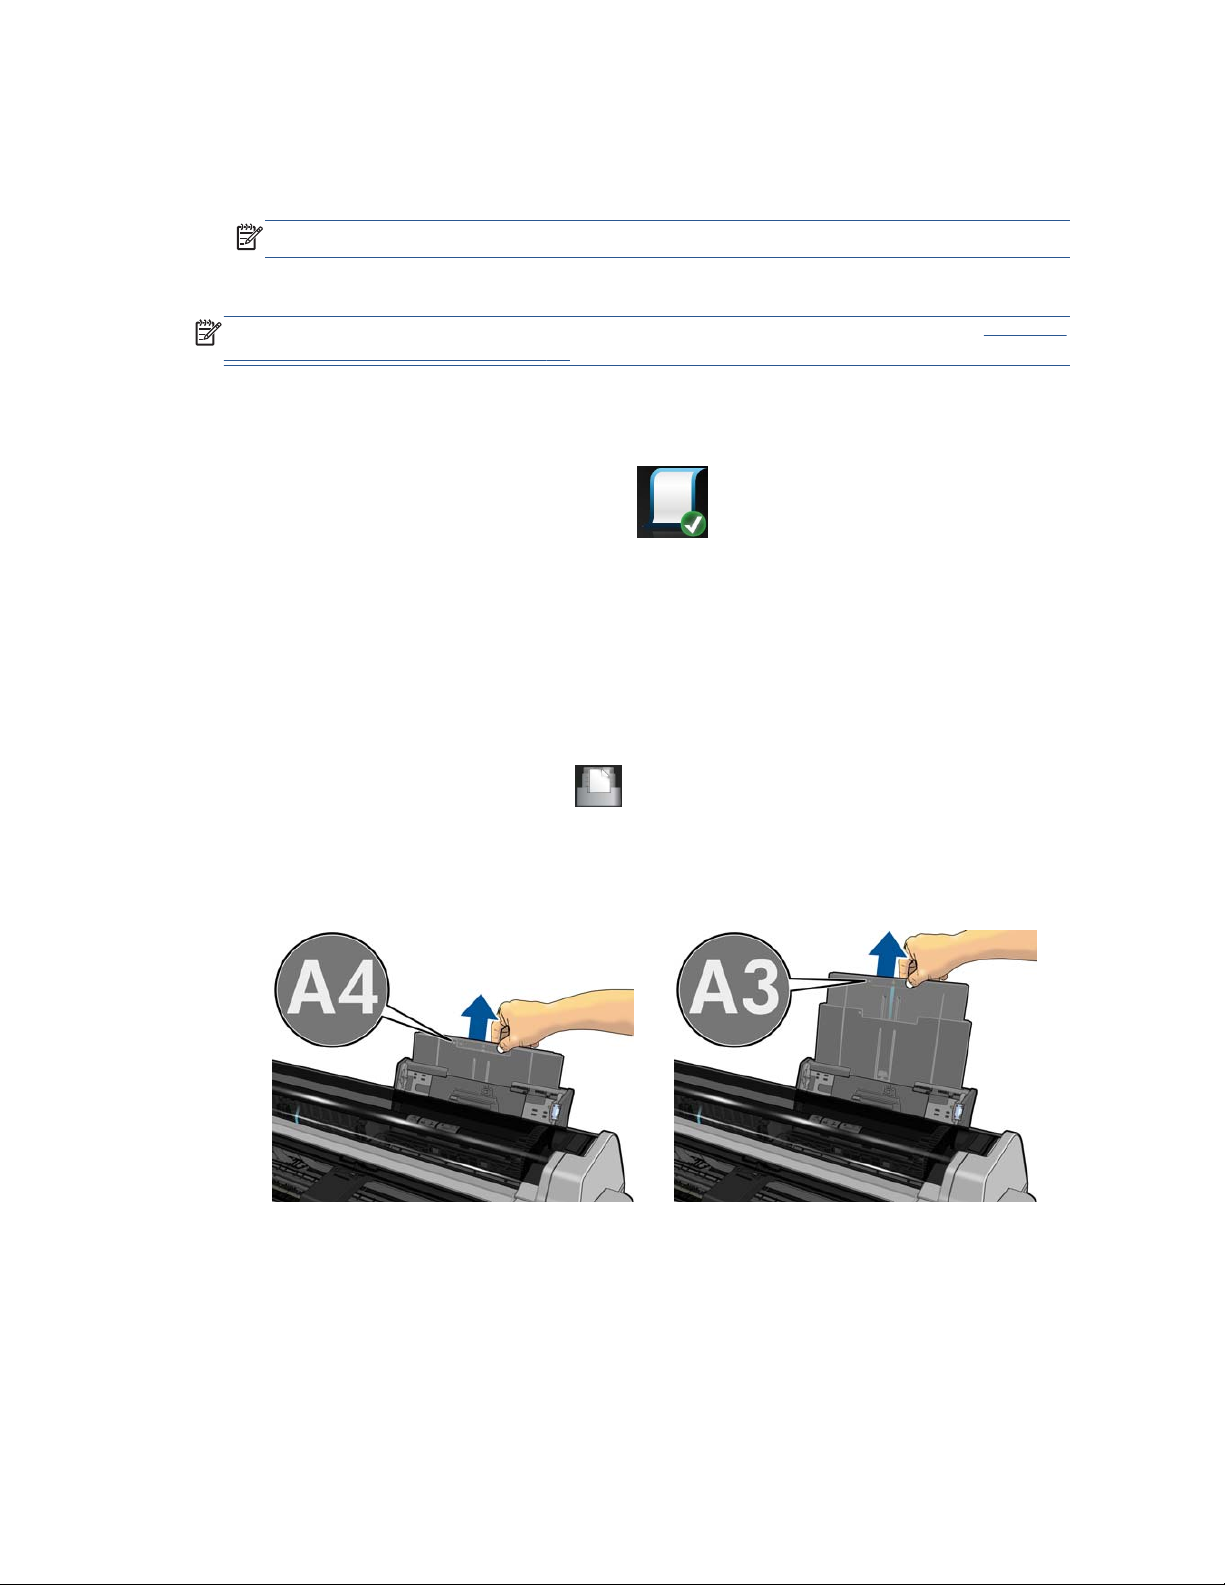
7. Press OK on the front panel to feed the paper into the printer. Guide the sheet into the printer; this
is especially important with thicker papers.
8. The printer checks the alignment and measures the sheet.
NOTE: Depending on the width of the sheet, it feeds out the front of the printer.
9. If the sheet is not correctly aligned, you may be asked to reload it.
NOTE: If you have an unexpected problem at any stage of the paper loading process, see The paper
cannot be loaded successfully on page 96.
Unload a single sheet
To unload a sheet, go to the front panel and press , then Unload single sheet.
The sheet unloads out of the front of the printer; either catch it manually or allow it to fall into the bin.
After unloading, the multi-sheet tray is the default active paper source.
Use the multi-sheet tray
1. If no roll is loaded or the roll has run out of paper, the multi-sheet tray is active by default.
Alternatively, at the front panel, press
, then Use multi-sheet tray. If a roll or single sheet
is already loaded, you have to wait while it is automatically unloaded.
2. Adjust the input tray extensions depending on the length of the paper: the first extension for A4
and the second extension for A3 paper.
38 Chapter 5 Paper handling ENWW
Page 47
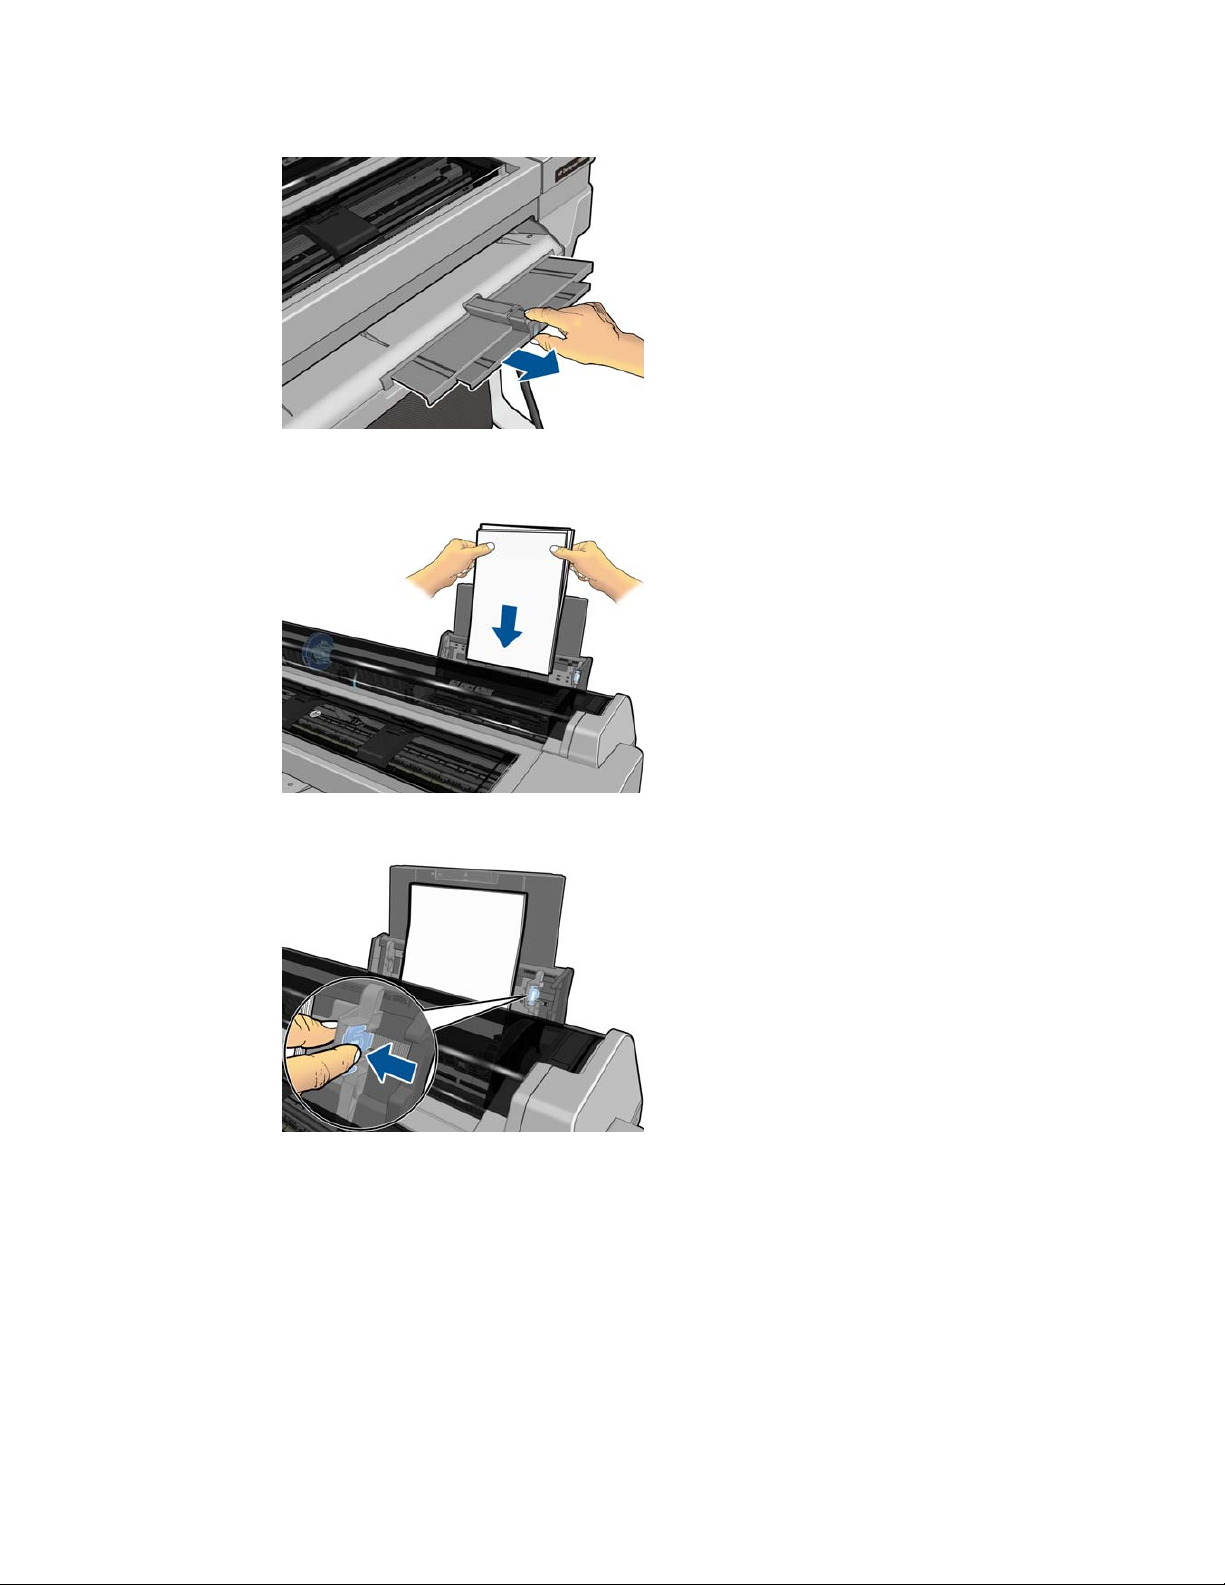
3. Adjust the output tray extensions depending on the length of the paper.
4. Load sheets of paper into the tray with the printed side facing outwards. Ensure that the sheets are
all of the same size.
5. Adjust the tray to fit the width of the paper.
View information about the paper
To view the loaded paper information, press the icon of the active paper source.
The following information is displayed on the front panel:
●
Paper type you have selected
●
Roll or sheet status
●
Width of the paper in millimeters (estimated)
ENWW
View information about the paper
39
Page 48

If no roll and no single-sheet paper is loaded, the message Out of paper is displayed.
Maintain paper
To maintain paper quality, follow the recommendations below.
●
Store rolls covered by another piece of paper or cloth
●
Store cut sheets covered and clean or brush them before loading them in the printer
●
Clean input and output platens
●
Always keep the top cover of your printer closed
NOTE: Photo and coated paper requires careful handling, see The print is scuffed or scratched
on page 112.
Change the drying time
You may wish to change the drying time setting to suit special printing conditions such as multiple prints
where time is of higher importance or when you need to be sure ink is dry before handling.
Press
, then Printer preferences > Print retrieval > Select drying time. You can select:
●
Extended, to set a longer than recommended time to ensure ink is completely dry
●
Optimized, to set the default and recommended time for your selected paper (this is the default
setting)
●
None, to disable the drying time and remove your print as soon as it finishes printing
CAUTION: If the ink is not dry when the print is removed it could leave ink in the output tray and
marks on the print.
NOTE: If you cancel the drying time during a print, the printer may not feed and cut the paper right
away due to the printhead maintenance, which runs in parallel. If the dry time is zero, the printer cuts
the paper and then performs the printhead maintenance. However, if the dry time is greater than zero,
the printer does not cut the paper until after the printhead maintenance has completed.
Turn the automatic cutter on and off
To turn the printer's paper cutter on or off, go to the front panel and press , then Printer
preferences > Print retrieval > Enable cutter and change the cutter option.
The default setting is On.
NOTE: If the cutter is turned off, it will not cut the paper between jobs, but it will continue to cut the
paper on loading and unloading rolls.
TIP: To cut roll paper while the automatic cutter is disabled, see Form feed with or without cutting
on page 41.
40 Chapter 5 Paper handling ENWW
Page 49

Form feed with or without cutting
If you go to the front panel and press , then Form feed and cut, the printer advances the paper
and makes a straight cut across the front edge. There are at least two possible reasons why you might
want to do this.
●
To trim the leading edge of the paper if it is damaged or not straight.
●
To feed and cut the paper when the automatic cutter has been disabled.
NOTE: The printhead is serviced after each print, and the paper cannot be cut until the process
completes, so you may notice a delay.
CAUTION: Remove the cut piece from the output platen. If strips or short prints are left on the output
platen, the printer could jam. Check also that there are no pieces of paper in the cutter guide.
NOTE: Photo and coated paper requires careful handling, see The print is scuffed or scratched
on page 112.
To advance the paper without cutting it, go to the front panel and press , then Form feed.
ENWW
Form feed with or without cutting
41
Page 50

6Printing
●
Print from a computer using a printer driver
●
Advanced print settings
●
Color management
42 Chapter 6 Printing ENWW
Page 51

Print from a computer using a printer driver
This is the traditional way of printing from a computer. The correct printer driver must be installed on
the computer (see
Connecting the printer on page 13), and the computer must be connected to the
printer by network or USB cable, or by Wi-Fi.
When the printer driver has been installed and the computer is connected to the printer, you can print
from a software application by using the application's own Print command and selecting the correct
printer.
Advanced print settings
The rest of this chapter explains the various print settings that you can use. These methods offer a
relatively large number of settings in order to satisfy all requirements.
TIP: In general you are recommended to use the default settings unless you know that they do not
meet your requirements.
TIP: If you intend to reuse a particular group of settings repeatedly, you can save those settings under
a name of your own choice and recall them later. A saved group of settings is known as a 'quick set' in
the Windows printer driver.
Select print quality
The printer has various print-quality options because best-quality printing requires some loss of speed,
while fast printing implies some reduction in print quality.
Therefore, the standard print-quality selector is a slider that allows you to choose between quality and
speed. With some paper types, you can choose a compromise position between the two.
Alternatively, you can select from the custom options: Best, Normal and Fast. If you select Fast, you
can also select Economode, which uses a lower rendering resolution and consumes less ink. It
therefore increases printing speed even further, but reduces print quality. Economode can be selected
only from the custom options (not from the slider).
There is also a supplementary custom option that may have an effect on print quality: Maximum
detail. See
High-quality printing on page 47.
NOTE: In the Windows driver dialog, the rendering resolution for your job is displayed in the Custom
Print Quality Options dialog box (select Custom options and then Settings). In the Mac OS X Print
dialog, it is displayed in the Summary panel.
You can select print-quality options in the following ways:
●
In the Windows driver dialog: go to the Paper/Quality tab and look at the Print Quality
section. If you select Standard Options, you will see a simple slider with which you can select
speed or quality. If you select Custom Options, you will see the more specific options described
above.
●
In the Mac OS X Print dialog: go to the Paper/Quality panel and look at the Quality
Options section. If you select Standard quality options, you will see a simple slider with which
you can select speed or quality. If you select Custom quality options, you will see the more
specific options described above.
NOTE: You cannot change the print quality of pages that the printer is already receiving or has
already received (even if they have not started to print yet).
ENWW
Print from a computer using a printer driver
43
Page 52

Select paper size
The paper size can be specified in the following ways.
NOTE: The paper size specified here should be the paper size in which the document was created. It
is possible to rescale the document to a different size for printing. See
Rescale a print on page 46.
●
In the Windows driver dialog: select the Paper/Quality tab, then select your paper size
from the Document Size list.
●
In the Mac OS X Page Setup dialog: select your printer from the Printer list, then select
your paper size from the Paper Size list.
NOTE: If your application offers no Page Setup dialog, please use the Print dialog.
Custom paper sizes
If you want to choose a paper size that is not included in the list of standard paper sizes, there are
various different ways to specify it.
Use the Windows printer driver
1. Select the Paper/Quality tab.
2. Press the Custom button.
3. Enter the name and dimensions of your new paper size.
4. Press OK. The new paper size is automatically selected.
A custom paper size created in this way has the following characteristics:
●
The paper size is permanent. It will not disappear if the driver is closed or the computer is turned
off.
●
The paper size is local to the printer queue. It will not be seen from other printer queues in the
same computer.
●
In Domain server networks, the paper size is local to the computer. It will not be seen from other
computers sharing the printer queue.
●
In Workgroup networks, the paper size will be shared among all the computers sharing the printer
queue.
●
If the printer queue is deleted, the paper size is deleted with it.
Use Windows forms
1. Windows Vista or XP: From the Start menu, or from the Control Panel, select Printers; then, from
the File menu, select Server Properties.
Windows 7: From the Start menu, or from the Control Panel, select Devices and Printers, then
Select Printer.
2. In the Forms tab, check the Create a new form box.
3. Enter the name and dimensions of your new paper size. Leave the margins as 0.00.
4. Press the Save Form button.
44 Chapter 6 Printing ENWW
Page 53

5. Go to the printer driver, and select the Paper/Quality tab.
6. Select More… from the drop-down list of paper sizes.
7. Select your new paper size from the group of Custom sizes.
A custom paper size created in this way has the following characteristics:
●
The paper size is permanent. It will not disappear if the driver is closed or the computer is turned
off.
●
Restricted users cannot create paper forms. The “manage documents” role in the Windows Active
Directory is the minimum required.
●
The paper size is local to the computer. It will be seen in all the printer queues that have been
created on the computer and that support paper of that size.
●
If a printer queue is shared, this paper size will appear in all the client computers.
●
If a printer queue is shared from another computer, this paper size will not appear on the driver´s
document size list. A Windows form in a shared queue needs to be created in the server.
●
If the printer queue is deleted, the paper size is not deleted.
Use the Mac OS X printer driver
1. Go to the Page Setup dialog.
NOTE: If your application offers no Page Setup dialog, please use the Print dialog.
2. Select Paper Size > Manage Custom Sizes.
Select margins options
By default, the printer leaves a 5 mm margin between the edges of your image and the edges of the
paper, increased to 17 mm at the foot of cut-sheet paper. However, you can change this behavior in
several ways.
●
In the Windows driver dialog: select the Paper/Quality tab and then the Margins/
Layout button.
●
In the Mac OS X Print dialog: select the Margins/Layout panel.
You will then see at least some of the following options.
NOTE: Under Mac OS X, the available margins options depend on the paper size selected.
●
Standard. Your image will be printed on a page of the size you have selected, with the default
margin between the edges of the image and the edges of the paper. The image should be small
enough to fit between the margins.
●
Oversize. You should load paper that is larger than the size you selected in the application or
driver. If you cut off the margins after printing, you will be left with a page of the size you
selected, with no margins remaining between your image and the edges of the paper. This is
useful when you want your image to cover the whole area of the paper.
●
Clip Contents By Margins. Your image will be printed on a page of the size you have
selected, with the default margin between the edges of the image and the edges of the paper. In
ENWW
Advanced print settings
45
Page 54

this case, if the image is the same size as the page, the printer assumes that the extreme edges of
the image are either white or unimportant, and do not need to be printed. This may be useful
when your image already contains a border.
Print on loaded paper
To print a job on whichever paper is loaded in the printer, select Any in the Paper Type option of your
printer driver.
●
In the Windows driver dialog: select the Paper/Quality tab, then select Any in the Paper
Type drop-down list.
●
In the Mac OS X Print dialog: select the Paper/Quality panel, then select Any in the Paper
Type drop-down list.
NOTE: Any is the default Paper Type selection.
Rescale a print
You can send an image to the printer at a certain size but tell the printer to rescale it to a different size
(normally larger). This may be useful:
●
If your software does not support large formats
●
If your file is too large for the printer's memory—in this case, you can reduce the paper size in
your software and then scale it up again using the front-panel option
You can rescale an image in the following ways:
●
In the Windows driver dialog: go to the Features tab and look at the Resizing Options
section.
◦
The Print document on option adjusts the image size to the paper size you have selected.
For example, if you have selected ISO A2 as the paper size and you print an A3-sized
image, it is enlarged to fit the A2 paper. If the ISO A4 paper size is selected, the printer
reduces a larger image to fit the A4 size.
◦
The % of actual size option enlarges the printable area of the original paper size (the
page minus the margins) by the percentage indicated, then adds the margins to create the
output paper size.
●
In the Mac OS X Print dialog: select the Paper Handling panel, then Scale to fit paper
size, and select the paper size to which you want to scale the image. If you want to increase the
size of the image, make sure that the Scale down only box is unchecked.
If you are printing to a single sheet, you must ensure that the image can actually fit onto the sheet,
otherwise the image will be clipped.
Print a draft
You can specify fast draft-quality printing in the following ways:
●
In the Windows driver dialog: go to the Paper/Quality tab and look at the Print Quality
section. Move the print-quality slider to the extreme left ('Speed').
●
In the Mac OS X Print dialog: go to the Paper/Quality panel and move the print-quality
slider to the extreme left ('Speed').
46 Chapter 6 Printing ENWW
Page 55

You can specify even faster draft-quality printing by using Economode, as follows. This is intended
mainly for documents containing only text and line drawings.
●
In the Windows driver dialog: go to the Paper/Quality tab and look at the Print Quality
section. Select Custom Options, then set the quality level to Fast and check the Economode
box.
●
In the Mac OS X Print dialog: go to the Paper/Quality panel and set the quality options to
Custom, then set quality to Fast and check the Economode box.
High-quality printing
You can specify high-quality printing in the following ways:
●
In the Windows driver dialog: go to the Paper/Quality tab and look at the Print Quality
section. Move the print-quality slider to the extreme right ('Quality').
●
In the Mac OS X Print dialog: go to the Paper/Quality panel and move the print-quality
slider to the extreme right ('Quality').
If you have a high-resolution image
If your image has a resolution greater than the rendering resolution (which you can see in the Custom
Print Quality Options box under Windows), print sharpness may be improved by selecting the
Maximum Detail option. This option is available only if you are printing on glossy paper and you have
selected Best print quality.
●
In the driver dialog (Mac OS X Print dialog): select Custom instead of Standard printquality options, then check the Maximum Detail box.
NOTE: The Maximum Detail option results in slower printing with photo papers, but it does not
increase the amount of ink used.
Use paper economically
You may be able to save some roll paper by using the following options:
●
In the Windows driver dialog: select the Features tab and then Remove top/bottom
blank areas and/or Rotate by 90 degrees or Autorotate.
●
In the Mac OS X Print dialog: select the Finishing panel, then Remove Top/Bottom
Blank Areas.
Use ink economically
Here are some recommendations for making economical use of ink.
●
For draft prints, use plain paper and move the print-quality slider to the left end of the scale
('Speed'). For further economy, select custom print quality options, then select Fast and
Economode.
●
Clean the printhead only when needed. Cleaning the printhead can be useful, but it uses a small
amount of ink.
ENWW
Advanced print settings
47
Page 56

●
Leave the printer permanently turned on so that it can maintain the printhead in good condition
automatically. This regular printhead maintenance uses a small amount of ink. However, if it is not
done, the printer may need to use much more ink later to restore the health of the printhead.
●
Wide prints make more efficient use of ink than narrow prints, because printhead maintenance
uses some ink, and its frequency is related to the number of passes made by the printhead.
Color management
Your printer has been engineered with advanced hardware and software features to ensure predictable
and dependable color results.
●
State-of-the-art HP printheads and HP inks
●
Dedicated color resources for most available paper types
●
Color emulation of other HP Designjet printers
Color management options
The aim of color management is to reproduce colors as accurately as possible on all devices: so that,
when you print an image, you see very similar colors as when you view the same image on your
monitor. Color management is highly dependent on the paper type loaded at the printer, so please
select the correct preset for the paper type you are using.
The color management options for your printer can be selected from the Color menu in the Windows
driver dialog or from the Color Options panel in the Mac OS X Print dialog. In some applications
you can make the choice in the application itself. Please consult the HP Support Center for guidance on
how to use the color management options of your particular application.
●
Application-Managed Colors: In this case your application program must convert the colors
of your image to the color space of your printer and paper type, using the ICC profile embedded
in the image and the ICC profile of your printer and paper type.
●
Printer-Managed Colors: In this case your application program sends your image to the
printer without any color conversion, and the printer converts the colors to its own color space. The
color management in the printer is done using a set of stored color tables. ICC profiles are not
used. This method can produce very good results with supported HP paper types. There are two
color spaces that the printer can convert to its own color space using the stored color tables: sRGB
and Adobe RGB.
◦
sRGB emulates the characteristics of the average computer monitor. This standard space is
endorsed by many hardware and software manufacturers, and has become the default color
space for many scanners, cameras, printers, and software applications.
◦
Adobe RGB provides a larger color gamut than sRGB. Use this space if you need to do
print production work with a wide range of colors.
Printer emulation
If you want to print a particular job and to see approximately the same colors that you would get from
printing the same job on a different HP Designjet printer, you can use the emulation mode provided by
your printer.
NOTE: Printer emulation is available only when printing an HP-GL/2 job on plain or coated paper. It
is not available from Mac OS X.
48 Chapter 6 Printing ENWW
Page 57

In the Windows HP-GL/2 driver dialog, select the Color tab, then Printer Managed Colors, then
select Printer Emulation from the Source Profile list. You can then select from the Emulated Printer
list.
Printing in grayscale or black-and-white
You can convert all colors in your image to shades of gray in the following ways:
●
In your application program: Many applications provide this option.
●
In the Windows driver dialog: Go to the Color tab and look at the Color Options section.
Select Print in Grayscale. Only the black ink will be used for printing, except if the paper
loaded is glossy, in which case colored inks are used to compose the gray shades. You can also
select Print in pure black and white if you want only black and white output with no gray
shades. In this case, only black ink will be used for printing. The Print in pure black and
white option is not supported when printing on glossy paper.
●
In the Mac OS X Print dialog: Go to the Color Options panel and select Grayscale from
the Mode drop-down list. Only the black ink will be used for printing, except if the paper loaded
is glossy, in which case colored inks are used to compose the gray shades. You can also select
Print in pure black and white if you want only black and white output with no gray shades.
In this case, only black ink will be used for printing. The Print in pure black and white
option is not supported when printing on glossy paper.
ENWW
Color management
49
Page 58

7 Web-connected printing
Your printer can be connected to the Web, providing various benefits:
●
Automatic firmware updates (see
Firmware update on page 88)
●
Print on HP ePrinters from almost anywhere
●
Print on HP ePrinters from almost any device, including smartphones, tablets, and laptops
See
http://www.hp.com/go/designjeteprinters for more detailed information.
You can enable Web Services when setting up the printer: see
Set up Web Services on page 24 or the
Assembly Instructions for more information. Alternatively, you can do it later by pressing
on the
home screen and following the instructions on the front panel.
IMPORTANT: The printer must be connected to a network: connect an Ethernet cable for a wired
connection, or start the Wireless Wizard in the Connectivity menu for a wireless connection. See
Connecting the printer on page 13.
Print remotely with HP Designjet ePrint & Share
If you are working from home, and you want to print to your office printer, you can print using HP
Designjet ePrint & Share.
1. From your application, send the file to print, selecting your printer.
2. As you are not locally connected to the printer, a dialog appears asking you if you are trying to
print locally or remotely through the cloud.
3. Select the option Print remotely through the cloud and sign in to your account.
4. If you already set up the printer, it will appear in the list. Otherwise, you will need to add the
printer's email address.
5. After selecting the printer, select Continue. The driver dialog appears, in which you can select
print settings.
NOTE: When printing remotely, no print preview is available.
6. Click Print, and your document is sent to print on your Web-connected printer.
50 Chapter 7 Web-connected printing ENWW
Page 59

Print by email
After you have enabled Web Services, you can print to your printer by email. Just check the Web
Services menu or the ePrint menu for the email address of your printer, then send the file you want to
print to that email address as an attachment.
In this way, you can print from anywhere with an Internet connection, without needing any printer
driver. There are a few limitations that you should bear in mind:
●
The attached files to be printed must be in PDF, JPEG, or TIFF formats.
●
The maximum file size is 10 MB, but your email server may have a lower limit.
●
Files are printed in the original document size (at 100% scale), in normal quality, in color, and
normally in portrait orientation (some printers may offer autorotation)..
Print from a smartphone or tablet
The HP Designjet ePrint & Share apps enable you to access files on your mobile device or in HP
Designjet ePrint & Share and print them to an HP Designjet Web-connected printer. You can obtain
these apps from the following sources:
●
http://www.hp.com/go/designjeteprinters
●
Your smartphone's application storefront
For the latest information, see
http://www.hp.com/go/eprintandshare.
You can use your 3G connection to print. You do not need to be connected with the printer by wifi,
and you do not need a printer driver.
1. Select the files to print from your Online Print History or from any other location connected to your
HP Designjet ePrint & Share account..
ENWW
Print by email
51
Page 60

2. An image of your print is displayed. On some devices, you can zoom in and out.
NOTE: The orientation of the preview (portrait/landscape) may not be the same as the
orientation of the print.
3.
To print the file, press the
button.
4. Select the printer if it is already listed; or, if necessary, press Add a printer and give your
printer's email address to add it to the list.
5. Choose the print settings, then press Print.
NOTE: Printing may not start immediately.
Whenever you print a document with HP Designjet ePrint & Share, it is saved in your Online Print
History.
From other applications, when there is an ‘Open In’ option available, select ePrint & Share in order to
print your documents on a Web-connected HP Designjet printer.
52 Chapter 7 Web-connected printing ENWW
Page 61

View and print from the HP Designjet ePrint &
Share website
1. Go to http://www.hp.com/go/eprintandshare and log in to your account.
2. To view and print a file, select the category to filter your list of saved files (printed, scanned,
shared with me, or all). You will see a list of your files ordered by time. The file can be identified
by the name, the date and time of printing, the printer that was used, and the thumbnail.
3. Select the file, and a file preview is shown in the right panel. If the file contains multiple pages,
you can navigate through the pages using the arrows. You can also click the preview to enlarge it,
and zoom in to see details.
4. Press the Print button.
5. If you have the full HP Designjet software suite installed, a print-preview dialog appears, in which
you can check and modify some settings and select your local or remote eprinters.
If you do not have the software installed on the computer you are using, you will see a generic
screen that allows you to select the remote printer and change basic settings.
6. Press the Print button again to send your document to print.
To print on any printer, use the option Print to .PDF. This creates a copy of your document in
your computer, which you can print later.
ENWW
View and print from the HP Designjet ePrint & Share website
53
Page 62

Print from HP Designjet ePrint & Share using the
printer’s front panel
HP Designjet ePrint & Share allows you to print files on any Web-connected printer, when you want.
You don't need a computer: you can use the printer's front panel.
1. Press the Web Services icon.
2. Sign in to HP Designjet ePrint & Share using your registered email address and password.
3. The event categories are listed. Select the category you require.
4. Select the document you want to print.
5. Choose the print settings before printing the document. The specific print settings that you will see
depend on the printer model.
6. Return to the preview screen and send the document to print. It will not start printing immediately.
54 Chapter 7 Web-connected printing ENWW
Page 63

View and print from other content repositories
You may be able to connect your HP Designjet ePrint & Share account to other content repositories,
such as FTP sites, in which case you can use HP Designjet ePrint & Share to print directly from those
repositories. For further information, see
.
Create your Online Print History
Documents are automatically added to your Online Print History in each of the following cases:
●
Whenever you print using the HP Designjet ePrint & Share driver, and you are logged into HP
Designjet ePrint & Share.
●
Whenever you print from the front panel using HP Designjet ePrint & Share.
●
Whenever you print from the the mobile app on your smartphone or tablet.
●
Whenever you print from an FTP site using HP Designjet ePrint & Share or the mobile app.
Share files in your Online Print History
You can share any of the files in your Online Print History with your colleagues. For further information,
see
http://www.hp.com/go/eprintandshare.
HP Designjet ePrint & Share security
When you add new content to your Online Print History (by printing), only you will have access to that
content; but, whenever you choose to share a file, which you do by sharing a special link with your
colleague, anyone who has that link and an HP Designjet ePrint & Share account can access your file.
The access control mechanism is on a file-by-file basis, meaning that if you share something with
someone, that person will have access only to the content of that specific shared file.
You can also unshare a file at any time, in which case the link will no longer work, and no-one will be
able to see the file any more.
NOTE: Anyone who has printed the file will still have it in his or her online print history.
HP support personnel have special account privileges to help in troubleshooting any issue you may
have, but they cannot download any of your files.
As part of the normal service operation, HP performs regular backups of your data. These backups are
an automated process with only the software processes themselves having access to your data.
HP Designjet ePrint & Share is hosted in a first-class data center. Physical access to these premises is
strictly controlled and restricted. Only employees who have a legitimate business need can access the
data center.
All the computers hosting the HP Designjet ePrint & Share service are protected by a multi-tiered
firewall, all the systems are constantly monitored, and intrusion detection tests are run periodically.
The servers on which your files are stored have additional levels of security and isolation, both physical
and logical, even from other services hosted in the same premises.
ENWW
View and print from other content repositories
55
Page 64

HP takes security and data privacy very seriously. HP will not sell, rent, or lease your personal
information to others.
You retain full ownership, and any intellectual property rights you may have, to the files you upload to
HP Designjet ePrint & Share. By providing the service, HP does not obtain any special ownership or
rights to these files.
In order for HP to be legally capable of making backups of your data and performing certain actions
(generate a preview, etc.), you grant to HP the right to use the files, solely for the purposes of providing
the HP Designjet ePrint & Share service.
Before you log off from your computer, check that all pending uploads to your Online History have
been submitted or cancelled. Otherwise, they could be uploaded by another user of the same
computer.
For the latest information, see
http://www.hp.com/go/eprintandshare.
56 Chapter 7 Web-connected printing ENWW
Page 65

8 Practical printing examples
●
Print from Adobe Acrobat
●
Print from Autodesk AutoCAD
●
Print from Adobe Photoshop
●
Print and scale from Microsoft Office
ENWW 57
Page 66

Print from Adobe Acrobat
1. In the Acrobat window, move the mouse cursor to the bottom left corner of the document pane
until the document size appears there.
2. Select File > Print and ensure that Page Scaling is set to None.
NOTE: The page size will not be automatically selected according to the document size.
58 Chapter 8 Practical printing examples ENWW
Page 67

3. Press the Properties button and then select the Paper/Quality tab.
4. Choose whatever Document Size and Print Quality you want to use. If you want to define a
new custom paper size, press the Custom button.
ENWW
Print from Adobe Acrobat
59
Page 68

5. Select the Features tab, and then Autorotate.
6. Click OK, and check that the print preview in the Print dialog box seems correct.
60 Chapter 8 Practical printing examples ENWW
Page 69

Print from Autodesk AutoCAD
1. The AutoCAD window can show a model or layout. Normally a layout is printed rather than the
model.
2. Click the Plot icon at the top of the window.
3. The Plot window opens.
ENWW
Print from Autodesk AutoCAD
61
Page 70

4. You can see further options by pressing the circular button in the lower right corner of the window.
NOTE: The Quality option here does not refer to the final print quality but to the quality of
AutoCAD viewport objects that are sent for printing.
5. Press the Properties button.
6. Select the Device and Document Settings tab, and press the Custom Properties button.
62 Chapter 8 Practical printing examples ENWW
Page 71

7. In the Paper/Quality tab, select the paper type that you intend to use.
8. Select the print quality (your own choice between speed and quality of printing).
9. If you intend to print on roll paper, you must decide where the printer should cut the paper. Press
the Margins/Layout button and select Clip contents by margins.
ENWW
Print from Autodesk AutoCAD
63
Page 72

10. Select the Features tab, then select the Autorotate option. Autorotation can help to avoid
wasting paper.
11. Press the OK button and save your configuration changes to a PC3 file.
12. If you have the HP Designjet software suite installed, you will see a preview of the file you want to
print.
Using printer emulation (T520 only)
Printer emulation can be requested by selecting Advanced settings > Color > Color
management > Printer Managed Colors > Printer emulation.
64 Chapter 8 Practical printing examples ENWW
Page 73

You can select Off (no printer emulation) or the name of the printer model that you want to emulate.
This setting will apply to jobs that do not contain any printer emulation setting saved in the job.
Using clip contents by margins
You can select this margins option from Advanced settings > Paper/Quality > Margins/
Layout > Print with margins > Layout > Clip contents by margins.
Use this option when the contents to be printed have white borders and a size equal to that of the
paper you have selected. The printer will use the white border for its margins and you will get a page
of size equal to that which is selected in the driver.
Print from Adobe Photoshop
1. In Photoshop CS5, select File > Print and then select your printer.
ENWW
Print from Adobe Photoshop
65
Page 74

2. Choose from the available paper sizes.
If you do not find the paper size that you intend to use, press the Custom button. Enter the width,
the length and the name of your custom paper size. Press the Save and OK buttons.
66 Chapter 8 Practical printing examples ENWW
Page 75

3. You may wish to change the default paper source, paper type and print quality.
4. In the Color tab, the default color management option is Printer managed colors, and this is
the correct option because you have already selected Printer Manages Colors in Photoshop.
Print and scale from Microsoft Office
This section demonstrates how to print and scale from Microsoft Office 2010.
ENWW
Print and scale from Microsoft Office
67
Page 76

Using PowerPoint
1. Select the File tab, then Print, and select the name of your printer.
2. Select Printer Properties > Features > Print document on to scale the document to a
particular size.
68 Chapter 8 Practical printing examples ENWW
Page 77

3. Select the Paper/Quality tab, then select Paper Source and Paper Type.
4. Select Margins/Layout, then select Clip contents by margins to keep the size.
Using Project
1. Select File > Page Setup > Print.
ENWW
Print and scale from Microsoft Office
69
Page 78

2. Select your printer's name, then Close.
3. Select Page Setup, and choose the Paper Size you want.
4. Select Options to go to the printer driver. The default options in the Paper/Quality tab are
probably suitable: Paper source: Printer auto select and Paper Type: Any.
70 Chapter 8 Practical printing examples ENWW
Page 79

5. Select Features > Print document on to scale the document to a particular size. Alternatively,
you can scale the document in Project.
Using Excel
1. Select the Page Layout tab, then Size, and choose the paper size you want.
ENWW
Print and scale from Microsoft Office
71
Page 80

2. Select the File tab, then Print, and select the name of your printer.
3. Select Printer Properties to go to the printer driver. In the Paper/Quality tab, select Paper
source, Paper Type and Print Quality.
72 Chapter 8 Practical printing examples ENWW
Page 81

4. Select Features > Print document on to scale the document to a particular size. Alternatively,
you can scale the document in Excel.
ENWW
Print and scale from Microsoft Office
73
Page 82

9 Handling ink cartridges and
printhead
●
About the ink cartridges
●
Storage of anonymous usage information
●
Check ink cartridge status
●
Replace an ink cartridge
●
About the printhead
74 Chapter 9 Handling ink cartridges and printhead ENWW
Page 83

About the ink cartridges
Ink cartridges store the ink and are connected to the printhead, which distributes the ink on the paper.
To purchase additional cartridges, see
Accessories on page 90.
CAUTION: Observe precautions when handling ink cartridges because they are ESD-sensitive
devices (see the
Glossary on page 143). Avoid touching pins, leads and circuitry.
Storage of anonymous usage information
Each ink cartridge contains a memory chip that assists in the operation of the printer. In addition, this
memory chip stores a limited set of anonymous information about the usage of the printer, which can
include the following: the date when the cartridge was first installed, the date when the cartridge was
last used, the number of pages printed using the cartridge, the page coverage, the frequency of
printing, the printing modes used, any printing errors that may have occurred, and the product model.
This information helps HP to design future products to meet our customers' printing needs.
The data collected by the memory chip does not include information that could be used to identify a
customer or user of the cartridge or printer.
HP collects a sample of the memory chips from ink cartridges returned to HP's free return and recycling
program (HP Planet Partners:
http://www.hp.com/hpinfo/globalcitizenship/environment/recycle/).
The sampled memory chips are read and studied in order to improve future HP products.
HP partners who assist in recycling ink cartridges may also have access to the data. Any third party
possessing the cartridge may be able to access the anonymous information on the memory chip. If you
prefer to not allow access to this information, you can render the chip inoperable. However, after you
render the memory chip inoperable, the cartridge cannot be used in an HP printer.
If you are concerned about providing this anonymous information, you can turn off the memory chip's
ability to collect printer usage information. To do so, access the Embedded Web Server, and select
Settings > Anonymous Usage Information Storage. This does not prevent the cartridge from
working normally in other respects. However, if you change your mind later, you can restore the factory
defaults to resume collecting printer usage information.
Check ink cartridge status
To view the ink levels of your ink cartridges, press on the front panel.
For more information, press More.
You can also get this information from the HP Utility.
●
In the HP Designjet Utility for Windows, go to the Supplies tab to see each cartridge's status.
●
In the HP Utility for Mac OS X, select Supplies Status in the Information group.
For an explanation of the ink cartridge status messages, see
Ink cartridge status messages
on page 119.
ENWW
About the ink cartridges
75
Page 84

Replace an ink cartridge
There are two occasions when you need to replace an ink cartridge.
●
The ink cartridge is very low and you want to replace it with a full cartridge for unattended
printing (you can use up the remaining ink in the first cartridge at a more convenient time).
●
The ink cartridge is empty or faulty, and you must replace it to continue printing.
CAUTION: Do not try to remove an ink cartridge while printing.
CAUTION: Remove an ink cartridge only if you are ready to insert another one.
NOTE: When a cartridge runs out of ink, the current job is cancelled.
1. Make sure the printer is turned on.
2. If your printer is on a stand, make sure the printer wheels are locked (the brake lever is pressed
down) to prevent the printer from moving.
3. Open the ink cartridge cover on the left-hand side of the printer.
4. Wait until the carriage stops moving.
5. Press the ink cartridge to unlock it.
76 Chapter 9 Handling ink cartridges and printhead ENWW
Page 85

6. Remove the ink cartridge.
7. Insert the new ink cartridge. Make sure that you insert the ink cartridge into the slot that has the
same colored letter as the cartridge you are installing.
8. Close the ink cartridge cover.
About the printhead
The printhead, which is supplied installed in the printer, is connected to the ink cartridges and jets ink
onto the paper.
CAUTION: Observe precautions when handling the printhead, because it is an ESD-sensitive device
(see the
Glossary on page 143). Avoid touching pins, leads, and circuitry.
ENWW
About the printhead
77
Page 86

10 Maintaining the printer
●
Check printer status
●
Take care of the printer
●
Clean the exterior of the printer
●
The Print Quality Diagnostic Report
●
Clean the printhead
●
Align the printhead
●
Replace the printhead
●
Clean the encoder strip
●
Recalibrate the paper advance
●
Move or store the printer
●
Firmware update
●
Software update
●
Printer maintenance kits
78 Chapter 10 Maintaining the printer ENWW
Page 87

Check printer status
You can check the current status of the printer in various ways:
●
If you start the HP Utility and select your printer, you see a page of information describing the
status of the printer and its paper and ink supplies.
●
If you access the Embedded Web Server, you see information about the general status of the
printer. The Supplies page in the Main tab describes the status of the paper and ink supplies.
●
From the front panel, you can get information about the loaded paper and the ink levels.
Take care of the printer
The printer is not designed for any purpose other than printing, and you are not recommended to use it
as a table, for two reasons:
●
The surface can easily be damaged.
●
Anything that falls into the printer can cause more serious damage.
Clean the exterior of the printer
Clean the outside of the printer and all other parts of the printer that you regularly touch as part of
normal operation with a damp sponge or a soft cloth and a mild household cleaner such as nonabrasive liquid soap.
WARNING! To avoid an electric shock, make sure that the printer is turned off and unplugged
before you clean it. Do not let water get inside the printer.
CAUTION: Do not use abrasive cleaners on the printer.
The Print Quality Diagnostic Report
The Print Quality Diagnostic Report consists of two test patterns designed to highlight printhead
reliability problems. It helps you to check the performance of the printhead that is currently installed in
your printer, and whether it suffers from clogging or alignment problems.
To print the Print Quality Diagnostic Report:
1. Use the same paper type that you were using when you detected a problem. The test patterns are
easiest to evaluate on plain white paper.
2. Check that the selected paper type is the same as the paper type loaded into the printer. See
View
information about the paper on page 39.
3. At the printer's front panel, press
, then select Image Quality Maintenance > Print
diagnostic image.
NOTE: The report can also be requested from the Embedded Web Server.
It takes about two minutes to print the Print Quality Diagnostic Report.
ENWW
Check printer status
79
Page 88

Corrective actions
1. If the lines in Test Pattern 1 are not straight and connected, align the printhead (see Align the
printhead on page 81).
2. If any of the colored blocks in Test Pattern 2 show white lines, or are faded or completely missing,
clean the printhead (see
Clean the printhead on page 80). Follow the front-panel prompts and
perform all three levels of cleaning if necessary.
3. If the problem remains, clean the printhead again.
4. If the problem remains, replace the ink cartridge (see
Replace an ink cartridge on page 76)
corresponding to the streaked, faded, or missing color block in Test Pattern 2.
5. If the problem remains, replace the printhead (see
Replace the printhead on page 82). If the
printhead is still in warranty, contact HP Support (see
Contact HP Support on page 137).
Clean the printhead
If your print is streaked or has incorrect or missing colors, the printhead may need to be cleaned.
There are three stages of cleaning. Each stage lasts about two minutes, uses one sheet of paper, and
uses an increasing amount of ink. After each stage, review the quality of the printed page. You should
initiate the next phase of cleaning only if the print quality is poor.
If print quality still seems poor after you complete all stages of cleaning, try aligning the printhead.
NOTE: Cleaning uses ink, so clean the printhead only when necessary.
NOTE: Failing to turn off the printer correctly can cause print-quality problems.
Clean the printhead from the front panel
1. Make sure there is paper in the input tray or a roll loaded.
2. Go to the front panel and press
, then Image Quality Maintenance > Clean printhead.
80 Chapter 10 Maintaining the printer ENWW
Page 89

Clean the printhead from the Embedded Web Server
1. Make sure there is paper in the input tray or a roll loaded.
2. In the Tools tab of the Embedded Web Server, select Print Quality Toolbox > Clean
Printhead, and follow the instructions on the screen.
Clean the printhead from the HP Utility
1. Make sure there is paper in the input tray or a roll loaded.
2. Windows: In the Support tab of the HP Utility, select Printhead Cleaning, and follow the
instructions on the screen.
3. Mac OS X: In the Information and Print Quality tab of the HP Utility, select Clean
Printhead, and follow the instructions on the screen.
Align the printhead
Precise printhead alignment is essential for accurate colors, smooth color transitions, and sharp edges
in graphical elements. Your printer has an automatic printhead alignment process which runs whenever
a printhead has been accessed or replaced.
You may need to align the printhead after a paper jam or if you are experiencing print-quality
problems.
1. Load the paper you wish to use, see
Paper handling on page 31. You can use a roll or a cut
sheet; plain white paper is recommended.
CAUTION: Do not use transparent or semi-transparent paper to align the printhead.
2. Ensure that the window is closed, as a strong light source near the printer during printhead
realignment can affect alignment.
3. From the front panel, press
, then Image Quality Maintenance > Align printhead.
NOTE: Printhead alignment can also be started from the Embedded Web Server (Tools > Print
Quality Toolbox > Align Printhead), or from the HP Utility (Windows: Support >
Printhead Alignment; Mac OS X: Information and Print Quality > Align).
4. If the loaded paper is satisfactory, the printer runs the realignment and prints a realignment
pattern.
5. The process takes about five minutes. Wait until the front-panel display shows the process
complete before using the printer.
If the printer cannot complete the printhead alignment successfully, you may be asked to clean the
printhead and try again.
ENWW
Align the printhead
81
Page 90

Replace the printhead
TIP: When the printhead has been replaced, the printer will automatically perform a printhead
alignment on the loaded paper. If you would like to perform the printhead alignment on a different
paper (perhaps from the multi-sheet tray), you could change the paper before starting this procedure.
Plain white paper is recommended.
1. Make sure the printer is turned on.
2. If your printer is on a stand, make sure the printer wheels are locked (the brake lever is pressed
down) to prevent the printer from moving.
3. From the front panel, press
, then Image quality maintenance > Replace printhead.
4. Open the ink cartridge cover.
5. Wait until the carriage stops moving.
6. Press each ink cartridge to unlock it.
82 Chapter 10 Maintaining the printer ENWW
Page 91

7. Remove each ink cartridge.
8. Close the ink cartridge cover.
9. Press Next on the front panel.
10. Open the top cover.
ENWW
Replace the printhead
83
Page 92

11. Raise the carriage lever.
12. Remove the printhead, keeping it vertical to avoid getting ink on the connections.
13. Insert the new printhead.
84 Chapter 10 Maintaining the printer ENWW
Page 93

14. Lower the carriage lever.
15. Close the top cover.
16. Press Next on the front panel.
17. Open the ink cartridge cover.
ENWW
Replace the printhead
85
Page 94

18. Insert the ink cartridges. Make sure that you insert each ink cartridge into the slot that has the
same colored letter as the cartridge you are installing.
IMPORTANT: If the printhead is new, install new ink cartridges. New ink cartridges are
required for successful printhead replacement.
19. Close the ink cartridge cover.
20. Press Done on the front panel. The front panel recommends a printhead alignment.
Clean the encoder strip
1. Make sure that the printer is not printing and that the carriage is located in the service station on
the right-hand side of the printer.
2. Using tap water and a small cloth that will not leave fibers in the printer, dampen the cloth and
remove any excess water, so that the cloth is damp but not wet.
3. Open the printer window.
4. Hold the cloth in an inverted U shape around the encoder strip and carefully wipe until no further
ink residue appears on the cloth. Be very careful not to scratch the encoder strip with your
fingernails or any other object. Make sure that you are holding the cloth correctly.
NOTE: Do not move the carriage away from the service station.
5. Close the printer window.
6. From the front panel, press
, then Image quality maintenance > Replace printhead.
The carriage moves to the left and stops in the correct position to remove the printhead.
86 Chapter 10 Maintaining the printer ENWW
Page 95

7. Turn off the printer by pressing the Power key and then unplugging the power code.
8. Open the printer window and move the carriage further to the left, allowing you to access the
service station.
9. Clean the part of the encoder strip inside the service station as described above.
10. Close the printer window.
11. Turn the printer back on.
If you would like further guidance on this procedure, please see the Service Manual.
Recalibrate the paper advance
Accurate paper advance is important to image quality because it is part of controlling the proper
placement of dots on the paper. If the paper is not advanced the proper distance between printhead
passes, light or dark bands appear in the print and image grain may increase.
The printer is calibrated to advance correctly with all the papers appearing in the front panel. When
you select the type of loaded paper, the printer adjusts the rate at which to advance the paper while
printing. However, if you are not satisfied with the default calibration of your paper, you may need to
recalibrate the rate at which the paper advances. See
Troubleshooting print-quality issues
on page 106 to determine whether paper advance calibration will solve your issue.
Recalibrating the paper advance procedure
1. From the front panel, press , then Image Quality Maintenance > Paper advance
calibration > Calibrate ready paper. The printer automatically recalibrates the paper
advance and prints a paper advance calibration image.
2. Wait until the front panel displays the status screen and re-print your print.
NOTE: The recalibration procedure takes approximately three minutes. Do not worry about the
paper advance calibration image. The front-panel display shows any errors in the process.
If you are satisfied with your print continue using this calibration for your paper type. If you see
improvement in your print, continue with step three. If you are dissatisfied with the recalibration,
return to the default calibration, see
Return to default calibration on page 87.
Return to default calibration
Returning to the default calibration sets all the corrections made by the paper advance calibration to
zero. To return to the default paper advance calibration value, you must reset the calibration.
1. From the front panel, press
, then Image Quality Maintenance > Paper advance
calibration > Reset ready paper calibration.
2. Wait until the front panel displays the operation has completed successfully.
ENWW
Recalibrate the paper advance
87
Page 96

Move or store the printer
If you need to move or store the printer, prepare it correctly to avoid possible damage to it. To prepare
the printer, follow the instructions below.
1. Do not remove the ink cartridges or printhead.
2. Make sure that no paper is loaded.
3. Turn off the power using the Power key on the front panel.
4. Unplug the printer's power cord.
5. Disconnect any cables connecting the printer to a network or a computer.
CAUTION: If you turn the printer upside down, ink could escape into the printer and cause serious
damage.
When the printer is turned back on, it takes about three minutes to initialize itself and to check and
prepare the printhead. Preparing the printhead normally takes just over a minute. However, if the
printer has been off for a six weeks or more, preparing the printhead could take up to 45 minutes.
CAUTION: If the printer remains off for a long period of time, the printhead may become unusable.
In this case, you need to replace the printhead with a new one.
TIP: Because preparing and purging the printhead uses both time and ink, you are strongly
recommended to leave the printer always on or in sleep mode, whenever possible, to maintain the
health of the printhead. In both cases, the printer wakes up from time to time to maintain the printhead.
Thus you can avoid going through lengthy preparation processes before using your printer.
Firmware update
There are various ways of downloading and installing firmware updates, as described below; you can
choose whichever you find most convenient.
NOTE: A firmware update package can be large; you may want to consider whether there are any
implications for your network or Internet connection.
●
You can configure the printer to download firmware updates automatically whenever they become
available: see
Automatic firmware update on page 22.
The following options are available if you choose manual firmware updates.
●
Using the front panel, press
, then Web Services > Product update. Press Check now to
check whether new firmware is available. If new firmware is available, you are given the
opportunity to download and install it.
●
Using the Embedded Web Server, select Firmware Update.
●
Using the HP Designjet Utility under Windows, select your printer, the Support tab and then
Firmware Update.
●
Using the HP Utility under Mac OS X, select Update Firmware in the Support group.
The firmware includes a set of the most commonly used paper presets.
88 Chapter 10 Maintaining the printer ENWW
Page 97

Software update
Under Windows or Mac OS X, you are normally offered software updates automatically.
For manual updates of printer drivers and other software for your printer, go to
http://www.hp.com/
go/T120/drivers or http://www.hp.com/go/T520/drivers.
Printer maintenance kits
Three maintenance kits are available for your printer, containing components that may need to be
replaced after long use. When one of them is needed, a message is displayed on the front panel and
by the HP Utility.
When you see the message, you should contact HP Support (see
Contact HP Support on page 137)
and request the maintenance kit. The kits are installed by service engineers only.
ENWW
Software update
89
Page 98

11 Accessories
●
How to order supplies and accessories
●
Introduction to the accessories
90 Chapter 11 Accessories ENWW
Page 99

How to order supplies and accessories
There are two alternative ways to order supplies or accessories for your printer:
●
Visit
http://www.hp.com/go/T120/accessories or http://www.hp.com/go/T520/accessories
on the Web.
●
Contact HP Support (see
Contact HP Support on page 137).
The rest of this chapter lists the available supplies and accessories, and their part numbers.
Order ink supplies
The following ink supplies can be ordered for your printer.
Table 11-1 Ink cartridges
Cartridge Part number
HP 711 38 ml Black Ink Cartridge CZ129A
HP 711 29 ml Cyan Ink Cartridge CZ130A
HP 711 29 ml Magenta Ink Cartridge CZ131A
HP 711 29 ml Yellow Ink Cartridge CZ132A
HP 711 80 ml Black Ink Cartridge CZ133A
Table 11-2 Printhead
Printhead Part number
HP 711 Designjet Printhead Replacement Kit C1Q10A
Order paper
The following paper types are currently provided for use with your printer.
NOTE: This list is likely to change over the course of time. For the latest information, see
http://www.hp.com/go/LFPrintingMaterials.
NOTE: Paper types that HP does not support may nevertheless be compatible with your printer.
Key to availability:
●
(A) indicates papers available in Asia (excluding Japan)
●
(C) indicates papers available in China
●
(E) indicates papers available in Europe, the Middle East and Africa
●
(J) indicates papers available in Japan
●
(L) indicates papers available in Latin America
●
(N) indicates papers available in North America
ENWW
How to order supplies and accessories
91
Page 100

If the part number is not followed by parentheses, the paper is available in all regions.
Table 11-3 Roll paper
Paper type g/m² Length Width Part numbers
HP Bond and Coated Paper
HP Recycled Bond Paper 80 45.7 m (150 ft) 420 mm (16.54 in) (A2) CG892A (E)
610 mm (24 in) CG889A (EN)
914 mm (36 in) CG890A (EN)
HP Universal Bond Paper 80 45.7 m (150 ft) 594 mm (23.39 in) (A1) Q8003A (AJ)
610 mm (24 in) Q1396A
914 mm (36 in) Q1397A
HP Bright White Inkjet Paper 90 45.7 m (150 ft) 420 mm (16.54 in) (A2) Q1446A (EJ)
594 mm (23.39 in) (A1) Q1445A (EJ)
610 mm (24 in) C1860A (LN),
C6035A (AEJ)
841 mm (33.11 in) (A0) Q1444A (EJ)
914 mm (36 in) C1861A (LN),
C6036A (AEJ)
HP Universal Coated Paper 95 45.7 m (150 ft) 610 mm (24 in) Q1404A (AEJN)
914 mm (36 in) Q1405A (AEJN)
HP Coated Paper 90 45.7 m (150 ft) 420 mm (16.54 in) (A2) Q1443A (J)
457 mm (18 in) Q7897A (EJN)
594 mm (23.39 in) (A1) Q1442A (EJ)
610 mm (24 in) C6019B
841 mm (33.11 in) (A0) Q1441A (EJ)
914 mm (36 in) C6020B
HP Universal Heavyweight Coated
Paper
120 30.5 m (100 ft) 610 mm (24 in) Q1412A (AEJN)
914 mm (36 in) Q1413A
HP Heavyweight Coated Paper 131 30.5 m (100 ft) 610 mm (24 in) C6029C (AEJN)
914 mm (36 in) C6030C
HP Yellow Colored Paper 92 45.7 m (150 ft) 914 mm (36 in) Q1760A (EN)
HP Technical Paper
HP Natural Tracing Paper 90 45.7 m (150 ft) 594 mm (23.39 in) (A1) Q1439A (J)
610 mm (24 in) C3869A
914 mm (36 in) C3868A
HP Translucent Bond Paper 67 45.7 m (150 ft) 610 mm (24 in) C3860A (AJN)
914 mm (36 in) C3859A (LN)
92 Chapter 11 Accessories ENWW
 Loading...