

Page 1

HP DesignJet T2600 MFP
User Guide
Page 2

Edition 1
Legal notices
Trademarks
© Copyright 2019 HP Development Company,
L.P.
The information contained herein is subject to
change without notice.
The only warranties for HP products and
services are set forth in the express warranty
statements accompanying such products and
services. Nothing herein should be construed as
constituting an additional warranty. HP shall not
be liable for technical or editorial errors or
omissions contained herein.
IPv6-ready
Adobe®, Acrobat®, Adobe Photoshop® and
Adobe® PostScript® 3™ are trademarks of
Adobe Systems Incorporated.
ENERGY STAR and the ENERGY STAR mark are
registered U.S. trademarks.
Microsoft® and Windows® are U.S. registered
trademarks of Microsoft Corporation.
PANTONE® is Pantone, Inc.'s check-standard
trademark for color.
Page 3

Table of contents
1 Introduction ............................................................................................................................................................................................... 1
Welcome to your printer ......................................................................................................................................................... 2
Printer models .......................................................................................................................................................................... 2
Safety precautions ................................................................................................................................................................... 3
Main components ..................................................................................................................................................................... 7
Turn the printer on and o ...................................................................................................................................................... 8
Front panel .............................................................................................................................................................................. 10
HP Utility .................................................................................................................................................................................. 13
HP Print Preview ..................................................................................................................................................................... 14
Embedded Web Server ......................................................................................................................................................... 15
Demo prints ............................................................................................................................................................................ 15
Congure your printer ........................................................................................................................................................... 16
Mobile printing ........................................................................................................................................................................ 32
Accessibility ............................................................................................................................................................................. 32
Other sources of information ............................................................................................................................................... 33
2 Paper handling ........................................................................................................................................................................................ 34
General advice ........................................................................................................................................................................ 35
Load a roll onto the spindle .................................................................................................................................................. 35
Load a roll into the printer .................................................................................................................................................... 38
Unload a roll ............................................................................................................................................................................ 41
Load a single sheet ................................................................................................................................................................ 42
The stacker .............................................................................................................................................................................. 45
The basket ............................................................................................................................................................................... 47
View information about the paper ...................................................................................................................................... 48
Paper presets .......................................................................................................................................................................... 48
Printing paper info ................................................................................................................................................................. 49
Move the paper ....................................................................................................................................................................... 49
Maintain paper ........................................................................................................................................................................ 50
Change the drying time ......................................................................................................................................................... 50
Turn the automatic cutter on and o .................................................................................................................................. 50
Clean cut .................................................................................................................................................................................. 51
ENWW iii
Page 4

3 Working with two rolls (T2600dr only) ............................................................................................................................................... 52
Advantages of a multiroll printer ......................................................................................................................................... 53
How the printer allocates jobs to paper rolls ..................................................................................................................... 53
4 Networking .............................................................................................................................................................................................. 55
Introduction ............................................................................................................................................................................. 56
Control network protocols .................................................................................................................................................... 56
Front-panel menu items ....................................................................................................................................................... 56
Link conguration methods ................................................................................................................................................. 59
Troubleshooting ..................................................................................................................................................................... 60
5 Printing ..................................................................................................................................................................................................... 64
Introduction ............................................................................................................................................................................. 65
Print from a USB ash drive ................................................................................................................................................. 65
Print from the network folder .............................................................................................................................................. 66
Print from a computer using a printer driver ..................................................................................................................... 67
Advanced print settings ........................................................................................................................................................ 68
6 Mobile printing ........................................................................................................................................................................................ 79
Introduction ............................................................................................................................................................................. 80
Print from Android ................................................................................................................................................................. 80
Print from Chrome OS ........................................................................................................................................................... 80
Print, scan, and share from the HP Smart App ................................................................................................................. 81
Print by email (HP ePrint) ...................................................................................................................................................... 81
Mobile specications .............................................................................................................................................................. 81
7 Job queue management ....................................................................................................................................................................... 83
Job queue in the front panel ................................................................................................................................................ 84
Print job queue in the Embedded Web Server or HP DesignJet Utility .......................................................................... 89
Scan queue in the Embedded Web Server or HP DesignJet Utility ................................................................................ 91
8 Scanning and copying ............................................................................................................................................................................ 93
Quicksets ................................................................................................................................................................................. 94
Scanning .................................................................................................................................................................................. 94
Copying .................................................................................................................................................................................. 100
Scanner preferences ........................................................................................................................................................... 105
Scanner troubleshooting .................................................................................................................................................... 106
Scanner diagnostic plot ...................................................................................................................................................... 116
iv ENWW
Page 5

9 Color management .............................................................................................................................................................................. 119
Introduction .......................................................................................................................................................................... 120
How colors are represented ............................................................................................................................................... 120
A summary of the color management process .............................................................................................................. 120
Color calibration ................................................................................................................................................................... 120
Color management from printer drivers .......................................................................................................................... 122
Color management from the front panel ........................................................................................................................ 124
10 Practical printing examples .............................................................................................................................................................. 125
Print a draft for revision with the correct scale .............................................................................................................. 126
Print a PDF multipage job from Adobe Acrobat Reader or Adobe Acrobat Pro ......................................................... 127
Print a document with the correct colors ........................................................................................................................ 129
Print a project ....................................................................................................................................................................... 136
Print a presentation ............................................................................................................................................................. 139
Print and scale from Microsoft Oce ............................................................................................................................... 143
11 Retrieving printer usage information ............................................................................................................................................. 147
Get printer accounting information .................................................................................................................................. 147
Check usage statistics ......................................................................................................................................................... 147
Check usage statistics for a job ......................................................................................................................................... 150
Check cost assignment ....................................................................................................................................................... 151
12 Handling ink cartridges and printhead ........................................................................................................................................... 153
About the ink cartridges ..................................................................................................................................................... 154
Check the ink cartridges status ......................................................................................................................................... 154
Remove an ink cartridge ..................................................................................................................................................... 154
Insert an ink cartridge ......................................................................................................................................................... 155
About the printhead ............................................................................................................................................................ 157
Check the printhead status ................................................................................................................................................ 157
Remove the printhead ........................................................................................................................................................ 158
Insert the printhead ............................................................................................................................................................. 161
Storage of anonymous usage information ..................................................................................................................... 165
Safe mode ............................................................................................................................................................................. 165
13 Printer maintenance ......................................................................................................................................................................... 166
Check printer status ............................................................................................................................................................ 167
Clean the exterior of the printer ........................................................................................................................................ 167
Maintain the ink cartridges ................................................................................................................................................. 167
Move or store the printer .................................................................................................................................................... 167
Update the rmware ........................................................................................................................................................... 168
ENWW v
Page 6

Update the software ........................................................................................................................................................... 169
Printer maintenance kits .................................................................................................................................................... 169
Secure File Erase .................................................................................................................................................................. 169
Disk Wipe ............................................................................................................................................................................... 170
14 Scanner maintenance ....................................................................................................................................................................... 171
Clean the scanner’s glass plate ......................................................................................................................................... 172
Calibrate the scanner .......................................................................................................................................................... 173
15 Supplies and accessories ................................................................................................................................................................. 175
How to order supplies and accessories ........................................................................................................................... 176
Introduction to the accessories ......................................................................................................................................... 180
16 Troubleshooting paper issues ......................................................................................................................................................... 181
Paper cannot be loaded successfully ............................................................................................................................... 182
Paper type is not in the driver ............................................................................................................................................ 183
Printer printed on the wrong paper type ......................................................................................................................... 184
Automatic cut not available ............................................................................................................................................... 184
On hold for paper ................................................................................................................................................................. 184
The paper has jammed in the print platen ...................................................................................................................... 185
The paper has jammed in the stacker .............................................................................................................................. 190
The printer reports unexpectedly that the stacker is full ............................................................................................. 190
A strip stays on the output tray and generates jams .................................................................................................... 190
Printer displays out of paper when paper is available ................................................................................................... 190
Prints do not fall neatly into the basket ........................................................................................................................... 191
Sheet stays in the printer when the print has been completed ................................................................................... 191
Paper is cut when the print has been completed ........................................................................................................... 191
Cutter does not cut well ...................................................................................................................................................... 191
Roll is loose on the spindle ................................................................................................................................................. 191
Recalibrate the paper advance .......................................................................................................................................... 191
17 Troubleshooting print-quality issues ............................................................................................................................................. 194
General advice ...................................................................................................................................................................... 196
Horizontal lines across the image (banding) ................................................................................................................... 196
Whole image is blurry or grainy ......................................................................................................................................... 197
Paper is not at .................................................................................................................................................................... 198
Print is scued or scratched ............................................................................................................................................... 198
Ink marks on the paper ....................................................................................................................................................... 198
Black horizontal lines on yellow background .................................................................................................................. 199
Black ink comes o when you touch the print ................................................................................................................ 199
vi ENWW
Page 7

Edges of objects are stepped or not sharp ..................................................................................................................... 200
Edges of objects are darker than expected ..................................................................................................................... 200
Horizontal lines at the end of a cut sheet print .............................................................................................................. 200
Vertical lines of dierent colors ......................................................................................................................................... 200
White spots on the print ..................................................................................................................................................... 201
Colors are inaccurate ........................................................................................................................................................... 201
Colors are fading .................................................................................................................................................................. 202
Image is incomplete (clipped at the bottom) .................................................................................................................. 202
Image is clipped ................................................................................................................................................................... 202
Some objects are missing from the printed image ........................................................................................................ 203
Lines are too thick, too thin or missing ............................................................................................................................ 204
Lines appear stepped or jagged ........................................................................................................................................ 204
Lines print double or in the wrong colors ........................................................................................................................ 205
Lines are discontinuous ...................................................................................................................................................... 205
Lines are blurred .................................................................................................................................................................. 206
Line lengths are inaccurate ................................................................................................................................................ 206
Image Diagnostics Print ...................................................................................................................................................... 207
If you still have a problem .................................................................................................................................................. 210
18 Troubleshooting ink cartridge and printhead issues ................................................................................................................... 211
Cannot insert an ink cartridge ........................................................................................................................................... 212
Ink cartridge status messages .......................................................................................................................................... 212
Cannot insert the printhead ............................................................................................................................................... 212
The front-panel display recommends reseating or replacing the printhead ............................................................. 212
Clean the printhead ............................................................................................................................................................. 213
Align the printhead .............................................................................................................................................................. 213
Printhead status messages ............................................................................................................................................... 214
19 Troubleshooting general printer issues ......................................................................................................................................... 215
Printer does not print .......................................................................................................................................................... 216
Front panel fails to initialize ............................................................................................................................................... 216
Printer seems slow .............................................................................................................................................................. 217
Communication failures between computer and printer .............................................................................................. 217
Cannot access the Embedded Web Server ...................................................................................................................... 217
Cannot connect to the Internet ......................................................................................................................................... 218
Web Services issues ............................................................................................................................................................ 218
Automatic le system check .............................................................................................................................................. 218
Alerts ...................................................................................................................................................................................... 218
ENWW vii
Page 8

20 Front-panel error messages ............................................................................................................................................................ 220
System error log .................................................................................................................................................................. 220
21 HP Customer Care ............................................................................................................................................................................. 221
Introduction .......................................................................................................................................................................... 222
HP Professional Services .................................................................................................................................................... 222
Customer Self Repair .......................................................................................................................................................... 223
Contact HP Support ............................................................................................................................................................. 223
22 Printer specications ......................................................................................................................................................................... 225
Functional specications .................................................................................................................................................... 226
Mobile printing specications ............................................................................................................................................ 228
Physical specications ........................................................................................................................................................ 228
Memory specications ........................................................................................................................................................ 228
Power specications ............................................................................................................................................................ 229
Environmental specications ............................................................................................................................................. 229
Acoustic specications ........................................................................................................................................................ 229
Glossary ..................................................................................................................................................................................................... 230
Index ........................................................................................................................................................................................................... 233
viii ENWW
Page 9

1 Introduction
●
Welcome to your printer
●
Printer models
●
Safety precautions
●
Main components
●
Turn the printer on and o
●
Front panel
●
HP Utility
●
HP Print Preview
●
Embedded Web Server
●
Demo prints
●
Congure your printer
●
Mobile printing
●
Accessibility
●
Other sources of information
ENWW 1
Page 10

Welcome to your printer
Your printer is a color inkjet printer designed for printing high-quality images on paper up to 914 mm (36 in)
wide. Some major features of the printer are shown below:
● Print resolution of up to 2400 × 1200 optimized dpi, from a 1200 × 1200 dpi input, using the Best print-
quality option, the Maximum Detail option and photo paper.
● The printer can be controlled from its front panel or from a remote computer using the Embedded Web
Server, HP DesignJet Utility, or HP Click Printing Software (see http://www.hp.com/go/designjetclick).
● Touch-sensitive front panel in color, with an intuitive graphical user interface.
● Job previews in the front panel.
● Job previews on remote computers.
● Includes Web-connected features such as automatic rmware updates, HP ePrint, and Mobile Printing.
● Driverless printing: Files in common graphical formats can be printed directly without needing a printer
driver. Just insert a USB ash drive or use HP Click Printing Software.
● Paper exibility and automatic easy load, see Paper handling on page 34, with information and presets
accessible from the front panel and the HP DesignJet Utility.
● Handles cut-sheet and roll paper.
● Six-ink system.
● Accurate and consistent color reproduction with automatic color calibration.
● Economode for printing economically.
● Two rolls loaded at once (T2600MFP dr only) provide fast and easy switching between dierent rolls, or
long runs of unattended printing.
● High productivity features such as job previewing and nesting using HP Click Printing Software.
● Ink and paper usage information available from the Embedded Web Server, see Embedded Web Server
on page 15.
● Access to the online HP Support Center (see HP Support Center on page 222).
Printer models
This guide covers the following printer models, normally referring to them by their short names for brevity.
Full name Short name
HP DesignJet T2600 T2600
HP DesignJet T2600 PostScript Printer T2600 PS
HP DesignJet T2600dr T2600dr
HP DesignJet T2600dr PostScript Printer T2600dr PS
2 Chapter 1 Introduction ENWW
Page 11

Safety precautions
Read these safety precautions before using your printer. Also read your local Environmental, Health, and Safety
regulations.
This equipment is not suitable for use in locations where children are likely to be present.
For any maintenance or part replacement, follow the instructions provided in HP documentation to minimize
safety risks and to avoid damaging the printer.
General safety guidelines
There are no operator-serviceable parts inside the printer except those covered by HP’s Customer Self Repair
program (see http://www.hp.com/go/selfrepair). Refer servicing of other parts to qualied service personnel.
Turn o the printer and call your service representative in any of the following cases:
● The power cord or plug is damaged.
● The printer has been damaged by an impact.
● There is any mechanical or enclosure damage.
● Liquid has entered the printer.
● There is smoke or an unusual smell coming from the printer.
● The printer has been dropped.
● The printer is not operating normally.
Turn o the printer in either of the following cases:
● During a thunderstorm.
● During a power failure.
Take special care with zones marked with warning labels.
Ventilation measures for your location, whether oce, copy room, or printer room, should meet local
environmental health and safety (EHS) guidelines and regulations.
Electrical shock hazard
WARNING! The internal circuits of the built-in power supplies and power inlet operate at hazardous voltages
capable of causing death or serious personal injury.
Unplug the printer’s power cord before servicing the printer.
The printer requires a building installation circuit breaker, which must meet the requirements of the printer and
should be in accordance with the Electrical Code requirements of the local jurisdiction of the country in which the
equipment is installed.
To avoid the risk of electric shock:
● The printer should be connected to earthed mains outlets only.
● Avoid overloading the printer's electrical outlet with multiple devices.
ENWW Safety precautions 3
Page 12

● Do not remove or open any closed system covers or plugs.
● Do not insert objects through slots in the printer.
● Take care not to trip over the cables when walking behind the printer.
●
● Never handle the power cord with wet hands.
Fire hazard
To avoid the risk of re, take the following precautions:
● The customer is responsible for meeting the printer’s requirements and the Electrical Code requirements
● Use only the power cord supplied by HP with the printer. Do not use a damaged power cord. Do not use the
● Do not insert objects through slots in the printer.
● Take care not to spill liquid on the printer. After cleaning, make sure all components are dry before using
● Do not use aerosol products that contain ammable gases inside or around the printer. Do not operate the
Insert the power cord securely and completely into the wall socket and printer inlet.
according to the local jurisdiction of the country where the printer is installed. Use the power supply voltage
specied on the nameplate.
power cord with other products.
the printer again.
printer in an explosive atmosphere.
● Do not block or cover the openings of the printer.
Mechanical hazard
The printer has moving parts that could cause injury. To avoid personal injury, take the following precautions
when working close to the printer.
● Keep your clothing and all parts of your body away from moving parts.
● Avoid wearing necklaces, bracelets, and other hanging objects.
● If your hair is long, try to secure it so that it will not fall into the printer.
● Take care that sleeves or gloves do not get caught in moving parts.
● Do not operate the printer with covers bypassed.
If you need to replace the cutter assembly, take care not to cut yourself on the sharp cutting edge.
●
● Internal fan blades are hazardous moving parts. Disconnect the printer before servicing.
● Never insert your hands into the printer while it is printing, due to the moving parts inside.
4 Chapter 1 Introduction ENWW
Page 13
Heavy paper hazard
Special care must be taken to avoid personal injury when handling heavy papers.
● Handling heavy paper rolls may require more than one person. Care must be taken to avoid back strain
and/or injury.
● When handling heavy paper rolls, wear personal protective equipment, including boots and gloves.
● Follow your local Environmental Health and Safety regulations for handling heavy paper rolls.
Ink handling
HP recommends that you wear gloves when handling ink supplies.
Warnings and cautions
The following symbols are used in this manual to ensure the proper use of the printer and to prevent the printer
from being damaged. Follow the instructions marked with these symbols.
WARNING! Failure to follow the guidelines marked with this symbol could result in serious personal injury or
death.
CAUTION: Failure to follow the guidelines marked with this symbol could result in minor personal injury or
damage to the printer.
Warning labels
Label Explanation
Electric shock hazard. Power Supply inside that operates at
hazardous voltages. Disconnect all power sources before servicing.
Before starting, read and follow the operating and safety
instructions.
Moving part. Keep your ngers and hands away from the moving
paper system.
ENWW Safety precautions 5
Page 14
Label Explanation
Moving parts. Rotating roll bar. Keep hands out.
Do not lift. Your ngers or hand may be trapped or crushed.
NOTE: The nal label position and its size on the printer may vary slightly, but labels should always be visible
and close to the potential risk area.
6 Chapter 1 Introduction ENWW
Page 15
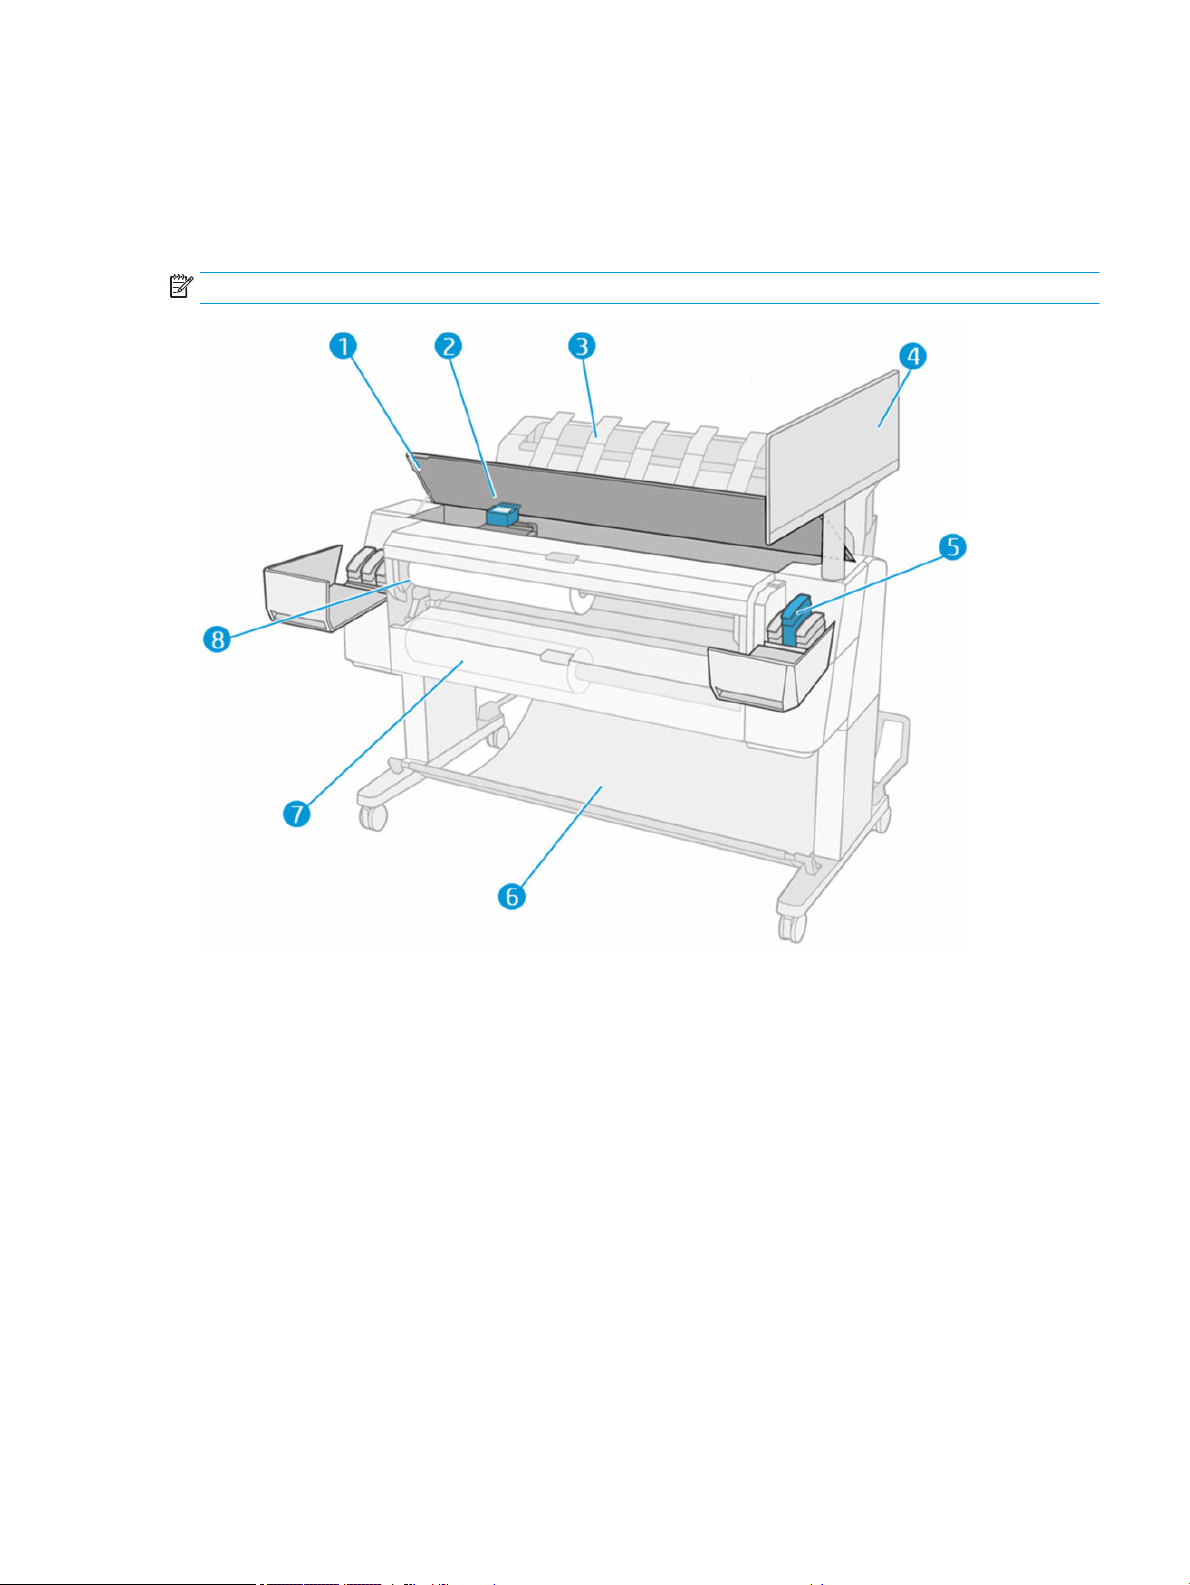
Main components
The following front and rear views of the printer illustrate the main components.
Front view
NOTE: This illustration shows the T2600dr.
1. Scanner
2. Printhead
3. Stacker
4. Front panel
5. Ink cartridge slot
6. Basket
7. lower roll cover ( T2600dr only)
8. Upper roll cover
ENWW Main components 7
Page 16
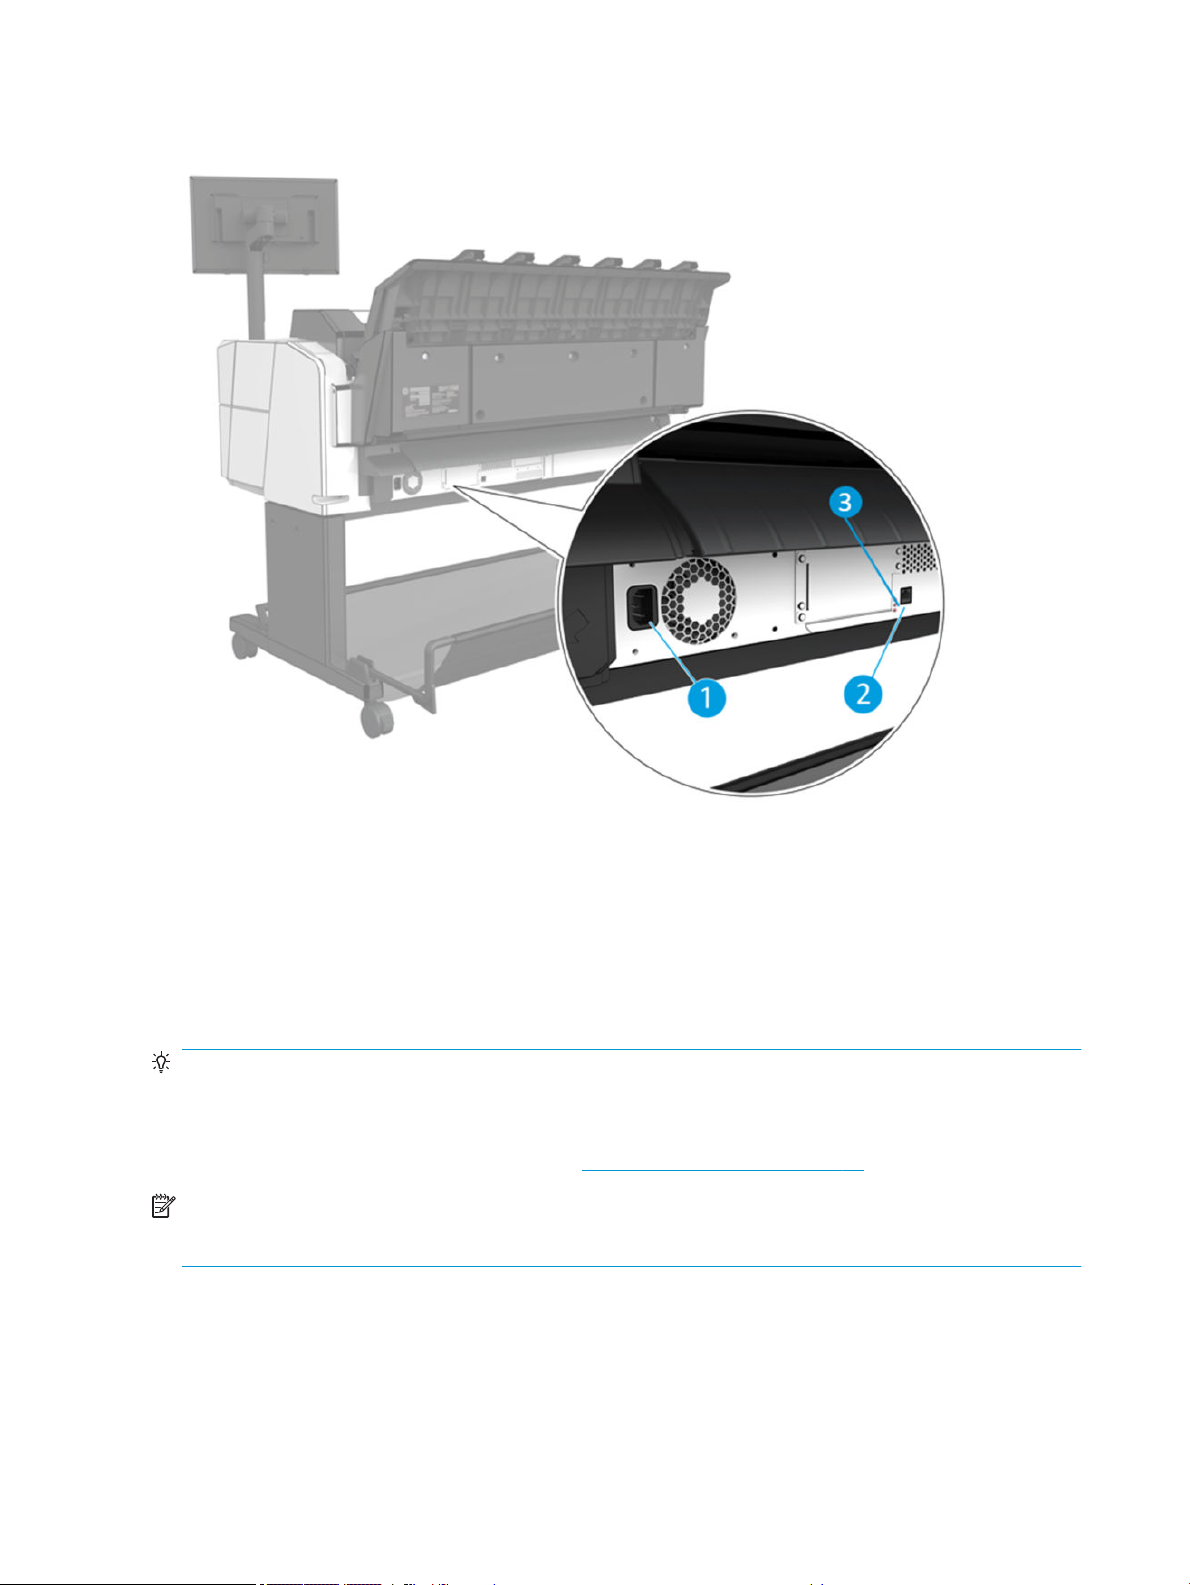
Rear view
1. Power socket
2. Gigabit Ethernet port, to connect to a network
3. Diagnostic LEDs (to be used by service engineers)
The Hi-Speed USB host port is on the other side of the printer, beside the front panel.
Turn the printer on and o
TIP: The printer can be left powered on almost without wasting energy. Leaving it on improves response time
and overall system reliability. When the printer has not been used for a certain period of time (the default time is
determined by Energy Star), it saves power by going into sleep mode. However, any interaction with the printer's
front-panel display, or sending a new job to print, returns it to active mode, and it can resume printing
immediately. To change the sleep mode time, see Change system options on page 13.
NOTE: In sleep mode, the printer performs maintenance service to the printheads from time to time. This
avoids long preparation times after long idle periods. Therefore, it is strongly recommended to leave the printer
powered on or in sleep mode to avoid wasting ink and time.
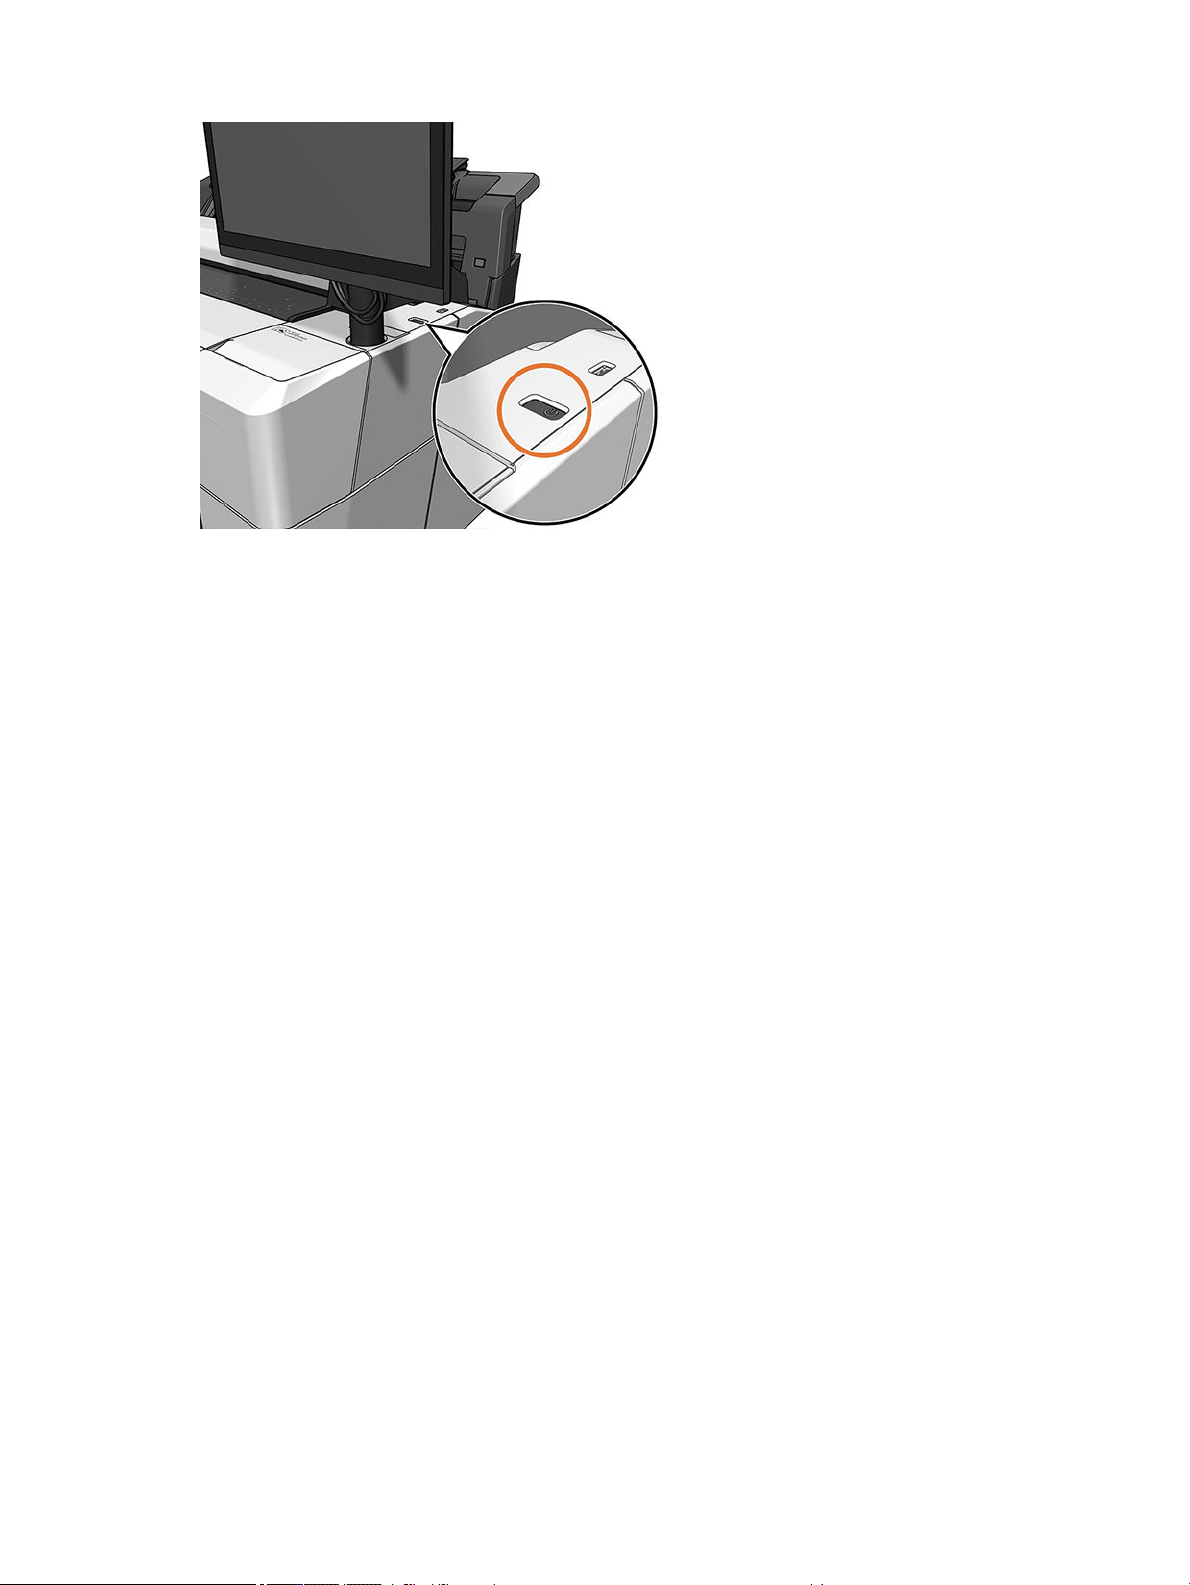
If you want to turn the printer on or o or reset the printer, the normal and recommended method is to use the
power key beside the front panel.
8 Chapter 1 Introduction ENWW
Page 17
However, if you plan to store the printer for a long period or the power key does not seem to work, you are
recommended to unplug the power cord at the rear.
To turn it back on, plug in the power cord.
When the printer is powered back on, it takes about three minutes to initialize and check and prepare the
printheads. Preparing the printheads takes about 75 seconds. However, if the printer has been o for six weeks
or more, preparing the printheads could take up to 45 minutes.
ENWW Turn the printer on and o 9
Page 18
Front panel
The front panel is a touch-sensitive screen with a graphical user interface, located on the front right of the
printer.
It gives you complete control of your printer: from the front panel, you can view information about the printer,
change printer settings, monitor printer status, and perform tasks such as supplies replacement and
calibrations. The front panel displays alerts (warning and error messages) when necessary.
It includes the following components:
1. The front panel itself: a 15.6 inch, full-color, touch-sensitive screen with a graphical user interface.
2. The power key, with which you can turn the printer on or o, or wake up from sleep mode.
3. A Hi-Speed USB host port, intended for connecting a USB ash drive, which can provide les to be printed.
When a USB ash drive is inserted, a USB icon is displayed on the front panel's all-apps page.
The front panel has a large central area to display dynamic information and icons.
10 Chapter 1 Introduction ENWW
Page 19

Home pages
There are three top-level pages that you can move between by sliding your nger across the screen:
● The main screen provides direct access to the main printer functions.
● The all-apps page displays a list of all apps available in your printer, and the status of each of them.
ENWW Front panel 11
Page 20
● If you swipe left to the widget page, you can see at a glance the status of ink, paper supplies and job queue.
● At the top of the all-apps page there is a dashboard that displays alerts related to the main functions of the
Dim mode
After some time with no activity (5 minutes by default), the printer goes to dim mode, which reduces the
brightness of the front panel by 25%. Any activity, such as the use of the front panel or the arrival of a print job,
ends dim mode and restores normal brightness. After some time in dim mode (15 minutes by default), the
printer changes to sleep mode. The time periods can be changed from the front panel.
printer. Swipe down the dashboard to access the Status Center.
Sleep mode
Sleep mode puts the printer into a reduced power state after a period of inactivity, turning o some elements to
save energy. Printer features can be enabled from this mode, and the printer maintains network connectivity,
waking up only as necessary.
The printer can be woken from sleep mode any of the following ways:
● By pressing the power button
● By opening a cover
● By sending a print job
The printer wakes up in several seconds, more quickly than if it is completely turned o. While in sleep mode, the
power button blinks.
To change the time that elapses before sleep mode, see Change system options on page 13.
Printer Monitoring (with the Print Spooler) and Remote Printer Management with the HP Utility and Web
JetAdmin continue to be available during sleep mode. Some remote management tasks oer the option of
remotely waking up the printer if needed to perform the task.
Change the language of the front-panel display
If you can understand the current front-panel display language, tap , then System > Language.
12 Chapter 1 Introduction ENWW
Page 21

The language selection menu should now appear on the front-panel display. Tap your preferred language.
The available languages are English, Portuguese, Spanish, Catalan, French, Dutch, Italian, German, Polish,
Russian, Simplied Chinese, Traditional Chinese, Korean, and Japanese.
Change system options
You can change various printer system options from the front panel. Tap , then System.
● Language.
● Display brightness to change the brightness of the front-panel display.
● Date and time options to view or set the printer's date and time.
● Unit selection to change the units of measurement in the front-panel display. Select English or Metric. By
default, units are set to Metric.
● Speaker volume to change the volume of the printer's loudspeaker. Select O, Low, or High.
● Power options > Printer sleep to change the length of time the printer waits before going into sleep mode
(see Sleep mode on page 12). You can set the time from 5 to 60 minutes. The default time is <15 minutes
(total time including 5 minutes in dim mode).
● Power options > Auto-o due to inactivity to turn o the printer automatically after 120 minutes of
inactivity.
● Restore factory settings to restore the printer settings to their original values as set in the factory. This
● Firmware update to congure the automatic rmware update..
HP Utility
The HP Utility is a Windows only tool that enables you to manage your printer from a computer with a TCP/IP
connection.
You can install the HP Utility from http://www.hp.com/go/DesignJetT2600/drivers.
option restores all of the printer settings except the administrator password and the paper presets.
ENWW HP Utility 13
Page 22
How to launch the HP Utility
Start the HP DesignJet Utility from the icon on your taskbar or from the Start menu > HP > HP DesignJet
Utility. This launches the HP DesignJet Utility, showing the printers installed on your computer. When you
open the HP DesignJet Utility for the rst time, it may oer you an automatic update with enhanced
functionality that we recommend you to accept.
When you select your printer in the left pane, everything that appears in the right pane is specic to that
printer.
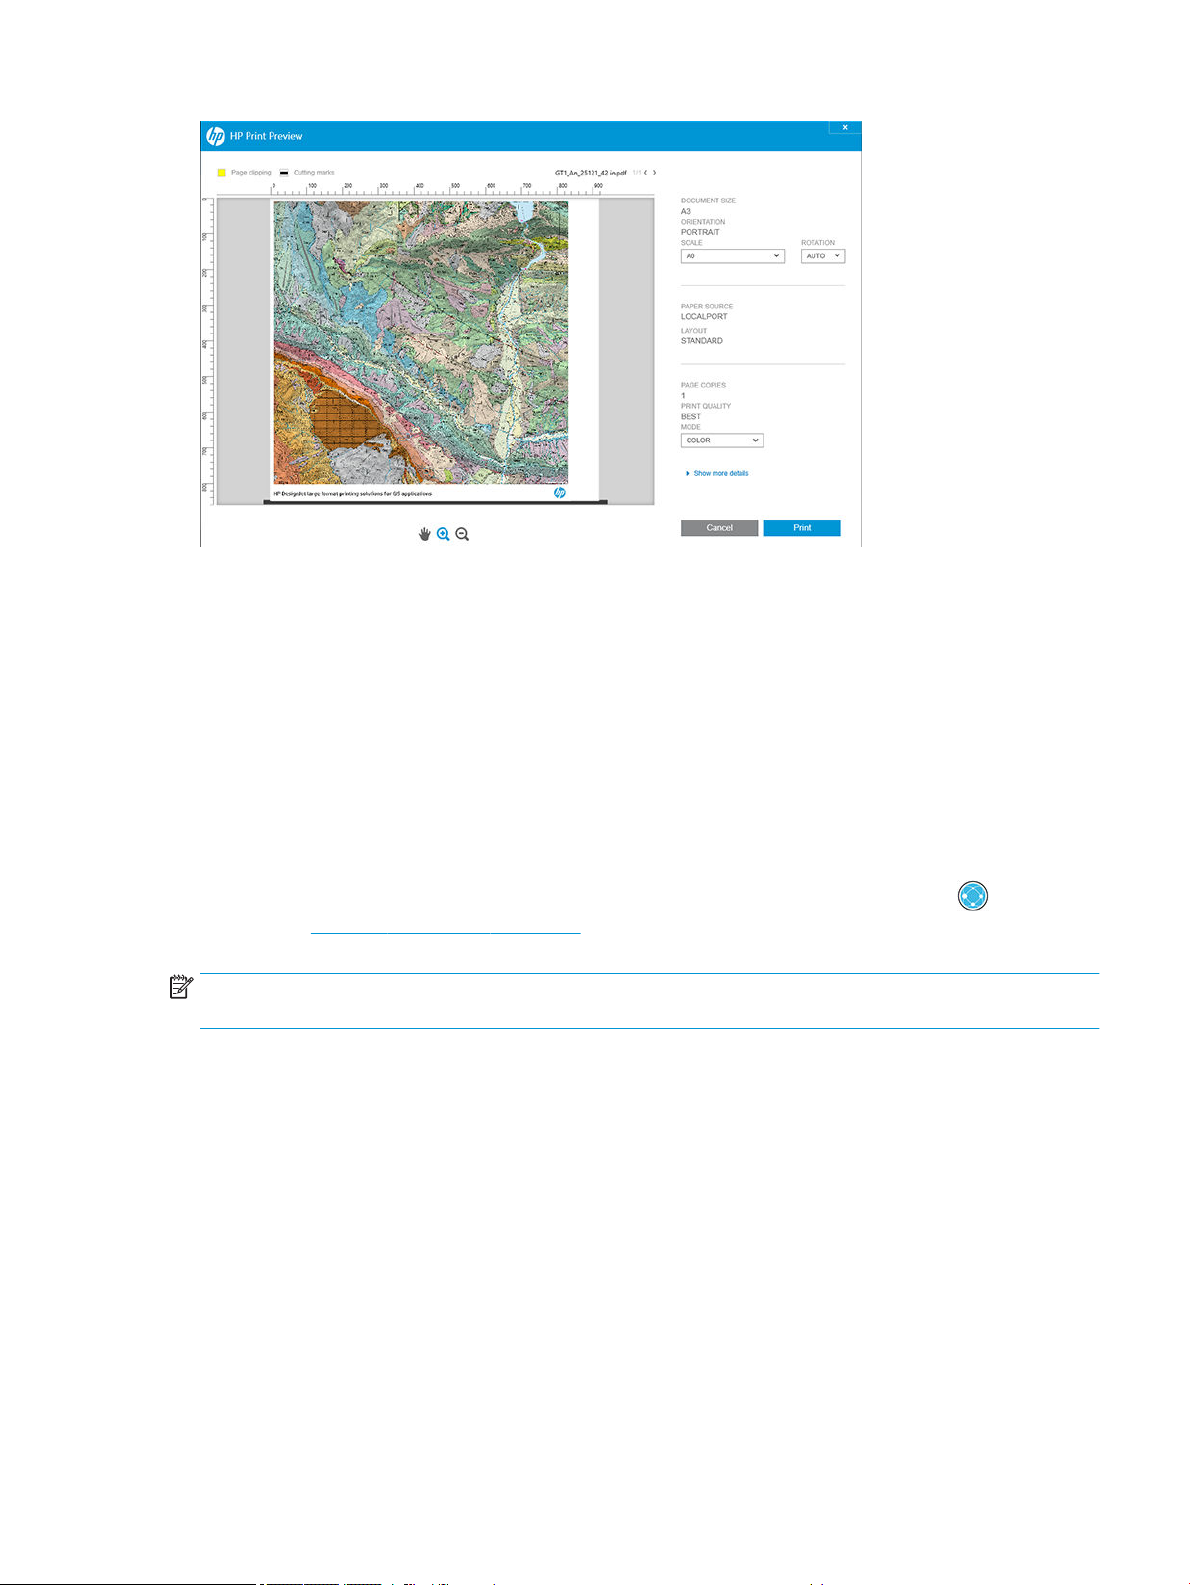
HP Print Preview
The HP Print Preview application enables you to see a basic preliminary preview of how your job will be printed.
This application is available only under Windows. You can install the HP Print Preview by downloading the
integrated installer from http://www.hp.com/go/DesignJetT2600/drivers.
If you use a V4 PDF driver, you can change the rotation, scaling, color mode and the paper source settings in the
application before you print.
14 Chapter 1 Introduction ENWW
Page 23
Embedded Web Server
The following browsers are known to be compatible with the Embedded Web Server:
● Microsoft Internet Explorer 11 and later for Windows 7 and later
● Apple Safari 8 and later for OS X 10.10 and later
● Mozilla Firefox (latest version)
● Google Chrome (latest version)
To use the Embedded Web Server on any computer, open your Web browser and enter the printer's IP address in
the browser's address bar. You can nd your printer's IP address in the printer’s front panel: tap and then
Network. See Congure your printer on page 16.
NOTE: Your browser may display a security warning when you enter the IP address. If you have entered the
correct address, it is safe to ignore the warning and continue to access the Embedded Web Server.
The Embedded Web Server window displays a menu used to access all the supported functionality. It supports
the following languages: English, Portuguese, Spanish, Catalan, French, Dutch, Italian, German, Polish, Russian,
Simplied Chinese, Traditional Chinese, Korean, and Japanese. It uses the language that you specied in your
Web browser options. If you specify a language that it cannot support, it is displayed in the language selected in
the printer, or else in English.
To change the language, change your Web browser's language setting. To complete the change, close and
reopen your Web browser.
Demo prints
The demo prints give various kinds of information about your printer. They can be requested from the front
panel.
Before requesting a demo print, check that the printer and the paper are ready for printing.
ENWW Embedded Web Server 15
Page 24
● The loaded paper should be at least A3 landscape—419 mm (16.53 in) wide—otherwise the print may be
clipped.
● The front panel should be displaying the Ready message.
To print a demo print, tap , then scroll down and tap Internal prints, then Demo prints, and select a print. The
following prints are available:
● Cad Color
● GIS
● Render
● Architectural Presentation Panel
Congure your printer
Connect the printer to your network
The printer is able to congure itself automatically for most networks, in a similar way to any computer in the
same network. The rst time you connect it to a network, this process may take a few minutes.
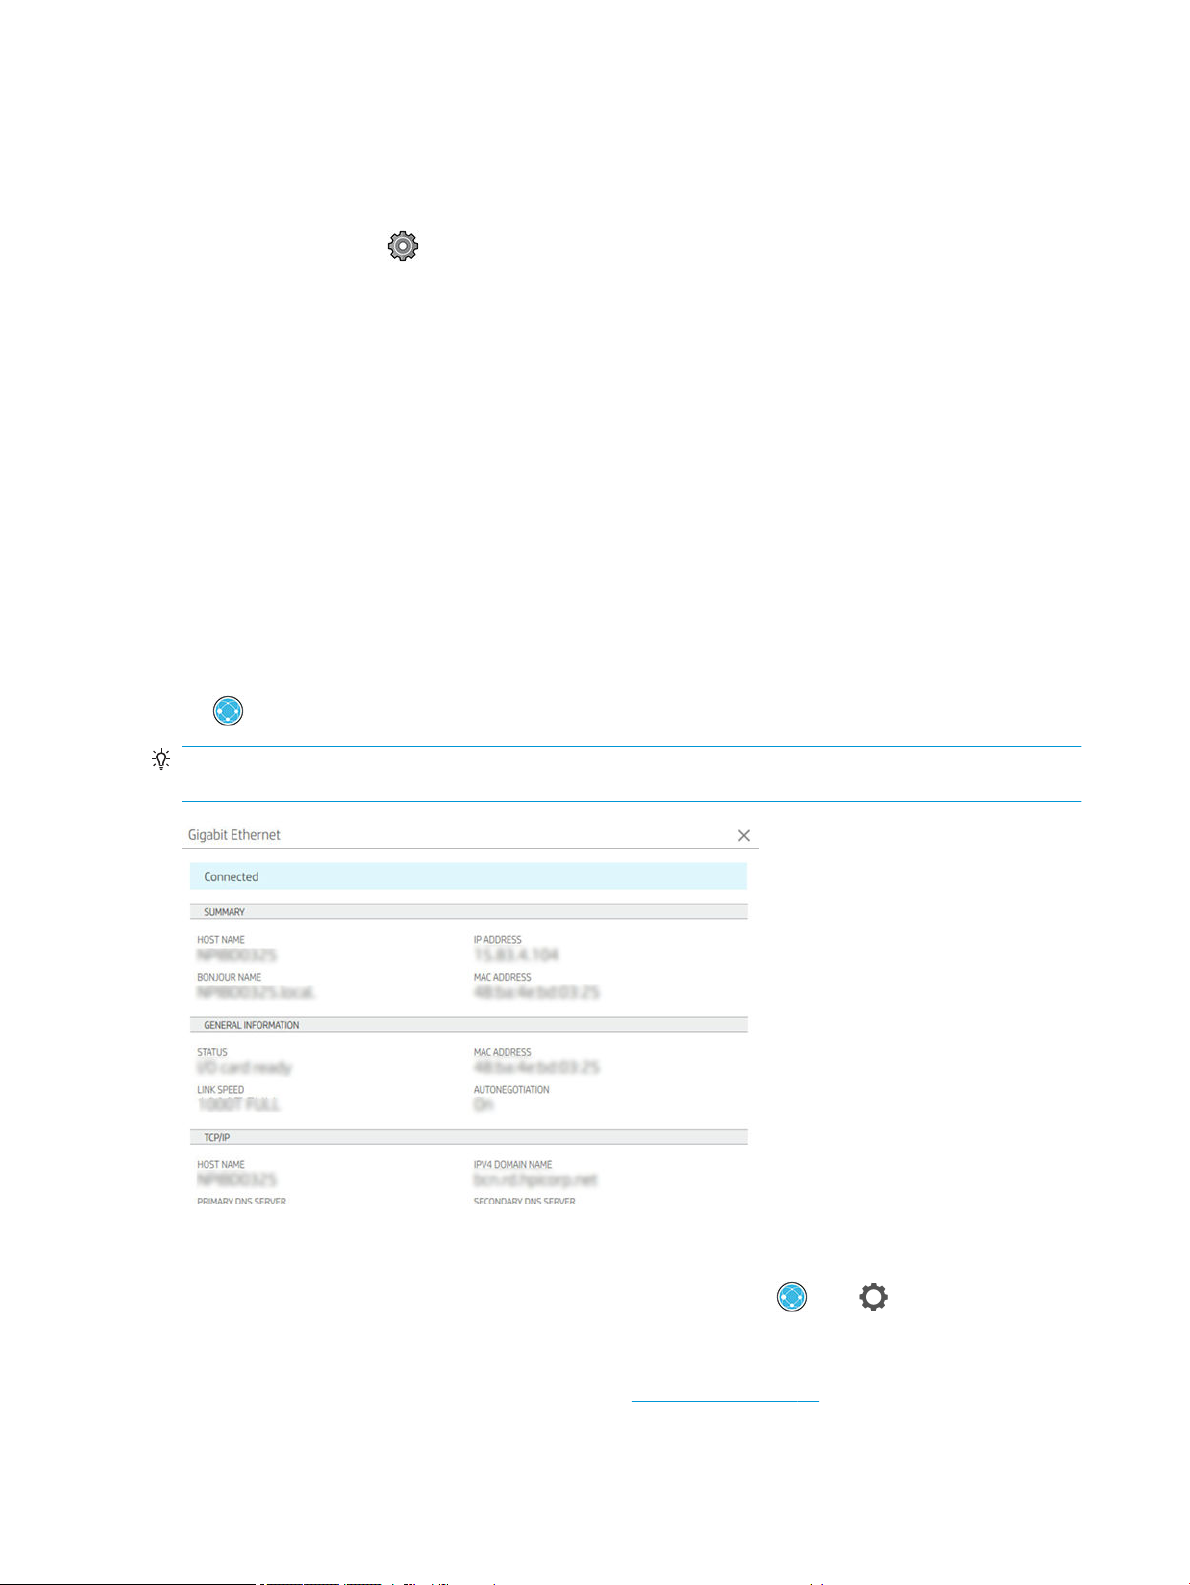
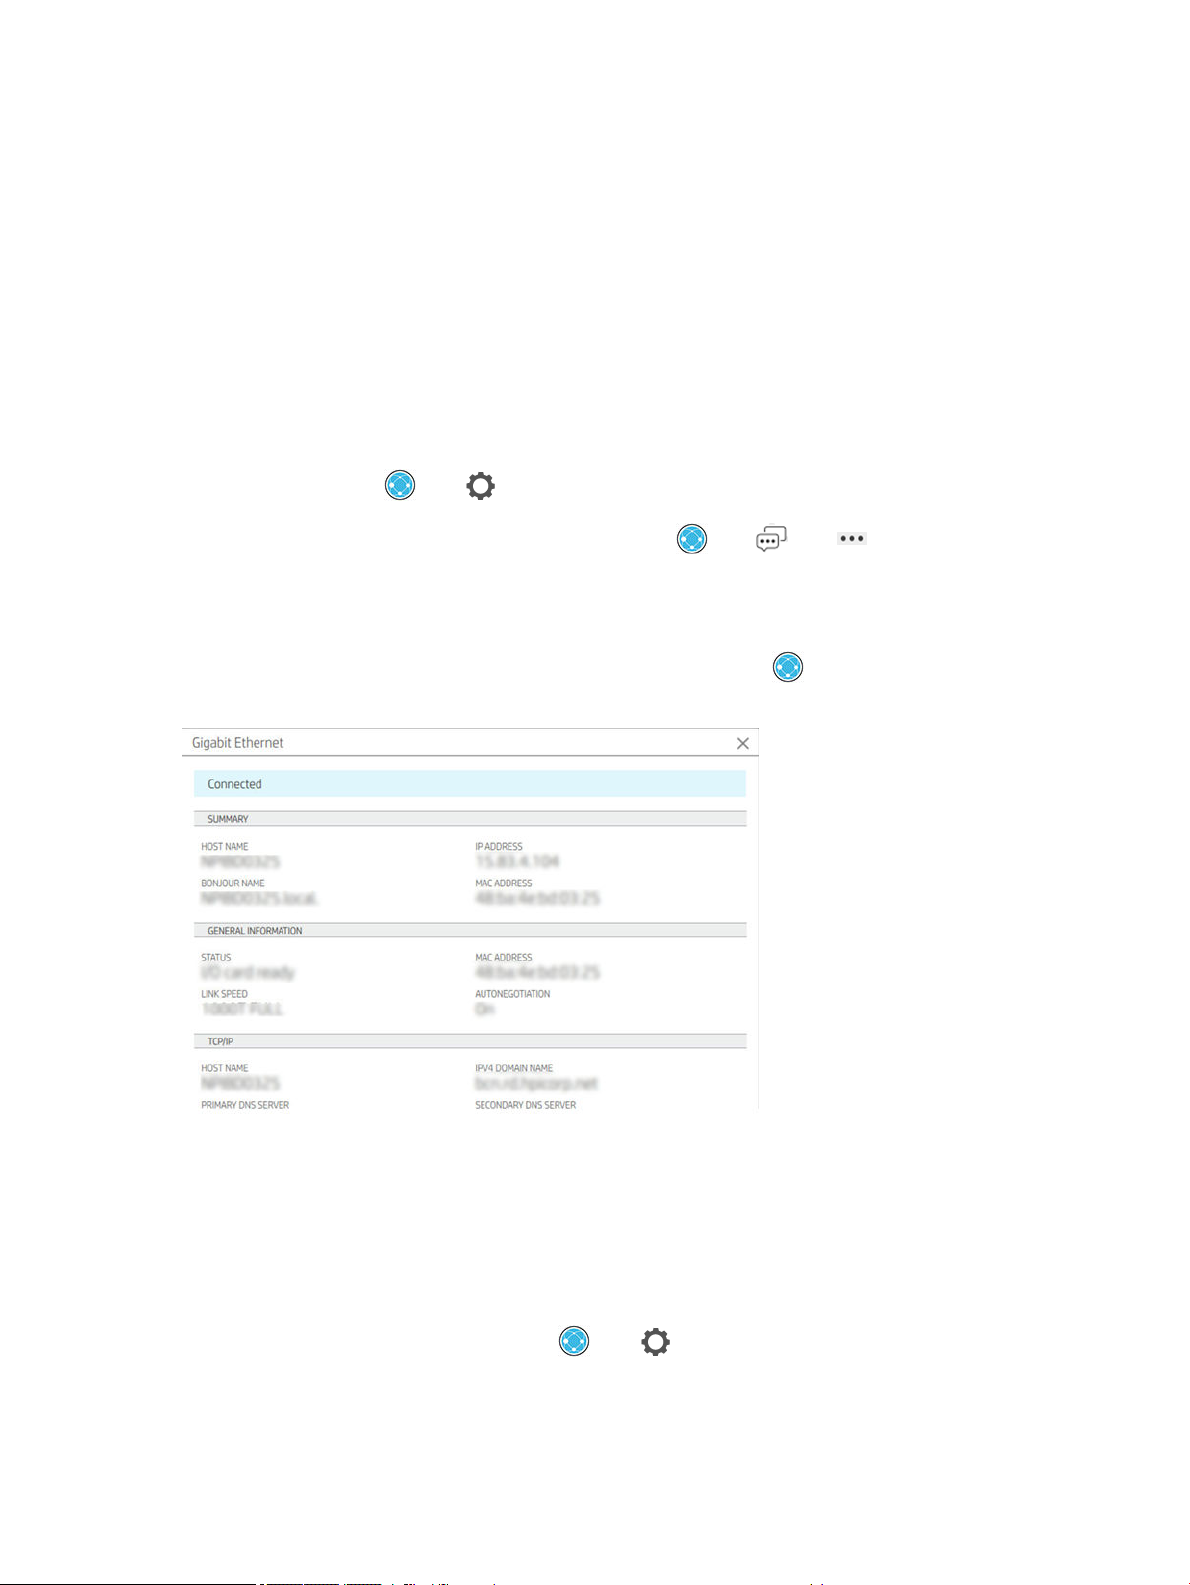
Once the printer has a working network conguration, you can check its network address from the front panel:
tap .
TIP: Consider making a note of the printer’s IP address, because you may need it during the setup process of
connecting your Windows or Mac OS computer clients.
Modify network conguration
To modify the current network conguration, go to the front panel and tap , then , then Network > Gigabit
Ethernet. From here it is possible, though not normally necessary, to change the settings manually; this can also
be done remotely using the Embedded Web Server.
For full details of the available connectivity settings, see Networking on page 55.
16 Chapter 1 Introduction ENWW
Page 25

If you accidentally miscongure the printer’s network settings, you can restore the network settings to their
factory values from the front panel: tap , then , then Restore factory settings. Then you must restart the
printer. This automatically provides a working network conguration for most networks. The printer’s other
settings remain unchanged.
Install your printer under Windows
The following instructions apply if you intend to print from software applications using a printer driver. See
Printing on page 64 for alternative ways of printing.
Before you begin, check your equipment:
● The printer should be set up and on.
● The Ethernet switch or router should be on and functioning correctly.
● The printer and the computer should be connected to the network (see Connect the printer to your network
on page 16).
Now you can proceed to install the printer software and connect to your printer.
Printer software installation
1. Make a note of the printer’s host name and IP address from the front panel (see Connect the printer to your
network on page 16).
2. Install the printer software from http://www.hp.com/go/DesignJetT2600/drivers, following the software
installation instructions. By default, the following driver is installed:
● Non-PostScript printers: The raster driver
● PostScript printers, with Windows 7 or Windows Server 2008R2: The PostScript driver
● PostScript printers, with Windows 8, Windows Server 2012, or later: The PDF driver
3. Once downloaded, open it, and follow on-screen steps.
If your computer fails to nd any printers on the network, the Printer Not Found window is displayed, which helps
you to try to nd your printer. If you have a rewall in operation; you may have to disable it temporarily in order
to nd the printer. You also have the options of searching for the printer by its hostname, IP address or MAC
address.
Uninstall the printer software under Windows
Use the Control Panel to uninstall the software, in the same way as you can uninstall any other software.
Connect a computer to the printer by network (Mac OS X)
HP Click is the recommended way to connect with your printer to a network. See http://www.hp.com/go/
clickDesignJet for installation instructions.
ENWW Congure your printer 17
Page 26
Set up printer services
You can set up the following services:
● Receive automatic rmware updates
● Enable email printing
● Enable additional printer services
A network connection is required, so the printer will test its own connectivity. Remember to connect the network
cable to the printer.
Each printer service can be enabled or disabled individually as explained below.
During initial printer setup, you are asked whether you want to enable these services. That decision can be
changed later by tapping , then , then Services > Data Collection & HP Privacy Statement.
If you are part of the HP Partner Link Pay-per-use service, tap , then , then , then Register new service
in order to register the printer service.
Verify printer connection to HP
You can check that the printer is able to connect to HP services by tapping and viewing the status there. You
can see detailed information by clicking the Network or Service card.
If there is any problem connecting to HP, you will be provided with a description of the problem and some
possible solutions.
Enable email printing with HP ePrint
The HP Connected service makes it easy to send jobs to your printer by attaching them to an email message.
You must accept the Data Collection & HP Privacy Statement in order to use HP Connected.
To enable email printing, in the front panel, tap , then at the right top corner of the page, then Services. >
HP Connected > Setup Web Services. A printer email address and printer code are assigned to the printer.
18 Chapter 1 Introduction ENWW
Page 27
To see your printer email address, tap > in the right top corner of the page, then Services. > HP
Connected > Printer email address.
Alternatively, you can congure it from the Embedded Web Server, Go to the HP Web Services menu and click
Enable HP web Services to register and enable HP ePrint.
If you are the printer administrator, log in at HP Connected (http://www.hpconnected.com) to customize your
printer’s email address or manage printer security for remote printing. Refresh the printer’s email address from
the front panel, tap > in the right top corner of the page, then Services. > HP Connected > Printer email
address.
Visit http://www.hpconnected.com to register yourself and your printer (using the printer code).
HP ePrint job policies
By default, the jobs sent by email are directly printed. To change the settings, tap , then at the right top
corner of the page, then Services > HP Connected > HP ePrint jobs.
You can select the roll to be used for HP ePrint jobs, or let the printer decide (save paper).
Congure ePrint connectivity service
You can remove the connection to HP ePrint if required for security. At the front panel, tap , then at the
right top corner of the page, then
To use remote printing again, you will need to set it up again from scratch.
Congure rmware updates
You can choose from the Embedded Web Server or from the front panel whether and how to download rmware
updates.
NOTE: If an administrator password has been set, it will be required to change these settings.
● In the Embedded Web Server: Click About printer > Firmware update.
● Using the front panel: Tap , then System > Firmware update.
Services > HP Connected > Remove Web Services.
ENWW Congure your printer 19
Page 28

The following settings are available:
● Check for updates automatically: The printer will inform you when new rmware is available.
● Download new rmware automatically: The printer will automatically download new rmware whenever it
becomes available. Deactivate this option to download new rmware manually.
NOTE: Downloading the rmware does not mean that you have installed it in your printer. To install the
new rmware, you must conrm the installation manually.
Firmware update history.
●
LDAP Congure the email address book
The printer uses Lightweight Directory Access Protocol (LDAP), which provides access to a network address book
for scan-to-email and authentication purposes.
The following instructions explain how to use LDAP to connect the printer to a network email address book, and
to authenticate users of the printer using their LDAP credentials.
Email lookup
When the printer uses LDAP for scan-to-email, it searches a database of email addresses. When you enter the
email address and click the Search button, LDAP searches a list of email addresses for matching characters. You
can rene the search results by typing additional characters and performing a new search.
Printers that support LDAP also support the use of a standard outgoing email prole, so they do not require a
connection to an LDAP server in order to send email.
Information needed before starting
Ensure that you have the following information before starting the conguration:
● Server address (hostname or IP).
● Server authentication requirements.
● Path to start search (BaseDN, Search Root) (for example, o=mycompany.com).
● Attributes for matching the name entered (such as cnor samAccountName), retrieving the email
address (such as mail), and how the name will be displayed on the control panel (such as
displayName).
Address book setup
In the Embedded Web Server, click Settings >Address book. Here you can congure the printer to obtain email
addresses from an LDAP server, so that they are available when users perform a search from the Scan to Email
screen.
1. Open the Embedded Web Server.
2. Click Settings >Address book.
3. Enable the LDAP server (mandatory to continue with the LDAP conguration).
Network Directory Server section:
20 Chapter 1 Introduction ENWW
Page 29

4. In the Network Directory Server section, enter the name of the LDAP server address (for example,
ldap.mycompany.com) and Port.
Server Authentication requirements section:
5. In the Server authentication requirements section you can select the appropriate authentication type in the
server (Windows credentials, simple credential, use printer user’s credentials). It is mandatory to ll the
Domain name, Username, and password.
LDAP Database search settings section:
6. Fill in these elds:
● In the path to start a search (BaseDN, Search Root) box, enter the path to start searching the
database (for example, o=mycompany.com).
● In the recipients's display name box, enter the name of the attribute that contains the person's name
(for example, displayName).
● In the recipient's email address box, enter the name of the attribute that contains the person's email
address (for example, mail or rfc822Mailbox).
● Use the LDAP lter condition box to set up an optional lter to lter out e-mail addresses.
7. Click the Apply button to save the settings. Setup is complete.
8. To check that the LDAP retrieval is set up correctly, enter at least three characters of a network contact
name in the Test box, and then click the Test button. If the test is successful a message is displayed.
Congure a network folder
In the printer's Embedded Web Server, click the Settings tab and Network folder. See Embedded Web Server
on page 33.
ENWW Congure your printer 21
Page 30
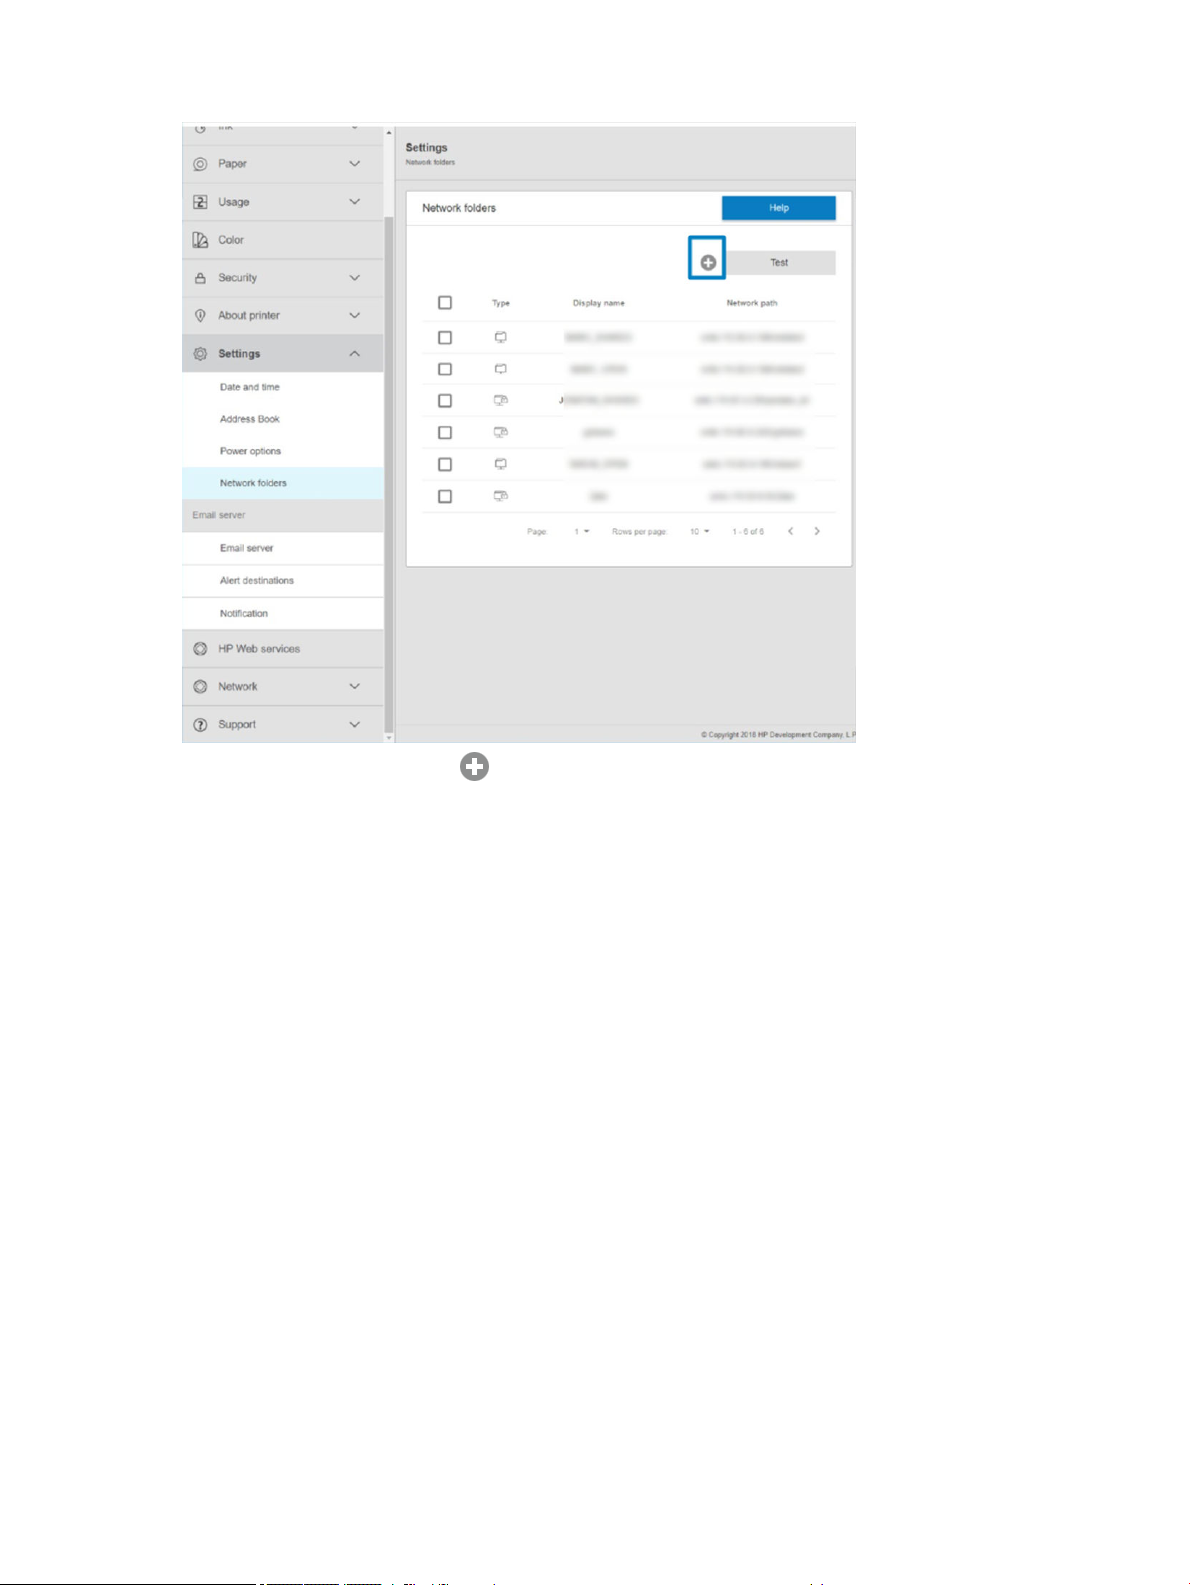
On the Network folders page, click at the top of the page, and ll in the various elds:
● Display name: Name displayed in the front panel when you are choosing the le’s scan destination/printing
origin (depending of the functionality use).
● Network path: Should contain the network name of the remote computer and must start with // followed
by the path.
● Protocol: SMB
● Functionality Use: Choose between Print only, Scan only, Print and Scan or None.
● Default Network destination: Enable this option to congure this folder as the default destination for les.
● Browse Network folder Structure: Enable to browse through the structure of folders.
● Authentication requirements: Enter the login username and password for the printer to access documents
and images in the network folder. The username and password are stored and encrypted in the printer's
memory. There are 3 options:
– None: Use this setting for an unprotected folder on the network (no credentials required).
– Automatic login using following credentials: Enter username and password only once during
conguration and later use the folder in the front panel without entering credentials.
– Prompt for credentials when needed: Enter username and password in the front panel every time you
use it.
22 Chapter 1 Introduction ENWW
Page 31

NOTE: User password should contain the password of the user. Domain should contain the name of the
domain in which the user name exists. If the user does not belong to any domain, leave this eld empty.
● Security Pin Option: Create a 4-digit security PIN to prevent unauthorized people from accessing
documents and images in this network folder.
For a network folder, enter the remote computer’s name or IP address, the shared folder’s, and the username
and password of the user already created on the remote computer. Leave the user domain eld empty unless
the user is a member of a Windows domain. If the user is only a local user of the remote computer, leave the
eld empty. You can use the name (instead of the IP address) in the server name eld, only if the shared folder is
on a Windows computer in the same local network.
● Click Apply to save the conguration.
● The printer automatically checks that it can access the network folder. If not, see Cannot access the
network folder on page 116.
NOTE: If the product has already been congured for scanning to network/printing from networks and you now
want to use a dierent shared folder, click .
You can check that the shared folder remains accessible by clicking Verify in the Embedded Web Server at any
time. A correctly congured shared folder can become inaccessible if the user’s password is changed, or if the
shared folder is moved or deleted.
Example: Create a network folder under Windows
1. Create a new user account on the remote computer. You can use an existing user
account for this purpose, but it is not recommended.
2. Create a new folder on the remote computer, unless you want to use an existing folder.
3. Right-click the folder and click Properties.
ENWW Congure your printer 23
Page 32

4. In the Sharing tab, click the Advanced Sharing button.
24 Chapter 1 Introduction ENWW
Page 33

5. Ensure that the user has the correct permission settings depending of the functionality use of the network
folder. If you congured a scan-to-folder, you need to ensure full read/write control over the shared folder
so that the user(s) can add les to folder. To do this, click Permissions and grant Full Control to the user (or
to any suitable group that includes that user). If the user(s) is going to use the folder to print documents, a
read-only permission is enough.
ENWW Congure your printer 25
Page 34

6. For scanner users, If there is a Security tab in the Properties window for your folder, then you must also
grant the same user Full Control over the folder in the Security tab. Only some le systems such as NTFS
require this.
Example: Create a scan-to-network folder under Mac OS
1. Create a new user account for the Scanner user on the remote computer. You can use an existing user
account for this purpose, but it is not recommended.
2. Create or choose a folder on the remote computer. By default, Mac OS users have a Public folder that can
easily be used for this purpose.
26 Chapter 1 Introduction ENWW
Page 35

3. Open the System Preferences application and click the Sharing icon.
4. Depending of the functionality of the folder, make sure the user has the right permissions. For scanning
purposes, Read & Write is needed to access the folder.
5. Click Options.
ENWW Congure your printer 27
Page 36

6. Check the Share les and folder using the SMB box, and make sure that the scanner user is checked in the
On column.
7. Click Done. You can now see le sharing enabled and Windows sharing on.
8. You must congure the printer to send scans to the folder.
28 Chapter 1 Introduction ENWW
Page 37

Congure the email server
To congure the email server using the Embedded Web Server, click Setup > E-mail server, and ll in the
following elds, which are usually supplied by the email server provider.
● SMTP server and port number: The IP address or fully qualied domain name of the outgoing mail server
(SMTP) that will process all email messages from the printer. If the mail server requires authentication,
email notications will not work.
● Printer e-mail address: The email address assigned to the account that is being congured in the printer.
This email address will appear in the From: eld of all the email messages sent by the printer. This is not
the same email address that is used by HP Connected.
● Attachment size limit: The maximum size of a le attached to an email message. When you scan to email
from the front panel, you will be warned if an attachment is higher than this limit, but you can ignore the
warning and send the message anyway.
● Use SSL certicates: Check this box to use SSL certicates if the server requires an encrypted connection.
Click the link to congure advanced certicate settings.
● Authentication. If you choose authentication, you are also asked for your username and password.
Once you have congured the email server, you are strongly recommended to check the conguration.
Control access to the printer
Manage printer security with HP Connected
When you have set up Web Services, the printer is in unlock mode. In unlock mode, anyone who knows your
printer's email address can print to your printer just by sending a le to it. Although HP provides a spam ltering
service, you should be careful about giving out your printer's email address, as everything sent to that address
may be printed on your printer.
If you are the printer administrator, you can manage printer security or change your printer status to lock mode
by visiting HP Connected at http://www.hpconnected.com. You can also customize your printer's email address
and manage print jobs from there. At your rst visit, you will need to create an account at HP Connected using
the printer's code.
Embedded Web Server security settings
From the Embedded Web Server menu, you can click Security and then Administrator password to control access
to the printer by specifying an administrator account to control access to the Embedded Web Server and the
printer’s front panel.
The administrator can also dene other types of permissions in the control panel through the Access control
menu option. In this section, the administrator can create new printer user accounts and assign them specic
permissions depending on their role.
Other security settings are available under the Security settings menu option, which apply to all users.
ENWW Congure your printer 29
Page 38

Front-panel security settings
From the front panel, you can tap , then Security, to control some of the features of the printer:
● User sessions: Enable or disable automatic log-out after 1, 3, or 5 minutes.
● Embedded Web Server: Enable or disable the Embedded Web Server.
● Printing & management Web services: Enable or disable Web services that are used by printing and
management tools such as the HP Utility, HP Click, and SDK for RIPs.
If an administrator password has been set, it must be given in order to perform the following operations:
● Change the security settings (including the administrator password itself).
● Change the conguration of the Internet connection.
● Change the Automatic Firmware Update conguration.
● Enable or disable automatic downloading and/or installation of automatic rmware updates.
● Restore an earlier rmware version.
● Reset factory defaults.
NOTE: The administrator password can contain only characters that appear on the front panel's on-screen
keyboard. If you set a new password with the Embedded Web Server, it will reject characters that do not appear
in that limited character set.
Require account ID
If you want to keep records of printer usage by dierent users, you can set your printer to require an account ID
for each job. At the front panel, tap
If this setting is turned on, the account ID eld will be mandatory and jobs with no account ID will be kept "on
hold for accounting".
The account ID can be set in the printer driver when sending the job. If the job is set "on hold for accounting" by
the printer, you can introduce the account ID in the driver or front panel, by going to the job queue and clicking
the job that is on hold. A window with a text box is displayed and you can enter the account ID into it.
Drivers
There are various dierent drivers for your printer; which is best for you depends on your circumstances:
● Your operating system
● The type of applications from which you print
● The number of printers you have
● The output accessories you have
You may wish to install one or several drivers according to your needs.
, then Job management > Account ID required.
You can nd the latest driver software at http://www.hp.com/go/DesignJetT2600/drivers/.
30 Chapter 1 Introduction ENWW
Page 39

Specic Windows drivers
The following driver is recommended:
● Non-PostScript printers: The raster driver
● PostScript printers, with Windows 7 or Windows Server 2008R2: The PostScript driver
● PostScript printers, with Windows 8, Windows Server 2012, or later: The PDF driver
HP Universal Print Driver conguration tool
To install the HP Designjet Universal Print Driver, go to http://www.hp.com/go/DesignJetT2600/support and click
Software and drivers > Driver - Universal Print Driver >
UPD PostScript Driver if you have a PostScript Printer.
At the end of installation, go to Printer > Device Settings > Properties, and conrm that Generic is displayed in
Current model.
Download. We recommend to select the HP DesignJet
To install the tool, go to http://www.hp.com/go/DesignJet
Software – Utility > UPD conguration tool > Download.
For information about how to install and use the tool, go to https://support.hp.com/us-en/document/
c05658213.
T2600/support and click Software and drivers >
Set Windows driver preferences
You can change some default settings in your printer driver according to your own preferences, for instance to
set c
olor or paper-saving options. To do this, click the Start or Search button on your computer's screen, then
click Devices and Settings or Devices and Printers. In the next window, right-click your printer's icon, and click
Printing Preferences. Any settings you change in the Printing Preferences window will be saved as default values
for the current user.
To set the default values for all users of your system, right-click the printer’s icon, click Printer Properties, go to
the Advanced tab, and click Printing Defaults. Any settings you change in the printing defaults will be saved for
all users.
ENWW Congure your printer 31
Page 40

Change the graphic language setting
You can change the graphic language setting from the front panel. Tap , then Default printing conguration >
Graphics language.
Then select one of the following options:
● Select Automatic to let the printer determine which type of le it is receiving. This is the default setting; it
works for most software applications. You should not normally need to change it.
● Select PS (PostScript) only if you are sending a le of that type directly to the printer, without going through
a printer driver.
● Select PDF only if you are sending a le of that type directly to the printer, without going through a printer
driver.
● Select HP-GL/2 only if you are sending a le of that type directly to the printer, without going through a
printer driver.
● Select CALS/G4 only if you are sending a le of that type directly to the printer, without going through a
printer driver.
● Select TIFF only if you are sending a le of that type directly to the printer, without going through a printer
driver.
● Select JPEG only if you are sending a le of that type directly to the printer, without going through a printer
driver.
Mobile printing
With HP Mobile Printing Solutions you can print straight from your smartphone or tablet in just a few simple
steps wherever you are; using your mobile device OS or sending an email to your printer with PDF, TIFF, or JPEG
attachments.
● For Android printing, install the HP Print Service App from Google Play. If you have have already installed it,
check that it is up to date. You can obtain the latest version from https://play.google.com/store/apps/
details?id=com.hp.android.printservice.
● You can also download the HP Smart App to enhance your printing capabilities from a smartphone or
tablet.
– Latest iOS version from https://itunes.apple.com/app/id469284907
– Latest Android version from https://play.google.com/store/apps/details?id=com.hp.printercontrol
● To enable email printing, ensure that the service is enabled, and retrieve the printer's email address from
the front panel.
For more detailed information, see http://www.hp.com/go/designjetmobility.
Accessibility
Front panel
If required, the front-panel display brightness and the loudspeaker volume can be changed (see Change system
options on page 13).
32 Chapter 1 Introduction ENWW
Page 41

Embedded Web Server
From the Embedded Web Server, you can see the status of the printer, and perform other actions without using
the front panel.
For information about the accessibility features of the Embedded Web Server, click Support > Accessibility.
See http://www.hp.com/hpinfo/abouthp/accessibility/ for information about the HP Accessibility Program, and
HP's commitment to making its products and services accessible to people with disabilities.
Other sources of information
The following documents can be downloaded from http://www.hp.com/go/DesignJetT2600/manuals/:
● Introductory information
● User guide
● Legal information
● Limited warranty
ENWW Other sources of information 33
Page 42

2 Paper handling
●
General advice
●
Load a roll onto the spindle
●
Load a roll into the printer
●
Unload a roll
●
Load a single sheet
●
The stacker
●
The basket
●
View information about the paper
●
Paper presets
●
Printing paper info
●
Move the paper
●
Maintain paper
●
Change the drying time
●
Turn the automatic cutter on and o
●
Clean cut
34 Chapter 2 Paper handling ENWW
Page 43

General advice
CAUTION: Before starting a paper loading process, ensure that you have enough room around the printer, both
in front and behind. You need at least enough space behind the printer to open the basket fully.
CAUTION: Ensure that the printer wheels are locked (the brake lever is pressed down) to prevent the printer
from moving.
CAUTION: All paper must be 280 mm (11 in) or longer. A4 and letter paper cannot be loaded in landscape
orientation.
TIP: For photo paper wear cotton gloves to avoid transferring oils onto the paper.
Load a roll onto the spindle
1. Open the roll cover.
ENWW General advice 35
Page 44

2. Remove the black end of the spindle from the printer, then the blue end.
CAUTION: Be sure to remove the black end rst. Removing the blue end rst could damage the black end.
WARNING! Do not insert your ngers into the spindle supports during the removal process.
36 Chapter 2 Paper handling ENWW
Page 45

3. The spindle has a stop at each end. The blue stop can move along the spindle and has a latch to lock it in
place. Open the latch and remove the blue stop from the end of the spindle.
4. If there is already a roll or core on the spindle, remove it.
5. If the roll is long, rest it horizontally on a table and insert the spindle into it.
TIP: You may need two people to handle a large roll.
6. Slide the new roll onto the spindle. Make sure the paper type is oriented as shown. If it is not, remove the
roll, turn it 180 degrees and slide it back on to the spindle. There are labels on the spindle showing the
correct orientation.
NOTE: From the front of the printer, the blue stop should be inserted into the right-side holder.
ENWW Load a roll onto the spindle 37
Page 46

7. Put the blue stop onto the open end of the spindle, and push it towards the end of the roll.
8. Ensure that the blue stop is pushed in as far as it goes; until both ends are against the stops, then close the
latch.
If you are a regular user of dierent paper types, you can change rolls more quickly if you preload rolls of
dierent paper types on dierent spindles. Extra spindles are available for purchase, see Supplies and
accessories on page 175.
Load a roll into the printer
To start this procedure, you must have a roll loaded on the spindle. See Load a roll onto the spindle on page 35.
TIP: Do not try to open both roll covers at once; this may cause problems. Always close one cover before
opening the other.
NOTE: The rst two steps below are optional: you can start with step 3. However, in this case the printer will
not keep track of the length of the roll, and will print no barcode on the roll when it is next unloaded. So you are
recommended to follow all the steps, starting with step 1, unless you have turned o the Printing paper info
option. See Printing paper info on page 49.
38 Chapter 2 Paper handling ENWW
Page 47

1. From the front panel, press , then the roll icon, then Load.
If the roll you have selected is already loaded, you have to wait while it is automatically unloaded.
2. If you start to load roll 1 while roll 2 is already loaded, roll 2 is withdrawn to the standby position, so that it
can be printed on again without reloading whenever required (and vice versa).
NOTE: If at any time you open a roll cover while that roll is loaded but not printing, the roll will be
automatically unloaded, and you will have to reload it the next time you want to print on it.
. Open the roll cover.
3
4. Load the spindle into the printer, with the blue stop on the right. Hold the spindle by its ends and not in the
middle, to avoid touching the paper and perhaps leaving marks on it.
ENWW Load a roll into the printer 39
Page 48

5. If the edge of the roll is not straight or torn (sometimes due to tape used to hold end of the roll), pull the
paper slightly and cut a straight edge.
6. Insert the edge of the paper into the printer.
WARNING! Do not push your ngers inside the printer's paper path.
40 Chapter 2 Paper handling ENWW
Page 49

7. Roll the paper into the printer until you feel resistance and the paper exes slightly. When the printer
detects the paper, it feeds it in automatically. You will hear a beep.
8. If the leading edge of the paper has a barcode, the printer reads and then cuts o the barcode, which falls
into the basket.
9. If the leading edge of the paper has no barcode, the front panel prompts you to select the paper category
and type.
TIP: If you have loaded a paper type whose name does not appear in the paper list, see Paper type is not
in the driver on page 183.
10. The front panel may ask you to specify the length of the roll. See Printing paper info on page 49. Press
OK.
11. Close the roll cover only when the front panel prompts you to do so.
NOTE: If you have an unexpected issue at any stage of the paper loading process, see Paper cannot be loaded
successfully on page 182.
Unload a roll
Before unloading a roll, check whether there is paper on the roll or if the roll is out of paper, and follow the
appropriate procedure as described below.
Quick procedure with paper on the roll
If there is paper on the roll, just open the roll cover, and the roll is unloaded automatically. The front panel
prompts you to load a new roll or sheet.
ENWW Unload a roll 41
Page 50

NOTE: When the roll is unloaded in this way, no barcode is printed on it, so the printer will not know the length
of the roll when it is next loaded. See Printing paper info on page 49.
NOTE: If you open the a roll cover while a sheet is loaded, the sheet is also unloaded.
Front panel procedure with paper on the roll
If there is paper on the roll, you can unload it from the front panel.
1. Press , then the roll icon, then Unload.
2. You may need to open the roll cover.
Load a single sheet
1. Measure sheet length before loading (if it is not standard size).
42 Chapter 2 Paper handling ENWW
Page 51

2. Ensure that both roll covers are closed. If a roll cover is opened while a sheet is loaded, the sheet is
immediately unloaded.
WARNING! Do not load the sheet before starting the loading process from the front panel.
3. At the front panel, press , then the sheet icon, then Load > Load sheet.
4. If a roll is already loaded, you have to wait while it is automatically unloaded. The roll is not unloaded, but
withdrawn to the standby position, so that it can be printed on again without reloading as soon as the
sheet paper has been unloaded.
NOTE: If at any time you open a roll cover while that roll is loaded but not printing, the roll will be
automatically unloaded, and you will have to reload it the next time you want to print on it.
5. Select your paper category and type.
TIP: If you have loaded a paper type whose name does not appear in the paper list, see Paper type is not
in the driver on page 183.
6. When prompted by the front panel, insert the sheet into the front of the printer.
ENWW Load a single sheet 43
Page 52

7. Align the left-hand edge of the sheet with the blue line on the left-hand side of the printer.
8. Push the sheet into the printer until it will not go any further.
WARNING! Do not push your ngers inside the printer's paper path.
9. Guide the sheet into the printer until the printer beeps and starts pulling the paper.
10. The printer checks the alignment.
11. If the sheet is not correctly aligned, it is ejected, and you will have to try again.
NOTE: If you have an unexpected problem at any stage of the paper loading process, see Paper cannot be
loaded successfully on page 182.
44 Chapter 2 Paper handling ENWW
Page 53

The stacker
1. Basket
2. Stacker pivoting cover
3. Stacker
By default, the printer cuts the paper after every print job. The resulting printed sheet of paper is neatly stacked
on top of the other printed sheets by the stacker.
To empty the stacker, stand in front of the printer and pull the stack of printed sheets out of the stacker. The
stacker cover may open during this process; make sure that it is closed after you have removed the sheets.
Normally the return spring will close it automatically.
ENWW The stacker 45
Page 54

TIP: Although you can remove sheets from the stacker while the printer is printing, you are recommended to
remove all the prints together while the printer is not printing.
TIP: You can lock the stacker cover in the open position to collect special jobs. Make sure that you close it
afterwards.
TIP: If you want to use a photo paper for printing in normal printing mode to the stacker, you are
recommended to use an HP Instant-Dry Photo Paper.
TIP: For stacking papers below 75 gr/m2 activate the blue separators located in the laterals of the stacker
cover. Make sure you deactivate them when using the rest of papers.
Manual printing with the stacker open
The stacker's manual printing mode is designed to be used when you want the highest-quality print possible on
photo paper, and you are willing to stand in front of the printer to ensure it.
You can choose attended mode either for a particular job (for example, from the printer driver), or by putting the
printer into attended mode from the front panel.
● If you send a job with attended mode selected, the job is put on hold, and other jobs can continue printing,
until you select it for printing from the front panel (the front panel can guide you through this process) and
open the stacker cover.
● If you put the printer into manual mode from the front panel, all jobs in the queue are put on hold for
manual mode, and you can print them from the queue. When you exit manual mode, any jobs still in the
queue return to their previous status.
NOTE: When opening the stacker to enter manual mode, lock the stacker cover into the open position.
46 Chapter 2 Paper handling ENWW
Page 55

In manual mode:
● You can print only one page at a time. You must start each page manually from the front panel.
● You print with the stacker cover open, and stand in front of the printer to check the print as it emerges.
● With the stacker cover open, you have a better view of the print as it emerges, but the stacker cannot
guarantee that the print will follow the correct paper path, so you must watch over it to prevent possible
damage.
● You cannot scan or copy because the stacker cover is blocking the scanner.
● If the printer is left idle and in manual mode for more than 15 minutes, manual mode is cancelled, and you
are advised to close the stacker.
● You can exit manual mode from the front panel or by closing the stacker.
Manual mode is indicated in various front-panel screens by the icon.
To enter manual mode, on the front panel tap , then output options > top stacker > attended mode.
The basket
The stacker is normally used to collect prints. If you decide not to use the stacker, you can send your prints to the
basket. You may decide to use the basket if the stacker is full, or if you want to separate a job from the other
jobs printed to the stacker.
The basket can accept up to 10 A1 or D-sized sheets of bond paper. Larger prints should be removed from the
basket immediately after printing.
TIP: Ensure that you have routed all cables correctly, so that they do not interfere with paper falling into the
basket. Otherwise you may experience paper jams.
ENWW The basket 47
Page 56

View information about the paper
To view the loaded paper information, press , then the roll icon.
The following information is displayed on the front panel:
● The paper type you have selected
● Roll or sheet status
● Width of the paper in millimeters (estimated)
● Length of the paper in millimeters (estimated)
● Calibration status
The same information is displayed in the HP DesignJet Utility for Windows (Overview tab > Supplies tab) and the
HP Utility for Mac OS X (Information group > Supplies Status).
Paper presets
Each supported paper type has its own characteristics. For optimum print quality, the printer changes the way it
prints on each dierent paper type. For example, some may need more ink and some may require a longer
drying time. So the printer must be given a description of the requirements of each paper type. This description
is called the paper preset. The paper preset contains the ICC prole, which describes the color characteristics of
the paper; it also contains information on other characteristics and requirements of the paper that are not
directly related to color. Existing paper presets for your printer are already installed in the printer's software.
However, as it is inconvenient to scroll through a list of all paper types available, your printer only contains paper
presets for the most commonly used paper types. If you have a paper type for which your printer has no preset,
you cannot select that paper type.
There are two ways to assign a preset for a new paper type.
● Use one of the existing HP factory paper presets by selecting the closest category and type in the front
panel or the printer driver. See Paper type is not in the driver on page 183.
NOTE: Colors may not be accurate. This method is not recommended for high-quality prints.
● Download the correct paper preset from http://hp.globalbmg.com/paperpresets.
NOTE: HP provides presets for HP paper types only. If you do not nd the paper preset you want on the
Web, you may nd that it has been added to the latest rmware for your printer. You can check the
rmware release notes for information, see Update the rmware on page 168.
To install a downloaded paper preset
1. After nding the right paper preset at http://www.globalbmg.com/hp/paperpresets, or the paper
manufacturer's website, click the Download Now button and save the paper preset (an .oms le) on your
computer.
48 Chapter 2 Paper handling ENWW
Page 57

NOTE: If you do not nd the paper preset you want on the Web, you may nd that it has been added to
the latest rmware for your printer. You can check the rmware release notes for information, see Update
the rmware on page 168.
2. Before starting to install the new preset, make sure that the printer is idle and the print queue is stopped.
Installing a new paper preset will interrupt any printing that is in progress.
3. Start the HP DesignJet Utility or the Embedded Web Server.
● In the HP DesignJet Utility for Windows, select the Color Center and then Import Paper Preset.
● In the Embedded Web Server, click the Paper tab. In the Paper Management section, click the Import
Paper Preset tab.
4. On the Import page, select the paper preset le that you downloaded in step 1.
5. Click the Import button and wait for the update process to nish. It may take some time.
6. Check that the new paper type appears in the Additional paper or Custom paper category in your printer's
front panel.
Now that you have imported the paper preset, you can select the paper type from the front panel and from the
driver. The ICC prole for the new paper type is ready to use by your application.
Printing paper info
Enable the Printing paper info option to record the printer's estimate of the remaining roll length, paper width
and type. The information is a combination of barcode and text that is printed on the leading edge of the roll
when the paper is unloaded from the printer.
NOTE: The paper-length estimate is available only if the printer registered the amount of paper that was on
the roll when you loaded it. To provide this information to the printer, specify the roll length on the front panel
when loading the paper, or load a roll that has the paper-data barcode printed on it.
NOTE: The barcode and text are printed on the roll only when the loading and unloading processes are started
from the front panel's Paper menu.
NOTE: This option can be expected to work only with papers that are completely opaque. It may fail with
transparent or translucent papers.
To enable the Printing paper info option, go to the front panel and press , then Paper source > Printing paper
info > Enable.
NOTE: Enabling this option slightly changes the paper loading and unloading procedures.
Move the paper
If the printer is idle (ready to print), you can move the paper forwards or backwards from the front panel. You
may want to do this in order to have more or less white space between the last print and the next one when the
cutter is disabled; or to increase top margin of the next print.
ENWW Printing paper info 49
Page 58

To move the paper, press , then Paper source > Move paper.
Maintain paper
To maintain paper quality, follow the recommendations below.
● Store rolls covered by another piece of paper or cloth
● Store cut sheets covered and clean or brush them before loading them in the printer
● Clean input and output platens
● Keep the scanner lowered unless you need to lift it for some reason
NOTE: Photo and coated paper requires careful handling, see Print is scued or scratched on page 198.
Change the drying time
You may wish to change the drying time setting to suit special printing conditions such as multiple prints where
time is of higher importance or when you need to be sure ink is dry before handling.
Press , then Default printing conguration > Print retrieval > Drying time. You can select:
● Extended, to set a longer than recommended time to ensure ink is completely dry
● Optimal, to set the default and recommended time for your selected paper (this is the default setting)
● Reduced, to set a shorter than recommended time when quality is of lower importance
● None, to disable the drying time and remove your print as soon as it nishes printing
CAUTION: If the ink is not dry when the print is removed it could leave ink in the output tray and marks on the
print.
NOTE: If you cancel the drying time during a print, the printer may not feed and cut the paper right away due to
the printhead maintenance, which runs in parallel. If the dry time is zero, the printer cuts the paper and then
performs the printhead maintenance. However, if the dry time is greater than zero, the printer does not cut the
paper until after the printhead maintenance has completed.
Turn the automatic cutter on and o
To turn the printer's paper cutter on or o:
● From the front panel, press , then Default printing conguration > Cutter > Horizontal cutter.
The default setting is On.
If the cutter is turned o, it does not cut the paper between jobs, but continues to cut the paper on loading,
unloading, switching between rolls, and switching between the stacker and the basket.
TIP: To cut roll paper while the automatic cutter is disabled, see Clean cut on page 51.
50 Chapter 2 Paper handling ENWW
Page 59

Clean cut
If you go to the front panel and tap , then tap the cutter icon at the top of the page, the printer advances the
paper and makes a straight cut across the front edge. There are several possible reasons why you might want to
do this.
● To trim the leading edge of the paper if it is damaged or not straight. The cut strip falls into the basket.
● To feed and cut the paper when the automatic cutter has been disabled.
● To cancel the waiting time and print the available pages immediately, if the printer is waiting to nest more
NOTE: The printhead is serviced after each print, and the paper cannot be cut until the process completes, so
you may notice a delay.
NOTE: Photo and coated paper requires careful handling, see Print is scued or scratched on page 198.
TIP: To move the paper without cutting it, see Move the paper on page 49.
pages.
ENWW Clean cut 51
Page 60

3 Working with two rolls (T2600dr only)
●
Advantages of a multiroll printer
●
How the printer allocates jobs to paper rolls
52 Chapter 3 Working with two rolls (T2600dr only) ENWW
Page 61

Advantages of a multiroll printer
A multiroll printer can be useful in several dierent ways:
● The printer can automatically switch between dierent paper types according to your needs.
● The printer can automatically switch between dierent paper widths according to your needs. This enables
you to save paper by printing smaller images on narrower paper.
● If you load two identical rolls into the printer, you can leave it printing unattended for a long time, because
it can switch from one roll to the other automatically when the rst is exhausted. See Unattended printing/
overnight printing on page 77.
The current status of both rolls is shown on the front panel if you tap .
NOTE: Bear in mind that a paper type is protected from use unless that paper type is specically requested.
See Protect a paper type on page 77.
NOTE: If you use a paper not supported by your printer, you may nd that automatic switching is disabled, in
which case jobs sent to the standby roll are put on hold until the roll is manually unloaded.
NOTE: When you print from a USB ash drive, multiroll printing is considerably simplied: either you specify
manually which roll you want to use, or you can select Save paper, in which case the printer chooses the
narrowest roll on which the print will t. You cannot specify the paper type.
How the printer allocates jobs to paper rolls
When you submit a print job from the printer driver, you can specify (using the Paper type or Type is option) that
you want it to be printed on a particular paper type; you can even specify (using the Paper source, Source is or
Paper Feed option) that you want it to be printed on a particular roll (1 or 2). The printer will try to satisfy these
requirements, and it will also look for a paper roll large enough to print the image without clipping.
● If both rolls are suitable for the job, the roll will be chosen according to the roll switching policy. See Roll
policies on page 87.
● If just one of the rolls is suitable for the job, it will be printed on that roll.
● If neither roll is suitable for the job, it will be put on hold for paper, or printed on an unsuitable roll,
depending on the paper mismatch action. See Solve paper mismatch on page 88.
The printer driver for Windows will tell you which paper types and widths are currently loaded in the printer, and
on which rolls.
Here are some settings that may be used in typical situations.
NOTE: The Paper settings are in the printer driver; the Roll switching policy is set in the front panel.
● With dierent paper types loaded:
– Paper types: select the paper type you require
– Paper source: Use printer settings
– Roll switching policy: doesn't matter
● With dierent paper widths loaded:
ENWW Advantages of a multiroll printer 53
Page 62

– Paper type: Use printer settings
– Paper source: Use printer settings
– Roll switching policy: Minimize paper waste
TIP: You can also save paper in some cases by rotating or nesting your images. See Use paper
economically on page 74.
With identical rolls loaded:
●
–
Paper type: Use printer settings
– Paper source: Use printer settings
– Roll switching policy: Minimize roll changes
54 Chapter 3 Working with two rolls (T2600dr only) ENWW
Page 63

4 Networking
●
Introduction
●
Control network protocols
●
Front-panel menu items
●
Link conguration methods
●
Troubleshooting
ENWW 55
Page 64

Introduction
The printer provides a single RJ-45 connector port for a network connection. In order to meet Class B limits, the
use of shielded I/O cables is required.
The embedded Jetdirect print server supports connection to IEEE 802.3 10Base-T Ethernet, IEEE 802.3u
100Base-TX Fast Ethernet and 802.3ab 1000Base-T Gigabit Ethernet compliant networks. When connected and
powered on, the printer auto-negotiates with your network to operate with a link speed of 10, 100, or 1000
Mbps, and to communicate using full- or half-duplex mode. However, you can manually congure the link using
the printer's front panel, or through other conguration tools once network communication is established.
The printer can support multiple network protocols simultaneously, including TCP/IPv4 and TCP/IPv6. For
security, it includes features to control IP trac to and from the printer and supports conguration of IP Security
(IPsec) protocols.
Control network protocols
The printer can simultaneously support multiple network communication protocols. This allows network
computers that may be using dierent protocols to communicate with the same printer.
Each protocol may require some conguration before the printer can communicate on the network. For some
protocols, required parameters are automatically sensed and user-specied settings are not needed. However,
for other protocols, there may be many parameters to congure.
Enable or disable network protocols
If a network protocol is enabled, the printer may actively transmit on the network even when there are no
computers on the network that use the protocol. This may increase network trac. To eliminate unnecessary
trac, you can disable unused protocols. Disabling unused protocols lets you:
● Reduce network trac by eliminating broadcast messages from unused protocols
● Provide better control over who prints to the printer by eliminating users from other networks who might
route print jobs to this printer
● Display protocol-specic error conditions for enabled protocols only
To disable unused protocols through the device’s control panel menu, see Front-panel menu items on page 56.
More detailed control of network protocols is available in the printer's Embedded Web Server, in the Networking
section web pages. For other tools, such as system command access to the embedded Telnet server, see the
HP Jetdirect Print Server Administrator’s Guide for your print server model.
Front-panel menu items
To access the printer network conguration settings, go to the front panel and tap , then , then Network
> Gigabit Ethernet > Modify Conguration.
Menu item
Information Print Sec Report Yes: Prints a report.
Sub-menu item Sub-menu item Values and description
No (default): Does not print a report.
56 Chapter 4 Networking ENWW
Page 65

Menu item Sub-menu item Sub-menu item Values and description
TCP/IP Host Name An alphanumeric string, up to 32 characters, used to identify the device. This name is listed on
the HP Jetdirect conguration page. The default host name is NPIxxxxxx, where xxxxxx is the
last six digits of the LAN hardware (MAC) address.
IPV4 Settings Cong Method Species the method that TCP/IPv4 parameters will be congured on the HP Jetdirect print
server.
Bootp: Use BootP (Bootstrap Protocol) for automatic conguration from a BootP server.
DHCP (default): Use DHCP (Dynamic Host Conguration Protocol) for automatic conguration
from a DHCPv4 server. If selected and a DHCP lease exists, DHCP Release and DHCP Renew
menus are available to set DHCP lease options.
Auto IP: Use automatic link-local IPv4 addressing. An address in the form 169.254.x.x is
assigned automatically.
Manual: Use the Manual Settings menu to congure TCP/IPv4 parameters.
DHCP Release This menu appears if Cong Method was set to DHCP and a DHCP lease for the print server
exists.
No (default): The current DHCP lease is saved.
Yes: The current DHCP lease and the leased IP address are released.
DHCP Renew This menu appears if Cong Method was set to DHCP and a DHCP lease for the print server
exists.
No (default): The print server does not request to renew the DHCP lease.
Yes: The print server requests to renew the current DHCP lease.
Manual Settings (Available only if Cong Method is set to Manual) Congure parameters directly from the
printer control panel:
IP Address: The unique IP address of the printer (n.n.n.n).
Subnet Mask: The subnet mask for the printer (n.n.n.n).
Syslog Server: The IP address of the syslog server (n.n.n.n) used to receive and log syslog
messages.
Default Gateway: The IP address (n.n.n.n) of the gateway or router used for communications
with other networks.
Idle Timeout: The time period, in seconds, after which an idle TCP print data connection is
closed (default is 270 seconds, 0 disables the timeout).
Default IP Specify the IP address to default to when the print server is unable to obtain an IP address
from the network during a forced TCP/IP reconguration (for example, when manually
congured to use BootP or DHCP).
Auto IP: A link-local IP address 169.254.x.x is set.
Legacy: The address 192.0.0.192 is set, consistent with older HP Jetdirect devices.
Primary DNS Specify the IP address (n.n.n.n) of a Primary DNS Server.
NOTE: This item appears only if Manual conguration is a higher priority than DHCP in the
Cong. Precedence table, congured through the embedded Web server.
Secondary DNS Specify the IP address (n.n.n.n) of a Secondary Domain Name System (DNS) Server.
NOTE: This item will appear only if Manual conguration is a higher priority than DHCP in the
Cong. Precedence table, congured through the embedded Web server.
ENWW Front-panel menu items 57
Page 66

Menu item Sub-menu item Sub-menu item Values and description
IPV6 Settings Enable Use this item to enable or disable IPv6 operation on the print server.
O: IPv6 is disabled.
On (default): IPv6 is enabled.
Address Use this item to manually congure an IPv6 address.
Manual Settings: Use the Manual Settings menu to enable and manually congure a TCP/ IPv6
address.
Enable: Select this item and choose On to enable manual conguration, or O to disable
manual conguration.
Address: Use this item to type a 32 hexadecimal digit IPv6 node address that uses the colon
hexadecimal syntax.
DHCPV6 Policy Router Specied: The stateful auto-conguration method to be used by the print server is
determined by a router. The router species whether the print server obtains its address, its
conguration information, or both from a DHCPv6 server.
Router Unavailable: If a router is not available, the print server should attempt to obtain its
stateful conguration from a DHCPv6 server.
Always: Whether or not a router is available, the print server always attempts to obtain its
stateful conguration from a DHCPv6 server.
Primary DNS Use this item to specify an IPv6 address for a primary DNS server that the print server should
use.
NOTE: This item will appear only if Manual conguration is a higher priority than DHCP in the
Cong Precedence table, congured through the embedded Web server.
Secondary DNS Use this item to specify an IPv6 address for a secondary DNS server that the print server
should use.
NOTE: This item will appear only if Manual conguration is a higher priority than DHCP in the
Cong Precedence table, congured through the embedded Web server.
Proxy Server Species the proxy server to be used by embedded applications in the device. A proxy server is
typically used by network clients for Internet access. It caches Web pages, and provides a
degree of Internet security, for those clients.
To specify a proxy server, enter its IPv4 address or fully-qualied domain name. The name can
be up to 255 octets.
For some networks, you may need to contact your Independent Service Provider (ISP) for the
proxy server address.
Proxy Port Type the port number used by the proxy server for client support. The port number identies
the port reserved for proxy activity on your network, and can be a value from 0 to 65535.
Security Print Sec Page Yes: Prints a page that contains the current IPsec security settings on the HP Jetdirect print
server.
No (default): A security settings page is not printed.
58 Chapter 4 Networking ENWW
Page 67

Menu item Sub-menu item Sub-menu item Values and description
Secure Web For conguration management, specify whether the embedded Web server will accept
communications using HTTPS (Secure HTTP) only, or both HTTP and HTTPS.
HTTPS Required: For secure, encrypted communications, only HTTPS access is accepted. The
print server will appear as a secure site.
HTTP/HTTPS optional: Access using either HTTP or HTTPS is permitted.
NOTE: The factory default setting depends on the print server model.
IPSEC Specify the IPsec or Firewall status on the print server.
Keep: IPsec/Firewall status remains the same as currently congured.
Disable: IPsec/Firewall operation on the print server is disabled.
802.1x
Enable Wipe
Reset Security Specify whether the current security settings on the print server will be saved or reset to
factory defaults.
No (default): The current security settings are maintained.
Yes: Security settings are reset to factory defaults.
Link Speed The link speed and communication mode of the print server must match the network. The
available settings depend on the device and installed print server. Select one of the following
link conguration settings:
Link conguration methods
The printer supports 10, 100, or 1000 Mbps network link speeds using full-duplex or half-duplex communication
modes (a 1000T half-duplex selection is not supported). By default, it will attempt to auto-negotiate its link
operation with the network.
When connecting to network hubs and switches that do not support auto-negotiation, the printer will congure
itself for 10 Mbps or 100 Mbps half-duplex operation. For example, when connected to a non-negotiating 10
Mbps hub, the print server will automatically set itself to operate at 10 Mbps half-duplex.
CAUTION: If you change the link setting, network communications with the print server and
network device might be lost.
Auto (default): The print server uses auto-negotiation to congure itself with the highest link
speed and communication mode allowed. If auto-negotiation fails, either 100TX HALF or 10TX
HALF is set depending on the detected link speed of the hub/switch port. (A 1000T half-duplex
selection is not supported.)
10T Half: 10 Mbps, half-duplex operation.
10T Full: 10 Mbps, Full-duplex operation.
100TX Half: 100 Mbps, half-duplex operation.
100TX Full: 100 Mbps, full-duplex operation.
100TX Auto: Limits auto-negotiation to a maximum link speed of 100 Mbps.
1000TX Full: 1000 Mbps, full-duplex operation.
ENWW Link conguration methods 59
Page 68

If the printer is not able to connect to the network through auto-negotiation, you can set the link setting by one
of the following methods:
● The front panel
● The Embedded Web Server
● The Telnet interface, through a system command prompt
● Network management tools such as HP Web Jetadmin
Troubleshooting
IO Conguration card
The IO Conguration card provides comprehensive print server status. The information provided is an important
diagnostic tool, especially if network communication is not available. For a description of messages that may
appear on the card, see the HP Jetdirect Print Servers Administrator’s Guide for your print server model.
For detailed connectivity information, go to the Connectivity menu and click Network card or Services card to see
all the information available.
The network card provides details about the network conguration and status. The services card provides
information about the state of connections to HP services, such as HP ePrint.
To verify correct operation:
1. On the network card, look for the status message I/O Card Ready.
2. If I/O Card Ready appears, the print server is operating properly. Proceed to the next section.
If a message other than I/O Card Ready appears, try the following:
a. Turn the printer o and then on again to re-initialize the print server.
b. Check that the status indicator lights (LEDs) are providing proper status.
See the HP Jetdirect Print Servers Administrator’s Guide for your print server model to interpret and troubleshoot
other messages.
Reset network parameters
If you accidentally miscongured the printer’s network settings, they can be reset to factory default values by
tapping , then , then Network > Restore connectivity factory settings.
CAUTION: A factory-installed HP Jetdirect X.509 certicate will be saved during reset to factory default values.
However, a Certicate Authority (CA) certicate that has been installed by the user to validate a network
authentication server will not be saved.
60 Chapter 4 Networking ENWW
Page 69

Link troubleshooting
The printer has status lights (LEDs) beside the network connector that indicate the link status and network
activity.
● When the green light is on, the printer has successfully linked to the network.
● When the yellow light is blinking, there is network transmission activity.
If the printer does not successfully connect to the network:
● Both LEDs will be o.
● The alert No network cable connected will appear on the front panel.
If a link failure is indicated, try the following:
1. Check the cable connections at both ends.
2. Consider replacing the cables by known good ones.
3. Consider switching to another network connector in the network switch, hub, or device to which the printer
is connected.
4. Manually congure the link setting to match the port conguration of the network hub or switch. For
manual conguration methods, see Link conguration methods on page 59. Turn the printer o, then on
again, to re-initialize the setting.
5. Print a Connectivity Conguration page and check link settings.
Item Description
Port Cong If the printer is properly linked, this item has one of the following values:
● 10BASE-T HALF: 10 Mbps, half-duplex
● 10BASE-T FULL: 10 Mbps, full-duplex
● 100TX-HALF: 100 Mbps, half-duplex
● 100TX-FULL: 100 Mbps, full-duplex
● 1000TX FULL
If the printer is not properly linked, one of the following messages will appear:
● UNKNOWN: The printer is in an initialization state.
● DISCONNECTED: A network connection has not been detected. Check network cables. Recongure the
link settings, or restart the printer.
Auto Negotiation Indicates whether auto-negotiation for link conguration is on or o.
● ON (default): The printer will attempt to automatically congure itself onto the network at the proper
speed and communication mode.
● OFF: You must manually congure the link speed and communication mode using the front panel. Your
settings must match those of the network for proper operation.
. In case of doubt or misconguration of link settings, reset the network parameters to their factory settings.
6
See Reset network parameters on page 60.
ENWW Troubleshooting 61
Page 70

Communication failures between computer and printer
Some symptoms are:
● The front-panel display does not show the Received jobs message when you have sent jobs to the printer.
● Your computer displays an error message when you are trying to print.
● Your computer or printer hangs (stays idle), while communication is taking place.
● Print jobs get stuck in your computer’s print spooler.
● Your printed output shows random or inexplicable errors (misplaced lines, partial graphics, and so on).
To solve a communication problem:
● Ensure that you have selected the correct printer when sending your job.
● Ensure that the printer works correctly when printing from other applications.
● If your printer is connected to your computer through any other intermediate devices, such as switch
boxes, buer boxes, cable adapters, or cable converters, try using it when connected directly to your
computer.
● Try another network cable.
● Remember that very large prints may take some time to receive, process and print.
● If your printer displays warning or error messages that require action, take the required action before
trying to print.
Cannot access the Embedded Web Server
1. If you have not done so already, read Embedded Web Server on page 15.
2. Make sure that Embdedded Web Server functionality is enabled in the printer: from the front panel, tap
, then Security > Connectivity > Embedded Web Server (EWS) > On.
3. Check the proxy conguration in your Web browser in case it is preventing communication with the printer.
4. Ensure that the printer works correctly when printing or accessed from other applications.
5. If the printer displays warning or error messages that require further action, take the action to resolve the
problems.
6. If all else fails, turn the printer o and on again with the power key on the front panel.
Cannot access the printer from the HP Utility
1. If you have not done so already, read HP Utility on page 13.
2. Make sure your printer is not in sleep mode.
3. Make sure your printer driver is available and working correctly for the HP Utility in Windows.
4. From the front panel, tap , then Security > Web services > Printing & management, and make sure that
it is enabled. If it is disabled, some parts of the HP Utility may not work properly.
62 Chapter 4 Networking ENWW
Page 71

Print jobs take too much time to be received by the printer
If you send a very large print to the printer, there will normally be some delay before it starts printing. However,
if you think you are experiencing abnormally long delays, there are various things you could check:
● Make sure the network cable connected to the printer is rated at least Cat5e.
● Make sure that gigabit-speed networking equipment and cabling interconnects your computer client to the
printer.
● Make sure that there are no network link issues. See Link troubleshooting on page 61.
● Take into account that, in network deployments with IPSec security protocols enabled and congured in the
printer, network performance may be reduced due to the use of cryptographic algorithms to protect
network communications.
● Try resetting the network conguration to its factory settings in order to get default settings that are
suitable for most standard network environments. See Reset network parameters on page 60.
● You may also nd it helpful to test connecting the computer to the printer directly, using a normal Ethernet
(Cat5e or Cat6) cable point-to-point, without passing through an Ethernet switch or router. In this
conguration, the printer and the computer should both automatically change their IPv4 addresses to the
form 169.254.x.x . In this point-to-point conguration you can discard any issues caused by other network
equipment.
ENWW Troubleshooting 63
Page 72

5 Printing
●
Introduction
●
Print from a USB ash drive
●
Print from the network folder
●
Print from a computer using a printer driver
●
Advanced print settings
64 Chapter 5 Printing ENWW
Page 73

Introduction
There are various dierent ways in which you can choose to print, depending on your circumstances and
preferences:
● Print a TIFF, JPEG, HP-GL/2, RTL, PDF, or PostScript le directly from a USB ash drive. See Print from a USB
ash drive on page 65.
● Print a TIFF, JPEG, HP-GL/2, or PDF le directly from a computer connected to the printer, using HP Click.
See http://www.hp.com/go/DesignJetclick.
● Print any kind of le from a computer connected to the printer, using a software application that can open
the le, and a printer driver supplied with your printer. See Print from a computer using a printer driver
on page 67.
● Print from a smartphone or tablet. See Mobile printing on page 79.
● Print from a network folder. See Print from the network folder on page 66.
Print from a USB ash drive
1. Insert a USB ash drive containing one or more TIFF, JPEG, HP-GL/2, RTL, PDF, or PostScript les into the
printer's USB port.
NOTE: To print PDF or PostScript le, you must have a PostScript printer.
NOTE: The use of USB ash drives with your printer may be disabled by the administrator.
2. At the front panel, go to the home page and tap .
You can tap folders to browse their contents. Files are shown as document thumbnails, and you can
preview a le by tapping the preview icon. When the preview is displayed, you can zoom in and out. Files
that cannot be printed are indicated with . For more details, press the information button.
3. Select .
4. Select a le to be printed. A preview of the document is displayed. Multipage documents are supported
only in PDF les; in this case, you can also select a page to print. Use the toolbar buttons to zoom in and
out to see information about the selected job. You can also choose the predened zoom modes t to
screen, pinch to zoom or original document size. Press OK to go to the quickset selection.
ENWW Introduction 65
Page 74

5. The list of print-from-USB quicksets is displayed. You can choose and/or edit one of the quicksets for the
selected job.
NOTE: If you edit a quickset after selecting a job, the changed settings are applied only to the current job
and are not saved permanently. You can change any of your own quicksets permanently by tapping ,
then manage quicksets, or by tapping , then Quicksets.
NOTE: The factory quicksets cannot be modied.
The following settings are available:
● Quickset name allows you to name the quickset you are working with.
● Print quality allows you to set the print quality to Fast, Normal, or Best.
● Output scale allows you to resize the print in two dierent ways: to a percentage of its original size, or
to t a particular paper size. The default is 100% (its original size).
● Color options allows you to choose color or grayscale.
● Paper source allows you to specify printing on roll 1 or roll 2, or you can choose Save paper, which
automatically chooses the narrowest roll on which the print will t (if two rolls are loaded).
● Paper category allows you to choose the type of paper.
● Page order allows you to choose rst page on top, or last page on top.
● Collate allows you to turn collation on or o.
● Rotation allows you to rotate the print by any multiple of 90°, or you can choose Automatic, which
rotates the print automatically if that will save paper.
● Print margins allows you to change the default printer margins.
● Storage mode oers two options, print and delete (the job is not retained in the job queue) and print
and store (the job is retained in the job queue).
● Output destination.
6. When you are satised with the quickset settings, tap OK to continue. You can tap , then show quickset
details panel to show the most common quickset settings used.
7. Copies, Page order, and Collate can be selected in the right column of the screen. Tap Print to continue.
8. After printing, you can choose to print another le or go to the job queue. If you print another le
immediately without returning to the home page, the temporary settings used for the previous le are
used again.
Print from the network folder
1. Conrm the network folder is congured. See Congure a network folder on page 21.
2. At the front panel, go to the home page and tap
3. Select Network.
66 Chapter 5 Printing ENWW
Page 75

4. Select a le to be printed. Multipage documents are only supported in PDF; in this case, you can also select
a page to print.
5. The list of print-from-Network quicksets is displayed. You can choose and/or edit one of the quicksets for
the selected job.
NOTE: If you edit a quickset after selecting a job, the changed settings are applied only to the current job
and are not saved permanently. You can change any of your own quicksets permanently by tapping ,
then manage quicksets, or by tapping , then Quicksets.
NOTE: The factory quicksets cannot be modied.
The following settings are available:
● Quickset name allows you to name the quickset you are working with.
● Print quality allows you to set the print quality to Fast, Normal, or Best.
● Output scale allows you to resize the print in two dierent ways: to a percentage of its original size, or
to t a particular paper size. The default is 100% (its original size).
● Color options allows you to choose color or grayscale.
● Paper source allows you to specify printing on roll 1 or roll 2, or you can choose Save paper, which
automatically chooses the narrowest roll on which the print will t (if two rolls are loaded).
● Paper category allows you to choose the type of paper.
● Page order allows you to choose rst page on top, or last page on top.
● Collate allows you to turn collation on or o.
● Rotation allows you to rotate the print by any multiple of 90°, or you can choose Automatic, which
rotates the print automatically if that will save paper.
● Print margins allows you to change the default printer margins.
● Storage mode oers two options, print and delete (the job is not retained in the job queue) and print
and store (the job is retained in the job queue).
● Output destination.
6. When you are satised with the quickset settings, tap OK to continue. You can tap , then show quickset
details panel to show the most common quickset settings used.
7. Copies, Page order, and Collate can be selected in the right column of the screen. Tap Print to continue.
8. After printing, you can choose to print another le or go to the job queue. If you print another le
immediately without returning to the home page, the temporary settings used for the previous le are
used again.
Print from a computer using a printer driver
This is the traditional way of printing from a computer. The correct printer driver must be installed on the
computer (see Install your printer under Windows on page 17), and the computer must be connected to the
printer.
ENWW Print from a computer using a printer driver 67
Page 76

When the printer driver has been installed and the computer is connected to the printer, you can print from a
software application by using the application's own Print command and selecting the correct printer.
Advanced print settings
The rest of this chapter explains the various print settings that you can use when printing with a printer driver or
the front panel. These methods oer a relatively large number of settings in order to satisfy all requirements.
TIP: In general you are recommended to use the default settings unless you know that they do not meet your
requirements.
TIP: If you intend to reuse a particular group of settings repeatedly, you can save those settings under a name
of your own choice and recall them later. A saved group of settings is known as a 'quick set' in the Windows
printer driver, and as a 'preset' in the Mac OS printer driver.
Select print quality
The printer has various print-quality options because best-quality printing requires some loss of speed, while
fast printing implies some reduction in print quality.
Therefore, the standard print-quality selector is a slider that allows you to choose between quality and speed.
With some paper types, you can choose a compromise position between the two.
Alternatively, you can select from the custom options: Best, Normal and Fast. If you select Fast, you can also
select Economode, which uses a lower rendering resolution and consumes less ink. It therefore increases
printing speed even further, but reduces print quality. Economode can be selected only from the custom options
(not from the slider).
There is also a supplementary custom option that may have an eect on print quality: Maximum detail. See
High-quality printing on page 73.
NOTE: In the Windows driver dialog, the rendering resolution for your job is displayed in the Custom Print
Quality Options dialog box (click Custom options > Settings).
68 Chapter 5 Printing ENWW
Page 77

You can select print-quality options in the following ways:
● In the Windows driver dialog: Go to the Paper/Quality or Paper tab (depending on the driver version) and
look at the Print Quality section. If you use Standard Options, you will see a simple slider with which you
can select speed or quality. If you use Custom Options or Advanced (depending on the driver version), you
will see the more specic options described above.
● Using the front panel: Tap , then Default printing conguration > Print quality.
NOTE: If the print quality is set from your computer, it overrides the print-quality setting in the front
panel.
NOTE: You cannot change the print quality of pages that the printer is already receiving or has already received
(even if they have not started to print yet).
Select paper size
The paper size can be specied in the following ways.
NOTE: The paper size specied here should be the paper size in which the document was created. It is possible
to rescale the document to a dierent size for printing. See Rescale a print on page 72.
● In the Windows driver dialog: Select the Paper/Quality or Paper tab (depending on the driver version), then
select your paper size from the Document Size list.
NOTE: If you are printing with the V4 driver and from Adobe Acrobat, the page size and orientation are
determined by the application.
NOTE: If your application oers no Page Setup dialog, use the Print dialog.
● Using the front panel: tap , then Default printing conguration > Paper options > Paper size.
NOTE: If the paper size is set from your computer, it overrides the paper size setting in the front panel.
ENWW Advanced print settings 69
Page 78

Custom paper sizes
If you want to choose a paper size that is not included in the list of standard paper sizes, there are various
dierent ways to specify it.
Use the Windows printer driver (version 3)
1. Click the Paper/Quality tab.
2. Click Custom.
3. Enter the name and dimensions of your new paper size.
4. Click OK. The new paper size is automatically selected.
Use the Windows printer driver (version 4)
1. Click the Paper tab.
2. Click Document size.
3. Enter the dimensions of your new paper size into the two elds in the custom area.
4. Click the arrow button.
A custom paper size created with the printer driver has the following characteristics:
● The paper size is permanent. It will not disappear if the driver is closed or the computer is turned o.
● The paper size is local to the printer queue. It will not be seen from other printer queues in the same
computer.
● In Domain server networks, the paper size is local to the computer. It will not be seen from other computers
sharing the printer queue.
● In Workgroup networks, the paper size will be shared among all the computers sharing the printer queue.
● If the printer queue is deleted, the paper size is deleted with it.
Use Windows forms
1. From the Start menu, or from the Control Panel, select Printers and Faxes.
2. From the File menu, select Server Properties.
3. In the Forms tab, check the Create a new form box.
4. Enter the name and dimensions of your new paper size. Leave the margins as 0.00.
5. Click the Save Form button.
6. Go to the printer driver, and select the Paper/Quality or Paper tab (depending on the driver version).
7. Select More… from the drop-down list of paper sizes.
8. Select your new paper size from the group of Custom sizes.
70 Chapter 5 Printing ENWW
Page 79

A custom paper size created with Windows forms has the following characteristics:
● The paper size is permanent. It will not disappear if the driver is closed or the computer is turned o.
● Restricted users cannot create paper forms. The “manage documents” role in the Windows Active Directory
is the minimum required.
● The paper size is local to the computer. It will be seen in all the printer queues that have been created on
the computer and that support paper of that size.
● If a printer queue is shared, this paper size will appear in all the client computers.
● If a printer queue is shared from another computer, this paper size will not appear on the driver´s
document size list. A Windows form in a shared queue needs to be created in the server.
● If the printer queue is deleted, the paper size is not deleted.
Select margin options
By default, the printer leaves a 3 mm margin between the edges of your image and the edges of the paper
(increased to 17 mm at the foot of cut-sheet paper). However, you can change this behavior in several ways.
Choose between 3 and 5 mm margins
● In the Windows V3 driver dialog: Select the Advanced tab, then click Advanced features > Document
options > Printer features > Margin, and select the margin size.
● In the Windows V4 driver dialog: Select the Layout tab and select your margins from the With Margins list.
● Using the front panel: Tap , then Default Printing Conguration > Margins.
Choose margin layout options
● In the Windows V3 driver dialog: Select the Paper/Quality tab, and click the Margins/Cutter Settings button.
The Layout and Margins window is displayed.
● In the Windows V4 driver dialog: Select the Layout tab and go to the Layout Mode area.
● Using the front panel: Tap , then Default printing conguration > Margins layout.
You will then see at least some of the following options.
● Use application settings (drivers)/Use standard (front panel). Your image will be printed on a page of the
size you have selected, with a narrow margin between the edges of the image and the edges of the paper.
The image should be small enough to t between the margins.
● Oversize. Your image will be printed on a page slightly larger than the size you have selected. If you cut o
the margins, you will be left with a page of the size you selected, with no margins remaining between your
image and the edges of the paper.
● Clip contents by margins. Your image will be printed on a page of the size you have selected, with a narrow
margin between the edges of the image and the edges of the paper. In this case, if the image is the same
size as the page, the printer assumes that the extreme edges of the image are either white or unimportant,
and do not need to be printed. This may be useful when your image already contains a border.
ENWW Advanced print settings 71
Page 80

Print on loaded paper
To print a job on whichever paper is loaded in the printer, choose the following Paper Type option in your printer
driver:
● In the Windows driver dialog: Select the Paper/Quality or Paper tab (depending on the driver version), then
select Use Printer Settings in the Paper Type drop-down list.
NOTE: Use Printer Settings (Windows).
Rescale a print
You can send an image to the printer at a certain size but tell the printer to rescale it to a dierent size (normally
larger). This may be useful:
● If your software does not support large formats
● If your le is too large for the printer's memory—in this case, you can reduce the paper size in your
software and then scale it up again using the front-panel option
You can rescale an image in the following ways:
● In the Windows driver dialog: Go to the Layout Output or Layout tab (depending on the driver version) and
look at the Resizing Options section.
– The Actual size option leaves the size of the image unchanged.
– The Fit to option adjusts the image size to the paper size you have selected. For example, if you have
selected ISO A2 as the paper size and you print an A3-sized image, it is enlarged to t the A2 paper. If
the ISO A4 paper size is selected, the printer reduces a larger image to t the A4 size.
– The % of actual size or Scale % option (depending on the driver version) enlarges the printable area of
the original paper size (the page minus the margins) by the percentage indicated, then adds the
margins to create the output paper size.
● Using the front panel: Tap , then Default printing conguration > Paper options > Resize.
If you are printing to a single sheet, you must ensure that the image can actually t onto the sheet, otherwise
the image will be clipped.
Change the treatment of overlapping lines
NOTE: This topic applies only when printing an HP-GL/2 job.
The merge option controls the overlapping lines in an image. There are two settings:
● O: Where the lines cross, only the color of the top line is printed. This is the default setting.
● On: Where the lines cross, the colors of the two lines merge.
To turn merge on, go to the front panel and tap , then Default printing conguration > HP-GL/2 options >
Merge. You can set the merge option from your software in some applications. Settings in your software override
the front-panel settings.
72 Chapter 5 Printing ENWW
Page 81

Preview a print
Previewing a print on the screen allows you to check the layout of the print before printing, which may help you
to avoid wasting paper and ink on a bad print.
● To preview a print under Windows, you have the following options:
– Use the HP Print Preview application:
– Use your application's print preview option.
● To preview a print under Mac OS X, you have the following options:
– Use your application's print preview option.
– A print preview is always shown on the print dialog box for most applications.
Check the Show preview before printing box, which you can nd in the right bottom corner of the
driver dialog. Click Print, then wait a few seconds for the HP Print Preview application to be launched.
Check that the preview of the job is what you wanted. If so, click Print, otherwise click Cancel; you can
readjust the driver settings before trying again.
NOTE: The Show preview before printing box appears in the driver dialog only if HP Print Preview is
installed in your computer. See HP Print Preview on page 14.
Print a draft
You can specify fast draft-quality printing in the following ways:
● In the Windows driver dialog: Go to the Paper/Quality or Paper tab (depending on the driver version) and
look at the Print Quality section. Move the print-quality slider to the extreme left ('Speed').
● Using the front panel: Tap , then Default printing conguration > Print quality > Select quality level >
Fast.
You can specify even faster draft-quality printing by using Economode, as follows. This is intended mainly for
documents containing only text and line drawings.
● In the Windows driver dialog: Go to the Paper/Quality or Paper tab (depending on the driver version) and
look at the Print Quality section. Select Custom Options or Advanced (depending on the driver version),
then set the quality level to Fast and check the Economode box.
● Using the front panel: Tap , then Default printing conguration > Print quality > Enable economode.
NOTE: If the print quality is set from your computer, it overrides the print-quality setting in the front panel.
High-quality printing
You can specify high-quality printing in the following ways:
● In the Windows driver dialog: Go to the Paper/Quality or Paper tab (depending on the driver version) and
look at the Print Quality section. Move the print-quality slider to the extreme right ('Quality').
● Using the front panel: Tap , then Default printing conguration > Quality level > Best.
NOTE: If the print quality is set from your computer, it overrides the print-quality setting in the front panel.
ENWW Advanced print settings 73
Page 82

If you have a high-resolution image
If your image has a resolution greater than the rendering resolution (which you can see in the Custom Print
Quality Options box under Windows), print sharpness may be improved by selecting the Maximum detail option.
This option is available only if you are printing on glossy paper and you have selected Best print quality.
● Using the front panel: Tap , then Default printing conguration > Print quality > Enable maximum detail.
NOTE: The Maximum detail option results in slower printing with photo papers, but it does not increase the
amount of ink used.
Print in gray shades
You can convert all colors in your image to shades of gray: see Printing in grayscale on page 123.
Print with crop lines
Crop lines indicate where the paper should be cut to reduce it to your selected page size. You can print crop lines
with individual jobs in the following ways:
● In the Windows V3 driver dialog: Select the Paper/Quality tab, then click the Margins/Cutter Settings button.
Check the Draw cutting lines box in the Layout and Margins window.
● In the Windows V4 driver dialog: Select the Output tab and check the Crop lines box.
Alternatively, you can choose to print crop lines with all jobs by default:
● Using the front panel: Tap , then Default printing conguration > Paper options > Enable crop lines > On.
To print crop lines with nested jobs (see Nest jobs to save roll paper on page 75), you must select a dierent
option:
● Using the front panel: Tap , then Job management > Nest options > Enable crop lines > On.
Use paper economically
Here are some recommendations for making economical use of paper:
● If you are printing relatively small images or document pages, you can use nesting to print them side by
side instead of one after another. See Nest jobs to save roll paper on page 75.
● You may be able to save some roll paper by using the following options:
– In the Windows driver dialog:
○ With a version 3 driver: Click the Paper/Quality tab, then the Margins/Cutter Settings button,
then check the box Remove blank areas.
○ With a version 4 driver: Click the Output tab, then Roll options, then check the box Remove blank
areas.
You can also select the Layout/Output or Layout tab (depending on the driver version) and then select
one of the Rotation options.
● If you check the print preview on your computer before printing, you can sometimes avoid wasting paper
on prints containing obvious mistakes. See Preview a print on page 73.
74 Chapter 5 Printing ENWW
Page 83

Nest jobs to save roll paper
Nesting means automatically printing images or document pages side by side on the paper, rather than one
after the other. This is done to avoid wasting paper.
1. Direction of paper ow
2. Nesting o
3. Nesting on
4. Paper saved by nesting
When does the printer try to nest pages?
When both of the following are true:
● The printer is loaded with roll paper, not sheet paper.
● The printer's Nest option is turned on. See How to turn nesting on and o on page 76.
What pages can be nested?
All pages can be nested, unless they are so large that two of them cannot t side by side on the roll, or unless
there are too many of them to t into the remaining length of the roll. A single group of nested pages cannot be
split between two rolls.
Which pages qualify for nesting?
In order to be in the same nest, the individual pages must be compatible in all of the following ways:
● All pages must have the same print quality setting (Economode, Fast, Normal or Best).
● The Maximum Detail setting must be the same on all pages.
● The Layout/Margins setting must be the same for all pages.
● The Mirror Image setting must be the same for all pages.
● The Rendering Intent must be the same for all pages.
● The Cutter setting must be the same for all pages.
● Pages must be all color, or all grayscale: not some in color and some in grayscale.
ENWW Advanced print settings 75
Page 84

● All pages must be in one or other of the following two groups (the two groups cannot be mixed in the same
nest):
– PCL3, RTL, TIFF, JPEG
– PostScript, PDF
● JPEG and TIFF pages with resolutions greater than 300 dpi may not nest with other pages in some cases.
How to turn nesting on and o
To turn nesting on or o, you must rst make sure that the start of printing is set to After Processing (see Select
when to print a job on page 87).
Then go to the front panel and tap , then Job management > Nest options > Nesting.
You will see the following options:
● In order: Pages are nested in the order in which they are sent to the printer (this is the default option). The
nested pages are printed as soon as one of three conditions is met:
– The next page will not t on the same row as the other pages already nested.
– No page has been sent to the printer during the specied wait time.
– The next page is incompatible with the pages already nested (see Nest jobs to save roll paper
on page 75).
● Optimized order: Pages are not necessarily nested in the order in which they are sent to the printer. When it
receives an incompatible page, the printer holds it and waits for compatible pages to complete the nest.
The nested pages are printed as soon as one of three conditions is met:
– The next page will not t on the same row as the other pages already nested.
– No page has been sent to the printer during the specied wait time.
– The incompatible-page queue is full. The printer can queue up to six incompatible pages while
nesting compatible pages. If it receives a seventh incompatible page, the nest is printed as it is.
● O: nesting is disabled.
TIP: Optimized order uses the minimum amount of paper; however, it may take longer to print because the
printer waits for compatible pages to arrive.
How long does the printer wait for another le?
So that the printer can make the best nest possible, it waits after a le has been received to check whether a
subsequent page will nest with it or with pages already in the queue. This waiting period is the nest wait time;
the factory default nest wait time is 2 minutes. This means that the printer waits for up to 2 minutes after the
last le is received before printing the nal nest. You can change this waiting time from the printer's front panel:
tap
While the printer is waiting for nesting to time out, it displays the remaining time on the front panel and in the
Embedded Web Server.
, then Job management > Nest options, and select the wait time. The available range is 1 to 99 minutes.
76 Chapter 5 Printing ENWW
Page 85

Use ink economically
Here are some recommendations for making economical use of ink:
● For draft prints, use plain paper and move the print-quality slider to the left end of the scale ('Speed'). For
further economy, select custom print quality options, then select Fast and Economode.
● Clean the printheads only when needed, and clean only those printheads that need cleaning. Cleaning the
printheads can be useful, but it uses a small amount of ink.
● Leave the printer permanently turned on so that it can maintain the printheads in good condition
automatically. This regular printhead maintenance uses a small amount of ink. However, if it is not done,
the printer may need to use much more ink later to restore the health of the printheads.
● Wide prints make more ecient use of ink than narrow prints, because printhead maintenance uses some
ink, and its frequency is related to the number of passes made by the printheads. Therefore, nesting jobs
can save ink as well as saving paper (see Nest jobs to save roll paper on page 75).
Protect a paper type
You can protect selected paper types to avoid printing on them unintentionally. A protected paper type will be
printed on only when the paper type is explicitly specied in the job.
To protect a paper type, tap , then Job management > Roll policies > Paper Type Protection, then select the
category of paper you want to protect.
When a paper type is protected, the icon appears before the paper name.
To print on a protected paper category, just select the paper type explicitly when submitting the job from a
printer driver or other job submission software.
NOTE: If a protected paper type is not explicitly selected, and no other paper types are available, an out-of-
paper message will appear.
Unattended printing/overnight printing
The printer is well suited to long, unattended print jobs, having multiple rolls plus robust and consistent image
quality.
Here are some recommendations to help you deal with a long queue of printing jobs.
● If feasible, use brand-new long rolls of paper.
● If you want to print on partly-used rolls, you can check the paper type and the remaining length in the
Embedded Web Server or in the front panel, to conrm that you have enough paper to print all your jobs.
NOTE: Information on the remaining length is available only if you told the printer the length of the roll
when you loaded it, or if the printer read the length of the roll from the barcode printed on it.
● If you have a T2600dr printer, load two rolls of paper suitable for your jobs. If the printer nishes one roll, it
will automatically switch to the other.
● HP recommends the use of papers approved for your printer. See Supplies and accessories on page 175.
● Check that you have paper wide enough to print all of your jobs. Any jobs that are too wide may be put on
hold for paper if the paper mismatch action is set to Put job on hold (see Solve paper mismatch
on page 88).
ENWW Advanced print settings 77
Page 86

● Check the ink levels remaining in your ink cartridges.
● When you have submitted your print jobs, you can use the Embedded Web Server from a remote location
to monitor their status.
● Drying time should be set to Optimal.
● T2600dr only: Tap , then Job management > Roll policies > Use most depleted roll > On.
We recommend the following settings, depending on the paper type and what kind of prints you are making.
Recommended settings for unattended printing
Print type Print mode Maximum detail Drying time Paper types
Lines Normal O Optimal Coated, Bond, Heavyweight
Coated, Glossy
Lines and lls Normal O Optimal Coated, Bond, Heavyweight
Coated, Glossy
Maps Best O Optimal Coated, Heavyweight Coated,
Glossy
Renderings, photographs Best O Optimal Coated, Heavyweight Coated,
Glossy
78 Chapter 5 Printing ENWW
Page 87

6 Mobile printing
●
Introduction
●
Print from Android
●
Print from Chrome OS
●
Print, scan, and share from the HP Smart App
●
Print by email (HP ePrint)
●
Mobile specications
ENWW 79
Page 88

Introduction
You can print to your printer from many mobile devices and from almost any location. There are two main
methods of Mobile Printing:
● Direct printing by connection to the same network
● Printing by e-mail
Your printer can be connected to the Web, providing various benets:
● Automatic rmware updates (see Update the rmware on page 168)
● Print on HP printers from almost anywhere
● Print on HP printers from almost any device, including smartphones, tablets, and laptops
See http://www.hp.com/go/designjetmobility for more detailed information.
You can enable Web Services when setting up the printer: see Set up printer services on page 18 or the
Assembly Instructions for more information.
IMPORTANT: The printer must be connected to a network with Internet access: connect an Ethernet cable. See
Connect the printer to your network on page 16.
Print from Android
NOTE: Printing is only available from applications that oer printing or sharing.
For Android printing, install and enable the HP Print Service App from Google Play (https://play.google.com/
store/apps/details?id=com.hp.android.printservice&hl=en), if it is not already installed in your device. You must
have Android KitKat 4.4 or later.
1. Open the document or photo you want to print, and press the menu icon, and select Print.
2. Choose your printer from the list.
3. Check the print settings, then press Print.
Print from Chrome OS
Printing from Chromebook devices is as easy as installing the HP Print for Chrome extension from the Chrome
Web Store (https://chrome.google.com/webstore/detail/hp-print-for-chrome/
cjanmonomjogheabiocdamfpknlpdehm).
1. Choose your content. Open the document or photo you want to print, tap the menu icon and select Print.
2. Choose your printer. Select from the list of printers that appears.
3. Conrm that the correct printer and print setting are selected. Tap Print and collect your printed
documents.
NOTE: Printing is only available from applications that oer printing or sharing.
80 Chapter 6 Mobile printing ENWW
Page 89

Print, scan, and share from the HP Smart App
Use the screen on your mobile device to control printer scan and print functions. Send scans directly to your
mobile device from your printer. Print PDF, photos, email attachments, and more from virtually anywhere.
You can download the HP Smart App from the following locations:
● Android: https://play.google.com/store/apps/details?id=com.hp.printercontrol
● iOS: https://itunes.apple.com/app/id469284907
Make sure your device and printer are operating on the same network, and follow the steps below:
iOS and Android printing with the HP Smart App
1. Open the HP Smart App and select your printer.
2. Select whether you want to print documents or photos from your local device, or link your Google Drive,
Dropbox, or other accounts to access your content.
3. Use the edit options to adjust quality, color, and other settings if you wish to make such adjustments.
4. Tap Print and collect your printed documents.
iOS and Android scanning and sharing with the HP Smart App
1. Load the paper to be scanned to. Place the document that you want to scan on the printer.
2. Open the HP Smart App and trigger scanning from it. You can either store the document in your mobile
device, send it by email, or upload it directly to your preferred cloud repository.
Print by email (HP ePrint)
IMPORTANT: To enable email printing, see Enable email printing with HP ePrint on page 18.
If you can email it, you can print it. Simply attach a PDF or other print-ready le to an email message, and send it
to your printer’s dedicated address.
You can print from anywhere with an Internet connection, with no need for a printer driver, but there are a few
limitations to bear in mind:
● The attached les to be printed must be in PDF format.
● The maximum le size is 10 MB, but your email server may have a lower limit.
● Files are printed in the original document size (at 100% scale), in normal quality, in color, and normally in
portrait orientation (some printers may oer autorotation).
For more information, see https://www.hpconnected.com.
Mobile specications
● Mobile devices must have an Internet connection and email capability.
● Print, scan, and copy control requires the mobile device and printer to be on the same network.
ENWW Print, scan, and share from the HP Smart App 81
Page 90

● Printing by email also requires the printer to be connected to the Internet.
● iOS 7.0 and above, or Android KitKat4.4 and above, is required.
82 Chapter 6 Mobile printing ENWW
Page 91

7 Job queue management
●
Job queue in the front panel
●
Print job queue in the Embedded Web Server or HP DesignJet Utility
●
Scan queue in the Embedded Web Server or HP DesignJet Utility
ENWW 83
Page 92

Job queue in the front panel
Tap on the home screen to view the job queue(s) on the front panel.
You can choose Print & Copy queue or Scan queue from the tabs at the left of the screen. The job queue page
shows all jobs that are available in the selected job queue.
Print & Copy queue
The Print & Copy queue(s) includes jobs that are in dierent phases: being received, parsed, rendered, printed,
already printed, and so on.
Tap the name of the job to see all the job details, including information about status and preview. The details
displayed depend of the type of job.
In an active queue, the job you are printing appears in the middle of the queue, with printed jobs below and jobs
to be printed above. You can scroll up and down. Once scrolled, the queue remains static and does not move
automatically.
Jobs in the left pane are divided into four categories (Up next, Now printing, On hold, and History) in
chronological order starting from the top. On hold is shown only when there are one or more jobs on hold. Below
the job name, you can see its status:
Up next
● Waiting to process: The job has been received by the printer and is waiting to be rendered.
● Processing: The printer is parsing and rendering the job.
● Waiting to print or Paused: The job is processed and waiting for the print engine to be ready to proceed with
printing.
84 Chapter 7 Job queue management ENWW
Page 93

Now printing
On hold
The job is being printed.
● Paused: The job is paused.
NOTE: Sometimes, while printing, you may see a Self-servicing status, which means that the printer is
performing some task such as paper type change or print mode change between pages of the same job.
The job will not be printed until you take some action. You should respond in one of the following ways:
● On hold: Private job: Enter the PIN required to print the job. The job will be deleted from the queue after
printing.
● Oh hold: Personal job: The job is not automatically printed: you must select it from the queue. No details
can be seen.
● On hold to preview: The job is not automatically printed: you must select it from the queue.
● On hold for paper mismatch: Load the paper required by the job.
● On hold for accounting: Enter an account ID to be used for the job.
● On hold: Recovered job: After a printer recovery, some jobs that were not printed are kept on hold.
History
● Printed: In chronological order, divided into today, yesterday, last week, and so on.
● Canceled: Canceled by the user.
● Failed: The job has failed for one or more reasons.
Scan queue
The scan queue structure is similar to the Print & Copy queue, but with the les organized by date. The main
details (selected destination and its respective status) are in the left panel, below each job.
In the right pane, detailed information appears after scrolling:
a. Scanned by
b. Date and time
c. File type
d. File Size (if there are several sizes, value will be several)
e. Content type
f. Size
g. Color mode
h. Resolution
i. Destination
ENWW Job queue in the front panel 85
Page 94

Scan queue actions
Some job queue actions are determined by the settings selected. Depending on the environment, it may be
worthwhile to change some default settings; to do so, tap in the home screen, then Job Management.
Alternatively, in the job queue, tap at the top right, then Settings.
In the left panel, tap the job to print, then on the details screen select Print. On the following screen, select the
number of copies, choose a quickset, and edit the printing preferences. When you press Print, there is an option
to manage the job in the job queue.
Delete
To delete a job manually, select the job and tap Delete.
Cancel Sending
The transfer of a le can be canceled if it is in the status: waiting to be sent or sending.
Send to
Available only if the le has already been sent or failed. When you tap Sent to options appear:
● To Network folder: possible only if a network folder is congured. See Congure a network folder
on page 21
● To email: see Congure the email server on page 29
● USB drive: see Scanning and copying on page 93
Scan queue options
Delete all scan jobs
To delete the whole job queue: tap , then Delete all jobs.
Manage remotely
Tap at the top of the screen, then manage remotely. A QR code is displayed. To access the scanned les in
the EWS, scan the QR code or enter the URL shown. See Scan queue in the Embedded Web Server or HP
DesignJet Utility on page 91.
NOTE: The device used to connect to this link must be on the same network as the printer.
Job queue actions
Some of the actions in the job queue are determined by the settings selected. Some default settings may be
worth changing, depending on your environment. To do so, tap in the home screen, then Job management.
Alternatively, in the job queue app, tap
at the top right, then Settings.
Pause the job queue
You can pause the job queue by tapping and resume by tapping . The pause takes eect at the end of
the page that is currently printing.
86 Chapter 7 Job queue management ENWW
Page 95

Reprint
In the History section, tap the job you want to reprint. On the details screen, tap Reprint. On the next screen, you
can select the number of copies, the source, and the destination.
Print next
If you want to change the position of a job in the queue to be printed immediately after the currently printing job,
select the desired job and tap the Print next button.
Select when to print a job
NOTE: The When To Start Printing options cannot be used with PostScript jobs.
You can select at what point you want to print a job in the queue. Tap , then Job management > When to start
printing.
There are three options you can select:
● When After Processing is selected, the printer waits until the whole page has been processed and then it
starts to print. This is the slowest setting but ensures the best print quality in large or complex prints.
● When Immediately is selected, the printer prints the page as it is processed. This is the quickest setting, but
the printer may stop halfway through a print to process data. This setting is not recommended for complex
images with dense color.
● When Optimized is selected (this is the default setting), the printer calculates the best time to begin
See job details
Tap the name of the job to show its details, including information about status, pages, copies, total, and preview.
Scroll down as necessary to see all of the information.
By tapping the thumbnail, you can navigate over all pages of the job. From there you can zoom in and out (pinch
and zoom) and see more information about each page.
In an active queue, the job you are printing appears in the middle of the queue, with printed jobs below and jobs
to be printed above.
Roll policies
At the front panel, tap , then , then , then Roll policies.
Alternatively, tap , then Job management > Roll policies.
The following options are available:
● Increase productivity: To increase the productivity of the printer.
printing the page. It is usually the best compromise between the After Processing and Immediately
settings.
– Job autorotation: The printer can rotate a job automatically in order to save paper.
● Automatic roll selection:
– Roll width selection: The printer can be more or less restrictive when selecting the roll width on which
to print. You can select:
ENWW Job queue in the front panel 87
Page 96

○ Print on the same width only: Each page prints on a roll with the same page width.
○ Print on the same width or wider: Each page prints on a roll with the same width or wider.
– Use most depleted roll (T2600dr only): When there are two with the same paper type and width, the
roll selected is the roll with less paper.
● Paper type protection (T2600dr only): You can avoid printing accidentally on special paper types by
protecting them. Protected types are eligible for printing only when paper type or roll are specied in the
job.
See also Protect a paper type on page 77.
Solve paper mismatch
If the paper currently loaded in the printer is not suitable for a particular job or page, the printer can
automatically solve the conict or give a number of choices depending on the printer policies. Such a conict
may be caused by a job sent to the printer with no specic roll or paper type assigned to it, or by a roll coming to
its end during printing. The following options are available in the paper mismatch settings menu; you can reach
this menu from the job queue by tapping , then , then Mismatch actions > Paper mismatch; or by tapping
, then Job management > Mismatch actions > Paper mismatch.
● Pause and ask (the most restrictive option): Printing stops until the correct paper is loaded. This option is
recommended when the printer is attended. A message appears, asking what you want to do: cancel the
job, print anyway, put on hold, or load paper. These options are also available in the job queue.
● Hold job and continue with next: Put mismatched jobs on hold until the correct paper is loaded, and
continue printing the rest of the job queue. The printer sends an alert whenever a job is put on hold. This
option is recommended when the printer is unattended, even though the integrity of a job may be
disrupted, to avoid stopping the queue. Once the paper required for the job is loaded, the job or pages are
automatically resumed.
● Print anyway (the least restrictive option): Print on whatever paper is loaded. The printer will choose the roll
to print according to the following criteria: rst where the page ts and then the same paper type. This
option will never select a paper type that has been protected.
Job queue options
To change the job queue options, tap , then Job management > Job queue. Alternatively go to , then ,
then Settings > Job queue.
You can select the maximum number of printed jobs to have in the queue, when to delete printed jobs, and
whether to delete jobs on hold after a specied time.
Default printing preferences
At the front panel, tap , then Default Printing conguration to dene the default properties of jobs sent to
your printer from remote locations.
You can dene settings in the following areas: Print quality, Color, Paper, Margins, PostScript, Print retrieval.
Job deletion
If the printer runs out of storage space for new jobs, the oldest printed jobs are automatically deleted from the
queue.
88 Chapter 7 Job queue management ENWW
Page 97

You can request that printed jobs should be automatically deleted from the queue when the total number of
printed jobs exceeds a specied limit (the maximum number in the history setting), or when the jobs were
printed more than a specied time ago (clear history settings).
To delete jobs on hold, the setting Delete jobs on hold allows you to dene the time after which these jobs will be
removed (2–48 h).
To delete a job manually, select the job and tap Delete on the bottom right.
The Delete option deletes the job from the queue, while the Cancel option cancels the job but leaves it in the
queue, marked as Canceled by the user in the history category.
To cancel a job while printing, tap X. To cancel a job from the Up Next category, tap the job name on the list and
then tap Cancel job on the bottom right.
NOTE: If you tap X, you cancel the currently printing job only.
Print job queue in the Embedded Web Server or HP DesignJet Utility
The HP DesignJet Utility provides a dierent way of accessing the Embedded Web Server's job management
facilities, but the facilities are exactly the same whether you use the Embedded Web Server or the HP DesignJet
Utility.
To see the queue in the Embedded Web Server, select Job queue in the Main menu.
Printing
Job queue page
By default, access to the job queue is open to all users. An administrator can set a password so that users are
required to enter a password to access the page.
The job queue page shows all jobs that are available in the queue. The queue includes jobs that are being
received, parsed, rendered, printed and already printed.
The Embedded Web Server displays the following information for each print job:
● File name: The name of the job.
● Status: The current status of the job.
● Pages: The number of pages in the job.
● Copies: The number of copies printed.
● Total: The total number of pages (including copies).
● Sent by: The username.
● Account ID: The account ID for the job.
● Date: The date and time attached to the job that was received by the printer, shown in the locale of the
Embedded Web Server.
● File source: The application from which the job was sent to print.
● Paper destination: The output option selected for the printed job.
ENWW Print job queue in the Embedded Web Server or HP DesignJet Utility 89
Page 98

You can perform the following operations on one or all jobs in the queue:
● Cancel: Cancels the selected jobs. You are asked to conrm before the job is canceled. The job remains
stored in the printer, but will not be printed unless you click Reprint.
● Hold: Holds the select jobs until you click Continue to print.
● Resume: All selected jobs, which are on hold, continue printing.
● Reprint: Prints more copies of a job.
● Next print: Sends all selected jobs to the top of the job queue.
● Print anyway: The printer will try to print the job even if there is some problem with it.
● Delete: Deletes selected jobs from the job queue. You are asked to conrm before the job is deleted.
Prioritize a job in the queue
You can select any job in the queue and make it the next one to be printed. After selecting the job, click Move to
front.
If nesting is turned on, the prioritized job may still be nested with others. If you really want this job to be printed
next, and not nested with others, rst turn nesting o in the front panel and then move it to the front of the
queue.
In the following cases, the Next print button is not displayed:
● The job is already at the front of the queue.
● The job is on hold—in this case the Resume printing button is displayed instead.
● The job has nished—in this case the Reprint button is displayed instead.
● The job has some error condition.
Delete a job from the queue
Under normal circumstances, there is no need to delete a job from the queue after printing it, as it will just fall o
the end of the queue as more les are sent. However, if you have sent a le in error, and want to avoid printing it,
you can simply select the job and then click Delete.
In the same way, you can delete a job that has not been printed yet.
If the job is currently being printed (its status is printing), you can click Cancel and then Delete.
Reprint a job in the queue
To reprint an already-printed job, select the job from the queue, then click Reprint. When reprinting a print job,
you cannot change the print settings, because the job has already been rasterized.
Job status messages
These are the possible job status messages, approximately in the order in which they may be seen:
● Downloading: The printer is receiving the job from the computer.
● Processing: The printer is parsing and rendering the job.
90 Chapter 7 Job queue management ENWW
Page 99

● Waiting to print: The job is waiting for the print engine to become free to proceed with printing.
● Nested: The printer is set up with Nesting=On and is waiting for other jobs in order to complete the nest
and proceed with printing.
● Preparing to print: The printer is performing writing system checks before printing the job.
● On hold for preview: The job was sent with the on hold for preview option.
NOTE: If the printer hangs up while printing a job, and the queue facility is turned on, the partially printed
job will appear in the queue as on hold when the printer is next turned on. When you resume the job, it will
start printing at the page at which it was interrupted.
● On hold for paper: The job cannot be printed because the right paper is not loaded in the printer. Load the
required paper, see Paper handling on page 34, and click Continue to resume the job.
● On hold for accounting: The job cannot be printed because the printer requires all jobs to have an account
ID: enter the account ID and then click Continue to resume the job.
TIP: To set an account ID, see Require account ID on page 30.
● Printing
● Drying
● Cutting paper
● Ejecting page
● Canceling: The job is being canceled, but will remain in the printer job queue.
● Deleting: The job is being deleted from the printer.
● Printed
● Canceled: The job has been canceled by the printer.
● Canceled by user
● Empty job: The job does not contain anything to print.
Reactivate a job on hold
When the printer puts a job on hold you receive an alert, see Alerts on page 218, which explains why the job is
on hold. Follow the instructions on the screen to remove the hold and continue printing.
Scan queue in the Embedded Web Server or HP DesignJet Utility
To see the queue in the Embedded Web Server, tap Job queue > Scan queue.
By default, access to the job queue is open to all users. The administrator can set a password for users to access
the page.
The Embedded Web Server displays the following information for each job:
● File name: name of the job.
● Status: current status of the job.
ENWW Scan queue in the Embedded Web Server or HP DesignJet Utility 91
Page 100

● Pages: number of pages in the job.
● Date: date and time attached to the job that was scanned.
● Destination: storage location.
You can perform the following operations on one or all jobs in the queue:
● Delete all: deletes all jobs from the job queue from the top of the window. You are asked to conrm before
the job is deleted.
● Delete: press the button at the bottom of the window to delete selected jobs from the job queue. You are
asked to conrm before the job is deleted.
● Download: the selected job can be download and saved to your local disk.
● Tap preview to see the job in full-screen. If the job is multi-page, select the page you want to preview.
Manage scanned les remotely
During the scan process you can request a QR code to manage your job remotely. Scan the QR code with your
mobile phone to access your printer’s embedded web server remotely, and select the job to manage from the
job queue.
NOTE: Your device must be on the same network as the printer.
92 Chapter 7 Job queue management ENWW
 Loading...