

Page 1
EN
HP DesignJet T2500
Multifunction Series
Assembly Instructions
JA
HP DesignJet T2500
Multifunction シリーズ
組み立てマニュアル
ZHCN
HP DesignJet T2500
Multifunction 系列
组装说明
ZHTW
HP DesignJet T2500
Multifunction 系列
組裝說明
KO
HP DesignJet T2500
Multifunction 시리즈
조립 지침
ID
HP DesignJet T2500
Multifunction Series
Petunjuk Per
akitan
*L2Y26-90010*
L2Y26-90010
© Copyright 2015 HP Development Company, L.P.
Large Format Division
Camí de Can Graells 1-21 · 08174
Sant Cugat del Vallès
Barcelona · Spain
All rights reserved
Printed in XXX
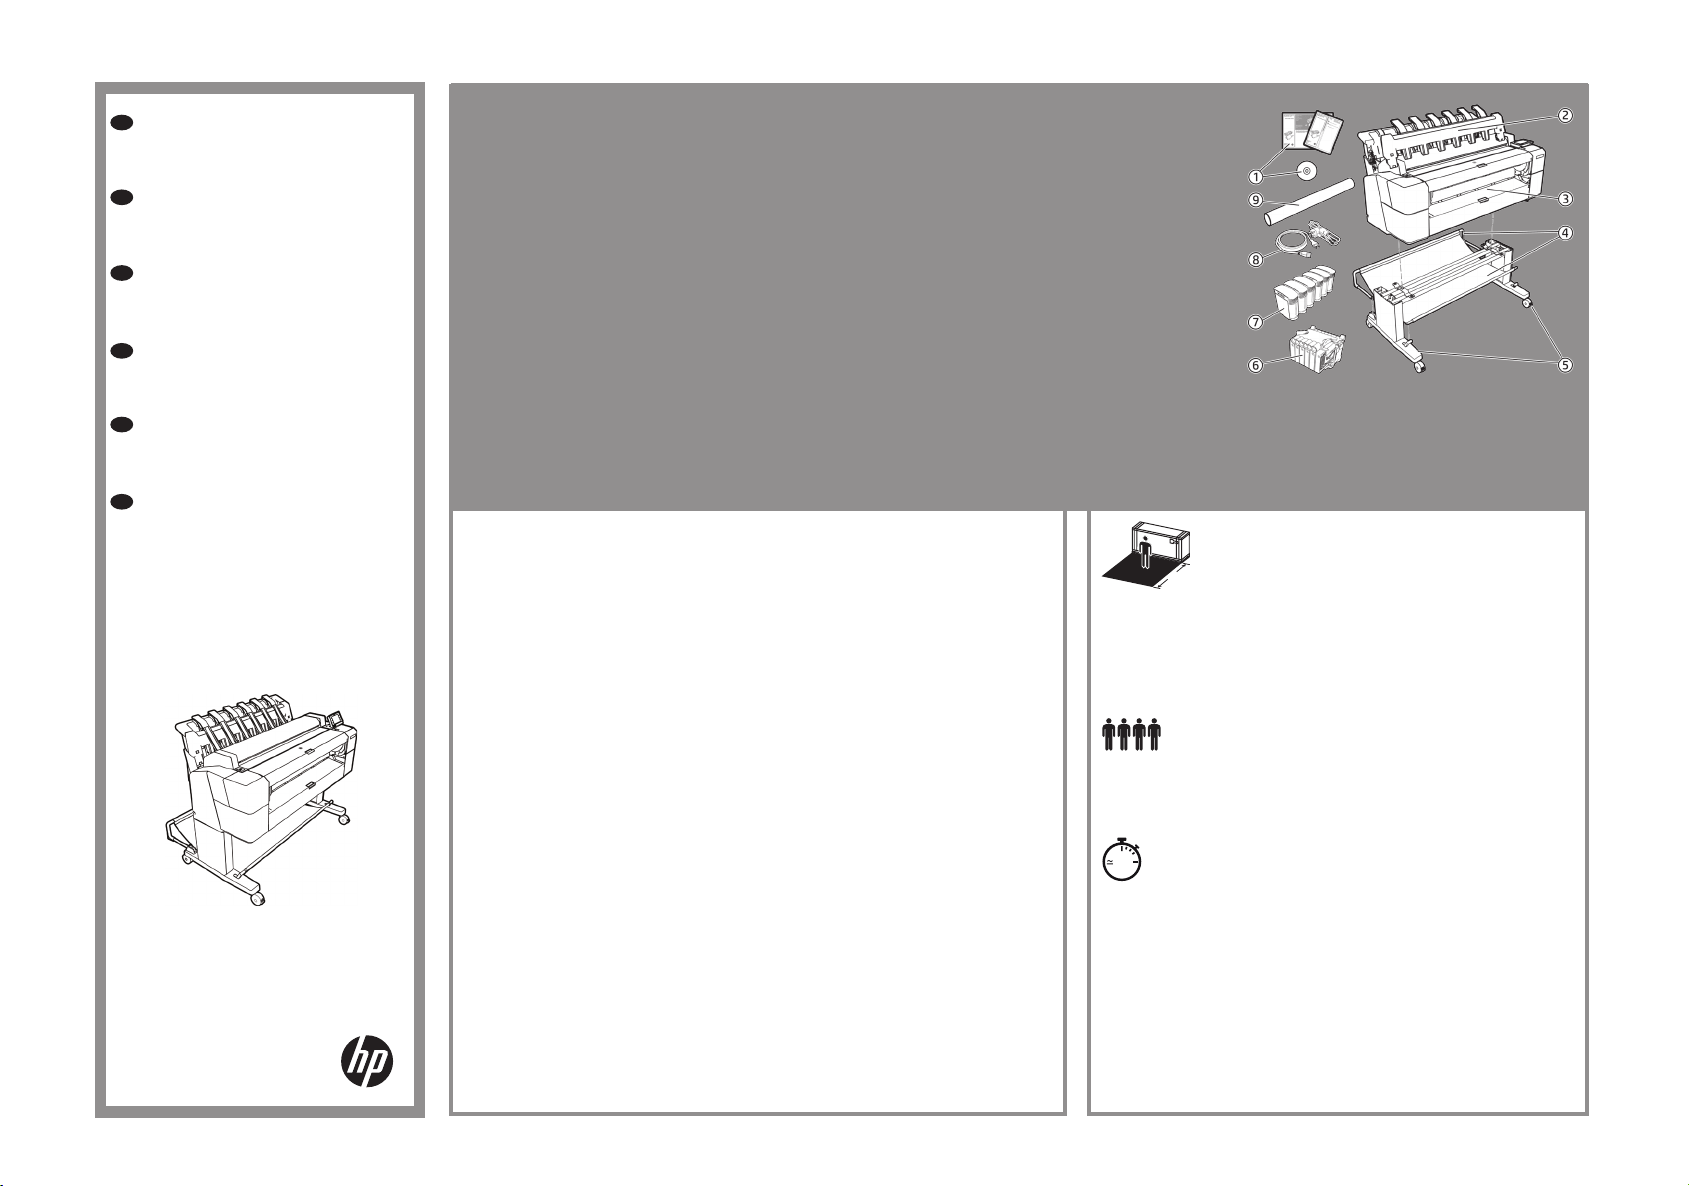
EN: Crate contents
1. Documentation: Assembly
Instructions, Introductory info, CD
2. Stacker accessory
3. Prin ter
4. Bas ket
5. Stand accessory pieces
6. Printhead
7. Ink cartridges
8. Power cords
9. Scanner calibration paper
Note: r oll and LA N cable not in cluded.
JA:
クレートの内容
1.
マ ニュア ル: セ ット ア ップ
手順、導入情報、
2.
スタッカ アクセサリ
3.
プリンタ
4.
バ ス ケット
5.
スタンド アクセサリ部品
6.
プ リント ヘッド
7.
インク カートリッジ
8. 電源コード
9. スキャナのキャリブレー ション用紙
注記: ロールおよび LA Nケーブルは付属し
ていません。
CD
ZHCN :
包装箱物品
1. 文档: 组装
说明、介绍性信息、CD
2. 堆积箱附件
3. 打印机
4. 纸筐
5. 支架附件
6. 打印头
7. 墨盒
8. 电源线
9. 扫描仪校准纸
注意: 不附带卷筒和 LAN 电缆。
ZHTW :
箱內包含
1. 說明文件: 組裝
說明、簡介資訊、CD
2. 堆疊器附件
3. 印表機
4. 承接槽
5. 機架附件零件
6. 印字頭
7. 墨水匣
8. 電源線
9.掃描器校準紙張
附註: 不含捲筒紙和 LAN 纜線。
KO:
상자 내용물
1. 설명서: 조립
지침, 출시 정보,
2.
스태커 액세서리
3.
프린터
4.
바스켓
5.
스탠드 액세서리 조각
6.
프린트 헤드
7.
잉크 카트리지
8.
전원 코드
9. 스캐너 보정 용지
참고: 롤 및
니다.
ID: Isi kemasan
1. Dokumentasi: Petunjuk
Pemasangan, Info pendahuluan, CD
2. Aksesori penumpuk
3. Prin ter
4. Keranjang
5. Komponen aksesori dudukan
6. Printhead
7. Kartri d tinta
8. Kab el daya
9. Kertas kalibrasi pemindai
Catatan: Gulungan dan kabel LAN tidak
disertakan.
EN: Please read these instructions carefully. These assembly instructions explain how to assemble
the printer.
Because spare screws are supplied, some screws may remain unused after assembly of the printer.
JA: 以 下 の 指 示 をよ くお 読みくだ さい 。 以下の手順では、プリンタを組み立てる方法について説
明します。
予備のネジが含まれているため、ネジは何本か余る場合があります。
ZHCN: 请仔细阅读这些说明。 这些组装说明对如何组装打印机进行了介绍。
由于提供了备用螺钉,在组装完打印机后,可能会剩余一些未用的螺钉。
ZHTW: 請仔細閱讀下列說明。 這些組裝說明將解釋如何組裝印表機。
由於我們有提供備用螺絲,因此完成印表機組裝後仍會有多餘的未用螺絲。
KO: 이 설명서를 주의 깊게 읽으십시오. 이 조립 지침에서는 프린터 조립 방법을 설명합니다.
나사는 여유 있게 제공되므로 프린터 조립이 끝난 뒤 남을 수 있습니다.
ID: Baca petunjuk ini dengan cermat. Petunjuk pemasangan ini menjelaskan tentang cara memasang
printer.
Karena tersedianya sekrup cadangan, maka tidak semua sekrup akan digunakan pada pemasangan
printer ini.
CD
LAN
케이블은 들어 있지 않습
EN: The size of the crate is 1502 x 739 x 805 mm. The space
required for assembly is2.5m (8.5 feet) in front. / JA: クレート
のサイズは1502 x 739 x 805 mmです。 組み立てを行うに
2.5m
は、前面に2.5m (8.5 フィート) のスペースが必要です。/
8.5ft
ZHCN: 包装箱的尺寸是 1502 毫米 X 739 毫米 X 805 毫米。
组装所需的 前端空间是 2.5 米(8.5 英尺)。/ ZHTW: 箱子尺寸為 1502 公釐
X 739 公釐 X 805 公釐。前方 必須騰出 2.5 公尺(8.5 英呎)以進行組裝。/
KO: 상자 크기는 1502 x 739 x 805 mm입니다. 어셈블리에는 앞쪽에 2.5m의
공간이 필요합니다. / ID: Ukuran kemasan adalah 1.502 x 739 x 805 mm. Ruang
yang diperlukan untuk pemasangan adalah 2,5 m (8,5 kaki) di bagian depan.
EN: 4 people are required to perform certain tasks. / JA: 特定の作業は、4名で
行う必要があります。/ ZHCN: 某些任务需要 4 人完成。/ ZHTW: 某些工
作需要 4 個人才能執行。/ KO: 일부 작업의 경우 네 사람이 필요합니다. / ID:
Diperlukan 4 orang untuk menjalankan tugas tertentu.
100’
EN: Time required for assembly of the printer isapproximately
100 minutes . / JA: プリンタの組み立て所要時間は約100分です。 / ZHCN: 组
装打印机大约需要 100 分钟的时间。 / ZHTW: 組裝印表機大約要花 100 分
鐘的時間。 / KO: 프린터 조립에 소요되는 시간은 약 100분입니다. / ID: Waktu
yang diperlukan untuk memasang printer adalah sekitar 100 menit.
EN: Tools required: Screwdriver (included). / JA: 必要な工具: ドライバ(付属し
ています)。/ ZHCN: 必备工具: 螺丝刀(附带提供)。/ ZHTW: 必要工
具: 螺絲起子(隨附)。/ KO: 필요한 도구: 드라이버(포함됨) / ID: Alat yang
diperlukan: Obeng (disertakan).
1
Page 2
EN
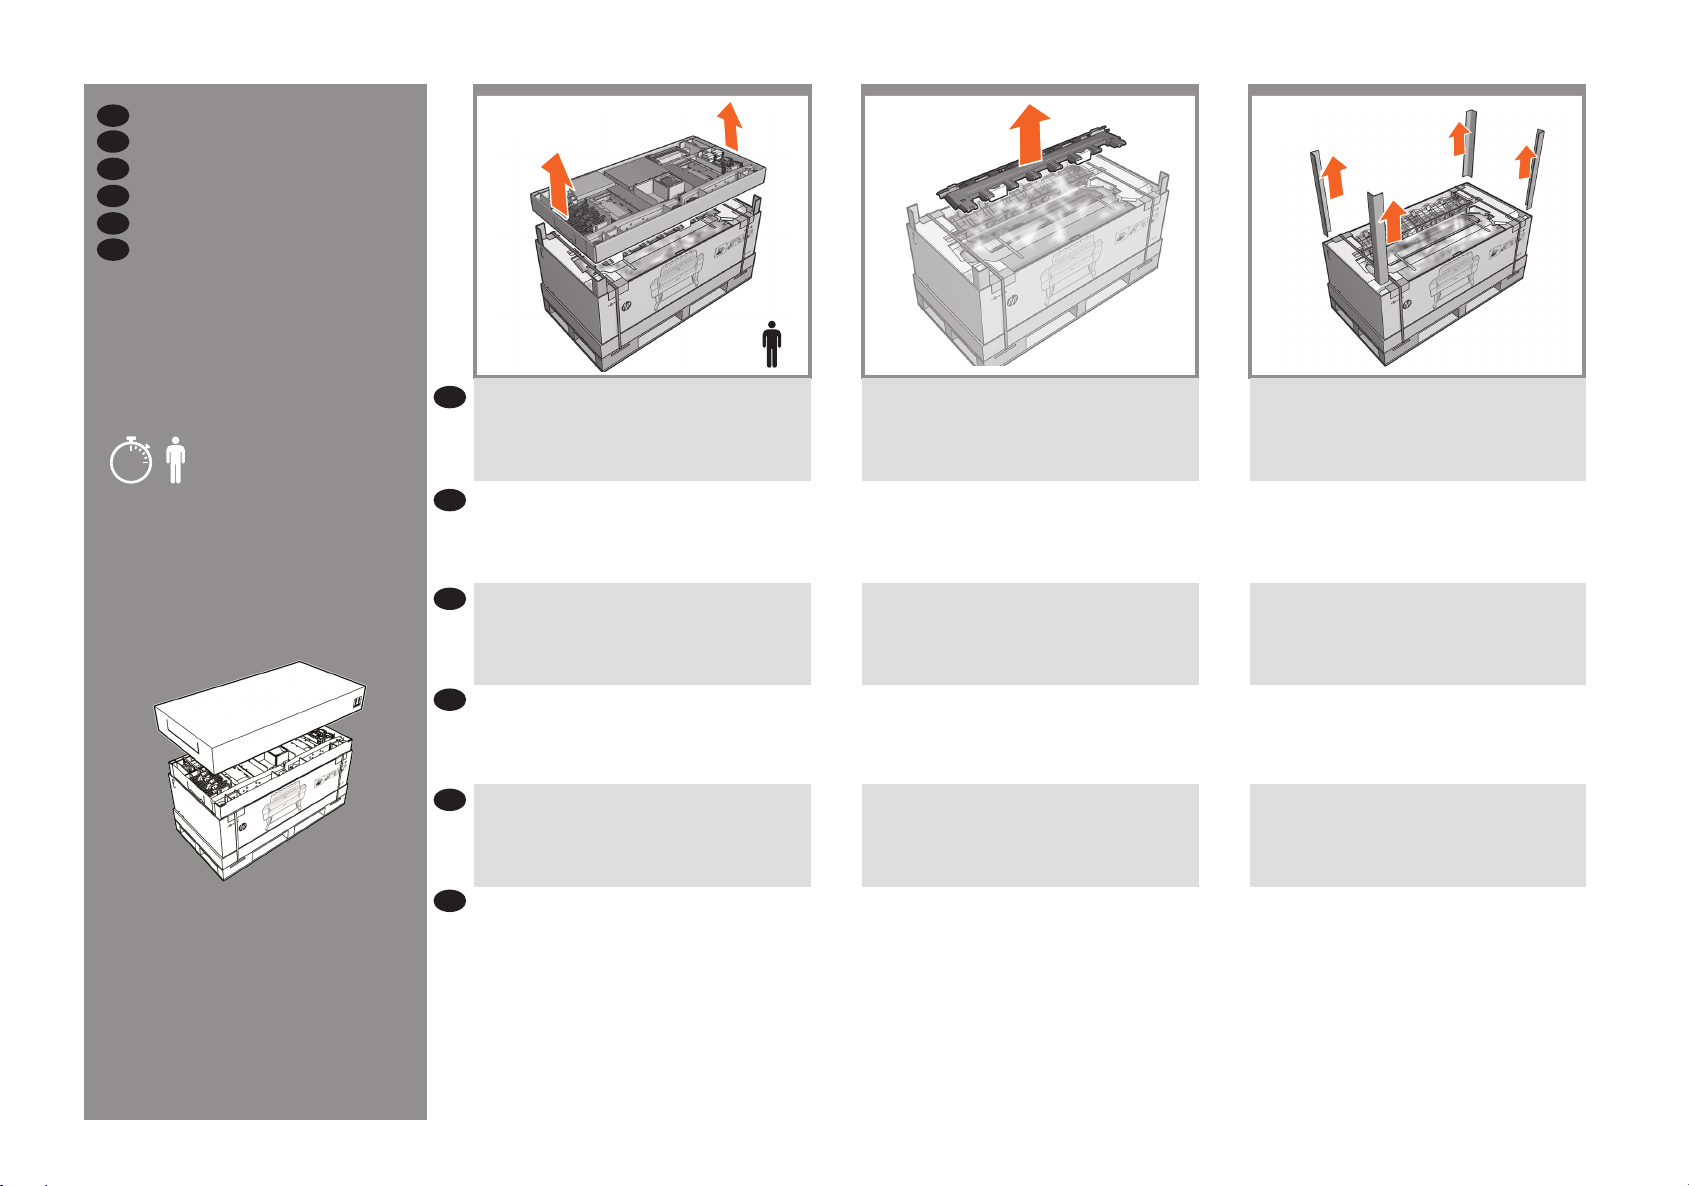
Open the box
JA
箱を開く
ZHCN
打开包装箱
ZHTW
打開箱子
KO
상자 열기
ID
Membuka kemasan
1
Remove the components tray.
EN
IMPORTANT: Do not cut straps until requested.
2
3
x2
Remove the stacker arm and the 3 packing pieces. Take
the stacker arm out of its plastic bag.
Remove the 4 carton corner pieces.
10’
x2
各コンポーネントのトレイを取り外します。
JA
重 要: 指示されるまでストラップは切断しないでく
ださい。
卸下组件托盘。
ZHCN
重要说明: 请按要求切断包装带。
取出元件匣。
ZHTW
重要: 在要求您這麼做之前,請勿剪開包裝帶。
KO
부품 트레이를 분리합니다.
중요: 스트랩을 자르라고 하기 전에 먼저 자르지 말 것.
ID
Keluarkan baki komponen.
PENTING: Jangan potong tali hingga diminta.
スタッカ アームと3個の梱包材を取り外します。
スタッカ アームをプラスチックの袋から取り出し
ます。
取出堆栈器臂和 3 个填塞块。从塑料袋中取出堆栈
器臂。
取出堆疊器臂和 3 個包裝材料。從塑膠袋中取出堆
疊器臂。
스태커 장착부와 3개의 포장재를 분리합니다. 스태커
장착부를 개폐형 백에서 꺼냅니다.
Lepas lengan penumpuk dan 3 bantalan kemasan.
Keluarkan lengan penumpuk dari kantong plastik.
四隅の梱包部品を取り外します。
卸下 4 个包装箱角片。
取出 4 個紙箱角落的包裝材料。
상자 모서리 조각 4개를 제거합니다.
Keluarkan keempat potongan sudut karton.
2
Page 3
4
EN
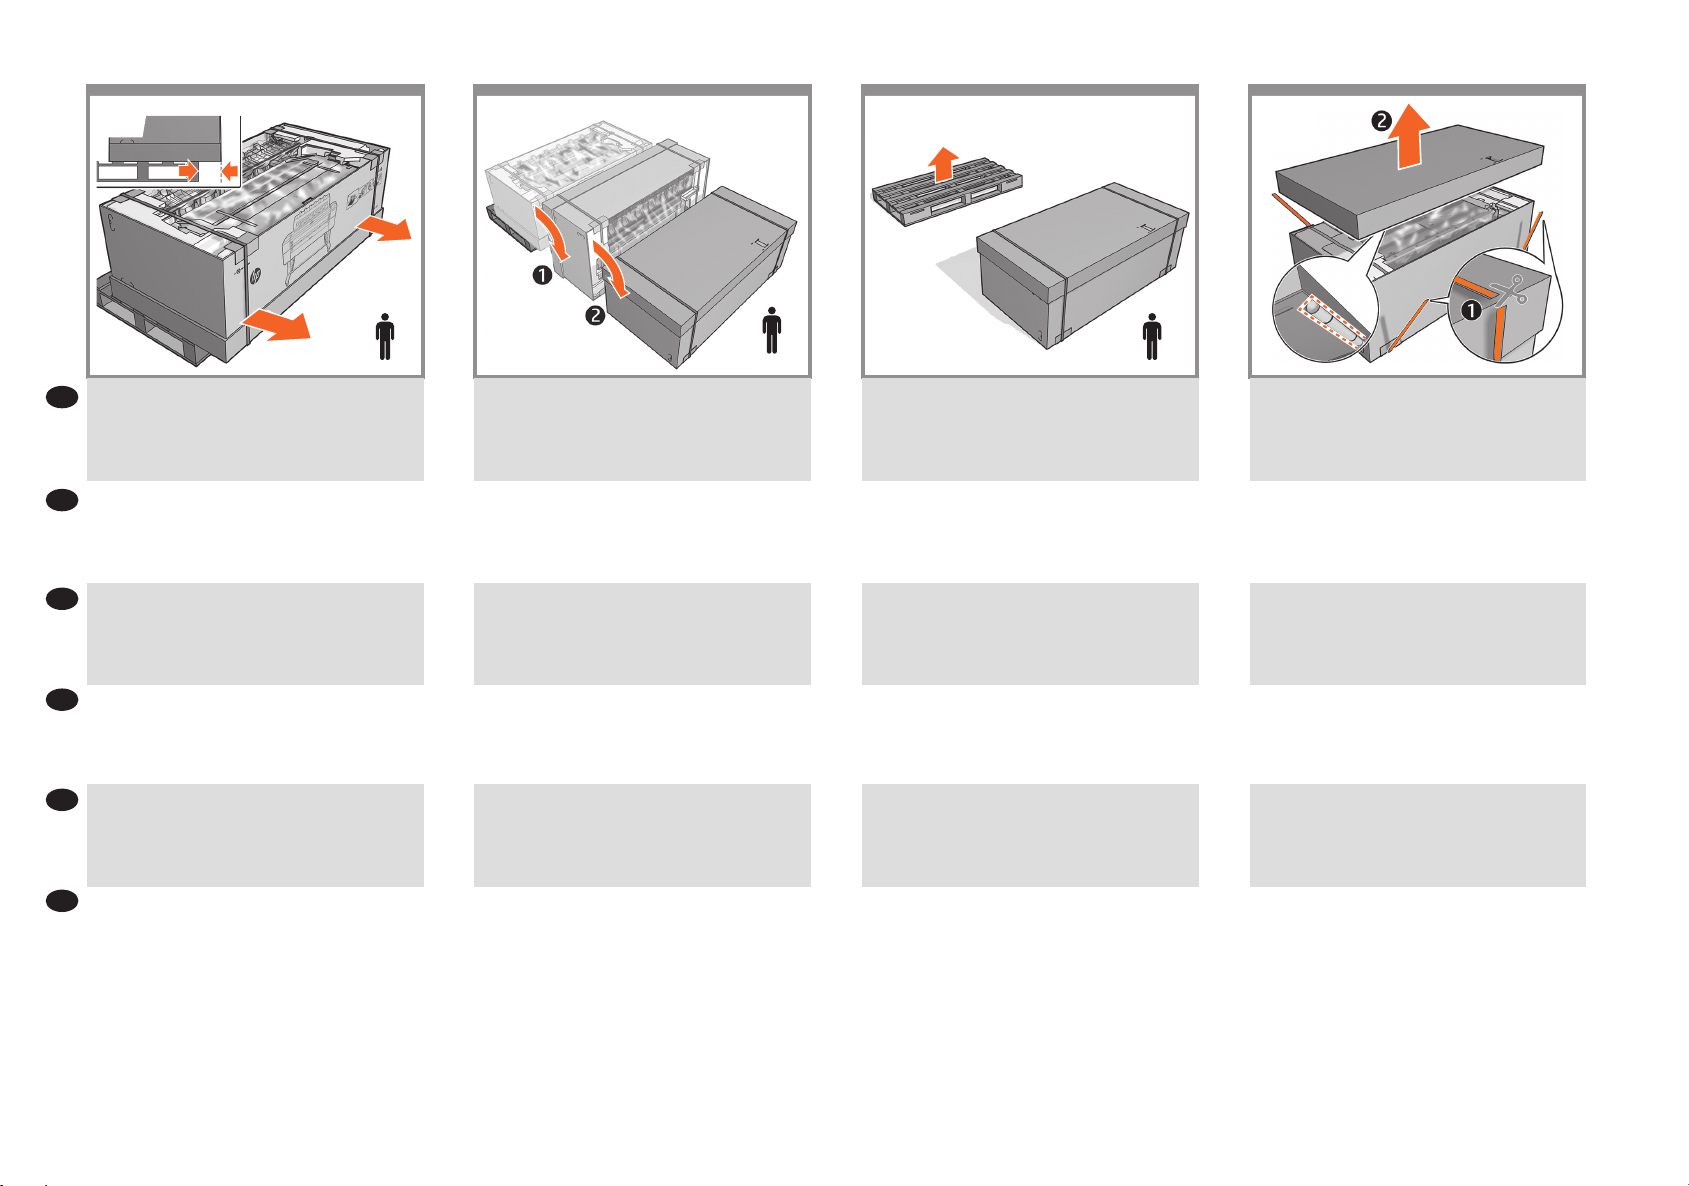
Slide the box forward on the pallet to create a space.
5
180°
x2 x2
Carefully roll the box 180° onto the oor.
x2
Remove the wooden pallet.
76
Cut the straps and remove the box lid.
Note: the scanner calibration roll is on the box lid; do not
discard it.
箱をパレット上で前方にスライドさせて、スペース
JA
をつくります。
ZHCN
在货盘上向前滑动包装箱,以腾出空间。
ZHTW
將包裝箱向前滑動到棧板上,挪出一些空間。
KO
상자를 운반대로 밀어 공간을 확보합니다.
ID
Geser kemasan ke depan pada palet untuk memberikan
ruang yang memadai.
床で箱をゆっくりと180°回転させます。
小心地将包装箱在地板上滚动 180°。
小心地將包裝箱翻轉 180° 到地板上。
상자를 바닥에서 조심스럽게 180° 회전시킵니다.
Putar kemasan 180° secara perlahan di atas lantai.
木製のパレットを取り外します。
取下木质货盘。
移除木棧板。
나무 운반대를 제거합니다.
Lepas palet kayu.
ヒモを切って箱の蓋を取り外します。
注記:スキャナのキャリブレーション ロールは箱の
蓋に取り付けられています。破棄しないように注意
してください。
剪开绑扎带并取下包装箱盖。
注意:扫描仪校准卷筒位于包装箱盖上,请勿丢弃。
剪開包裝帶,取下包裝箱箱蓋。
注意:掃描器校準捲筒在包裝箱箱蓋上,請勿將它
丟棄。
끈을 자른 다음 상자 뚜껑을 제거합니다.
참고: 상자 덮개 위의 스캐너 보정 롤을 버리지
마십시오.
Potong tali pengikat, lalu lepas penutup kemasan.
Catatan: gulungan kalibrasi pemindai berada di tutup
kotak; jangan dibuang.
3
Page 4
8
9
10
EN
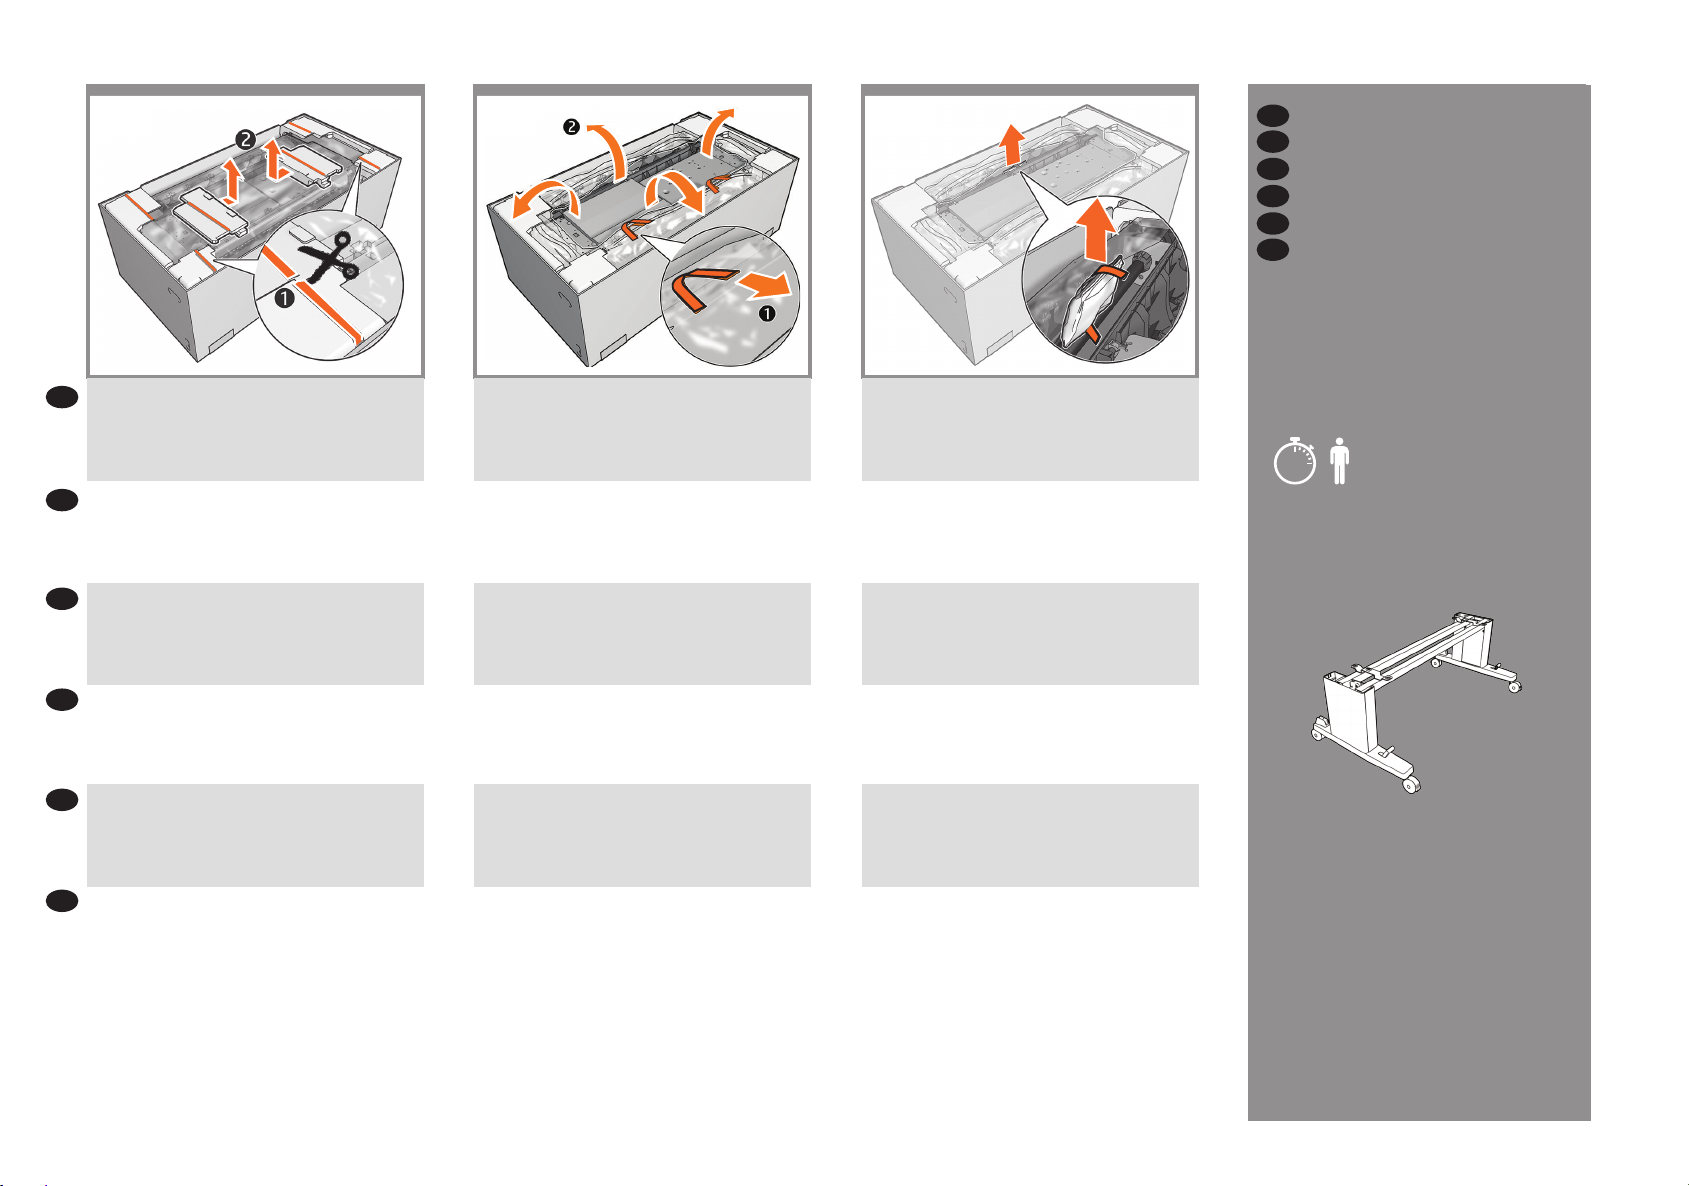
Assemble the stand
JA
スタンドの 組 み立て
ZHCN
组装支架
ZHTW
組裝機架
KO
스탠드 조립
ID
Memasang dudukan
EN
Remove the lament tapes, the tapes, and then the end
cap covers by sliding them inwards, and out.
フィラメント テープやテープを取り外し、エンド
JA
キャップ カバーを内側にスライドさせて取り外し
ます。
ZHCN
撕下细丝胶带和胶带,然后将末端护罩盖板向里滑动
以将其卸下,并将其拉出。
ZHTW
撕下細膠帶、膠帶,然後將兩端的護蓋先向內再向外
滑動以取下。
KO
필라멘트 테이프, 테이프 및 끝 캡 덮개를 안쪽으로
밀었다가 바깥으로 밀어서 제거합니다.
ID
Keluarkan pita lamen, pita, dan penutup ujung dengan
menggesernya ke dalam, lalu keluar.
Remove the tape, and open the plastic covering.
テープを取り外し、プラスチックのカバーを開き
ます。
撕下胶带,然后打开塑料盖。
撕下膠帶,打開塑膠套。
테이프를 제거하고 비닐 덮개를 엽니다.
Lepas pita, lalu buka plastik penutup.
Remove the desiccant bag.
乾燥材を取り除きます。
取出干燥剂袋。
取出乾燥劑。
건조제 봉지를 제거합니다.
Lepas kantong penyerap kelembaban.
20’
x2
4
Page 5
12
13
1411
5
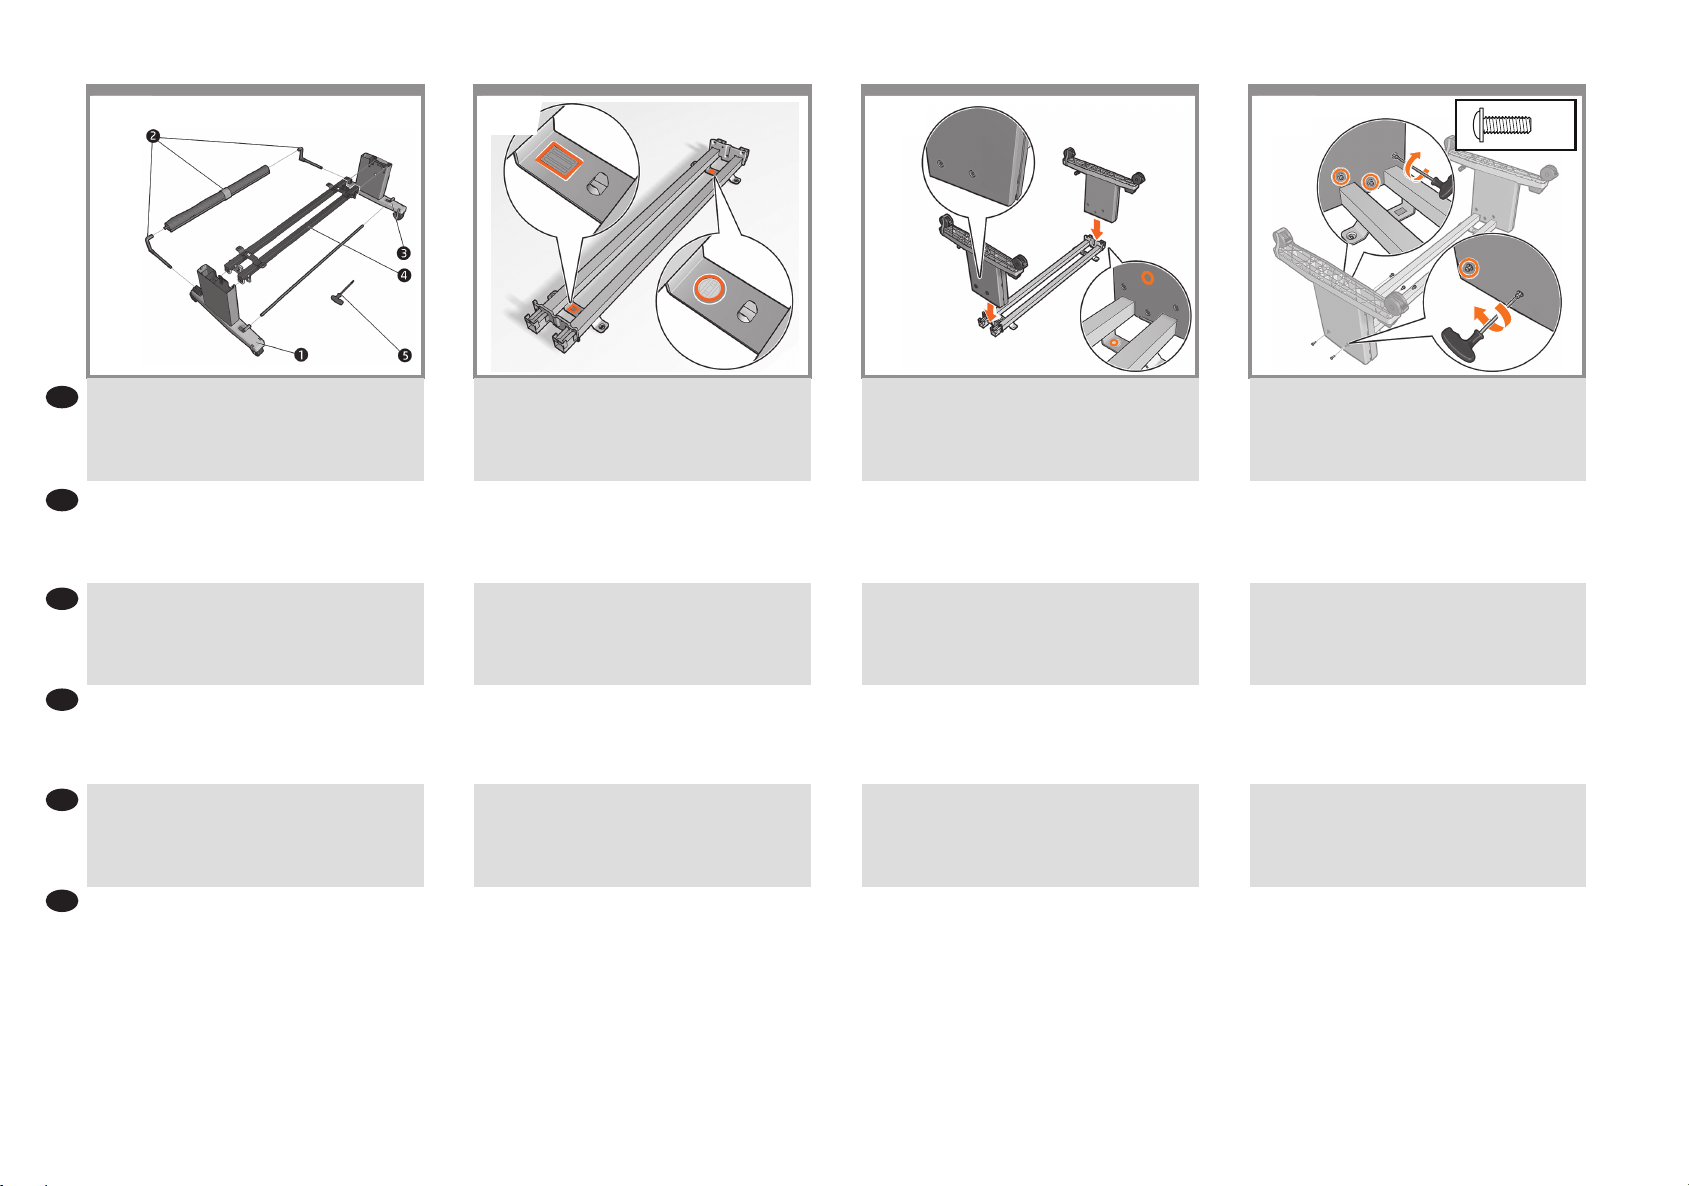
Locate the stand pieces:
EN
1. Left leg / 2. Basket Assembly / 3. Right leg /
4. Crossbar / 5. Screwdriver
スタンドの部品を確認します。
JA
1. 左脚部 / 2. バスケット アセンブリ /
3. 右脚部 / 4. クロスバー / 5. ドライバ
找到支架片:
ZHCN
1. 左侧支腿 / 2. 纸筐组件 / 3. 右侧支腿 /
4. 横杆 / 5. 螺钉刀
找到機架零件:
ZHTW
1. 左腳架 / 2. 承接槽組件 / 3. 右腳架 /
4. 橫桿 / 5. 螺絲起子
스탠드 조각을 찾습니다.
KO
1. 왼쪽 다리 / 2. 바스켓 어셈블리 /
3. 오른쪽 다리 / 4. 가로대 / 5. 드라이버”
Cari komponen dudukan:
ID
1. Kaki kiri / 2. Unit Keranjang /
3. Kaki kanan / 4. Palang / 5. Obeng
Place the crossbar on the oor; with the green rectangle
and yellow circle plastic pieces facing downwards.
クロスバーを床の上に置きます。 緑色の四角形と
黄色の円形のプラスチック部品を下に向けます。
将横杆放在地面上; 使绿色矩形 和黄色圆圈塑料片
朝下。
將橫桿放在地板上; 綠色矩形 和黃色圓形塑膠零件
面朝下。
가로대를 녹색 사각형과 노란색 원형 플라스틱
조각이 아래를 향하도록 바닥에 놓습니다.
Letakkan palang di lantai; dengan potongan plastik
persegi panjang hijau dan lingkaran kuning menghadap
ke bawah.
Slot the two legs onto the crossbar.
Note: The leg with the green plastic part must go on the
green side of the crossbar.
クロスバーに2個の脚部を差し込みます。
注記: 緑色のプラスチック製の部品が付いた脚部
は、クロスバーの緑色の側にくるようにします。
将支脚插到横杆上。
注意: 带绿色塑料部件的支腿必须前进到横杆的绿色
侧。
將兩個腳架插到橫桿上。
附註: 標有綠色塑膠部分的腳架,必須置於橫桿上的
綠色側。
다리 2개를 가로대에 끼웁니다.
참고: 녹색 플라스틱 부품이 있는 다리가 가로대의
녹색 면에 있어야 합니다,
Pasang kedua kaki pada palang.
Catatan: Kaki dengan bagian plastik hijau harus berada
pada sisi hijau palang.
Fix the crossbar to the left leg with 5 screws, do not
tighten them fully yet; leave them out about 10mm.
クロスバーを5本のネジで左脚部に固定します。
ここではネジを完全に締めないようにしてくださ
い。10mm程度隙間を空けるようにします。
用 5 个螺丝将横杆固定到左支腿上,但不要拧到底(
留出约 10mm 的长度)。
使用 5 顆螺絲將橫桿固定在左側腳架上,此時不要完
全鎖緊這些螺絲,請保留約 10 公釐的長度。
5개의 나사를 사용하여 왼쪽 다리에 크로스바를
고정하되, 아직 완전히 조이지 말고 10mm 정도의
여유를 남겨 둡니다.
Pasang palang silang ke kaki kiri dengan 5 sekrup.
Jangan pasang terlalu kencang; biarkan longgar kurang
lebih 10 mm.
5
Page 6
5 10
1615
17
180°
EN
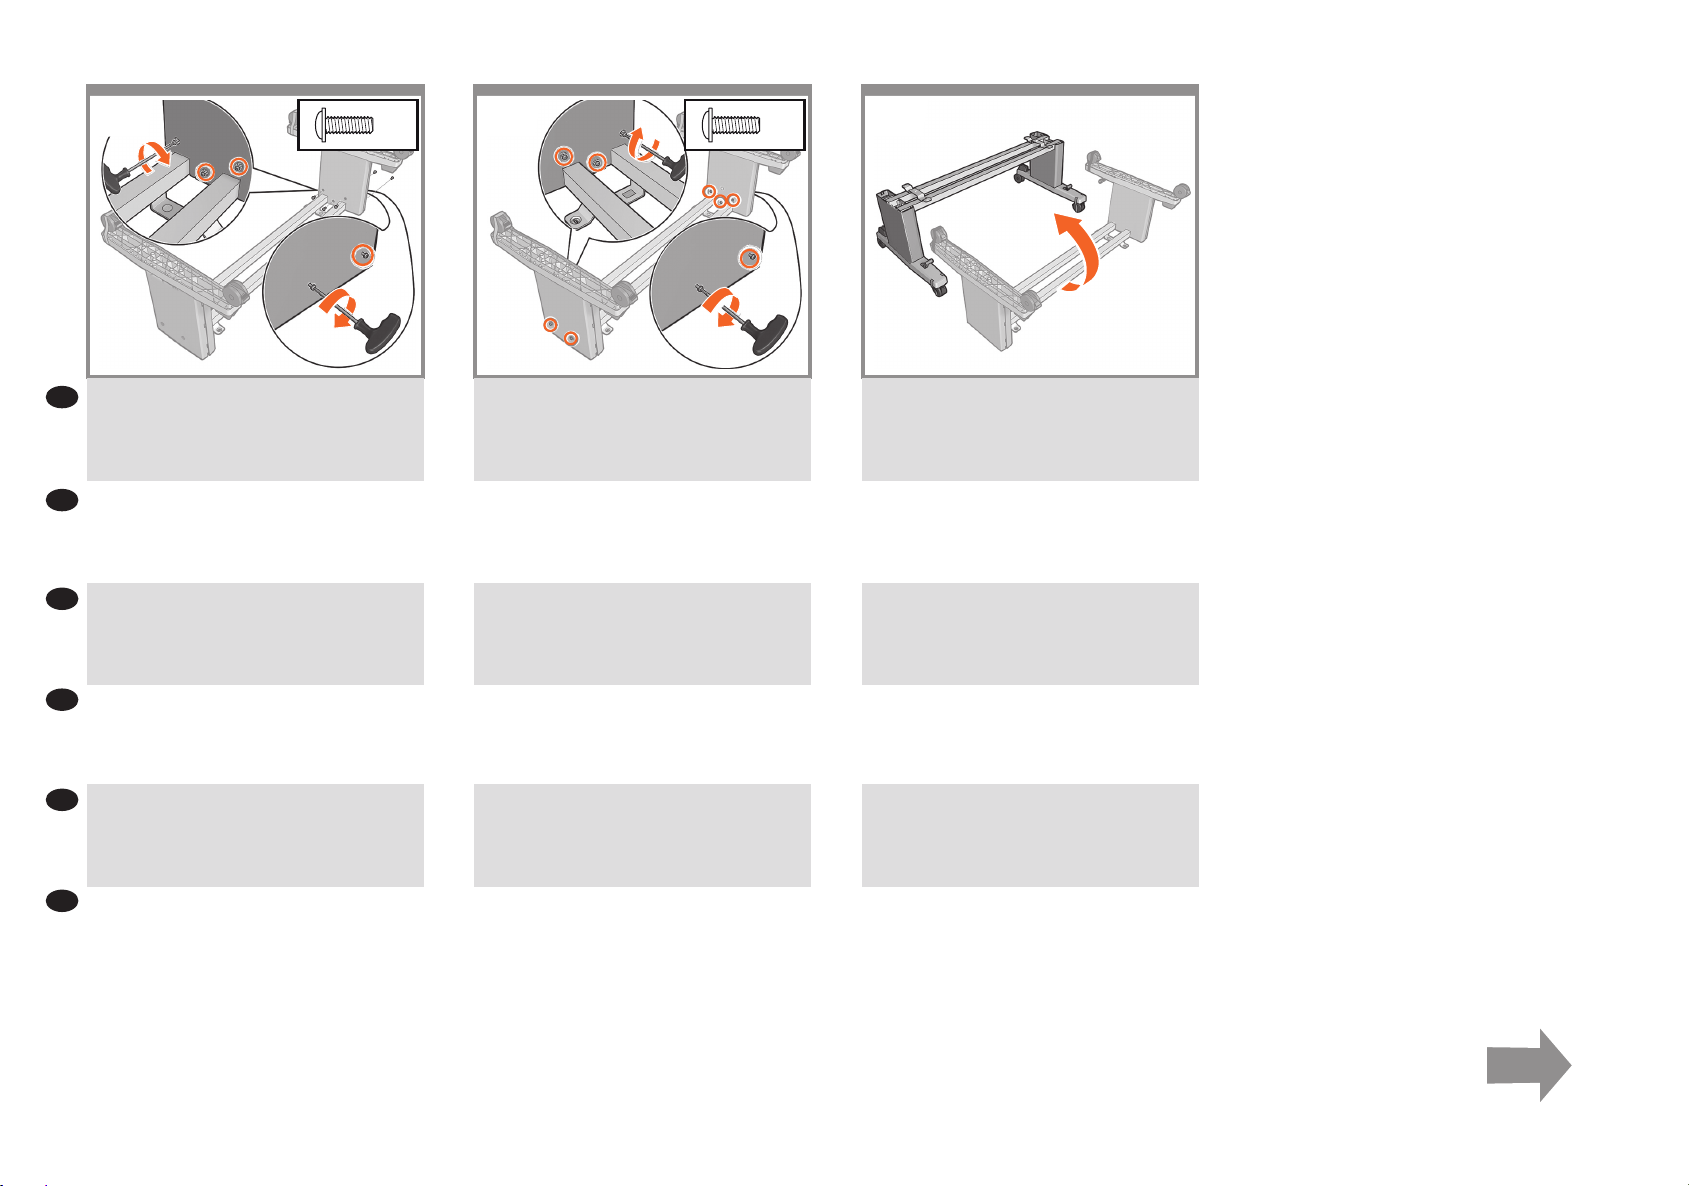
Fix the crossbar to the right leg with 5 screws, do not
tighten them fully yet.
5本のネジで右脚部にクロスバーを固定します。
JA
ここではまだネジを完全には締めないでください。
ZHCN
用 5 颗螺丝将横杆固定到右侧支腿,此时先不要
完全拧紧它们。
ZHTW
使用 5 個螺絲將橫桿固定在右腳架上,此時請勿
將其完全鎖緊。
KO
가로대를 나사 5 개로 오른쪽 다리에 고정시키고
아직 완전히 조이지 마십시오.
ID
Pasang palang ke kaki kanan dengan 5 sekrup, jangan
kencangkan sekrup sepenuhnya.”
Fully tighten all 10 screws: left and right.
左右10本のネジを すべて完全に締めます。
完全拧紧所有 10 颗螺钉: 左和右。
完全鎖緊所有 10 個螺絲: 左與右。
오른쪽과 왼쪽의 나사 10개를 모두 완전히 조입니다.
Kencangkan kesepuluh sekrup sepenuhnya: kiri dan
kanan.
Turn the stand 180° into the upright position.
スタンドを180°動かして垂直に立たせます。
将支架旋转 180°,转至竖直位置。
將機架翻轉 180°,使其直立。
스탠드를 180° 회전하여 바르게 합니다.
Putar dudukan 180° ke posisi tegak.
6
Page 7
EN
Attach the printer body to the
stand assembly
JA
スタンド アセンブリへのプリン
タ本体の取り付け
ZHCN
将打印机主体连接到支架组件
ZHTW
將印表機機身裝到機架 組件上
KO
프린터 본체를 스탠드 어셈블리
에 장착합니다
ID
Pasang badan printer ke unit
dudukan
18
19
x2
2+2
20
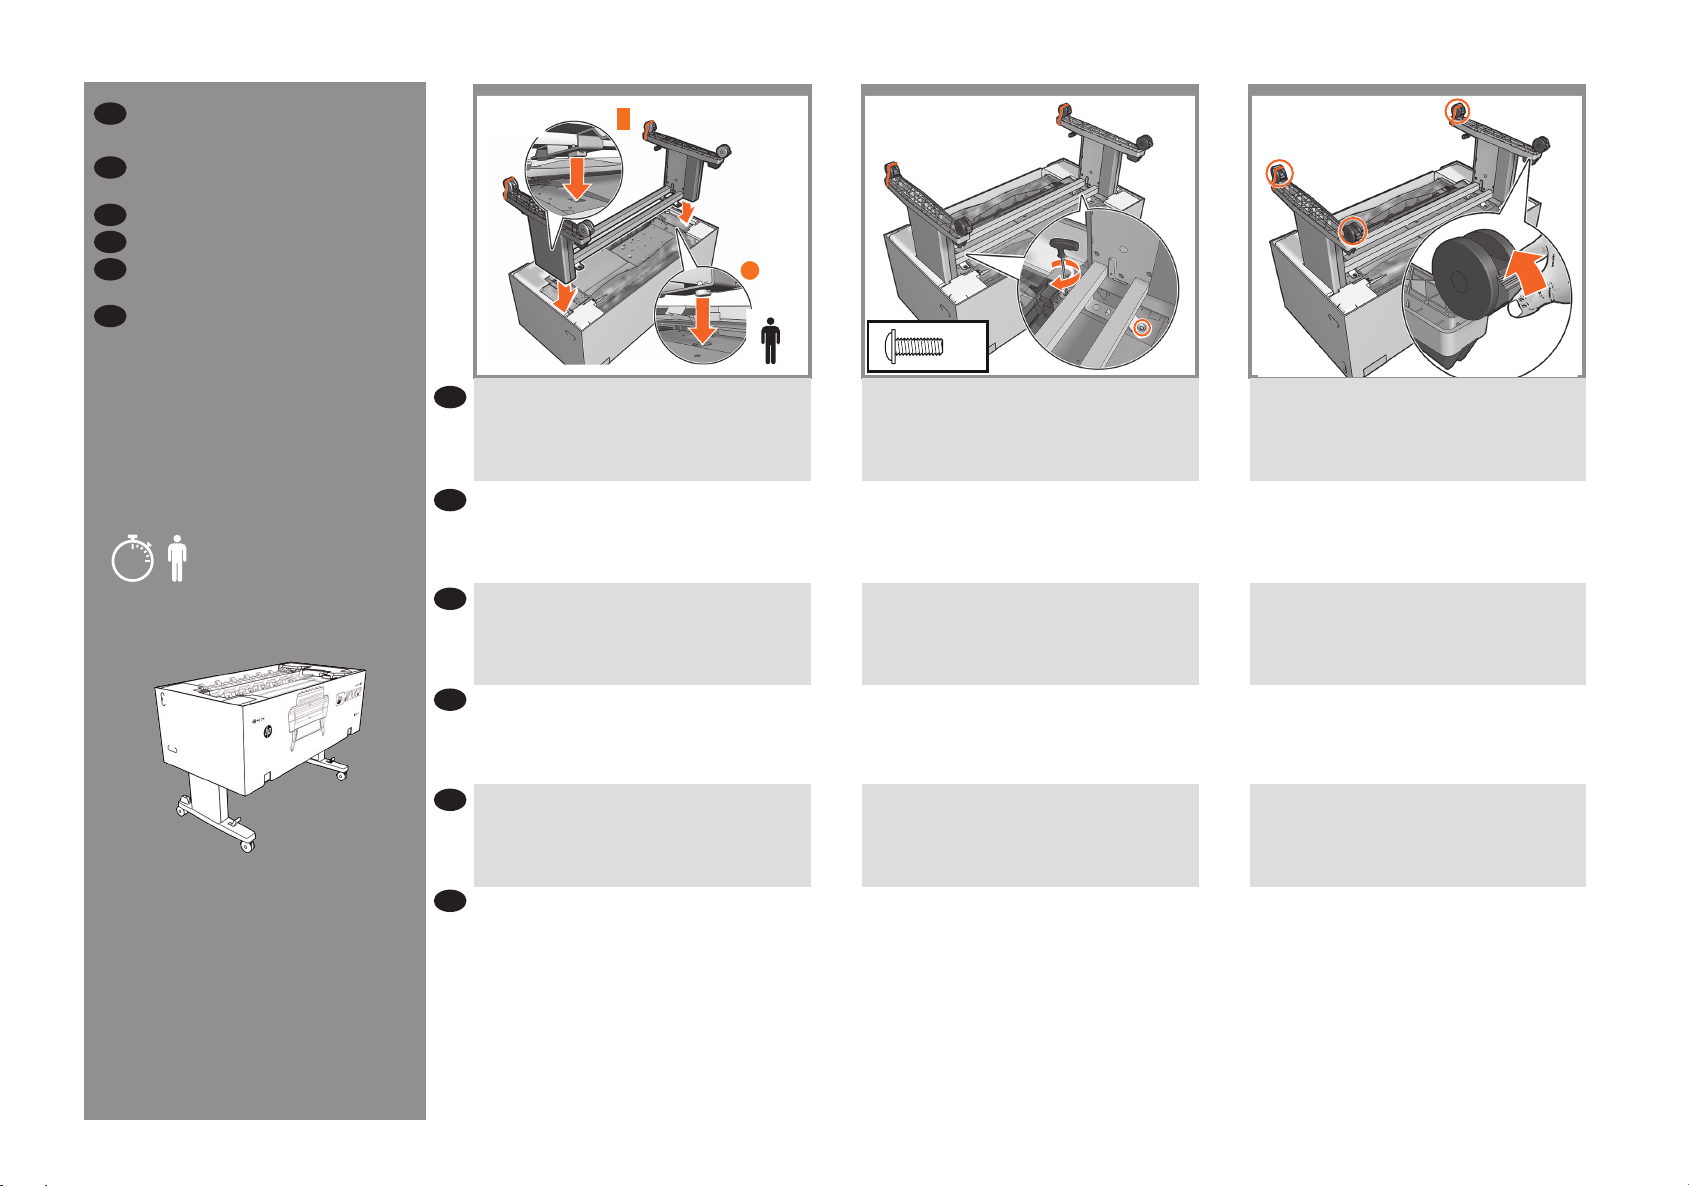
EN
Attach the stand assembly to the printer body slotting
the rectangle and circle into place. Important: Be careful
not to catch the plastic bag between the stand and
printer.
四角や円の形を合わせて差し込みながら、スタンド
JA
アセンブリをプリンタ本体に取り付けます。 重 要:
注意事項 スタンドとプリンタの間にビニール袋を挟
5’
x2
まないようにします。
ZHCN
将支架组件连接到打印机主体,以使矩形和圆圈插入
到位。 重要信息: 请小心操作,不要使塑料袋中卡
在支架和打印机之间。
ZHTW
將矩形和圓形插入定位,以將機架組件裝到印表機機
身上。 重要: 請小心,不要讓塑膠袋纏到機架和印
表機之間。
KO
스탠드 어셈블리를 사각형 및 원 모양에 맞추어
넣어서 프린터 본체에 부착합니다. 중요: 스탠드와
프린터 사이에 비닐 백이 끼지 않도록 조심하십시오.
ID
Pasang unit dudukan ke badan printer dengan
menyisipkan persegi panjang dan lingkaran pada
tempatnya. Penting: Hati-hati agar tas plastik tidak
tersangkut antara dudukan dan printer.
Fix the stand assembly to the printer body with 2 screws
each side.
2本のネジ (各側に2本ずつ) でプリンタ本体にスタン
ド アセンブリを固定します。
使用 2 颗螺钉(每侧 2 个)将支架组件固定到打印
机主体上。
每側使用 2 個螺絲,將機架組件固定在印表機機身
上。
스탠드 어셈블리를 프린터 본체에 각각 나사 2개로
고정시킵니다.
Pasang unit dudukan ke badan printer menggunakan 2
sekrup di setiap sisi.
Check the 4 wheels are locked.
4個のキャスターがロックされていることを確認し
ます。
确保 4 个脚轮已锁紧。
檢查 4 個腳輪是否都已鎖定。
4개의 휠이 잠겨있는지 확인합니다.
Pastikan keempat roda telah terkunci.
7
Page 8
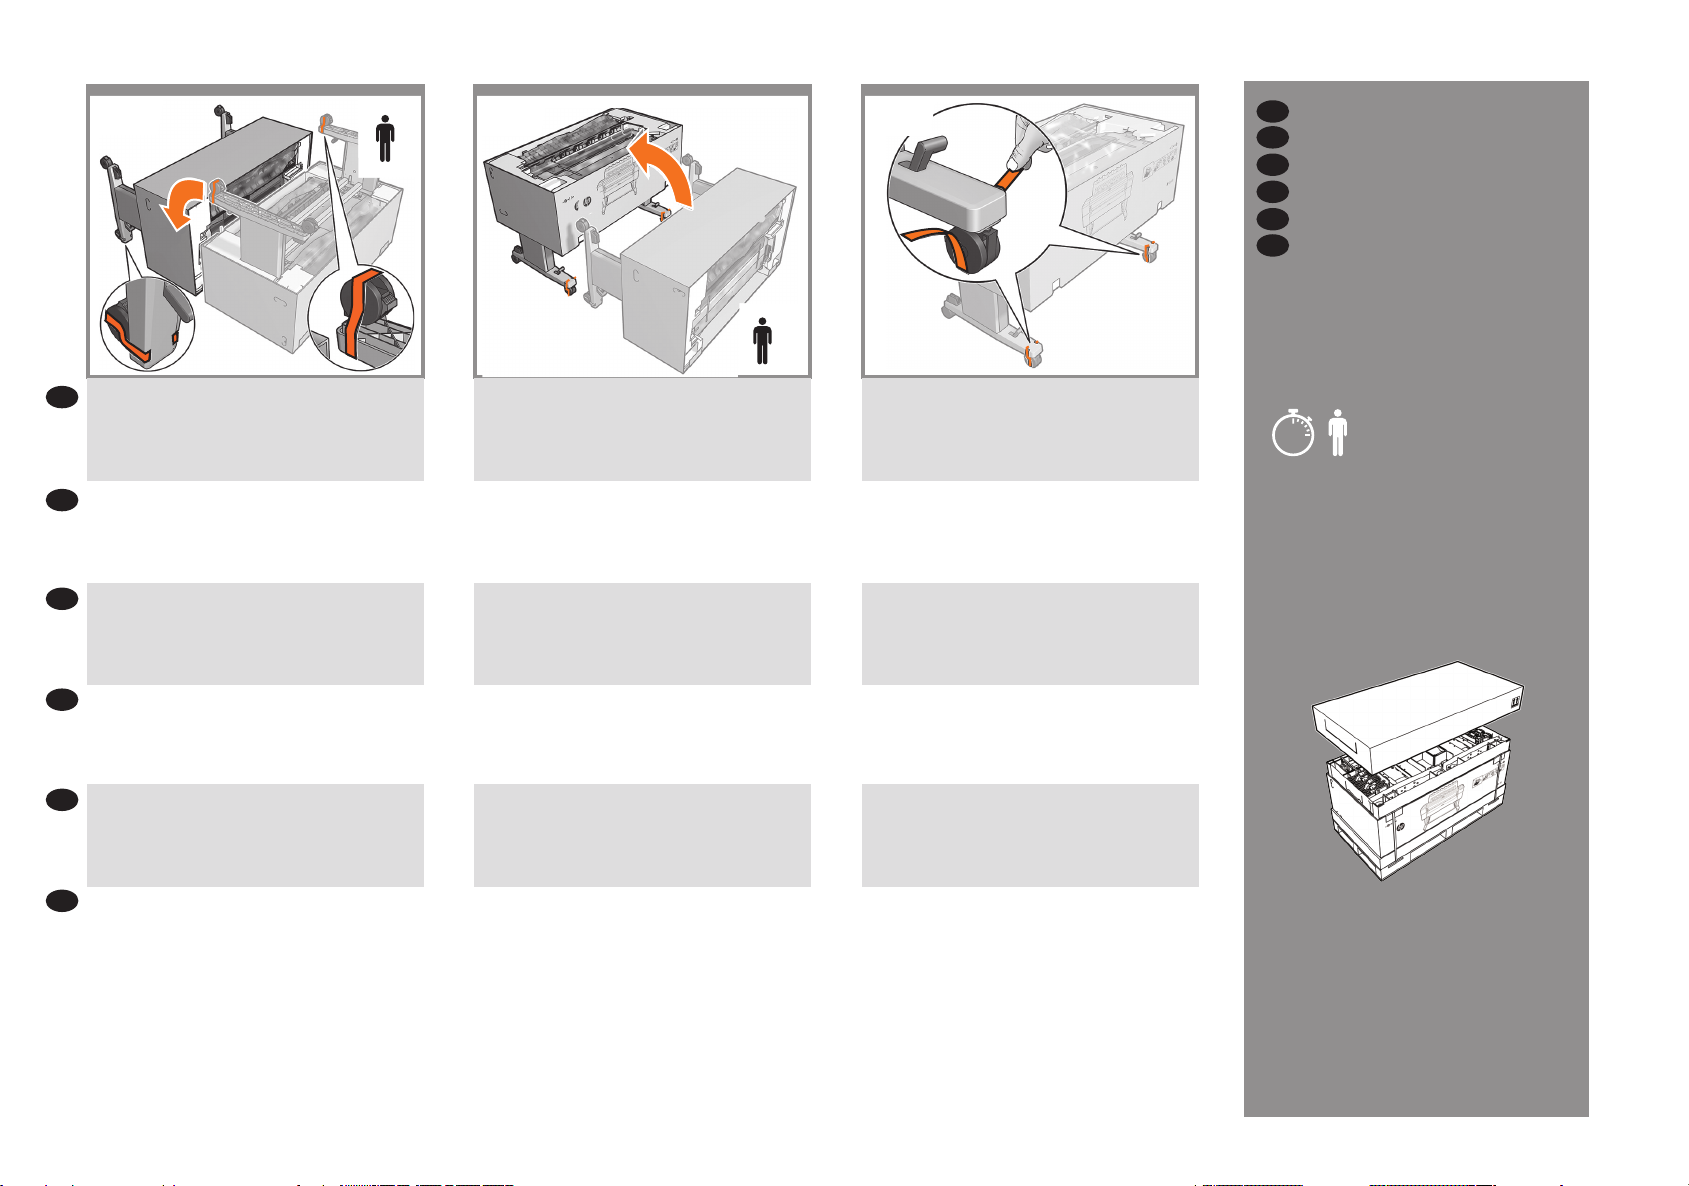
21
Rotate the printer 90°.
EN
90°
EN
x4
Rotate the printer 90° into the upright position.
90°
x4
2322
Remove the orange tapes and unlock the wheels.
Remove the packaging
JA
パッケージの開梱
ZHCN
拆开包装
ZHTW
移除包裝
KO
포장 제거
ID
Membuka kemasan
プリンタを90°回転させます。
JA
将打印机旋转 90°。
ZHCN
將印表機旋轉 90°。
ZHTW
KO
프린터를 90° 회전시킵니다.
ID
Putar printer 90°.
プリンタを90°回転させて垂直に立たせます。
将打印机旋转 90°,转至竖直位置。
將印表機旋轉 90°,使其直立。
프린터를 90° 회전시켜 똑바로 세웁니다.
Putar printer 90° ke posisi tegak.
オレンジ色のテープを取り外し、キャスターのロッ
クを解除します。
去掉橙色胶带,解锁脚轮。
撕下橘色膠帶,並解除腳輪的鎖定。
주황색 테이프를 제거하고 바퀴를 잠금 해제합니다.
Lepas pita oranye, lalu buka kunci roda.
10’
x2
8
Page 9

Remove the box.
EN
24
25
x2
Remove the 2 end caps.
26
Remove the plastic cover and the packing cloth.
27
Remove all the orange tapes.
ボックスを取り外します。
JA
ZHCN
卸下电线盒。
ZHTW
移除包裝箱。
KO
상자를 빼냅니다.
ID
Keluarkan kotak.
2個のエンド キャップを取り外します。
卸下 2 个护罩。
取下 2 個保護蓋。
2개의 양쪽 끝 진열대를 제거합니다.
Lepas kedua penutup ujung.
プラスチック カバーと梱包用の布を取り外します。
取出塑料盖和包装布。
取出塑膠護蓋和包裝布料。
플라스틱 덮개와 포장용 천을 제거합니다.
Lepas penutup plastik dan kain kemasan.
オレンジ色のテープをすべて取り外します。
撕掉所有橙色胶带。
撕下所有橘色膠帶。
주황색 테이프를 모두 제거합니다.
Lepas semua pita oranye.
9
Page 10

28
29
30
31
X2
EN
Remove the screws fro m the stacker.
スタッカからネジを 取り外します。
JA
ZHCN
从堆 积箱上 卸下螺钉。
ZHTW
取下堆疊器的螺絲。
KO
스태커에서 나사를 제거합니다.
ID
Lepas sekrup dari penumpuk.
Unfold the sta cker.
スタッカを開 きます。
打开折叠的堆积箱。
展開堆疊器。
스태커를 폅니다.
Buka penumpuk.
Fix the stacker with 2 stacker screws.
2 本のスタッカのネジでスタッカを固 定します。
用 2 颗堆积箱螺钉固定堆积箱。
使用 2 個堆疊器螺絲固定堆疊器。
스태커를 스태커 나사 2 개로 고정시킵니다.
Pasang penumpuk dengan 2 sekrup penumpuk.
Remove the car ton piece an d attach the s tacker cover
by push ing it into pl ace.
段ボール製の梱包材を取り外し、スタッカ カバーを所
定の位置に押し込んで取り付けます。
取下纸板,将堆栈器盖推送到位,完成连接。
取出紙板,然後將堆疊器護蓋推入定位加以安裝。
판지 조각을 제거하고 스태커 덮개를 해당 위치에 눌러
장착합니다.
Buka lapisan karton dan pasang penutup penumpuk
dengan menekan ke tempatnya.
10
Page 11

32 33
34
35
EN
Insert the 6 deectors.
6 個の デ フレクタを 差し込みま す。
JA
插入 6 个挡板。
ZHCN
ZHTW
插入 6 個轉向器。
KO
6개의 디플렉터를 끼웁니다.
ID
Masukkan ke-6 deektor.
Open top roll cover.
上部のロール カバーを開きます。
打开顶部卷筒盖。
打開上方捲筒紙護蓋。
상단 롤 덮개를 엽니다.
Buka penutup gulungan atas.
Remove the tape, pull the orange plas tic piece, rot ate
horizontal a nd remove. Cl ose the top roll cover.
テープを取り外し、オレンジ色のプラスチック製の部
品を引 き出して、 水 平 方 向 に 回 転 して 取 り外しま す。 上
部のロール カバーを閉じます。
撕下胶带,拉动橙色塑料件、水平转动并移除。合上顶
部卷筒盖。
拔掉膠帶、拉動橙色塑膠 組件,水平旋轉然後移除。關
閉上方捲筒紙護蓋。
테이프를 제거하고, 오렌지색 플라스틱 부분을 당겨 가
로로 돌린 다음 제거합니다. 상단 롤 덮개를 닫습니다.
Lepaskan perekat, tarik plastik oranye, putar secara
horizontal, lalu lepas. Tutup penutup gulungan atas.
Open the scan ner cover (1 and 2) and rem ove the
carton piece with tape on it (3).
スキャナ カバーを開き (1および2)、テープが取り付け
られている段ボール製の梱包材を取り外します (3)。
打开扫描仪盖板 (1和 2),并移除带有胶带的纸板 (3)。
打開掃描器護蓋 (1和2),然後取出帶有膠帶的紙板 (3)。
스캐너 덮개 (1과2) 을 열고 테이프가 붙어 있는 판지
조각 (3)를 제거합니다.
Buka penutu p pemindai (1dan 2), lalu lepas lapisan
karton berperekat (3).
11
Page 12

36
37
38
39
EN
IMPORTANT: in the followi ng step you mus t remove
the carriage retainter; be very carefu l not to touch the
encoder strip.
重 要: 以下の手順で、キャリッジ リテーナを 取り外す必
JA
要があります。 エンコーダ ストリップには触れないよ
うに注 意してください。
ZHCN
重要说明: 在下一步骤中,您必须卸下托架固定器;
请 小 心 操 作,不 要 触 碰 编 码 器 条 。
ZHTW
重要: 在下列步驟中,您必須移除托架固定器; 務必
非 常 小 心,不 要 碰 觸 編 碼 帶 。
중요: 다음 단계에서 캐리지 리테이너를 제거해야
KO
합니다. 인코더 스트립을 건드리지 않도록
주의하십시오.
ID
PENTING: Dalam langkah berikut ini, A nda harus
melepas penahan media printhead; hati-hati agar tidak
menyentuh strip enkoder.
Carefully remove th e carriage r etainer wi thout
touching the encoder strip.
エンコーダ ストリップには触れないように注意して、
キャリッジ リテーナを取り外します。
小 心地 卸 下 托架 固 定 器, 而不
触碰编码器条。
小心地移除托架固定器,
避免碰觸編碼帶。
인코더 스트립을 건드리지 않고
조심해서 캐리지 리테이너를 제거합니다.
Lepas penahan media printhead secara perlahan tanpa
menyentuh strip enkoder.
Close the scanner window.
スキャナ ウィンドウを閉じます。
盖上扫描仪护盖。
關閉掃描器窗蓋。
스캐너 창을 닫습니다.
Tutup jendela pemindai.
Remove the orange pla stic piece fr om the back of the
scanner by pulling it hard.
プラスチック製のオレンジ色の部品をスキャナの背面
からしっかりと引き出して 取り外 します。
用力拉橙色塑料板将其从扫描仪背部移除。
從掃描器背面用力拉動橙色塑膠組件以將它取出。
스캐너 뒷편에 있는 오렌지색 플라스틱 부분을 세게
당겨 제거합니다.
Lepas lapisan plastik oranye dari bagian belakang
pemindai dengan menariknya keras.
12
Page 13

40
EN
Locat e the basket pi eces and connect th e 2 elbows.
Note: the shortest b ar goes inside the basket.
バスケット部品を確認し、2個の関節部をつなげます。
JA
注 記:
短い方のバーをバスケット内部に差し込んでくだ
さい。
ZHCN
找到纸筐片并连接 2 个扶手。
注 意:
最短的杆要伸进纸筐里。
EN
Assemble the basket
JA
バ スケ ット の 取 り付 け
ZHCN
装配纸筐
ZHTW
組裝承接槽
KO
바스켓 조립
ID
Memasang keranjang
x2
5’
41
Slot the basket a rms into the feet until they cl ick into
place.
所定の位 置に固定されるまでバスケット アームを脚部
に差し込みます。
将纸筐臂插入支脚,直到其卡入到位。
42
Remove the tape, and feed the basket thr ough to the
front of the pri nter.
テープを取り外し、プリンタの前面にバスケットを挿入
します。
撕下胶带,并将纸筐馈送到打印机的前部。
13
ZHTW
找到承接槽零件並連接 2 個肘。
注 意:
最短的桿子會進入承接槽內部。
KO
바스켓 조각을 찾아서 2개의 엘보우를 연결합니다.
참고 :
가장 짧은 막대는 바스켓 안에 넣습니다.
ID
Cari potongan keranjang, lalu sambungkan kedua
potongan tersebut.
Catatan: panel t erpendek h arus dimas ukkan ke dal am
keranjang.
將承接槽臂插入支腳直到卡入定位。
바스켓 가로대를 피트에 찰칵하는 소리가 날 때까지
끼웁니다.
Masukkan lengan ker anjang ke dal am kaki hingga
terpasang dengan benar pada tempatnya.
撕下膠帶,並將承接槽穿過到印表機前方。
테이프를 제거하고 프린터 전면을 통해 바스켓을 공급
합니다.
Lepas pita, l alu masukkan keran jang melalui bagian
depan printer.
Page 14

43
44
45
46
EN
Slot the bar thr ough the bas ket.
バーをバスケットに差し込みます。
JA
将条杆插入整个纸筐。
ZHCN
ZHTW
將桿子穿過承接槽。
KO
바스켓을 통해 막대를 넣습니다.
ID
Masukkan palang melalui keranjang.
Slot the basket i nto place.
バスケットを所定の位置に固定します。
将支架插入到位。
將承接槽插入定位。
바스켓을 제자리에 넣습니다.
Masukkan keranjang pada tempatnya.
Make su re the basket is open; th is indicates the am ount
of dist ance requi red at the back o f the printer from a
wall or object.
バスケットが開いていることを確認します。 これは、
プリンタの背面を壁や近くの物からある程度離す必要
があるこ とを 示 していま す。
请确保纸筐打开。 这表示打印机背面需要与墙面或物
体之间保持的距离量。
確定承接槽是打開的; 這麼做才會在印表機背部與牆
壁或物體 之間保留必要的距離。
바스켓이 열려 있는지 확인합니다. 벽이나 물체로부터
프린터 뒷면까지 띄어야 하는 거리를 표시합니다.
Pastikan keranjang telah dibuka; hal ini menunjukkan
jarak yang diperlukan di bagian belakang printer dari
dinding atau objek tertentu.
Unlock the wheels.
キャスターのロックを解除します。
解锁脚轮。
解除腳輪的鎖定。
바퀴를 잠금 해제합니다.
Buka kunci roda.
14
Page 15

47
EN
Move th e printer to its nal d estination.
プリンタを最 終 的に設 置する場 所に移動しま す。
JA
EN
Set up the printer
JA
プ リ ンタ を セ ットアップ す る
ZHCN
设置打印机
ZHTW
設定印表機
KO
프린터 설치
ID
Membuat pengaturan awal
printer
40’
x2
48
IMPORTANT: Attach the cables into the gutter: route the
cables to the side that you wish to attach the power cable
to an outlet from; to the left shown in this step, to the
right shown in the next step. Note: the LAN cable is not
provided.
重 要: ケーブル を 溝 に 取り付け ます。 電源 ケーブル を
コンセントに接続する側にケーブルを回します。 こ
の手順では左側、次の手順では右側に回します。 注
記:L A N ケ ーブル は付属して い ま せん 。
49
Power cables attached to the right.
電 源 ケーブル を右側に接 続します。
将打印机移到最终目标位置:
ZHCN
ZHTW
將印表機移至最後的定位。
KO
프린터를 최종 위치로 옮깁니다.
ID
Pindahkan printer ke lokasi akhir.
重要说明: 将电缆连入装订线: 将电缆伸到您想要将
电源线 从中连接到插座的一侧; 此步骤中所示的左侧,
下一步骤中所示的右侧。 注意:没有提供 LAN 电缆。
重要: 將纜線裝到溝槽上: 沿著您要將電源線連接到
電源插座的那一面繞接纜線; 如本步驟所示的左側,
然後繞接到右側,如下一個步驟所示。
注意:未提供 LAN 纜線。
중요: 케이블을 거터에 연결합니다. 이 단계에
표시된 것처럼 왼쪽으로, 다음 단계에 표시된 것처럼
오른쪽으로, 콘센트에 전원 케이블을 연결하고
싶은 쪽으로 케이블을 뺍니다. 참고: LAN 케이블은
제공되지 않습니다.
PENTING: Pasang kabel ke dalam saluran: rutekan kabel
ke sisi yang ingin digunakan untuk memasang kabel daya
ke stopkontak; sisi kiri ditunjukkan dalam langkah ini, sisi
kanan ditunjukkan dalam langkah berikutnya. Catatan:
kabel LAN tidak diberikan.
连接到右侧的电源线。
電源線 連接到右側。
전원 케이블이 오른쪽으로 연결되었습니다.
Kabel daya dipasang ke sisi kanan.
15
Page 16

50
51
52
53
Note: make sure that the cables do not hang out in order
EN
to avoid jams when printing to the basket.
注記: バスケットへの印刷時に紙詰まりが起こる
JA
のを防ぐため、ケーブルは垂れ下がらないように
します。
注意: 确保电缆不伸出,以避免在打印到纸筐时卡
ZHCN
纸。
附註: 確定纜線沒有懸掛著,以免在列印至承接槽時
ZHTW
造成卡紙。
참고: 바스켓으로 인쇄할 때 용지 걸림을 방지하기
KO
위해 케이블이 늘어지지 않도록 확인합니다.
Catatan: Pastikan kabel tidak menggantung keluar agar
ID
tidak terjadi kemacetan saat mencetak ke keranjang.
IMPORTANT: Connect the LAN and power cable. Switch
the printer on at the back only. Lock the wheels.
重 要: LANケーブルと電源ケーブルを接続します。
背面のスイッチを使用してプリンタの電源を入れま
す。 キャスターをロックします。
重要说明: 连接 LAN 和电源线。 仅在背面打开打印
机。 锁定脚轮。
重要: 連接 LAN 纜線和電源線。 僅開啟背面的印表
機電源開關。 鎖定腳輪。
중요: LAN 및 전원 케이블을 연결합니다. 뒷면에서만
프린터를 켭니다. 바퀴를 잠급니다.
PENTING: Sambungkan kabel LAN dan kabel daya.
Hidupkan printer hanya di bagian belakang. Kunci roda.
Select your language on the touch screen, and conrm it.
タッチスクリーンで言語を選択し、確定します。
在触摸屏上选择所需语言,并对其进行确认。
在觸控螢幕上選擇您的語言,並加以確認。
터치 스크린에서 언어를 선택하고 확인합니다.
Pilih bahasa di layar sentuh, lalu konrmasikan.
Selecteer uw taal op het aanraakscherm en bevestig.
The front panel will ask you to install the ink cartridges.
フロントパネルに、インク カートリッジを取り付け
るように表示されます。
前面板将要求您安装墨盒。
前控制面板會要求您安裝墨水匣。
전면 패널에 잉크 카트리지를 끼우라는 메시지가
표시됩니다.
Panel depan akan menanyakan apakah Anda ingin
memasang kartrid tinta.
16
Page 17

54
55
56
57
EN
Open the ink cartridge covers (left and right).
インク カートリッジ カバー (左と右) を開きます。
JA
ZHCN
打开墨盒盖板(左和右)。
ZHTW
開啟墨水匣護蓋(左和右)。
KO
잉크 카트리지 덮개(왼쪽 및 오른쪽)를 엽니다.
ID
Buka penutup kartrid tinta (kiri dan kanan).
Shake all the ink cartridges.
すべてのインク カートリッジを振ります。
摇动所有墨盒。
搖晃所有墨水匣。
모든 잉크 카트리지를 흔듭니다.
Goyang semua kartrid tinta.
Insert the ink cartridges: black, gray, and matte black on
the left, cyan, magenta, and yellow on the right. A beep is
heard when the cartridges are inserted correctly.
Iインク カートリッジを挿入します。 左側にブラッ
ク、グレー、およびマット ブラック、右側にシア
ン、マゼンタ、およびイエローを挿入します。 カ
ートリッジが正しく挿入されるとビープ音が鳴り
ます。
插入墨盒: 左侧的黑色、灰色和消光黑色,右侧的青
色、洋红色和黄色。 当墨盒正确插入后,会听到一
声蜂鸣音。
插入墨水匣: 黑色、灰色和消光黑在左邊,青色、
洋紅色和黃色在右邊。 墨水匣正確插入時,您會聽
到嗶聲。
잉크 카트리지를 넣습니다. 왼쪽은 검정, 회색 및 검정
(무광), 오른쪽은 노란색입니다. 카트리지를 잘못
넣으면 경고음이 울립니다.
Masukkan kartrid tinta: hitam, abu-abu, dan hitam matte
di sebelah kiri, cyan, magenta, dan kuning di sebelah
kanan. Bunyi bip akan terdengar bila kartrid telah
dimasukkan dengan benar.
Close the ink cartridge covers (left and right).
インク カートリッジ カバー (左と右) を閉じます。
合上墨盒盖板(左和右)。
關上墨水匣護蓋(左和右)。
잉크 카트리지 덮개(왼쪽 및 오른쪽)를 닫습니다.
Tutup penutup kartrid tinta (kiri dan kanan).
17
Page 18

58
59
60
61
EN
The printer will now prepare the ink system for use.
When the process nishes a message appears asking you
to open the window.
JA
次に、プリンターで使用するインク システムを設定
します。 処理が完了すると、メッセージが表示さ
れ、ウィンドウを開きます。
ZHCN
打印机现在将准备墨水系统以便使用。 当此过程
完成后,会显示一条消息,要求您打开
护盖。
ZHTW
印表機現在會準備墨水系統以供使用。 此程序
完成時,會出現一則訊息要求您打開 上蓋。
KO
이제 프린터가 잉크 시스템을 사용할 수 있도록
준비합니다. 절차가 끝나면 창을 열지 묻는 메시지가
표시됩니다.
ID
Sekarang printer akan mempersiapkan sistem tinta
untuk digunakan. Setelah proses selesai, pesan akan
ditampilkan untuk meminta Anda membuka
jendela.
When prompted, open the scanner window.
メッセージが表示されたら、スキャナ ウィンドウを
開きます。
提示时,打开扫描仪护盖。
出現提示時,打開掃描器窗蓋。
메시지가 표시되면 스캐너 창을 엽니다.
Bila diminta, buka jendela pemindai.
Lift up the printhead cover handle.
プリントヘッド カバー ハンドルを持ち上げます。
提起打印头护盖手柄。
提起印字頭護蓋把手。
프린트헤드 덮개 핸들을 들어 올립니다.
Angkat gagang penutup printhead.
Pull the blue handle up as far as it will go.
青いハンドルを、いっぱいまで上に引き出します。
将蓝色手柄向上拉动,直到拉不动为止。
將藍色把手拉到底。
파란 손잡이를 최대한 위로 당깁니다.
Tarik gagang biru ke atas sepenuhnya.
18
Page 19

62
63
64
65
Open the printhead cover by pulling the handle down.
EN
ハンドルを下に引いて、プリントヘッド カバーを
JA
開きます。
通过将手柄向下拉动,打开打印头盖。
ZHCN
將把手向下拉以打開印字頭護蓋。
ZHTW
핸들을 끌어 내려 프린트헤드 덮개를 엽니다.
KO
Buka penutup printhead dengan menarik gagang ke
ID
bawah.
Remove the orange caps from inside the carriage.
キャリッジの内部からオレンジ色のキャップを取り
外します。
从卡式盒内侧取下橙色保护帽。
請將托架內部的橘色蓋子移除。
오렌지색 캡을 캐리지에서 제거하십시오.
Lepaskan tutup oranye dari bagian dalam media.
Insert the printhead.
プリントヘッドを挿入します。
插入打印头。
插入印字頭。
프린트헤드를 삽입합니다.
Pasang printhead.
Check the printhead is correctly aligned. Note: do not
insert the nozzles yet.
プリントヘッドが正しく軸合わせされていることを
確認します。注記: ここではノズルは挿入しないで
ください。
注記: ここではノズルは挿入しないでください。
确定打印头正确对齐。 注意: 此时先不要插入喷嘴。
檢查印字頭是否正確對齊。 附註: 此時請勿插入噴
嘴。
프린트헤드가 잘 맞는지 확인합니다. 참고: 노즐을
아직 삽입하지 마십시오.
Pastikan printhead telah disejajarkan dengan benar.
Catatan: Jangan masukkan nosel sekarang.
19
Page 20

66
Lift the printhead cover handle.
EN
67
Push the handle down to clip the cover to the bar.
68 69
Pull the handle down to close the cover.
Push down to close the cover completely.
プリントヘッド カバー ハンドルを持ち上げます。
JA
提起打印头护盖手柄。
ZHCN
提起印字頭護蓋把手。
ZHTW
프린트헤드 덮개 핸들을 들어 올립니다.
KO
Angkat gagang penutup printhead.
ID
ハンドルを下に押して、カバーをバーに固定しま
す。
将手柄向下推送,以将盖板夹紧到条杆。
將把手往下推以將護蓋扣到桿子上。
덮개가 막대에 끼워지도록 핸들을 아래로 누릅니다.
Tekan gagang ke bawah untuk mengaitkan penutup ke
palang.
ハンドルを下に引いて、カバーを閉じます。
将手柄向上拉动,以合上盖板。
將把手向下拉以關上護蓋。
핸들을 아래로 당겨서 덮개를 닫습니다.
Tarik gagang ke bawah untuk menutup penutup.
カバーを押して完全に閉じます。
向下推送以完全合上盖板。
向下按壓,將護蓋完全關上。
덮개를 눌러서 완전히 닫습니다.
Tekan ke bawah untuk menutup penutup sepenuhnya.
20
Page 21

70
EN
Close the scanner window and press OK.
スキャナ ウィンドウを閉じて [OK] を押します。
JA
ZHCN
盖上扫描仪护盖并按 OK。
10’
The tubes will now ll. This will take about 10 minutes;
please wait until completed before continuing.
Note: Do not maniputale the printer during this process.
チューブにインクが供給されます。 これには10分程
度かかる場合があります。完了するまで待機してか
ら、次に進んでください。
注記:この処理中はプリンタを操作しないでくだ
さい。
墨水管现在将是已满状态。 此过程将需要约 10 分钟
的时间。请稍候,直到完成,然后再继续操作。
注意:此过程中请勿操作打印机。
EN
Load the paper
JA
用紙の取り付け
ZHCN
装入纸张
ZHTW
裝入紙張
KO
용지 넣기
ID
Isikan kertas
5’
7271
Push the latch, and open the upper front roll cover.
x2
ラッチを押し、前面上部のロール カバーを開きま
す。
推动闩锁,打开前上部卷筒盖。
21
ZHTW
關閉掃描器窗蓋,然後按 OK。
KO
스캐너 창을 닫고 [OK]를 누릅니다.
ID
Tutup jendela pemindai, lalu tekan OK.
墨水管現在會開始填充。 此動作大約需要 10 分鐘;
請等到此動作完成後再繼續。
注意:請勿在此程序期間操作印表機。
이제 튜브가 채워집니다. 이 작업에는 약 10
분이 소요됩니다. 계속하기 전에 완료될 때까지
기다리십시오.
참고: 이 작업 중에는 프린터를 조작하지 마십시오.
Tabung kini akan diisi. Proses ini akan berlangsung
selama sekitar 10 menit; tunggu hingga proses selesai
sebelum melanjutkan.
Catatan: Jangan ubah pengaturan printer selama proses
ini berlangsung.
推動閂鎖,並打開上方的前捲筒紙護蓋。
걸쇠를 밀고 상단 앞쪽 롤 덮개를 엽니다.
Dorong kait, lalu bu ka penutup g ulungan di b agian
depan atas.
Page 22

73
74
75
76
Remove the orange tap es and two sma ll carton pieces.
EN
オレンジ色のテープを剥がし、2個の小さな段ボール製
JA
の梱包 材 を取り外します。
撕下橙色胶带并移除两个小纸板。
ZHCN
取下橙色膠帶和兩個小紙板。
ZHTW
오렌지색 테이프와 두 개의 작은 판지 조각을
KO
제거합니다.
ID
Lepas perekat oranye dan dua lapisan karton kecil.
Remove the spindle and remove the orange tape and
carton piece.
スピンドルを取り外し、オレンジ色のテープと梱包
部品を取り外します。
取下卷轴并撕下橙色胶带和包装箱片。
取出捲軸並移除橘色膠帶和紙板。
스핀들을 제거하고 주황색 테이프와 상자 조각을
제거합니다.
Keluarkan penggulung, lalu lepas pita oranye dan
potongan karton.
Unlock (1), and remove the blue hub (2).
青色のハブのロックを解除し (1)、取り外します
(2)。
解锁 (1), 然后卸下蓝色轮毂 (2)。
解除鎖定 (1),然後取下藍色輪軸 (2)。
잠금을 해제하고(1), 파란색 허브를 제거합니다(2).
Buka kunci (1), lalu lepas hub biru (2).
Load the paper (1), replace, and lock the blue hub (2).
用紙を取り付け (1)、青色のハブを元の位置に戻して
ロックします (2)。
装入纸张 (1),重新安装,然后锁定蓝色轮毂 (2)。
裝入紙張 (1),裝回並鎖定藍色輪軸 (2)。
용지를 넣고(1), 교체한 다음 파란색 허브를 잠급니다
(2).
Masukkan kertas (1), pasang kembali, lalu kunci hub
biru (2).
22
Page 23

77
78
79 80
Replace the spindle.
EN
EN
スピンドルを元の位置に戻します。
JA
JA
重新安装卷轴。
ZHCN
ZHCN
ZHTW
ZHTW
裝回捲軸。
KO
KO
스핀들을 교체합니다.
ID
ID
Pasang kembali penggulung.
Insert the paper edge into the printer.
用紙の端をプリンタに差し込みます。
将纸张边缘插入打印机。
將紙張的邊緣插入印表機。
용지의 가장자리를 프린터 안으로 넣습니다.
Masukkan tepi kertas ke dalam printer.
Feed the paper into the printer.
プリンタに用紙を挿入します。
将纸张馈送到打印机中。
將紙張送入印表機。
프린터에 용지가 공급됩니다.
Masukkan kertas ke dalam printer.
Roll the paper in.
用紙を巻き取ります。
将纸张卷入。
將紙張捲入。
용지가 말려 들어갑니다.
Gulung kertas ke dalam.
23
Page 24

81
82
83
EN
Follow steps 74 - 80 for the 2nd roll.
2個目のロールで、ステップ74から80の手順を実行
JA
してください。
ZHCN
对第二个卷筒执行步骤 74-80。
ZHTW
第二個捲筒紙,請依照步驟 74 - 80 進行。
KO
두 번째 롤에 대해 위의 74-80 단계를 수행합니다.
ID
Ikuti langkah 74-80 untuk gulungan kedua.
When the roll/rolls are loaded, the printer will align the printheads. This process involves printing, and needs the paper
to have a straight leading edge. Note: printhead alignment requires paper at least 24in (61cm) wide. Roll paper is
recommended. At the end of the process, a print will exit to the basket, and another to the stacker.
1つまたは複数のロールを取り付けると、プリンタでプリントヘッドが調整されます。 この処理では印刷が行わ
れるので、先端がまっすぐな用紙を使用する必要があります。 注記: プリントヘッドの軸合わせには、幅24イ
ンチ (61cm) 以上の用紙が必要です。 ロール紙を推奨します。 処理が完了すると、印刷物はバスケットに排出さ
れ、それ以外はスタッカに排出されます。
装入卷筒(一个或多个)时,打印机将对齐打印头。 此过程涉及打印,因此需要纸张具有平直的前缘。 注意: 打
印头对齐需要宽度至少为 24 英寸(61 厘米)的纸张。 建议使用卷筒纸张。 在此过程末尾,一个打印件将退出到
纸筐,另一个打印件将退出到堆积箱。
捲筒紙裝入之後,印表機將會校正印字頭。 此程序需要進行列印,而且必須使用一些前緣平直的紙張。 附註: 印
字頭校正需要至少寬 24 英吋(61 公分)的紙張。 建議使用捲筒紙。 程序結束時,將有一份圖件退出到承接槽,
另有一份退出到堆疊器。
롤이 로드되면 프린터가 프린트헤드를 정렬합니다. 이 절차에는 인쇄 작업이 포함되므로 앞쪽 끝이 곧게 펴진
용지가 필요합니다. 참고: 프린트 헤드 정렬을 수행하기 위해 최소 61cm(24인치) 너비의 용지가 필요합니다. 롤
용지를 사용하는 것이 좋습니다. 절차가 끝나면 한 인쇄물은 바스켓으로 나오고 다른 인쇄물은 스태커로 나옵니다.
Bila gulungan telah dimasukkan, printer akan menyelaraskan printhead. Proses ini melibatkan pencetakan dan bagian
tepi atas kertas harus lurus. Catatan: Penyelarasan printhead memerlukan kertas dengan lebar minimal 24 inci (61 cm).
Sebaiknya gunakan kertas gulung. Di akhir proses, sebagian hasil cetak akan masuk ke keranjang dan hasil cetak lainnya
masuk ke penumpuk.
MAC users only: for full control of this DesignJet
product; HP recommends the installation and use of HP
product software.
MACユーザーのみ: このDesignJet製品を十分に
活用していただくため、HPはHP製品のソフト
ウェアのインストールと使用をお勧めしていま
す。
ソフトウェア
仅限 MAC 用户: 可实现对此 DesignJet 产品的完
全控制;HP 建议您安装和使用 HP 产品
软件。
僅適用於 MAC 使用者: 為了完全掌控此
DesignJet 產品; HP 建議您安裝並使用 HP 產品
軟體。
MAC 사용자만 해당: 디자인젯 제품의 완전한 제어를
위해 HP는 HP 제품 소프트웨어를 설치하고 사용할
것을 권장합니다.
Hanya pengguna Mac: Untuk kontrol penuh atas
produk DesignJet ini; HP menyarankan penginstalan
dan penggunaan perangkat lunak produk HP.
24
Page 25

HP ePrint: Enable email printing
EN
1. Make sure that your printer is correctly connected to the Internet.
2.Enable Web Services during initial setup of the printer, or later following the instructions on the front panel. The printer may need to restart if it has updated its rmware.
Mobile Printing
With HP Mobile Printing Solutions you can print straight from your smartphone or tablet in just a few simple steps wherever you are; using your mobile device OS or sending an email to
your printer with a PDF attachment.
You can also benefit from automatic firmware updates after following this setup.
JA
HP ePrint: 電子メール印刷の有効化
1. プリンタがインターネットに正しく接続されていることを確認します。
2.プリンタの初期セットアップ中にWeb サービスを有効にします。または、フロントパネルの指示に従って後で行うこともできます。 ファームウェアがアップデート
されたら、再起動する必要がある場合があります。
Mobile Printing
HPモバイル印刷ソリューションを使用すると、どこにいてもスマートフォンやタブレットから少しの手順で直接印刷することができます。 その際、モバイル デバイ
スのOSを使用するか、電子メールに PDF を添付してプリンタに送信します。
このセットアップを行った後は、自動ファームウェア アップデートを利用できます。
ZHCN
HP ePrint: 启用电子邮件打印
1. 确保打印机正确连接到 Internet。
2. 在初次设置打印机期间启用 Web 服务,或者以后按主屏幕并按照前面板上的说明进行操作。 如果打印机更新了固件,则可能需要重新启动打印机。
Mobile Printing
通过使用 HP 移动打印解决方案,无论您在哪里,都可以通过几个简单步骤直接从智能手机或平板电脑中进行打印: 使用移动设备操作系统,或向打印机发送包含 PDF 附
件的电子邮件。
在进行该设置后,您还可以利用自动固件更新功能。
ZHTW
HP ePrint: 啟用電子郵件列印
1. 確認印表機已經正確連線到網際網路。
2. 在印表機初始設定期間啟用 Web 服務;或者,然後依照前控制面板上的指示執行。 如果印表機已更新其韌體,可能需要重新啟動。
Mobile Printing
无论您在哪里,都可以通过几个简单步骤直接从智能手机或平板电脑中进行打印: 使用移动设备操作系统,或向打印机发送包含 PDF 附件的电子邮件。
遵循此設定後您也可享有自動韌體更新。
KO
HP ePrint: 이메일 인쇄 활성화
1. 프린터가 인터넷에 제대로 연결되어 있는지 확인합니다.
2.프린터 초기 설정 도중 또는 나중에 전면 패널의 지침을 따라 웹 서비스를 사용할 수 있습니다. 펌웨어를 업데이트한 경우 프린터를 다시 시작해야 할 수도 있습니다 .
Mobile Printing
HP Mobile Printing 솔루션을 사용하여 어디서나 간편하게 몇 단계만 거쳐 스마트폰 또는 태블릿에서 바로 인쇄할 수 있습니다. 모바일 장치 OS를 사용하거나 PDF 를 첨부
하여 프린터로 이메일을 전송합니다.
설정 후에 자동 펌웨어 업데이트도 활용할 수 있습니다.
ID
HP ePrint: Mengaktifkan pencetakan melalui email
1. Pastikan printer telah tersambung dengan benar ke Internet.
2. Aktifkan Layanan Web saat kongurasi awal printer berlangsung atau nanti, mengikuti petunjuk di panel depan. Printer mungkin perlu dihidupkan ulang jika rmware telah
diperbarui.
Mobile Printing
Dengan Solusi Pencetakan Melalui Perangkat Bergerak HP, Anda dapat mencetak langsung dari smartphone atau tablet hanya dengan beberapa langkah mudah di mana pun Anda
berada: menggunakan OS perangkat bergerak atau mengirim email ke printer dengan lampiran PDF.
Anda juga dapat memanfaatkan pembaruan
rmware otomatis setelah mengikuti kongurasi ini.
84
The connectivity wizard will now start and take you
step by step through connecting your printer to the
internet. Click continue to follow the steps.
接続ウィザードが開始し、ステップバイステップ
の手順でプリンタをインターネットに接続しま
す。 [続行] をクリックし、手順に従ってくださ
い。
连接向导现在将启动并引导您 按步骤将打印机连接
到 Internet。 单击继续以按步骤进行操作。
連線精靈即將啟動並帶領您 逐步完成將印表機連
線至網際網路的程序。 按一下「繼續」執行下列
步驟。
이제 연결 마법사가 단계별로 프린터를 인터넷에
연결하는 작업을 시작합니다. 단계를 따르려면
계속을 클릭하십시오.
Wizard konektivitas kini akan dijalankan untuk
memandu Anda melalui langkah demi langkah dalam
menyambungkan printer ke Internet. Klik lanjut untuk
mengikuti langkah-langkah yang ada.
25
Page 26

85
86 87
EN
A screen appears explaining what steps you will
need to complete, click ´Continue´.
画面に、完了する必要がある手順が表示された
JA
ら、[続行] をクリックします。
将会显示一个屏幕,解释您将需要完成的
ZHCN
步骤,请单击“继续”。
隨即出現一個畫面,說明您 需要完成的步驟,請按
ZHTW
一下「繼續」。
KO
완료해야 하는 단계에 대해 설명하는 화면에
표시되면 ‘계속’을 클릭합니다.
ID
Layar akan muncul untuk menjelaskan langkah yang
harus Anda selesaikan, klik ´Continue´ (Lanjut).
Your network conguration connectivity will now be
veried, click ´Check´.
Retrieve the printer’s email address.
For more information visit: HP Connected
ネットワーク設定の接続を確認したら、[確認]をク
リックします。
プリンタの電子メール アドレスを取得します。
詳細については、次を参照してください: HP
Connected
您的网络配置连接现在将被验证,请单击“检查”。
检索打印机的电子邮件地址。
欲知详情,请访问: HP Connected
現在將驗證您網路組態的連線能力,請按一下「檢
查」。
擷取印表機的電子郵件地址。
詳情請上網查詢: HP Connected
이제 네트워크 구성 연결이 확인되면 ‘확인’을
클릭합니다.
프린터의 이메일 주소를 검색합니다.
자세한 정보는 다음 사이트를 참조하십시오. HP
Connected
Konektivitas kongurasi jaringan sekarang akan
diverikasi, klik ´Check´ (Periksa).
Ambil alamat email printer.
Untuk informasi lebih lanjut, kunjungi: HP Connected
Print from your smartphone or tablet
• iOS printing is enabled through Airprint, no installation is required.
• For Android printing, install the “HP Print Service App” from Google Play.
For more information visit: http://www.hp.com/go/designjetmobility
スマートフォンまたはタブレットから印刷する
• iOSでの印刷は、Airprintを介して行うことができます。インストールは必要ありません。
• Androidで印刷する場合、Google Playから「HPプリント サービス アプリ」をインストールします。
詳細については、次を参照してください: http://www.hp.com/go/designjetmobility
从智能手机或平板电脑中打印
• 通过 Airprint 启用 iOS 打印,不需要进行安装。
• 要进行 Android 打印,请从 Google Play 中安装“HP Print Service 应用程序”。
欲知详情,请访问:http://www.hp.com/go/designjetmobility
從智慧型手機或平板電腦列印
• iOS 列印已透過 Airprint 啟用,不需要安裝。
• 對於 Android 列印,請從 Google Play 安裝「HP Print Service」應用程式。
詳情請上網查詢:http://www.hp.com/go/designjetmobility
스마트폰 또는 태블릿에서
• Airprint를 통해 iOS 인쇄가 가능합니다. 설치는 필요하지 않습니다.
• Android에서 인쇄하려면 Google Play에서 “HP Print Service App”을 설치합니다.
자세한 정보는 다음 사이트를 참조하십시오. http://www.hp.com/go/designjetmobility
Cetak dari smartphone atau tablet
• Pencetakan iOS diaktifkan melalui Airprint; tidak diperlukan pemasangan.
• Untuk pencetakan Android, instal “”HP Print Service App”” dari Google Play.
Untuk informasi lebih lanjut, kunjungi: http://www.hp.com/go/designjetmobility
인쇄
26
Page 27

88
EN
Install the product software from the DVD that came with your Printer onto your computer. Be sure to follow the software installation instructions. For USB connections: Connecting
your product before installing the software can lead to product errors.
On the DVD you will find: Software installation (drivers with HP Utility) / Documentation / Support
For latest information please visit: http://www.hp.com/go/T2530
Printerに同梱されているDVDを使用して、コンピュータに製品のソフトウェアをインストールします。 ソフトウェア インストール手順に従ってください。 USB接続の場
JA
合: ソフトウェアをインストールする前に製品を接続すると、製品エラーが発生する可能性があります。
このDVDの内容:
ソフトウェア インストール (のドライバ、HPユーティリティ)/マニュアル/サポート
最新の情報については、 http://www.hp.com/go/T253
ZHCN
将 Printer 附带的 DVD 中的产品软件安装到您的计算机中。 确保按照软件安装说明进行操作。 对于 USB 连接: 如果在安装软件之前连接产品,可能会产生产品错误。
在 DVD 中,您将找到以下内容:
软件安装(有关 的驱动程序 HP Utility)/文档/支持
有关最新信息,请访问: http://www.hp.com/go/T253
將 Printer 隨附 DVD 中的產品軟體安裝到電腦中。 確定有依照軟體安裝指示進行安裝。 用於 USB 連線: 在安裝軟體之前連接印表機會發生產品錯誤。
ZHTW
DVD 的內容:
軟體安裝(驅動程式,包含 HP Utility)/ 說明文件 / 支援
如需最新資訊,請造訪: http://www.hp.com/go/T253
0
0
0
2
7
프린터와 함께 제공되는 DVD의 제품 소프트웨어를 컴퓨터에 설치합니다. 소프트웨어 설치 지침을 따르십시오. USB 연결: 소프트웨어를 설치하기 전에 프린터를 연결하면
KO
프린터 오류가 발생할 수 있습니다.
DVD에는 다음 정보가 들어 있습니다.
소프트웨어 설치(드라이버 HP Utility)/설명서/지원
최신 정보를 보려면 다음 사이트를 방문하십시오. http://www.hp.com/go/T253
ID
Instal perangkat lunak produk dari DV
Menyambung produk sebelum menginstal perangkat lunak dapat mengakibatkan kesalahan pada produk.
Dalam DVD, Anda akan menemukan:
Penginstalan perangkat lunak (driver dengan HP Utility)/Dokumentasi/Dukungan
Untuk informasi terbaru, kunjungi: http://www.hp.com/go/T2530
D yang disertakan dengan Printer ke komputer. Pastikan untuk mengikuti petunjuk penginstalan perangkat lunak. Untuk sambungan USB:
0
Page 28

89
Optional: Managing printer security in the HP Connected. When you enable web services the printer is in unlock mode
EN
meaning everyone who knows the printer’s email address can print. If you are the printer administrator you can change
the status to lock mode, customize your printer’s email address, or manage the printer security (you will need the printer
code and an account at the HP Connected: http://www.hp.com/go/hpconnected).
オ プ ショ ン: HP Connected でPrinterの セキュリティを管 理しま す。 Webサービスを有効にすると、プリンタはロック
JA
解除モードになり、プリンタの電子メール アドレスを知っているすべてのユーザーが印刷できるようになりま
す。 プリンタの管理者の方であれば、ステータスをロック モードに変更したり、プリンターの電子メール アド
レスを変更したり、Printerのセキュリティを管理したりできます (HP Connectedー
(http://www.hp.com/go/hpconnected) で、プリンタ コードとアカウントが必要になります)。
可选: 在 HP Connected 管理 printer 安全性 当您启用 Web 服务时,打印机处于解锁模式,这意味着凡是知道打印
ZHCN
机的电子邮件地址的人都可以进行打印。 如果您是打印机管理员,您可以将此状态更改为锁定模式、自定义打印
机的电子邮件地址或管理 Printer 安全性(在 HP Connected,您将需要打印机代码和帐户:
http://www.hp.com/go/hpconnected)。
其他: 在 HP Connected 管理 Printer 安全性。 當您啟用 Web 服務時,印表機處於解除鎖定模式,這表示任何知道
ZHTW
印表機電子郵件地址的人都可以列印到該印表機。 如果您是印表機管理員,您可以將狀態變更為鎖定模式、自訂
您印表機的電子郵件地址,或管理 Printer 安全性(您將需要印表機代碼和 HP Connected 的帳戶:
http://www.hp.com/go/hpconnected)。
옵션: HP Connected의 프린터 보안 관리 웹 서비스를 활성화하면 프린터가 잠금 해제 모드가 되고 프린터의 이메일
KO
주소를 아는 사람은 누구나 인쇄할 수 있습니다. 프린터 관리자인 경우 상태를 잠금 모드로 변경하고 프린터의
이메일 주소를 사용자화하거나 e프린터 보안을 관리할 수 있습니다(프린터 코드 및 HP Connected
http://www.hp.com/go/hpconnected의 계정 필요).
Opsional: Mengelola keamanan printer dalam HP Connected. Bila Anda mengaktifkan layanan Web, printer akan berada
ID
dalam mode buka kunci yang berarti setiap pengguna yang mengetahui alamat email printer dapat mencetak. Jika Anda
adalah administrator printer, Anda dapat mengubah status ke mode terkunci, menyesuaikan alamat email printer, atau
mengelola keamanan printer (Anda akan memerlukan kode printer dan account di HP Connected:
http://www.hp.com/go/hpconnected).
2
8
Legal notices
© Copyright 2015 HP Development Company, L.P.
The information contained herein is subject to change without notice. The only warranties for HP products and services are set forth
in the express warranty statements accompanying such products
and services. Nothing herein should be construed as constituting
an additional warranty. HP shall not be liable for technical or editorial errors or omissions contained herein.
 Loading...