


HP Compaq Presario 1516EA, Compaq Presario 1516US, Compaq Presario 1520CA, Compaq Presario 1522EA, Compaq Presario 1525CA Getting Started Guide
...b
Getting Started
Compaq Notebook Series
Document Part Number: 271247-002
October 2002
This guide explains how to set up your hardware and software, begin using the notebook, identify hardware components, and contact Compaq if you need assistance.
© 2002 Compaq Information Technologies Group, L.P.
Compaq, the Compaq logo, Evo, and Presario are trademarks of Compaq Information Technologies Group, L.P. in the U.S. and/or other countries. Microsoft and Windows are trademarks of Microsoft Corporation in the U.S. and/or other countries. All other product names mentioned herein may be trademarks of their respective companies.
Compaq shall not be liable for technical or editorial errors or omissions contained herein. The information is provided “as is” without warranty of any kind and is subject to change without notice. The warranties for Compaq products are set forth in the express limited warranty statements accompanying such products. Nothing herein should be construed as constituting an additional warranty.
Getting Started
Second Edition October 2002
First Edition June 2002
Reference Number: N1020v/1500
Document Part Number: 271247-002

Using This Guide
This preface explains how to interpret the symbols, text styles, and paths in your notebook documentation.
Warnings, Cautions and Notes
Warnings and cautions contain important information that can protect you, your work, and your system.
Notes contain additional information about a topic. Some notes provide basic information for inexperienced users. Others provide technical information for advanced users.
The following icons identify warnings, cautions, and notes.
ÅWARNING: The information in a warning alerts you to potential bodily harm or loss of life.
ÄCAUTION: The information in a caution alerts you to potential damage to your work, your notebook, or an optional
external device.
The information in a note provides supplementary information.
Getting Started |
iii |

Text Styles
Some text in your notebook documentation is styled typographically to help you interpret the information it contains. The following table explains other text styles used in your notebook documentation.
Style |
Explanation |
|
|
keys |
Identifies a key, such as the enter key, on the |
|
notebook keyboard or on an optional external |
|
keyboard. |
|
A plus sign (+) between 2 or more keys indicates |
|
that they are a key combination. To use most key |
|
combinations: |
|
■ Briefly press the first key, then briefly press |
|
each succeeding key. |
|
or |
|
■ Press and hold the first key, press and hold |
|
each succeeding key, then release all the keys |
|
simultaneously. |
|
Unless you are instructed to do so, do not press |
|
keys simultaneously. |
|
|
commands |
Identifies characters you are asked to type. For |
|
example, to visit the Compaq Web site, you would |
|
type http://www.compaq.com into the address field on |
|
your Web browser. |
|
|
Initial Capital |
Identify labels or options you can choose on the |
Letters |
screen. For example, in a procedure for displaying |
|
an icon on the taskbar, you might be asked to select |
|
the Always show icon on the taskbar check box. |
|
|
iv |
Getting Started |

Following a Path
Instructions in the documentation may direct you to the operating system, an application, or a utility where you can select settings. The greater than symbol (>) is used to direct you along the path to the destination settings.
The paths described in your notebook documentation are based on the notebook pointing device default functions:
■To select, press the left TouchPad button 1 once.
■To double-click, press the left TouchPad button twice.
■To right-click, press the right TouchPad button 2 once.
Most paths to Windows destinations begin with “Start >.” To select Start (and display the Windows Start menu), select the Start button in the lower left corner of your screen or press either of the Microsoft logo keys 3 on the keyboard.
Identifying TouchPad buttons and Microsoft logo keys
Getting Started |
v |

Contents
Using This Guide
1 Setting Up the Notebook
Setting Up the Hardware . . . . . . . . . . . . . . . . . . . . . . . . . 1–1 Installing the Battery Pack. . . . . . . . . . . . . . . . . . . . . 1–2 Connecting the Notebook to External Power . . . . . . 1–3 Opening the Notebook. . . . . . . . . . . . . . . . . . . . . . . . 1–4 Turning On the Notebook . . . . . . . . . . . . . . . . . . . . . 1–5
Setting Up the Software . . . . . . . . . . . . . . . . . . . . . . . . . . 1–6 Turning Off the Notebook . . . . . . . . . . . . . . . . . . . . . . . . 1–7 Using Emergency Shutdown Procedures . . . . . . . . . 1–7 Using the Notebook Safely . . . . . . . . . . . . . . . . . . . . . . . 1–8
2 Beginning to Use the Notebook
Selecting Regional Settings . . . . . . . . . . . . . . . . . . . . . . . 2–1 Selecting Screen Settings . . . . . . . . . . . . . . . . . . . . . . . . . 2–2 Protecting the Notebook Against Viruses . . . . . . . . . . . . 2–2 Installing Optional Software . . . . . . . . . . . . . . . . . . . . . . 2–3 Accessing Notebook Documentation. . . . . . . . . . . . . . . . 2–4
Accessing the Documentation Library Menu . . . . . . 2–5 Using the Documentation Library CD . . . . . . . . . . . . . . . 2–5 Selecting a Guide. . . . . . . . . . . . . . . . . . . . . . . . . . . . 2–6 Finding a Topic Within a Guide . . . . . . . . . . . . . . . . 2–7 Contacting Compaq . . . . . . . . . . . . . . . . . . . . . . . . . . . . . 2–8 Preparing to Call Technical Support . . . . . . . . . . . . . 2–8 Taking the Notebook to a Service Provider. . . . . . . . 2–9
Getting Started |
vii |

Contents
3 Hardware Components
Display Components . . . . . . . . . . . . . . . . . . . . . . . . . . . . 3–1
Pointing Device Components. . . . . . . . . . . . . . . . . . . . . . 3–2
TouchPad Models . . . . . . . . . . . . . . . . . . . . . . . . . . . 3–2
Dual-Device Models . . . . . . . . . . . . . . . . . . . . . . . . . 3–3
Top Components . . . . . . . . . . . . . . . . . . . . . . . . . . . . . . . 3–4
Power Lights . . . . . . . . . . . . . . . . . . . . . . . . . . . . . . . 3–4
Keyboard and Drive Lights . . . . . . . . . . . . . . . . . . . . 3–5
Power and Volume Controls . . . . . . . . . . . . . . . . . . . 3–6
Easy Access Buttons and Keyboard Keys. . . . . . . . . 3–7
Function and Keypad Keys . . . . . . . . . . . . . . . . . . . . 3–8
Front Panel Components . . . . . . . . . . . . . . . . . . . . . . . . . 3–9
Rear Panel Components . . . . . . . . . . . . . . . . . . . . . . . . . 3–10
Connectors . . . . . . . . . . . . . . . . . . . . . . . . . . . . . . . . 3–10
Jacks and Thermal Components . . . . . . . . . . . . . . . 3–11
Left Side Components . . . . . . . . . . . . . . . . . . . . . . . . . . 3–12
Right Side Components . . . . . . . . . . . . . . . . . . . . . . . . . 3–13
Bottom Components. . . . . . . . . . . . . . . . . . . . . . . . . . . . 3–14
Memory and Mini PCI Compartments . . . . . . . . . . 3–14
Docking and Thermal Components. . . . . . . . . . . . . 3–15
Labels. . . . . . . . . . . . . . . . . . . . . . . . . . . . . . . . . . . . 3–16
Additional Standard Components . . . . . . . . . . . . . . . . . 3–17
Software Restore and Documentation CDs . . . . . . . 3–17
Cords and Cables . . . . . . . . . . . . . . . . . . . . . . . . . . . 3–18
Adapters and Accessories . . . . . . . . . . . . . . . . . . . . 3–19
Index
viii |
Getting Started |
1
Setting Up the Notebook
Setting Up the Hardware
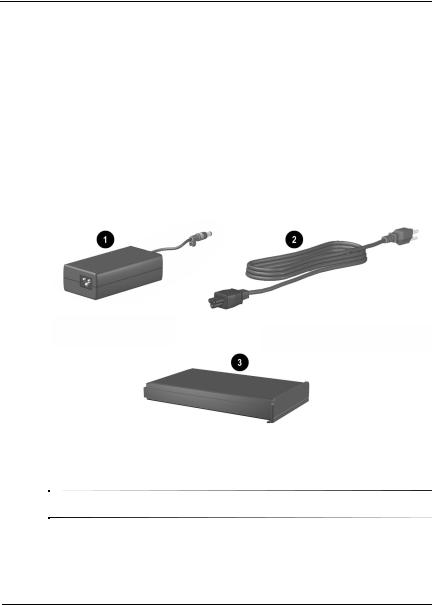
To set up the notebook for the first time, you will need the notebook, the AC adapter 1, the power cord 2, and the battery pack 3. During the hardware setup, you will install the battery pack, connect the computer to external power, open the display, and turn on the notebook.
Identifying the AC adapter, the power cord, and the battery pack
AC adapters and power cords vary by region.
Getting Started |
1–1 |
Setting Up the Notebook
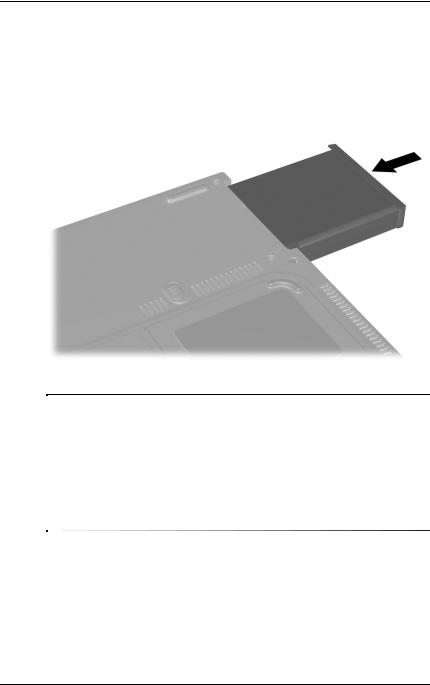
Installing the Battery Pack
To install the battery pack, place the notebook upside down on a flat surface and slide the battery pack into the battery bay until it is seated.
Installing the battery pack
ÄCAUTION: Setup must begin by connecting the notebook to AC power. To ensure that the correct drivers load and to prevent file corruption or damage to the components during initial setup:
■Do not remove the battery pack until the notebook has been connected to external AC power.
■Run the notebook on external AC power, not on battery power, throughout the initial setup.
■Do not set up the notebook while it is docked in an optional Port Replicator.
1–2 |
Getting Started |

Setting Up the Notebook
Connecting the Notebook to External Power
To connect the notebook to external power:
1.Place the notebook on a flat surface near an electrical outlet.
2.Plug the AC adapter cable into the AC power connector 1.
3.Plug the power cord into the AC adapter 2 and into an electrical outlet 3.
When the notebook receives AC power, the AC adapter light 4 turns on.
Connecting the notebook to external power
AC adapters, power cords, and outlets vary by region.
Getting Started |
1–3 |
Setting Up the Notebook
Opening the Notebook
To open the notebook, briefly press the display release latch 1 as you raise the display 2.
Opening the notebook
1–4 |
Getting Started |

Setting Up the Notebook
Turning On the Notebook
To turn on the notebook, press the power button 1. When the notebook turns on, the power/standby light 2 turns on, and you are prompted to begin software setup.
Turning on the notebook
If the notebook does not turn on, make sure that the battery pack is firmly seated and that the AC adapter is securely attached to a live electrical outlet.
Getting Started |
1–5 |

Setting Up the Notebook
Setting Up the Software
A prompt to set up the software is displayed on the screen when the notebook is turned on for the first time.
Before responding to the prompt and proceeding through the online instructions, read the following caution and other installation information.
ÄCAUTION: To prevent file corruption and be sure that the correct device drivers install, during software setup:
■Do not unplug the notebook from the electrical outlet.
■Do not shut down the notebook.
■Do not remove or insert a drive.
■After beginning the software setup, you must complete the
entire process without interruption. Setup time varies.
■If you are prompted to select a language, choose carefully. The languages that you do not choose are deleted from the system and cannot be restored during the installation.
■When you are prompted to accept the End User License Agreement, you must choose Accept to continue the software setup.
1–6 |
Getting Started |

Setting Up the Notebook
Turning Off the Notebook
When possible, shut down the notebook by following the Windows shutdown procedure provided for your operating system:
■In Windows 2000 Professional, select Start > Shut Down > What do you want the computer to do? > Shut Down, then select the OK button.
■In Windows XP Professional or XP Home, select Start > Turn Off Computer > Turn Off.
If the notebook does not respond to a Windows shutdown procedure, try the steps described in the next section.
Using Emergency Shutdown Procedures
If you are unable to use normal Windows shutdown procedures, try one of these additional emergency procedures:
■Press and hold down the power button for at least 4 seconds to completely turn off the system.
■Press Fn+power.
If you are unable to shut down the notebook with the power procedures described above, disconnect the notebook from external power and remove the battery pack.
Getting Started |
1–7 |

Setting Up the Notebook
Using the Notebook Safely
To protect the notebook from the power surges that may be caused by an uncertain power supply or an electrical storm:
■Plug the notebook power cord into an optional, high-quality surge protector, available at computer or electronics retailers.
■Provide surge protection on the cable that connects the modem to the telephone line.
■During an electrical storm, run the notebook on battery power or shut down the notebook and disconnect the power cord.
To learn more about protecting yourself, your work, and your notebook from electrical and other risks read the ergonomic and safety information included with the notebook.
ÅWARNING: This is a Class B digital device, pursuant to Part 15 of the FCC Rules. For more Class B information, refer on the Documentation Library CD to Regulatory and Safety Notices. To reduce the risk of personal injury, electric shock, fire, or damage to the equipment:
■Do not disable the power cord grounding plug. It is an important safety feature.
■Plug the equipment into a grounded (earthed) electrical outlet that is easily accessible at all times.
■Disconnect power from the equipment by unplugging the power cord from the electrical outlet.
■Do not place anything on power cords or cables. Arrange them so that no one can accidentally step on or trip over them.
■Do not pull on a cord or cable. When unplugging a cord from an electrical outlet, grasp the cord by the plug.
■Disconnect the modem from a telephone line when you are not using the modem.
■Do not use the modem during an electrical storm without an optional surge protector.
1–8 |
Getting Started |
 Loading...