


Hp COMPAQ NX6115, COMPAQ NC6120, COMPAQ NX9010, COMPAQ NX9008, COMPAQ NX9000 Getting Started
...Getting Started
HP Compaq Notebook Series
Document Part Number: 310028-002
November 2003
This guide explains how to set up your hardware and software, find and install the latest versions of HP software, and find additional information and support. This guide also introduces you to exterior features of the notebook.
© 2003 Hewlett-Packard Development Company, L.P.
Microsoft® and Windows® are U.S. registered trademarks of Microsoft Corporation. Intel® is a registered trademark of Intel Corporation or its subsidiaries in the United States and other countries. SD Logo is a trademark of its proprietor. Bluetooth® is a trademark owned by its proprietor and used by Hewlett-Packard Company under license.
The information contained herein is subject to change without notice. The only warranties for HP products and services are set forth in the express warranty statements accompanying such products and services. Nothing herein should be construed as constituting an additional warranty. HP shall not be liable for technical or editorial errors or omissions contained herein.
Getting Started
HP Compaq Notebook Series
Second Edition November 2003
First Edition April 2003
Reference Number: nc4010
Document Part Number: 310028-002

Contents
1 Hardware and Software Setup
Setting Up the Hardware . . . . . . . . . . . . . . . . . . . . . . . . . 1–2
Setting Up the Software . . . . . . . . . . . . . . . . . . . . . . . . . . 1–7
Installing Optional Software . . . . . . . . . . . . . . . . . . . 1–9
Selecting Regional Settings. . . . . . . . . . . . . . . . . . . 1–10
Selecting Screen Settings. . . . . . . . . . . . . . . . . . . . . 1–10
Checking System Memory and
Video Memory Size. . . . . . . . . . . . . . . . . . . . . . . . . 1–11
Setting Power Options. . . . . . . . . . . . . . . . . . . . . . . 1–12
Setting Up Wireless LAN . . . . . . . . . . . . . . . . . . . . 1–13
Setting Up Bluetooth . . . . . . . . . . . . . . . . . . . . . . . . 1–16
Safeguarding the Notebook . . . . . . . . . . . . . . . . . . . . . . 1–17
Using Security Software . . . . . . . . . . . . . . . . . . . . . 1–17
Preventing Power Surges. . . . . . . . . . . . . . . . . . . . . 1–18
Preventing Shutdown Problems. . . . . . . . . . . . . . . . 1–18
Regulatory and Safety Information . . . . . . . . . . . . . . . . 1–19
2 Additional Information, Help and Updates
Using the Documentation Library CD . . . . . . . . . . . . . . . 2–1 Getting Help . . . . . . . . . . . . . . . . . . . . . . . . . . . . . . . . . . . 2–3
Using the Help and Support Center in
Windows XP . . . . . . . . . . . . . . . . . . . . . . . . . . . . . . . 2–3 Contacting Technical Support . . . . . . . . . . . . . . . . . . 2–5 Installing a Retail Version of an Operating System. . . . . 2–6
Getting Started |
v |

3 Notebook Features
Pointing Device Components. . . . . . . . . . . . . . . . . . . . . . 3–1
Top Components . . . . . . . . . . . . . . . . . . . . . . . . . . . . . . . 3–2
Left-Side Components . . . . . . . . . . . . . . . . . . . . . . . . . . . 3–4
Right-Side Components . . . . . . . . . . . . . . . . . . . . . . . . . . 3–5
Front Components . . . . . . . . . . . . . . . . . . . . . . . . . . . . . . 3–6
Rear Components. . . . . . . . . . . . . . . . . . . . . . . . . . . . . . . 3–7
Bottom Components. . . . . . . . . . . . . . . . . . . . . . . . . . . . . 3–8
Lights . . . . . . . . . . . . . . . . . . . . . . . . . . . . . . . . . . . . . . . 3–10
Labels . . . . . . . . . . . . . . . . . . . . . . . . . . . . . . . . . . . . . . . 3–12
Index
vi |
Getting Started |

1
Hardware and Software Setup
ÅWARNING: This notebook is designed to run demanding applications at full power. As a result of increased power consumption, it is normal for the notebook to feel warm or hot when used continuously. To avoid potential discomfort or burns, do not block the air vents or use the notebook on your lap for extended periods. The notebook complies with the user-accessible surface temperature limits defined by the international Standard for Safety of Information Technology Equipment (IEC 60950).
Because of limitations in current TFT manufacturing technology, TFT displays might show imperfections as bright, dim, or dark spots. HP does not guarantee that TFT displays (available on selected models only) are free from such imperfections.
For governmental agency and safety information, refer to the
Regulatory and Safety Notices guide on the Documentation Library CD.
Getting Started |
1–1 |

Hardware and Software Setup
Setting Up the Hardware
ÄCAUTION: To ensure that the correct drivers load and to prevent file corruption or damage to the components during initial setup:
■Do not set up the notebook while it is docked in an optional Port Replicator.
■Do not remove the battery pack until the notebook has been connected to external AC power.
■Run the notebook on external AC power, not on battery power, throughout initial setup.
To set up the notebook hardware:
1.Insert the battery pack:
a.Turn the notebook upside-down.
b.Align the battery pack with the notebook battery bay.
c.Insert the battery pack tabs into the battery bay recesses.
Inserting the battery pack tabs into the battery bay recesses
1–2 |
Getting Started |

Hardware and Software Setup
d. Snap the battery pack into place.
Inserting the battery pack
If the notebook will be idle for 2 weeks or more, removing the battery and storing it will prolong its life. For more information, refer to the “Battery Packs” chapter in the Hardware Guide on the
Documentation Library CD.
Getting Started |
1–3 |
Hardware and Software Setup
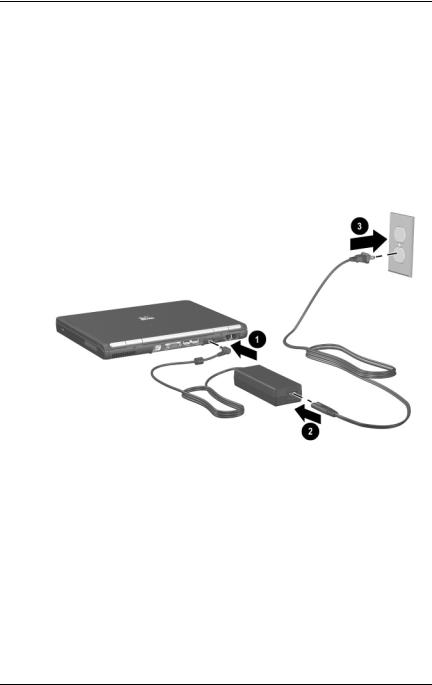
2.Connect the notebook to external AC power:
a.Place the notebook on a flat surface near an electrical outlet.
b.Plug the AC adapter cable 1 into the power connector on the notebook.
c.Plug the power cord 2 into the AC adapter.
d.Plug the power cord 3 into an electrical outlet. (Power cords and outlets vary by country.)
Connecting the notebook to AC power
1–4 |
Getting Started |

Hardware and Software Setup
3.Open the notebook by pressing the display release latch 1 and lifting the display 2.
Opening the notebook
Getting Started |
1–5 |

Hardware and Software Setup
4. Turn on the notebook by pressing the power button.
Turning on the notebook
The power/Standby light turns on. (See “Lights” later in this guide for more information.)
The battery pack in the battery bay begins to charge, and the battery light turns on. (See “Lights” later in this guide for more information.)
The battery light remains on while the battery pack is charging and turns off after the battery pack is fully charged.
The software setup prompt is displayed on the screen.
1–6 |
Getting Started |
Hardware and Software Setup
Setting Up the Software
ÄCAUTION: To prevent file corruption and ensure that the correct device drivers are installed, follow these guidelines during software setup:
■Do not unplug the notebook from the electrical outlet.
■Do not shut down the notebook.
■Do not remove or insert a drive.
A prompt asking you to set up your software is displayed on the screen when the notebook is turned on for the first time. Before responding to the prompt and proceeding through the online instructions, read the caution above and other installation information contained in this chapter.
■After you begin the software setup, you must complete the entire process without interruption. Setup time varies.
■If you are prompted to select a language, choose carefully. The languages you do not choose are deleted from the system and cannot be restored after the setup process has begun.
■If you are prompted to accept the End User License Agreement, you must choose Accept to continue the software setup.
■Preloaded software applications are included with the notebook but must be installed through the Software Setup utility. Preinstalled software applications have already been installed on the notebook and require no further installation procedures.
Getting Started |
1–7 |

Hardware and Software Setup
■This guide does not take into account any variation that might result from the notebook being connected to a network.
■This guide includes instructions based on the Microsoft® Windows® XP and Windows 2000 operating systems. Any other operating systems installed on this notebook after purchase might not match the descriptions and procedures provided in this guide.
For Windows XP, this guide includes instructions based on the category view that is used by default in Windows XP. If Windows XP is set to classic view on your notebook, you might notice discrepancies between your notebook and this documentation. For information on switching views, see Windows XP Help and Support.
1–8 |
Getting Started |

Hardware and Software Setup
Installing Optional Software
You can install third-party software or preloaded utilities anytime after initial setup is complete.
■To install third-party software, refer to the documentation included with the software.
■To install a preloaded utility:
In Windows 2000, select Start > Programs > Software Setup.
In Windows XP, select Start > All Programs > Software Setup.
A setup wizard loads, and a list of applications is displayed. Select the application you want to install, and follow the instructions on the screen.
To view the descriptions and space requirements of preloaded HP utilities without installing them:
■In Windows 2000, select Start > Programs > Software Setup.
■In Windows XP, select Start > All Programs > Software Setup.
After viewing the utility information, select Cancel.
Getting Started |
1–9 |

Hardware and Software Setup
Selecting Regional Settings
Keyboard language and other regional preferences, such as time, date, and currency format, are set in the operating system.
To access these settings:
In Windows 2000:
Select Start > Settings > Control Panel > Date/Time.
-or-
Select Start > Settings > Control Panel > Regional Options.
In Windows XP:
Select Start > Control Panel > Date, Time, Language, and Regional Options > Date and Time.
-or-
Select Start > Control Panel > Date, Time, Language, and Regional Options > Regional and Language Options.
For information about selecting regional settings, open the Regional Options window, then use context-sensitive Help. To use context-sensitive Help, select the question mark button in the upper-right corner of the window, and then select an item.
A definition, explanation, or procedure is displayed.
Selecting Screen Settings
If you would like to see more items on your screen or to see the items on your screen displayed larger, change the screen
resolution setting in your operating system. To access the screen resolution settings:
In Windows 2000, select Start > Settings > Control Panel > Display > Settings tab.
In Windows XP, select Start > Control Panel > Appearance and Themes > Display > Settings tab.
1–10 |
Getting Started |
 Loading...