Hoover Uh70825, Uh70831, UH70800, UH70820, UH70816 Owner's Manual
...
©2012TechtronicFloorCareTechnology.LimitedTousdroits.réservés#961151061ID:105881R1
LAPRÉSENTE.GARANTIE L’UTILISATIONDECEPRODUITÀDESFINSCOMMERCIALESINVALIDE
VEUILLEZNEPASRETOURNERCEPRODUITAU.MAGASIN 18009449200dulundiauvendredi,de8hà19h.(HNE)
Vousavezdesquestionsoudesinquiétudes?Veuillezappelerleserviceàlaclientèleau
D’UTILISER.L’ASPIRATEUR IMPORTANT:LIRECESINSTRUCTIONSATTENTIVEMENTAVANT
com.hoover.www
Instructionsd’utilisationetd’entretien
GUIDED’UTILISATION
OWNER’S MANUAL
Operating and Servicing Instructions
Español - página E1
www.hoover.com
IMPORTANT: READ CAREFULLY BEFORE ASSEMBLY AND USE.
Questions or concerns? For assistance, please call Customer Service at 1-800-944-9200 Mon-Fri 8am-7pm EST. PLEASE DO NOT RETURN THIS PRODUCT TO THE STORE.
THIS PRODUCT IS INTENDED FOR HOUSEHOLD USE ONLY. IF USED COMMERCIALLY WARRANTY IS VOID.
©2012 Techtronic Floor Care Technology Limited. All Rights Reserved. #961151061 ID:105881 R1

Thank you for choosing a HOOVER® product.
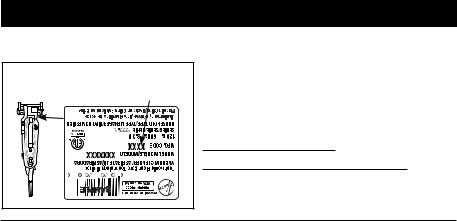
Please enter the complete model and Manufacturing Code in the spaces provided.
MODEL
MFG. CODE
Hint: Attach your sales receipt to this owner’s manual. Verification of date of purchase may be required for warranty service of your HOOVER® product.
Be sure to register your product online at Hoover.com or call 1-800-944-9200 to register by phone. Visit Hoover. com for additional video instructions for assembly and maintenance.
MANUFACTURING CODE |
(Label located on back of vacuum) |
CONTENTS |
|
Important Safety Instructions........................................................................... |
3 |
Vacuum Assembly............................................................................................. |
5 |
Carton Contents.............................................................................................. |
5 |
Attach Handle ................................................................................................. |
5 |
Attach Dirt Cup ............................................................................................... |
5 |
Position Tools ................................................................................................. |
5 |
How To Use ........................................................................................................ |
6 |
Vacuum Description........................................................................................ |
6 |
On-Off Switch.................................................................................................. |
6 |
Cord Release.................................................................................................. |
6 |
Folding Handle................................................................................................ |
6 |
Carpet Height Adjustment............................................................................... |
7 |
Tools .................................................................................................................. |
7 |
Select Proper Tool .......................................................................................... |
7 |
Removing Hose .............................................................................................. |
7 |
Attach Wand And Tools .................................................................................. |
7 |
Stair Cleaning ................................................................................................. |
8 |
Cord Storage .................................................................................................. |
8 |
Cord Rewind And Storage .............................................................................. |
8 |
How To Clean Tools ....................................................................................... |
8 |
Maintenance....................................................................................................... |
8 |
Dirt Cup........................................................................................................... |
9 |
Filters .............................................................................................................. |
9 |
Brushroll.......................................................................................................... |
11 |
Hose................................................................................................................ |
11 |
Powered Hand Tool ....................................................................................... |
11 |
Headlight......................................................................................................... |
12 |
Belt.................................................................................................................. |
12 |
Troubleshooting ................................................................................................ |
13 |
Service................................................................................................................ |
14 |
Warranty ............................................................................................................. |
15 |
If you need assistance:
Visit our website at hoover.com. Follow the authorized dealer locator link to find the Hoover® authorized dealer nearest you or call 1-800-944-9200 for an automated referral of Hoover® authorized dealer locations (U.S. only) or to speak with a customer service representative; MonFri 8am7pm EST.
PLEASE DO NOT RETURN THIS PRODUCT TO THE STORE. 2
|
2 |
|
VEUILLEZNE.MAGASIN AU PRODUIT CE RETOURNER PAS |
|
.vendredi) |
Seulement)oupourparleràunreprésentantduserviceàlaclientèle(de8hà19h,hne,dulundiau |
|
9200pourécouterunmessageindiquantlesadressesdesmarchandsautorisésHooverMD.(é-.U |
|
autorisésHooverMDpourtrouverlemarchandleplusprèsdechezvous,oucomposezle1800944 |
|
visiteznotresitewebàl’adresse.ca.hoover.wwwCliquezsurleliendulocalisateurdemarchands |
|
|
Pourobtenirde: l’assistance |
15 |
Garantie.............................................................................................................. |
14 |
Service................................................................................................................ |
.........................................................................................................13 |
Dépannage |
..........................................................................................................12 |
Courroie |
..............................................................................................................12 |
Phare |
..........................................................................11 |
électrique portatif Accessoire |
..............................................................................................................11 |
Tuyau |
................................................................................................11 |
Rouleaubrosse |
..............................................................................................................9 |
Filtres |
................................................................................................9 |
Vide-poussière |
.............................................................................................................8 |
Entretien |
...............................................................................8 |
nettoyage de Accessoires |
.................................................................8 |
rangement et cordon de Enrouleur |
....................................................................................8 |
cordon du Rangement |
......................................................................................8 |
d’escaliers Nettoyage |
..........................................................7 |
accessoires des et lance la de Fixation |
..............................................................................................7 |
tuyau du Retrait |
................................................................7 |
approprié l’accessoire de Sélection |
.......................................................................................................7 |
Accessoires |
..................................................................7 |
tapis du hauteur la selon Réglage |
...............................................................................................6 |
pliante Poignée |
..............................................................6 |
cordon du dégagement de Dispositif |
...............................................................................6 |
Arrêt Marche/ Interrupteur |
..............................................................................6 |
l’aspirateur de Description |
...........................................................................................................6 |
Utilisation |
..................................................................................5 |
accessoires les Installer |
.....................................................................................5 |
Fixervidepoussière le |
.............................................................................................5 |
FixerManche Le |
..................................................................................5 |
l’emballage de Contenu |
Assemblagedel’aspirateur..............................................................................5 |
||||||||
3 |
|
|
.................................Consignesdesécuritéimportantes |
|||||
CONTENU |
|
|
|
|
||||
|
|
|
|
|
|
|
.d’entretien |
|
|
unevidéoprésentantlesinstructionsd’assemblageet |
|||||||
|
1-800-944-.9200Visiterlecom.Hooverpourvisualiser |
|||||||
(Étiquettesituéeaudosdel’aspirateur) |
au |
|
téléphone, |
par |
ou |
com,.Hoover |
l’adresse |
|
N’oubliezpasd’enregistrervotreproduitenligne,à |
||||||||
ODECDEFABRICATION |
||||||||
|
couverteparlagarantiedevotreproduitHOOVERMD. |
|||||||
|
|
|||||||
|
dated’achatpeutêtreeffectuéeavanttouteréparation |
|||||||
|
caisseauguidedel’utilisateur,carunevérificationdela |
|||||||
|
de |
joindrevotrereçu |
estrecommandéde |
Conseil:Il |
||||
|
|
|
|
|
|
CODEDEFABRICATION |
||
|
|
|
|
|
|
|
MODÈLE |
|
|
|
|
COMPLETSdanslesespacesfournisàceteffet |
|||||
|
série |
Veuillezinscrirelesnumérosdemodèleetde |
||||||
Mercid’avoirchoisiunproduitHOOVERMD. |
|
|||||||
3 |
|
oudes.dommages |
|
l’appareildanslesescaliersousurunmeuble,cequipourraitcauserdesblessures |
|
l’appareildetomber,toujoursplacerl’appareilaubasde.l’escalierNepasplacer |
|
surles.marchesAfind’éviterlesblessuresoulesdommagesetd’empêcher |
|
Êtretrèsprudentpendantl’utilisationdansles.escaliersNepasdéposerl’aspirateur |
• |
Éteindretouteslescommandesavantdedébrancher.l’appareil |
• |
àl’écartdesouverturesetdespiècesen.mouvement |
|
Garderlescheveux,lesvêtementsamples,lesdoigtsettouteautrepartieducorps |
• |
quipourraitréduireledébit.d’air |
|
silesorificessontobstrués;retirerlapoussière,lamousse,lescheveuxoutoutce |
|
Nepasinsérerd’objetsdanslesouverturesde.l’appareilNepasutiliserl’appareil |
• |
Nepasmanipulerlaficheoul’aspirateuraveclesmains.mouillées |
• |
Nepastirersurlecordonpourdébrancherl’appareil,maisplutôtsurla.fiche |
• |
cordonéloignédessurfaces.chaudes |
|
tranchantsavecle.cordonÉviterdefaireroulerl’appareilsurle.cordonTenirle |
|
nepasfermerdeportessurlecordonetnepascontournerdescoinsoudesrebords |
|
Nepastirerl’appareilparlecordon,nepasseservirducordoncommepoignée, |
• |
soit.vérifié |
|
l’extérieurouesttombédansl’eau,l’expédieràuncentrederéparationpourqu’il |
|
nefonctionnepasadéquatement,s’ilesttombé,aétéendommagé,aétélaisséà |
|
Nepasutiliserl’appareilsilaficheoulecordonest.endommagéSil’aspirateur |
• |
uniquementlesaccessoiresetlesproduitsrecommandésparle.fabricant |
|
L’appareildoitêtreutiliséseulementcommeindiquédansce.manuelUtiliser |
• |
etnepasleurpermettredeplacerleursdoigtsoudesobjetsdansles.ouvertures |
|
quesdeblessuresoudedommages,tenirleproduithorsdelaportéedesenfants, |
|
surveillancelorsquel’appareilestutiliséàproximité.d’enfantsPouréviterlesris |
|
conçupourêtreutilisépardesenfantsde12anset.moinsExerceruneétroite |
|
Nepaspermettrequel’appareilsoitutilisécommeun.jouetCeproduitn’estpas |
• |
Nepasutiliserl’appareilàl’extérieurousurdessurfaces.humides |
• |
quandiln’estpasutiliséetavantd’enfaire.l’entretien |
|
Nepaslaisserl’appareilsanssurveillancelorsqu’ilest.branchéLedébrancher |
• |
dosde.l’appareil |
|
N’utiliserl’aspirateurqu’àlatensionspécifiéesurlaplaquesignalétiquesituéeau |
• |
Assemblercomplètementavant.l’utilisation |
• |
chocélectriqueoudeblessures: |
|
minimumlesrisquesd’incendie,de |
|
AVERTISSEMENT:Afinderéduireau |
|
LIRETOUTESLESINSTRUCTIONSAVANTD’UTILISERCET.APPAREIL |
|
élémentaires,ycomprislessuivantes: |
|
Durantl’utilisationd’unappareilélectrique,toujoursrespecterlesprécau |
|
RANGERETCONSERVERCESINSTRUCTIONS CONSIGNESDESÉCURITÉIMPORTANTES
IMPORTANT SAFETY INSTRUCTIONS
SAVE THESE INSTRUCTIONS
When using an electrical appliance, basic precautions should always be
followed, including the following:
READ ALL INSTRUCTIONS BEFORE USING THIS APPLIANCE.
WARNING: TO REDUCE THE RISK OF FIRE, ELECTRIC SHOCK OR INJURY:
•Fully assemble before operating.
•Operate cleaner only at voltage specified on data label on back of cleaner.
•Do not leave appliance when plugged in. Unplug from outlet when not in use and before cleaning or servicing.
•Do not use outdoors or on wet surfaces.
•Do not allow to be used as a toy. Not intended for use by children age 12 and under. Close supervision is necessary when used near children. To avoid injury or damage, keep children away from product, and do not allow children to place fingers or other objects into any openings.
•Use only as described in this manual. Use only manufacturer’s recommended attachments and products.
•Do not use with damaged cord or plug. If appliance is not working as it should, has been dropped, damaged, left outdoors, or dropped into water, take it to a service center prior to continuing use.
•Do not pull or carry by cord, use cord as a handle, close a door on cord, or pull cord around sharp edges or corners. Do not place product on cord. Do not run appliance over cord. Keep cord away from heated surfaces.
•Do not unplug by pulling on cord. To unplug, grasp the plug, not the cord.
•Do not handle plug or appliance with wet hands.
•Do not put any object into openings. Do not use with any opening blocked; keep free of dust, lint, hair, and anything that may reduce air flow.
•Keep hair, loose clothing, fingers, and all parts of body away from openings and moving parts. Brushroll continues to rotate when in the upright position.
•Turn off all controls before unplugging.
•Use extra care when cleaning on stairs. To avoid personal injury or damage, and to prevent the cleaner from falling, always place cleaner at bottom of stairs on floor. Do not place cleaner on stairs or furniture, as it may result in injury or damage.
•Do not use to pick up flammable or combustible liquids, such as gasoline, or fine wood sandings, or use in areas where they may be present.
•Hold plug when rewinding onto cord reel. Do not allow plug to whip when rewinding (cord rewind available on select models only).
•Unplug before connecting Powered Hand Tool.
•Do not pick up anything that is burning or smoking, such as cigarettes, matches, or hot ashes.
•Do not use without Dirt Cup and/or Filters in place.
•WARNING: This product contains chemicals known to the State of California to cause cancer, birth defects or reproductive harm. WASH HANDS AFTER HANDLING.
3
CAUTION: TO REDUCE THE RISK OF DAMAGE:
•Avoid picking up hard, sharp objects with this product, as they may cause damage.
•Store appropriately indoors in a dry place. Do not expose machine to freezing temperatures.
•Brushroll continues to turn while product is turned on and handle is in upright position. To avoid damage to carpet, rugs, furniture and flooring, avoid tipping cleaner or setting it on furniture, fringed area rugs, or carpeted stairs during tool use.
•Do not use sharp objects to clean out hose as they can cause damage.
•With brushroll on, do not allow cleaner to sit in one location for an extended period of time, as damage to floor can result.
WARNING:
•To reduce the risk of electric shock, this appliance has a polarized plug (one blade is wider than the other). This plug will fit in a polarized outlet only one way. If the plug does not fit fully in the outlet, reverse the plug. If it still does not fit, contact a qualified electrican to install the proper outlet. Do not change the plug in any way.
4
4
laprise.appropriéeNejamaismodifierla.fiche |
|
||
Siellenes’insèretoujourspas,demanderàunélectricienqualifiéd’installer |
|
||
.sensSilafichenes’insèrepascomplètementdanslaprise,ilfaut.l’inverser |
|
||
êtreinséréequedansuneprisedecourantpolariséeetuniquementdansun |
|
||
d’unefichepolarisée(unetigeestpluslargeque.l’autre)Cettefichenepeut |
|
||
Afinderéduirelesrisquesdedéchargeélectrique,cetappareilestmuni |
• |
||
|
|
MISEENGARDE: |
|
mêmeendroit,carcelapourraitendommagerle.plancher |
|
||
Lorsquelerouleau-brosseestenmarche,nepaslaisserl’appareillongtempsau |
• |
||
|
|
celarisqueraitde.l’endommager |
|
Nepasutiliserd’objetsauxarêtestranchantespournettoyerletuyaucar |
• |
||
|
|
l’utilisationdes.accessoires |
|
.soiresToujoursmettrel’aspirateurenmodedesuccionseulementpendant |
|
||
oudansdesescaliersrecouvertsdetapispendantl’utilisationdesacces |
|
||
leplacersurunmeubleoudelefairepassersurlesfrangesdecarpettes |
|
||
carpettesetlesrevêtementsdesol,éviterdefairebasculerl’aspirateur,de |
|
||
mancheenposition.verticalePouréviterd’endommagerlesmoquettes,les |
|
||
Lerouleau-brossecontinueàtournersil’aspirateurestsoustensionetle |
• |
||
|
|
de.gel |
|
Rangerdansunendroit.secNepasexposerl’appareilàdestempératures |
• |
||
|
Ilspeuventendommager.l’appareil |
|
|
Éviterderamasserdesobjetsdursouauxarêtestranchantesavec.l’appareil |
• |
||
RISQUESDEDOMMAGES: |
|||
POURRÉDUIRELES |
: |
MISEENGARDE |
|
APRÈSL’UTILISATIONDE.L’APPAREIL |
|
||
congénitalesoud’autrestroublesdela.reproduction |
MAINS |
||
delaCaliforniecommepouvantcauserlecancerou,entraînerdesmalformations |
|
||
MISEENGARDE:Cetappareilcontientdesproduitschimiquesreconnusparl’État |
• |
||
Nepasutiliserl’appareilsanssonvide-poussièreouses.filtres |
• |
||
rettes,desallumettesoudescendres.chaudes |
|
||
N’aspireraucunematièrebrûlanteoudégageantdelafumée,commedesciga |
• |
||
Débrancherl’appareilavantdefixerunaccessoireportatif.électrique |
• |
||
Tenirlafichelorsdel’enroulementducordonafinqu’ellenecingle.pas |
• |
||
utiliserl’appareilàproximitédeces.matériaux |
|
||
Nepasaspirerlesliquidesinflammablesoucombustiblescommel’essence,ni |
• |
||
celui.illustré |
|
|
|
5 |
|
Lemodèled’aspirateurpeutvarierde |
|
||||
|
|
|
|
droitaudos(C)del’aspirateur,tel.qu’illustré |
|
|
|
|
|
labrossepourtissusd’ameublementsurlecôté |
|
|
|
|
|
lecôtégaucheaudos(B)del’aspirateuretplacer |
|
|
|
|
|
glisserdanslecompartimentpouraccessoiressur |
|
|
|
|
|
6.1Placerlesuceurplatdanslarallongeetlefaire |
|
|
|
|
|
.pince |
|
|
|
|
|
fairepivoterjusqu’àcequ’ils’enclenchedansla |
|
|
|
|
|
Fixerlebasdel’accessoireportatifélectriqueetle |
|
|
B |
|
|
triques(A)surlesrainureslatéralesdu.manche |
|
|
A |
|
5.1Fixerlapincepouraccessoiresportatifsélec |
||
|
|
|
|||
C |
6.1 |
5.1 |
NSTALLERILESACCESSOIRES |
||
|
|||||
|
|
||||
mentquandvousentendezun.clic .l’aspirateurLevidepoussièreestfixéadéquate .l’appareilFairepivoterlevidepoussièredans 4.1Placerd’abordlabaseduvide-poussièredans
|
|
|
|
4.1 |
|
|
IXERFLEVIDEPOUSSIÈRE |
|||
|
|
|
|
|
|
|
|
.l’aspirateur |
|
|
|
|
|
|
|
(1)vissituéeàl’arrièredumanchedanslabasede |
|
||||
|
|
|
|
|
3.1Àl’aided’untournevisàtêtecruciforme,serrer |
|
||||
|
|
|
|
|
|
|
|
Appuyer.fermement |
|
|
|
|
|
|
|
2.1Insérerlemanchedanslabasede.l’aspirateur |
|
||||
|
|
|
|
|
|
|
|
.3.1 |
direc |
tive |
|
|
|
|
|
la |
jusqu’à |
côté |
l’aspirateuretlamettrede |
|
|
|
3.1 |
|
|
2.1 |
:Retirerlavissituéedanslabasede |
Nota |
|
|||
|
|
|
|
|
|
(Varientselonlemodèle) |
|
|||
|
|
|
|
|
|
|
|
FIXERMANCHEL |
||
|
|
|
|
|
|
|
|
despiècesillustréesne.manque |
|
|
|
|
|
|
|
|
|
|
d’emballage,s’assurerqu’aucune |
|
|
|
|
|
|
|
|
|
|
Avantd’éliminerlesmatériaux |
|
|
|
|
|
|
|
|
|
|
.l’emballage |
|
|
|
|
|
|
|
|
|
|
Retirertouteslespiècesde |
|
|
|
|
|
F |
|
|
|
|
*Varientselonle.modèle |
|
|
|
|
|
|
|
|
|
|
|
||
|
|
|
|
|
|
A |
|
.IVide-poussière |
|
|
|
|
|
|
|
|
|
.HVis(pourl’assemblage) |
|
||
|
|
|
|
|
|
|
|
.GRallonge |
|
|
|
|
|
|
|
|
|
|
meuble* |
|
|
|
|
|
|
|
|
|
.FBrosseàépousseter/busepour |
|
||
|
|
|
|
|
|
|
|
.ESuceurplat |
|
|
I |
|
|
|
|
|
|
|
électrique |
|
|
|
|
D |
|
|
|
|
.DPincepouraccessoireportatif |
|
||
|
|
|
|
|
|
|
|
|||
|
|
|
|
|
|
1.1 |
.CAccessoireportatifélectrique* |
|
||
H |
G |
E |
C |
B |
|
.BAspirateur |
|
|||
|
|
|
|
|
|
.APoignée* |
|
|||
|
|
|
|
|
|
|
|
ONTENUCDEL’E |
||
BLADODE.1LASPIRADORAENAM

1. VACUUM ASSEMBLY
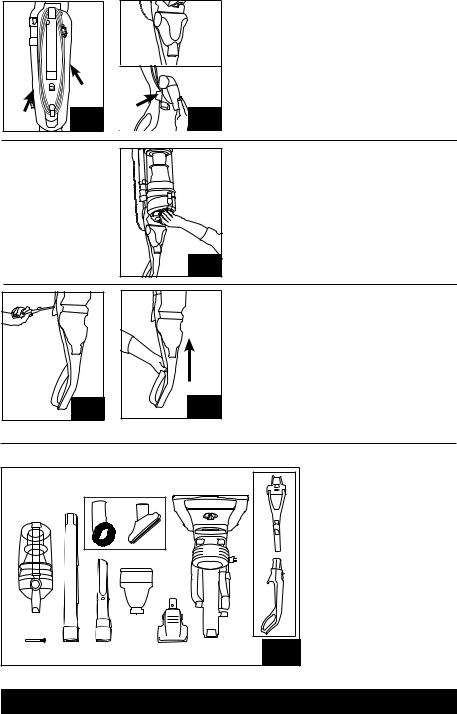
CARTON CONTENTS
A.Handle*
B.Vacuum Base
C.Powered Hand Tool*
D.Powered Hand Tool Clip*
E.Crevice Tool
F.Dusting/Upholstery Tool*
G.Wand
H.Screw (for assembly)
I.Dirt Cup
*Varies per model
Remove all parts from carton and identify each item shown.
Make sure all parts are located before disposing of packing materials.
1.1 |
B |
C |
E |
G |
H |
|
|
|
|
|
|
|
|
|
D |
|
I |
|
|
|
|
|
|
|
A |
|
|
|
|
|
|
|
F |
|
|
ATTACH HANDLE |
1.2 |
1.3 |
(varies per model) |
|
|
Note: Remove the screw located in the vacuum |
|
|
base and set aside until instruction 1.3 |
|
|
1.2 Insert handle section into vacuum base. Push down firmly.
1.3 Using a Phillips screwdriver, fasten (1) screw behind handle into vacuum base.
ATTACH DIRT CUP |
1.4 |
1.4 Place bottom of dirt cup into vacuum body first. Pivot cup into vacuum. Dirt cup is secure when you hear a click.
POSITION TOOLS |
1.5 |
A |
1.6 |
C |
1.5 Secure Powered Hand Tool Clip (A) over |
|
B |
|
|
ridges on side of handle. Attach bottom of Powered |
|
|
|
|
Hand Tool and pivot into clip until secure. |
|
|
|
|
1.6 Place Crevice Tool into Wand and slide into tool storage area on left back side (B) of vacuum and place Upholstery Tool on right back side (C) of vacuum as shown.
5 Actual model may vary from images shown.
2. HOW TO USE
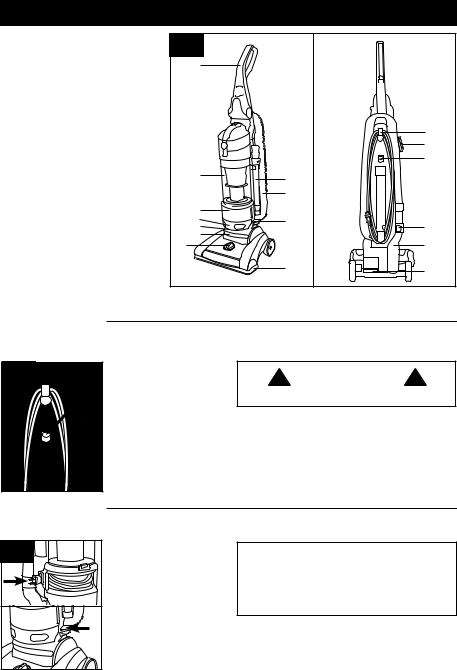
VACUUM DESCRIPTION
1.Handle**
2.Powered Hand Tool**
3.Dirt Cup Release Button
4.Carry Handle
5.Rinsable Filter Access
6.Dirt Cup
7.Automatic/Cord Rewind*
8.Filter made with HEPA media and Carbon Filter* Access
9.Stair Cleaning Handle
10.Headlight*
11.Height Adjustment
12.System Check Indicator
13.Crevice Tool
14.Wand
15.Hose
16.Cord Rewind Pedal*
17.Furniture Guard
18.Cord Release
19.Dusting/ Upholstery Tool**
20.ON/OFF Switch
21.Hose Release Button
22.Hose Tube
23.Handle Release Pedal
2.1
1
2
3
4

 12
12
5 

 13
13
6 |
14 |
|
|
||
|
15 |
|
7 |
|
|
8 |
16 |
|
9 |
||
|
||
10 |
|
|
11 |
|
|
|
17 |
*Available on select models only **Varies per model
18
19
20
21
22
23
ON-OFF SWITCH
2.2 |
A |
2.2 Plug cord into electrical outlet.
To turn vacuum ON, push ON/OFF switch
(A) once.
To turn vacuum OFF, push switch again.
! CAUTION !
Not to be used for grooming a pet.
CORD RELEASE
2.3 |
A |
(Available on select models only)
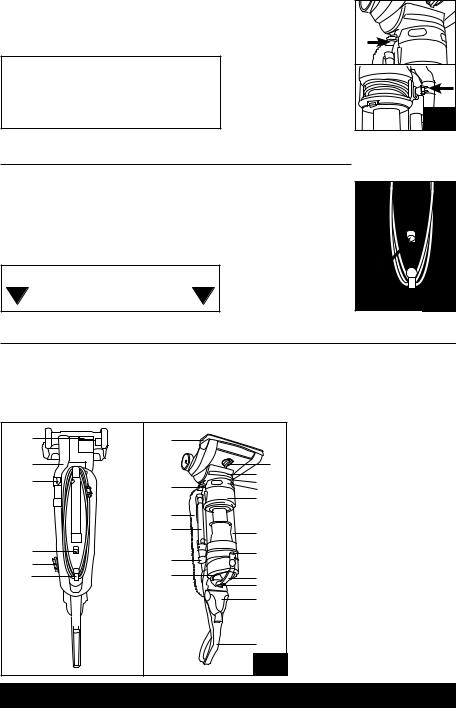
2.3 Grasp the end of the plug and pull to release cord from cord reel until red tape is reached.
To return cord for storage, hold plug and press down Cord Release Pedal (A) on side of cord reel. Hold plug when rewinding onto cord reel. Do not allow plug to whip when rewinding.
IMPORTANT When pulling on the cord, yellow tape will
identify when the cord is almost fully extended. When red tape is visible on the cord, the cord has reached its full length. Do not pull the cord past the red tape.
Actual model may vary from images shown. |
6 |
6 |
celui.illustré |
Lemodèled’aspirateurpeutvarierde |
|
|
cordon.s’enroule |
|
|
|
|
lafichependantquele |
|
|||
|
|
|
|
cordonnefouette,tenir |
|
|||
|
|
|
|
.donPouréviterquele |
|
|||
|
|
|
|
decor |
del’enrouleur |
- |
||
|
|
|
|
(A)situésurledessus |
|
|||
|
|
|
|
surlebouton |
appuyer |
A |
||
|
|
|
|
don,tenirlaficheet |
||||
Nepastirerlecordonau-delàdelabande.rouge |
Pourfairerentrerlecor |
- |
||||||
rubanrougesoit.atteint |
|
|||||||
cordon,cedernieraatteintsalongueur.maximale |
|
|||||||
cordonjusqu’àcequele |
|
|||||||
.sortiLorsquelabanderougeestvisiblesurle |
|
|||||||
cordondel’enrouleurde |
|
|||||||
indiquelemomentoùilestpresqueentièrement |
|
|||||||
tirerpourdégagerle |
|
|||||||
jaune |
tiré,unruban |
IMPORTANT |
3.2 |
|||||
l’extrémitédelaficheet |
||||||||
Lorsquelecordonest |
||||||||
Empoigner |
4.2 |
|||||||
|
|
|||||||
surfacedureetavecles.accessoires |
|
|
|
|
DISPOSITIFDED |
|||
|
ENTDUCORDONpourl’utilisationsurlesplanchersà |
|
||||||
|
|
|
|
surl’interrupteur |
|
|||
|
|
|
|
nouveau |
de |
appuyer |
|
|
|
|
|
|
Pouréteindrel’appareil, |
|
|||
|
|
|
|
teurMarche.Arrêt |
|
|||
|
|
|
|
l’interrup- |
sur |
appuyer |
|
|
|
Nepasutiliserpourtoiletterun.animal |
Pourallumerl’appareil, |
A |
|||||
! |
MISEENGARDE |
! |
.d’alimentation |
|
||||
prise |
une |
dans |
2.2 |
|||||
|
|
2.2Brancherlecordon |
||||||
|
|
|
|
|
NTERRUPTEURIMARCHE/ |
|||
23
22 21
20
19 18
**Lesaccessoiresvarientselonle.modèle |
|
*Seulementsurcertains.modèles |
|
17 |
|
|
11 |
|
10 |
16 |
9 |
8 |
|
|
7 |
15 |
|
14 |
6 |
|
|
13 |
5 |
|
|
12 |
4 |
|
3 |
|
2 |
|
1 |
|
1.2 |
.23Pédalededéblocageduman |
|
.22Tubepourtuyau |
|
.21Boutondedégagementdutuyau |
|
.20Boutonmarche/arrêt |
|
meuble** |
|
.19Brosseàépousseter/busepour |
|
cordon |
|
.18Dispositifdedégagementdu |
|
.17Protège-meubles |
|
.16Enrouleurdecordon* |
|
.15Tuyau |
|
.14Rallonge |
|
.13Becsuceur |
|
système |
|
.12Indicateurdevérificationdu |
|
dutapis |
|
.11Réglageselonlahauteur |
|
.10Ampoule* |
|
escaliers |
|
Poignéepourlenettoyagedes |
.9 |
aucharbon* |
|
filtranteHEPAetaufiltre |
|
Accèsaufiltreavecsubstance |
.8 |
Enrouleurautomatiquedecordon* |
.7 |
Vide-poussière |
.6 |
Accèsaufiltrelavable |
.5 |
Poignéedetransport |
.4 |
videpoussière |
|
Boutondedégagementdu |
.3 |
Accessoireportatifélectrique** |
.2 |
Poignée** |
.1 |
CARACTÉRISTIQUES |
|
.2FUNCIONAMIENTO

celui.illustré |
|
7 |
|
|
|
|
Lemodèled’aspirateurpeutvarierde |
|
|
|
|
||
|
|
|
Nepasutiliserpourtoiletterun.animal |
|||
l’accessoireportatif.électrique |
! |
MISEENGARDE |
! |
|||
Débrancherl’aspirateuravantdebrancher |
||||||
|
|
|||||
AVERTISSEMENT: |
! |
|
|
.clic |
|
|
|
|
|
|
|
||
|
|
quevousentendiezun |
|
|||
|
|
pourletuyaujusqu’àce |
|
|||
|
|
letuyaudansletube |
|
|||
s’enclencheen.place |
|
tuyauenplace,insérer |
|
|||
|
réenclencherle |
Pour |
|
|||
l’insérerjusqu’àcequ’il |
|
l’extrémitédu.tuyau |
|
|||
tuyau,appuyerpour |
|
retirer |
et |
tuyau |
du |
|
soireoulalancesurle |
-3.3 |
boutondedégagement |
|
|||
Pourfixerunacces |
surle |
soire,appuyer |
- |
|||
|
|
afind’utiliserunacces |
||||
ACCESSOIRES |
2.3Pourretirerletuyau |
.32 |
||||
IXATIONFDELALANCEETDES |
|
|
|
|
ETRAITDUTU |
|
|
.plinthes |
|
|
D |
|
|
blescapitonnés,danslesescaliersetlelongdes |
|
|
|
|
||
|
|
|
|
|
||
commedanslestiroirsdebureaux,surlesmeu |
|
|
|
|
|
|
esétroits,danslescoinsetlelongdesbordures, |
|
|
|
|
|
|
.DLesuceurplatpeutêtreutilisédanslesespac |
|
|
|
|
- |
|
êtreutiliséeavectouslesaccessoires.cidessus |
|
|
|
|
C |
|
.CLalancesertàrallongervotre.tuyauEllepeut |
|
|
B |
|
|
|
|
.modèle) |
|
|
|
A |
|
de.moquette(Lesaccessoiresvarientselonle |
|
|
|
|
||
|
|
|
|
|
||
matelas,lesvêtementsetlesescaliersrecouverts |
|
|
|
|
|
|
pourlesmeublesrembourrés,lesrideaux,les |
|
|
|
|
1.3 |
|
.BL’accessoireportatifélectriquepeutêtreutilisé |
|
|
|
|
||
|
modèles) |
|
|
|
|
modèles) |
accessoiresvarientselonles |
.moquette(Les |
|
|
|
|
|
(Lesaccessoirespeuventvarierselonles |
||||||
lesescaliersrecouvertsde |
lesmatelaset |
|
|
|
|
APPROPRIÉ |
pournettoyerlesmeublescapitonnés,lesrideaux, |
|
|
|
|
||
|
|
LECTIONSÉDEL’ACCESSOIRE |
||||
.AUtiliserl’accessoirepourtissud’ameublement |
|
|
||||
|
.accessoires |
dansdesescaliersrecouvertsdemoquettependantl’utilisationdes |
|
surunmeubleoudelefairepassersurlesfrangesdecarpettesou |
|
revêtementsdesol,éviterdefairebasculerl’appareil,deleplacer |
|
d’endommagerlesmoquettes,lescarpettes,lesmeublesetles |
|
position.verticalePouréviter |
tensionetsilemancheesten |
Lerouleau-brossecontinueà |
IMPORTANT |
tournersil’appareilestsous |
|
lemancheàlaposition.verticale Pourutiliserlesacces
lesendroitsdifficilesà.atteindre toyerlessurfacesplusélevéeset Lesaccessoirespermettentdenet
|
.3ACCESSOIRES |
|
|
|
tournerleboutonjusqu’auréglage.supérieur |
|
|
||
S’ilvousestdifficiledepousserl’aspirateur, |
|
|
||
IMPORTANT |
|
|
|
|
enmaintenantunebonne.performance |
|
|
||
épais,lorsqu’uneffortmoindreestdésirétout |
|
|
||
•:Réglagesupérieurpourlestapistrès |
|
|
||
|
Floor.» |
A |
|
|
Bare |
surfaceàdure,«réglerl’appareil |
|
||
lestypesde.moquettesPourlesplanchersà |
|
4.2 |
||
»réglageLOWestindiquépourtous |
«•Le |
|
||
|
teurci-dessoussontrecommandés |
: |
|
|
Pourunrendementmaximal,lesréglagesdehau |
|
- |
||
|
(A)jusqu’auréglage.souhaité |
|
DUTAPIS |
|
|
ELONLAHAUTEURRÉGL |
|||
6.2Pourréglerlahauteur,TOURNERlebouton |
||||
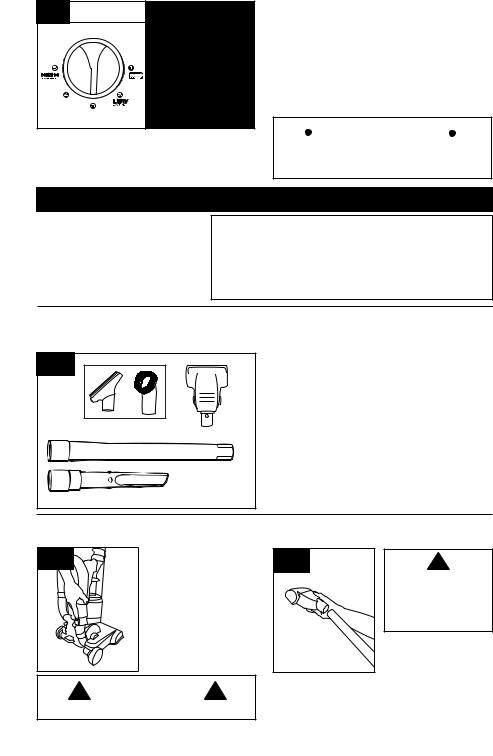
CARPET HEIGHT ADJUSTMENT |
|
2.4 |
2.4 To adjust height setting, TURN knob (A) to |
desired height setting. |
|
A |
For maximum cleaning performance, the following |
|
carpet height settings are recommended: |
|
• LOW setting for all types of carpet, for bare |
|
floors turn dial to “Hard Floor” setting. |
|
• Higher settings: for very deep pile carpet, |
|
where easier pushing effort is desired, while |
|
maintaining good cleaning performance. |
|
IMPORTANT |
Tools allow for cleaning surfaces above the floor and for reaching hard to clean areas.
The vacuum is ready for tool use when handle is in upright position.
If the vacuum is difficult to push, push down and turn knob to the next higher setting.
3. TOOLS
 IMPORTANT
Brushroll continues to turn while product is turned on and handle is in upright position. To avoid damage to carpet, rugs, furniture and flooring, avoid tipping cleaner or setting it on furniture, fringed area rugs, or carpeted stairs during tool use.
SELECT PROPER TOOL
(Tools may vary per model)
3.1 |
|
A |
B |
|
|
C |
|
|
D |
A.Use Upholstery Tool to clean upholstered furniture, draperies, mattresses, clothing, and carpeted stairs. (Tool varies per model)
B.Powered Hand Tool may be used for upholstered furniture, draperies, mattresses, clothing, and carpeted stairs. (Tool varies per model)
C.Wand is used to give extra length to your hose. Use it with any of the above tools.
D.Crevice Tool may be used in tight spaces, corners and along edges in such places as dresser drawers, upholstered furniture, stairs and baseboards.
REMOVING HOSE |
ATTACH WAND AND TOOLS |
3.2 |
To remove hose for tool |
use, press the hose |
|
|
release button and pull |
|
hose end out. |
|
To lock back into place, |
|
push hose into hose |
|
tube until you hear a |
|
click. |
! CAUTION !
Not to be used for grooming a pet.
3.3 |
! |
|
WARNING |
Unplug vacuum before connecting Powered Hand Tool.
To attach tool or wand to hose, push firmly into place.
7 Actual model may vary from images shown.
STAIR CLEANING
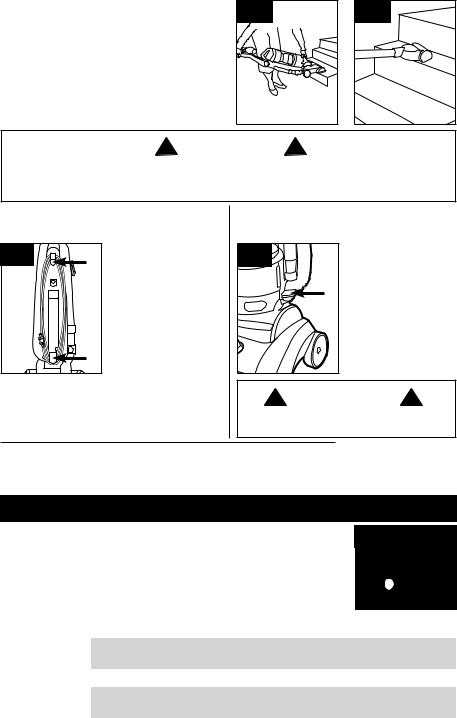
3.4Lift vacuum by Stair Cleaning Handle and position on stairs. Clean forward to back. Never leave the vacuum standing on stairs when not cleaning.
3.5Use the Hose and Powered Hand Tool (Tool varies per model) for stair cleaning. When using tools, always ensure handle is in upright position.
3.4 |
3.5 |
! CAUTION !
Use extra care when cleaning on stairs. To avoid personal injury or damage, and to prevent the cleaner from falling, always place cleaner at bottom of stairs on floor. Do not place cleaner on stairs or furniture, as it may result in injury or damage. When using tools, always ensure handle is in upright position.
CORD STORAGE
(For units without cord reel)
2.3 |
2.3 Wrap cord around |
hooks for convenient |
|
|
storage. Attach the plug |
|
end to the cord. |
CORD REWIND AND STORAGE
(Available on select models only)
2.4 |
2.4 To return cord for |
||
storage, |
unplug |
from |
|
|
wall. Hold plug |
and |
|
A |
press |
down |
Cord |
Release |
Pedal (A) on |
||
|
side of cord reel. |
|
|
! WARNING !
Hold plug when rewinding onto cord reel. Do not allow plug to whip when rewinding.
HOW TO CLEAN TOOLS
To clean Hose and Powered Hand Tool, wipe with a damp cloth. DO NOT submerge in water.
Other cleaning tools may be washed in warm water with a detergent. Rinse and air dry 24 hours before using.
4. MAINTENANCE
Familiarize yourself with these home maintenance tasks as proper use and care |
4.1 |
A |
|||
of your vacuum will ensure continued cleaning effectiveness. |
|
||||
4.1 The System Check Indicator located at (A), alerts you to possible system |
|
|
|||
performance issues. |
|
|
|
|
|
If appliance is not working as it should, has been dropped, damaged, left |
|
|
|||
outdoors, or dropped into water, take it to a service center prior to continuing use. |
|
|
|||
|
|
|
|
|
|
|
|
|
|
||
PROBLEM |
POSSIBLE CAUSE |
POSSIBLE SOLUTION |
|
||
|
|
|
|
||
If System Check |
1. Rinsable filter and/or filter made |
1. |
Clean rinsable filter and/or filter made with |
||
Indicator is red: |
with HEPA media is dirty. |
HEPA media - reference pg. 9 |
|
||
|
2. Dirt cup is full and/or clogged. |
2. |
Empty dirt cup - reference pg. 9 |
|
|
|
3. Brushroll and/or hose is |
3. |
Check hose for clogging - reference pg 11. |
||
|
clogged. |
Check brushroll for clogging - reference pg. 11. |
|||
|
|
|
|
|
|
Any other servicing should be done by an authorized service representative.
Actual model may vary from images shown. |
8 |
 Loading...