


VMB 1500
User Instructions
English GB
Français FR
Deutsch DE
Italiano IT
Español ES
Portugues PT
Vlaams/ Nederlands BE/NL
Dansk DK
Suomi FI
Česky CZ
Polski PL
PyccKИЙ RU
Svenska SE
Norsk NO
∂ППЛУИО¿ GR
Slovenski SL
1
2
3
4
5
6
7
15
14
13
12
16
18
17
19
20
21
22
23
B
A
C
D
D1
D2
D3
E
E1
E2
F1
F3
G
H
I
J
K
L
M
N
O
A2
A1
A3
A5
A4
9
11
10
12
8
9
10
11
F
F2
F1
vapormate_cover_8194_030305.qxd 3/3/05 10:50 am Page 1

Fig. 9 Fig. 10
Fig. 11
Fig. 12
Fig. 13 Fig. 14
Fig. 15
Fig. 16 Fig. 17
Fig. 18
Fig. 19
Fig. 20
Fig. 21
Fig. 22
Fig. 23
Fig. 24
vapormate_cover_8194_030305.qxd 3/3/05 10:50 am Page 4

4
GB
1. Vacuum power indicator
2. W ater empty indicator
3. O n/off s team b oiler
4. W ater h eating indicator
5. S team ready indicator
6. S team reg ulation
7. O n/O ff main s witch
8. C arry h andle
9. H os e connection with cov er
10. T ub e park ing
11. B oiler s afety cap
12. H y drofilt water container
13. W as h ab le H E P A ex h aus t filter
14. P ower cord
15. P ower cord connection with cov er
16. H E P A filter retaining clips
17. C ontainer h andle
18. C lean M ax W ater L ev el mark
19. H y drofilt as s emb ly
20. C ov er with integ rated h andle
21. W as h ab le pre-motor filter
22. M icronet filter
23. H y drofilt inlet
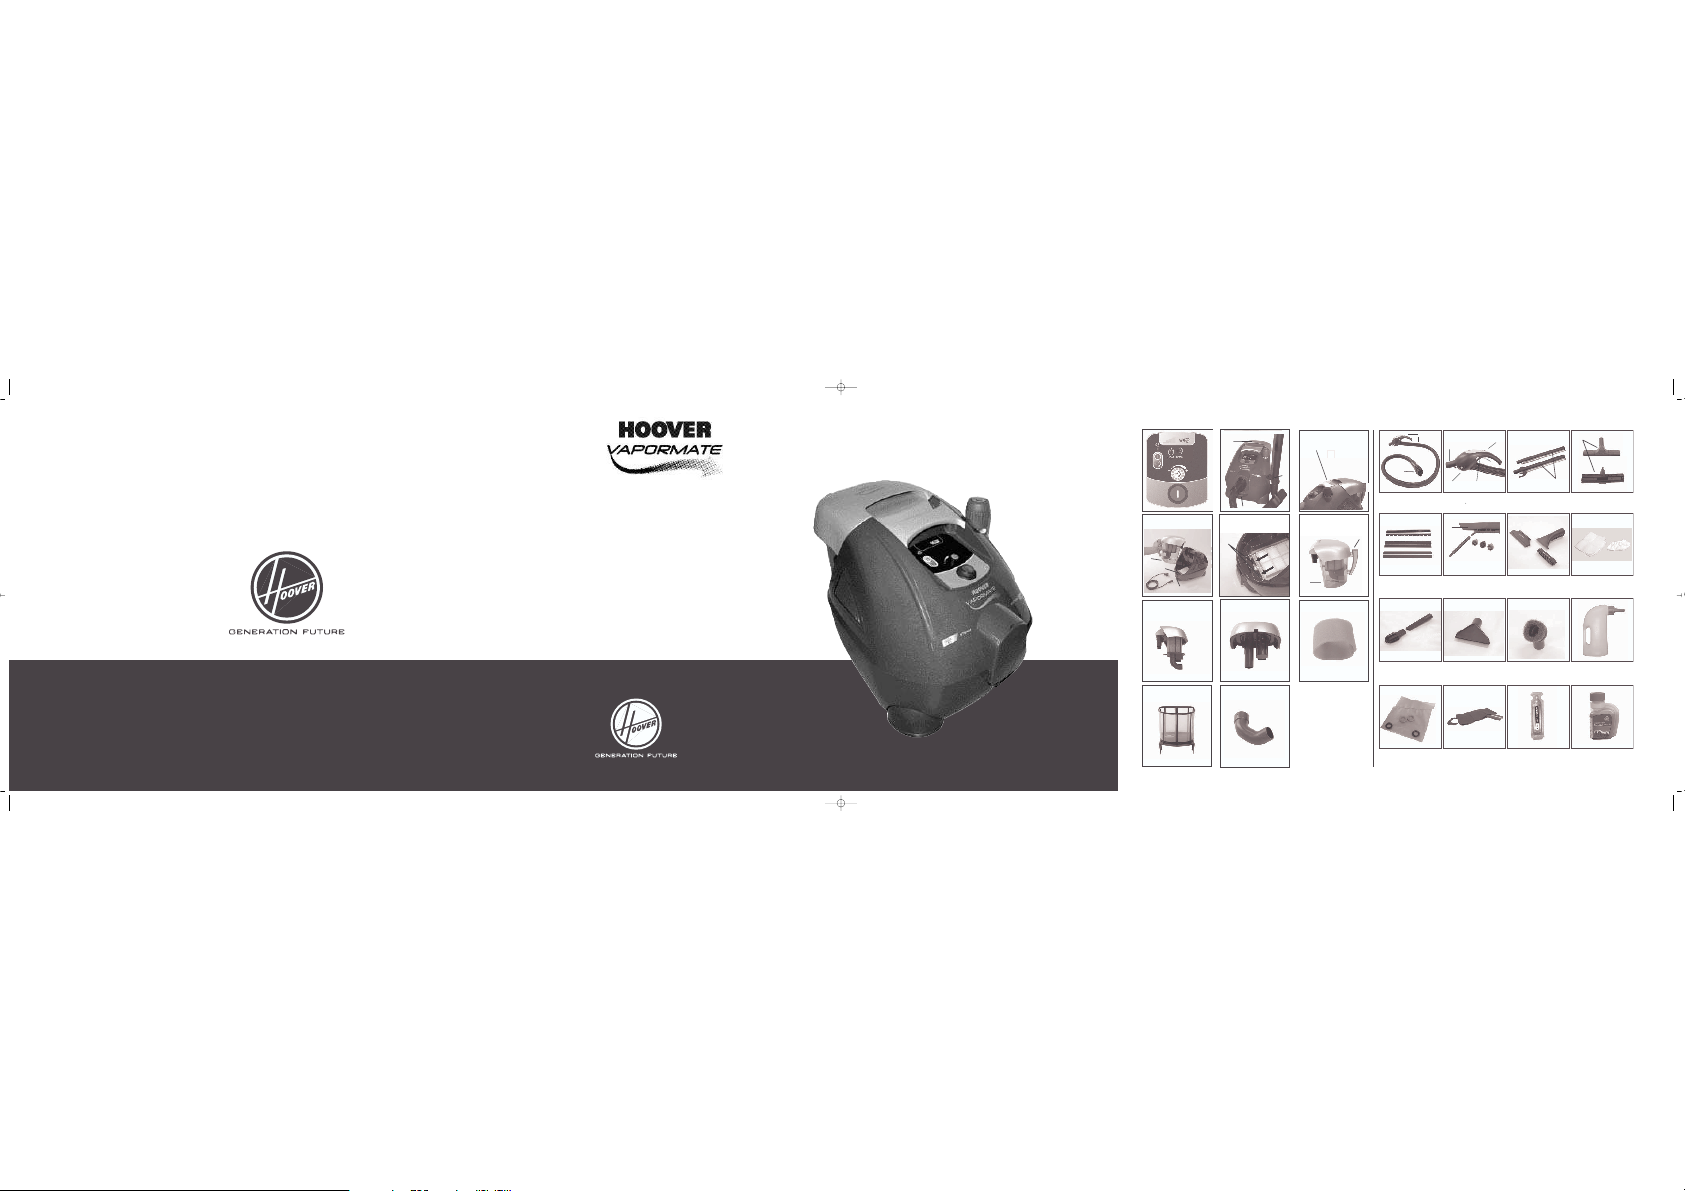
ACCESSORIES
Steam & V
acuum use
A) F lex ib le h os e and multifunctional
h andle
A1) A cces s ories connection
A2) A cces s ory lock /releas e b utton
A3) S team emis s ion control
A4) S team trig g er
A5) S uction control b utton
B) H os e connector
C) E x tens ion tub es
D) F loor b rus h
D1) B ris tled ins erts
D2) S q ueeg ee ins erts
D3) C arpet ins erts
E) C rev ice tool with s team emis s ion
E1) S team J et noz z le
E2) R ound b rus h es
F) U niv ers al noz z le
F1) W indow ins ert
F2) U ph ols tery ins ert
F3) C otton cloth s
V
acuum only use
G) C rev ice tool
H) R adiator b rus h
I) U ph ols tery noz z le
J) D us ting b rus h
Others
K) N o s pill b ottle
L) A dditional s eals
M) A cces s ories b ag
N) H oov er-K aldefender v ial
O) H oov er-E cob reez e b ottle
H O O VE R VA P O R M A T E U S E R M A N U A L :
Contents:
Important s afety reminders . . . . . . . . . . . . . . . . . . . . . . . . . . . . . . . . . . . . . . . . . . . . . . . . . . . . . . . . 4
G etting to k now y our product . . . . . . . . . . . . . . . . . . . . . . . . . . . . . . . . . . . . . . . . . . . . . . . . . . . . . . 4
D o not . . . . . . . . . . . . . . . . . . . . . . . . . . . . . . . . . . . . . . . . . . . . . . . . . . . . . . . . . . . . . . . . . . . . . . . . 5
E nv ironment . . . . . . . . . . . . . . . . . . . . . . . . . . . . . . . . . . . . . . . . . . . . . . . . . . . . . . . . . . . . . . . . . . . 5
H ow to s tart . . . . . . . . . . . . . . . . . . . . . . . . . . . . . . . . . . . . . . . . . . . . . . . . . . . . . . . . . . . . . . . . . . . 5
U s ing y our Vapormate . . . . . . . . . . . . . . . . . . . . . . . . . . . . . . . . . . . . . . . . . . . . . . . . . . . . . . . . . . . 6
C leaner maintenance . . . . . . . . . . . . . . . . . . . . . . . . . . . . . . . . . . . . . . . . . . . . . . . . . . . . . . . . . . . . 6
A cces s ories . . . . . . . . . . . . . . . . . . . . . . . . . . . . . . . . . . . . . . . . . . . . . . . . . . . . . . . . . . . . . . . . . . . 7
Important information . . . . . . . . . . . . . . . . . . . . . . . . . . . . . . . . . . . . . . . . . . . . . . . . . . . . . . . . . . . . 7
T roub les h ooting g uide . . . . . . . . . . . . . . . . . . . . . . . . . . . . . . . . . . . . . . . . . . . . . . . . . . . . . . . . . . . 8
G uarantee s tatement . . . . . . . . . . . . . . . . . . . . . . . . . . . . . . . . . . . . . . . . . . . . . . . . . . . . . . . . . . . . 8
IM P O R T A N T S A F E T Y R E M IN D E R S :
T h is cleaner s h ould only b e us ed for domes tic cleaning as des crib ed in th is us er manual. P leas e
ens ure th at th is g uide is fully unders tood b efore operating th is appliance.
W ARNING:R ememb er electricity can b e dang erous th is appliance mus t b e earth ed. T h is plug is fitted with a 1 3 - amp fus e (U K only ).
IMPORTANT:T h e wires in th e mains lead are coloured in accordance with th e following code:
BLUE – Neutral BROW N – Live G REEN/YELLOW – Earth
REMEMBER:A fter us e, s witch th e cleaner off and remov e th e plug from th e electricity s upply .
A lway s s witch off, remov e th e plug and wait for th e appliance to cool down b efore cleaning th e appliance or attempting any maintenance.
G E T T IN G T O K N O W Y O U R P R O D U C T :
T h e following features and acces s ories are mentioned with in th is us er manual and are s h own in th e
pictures on pag e 1 .
vapormate_4j.qxd 3/3/05 4:18 pm Page 4

5
GB
DO NOT:
- Position the cleaner above you when cleaning stairs.
- Put any liquids in the tank/boiler other than water and Hoover-Kaldefender.
- Submerge the product in any liquid.
- Touch the appliance with wet hands or feet with the cable plugged into the mains.
- Leave the appliance unattended whilst plugged into the mains.
- Attempt to disassemble the product.
- Use the product if it appears to be faulty.
- Direct steam towards people, animals or other appliances.
- Spray with or pick up any flammable liquids, as this risks explosion.
- Stand on or wrap the power cord around legs or arms while in use.
- Press the steam trigger when the water tank is empty.
TO AVOID SAFETY HAZARDS, THE CLEANER MUST ONLY BE REPAIRED BY AN AUTHORISED
HOOVER SERVICE ENGINEER.
ENVIRONMENT:
Hoover has made a long-term commitment, in all its activities, to safeguarding the environment. Our
environmental policy states: “ To adopt the best practicable environmental methods in design, production, packaging, use and disposal of products, whilst continuing to improve benefits to the consumer” .
The majority of materials used in this appliance are recyclable. Please use the best available disposal
method to take advantage of this feature.
HOW TO START:
Opening the box
Remove the product from the packaging. The flexible hose and accessories are found at the bottom
of the box, they are clearly visible once the product is removed.
Hose connection
Open the cover; fit the hose connector and push until you hear the click of the locking mechanism,
then make sure it is well locked (Fig. 1).
To disconnect the hose push the button on the top of the connector and pull the hose from the appliance (Fig. 2 ).
Power cord connection
Open the cover and push on the power cord (Fig. 3). Plug the other end of the power cord into the
wall socket. Ensure hands are dry and no moisture is present.
Accessories
Accessories can be connected directly to the multifunctional handle or to the extension tubes.
- Push desired accessory until the locking mechanism is engaged (Fig. 4).
- To disconnect accessory from the handle press the lock/release button and separate the 2
parts (Fig. 5).
- To disconnect accessory from tube press the retention clips. Note: for more information on
accessories application and use refer to the specific “Accessory” section.
Reminder: while assembling or changing accessories during use stop the steam function by pressing
from left to right the steam emission control.
Filling the Hydrofilt container
Remove the Hydrofilt container from the machine (Fig. 6), remove the filter assembly (Fig. 7) and fill
with water up to the MAX mark printed on the container (Fig. 8). Please add 1 measured fill of Hoover
Ecobreeze to the clean water, as described in the cleaner maintenance section.
What is the Hydrofilt?
Hydrofilt is a water filter, specifically designed for an efficient wet & dry suction, which uses the natural purifying property of water.
It is in fact the flow of water into the container that efficiently captures the dirt avoiding its dispersion
into the environment.
Filling the boiler
Unscrew the Boiler safety cap (Fig. 9 ) and fill with water using the no spill filler bottle supplied (Fig.
10 ), periodically add Kaldefender as described in the cleaner maintenance section.
Reminder: please read carefully chapter “Using your Vapormate” when re-filling the boiler during long
periods of cleaning.
Press the on/off main switch. This will illuminate in red. The first level of the Vacuum Power indicator
will flash in green.
You are now ready to use your Vapormate.
vapormate_4j.qxd 3/3/05 4:18 pm Page 5
 Loading...