


C o m m e rc i a l WindTunnel™ by Hoover
Index |
|
Assembling Cleaner .......................... |
2-3 |
Cleaner Descriptions............................ |
4 |
How To Use |
|
Cleaning Tools .................................. |
6 |
Upright Cleaner .............................. |
5-6 |
If You Have a Problem ........................ |
11 |
Important Safeguards .......................... |
1 |
Lubrication .......................................... |
12 |
Maintenance |
|
Authorized Service.......................... |
12 |
Cleaning Filters.................................. |
8 |
Clearing Blockages ........................ |
11 |
Emptying Cloth Bag ...................... |
6-7 |
Replacing Agitator .......................... |
10 |
Replacing Belt .............................. |
9-10 |
Replacing Edge Groomers ............ |
10 |
Replacing Headlight.......................... |
9 |
Replacing Paper Bag ........................ |
8 |
Thermal Protector .............................. |
11 |
Unpacking Cleaner................................ |
4 |
Warranty .............................................. |
12 |
Model Number______________________________
Serial Number______________________________
(Located on bottom of cleaner as shown)
Important Safeguards!
When using an electrical appliance, always follow basic precautions, including the following:
READ ALL INSTRUCTIONS BEFORE USING THIS APPLIANCE
Warning:To reduce the risk of fire, electric shock, or injury:
•Do not use outdoors or on wet surfaces.
•Connect to a properly grounded outlet only. See “Grounding Instructions”.
•Close supervision is necessary when any appliance is used by or near children. Do not allow vacuum cleaner to be used as a toy or to run unattended at any time.
•Keep hair, loose clothing, fingers, feet and all parts of body away from openings, rotating agitator and other moving parts. Do not operate cleaner in bare feet or when wearing open toe shoes or sandals.
•Do not pick up anything that is burning or smoking, such as cigarettes, matches, or hot ashes.
•Do not use to pick up flammable or combustible liquids such as gasoline or fine wood sandings or use in areas where they may be present.
•Avoid picking up hard, sharp objects with the cleaner. They may damage the cleaner and the bag.
•Always turn off this appliance before connecting or disconnecting hose.
•Do not use without dust bag or filters in place. Change bag frequently when picking up very fine materials such as powder.
•Use extra care when cleaning on stairs.
•Do not put any object into openings. Do not use with any opening blocked; keep free of dust, lint, hair, or anything that may reduce air flow.
•Do not pull or carry by cord, use cord as a handle, close door on cord or pull cord around sharp edges or corners. Do not run appliance over cord. Keep cord away from heated surfaces.
•Always disconnect cord from electrical outlet before servicing the cleaner.
•Unplug cleaner when not in use. Turn off all controls before unplugging.
• Do not unplug by pulling on cord. To unplug, grasp the plug, not the cord. Never handle plug or appliance with wet hands.
•The use of an extension cord is not recommended.
•Do not use with damaged cord or plug. If appliance is not working as it should, has been dropped, damaged, left outdoors, or dropped into water, take it to a Hoover Factory Service Center or Authorized Hoover Warranty Service Dealer
( D e p o t ) .
•Use vacuum cleaner only for its intended use as described in the instructions. Use only attachments recommended by The Hoover Company; others may cause h a z a r d s .
Save these instructions!
© 1997 The Hoover Company
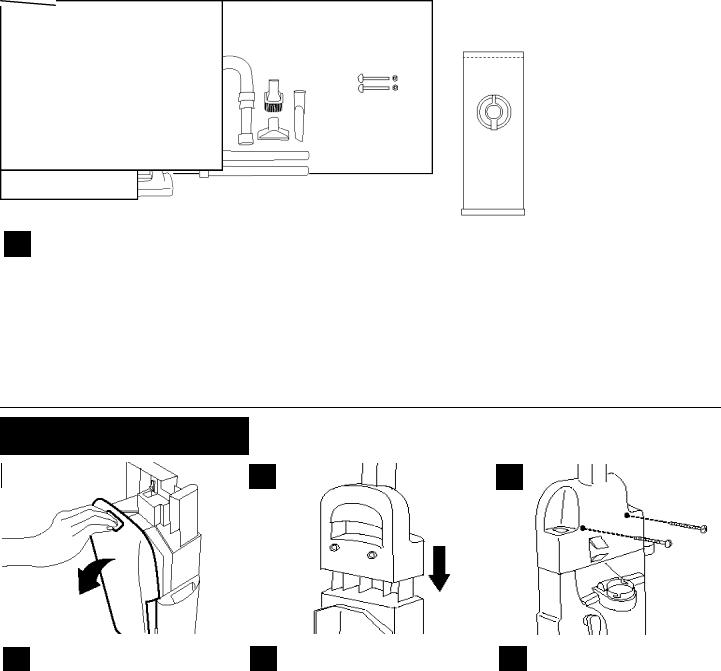
STEP 1 Unpack carton
1
C
B D
A
1Remove all parts from carton and identify each item shown.
Make sure all parts are located before disposing of packing.
A.Handle section
B.Cleaner body
C.Hose, cleaning tools and wands
D.Handle bolts and nuts packet
(in bag with operating instructions)
E F
Not required for assembly:
E. Optional Paper filter bag
(Cloth bag already installed in cleaner)
F. Extra belt
(One already installed in cleaner)
STEP II Attach handle
A
2 |
Remove bag door on cleaner |
3 Slide handle onto cleaner body. |
|
body by pushing down at top |
|
of door and pulling door outward.
Switch (A) above bag door should be in OFF position.
4Push bolts into holes on back of handle.
2

6
5Place nuts in recessed areas on front of handle. Hold each
nut in place while tightening each bolt securely with a Phillips screw driver.
Reposition bag door by fitting 6 tabs on bottom of door into opening. Press top of door to snap securely shut.
STEP III Attach Hose NOTE: HOSE MUST BE CONNECTED AS SHOWN
FOR ALL OPERATIONS
8
A
B
7Align end of hose with projections (A) over slots (B) in dirt
duct.
B
8Slide hose into (B) and twist hose to lock it into place.
C
9Lift hose tube cover (C). Position hose over hose hook
(D) and onto hose tube (E).
STEP IV Position Tools
10 |
11 |
C
B
A
10Place smaller unridged end of wand into bottom of rack. Snap
wand into clip. Repeat with other wand .
11Snap ends of dusting brush (A) crevice tool (B) and furniture
nozzle (C) into clips as shown.
3
Cleaner description
12 |
|
1 |
|
|
|
|
|
|
|
|
2 |
|
|
|
|
|
|
|
|
3 |
|
|
|
2 |
|
|
|
|
|
|
|
18 |
|||
|
|
|
|
|
|
|||
|
|
4 |
|
|
|
|
|
|
13 |
|
|
5 |
4 |
13 |
|||
|
||||||||
|
|
|
|
|
|
|
||
|
|
6 |
2 |
17 |
||||
|
|
|
|
|
|
|||
|
|
7 |
14 |
|
|
|
||
|
|
15 |
|
|
|
|||
|
|
8 |
|
|
16 |
|||
|
|
9 |
|
|
|
|||
|
|
|
|
|||||
|
|
10 |
|
|
|
|
||
12 |
11 |
|
8 |
||
|
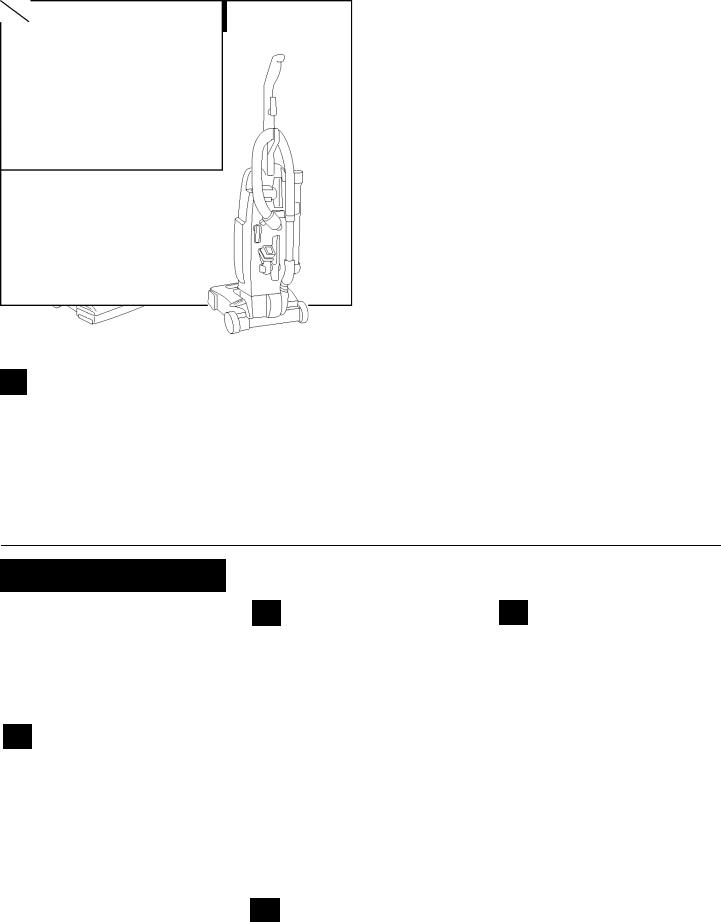
12The assembled cleaner will look like the drawing.
1.Handle
2.Cord hooks: wrap cord around
hooks for storage. The top hook can be rotated right or left for easy cord release.
3.Hose
4.ON/OFF Switch: located on left
rear corner of cleaner body.
5. Carrying handle
6.Bag door
7.Stair cleaning handle: located
on lower edge of bag door.
8.Handle release lever: step on lever to lower to operating or low positions.
9.Headlight
10.Nozzle control knob: slide
knob to correct setting for height of carpet being cleaned.
11.Furniture guard: helps prevent cleaner from marking furniture.
12.Edge groomers
13.Wands
14.Final exhaust filter
15.Dusting brush
16.Crevice tool
17.Furniture nozzle
18.Hose hook
How to use
Operate cleaner only at voltage specified on data plate on bottom of cleaner.
WARNING: Electric shock could occur if used outdoors or on wet surfaces
G rounding instru c t i o n s
This appliance must be grounded. If 13 it should malfunction or breakdown,
grounding provides a path of least resistance for electrical current to reduce the risk of electric shock. This appliance is equipped with a cord having an equipment - grounding conductor (C) and grounding plug (A). The plug must be plugged into an appropriate outlet (B) that is properly installed and grounded in accordance with all local codes and ordinances .
DANGER –
Improper connection of the equipmentgrounding conductor can result in the risk of electric shock. Check with a qualified
A
C B
electrician or service person if you are in doubt as to whether the outlet is properly grounded. Do not modify the plug provided with the appliance - if it will not fit the outlet have a proper outlet installed by a qualified electrician. This appliance is for use on a nominal 120 volt circuit and has a grounding plug that looks like the plug illustrated in sketch (A).
A temporary adapter (D) may be 14 used to connect this plug to a 2-pole receptacle (E) if a property grounded outlet is not available. The temporary adapter
D
F
G
E
should be used only until a properly grounded outlet (B) can be installed by a qualified electrician. The green colored rigid ear, lug, or the like (F) extending from the adapter must be connected to a permanent ground (G) such as a properly grounded outlet box cover. Whenever the adapter is used, it must be held in place by a metal screw.
Note: In Canada, the use of a temporary adapter is not permitted by the Canadian Electrical Code.
4
15 |
16 |
17 |
|
|
|
A
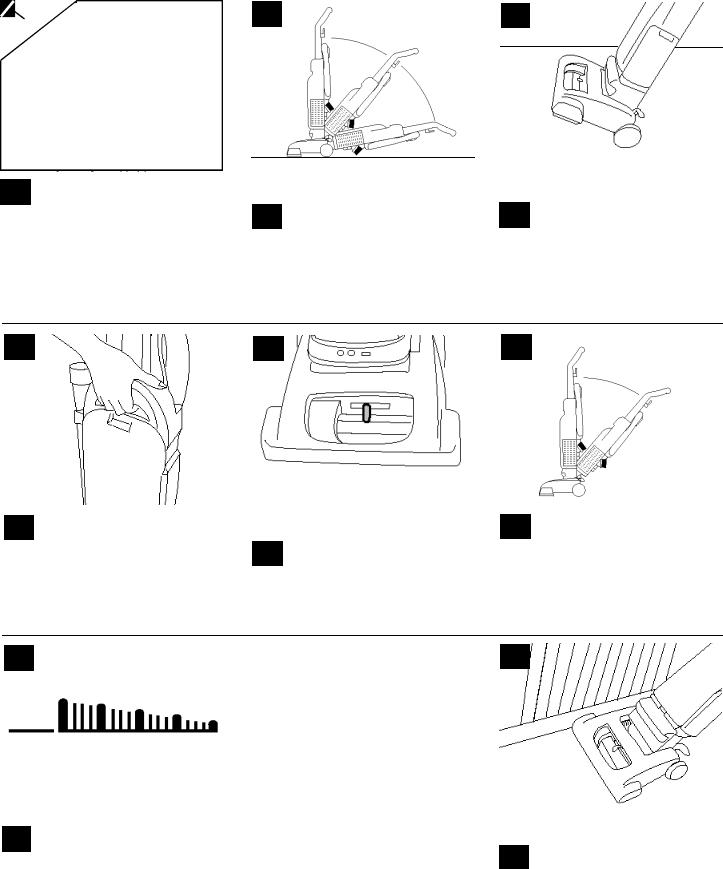
15Plug cord into electrical outlet. To turn cleaner ON, push
switch (A) toward front of cleaner. To turn cleaner OFF, push (A) toward back of cleaner.
Handle Positions
The handle of your cleaner has 16 three positions; upright for storage and when using cleaning tools; operating position for general operation on carpet and floors; low for reaching under low furniture. Step on handle release lever to lower handle.
Tr a n s p o rting cleaner
17To move your cleaner from room to room, put handle in
upright position, tilt cleaner back on rear wheels and push forward.
18 |
19 |
20 |
C |
D
B
A
18The cleaner can also be moved by using carrying handle.
Carpet height adjustment
The cleaning of carpet and ru g s 19 takes place at the nozzle (A).
When it is necessary to raise and lower the nozzle for various carpet pile heights, slide the nozzle control knob (B) to the desired setting.
20For ease in sliding knob, the handle should be in the upright
position (C).
The nozzle will not move into the adjusted position until the cleaner handle is lowered to the operating position (D).
21 |
22 |
HIGH |
BARE |
|
FLOOR |
For maximum cleaning perfor-
21mance, the following carpet height settings are recommended .
•Lowest setting: for all types of carpet
•Higher settings: for very deep pile carpet where easier pushing effort is desired, while maintaining good cleaning performance.
Note: If the cleaner is difficult to push, slide knob to the next higher setting.
Edge cleaning
22Special edge groomers are provided on both sides of the nozzle
to remove dirt in carpet near baseboards and furniture. Guide either side of nozzle parallel to edge of carpet or furniture.
5
23
Stair cleaning
23A stair cleaning handle has been designed for ease in using your
cleaner on stairs. With handle in operating position, place fingers under the edge of stair cleaning handle and guide cleaner with the other hand on upper handle.
As an alternative, you may use the hose and furniture nozzle for stair cleaning. Clean from bottom to top.
When using cleaning tools, the agitator will continue to rotate.
C A U T I O N : To avoid personal injury or unnecessary wear to carpet, and to prevent the cleaner from falling, always place it a t bottom of stairs.
Cleaning tools
Tools allow for cleaning surfaces above the floor and for reaching hard to clean areas .
Suction will automatically be diverted to the hose when handle is in u p r i g h t p o s i t i o n and cleaner is turned ON.
CAUTION: Agitator continues to rotate while cleaner handle is in upright position. Avoid tipping cleaner or setting it on furniture, fringed area rugs or carpeted stairs during tool use.
How to clean tools
To clean hose, wipe off dirt with a cloth dampened in a mild detergent. Rinse with a damp cloth.
Cleaning tools may be washed in warm water with a detergent. Rinse and air dry before using.
24 |
B |
A |
C
D
24 Select proper tool
A. Dusting brush may be used for carved furniture, table tops, books, lamps, lighting fixtures, venetian blinds, baseboards, shutters, and registers.
B.Furniture nozzle may be used for upholstered furniture, draperies, mattresses, clothing, automobile interiors, and carpeted stairs.
C.Crevice tool may be used in tight spaces, corners and along edges in such places as dresser drawers, upholstered furniture, stairs and baseboards.
D.Wands are used to give extra length to your hose. Use them with any of the above tools.
25 |
26 |
B
D
A |
C |
Attach wand and tools
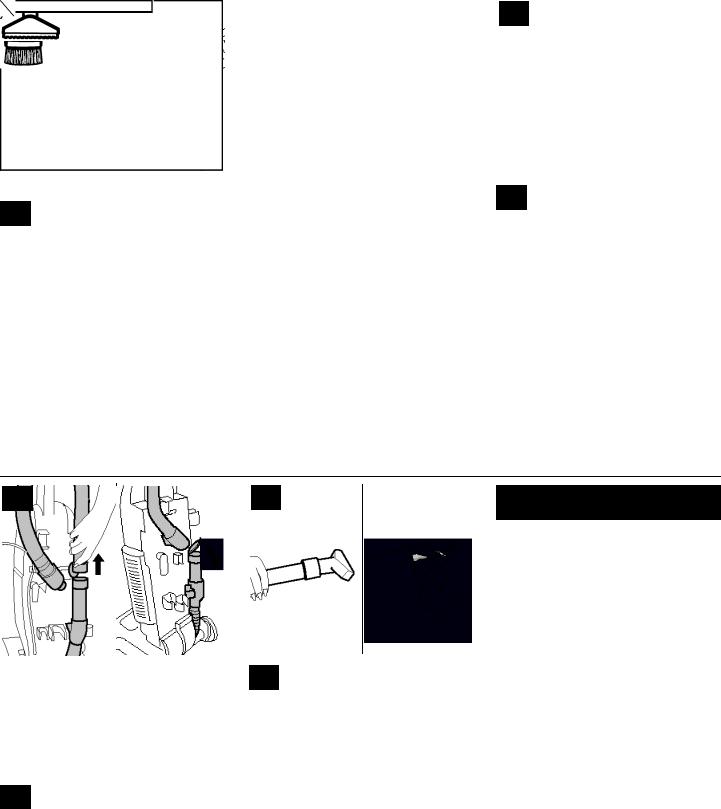
When using cleaning tools, cleaner should be in upright position. Also, turn cleaner OFF before disconnecting and connecting hose to hose tube (A).
25To use hose, lift hose end as shown.Lower cover (B) on hose
tube.
When you are finished cleaning with the tools, be sure to lift cover from hose tube and reposition hose end into tube.
26Attach tool or wand to the hose (C) by pushing it firmly
into hose.
Attach second wand or tool to wand
(D) by pushing it firmly onto the wand.
Twist wand or tool slightly to tighten or loosen the connection.
Maintenance
Disconnect cleaner from electrical outlet before attempting to service it in any manner.
Do not operate cleaner without either cloth filter bag or paper filter bag in place.
The cloth filter bag
When to empty
Check filter bag from time to time. It should be emptied often. If the filter bag is allowed to overfill, the cleaner will not operate eff e c t i v e l y.
6
27 |
28 |
29 |
|
|
|
C
A
B
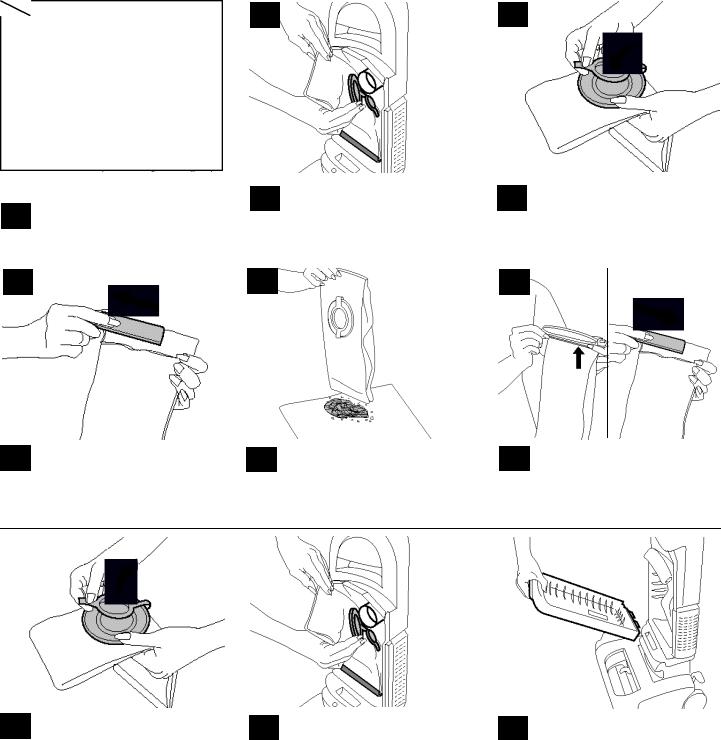
How to empty |
Grasp filter bag collar (A) and |
Snap cap (C) into collar open- |
||
27 Push down at top of bag door |
28 pull collar from tube (B). |
29 ing. |
||
and pull forw a rd. Remove door. |
|
|
|
|
|
|
|
|
|
30 |
31 |
32 |
|
|
|
|
|
|
|
|
|
|
|
|
30Slide filter bag clip from bottom of bag.
31Empty filter bag over paper, shaking bag until clean.
D
32To replace filter bag clip, first fold down top of bag over
plastic strip (D).
Push clip over edge.
33 |
|
35 |
|
|
|
C
A
B
33After replacing clip, open bag cap (C).
34Hold filter bag as shown in Fig. 28 aligning opening in bag
with (B). Push (A) firmly onto (B). Fit bottom of filter bag into bag compart- m e n t .
Reposition bag door by placing 35 tabs on bottom of door into opening. Press top of door to snap s e c u rely shut.
Should you want to replace the cloth filter bag, ask for Hoover part
No. 43667-050.
7
Optional paper filter bag
A Genuine Hoover® Allergen Filtration Type Y disposable paper bag may be used with the cleaner in place of the cloth filter bag.
How to install
Disconnect cleaner from electrical outlet.
1.Remove cloth filter bag from cleaner following Figs. 27-29.
2.Hold paper filter bag collar as shown in Fig. 28, aligning opening in bag with tube (B). Push collar firmly onto tube.
3.Tuck in filter bag and reposition bag door as shown in Fig. 35.
When to replace
It is recommended that you change the paper filter bag when dirt reaches the dotted line. If more dirt than this accumulates, the cleaner will not operate effectively.
CAUTION: Very fine materials such as face powder, cornstarch, fireplace ashes or fireplace soot, may seal the filter bag and may cause it to burst even though it is only partially full of dirt. When cleaner is used to remove material of this nature, change filter bag often.
Where to buy
Filter bags may be purchased from your Authorized Hoover Dealer (Depot) or from a Hoover Factory Service Center. When ordering paper filter bags, be sure to give the model number of your cleaner.
What to buy
To assure cleaning effectiveness, use only Genuine HOOVER®
Allergen Filtration Type Y disposable filter bags.
To assure that your cleaner operates at peak performance, it is imperative that you use only genuine HOOVER filter bags made by The Hoover Company. HOOVER bags can be identified by these trademarks —
®
®
36 |
37 |
|
|
A
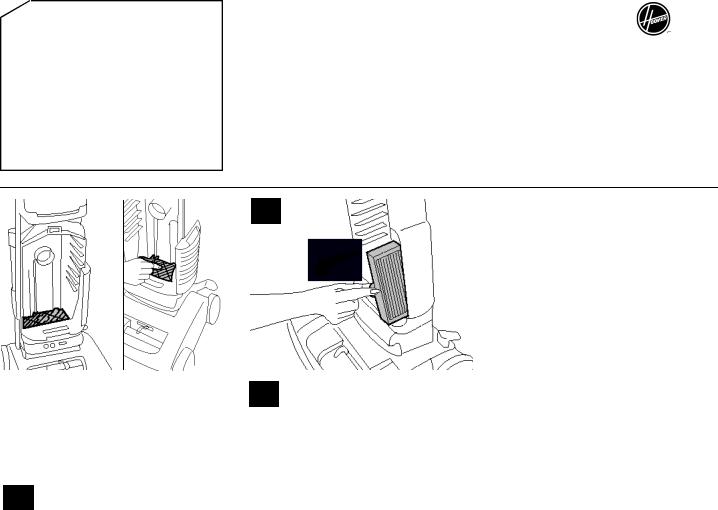
The secondary & final filters
How to clean
Disconnect cleaner from electrical outlet.
36The secondary filter (A), located behind the grill in the
bottom of bag compartment, protects the motor from dirt particles.
To clean the filter when it becomes dirty, remove bag door, pull off grill and lift out filter.
Hand wash filter in cold water with mild detergent, then air dry.
37The final filter assists in the filtration process to return clean
air to the room.
To remove this filter when it becomes dirty, pull out filter as shown.
Hand wash the filter in cold water with mild detergent.
Let filter air dry and reposition it on the side of cleaner.
Reposition bag door.
Should you want to replace this filter, ask for Hoover part No. 43613-006.
Do not operate cleaner without either the secondary or final filter in place.
Reposition dry filter and grill.
Should you want to replace this filter, ask for HOOVER part No. 38765-022.
8
 Loading...