


Honda TRX420TM/FM FOURTRAX 420/4×4
OWNER’S MANUAL

Introduction
Congratulations on choosing your Honda ATV.
When you own a Honda, you’re part of a worldwide family of satisfied customers people who appreciate Honda’s reputation for building quality into every product.
Your Honda was designed as a recreational ATV for off-road use by one rider only.
Before riding, take time to get acquainted with your ATV and how it works. To protect your investment, we urge you to take responsibility for keeping your ATV well maintained. Scheduled service is a must, of course. But it’s just as important to observe the break-in guidelines, and perform all pre-ride and other periodic checks detailed in this manual.
We also recommend that you read this owner’s manual before you ride. It’s full of facts, instructions, safety information, and helpful tips. To make it easy to use, the manual contains a detailed list of topics at the beginning of each section, and both an in-depth table of contents and an index at the back of the book.
As you read this manual, you will find information that is preceded by a 


 symbol. This information is intended to help you avoid damage
to your Honda, other property, or the environment.
Whenever you ride, tread lightly. By staying on established trails and riding only in approved areas, you help protect the environment and keep off-road riding areas open for the future.
Introduction

Introduction
If you have any questions, or if you ever need special service or repairs, remember that your Honda dealer knows your ATV best and is dedicated to your complete satisfaction.
Happy riding!
Introduction

A Few Words About Safety
Your safety, and the safety of others, is very important. And operating this ATV safely is an important responsibility.
To help you make informed decisions about safety, we have provided operating procedures and other information on labels and in this manual. This information alerts you to potential hazards that could hurt you or others.
Of course, it is not practical or possible to warn you about all hazards associated with operating or maintaining an ATV. You must use your own good judgment.
You will find important safety information in a variety of forms, including:
Safety Labels –– on the ATV.
Safety Messages –– preceded by a safety alert symbol and one of three signal words: DANGER, WARNING, or CAUTION.
A Few Words About Safety

A Few Words About Safety
These signal words mean:
You WILL be KILLED or SERIOUSLY HURT if you don’t follow instructions.
You CAN be KILLED or SERIOUSLY HURT if you don’t follow instructions.
You CAN be HURT if you don’t follow instructions.
Safety Headings –– such as Important Safety Reminders or Important Safety Precautions.
Safety Section –– such as ATV Safety.
Instructions –– how to use this ATV correctly and safely.
This entire manual is filled with important safety information –– please read it carefully.
A Few Words About Safety

Contents
These pages give an overview of the contents of your owner’s manual. The first page of each section lists the topics covered in that section.
ATV Safety ........................................................................................ |
1 |
Important safety information you should know, plus a look at the |
|
safety related labels on your ATV. |
|
Instruments & Controls.................................................................... |
9 |
The location and function of indicators and controls on your ATV |
|
and operating instructions for various controls and features. |
|
Before Riding..................................................................................... |
37 |
The importance of wearing a helmet and other protective gear, |
|
how to make sure you and your ATV are ready to ride, and |
|
important information about loading. |
|
Basic Operation & Riding ................................................................ |
53 |
How to start and stop the engine, shift gears, and brake. Also, riding precautions.
Contents

Contents
Servicing Your Honda ...................................................................... |
85 |
Why your ATV needs regular maintenance, what you need to know before servicing your Honda, an owner maintenance schedule, and instructions for specific maintenance and adjustment items.
Tips ..................................................................................................... |
171 |
How to store and transport your ATV and how to be an |
|
environmentally responsible rider. |
|
Taking Care of the Unexpected ....................................................... |
181 |
What to do if you have a flat tyre, your engine won’t start, etc. |
|
Technical Information ...................................................................... |
201 |
ID numbers, technical specifications, and other technical facts. |
|
Table of Contents .............................................................................. |
210 |
Sequential listing of topics in this owner’s manual. |
|
Index................................................................................................... |
216 |
Manufacturer and Authorised Representative for EU Market .... |
228 |
Contents

ATV Safety
This section presents some of the most important information and recommendations to help you ride your ATV safely. Please take a few moments to read these pages. This section also includes information about the location of safety labels on your ATV.
Important Safety Information ................................................................ |
2 |
Safety Labels.......................................................................................... |
5 |
ATV Safety 1

Important Safety Information
Your ATV can provide many years of service and pleasure if you take responsibility for your own safety and understand the challenges you can meet while riding.
There is much that you can do to protect yourself when you ride. You’ll find many helpful recommendations throughout this manual. The following are a few that we consider to be most important.
Follow the Age Recommendation
The minimum recommended age for this ATV model is 16. Children under age 16 should never operate this vehicle.
Always Wear a Helmet
It’s a proven fact: helmets significantly reduce the number and severity of head injuries. So always wear an approved motorcycle helmet. We also recommend that you wear eye protection, sturdy boots, gloves, and other protective gear (page 38 ).
Never Carry a Passenger
Your ATV is designed for one person only. There are no handholds, footrests, or seat for a second person, so never carry a passenger. A passenger could interfere with your ability to move around to maintain your balance and control of the ATV.
2 ATV Safety

Important Safety Information
Ride Off-road Only
Your ATV is designed and manufactured for off-road use only. The tyres are not made for pavement, and the ATV does not have turn signals and other features required for use on public roads. If you need to cross a paved or public road, get off and walk your ATV across.
Take Time to Learn & Practice
Even if you have ridden other ATVs, take time to become familiar with how this ATV works and handles. Practice in a safe area until you build your skills and get accustomed to the ATV’s size and weight.
Be Alert for Off-road Hazards
The terrain can present a variety of challenges when you ride off-road. Continually ‘‘read’’ the terrain for unexpected turns, drop-offs, rocks, ruts, and other hazards. Always keep your speed low enough to allow time to see and react to hazards.
ATV Safety 3

Important Safety Information
Ride within Your Limits
Pushing limits is another major cause of ATV accidents. Never ride beyond your personal abilities or faster than conditions warrant. Remember that alcohol, drugs, fatigue, and inattention can significantly reduce your ability to make good judgments and ride safely.
Don’t Drink and Ride
Alcohol and riding don’t mix. Even one drink can reduce your ability to respond to changing conditions, and your reaction time gets worse with every additional drink. So don’t drink and ride, and don’t let your friends drink and ride either.
Keep Your Honda in Safe Condition
It’s important to keep your ATV properly maintained and in safe riding condition. Having a breakdown can be difficult, especially if you are stranded off-road far from your base. To help avoid problems, inspect your ATV before every ride and perform all recommended maintenance.
4 ATV Safety

Safety Labels
Your ATV comes with several labels containing important safety information. Anyone who rides the vehicle should read and understand this information before riding.
The labels should be considered permanent parts of the vehicle. If a label comes off or becomes hard to read, contact your Honda dealer for replacements.
ATV Safety 5
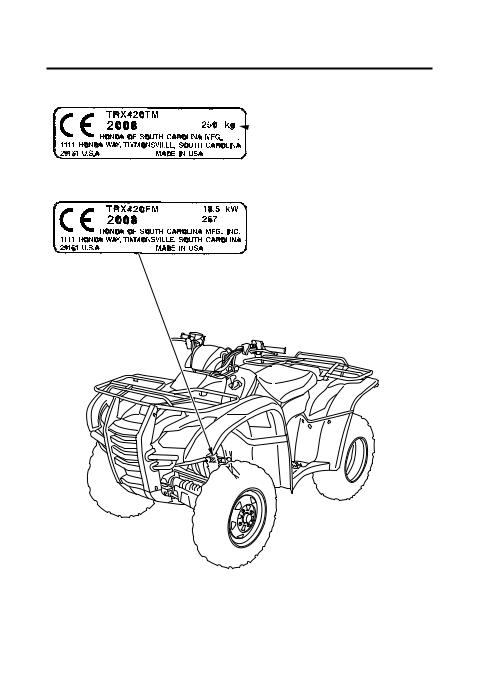
Safety Labels
(TRX420TM)


 Engine net power


 Machine mass
(TRX420FM)
 Engine net power

 Machine mass
6 ATV Safety

Safety Labels
ATV Safety 7

Safety Labels
(TRX420FM only)
8 ATV Safety

Instruments & Controls
This section shows the location of all indicators and controls you would normally use before or while riding your ATV.
The items listed on this page are described in this section. Instructions for other components are presented in other sections of this manual where they will be most useful.
Operation Component Locations .......................................................... |
.11 |
Indicators & Displays............................................................................. |
14 |
Multi-function Display....................................................................... |
18 |
Gear Position Indicator....................................................................... |
19 |
Oil Change Indicator .......................................................................... |
20 |
Odometer............................................................................................ |
21 |
Tripmeter............................................................................................ |
21 |
Hourmeter .......................................................................................... |
22 |
Fuel Gauge ......................................................................................... |
23 |
(cont’d)
Instruments & Controls |
9 |

Instruments & Controls
Controls & Features ............................................................................... |
24 |
Fuel Valve .......................................................................................... |
24 |
Ignition Switch ................................................................................... |
25 |
2WD/4WD Select Lever (TRX420FM only) ..................................... |
26 |
Start Button ........................................................................................ |
27 |
Engine Stop Switch ............................................................................ |
27 |
Headlight Switch................................................................................ |
28 |
Headlight Dimmer Switch.................................................................. |
28 |
Horn Button........................................................................................ |
28 |
Recoil Starter...................................................................................... |
29 |
Throttle Lever .................................................................................... |
30 |
Reverse Selector Knob ....................................................................... |
31 |
Front Brake Lever .............................................................................. |
32 |
Rear Brake Lever/Parking Brake Lever ............................................. |
32 |
Rear Brake Pedal................................................................................ |
32 |
Parking Brake..................................................................................... |
33 |
Flag Pole Bracket ............................................................................... |
34 |
Trailer Hitch ....................................................................................... |
35 |
10 Instruments & Controls
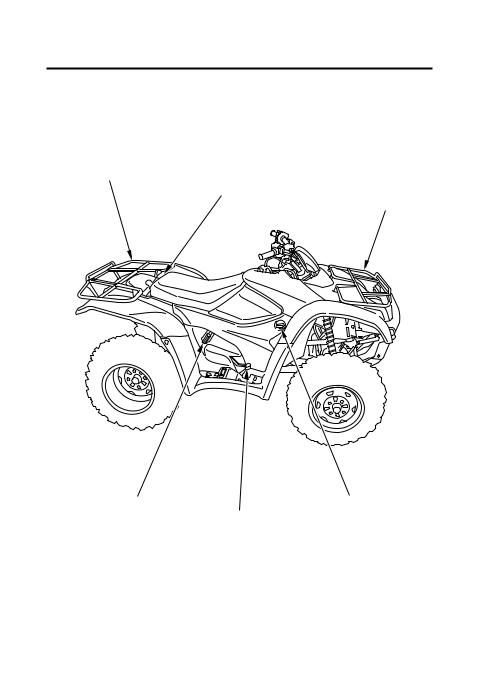
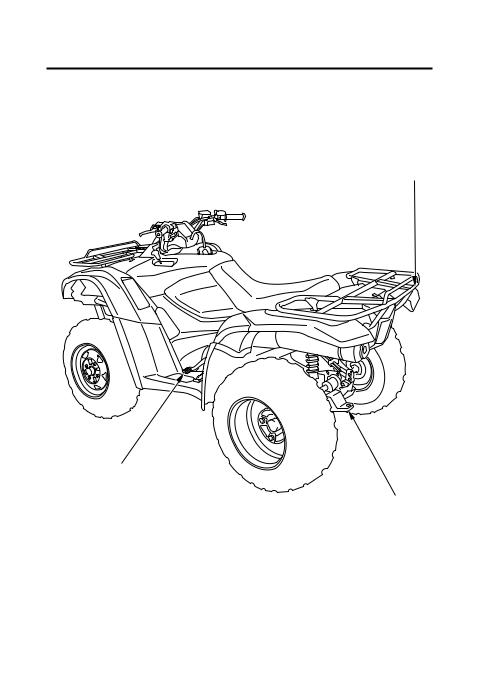
Operation Component Locations
reverse selector knob headlight switch
parking brake lock lever
rear brake lever/ parking brake lever
headlight dimmer switch
start button
horn button
front brake lever
throttle lever
ignition switch
2WD/4WD select lever (TRX420FM only)
engine stop switch
Instruments & Controls 11
Operation Component Locations
rear cargo rack
seat latch
front cargo rack
recoil starter |
fuel valve |
|
rear brake pedal |
12 Instruments & Controls
Operation Component Locations
flag pole bracket
shift lever
trailer hitch
Instruments & Controls 13
Indicators & Displays
The indicators and displays on your ATV keep you informed, alert you to possible problems, and make your riding safer and more enjoyable. Refer to the indicators frequently. Their functions are described on the following pages.
(1) |
(2) |
(3) |
(4) |
(5) |
|
(6) |
|
(7) |
(1) reverse indicator |
(5) PGM-FI indicator |
(2) neutral indicator |
(6) multi-function display |
(3) 4WD indicator |
(7) hourmeter/odometer/ |
(TRX420FM only) |
tripmeter select button |
(4)high coolant temperature indicator
Lamp Check
The high coolant temperature indicator and PGM-FI indicator come on for a few seconds and then go off when you turn the ignition switch ON ( ).
14 Instruments & Controls
Indicators & Displays
The indicators are identified in the table on page 16 with the words:
Lamp Check.
When applicable, the reverse or neutral indicators come on when you turn the ignition switch ON ( ) and remain on until you shift out of reverse or neutral.
TRX420FM only:
When applicable, the 4WD indicator comes on when you turn the ignition switch ON ( ) and remains on until you shift out of 4WD mode.
If one of these indicators does not come on when it should, have your Honda dealer check for problems.
Display Check
When the ignition switch is turned ON ( ), the multi-function display ( 1 ) will temporarily show all the modes and digital segments so you can make sure the liquid crystal display is functioning properly.
The displays are identified in the table on page 17 with the words:
Display Check.
If any part of these displays does not come on when it should, have your Honda dealer check for problems.
(1)
(1) multi-function display
Instruments & Controls 15

Indicators & Displays
1 |
Reverse indicator |
Lights when the transmission is in |
||
|
|
reverse. Lamp Check. |
||
2 |
Neutral indicator |
Lights when the transmission is in |
||
|
|
neutral. Lamp Check. |
||
3 |
4WD indicator |
Lights when the 4WD drive mode |
||
|
(TRX420FM only) |
engages. Lamp Check. |
||
4 |
High coolant |
Lights when coolant temperature is |
||
|
temperature |
high enough to adversely affect the |
||
|
indicator |
service life of the engine. |
||
|
|
If the high coolant temperature |
||
|
|
indicator comes on while you are |
||
|
|
riding, immediately bring the vehicle |
||
|
|
to a stop, turn the engine off and let |
||
|
|
it cool. See page190. Lamp Check. |
||
5 |
PGM-FI indicator |
Lights when there is any abnormality |
||
|
|
in the PGM-FI (Programmed Fuel |
||
|
|
Injection) system. Should also light |
||
|
|
for a few seconds and then go off |
||
|
|
when the ignition switch is turned |
||
|
|
ON ( |
|
). If the indicator comes on |
|
|
|
||
|
|
at any other time, reduce speed and |
||
|
|
take your vehicle to a Honda dealer |
||
|
|
as soon as possible. Lamp Check. |
||
16 Instruments & Controls

|
|
Indicators & Displays |
|
|
|
6 |
Multi-function |
The display includes the following |
|
display |
functions. Display Check. |
|
Gear position |
Shows the gear position (page 19 ). |
|
indicator |
|
|
Oil change |
Lights when specified maintenance |
|
indicator |
interval for engine oil change is |
|
|
reached (page 20 ). |
|
Speedometer |
Shows riding speed. |
|
Odometer |
Shows accumulated mileage |
|
|
(page 21 ). |
|
Tripmeter |
Shows mileage per trip (page 21 ). |
|
Hourmeter |
Shows hours and tenths of hours of |
|
|
engine operation (page 22 ). |
7 |
Hourmeter/ |
Selects display of the odometer or |
|
odometer/tripmeter |
tripmeter or hourmeter. Resets the |
|
select button |
tripmeter to zero (0) (page 21 ). This |
|
|
button also used to reset the oil |
|
|
change indicator (page 20 ). |
Instruments & Controls 17
Indicators & Displays
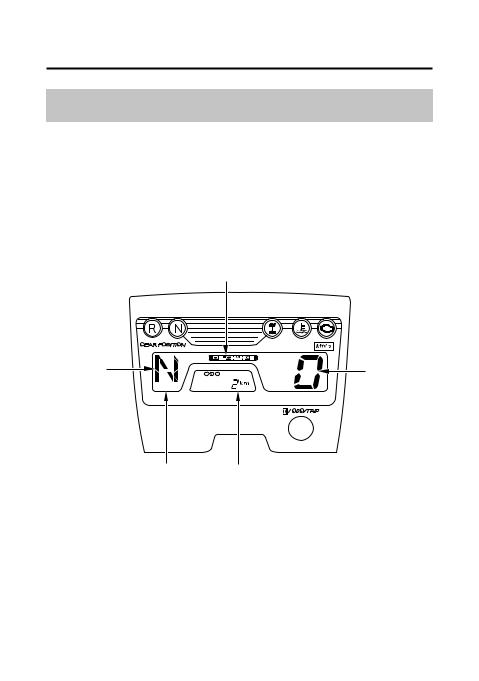
Multi-function Display
The multi-function display ( 1 ) includes the following functions: Gear position indicator
Oil change indicator Speedometer Odometer Tripmeter Hourmeter
(3) |
(2) |
(4) |
(1)(5)
(1) multi-function display |
(4) speedometer |
(2) gear position indicator |
(5) odometer/tripmeter/ |
(3) oil change indicator |
hourmeter |
18 Instruments & Controls
Indicators & Displays
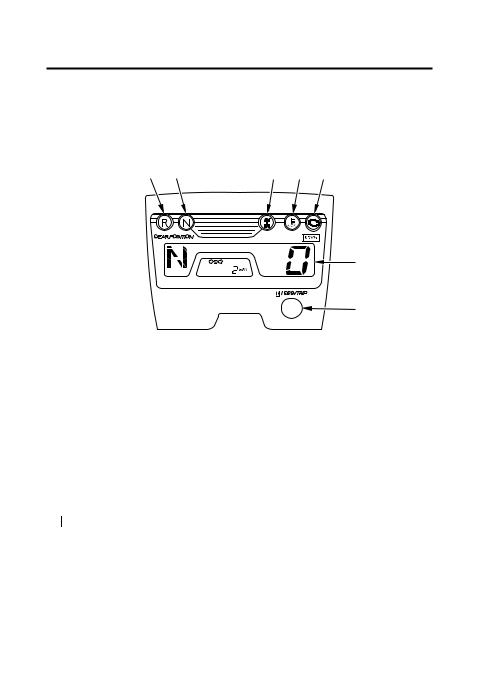
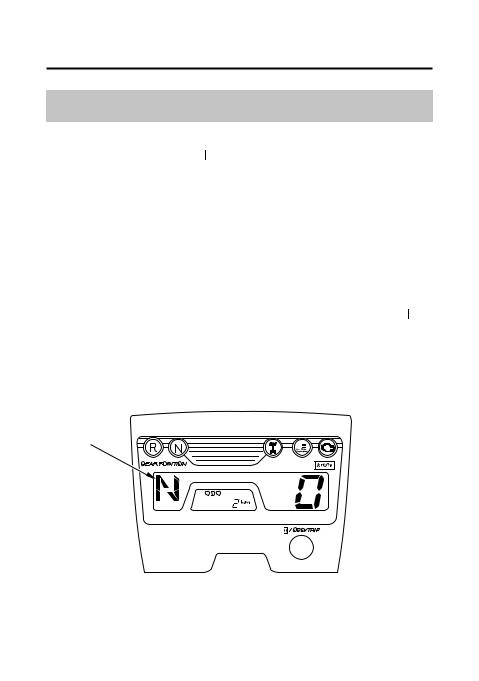
Gear Position Indicator
The gear position indicator ( 1 ) shows the gear position when the ignition switch is in the ON ( ) position.
The indicator displays: N for neutral, R for reverse, and 1 5 for the five forward gears.
‘‘ ’’ will be displayed on the gear position indicator when the transmission is not shifted into gear properly. Before riding, check that the gear position is properly displayed on the gear position indicator.
If the gear position indicator shows ‘‘ ’’ and blinks, turn the ignition switch to the OFF (  ) position, and then turn it back to the ON ( ) position again. If the gear position indicator still shows ‘‘ ’’ and blinks, see your Honda dealer.
(1)
(1) gear position indicator
Instruments & Controls 19
Indicators & Displays
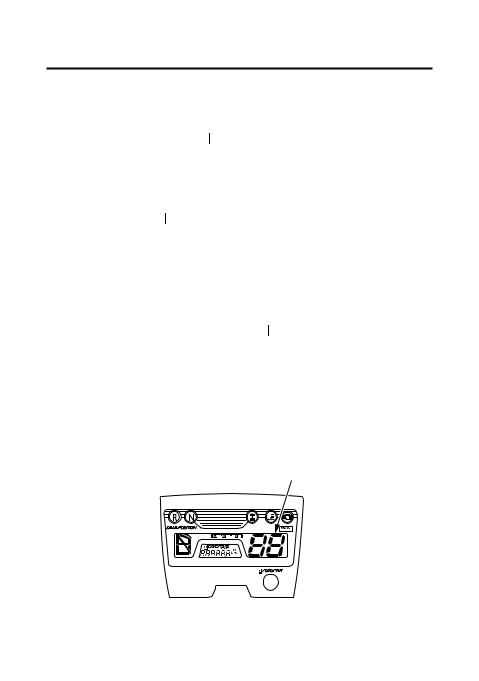
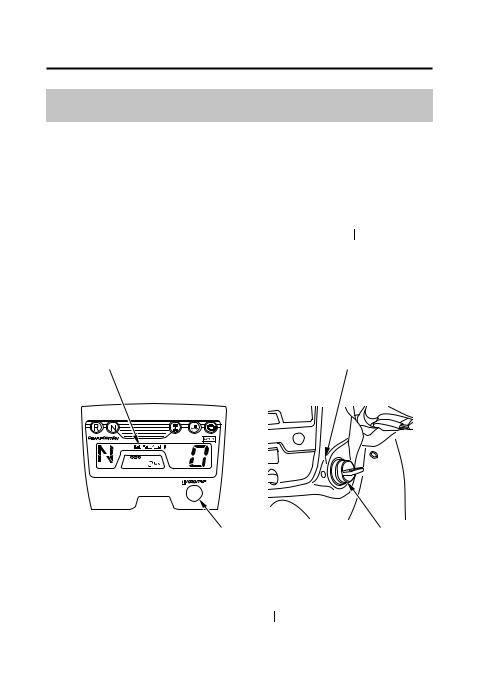
Oil Change Indicator
The oil change indicator ( 1 ) appears in the display when the mileage or operating hours on your ATV approaches the oil change interval specified on the maintenance schedule.
Reset the indicator after each oil change.
To reset the indicator, press and hold the hourmeter/odometer/tripmeter select button ( 2 ) and turn the ignition switch ( 3 ) to ON ( ) for more than 5 seconds. The indicator message will disappear.
If the oil is changed before the oil change indicator appears, be sure to reset the oil change indicator after changing the oil. The indicator will appears for 5 seconds, then disappear. This means the indicator is reset.
(1) |
ON |
(2) |
(3) |
(1) oil change indicator |
|
(2) hourmeter/odometer/ |
|
tripmeter select button |
|
(3) ignition switch |
ON |
20 Instruments & Controls
 Loading...