

Page 1
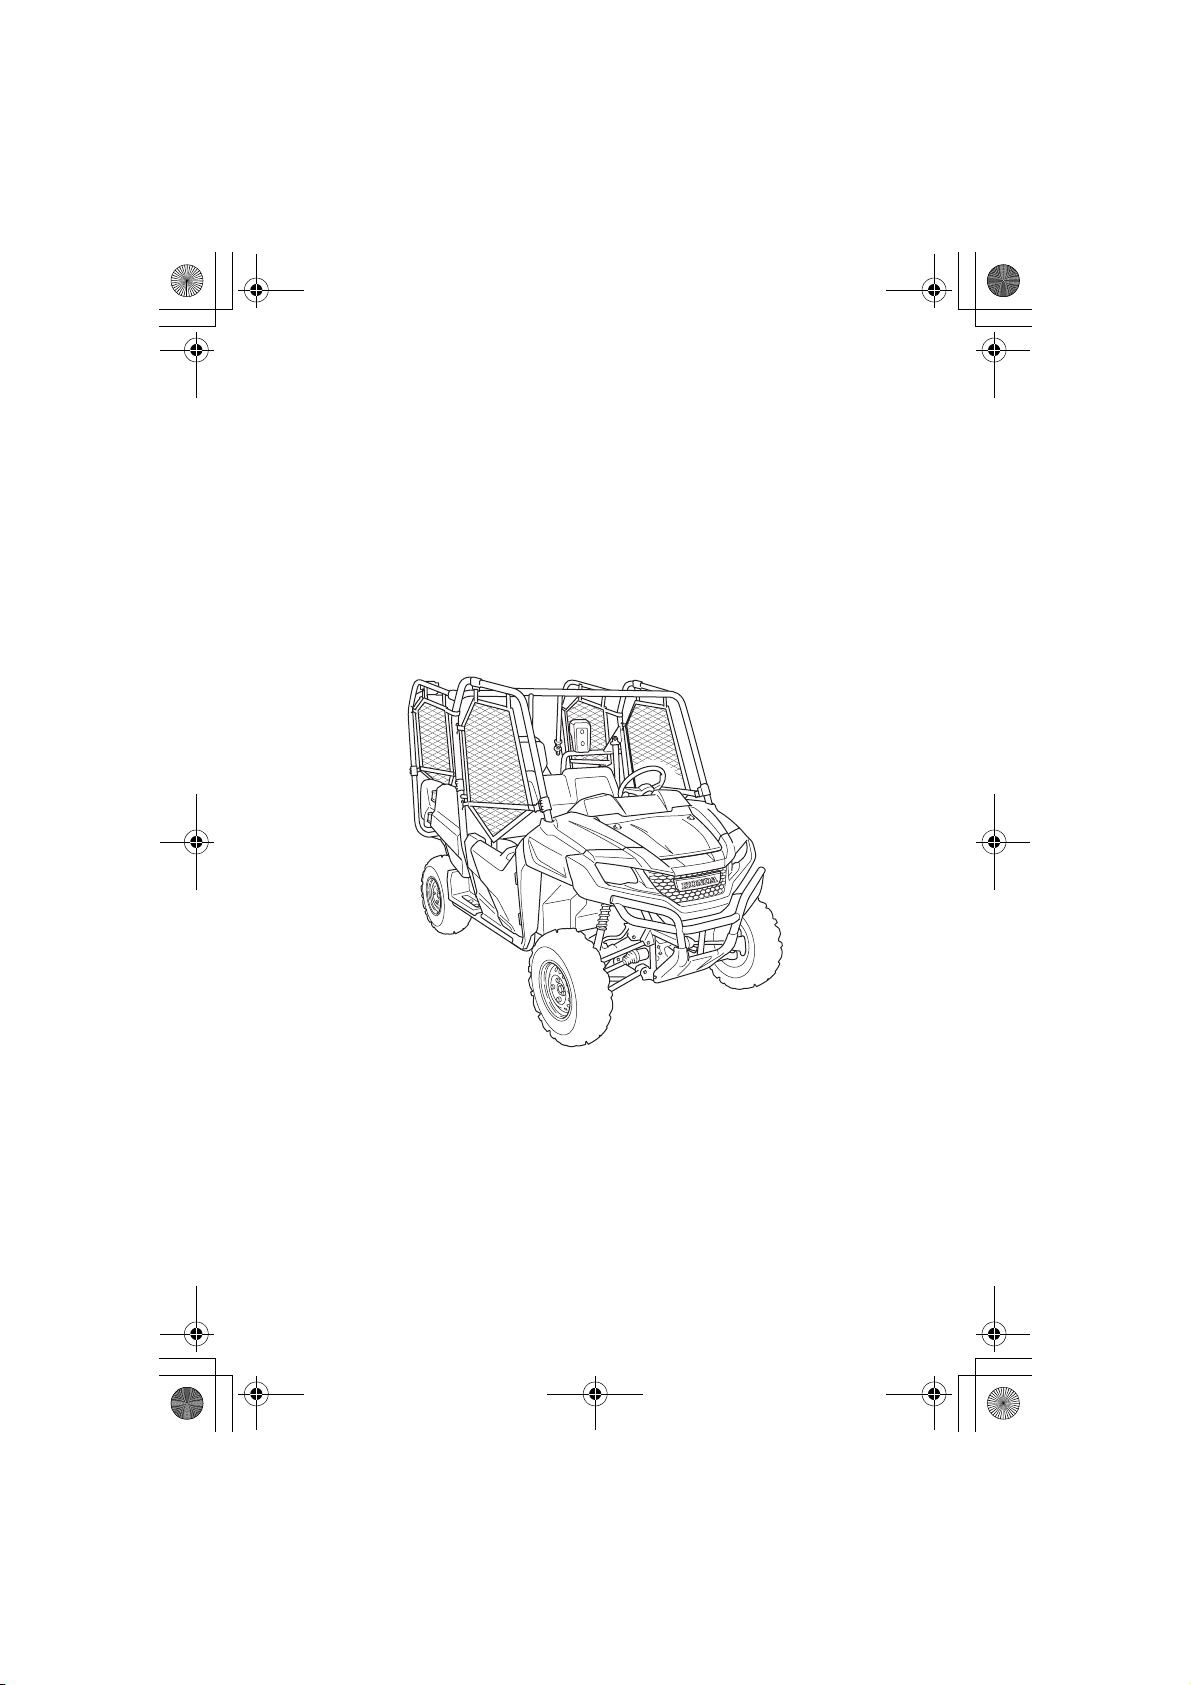
2014
Honda PIONEER SXS700
OWNER’S MANUAL
14 SXS700-31HL36000.book 2 ページ 2013年5月14日 火曜日 午前10時59分
Page 2

NOTICE
14 SXS700-31HL36000.book 3 ページ 2013年5月14日 火曜日 午前10時59分
Introduction
Introduction
Congratulations on choosing your Honda Pioneer. When you own a
Honda, you’re part of a worldwide family of satisfied customers–
people who appreciate Honda’s reputation for building quality into
every product.
Before you begin driving your vehicle, we recommend that you read
this owner’s manual. It’s full of facts, instructions, safety
information, and helpful tips. To help you find what you are looking
for, the manual contains a detailed list of contents at the beginning
of each section and an alphabetical index at the back of the book.
To protect your investment, we urge you to keep your vehicle well
maintained. Scheduled service is a must, of course, but it’s also
important to observe the break-in guidelines and perform all predrive and other periodic checks detailed in this manual.
As you read this manual, you will find information that is preceded
by a symbol. This information is intended to help you avoid
damage to your Honda, other property, or the environment.
Be sure to read the Warranties Booklet (page 229) so you
understand the coverages that protect your new Honda and are
aware of your rights and responsibilities.
If you have any questions, or if you ever need special service or
repairs, remember that your dealer knows your Honda SXS best and
is dedicated to your complete satisfaction.
Please report any change of address or ownership to your dealer so
we will be able to contact you concerning important product
information.
You may also want to visit our website at www.honda.com.
USA: www.powersports.honda.com.
Canada: www.honda.ca.
Introduction
Page 3
14 SXS700-31HL36000.book 4 ページ 2013年5月14日 火曜日 午前10時59分
Introduction
• The following codes in this manual indicate each country.
SXS700 4 Person Model
AC, III AC
CM, III CM Canada
SXS700 2 Person Model
II AC, IV AC
II CM, IV CM Canada
• The illustrations herein are based on the SXS700 4 Person Model
AC type.
• The specifications may vary with each locale.
USA only
California Proposition 65 Warning
WARNING: This product contains or emits chemicals known to the
State of California to cause cancer and birth defects or other
reproductive harm.
United States of America, Australia,
New Zealand
United States of America, Australia,
New Zealand
Introduction
Page 4
3
DANGER
3
WARNING
3
CAUTION
14 SXS700-31HL36000.book 5 ページ 2013年5月14日 火曜日 午前10時59分
A Few Words About Safety
A Few Words About Safety
Your safety, and the safety of others, is very important. And
operating your Honda safely is an important responsibility.
To help you make informed decisions about safety, we have
provided operating procedures and other information on labels and
in this manual. This information alerts you to potential hazards that
could hurt you or others.
Of course, it is not possible to warn you about all hazards associated
with operating or maintaining this vehicle. You must use your own
good judgment.
You will find important safety information in a variety of forms,
including:
Safety Labels — on the vehicle.
Safety Messages — boxed messages preceded by a safety alert
symbol
CAUTION.
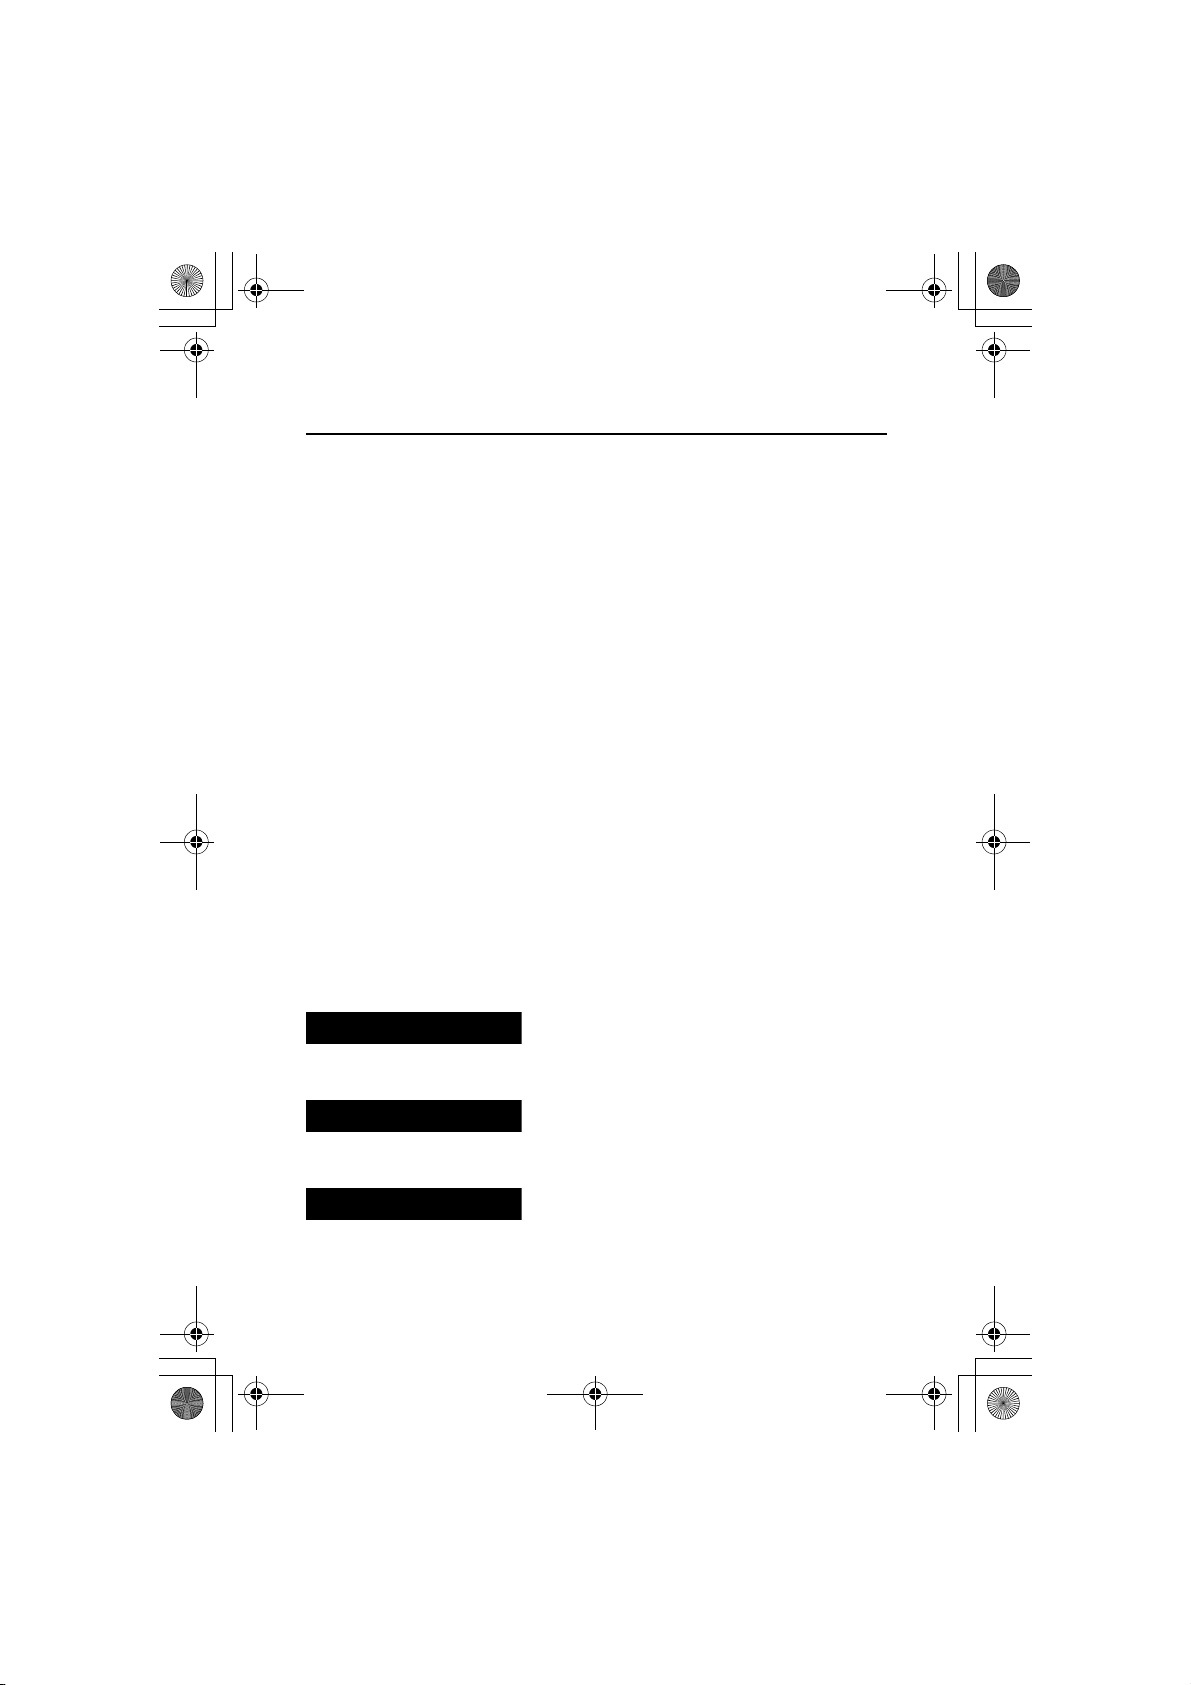
2
and one of three signal words: DANGER, WARNING, or
These signal words mean:
A Few Words About Safety
You WILL be KILLED or
SERIOUSLY HURT if you don’t
follow instructions.
You CAN be KILLED or SERIOUSLY
HURT if you don’t follow
instructions.
You CAN be HURT if you don’t
follow instructions.
Page 5
14 SXS700-31HL36000.book 6 ページ 2013年5月14日 火曜日 午前10時59分
A Few Words About Safety
Safety Headings — such as “Important Safety Reminders” or
“Important Safety Precautions.”
Safety Section — “Driver & Passenger Safety,” beginning on
page 1.
Instructions — how to operate this vehicle correctly and safely.
In addition to the above, your owner's manual is full of information
that can help you safely operate and maintain your vehicle. So please
read it carefully.
A Few Words About Safety
Page 6
14 SXS700-31HL36000.book 7 ページ 2013年5月14日 火曜日 午前10時59分
Contents
Contents
These pages give an overview of the contents of your owner’s
manual.
The first page of each section lists the topics discussed in that
section.
Driver & Passenger Safety ......................................................... 1
The most important safety guidelines, how accessories and
modifications can affect your safety, and the location of safetyrelated labels on your vehicle.
Instruments & Controls .............................................................. 9
The location, function and operation of the indicators, driver
controls, and other operational components.
Before Driving........................................................................... 61
The importance of wearing a seat belt, helmet and protective
eyewear, how to make sure you and your Honda are ready to
drive, plus load limits and guidelines on carrying cargo and towing
a trailer.
Basic Operation & Driving Guidelines ..................................... 73
How to start and stop the engine, select a driving mode and gear,
plus guidelines for driving on hills and other off-road situations.
Servicing Your Honda .............................................................. 87
Why your vehicle needs regular maintenance, what you need to
know before servicing your vehicle, a maintenance schedule, and
instructions for specific maintenance and adjustment items.
Tips ..........................................................................................179
How to store and transport your Honda, and how to be an
environmentally responsible driver.
Contents
Page 7
14 SXS700-31HL36000.book 8 ページ 2013年5月14日 火曜日 午前10時59分
Contents
Taking Care of the Unexpected ............................................. 189
What to do if you have a flat tire, your engine won’t start, etc.
Technical Information ............................................................ 211
ID numbers, technical specifications, and other technical facts.
Consumer Information (USA & Canada only) ....................... 227
Information on warranties, emissions controls, how to get a service
manual, and how to contact Honda.
Index........................................................................................ 234
Alphabetical listing of topics in the manual.
Quick Reference
Handy facts about fuel, engine oil, tire sizes, and air pressure.
Contents
Page 8
14 SXS700-31HL36000.book 9 ページ 2013年5月14日 火曜日 午前10時59分
Page 9
14 SXS700-31HL36000.book 1 ページ 2013年5月14日 火曜日 午前10時59分
Driver & Passenger Safety
Driver & Passenger Safety
This section presents some of the most important information and
recommendations to help you drive your Honda safely. Please take a
few moments to read these pages. This section also shows you the
location of safety labels on your vehicle.
Important Safety Information........................................................ 2
Accessories & Modifications.......................................................... 4
Safety Labels ................................................................................ 6
Driver & Passenger Safety
1
Page 10
14 SXS700-31HL36000.book 2 ページ 2013年5月14日 火曜日 午前10時59分
Important Safety Information
There is much that you can do to protect yourself and passenger(s).
You’ll find many helpful recommendations throughout this manual.
The following are those we consider to be most important.
Follow Age and Size Recommendations
The driver should be at least 16 years old and tall enough to wear the
seat belt properly and reach all the controls. A passenger should also
be tall enough for the seat belt to fit properly and brace themselves,
if needed, placing both feet firmly on the floor. Never allow anyone
to ride in the middle of the bench seat. There is no seat belt to
restrain them.
Always Wear a Seat Belt
Wearing a seat belt and positioning it properly is your best
protection against injury in a crash or rollover.
Protect Your Head and Eyes
We recommend that occupants always wear a helmet with a chin
strap, impact resistant goggles or eyeglasses, and clothing
appropriate to the driving situation.
Keep Doors and Side Nets Closed
Making sure the doors are closed and the side nets are rolled down
and secure help keep the driver’s and passenger’s arms and legs
inside the occupant protective structure (OPS) should the vehicle tip
or turn over.
Driver & Passenger Safety
2
Page 11
14 SXS700-31HL36000.book 3 ページ 2013年5月14日 火曜日 午前10時59分
Important Safety Information
Never Carry a Passenger in the Cargo Area
Your vehicle was designed to either carry a driver and one passenger
(2 Person Model) or a driver and up to three passengers (4 Person
Model). Never carry additional passengers in the cargo area, as they
could be thrown against or out of the vehicle and be seriously hurt
or killed.
Obey Loading Limits & Guidelines
Do not carry more than 1,000 lb (454 kg) in the cargo bed, and
make sure all cargo is properly loaded as forward and centered as
possible and secured to prevent shifting.
Keep Your Vehicle in Safe Condition
It’s important to keep your vehicle properly maintained and in safe
operating condition. Having a breakdown can be difficult, especially
if you are stranded far from your base. To help avoid problems,
inspect your Honda before each use and perform all recommended
maintenance.
Don’t Drink and Drive
Alcohol and driving don’t mix. Even one drink can affect your
judgment and your ability to respond to changing conditions. Drugs
can also impair your abilities. So don’t drive if you are under the
influence of alcohol or drugs.
Stay Off Public Roads
Your vehicle has been designed for use on private property and
designated off-highway areas. It does not have turn signals or many
other items required for use on either paved or unpaved public
roads.
Driver & Passenger Safety
3
Page 12
WARNING
3
WARNING
14 SXS700-31HL36000.book 4 ページ 2013年5月14日 火曜日 午前10時59分
Accessories & Modifications
Modifying your vehicle or using non-Honda accessories can make it
unsafe. Before you consider making any modifications or adding an
accessory, be sure to read the following information.
Accessories
We strongly recommend that you use only Honda Genuine or
Signature Accessories that have been specifically designed or
approved and tested for your vehicle. Because Honda cannot test all
other accessories, you must be personally responsible for the proper
selection, installation, and use of non-Honda accessories.
Check with your dealer for assistance, and always follow these
guidelines:
• Make sure the accessory does not obscure any lights, reduce
ground clearance, limit suspension travel or steering travel, or
interfere with operating any controls.
• Do not add any electrical equipment that will exceed the vehicle’s
electrical system capacity (page 217). A blown fuse can cause a
loss of lights or engine power (page 202).
Improper accessories or modifications can
cause a crash in which you can be seriously
hurt or killed.
Follow all instructions in this owner’s manual
regarding accessories and modifications.
Driver & Passenger Safety
4
Page 13
14 SXS700-31HL36000.book 5 ページ 2013年5月14日 火曜日 午前10時59分
Accessories & Modifications
Modifications
We strongly advise you not to remove any original equipment or
modify your Honda in any way that would change its design or
operation. Such changes could seriously impair your vehicle’s
handling, stability, and braking and make it unsafe to drive.
We also advise you not to make any modifications or remove any
equipment (such as the spark arrester, muffler, or emissions control
system components) that would make your vehicle illegal in your
area.
Driver & Passenger Safety
5
Page 14
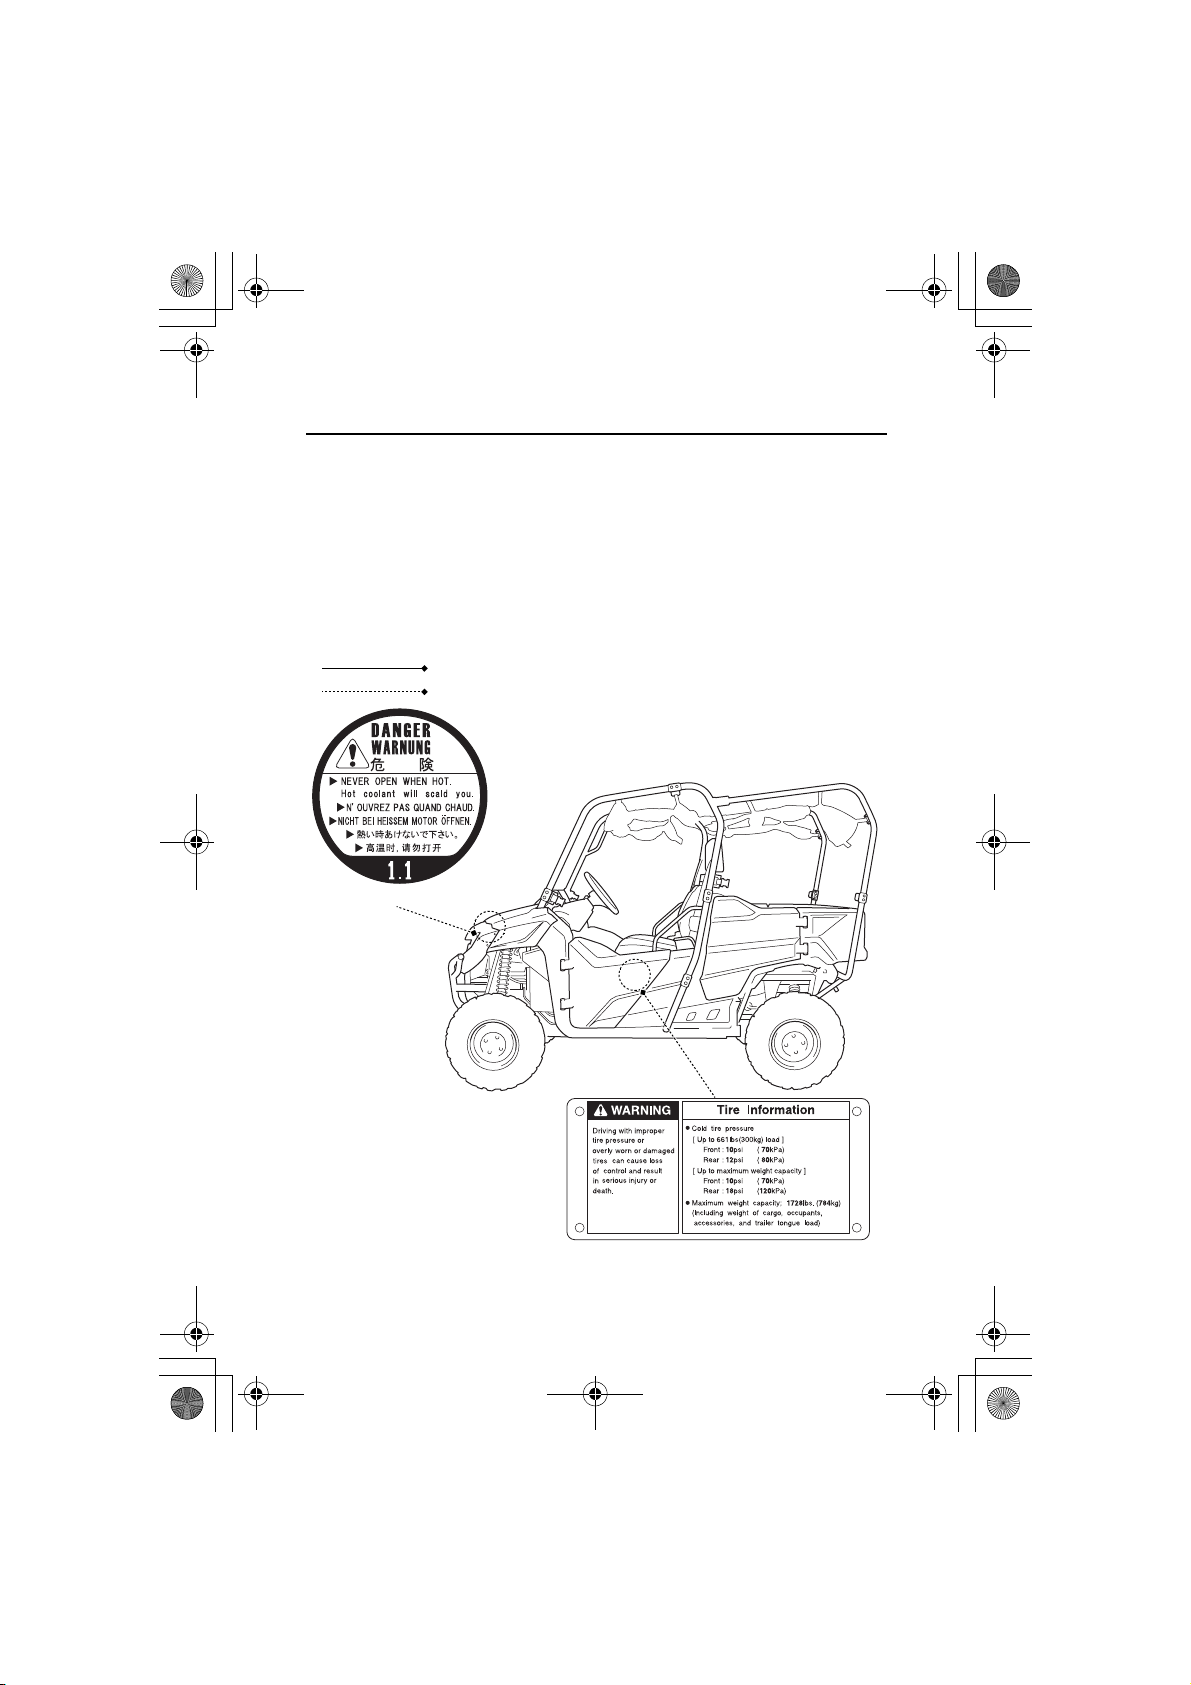
Indicates something apparent.
Indicates something concealed.
radiator cap danger
tire & overload warning
14 SXS700-31HL36000.book 6 ページ 2013年5月14日 火曜日 午前10時59分
Safety Labels
Your Honda comes with several labels that contain important
information.
You, and anyone else who operates or rides in the vehicle, should
read and understand this information before driving.
The labels should be considered permanent parts of the vehicle. If a
label comes off or becomes hard to read, contact your Honda dealer
for a replacement.
Driver & Passenger Safety
6
Page 15
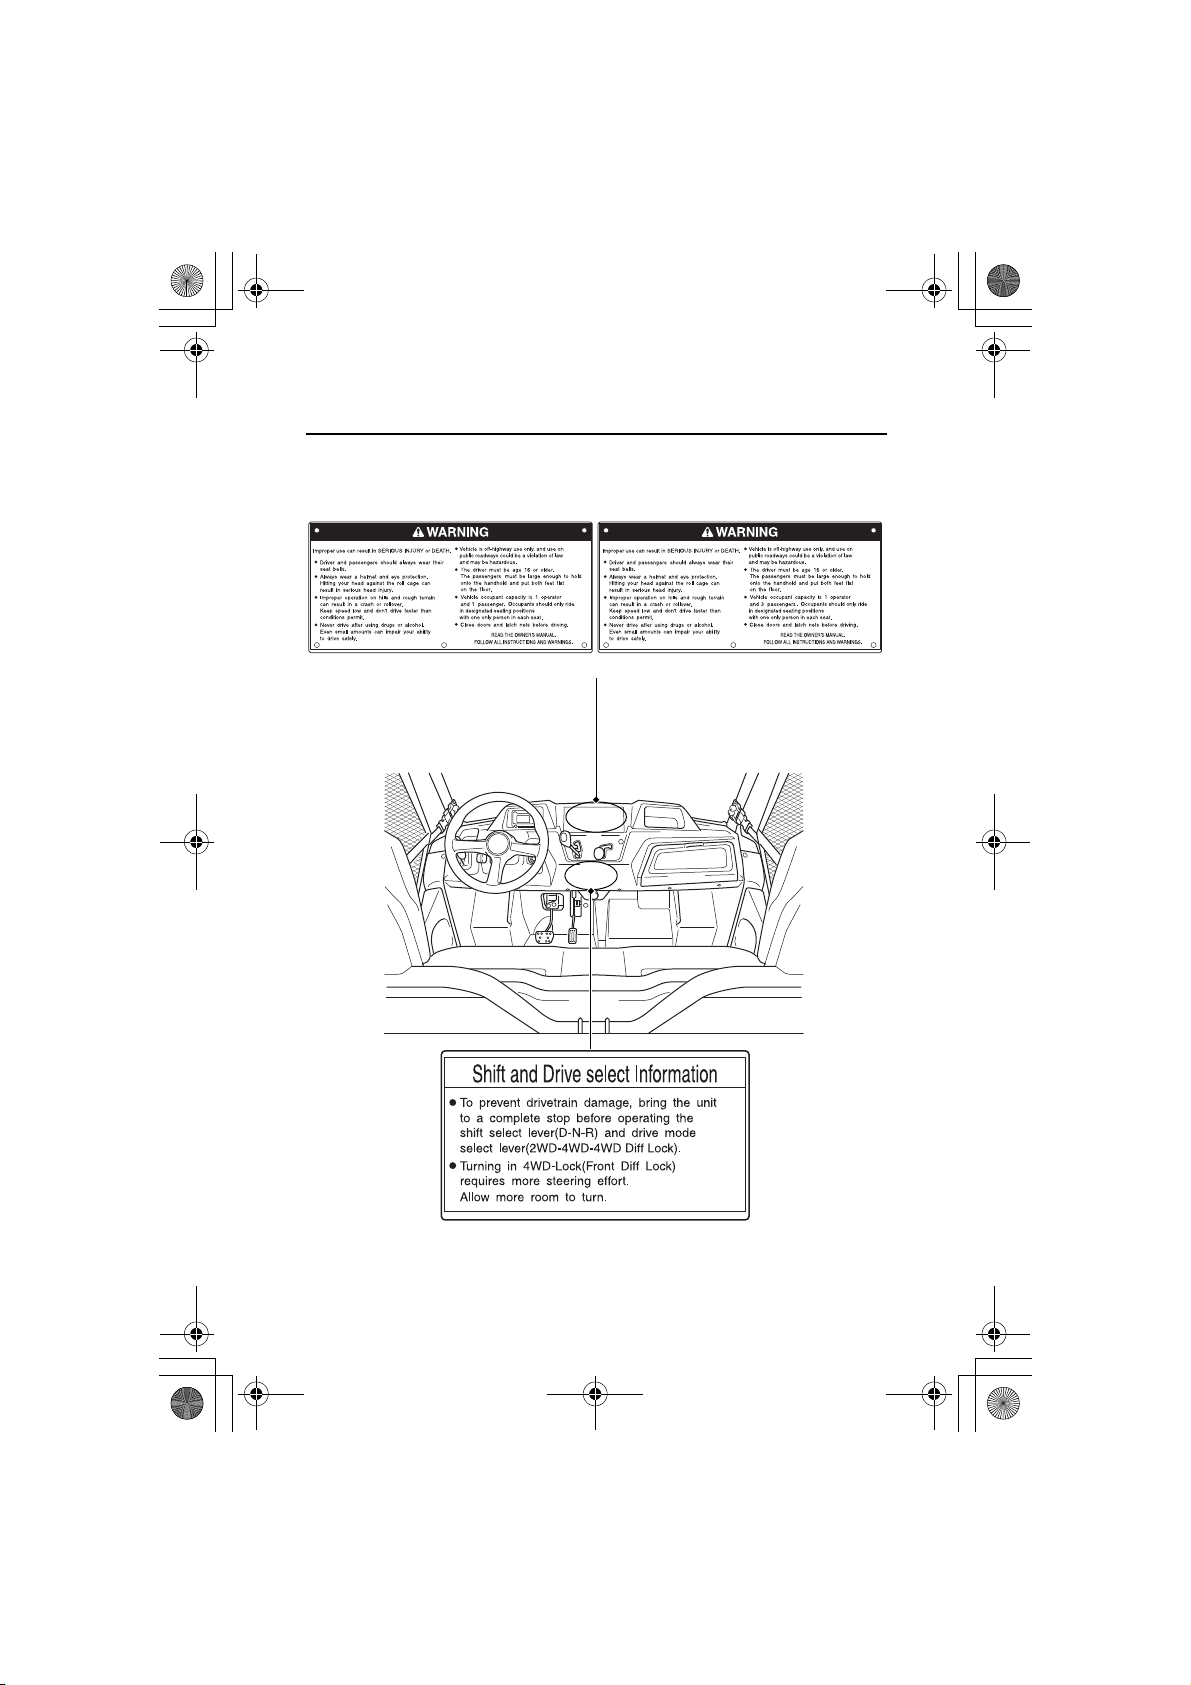
(2 Person Model)
general warning
(4 Person Model)
shift & drive select
14 SXS700-31HL36000.book 7 ページ 2013年5月14日 火曜日 午前10時59分
Safety Labels
Driver & Passenger Safety
7
Page 16

loading warning rear passenger warning
(4 Person Model only)
trailer hitch
14 SXS700-31HL36000.book 8 ページ 2013年5月14日 火曜日 午前10時59分
Safety Labels
Driver & Passenger Safety
8
Page 17
14 SXS700-31HL36000.book 9 ページ 2013年5月14日 火曜日 午前10時59分
Instruments & Controls
Instruments & Controls
The items listed below are described in this section.
Operation Component Locations ................................................ 11
Indicators & Displays ................................................................... 14
Neutral Indicator...................................................................... 15
Reverse Indicator ..................................................................... 15
Parking Brake Indicator ............................................................ 15
Differential Lock Indicator ........................................................ 15
High Coolant/Oil Temperature Indicator ................................... 15
PGM-FI Malfunction Indicator Lamp (MIL) ................................ 15
Seat Belt Indicator.................................................................... 15
Multi-function Display.............................................................. 18
Speedometer Display ............................................................... 19
Odometer Display .................................................................... 20
Gear position display ............................................................... 29
Driver Controls ........................................................................... 30
Ignition Switch......................................................................... 30
Headlight Switch ..................................................................... 31
Shift Lever ............................................................................... 32
Drive Mode Lever..................................................................... 33
Parking Brake Lever ................................................................. 35
Doors ......................................................................................... 36
Side Nets .................................................................................... 38
Seat............................................................................................ 45
Seat......................................................................................... 45
Rear Seat Conversion (4 Person Model only) ............................ 46
Rear Seat Stopper Adjustment (4 Person Model only)............... 48
(cont’d)
Instruments & Controls
9
Page 18
14 SXS700-31HL36000.book 10 ページ 2013年5月14日 火曜日 午前10時59分
Instruments & Controls
Seat Belts ................................................................................... 49
Passenger Handhold ................................................................... 53
Storage Compartments .............................................................. 54
Accessory Power Socket ............................................................. 55
Cargo Bed Controls .................................................................... 56
Tailgate Levers ......................................................................... 56
Tie-Down Hooks ...................................................................... 57
Tilt Bed Lever ........................................................................... 58
Trailer Hitch................................................................................ 60
Instruments & Controls
10
Page 19
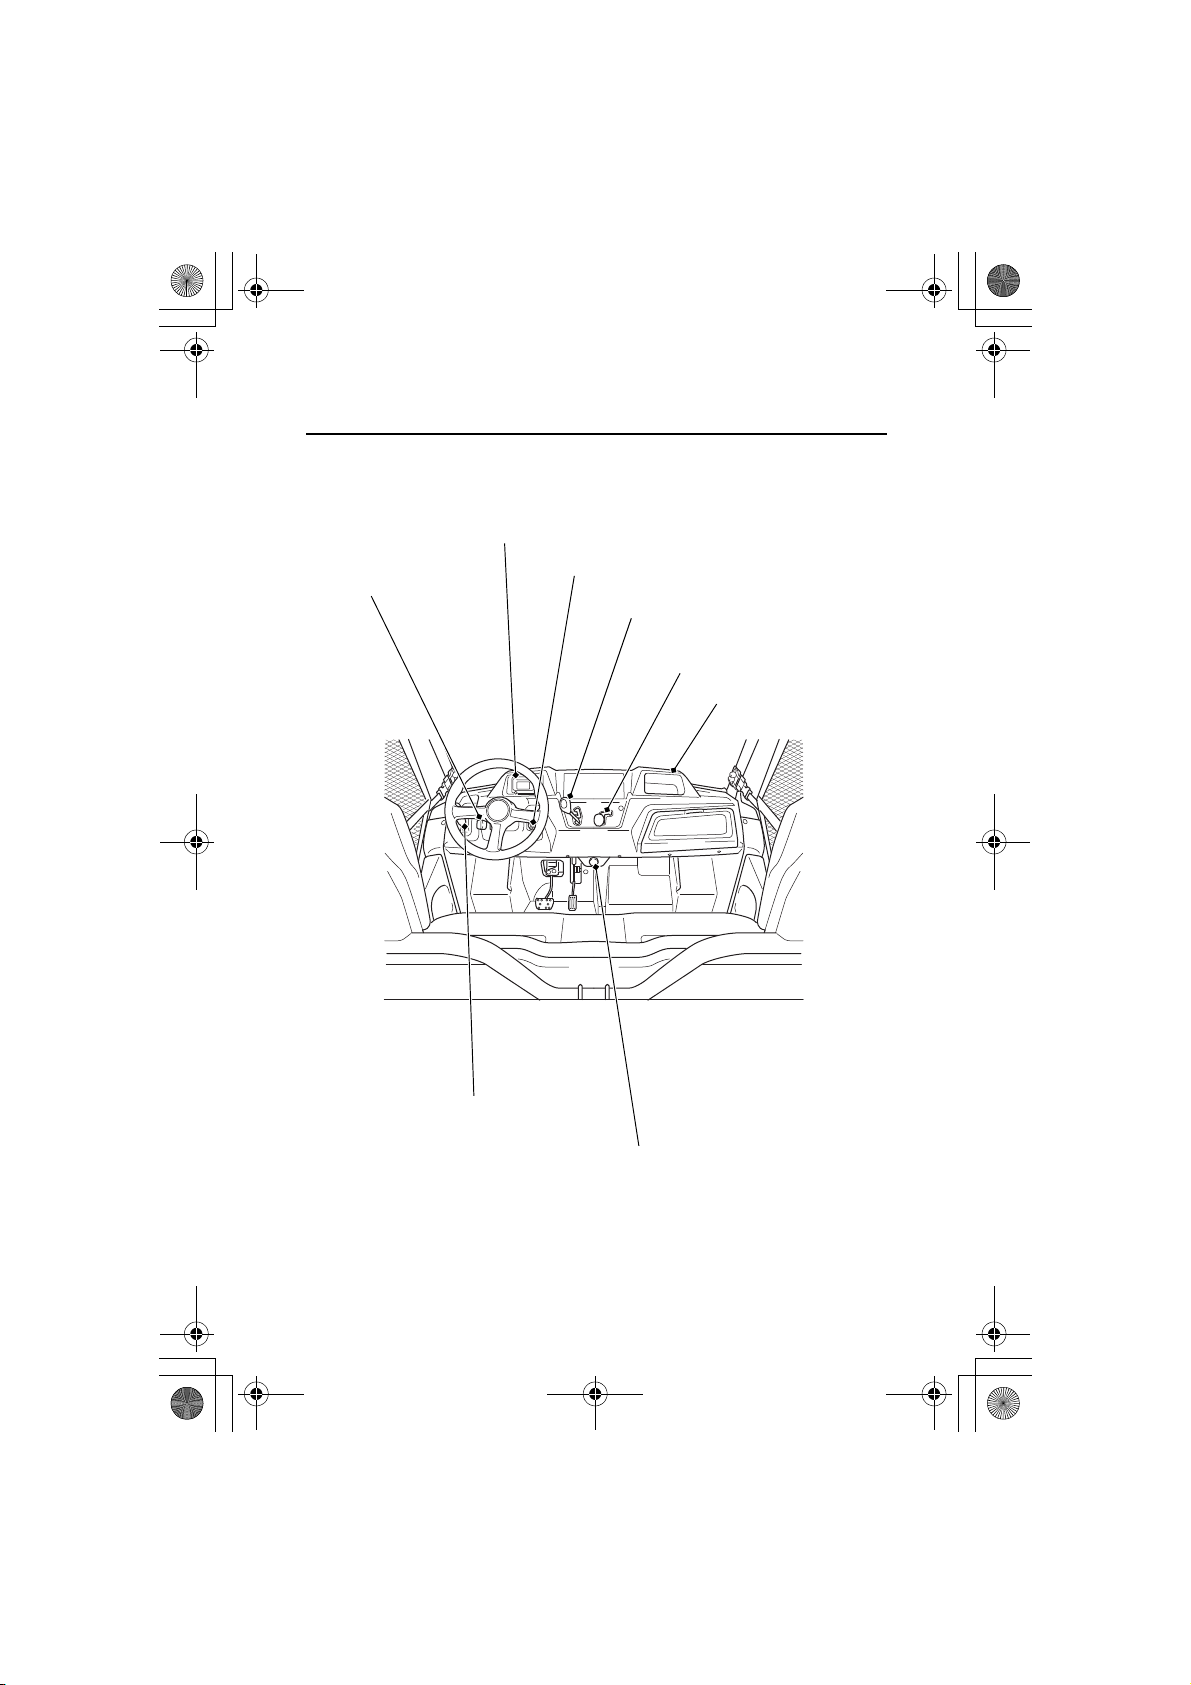
headlight switch
(page 31)
accessory power socket (page 55)
parking brake lever (page 35)
ignition switch (page 30)
drive mode lever
(page 33)
shift lever (page 32)
indicators & displays
(page 14)
utility pocket
14 SXS700-31HL36000.book 11 ページ 2013年5月14日 火曜日 午前10時59分
Operation Component Locations
Instruments & Controls
11
Page 20
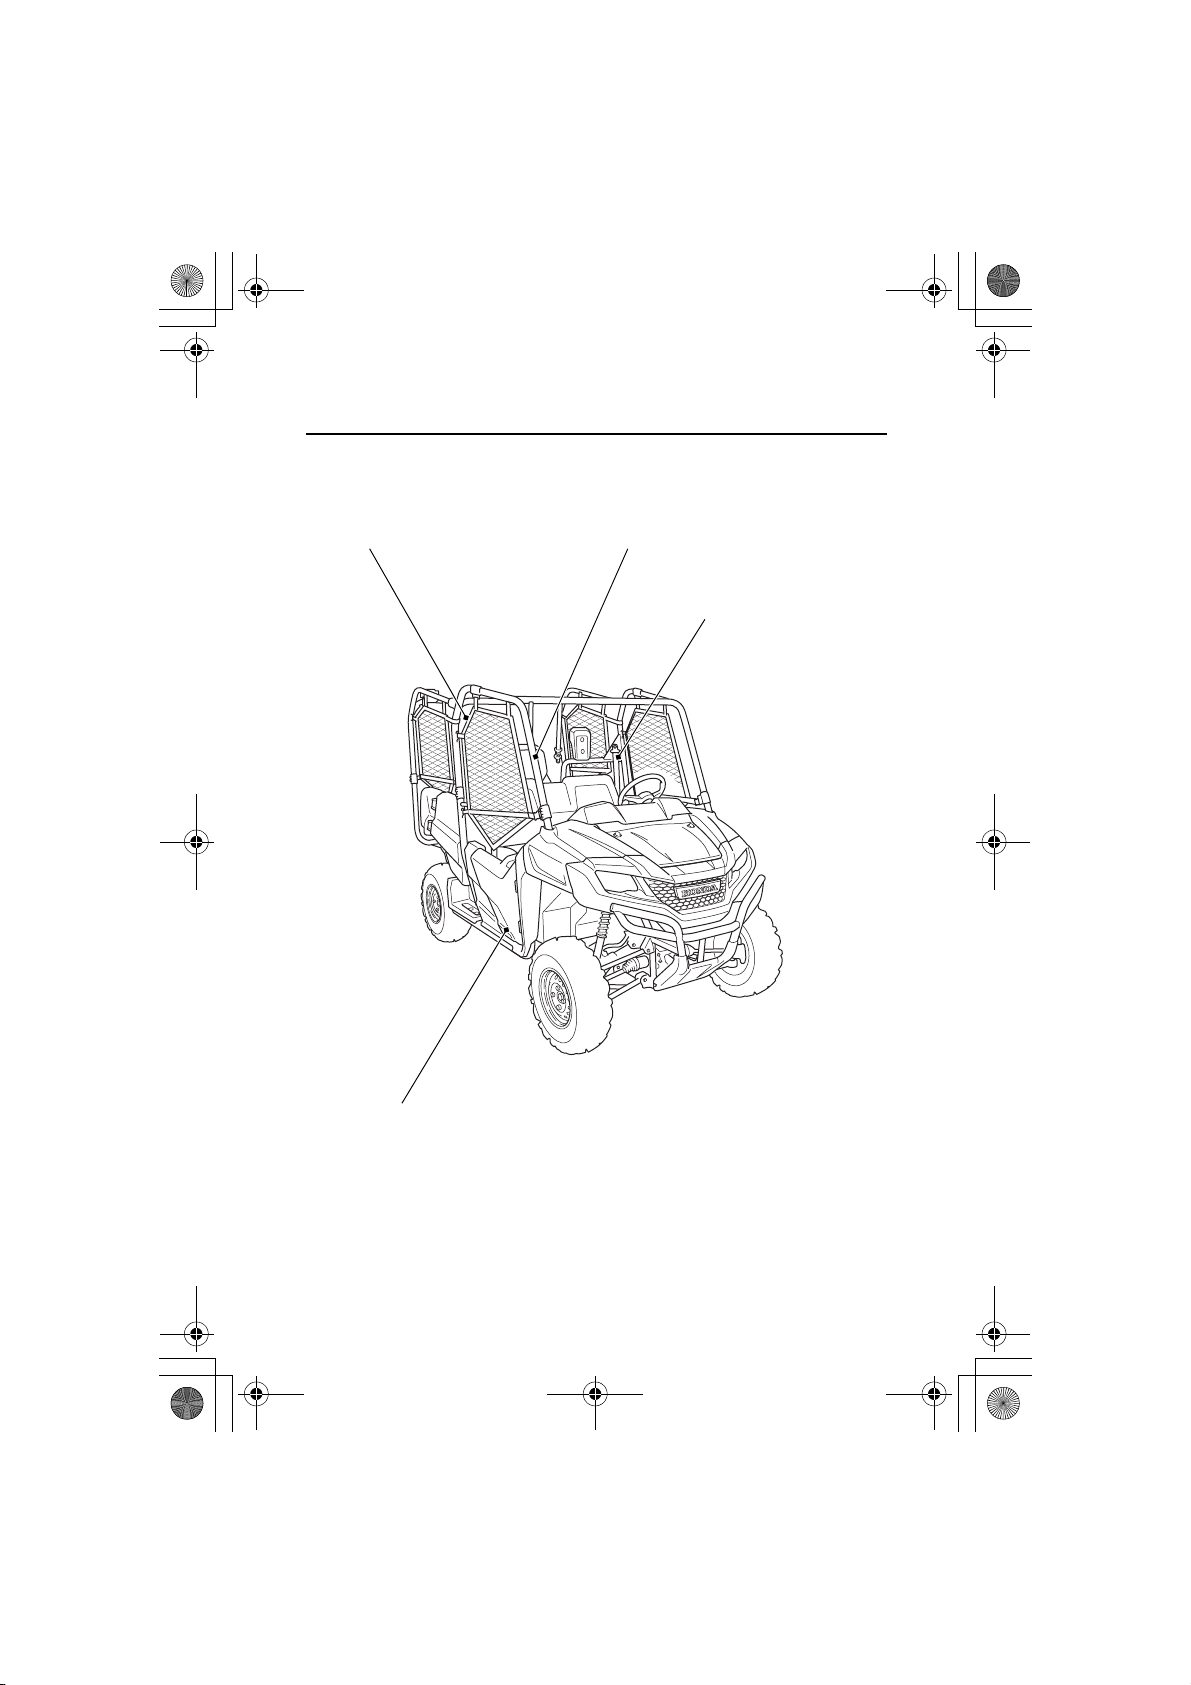
seat belt (page 49)
side net (page 38)
door (page 36)
passenger handhold (page 53)
14 SXS700-31HL36000.book 12 ページ 2013年5月14日 火曜日 午前10時59分
Operation Component Locations
Instruments & Controls
12
Page 21
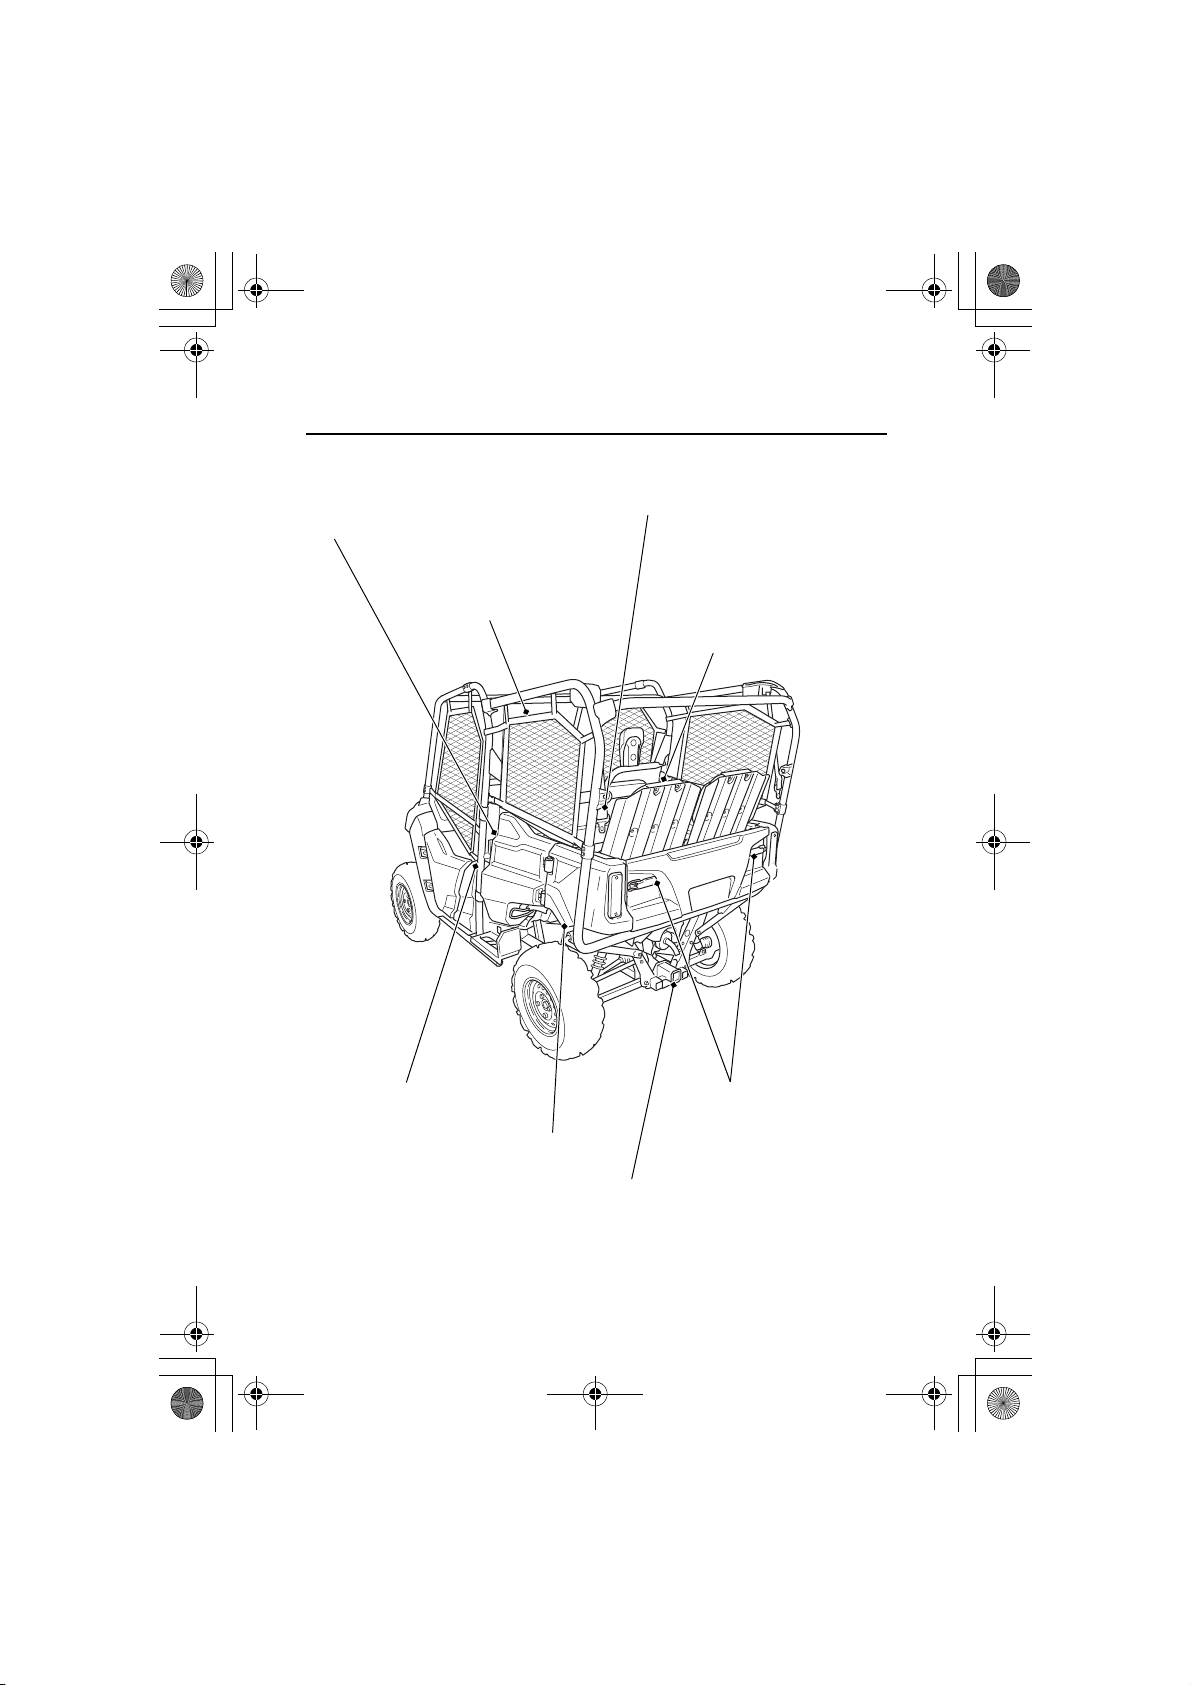
rear door
(4 Person Model only)
(page 36)
rear side net
(4 Person Model only)
(page 38)
rear seat belt
(4 Person Model only) (page 49)
tilt bed lever (page 58)
cargo bed (page 56)
trailer hitch receiver (page 60)
tailgate levers
(page 56)
rear seat
(4 Person Model only)
(page 45)
14 SXS700-31HL36000.book 13 ページ 2013年5月14日 火曜日 午前10時59分
Operation Component Locations
Instruments & Controls
13
Page 22
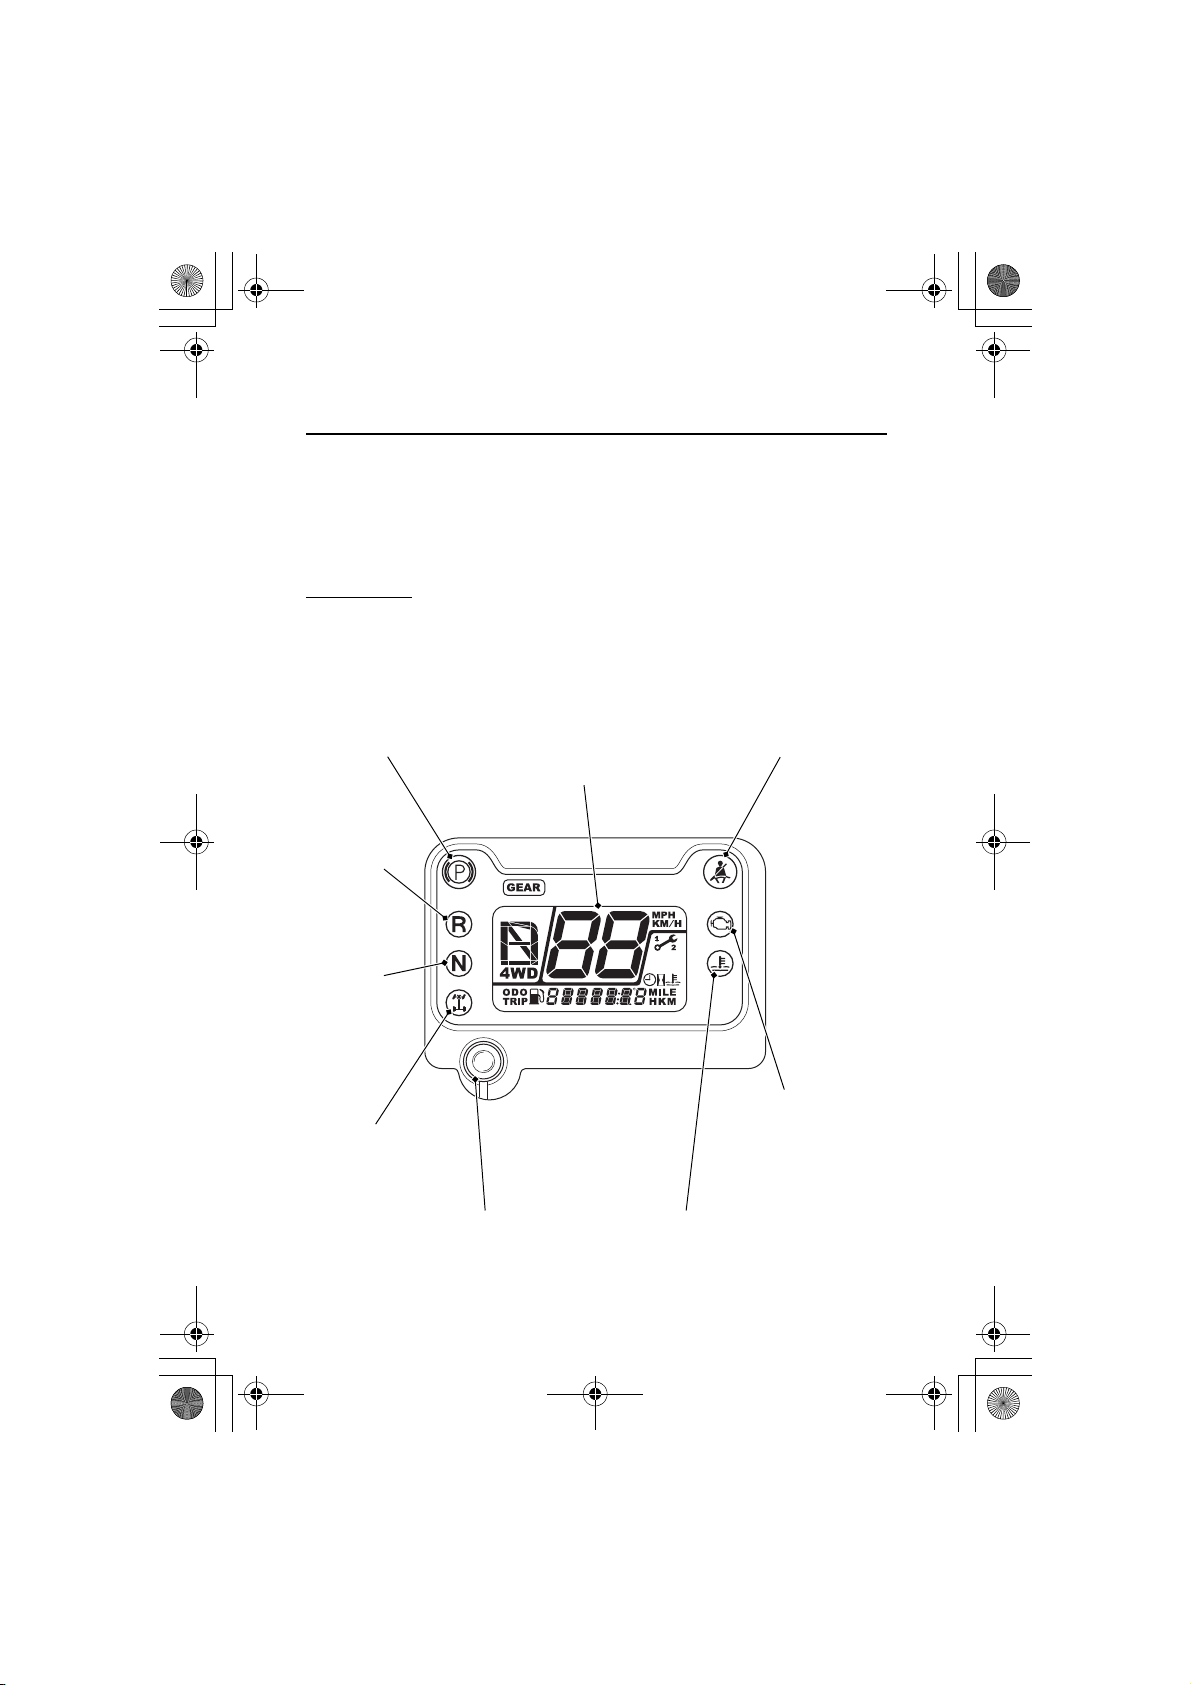
parking brake indicator
multi-function display
PGM-FI
malfunction
indicator lamp
(MIL)
seat belt indicator
reverse
indicator
neutral
indicator
differential
lock
indicator
mode switch high coolant/oil temperature
indicator
14 SXS700-31HL36000.book 14 ページ 2013年5月14日 火曜日 午前10時59分
Indicators & Displays
The indicators and displays on your Honda SXS keep you informed,
alert you to possible problems, and make your driving safer and
more enjoyable. Refer to the indicators frequently. Their functions
are described on the following pages.
Lamp Check
The indicators come on and go off sequentially when you turn the
ignition switch to the ON (q) position.
If one of these indicators does not come on key ON check, have your
dealer check for problems.
14
Instruments & Controls
Page 23
14 SXS700-31HL36000.book 15 ページ 2013年5月14日 火曜日 午前10時59分
Indicators & Displays
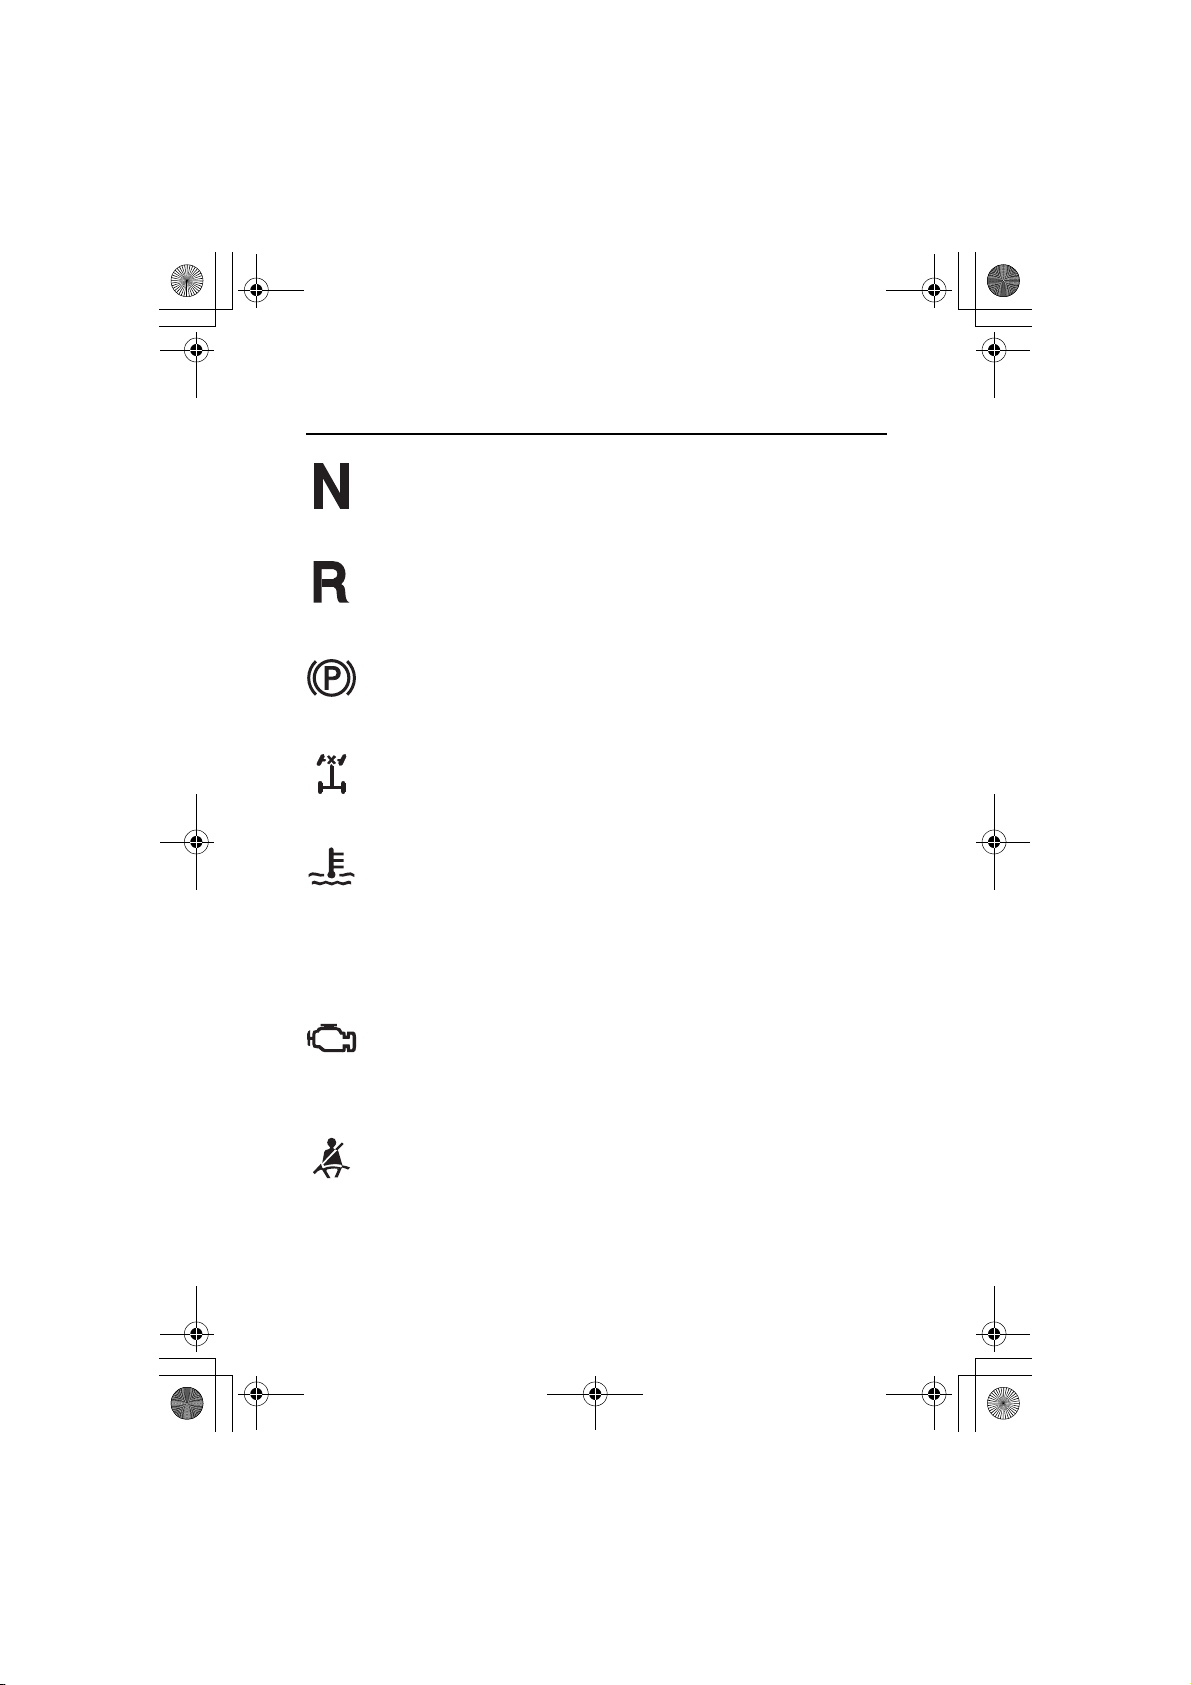
Neutral Indicator
This indicator comes on and stays on when the transmission
is in neutral.
Reverse Indicator
This indicator comes on and stays on when the transmission
is in reverse.
Parking Brake Indicator
This indicator comes on and stays on when the parking brake
is on.
Differential Lock Indicator
This indicator will be on when the 4WD diff lock mode
engages, along with the 4WD indicator (page 29).
High Coolant/Oil Temperature Indicator
This indicator comes on and stays on when either the coolant
temperature or the engine oil temperature is high enough to
adversely affect the service life of the engine. If this indicator comes
on while you are driving, stop as soon as possible, turn the engine
off, and let it cool.
PGM-FI Malfunction Indicator Lamp (MIL)
This indicator comes on and stays on when there is a problem
with your vehicle’s engine system. If this happens, reduce
speed and take your vehicle to a dealer as soon as possible.
Seat Belt Indicator
This indicator starts flashing for few seconds, after initial
display indication, when you turn the ignition switch to the
ON (q) position to remind occupants to fasten their seat belts.
Instruments & Controls
15
Page 24
14 SXS700-31HL36000.book 16 ページ 2013年5月14日 火曜日 午前10時59分
Indicators & Displays
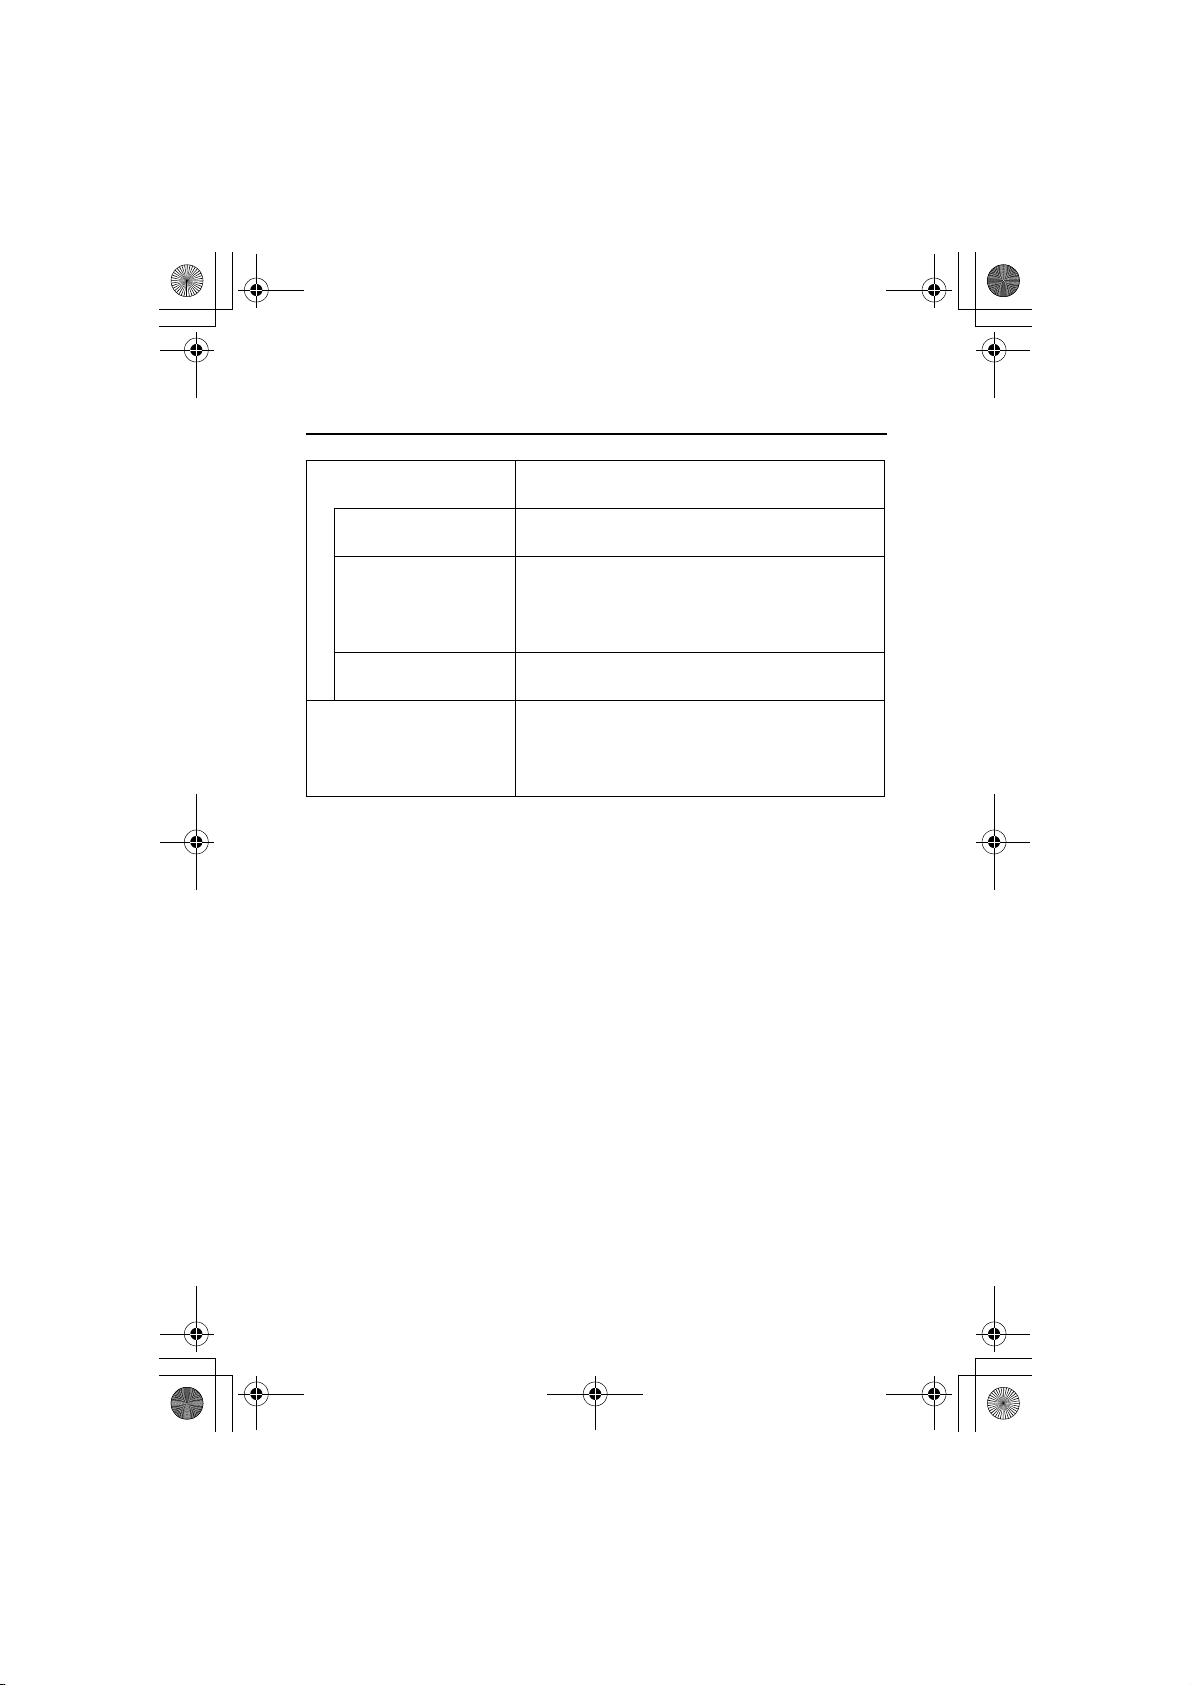
Multi-function
display
Speedometer
display
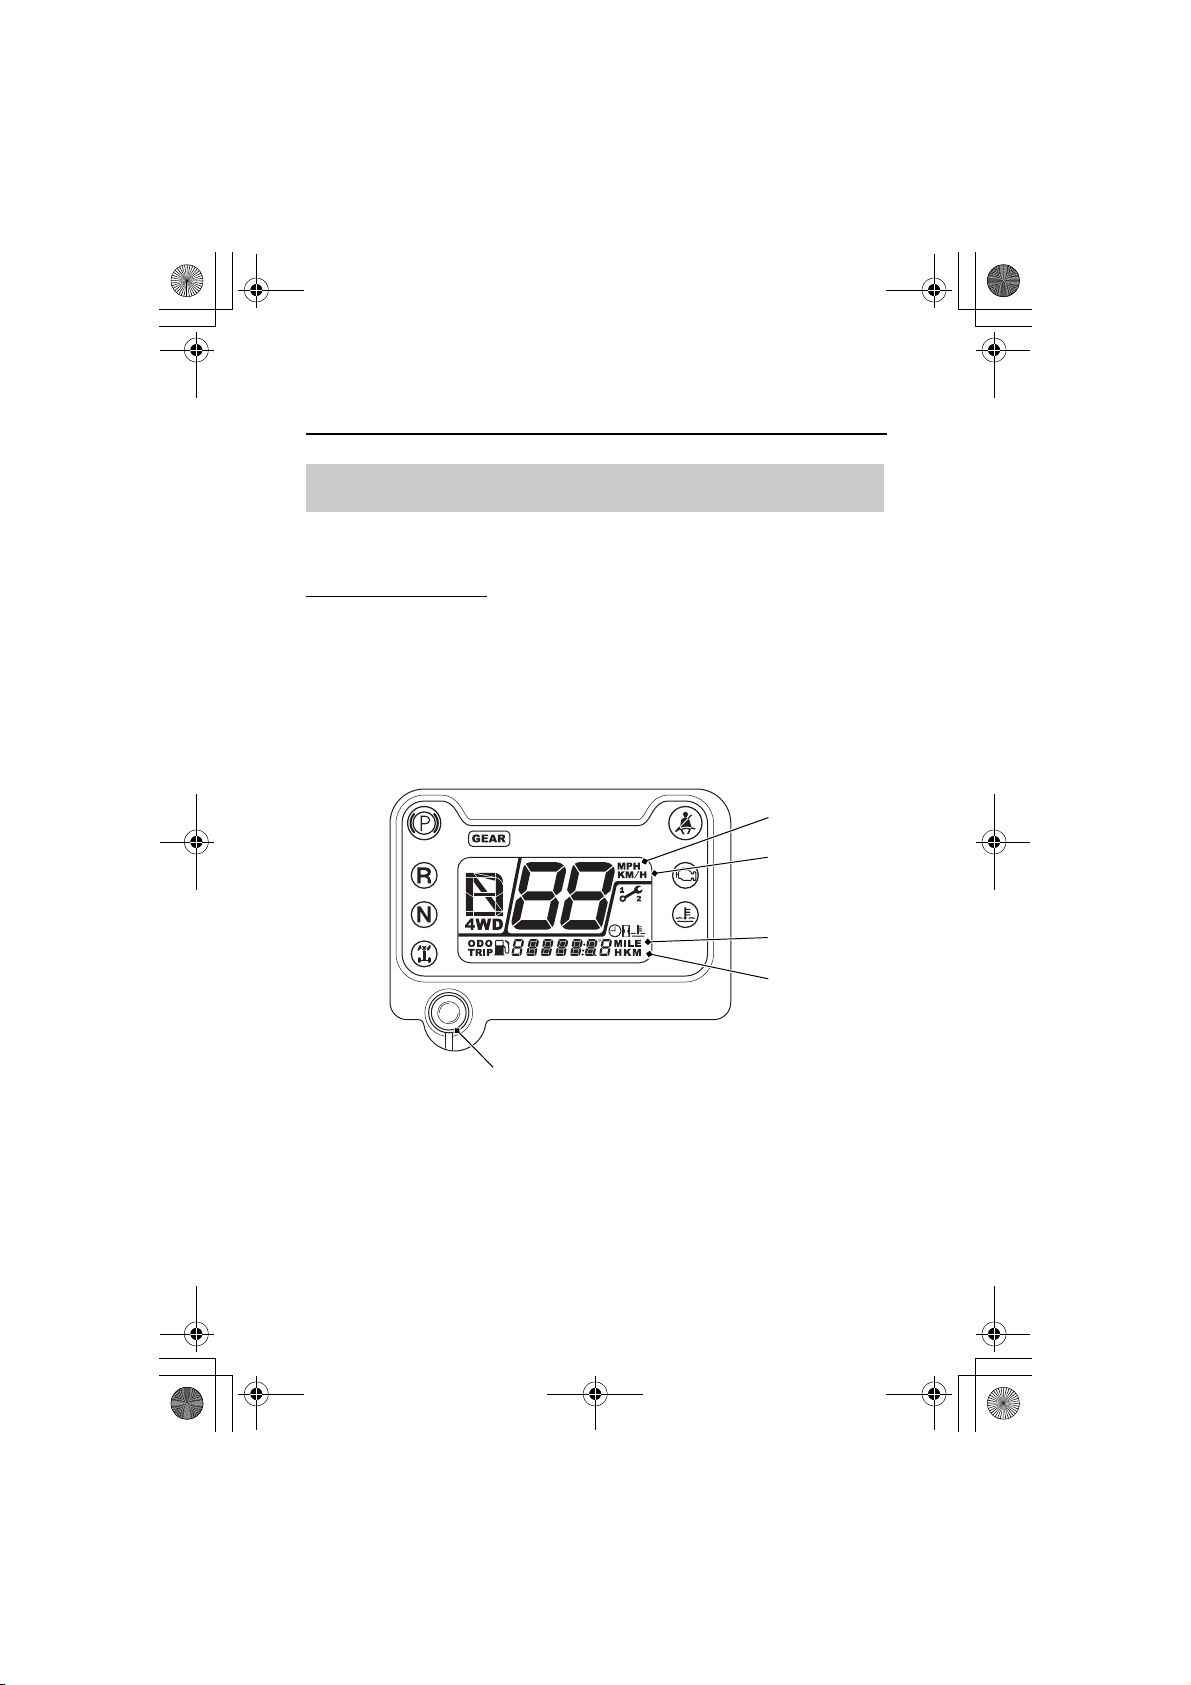
Odometer display Shows fuel gauge, clock, odometer,
Gear position
display
Mode switch This button is used to select the mode,
This display includes the following
functions.
Shows riding speed in miles or
kilometers per hour (page 19).
tripmeter, water temperature gauge,
hour meter, maintenance trip meter and
maintenance hour meter (page 20).
Shows gear position (page 29).
to change the mileage unit and adjust/
resets the clock, tripmeter and hour
meter (page 18).
Instruments & Controls
16
Page 25
multi-function display
14 SXS700-31HL36000.book 17 ページ 2013年5月14日 火曜日 午前10時59分
Indicators & Displays
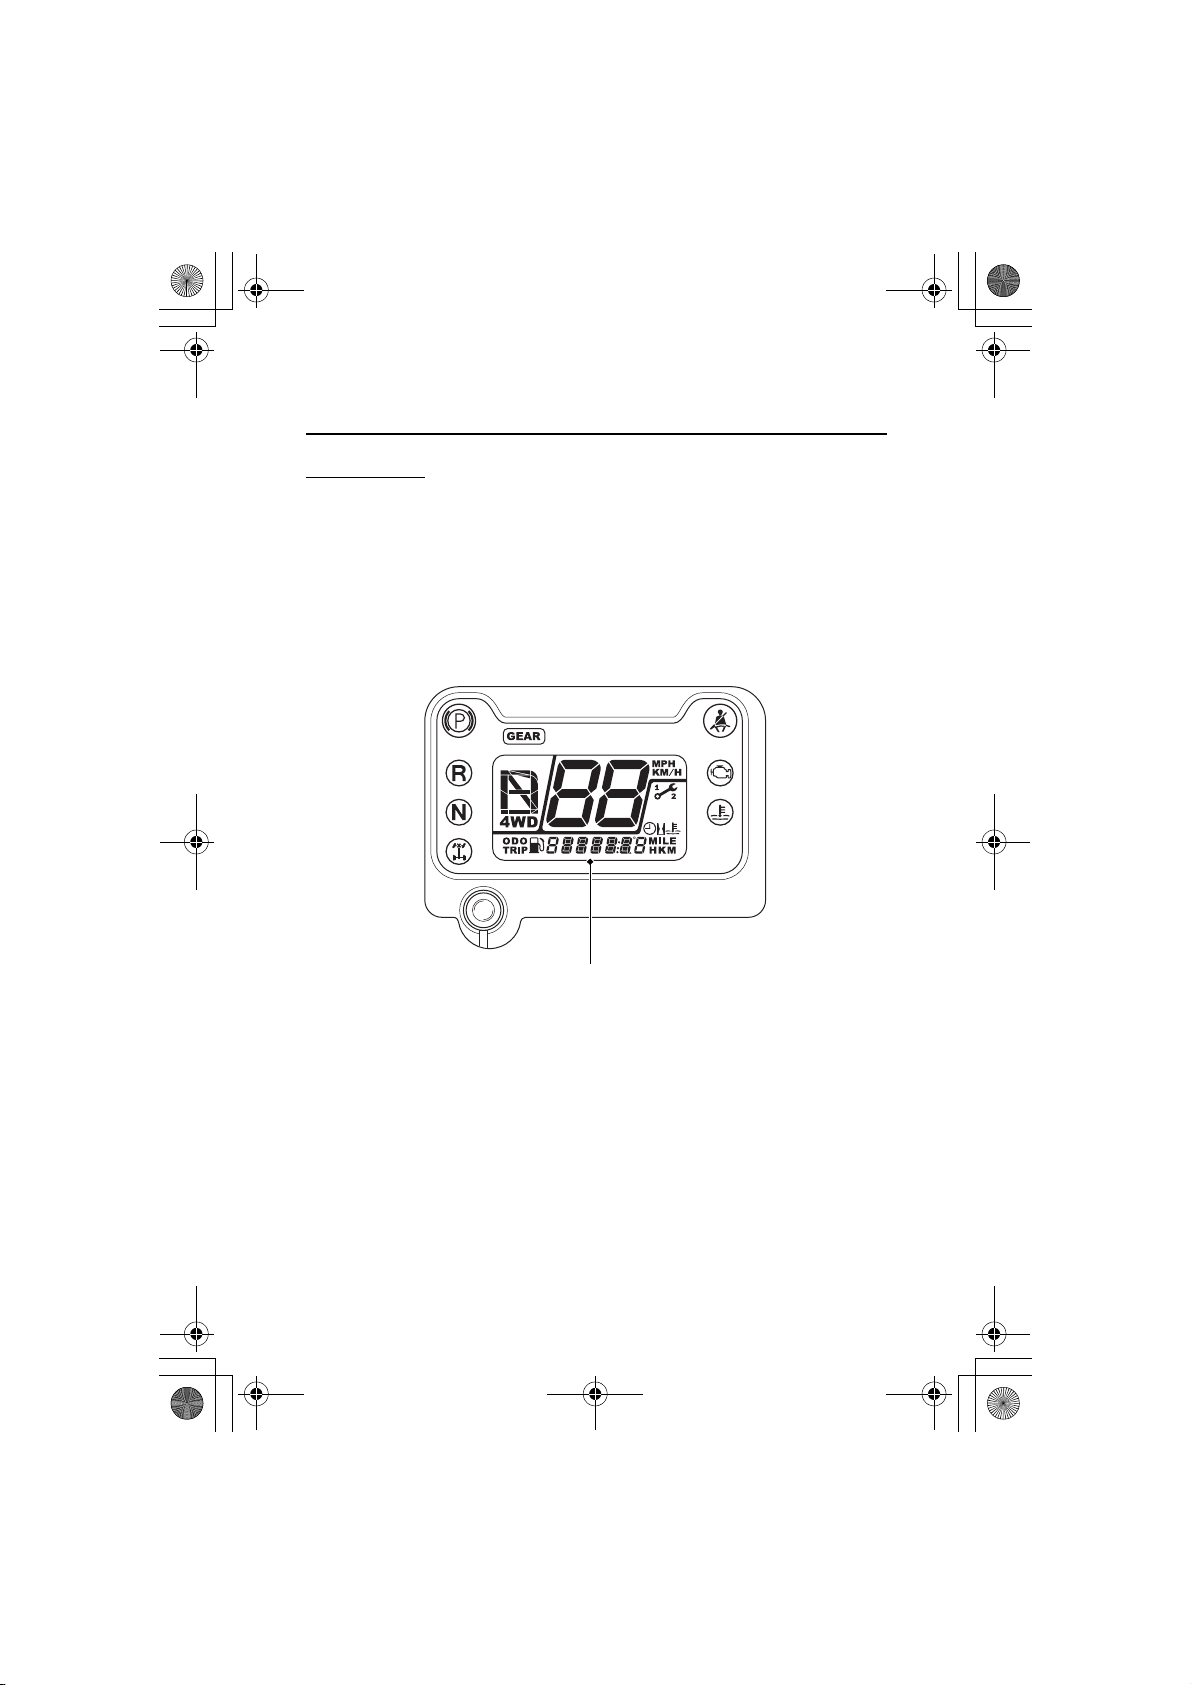
Display Check
When the ignition switch is turned ON (q) , the multi-function
display will temporarily show all the modes and digital segments and
initial message. So you can make sure the liquid crystal display is
functioning properly.
If any part of this display does not come on during the key ON check,
have your dealer check for problems.
Instruments & Controls
17
Page 26
mode switch
gear position display
speedometer display
odometer display
14 SXS700-31HL36000.book 18 ページ 2013年5月14日 火曜日 午前10時59分
Indicators & Displays
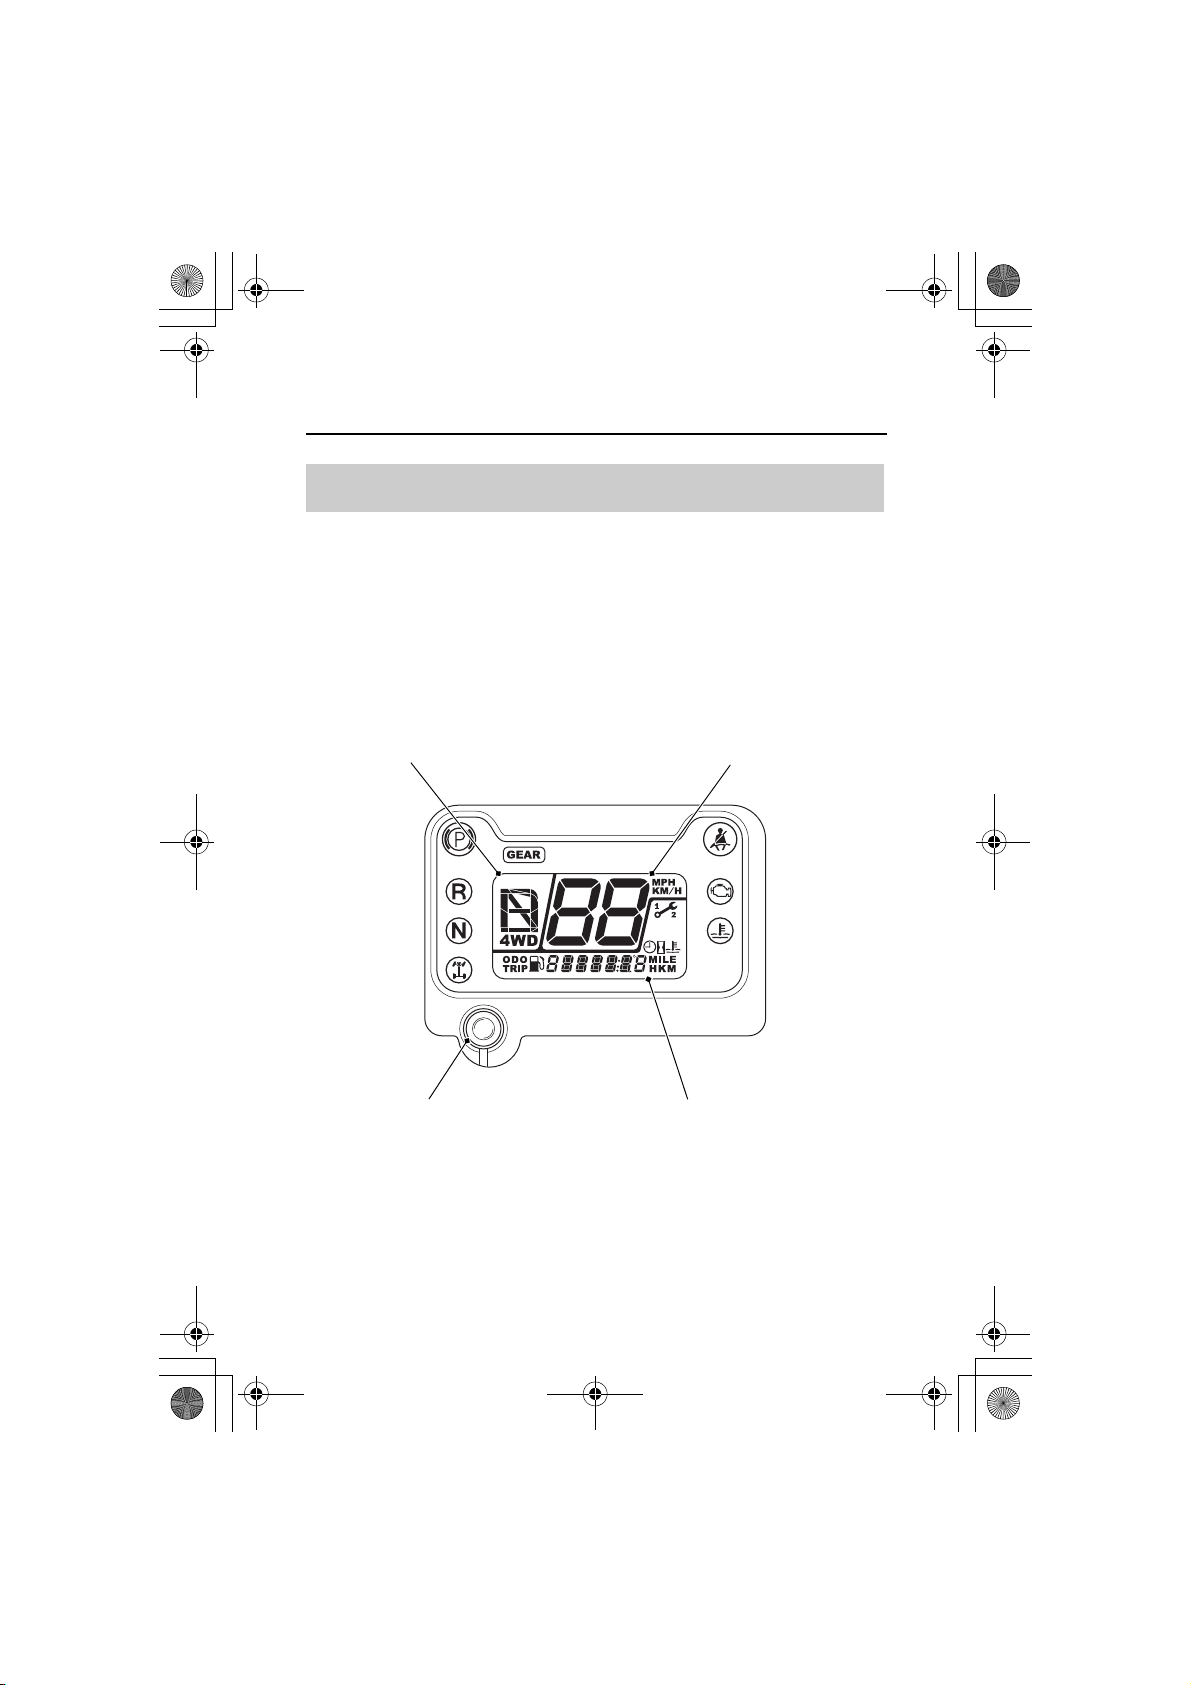
Multi-function Display
The multi-function display consists of the following function
displays:
Speedometer display
Odometer display
Gear position display
Instruments & Controls
18
Page 27
mode switch
KM
MILE
KM/H
MPH
14 SXS700-31HL36000.book 19 ページ 2013年5月14日 火曜日 午前10時59分
Indicators & Displays
Speedometer Display
This display shows speed in miles or kilometers per hour.
Mileage Unit Change
The speedometer, odometer, tripmeter and maintenance tripmeter
show in either “MPH” and “MILE” or “KM/H” and “KM”.
To change the mileage unit, press and hold the mode switch for
more than 5 seconds in odometer mode (page 20) with the SXS
stopped.
Instruments & Controls
19
Page 28
Fuel gauge (page 21)
Digital clock (page 23)
Odometer (page 24)
Tripmeter (page 24)
Coolant temperature
gauge (page 25)
Hourmeter (page 27)
Maintenance tripmeter
(page 28)
Maintenance
hourmeter (page 28)
When SXS
is moving
When SXS is
not moving
14 SXS700-31HL36000.book 20 ページ 2013年5月14日 火曜日 午前10時59分
Indicators & Displays
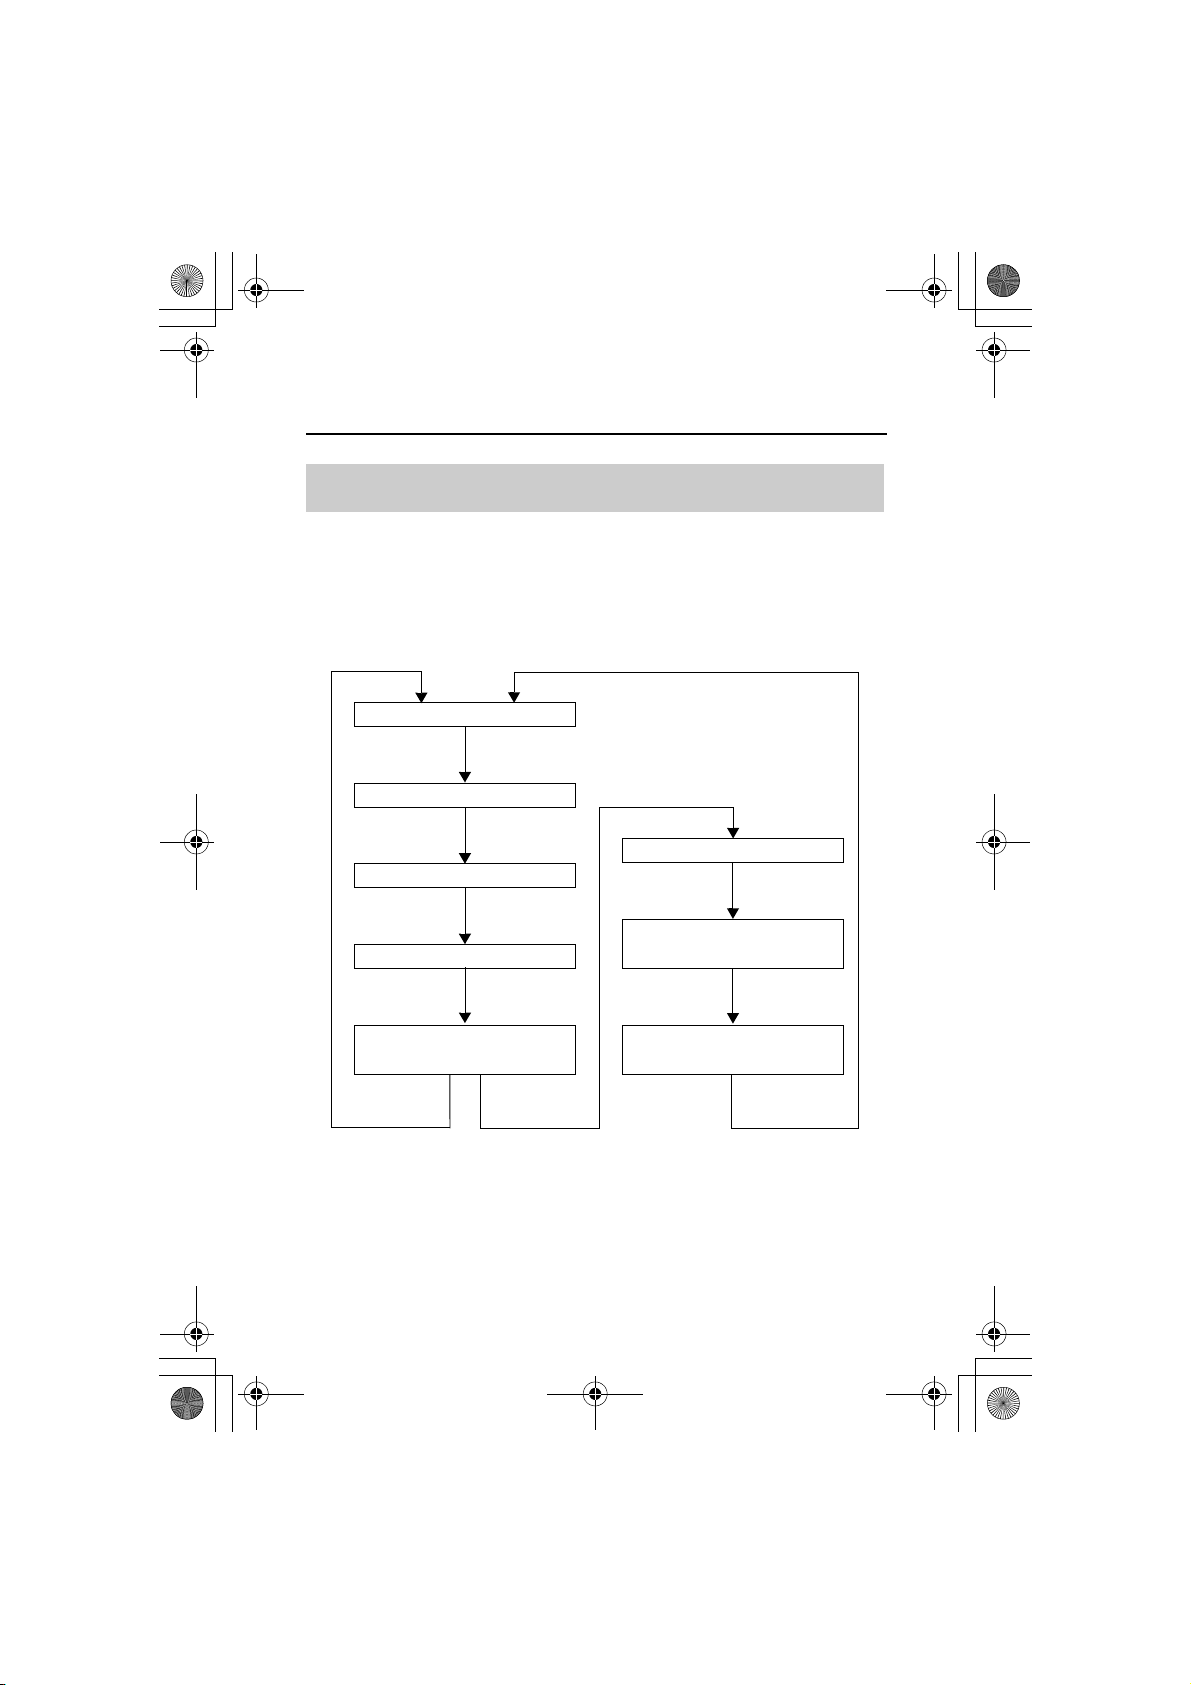
Odometer Display
This display includes fuel gauge, digital clock, odometer, tripmeter,
coolant temperature gauge, hourmeter, maintenance tripmeter, and
maintenance hourmeter.
Each time you press the mode switch, mode will change as shown in
the illustration.
If there are warning and/or caution with your SXS, and mode switch
is not pressed for 10 seconds, a message will automatically appear in
the display.
Instruments & Controls
20
Page 29
fuel symbol fuel gauge segment F
fuel gauge
LO FUEL message
14 SXS700-31HL36000.book 21 ページ 2013年5月14日 火曜日 午前10時59分
Indicators & Displays
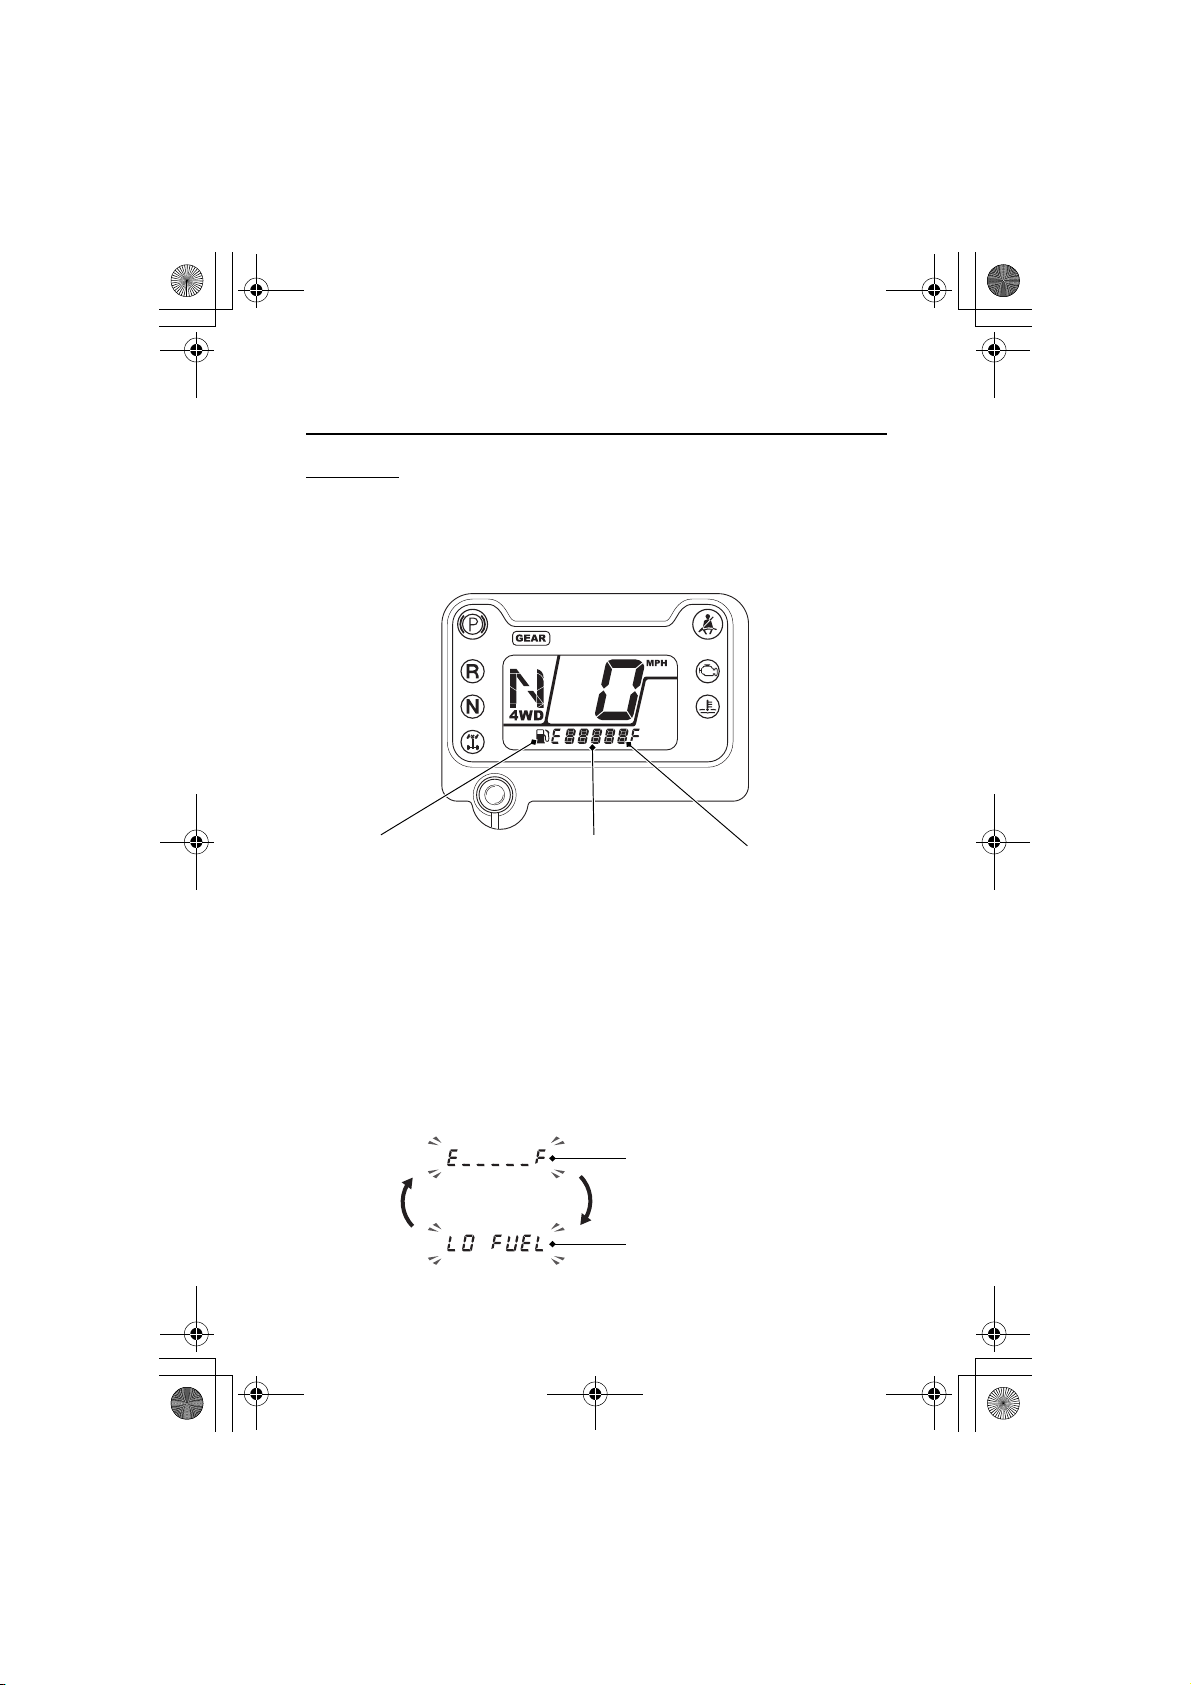
Fuel gauge
The fuel gauge shows the approximate fuel supply available in a
graduated display with the fuel symbol. When the segment F goes
on, the fuel tank capacity is:
7.9 US gal (30 ℓ)
Regardless of what mode the display is in, when the fuel level
reaches only one segment remaining, the display will automatically
switch to the fuel gauge display. You should refuel as soon as
possible.
The amount of fuel left in the tank with the vehicle on a firm, level
surface is approximately:
2.76 US gal (10.5 ℓ)
The fuel gauge and LO FUEL will begin to flash alternately when the
fuel leveldecreases further.
Instruments & Controls
21
Page 30
fuel gauge
14 SXS700-31HL36000.book 22 ページ 2013年5月14日 火曜日 午前10時59分
Indicators & Displays
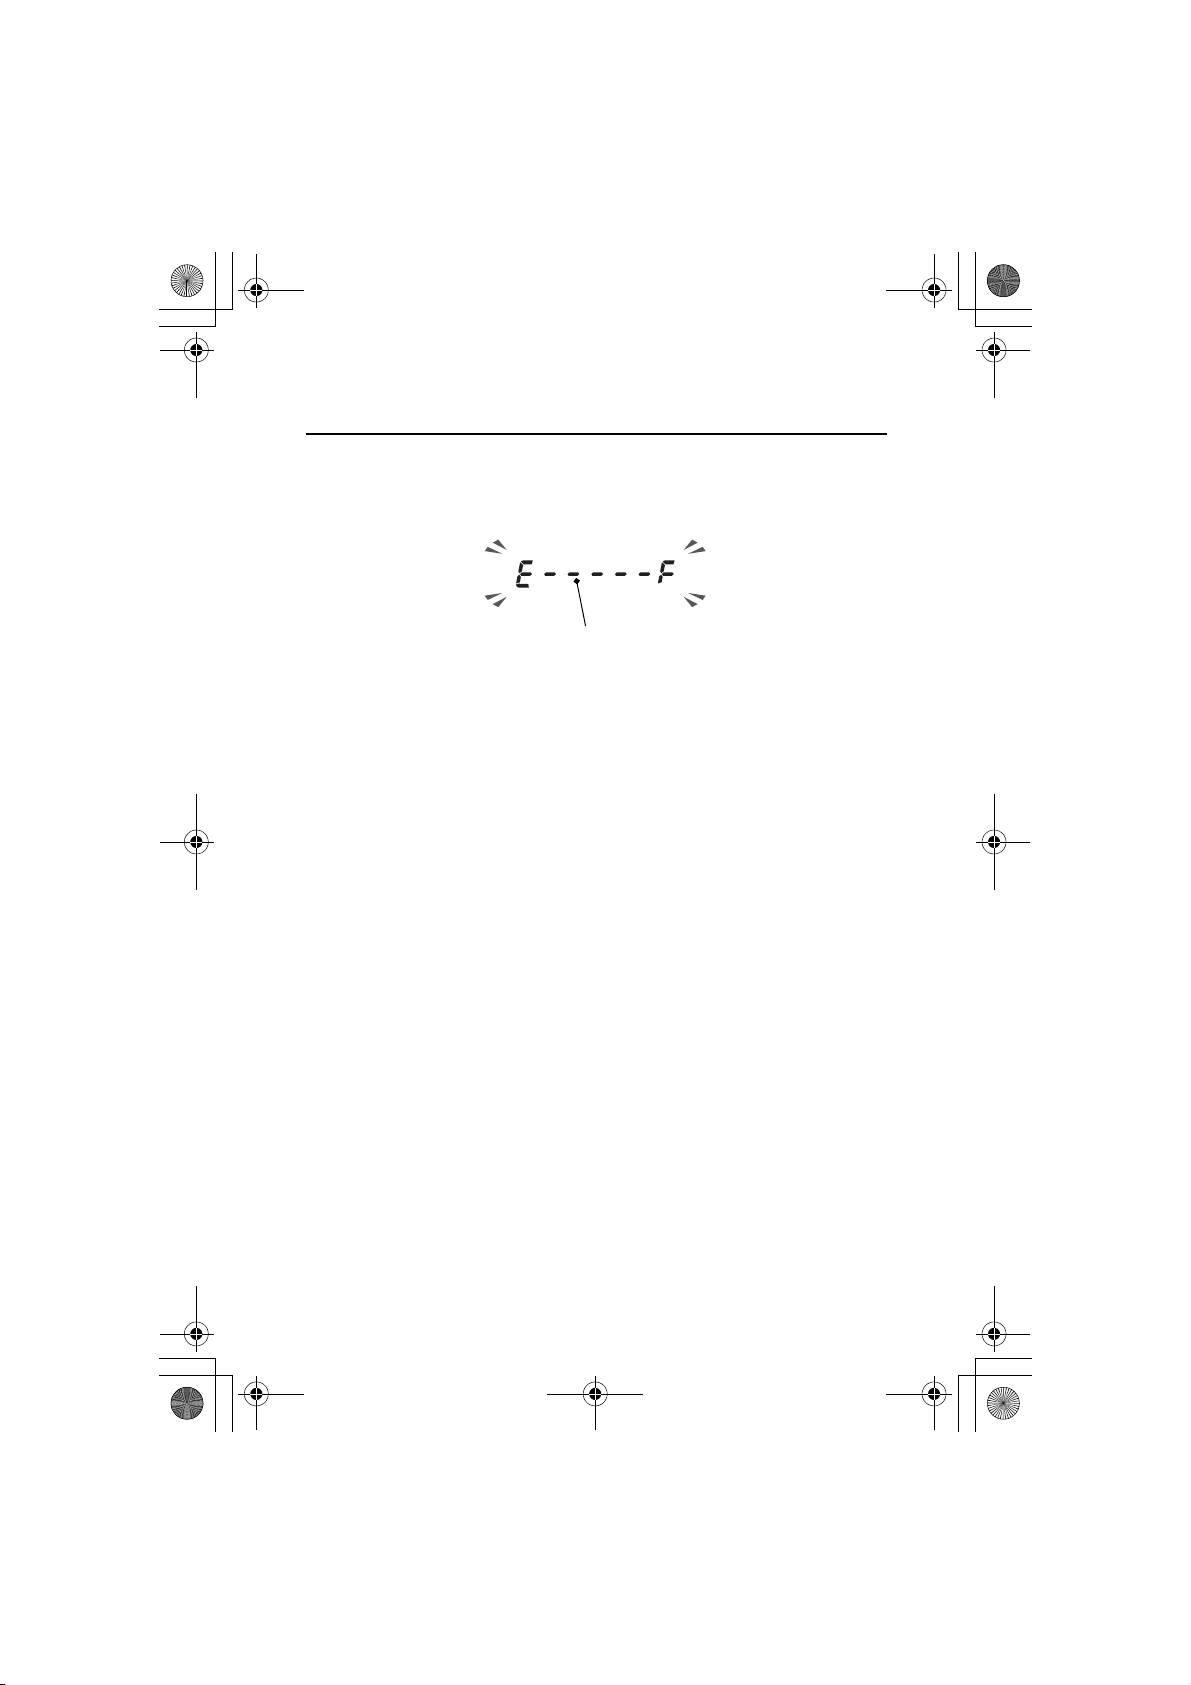
Fuel gauge failure:
If the fuel system has an error, the fuel gauge will flash.
If this occurs, see your dealer as soon as possible.
22
Instruments & Controls
Page 31
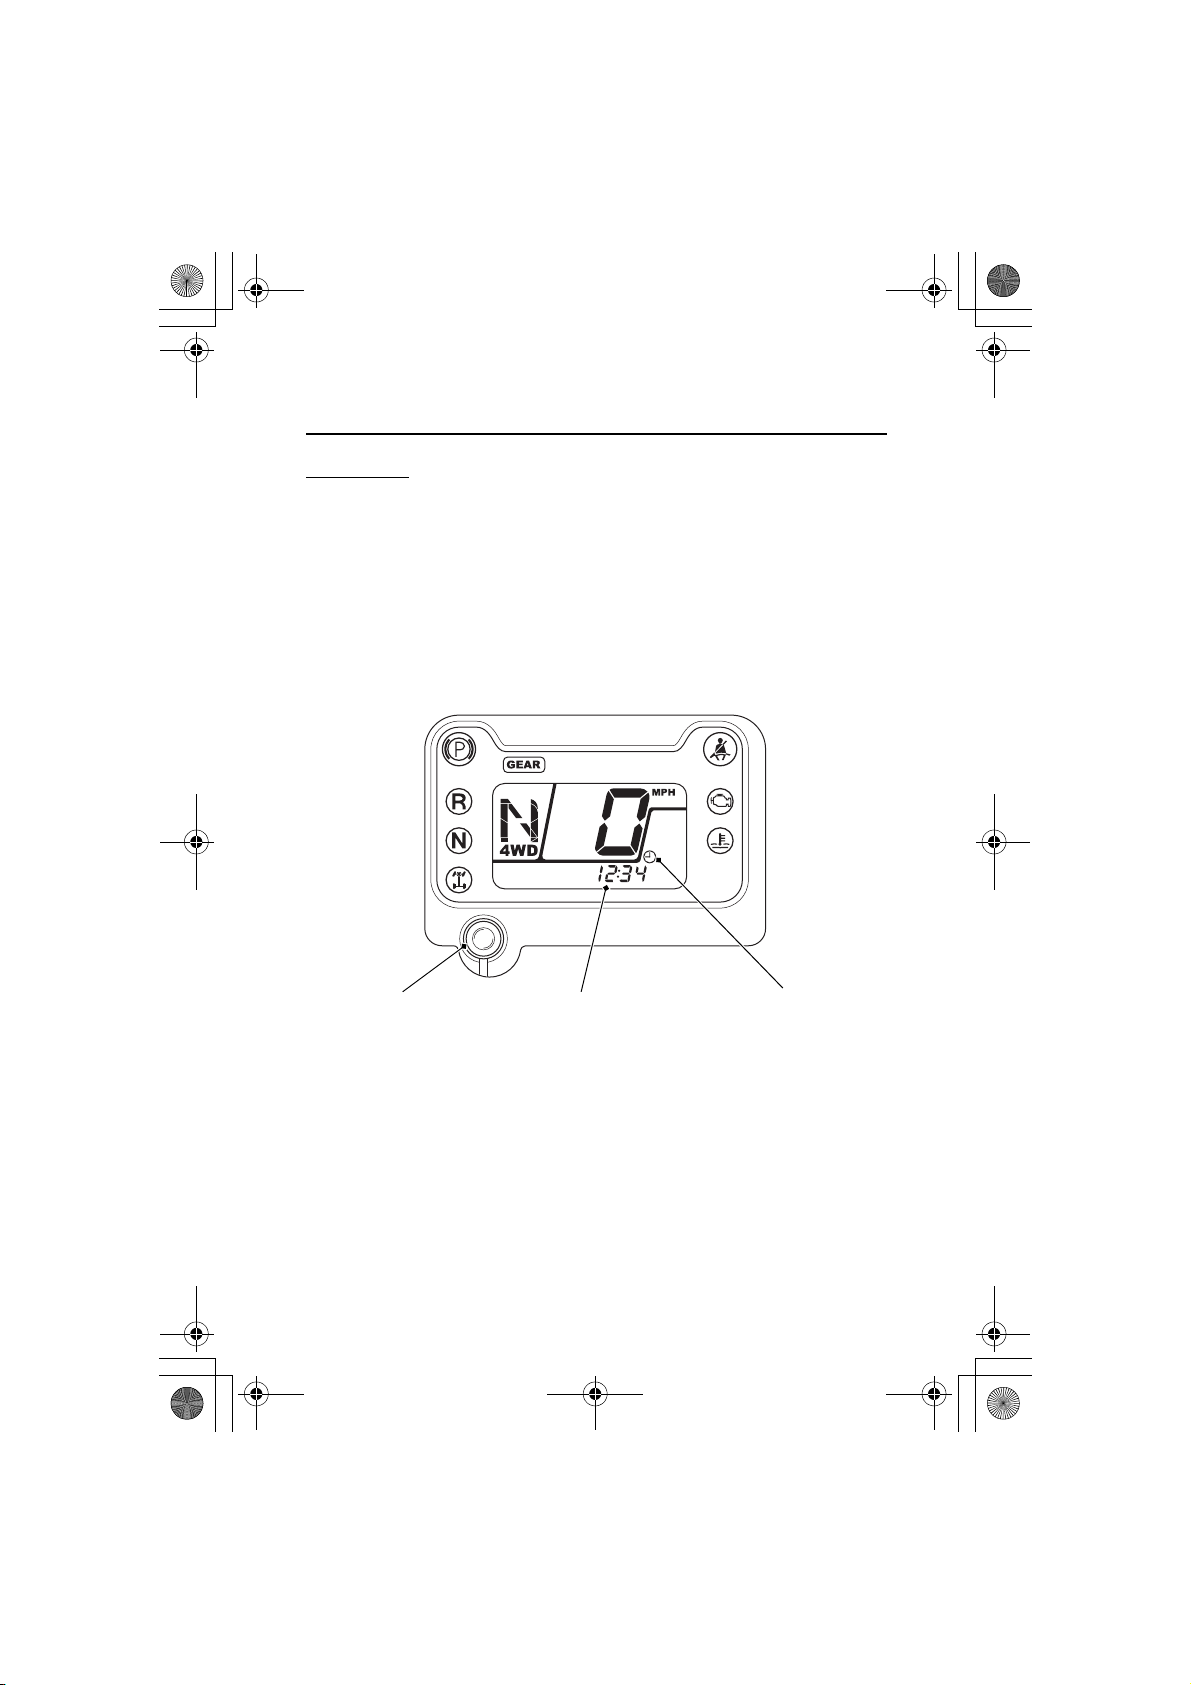
mode switch digital clock clock display
14 SXS700-31HL36000.book 23 ページ 2013年5月14日 火曜日 午前10時59分
Indicators & Displays
Digital clock
The digital clock shows the hour and minute with the clock display.
To adjust the time:
1.
Turn the ignition switch to ON (q).
2.
Press and hold the mode switch in the clock mode. The clock will
start blinking.
3.
Press and hold the mode switch until the desired time appears.
4.
To end the adjustment, press the mode switch, or turn the
ignition switch OFF.
Instruments & Controls
23
Page 32
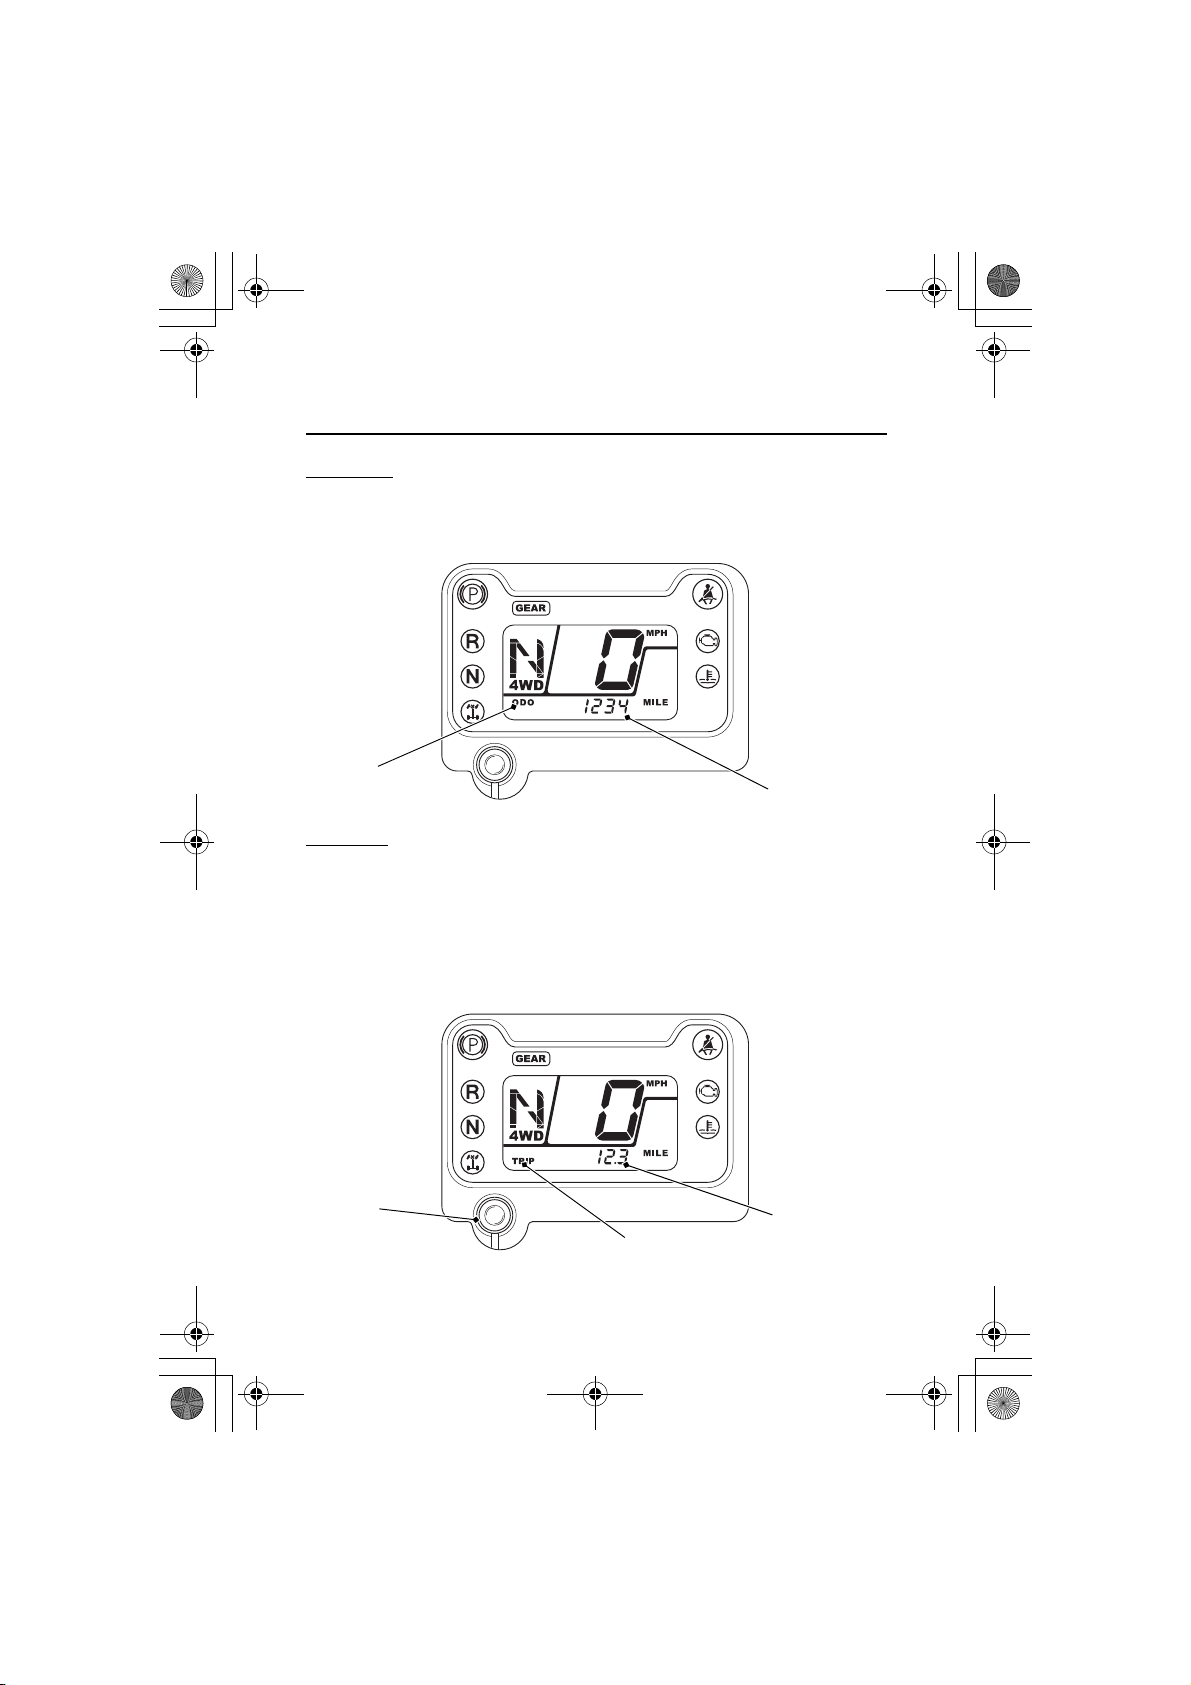
ODO
display
odometer
mode
switch
TRIP display
tripmeter
14 SXS700-31HL36000.book 24 ページ 2013年5月14日 火曜日 午前10時59分
Indicators & Displays
Odometer
The odometer shows the total miles or kilometers ridden with the
ODO display. The odometer locks at 999,999 when the readout
exceeds 999,999.
Tripmeter
The tripmeter shows the number of miles or kilometers ridden with
the TRIP display, since you last reset the tripmeter. The tripmeter
returns to 0 when the read-out exceeds 999.9.
To reset the tripmeter, press and hold the mode switch with the
display in the tripmeter mode.
Instruments & Controls
24
Page 33
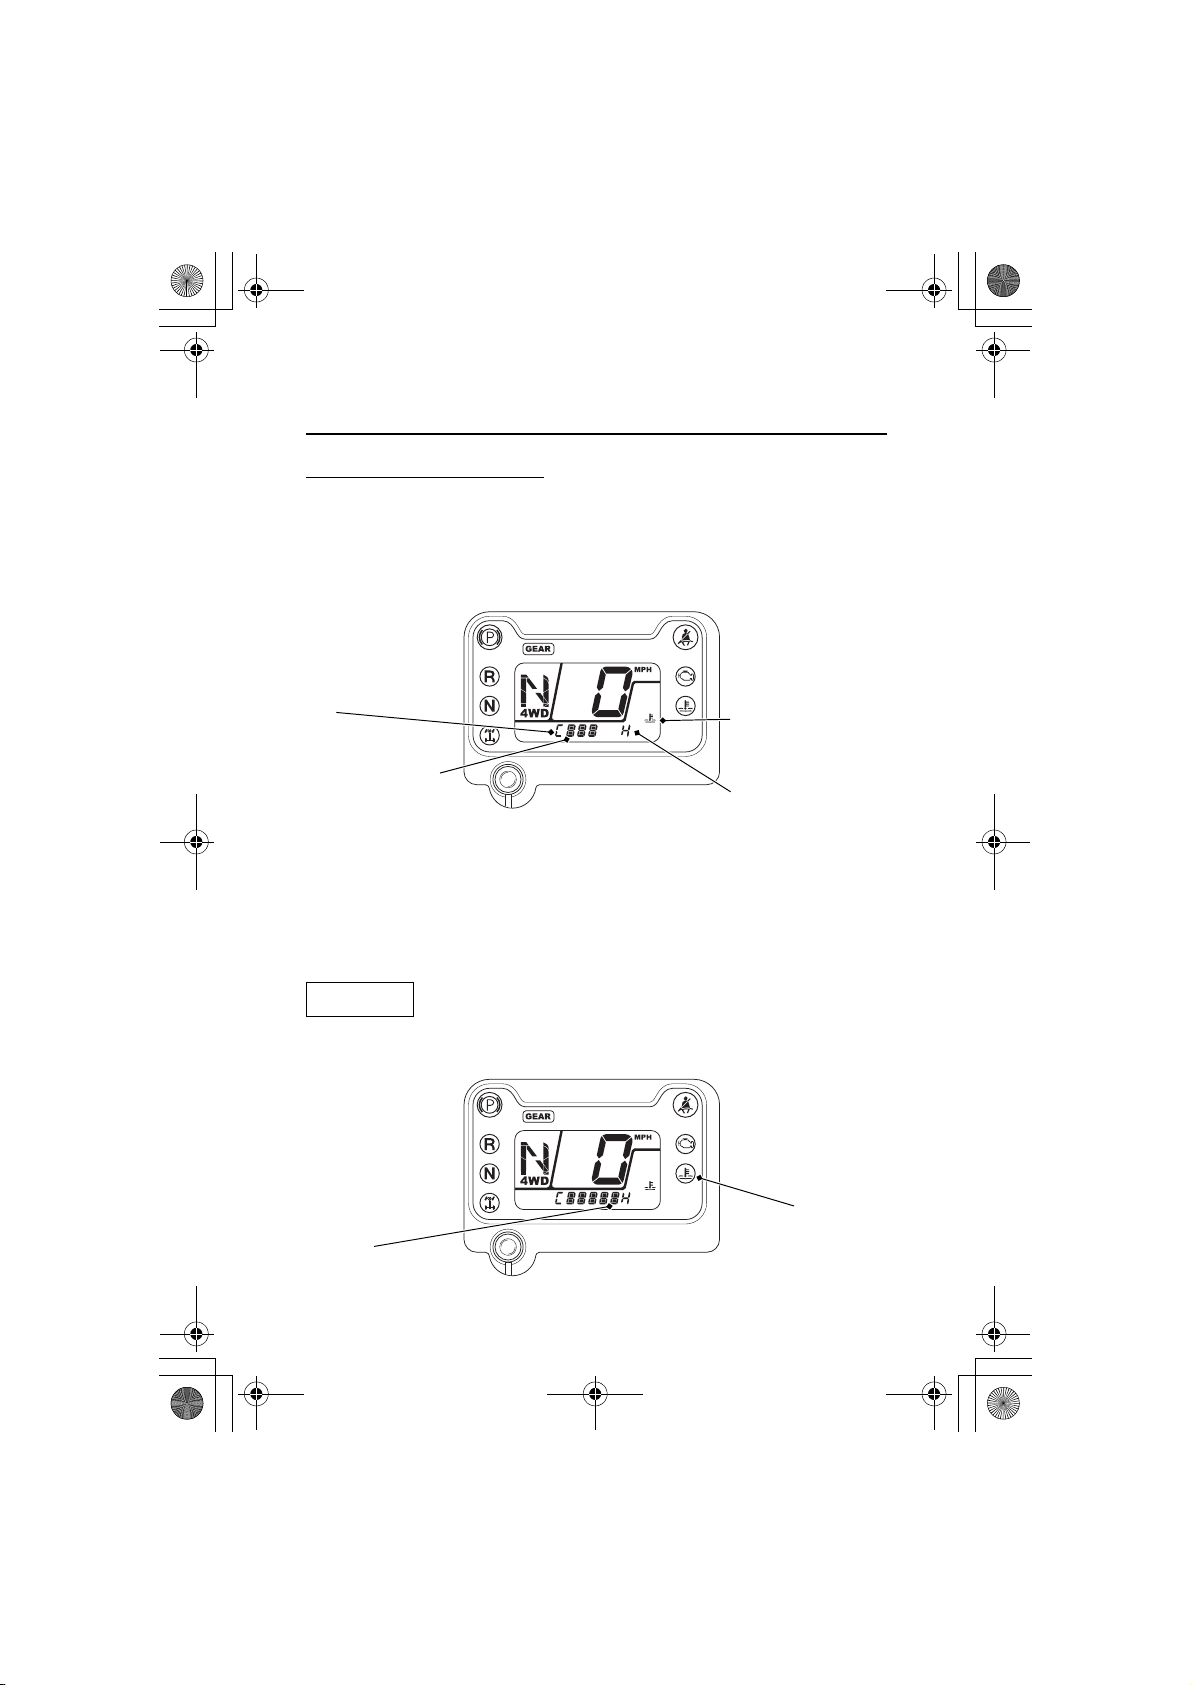
NOTICE
coolant
temperature
gauge
coolant
temperature
display
C
H
segment H
high coolant/oil
temperature
indicator
14 SXS700-31HL36000.book 25 ページ 2013年5月14日 火曜日 午前10時59分
Indicators & Displays
Coolant temperature gauge
The coolant temperature gauge shows engine coolant temperature
with the coolant temperature display. When the segment begins to
move above the C (Cold) display, the engine is warm enough for the
SXS to be ridden. The normal operating temperature range is within
the section between the H and C displays.
If the all sections of the coolant temperature gauge including
segment H and high coolant/oil temperature indicator are on
(automatically appears in the display), stop the engine and check the
reserve tank coolant level.
Read pages 200 - 201 and do not drive the SXS until the problem has
been corrected.
Continuing to ride with an overheated engine can cause serious
engine damage.
Instruments & Controls
25
Page 34
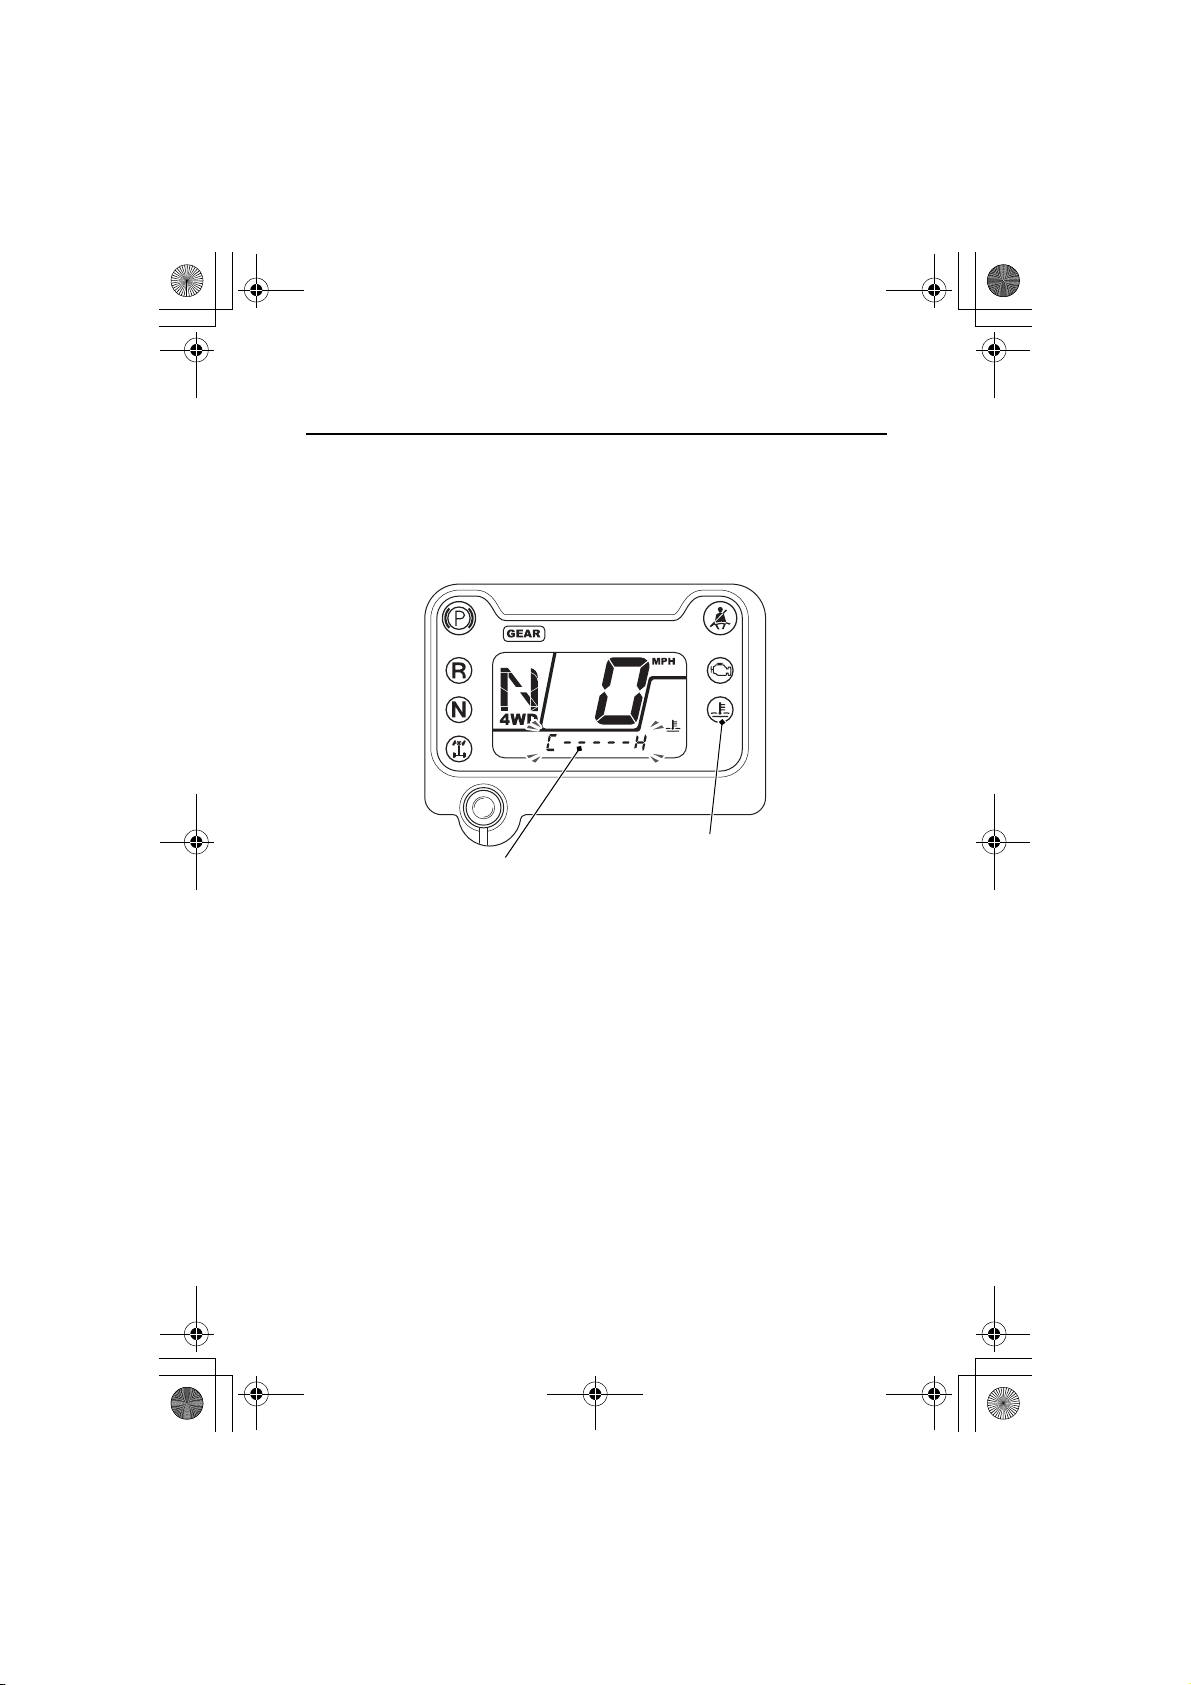
coolant temperature gauge
high coolant/oil
temperature indicator
14 SXS700-31HL36000.book 26 ページ 2013年5月14日 火曜日 午前10時59分
Indicators & Displays
Coolant temperature gauge failure:
If the coolant temperature system has an error, the coolant
temperature gauge will flash and preferentially appear in the display,
and/or high coolant/oil temperature indicator will turned on.
If this occurs, see your dealer as soon as possible.
Instruments & Controls
26
Page 35
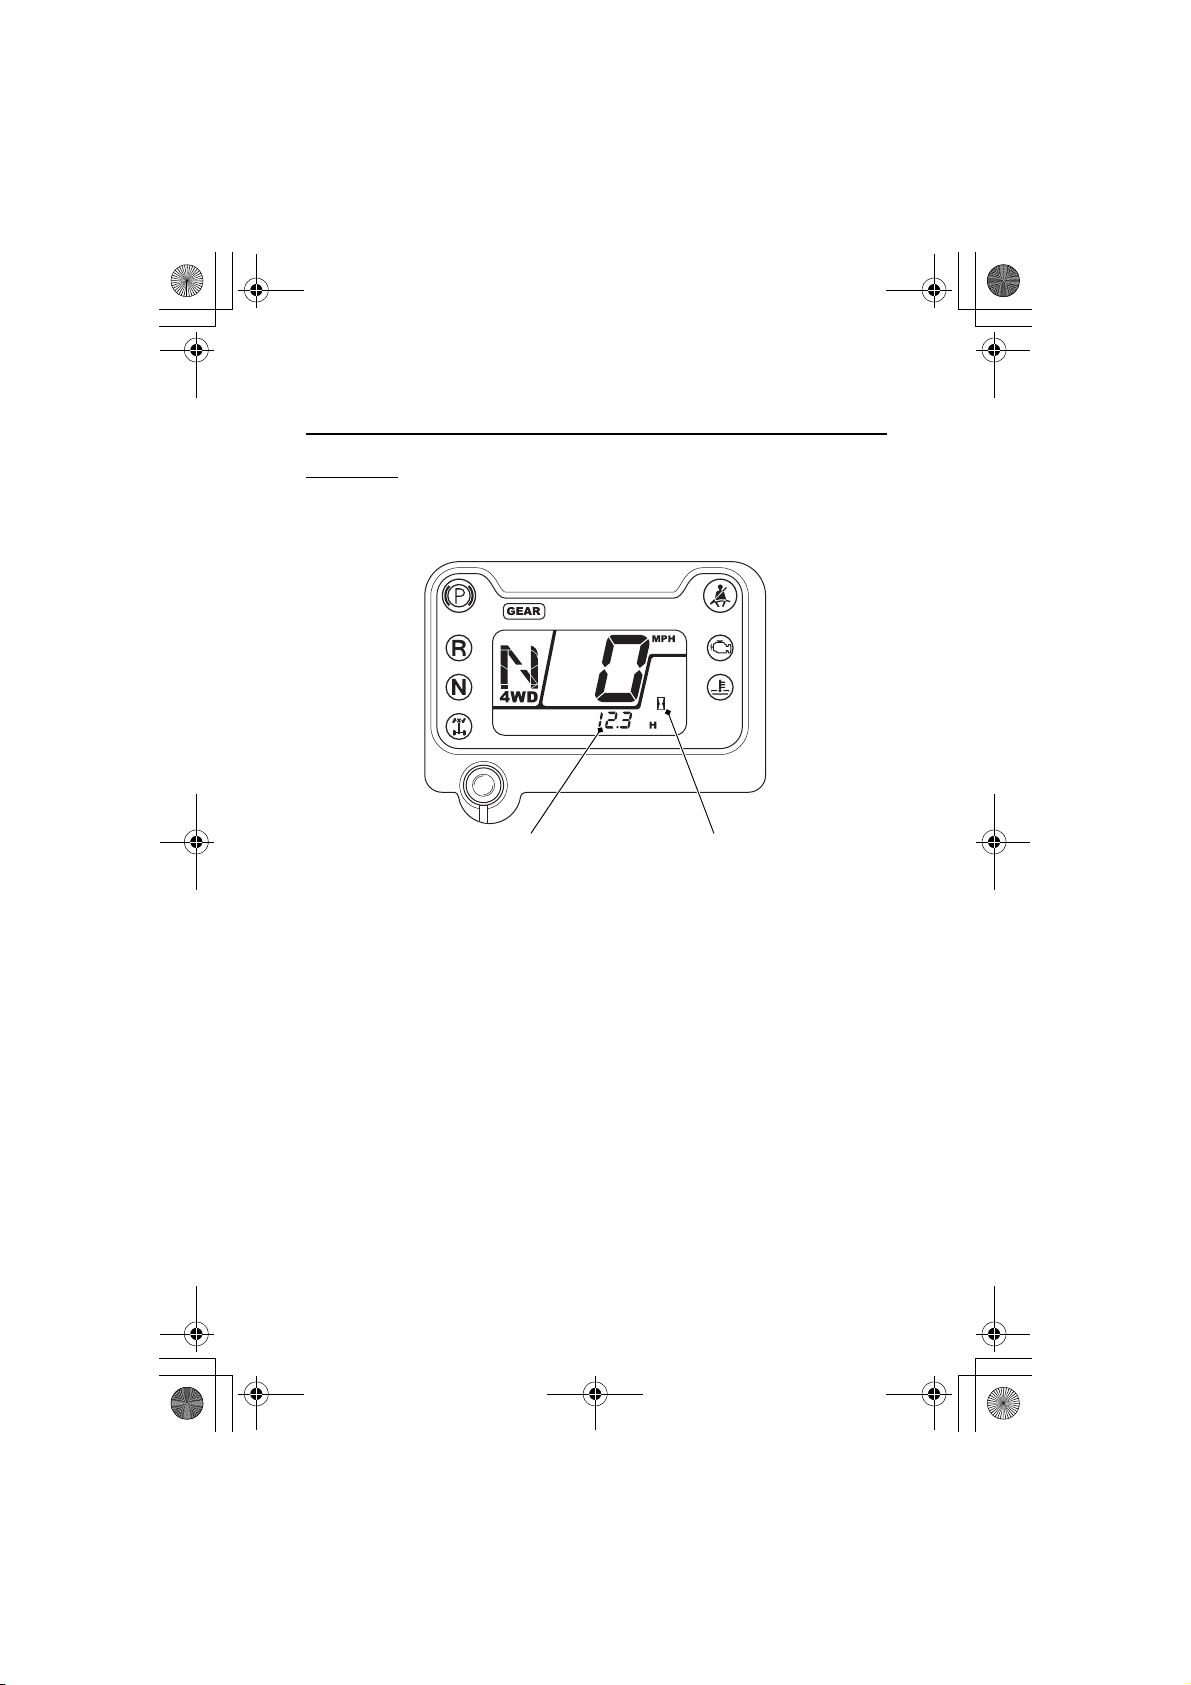
hourmeter hourmeter display
14 SXS700-31HL36000.book 27 ページ 2013年5月14日 火曜日 午前10時59分
Indicators & Displays
Hourmeter
The hourmeter shows accumulated hours while the ignition is ON (q)
with the hourmeter display. The hourmeter locks at 99,999.9 when
the readout exceeds 99,999.9.
Instruments & Controls
27
Page 36
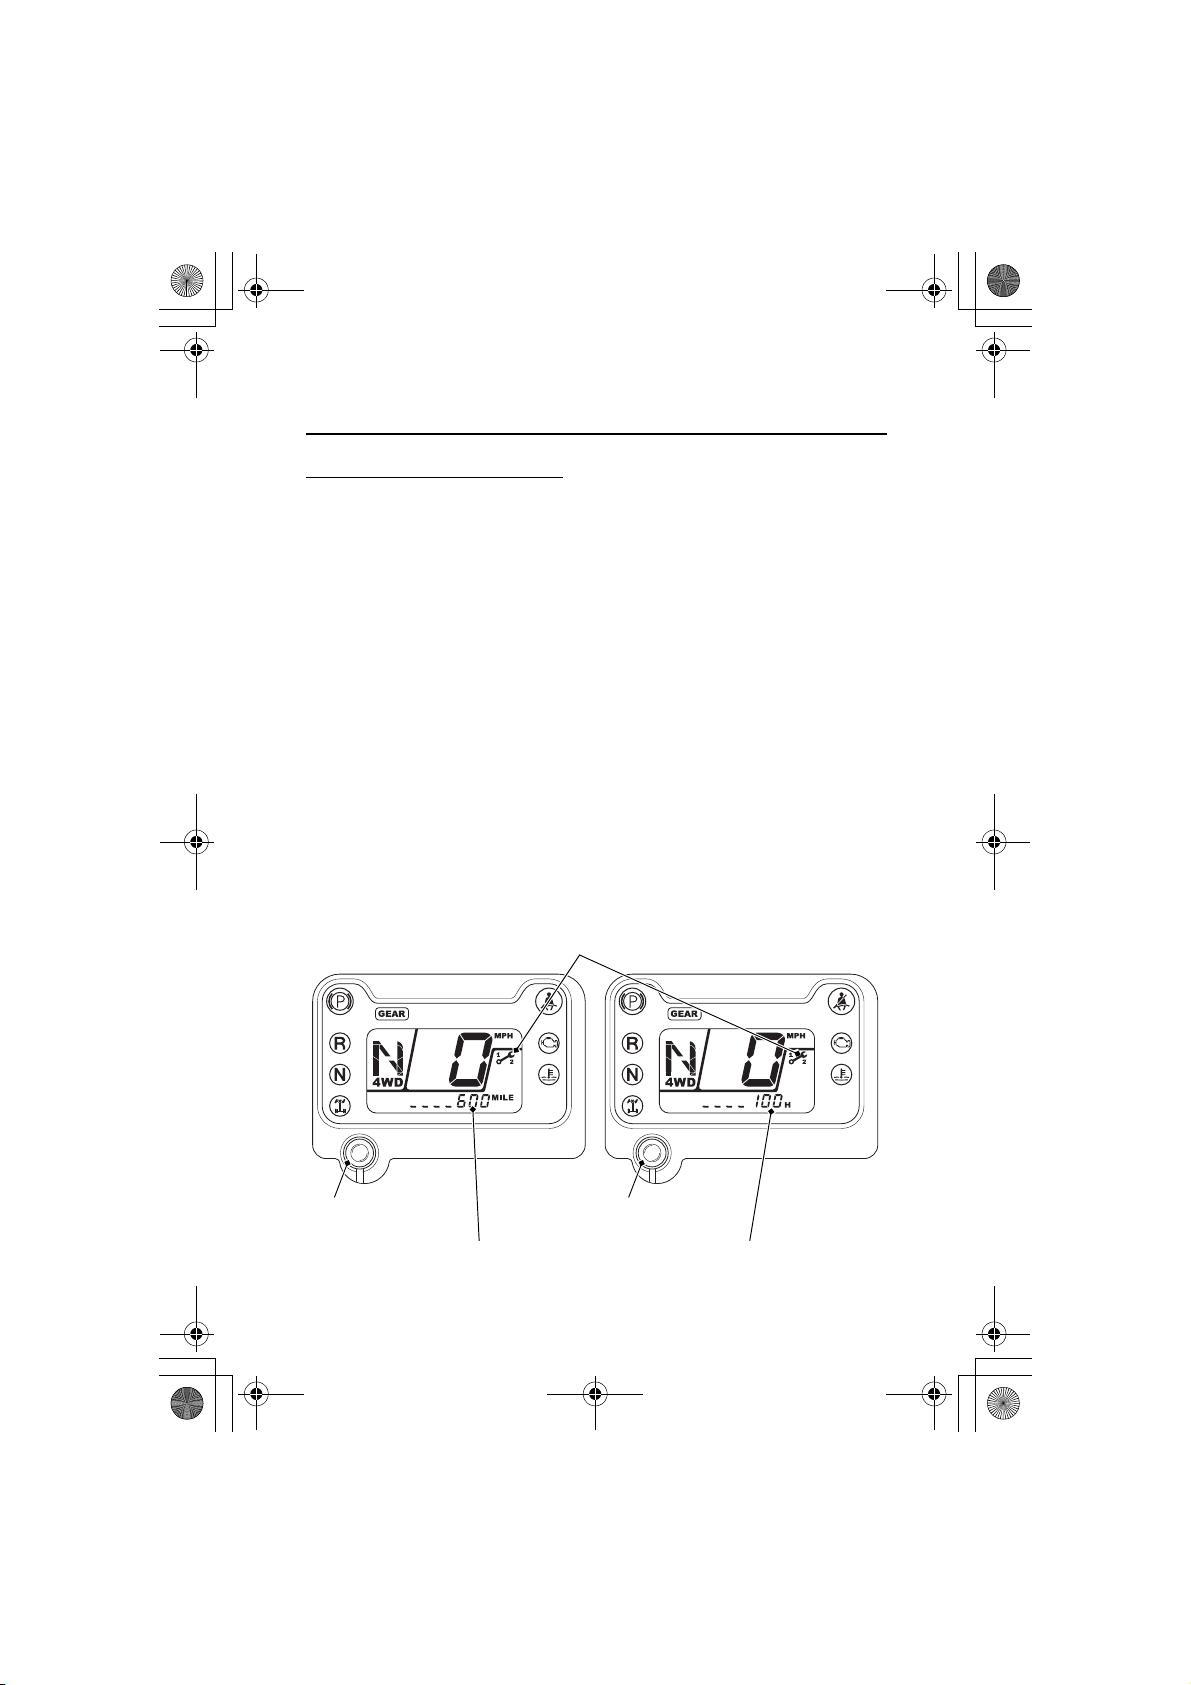
maintenance minder indicator
mode switch
maintenance tripmeter maintenance hourmeter
mode switch
14 SXS700-31HL36000.book 28 ページ 2013年5月14日 火曜日 午前10時59分
Indicators & Displays
Maintenance minder indicator
The maintenance minder indicator appears in the display when the
mileage or operating hours on your Honda SXS reaches the
maintenance interval specified on the maintenance schedule
(page 95).
Reset the indicator after each scheduled maintenance is performed.
If the scheduled maintenance is performed before the maintenance
minder indicator appears, be sure to reset the maintenance minder
after performing the scheduled maintenance.
Resetting the indicator:
To reset the indicator, press and continue to hold the mode switch
and turn the ignition switch to ON (q). The indicator message will
light up, and after 2 seconds will flash twice, the maintenance
minder indicator is reset.
Also the maintenance tripmeter and maintenance hourmeter will
reset.
See more details about maintenance minder indicator on page 93.
Instruments & Controls
28
Page 37
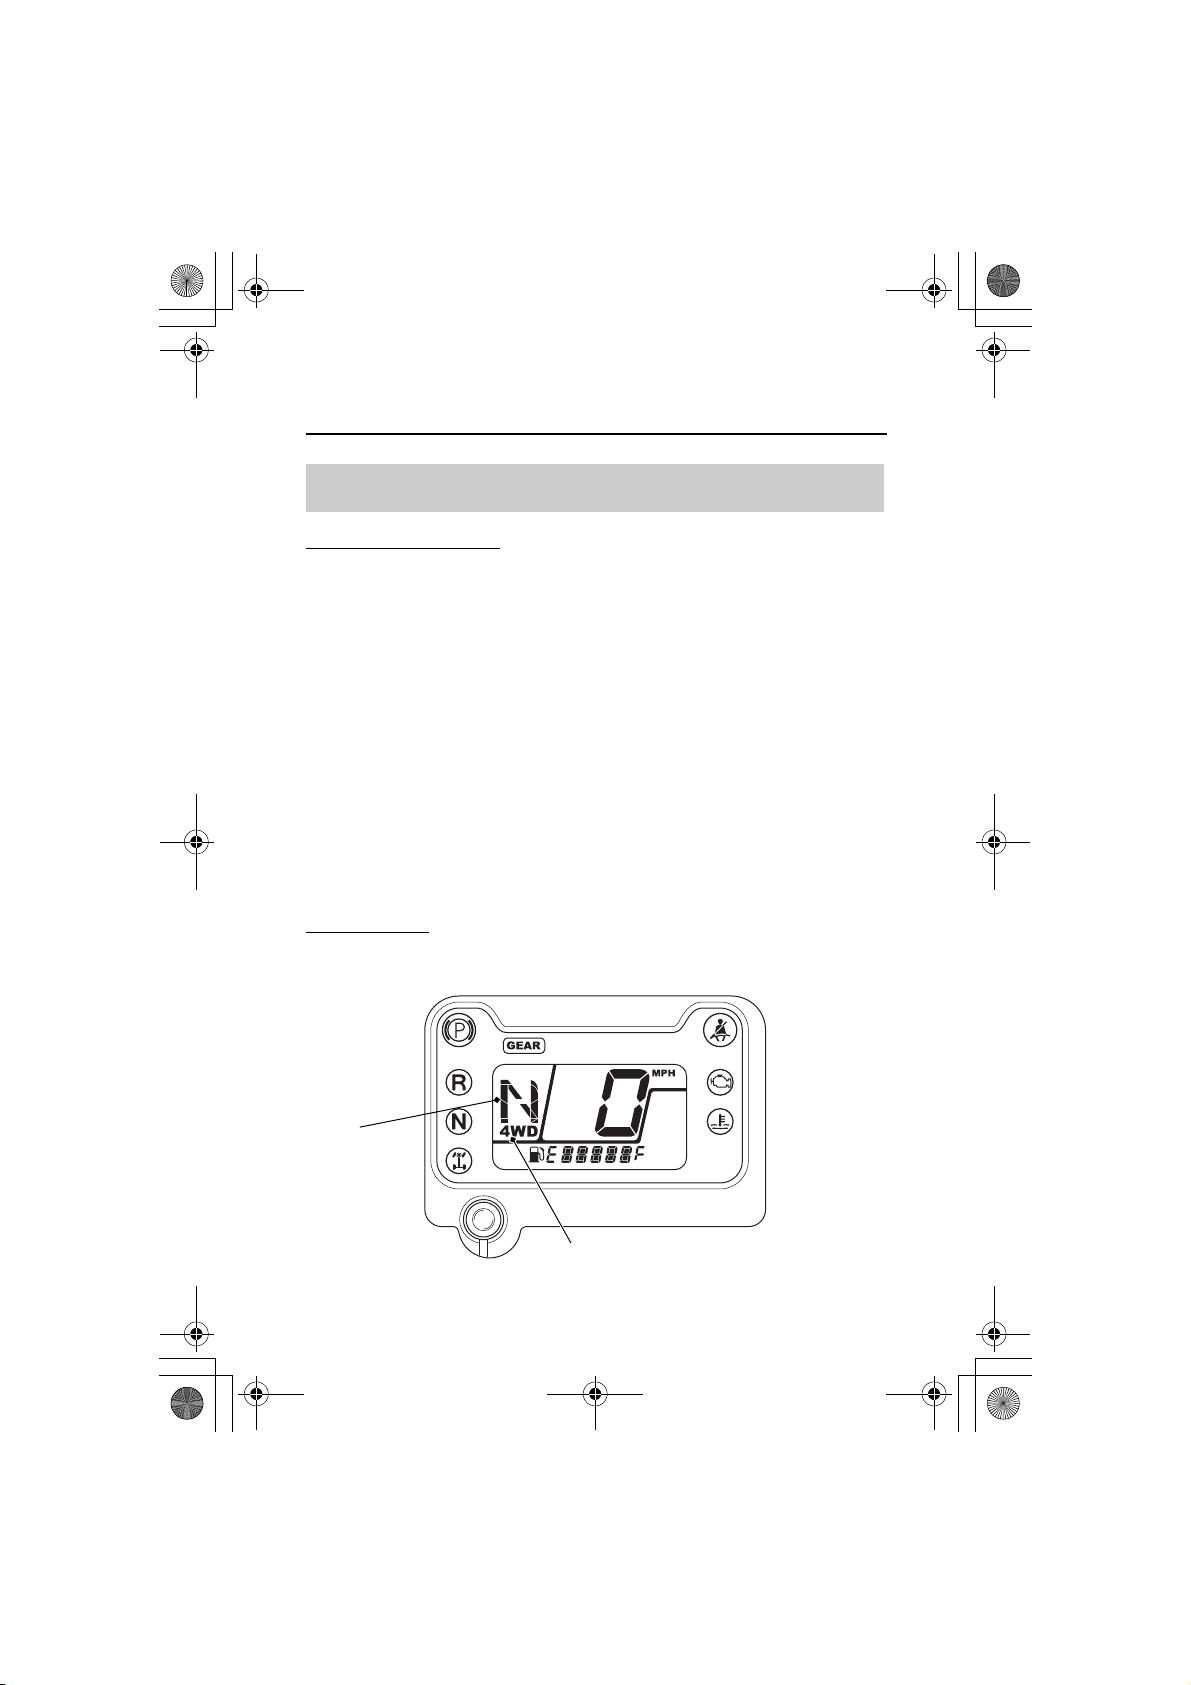
gear
position
indicator
4WD indicator
14 SXS700-31HL36000.book 29 ページ 2013年5月14日 火曜日 午前10時59分
Indicators & Displays
Gear position display
Gear position indicator
The gear position indicator shows the gear position when the
ignition switch is in the ON (q) position.
The indicator displays: N for neutral, R for reverse, and D for the drive.
“–” will be displayed on the gear position indicator when the
transmission is not shifted into gear properly. Before driving, check
that the gear position is properly displayed on the gear position
indicator.
If the gear position indicator shows “–” and blinks, turn the ignition
switch to the OFF (w) position, and then turn it back to the ON (q)
position again. If the gear position indicator still shows “–” and
blinks, see your dealer.
4WD indicator
This indicator will be on when the 4WD or 4WD diff lock mode
engages (page 33).
Instruments & Controls
29
Page 38
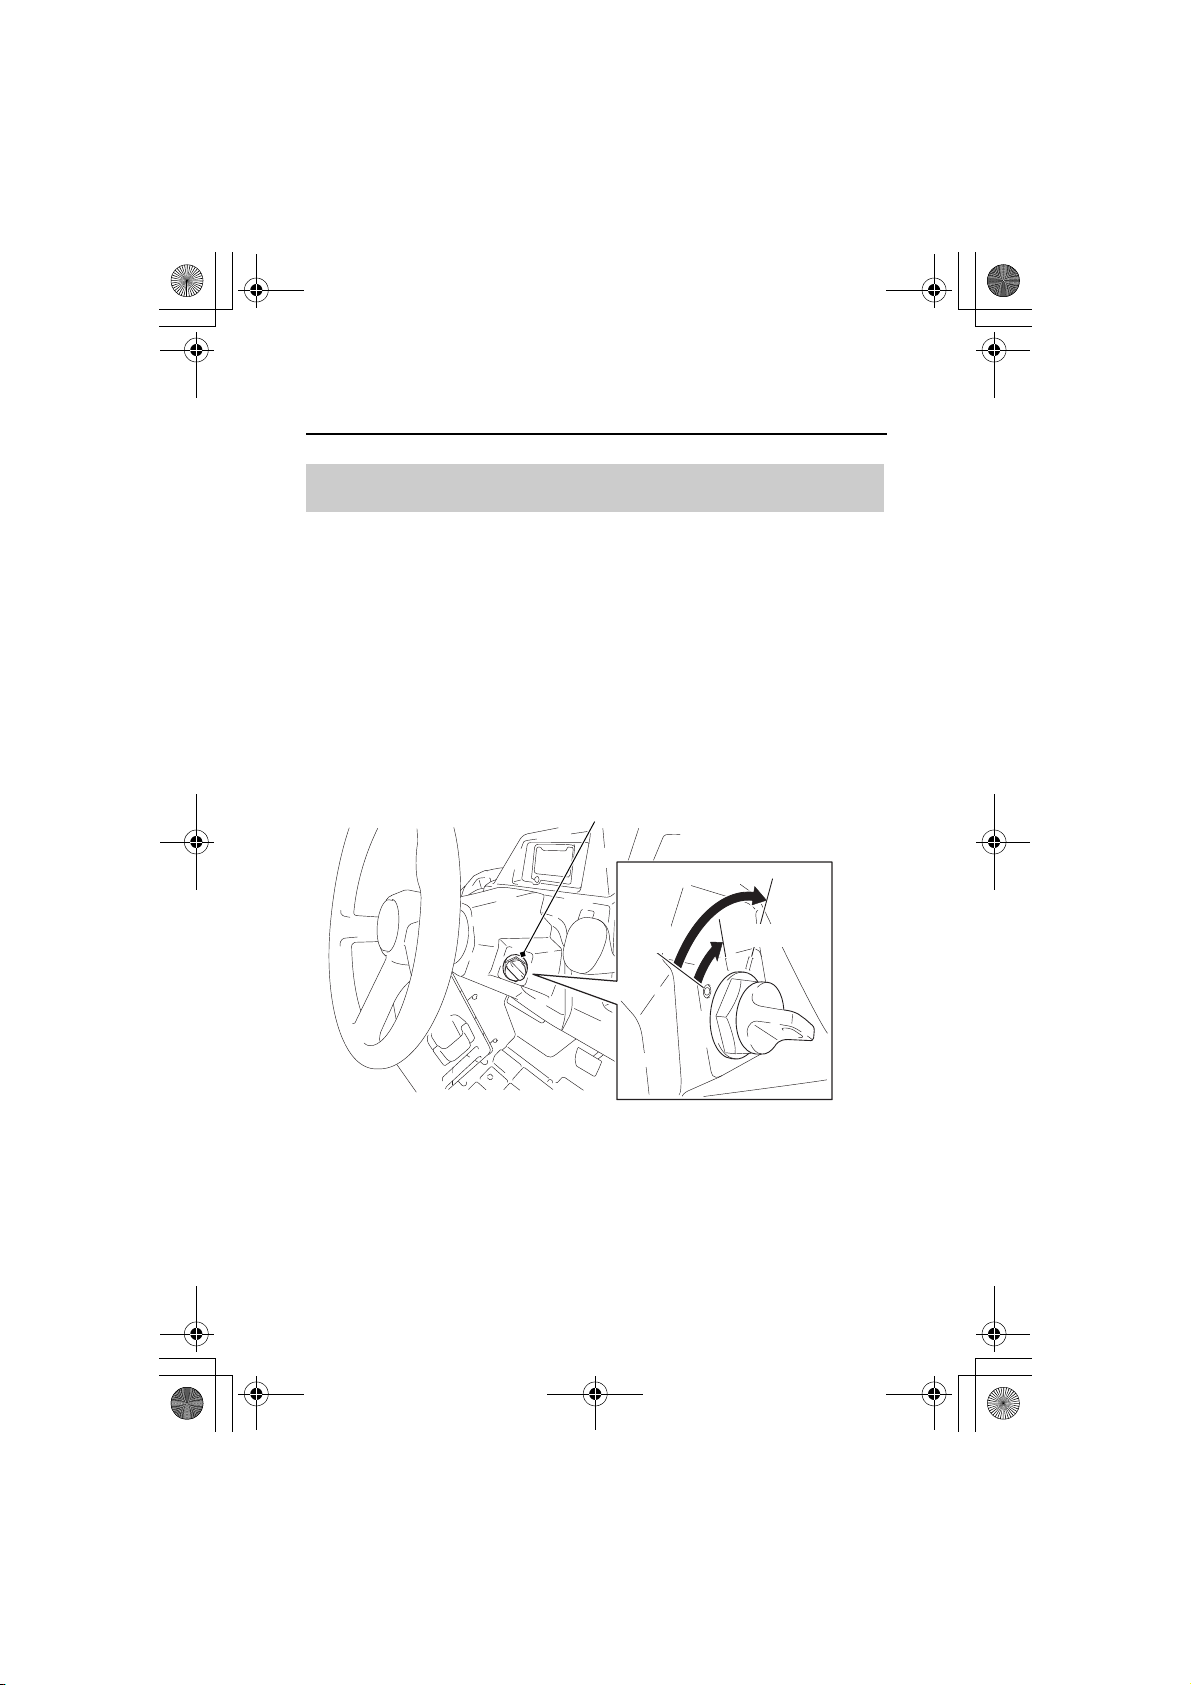
OFF
(w)
ON (q)
ignition switch
START (p)
14 SXS700-31HL36000.book 30 ページ 2013年5月14日 火曜日 午前10時59分
Driver Controls
Ignition Switch
The ignition switch is a three-position, key-operated switch used to
start and stop the engine.
OFF (w) — The engine and all electrical circuits are off. The key can
be inserted and removed only when it is in this position.
ON (q) — The electrical circuits are on. You can use the accessory
power socket in this position.
START (p) — This position is used only to start the engine. The key
will automatically return to the ON (q) position when you let go of it.
30
Instruments & Controls
Page 39
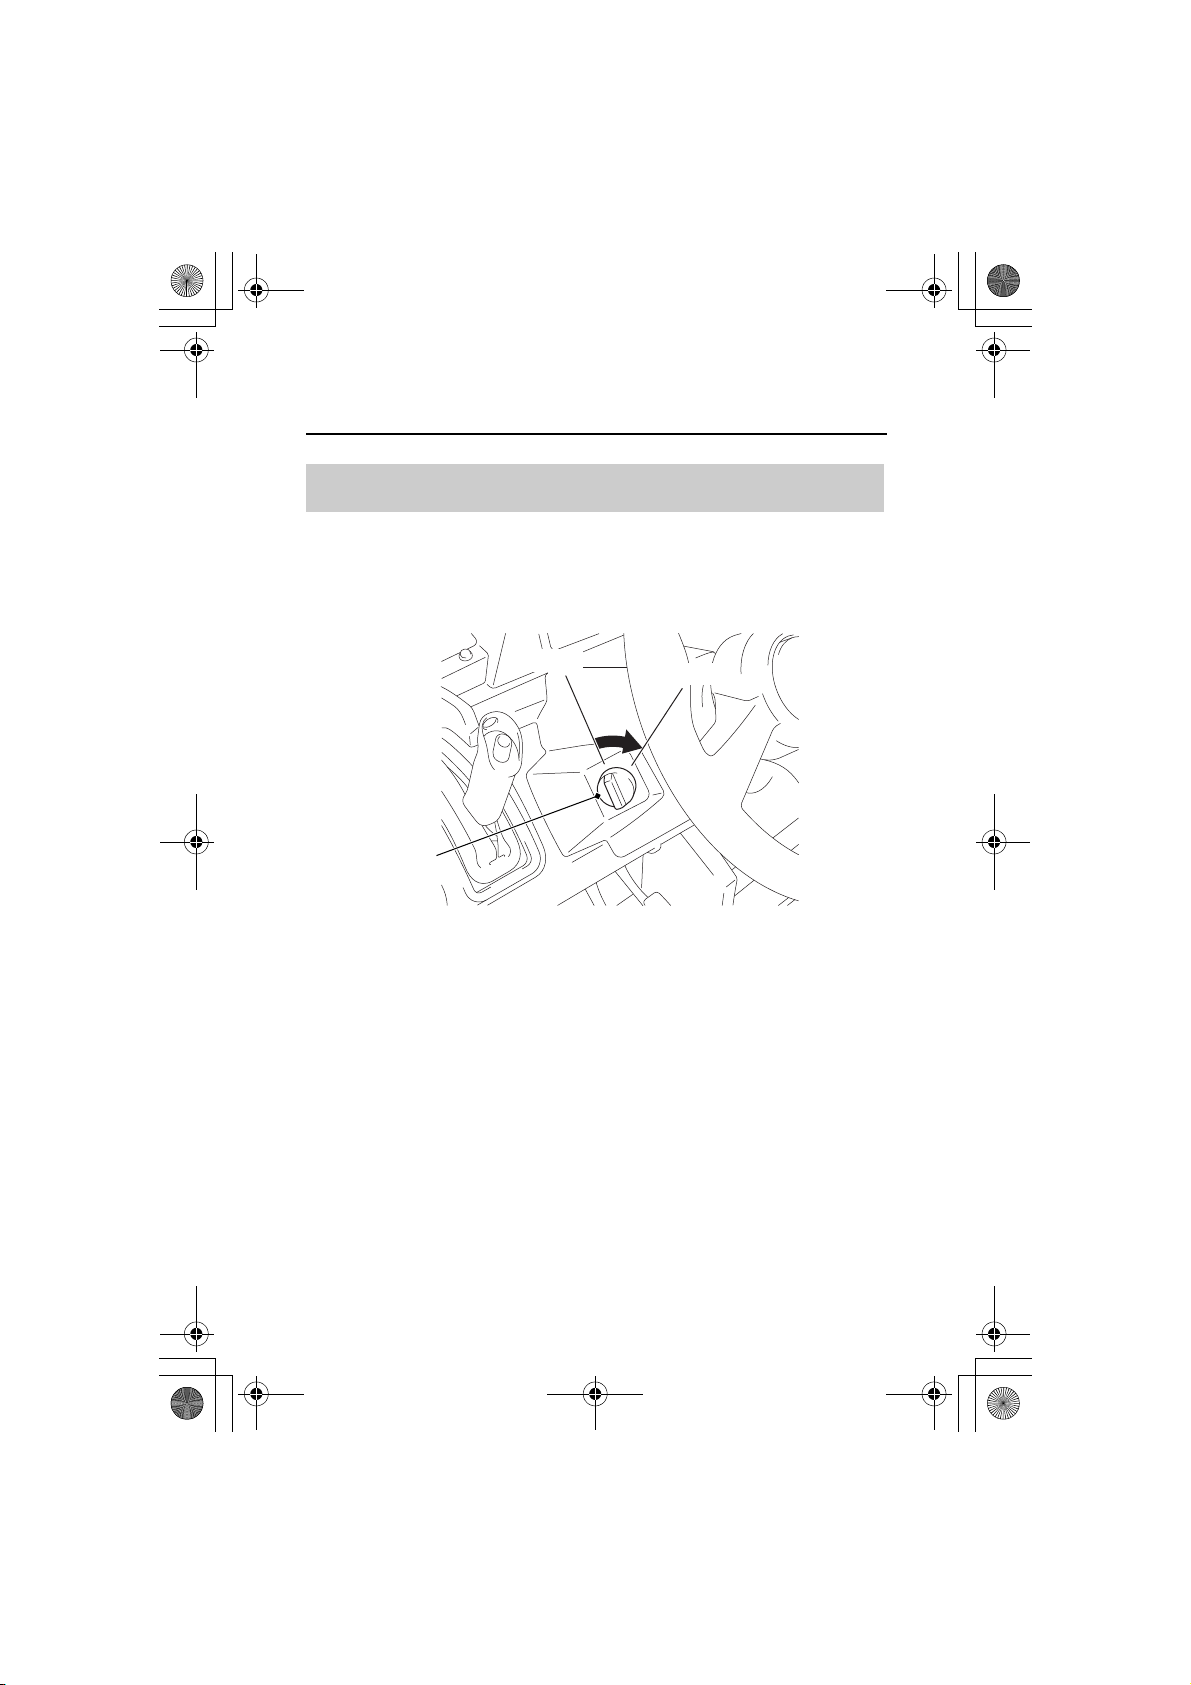
headlight switch
OFF (w)
ON (y)
14 SXS700-31HL36000.book 31 ページ 2013年5月14日 火曜日 午前10時59分
Driver Controls
Headlight Switch
The headlight switch is located on the front console, to the left of
the steering wheel. This switch turns the headlights and taillights on
and off.
Instruments & Controls
31
Page 40
NOTICE
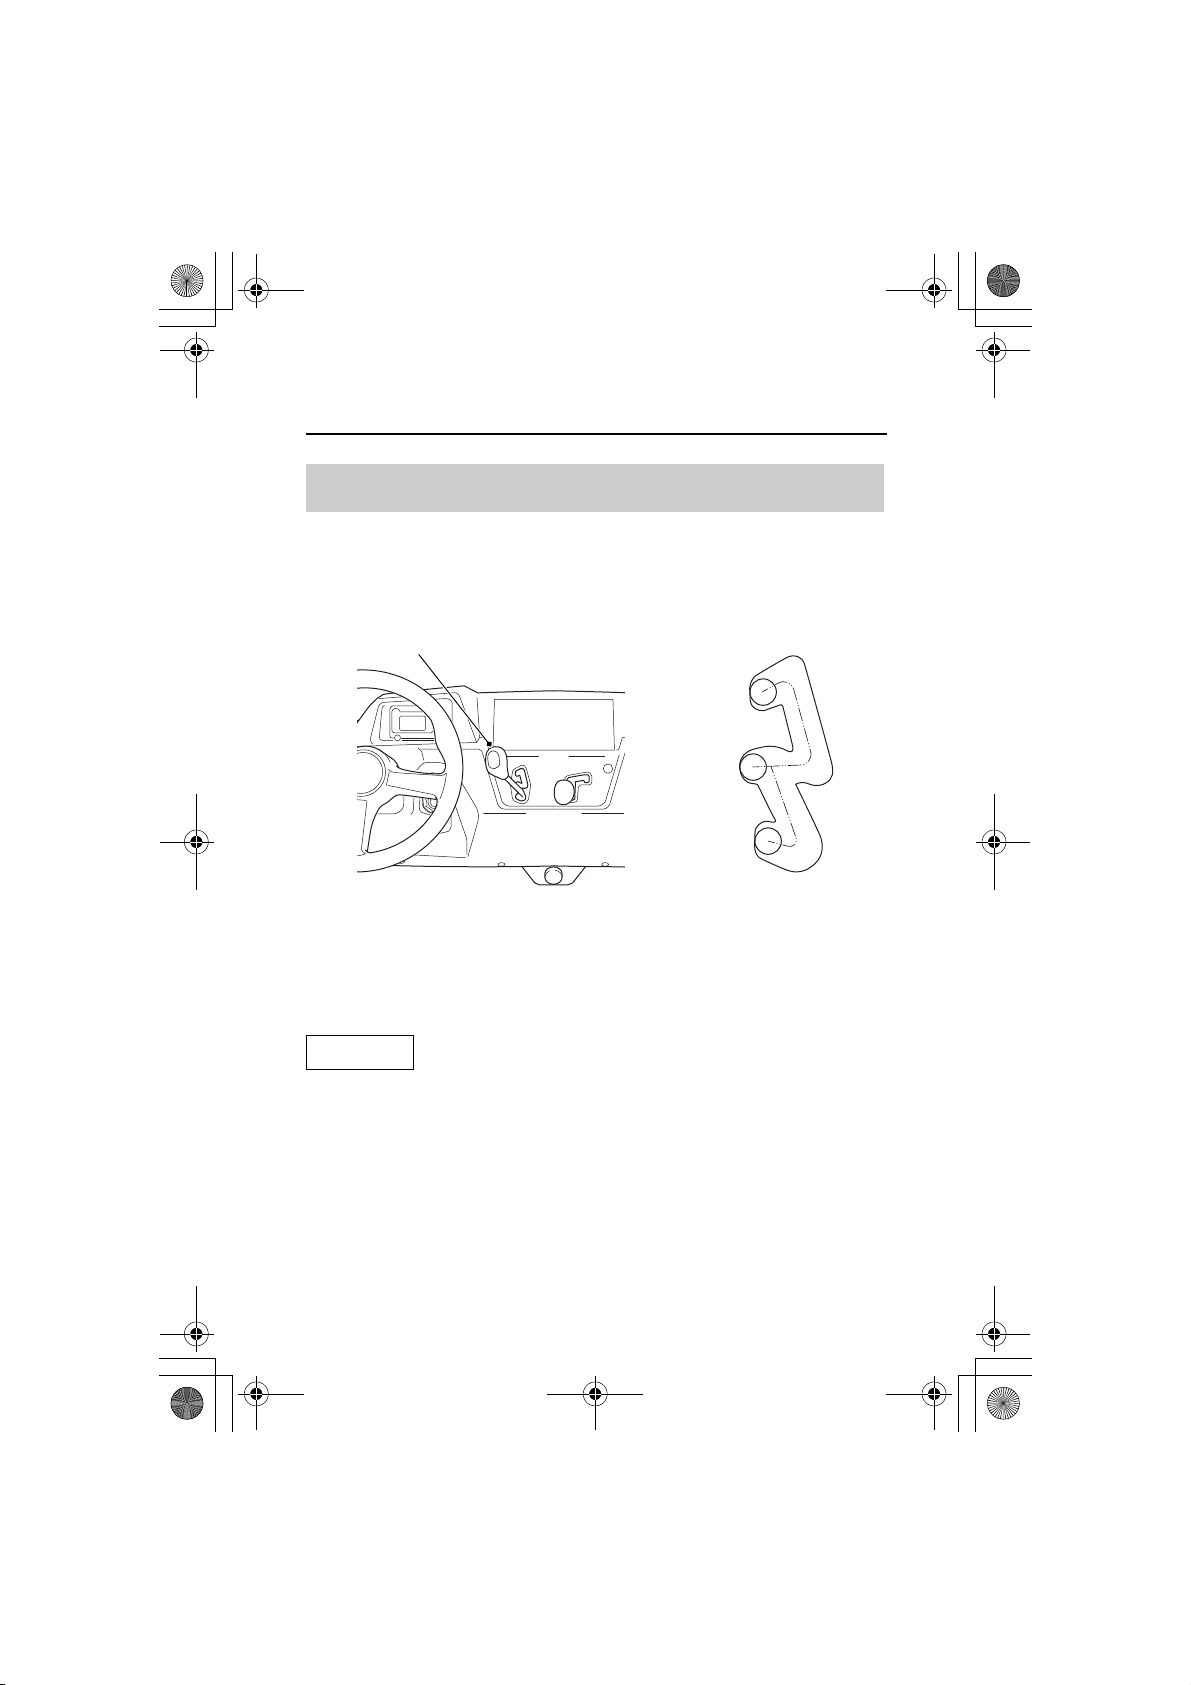
shift lever
shift positions
reverse (R)
drive (D)
neutral (N)
14 SXS700-31HL36000.book 32 ページ 2013年5月14日 火曜日 午前10時59分
Driver Controls
Shift Lever
Your Honda SXS is equipped with an automatic transmission. The
shift lever, located to the right of the steering wheel, has three
positions: drive (D), neutral (N), and reverse (R).
You should move the shift lever only when the vehicle is stopped
with your foot on the brake pedal and with the engine idling. Use a
firm motion to select the appropriate gear. Have your vehicle
checked by a dealer if you experience any shifting problems.
Do not attempt to move the shift lever with the engine speed above
idle or while the vehicle is moving, as you may damage the
transmission.
Instruments & Controls
32
Page 41
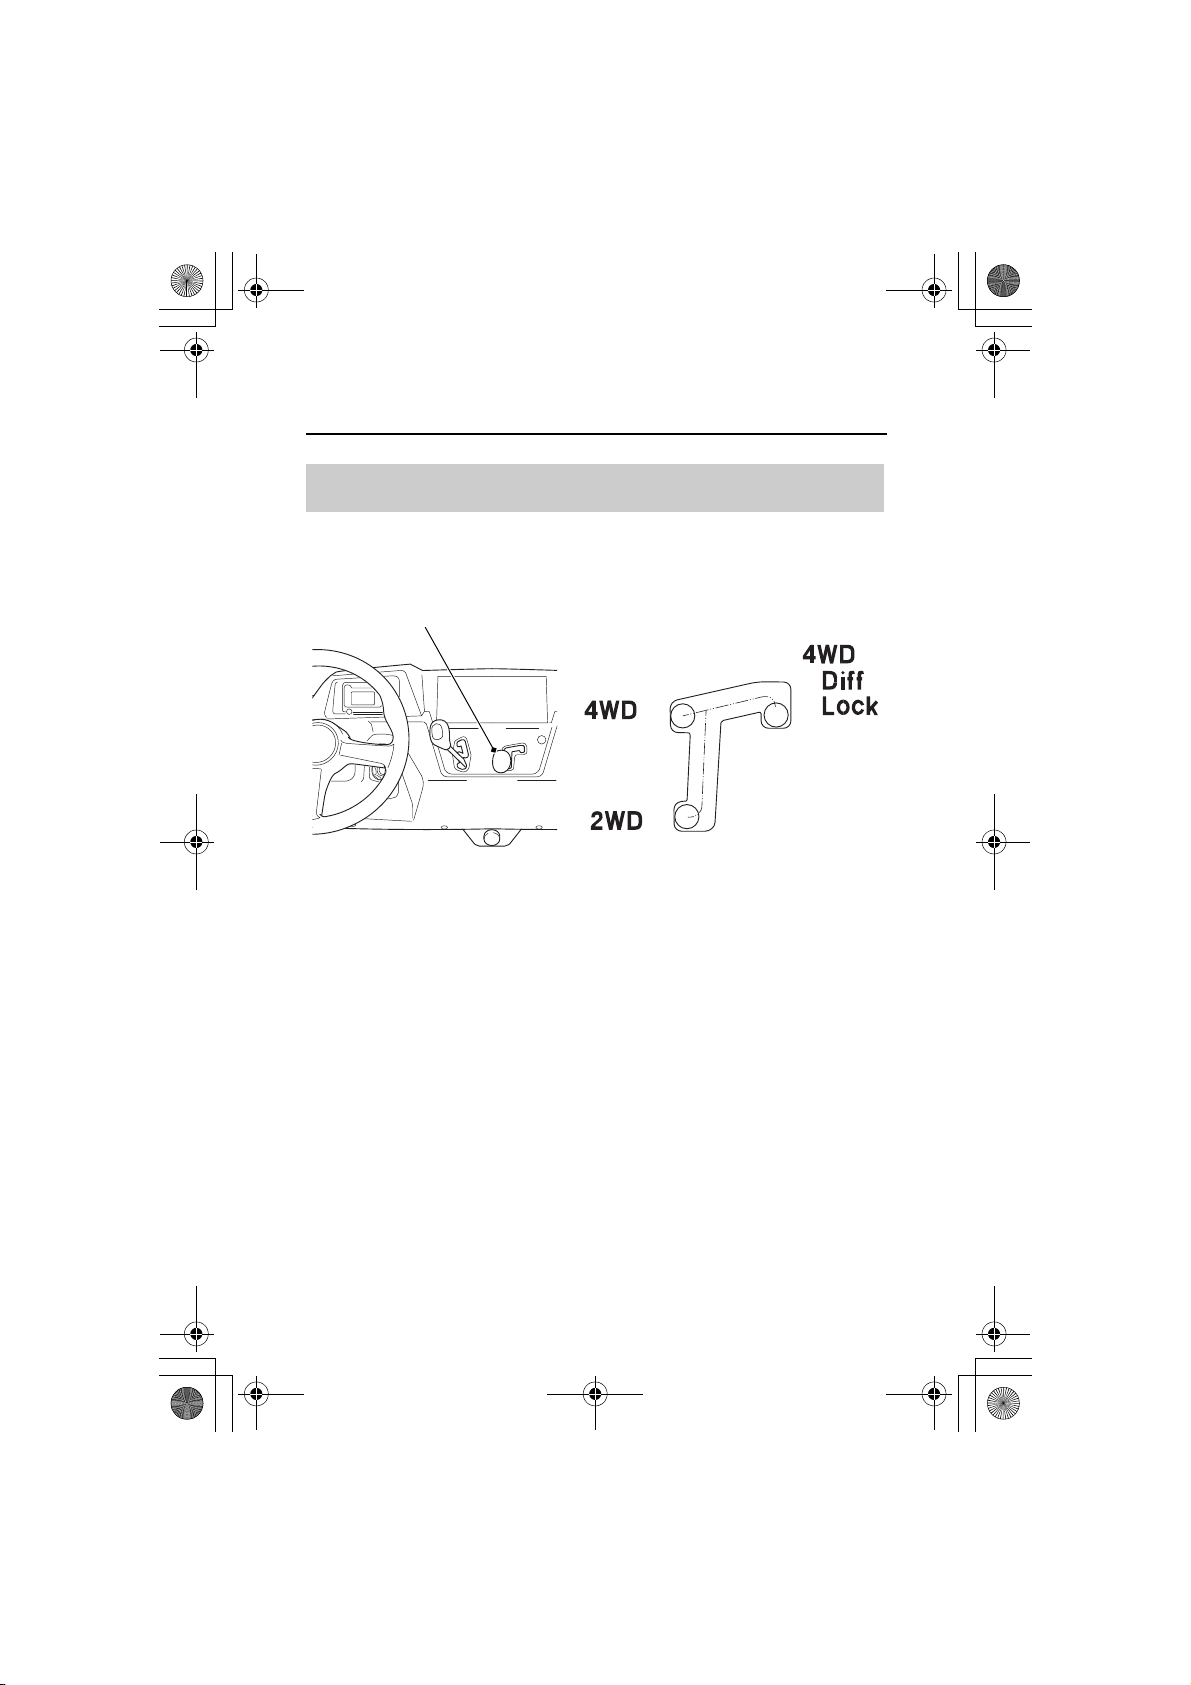
drive mode lever
drive mode positions
14 SXS700-31HL36000.book 33 ページ 2013年5月14日 火曜日 午前10時59分
Driver Controls
Drive Mode Lever
The drive mode lever, located to the right of the shift lever, has three
drive mode positions: 2WD, 4WD and 4WD diff lock.
To check your present drive mode, look at the 4WD indicator and
differential lock indicator.
2WD mode:
Both indicators will be off when the 2WD mode engages.
4WD mode:
The 4WD indicator will be on when the 4WD mode engages.
4WD Diff Lock mode:
The 4WD indicator and differential lock indicator will be on when
the 4WD diff lock mode engages.
Instruments & Controls
33
Page 42
NOTICE
14 SXS700-31HL36000.book 34 ページ 2013年5月14日 火曜日 午前10時59分
Driver Controls
You should change drive modes only when the vehicle is stopped
and the engine is idling.
Changing drive modes while the vehicle is moving could damage the
drivetrain.
After changing the drive mode, drive several yards, making right and
left turns, and make sure that indicators work properly. If the
indicators do not go out or come on according to the drive mode
position, see your dealer.
Instruments & Controls
34
Page 43
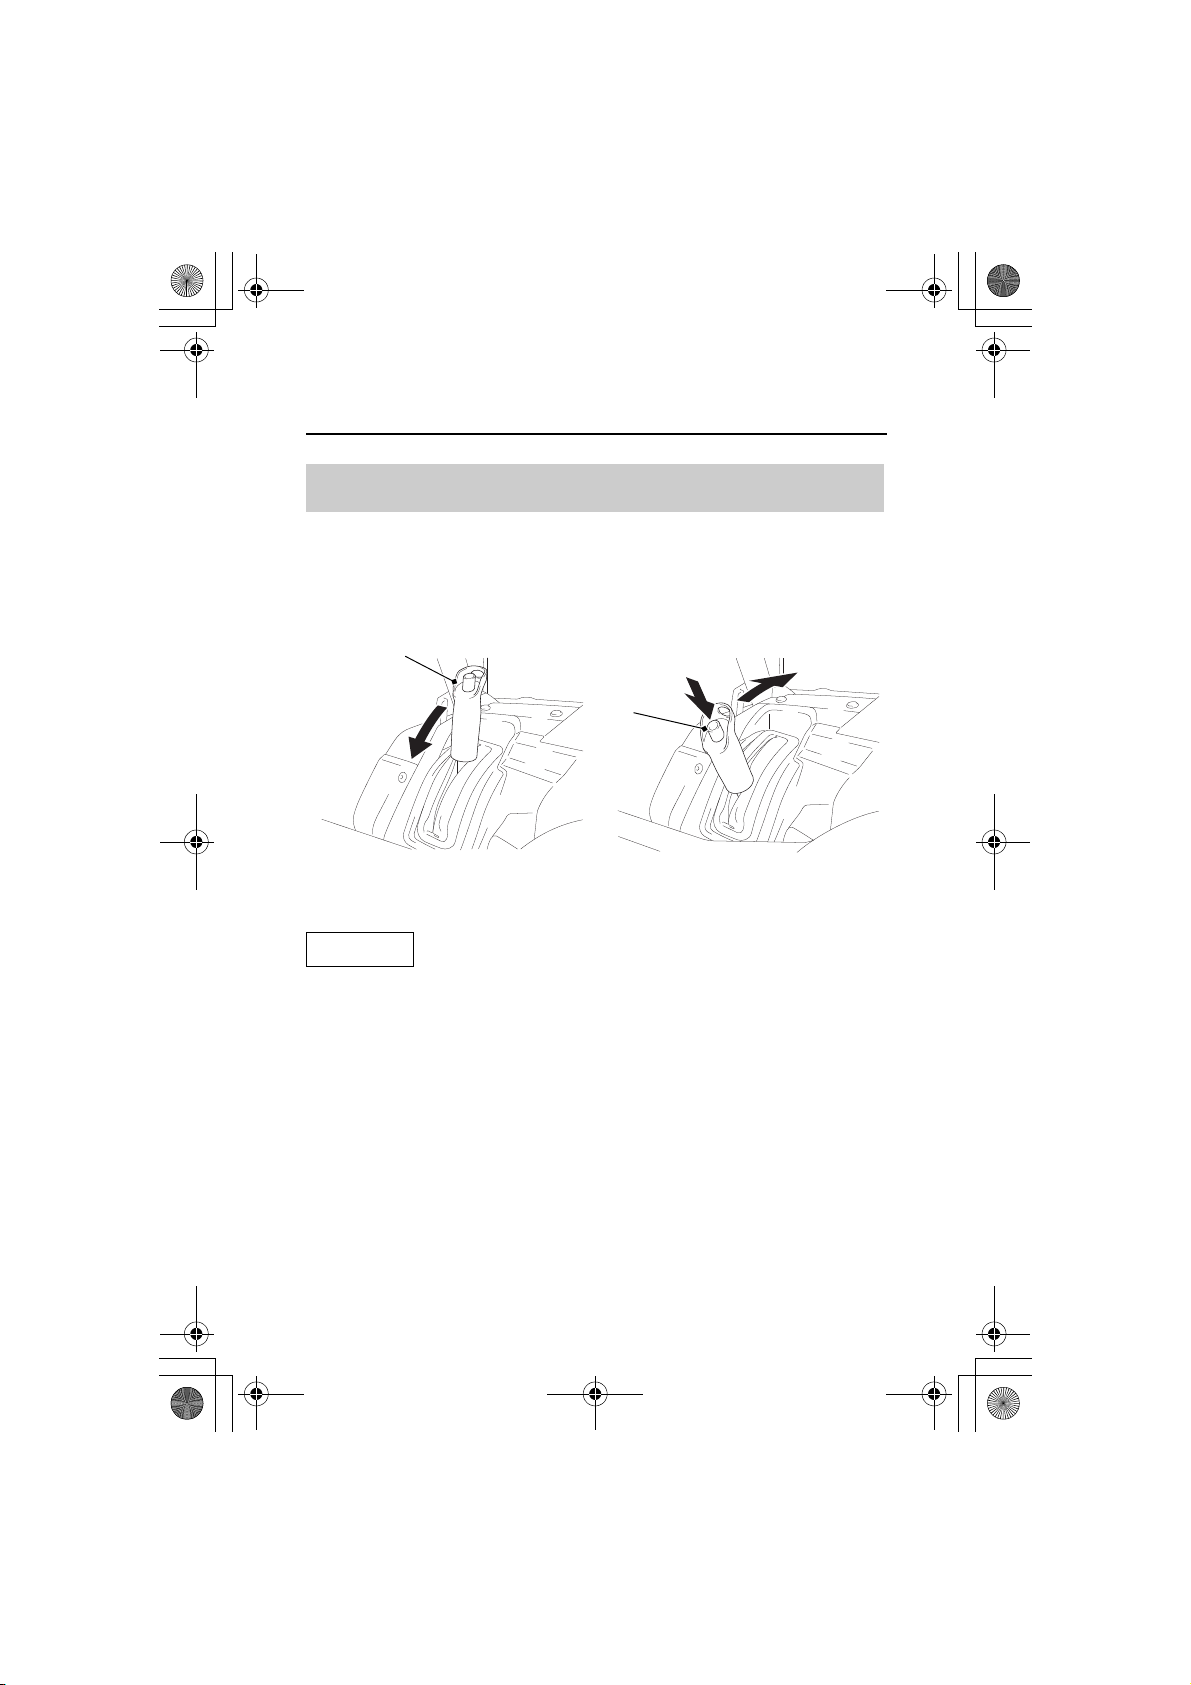
NOTICE
button
TO APPLY
THE PARKING BRAKE
parking brake lever
TO RELEASE
THE PARKING BRAKE
14 SXS700-31HL36000.book 35 ページ 2013年5月14日 火曜日 午前10時59分
Driver Controls
Parking Brake Lever
The parking brake lever is located on the left side of the steering
wheel. To apply the brake, pull the lever down fully. To release it,
pull down slightly, push the button at the end of the lever, then push
lever forward.
Driving with the parking brake on can damage the rear brake and
drivetrain.
Instruments & Controls
35
Page 44
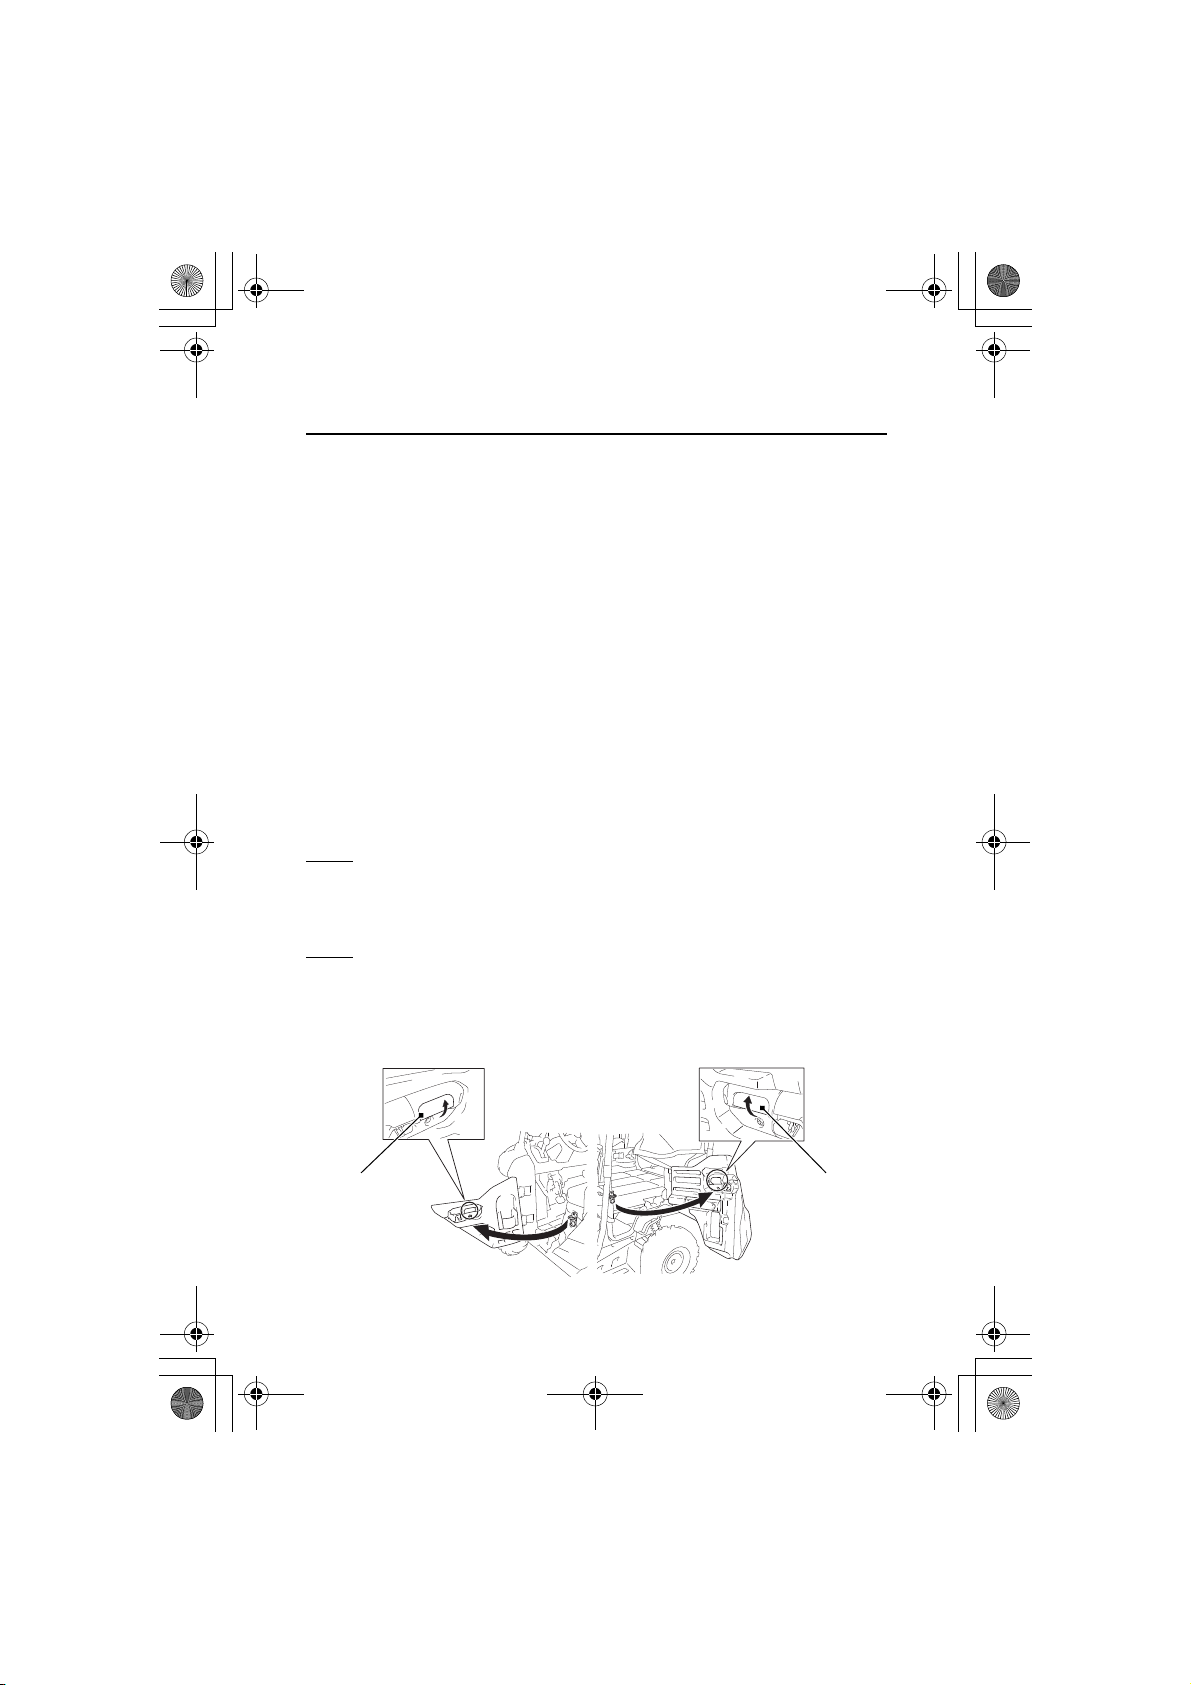
handle handle
FRONT REAR
(4 Person Model only)
14 SXS700-31HL36000.book 36 ページ 2013年5月14日 火曜日 午前10時59分
Doors
Your Honda SXS is equipped with doors to prevent branches, gravel,
or other debris from getting inside the driver’s compartment, and to
keep the driver’s and passenger’s legs and feet inside the vehicle if
your vehicle ever tips or overturns. Be sure all doors are securely
closed before driving your Honda SXS, and never remove a door.
If a door is damaged or does not close securely, see your dealer for
repair or replacement.
Do not drive the Honda SXS with the doors open.
The left and right doors can be opened in the same manner.
4 Person Model only
Do not open the rear door while the cargo bed is raised. Opening the
rear doors while the cargo bed is raised, will cause the seats to flip
up unexpectedly.
Open
1.
Pull up the handle.
2.
Open the door.
Close
1.
Close the door securely until the second latch click is heard.
2.
Make sure the door is closed securely.
36
Instruments & Controls
Page 45
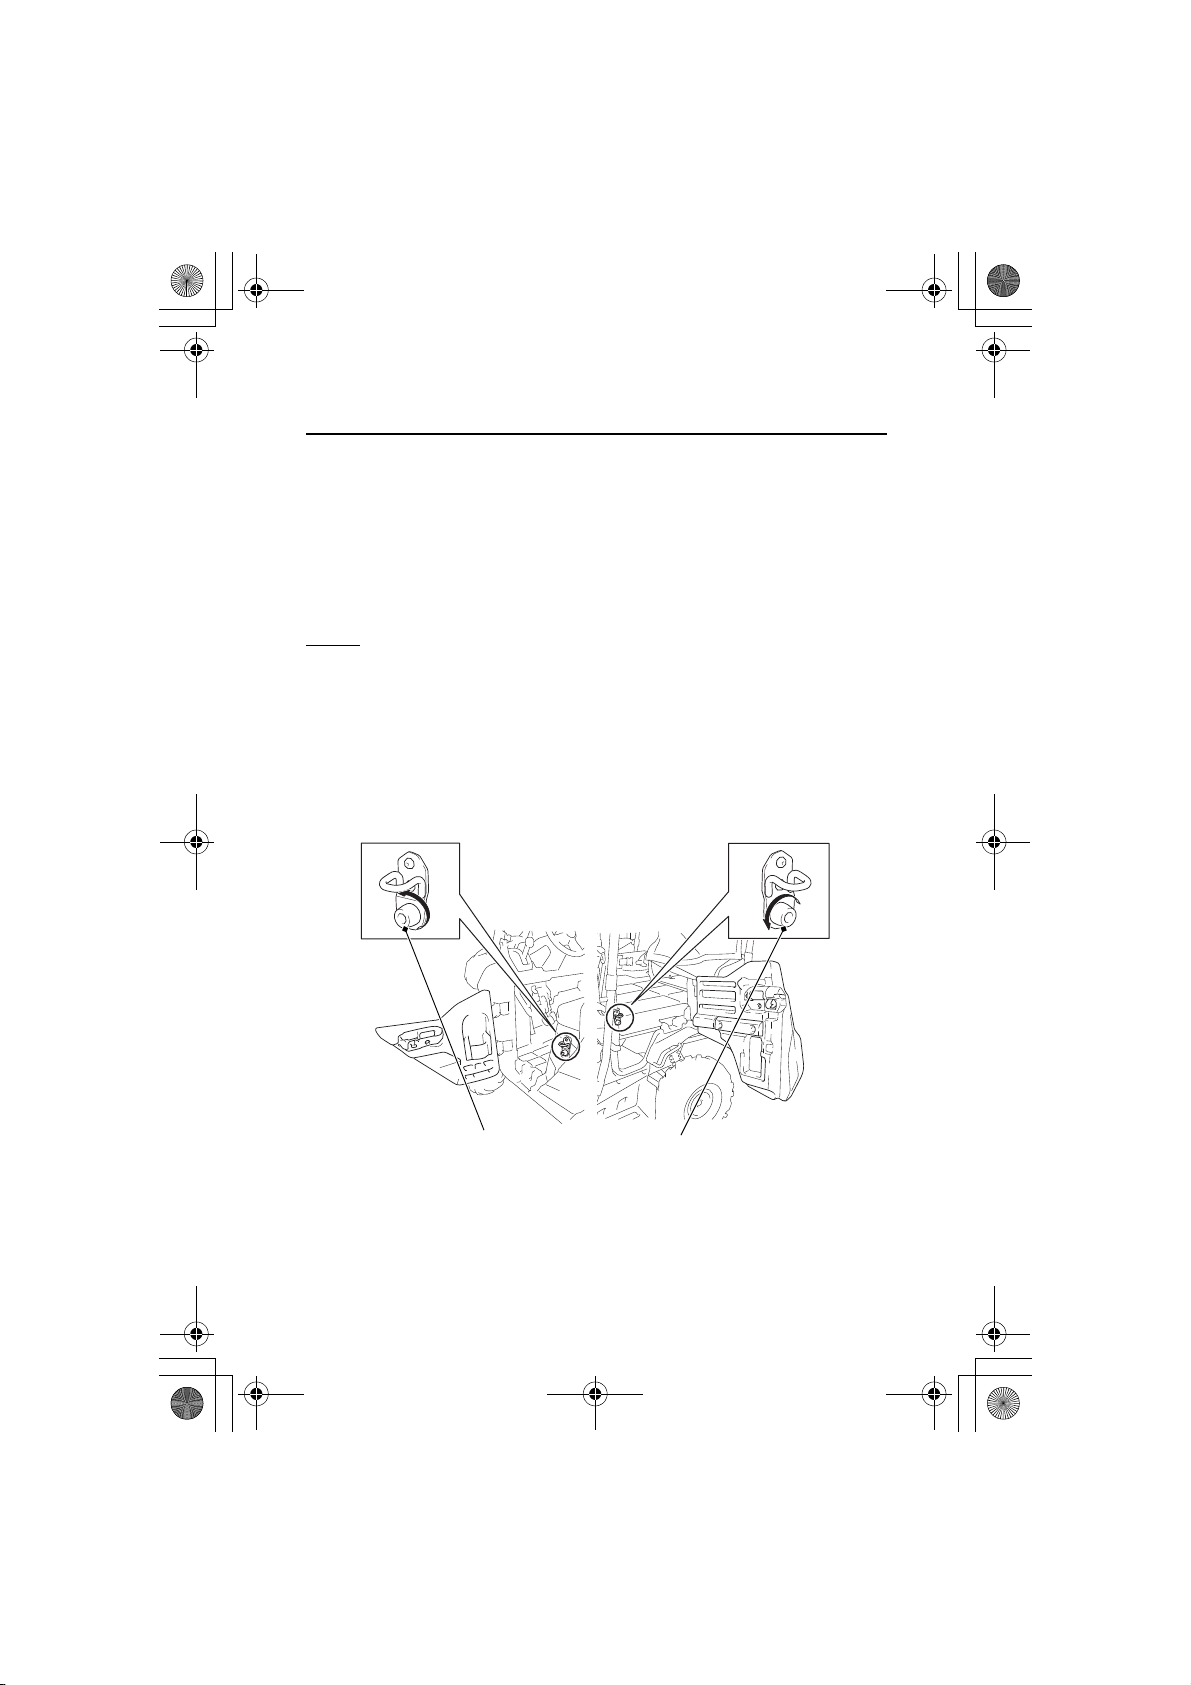
door stopper
FRONT REAR
(4 Person Model only)
door stopper
14 SXS700-31HL36000.book 37 ページ 2013年5月14日 火曜日 午前10時59分
Doors
If the doors rattles when closed, turn the door stopper
counterclockwise to adjust the doors. Each door has a double
latching mechanism. Adjust the door stoppers, so that it latches on
the second click.
The left and right doors can be adjusted in the same manner.
Adjust
1.
Open the door (page 36).
2.
Turn the door stopper counterclockwise to extend it, and
clockwise to retract it.
3.
Make sure the door is closed securely until the second latch click
is heard.
Instruments & Controls
37
Page 46
14 SXS700-31HL36000.book 38 ページ 2013年5月14日 火曜日 午前10時59分
Side Nets
Your Honda SXS is equipped with side nets to prevent branches, or
other debris from getting inside the driver’s compartment, and to
keep the driver’s and passenger’s hands and arms inside the
occupant protective structure (OPS) if the vehicle ever tips or
overturns.
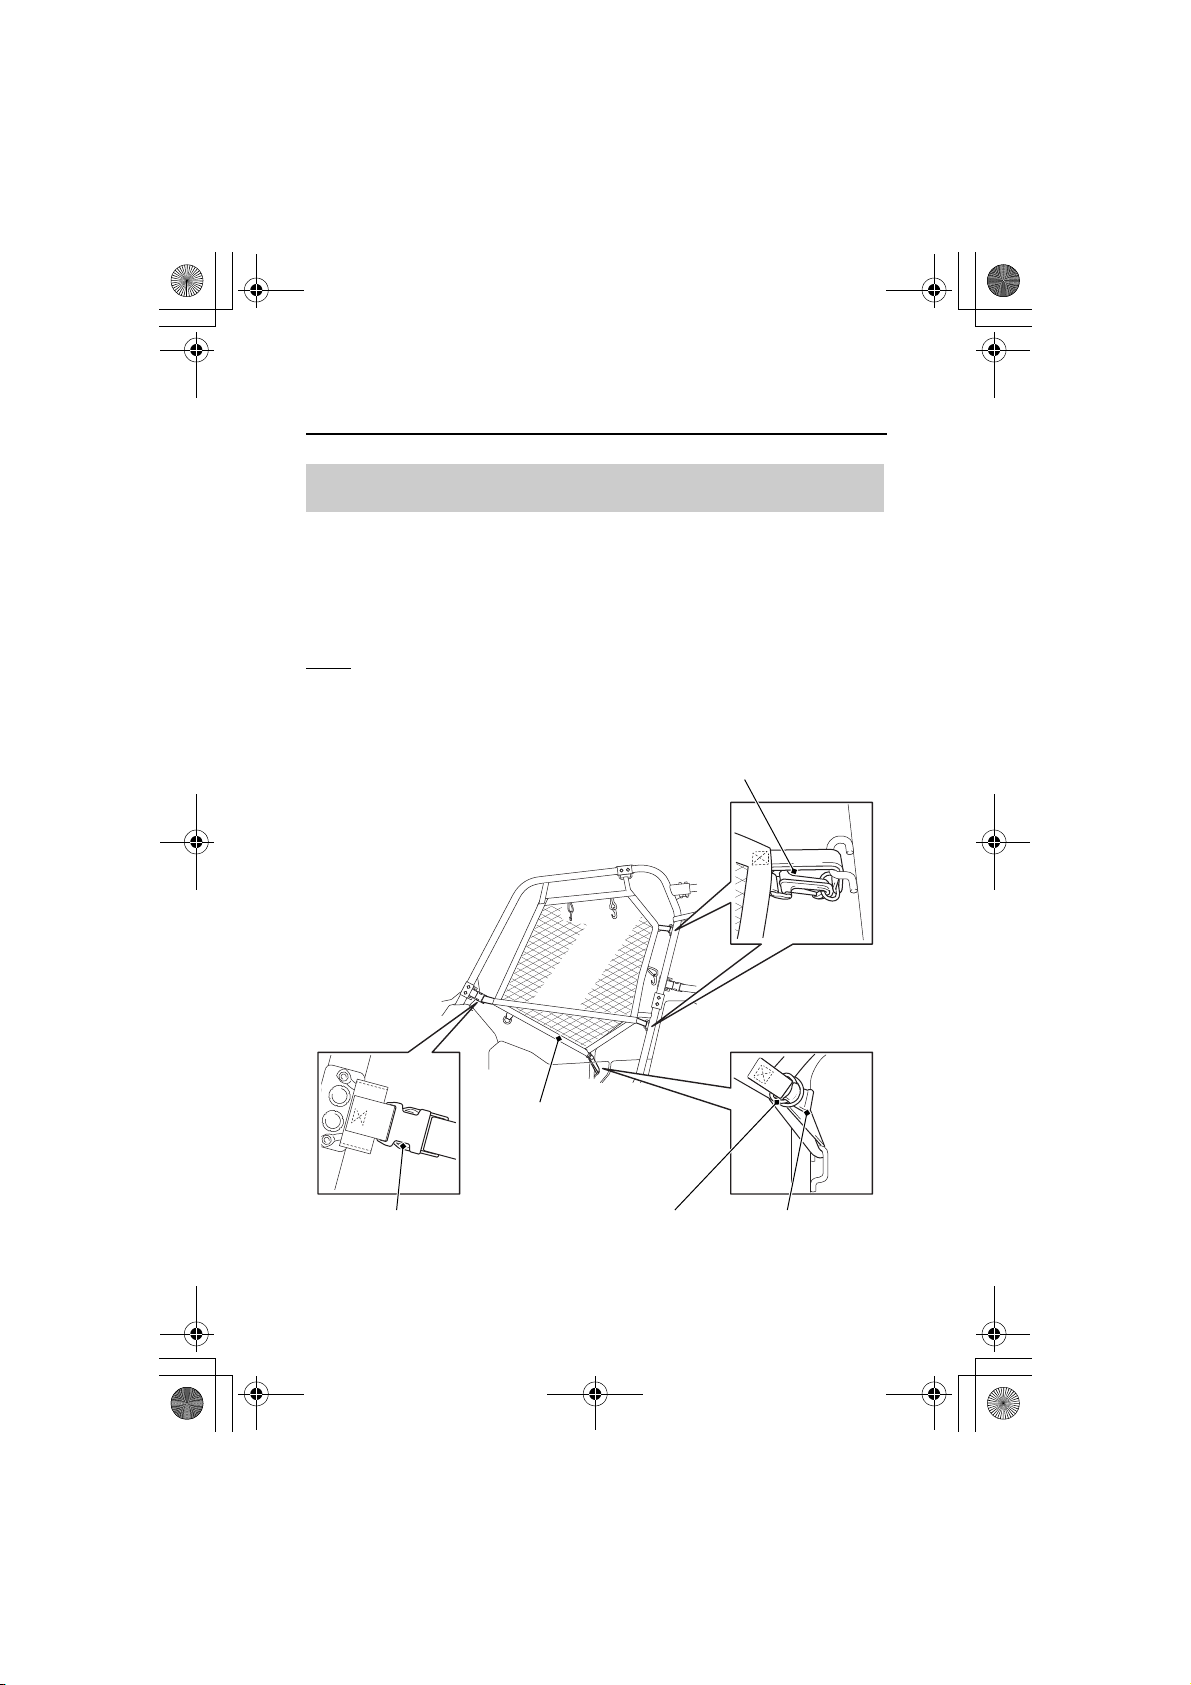
The side nets are secured to the OPS with side net rings, side net
snap hooks and side net buckles. To function properly, the side nets
should be tight. If a side net is loose, tighten the belts on the side net
rings.
Be sure the side nets are properly latched before driving your Honda
SXS, and never remove a side nets from the vehicle. Inspect the
condition of the side net and its mounting hardware. If there is wear,
deterioration, damage, or they do not latch and tighten securely, see
your dealer for repair or replacement.
Instruments & Controls
38
Page 47
side net snap hook
side net
side net buckle beltside net ring
14 SXS700-31HL36000.book 39 ページ 2013年5月14日 火曜日 午前10時59分
Side Nets
Side Nets Set Up
The left and right side nets can be set up in the same manner.
Inspect the side nets and their mounting hardware for damage as
specified in the maintenance schedule on page 95.
Front
1.
Hook the side net snap hooks and fasten the side net buckle.
2.
Tighten the belt on the lower side net ring.
Instruments & Controls
39
Page 48
belt side net ring side net snap hook
side net
side net buckle side net snap hook
0.24 in (6 mm)
14 SXS700-31HL36000.book 40 ページ 2013年5月14日 火曜日 午前10時59分
Side Nets
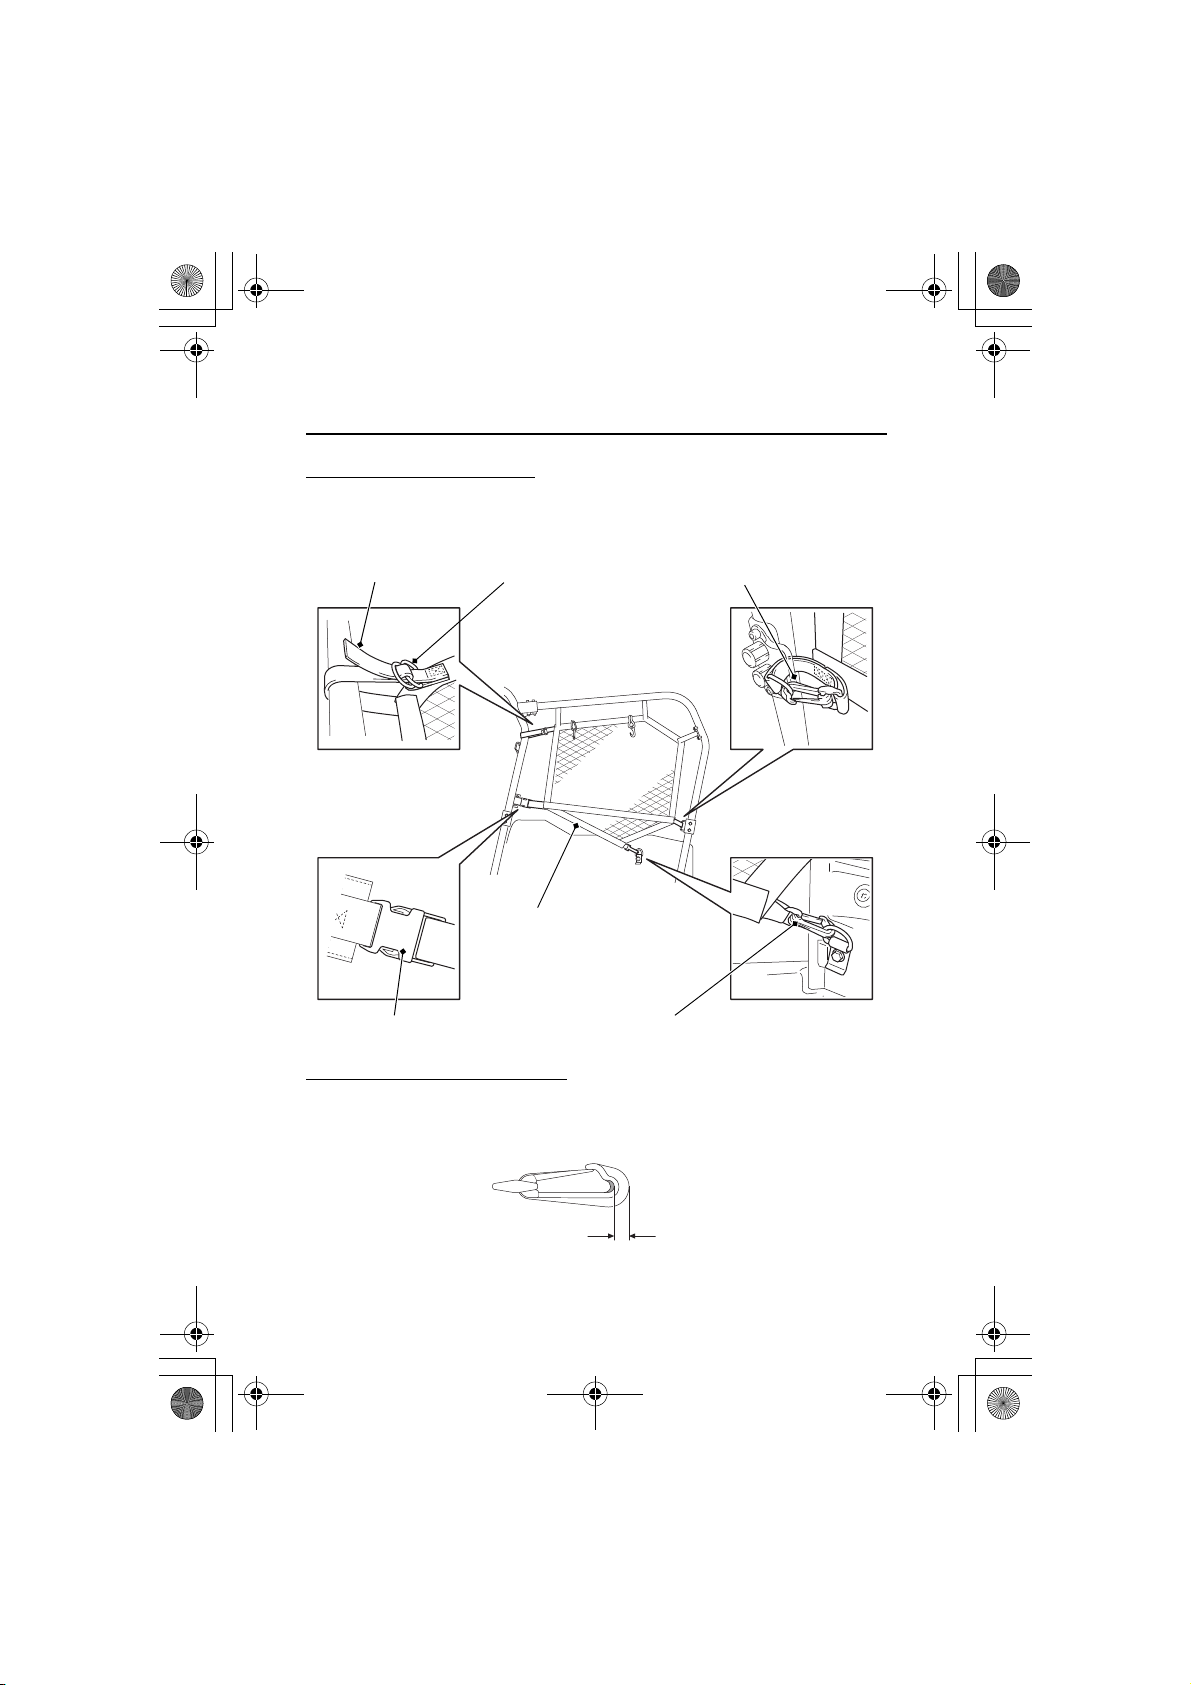
Rear (4 Person Model only)
1.
Hook the side net snap hooks and fasten the side net buckle.
2.
Tighten the belt on the side net ring.
Side net snap hooks wear limit
Inspect the side net snap hooks for wear. If the side net snap hook
become less than 0.24 in (6 mm), see your SXS dealer for
replacement.
Instruments & Controls
40
Page 49
side net buckle
side net ring side net hook
14 SXS700-31HL36000.book 41 ページ 2013年5月14日 火曜日 午前10時59分
Side Nets
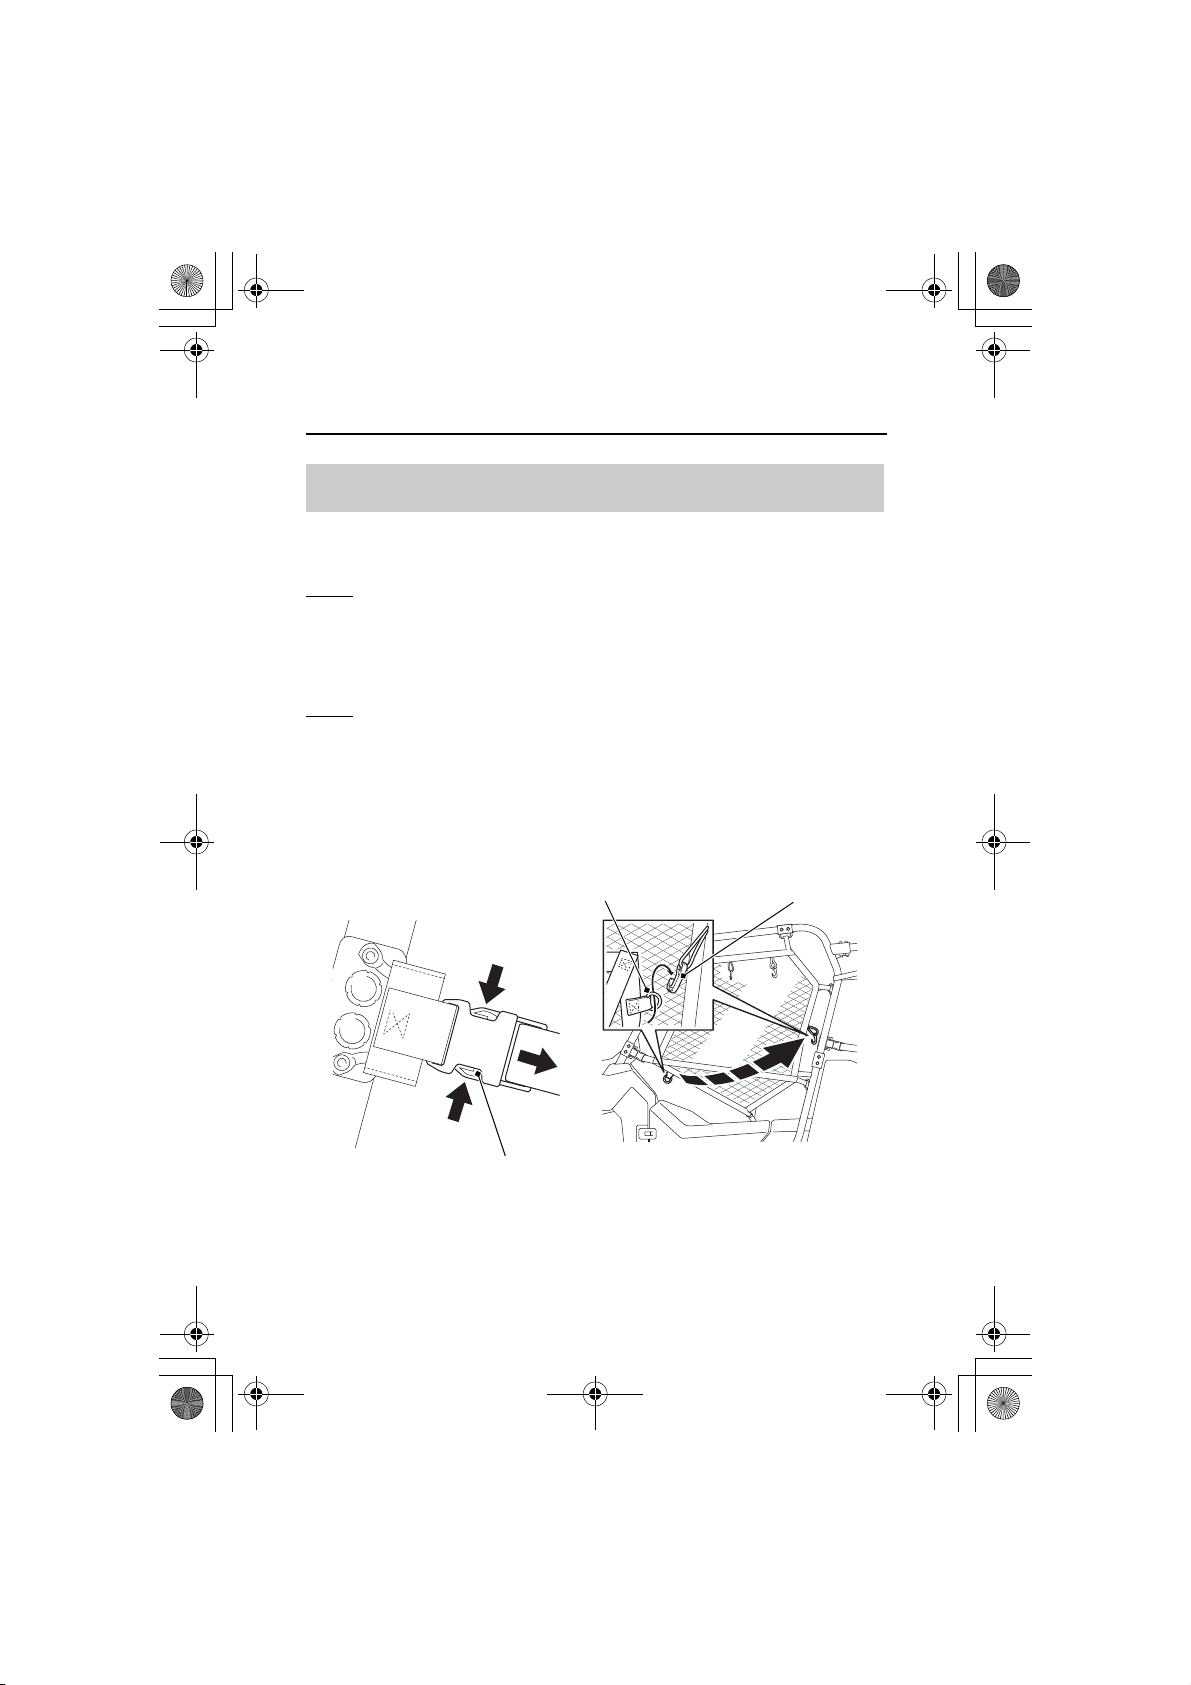
Front Side Nets
The left and right side nets can be opened in the same manner.
Open
1.
Release the side net buckle.
2.
Hook the side net ring onto the side net hook while lifting the
side net.
Close
1.
Unhook the side net ring from the side net hook.
2.
Fasten the side net buckle.
Always return the side nets to their normal positions, properly
fastened, and tightened before driving.
Instruments & Controls
41
Page 50
side net buckle
side net hook
side net snap hook
14 SXS700-31HL36000.book 42 ページ 2013年5月14日 火曜日 午前10時59分
Side Nets
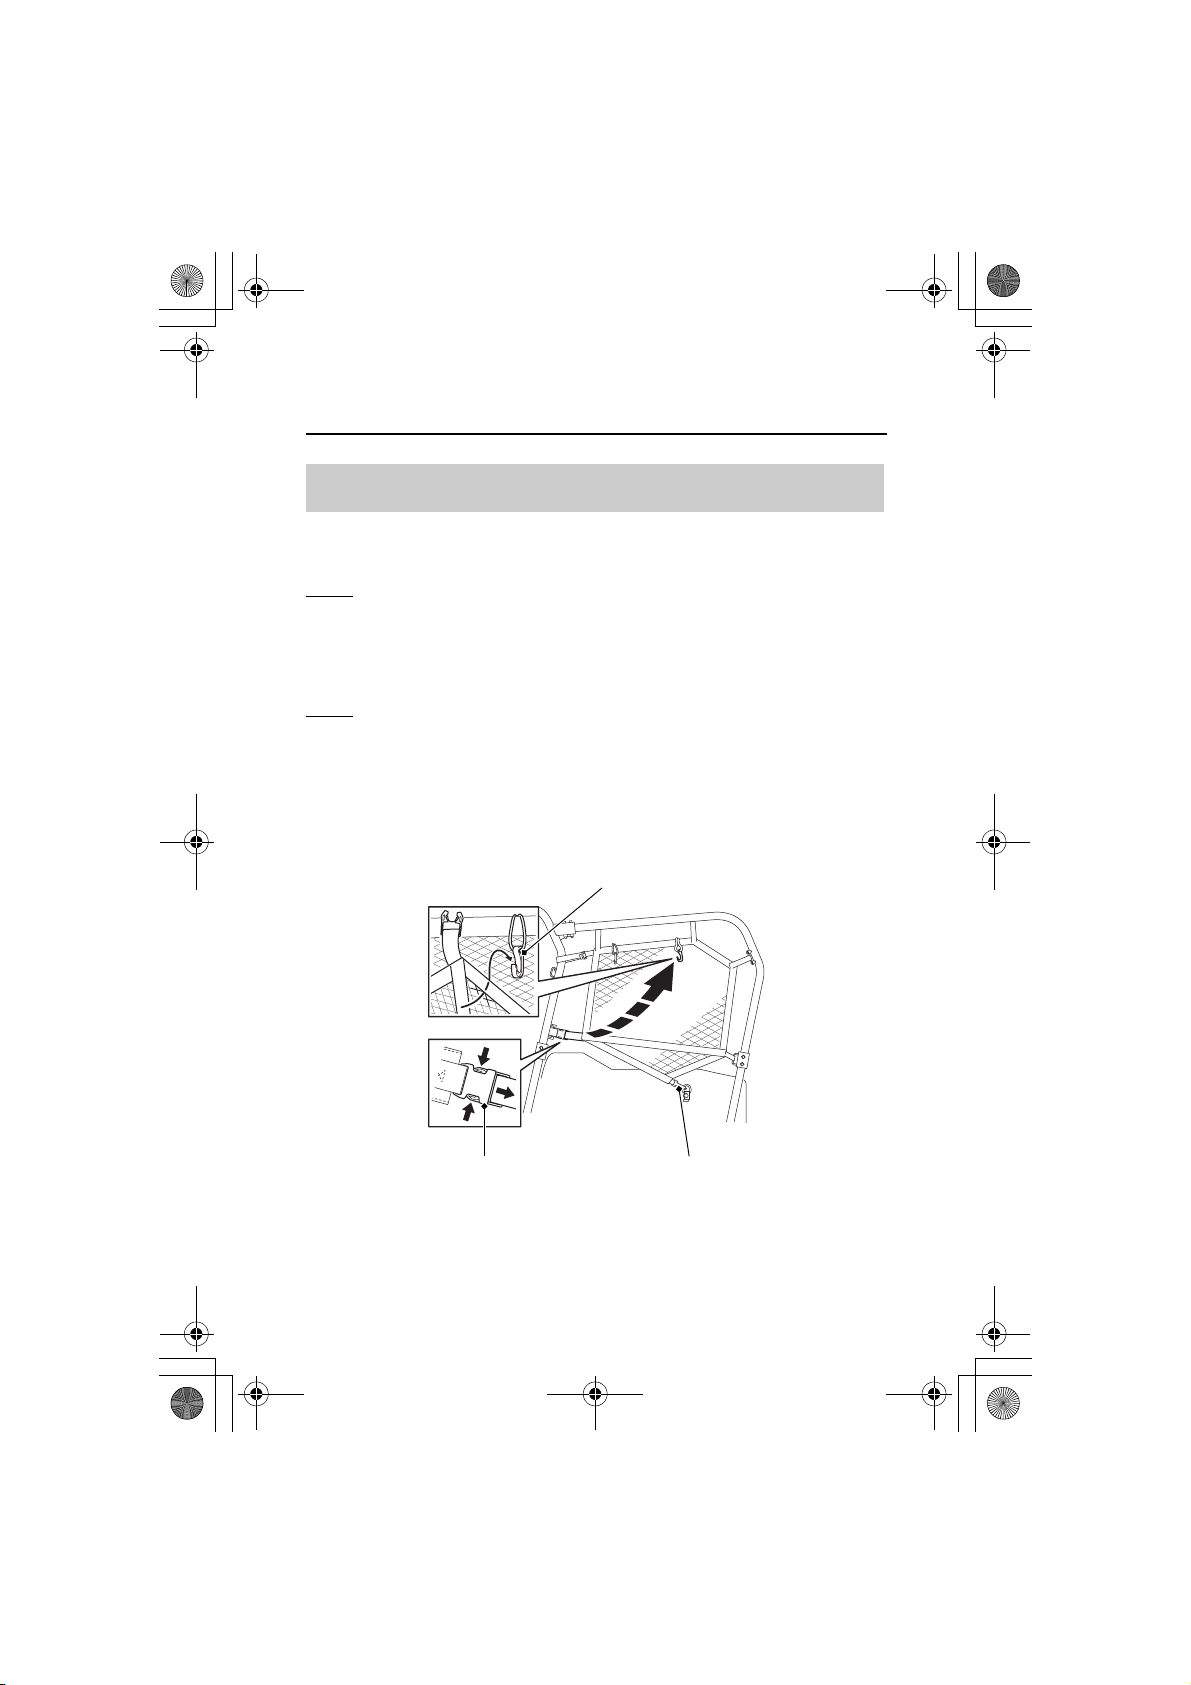
Rear Side Nets (4 Person Model only)
The left and right side nets can be opened in the same manner.
Open
1.
Release the side net buckle and lower side net snap hook.
2.
Hook the side net onto the side net hook while lifting the side
net.
Close
1.
Unhook the side net from the side net hook.
2.
Hook the side net snap hook and fasten the side net buckle.
Always return the side nets to their normal positions, properly
fastened, and tightened before driving.
Instruments & Controls
42
Page 51
side net snap hook
side net ring
side net buckle
side net hook
14 SXS700-31HL36000.book 43 ページ 2013年5月14日 火曜日 午前10時59分
Side Nets
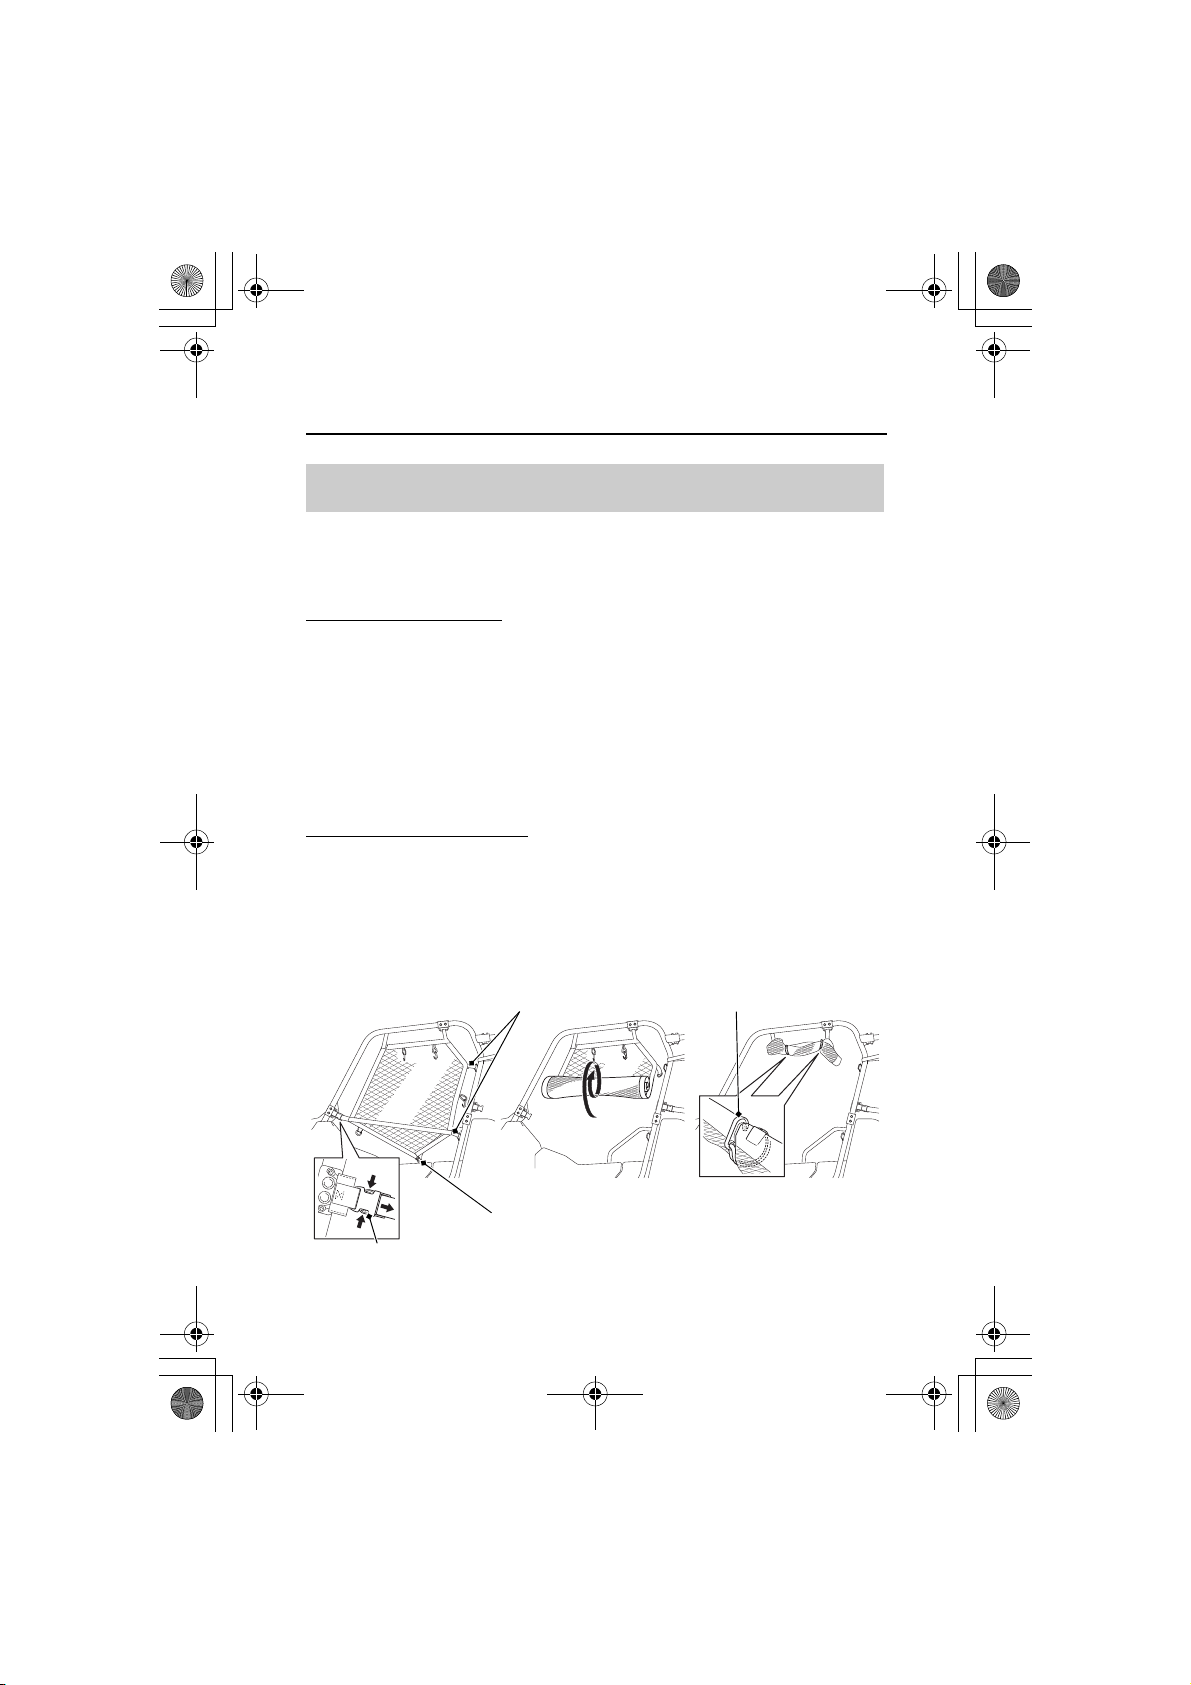
Roll Up The Side Nets
The side nets can be rolled up to make cleaning and maintaining
your Honda SXS a little easier.
Front Side Nets Roll Up
1.
Release the side net buckle and side net ring.
2.
Unhook the side net snap hooks and slide the D-rings out of the
stays.
3.
Roll up the side net tightly, folding in the buckle and snap hooks
on the way.
4.
Hook the two upper side net hooks to the top edge of the side
net.
Front Side Nets Roll Down
1.
Unhook the upper side net hooks.
2.
Fasten the side net buckle and hook the side net snap hooks.
Tighten the belt of side net ring.
Always return the side nets to their normal positions, properly
fastened, and tightened before driving.
Instruments & Controls
43
Page 52
side net snap hook
side net buckle
side net hook
14 SXS700-31HL36000.book 44 ページ 2013年5月14日 火曜日 午前10時59分
Side Nets
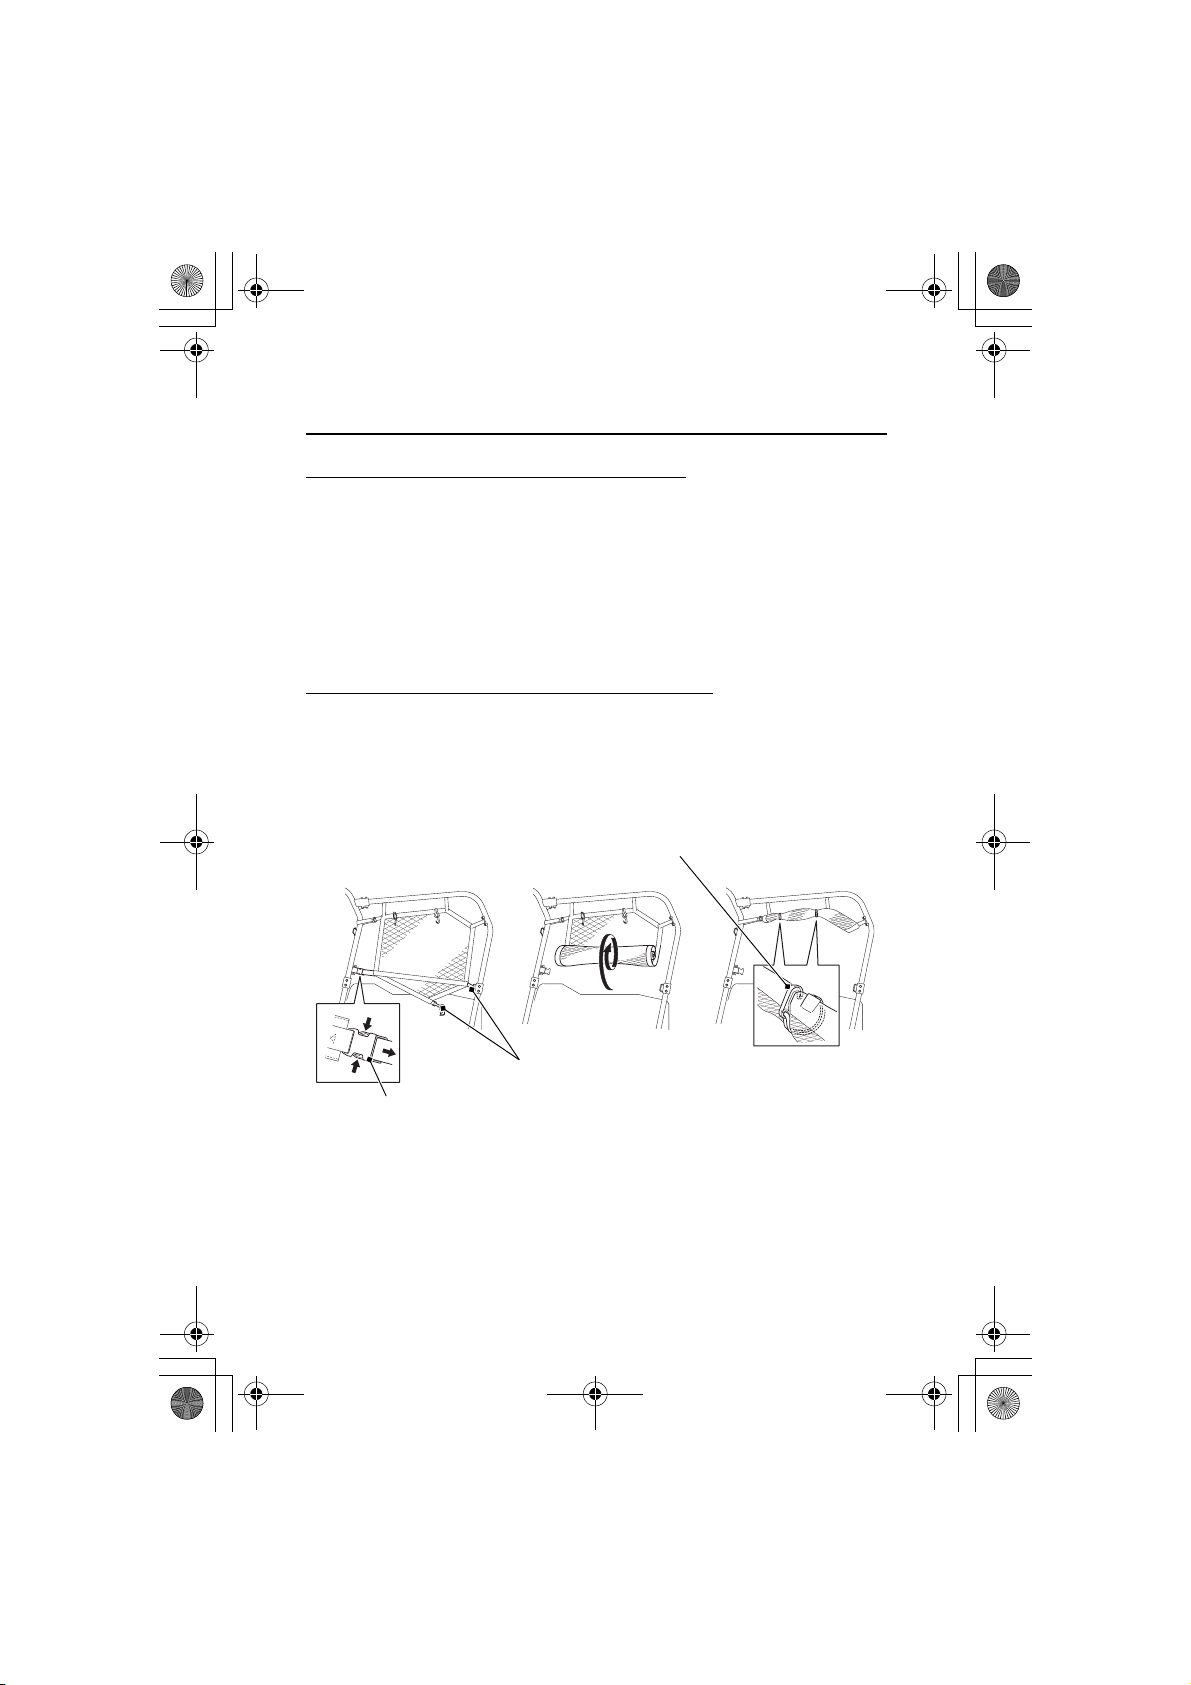
Rear Side Nets Roll Up (4 Person Model only)
1.
Release the side net buckle.
2.
Unhook the side net snap hooks and slide the D-rings out of the
stays.
3.
Roll up the side net tightly, folding in the buckle and snap hooks
on the way.
4.
Hook the two upper side net hooks to the top edge of the side
net.
Rear Side Nets Roll Down (4 Person Model only)
1.
Unhook the upper side net hooks.
2.
Hook the side net snap hooks and fasten the side net buckle.
Always return the side nets to their normal positions, properly
fastened, and tightened before driving.
Instruments & Controls
44
Page 53
WARNING
3
WARNING
14 SXS700-31HL36000.book 45 ページ 2013年5月14日 火曜日 午前10時59分
Seat
Seat
2 Person Model:
Your Honda SXS is equipped with a bench seat that has two seating
positions and is designed to carry one driver and one passenger only.
4 Person Model:
Your Honda SXS is equipped with a bench seat in front, and two
jump seats stowed in the rear cargo area. Your Honda SXS has four
seating positions and is designed to carry one driver and up to three
passengers.
The center of the bench seat is not intended as a seating position
and is, therefore, not equipped with a seat belt. Do not allow
someone to ride there.
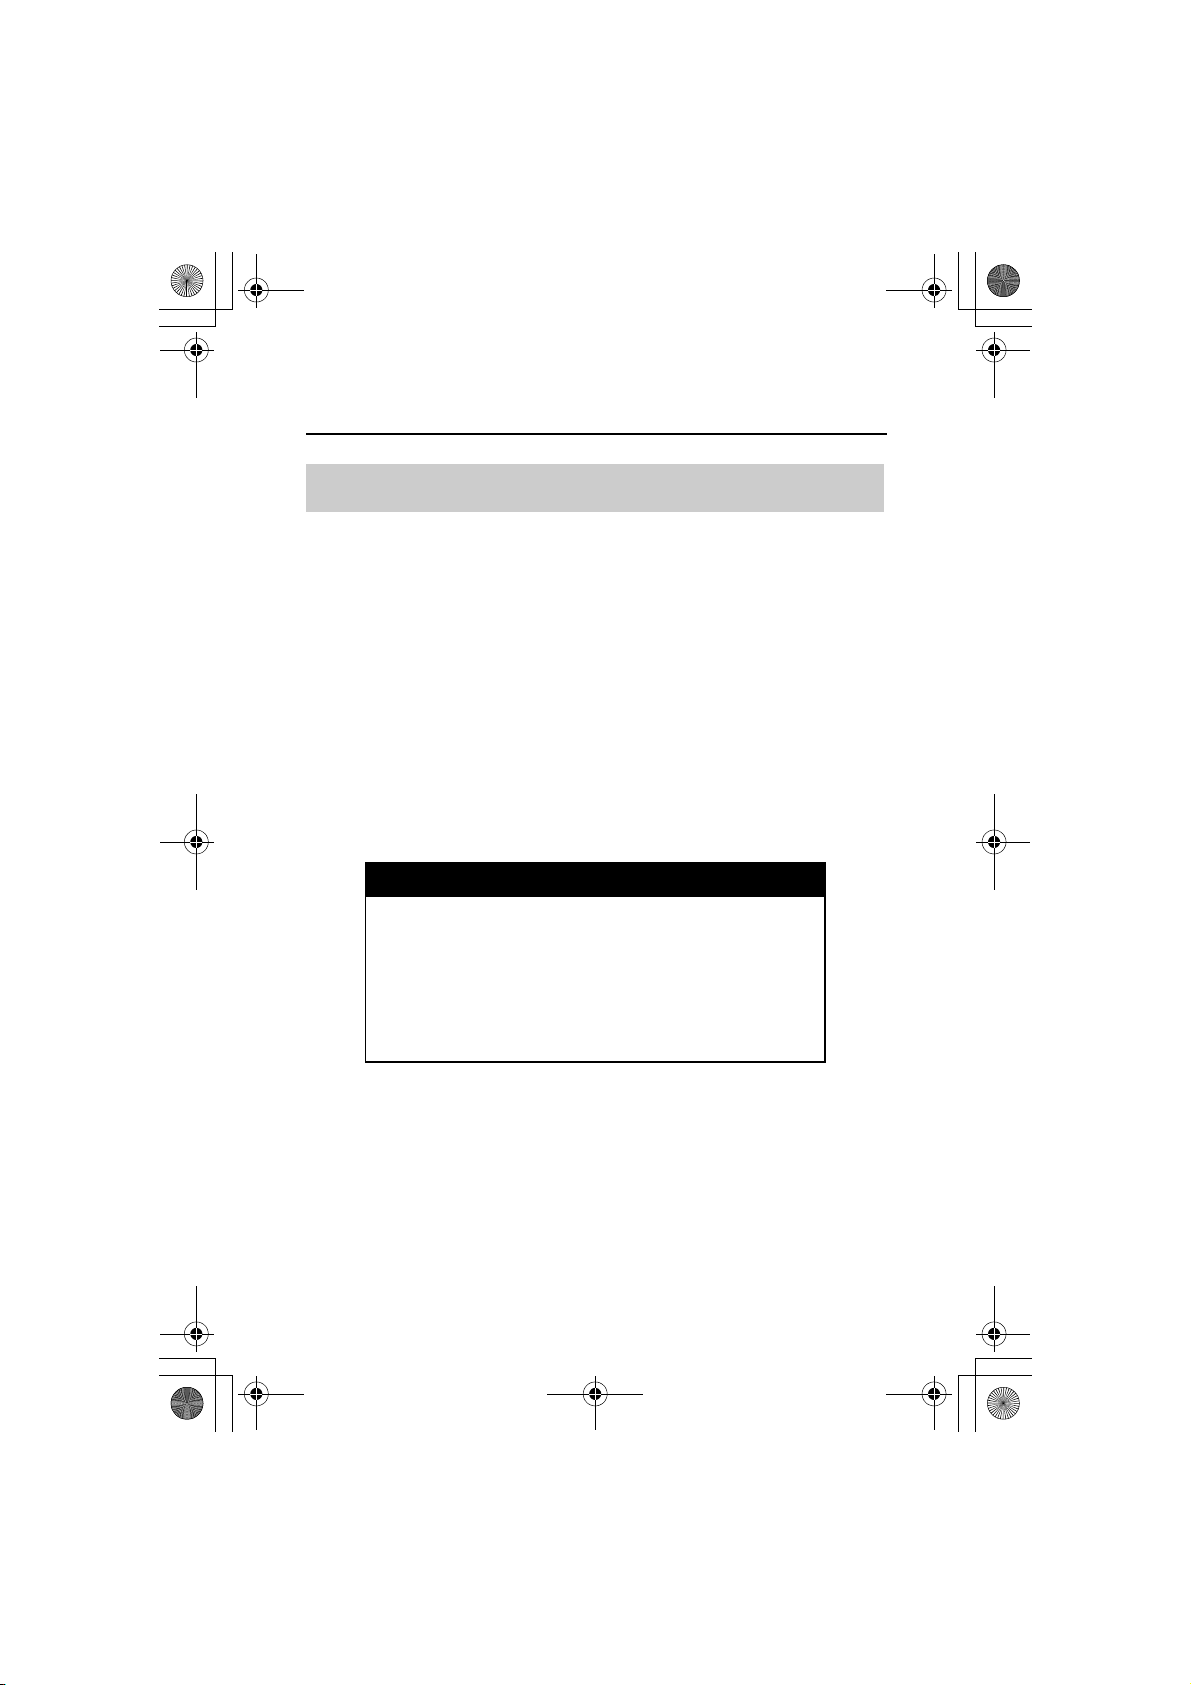
Do not sit on the center of the bench seat.
The center is not equipped with a seat belt.
Not wearing a seat belt can result in serious
injury or death.
Do not drive with any cargo on the center of the seat. Cargo on the
center of the bench seat can interfere with the drivers ability to
control the vehicle and can be thrown around and hurt someone
during an overturn or a crash.
Instruments & Controls
45
Page 54
strap ring
seat back tab
lower seat back
slot
stay
14 SXS700-31HL36000.book 46 ページ 2013年5月14日 火曜日 午前10時59分
Seat
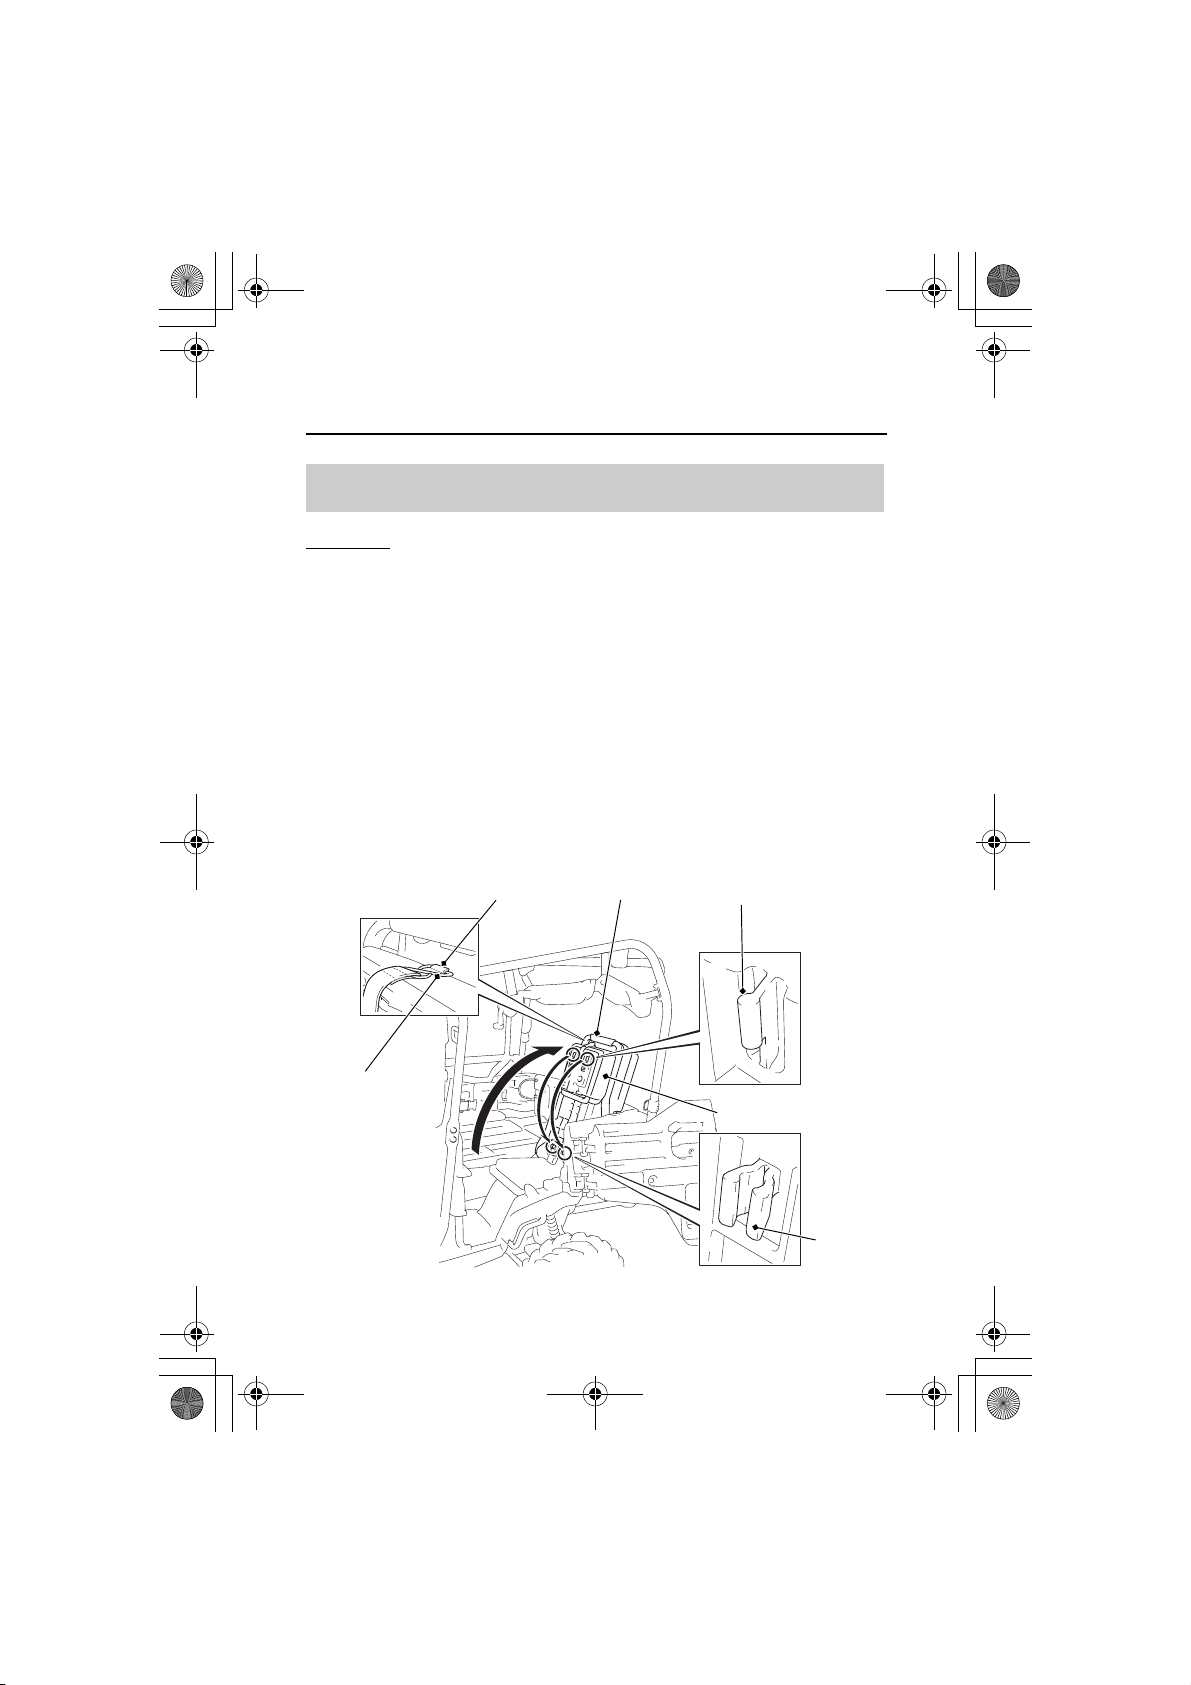
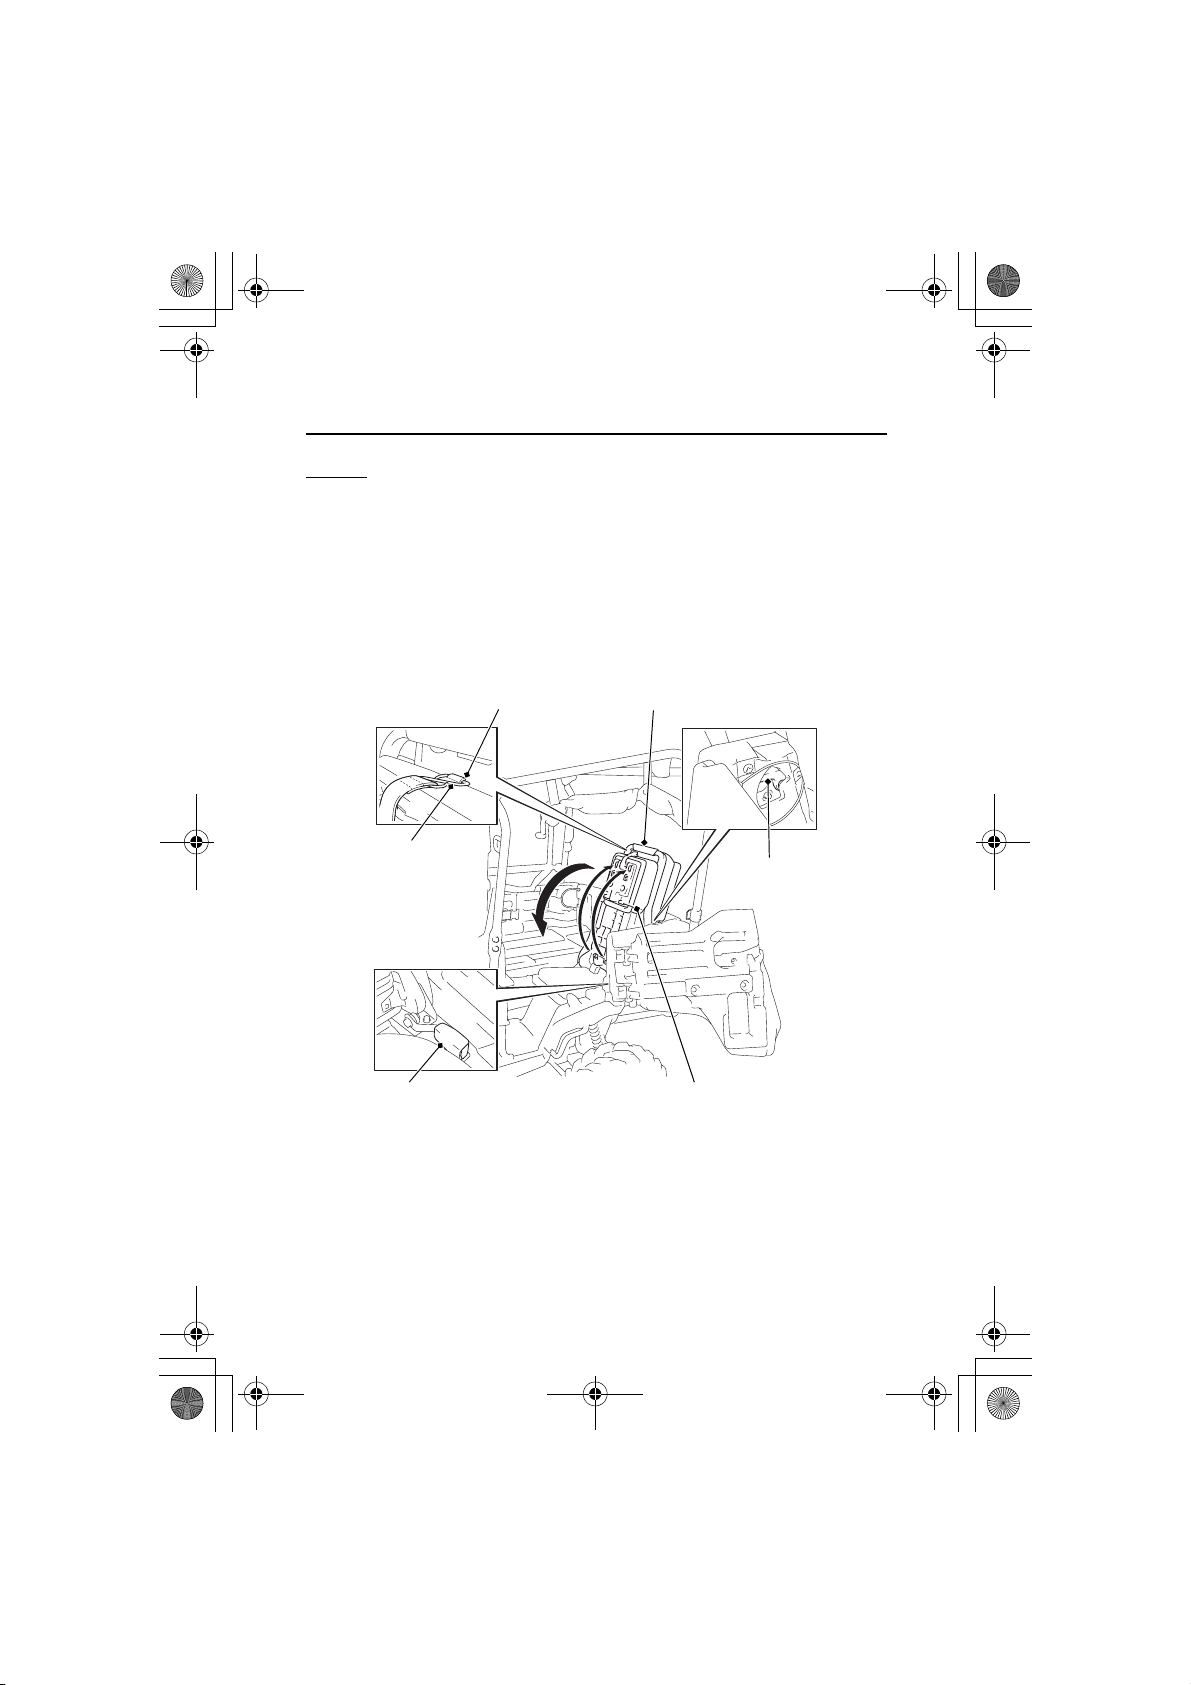
Rear Seat Conversion (4 Person Model only)
Unfolding
1.
Park your Honda SXS on a firm, level surface, and roll up the rear
side nets (page 44).
2.
Open the rear door (page 36).
3.
Lift up the rear seat back until it latches into position.
4.
Unhook the strap ring from the stay.
5.
Fold down the lower seat back and push it to snap the tabs into
slots.
Do not open the rear doors while the cargo bed is raised. Opening
the rear doors while the cargo bed is raised, will cause the seats to
flip up unexpectedly.
Fold up the rear seats only while the cargo bed is in the lowered
position.
Instruments & Controls
46
Page 55
seat back
strap ring
stay
handle
lower seat backseat belt buckle
14 SXS700-31HL36000.book 47 ページ 2013年5月14日 火曜日 午前10時59分
Seat
Storing
1.
Park your Honda SXS on a firm, level surface, and roll up the rear
side nets (page 44).
2.
Open the rear door (page 36).
3.
Fold up the lower seat back and hook the strap ring to the stay.
Be sure the outer side of the seat belt buckle is lowered.
4.
Pull the handle up and flip the seat back forward.
5.
While pushing down on the rear seat, close the rear door.
Instruments & Controls
47
Page 56
screws door opener handle
rear seat stopper
14 SXS700-31HL36000.book 48 ページ 2013年5月14日 火曜日 午前10時59分
Seat
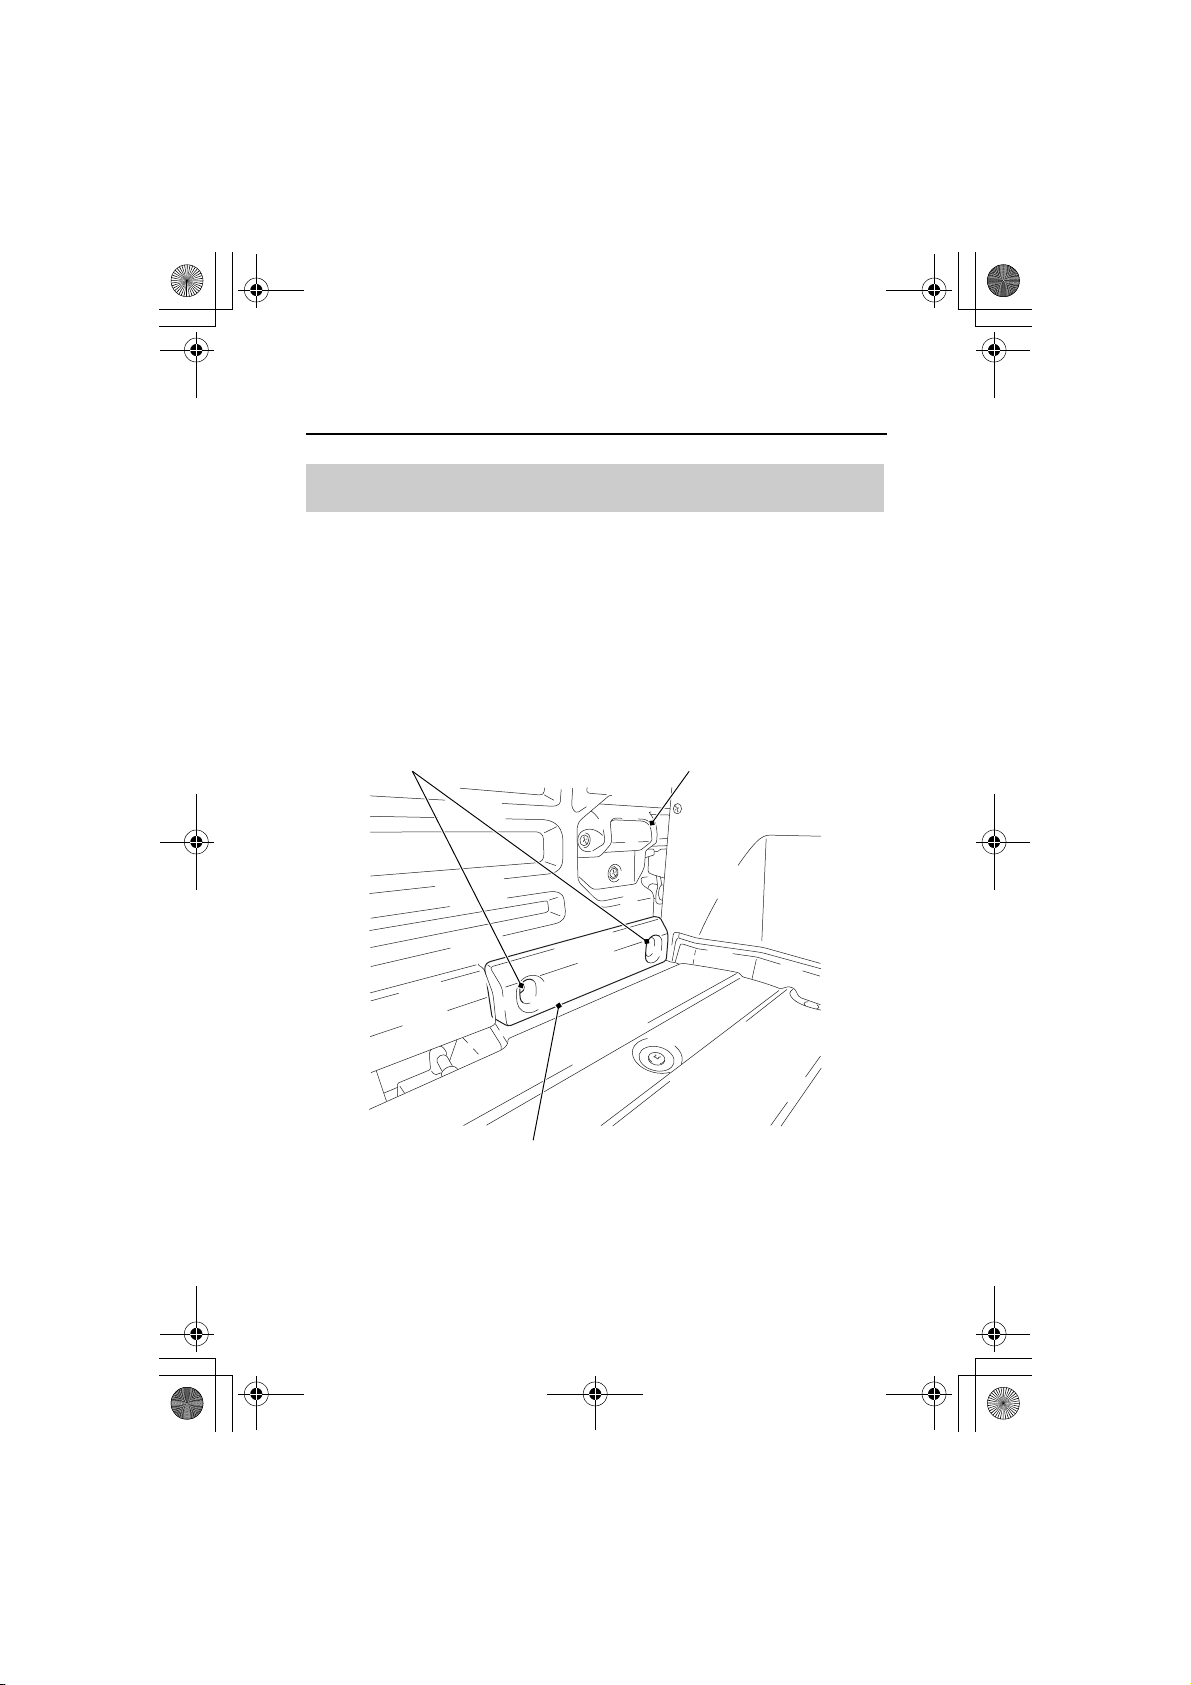
Rear Seat Stopper Adjustment (4 Person Model only)
If the rear seat back has excessive vibration in the stored position or
if the doors are hard to close, adjust the rear seat stopper.
Rear seat stopper is located below the rear door opener handle.
1.
Loosen the screws.
2.
Adjust the rear seat stopper in proper position.
3.
Tighten the screws.
Instruments & Controls
48
Page 57
WARNING
3
WARNING
14 SXS700-31HL36000.book 49 ページ 2013年5月14日 火曜日 午前10時59分
Seat Belts
Your Honda SXS is equipped with lap/shoulder seat belts in each
seating position. A seat belt keeps you connected to the vehicle so
you won’t be thrown out during a crash or rollover. Together with a
proper helmet, a seat belt is your best protection against serious
injuries in any type of crash, so make sure all occupants always
buckle up before driving.
Not wearing a seat belt, or wearing one
improperly, can result in serious injury or
death in a crash or rollover.
Make sure the driver and any passengers
always wear their seat belts properly.
Of course, seat belts cannot completely protect you in every crash.
But in most cases, seat belts can reduce your risk of serious injury.
(cont’d)
Instruments & Controls
49
Page 58
buckle
latch plate
14 SXS700-31HL36000.book 50 ページ 2013年5月14日 火曜日 午前10時59分
Seat Belts
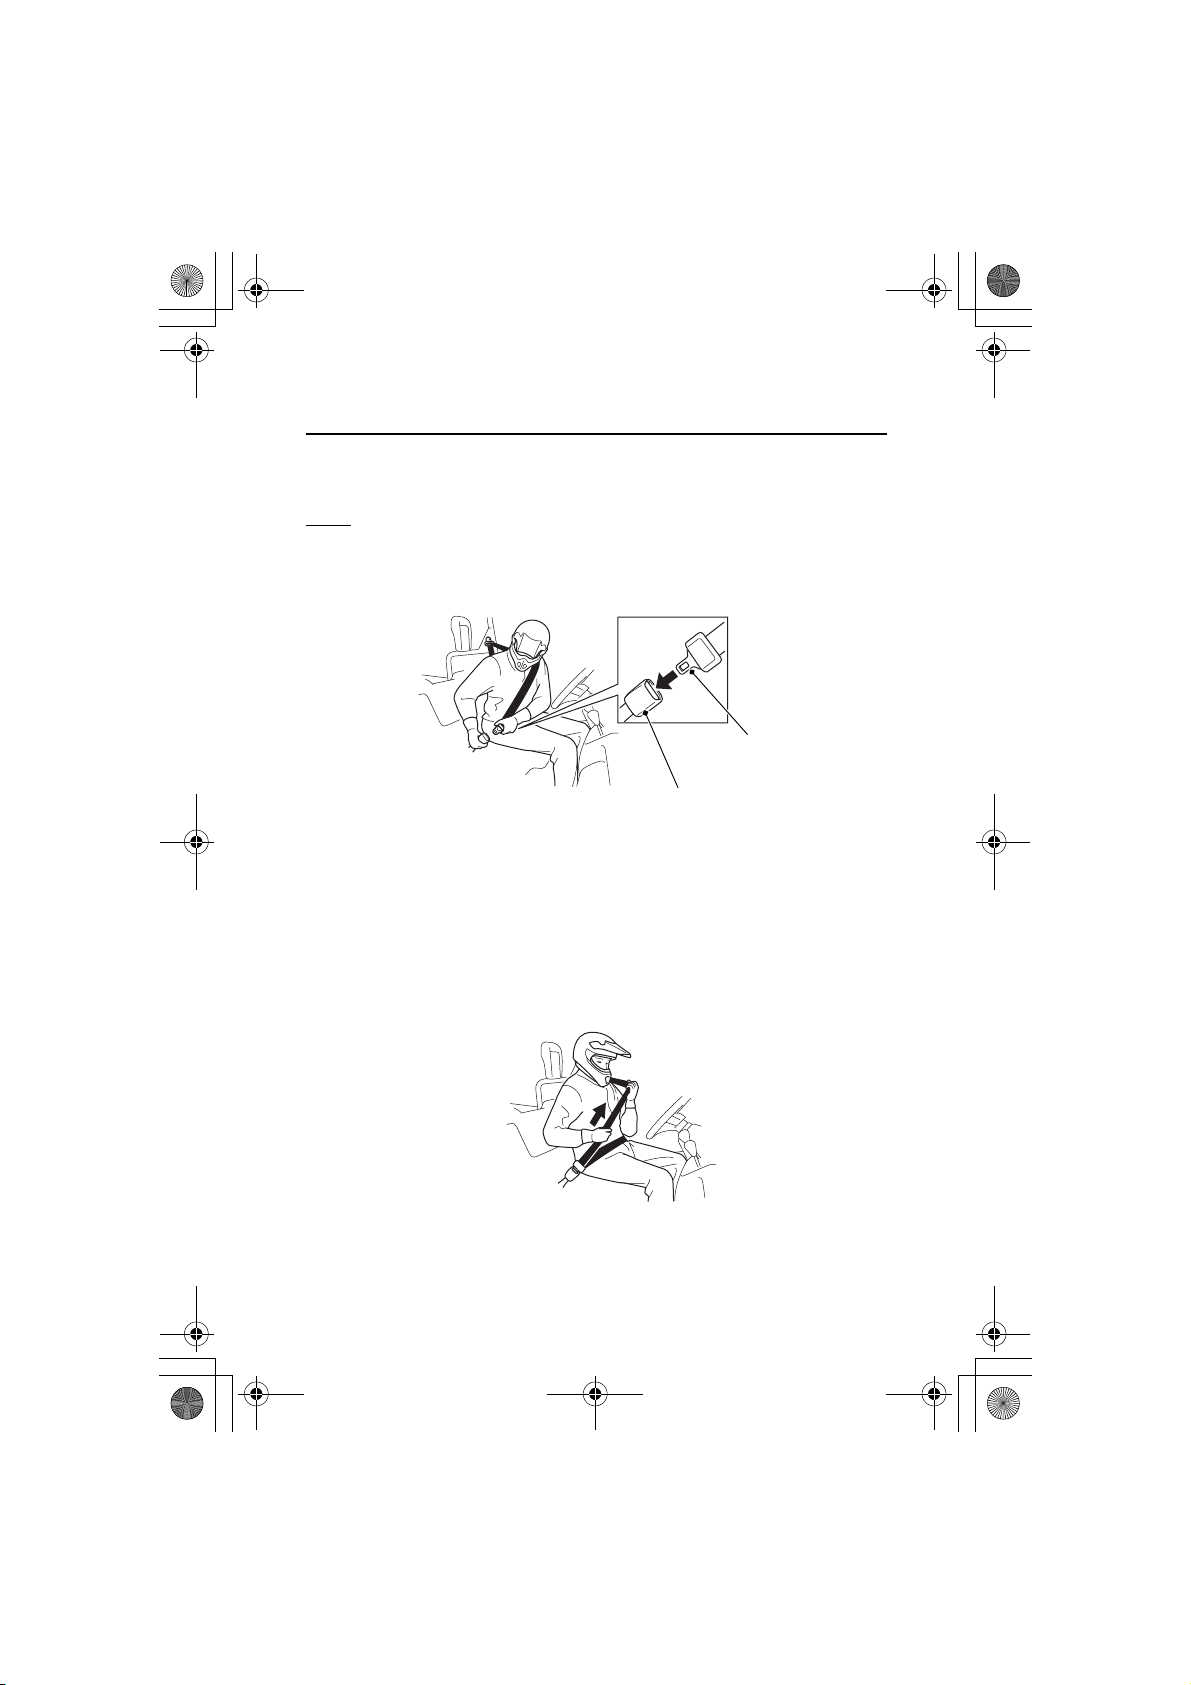
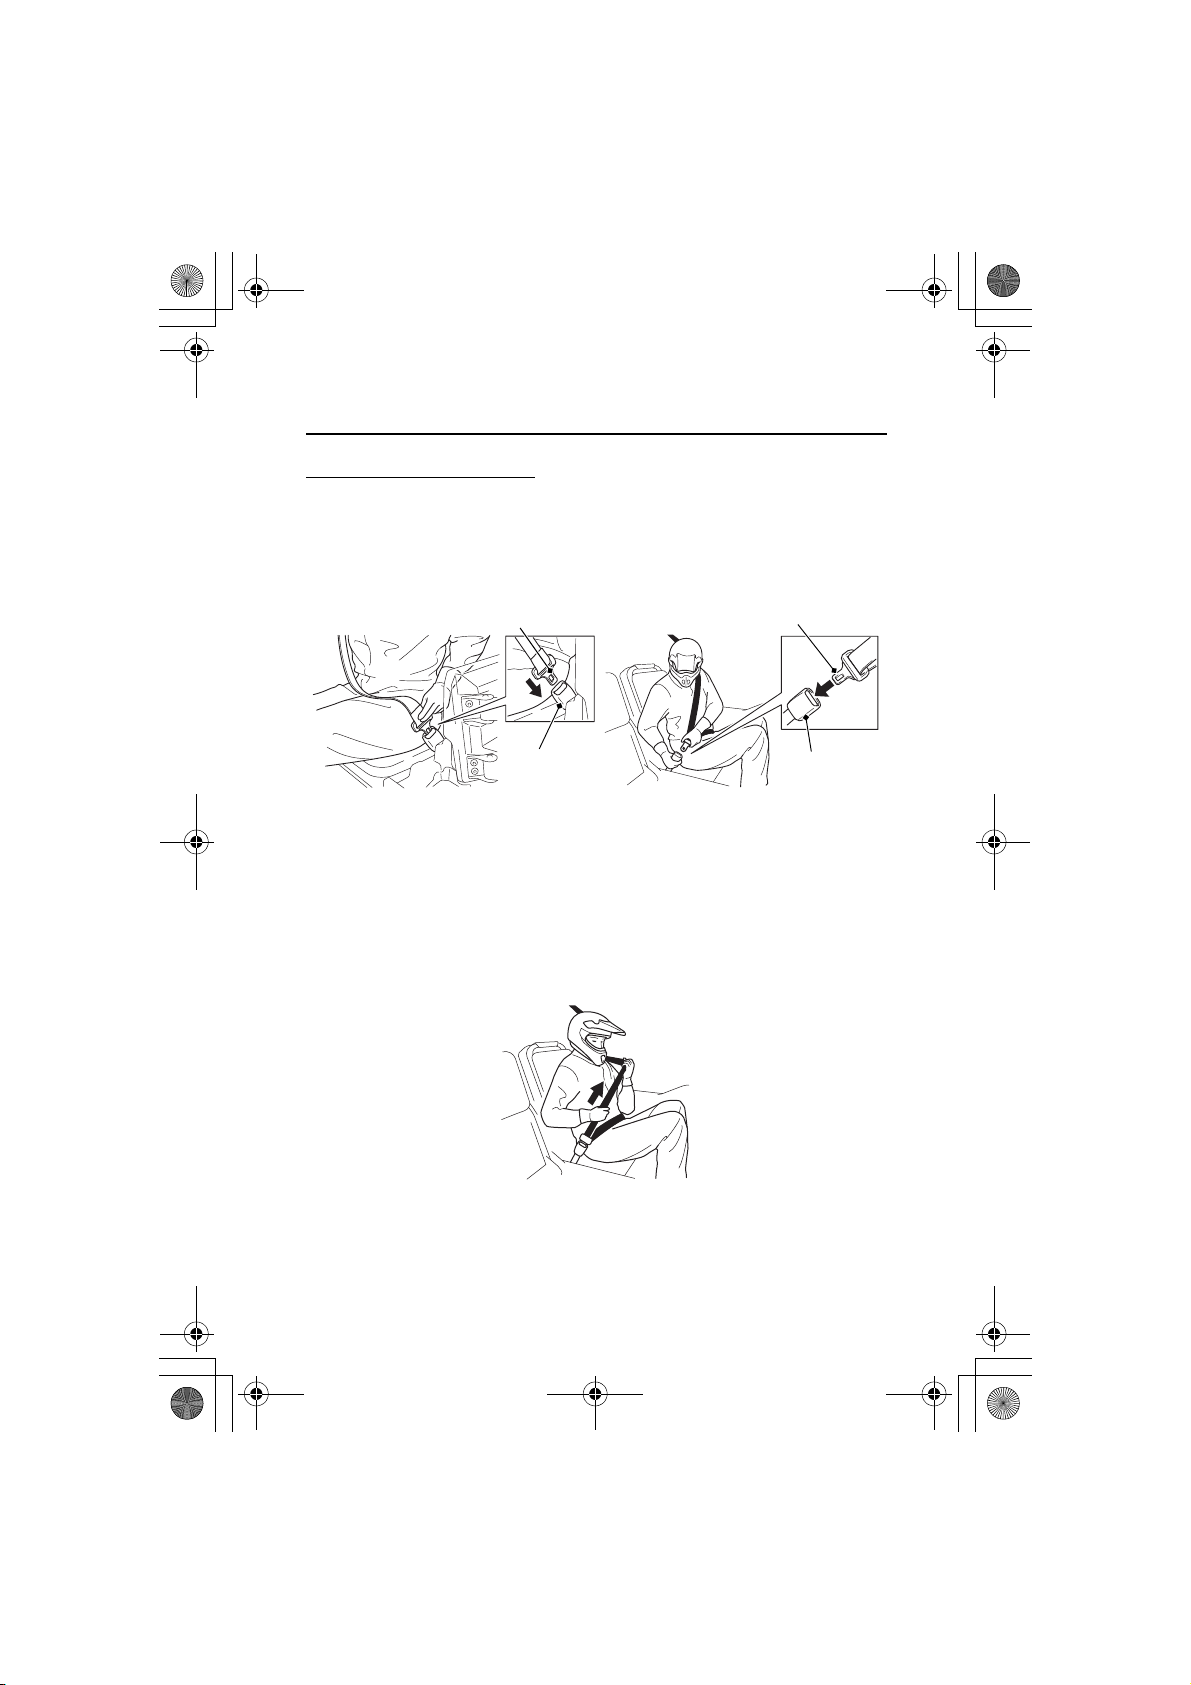
How you wear a seat belt also matters. For the best protection:
Front
1.
Insert the latch plate into the buckle, then tug on the belt to
make sure it is securely latched.
2.
Check that the belt is not twisted, because a twisted belt can
cause injuries.
3.
Position the lap part of the belt as low as possible across your
hips, then pull up on the shoulder part of the belt to make sure
the lap part is snug. This keeps you connected to the vehicle and
lets your strong pelvic bones take the force of a crash.
4.
Make sure the shoulder part of the belt goes over your shoulder
and rests against your chest.
To unlatch a seat belt, press the red PRESS button on the buckle.
Instruments & Controls
50
Page 59
buckle
latch plate
buckle
latch plate
OUTER SIDE CENTER SIDE
14 SXS700-31HL36000.book 51 ページ 2013年5月14日 火曜日 午前10時59分
Seat Belts
Rear (4 Person Model only)
1.
Insert the tip of the latch plate into the outer side of the buckle
first.
2.
Insert the middle of the latch plate into the center of the buckle,
then tug on the belt to make sure they are securely latched.
3.
Check that the belt is not twisted, because a twisted belt can
cause injuries.
4.
Position the lap part of the belt as low as possible across your
hips, then pull up on the shoulder part of the belt to make sure
the lap part is snug. This keeps you connected to the vehicle and
lets your strong pelvic bones take the force of a crash.
5.
Make sure the shoulder part of the belt goes over your shoulder
and rests against your chest.
To unlatch a seat belt, press the red PRESS button on the buckles.
Instruments & Controls
51
Page 60
14 SXS700-31HL36000.book 52 ページ 2013年5月14日 火曜日 午前10時59分
Seat Belts
If you have been driving in an extremely muddy area, be sure to
inspect your belt and remove any dirt or debris before letting the belt
retract into the retractor. Failure to do so could clog the retractor
and make it inoperable.
Each seat belt has an emergency locking retractor. In normal driving
conditions, the retractor lets you move freely in your seat while
keeping some tension on the belt. During a crash or rollover, the
retractor automatically locks the belt to help restrain your body.
Do not put any accessories on a seat belt, as that may reduce the
effectiveness of the belt and increase the chance of injury in a crash.
If a seat belt is worn in a crash, the seat belt assembly must be
replaced by your dealer. A belt that has been worn during a crash
may not provide the same level of protection in a subsequent
incident. The dealer should check the retractor and replace it if
needed.
Instruments & Controls
52
Page 61
passenger handhold
passenger handhold
FRONT
REAR (4 Person Model only)
14 SXS700-31HL36000.book 53 ページ 2013年5月14日 火曜日 午前10時59分
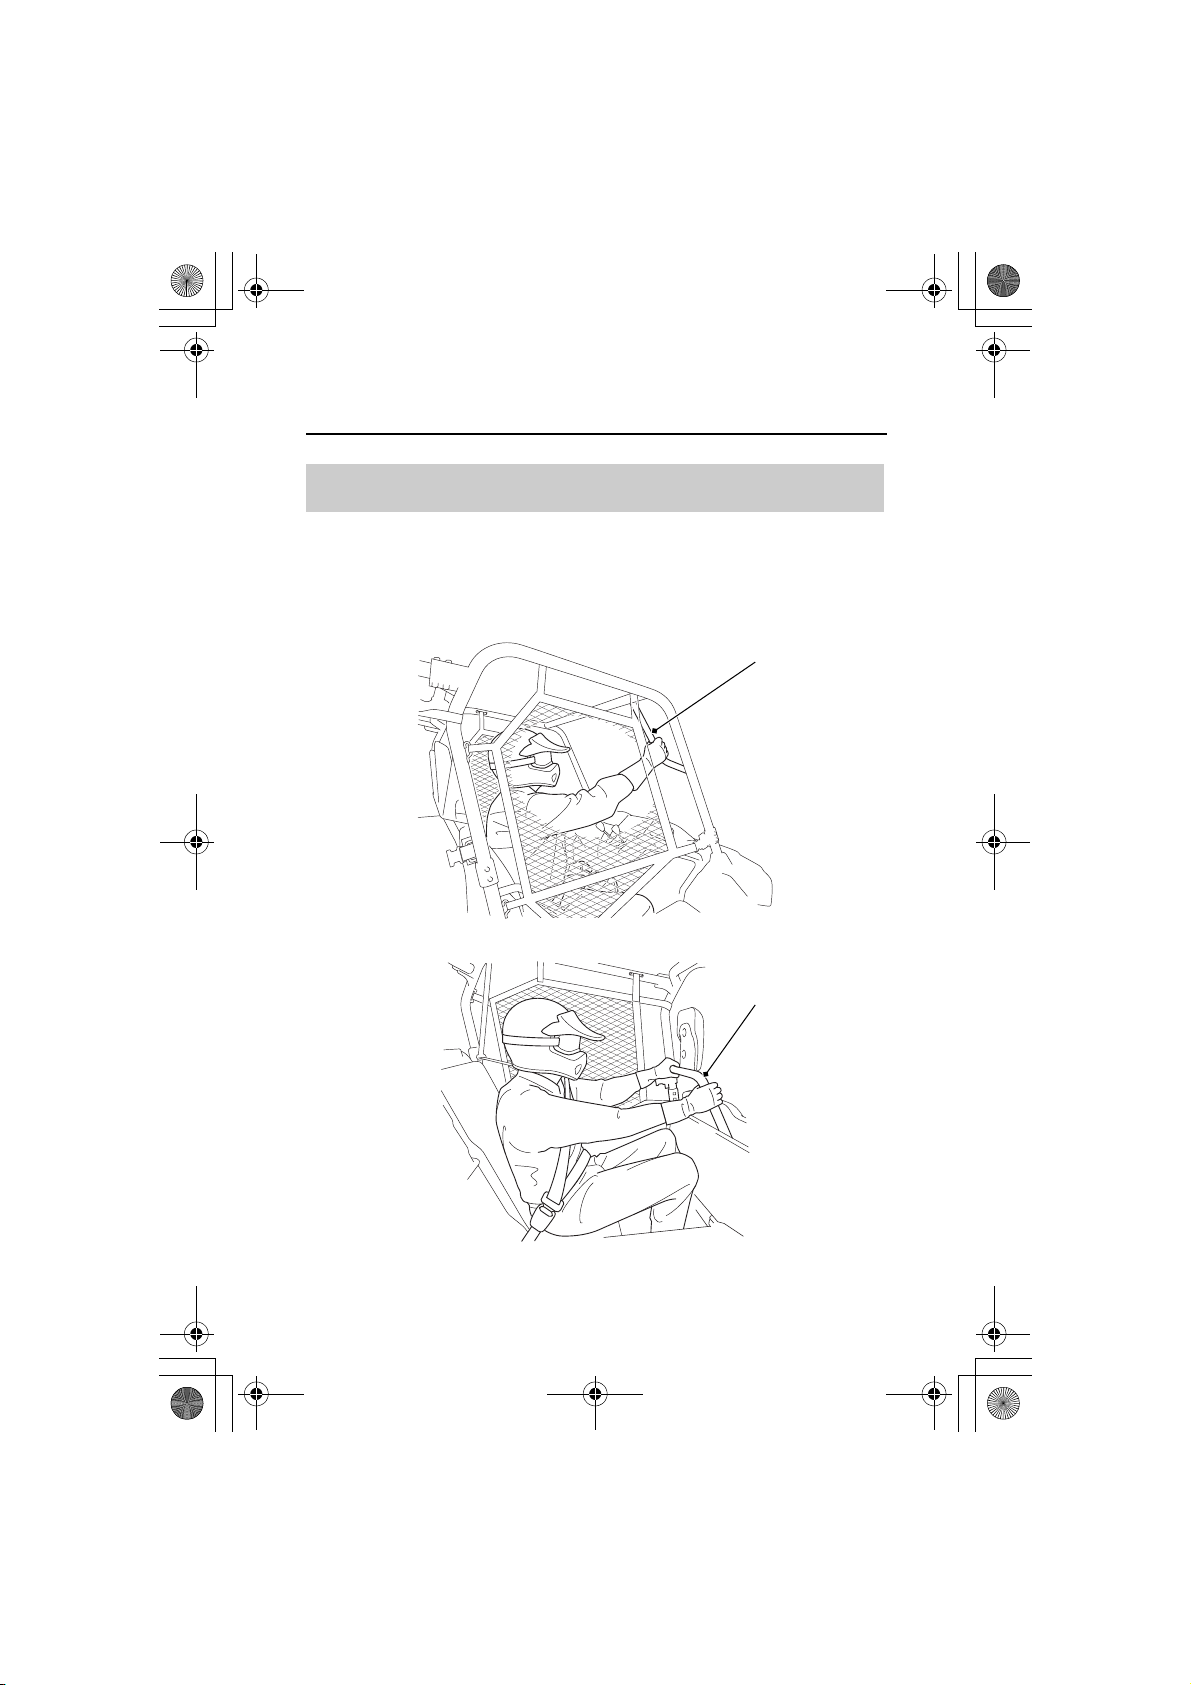
Passenger Handhold
Passenger Handhold
The occupant protective structure (OPS) has a handhold to give a
passenger extra support when the vehicle travels over rough or
bumpy terrain. Passenger can also brace their feet against the
floorboard.
Instruments & Controls
53
Page 62
side pocket
side pocket
document compartment
glove box
document compartment document compartment cover
14 SXS700-31HL36000.book 54 ページ 2013年5月14日 火曜日 午前10時59分
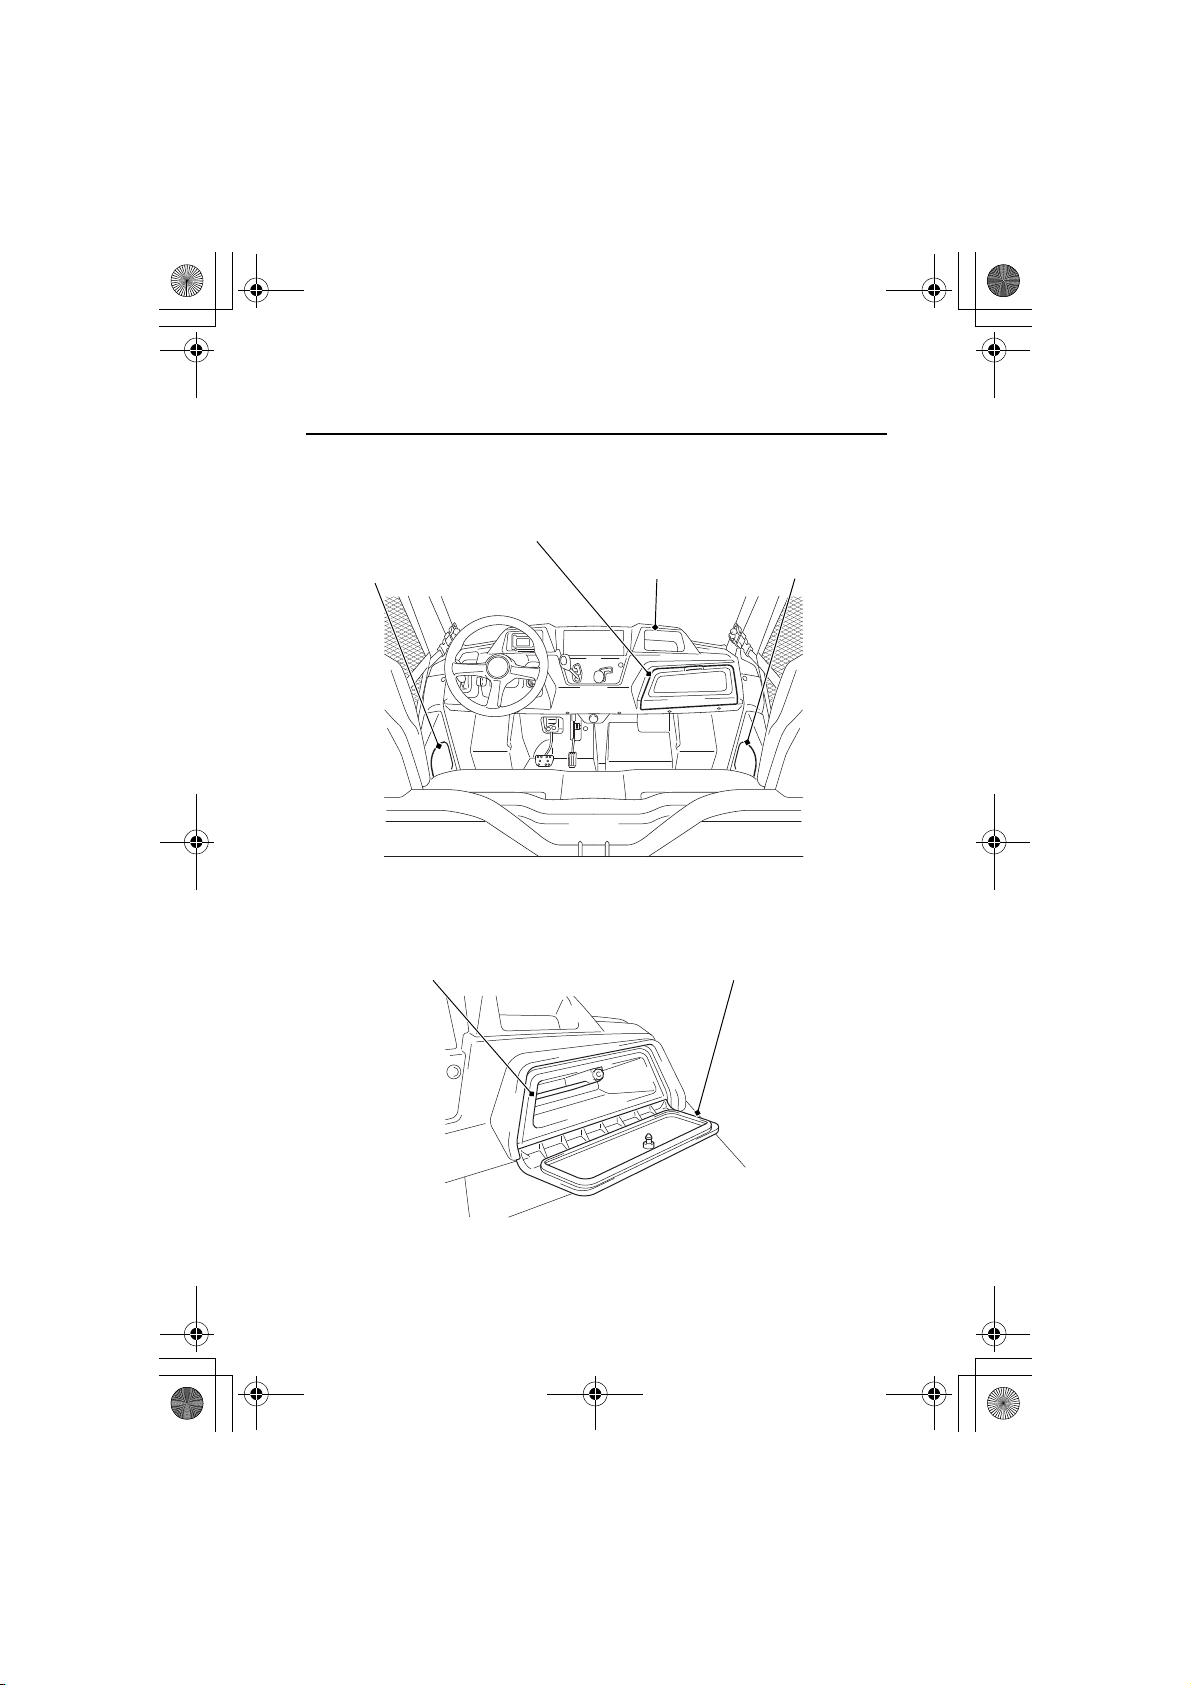
Storage Compartments
Your Honda SXS has a document compartment, glove box and two
side pockets where you can carry small, lightweight items.
To open the document compartment, pull the cover forward. Close
the cover securely before riding.
Instruments & Controls
54
Page 63
NOTICE
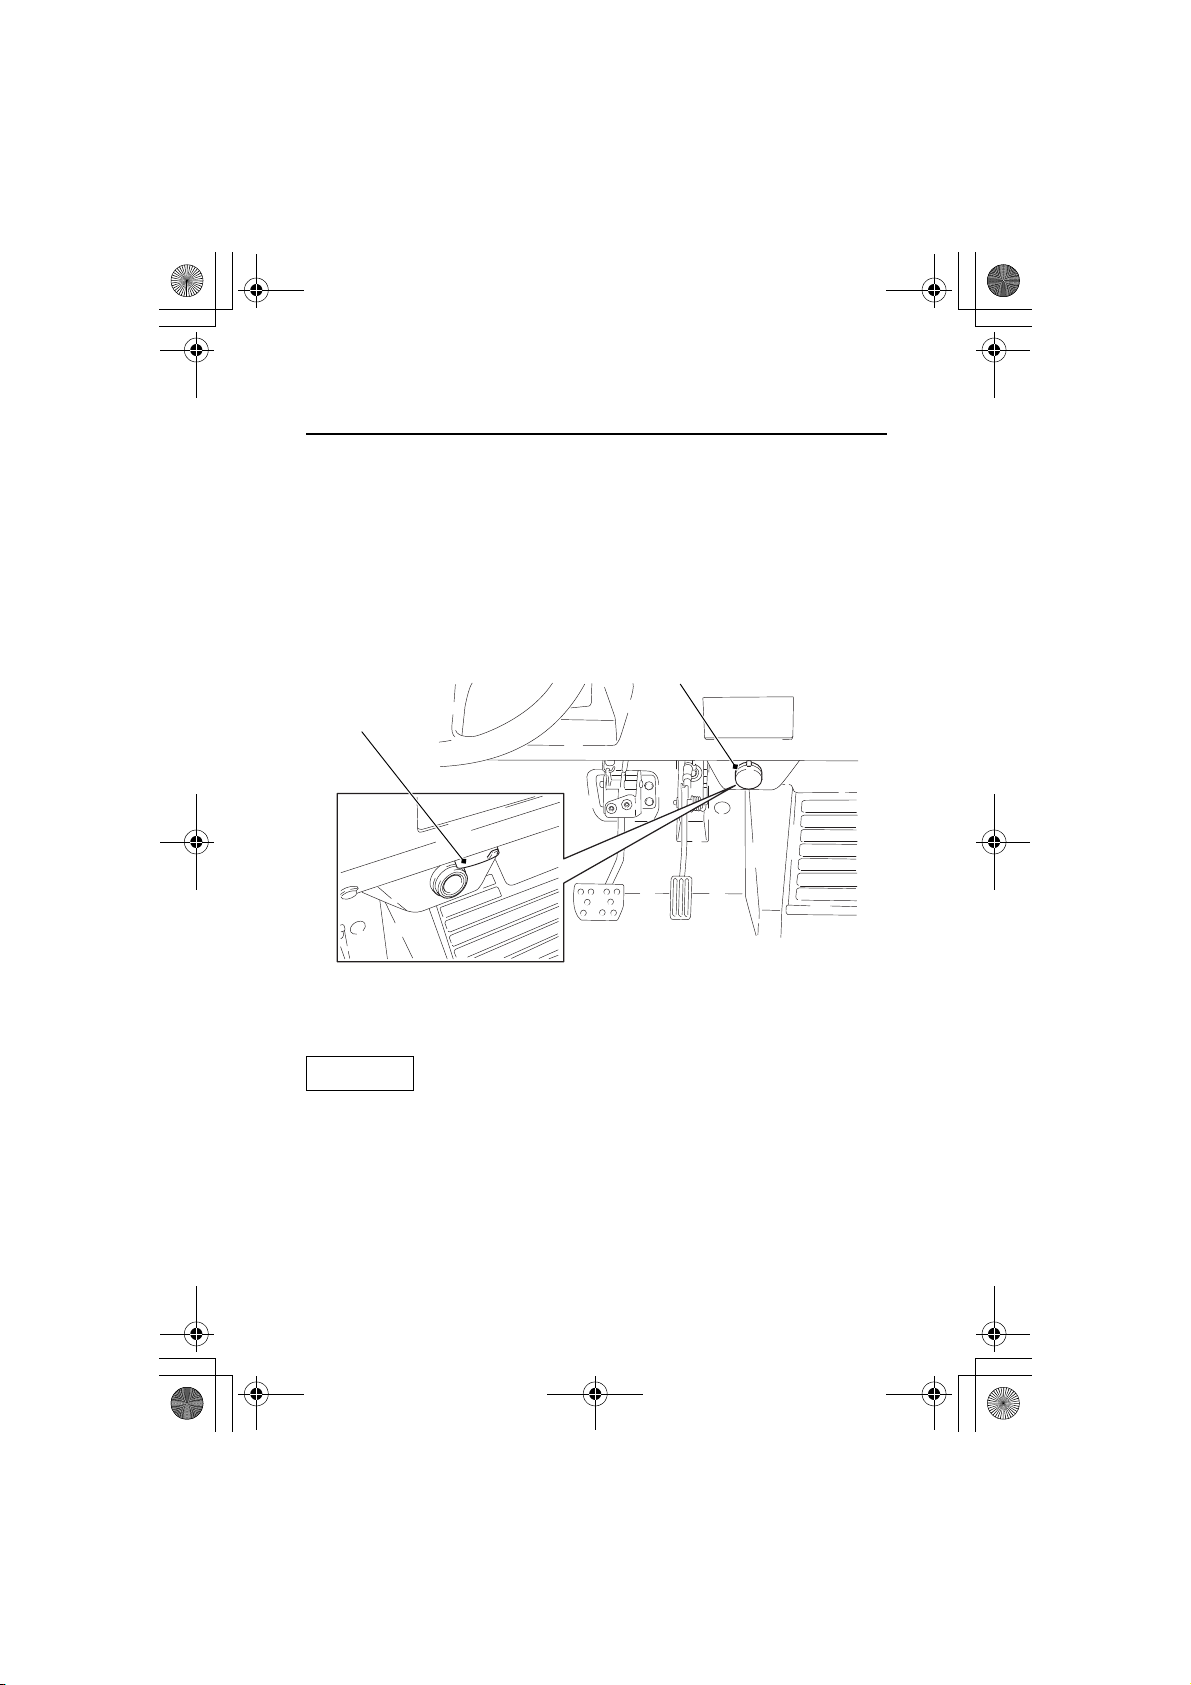
accessory power socket
socket cap
14 SXS700-31HL36000.book 55 ページ 2013年5月14日 火曜日 午前10時59分
Accessory Power Socket
The accessory power socket is located in the center of the lower
dash. The socket is intended for 12-volt DC accessories rated for 120
watts (10 amps) or less. Exceeding the limit can blow the accessory
socket fuse (see page 202).
The socket can be used to power such items as a trouble light,
spotlight, CB radio, or cell phone, but not a heat-generating
accessory, such as a car cigarette lighter.
To use the accessory power socket, the engine must be on and
idling.
Using any heat-generating accessory or improperly rated accessory
can damage the socket.
Remember to close the cap when you are finished using an
accessory, and keep water or other fluids away from the socket.
Instruments & Controls
55
Page 64
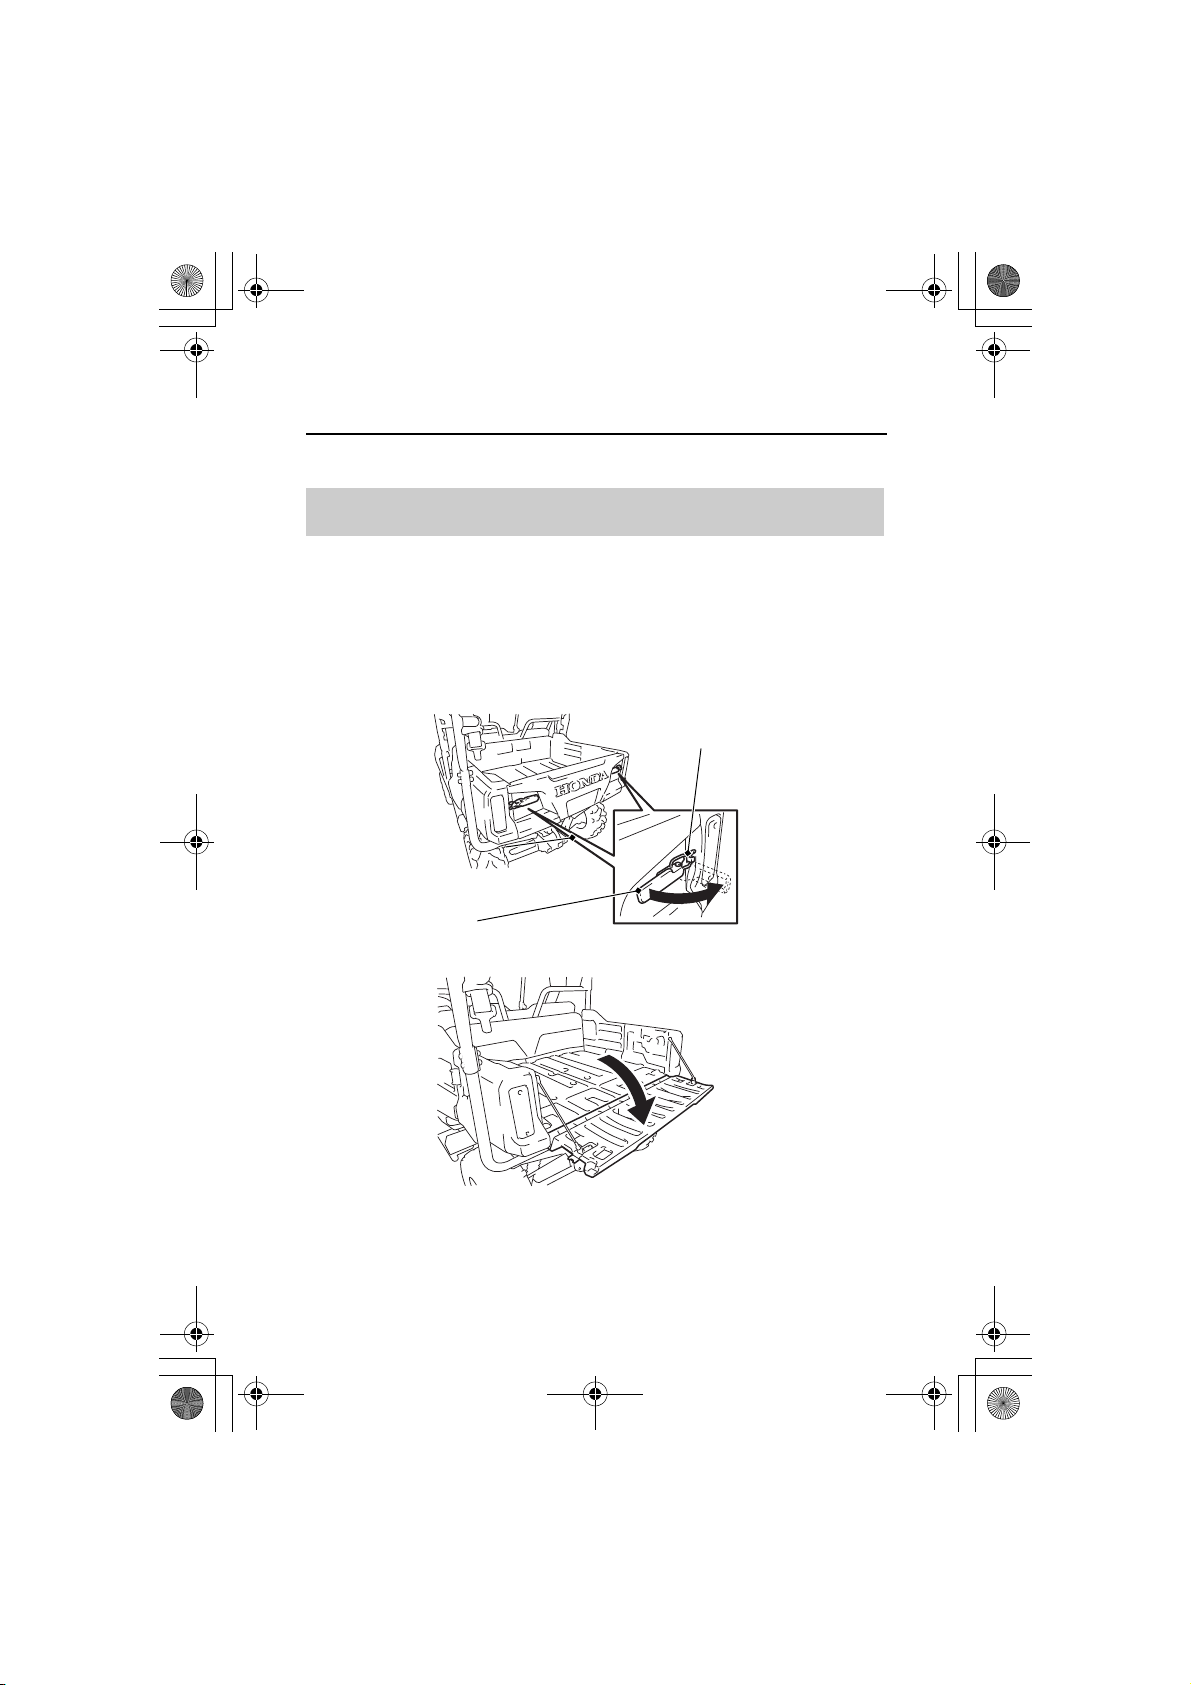
LIFT THE HOOK.
PULL THE LEVER.
TILT GENTLY.
tailgate levers
hook
14 SXS700-31HL36000.book 56 ページ 2013年5月14日 火曜日 午前10時59分
Cargo Bed Controls
See page 69 for Loading Cargo when driving with cargo in the bed.
Tailgate Levers
Before lowering the tailgate, select a firm level surface and set the
parking brake.
To lower the tailgate, pull each tailgate lever out and unhook the
hook as shown below. Reverse the process to secure the tailgate in
the upright position.
Do not drive the Honda SXS with the tailgate lowered.
Instruments & Controls
56
Page 65
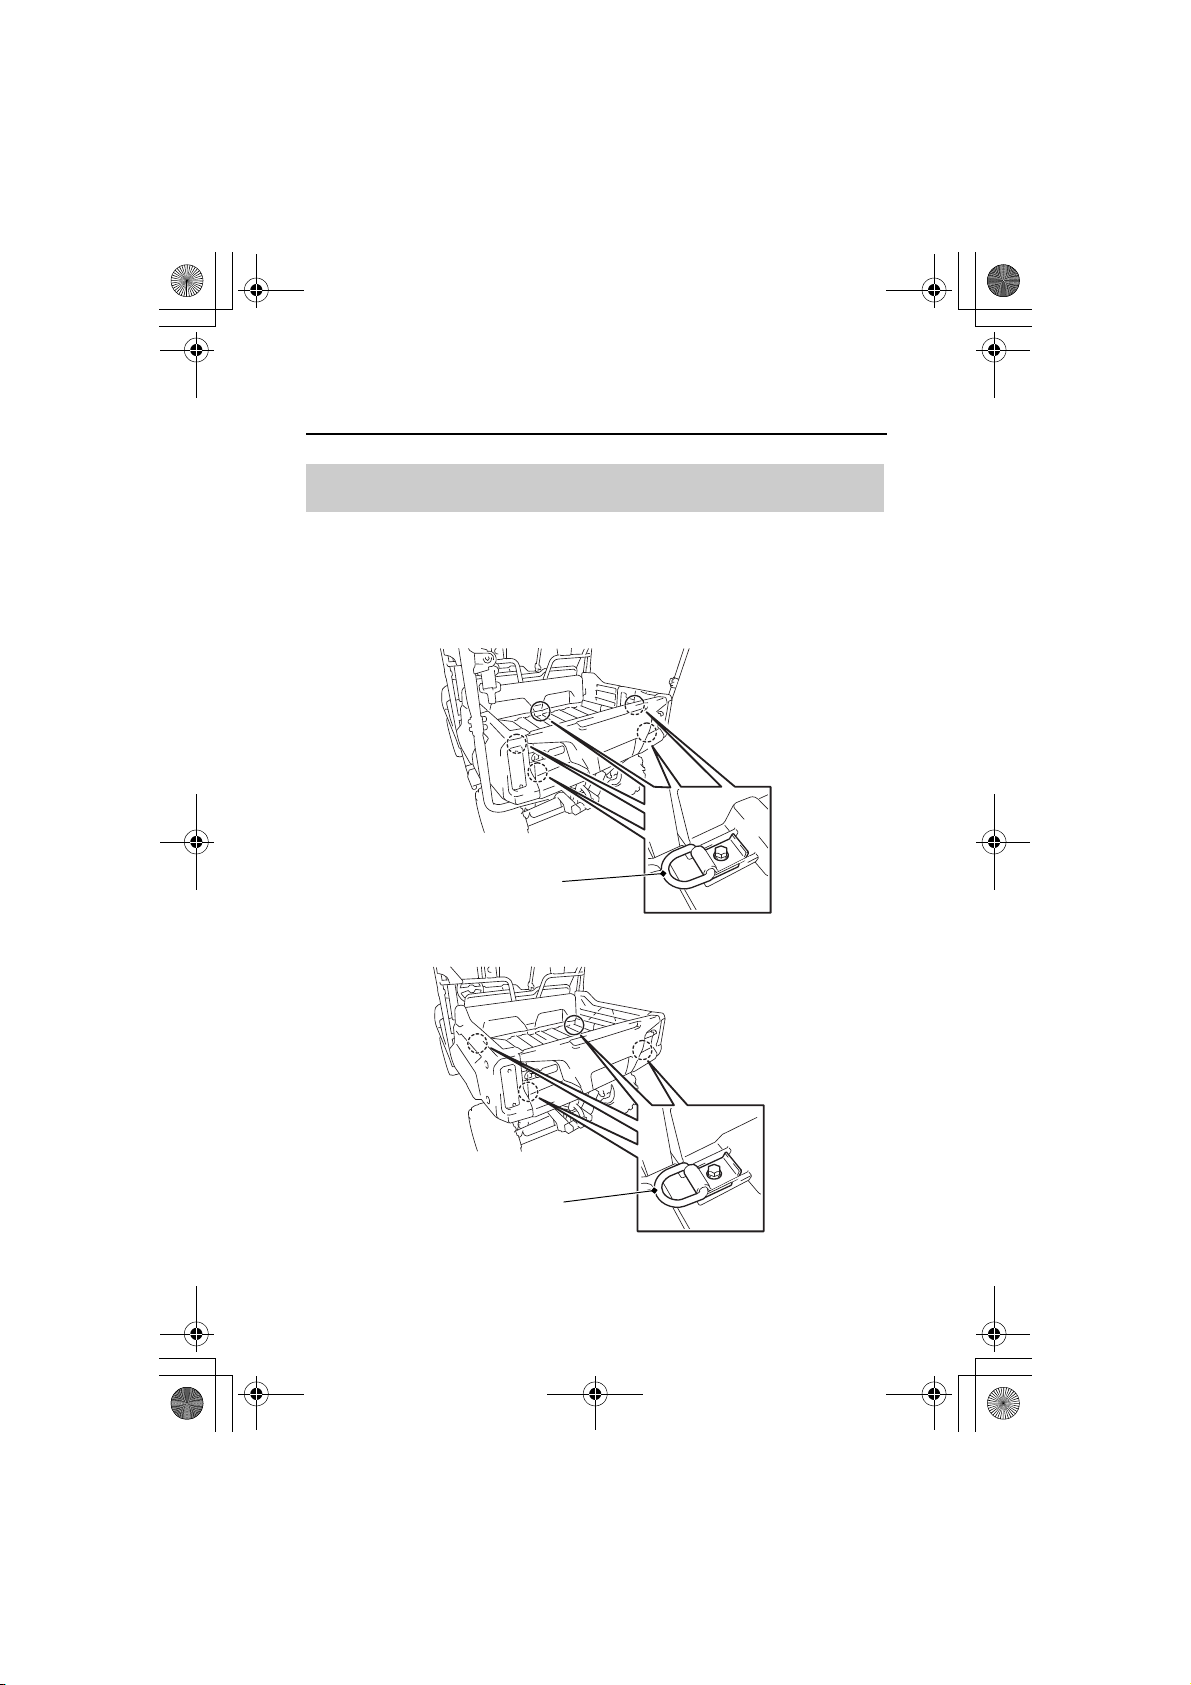
tie-down hook
4 Person Model
2 Person Model
tie-down hook
14 SXS700-31HL36000.book 57 ページ 2013年5月14日 火曜日 午前10時59分
Cargo Bed Controls
Tie-Down Hooks
The cargo bed has tie-down hooks for securing items in the bed.
Before using the tie-down hooks, select a firm level surface and set
the parking brake.
Instruments & Controls
57
Page 66
14 SXS700-31HL36000.book 58 ページ 2013年5月14日 火曜日 午前10時59分
Cargo Bed Controls
Tilt Bed Lever
Before raising the cargo bed, select a firm level surface and set the
parking brake.
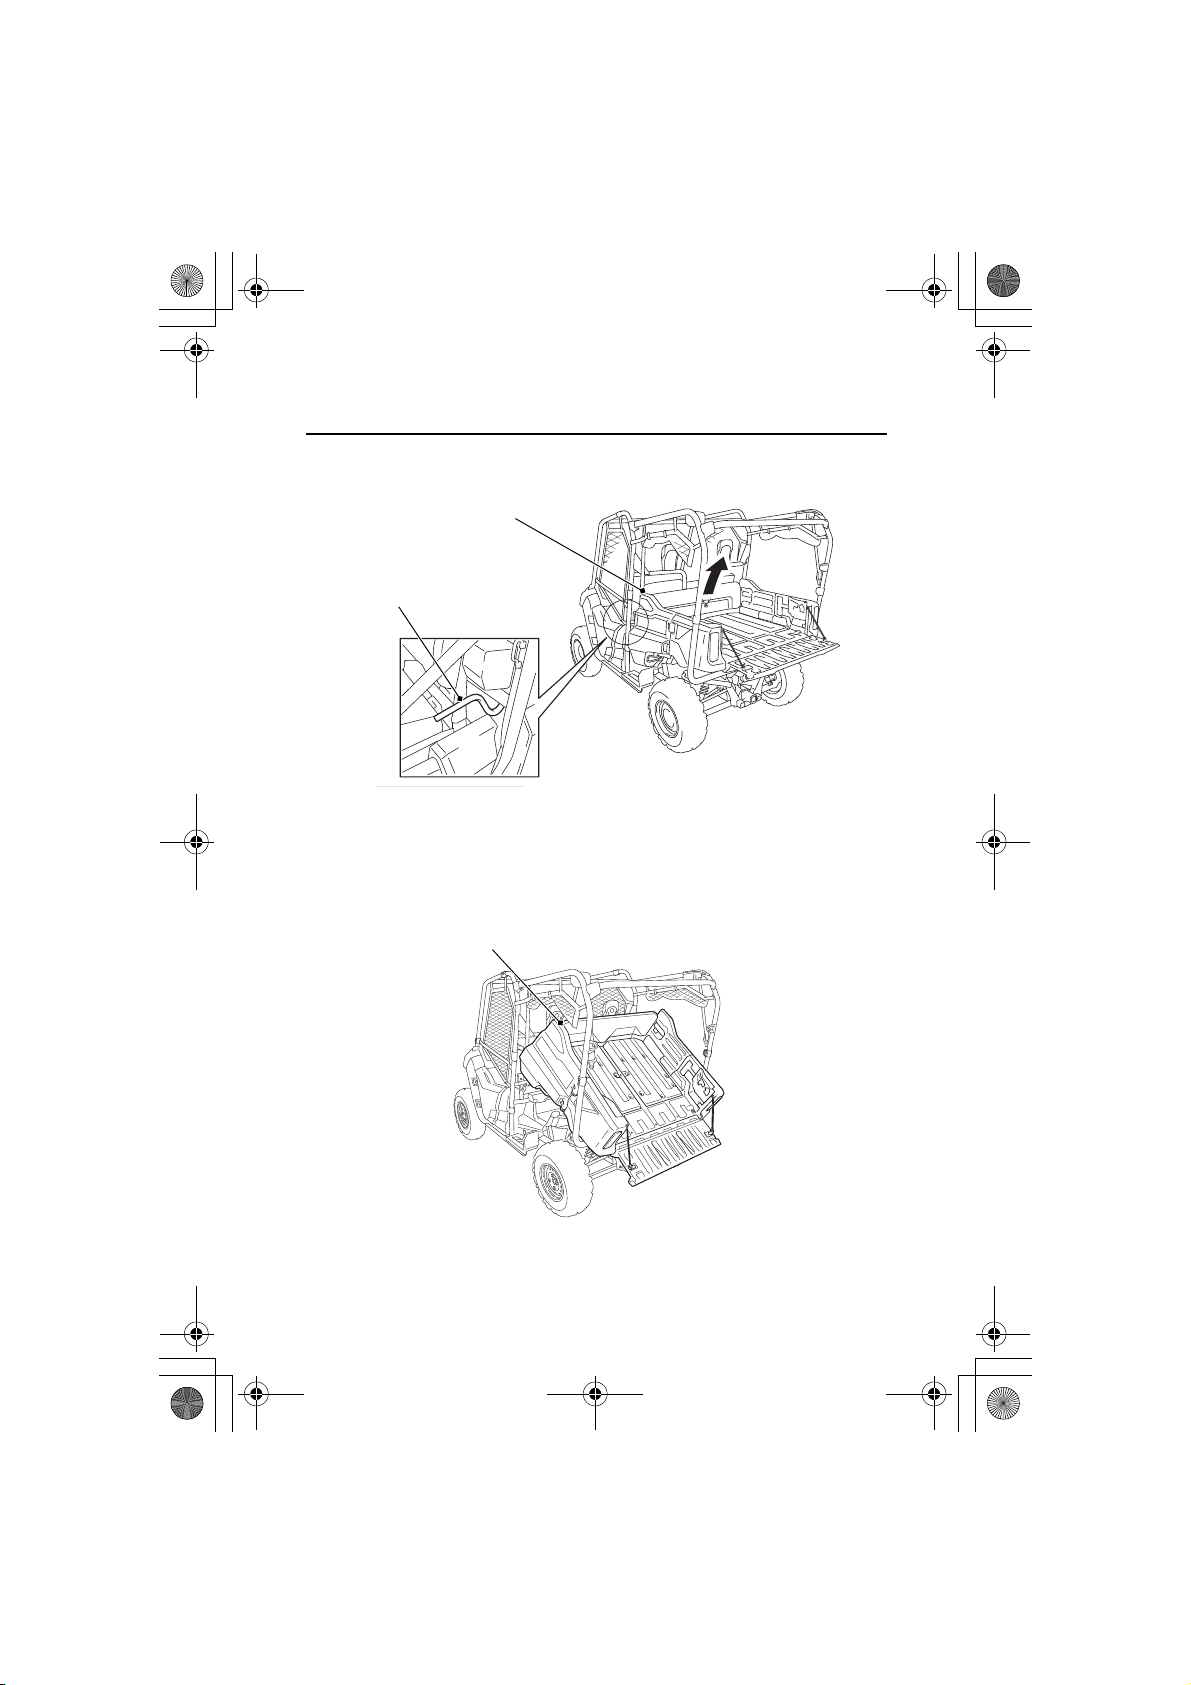
Your Honda SXS has a tilt bed lever, on the left front side of the bed.
Using the lever, the front end of the bed will lift up, making it easier
to dump items out the rear or to maintain the air cleaner, lubricate
the cargo bed pivots and cargo bed strikers.
To raise the front of the cargo bed, first make sure that the tailgate
has been unlatched and lowered, then pull up the lever.
4 Person Model:
Make sure the rear seats are stowed in place before raising the cargo
bed. The cargo bed should not be raised with the rear passenger
jump seats deployed. The cargo bed should not be raised with
passengers seated in the rear seats.
1.
Pull up the tilt bed lever, then grasp the top of the bed.
2.
Raise the front end of the cargo bed.
Do not drive the Honda SXS with the front end of the cargo bed
raised.
4 Person Model:
Do not open the rear doors while the cargo bed is raised. Opening
the rear doors while the cargo bed is raised, will cause the seats to
flip up unexpectedly.
Instruments & Controls
58
Page 67
tilt bed lever
top of the bed
SLOWLY LIFT UP THE CARGO BED.
top of the bed
LOWER THE CARGO
BED SLOWLY.
BE SURE IT IS LOCKED INTO PLACE.
14 SXS700-31HL36000.book 59 ページ 2013年5月14日 火曜日 午前10時59分
Cargo Bed Controls
To lower the cargo bed, make sure that the area under the front of
the cargo bed is clear, then manually push down on the top of the
bed.
Check that the bed is securely latched.
Instruments & Controls
59
Page 68
trailer hitch receiver
14 SXS700-31HL36000.book 60 ページ 2013年5月14日 火曜日 午前10時59分
Trailer Hitch
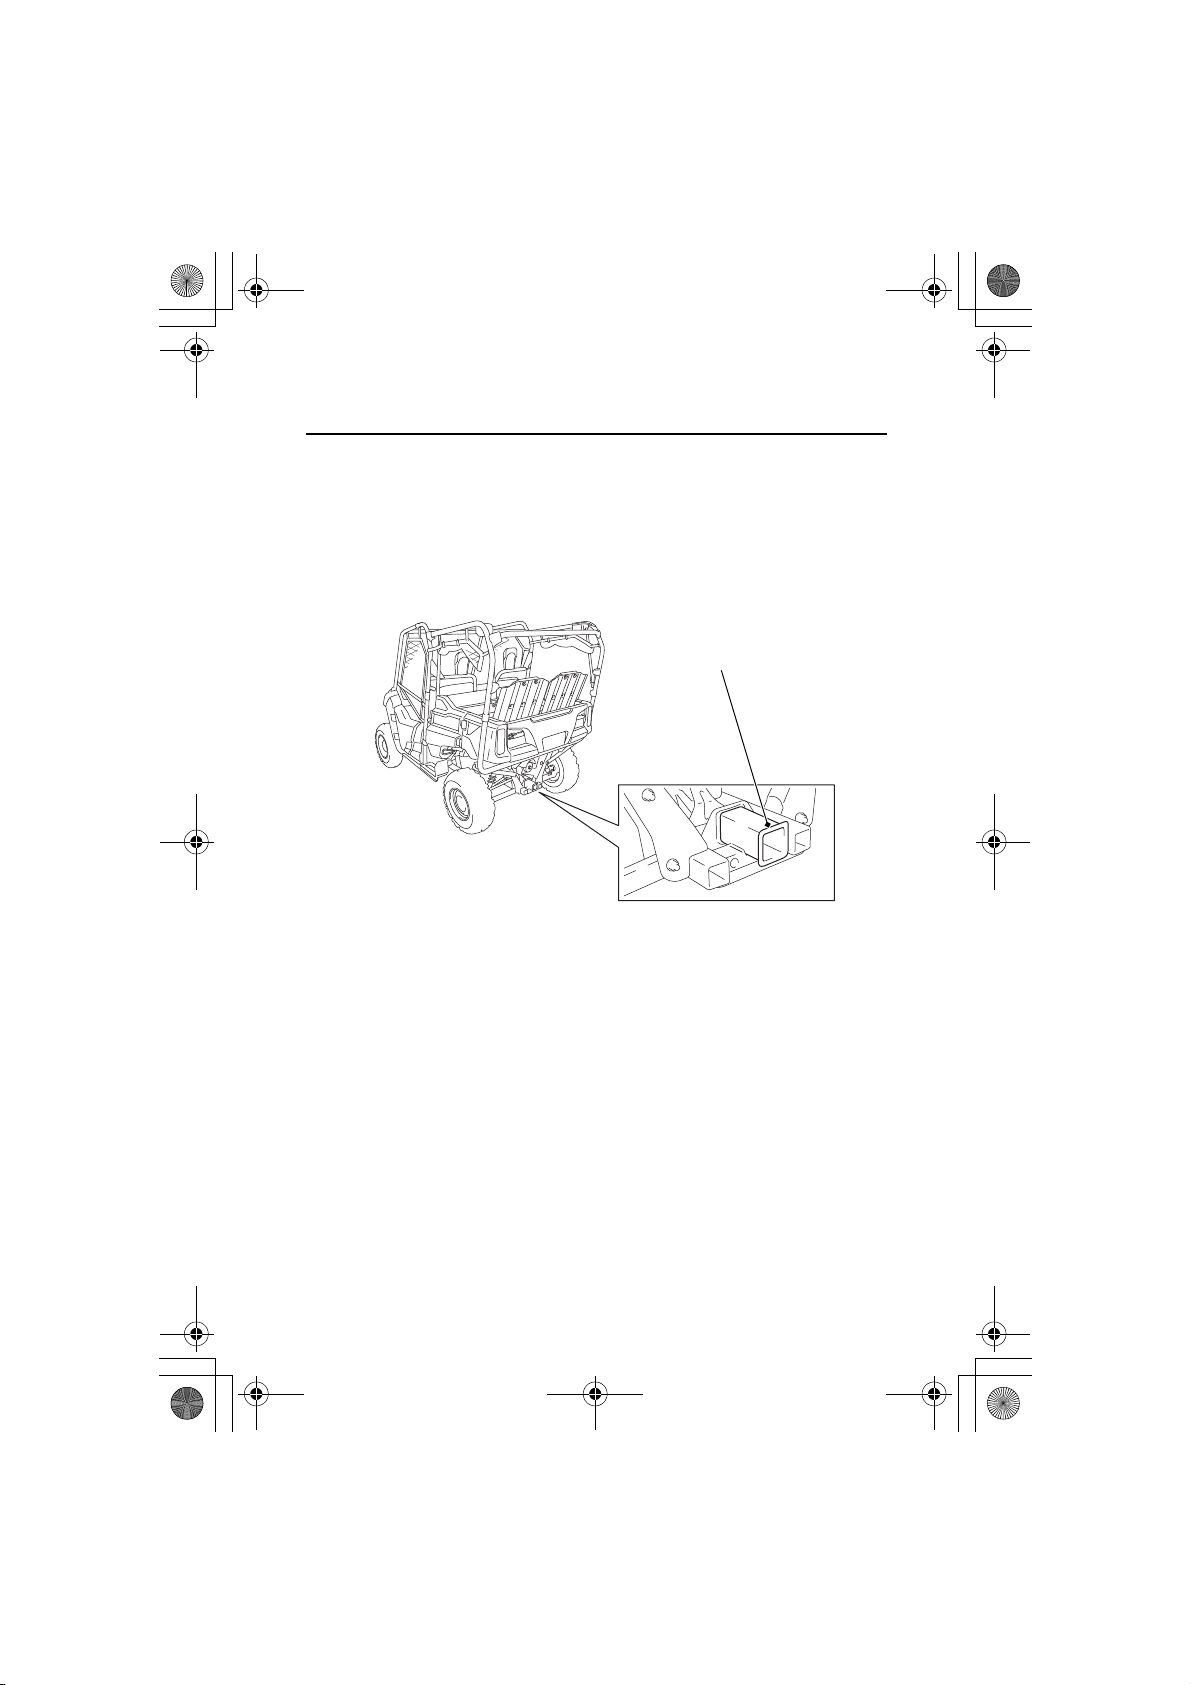
Your Honda SXS is equipped with a trailer hitch receiver that accepts
a 2 inch drawbar. You can purchase an approved drawbar from your
Honda dealer.
See page 71 for page Towing a Trailer.
Instruments & Controls
60
Page 69
14 SXS700-31HL36000.book 61 ページ 2013年5月14日 火曜日 午前10時59分
Before Driving
Before Driving
Before driving your SXS, you need to make sure you and your vehicle
are both ready. This section discusses how to evaluate your driving
readiness and what items you should check on your vehicle. It also
includes important information about loading cargo.
Are You Ready to Drive?............................................................. 62
Age & Size Recommendations ................................................. 62
Protective Apparel ................................................................... 63
Get to Know Your Vehicle ....................................................... 64
Don’t Drink & Drive ................................................................. 64
Is Your Vehicle Ready to Drive?................................................... 65
Pre-drive Inspection ................................................................. 66
Loading Cargo............................................................................ 69
Cargo Limit.............................................................................. 69
Loading Guidelines .................................................................. 70
Towing a Trailer.......................................................................... 71
Towing Limits .......................................................................... 71
Checking Loads ....................................................................... 71
Loading a Trailer ...................................................................... 72
Before Driving
61
Page 70
WARNING
3
WARNING
14 SXS700-31HL36000.book 62 ページ 2013年5月14日 火曜日 午前10時59分
Are You Ready to Drive?
Before driving your Honda SXS for the first time, we urge you to
carefully read this owner’s manual and the labels on your vehicle and
make sure you understand all the safety information.
Age & Size Recommendations
The driver should be at least 16 years old and tall enough to wear
their seat belt properly (page 49) and operate all the controls. A
passenger should also be tall enough to wear the seat belt properly
and ride with both feet on the floor.
Allowing a person who is too young or too
small to drive this vehicle or ride as a
passenger could result in serious injury or
death in a crash.
Before Driving
62
Follow all instructions and guidelines in this
owner’s manual regarding the proper age
and size for a driver and a passenger.
Page 71
WARNING
3
WARNING
14 SXS700-31HL36000.book 63 ページ 2013年5月14日 火曜日 午前10時59分
Are You Ready to Drive?
Protective Apparel
To help prevent head injury from striking an occupant protective
structure (OPS) or other hard object, we recommend that occupants
always wear a helmet secured with a chin strap.
To protect the eyes from brush and flying objects, we also
recommend that occupants wear impact-resistant goggles or a face
shield.
Driving or riding in this vehicle without a
proper helmet and eye protection can result
in serious injury or death in a crash.
Always wear a helmet secured with a chin
strap and eye protection when driving or
riding in this vehicle.
Before Driving
63
Page 72
WARNING
3
WARNING
14 SXS700-31HL36000.book 64 ページ 2013年5月14日 火曜日 午前10時59分
Are You Ready to Drive?
Get to Know Your Vehicle
Because all vehicles have unique characteristics, it’s important to
learn how this one operates and handles. We recommend that you
take time to practice using the different controls, and get
accustomed to how the vehicle accelerates, brakes, and turns in
different driving modes, on different surfaces, and on different
terrain conditions.
Don’t Drink & Drive
It’s well known that alcohol and drugs can seriously affect a person’s
judgment, perception, and ability to safely operate any vehicle. We
therefore strongly recommend that you do not drive, or let anyone
else drive or ride in this vehicle, while under the influence of alcohol
or drugs.
Before Driving
64
Operating this vehicle under the influence of
alcohol or drugs can result in a crash in which
you or others can be seriously injured or
killed.
Never drive this vehicle while under the
influence of alcohol or drugs.
Page 73
WARNING
3
WARNING
14 SXS700-31HL36000.book 65 ページ 2013年5月14日 火曜日 午前10時59分
Is Your Vehicle Ready to Drive?
Before driving your Honda SXS, it’s important to inspect the vehicle
and correct any problem you find. A pre-drive inspection is a must,
not only for safety, but because having a breakdown can be a major
inconvenience.
If your vehicle has overturned or been involved in a crash, do not
drive it until it has been inspected by your dealer. There may be
damage or other problems you cannot see.
Improperly maintaining this vehicle or failing
to correct a problem before driving can cause
a crash in which you or someone else can be
seriously hurt or killed.
Always perform a pre-drive inspection and
correct any problems before you operate the
vehicle.
Before Driving
65
Page 74
14 SXS700-31HL36000.book 66 ページ 2013年5月14日 火曜日 午前10時59分
Is Your Vehicle Ready to Drive?
Pre-drive Inspection
Check the following items before driving your Honda SXS:
Oil Level Check the engine oil level and add oil, if needed
(page 116). Also check under the vehicle for leaks.
Coolant Check the coolant level (page 128). If it is low, add a
50/50 mixture of silicate-free coolant and distilled
water.
Check for leaks.
Fuel Level Check the fuel gauge (page 21) and add fuel, if
needed (page 111). Make sure the fuel fill cap is
secure. Also check for the smell of fuel or fumes - if
you smell any fuel, turn the ignition switch to OFF (w)
immediately, and see your dealer.
Brake Fluid Check the level (page 154). If it is near MIN, check the
brake pads for wear (page 156). If the brake pads are
within the specification, check for leaks in the braking
system (page 153).
Tires Check the air pressure of all tires and inflate them to
the proper pressure (page 161). Also inspect the tires
for damage or excessive wear (page 163). If necessary
see your dealer.
Wheels Make sure the wheel nuts are properly tightened and
the wheels are not cracked or deformed (page 167).
Driveshafts Inspect the driveshafts and boots for damage, tears, or
leaks. If any tears are found, see your dealer.
Before Driving
66
Page 75
14 SXS700-31HL36000.book 67 ページ 2013年5月14日 火曜日 午前10時59分
Is Your Vehicle Ready to Drive?
Steering
gearbox and
boots
Underbody If the vehicle was last driven in deep grass or a brushy
Air Cleaner Inspect the air cleaner element (page 133) to insure it
Air Cleaner
Housing
Drain Tube
Suspension Check the condition of all suspension components. Be
Lights Make sure the headlights, taillights, and brake lights
Controls Check that all driving controls, including the
Check the steering to make sure it turns smoothly in both
directions. Check for any tears in the boots.
If any tears are found, see your dealer.
area, look for and remove any debris. Check for any
visible dents or cracks. If any dents or cracks are found,
see your dealer.
is clean and evenly oiled.
Check for deposits in the drain tube. If necessary,
clean the tube (page 136) and check the air cleaner
housing.
sure to look for bends or oil leaks in the cushion
damper.
are working properly.
accelerator pedal, brake pedal, parking brake lever,
drive mode select lever, and the shift lever are
operating smoothly.
Exhaust
System
Make sure no flammable materials or debris are
sticking to the exhaust system. If any flammable
materials or debris is found, remove it. Start the
engine and listen for any exhaust leaks.
(cont’d)
Before Driving
67
Page 76
14 SXS700-31HL36000.book 68 ページ 2013年5月14日 火曜日 午前10時59分
Is Your Vehicle Ready to Drive?
Tie-rod ends The wheels need to be lifted off the ground to
correctly check the tie-rod ends, so it cannot be done
in the pre-drive inspection. To have the tie-rod ends
properly inspected, see your dealer.
Cargo Be sure items in the cargo bed are within the cargo
limit and are properly secured to prevent shifting
(pages 69, 70).
Seat Belts Make sure all seat belts are in good condition and
operate properly. The seat belts must move smoothly
when pulled out, and retract on their own when
released.
The latch plates should click securely into the buckles
and release when the release buttons are pushed
firmly.
Side Nets Make sure all side nets and their mounting hardware
are in good condition and that they latch and tighten
securely.
Remember to take care of any problem you find or have your dealer
correct it before you drive your Honda SXS.
Before Driving
68
Page 77
WARNING
3
WARNING
14 SXS700-31HL36000.book 69 ページ 2013年5月14日 火曜日 午前10時59分
Loading Cargo
Your vehicle was designed to carry cargo. However, carrying a load
that is too heavy or improperly loaded can adversely affect your
vehicle’s handling, stability, and stopping distance and make it
unsafe. Before carrying any type of cargo, be sure to read the
following pages.
Cargo Limit
See page 82 for guidelines on driving with cargo.
Maximum weight capacity = 1,728 lb (784 kg)
This includes the weight of cargo, occupants, accessories, and trailer
tongue load.
Maximum cargo weight = 1,000 lb (454 kg)
This includes all items in the cargo bed, any accessories, and the
tongue load if you are towing a trailer (see page 71).
Overloading the cargo bed or failing to secure
cargo properly can cause an accident in which
you or others could be seriously hurt or killed.
Follow the cargo limits and loading guidelines
in this owner’s manual.
Before Driving
69
Page 78
WARNING
3
WARNING
14 SXS700-31HL36000.book 70 ページ 2013年5月14日 火曜日 午前10時59分
Loading Cargo
Loading Guidelines
• Make sure the tires are properly inflated (page 161).
• Place all items on the floor of the cargo bed, and as far forward
and centered as possible.
• Use the tie-down hooks (page 57) to secure any items that could
shift position while you are driving.
• Do not let items extend over the side rails, as they could get
caught on something.
• Be aware that carrying tall, heavy items will significantly raise the
vehicle’s center of gravity, increasing the chance of a rollover.
• Never let a passenger ride in the cargo area or hang onto the side
of the vehicle, even for a short distance. The person could be
thrown off the vehicle or cause a crash.
Before Driving
70
Driving with a passenger in the cargo area can
result in very serious injury or death if the
person is thrown against the vehicle or out of
the bed.
A passenger should only ride in the
passenger’s seat and wear their seat belt
properly.
Page 79
14 SXS700-31HL36000.book 71 ページ 2013年5月14日 火曜日 午前10時59分
Towing a Trailer
Your vehicle can pull a trailer as well as carry cargo, provided you
follow the load limits and guidelines below.
Towing Limits
There are two main types of limits that apply to towing a trailer:
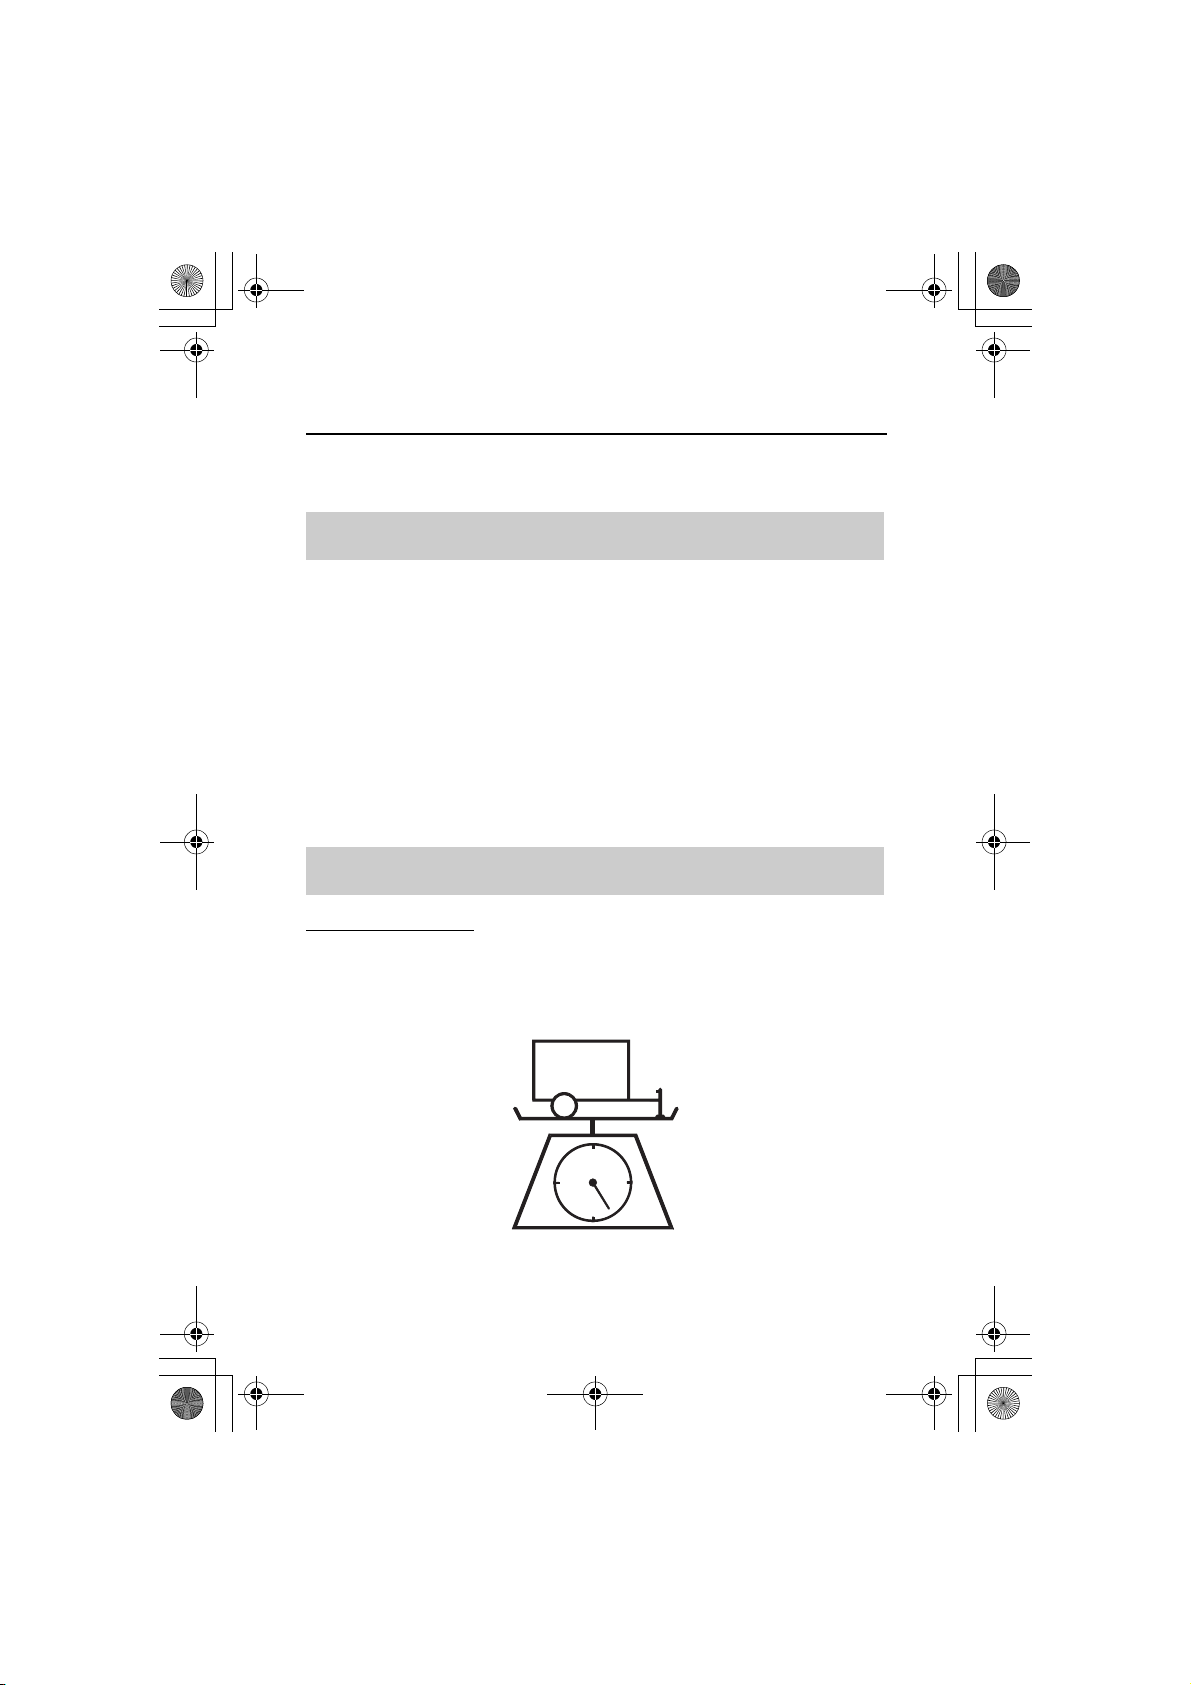
Maximum total trailer weight = 1,500 lb (680 kg)
This includes the weight of the trailer and everything in it or on it.
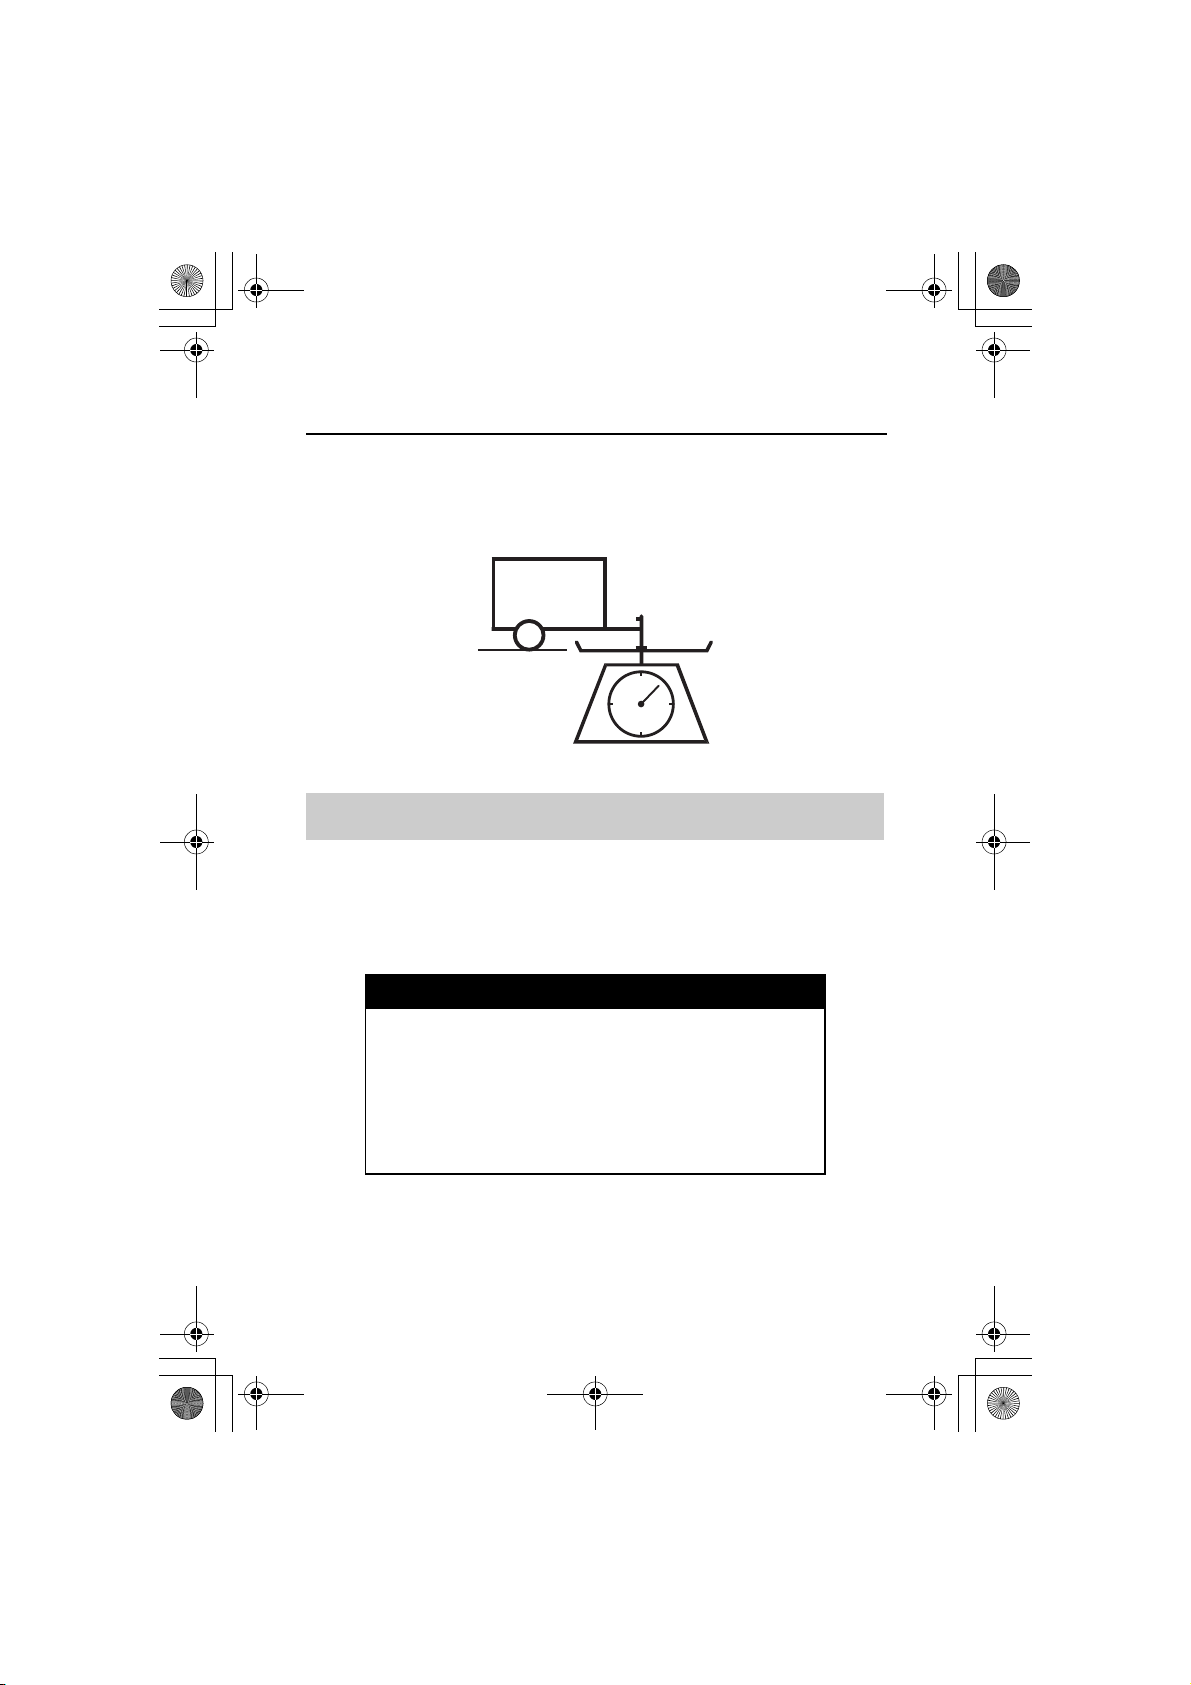
Maximum tongue load = 150 lb (68 kg)
The weight that the fully loaded trailer places on the tongue.
The tongue load also affects the total weight you can carry in the
vehicle and the cargo bed. See “Maximum weight capacity” on
page 69.
Checking Loads
Total Trailer Weight
Check the weight of a fully loaded trailer or estimate the total by
adding the weight of the trailer (as quoted by the trailer maker) with
the weight of all items placed in or on the trailer.
Before Driving
71
Page 80
WARNING
3
WARNING
14 SXS700-31HL36000.book 72 ページ 2013年5月14日 火曜日 午前10時59分
Towing a Trailer
To achieve a proper tongue load, start by placing 60 percent of the
load toward the front of the trailer and 40 percent toward the rear,
then readjust the load as needed.
Loading a Trailer
• Always use a proper trailer hitch. Do not tow by attaching a rope
or cable to the vehicle’s frame.
• Secure all items inside the trailer so they cannot shift while
driving.
Before Driving
72
Exceeding a load limit or improperly towing a
trailer can cause a crash in which you can be
seriously hurt or killed.
Follow all load limits and towing guidelines in
this owner’s manual.
Page 81
14 SXS700-31HL36000.book 73 ページ 2013年5月14日 火曜日 午前10時59分
Basic Operation & Driving
Guidelines
Basic Operation & Driving Guideline s
This section gives information on how to start and stop your engine.
It also provides guidelines for operating on different types of terrain,
driving with cargo, and towing a trailer.
Basic Operation .......................................................................... 74
Starting & Stopping the Engine................................................ 74
Selecting a Shift Position.......................................................... 76
Selecting a Drive Mode ............................................................ 76
Parking .................................................................................... 77
Driving Guidelines ...................................................................... 78
Safe Driving Precautions .......................................................... 78
Off-road Driving Considerations............................................... 80
Basic Driving ............................................................................ 82
Driving on Hills ........................................................................ 83
Driving Through Water ............................................................ 86
Driving at Night ....................................................................... 86
Basic Operation & Driving Guidelines
73
Page 82
WARNING
3
WARNING
14 SXS700-31HL36000.book 74 ページ 2013年5月14日 火曜日 午前10時59分
Basic Operation
Starting & Stopping the Engine
For safety, we recommend that you start the engine in a wellventilated area. If that is not practical, move the vehicle outdoors as
soon as possible. The engine’s exhaust contains carbon monoxide, a
colorless and odorless gas that can cause illness and even death.
Engine exhaust contains toxic carbon
monoxide, a colorless and odorless gas.
Breathing it can cause unconsciousness and
even kill you.
If you must start the engine in a poorly
ventilated area, move it outdoors
immediately.
The starter motor will operate when the transmission is in neutral or
the brake pedal is pressed.
You should do the following checks and adjustments before you
drive your vehicle.
Before START:
1.
Make sure the doors, side nets, tailgate and front hood are
securely closed.
2.
Make sure the cargo bed is securely lowered.
3.
Check that any items you may be carrying are stored properly or
fastened down securely.
4.
Fasten your seat belt. Check that any passenger has fastened
their seat belt as well.
5.
When you start the engine, check the indicators in the instrument
panel.
Basic Operation & Driving Guidelines
74
Page 83
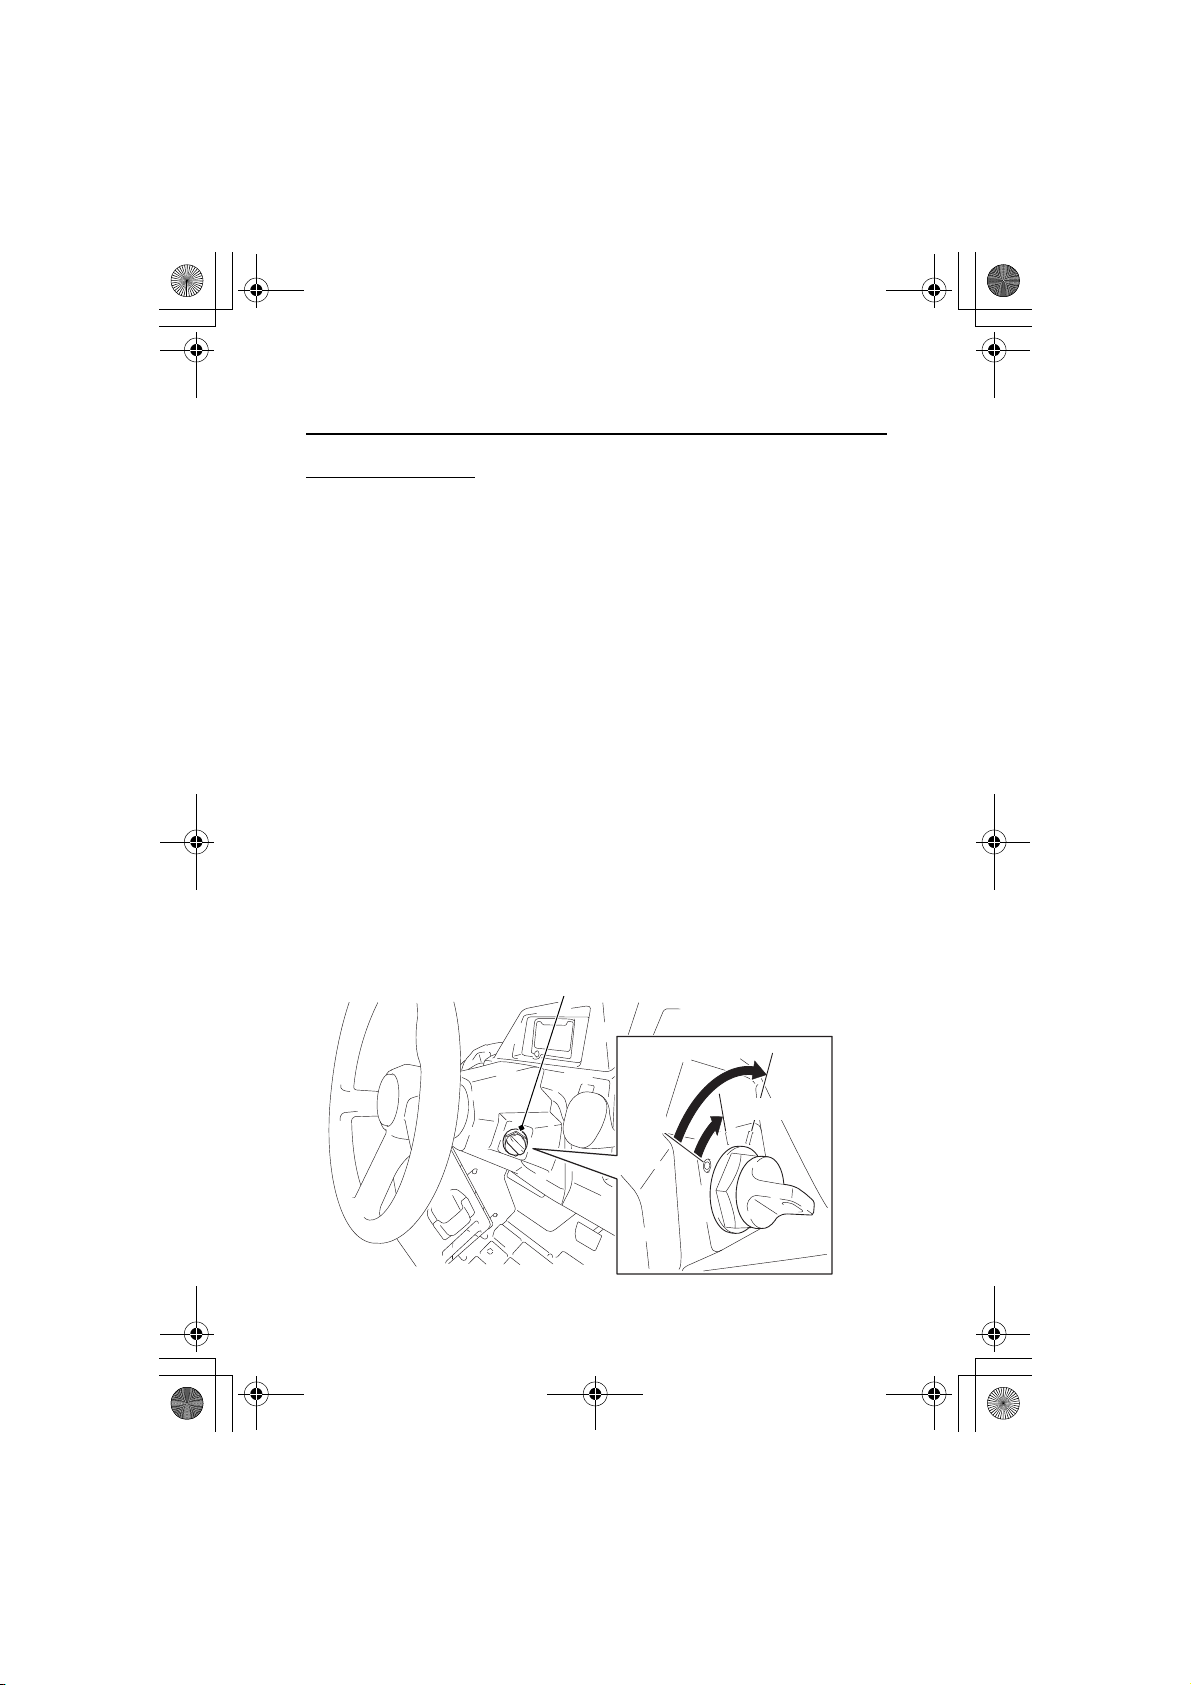
OFF
(w)
ON (q)
ignition switch
START (p)
14 SXS700-31HL36000.book 75 ページ 2013年5月14日 火曜日 午前10時59分
Basic Operation
Starting the engine:
1.
Apply the parking brake.
2.
Make sure the shift lever is in neutral. Press on the brake pedal.
3.
To start the engine, without touching the accelerator pedal,
insert the key and turn the ignition switch to the START (p)
position.
Immediately after the engine starts, let go of the key. The switch
returns to the ON (q) position.
Do not hold the key in the START (p) position for more than 5
seconds at a time.
If the engine does not start after 5 seconds, turn the key back to
the OFF (w) position and wait about 10 seconds before turning it
to START (p) again.
4.
If the engine does not start within 5 seconds, or starts but stalls
right away, repeat step 3 with the accelerator pedal pressed
halfway down.
If the engine starts, release pressure on the accelerator pedal so
the engine does not race.
5.
If the engine fails to start, press the accelerator pedal all the way
down, and hold it there while starting to clear flooding. If the
engine still does not start, return to step 3.
Basic Operation & Driving Guidelines
75
Page 84
14 SXS700-31HL36000.book 76 ページ 2013年5月14日 火曜日 午前10時59分
Basic Operation
To stop the engine, turn the ignition switch to the OFF (w) position.
Remember to apply the parking brake and remove the key if you
plan to leave the vehicle.
Selecting a Shift Position
You can drive your vehicle either forward or backward by moving the shift
lever from neutral (N) to drive (D) or reverse (R).
Remember, to avoid damaging the transmission, move the shift lever
only when the vehicle is stopped and the engine is idling.
See page 32 for additional information.
Selecting a Drive Mode
2WD This mode supplies power to the rear wheels only, this
mode is best for surfaces with good traction.
4WD This mode supplies power to the front and rear wheels.
Steering will require slightly more effort than with
2WD. This mode is recommended for driving on
surfaces with relatively poor traction.
4WD
(Diff Lock)
This mode supplies power to the front and rear wheels,
and locks the front differential. As a result, steering will
require extra space and effort. Select this mode for
maximum traction.
Before using the drive mode select lever to change from one mode
to another, be sure the vehicle is stopped and the engine is idling.
See page 33 for additional information.
Basic Operation & Driving Guidelines
76
Page 85
14 SXS700-31HL36000.book 77 ページ 2013年5月14日 火曜日 午前10時59分
Basic Operation
Parking
Look for a level parking area with a firm surface. Avoid parking on a
slope or on loose or slippery surfaces when possible. If you must park
on a slope, block the wheels to help keep the vehicle from sliding.
After bringing your vehicle to a stop:
1.
Keep your foot on the brake pedal while you shift into neutral
(N).
2.
Set the parking brake.
3.
Turn the ignition switch to the OFF (w) position, and remove the
key.
Fully push the parking brake lever forward when releasing parking
brake.
Basic Operation & Driving Guidelines
77
Page 86
WARNING
3
WARNING
14 SXS700-31HL36000.book 78 ページ 2013年5月14日 火曜日 午前10時59分
Driving Guidelines
Your Honda SXS has been designed with many safety features to
help protect you. These include a strong occupant protection
structure, seat belts, doors, and side nets. However, no safety system
can prevent all injuries.
The following pages contain important precautions and driving
guidelines to help you make good decisions and operate your vehicle
safely.
Failure to follow the driving guidelines in this
owner’s manual can lead to a crash or
overturn in which you or others can be
seriously hurt or killed.
Follow all safe-driving guidelines in this
owner’s manual.
Safe Driving Precautions
Before driving your Honda SXS for the first time, please review the
“Driver & Passenger Safety” section (page 1), the “Before Driving”
section (page 61), and the precautions below.
We also recommend that you complete the Recreational OffHighway Vehicle (ROV) E-Course. The free course is available at
www.ROHVA.org. The two-hour ROV E-Course is a multi-media,
interactive, online safety course that reinforces:
• Key risk factors associated with ROV operation
• Safe driving practices that will reduce risk of injury
• The best resources for learning about your particular vehicle
Basic Operation & Driving Guidelines
78
Page 87
14 SXS700-31HL36000.book 79 ページ 2013年5月14日 火曜日 午前10時59分
Driving Guidelines
The ROHVA (Recreational Off-Highway Vehicle Association) also
offers the hands-on ROV Basic Driver Course (RBDC). Information on
and registration for the RBDC is available at www.ROHVA.org.
Off-highway Use Only
Your Honda SXS was designed for use on a wide variety of terrain
and situations. However, it should not be driven on any public road,
paved or unpaved, because it is not equipped to legally or safely
drive on such roads.
Remember to obey all local off-road regulations, obtain permission
before driving on someone else’s private property, and respect all
“no trespassing” signs.
Control Speed
Driving at excessive speed for the terrain or other conditions
increases the chance of a crash or overturn. Always reduce speed
when driving on hilly terrain, or when carrying cargo or towing a
trailer.
Use Extra Care on Unfamiliar Terrain
When driving in a new area, keep your speed low and check the
terrain ahead for possible problems, such as large rocks, bumps,
holes, or drop-offs. Don’t drive fast on unfamiliar terrain or when
visibility is limited. If you drive in an area with other vehicles, be sure
to keep a safe distance to avoid a collision.
Do Not Perform Stunts
Keep all four wheels on the ground at all times. Showing off or
attempting to perform stunts could lead to a crash or overturn in
which the driver, a passenger, or others could be seriously hurt or
killed.
Basic Operation & Driving Guidelines
79
Page 88
14 SXS700-31HL36000.book 80 ページ 2013年5月14日 火曜日 午前10時59分
Driving Guidelines
Off-road Driving Considerations
Your Honda SXS was designed and intended for off-road use. In the
event that you must drive on a paved surface, be aware that your
Honda SXS will feel and handle different than it does on dirt. The
tires will also wear much faster.
Vehicle Design
The Honda SXS handles somewhat differently from on-highway
vehicles due in part to features that allow it to perform its role as an
off-highway utility vehicle. For example, Honda SXS has a higher
center of gravity than cars designed for use only on pavement. It is
also equipped with large low-pressure tires that allow good traction
in sand, loose dirt, wet grass and other low-traction surfaces.
These advantages come at some cost. Because your vehicle is taller
and rides higher off the ground, it can more easily tip or roll over if
you make abrupt turns or drive on sloped terrain.
Off-highway Environments
Driving on private property, or in approved off-highway areas,
means you leave a generally predictable and orderly world behind.
You won’t find lane markers or traffic signals, and no one will be
there to warn you of trouble ahead. It’s up to you to assess situations
and drive within limits. The terrain has limits (it may be too steep or
bumpy, for example). The vehicle has limits (e.g., traction, stability,
and power). And you may be limited by lack of experience.
Basic Operation & Driving Guidelines
80
Page 89
14 SXS700-31HL36000.book 81 ページ 2013年5月14日 火曜日 午前10時59分
Driving Guidelines
Surface Considerations
The kind of surface you drive on can have important effects on how
your vehicle handles. For example, on loose or soft surfaces you’ll
need more time and distance to accelerate, turn, or brake to a stop.
Avoid any sudden sharp turn, particularly on pavement and other
hard surfaces. And always slow down after moving from one type of
surface to another until you get accustomed to how your vehicle
handles.
Reading the Terrain
Because visual information comes in unpredictable ways off-road,
you need to stay alert, constantly survey the terrain, and go slow
enough to analyze situations and make good decisions.
As your eyes search the terrain ahead, watch for changes in surface
conditions. One minute you can be on firm soil and the next in soft
sand or deep mud. A path can quickly change from level to bumpy,
slope at a dangerous angle, or disappear in a drop-off. Always keep
your eyes open for holes, washouts, or obstacles that could upset or
damage the vehicle.
Controlling Speed
Whether you travel off-road or on pavement, the general rule is to
keep your speed low. Of course, you’ll need enough speed to keep
moving forward, but too much speed leads to problems.
When driving off-road at higher speeds, you have less time to read
the terrain and make good decisions. The drive can also be more
bumpy, and there’s a greater chance of the vehicle sliding if you
brake or turn quickly on wet soil, gravel, or another slippery surface.
Never go faster than conditions allow.
Basic Operation & Driving Guidelines
81
Page 90
14 SXS700-31HL36000.book 82 ページ 2013年5月14日 火曜日 午前10時59分
Driving Guidelines
Driving with Cargo or Pulling a Trailer
The added weight of carrying cargo or pulling a trailer will affect
how your vehicle accelerates, brakes, and handles. The added
weight and length of a trailer will affect your directional control.
Please follow these guidelines whenever you carry cargo or pull a
trailer:
• Do not exceed the cargo limit and towing limits (see page 69 for
loading cargo and page 71 for towing a trailer).
• Keep speed low, particularly when driving on hills.
• Allow extra distance to accelerate, turn and slow or stop.
• Do not drive across a steep slope with a trailer.
Basic Driving
Making Turns
The basic turning technique for Honda SXS is to drive at low speed
and gradually adjust the amount of steering to suit the surface. Do
not make sudden sharp turns, either off-road or on pavement.
If your vehicle ever skids sideways during a turn, steer in the direction
of the skid. Also, avoid hard braking or accelerating until you have
regained directional control.
Braking
The best off-road braking technique is to gently step down on the
brake pedal, then increase pressure as more braking is needed. Light
braking may be all you need on soft surfaces, such as sand or loose
dirt. Avoid hard braking on any surface.
Basic Operation & Driving Guidelines
82
Page 91
14 SXS700-31HL36000.book 83 ページ 2013年5月14日 火曜日 午前10時59分
Driving Guidelines
Driving on Hills
Hills present some of the greatest challenges and hazards, especially
if you are carrying cargo or pulling a trailer. If you are new to offroad driving, start with gentle inclines, take time to learn how your
vehicle handles on slopes, and read the information that follows.
Even if you have previous off-road driving experience, the guidelines
below should serve as important reminders.
Approaching a Hill
When you approach a hill, you need to decide whether it is one that
you, your passengers, your cargo and your vehicle can handle. For
example, ask yourself:
• Is the hill too steep? Is the incline constant, or are there places
where it gets suddenly steeper? If you run out of power, you may
not be able to continue forward.
• Is there enough traction for you to make it to the top without
spinning the wheels or sliding backwards?
• Are there obstacles, such as rocks or ruts, that could upset your
vehicle and make it roll over?
• If there is no safe predetermined path, can you drive straight up
the hill without turning?
• Do you know what is on the other side of the hill?
If you do not know the answers to these questions before beginning
an ascent, you should stop and walk up the hill to find out.
Basic Operation & Driving Guidelines
83
Page 92
14 SXS700-31HL36000.book 84 ページ 2013年5月14日 火曜日 午前10時59分
Driving Guidelines
Driving Up a Hill
If you decide that it is safe to drive your Honda SXS up a hill:
• Select an appropriate drive mode for the hill.
• Approach the hill with enough speed to smoothly start up the
hill.
• Maintain a steady speed as you climb the hill.
• Reduce speed as you approach the top, and watch for other
vehicles that may be approaching the top from the other side of
the hill.
If You Stall Going Up a Hill
If a hill is steeper than you expected, traction is poor, or you don’t
maintain sufficient speed, you may begin to stall. If that happens:
• Stop the vehicle and set the parking brake.
• If you have a passenger, you may want to have them get out and
move away from the vehicle.
• If you are headed straight up the hill, shift into reverse, release
the parking brake, and slowly back straight down the hill, gently
using the brake pedal to control speed.
Driving Down a Hill
Before driving down a hill, as with driving up a hill, you need to
evaluate whether you can make it safely to the bottom and away
from the slope.
Ask yourself:
• Is the hill too steep to maintain speed and steering control?
• Is the surface too rough or too slippery?
• Can you drive straight down without turning?
• Is there a safe exit when you reach the bottom of the hill?
Basic Operation & Driving Guidelines
84
Page 93
14 SXS700-31HL36000.book 85 ページ 2013年5月14日 火曜日 午前10時59分
Driving Guidelines
If you decide it is safe to drive down a hill:
• Hold the steering wheel firmly and drive straight back down the
hill.
• Gently apply the brakes to help control speed, but do not “ride”
the brakes.
Crossing a Hill
Before traversing a hill, consider these facts:
• A hill that you can drive straight up or down can be too steep to
drive across.
• When you drive straight up or down a slope, the length of the
wheelbase reduces the chance of tipping over backward or
forward, but when you drive across a slope, the vehicle’s
narrower track and higher center of gravity increases the chance
of tipping or rolling over.
• If you drive across a slope and an uphill wheel hits a bump, or a
downhill wheel drops into a hole, your vehicle will tip downward
even more.
If you can’t clearly see all terrain conditions (good traction, no
bumps, holes or other obstacles, etc.), stop and walk the slope
before you drive on it. If you have any doubt whether you can safely
drive across a slope, don’t do it. Find another route.
Avoiding Obstacles
When driving off-road, always watch for bumps, pot holes, rain ruts
and other obstacles. Large bumps and holes can bounce you around
and cause you to lose control or get stuck. Slow down whenever you
drive on rough terrain.
Basic Operation & Driving Guidelines
85
Page 94
14 SXS700-31HL36000.book 86 ページ 2013年5月14日 火曜日 午前10時59分
Driving Guidelines
Driving Through Water
Before driving through water, stop and make sure that:
• The water is not more than about 10 inches (25 cm) deep.
• The water is not flowing too fast. Deep rushing water can sweep
you downstream. Even very shallow rushing water can wash the
ground from under your tires and cause you to lose traction and
possibly roll over.
• Both banks have gradual slopes and good traction, so you can
enter the stream and exit safely.
• The surface under the water appears to provide good traction.
Remember, the water may hide hazards, such as rocks, holes,
mud, or slippery vegetation.
If you decide you can safely cross the water:
• Proceed at a slow, steady speed.
• Watch for submerged obstacles, including slippery rocks and
holes.
• Avoid getting the spark plug or air cleaner wet, as this would
cause the engine to stop.
Driving at Night
If you drive your Honda SXS at night, always drive slower and more
cautiously than you would in daylight.
Basic Operation & Driving Guidelines
86
Page 95
14 SXS700-31HL36000.book 87 ページ 2013年5月14日 火曜日 午前10時59分
Servicing Your Honda
To help keep your Honda SXS in good shape, this section includes a
Servicing Your Honda
Maintenance Schedule for required service and step-by-step
instructions for specific maintenance tasks. You’ll also find important
safety precautions, information on fuels and oils, and tips for
keeping your Honda looking good.
For information about replacing fuses, see page 202.
(USA & Canada only)
For information about the exhaust emission and noise requirements
of the U.S. Environmental Protection Agency (EPA), the California Air
Resources Board (CARB), and Environment Canada (EC), see
page 220.
USA Only
Maintenance, replacement or repair of the emission control
devices and systems may be performed by any off-road utility
vehicle repair establishment or individual using parts that are
“certified” to EPA standards.
Before You Service Your Honda
The Importance of Maintenance ................................................. 89
Maintenance Safety .................................................................... 90
Important Safety Precautions ................................................... 91
Maintenance Schedule ............................................................... 92
Maintenance Record................................................................... 97
Service Preparations
Maintenance Component Locations ........................................... 98
Tool Kit .................................................................................... 103
Owner’s Manual Storage .......................................................... 104
Front Hood ............................................................................... 105
Air Guide Plate Removal ........................................................... 106
(cont’d)
Servicing Your Honda
87
Page 96
14 SXS700-31HL36000.book 88 ページ 2013年5月14日 火曜日 午前10時59分
Servicing Your Honda
Clip Removal ............................................................................ 107
Seat Removal............................................................................ 108
Jack Up Point & Support Point .................................................. 109
Service Procedures
Fluids, Filters & Lubricants
Fuel .......................................................................................... 110
Engine Oil & Filter..................................................................... 113
Front Final Gear Oil................................................................... 123
Rear Final Gear Oil .................................................................... 125
Coolant .................................................................................... 127
Air Cleaner ............................................................................... 132
Lubrication ............................................................................... 137
Engine
Accelerator Pedal...................................................................... 142
Spark Plug ................................................................................ 144
Spark Arrester .......................................................................... 147
Exhaust System......................................................................... 149
Chassis
Suspension ............................................................................... 150
Frame....................................................................................... 152
Brakes ...................................................................................... 153
Tires ......................................................................................... 160
Wheels ..................................................................................... 167
Driveshaft Boots ....................................................................... 168
Electrical
Battery ..................................................................................... 169
Appearance Care...................................................................... 174
Servicing Your Honda
88
Page 97
WARNING
3
WARNING
14 SXS700-31HL36000.book 89 ページ 2013年5月14日 火曜日 午前10時59分
Before You Service Your Honda
The Importance of Maintenance
A well-maintained Honda SXS is essential for safe, economical, and
trouble-free operation. It will also help reduce air pollution. Careful
pre-drive inspections and good maintenance are especially
important because your Honda SXS is designed to be driven over
rough off-road terrain.
To help you properly care for your Honda SXS, this section of the
manual provides a Maintenance Schedule. The service intervals in
this schedule are based on average operation conditions.
Improperly maintaining this Honda SXS or
failing to correct a problem before you drive
can cause a crash in which you can be
seriously hurt or killed.
Always follow the inspection and
maintenance recommendations and
schedules in this owner’s manual.
Frequent servicing of the air cleaner is especially important to help
you avoid a possible costly engine repair.
If your Honda SXS overturns or is involved in a crash, be sure your
dealer inspects all major parts, even if you are able to make some
repairs.
Servicing Your Honda
89
Page 98
WARNING
3
WARNING
14 SXS700-31HL36000.book 90 ページ 2013年5月14日 火曜日 午前10時59分
Maintenance Safety
This section includes instructions on how to perform some important
maintenance tasks. If you have basic mechanical skills, you can
perform many of these tasks with the tools provided with your
Honda SXS.
Other tasks that are more difficult and require special tools are best
performed by professionals. Removing the wheels should normally
be handled only by a Honda technician or other qualified mechanic.
Instructions are included in this manual only to assist in emergency
service.
Some of the most important safety precautions follow. However, we
cannot warn you of every conceivable hazard that can arise in
performing maintenance. Only you can decide whether or not you
should perform a given task.
Failure to properly follow maintenance
instructions and precautions can cause you to
be seriously hurt or killed.
Always follow the procedures and
precautions in this owner’s manual.
Servicing Your Honda
90
Page 99
14 SXS700-31HL36000.book 91 ページ 2013年5月14日 火曜日 午前10時59分
Maintenance Safety
Important Safety Precautions
• Make sure the engine is off before you begin any maintenance or
repairs. This will help eliminate several potential hazards:
Carbon monoxide poisoning from engine exhaust. Be sure
there is adequate ventilation whenever you operate the engine.
Burns from hot parts. Let the engine and exhaust system cool
before touching.
Injury from moving parts. Do not run the engine unless
instructed to do so.
• Read the instructions before you begin, and make sure you have
the tools and skills required.
• To reduce the possibility of a fire or explosion, be careful when
working around gasoline. Use only non-flammable solvent, not
gasoline, to clean parts. Keep cigarettes, sparks, and flames away
from all fuel-related parts.
Remember that your Honda dealer knows your Honda SXS best and
is fully equipped to maintain and repair it. To ensure the best quality
and reliability, use only new Honda Genuine Parts or other
equivalents for repair and replacement. If you have the tools and
skills required for additional maintenance jobs, you can purchase an
official Honda Service Manual (page 228).
Servicing Your Honda
91
Page 100
14 SXS700-31HL36000.book 92 ページ 2013年5月14日 火曜日 午前10時59分
Maintenance Schedule
The required Maintenance Schedule that follows specifies how often
you should have your Honda SXS serviced, and what things need
attention. It is essential to have your Honda SXS serviced as
scheduled to maintain safe, dependable performance, and proper
emission control.
The service intervals in this Maintenance Schedule are based on
average driving conditions. Some items will need more frequent
service if you drive in unusually wet or dusty areas or at full throttle.
Consult your dealer for recommendations applicable to your
individual needs and use.
Some items in the Maintenance Schedule can be performed with
basic mechanical skills and hand tools. Procedures for these items
are provided in this manual. Other items involve more extensive
procedures and may require special training, tools, and equipment.
We recommend that you have your dealer perform these tasks
unless you have advanced mechanical skills and the required tools
and equipment. Procedures for such items in this schedule are
provided in an official Honda Service Manual available for purchase
(page 228).
If you do not feel capable of performing a given task or need
assistance, remember that your Honda dealer knows your Honda
SXS best and is fully equipped to maintain and repair it. If you decide
to do your own maintenance, use only Honda Genuine Parts or their
equivalents for repair or replacement to ensure the best quality and
reliability.
Servicing Your Honda
92
 Loading...