


SPLIT TYPE
INDOOR UNIT/OUTDOOR UNIT
MODEL
RAS-S28H2 / RAC-S28H2
OUTDOOR UNIT |
INDOOR UNIT |
ENGLISH
RAS-S28H2
RAC-S28H2
Instruction manual Page 1~24 To obtain the best performance and ensure years of trouble free use, please read this instruction manual completely.
Bedlenungsanleitung Suite 25~48 Bitte lesen Sie diese Bedienungsanleitung aufmerksam durch, um durch richtige Bedienung jahrelangen und störungsfreien Betrieb zu gewährleisten.
Manuale di istruzioni Pag. 49~72 Per garantire la migliore prestazione e la più lunga durataleggere attentamente e al completo le seguanti istruzioni.
Manual de instrucciones Página 73~96 Para obtener el mejor funcionamiento y asegurar años de uso libre de problemas, lea cuidadosamente este manual de instrucciones.
Инструкция по эксплуатации стр. 97~120
Для обеспечения наилууших эксплуатационных характеристик и многолетней безотказной работы оборудования необходимо полностыо оэнакомиться с данной Инструкцией по эксплуатации.
– 1 –
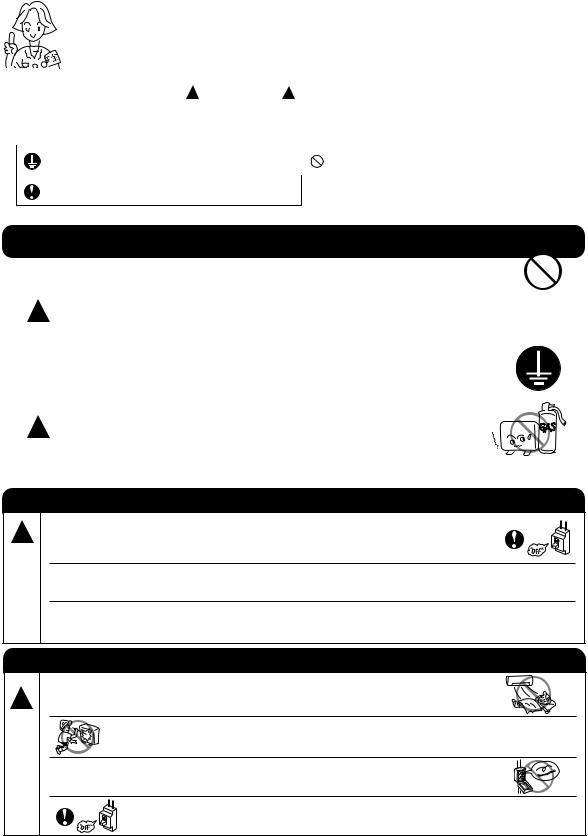
SAFETY PRECAUTION
●Please read the “Safety Precaution” carefully before operating the unit to ensure correct usage of the unit.
●Pay special attention to signs of “ ! Warning” and “ ! Caution”. The “Warning” section contains matters which, if not observed strictly, may cause death or serious injury. The “Caution” section contains matters which may result in serious consequences if not observed properly. Please observe all instructions strictly to ensure safety.
●The sign indicate the following meanings.
Make sure to connect earth line. |
The sign in the figure indicates prohibition. |
|
|
Indicates the instructions that must be followed.
● Please keep this manual after reading.
|
|
PRECAUTIONS DURING INSTALLATION |
||||
|
||||||
|
|
● Do not reconstruct the unit. |
||||
|
|
Water leakage, fault, short circuit or fire may occur if you reconstruct |
||||
|
|
the unit by yourself. |
|
|||
! |
|
● Please ask your sales agent or qualified technician for the installation |
||||
|
of your unit. Water leakage, short circuit or fire may occur if you install |
|||||
WARNING |
|
the unit by yourself. |
|
|||
|
|
● Please use earth line. |
||||
|
|
Do not place the earth line near water or gas pipes, lightning-conductor, |
||||
|
|
or the earth line of telephone. Improper installation of earth line may |
||||
|
|
cause electric shock. |
||||
|
|
|
|
|
|
|
|
|
● A circuit breaker should be installed depending on the mounting site of |
||||
! |
|
the unit. Without a circuit breaker, the danger of electric shock exists. |
|
|
||
|
|
|
||||
|
● Do not install near location where there is flammable gas. The outdoor |
|
|
|||
|
|
|||||
CAUTION |
|
unit may catch fire if flammable gas leaks around it. |
||||
|
|
|
|
|
|
|
|
|
● Please ensure smooth flow of water when installing the drain hose. |
||||
|
|
|
|
|
|
|
PRECAUTIONS DURING SHIFTING OR MAINTENANCE
! |
● |
Should abnormal situation arises (like burning smell), please stop operating the unit |
|
|
and turn off the circuit breaker. Contact your agent. Fault, short circuit or fire may |
||
W |
|
occur if you continue to operate the unit under abnormal situation. |
|
A |
|
Please contact your agent for maintenance. Improper self maintenance may cause |
|
R |
● |
||
|
|
||
N |
|
electric shock and fire. |
|
I |
|
Please contact your agent if you need to remove and reinstall the unit. Electric |
|
N |
● |
||
|
|
||
G |
|
shock or fire may occur if you remove and reinstall the unit yourself improperly. |
|
|
|
PRECAUTIONS DURING OPERATION |
|
! |
● |
Avoid an extended period of direct air flow for your health. |
|
|
|
||
W |
|
● Do not put objects like thin rods into the panel of blower and suction side |
|
A |
|
||
|
because the high-speed fan inside may cause danger. |
||
R |
|
||
|
|
||
N |
● |
Do not use any conductor as fuse wire, this could cause fatal accident. |
|
I |
|||
|
|
||
N |
|
|
|
G |
|
● During thunder storm, disconnect and turn off the circuit breaker. |
– 2 –

PRECAUTIONS DURING OPERATION
● The product shall be operated under the manufacturer specification and not for any other intended use.
● Do not attempt to operate the unit with wet hands, this could cause fatal accident.
● When operating the unit with burning equipments, regularly ventilate the room to avoid oxygen insufficiency.
● Do not direct the cool air coming out from the air-conditioner panel to face household heating apparatus as this may affect the working of apparatus such as the electric kettle, oven etc.
● Please ensure that outdoor mounting frame is always stable, firm and without defect. If not, the outdoor unit may collapse and cause danger.
|
● Do not splash or direct water to the body of the unit when cleaning it as this |
|
|
may cause short circuit. |
|
! |
● Do not use any aerosol or hair sprays near the indoor unit. This chemical |
|
can adhere on heat exchanger fin and blocked the evaporation water flow |
||
C |
to drain pan. The water will drop on tangential fan and cause water splashing |
|
out from indoor unit. |
||
A |
||
|
||
U |
● Please switch off the unit and turn off the circuit breaker during cleaning, the |
|
T |
||
high-speed fan inside the unit may cause danger. |
||
I |
||
|
||
O |
|
|
N |
|
● Turn off the circuit breaker if the unit is not to be operated for a long period.
● Do not climb on the outdoor unit or put objects on it.
● Do not put water container (like vase) on the indoor unit to avoid water dripping into the unit. Dripping water will damage the insulator inside the unit and causes short-circuit.
● Do not place plants directly under the air flow as it is bad for the plants.
●When operating the unit with the door and windows opened, (the room humidity is always above 80%) and with the air deflector facing down or moving automatically for a long period of time, water will condense on the air deflector and drips down occasionally. This will wet your furniture. Therefore, do not operate under such condition for a long time.
●If the amount of heat in the room is above the cooling or heating capability of the unit (for example: more people entering the room, using heating equipments and etc.), the preset room temperature cannot be achieved.
●This is not intended for use by young children or infirm persons unless they have been adequately supervised by a responsible person to ensure that they can use the appliance safely.
●Young children should be supervised to ensure that they do not play with the appliance.
–3 –
ENGLISH

NAMES AND FUNCTIONS OF EACH PART
INDOOR UNIT
AIR FILTER
To prevent dust from coming into the indoor unit. (Refer page 19)
FRONT PANEL (AIR INLET).
INDOOR UNIT INDICATORS
Light indicator showing the operating condition. (Refer page 5)
REMOTE CONTROL
Send out operation signal to the indoor unit. So as to operate the whole unit.
(Refer page 6)
OUTDOOR UNIT
DRAIN PIPE
Condensed water drain to outside.
CONNECTING CORD
AIR INLET (BACK, LEFT SIDE)
AIR OUTLET
MODEL NAME AND DIMENSIONS
MODEL |
WIDTH (mm) |
HEIGHT (mm) |
DEPTH (mm) |
|
|
|
|
RAS-S28H2 |
1030 |
295 |
191 |
|
|
|
|
RAC-S28H2 |
850 |
800 |
298 |
|
|
|
|
– 4 –

INDOOR UNIT INDICATORS
HITACHI
ENGLISH
OPERATION LAMP
This lamp lights during operation.
TIMER LAMP
This lamp lights when the timer is working.
FILTER LAMP
When the device is operated for a total of about 200 hours, the FILTER lamp lights to indicate that it is time to clean the filter. The lamp goes out when the POWER SWITCH set to OFF and ON again.
OPERATION INDICATOR
● This figure shows the opening condition of front panel. Refer to page 18 in relation to how to open or close the front panel.
TEMPORARY
SWITCH
TEMPORARY
SWITCH
TEMPORARY SWITCH
●Use this switch to start and stop when the remote controller does not work.
●By pressing the temporary switch, the operation is done in automatic mode.
– 5 –
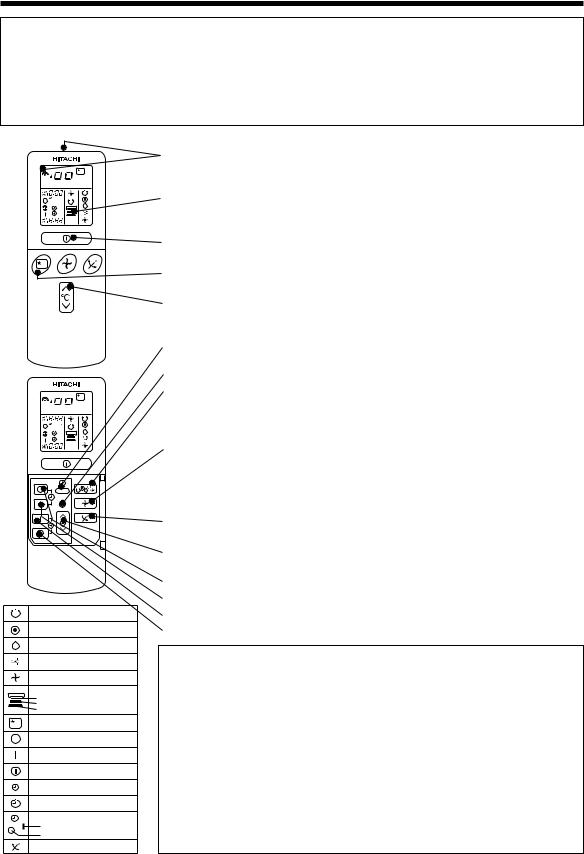
NAMES AND FUNCTIONS OF REMOTE CONTROL UNIT
REMOTE CONTROLLER
●This controls the operation of the indoor unit. The range of control is about 7 meters. If indoor lighting is controlled electronically, the range of control may be shorter.
This unit can be fixed on a wall using the fixture provided. Before fixing it, make sure the indoor unit can be controlled from the remote controller.
●Handle the remote controller with care. Dropping it or getting it wet may compromise its signal transmission capability.
●After new batteries are inserted into the remote controller, the unit will initially require approximately 10 seconds to respond to commands and operate.


 ˚CH
˚CH


 ˚CH
˚CH
RESET
AUTO
HEAT
DEHUMIDIFY
COOL
FAN
FAN SPEED
LOW
MED
HI
SLEEPING
STOP (CANCEL)
START (RESERVE)
START/STOP
TIME
TIMER SET
TIMER SELECTOR
ON TIMER
OFF TIMER
AUTO SWING
●Signal emitting window/transmission sign
Point this window toward the indoor unit when controlling it. The transmission sign blinks when a signal is sent.
●Display
This indicates the room temperature selected, current time, timer status, function and intensity of circulation selected.
●START/STOP button
Press this button to start operation. Press it again to stop operation.
●SLEEP button
Use this button to set the sleep timer.
●TEMPERATURE buttons
Use these buttons to raise or lower the temperature setting. (Keep pressed, and the value will change more quickly.)
●TIME button
Use this button to set and check the time and date.
●RESET buttons
●FUNCTION selector
Use this button to select the operating mode. Every time you press it, the mode will change from 
 (AUTO) to
  (HEAT) to
  (DEHUMIDIFY) to
  (COOL) and to
  (FAN) cyclically.
●FAN SPEED selector
This determines the fan speed. Every time you press this button, the intensity
of circulation will change from 
 (AUTO) to
  (HI) to
  (MED) to
  (LOW) (This button allows selecting the optimal or preferred fan speed for each operation mode).
●AUTO SWING button
Controls the angle of the horizontal air deflector.
●TIMER control
Use this button to set the timer.
●OFF-TIMER button Select the turn OFF time.
●ON-TIMER button Select the turn ON time.
●RESERVE button Time setting reservation.
●CANCEL button Cancel time reservation.
Precautions for Use
●Do not put the remote controller in the following places.
●Under direct sunlight.
●In the vicinity of a heater.
●Handle the remote controller carefully. Do not drop it on the floor, and protect it from water.
●Once the outdoor unit stops, it will not restart for about 3 minutes (unless you turn the power switch off and on or unplug the power cord and plug it in again).
This is to protect the device and does not indicate a failure.
●If you press the FUNCTION selector button during operation, the device may stop for about 3 minutes for protection.
– 6 –

VARIOUS FUNCTIONS
■ Auto Restart Control |
|
ENGLISH |
|
|
|
● If there is a power failure, operation will be automatically restarted when the power is resumed with previous operation mode |
|
|
|
|
|
and airflow direction. |
|
|
(As the operation is not stopped by remote controller.) |
|
|
● If you intend not to continue the operation when the power is resumed, switch off the power supply. |
|
|
When you switch on the circuit breaker, the operation will be automatically restarted with previous operation mode and airflow |
|
|
direction. |
|
|
Note: 1. If you do not require Auto Restart Control, please consult your sales agent or OFF by remote control. |
|
|
2. Auto Restart Control is not available when Timer or Sleep Timer mode is set. |
|
|
|
|
|
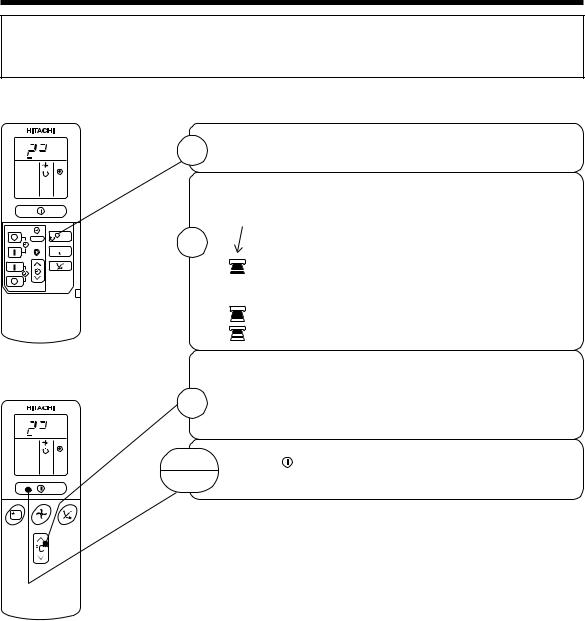
AUTOMATIC OPERATION
The device will automatically determine the mode of operation, HEAT, COOL or DEHUMIDIFY depending on the current room temperature. The selected mode of operation will change when the room temperature varies. However the mode of operation will not change when indoor unit connected to multi type outdoor unit.
Press the FUNCTION selector so that the display indicates the 
 (AUTO) mode of operation.
●When AUTO has been selected, the device will automatically determine the mode of operation, HEAT, COOL or DEHUMIDIFY depending on the current room temperature.
1However the mode of operation will not change when indoor unit connected to multi type outdoor unit.
●If the mode automatically selected by the unit is not satisfactory, manually change the mode setting (heat, dehumidify, cool or fan).
RESET
START
STOP
Press the  (START/STOP) button. Operation starts with a beep.
Press the button again to stop operation.
■As the settings are stored in memory in the remote controller, you only have to press the  (START/STOP) button next time.
You can raise or lower the temperature setting as necessary by maximum of 3°C.
°C |
Press the temperature button and the temperature setting will change by |
|
1°C each time. |
||
|
●The preset temperature and the actual room temperature may vary somewhat depending on conditions.
●The display does not indicate the preset temperature in the AUTO mode. If you change the setting, the indoor unit will produce a beep.
Press the  (FAN SPEED) button, AUTO and LOW is available.
– 7 –
HEATING OPERATION
●Use the device for heating when the outdoor temperature is under 21°C.
When it is too warm (over 21°C), the heating function may not work in order to protect the device.
●In order to keep reliability of the device, please use this device above -15°C of the outdoor temperature.
 ˚C
˚C
RESET
 ˚C
˚C
1


 2
2
3
Press the FUNCTION selector so that the display indicates  (HEAT).
Set the desired FAN SPEED with the  (FAN SPEED) button (the display indicates the setting).

 (AUTO): The fan speed is HI at first and varies to MED or LOW automatically when the preset temperature has been reached.
(HI) |
: Economical as the room will become warm |
|
quickly. |
|
But you may feel a chill at the beginning. |
(MED) : Fan speed slow. (LOW) : Fan speed slower.
Set the desired room temperature with the TEMPERATURE buttons (the display indicates the setting).
The temperature setting and the actual room temperature may vary somewhat depending on conditions.
START |
Press the |
(START/STOP) button. Heating operation starts |
STOP |
with a beep. Press the button again to stop operation. |
|
■As the settings are stored in memory in the remote controller, you only have to press the  (START/STOP) button next time.
– 8 –

DEHUMIDIFYING OPERATION
Use the device for dehumidifying when the room temperature is over 16°C.
When it is under 15°C, the dehumidifying function will not work.
|
|
1 |
Press the FUNCTION selector so that the display indicates |
|
˚C |
(DEHUMIDIFY). |
|
|
|
The FAN SPEED is set at LOW automatically. |
|
|
|
|
The FAN SPEED button does not work. |
|
|
|
Set the desired room temperature with the TEMPERATURE |
|
|
2 |
button (the display indicates the setting). |
RESET |
|
|
|
|
|
The range of 20-26˚C is recommended as |
|
|
|
|
the room temperature for dehumidifying. |
|
|
START |
Press the (START/STOP) button. Dehumidifying operation |
|
|
STOP |
starts with a beep. Press the button again to stop operation. |
ENGLISH
■ As the settings are stored in memory in the remote controller, you only have to press the  (START/STOP) button next time.
 ˚C
˚C
■ Dehumidifying Function
When the room temperature is higher than the temperature setting: The device will dehumidify the room, reducing the room temperature to the preset level.
When the room temperature is lower than the temperature setting: Dehumidifying will be performed at the temperature setting slightly lower than the current room temperature, regardless of the temperature setting. The function will stop (the indoor unit will stop emitting air) as soon as the room temperature becomes lower than the setting temperature.
– 9 –

COOLING OPERATION
Use the device for cooling when the outdoor temperature is 22-42°C.
If in doors humidity is very high (80%), some dew may form on the air outlet grille of the indoor unit.
 ˚C
˚C
RESET
 ˚C
˚C
1 |
Press the FUNCTION selector so that the display indicates |
(COOL). |
Set the desired FAN SPEED with the  (FAN SPEED) button (the display indicates the setting).
2 |
(AUTO): The FAN SPEED is HI at first and varies to |
|
|
MED or LOW automatically when the preset |
|
|
temperature has been reached. |
|
|
(HI) |
: Economical as the room will become cool |
|
|
quickly. |
|
(MED) |
: Fan speed slow. |
|
(LOW) : Fan speed slower. |
|
3 |
Set the desired room temperature with the TEMPERATURE |
|
button (the display indicates the setting). |
||
The temperature setting and the actual room temperature may |
||
vary some how depending on conditions.
Press the  (START/STOP) button. Cooling operation starts with a beep. Press the button again to stop operation. The START cooling function does not start if the temperature setting is STOP higher than the current room temperature (even though the
  (OPERATION) lamp lights). The cooling function will start as soon as you set the temperature below the current room
temperature.
■As the settings are stored in memory in the remote controller, you only have to press the  (START/STOP) button next time.
– 10 –
FAN OPERATION
You can use the device simply as an air circulator. Use this function to dry the interior of the indoor unit at the end of summer.
RESET
1
2
START
STOP
Press the FUNCTION selector so that the display indicates  (FAN).
Press the  (FAN SPEED) button.
Press the  (START/STOP) button. Fan operation starts with a beep. Press the button again to stop operation.
ENGLISH
FAN SPEED (AUTO) ..... When the AUTO fan speed mode is set in the cooling/heating operation:
|
● The fan speed will automatically change according to the temperature |
|
|
of discharged air. |
|
For the heating operation |
● When the difference of room temperature and setting temperature is |
|
large, fan starts to run at HI speed. |
||
|
||
|
● When the room temperature reaches setting temperature, fan speed |
|
|
changes to LOW automatically. |
|
|
|
|
|
● When the difference of room temperature and setting temperature is |
|
For the cooling operation |
large, fan starts to run at HI speed. |
|
● After room temperature reaches the preset temperature, the cooling |
||
|
operation, which changes the fan speed and room temperature to obtain |
|
|
optimum conditions for natural healthful cooling will be performed. |
|
|
|
– 11 –
HOW TO SET THE TIMER
TIME, DAY, |
Time, Day, Month |
1 Set the current month and |
After you change the |
day with the TIMER control |
|
MONTH |
batteries; |
button. |
(current time, day, month)
|
|
M D |
M |
D |
OFF TIMER |
|
|
|
|
RESET |
|
|
|
|
ON TIMER |
OFF-Timer |
|
1 Press the |
(OFF-TIMER) |
|
|
|||
RESERVE |
|
|
button. The |
(OFF) mark blinks |
|
|
on the display. |
|
|
CANCEL |
Start |
STOP |
|
AM |
|
|
You can set the device to turn off at the present time.
ON-Timer
Stop Start
●The device will turn on at the designated times.
1 Press the 
 (ON-TIMER) button the
  (ON) mark blinks on the display.
AM 


ON/OFF-Timer |
1 Press the |
(ON-OFF) |
|
button so that the |
(OFF) |
|
mark blinks. |
|
Start |
Stop |
|
●The device will turn on (off) and off (on) at the designated times.
● The switching occurs first at the |
PM |
|
preset time that comes earlier. |
||
|
||
● The arrow mark appearing on the |
|
|
display indicates the sequence of |
|
|
switching operations. |
|
2 Set the turn-off time |
3 Press the |
|
|
|
|
(ON- |
||||
with the TIMER control |
TIMER) button so |
|
|
that the |
||||||
button. |
(OFF) mark lights and |
|||||||||
Press the |
|
(RESERVE) |
the |
|
(ON) mark blinks. |
|||||
|
|
|||||||||
button.
PM 


PM 


AM 


How to Cancel Reservation
Point the signal window of the remote controller toward the indoor unit, and press the  (CANCEL) button.
The 
NOTE
You can set only one of the OFF-timer,
ON-timer and ON/OFF-timer.
– 12 –
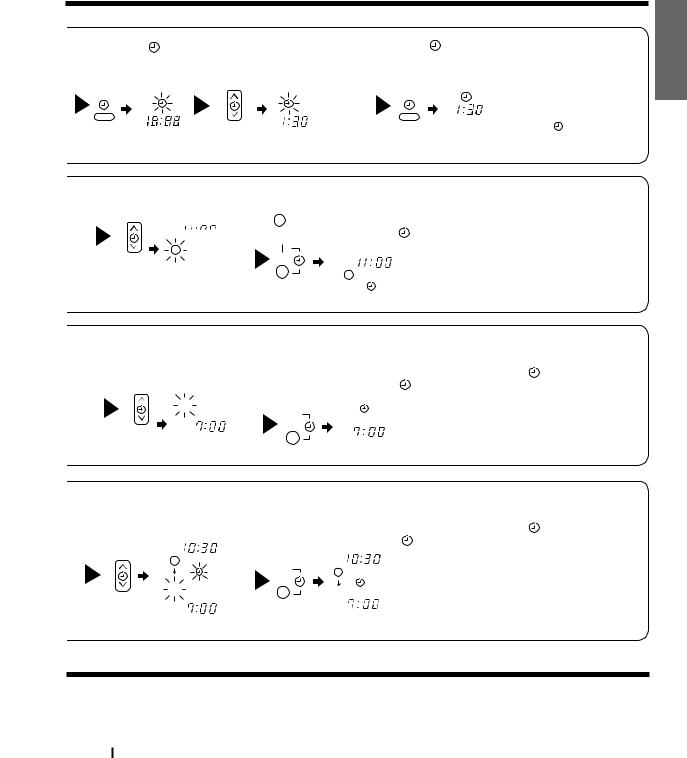
2 Press the |
3 Set the current time with the |
4 Press the |
(TIME) button again. |
|
||
(TIME) button. |
TIMER control button. |
The time indication starts lighting |
|
|||
|
|
instead of flashing. |
|
|
|
|
|
|
|
|
● The time indication will disappear |
||
|
|
|
PM |
|
automatically in 10 second. |
|
AM |
|
|
● |
To check the current time setting, |
||
|
|
|
||||
PM |
PM |
|
|
|
press the |
(TIME) button twice. |
|
Example: The current time is 1:30 p.m. |
|
|
The setting of the current time is |
||
|
|
|
now complete. |
|||
2 Set the turn-off time with the TIMER control button.
PM 


3 Point the signal window of the remote controller toward the indoor unit, and press the  (RESERVE) button.
The (OFF) mark starts lighting instead of flashing and the sign  (RESERVED)
lights. A beep occurs and the |
(TIMER) lamp lights on the indoor unit. |
PM |
|
|
Example: The device will turn off at 11:00p.m. |
The setting of turn-off time is now complete.
2 Set the turn-on time with the |
3 Point the signal window of the remote controller toward the indoor unit, and |
|||
TIMER control button. |
press the |
(RESERVE) button. |
||
|
The |
|
(ON) mark starts lighting instead of flashing and the (RESERVED) sign |
|
|
|
|||
|
|
|
|
lights. A beep occurs and the |
(TIMER) lamp lights on the indoor unit. |
||||||||
|
|
|
|
|
|
|
|
|
|
|
|
Example: |
|
|
|
|
|
|
|
|
|
|
|
|
|
|
|
|
|
|
|
|
|
|
|
|
|
|
|
|
|
|
|
|
|
|
|
|
|
|
|
|
|
|
|
|
|
AM |
|
|
|
|
|
|
AM |
The device will turn on at 7:00 a.m. |
|
||
|
|
|
|
|
|
|
|
|
|
The setting of the turn-on time is now complete. |
|||
|
|
|
|
|
|
|
|
|
|
|
|
||
4 Set the turn-on time with the |
5 Point the signal window of the remote controller toward the indoor unit, and |
||||||||||||
TIMER control button. |
press the |
(RESERVE) button. |
|
|
|||||||||
|
|
|
|
The |
|
(ON) mark starts lighting instead of flashing and the |
(RESERVED) sign |
||||||
|
|
|
|
|
|||||||||
|
|
|
|
lights. A beep occurs and the |
(TIMER) lamp lights on the indoor unit. |
||||||||
PM |
|
|
|
|
|
|
|
|
|
|
|||
|
|
|
|
|
|
|
|
|
PM |
Example: |
|
||
|
|
|
|
|
|
|
|
|
|
|
|
The device will turn off at 10:30 p.m. and it will be turned on |
|
|
|
|
|
|
|
|
|
|
|
|
|
||
|
|
|
|
|
|
|
|
|
|
|
|
at 7:00 a.m. |
|
|
|
|
|
|
|
|
|
|
|
|
|
The settings of the turn-on/off times are now complete. |
|
AM |
|
|
|
|
|
AM |
|
|
|||||
|
|
|
|
|
|
|
|
|
|
||||
ENGLISH
●The timer may be used in three ways: off-timer, on-timer, and ON/OFF (OFF/ON)-timer. Set the current time at first because it serves as a reference.
●As the time settings are stored in memory in the remote controller, you only have to press
the (RESERVE) button in order to use the same settings next time.
– 13 –

HOW TO SET THE SLEEP TIMER
Set the current time at first if it is not set before (see the pages for setting the current time). Press the  (SLEEP) button, and the display changes as shown below.
 H
H
|
Mode |
|
|
|
|
Indication |
|
|||
|
|
|
|
|
|
|||||
|
|
|
|
|
|
|
|
|
|
|
|
Sleep timer |
|
4 |
1 hour |
4 2 hours |
4 3 hours |
4 7 hours |
|
|
|
|
|
|
|
|||||||
|
|
|
|
|
Sleep timer off 1 |
|
||||
|
|
|
|
|
|
|
||||
|
|
|
|
|
|
|
||||
|
|
|
|
|
|
|
|
|
|
|
Sleep Timer: The device will continue working for the designated number of hours and then turn off.
Point the signal window of the remote controller toward the indoor unit, and press the SLEEP button.
The timer information will be displayed on the remote controller. The TIMER lamp lights with a beep from the indoor unit. When the sleep timer has been set, the display indicates the turn-off time.
|
|
|
Example: If you set 3 hours sleep |
|
|
|
time at 11:38 p.m., the turn-off |
|
H |
|
time is 2:38 a.m. |
Sleep |
Start |
The device will be turned off by the sleep |
|
timer |
|
|
timer and turned on by on-timer. |
1 Set the ON-timer.
2 Press the  (SLEEP) button and set the sleep timer.
AM
H
AM
For heating:
In this case, the device will turn off in 2 hours (at 1:38 a.m.) and turn on early so that the preset temperature will be almost reached at 6:00 next morning.
(CANCEL)

Explanation of the sleep timer
The device will control the FAN SPEED and room temperature automatically so as to be quiet and good for people’s health.
You can set the sleep timer to turn off after 1, 2, 3 or 7 hours.
NOTE
●If date or current time is not set, sleep timer can not be set.
●If you set the sleep timer after the off-, on/offor off/on-timer has been set, the sleep timer becomes effective instead of the off-, on/offor off/ on-timer set.
●You can not set other timer during sleep timer operation.
ENGLISH
– 15 –
 Loading...