


INTERNET RADIO
Cosmopolit 8 WEB
EN

CONTENTS-----------------------------------------------------------------------------------------------------------------------------------
4COSMOPOLIT 8 WEB
4Packing contents
4Special features
4Operate by UNDOK
4CE declaration
5SET-UP AND SAFETY
6OVERVIEW
6Controls
8 The back of the device
9The remote control
10The Multifunction display of the device
11CONNECTION AND PREPARATION
11Connecting an external device
11Connecting the headphones
11Connecting an MP3 player or a USB memory stick
12LAN connection to the Internet
13WLAN connection to the Internet
14Connecting the mains adapter
14Inserting battery in the remote control
15SETTINGS
15 Menu navigation
15First Installation using the installation assistant “Wizard”
15 Start First Installation
18Setting DAB stations
19Setting FM stations
20Installing Spotify
20Setting the sound effect “My EQ”
20Setting the brightness of the display
21GENERAL FUNCTIONS
21 Switching on and off
21 Selecting the input source
21 Adjusting the volume
21 Listening with headphones or earphones
21 Select the sound effects
21 Automatic switch-off
22 INTERNET RADIO MODE
22 Listening to an Internet radio station
22Selecting the internet radio stations’ input source
22 Selecting Internet radio stations according to search criteria
24Storing Internet radio stations on presets
24Opening preset Internet stations
25Displaying information about Internet radio stations
25Listening to a Podcast
26INTERNET RADIO TUNING SERVICE
26Registering on the GRUNDIG homepage
26Creating lists of favourites
28Searching for radio stations that are not provided by V-Tuner
29 SHARED MEDIA MODE
29Shared media server (audio streaming)
29Selecting the shared media input source
29Other playback functions
29Playlist
30Playback of media and "remote control" of Cosmopolit via the PC
31Play using the "Play to ..." function in the
Windows Media Player
31 Play using the "Play to ..." function without the Windows Media Player
31Display information
32USB MODE
32Playing the contents of a USB memory stick
32 Viewing information
34 DAB MODE
34 Selecting the DAB input source
34 Selecting a DAB station – from the station list
34 Selecting a DAB station – from presets
34 Displaying DAB station information
2 ENGLISH

CONTENTS-----------------------------------------------------------------------------------------------------------------------------------
35 FM MODE
35Selecting the FM input source
35Selecting stations – from presets
35Stereo and mono reception
35Displaying RDS station information
36SPOTIFY MODE
36Selecting and playing back music tracks
36Additional functions
37AUX MODE
37Listening to an external source
38REMOTE CONTROL USING UNDOK
38Requirements:
38Opening the application
38Selecting the input source
38Adjusting the volume
38Selecting favourites
39My Home
39Now Playing
39Browse
39Settings
39Additional functions
39Switching the device off and on again using the app
40TIMER MODE
40Switch-on timer
41Sleep timer
42Reminder timer
43 SPECIAL SETTINGS
43Displaying Software and ID information
43Displaying information and network status
44Installing an additional network
45Setting the WLAN region
45 Deleting servers which cannot be accessed
45 Registering the device with the WLAN router with individual network settings
47 Setting the time, time zone and date automatically
47Setting the time, time zone and date manually
48Enter the PIN code for the "remote control"
48"Keeping" the connection to the router
49Deleting a network which cannot be accessed
49Updating the device software
49Changing the menu language
49Restoring the default settings (reset)
50INFORMATION
50 Glossary
52 Licence conditions
56Cleaning the device
56Environmental note
56Technical data
57Troubleshooting
ENGLISH 3

COSMOPOLIT 8 WEB---------------------------------------------------------------------------------------------
Packing contents
Cosmopolit 8 WEB Remote control
1 lithium battery 3 V, CR 2025 Operating manual
Mains adapter 9 V, 1500 mA
Special features
Your device provides access to numerous internet radio stations via a router. You can connect the device to the internet using a LAN cable or WLAN.
For Internet operation, a DSL connection and DSL flat rate are recommended.
Music titles archived on a PC or hard drive (NAS - Network Attached Storage) can be played on the device using a UPnP server or enabled folders via LAN or WLAN (audio streaming).
Your device supports the industry standard DLNA (Digital Living Network Alliance) 1.5 digital media renderer.
This allows you to "Play To" other devices around your home and combine media streaming with controlling a connected media receiver while streaming content to it from another Windows 7/8 PC on a home network.
As well as internet radio stations, the device can receive DAB and FM radio stations.
Your device also has an input source for the music provider “Spotify”, that provides a large range of music tracks via the Internet. However, this is a fee-charging service.
The MP3 and WMA music data formats can also be played back via the USB input using a USB memory stick or an MP3 player.
Use the Aux input to connect any other audio sources.
Operate by UNDOK
An application for smartphones and tablet PCs is available for your device.
Just go to the App Store or Google play store and download the application.
With the “UNDOKTM“ application, you can control many functions of the device remotely using the smartphone and the tablet PC.
The functions are described on pages 38 and 39.
CE declaration
You can find the CE declaration for the Cosmopolit 8 WEB in the form of a pdf file on the enclosed CD-ROM or on the Grundig Homepage www.grundig.com/download/doc.
4 ENGLISH

SET-UP AND SAFETY------------------------------------------------------------------------------------------------
Please note the following instructions when setting up the system:
7The device is designed for the playback of audio signals. Any other use is expressly prohibited.
7If you want to set up the device on wall shelves or in cupboards, please ensure that it is adequately ventilated. There must be at least 10 cm of space at the side, above and behind the device.
7Do not cover the device with newspapers, table cloths, curtains, etc.
7When setting up the device, remember that furniture is often coated with various types of varnish and plastic, which often contain chemical additives. These additives may cause corrosion to the feet of the unit. This may leave stains on the surface of the furniture which can be difficult or impossible to remove.
7If the device is exposed to sudden changes in temperature, for example when taken from the cold into a warm room, wait at least two hours before using it.
7The device is designed for use in dry rooms. If you do use it outdoors, make sure it is protected from moisture such as dripping or splashing water.
7 Only use the device in a moderate climate.
7Do not place the device close to heating units or in direct sunlight, as this will impair cooling.
7Do not place any vessels containing liquids, such as vases, on the device.
7Do not place any objects such as burning candles on the device.
7Do not use any cleaning agents as they may damage the housing. Clean the device with a clean dry cloth.
7Thunderstorms are a danger to all electrical devices. Even if the device is switched off, it can be damaged by a lightning strike to the mains or the antenna cable. Always disconnect the mains during a storm.
7If malfunctions occur due to static electricity charges or brief mains voltage surges, reset the device. To do this, pull out the mains adapter and connect it again after a few seconds.
7Do not expose the battery to extreme heat, such as for example sunlight, radiators, fire, etc.
7The remote control contains a button cell. Please always keep the remote control and the button cell out of reach of children.
7If the button cell is accidentally swallowed, it can lead to burns and even death within two hours. You should therefore see a doctor immediately.
7Keep new and used batteries out of reach of children. If the battery compartment cannot be closed safely, do not continue to use the device and keep out of reach of children.
7CAUTION: Danger of explosion if battery is incorrectly replaced. Replace only with the same or equivalent type.
7Continuous use at high volume level can cause damage to the user’s hearing.
7Do not open the device casing under any circumstances. Warranty claims are excluded for damage resulting from improper handling.
7Do not connect any other equipment while the device is switched on.
7Switch off the other devices as well before connecting them.
7Unplug the mains adapter to completely disconnect the device from the mains.
7Make sure the mains adapter is freely accessible.
ENGLISH 5

OVERVIEW----------------------------------------------------------------------------------------------------------------------------------
Controls |
|
|
|
ON/OFF |
|
|
Antenna |
|
● |
i |
|
|
|
|
|
MENU |
|
|
V |
|
|
Λ |
|
|
Λ |
|
|
Λ |
|
|
OK/SNOOZE |
|
|
M |
|
|
+ C – |
|
Display |
1I6 |
e |
|
||
|
2I7 |
II |
|
3I8 |
7 |
|
4I9 |
|
|
5I10 |
|
6 ENGLISH

OVERVIEW----------------------------------------------------------------------------------------------------------------------------------
●
Display
ON/OFF
Antenna
i
MENU
V
Λ
V Λ
SNOOZE/OK
M
+ C –
Infrared sensor for remote control signals.
Multifunction display.
Switches the device in and out of standby mode.
Telescopic antenna for DAB and FM reception.
Displays information about the Internet, DAB and FM radio stations and Spotify.
Opens the menu.
In the menus: moves cursor down. In radio mode: starts the FM search.
In the menus: moves cursor up. In radio mode: starts the FM search.
Selects options and menu pages in reverse.
Selects options and menu pages forwards.
In the menu: selects and confirms options.
In alarm mode: interrupts the alarm signal.
Switches between the Internet radio, Spotify, music archive, DAB, FM and Aux input sources.
Adjust the volume.
1I6 e |
In radio mode: station button |
|
1/6. |
|
In music archive mode: |
|
starts playback of a track. |
2I7 II |
In radio mode: station button |
|
2/7. |
|
In music archive mode: pauses |
|
playback. |
3I8 7 |
In radio mode: station button |
|
3/8. |
|
In music archive mode: ends |
|
playback. |
4I9 |
In radio mode: station button |
|
4/9. |
|
In music archive mode: selects |
|
the previous track |
5I10 |
In radio mode: station button |
|
5/10. |
|
In music archive mode: selects |
|
the next track. |
ENGLISH 7
OVERVIEW----------------------------------------------------------------------------------------------------------------------------------
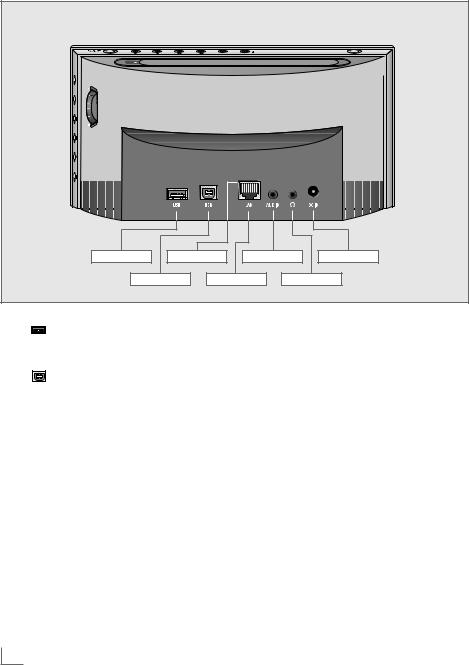
The back of the device
USB |
LED |
AUX IN |
DC 9V IN |
USB |
LAN |
|
U |
USB |
USB port type A. |
|
For connecting a USB memory |
|
stick or an MP3 player. |
USB |
USB port type B. |
|
Only for software upgrades. |
LAN |
Socket for connecting to the Eth- |
|
ernet network via LAN cable. |
LED |
Network status display. |
(green/yellow) |
|
AUX IN |
Audio signal input (stereo/ |
|
mono) for connecting an exter- |
|
nal device. |
UHeadphone jack for connecting a stereo headphone set with a jack plug (3.5 mm).
The loudspeaker of the device is automatically switched off.
DC 9V IN Socket for the mains adapter cable.
The only way to completely disconnect the device from the mains is to unplug the mains adapter cable.
8 ENGLISH

OVERVIEW----------------------------------------------------------------------------------------------------------------------------------
The remote control |
i |
MENU |
Λ |
V |
Λ |
V |
OK |
– X + |
e |
7 |
8 |
Switches the device to standby |
II |
|
||
|
mode and from standby mode |
AL1 |
|
to the last input source selected. |
|
M |
Switches between the Internet |
AL2 |
|
radio, Spotify, music archive, |
|
|
DAB, FM and Aux input sourc- |
|
|
es. |
S/N |
1 ... 0 |
Number buttons for various |
|
|
inputs. |
|
|
In radio mode: selects Internet, |
|
|
DAB and FM stations stored on |
|
|
preset channels 1 to 10. |
|
Displays information about the Internet, DAB and FM radio stations and Spotify.
Opens the menu.
In the menus: moves cursor up. In radio mode: starts the FM search.
In the menus: moves cursor down.
In radio mode: starts the FM search.
Switches in the menu one step forwards.
Switches in the menu one step backwards.
In the menus: confirms selected options.
Interrupts the alarm signal. Adjusts the volume.
In music archive and USB mode: starts playback of a track.
In music archive and USB mode: ends playback.
In music archive and USB mode: selects the previous track.
In music archive and USB mode: selects the next track.
In music archive and USB mode: pauses playback.
Activates the setting for alarm time 1.
Activates the setting for alarm time 2.
Press briefly: sets and deactivates the sleep timer.
Press and hold down: activates the reminder timer (NAP) settings.
ENGLISH 9

OVERVIEW----------------------------------------------------------------------------------------------------------------------------------
The Multifunction display of the device
Main menu
|
Internet radio |
|
Spotify |
|
Musik player |
|
DAB |
|
FM |
Internet radio |
Aux In |
The main menu shows the various input sources.
Select the main menu with icons using the »M« button.
DAB |
14:00 |
BAYERN 3
BAYERN 3 Mein Lieblingsmix
im Radio
The main menu shows the various input sources.
Select the main menu with list using the »MENU« button. Then select the option »Main menu« by using » « and confirm by pressing »OK«.
System settings
Equaliser |
> |
Network |
> |
Time/Date |
> |
Brightness |
> |
Language |
> |
Factory Reset |
|
The DAB menu: |
|
14:00 |
Time |
BAYERN 3 |
Radio station |
|
Icon of the input source. |
BAYERN 3 Mein ... Ticker text with various information from the broadcaster
The menu for system settings:
Contains all the necessary settings. You will find detailed information in the relevant section.
10 ENGLISH
CONNECTION AND PREPARATION----------------------------------------
Connecting an external device
Note:
7Switch the device off before you connect external devices.
1 Use standard audio cables to connect the audio outputs of the external device to the »AUX IN« socket on the device.
Connecting the headphones
1Insert the headphone plug (3.5 mm) into the »U« socket on the device.
–The loudspeaker of the device is switched off.
Important:
7Excessive volume levels when using headphones or earphonescan damage your hearing.
Note:
7You can also use the »U« socket to connect the device to a hi-fi system.
Connecting an MP3 player or a USB memory stick
The device supports most MP3 Players or USB memory sticks.
Important:
7The device must be switched off while the USB connection is being made. If it is not switched off, data can be lost.
1 Connect the USB interface of the MP3 player to the »USB« (type A) socket on the device using a standard USB cable;
or
insert the USB plug of the USB memory stick in the USB socket »USB« (type A) on the device.
Notes:
7To remove the MP3 player or the USB memory stick, switch off the device and pull out the cable for the data medium.
7The USB socket on the device does not support a connection for a USB extension cable and is not designed for directly connecting to a computer.
ENGLISH 11
CONNECTION AND PREPARATION----------------------------------------
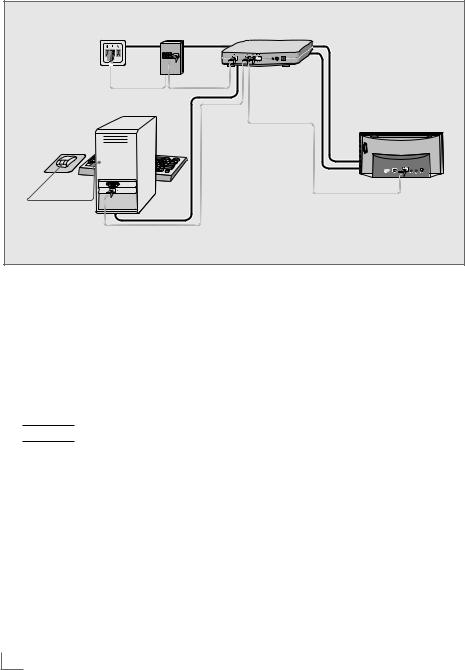
LAN connection to the Internet
Telephone socket |
Splitter |
Modem/router |
|
|
Cosmopolit 8 WEB |
Music archive on the computer |
|
|
Note: |
|
|
7Switch the device off before you connect it to the internet.
1 Connect the Ethernet socket of the modem/ router to the »LAN« socket of the device using a standard network cable (Twistedpair, RJ45 plug).
Notes:
7 The lines represent the function. Internet radio
Media servers (audio streaming)
7 The data throughput level is 10/100 Mbit.
12 ENGLISH
CONNECTION AND PREPARATION----------------------------------------
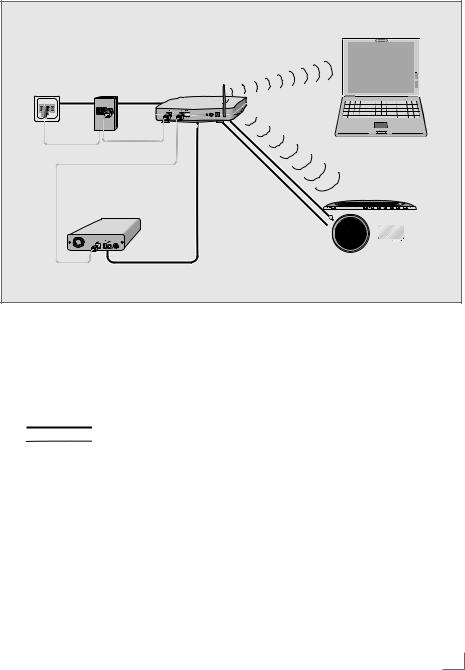
WLAN connection to the Internet
Telephone socket Splitter |
Modem/router |
Laptop
|
|
|
|
|
|
|
|
|
|
|
|
|
|
|
|
|
|
|
|
|
|
|
|
|
|
|
|
|
|
|
|
|
|
|
|
|
|
|
|
|
|
|
|
|
|
|
|
|
|
|
|
|
|
|
|
|
|
|
|
|
|
|
|
|
|
|
|
|
|
|
|
|
|
|
|
|
|
|
|
|
|
|
|
|
|
|
|
|
|
|
|
|
|
|
|
|
|
|
|
|
|
|
|
|
|
|
|
|
|
|
|
|
|
|
|
|
|
|
|
|
Music archive on hard drive (AS – Network Attached Storage) |
Cosmopolit 8 WEB |
|||||||||
Notes:
7The quality of the radio signal depends on the distance between the device and your modem/router.
7The substance of the building at the installation site can also affect this.
7 The lines represent the function. Internet radio
Music archive (audio streaming)
))))))))))) WLAN
ENGLISH 13

CONNECTION AND PREPARATION----------------------------------------
Connecting the mains adapter Inserting battery in the remote
Notes: |
control |
|
7Check that the mains voltage on the type plate (on the mains adapter) corresponds to your local mains supply. If this is not the case, contact your specialist dealer.
7 Before connecting the power adapter plug |
|
|
to the wall socket, ensure that all other con- |
|
|
nections have been made. |
OPEN• |
•LOCK |
|
|
|
|
|
• |
1 Insert the plug of the mains adapter cable |
|
|
into the »DC 9V IN« socket. |
|
|
2 Plug the power adapter into an electrical outlet.
Caution:
7The device is connected to the mains with the power supply unit. Unplug the mains adapter to completely disconnect the device from the mains.
1 Pull off the film from the battery.
2Take off the battery compartment cover (screw cap).
3When inserting the battery (3 V, lithium, CR 2025), make sure the positive terminal (+) is facing upwards and the buttons on the remote control are facing downwards.
4Replace the battery compartment cover (screw cap) and fasten it.
Notes:
7Do not expose the battery to extreme heat, caused for example by direct sunlight, heaters or fire.
7If the device no longer reacts properly to remote control commands, the battery may be flat. Always remove used batteries. The manufacturer accepts no liability for damage caused by leaking batteries.
Environmental note:
7Batteries, including those which contain no heavy metal, should not be disposed of with household waste. Always dispose of used batteries in accordance with local environmental regulations.
14 ENGLISH

SETTINGS----------------------------------------------------------------------------------------------------------------------------------------
Menu navigation
Press »MENU« on the device or on the remote control to open the menu.
Select the »Main menu« by using » « or »
 « and confirm by pressing »OK«.
In the main menu, you can select several sources (Internet radio, Spotify, Music player, DAB radio, FM radio, Auxiliary Input) or you change settings in the »System settings« menu.
Select the sources or submenus by pressing » « or »
 « and confirm by pressing »OK«.
If you wish to view the previous menu, press » «.
«.
Menus and submenus you can close with »MENU«.
First Installation using the installation assistant “Wizard”
When you connect the device to the mains at the first time, or after factory reset, the display will show the Grundig logo.
Start First Installation
1Switch on the device by pressing »8« on the remote control or »ON/OFF« on the device.
– Display: »Setup wizard« menu opens.
Setup wizard
Start now?
YES 
 NO#
NO#
2Select the push button »YES« with » « or »
 « and press »OK« to confirm.
– Display: »Language« menu opens.


 Language
English |
* |
Français |
|
Deutsch |
|
Italiano |
|
Dansk |
|
Nederlands |
|
The Wizard installation assistant then appears, which guides you through the installation step by step.
Notes:
7For Wi-Fi connection, please make sure, that the Wi-Fi router is switched on.
7The network name (SSID) must be visible and the MAC address of the device may be entered in the Wi-Fi router.
7Perform the registration process in the proximity of the router in order to avoid problems with the Wi-Fi range.
7If you wish to use a LAN cable for internet access, the device has to be connected to the router via LAN cable (see “Connection and Preparation” section).
3Select your preferred language by pressing
» « or »
 « and confirm by pressing »OK«.
– Display: »Date/Time« menu opens.
Date/Time
12/24 hour format
12 24*
4Select the hour format »12« or »24« with » « or »
 « and press »OK« to confirm.
– Display: »Auto update« menu opens.


 Auto update
Update from DAB
Update from FM
Update from Nework
No update
ENGLISH 15
SETTINGS----------------------------------------------------------------------------------------------------------------------------------------
5Select the input source from which the automatic time synchronisation should be performed.
Selection options:
–»Update from DAB«;
–»Update from FM«;
–»Update from Network« (Time synchronisation from an Internet station),
–»No update« (no automatic time synchronisation).
Select one of the options with » « or »
 « and press »OK« to confirm.
–The menu »Set timezone« appears (only if »Update from Network« was selected).
Note:
7If »Update from FM« or »Update from DAB« was selected, continue from point 8.
6Select the time zone (ex. »UTC +00:00
Dublin, London«) with » « or »
 « and press »OK« to confirm.
– Display: »Daylight savings« menu opens.
Daylight savings
Daylight savings
ON OFF*
7Select Daylight savings (for Central Europe)
with » « or »
 « to select »ON« and press »OK« to confirm.
Normal time is set using »OFF«.
– The menu »Network settings« appears.
Network settings
Keep network connected?
YES 
 NO*
NO*
8If the device is to be switched on via the net-
work, select the »YES« button with » « or »
 « and confirm with »OK«.
If the device is not to be switched on (low stand-by power), select the »NO« button with
» « or »
 « and confirm with »OK«.
– The menu »Wlan region« appears.


 Wlan region
Most of Europa
9Select one of the WLAN regions with » « or
« or
» « and press »OK« to confirm.
(This setting depends on the location where you are operating your Cosmopolit.)
–The »SSID« menu appears, and the available networks (access points) are displayed.


 SSID
SSID
[WPS]gimdsl
grinternet
TCC-WLAN [Rescan]
[Wired] [Manual config]
Notes:
7If you wish to connect via a LAN cable,
select the option »[Wired]« with » « or »
 « and press »OK« to confirm.
The initial set-up is then finished.
7If the connection to the router is via a WLAN, there are two options, depending on the router in use: If the router supports [WPS], then continue operation from step 10/11 or step. 10/12.
If the router does not support [WPS], then continue operation from step 13.
16 ENGLISH

SETTINGS----------------------------------------------------------------------------------------------------------------------------------------
7If the network name (SSID) is suppressed on the WLAN router for security reasons, the network cannot be found. It must then be entered manually. Select the option
»[Manual config]« with » « or »
 « and press »OK« to confirm. Continue with the chapter “Special Settings” – “Registering the device ...”, on page 43.
10 Select your wireless [WPS] network with » « or »
 « and press »OK« to confirm.
Note:
7There are two options for logging on to a [WPS] network: using the push button on the router or by entering a PIN on the router.
11 Select the option »Push-Button« with » « or »
 « and press »OK« to confirm.
Activate the »Push Button« function on the router (menu or button) and press »OK« on the device within 2 minutes.
– Display: »Please wait, connecting« and then »Connected«.
End setting with »OK« on the device; or
12 Select the option »PIN« with » « or »
 « and press »OK« to confirm.
–Display: PIN number that specifies the device.
Enter the PIN number in the router menu and confirm.
–Display: »Please wait, connecting« and then »Connected«.
13 Select your wireless network (SSID) with » « or »
 « and press »OK« to confirm.
–Key menu opens, the cursor is positioned in the first input position.
Key:
|
|
|
|
|
|
|
|
0 |
1 2 |
3 |
4 5 6 |
|
|||
BKSP |
|||||||
7 8 9 |
. _ – @ |
||||||
|
|||||||
OK |
|||||||
, |
|
a |
b |
c |
d e |
||
|
|
||||||
f |
g h |
i |
j |
k l |
CANCEL |
||
m n o p q r s |
|
||||||
Note:
7If the network is encrypted, the network key (security code WEP or WPA) must be entered.
14 Enter your wireless security code:
Select the first character (capital and small letters, numbers, symbols) with » «, »
«, » «, »
«, » « or »
 « and press »OK« to confirm. Repeat the procedure for all characters. After you finish entering all characters, select the push button »OK« with »
 «, »
«, » «, »
«, » « or »
 « and press »OK« to confirm.
–The menu »Internet Setup« appears, the network registration is processed.
–Display: »Please wait, Connecting« and then »Connected«.
–After successful registration, the message »Setup wizard completed« appears.
Notes:
7You can choose between numbers, lower and upper case letters, and special characters.
7Press » « or »
 « to scroll through the menu pages (numbers, letters, special characters, etc.).
7If you make a mistake during entry, press
» «, »
«, » «, »
«, » « or »
 « to select the push button »BKSP« and press »OK« to confirm. The last character is deleted.
7If you wish to exit the menu prematurely,
press » «, »
«, » «, »
«, » « or »
 « to select the push button »CANCEL« and press »OK« to confirm.
15 Press »OK« to end the setting.
ENGLISH 17

SETTINGS----------------------------------------------------------------------------------------------------------------------------------------
Setting DAB stations
Your device has a DAB/ DAB+ (Digital Audio Broadcasting) receiver unit which enables crystal-clear radio reception in CD quality, i.e. without hissing or crackling.
DAB stations are combined into ensembles (multiplexes) at regional and national levels. An ensemble contains several stations broadcast on the same frequency. One individual station can combine other secondary service components such as live broadcasts or foreign language news.
The device can receive DAB stations on Band III (174.928 – 239.200 MHz, 5A – 13F).
Automatic station search
If you first switch on the device in DAB mode, the automatic station search starts (Display: »Scanning«). During the search, the first line shows the number of stations found, and the second shows the search scale. After the end of the search, an alphanumeric arrangement of stations (A...Z, 0...9) appears. If no stations are found, the DAB menu appears in the display.
1Press »M« repeatedly until »DAB radio« appears on display.
– The device searches for DAB stations.
Note:
7In the »DAB Radio« – »Scan« menu, you can restart a new “Automatic station search”. This may be necessary when the location of the device is changed.
Manual station search
If you know the frequencies or the transmission channels of the ensembles (multiplexes), you can also search for DAB stations manually.
1 Press »MENU« to open the DAB menu.


 DAB
DAB
Station list |
> |
Scan |
|
Manual tune |
> |
Prune invalid |
|
DRC |
> |
Station order |
> |
2Select the option »Manual tune« with » « or »
 « and press »OK« to confirm.
– Display: »5A 174.928MHz«.
3Select your frequency with » « or »
 « and press »OK« to confirm.
–Display: e.g. »5D 180.064MHz« and the search scale.
–New stations are added to the list.
Sorting channels
You can sort the station list stored during the station search in three different ways.
–»Alphanumeric«: all stations are sorted alphanumerically (default setting).
–»Ensemble«: all stations are sorted by ensemble.
–»Valid«: active stations are listed first, stations that are not active are shown with a question mark.
1 Press »MENU« to open the DAB menu.
2Select the option »Station order« with » « or »
 « and press »OK« to confirm.
3Select your settings with » « or »
 « and press »OK« to confirm.
Deleting a station list
The names of the DAB stations remain in the station list even after a new automatic search. However, these DAB stations can no longer be received and the names can be deleted from the station list.
1 Press »MENU« to open the DAB menu.
2Select the option »Prune invalid« with » « or »
 « and press »OK« to confirm.
3Select the push button »YES« with » « or »
 « and press »OK« to confirm.
–The names of the DAB stations which are now invalid are deleted.
18 ENGLISH
 Loading...