


Π IMPORTANT INFORMATION Π KEEP FOR OPERATOR Π IMPORTANT INFORMATION Π
OPERATOR MANUAL |
OM-TD |
Part Number 121006 |
DOMESTIC |
MODELS: TDC/3, TDC/2, TDO/1, TDO,
TDA, TDA/1, TD/2
Steam Jacketed Kettles
Stainless Steel
Direct steam heated
Table top mounted
Tilting
Model TDC/3 |
Model TDO |
Model TD/2 |
THIS MANUAL MUST BE RETAINED FOR FUTURE REFERENCE. READ, UNDERSTAND AND FOLLOW THE INSTRUCTIONS AND WARNINGS CONTAINED IN THIS MANUAL.
WARNING
DO NOT STORE OR USE GASOLINE OR OTHER FLAMMABLE VAPORS AND LIQUIDS IN THE VICINITY OF THIS OR ANY OTHER APPLIANCE.
.

OM-TD
IMPORTANT — READ FIRST — IMPORTANT
CAUTION: BE SURE ALL OPERATORS READ, UNDERSTAND AND FOLLOW THE OPERATING INSTRUCTIONS, CAUTIONS, AND SAFETY INSTRUCTIONS CONTAINED IN THIS MANUAL.
WARNING: THIS UNIT IS INTENDED FOR USE IN THE COMMERCIAL HEATING, COOKING AND HOLDING OF WATER AND FOOD PRODUCTS, PER THE INSTRUCTIONS CONTAINED IN THIS MANUAL. ANY OTHER USE COULD RESULT IN SERIOUS PERSONAL INJURY OR DAMAGE TO THE EQUIPMENT AND WILL VOID WARRANTY.
WARNING: KETTLES MUST BE INSTALLED BY PERSONNEL QUALIFIED TO WORK WITH PLUMBING. IMPROPER INSTALLATION CAN RESULT IN INJURY TO PERSONNEL AND/OR DAMAGE TO EQUIPMENT.
WARNING: AVOID ANY EXPOSURE TO ESCAPING STEAM. STEAM CAN CAUSE SEVERE BURNS.
WARNING: TAKE EXTREME CARE TO KEEP HOT CONTENTS FROM SPILLING OR SPLASHING ON ANYONE. DO NOT STAND DIRECTLY IN FRONT OF KETTLE BODIES WHEN THEY ARE BEING TILTED.
WARNING: AVOID ALL DIRECT CONTACT WITH HOT EQUIPMENT SURFACES. DIRECT SKIN CONTACT COULD RESULT IN SEVERE BURNS.
WARNING: AVOID ALL DIRECT CONTACT WITH HOT FOOD OR WATER IN KETTLES. DIRECT CONTACT COULD RESULT IN SEVERE BURNS.
CAUTION: DO NOT OVER FILL THE KETTLE WHEN COOKING, HOLDING OR CLEANING. KEEP LIQUIDS A MINIMUM OF 2-3” (5-8 cm) BELOW THE KETTLE BODY RIM TO ALLOW CLEARANCE FOR STIRRING, BOILING AND SAFE PRODUCT TRANSFER.
WARNING: TAKE SPECIAL CARE TO AVOID CONTACT WITH HOT KETTLE BODY OR
HOT PRODUCT WHEN ADDING INGREDIENTS, STIRRING OR TRANSFERRING PRODUCT TO ANOTHER CONTAINER.
WARNING: WHEN TILTING KETTLE FOR PRODUCT TRANSFER:
1)WEAR PROTECTIVE OVEN MITT AND PROTECTIVE APRON.
2)USE CONTAINER DEEP ENOUGH TO CONTAIN AND MINIMIZE PRODUCT SPLASHING.
3)PLACE CONTAINER ON STABLE, FLAT SURFACE, AS CLOSE TO KETTLE AS POSSIBLE.
4)STAND TO LEFT OR RIGHT SIDE OF KETTLE (DEPENDING ON TILTING HANDLE PLACEMENT) WHILE POURING . DO NOT STAND DIRECTLY IN POUR PATH OF HOT CONTENTS.
5)POUR SLOWLY, MAINTAIN CONTROL OF KETTLE BODY HANDLE AT ALL TIMES, AND RETURN KETTLE BODY TO UPRIGHT POSITION AFTER CONTAINER IS FILLED OR TRANSFER IS COMPLETE.
6)DO NOT OVER FILL CONTAINER. AVOID DIRECT SKIN CONTACT WITH HOT CONTAINER AND ITS CONTENTS.
CAUTION: KEEP FLOORS IN FRONT OF KETTLE WORK AREA CLEAN AND DRY. IF SPILLS OCCUR, CLEAN IMMEDIATELY, TO AVOID SLIPS OR FALLS.
WARNING: FAILURE TO CHECK SAFETY VALVE OPERATION PERIODICALLY COULD RESULT IN PERSONAL INJURY AND/OR DAMAGE TO EQUIPMENT.
2

OM-TD
IMPORTANT — READ FIRST — IMPORTANT
WARNING: WHEN TESTING, AVOID ANY EXPOSURE TO THE STEAM BLOWING OUT OF THE SAFETY VALVE. DIRECT CONTACT COULD RESULT IN SEVERE BURNS.
WARNING: TO AVOID INJURY, READ AND FOLLOW ALL PRECAUTIONS STATED ON THE LABEL OF THE WATER TREATMENT COMPOUND.
CAUTION: MOST CLEANERS ARE HARMFUL TO THE SKIN, EYES, MUCOUS MEMBRANES AND CLOTHING. PRECAUTIONS SHOULD BE TAKEN. WEAR RUBBER GLOVES, GOGGLES OR FACE SHIELD AND PROTECTIVE CLOTHING. CAREFULLY READ THE WARNINGS AND FOLLOW THE DIRECTIONS ON THE LABEL OF THE CLEANER TO BE USED.
CAUTION: USE OF ANY REPLACEMENT PARTS OTHER THAN THOSE SUPPLIED BY GROEN OR THEIR AUTHORIZED DISTRIBUTORS CAN CAUSE OPERATOR INJURY AND DAMAGE TO THE EQUIPMENT, AND WILL VOID ALL WARRANTIES.
IMPORTANT: SERVICE PERFORMED BY OTHER THAN FACTORY AUTHORIZED PERSONNEL WILL VOID WARRANTIES.
3
OM-TD
Table of Contents
IMPORTANT OPERATOR WARNINGS . . . . . . . . . . . . . . . . . . . . . . . . . . . . . . . . . . . . . . . . . . 2 REFERENCES . . . . . . . . . . . . . . . . . . . . . . . . . . . . . . . . . . . . . . . . . . . . . . . . . . . . . . . . . . . . . 4 EQUIPMENT DESCRIPTION . . . . . . . . . . . . . . . . . . . . . . . . . . . . . . . . . . . . . . . . . . . . . . . . . . 5 INSTALLATION . . . . . . . . . . . . . . . . . . . . . . . . . . . . . . . . . . . . . . . . . . . . . . . . . . . . . . . . . . . . 7 INITIAL START-UP . . . . . . . . . . . . . . . . . . . . . . . . . . . . . . . . . . . . . . . . . . . . . . . . . . . . . . . . . . 8 OPERATION . . . . . . . . . . . . . . . . . . . . . . . . . . . . . . . . . . . . . . . . . . . . . . . . . . . . . . . . . . . . . . . 8 CLEANING . . . . . . . . . . . . . . . . . . . . . . . . . . . . . . . . . . . . . . . . . . . . . . . . . . . . . . . . . . . . . . . 11 MAINTENANCE . . . . . . . . . . . . . . . . . . . . . . . . . . . . . . . . . . . . . . . . . . . . . . . . . . . . . . . . . . . 13 SEQUENCE OF OPERATION . . . . . . . . . . . . . . . . . . . . . . . . . . . . . . . . . . . . . . . . . . . . . . . . 13 TROUBLESHOOTING . . . . . . . . . . . . . . . . . . . . . . . . . . . . . . . . . . . . . . . . . . . . . . . . . . . . . . 14 PARTS LISTS . . . . . . . . . . . . . . . . . . . . . . . . . . . . . . . . . . . . . . . . . . . . . . . . . . . . . . . . . . . . . 15 MAINTENANCE LOG . . . . . . . . . . . . . . . . . . . . . . . . . . . . . . . . . . . . . . . . . . . . . . . . . . . . . . . 22 WARRANTY . . . . . . . . . . . . . . . . . . . . . . . . . . . . . . . . . . . . . . . . . . . . . . . . . . . . . . . . . . . . . . 23
References
KLENZADE SALES CENTER ECOLAB. Inc.
370 Wabasha
St. Paul, Minnesota 55102 800/352-5326 or 612/293-2233
NATIONAL SANITATION FOUNDATION
3475 Plymouth Rd.
Ann Arbor, Michigan 48106
ZEP MANUFACTURING CO.
1310-T Seaboard Industrial Blvd.
Atlanta, Georgia 30318
4

OM-TD
Equipment Description
A.All Models
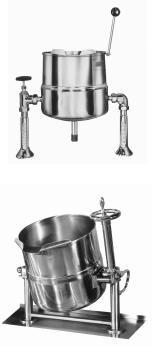
The Groen TDC/3, TDC/2, TDO/1, TDO, TDA/1 and TD/2 are tilting, table-top kettles with direct steam-heated jackets. The one-piece stainless steel body on each includes a butterfly shaped pouring lip. The kettles have a 180 emery grit interior finish and a bright semi-deluxe exterior finish.
Every unit requires a remote steam source. The steam supply is controlled by an inlet valve, and enters the jacket through one support and rotary joint. Condensate leaves the jacket through the other rotary joint and support. Standard units are ASME shop inspected, stamped, and registered with the National Board. These kettles operate efficiently at pressures above five PSI. A safety valve, strainer, steam trap, and check valve are all required for installation, and may be ordered from Groen as optional equipment.
B. Model TDC/3
The TDC/3 kettle has a 2/3 jacket rated for working pressures up to 55 PSI. The kettle body incorporates a triple reinforced rim. Two tubular steel supports support the swivel on which the kettle tilts. A leg projects from the bottom of the kettle.
The design of the TDC/3 makes it easy for one person to tilt the kettle with the tilting handle, even when the kettle is full.
C. Model TDC/2
The TDC/2 resembles the TDC/3, except that the kettle rests on a chrome plated base with arms, and has a maximum operating pressure of 45 PSI.
D. Models TDO and TDO/1
The TDO and TDO/1 Oyster Cookers have a special purpose kettle body and supports similar to those of the TDC/2 and TDC/3, with a tilting handle.
Model TDC/3
Model TDC/2
Model TDO
Model TDO/1
5
OM-TD
E.Model TDA/1
The TDA/1 kettle incorporates a triple reinforced rim and a 2/3 jacket registered for working pressures up to 50 PSI. Two chrome-plated arms support the trunnions on which the kettle tilts. The arm that also serves as the steam inlet has an integral steam control valve.
F. |
Model TD/2 |
TDA/1 |
The TD/2 kettle has a 2/3 jacket rated to operate at pressures up to 50 PSI. Two stainless steel legs support the trunnion. A crank-operated gear mechanism is used to tilt the kettle and to hold it in position.
|
|
|
|
TD/2 |
|
|
KETTLE CHARACTERISTICS |
|
|
|
|||
Model |
Capacity |
Dimensions, inches (mm) |
||||
|
|
|
|
|
||
Quarts (liters) |
Front to back |
Left to right |
|
Rim height |
||
|
|
|
|
|
|
|
TDC/3-10 |
10 (9.4) |
13-1/4 (337) |
12-7/8 (327) |
|
16-1/8 (410) |
|
|
|
|
|
|
|
|
TDC/3-20 |
20 |
(18.9) |
15-1/4 (387) |
14-7/8 (378) |
|
17-1/8 (435) |
|
|
|
|
|
|
|
TDC/2-10 |
10 (9.4) |
12-3/8 (314) |
12-7/8 (327) |
|
16-1/8 (410) |
|
|
|
|
|
|
|
|
TDC/2-20 |
20 |
(18.9) |
14-3/8 (365) |
14-7/8 (378) |
|
17-1/8 (435) |
|
|
|
|
|
|
|
TDO |
1 (0.94) |
9-1/4 (235) |
9-1/2 (241) |
|
11-5/8 (295) |
|
|
|
|
|
|
|
|
TDO/1-32 |
1 (0.94) |
10 (254) |
13-1/2 (343) |
|
11-5/8 (295) |
|
|
|
|
|
|
|
|
TDO/1-64 |
2 |
(1.9) |
10-11/16 (271) |
13-1/2 (343) |
|
12-3/8 (314) |
|
|
|
|
|
|
|
TDO/1-72 |
2-1/4 (2.2) |
10-13/16 (275) |
13-1/2 (343) |
|
12-7/8 (327) |
|
|
|
|
|
|
|
|
TDA-10 |
10 (9.4) |
12 (305) |
19-7/8 (505) |
|
19-1/4 (489) |
|
|
|
|
|
|
|
|
TDA-20 |
20 |
(18.9) |
14-1/2 (368) |
21-7/8 (556) |
|
20-3/8 (518) |
|
|
|
|
|
|
|
TDA/1-40 |
40 |
(37.8) |
19-3/4 (502) |
26-3/4 (679) |
|
22-3/8 (568) |
|
|
|
|
|
|
|
TD/2-40 |
40 |
(37.8) |
20-1/2 (521) |
28-1/4 (717) |
|
21-7/8 (556) |
Optional Features and Equipment
|
|
|
TDO, |
TDA, |
|
|
TDC/3 |
TDC/2 |
TDO/1 |
TDA/1 |
TD/2 |
|
|
|
|
|
|
Higher Maximum Pressure |
4 |
4 |
|
4 |
4 |
|
|
|
|
|
|
Lift-off cover |
4 |
4 |
|
4 |
4 |
|
|
|
|
|
|
T5C table mounting |
4 |
4 |
4 |
4 |
4 |
|
|
|
|
|
|
Basket inserts |
4 |
4 |
|
4 |
4 |
|
|
|
|
|
|
Kettle brush kit |
4 |
4 |
|
4 |
4 |
|
|
|
|
|
|
Steam trap assembly |
4 |
4 |
4 |
4 |
4 |
|
|
|
|
|
|
Motor-driven agitator |
4 |
4 |
|
4 |
4 |
|
|
|
|
|
|
6
OM-TD
Installation
WARNING
THIS UNIT MUST BE INSTALLED BY PERSONNEL QUALIFIED TO WORK WITH PLUMBING. IMPROPER INSTALLATION CAN CAUSE INJURY TO PERSONNEL AND/OR DAMAGE TO EQUIPMENT.
1. |
Installation under a ventilation hood is |
5. |
The safety valve is preset to relieve |
|
recommended. Consult local codes. |
|
jacket pressure that exceeds its rated |
2. |
Install and anchor the kettle on a level |
|
limit. Do not try to adjust the valve |
|
setting, and do not allow the valve |
||
|
rigid surface. |
|
outlet or lever to be blocked. |
3. |
If the steam supply pressure is greater |
6. |
Connect the kettle condensate return |
|
than the maximum working pressure |
|
line to the boiler return line, or to a |
|
stamped on the nameplate, you must |
|
drain. A suitable steam trap, strainer, |
|
install a pressure reducing valve in the |
|
and check valve must be installed. |
|
steam supply line near the kettle. |
|
(See piping diagram, below). |
4. |
Connect the steam supply line to the |
7. |
Any mechanical change must be |
|
steam inlet fitting. Include a steam |
|
approved by the Groen Food Service |
|
control valve and an appropriate safety |
|
Engineering Department. |
|
valve. To obtain the full heating |
|
|
capability of the kettle, the steam supply line must be as large as the steam inlet fitting.
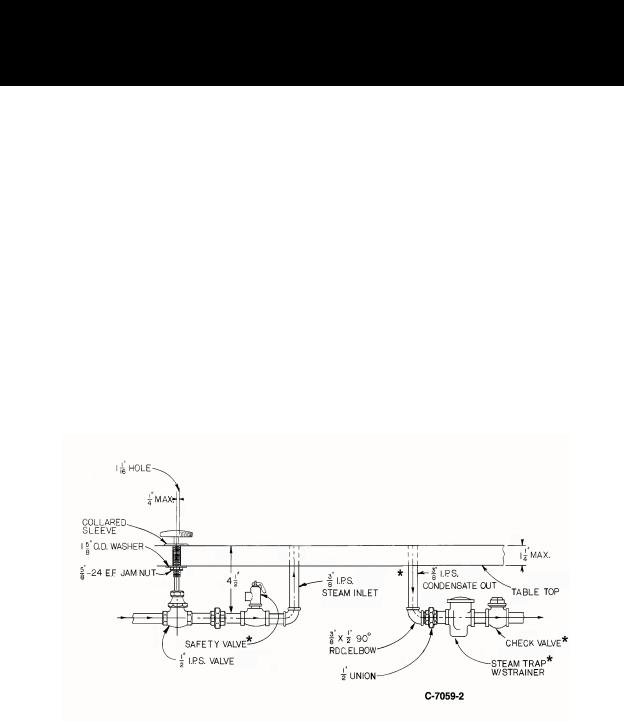
STANDARD PIPING FOR TDC/3, TDC/2, TDO/1, TDO and TD/2
The inlet valve may be located anywhere on the cabinet top or face but not through the face casting. The illustrated sleeve is designed to simplify valve installation by allowing the valve to shift off center by 1/4", if necessary. This should be enough to allow for thread take-up and misalignment.
*Accessories available from Groen as options. Piping is to be supplied by the installer.
7
OM-TD
Initial Start-Up
IMPORTANT
BE SURE ALL OPERATORS READ, UNDERSTAND AND FOLLOW THE OPERATING INSTRUCTIONS, CAUTIONS, AND SAFETY INSTRUCTIONS CONTAINED IN THIS MANUAL.
Now that the kettle has been installed, you should test it to ensure that it is operating correctly.
1.Remove all literature and packing materials from inside and outside of the unit.
2.Pour a small amount of water into the kettle.
3.Open the steam inlet valve.
4.When the water begins to boil, inspect all of the fittings to ensure that there are no leaks.
5.Check the safety valve by lifting its lever far enough to let steam escape. Then let it snap back into place to reseat the valve so that it will not leak.
6.Shut down the unit by closing the steam inlet valve.
WARNING
AVOID ANY EXPOSURE TO ESCAPING STEAM, WHICH CAN CAUSE SEVERE BURNS.
7.Operate the tilting mechanism to confirm that this feature functions through the whole range of normal operation.
If the unit functions as described above, it is ready for use. If the unit does not function as intended, contact your local Groen Certified Service Agency.
Operation
To heat the kettle, open the steam inlet valve. Adjusting the valve allows you to control the heating rate. Opening the valve more allows steam to flow into the jacket faster, and heats the product faster.
The kettle operates efficiently at pressures from five PSI to the maximum working pressure for which the kettle was designed. The maximum pressure is stamped on the kettle nameplate.
Tilting
To transfer product or empty the kettle: the kettle is designed and manufactured to be tilted in a controlled manner. Grasp the insulated plastic ball firmly. Maintain a firm grip on handle when tilting, while keeping the kettle body in a tilted position and then SLOWLY returning the kettle body to an upright position.
A.TDC/3, TDC/2, TDO. TDO/1 and TDA/1:
Pull the handle forward to tilt the kettle, backward to return the kettle to upright position.
WARNING
AVOID EXPOSURE TO ESCAPING STEAM, WHICH CAN CAUSE SEVERE BURNS.
B.TDA
The tilting handle on this older model is spring-loaded to latch the kettle in position. To tilt the kettle, pull up on the tilting handle to release the latch,
8
 Loading...