


BHV611ES

cooker hood, kuhinjska napa, dunstabzugshaube
кухонна витяжка, Mo`ri, aсуй сорып шыгаргышы кухонная
вытяжка, Campana decorative
E016E II 1K37A 2B S B | BHV611ES

DE Montage- und Gebrauchsanweisung
EN Instruction on mounting and use
FR Prescriptions de montage et mode d’emploi
NL Montagevoorschriften en gebruiksaanwijzingen
DA Bruger- og monteringsvejledning
SV Monterings- och bruksanvisningar
FI Asennus- ja käyttöohjeet
NO Instrukser for montering og bruk
IT Istruzioni di montaggio e d'uso
ES Montaje y modo de empleo
PT Instruções para montagem e utilização
EL Ο∆ΗΓΙΕΣ ΣΥΝΑΡΜΟΛΟΓΗΣΗΣ ΚΑΙ ΧΡΗΣΗΣ
SK Návod k montáži a užití
RU Инструкции по монтажу и эксплуатации
PL Instrukcja montażu i obsługi


DE - Montage- und Gebrauchsanweisung
Die Anweisungen, die in diesem Handbuch gegeben
werden, müssen strikt eingehalten werden. Es wird
keinerlei Haftung übernommen für mögliche Mängel, Schäden
oder Brände der Dunstabzugshaube, die auf die
Nichtbeachtung der Vorschriften in diesem Handbuch
zurückzuführen sind. Die Dunstabzugshaube wurde für die
Absaugung der beim Kochen entstehenden Dünste und
Dämpfe entwickelt. Sie ist nur für den Hausgebrauch
geeignet.
• Die Bedienungsanleitung muss aufbewahrt werden,
damit jederzeit ein Nachschlagen möglich ist. Bei
Verkauf, Abtretung oder Umzug muss die
Bedienungsanleitung immer beim Produkt bleiben.
• Die Bedienungsanleitung muss aufmerksam gelesen
werden, da sie wichtige Informationen über Installation,
Gebrauch und Sicherheit enthält.
• Es dürfen keine elektrischen oder mechanischen
Änderungen am Gerät oder an den Abluftleitungen
vorgenommen werden.
• Vergewissern Sie sich vor der Installation, dass das
Gerät keine Transportschäden aufweist. Bei auftretenden
Problemen setzen Sie sich bitte mit Ihrem Händler in
Verbindung.
Hinweis: Die mit dem“(*)“ Symbol versehenen Elemente sind
optionales Zubehör, welche nur bei einigen Modellen
vorhanden sind oder Teile die nicht im Lieferumfang enthalten
sind und getrennt zu erwerben sind.
Warnung
• Vor jeglicher Reinigung bzw. Wartung
muss das Gerät vom Stromnetz getrennt
werden, indem man den Stecker
herauszieht bzw. den Hauptschalter
ausschaltet.
• Alle Installations- und
Wartungarbeiten sind mit
Arbeitshandschuhen durchzuführen.
• Das Gerät kann von Kindern ab 8
Jahren, sowie von Menschen mit
verringerten physischen, sinnlichen oder
psychischen Fähigkeiten (oder ohne
Erfahrung und Kenntnisse) benutzt
werden, sofern sie entsprechend
überwacht werden bzw. in die Benutzung
des Geräts sicher eingewiesen wurden
und sich der damit verbundenen
Gefahren bewusst sind.
• Darauf achten, dass Kinder mit dem
Gerät nicht spielen. Kinder dürfen bei
Reinigung und Wartung nur dann helfen,
wenn sie dabei beaufsichtigt werden.
• Der Raum muss ausreichend belüftet
sein, wenn die Dunstabzugshaube
zusammen mit anderen Gas- bzw.
Brennstoffgeräten verwendet wird.
• Die Dunstabzugshaube muss
regelmäßig von innen und außen
gereinigt werden (MINDESTENS
EINMAL IM MONAT), außerdem sollten
die Anweisungen zur Wartung befolgt
werden. Das nicht befolgen der Normen
zur Reinigung der Dunstabzugshaube,
das nicht befolgen der Hinweise zur
Reinigung und zum Austausch von
Filtern führt zu Brandgefahr.
• Es ist streng verboten, Speisen auf
Kochstellen mit offener Flamme unter der
Dunstabzugshaube zu kochen.
• Für den Lampenersatz verwenden Sie
nur den Lampentyp, der in dem Absatz
Lampenwartung / Ersatz des
vorliegenden Handbuchs angegeben
wird.
Die Verwendung von offener Flamme
schadet den Filtern und kann zu
Brandgefahr führen, daher ist sie in
jedem Fall zu vermeiden.
Das Frittieren muss mit Vorsicht
durchgeführt werden, um zu vermeiden,
dass das überhitzte Öl Feuer fängt.
ACHTUNG: Ist das Kochfeld in Betrieb,
können zugängliche Teile der
Dunstabzugshaube heiß werden.
• Das Gerät nicht an das Stromnetz
anschließen, bis die Installation
vollständig abgeschlossen ist.
Für das Ableiten der Küchengerüche halten Sie sich an die
Voschriften der örtlichen Behörde.
• Bei gleichzeitigem Betrieb der Dunstabzugshaube im
Abluftbetrieb und gas- oder brennstoffbetriebenen Geräten
darf im Aufstellraum der Geräte der Unterdruck nicht größer
als 4 Pa (4 x 10
-5
bar) sein.
9

• Die Abluft darf nicht in einen Kamin geleitet werden, der
zugleich Abgase von der Verbrennung von Gas oder anderen
Brennstoffen führt.
• Benutzen Sie die Haube nicht ohne korrekt montierte
Lampen, um Stromschlaggefahr zu vermeiden.
• Die Dunstabzugshaube niemals ohne richtig installiertes
Gitter verwenden!
• Die Dunstabzugshaube darf NIEMALS als Auflagefläche
verwendet werden, sofern es nicht ausdrücklich angegeben
ist.
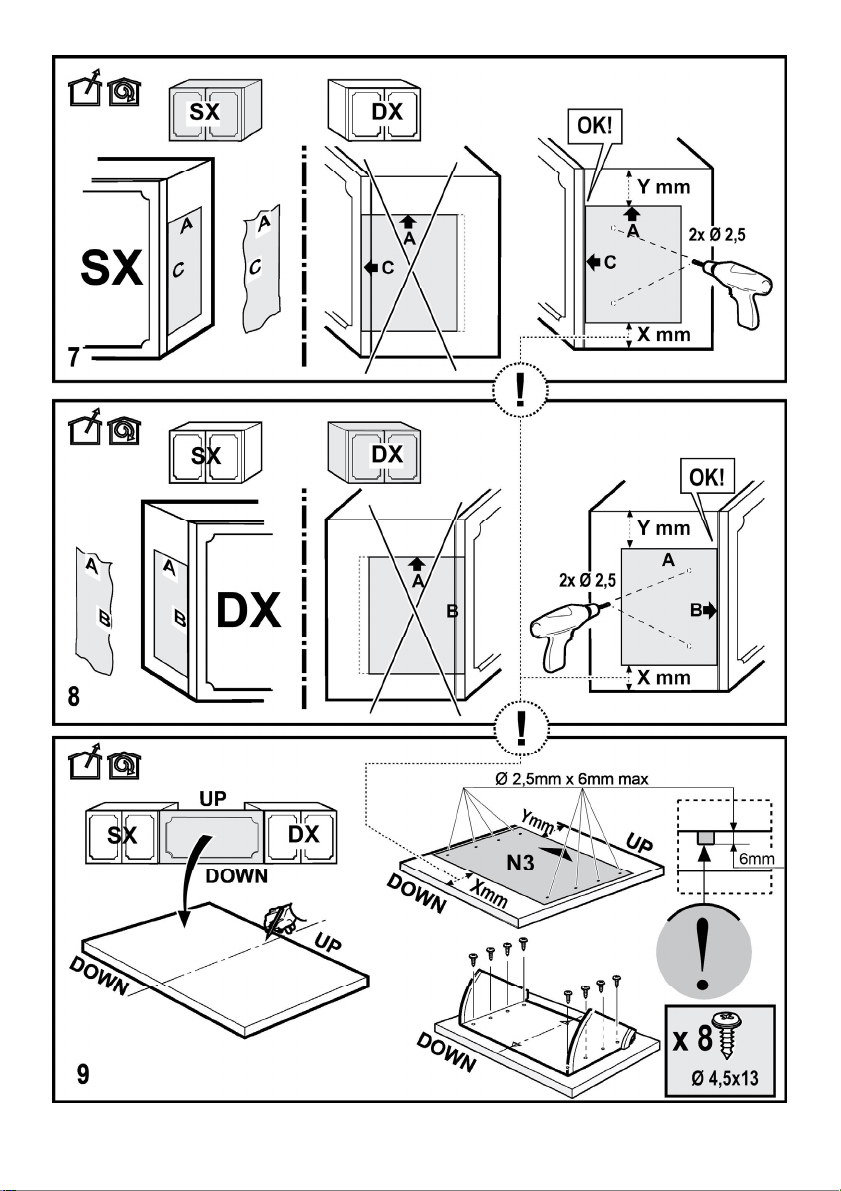
• Verwenden Sie nur die mit dem Produkt für die Installation
mitgelieferten Schrauben, oder, falls nicht im Lieferumfang
enthalten, kaufen Sie den richtigen Schraubentyp.
• Die Länge für die Schrauben verwenden, die im
Installationshandbuch angegeben wird.
• Im Zweifelsfall, fragen Sie Ihren autorisierten Kundendienst
oder ein ähnliches Fachpersonal.
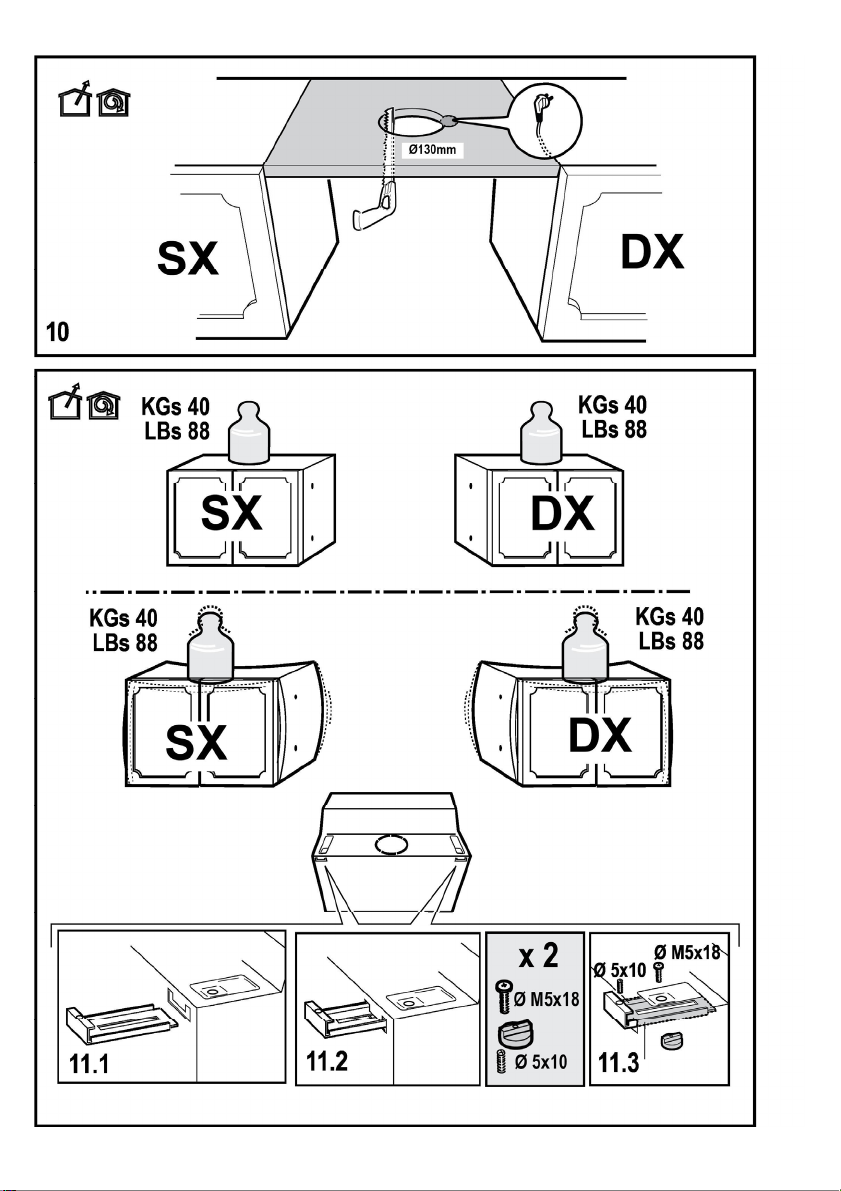
ACHTUNG!
• Schrauben und Befestigungselemente, die nicht in
Übereinstimmung mit diesen Hinweisen sind, können
zur elektrischen Gefährdung führen.
• Nicht mit einem externen Timer, einer Schaltuhr oder
einer Fernbedienung oder jeglicher anderer
Vorrichtung, die sich automatisch aktiviert, verwenden.
In Übereinstimmung mit den Anforderungen der Europäischen
Richtlinie 2012/19/EC über Elektro- und Elektronik-Altgeräte
(WEEE) ist vorliegendes Gerät mit einer Kennzeichnung
versehen.
Sie leisten einen positiven Beitrag für den Schutz der Umwelt
und die Gesundheit des Menschen, wenn Sie dieses Gerät
einer gesonderten Abfallsammlung zuführen. Im unsortierten
Siedlungsmüll könnte ein solches Gerät durch unsachgemäße
Entsorgung negative Konsequenzen nach sich ziehen.
Auf dem Produkt oder der beiliegenden
Produktdokumentation ist folgendes Symbol
durchgestrichenen Abfalltonne abgebildet. Es weist darauf
hin, dass eine Entsorgung im normalen Haushaltsabfall nicht
zulässig ist. Entsorgen Sie dieses Produkt im Recyclinghof mit
einer getrennten Sammlung für Elektro- und Elektronikgeräte.
Die Entsorgung muss gemäß den örtlichen Bestimmungen zur
Abfallbeseitigung erfolgen.
Bitte wenden Sie sich an die zuständigen Behörden Ihrer
Gemeindeverwaltung, an den lokalen Recyclinghof für
Haushaltsmüll oder an den Händler, bei dem Sie dieses Gerät
erworben haben, um weitere Informationen über Behandlung,
Verwertung und Wiederverwendung dieses Produkts zu
erhalten.
Gerät entwickelt, getestet und hergestellt nach:
•Sicherheit: EN/IEC 60335-1; EN/IEC 60335-2-31, EN/IEC
62233.
•Leistungsfähigkeit/Gebrauchstauglichkeit: EN/IEC 61591;
ISO 5167-1; ISO 5167-3; ISO 5168; EN/IEC 60704-1; EN/IEC
einer
60704-2-13; EN/IEC 60704-3; ISO 3741; EN 50564; IEC
62301.
•EMC: EN 55014-1; CISPR 14-1; EN 55014-2; CISPR 14-2;
EN/IEC 61000-3-2; EN/IEC 61000-3-3. Empfehlungen für eine
korrekte Verwendung, um die Umweltbelastung zu verringern:
Schalten Sie die Haube beim Kochbeginn bei kleinster
Geschwindigkeit EIN und lassen Sie die Haube einige
Minuten nachlaufen, wenn Sie mit dem Kochen fertig sind.
Erhöhen Sie die Geschwindigkeit nur bei großen Mengen von
Kochdunst und Dampf und benutzen Sie die Intensivstufe(n)
nur bei extremen Situationen. Wechseln Sie die Kohlefilter,
wenn notwendig, um eine gute Geruchsreduzierung zu
gewährleisten. Säubern Sie die Fettfilter, wenn notwendig,
um eine gute Fettfilterungseffizienz zu gewährleisten.
Verwenden Sie den in der Gebrauchsanweisung
angegebenen grössten Durchmesser des
Luftaustrittssystems, um die Leistungsfähigkeit zu optimieren
und die Geräuschentwicklung zu minimieren.
Betriebsart
Die Haube kann sowohl als Abluftgerät als auch als
Umluftgerät eingesetzt werden.
Abluftbetrieb
Die Luft wird mit Hilfe eines Rohrs ins Freie geleitet, das am
Abluftstutzen angebracht wird.
HINWEIS!
Das Abluftrohr wird nicht mitgeliefert und muss separat
erworben werden.
Das Abluftrohr muss den gleichen Durchmesser wie der
Abluftstutzen aufweisen.
HINWEIS!
Sollte die Dunstabzugshaube mit Aktivkohlefilter versehen
sein, so muss dieser entfernt werden.
Die Dunstabzugshaube an Abluftrohre und Abluftöffnungen in
der Wand anschließen, die den gleichen Durchmesser haben
wie der Abluftstutzen (Anschlussflansch).
Die Benutzung von Rohren und Abluftöffnungen mit
geringerem Durchmesser verursacht eine Verringerung der
Abluftleistung und eine drastische Zunahme der
Geräuschentwicklung.
Bei Nichtbeachtung der Anweisungen übernimmt der
Hersteller keine Haftung.
! Ein möglichst kurzes Rohr verwenden.
! Ein Rohrsystem mit einer möglichst geringen Anzahl von
Krümmungen verwenden (max. Winkel der Krümmung:
90°).
! Starke Änderungen des Rohrdurchmessers sind zu
vermeiden.
Umluftbetrieb
Die angesaugte Luft wird zuvor entfettet und desodoriert
10

werden, bevor sie wieder in den Raum zugeführt wird.
Um die Abzugshaube in dieser Version zu verwenden,
müssen Sie ein zusätzliches Filtersystem, welches auf
Aktivkohle basiert, installieren.
Modelle ohne Saugmotor funktionieren nur mit Abluftbetrieb
und müssen an eine externe Saugeinheit (nicht im
Lieferumfang enthalten) angeschlossen werden.
Die Anschlussanleitungen liegen der externe Saugeinheit bei.
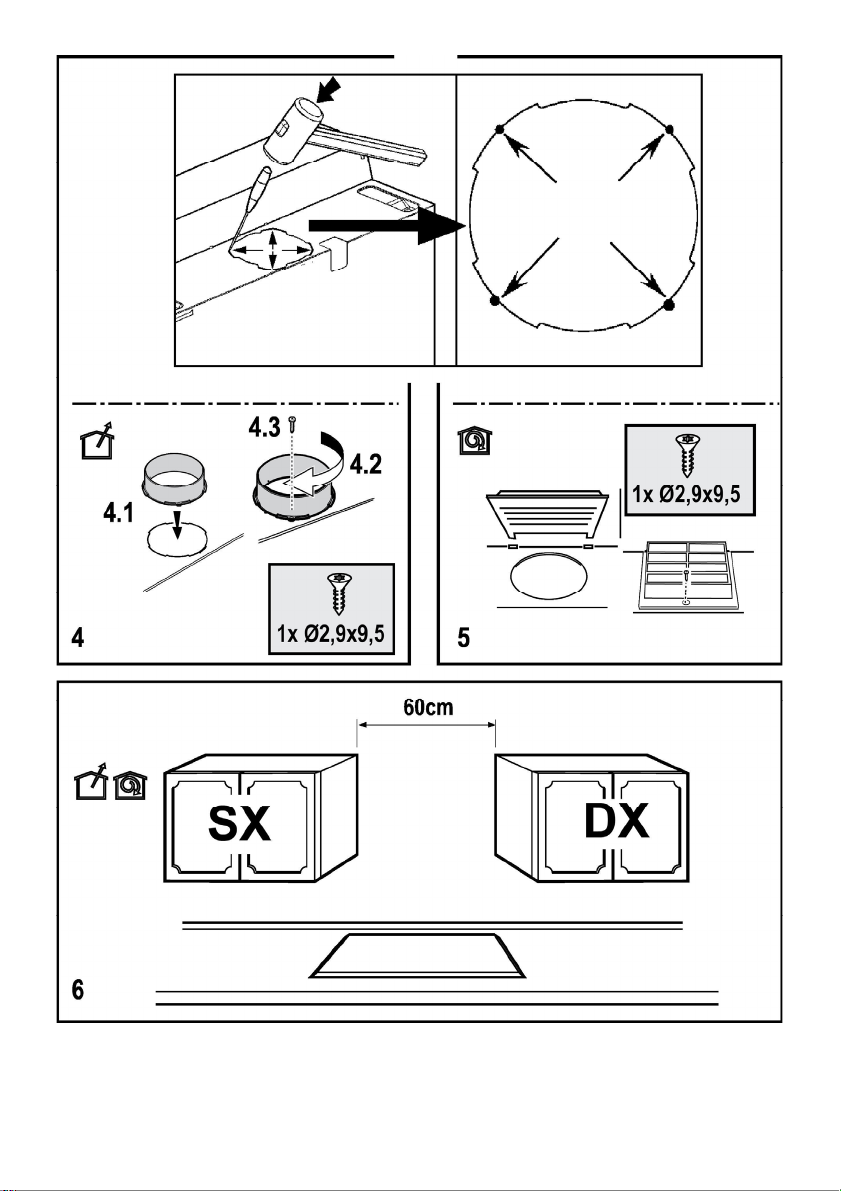
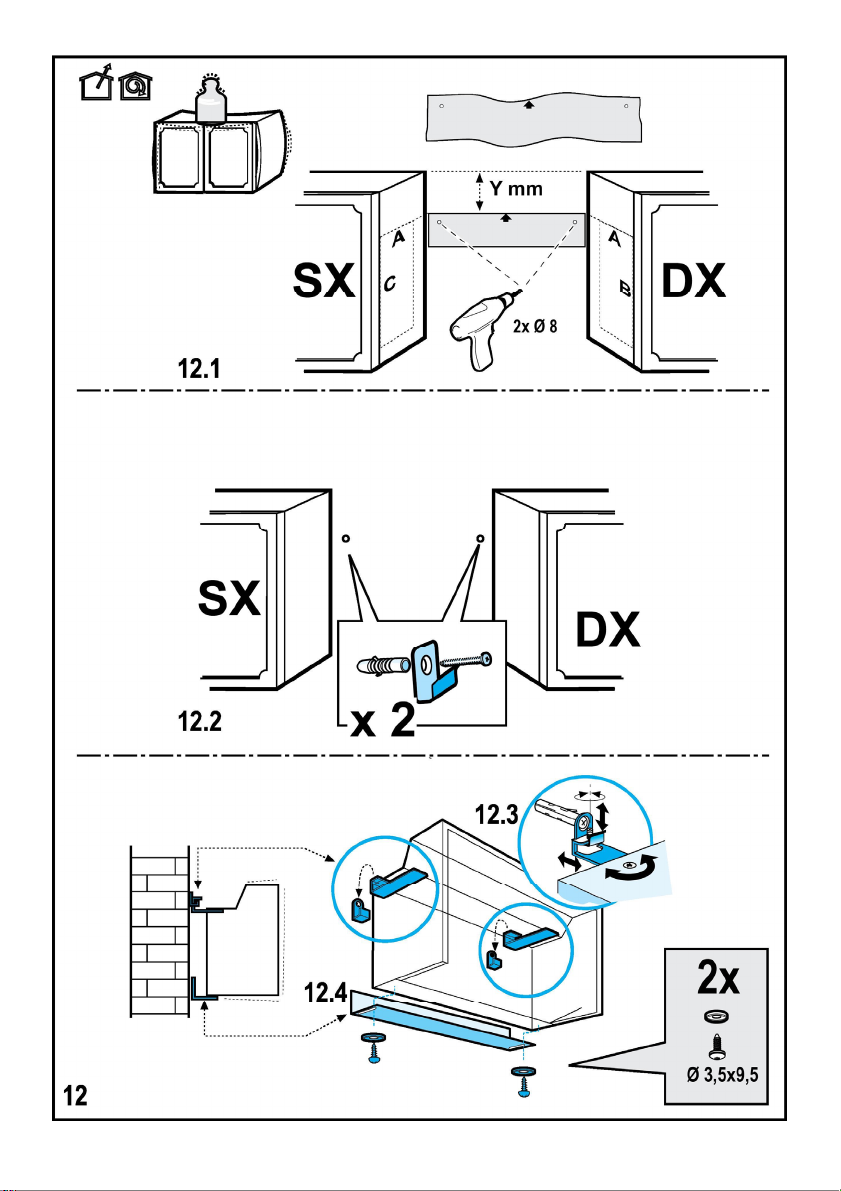
Befestigung
Der Abstand zwischen der Abstellfläche auf dem Kochfeld und
der Unterseite der Dunstabzugshaube darf 50 cm im Fall von
elektrischen Kochfeldern und 70cm im Fall von Gas- oder
kombinierten Herden nicht unterschreiten.
Wenn die Installationsanweisungen des Gaskochgeräts einen
größeren Abstand vorgeben, ist dieser zu berücksichtigen.
Elektrischer Anschluss
Die Netzspannung muss der Spannung entsprechen, die auf
dem Typenschild im Innern der Haube angegeben ist. Sofern
die Haube einen Netzstecker hat, ist dieser an zugänglicher
Stelle an eine den geltenden Vorschriften entsprechende
Steckdose nach der Montage anzuschließen. Bei einer Haube
ohne Stecker (direkter Netzanschluss) oder falls der Stecker
nicht zugänglich ist, ist ein normgerechter zweipoliger Schalter
nach der Montage anzubringen, der unter Umständen der
Überspannung Kategorie III entsprechend den
Installationsregeln ein vollständiges Trennen vom Netz
garantiert.
HINWEIS!
Vor der Inbetriebnahme muss sichergestellt werden, dass die
Netzversorgungleitung (Steckdose) ordnungsgemäß montiert
wurde.
Hinweis! Zur Vermeidung von Gefahren darf die
Auswechselung des Stromkabels nur vom autorisierten
Kundendienst vorgenommen werden.
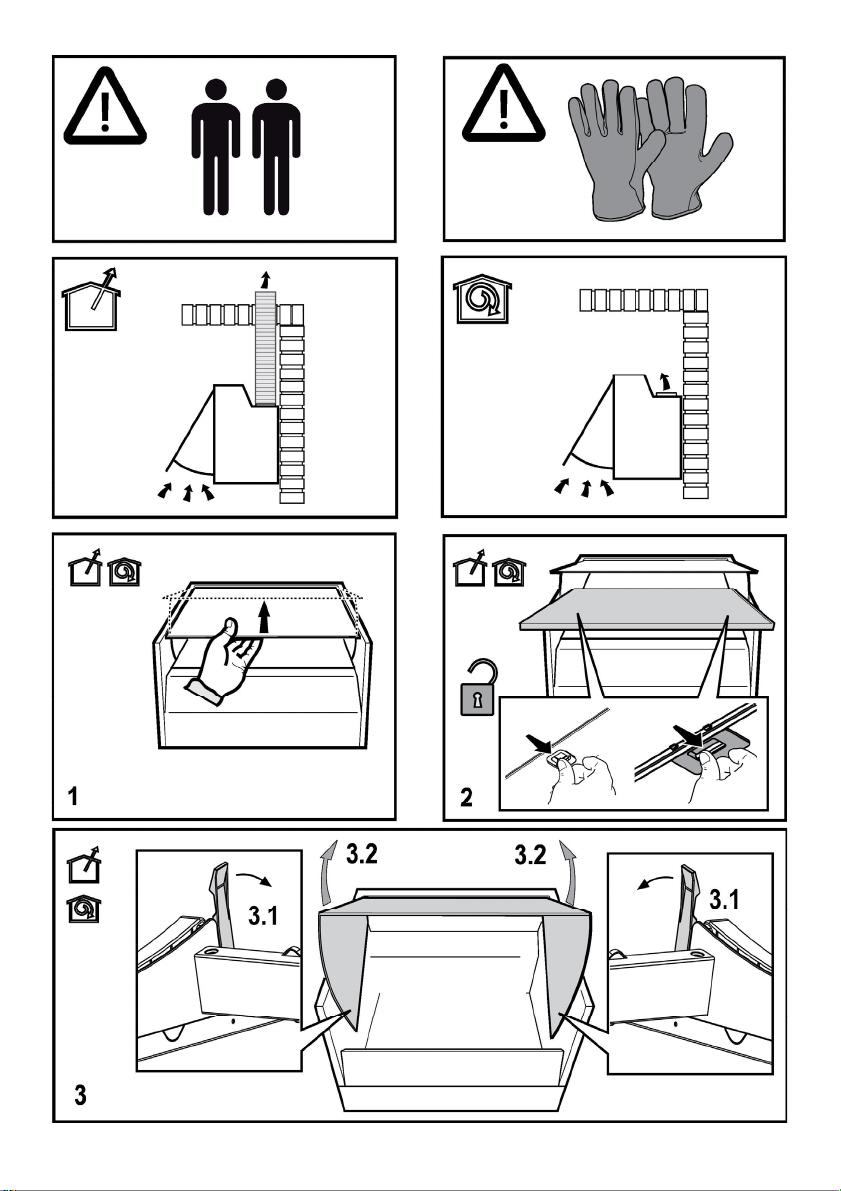
Montage
Die Abzugshaube ist mit Dübeln ausgestattet, die für die
meisten Wände/Decken geeignet sind. Trotzdem sollte ein
qualifizierter Techniker hinzugezogen werden, der
entscheidet, ob die Materialien für die jeweilige Wand/Decke
geeignet sind. Außerdem muß die Wand/Decke das Gewicht
der Abzugshaube tragen können.
Bevor Sie mit der Montage beginnen:
• Überprüfen Sie, dass das erstandene Produkt von der
Größe her dem Bereich entspricht, in dem es angebracht
werden soll.
• Entfernen Sie den/die Aktivkohlefilter (*), falls vorhanden
(siehe hierzu auch den entsprechenden Absatz
"Wartung"). Der/die Aktivkohlefilter wird/werden nur
wieder in die Dunstabzugshaube eingesetzt, wenn diese
im Umluftbetrieb verwendet werden soll.
• Vergewissern Sie sich, dass sich im Inneren der
Dunstabzugshaube (aus Transportgründen) kein im
Lieferumfang enthaltenes Material (zum Beispiel Tütchen
mit Schrauben (*), die Garantie (*), usw.) befindet; falls
vorhanden, entfernen Sie dieses und heben Sie sie auf.
Betrieb
Verwenden Sie die für die Kontrolle der Lichter und
Absaugleistung vorgesehenen Tasten oder Schalter.
Nur bei einigen Modellen: indem Sie den
Dunstauffangschirm öffnen oder schließen, können Sie das
Ein- bzw. Ausschalten des Gebläses, welches die
Absaugleistung reguliert, sowie in einigen Fällen auch das
Ein- bzw. Ausschalten der Lichter kontrollieren.
Wenn Ihr Produkt mit elektrischem oder mechanischem
Abluftklappe versehen ist, dienen die zur Verfuegung
stehehnen Tasten und oder die Druecktasten und
Drehknopfe, fuer die Kontrolle der Lichter und zum oeffnen
und schliessen der Abluftklappe.
Wartung
Reinigung
Zur Reinigung AUSSCHLIESSLICH ein mit flüssigem
Neutralreiniger getränktes Tuch verwenden. KEINE
WERKZEUGE ODER GERÄTE FÜR DIE REINIGUNG
VERWENDEN! Keine Produkte verwenden, die Scheuermittel
enthalten. KEINEN ALKOHOL VERWENDEN!
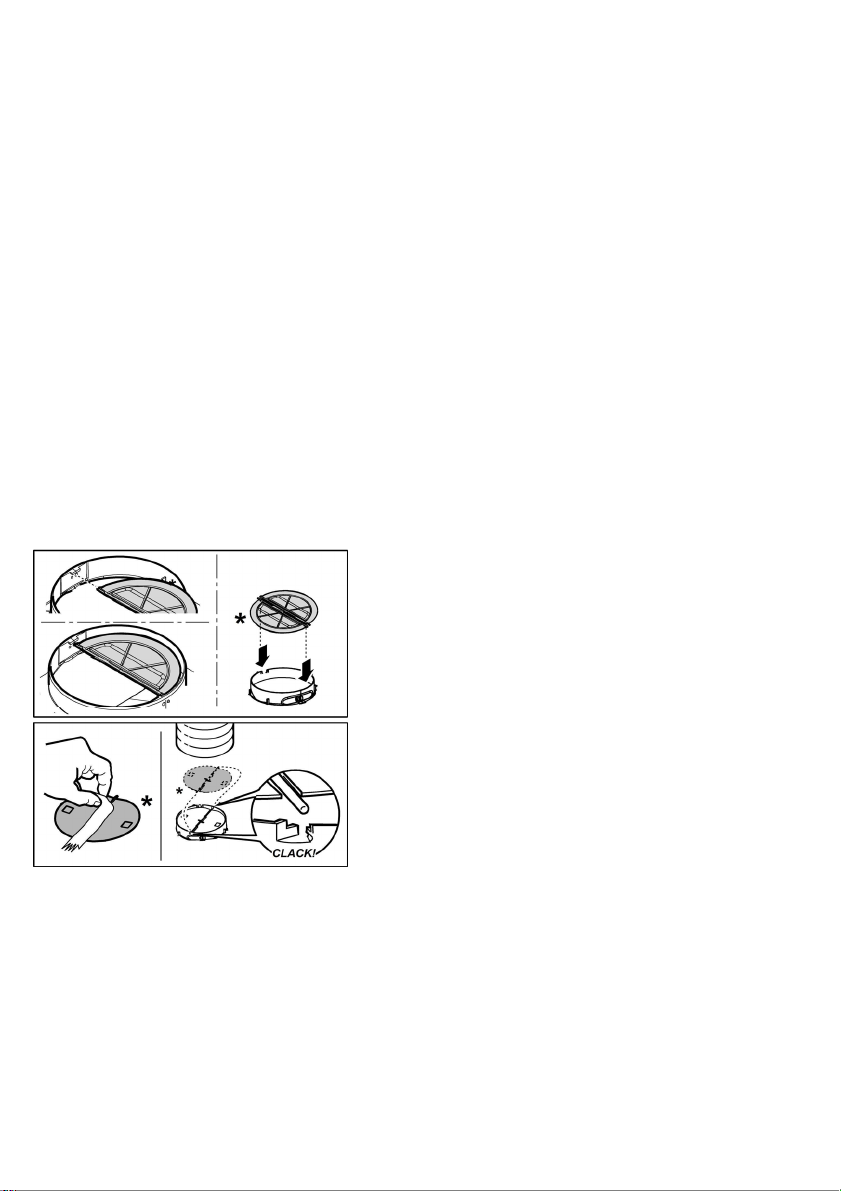
Fettfilter
Bild 2-17
Diese dienen dazu, die Fettpartikel, die beim Kochen frei
werden, zu binden.
Wenn dieser sich innerhalb eines Stützgitters befindet, kann
es sich um einen der folgenden Filtertypen handeln:
Der Papierfilte muss einmal im Monat ausgewechselt werden
oder dann, wenn er auf der Oberseite verfärbt ist und diese
Verfärbung durch die Löcher des Gitters sichtbar ist.
Der Metallfilter muss einmal monatlich mit einem milden
Reinigungsmittel per Hand gewaschen werden. Er kann auch
in der Geschirrspülmaschine bei niedriger Temperatur und im
Schnellwaschgang gereinigt werden. Der Metallfettfilter kann
bei der Reinigung in der Spülmaschine abfärben, was seine
Filtermerkmale jedoch in keiner Weise beeinträchtigt.
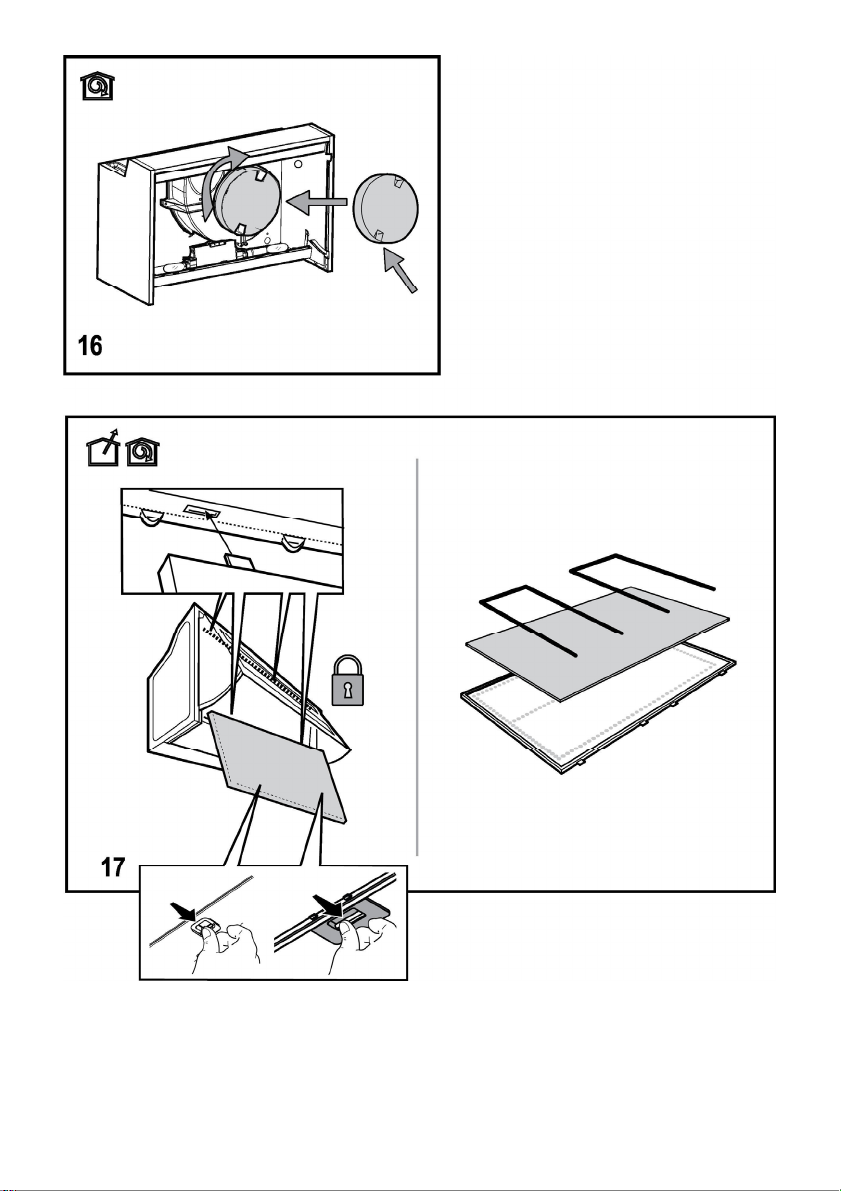
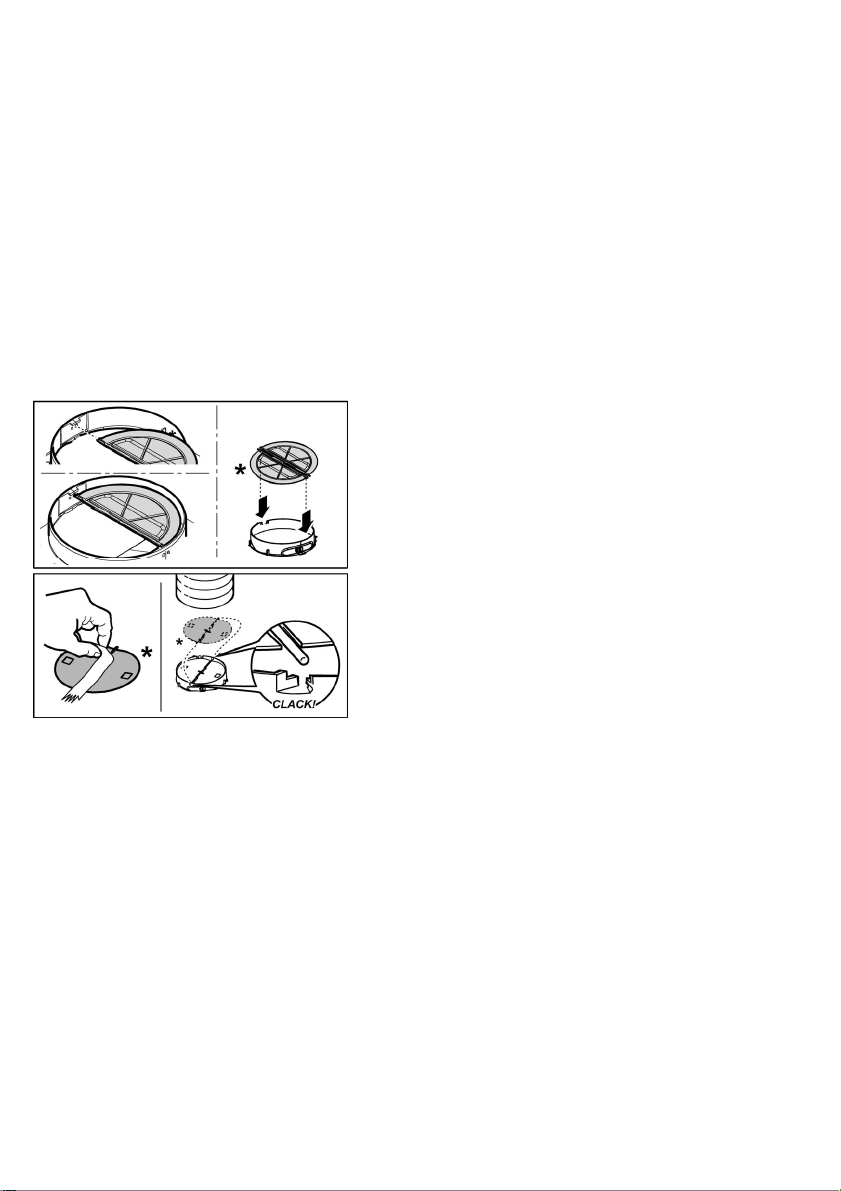
Aktivkohlefilter (nur bei der Umluftversion)
Bild 16
Dieser Filter bindet die unangenehmen Gerüche, die beim
Kochen entstehen.
Je nach der Benetzungsdauer des Herdes und der Häfigkeit
der Reinigung des Fettfilters tritt nach einer mehr oder
weniger langen Benutzungsdauer die Sättigung des
Aktivkohlefilters auf. Auf jeden Fall muß der Filtereinsatz
mindestens alle 4 Monate (oder wenn das
Sättigungsanzeigesystem der Filter – sofern bei dem
jeweiligen Modell vorgesehen – diese Notwendigkeit anzeigt)
ausgewechselt werden.
Er kann NICHT gereinigt oder erneut aktiviert werden.
Gitter entfernen
Aktivkohlefilter so einsetzen, dass das Motorschutzgitter
11
abgedeckt ist und durch Drehen im Uhrzeigersinn in den
Bajonettverschluss einrasten.
Gitter wieder einsetzen.
Fuer den Ausbau in umgekehrter Reihenfolge vorgehen.
Hinweis: bei den Modellen mit 2 Motoren sind 2 Filter
notwendig; der Montage- bzw. Demontagevorgang ist
identisch.
Ersetzen der Lampen
Das Gerät vom Stromnetz nehmen.
Hinweis: Vor Berühren der Lampen sich vergewissern, dass
sie abgekühlt sind.
Die beschädigte Lampe auswechseln.
Verwenden Sie nur max. 3W-E14 LED-Lampen. Für
detailliertere Angaben, bitte im Blatt "ILCOS D"
(alphanumerische Position "1d") im Anhang nachsehen.
NUR bei einigen Produkten:
Als optionales Zubehörteil wird eine Rückschlagklappe, die
installiert werden kann, mitgeliefert. Wenn die
Installationsbedingungen ihren Einbau notwendig machen (z.
B. wenn kein Schutz gegen Zugluft, die von draußen
hereindringt, vorhanden ist), setzen Sie die Rückschlagklappe
in das Rohranschlussstück für den Luftausgang ein, bevor Sie
den Rauchabzug installieren.
12
EN - Instruction on mounting and use
Closely follow the instructions set out in this manual. All
responsibility, for any eventual inconveniences, damages or
fires caused by not complying with the instructions in this
manual, is declined. This appliance is intended to be used in
household and similar application such as: - staff kitchen
areas in shop, offices and other working environments; - farm
houses; - by clients in hotels, motels and other residential type
environments; - bed and breakfast type environments.
• It is important to conserve this booklet for consultation at
any moment. In the case of sale, cession or move, make
sure it is together with the product.
• Read the instructions carefully: there is important
information about installation, use and safety.
• Do not carry out electrical or mechanical variations on the
product or on the discharge conduits.
• Before proceeding with the installation of the appliance
verify that there are no damaged all components.
Otherwise contact your dealer and do not proceed with
the installation.
Note: The parts marked with the symbol "(*)" are optional
accessories supplied only with some models or otherwise not
supplied, but available for purchase.
Caution
• Before any cleaning or maintenance
operation, disconnect hood from the
mains by removing the plug or
disconnecting the mains electrical supply.
• Always wear work gloves for all
installation and maintenance operations.
• This appliance can be used by children
aged from 8 years and above and
persons with reduced physical, sensory
or mental capabilities or lack of
experience and knowledge if they have
been given supervision or instruction
concerning use of the appliance in a safe
way and understand the hazards
involved.
• Children shall not be allowed to tamper
with the controls or play with the
appliance.
• Cleaning and user maintenance shall
not be made by children without
supervision.
• The premises where the appliance is
installed must be sufficiently ventilated,
when the kitchen hood is used together
with other gas combustion devices or
other fuels.
• The hood must be regularly cleaned on
both the inside and outside (AT LEAST
ONCE A MONTH).
• This must be completed in accordance
with the maintenance instructions
provided. Failure to follow the instructions
provided regarding the cleaning of the
hood and filters will lead to the risk of
fires.
• Do not flambé under the range hood.
• For lamp replacement use only lamp
type indicated in the
Maintenance/Replacing lamps section of
this manual.
The use of exposed flames is detrimental
to the filters and may cause a fire risk,
and must therefore be avoided in all
circumstances.
Any frying must be done with care in
order to make sure that the oil does not
overheat and ignite.
CAUTION: Accessible parts of the hood
may become hot when used with cooking
appliances.
• Do not connect the appliance to the mains
until the installation is fully complete.
• With regards to the technical and safety measures to be
adopted for fume discharging it is important to closely follow
the regulations provided by the local authorities.
• The air must not be discharged into a flue that is used for
exhausting fumes from appliance burning gas or other fuels.
• Do not use or leave the hood without the lamp correctly
mounted due to the possible risk of electric shocks.
• Never use the hood without effectively mounted grids.
• The hood must NEVER be used as a support surface unless
specifically indicated.
• Use only the fixing screws supplied with the product for
installation or, if not supplied, purchase the correct screws
type.
• Use the correct length for the screws which are identified in
the Installation Guide.
• In case of doubt, consult an authorized service assistance
center or similar qualified person.
13
WARNING!
• Failure to install the screws or fixing device in
accordance with these instructions may result in
electrical hazards.
• Do not use with a programmer, timer, separate remote
control system or any other device that switches on
automatically.
• This appliance is marked according to the European
directive 2012/19/EC on Waste Electrical and Electronic
Equipment (WEEE).
• By ensuring this product is disposed of correctly, you will
help prevent potential negative consequences for the
environment and human health, which could otherwise be
caused by inappropriate waste handling of this product.
• The symbol
accompanying the product, indicates that this appliance may
not be treated as household waste. Instead it should be taken
to the appropriate collection point for the recycling of electrical
and electronic equipment. Disposal must be carried out in
accordance with local environmental regulations for waste
disposal.
• For further detailed information regarding the process,
collection and recycling of this product, please contact the
appropriate department of your local authorities or the local
department for household waste or the shop where you
purchased this product.
Appliance designed, tested and manufactured according to:
• Safety: EN/IEC 60335-1; EN/IEC 60335-2-31, EN/IEC
62233.
• Performance: EN/IEC 61591; ISO 5167-1; ISO 5167-3; ISO
5168; EN/IEC 60704-1; EN/IEC 60704-2-13; EN/IEC 60704-3;
ISO 3741; EN 50564; IEC 62301.
• EMC: EN 55014-1; CISPR 14-1; EN 55014-2; CISPR 14-2;
EN/IEC 61000-3-2; EN/IEC 61000-3-3. Suggestions for a
correct use in order to reduce the environmental impact:
Switch ON the hood at minimum speed when you start
cooking and kept it running for few minutes after cooking is
finished. Increase the speed only in case of large amount of
smoke and vapor and use boost speed(s) only in extreme
situations. Replace the charcoal filter(s) when necessary to
maintain a good odor reduction efficiency. Clean the grease
filter(s) when necessary to maintain a good grease filter
efficiency. Use the maximum diameter of the ducting system
indicated in this manual to optimize efficiency and minimize
noise.
Use
The hood is designed to be used either for exhausting or filter
version.
Extraction version
In this case the fumes are conveyed outside of the building by
on the product, or on the documents
means of a special pipe connected with the connection ring
located on top of the hood.
CAUTION!
The exhausting pipe is not supplied and must be purchased
apart.
Diameter of the exhausting pipe must be equal to that of the
connection ring.
CAUTION!
If the hood is supplied with active charcoal filter, then it must
be removed.
Connect the hood and discharge holes on the walls with a
diameter equivalent to the air outlet (connection flange).
Using the tubes and discharge holes on walls with smaller
dimensions will cause a diminution of the suction performance
and a drastic increase in noise.
Any responsibility in the matter is therefore declined.
! Use a duct of the minimum indispensable length.
! Use a duct with as few elbows as possible (maximum
elbow angle: 90°).
! Avoid drastic changes in the duct cross-section.
Filtration version
The aspirated air will be degreased and deodorised before
being fed back into the room.
In order to use the hood in this version, you have to install a
system of additional filtering based on activated charcoal.
The models with no suction motor only operate in ducting
mode, and must be connected to an external suction device
(not supplied).
The connecting instructions are supplied with the peripheral
suction unit.
Installation
The minimum distance between the supporting surface for the
cooking equipment on the hob and the lowest part of the
range hood must be not less than 50cm from electric cookers
and 70cm from gas or mixed cookers.
If the instructions for installation for the gas hob specify a
greater distance, this must be adhered to.
Electrical connection
The mains power supply must correspond to the rating
indicated on the plate situated inside the hood. If provided with
a plug connect the hood to a socket in compliance with current
regulations and positioned in an accessible area, after
installation. If it not fitted with a plug (direct mains connection)
or if the plug is not located in an accessible area, after
installation, apply a double pole switch in accordance with
standards which assures the complete disconnection of the
mains under conditions relating to over-current category III, in
accordance with installation instructions.
14

WARNING!
Before re-connecting the hood circuit to the mains supply and
checking the efficient function, always check that the mains
cable is correctly assembled.
Warning! If the supply cord is damaged, it must be replaced
by the manufacturer, its service agent or similarly qualified
persons in order to avoid hazard.
Mounting
Expansion wall plugs are provided to secure the hood to most
types of walls/ceilings. However, a qualified technician must
verify suitability of the materials in accordance with the type of
wall/ceiling. The wall/ceiling must be strong enough to take
the weight of the hood.
Do not tile, grout or silicone this appliance to the wall.
Surface mounting only.
Before beginning installation:
• Check that the product purchased is of a suitable size for
the chosen installation area.
• Remove the charcoal (*) filter/s if supplied (see also
relative paragraph). This/these is/are to be mounted only
if you want lo use the hood in the filtering version.
• Check (for transport reasons) that there is no other
supplied material inside the hood (e.g. packets with
screws (*), guarantees (*), etc.), eventually removing
them and keeping them.
Operation
Use the keys or buttons envisaged for the control of the lights
and the power of the available suction.
Only in some models: switching on and off the fan that
adjusts the suction power and, in some cases, switching the
lights on and off, is controlled by opening and closing the
steam collector.
If your product is provided with an electrically or mechanically
activated valve, the keys and/or the buttons and/or the
handles available are for controlling the lights and for opening
and closing the valve.
Maintenance
Cleaning
Clean using ONLY a cloth dampened with neutral liquid
detergent. DO NOT CLEAN WITH TOOLS OR
INSTRUMENTS. Do not use abrasive products. DO NOT USE
ALCOHOL!
Grease filter
Fig. 2-17
Traps cooking grease particles.
If situated inside the support grill, it may be one of the
following types:
Paper filter must be replaced once a month or if colouring
appears on upper side, in such cases the colouring is evident
through the grill openings.
Metallic filter must be cleaned once a month, with non
abrasive detergents, by hand or in dishwasher on low
temperature and short cycle.
When washed in a dishwasher, the grease filter may discolour
slightly, but this does not affect its filtering capacity.
Charcoal filter (filter version only)
Fig. 16
It absorbs unpleasant odors caused by cooking.
The saturation of the charcoal filter occurs after more or less
prolonged use, depending on the type of cooking and the
regularity of cleaning of the grease filter.
In any case it is necessary to replace the cartridge at least
every four mounths (or when the filter saturation indication
system – if envisaged on the model in possession – indicates
this necessity).The charcoal filter may NOT be washed or
regenerated.
Remove the grill.
Apply the carbon filter to cover the grill that protects the
suction motor and turn the carbon filter clockwise to block it
(bayonet fixed).
Put the grill back.
Reverse dismantling.
Note: 2 filters are needed in the models with 2 motors. The
system of montage and dismantling is identical.
Replacing lamps
Disconnect the appliance from the electricity.
Warning! Prior to touching the light bulbs ensure they are
cooled down.
Replace the damaged lamp.
Use E14 3W max LED lamps only. For more details, check
enclosed leaflet “ILCOS D” (alfanumeric position “1d”).
On some models ONLY:
A Non Return Backdraft Damper is included in the supply, as
optional accessory to be installed under certain installation
conditions (i.e. if there is no protection against accidental
backdraft of air from the outside). The damper must be
installed inside the dedicated housing, inside of the Air Outlet
Fitting, before installing the flue.
15
FR - Prescriptions de montage et mode d’emploi
Suivre impérativement les instructions de cette notice. Le
constructeur décline toute responsabilité pour tous les
inconvénients, dommages ou incendies provoqués à l’appareil
et dûs à la non observation des instructions de la présente
notice. Cet appareil est destiné à être utilisé dans des
applications domestiques et analogues telles que : - des coins
cuisines réservés au personnel dans des magasins, bureaux
et autres environnements professionnels ; - des fermes ; l’utilisation par les clients des hôtels, motels et autres
environnements à caractère résidentiel ; - des
environnements du type chambre d’hôtes.
• Il est important de conserver ce livret pour pouvoir le
consulter à tout moment. En cas de vente, de cession ou
de déménagement, assurez-vous que la notice
d'utilisation l'accompagne.
• Veuillez lire attentivement les instructions, vous trouverez
des informations importantes sur l'installation, le mode
d'emploi et la sécurité.
• Ne pas effectuer des modifications électriques ou
mécaniques sur le produit ou sur les conduits
d’évacuation.
• Avant d'installer l'appareil, vérifiez qu’il n’y a aucun
composant endommagé. Sinon, contactez votre
revendeur et ne continuez pas l'installation.
Remarque : Les pièces portant le symbole "(*)" sont des
accessoires optionnels fournis uniquement avec certains
modèles ou des pièces non fournies, à acheter.
Attention
• Avant tout entretien ou nettoyage du
produit débranchez l'alimentation
électrique en retirant la fiche électrique
ou en coupant l'interrupteur général.
• Utilisez des gants de travail pour toute
opération de nettoyage ou d'entretien.
• Cet appareil peut être utilisé par des
enfants âgés d’au moins 8 ans et par des
personnes ayant des capacités
physiques, sensorielles ou mentales
réduites ou dénuées d’expériences ou de
connaissances, sauf si ces personnes
sont correctement surveillées ou si des
instructions relatives à l'utilisation
correcte de l'appareil permettant d'éviter
tout danger leur ont été communiquées.
• Les enfants ne doivent pas jouer avec
l’appareil.
• Le nettoyage et l’entretien par l’usager
ne doivent pas être effectués par des
enfants sans surveillance.
• La pièce doit avoir une aération
suffisante lorsque la hotte est utilisée
conjointement avec d'autres appareils
fonctionnant au gaz ou autres
combustibles.
• La hotte doit être régulièrement
nettoyée à la fois à l'intérieur et à
l'extérieur (AU MOINS UNE FOIS PAR
MOIS); cela devrait se faire en
conformité avec les instructions
d'entretien. Le non respect des
instructions expressément fournies
concernant le nettoyage de la hotte et
des filtres peut provoquer des risques
d'incendie.
• Ne pas flamber d’aliments sous la hotte.
• Pour le remplacement de la lampe,
utilisez uniquement le type de lampe
spécifié dans la section
remplacement/maintenance lampe dans
ce manuel.
L'utilisation d'une flamme nue est
dommageable pour les filtres et peut
causer un incendie, par conséquent, il
est déconseillé de l'utiliser.
La friture doit être faite avec soin afin de
s’assurer que l’huile surchauffée ne
prenne pas feu.
AVERTISSEMENT: Lorsque la table de
cuisson est en fonctionnement, les
parties accessibles de la hotte peuvent
devenir très chaudes.
• Ne pas brancher l'appareil au réseau
électrique avant que l'installation est
complètement terminée.
• En ce qui concerne les mesures techniques et de sécurité à
prendre pour l'évacuation des fumées, respectez strictement
les dispositions des règlements locales.
• L’air ne doit pas être envoyé dans un conduit utilisé pour
évacuer les fumées d’appareils utilisant du gaz ou un autre
combustible.
• Ne pas utiliser ou laisser la hotte sans les lampes
16
correctement montées, car un éventuel risque de choc
électrique est possible.
• N’utilisez jamais la hotte sans la grille montée correctement!
• La hotte ne doit JAMAIS être utilisée comme une surface
d'appui, sauf indication expresse.
• Utilisez uniquement les vis de fixation fournies avec le
produit pour l'installation, ou, si non fournies, acheter le type
correct de vis.
• Utilisez la longueur correcte pour les vis qui sont identifiées
dans le Guide d'installation.
• En cas de doute, consultez votre centre de service agréé ou
du personnel qualifié.
ATTENTION !
• Le défaut d'installer les vis et les dispositifs de fixation
conformément à ces instructions peut entraîner des
risques électriques.
• Ne pas mettre en marche au moyen d’un
programmateur, d’une minuterie, ou d’un système de
commande à distance séparé ou tout autre dispositif
qui met l’appareil sous tension automatiquement.
Cet appareil porte le symbole du recyclage conformément à la
Directive Européenne 2012/19/EC concernant les Déchets
d’Équipements Électriques et Électroniques (DEEE ou
WEEE).
En procédant correctement à la mise au rebut de cet appareil,
vous contribuerez à empêcher toute conséquence nuisible
pour l’environnement et la santé de l’homme.
Le symbole
documentation qui l’accompagne indique que ce produit ne
peut en aucun cas être traité comme déchet ménager. Il doit
par conséquent être remis à un centre de collecte des déchets
chargé du recyclage des équipements électriques et
électroniques.
Pour la mise au rebut, respectez les normes relatives à
l’élimination des déchets en vigueur dans le pays
d’installation.
Pour obtenir de plus amples détails au sujet du traitement, de
la récupération et du recyclage de cet appareil, veuillez vous
adresser au bureau compétent de votre commune, à la
société de collecte des déchets ou directement à votre
revendeur.
Appareil conçu, testé et fabriqué conformément aux normes
suivantes :
• Sécurité : EN/IEC 60335-1; EN/IEC 60335-2-31, EN/IEC
62233.
• Performances : EN/IEC 61591; ISO 5167-1; ISO 5167-3;
ISO 5168; EN/IEC 60704-1; EN/IEC 60704-2-13; EN/IEC
60704-3; ISO 3741; EN 50564; IEC 62301.
• EMC: EN 55014-1; CISPR 14-1; EN 55014-2; CISPR 14-2;
EN/IEC 61000-3-2; EN/IEC 61000-3-3. Suggestions pour une
utilisation correcte afin de réduire l’impact environnemental :
Allumer la hotte à la vitesse minimum pendant la cuisson et la
présent sur l’appareil ou sur la
laisser fonctionner pendant quelques minutes après la fin de
la cuisson. Augmenter la vitesse uniquement en présence
d’une grande quantité de fumée ou de vapeur et n’utiliser
la/les vitesse(s) accélérées que dans les cas extrêmes.
Remplacer le(s) filtre(s) au charbon lorsque cela est
nécessaire afin de maintenir une réduction efficace des
odeurs. Nettoyer le(s) filtres à graisse lorsque cela est
nécessaire afin de maintenir un filtrage efficace des graisses.
Utiliser un système de tuyauterie du diamètre maximum
indiqué dans ce manuel afin d’optimiser le rendement et de
minimiser le bruit.
Utilisation
La hotte est réalisée de façon qu’elle puisse être utilisée en
version aspirante à évacuation extérieure, ou filtrante à
recyclage intérieur.
Version aspirante
Les vapeurs sont évacuées vers l'extérieur à travers un
conduit d'évacuation fixé à la bride de raccord qui se trouve
au-dessus de la hotte.
ATTENTION!
Le tuyau d’évacuation n’est pas fourni et doit être acheté à
part.
Le diamètre du tuyau d'évacuation doit être égal à celui de la
bride de raccord.
ATTENTION!
Si la hotte est équipée d'un filtre à charbon, ce dernier doit
être enlevé.
Relier la hotte aux tubes et trous d’évacuation de la paroi d’un
diamètre équivalent à la sortie de l’air (collier de raccord).
L’utilisation de tubes et des trous d'évacuation à paroi avec un
diamètre inférieur entraînera une diminution des
performances d’aspiration et une nette augmentation du bruit.
Nous déclinons toute responsabilité à cet égard.
! Utiliser un tuyau de la longueur strictement nécessaire.
! Les coudes du tuyau doivent être en nombre minime
(angle maxi du coude: 90°).
! Éviter les variations excessives de section du tuyau.
Version filtrante
L'air d'aspiration sera dégraissé et désodorisé avant d'être
renvoyé dans la pièce.
Pour utiliser la hotte dans cette version, vous devez installer
un système de filtrage supplémentaire basé sur charbon actif.
Les modèles sans moteur d’aspiration fonctionnent
uniquement dans la version aspirante et ils doivent être
connectés à une unité périphérique d’aspiration (non fournie).
Les instructions de raccordement sont fournies avec l’unité
périphérique d’aspiration.
17
Installation
La distance minimum entre la superficie de support des
récipients sur le dispositif de cuisson et la partie la plus basse
de la hotte de cuisine ne doit pas être inférieure à 50cm dans
le cas de cuisinières électriques et de 70cm dans le cas de
cuisinières à gaz ou mixtes.
Si les instructions d’installation du dispositif de cuisson au gaz
spécifient une plus grande distance, il faut en tenir compte.
Branchement électrique
La tension électrique doit correspondre à la tension reportée
sur la plaque signalétique située à l’intérieur de la hotte. Si
une prise est présente, branchez la hotte dans une prise
murale conforme aux normes en vigueur et placée dans une
zone accessible également après l’installation. Si aucune
prise n’est présente (raccordement direct au circuit
électrique), ou si la prise ne se trouve pas dans une zone
accessible également après l’installation, appliquez un
disjoncteur normalisé pour assurer de débrancher
complètement la hotte du circuit électrique en conditions de
catégorie surtension III, conformément aux règlementations
de montage.
ATTENTION!
Avant de rebrancher le circuit de la hotte à l’alimentation
électrique et d’en vérifier le fonctionnement correct, contrôlez
toujours que le câble d’alimentation soit monté correctement.
Attention! Si le câble d’alimentation est endommagé, il doit
être remplacé par le fabricant, son service après-vente ou des
personnes de qualification similaire afin d’éviter un danger.
Montage
La hotte est équipée de chevilles de fixation convenant à la
plupart des parois/plafonds. Il est cependant nécessaire de
s’adresser à un technicien qualifié afin de s’assurer que le
matériel est approprié au type de paroi/plafond. La
paroi/plafond doit être suffisamment solide pour supporter le
poids de la hotte.
Avant de commencer l’installation:
• Vérifier que le produit acheté soit de dimensions
adéquates pour la zone d’installation choisie.
• Enlevez le(s) filtre(s) au charbon actif (*) si ceux-ci sont
fournis (voir également le paragraphe concerné). Celuici(ceux-ci) est(sont) remonté(s) uniquement si l’on veut
utiliser la hotte en version recyclage.
• Vérifier qu’à l’intérieur de la hotte il n’y ait pas d’autre
matériel fourni (pour des raisons de transport) d’autre
matériel fourni avec l’équipement (par exemple: vis (*),
garanties (*) etc., dans ce cas, enlevez-les et conservezles.
Fonctionnement
Utilisez les touches ou boutons-poussoirs prévus pour le
contrôle des lampes et des puissances d’aspiration
disponibles.
Uniquement pour certains modèles: en ouvrant ou en
fermant le récipient de récolte vapeur, il est possible de
contrôler l’allumage et l’arrêt de l’hélice qui règle la puissance
d’aspiration et, dans certains cas, l’allumage et l’arrêt des
lumières.
Si votre produit est fourni avec une valve à actionnement
électrique ou mécanique, les touches et/ou les boutons et/ou
les poignées à disposition servent au contrôle des lumières et
à l'ouverture et la fermeture de la valve.
Entretien
Nettoyage
Pour le nettoyage, utiliser EXCLUSIVEMENT un chiffon
humidifié avec des détersifs liquides neutres. NE PAS
UTILISER D'OUTILS OU D'INSTRUMENTS POUR LE
NETTOYAGE ! Éviter l'usage de produits abrasifs, NE PAS
UTILISER D'ALCOOL!
Filtre anti-gras
Fig. 2-17
Il retient les particules de graisse issues de la cuisson.
S’il est situé à l’intérieur d’une grille support, il peut s’agir d’un
des modèles suivants:
Le filtre en papier doit etre chengé une fois par mois ou s’il
se colore sur sa partie supérieure, lorsque la coloration
transparait au travers de la grille.
Il filtro metallique doit etre nettoyé une fois par mois avec
un detergent non agressif, à la main ou dans le lave vaisselle
à basse température et pendant un cycle court.
Le lavage du filtre anti-graisse métallique au lave-vaisselle
peut en provoquer la décoloration. Toutefois, les
caractéristiques de filtrage ne seront en aucun cas modifiées.
Filtre à charbon actif (uniquement pour version
recyclage)
Fig. 16
Retient les odeurs désagréables de cuisson.
La saturation du charbon actif se constate aprés un emploi
plus ou mois long, selon le type de cuisiniére et de régularité
du nettoyage du filtre à graisses. En tout cas, il est nécessaire
de changer le filtre aprés, au maximum, quatre mois (ou
lorsque le système d’indication de saturation des filtres – si
prévu sur le modèle possédé – indique cette nécessité).
IL NE PEUT PAS être nettoyé ou régénéré.
Enlever la grille
Placer le filtre au charbon pour couvrir la grille qui protège le
moteur d’aspiration et tourner le filtre au charbon dans le sens
des aiguilles d’une montre pour le bloquer (fixation à
baïonnette).
Replacer la grille.
Procéder en ordre inverse pour le démontage.
Note: pour les modèles avec 2 moteurs, 2 filtres à graisse
sont nécessaires; le système de montage est identique.
18
Remplacement des lampes
Débrancher l’appareil du réseau électrique
Attention! Avant de toucher les lampes, assurez-vous
qu’elles soient froides.
Remplacer l’ampoule brûlée.
Utiliser uniquement des ampoules LED de 3W-E14
(maximum). Pour de plus amples détails, consulter la notice
jointe "ILCOS D" (position alphanumérique "1d").
UNIQUEMENT sur certains produits :
Un Clapet Anti-Retour des Fumées est fourni comme
accessoire en option, à installer. Si les conditions d’installation
le requièrent (par ex. : absence de protections contre le retour
accidentel de courants d’air de l’extérieur), l’insérer dans le
logement dédié du Raccord de Sortie d’Air avant d’installer le
conduit d’échappement des fumées.
19
 Loading...