


GB-AEDTK-SI GB-AEDNK-SI
21.5" AIO System
User's Manual
Rev. 1.0
Table of Contents |
|
Overview Of Your Documentation.................................................................................... |
4 |
Document Type............................................................................................................ |
4 |
Document Type....................................................................................................................... |
4 |
Non-printed documentation..................................................................................................... |
4 |
Servicing................................................................................................................................. |
4 |
Typographics............................................................................................................... |
4 |
Box Contents.................................................................................................................... |
5 |
Standard Items............................................................................................................ |
5 |
Getting Started With Your PC........................................................................................... |
6 |
Touring Your PC........................................................................................................... |
6 |
Front View............................................................................................................................... |
6 |
Rear View................................................................................................................................ |
7 |
Right-side View....................................................................................................................... |
8 |
Left-side View.......................................................................................................................... |
9 |
Bottom-side View.................................................................................................................. |
10 |
Setting Up Your PC........................................................................................................ |
11 |
Preparing To Setup Your PC...................................................................................... |
11 |
Turning On Your PC................................................................................................... |
13 |
Turning Off Your PC................................................................................................... |
13 |
Brightness control...................................................................................................... |
14 |
Using Your PC................................................................................................................ |
15 |
Connecting To The Internet........................................................................................ |
15 |
Using The Webcam................................................................................................... |
16 |
Using The Optical Disc Drive (Optional).................................................................... |
17 |
CD-Writable Drives............................................................................................................... |
17 |
DVD-Writable Drives............................................................................................................. |
17 |
Upgrading Your PC........................................................................................................ |
18 |
Safety Measures........................................................................................................ |
18 |
Removing PC Cover.................................................................................................. |
19 |
System Components................................................................................................. |
20 |
Removing Motherboard Metal Cover......................................................................... |
21 |
Installing CPU ........................................................................................................... |
22 |
Installing Heat Sink.................................................................................................... |
23 |
Replacing Hard Disk Drive......................................................................................... |
24 |
Installing Memory....................................................................................................... |
25 |
GB-AEDTK |
2 |
Installing WiFi Module................................................................................................ |
26 |
Troubleshooting............................................................................................................. |
27 |
Frequently Asked Questions (FAQ)........................................................................... |
27 |
Power problems.................................................................................................................... |
27 |
Internet access problems...................................................................................................... |
28 |
Display problems................................................................................................................... |
29 |
Keyboard and mouse problems............................................................................................ |
30 |
Sound and microphone problems......................................................................................... |
31 |
Miscellaneous problems........................................................................................................ |
32 |
Specifications................................................................................................................. |
33 |
GB-AEDTK |
3 |

Overview Of Your Documentation
Document Type
Your documentation contains printed information and PDF user manuals to help you perform various tasks.
Document Type
• Quick Start Guide provides information about setting up your computer.
Non-printed documentation
•Manual CD (containing this manual) provides information about using your computer, cleaning and maintaining the monitor and the accessories, and the common solutions to the problems you may encounter while using your computer.
Servicing
•Do not attempt to service this product yourself, as opening or removing covers may expose you to the risk of electric shock and other hazards. If any of the above mentioned misuse or other accident such as dropping or mishandling occurs, contact qualified service personnel for servicing.
Typographics
Special tips, notes, and cautions that appear throughout this manual are designed to ensure that you perform specific tasks properly, preventing unnecessary errors.
CAUTION: Indicates important information to prevent potential damage to the unit and data, or personal injury caused by improper use.
NOTE: Indicates additional information for a particular situation. TIP: Indicates useful information for completing a task.
GB-AEDTK |
4 |
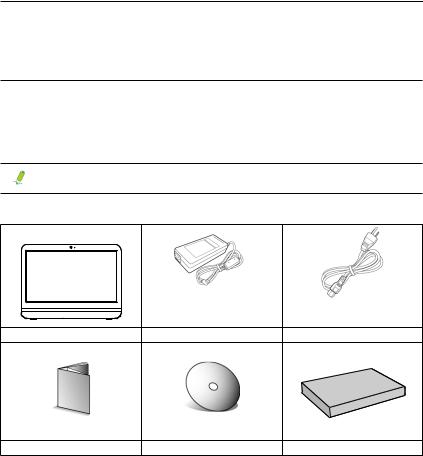
Box Contents
Carefully unpack the system and check that the following items were included. If any are missing or damaged, please contact your vendor. Retain the box and packing in case you need to transport your personal computer in the future. The fitted foam packaging is ideal for protecting the device during transport.
The appearance and contents of your package may be different from those illustrated below due to regional variations.
Standard Items
All-in-One PC |
Power Adapter |
Power Cord |
Quick Start Guide |
Driver and Manual CD |
Accessory Kit |
•The box contents above are for reference only and the actual items shall depend on the product package you obtain. The box contents are subject to change without notice.
•The motherboard image is for reference only.
GB-AEDTK |
5 |
Getting Started With Your PC
Touring Your PC
This section describes the views and the features of the controls, ports, buttons, components, and connectors of your computer.
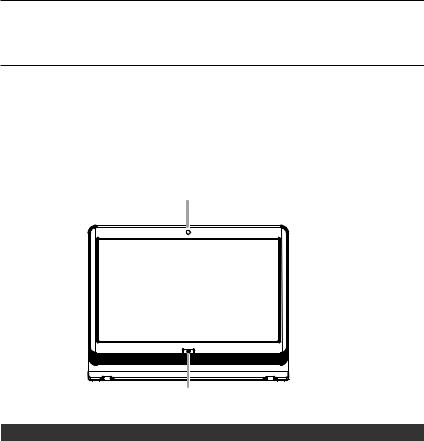
Front View
1
 3
3
2 |
No |
Item |
Description |
1 |
Webcam |
The built-in camera allows you to capture still images, record videos, |
|
|
and have video chats. |
2 |
Power Button |
Press the button to power your PC. |
|
|
|
3 |
Touch-enabled widescreen |
The monitor is equipped with a touch screen. You may make adjust- |
|
(for select models/ |
ments to your work field at your fingertips. The touch screen will re- |
|
GB-AEDTK) |
sponsively react with your fingertip commands. |
GB-AEDTK |
6 |
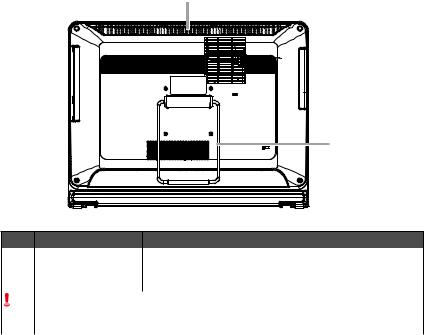
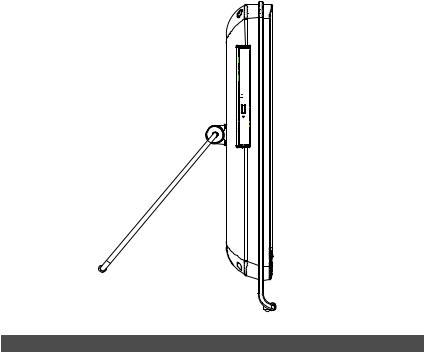
Rear View
|
|
1 |
|
|
2 |
No |
Item |
Description |
1 |
Vents |
The design of the vents is to prevent the computer from overheating. |
|
|
The internal fans blow hot air away from heat-sensitive components in |
|
|
the computer. |
|
Keep the vents clean and free of dirt and dust, as blocking it may cause serious thermal |
|
|
problems. |
|
2 |
Computer Stand |
You can adjust the computer stand for the best viewing angle. |
GB-AEDTK |
7 |
Right-side View
1 
2 
3 
4 
5 
6 
 7
7 


No |
Item |
Description |
|
1 |
B-CAS/SIM |
Insert the B-CAS card or SIM card into this card reader. |
|
|
|
All ISDB receiving apparatus such as DTV TV, tuner, and DVD recorder |
|
|
|
except 1seg-only devices require a B-CAS card. |
|
|
|
The SIM is used to identify and authenticate subscribers on mobile tele- |
|
|
|
phony devices. |
|
2 |
Media Card Reader |
Insert your memory card into this media card reader to access photos, |
|
|
|
audio and video files, or other data stored in the memory cards. This |
|
|
|
reader supports the following card types: |
|
|
|
• |
Secure Digital (SD) |
|
|
• |
Memory Stick (MS) |
|
|
• |
Extreme Digital (xD) |
|
|
• |
MultiMedia Card (MMC) |
3 |
USB Port |
Connect the USB plugs into the USB ports to connect your USB |
|
|
|
devices, such as MP3 players, digital cameras, keyboard and mouse, |
|
|
|
or external hard disk drives, etc. |
|
4 |
Microphone Input Jack |
Connect your microphone to this jack to record sound or voice. |
|
|
|
|
|
5 |
Audio/Headphone Output |
Connect your headphones or speakers to this jack to listen to the sound |
|
|
Jack |
from your PC when watching videos and DVDs, listening to music, and |
|
|
|
playing games. |
|
6/7 |
Brightness buttons |
Press the buttons to adjust the brightness level of the monitor. |
|
GB-AEDTK |
8 |
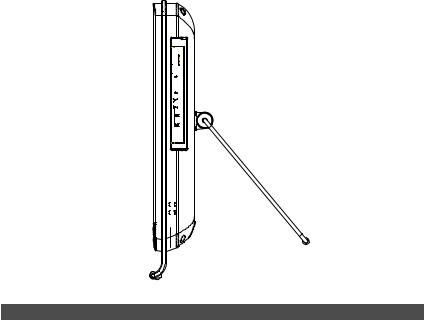
Left-side View


 1
1
No |
Item |
Description |
1 |
Optical Disc Drive |
Insert CD's or DVD's for viewing or playback of data, music or video |
|
(Optional) |
files. |
GB-AEDTK |
9 |
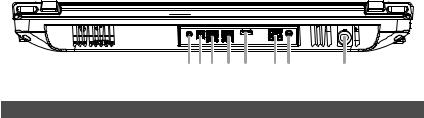
Bottom-side View
1 2 3 4 5 6 7 8
No |
Item |
Description |
1 |
Audio input jack |
Connect to an audio in jack on external audio equipment for audio |
|
|
sound. |
2 |
SPDIF OUT |
Connect to a SPDIF digital audio output on certain expansion cards. |
3 |
USB 3.0 Ports |
Connect a Universal Serial Bus device. It supports v3.0 of the USB standard, |
|
|
which allows data exchange rates as high as 5.0 Gb/s. |
4 |
USB Ports |
Connect a Universal Serial Bus device. It supports v2.0 of the USB |
|
|
standard, which allows data exchange rates as high as 3.0 Gb/s |
5 |
HDMI-Out Port |
Supports high definition digital video connections. |
6 |
LAN Port |
LAN (Local Area Network) port. Use an Ethernet (RJ45) cable to con- |
|
|
nect your computer with a network or broadband device. |
7 |
DC jack |
Connect the DC power to this port. |
8 |
RF Connector |
The RF connector is an electrical connector designed to work at radio |
|
|
frequencies in the multi-megahertz range. RF connectors are typically |
|
|
used with coaxial cables and are designed to maintain the shielding |
|
|
that the coaxial design offers. |
GB-AEDTK |
10 |

Setting Up Your PC
This section describes how to set up your computer and make adjustments to the monitor.
Preparing To Setup Your PC
To protect the computer and monitor, before setting up your computer you should:
•Find a flat open area on your desk to position your computer.
•Place a soft item like the computer packaging bag on the desk for padding.
It is suggested to install your computer in a space that allows for airflow as restricting the airflow may cause overheating which could impact the performance of your computer.
1.Gently lay the screen face down on a flat clean padded surface.
2.Pull the computer stand till it reaches the first detent stop. (approximately 10° apart from the rear of the computer).
Please ensure the computer stand has been pulled up to the first detent position, so that your computer may stand firm and upright.
3.Carefully lift the computer and adjust the angle of the screen.
GB-AEDTK |
11 |
 Loading...