

Page 1

OPERATOR MANUAL
Includes Safety, Service and Replacement Part Information
Model 240H
One Man Hole Digger
Form: GOM14081201
Version 1.1
Do not discard this manual. Before operation, read and
comprehend its contents. Keep it readily available for reference
during operation or when performing any service related
function. When ordering replacement parts, please supply the
following information: model number, serial number and part
number. For customer service assistance, telephone
800.533.0524, +507.451.5510. Our Customer Service Department
telefax number is 877.344.4375 (DIGGER 5), +507.451.5511.
There is no charge for customer service activities .
Internet address: http://www.generalequip.com.
Email: general@generalequip.com.
The product covered by this manual complies with the
mandatory requirements of 98/37/EC.
Copyright 2013, General Equipment Company.
Page 2

Page 3

Manufacturers of light construction
equipment
Congratulations on your decision to purchase a General light construction product. From our
humble beginnings in 1955, it has been a continuing objective of General Equipment Company to
manufacture equipment that delivers uncompromising value, service life and investment return.
Because of this continuous commitment for excellence, many products bearing the General name
actually set the standards by which competitive products are judged.
When you purchased this product, you also gained access to a team of dedicated and
knowledgeable support personnel that stand willing and ready to provide field support
assistance. Our team of sales representatives and inhouse factory personnel are available to
ensure that each General product delivers the intended performance, value and investment return.
Our personnel can readily answer your concerns or questions regarding proper applications,
service requirements and warranty related problems.
General Equipment Company places great emphasis upon not only product performance, but also
on product safety. It is important to remember that this product will only be as safe as the operators
which utilize it. It just makes good, common sense to take the time to read and fully understand the
contents of this manual before attempting to utilize this product in service. If you ever do have any
questions or concerns about this product, please feel free to contact our Customer Service
Department at the telephone numbers listed below for assistance.
If there is anything that I can do to assist your efforts when utilizing this product, please do not
hesitate to contact me. For assistance after normal business hours, telephone me at 507.451.9409
or 507.363.1033. If I am not immediately available, I will attempt to return your call as soon as
possible.
Sincerely,
GENERAL EQUIPMENT COMPANY
Dennis Von Ruden
President
620 Alexander Drive SW • P.O. Box 334 • Owatonna, Minnesota 55060-0334 USA
Telephone: 800.533.0524 • International Telephone: +507.451.5510
Telefax: +507.451.5511 • Sales/Customer Service Department Toll Free: 877.344.4375 (DIGGER 5)
http://www.generalequip.com • e-mail: general@generalequip.com
Page 4

Page 5

240H ONE MAN HOLE DIGGER
FORM GOM14081201, VERSION 1.1
Table of Contents
DESCRIPTION PAGE
3
Notice to Operators
Operator Instructional Data Sheet
Safety Precautions.
PREPARATION.
OPERATION.
MAINTENANCE, REPAIR, AND STORAGE.
GENERAL SAFETY INFORMATION.
Assembly
Before Starting the Engine
FILLING THE ENGINE CRANKCASE WITH OIL.
FILLING THE HOLE DIGGER TRANSMISSION WITH GREASE.
FILLING THE ENGINE FUEL TANK.
Digging Operation
OPERATIONAL DISCLAIMER.
CALIFORNIA PROPOSITION 65 DISCLAIMER.
SPARK ARRESTOR DISCLAIMER.
INFORMATION RELATIVE TO MINIMUM COMPONENT STANDARDS FOR THE OPERATION OF THE HOLE
DIGGER.
GENERAL TRANSPORTATION INFORMATION.
DETERMINATION OF POTENTIAL SUBSURFACE HAZARDS IN THE PROPOSED DIGGING LOCATION(S).
SET-UP FOR DIGGING.
STARTING THE ENGINE WITH THE AUGER CONNECTED TO THE AUGER DRIVESHAFT.
OPERATING THE HOLE DIGGER.
UNDERSTANDING KICKBACK.
BACK CARE/PROPER LIFTING INFORMATION.
MINIMIZING KICKBACK FROM AN OPERATIONAL STANDPOINT.
MINIMIZING KICKBACK FROM A DESIGN STANDPOINT.
OPERATING THE HOLE DIGGER CONTINUED.
STOPPING THE HOLE DIGGER.
TEMPORARY STORAGE FOR THE HOLE DIGGER WHILE ON THE JOB SITE.
ADDING AND REMOVING THE NONFLIGHTED AUGER EXTENSION.
4
6
7
7
9
10
12
14
14
14
15
15
15
15
16
16
16
17
17
18
20
21
21
22
23
24
27
27
28
Service
CHANGING THE HOLE DIGGER TRANSMISSION LUBRICANT.
MAGURA THROTTLE CONTROL MAINTENANCE PROGRAM.
AUGER MAINTENANCE PROGRAM.
REPLACING A WORN AUGER SCREW BIT.
REPLACING A WORN AUGER BLADE.
ENGINE SERVICE.
Repair
CENTRIFUGAL CLUTCH ROTOR AND SHOE ASSEMBLY REMOVAL AND INSTALLATION.
CENTRIFUGAL CLUTCH DRUM AND PINION SHAFT REMOVAL AND INSTALLATION.
Troubleshooting
ENGINE.
OPERATIONAL PROBLEMS.
Storage
Specifications
MSDS
Replacement Parts Diagrams
30
32
33
34
34
35
35
35
37
40
40
40
40
41
42
43
Page 6

240H ONE MAN HOLE DIGGER
FORM GOM14081201, VERSION 1.1
4
Notice to Operators
IF YOU CAN NOT READ OR DO NOT FULLY UNDERSTAND THE CONTENTS OF THIS
MANUAL, PLEASE CONTACT THE FACTORY FOR PROPER ASSISTANCE BEFORE
ATTEMPTING TO OPERATE THIS PRODUCT.
SI TU NO PUEDES LE'ER O NO COMPRENDES EL CONTENIDO DE ESTE MANUAL
FAVOR DE PONERSE EN CONTACTO CON LA. FABRICA PARA ASSISTENCIA- A
PROPIA ANTES DE INTENTAR PARA OPERAR ESTE PRODUCTO.
SOLLTEN SIE DIESE GEBRAUCHSANWEISUNG NICHT LESEN KOENNEN ODER ES
NICHT VOLLKOMMEN VERSTEHEN, WENDEN SIE SICH BITTE AN DEN HERSTELLER
FUER RICHTIGE HILFE EHE SIE VERSUCHEN DIESES PRODUKT ZU OPERIEREN.
SI VOUS NE LISEZ OU NE COMPRENDRE ENTIEREMENT LES MATIERES DE CE
MANUEL, S'IL VOUS PLAIT, CONTACTEZ L'USINE POUR L'ASSISTANCE
APPROPRIEE AVANT D'UTILISER LE PRODUIT.
DANGER indicates a hazard with a high level of risk which, if not avoided, will result in death or
serious injury.
WARNING indicates a hazard with a medium level of risk which, if not avoided, could result in death
or serious injury.
CAUTION indicates a hazard with a low level of risk which, if not avloided, could result in minor or
moderate injury.
These safety aler t symbols identify impor tant safety messages in this manual. When you see these symbols,
be alert to the possibility of personal injury and carefully read the message that follows.
Do not allow anyone to operate the Hole Digger without first reading this Operator Manual and becoming
familiar with its operation. The manufacturer of this Hole Digger has gone to great extremes to provide the
owner(s) and/or operator(s) with the finest equipment available for its intended job function of digging holes
in ice and earth formations. Yet, the possibility exists that the Hole Digger can be utilized in and/or subjected
to job applications not perceived and/or anticipated by the manufacturer. Such misuse and/or misapplication
of the Hole Digger can lead to the possibility of serious damage, injury or even death. It is the responsibility
of the owner(s) and/or operator(s) to determine that the Hole Digger is being utilized and/or operated within
the scope of its intended job function. It is the responsibility of the owner(s) and/or operator(s) to establish,
monitor and constantly upgrade all safety programs and/or practices utilized in and for the operation of the
Hole Digger. The purpose of such programs is to provide for owner(s') and/or operator(s') safety. Operators
Page 7

240H ONE MAN HOLE DIGGER
FORM GOM14081201, VERSION 1.1
must be instructed to recognize and avoid unsafe conditions associated with their work (29 CFR 1926.21
(b)(2)) and/or applicable updated revisions. It is the responsibility of the owner(s) and/or operator(s) to
determine that no modifications and/or alterations have been made to the Hole Digger. Modifications and/or
alterations can lead to the possibility of serious damage, injury or even death. It is the responsibility of the
owner(s) and/or operator(s) to make this Operator Manual available for consultation during all phases of
operation. Refer to OSHA 2207 which contains all OSHA job safety and health rules and regulations (1926
and 1910) covering construction.
The concept of portable, one and two man operated, hole digging equipment has been successfully
utilized for over forty years as a practical solution to many types of hole digging job requirements.
The basic concept is proven and well accepted within the associated marketplaces as an alternative
method to manual labor and/or larger, mounted earth drilling machinery. Use of a Hole Digger
requires strenuous work activity. This type of work activity can be considered to be greater in
magnitude than that experienced with the use of many other types of both light construction and
lawn and garden related equipment. This type of work activity should only be attempted by operators
of adequate physical size and stature, mental awareness and physical strength and condition. Each
operator is required to supply a resultant force that counteracts/balances and/or resists the natural
torque and kickback forces generated during the hole digging process. The body parts most
noticeably affected during the digging process are the arms, hands, wrists, shoulders, lower back
and legs. The hole digging process can also produce excessive stress/strain directly to the back
muscles, spinal vertebrae and many other body parts. Back related pain can be a side effect of the
hole digging process. An operator with a chronic back related problem or a history of back and/or
other medically related problems should not attempt to utilize the Hole Digger. Use of the Hole
Digger may only aggravate this and any other medically related problem. The torque and kickback
forces generated and/or encountered correspond to the natural laws of physics and are inherent to
the hole digging process. They can not be changed or totally eliminated with portable one and two
man operated, hole digging equipment of this design. Proper operating positions and techniques, as
outlined in this manual, can be successfully utilized to minimize the effects of the torque and
kickback forces upon the human body. Because of the diverse type of prevailing digging conditions,
operator experience levels and operator physical characteristics, no warranty, guarantee,
representation and/or liability is made by the factory as to the absolute correctness or sufficiency of
any operational procedure, operational position and/or technique. There is no absolute guarantee
that an operator of any given experience level, physical size and/or physical condition will be
immune to the possibility of and/or probable physical side effects of the normal hole digging
process. The normal hole digging process includes the auger striking buried obstructions (roots,
rocks, etc.) and the resulting torque and kickback forces created. Each potential operator of the Hole
Digger must be made aware of and assume the operational and physical liability described and/or
associated with the hole digging process when utilizing the Hole Digger. Each potential operator not
willing to assume the operational and physical liability described and/or associated with the hole
digging process should not operate the Hole Digger.
common sense are essential for maximizing the safe and efficient operation of the Hole Digger.
Proper levels of operator experience, skill and
5
Record the Hole Digger and engine/electric motor serial numbers in the spaces provided below.
_______________ Model Number _______________ Serial Number
_______________ Engine/Electric Motor Serial Number _______________ Date of Purchase
Specifications and design are subject to change without notice or obligation. All specifications are general
Page 8

240H ONE MAN HOLE DIGGER
FORM GOM14081201, VERSION 1.1
in nature and are not intended for specific application purposes. General Equipment Company reserves the
right to make changes in design, engineering or specifications and to add improvements or discontinue
manufacture at any time without notice or obligation. General Equipment Company and its agents accept
no responsibility for variations which may be evident in actual products, specifications, pictures and
descriptions contained in this publication.
6
Operator Instructional Data Sheet
The following undersigned operators of the Hole Digger described and/or pertaining to this Operator
Manual have received formal safety and operational information/instruction from the undersigned
owner(s)/instructor(s) in accordance to OSHA 29 CFR 1926.21 (b)(2) and/or applicable updated revisions
per taining to, but not necessarily limited to the:
1) READING, COMPREHENSION AND ACKNOWLEDGEMENT OF THE MATERIAL COMPRISING THE
ENTIRE CONTENTS OF THE APPLICABLE OPERATOR MANUAL FOR THE HOLE DIGGER.
2) FORMALIZED OPERATOR'S SAFETY PROGRAM TO BE DEVISED BY THE OWNER OF THE HOLE
DIGGER IN CONJUNCTION WITH THE CONTENTS OF THE APPLICABLE OPERATOR MANUAL FOR
THE HOLE DIGGER.
3) OSHA RULES AND REGULATIONS RESEARCHED FOR AND/OR BY THE OWNER OF THE HOLE
DIGGER AND DEEMED APPLICABLE TO THE SAFE AND PROPER USE AND/OR OPERATION OF THE
THE HOLE DIGGER FOR ANY SPECIFIC JOB APPLICATION.
4) LOCAL LAWS, REGULATIONS AND CUSTOMS RESEARCHED FOR AND/OR BY THE OWNER OF
THE HOLE DIGGER AND DEEMED APPLICABLE TO THE SAFE AND PROPER USE AND/OR
OPERATION OF THE HOLE DIGGER FOR ANY SPECIFIC JOB APPLICATION.
5) FORMALIZED MAINTENANCE PROGRAM FOR THE HOLE DIGGER TO BE DEVISED BY THE
OWNER OF THE HOLE DIGGER IN ACCORDANCE WITH, BUT NOT NECESSARILY LIMITED TO, THE
SPECIFICATIONS, GUIDELINES AND OPERATIONAL INFORMATION CONTAINED IN THE
APPLICABLE OPERATOR MANUAL.
6) COMPREHENSIVE OPERATIONAL INSTRUCTIONS FOR THE CORRECT AND PROPER USE OF THE
HOLE DIGGER AS PER THE CONTENTS OF THE APPLICABLE OPERATOR MANUAL.
_______________ Operator _______________ Owner/Instructor __________ Date
_______________ Operator _______________ Owner/Instructor __________ Date
_______________ Operator _______________ Owner/Instructor __________ Date
_______________ Operator _______________ Owner/Instructor __________ Date
Page 9

240H ONE MAN HOLE DIGGER
FORM GOM14081201, VERSION 1.1
7
Safety Precautions
THE FOLLOWING SAFETY PRECAUTIONS
PROVIDE SOME COMMON SENSE GUIDES TO
PROMOTE SAFETY AND EFFICIENCY WITH THE
200 SERIES HOLE DIGGERS. NO WARRANTY,
GUARANTEE OR REPRESENTATION IS MADE BY
THE MANUFACTURER AS TO THE ABSOLUTE
CORRECTNESS OR SUFFICIENCY OF ANY
INFORMATION OR STATEMENT. THESE SAFETY
PRECAUTIONS ARE INTENDED TO DEAL
PRINCIPALLY WITH COMMON PRACTICES AND
CONDITIONS ENCOUNTERED IN THE USE OF THE
HOLE DIGGER AND ARE NOT INTENDED TO BE
ALL INCLUSIVE. PROPER LEVELS OF OPERATOR
EXPERIENCE, SKILL AND COMMON SENSE ARE
ESSENTIAL FOR SAFE AND EFFICIENT
OPERATION.
THE ENGINE EXHAUST FROM THIS PRODUCT
CONTAINS CHEMICALS KNOWN TO THE STATE OF
CALIFORNIA TO CAUSE CANCER, BIRTH
DEFECTS OR OTHER REPRODUCTIVE HARM.
THIS STATEMENT IS MADE IN COMPLIANCE TO
CALIFORNIA PROPOSITION 65.
Hole Digger, read this Operator Manual, view the
applicable Safety and Operational Information DVD
and the material supplied by the engine manufacturer
to familiarize each operator with its correct operating
procedures. Avoid the urge not to take the necessary
time to read this Operator Manual before operating the
Hole Digger. DO NOT OPERATE THE HOLE DIGGER
UNTIL EACH OPERATOR COMPLETELY
COMPREHENDS THE CONTENTS OF THIS
MANUAL, THE APPLICABLE SAFETY AND
OPERATIONAL INFORMATION DVD, APPLICABLE
SUPPLEMENTAL INFORMATION AND THE
INFORMATION SUPPLIED BY THE ENGINE
MANUFACTURER.
2) Develop a comprehensive program for the safe
operation of the Hole Digger by its owner(s) and/or
operator(s). Such a program will include, but is not
limited to: instructional requirements for operation,
applicable OSHA requirements, local laws and
regulations, job site safety and a Hole Digger
maintenance program. Constantly examine and
upgrade this program to guarantee owner(s) and/or
operator(s) safety. Each operator must be fully
instructed regarding the specifics of this safety
program.
3) Determine that the Hole Digger is in its original,
factory configuration and has not been modified in any
manner. Many modifications can result in potentially
dangerous configurations that can lead to property
damage and/or personal injury. If there are any
questions about possible modifications made to the
Hole Digger, contact the Customer Service
Department for specific information BEFORE
utilization. There is no charge for this service.
INCORRECT USE OF THE HOLE DIGGER CAN
RESULT IN PROPERTY DAMAGE, PERSONAL
INJURY OR EVEN DEATH. TO REDUCE THIS
POSSIBILITY, GIVE COMPLETE AND UNDIVIDED
ATTENTION TO THE JOB AT HAND AND FOLLOW
THESE SAFETY PRECAUTIONS:
PREPARATION.
1) The 200 Series Hole Diggers are a specialized type
of powered equipment, designed for a specific job
function and require adequate and thorough instruction
BEFORE operated. The size, power, complexity and
operating characteristics of this type of powered
equipment would dictate that each operator must
receive adequate, professional instruction regarding
the proper operation of this Hole Digger before being
allowed to utilize it. BEFORE attempting to utilize this
4) Minors should never be allowed to operate the Hole
Digger. Bystanders, especially children and animals,
should not be allowed in the area where the Hole
Digger is in use. The hole digging process can result in
flying particles being emitted at high velocity and
striking the operator and/or onlookers. This can lead to
the possibility of property damage and/or personal
injury. Keep all body parts, loose clothing, foreign
objects and onlookers clear of the rotating auger
and/or auger extensions.
5) Operators must be in proper physical condition,
mental health and not under the influence of any
substance (drugs, alcohol, etc.) which might impair
vision, dexterity or judgment. Working with the Hole
Digger is strenuous. If you have any condition that
might be aggravated by strenuous work, check with
your doctor BEFORE operating the Hole Digger. Guard
Page 10

240H ONE MAN HOLE DIGGER
FORM GOM14081201, VERSION 1.1
8
against the possibility of back related injuries. Always
lift the Hole Digger with leg muscles and not with the
back. Operators must be of adequate height so that for
any given operating configuration, the operator
handle(s) remain below their shoulder sockets. Do not
operate the Hole Digger if this condition is not satisfied.
The 200 Series Hole Diggers require that the operator
be of proper height, weight and strength to maximize
digging efficiency and minimize the possibility of
personal injury.
6) Prolonged use of the Hole Digger (or other, similar
machines) exposes the operator to vibrations which
may produce Whitefinger Disease (Raynaud's
Phenomenon). This phenomenon reduces the hand's
ability to feel and regulate temperature, produces
numbness and burning sensations and may cause
nerve and circulation damage and tissue necrosis.
Antivibration systems do not guarantee that you will not
sustain Whitefinger Disease. Therefore, continuous and
regular users should closely monitor the condition of
their hands and fingers. After each period of use,
exercise to restore normal blood circulation. If any of
the symptoms appear, seek medical advice
immediately.
7) Clothing must be sturdy and snug fitting, but allow
complete freedom of movement. Never wear loose
fitting jackets, scarves, neckties, jewelry, flared or
cuffed pants or anything that could become caught on
controls or moving parts. Wear long pants to protect
your legs. Protect your hands with heavy duty, nonslip
gloves to improve your grip. Good footing is most
important when operating the Hole Digger. Wear sturdy
boots with nonslip soles. Steel-toed safety shoes are
highly recommended. Keep shoes properly laced.
Never wear tennis shoes or other, similar type shoes
which afford little or no protection. Wear an approved
safety hard hat to protect the operator’s head where
there is a danger of head injuries.
8) Noise, generated by the engine of the Hole Digger
and the actual process itself, can damage your hearing.
The 200 Series Hole Digger operates with a noise
emission greater than 70dBA. Hearing protection is
required while operating or when near operating
equipment. Continuous and regular operators should
have their hearing checked regularly.
10) Visually inspect the Hole Digger, auger(s), auger
extension, and accessories for damaged or worn parts.
Inspect each auger for the proper screw bit and blade.
Look for loose and/or damaged handle grip areas.
Check for loose and/or broken parts. Determine that
operator controls work freely, all safety devices are
operative and information/safety decals are readable.
Check to determine that the Hole Digger and all related
accessories are in good mechanical condition
BEFORE utilization.
11) Contact appropriate representatives to determine
if/where electrical cables, gas lines and other
hazardous items are buried under the work surface
BEFORE utilization. The Hole Digger and related
accessories are not classified as being insulated.
Contact with buried electrical cables, gas lines and
other hazardous items can result in electrocution
and/or an explosion.
12) Know how the controls operate. Know how to stop
the engine quickly in an emergency. Always start the
engine according to the instructions as outlined in this
manual to minimize the possibility of unexpected or
uncontrolled auger rotation. Unexpected auger rotation
can cause loss of machine control, and the possibility
of property damage and/or personal injury.
13) Never exceed the recommended capacities of the
Hole Digger. Refer to the Specifications section of this
manual for more detailed information. Always utilize the
correct auger and auger extension series designed for
use with the Hole Digger. Some Hole Diggers can
utilize specially designed augers intended for drilling
holes through ice. Such an auger will find limited
success when utilized to dig earth. Earth augers are
not designed to drill through ice. Use of an incorrect
auger or auger series can result in property damage
and/or personal injury.
14) Do not operate the Hole Digger on a jobsite
location where kickback forces generated during the
hole digging process can allow body parts to come in
direct contact with a vertical wall, foundation or other
support type structures in close proximity. Such an
occurrence can result in property damage and/or
personal injury. Always maintain a safe and reasonable
distance from these types of structures.
9) Flying debris, generated by the hole digging
process, can cause eye injury. Eye protection is
required while operating or when near operating
equipment.
15) Breathing Carbon Monoxide fumes while operating
the Hole Digger can result in property damage and/or
personal injury. The normal operation of the Hole
Digger is outdoors where the potential effects of
Carbon Monoxide to the operator are minimized. If the
Hole Digger is operated in a closed area (indoors or
outdoors), determine if supplemental ventilation is
Page 11

240H ONE MAN HOLE DIGGER
FORM GOM14081201, VERSION 1.1
9
required to minimize the potential effects of Carbon
Monoxide to the operator. Follow all current OSHA
regulations pertaining to ventilation.
OPERATION.
1) Give complete and undivided attention to the job at
hand. Do not chew gum, smoke and/or use smokeless
tobacco while utilizing the Hole Digger. Do not attempt
to eat and/or drink while utilizing the Hole Digger.
Determine that eyeglasses and/or hearing aid devices
and other medical related devices are properly
secured. Keep shoes properly laced. Use of the Hole
Digger is strenuous and causes fatigue. Help prevent
the cause of an accident. Plan to take work breaks as
required to help maintain proper mental and physical
alertness.
2) The 200 Series Hole Diggers are not sealed or
insulated. Do not operate any Hole Digger in an
explosive atmosphere or near combustible materials.
Refer to current OSHA rules and regulations.
3) Gasoline is an extremely flammable fuel. Use
extreme caution when handling gasoline or mixing fuel.
Always utilize UL®, CSA or CE approved containers for
the storage and/or transportation of fuel. Do not smoke
or bring any fire or flame near the fuel. Always shut off
the engine and allow it to cool before refueling. Never
remove the fuel tank filler cap while the engine is
running. Never operate an engine without a fuel tank
filler cap. Select bare ground for fueling and move at
least 10 feet from the fueling spot before starting the
engine. Wipe off any spilled fuel before starting the
engine and check for leakage. If a fuel or oil leak is
found, do not start or run the engine until the leak is
fixed and the spillage has been wiped away. Take care
not to get fuel or oil on your clothing. If this happens,
change your clothing immediately. Some 200 Series
Hole Diggers utilize a 2 Stroke gasoline engine. Two
Stroke engines require the addition of oil mixed with the
gasoline for lubrication. The 240 Series Hole Digger
utilizes a Four Stroke engine and does not
be mixed with gasoline. Before operating the Hole
Digger, refer to the Specifications section of this
manual for more detailed information regarding
gasoline and lubrication requirements.
4) The 200 Series Hole Diggers are designed for use
by one operator. Use of a one man Hole Digger by
more than one operator can lead to confusion and loss
require oil to
of control, resulting in damage and/or personal injury.
Never operate the Hole Digger with an improper
number of operators. Such a configuration can result in
property damage and/or personal injury. If it is felt that
a greater number of operators is required to furnish
additional "down pressure" to the auger, STOP and
contact the Customer Service Department for specific
operational and service/maintenance information.
There is no charge for this service.
5) Do not operate the Hole Digger with onlookers close
by. Caution all onlookers to stand clear. The hole
digging process can result in flying particles being
emitted at high velocity and striking the operator and/or
onlookers, This can lead to the possibility of property
damage and/or personal injury. Wear proper safety
eyewear. Keep all body parts, loose clothing and
foreign objects clear of the rotating auger.
6) Do not utilize a shovel and/or foreign object to
remove the loose soil from a hole area while the Hole
Digger is in use. Such a practice can result in the
shovel and/or foreign object to become entrapped by
the rotating auger, leading to the possibility of property
damage and/or personal injury.
7) Start the engine according to the instructions as
outlined in this manual to minimize the possibility of
unexpected auger rotation. Unexpected auger rotation
can result in the loss of machine control and the
possibility of property damage and/or personal injury.
The 240 Hole Digger is designed for the engine to be
started by the operator’s left hand only. The operator’s
right hand controls the twist grip throttle and engine
speed. Reversing the process by starting the engine
with the right hand will position the hot engine muffler
in close proximity to the operator’s body. This is not an
approved configuration because it can result in injury
from the hot muffler and/or breathing Carbon Monoxide
fumes during operation. If you have any questions
regarding proper starting procedures, contact the
Customer Service Department BEFORE utilization.
There is no charge for this service.
8) Start and operate the Hole Digger only in a well
ventilated area. Carbon Monoxide fumes given off by
an engine are poisonous. Breathing these fumes can
result in property damage and/or personal injury.
Operate the Hole Digger only when/where visibility and
light are adequate for the job at hand. Work carefully.
Always hold the Hole Digger firmly with both hands.
Page 12

240H ONE MAN HOLE DIGGER
FORM GOM14081201, VERSION 1.1
10
Wrap your fingers around the handle grips/gripping
areas, keeping the grips/gripping areas cradled
between your thumbs and forefingers. Always
determine the operator handle and grips/gripping areas
are in good condition and free of moisture, pitch, oil or
grease. Wear gloves to improve your grip. Never leave
the Hole Digger running unattended.
9) Stop the engine between each hole. Allowing the
engine to remain operating between each hole
substantially increases the potential for property
damage and/or personal injury. Special care must be
exercised in slippery conditions and on difficult, uneven
surfaces. Watch for cracks, high spots and other
surface irregularities. Keep proper footing and balance
at all times. The normal use of the Hole Digger is on
level ground. Other digging terrains can be dangerous
and should be avoided. Only properly trained operators
should attempt these techniques.
10) Contact with a hot engine muffler can cause
property damage and/or personal injury. Remain clear
of a hot, engine muffler at all times. Do not overspeed
the engine by altering the governor setting or by
disconnecting the engine governor (if so equipped).
Serious damage to the engine and/or personal injury
can result.
11) The 200 Series Hole Diggers are powered by
gasoline engines which produce Carbon Monoxide
fumes during the combustion process. Carbon
Monoxide fumes are poisonous. Breathing Carbon
Monoxide fumes while operating the Hole Digger can
result in property damage and/or personal injury. The
normal operation of the Hole Digger is outdoors where
the potential effects of Carbon Monoxide to the
operator are minimized. If the Hole Digger is operated
in a closed area (indoors or outdoors), determine if
supplemental ventilation is required to minimize the
potential effects of Carbon Monoxide to the operator.
Follow all current OSHA regulations pertaining to
ventilation.
12) Because this Hole Digger is classified as a low
cost, hand held, low horsepower, portable type
machine, it is limited in the number of practical and/or
suitable job applications for this type of equipment. A
particular job site, actual soil conditions, job
specifications and operator experience/skill/common
sense may dictate that a different type of machine (with
characteristics of higher purchase cost, being mounted
to a carrier vehicle, with greater horsepower and less
mobility), method and/or process be utilized to properly
complete the job with the degree of efficiency and
safety required. Contact the Customer Service
Department for specific information regarding suitable
job applications, job sites, soil conditions and operator
experience/skill/common sense recommendations for
this Hole Digger BEFORE utilization. There is no
charge for this service.
MAINTENANCE REPAIR AND STORAGE.
1) Use only genuine, approved replacement parts for
maintenance and repair. Use of parts manufactured by
others can result in property damage and/or personal
injury.
2) Follow the Service instructions as outlined in the
appropriate section of the Operator Manual.
3) Always stop the engine and disconnect the spark
plug wire BEFORE checking or working on the Hole
Digger.
4) Always properly maintain the Hole Digger.
Frequently check all fasteners and individual parts.
Built in safety features are effective only if they are
maintained in good working condition. Replace any
questionable part or assembly with a genuine,
approved replacement part. Do not forsake proper
maintenance for the price of a few replacement parts.
Proper maintenance does not cost---it actually pays
dividends. Do not attempt any maintenance or repair
work not described in the Operator Manual. Have such
work performed at your dealer's servicing shop.
5) Determine the engine throttle control and throttle
cable assemblies are not damaged and allow for
complete freedom of movement. This is necessary to
allow them to perform their intended job functions. Do
not operate the Hole Digger with a damaged or worn
throttle control and/or throttle cable assembly.
6) A worn or damaged engine muffler is a fire hazard
and may cause loss of hearing. Check to see that the
muffler is in good condition. If the muffler is equipped
with a spark arresting device, determine that it is in
proper working condition at regular service intervals.
Replace the spark arresting device with an approved
Page 13

240H ONE MAN HOLE DIGGER
FORM GOM14081201, VERSION 1.1
replacement if there is any question of its integrity. It is
the responsibility of the owner(s) and/or operator(s) to
provide for and properly maintain a USDA approved,
spark arresting muffler in an area where specified by
law. Check with appropriate governing agencies for
more specific information. The Hole Digger must not
be operated if the muffler is faulty or has been
removed. Contact with a hot muffler can cause property
damage and/or personal injury. Remain clear of a hot
engine muffler.
7) Maintain all safety and operation decals in proper
condition. If any decal becomes damaged and/or
unreadable, replace with a genuine, factory approved,
replacement part only.
8) The Hole Digger may utilize locking type hexagon
nuts to minimize the effects of vibration. Replace all self
locking hardware with genuine, factory approved,
replacement parts only.
9) Consult the material supplied by the engine
manufacturer for specific information relative to proper
operational, lubrication and storage requirements.
11
FIGURE 1
11) At the conclusion of the useful service life of the
Hole Digger, drain and properly dispose of all fluids per
local requirements. Disassemble engine and
transmission components. Wear appropriate safety
apparel during the disassembly process. Recycle
aluminum, steel and nonmetallic components properly
per local requirements.
10) Replace the auger teeth/blade and screw bit when
signs of excessive wear are seen. When such parts are
not replaced at proper intervals, undo wear will occur at
the boring head and auger flighting. The end result is
an inverted cone configuration for the auger, which
usually requires complete replacement. FIGURE 1.
Digging with equipment that is past its useful service
life or that have not been properly maintained can
result in substandard productivity, excessive property
damage and/or personal injury. Auger service life can
be greatly extended with constant auger wear part
maintenance.
Page 14

240H ONE MAN HOLE DIGGER
FORM GOM14081201, VERSION 1.1
General Safety Information
Physical Exertion
Operating the Hole Digger requires proper physical stamina and mental
alertness.
Improper operation can result in physical injury and/or damage to the
machine.
Operators must be alert and of proper physical size and condition.
Noise
The Hole Digger operates with a noise emission level grater then 70dba.
Exposure to high noise emission levels can result in hearing loss or damage.
Wear hearing protection when near or operating the Hole Digger.
Flying Debris
The hole digging process can result in flying debris.
Contact with flying debris can result in personal injury.
Wear eye protection and appropriate safety apparel when near or operating
the Hole Digger.
12
Burn Danger
An engine muffler can become hot.
A hot muffler can result in personal injury.
Do not touch a hot engine muffler.
Auger Entrapment
The earth auger is not shielded.
Body contact with a rotating earth auger can result in personal injury.
Do not come in contact with a rotating earth auger.
Body Strain
The hole digging process can result in body strain.
Strain can inflict damage to lower back and upper body parts.
Minimize the effects of strain by lifting the Hole Digger with your back
positioned vertically.
Kickback
Auger contact with a buried rock or other obstruction can thrust the handle
toward the operator with a sharp, counter-clockwise rotation called kickback.
Kickback forces can inflict damage to hands, arms and other upper body parts.
Assume the proper operating position when digging to maximize control and
minimize the effects of kickback
Page 15
240H ONE MAN HOLE DIGGER
FORM GOM14081201, VERSION 1.1
13
Safety Practices:
Operation is strenuous work.
Operators must be in proper physical
condition, mental health and not under
the influence of any substance which
might impair vision, dexterity or
judgment. Check with your doctor
BEFORE operation.
Clothing must be sturdy and snug
fitting, but allow complete freedom of
movement. Wear sturdy leather boots
with nonslip soles; heavy duty, nonslip
gloves and hearing/eye protection.
Wear a safety hard hat as required.
Always assume the digging location
contains buried underground
obstructions. Contact appropriate
representatives to determine if/where
electrical cables, gas lines and other
hazardous objects are buried BEFORE
operation.
Know how controls operate. Know
how to stop theengine in anemergency.
Always operate the Hole Digger with
the correct number of operators.
Start and operate the Hole Digger
only in a well ventilated area. Carbon
Monoxide fumes from the engine are
poisonous.
Do not operate with onlookers close
by. Caution all onlookers to stand clear.
Keep all foreign objects clear of the
rotating auger.
Never attempt to “ream out” an
existing, smaller hole with a larger
diameter auger.
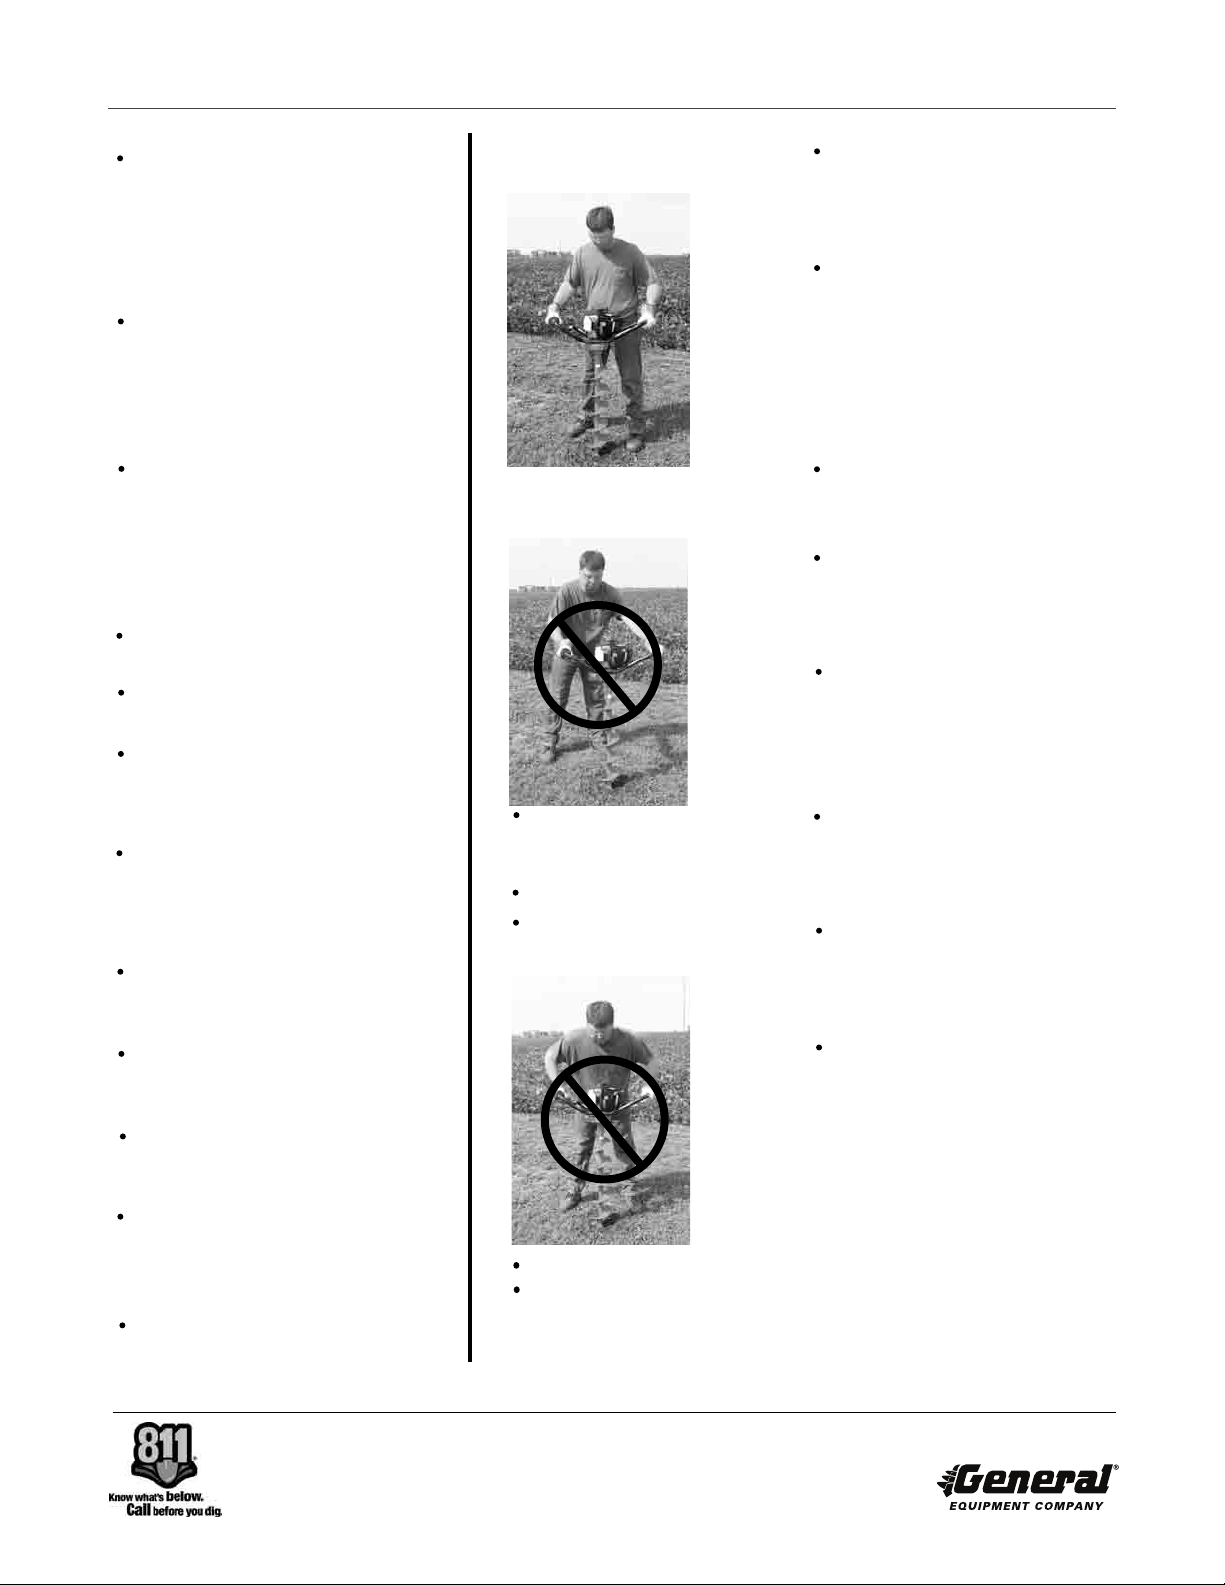
To minimize the effects of kickback,
operate the Hole Digger while
assuming the proper operator position.
Operate only when/where visibility
and light are adequate for the job at
hand.
Proper Operator
Position
Improper Operator
Positions
Improper leg positions. Move left
foot forward of right foot. Keep legs at
a comfortable distance apart.
Handle too far from upper body.
Arms too far from upper body.
Assume the digging
location is filled with buried
obstructions.
Position Hole Digger with
engine muffler facing away
from operator. Start engine
with left hand. Operate
engine throttle control with
right hand.
Grasp operator handle
firmly.
Position left foot forward of
right foot at a comfortable
distance apart.
Keep left side of handle as
close to waist/leg/arms as
possible to maximize
leverage and control.
Keep arms as close to
upper body as possible to
minimize stress.
Keep back as vertical as
possible while digging to
minimize stress.
Bend legs as needed
while digging to minimize
stress.
Stop the engine between each hole to
minimize the possibility of property
damage and/or personal injury. Normal
operation is on level surfaces.
Contact with a hot engine muffler and
heat shield can cause property damage
and/or personal injury. Remain clear of hot
engine muffler and heat shield.
Improper leg positions.
Operator leaning too far over
machine. Operator position will not
allow proper reaction and control in the
event of kickback.
Page 16
240H ONE MAN HOLE DIGGER
FORM GOM14081201, VERSION 1.1
14
Assembly
Open the shipping carton immediately upon receipt.
Visually inspect the contents of the carton for freight
damage and/or missing parts. If shipping damage is
evident, contact the delivering carrier immediately to
arrange for an inspection of the damage by their claims
representative. Federal law requires that a claim be
filed within a specified time period. If missing parts are
detected, notify your dealer who will assist you in
obtaining them.
Included in the shipment should be the following:
1 each, engine/handle/transmission assembly.
1 each, bottle of engine oil.
1 each, Operator Manual.
1 each, Safety and Operational Information DVD.
1 each, applicable engine manual.
1 each, warranty initiation card.
1 each, Final Inspection Form.
1 each, PN 2121 Auger Pin.
The Hole Digger is shipped from the factory completely
assembled. The transmission is lubricated at the
factory and will not require further servicing prior to the
initial usage. Visually inspect the throttle control,
throttle cable assembly and the carburetor for signs of
damage. Rotate the throttle control to determine that
the carburetor spring allows the throttle lever of the
carburetor to travel from its low speed to high speed
and back position without any restriction and/or
binding.
THROTTLE CONTROL CAN RESULT IN PROPERTY
DAMAGE AND/OR PERSONAL INJURY.
Check all fasteners for security. Consult a fastener
torque chart for the proper torque value if any fastener
is found to require retorquing.
Before Starting the Engine
FILLING THE ENGINE CRANKCASE WITH OIL.
Tools Required:
1 each, small, clean funnel with a flexible extension
spout.
Filling the engine crankcase with oil will require a level
working platform of sufficient size and appropriate
height. As an alternative, the transmission driveshaft
can be securely mounted in a suitable bench vice.
1) Wipe any dust or dirt from the crankcase
dipstick/filler plug area. Remove the dipstick/filler plug.
2) Using the funnel, add oil to the engine crankcase.
For proper classifications and/or amount, consult the
material supplied by the engine manufacturer for
specific information.
3) Replace the dipstick/filler plug and tighten. Wipe off
any excess spilled oil. Properly dispose of the spilled
oil.
DETERMINE THAT ALL COMPONENTS OF THE
ENGINE THROTTLE CONTROL ASSEMBLY ALLOW
FOR PROPER FUNCTION. THE THROTTLE LEVER
OF THE CARBURETOR MUST RETURN THE
ENGINE TO THE IDLE SPEED, AS STATED IN THE
SPECIFICATION SECTION OF THIS MANUAL WHEN
THE TWIST GRIP THROTTLE IS RELEASED BY
THE OPERATOR. IF THIS DOES NOT OCCUR,
CONTACT YOUR DEALER OR THE CUSTOMER
SERVICE DEPARTMENT FOR SPECIFIC
INFORMATION RELATIVE TO CORRECTING THIS
OCCURANCE. DO NOT OPERATE THE HOLE
DIGGER UNTIL THIS OCCURANCE HAS BEEN
CORRECTED. AN IMPROPERLY FUNCTIONING
4) Consult the material supplied by the engine
manufacturer for other service related information
including oil change interval.
Do not operate the Hole Digger unless proper oil
level is maintained. Improper oil level can result in
property damage and/or personal injury. Consult
the material supplied by the engine manufacturer
for information relative to proper maintenance
procedures.
Page 17

240H ONE MAN HOLE DIGGER
FORM GOM14081201, VERSION 1.1
15
FILLING THE HOLE DIGGER TRANSMISSION WITH
GREASE.
Application: All 200 Series models.
The transmission is filled at the factory with 8 fluid
ounces (224g) of high temperature transmission
grease and should not require additional service when
placing the Hole Digger into initial service. The factory
utilizes the Fisk Brothers (Lubriplate Brand) GR132
grease which features an EP additive. The EP (extreme
pressure) additive allows the grease to properly cling to
the gear teeth and provide lubrication at high rotational
speeds. Without the addition of and EP additive,
normal grease will not cling to the teeth, resulting in
abnormal wear and reduced service life. With normal
usage, the transmission grease should not require
further replacement until the centrifugal clutch
assembly is replaced. For further information, refer to
the Repair section of this manual for additional
information.
1) Carefully clean the filler cap and surrounding area to
insure that no dirt or debris falls into the fuel tank.
2) Fill the fuel tank with fresh, clean, unleaded
automotive gasoline. Leaded "regular" grade gasoline
is an acceptable substitute. DO NOT USE GASOLINE
CONTAINING METHANOL (WOOD ALCOHOL).
Gasoline containing a maximum of 10 per cent ethanol
or grain alcohol (sometimes referred to as Gasohol)
may be used but requires special care when the engine
is stored for extended periods.
3) Use of a properly blended gasoline for operation
during the intended season will result in easier engine
starting. Do not use gasoline left over from the previous
season of operation.
4) Never fill the fuel tank completely full. Instead, fill the
fuel tank to within 1/4 to 1/2 inch of the top of the tank
to provide space for fuel expansion. Always wipe any
fuel spillage from the engine and the Hole Digger
before starting the engine.
Do not fill the Hole Digger transmission with oil.
The transmission does not incorporate seals to
prevent the oil from draining from the bearings and
shafts. Such an occurrence will allow the oil to
drain with the potential for property damage.
FILLING THE ENGINE FUEL TANK.
Application: All 240 Series models.
Tools Required:
1 each, small, clean funnel.
The 240 Hole Digger utilizes an all-position, Four
Stroke, gasoline engine. While this engine may
have the same physical appearance of a
conventional Two Stroke engine, the lubrication
systems are completely different. The Honda GX35
engine does not require oil to be mixed with
gasoline. The crankcase oil does not function as a
reservoir for an oil injection system.
DO NOT SMOKE NEAR THE FUEL TANK. DO NOT
FILL THE FUEL TANK WITH THE ENGINE RUNNING
OR IF IT IS HOT. ALLOW AMPLE TIME BETWEEN
EACH REFUELING FOR THE ENGINE TO COOL. AN
IGNITION SOURCE IN CLOSE PROXIMITY TO THE
FUEL TANK CAN BE THE SOURCE OF AN
EXPLOSION, RESULTING IN PROPERTY DAMAGE
AND/OR PERSONAL INJURY. CONSULT THE
M AT E R I A L S U P P L I E D B Y T H E E N G I N E
MANUFACTURER FOR INFORMATION RELATIVE
TO PROPER FUELING PROCEDURES.
Digging Operation
OPERATIONAL DISCLAIMER.
Application: All 200 Series models.
THE MANUFACTURER OF THIS HOLE DIGGER
MAKES NO WARRANTY OR GUARANTEE THAT IT
IS MERCHANTABLE AND/OR SUITABLE FOR ANY
SPECIFIC JOB APPLICATION AND THAT IT WILL
HAVE THE POWER REQUIRED TO DIG A SPECIFIC
DIAMETER HOLE DOWN TO A SPECIFIC DEPTH IN
A SPECIFIC SOIL CLASSIFICATION.
Page 18

240H ONE MAN HOLE DIGGER
FORM GOM14081201, VERSION 1.1
16
CALIFORNIA PROPOSITION 65 DISCLAIMER.
Application: All 200 Series models.
T H E E N G I N E E X H A U ST A N D D U S TS / BY PRODUCTS FROM THE OPERATIONAL PROCESS
OF THIS PRODUCT CONTAINS C H E M I C A L S
KNOWN TO THE STATE OF CALIFORNIA TO
CAUSE CANCER, BIRTH DEFECTS, OR OTHER
REPRODUCTIVE HARM.
SPARK ARRESTOR DISCLAIMER.
Application: All 240 Series models.
DO NOT OPERATE THE HOLE DIGGER ON ANY
FOREST COVERED, BRUSH COVERED OR
GRASS COVERED, UNIMPROVED LAND UNLESS
AN APPROVED SPARK ARRESTOR IS INSTALLED
ON THE MUFFLER. THE SPARK ARRESTOR MUST
BE MAINTAINED IN PROPER WORKING ORDER
BY THE OWNER AND/OR OPERATOR. IN THE
S TAT E O F C A L I F O R N I A , T H E A B O V E I S
REQUIRED BY LAW. OTHER STATES MAY HAVE
SIMILAR LAWS. FEDERAL LAWS WILL APPLY ON
FEDERAL LANDS. LAWS WILL VARY WITH USE IN
SPECIFIC COUNTRIES.
INFORMATION RELATIVE TO MINIMUM
COMPONENT STANDARDS FOR THE OPERATION
OF THE HOLE DIGGER.
2) The twist grip throttle control be equipped with a
properly fitting handle grip of sufficient integrity to allow
for proper job function as outlined within this manual. A
loose fitting grip or a grip without a full end cap is not
permitted.
3) Throttle cable is in proper mechanical condition that
allows it to perform its intended job function as outlined
within this manual. A cable with bends, abrasions or
other damage that restricts or limits inner wire
movement must be replaced with a factory approved
replacement part only.
4) Throttle control is installed in the correct operating
position and be in a mechanical condition that allows it
to perform it intended job function as outlined within
this manual. A worn or damaged throttle control hand
grip or any other, internal part must be replaced with a
factory approved replacement part only. Do not operate
the Hole Digger with the plastic protective cover plate
not properly installed or missing. Do not allow foreign
material to accumulate within the throttle control
assembly. Clean all throttle control components and
repair as necessary according to a regular
maintenance schedule.
5) An engine ON/OFF ignition switch that allows it to
perform its intended job function as outlined within this
manual. Replace any damaged engine ON/OFF
ignition switch with a factory approved replacement
part only.
6) Centrifugal clutch assembly in proper mechanical
condition that allows it to perform its intended job
function as outlined within this manual. Replace any
centrifugal clutch assembly with operational
characteristics that do not allow it to properly
disengage at the specific engine idle speed or properly
slip during overload conditions.
Application: All 200 Series models.
For operational, safety and overall productivity
considerations, it is required that specific Hole Digger
components meet minimum acceptable operational
standards as follows:
1) Operator handle be properly mounted to the
transmission and be of proper structural integrity. If
cracking or deformation is detected, replace the
operator handle with a factory approved replacement
part only.
7) Each auger is in a structural condition that allows it
to perform its intended job function as outlined within
this manual. Bent auger axles should not exceed
established limits. Bent axles exceeding established
limits should be properly discarded.
8) Earth auger(s) has/have replaceable wear parts
(screw bit and blade) that allow(s) it/them to perform
its/their intended job function as outlined within this
manual. An auger with a screw bit and/or blade worn
past normal service life limits is not to be utilized under
any circumstances.
Page 19

240H ONE MAN HOLE DIGGER
FORM GOM14081201, VERSION 1.1
OPERAT I O N OF A H O L E DIGGE R UTILIZI N G
C O M PO N E N T S N OT M E E T I NG M I N I M U M
OPERATIONAL STANDARDS CAN RESULT IN
PRO PERT Y DAMAGE AN D/OR P ERSON AL IN
JURY.
GENERAL TRANSPORTATION INFORMATION.
Application: All 200 Series models.
17
1) ROCKS OF ANY SPECIFIC SIZE.
2) ROOTS OF ANY SPECIFIC SIZE.
3) DIFFERENCES AND/OR VARIANCES IN
SPECIFIC SOIL CLASSIFICATIONS.
4) BURIED MATERIALS SUCH AS GARBAGE AND
OTHER DEBRIS.
5) BURIED PRESSURIZED PIPELINES
CONTAINING SUCH MATERIALS AS NATURAL
GAS, PROPANE, ETC.
6) BURIED ELECTRICAL CABLES.
When transporting the Hole Digger in/on a motor
vehicle, the gasoline tank breather vent (if so
equipped) must be completely closed to eliminate the
accidental seepage of fuel and resulting potential fire
hazard. In order to minimize the possibility of damage
to the Hole Digger, always transport it to the job site
with the auger disconnected. All equipment must be
secured in/on vehicles with suitable strapping or tie
downs. Personnel should not be transported in the
same compartment as equipment and fuel supplies.
Consult applicable OSHA regulations for specific
information.
An improperly secured Hole Digger and related
accessories can fall from a moving vehicle and
result in property damage and/or personal injury.
DETERMINATION OF POTENTIAL SUBSURFACE
H A Z AR D S I N T HE P RO P O SE D D I G G I NG
LOCATION(S).
Application: All 200 Series models.
BEFORE ATTEMPTING TO DIG WITH THE HOLE
DIG G E R I N THE PROPO S E D L O C ATION ( S ) ,
CONTACT ALL APPROPRIATE AGENCIES TO
DETERMINE THE EXACT LOCATION(S) OF ALL
BURIED PIPELINES, POWER LINES AND
MATERIAL DEBRIS. MANY UTILITIES AND OTHER
AGENCIES WILL P ERFORM THIS TASK FOR A
MINIMAL COST OR AT NO COST. HAVE ALL
SU BSURFACE HAZA RDS MARK ED FOR E ASY
RECOGNITION. DIRECT CONTACT WITH THESE
AN D O T H E R SUB S U R FACE HA Z A R D S CA N
R E S U LT I N P R OP E R T Y D A M AG E A ND / O R
PERSONAL INJURY.
SET UP FOR DIGGING.
Application: All 200 Series models.
1) The Hole Digger is designed for one operator to
transport it by the operator handle to, while on, and
from the job site. Connect the auger to the Hole Digger
with the correct, factory-supplied auger pin. All 200
Series Hole Diggers utilize the 3/8 inch (9.5 mm)
diameter pin, PN 2121 Auger Pin to connect to round
section of shaft. FIGURE 2.
BEFORE ATTEMPTING TO DIG WITH THE HOLE
D I G G E R , D E T E R M I N E T H E P OT E N T I A L
SUBSURFACE HAZARDS WHICH MAY EXIST IN
TH E PROP O S E D D I G G IN G L OCAT I ONS ( S ) .
P OT E N TI A L S U B SU R FACE H A ZA R D S M AY
INCLUDE, BUT NOT BE LIMITED TO, THE
FOLLOWING:
Page 20

240H ONE MAN HOLE DIGGER
FORM GOM14081201, VERSION 1.1
FIGURE 2
The auger pin supplied with the Hole Digger is
designed to withstand the high stress encountered
while digging. Use of any other connecting device,
including cap screws, bolts, pins, etc., can result in
damage to the Hole Digger driveshaft and/or auger
drive hub. Improper connecting devices can cause
property damage and/or personal injury.
18
THE CONTROLS ARE DESIGNED FOR THE
OPERATOR TO CHOKE AND START THE ENGINE
WITH THE LEFT HAND WHILE OPERATING THE
THROTTLE CONTROL WITH THE RIGHT HAND.
WITH THIS INTENDED OPERATING POSITION, THE
ENGINE EXHAUST MUFFLER WILL FACE
OPPOSITE THAT OF THE OPERATOR. THE
RESULTING FUMES AND HEAT WILL BE
DIRECTED AWAY FROM THE OPERATOR. DO NOT
OPERATE THE HOLE DIGGER WITH THE ENGINE
EXHAUST MUFFLER/SHIELD FACING TOWARD
THE OPERATOR. THIS OPERATION POSITION WILL
ALLOW THE OPERATOR TO COME IN CONTACT
WITH THE HOT SURFACE OF THE ENGINE
MUFFLER/SHIELD AND RESULT IN PROPERTY
DAMAGE AND/OR PERSONAL INJURY. IT WILL
ALSO ALLOW THE OPERATOR TO INHALE HIGH
LEVE L S OF CAR B O N MONOXIDE T H AT CAN
RESULT IN PERSONAL INJURY.
STARTING THE ENGINE WITH THE AUGER
CONNECTED TO THE TRANSMISSION
DRIVESHAFT.
DO NOT CONNECT THE AUGER TO THE HOLE
DIGGER WITH THE ENGINE RUNNING. A SUDDEN
CHANGE IN THE ENGINE SPEED WILL RESULT IN
HOLE DIGGER DAMAGE AND/OR PERSONAL
INJURY.
THE 240 HOLE DIGGER IS DESIGNED FOR ONE
MAN OPERATION. USE BY MORE THAN ONE
OPERATOR WILL LEAD TO CONFUSION AND
LOSS OF CONTROL, RESULTING IN HOLE DIGGER
DAMAGE AND/OR PERSONAL INJURY.
Application: 240H Hole Digger powered by the
Honda GX35 engine.
1) Grass and other overgrowth conditions will hamper
the digging characteristics of any earth auger by
becoming "clogged" around the auger blade and screw
bit. Removal of such obstructions from the hole
location will increase digging efficiency and overall
productivity.
2) Place the Hole Digger on the desired hole location.
The engine throttle is intended to be controlled by the
operator's right hand. The engine is intended to be
started by the operator’s left hand. Do not operate the
Hole Digger with the engine throttle control being
controlled by the operator's left hand. The operator
should position himself on firm footing. FIGURE 3.
Page 21

240H ONE MAN HOLE DIGGER
FORM GOM14081201, VERSION 1.1
FIGURE 3
3) Turn the engine ON/OFF ignition switch to the ON
position. The switch is located near the underside of
the engine fuel tank. FIGURE 4.
19
FIGURE 5
5) If the engine is cold or the ambient temperature is
low, move the choke control lever to the left/closed
position (away from the fuel tank) to deploy the engine
choke mechanism. A warm (previously run) engine
may not require choking. FIGURE 6.
FIGURE 4
4) Depress the engine primer system bulb repeatedly
to feed fuel directly into the carburetor until it can be
seen in the clear plastic fuel return line. FIGURE 5.
Proper operation of the choke lever moves it in a
sideways movement as viewed by the operator. Do
not attempt to move the choke lever in a fore and
aft direction. Such action can result in damage to
the choke control mechanism.
FIGURE 6
6) It is not necessary to open the engine carburetor
with the throttle control to start the engine. Grip the
throttle control with the right hand. This procedure is to
be followed regardless of the ambient temperature.
Page 22

240H ONE MAN HOLE DIGGER
FORM GOM14081201, VERSION 1.1
20
7) Using the left hand, pull the engine starter handle
slowly, until resistance is felt. This is the compression
point. Return the starter handle to its original position
and pull swiftly. Do not pull the rope out to its maximum,
extended length. Repeat as necessary for the engine
to start. Allow the starter handle to retract slowly. If the
engine does not start after five pulls, stop
and consult the material supplied by the engine
manufacturer.
8) Allow the engine to properly "warm up" and operate
without the requirement for engine choke. As the
engine warms up, move the choke lever up to the
right/open position (toward the fuel tank). In cold
weather, initial starting will require more pulls because
an extremely rich fuel/air mixture is required. Check for
proper centrifugal clutch operation, excessive
transmission noise and/or vibration.
9) Stopping the Hole Digger is accomplished by
releasing the twist grip throttle control to its maximum,
closed (engine idle speed) position and then turning
the engine ON/OFF ignition switch to the OFF position.
The switch is located under the fuel tank.
If the Hole Digger and/or an individual
component/accessory does not appear to be
functioning properly, STOP and do not further
operate the Hole Digger until the corrective action
has been completed. If there are any questions
regarding the proper operation of the Hole Digger,
contact the dealer or the Customer Service
Department for assistance BEFORE further
utilization. There is no charge for this service.
OPERATING THE HOLE DIGGER.
Application: All 200 Series models.
1) Do not attempt to begin digging with the Hole Digger
until the operator is ready to begin the process and is
in full control of the machine.
speed.
3) Normal operating procedure for the Hole Digger is to
dig with the engine operating at full speed. This will
allow the centrifugal clutch to become more firmly
engaged. This procedure will transmit more usable
power to the auger, resulting in greater productivity and
less component wear.
When digging in areas filled with known buried
obstructions such as tree roots, rocks and other
debris, operate the Hole Digger at less than full (an
intermediate) speed to insure a more rapid release
of the centrifugal clutch when an obstruction is
encountered. This is an industry wide operating
procedure.
4) The Hole Digger is equipped with a centrifugal clutch
assembly within the transmission, designed to slip
whenever overloaded or if the auger comes in contact
with a buried obstruction. Newton’s Laws of Physics
allow the centrifugal clutch assembly to ALWAYS slip
whenever overloaded or if the auger comes in direct
contact with a buried obstruction. The term slippage is
not intended to infer that the centrifugal clutch
assembly becomes fully disengaged with no
horsepower and torque being transmitted to the auger.
In the slipping mode, a centrifugal clutch still transmits
a specific amount of horsepower and torque to the
auger. This specific amount of horsepower and torque
is directly proportional to many factors including: the
mechanical condition of the centrifugal clutch
assembly and the rotational speed of the centrifugal
clutch assembly when the initial slippage occurs. The
response time for the centrifugal clutch assembly to
react to an overload condition is directly proportional to
its rotational speed. The higher the rotational speed
(RPM) of the centrifugal clutch at the time of overload,
the greater amount of time it requires to react and
actually slip. This phenomenon is inherent with all
centrifugal clutch assemblies. It is also inherent with all
powered equipment incorporating such a device.
2) Rotate the twist grip throttle control
counterclockwise to increase the engine speed. The
auger will begin to rotate when the engine speed
reaches the centrifugal clutch initial engagement
Page 23

240H ONE MAN HOLE DIGGER
FORM GOM14081201, VERSION 1.1
21
STRIKING BURIED OBSTRUCTIONS SUCH AS
TREE ROOTS, ROCKS AND OTHER DEBRIS AT
ANY SPECIFIC ENGINE OPERATING SPEED CAN
CAUSE THE HOLE DIGGER TO TRANSMIT
REACTIONARY TYPE "IMPACT" LOADS TO THE
OPERATOR. THESE TYPES OF LOADS ARE
CHARACTERIZED BY A SHARP, PULSATING
MOVEMENT OF THE HOLE DIGGER IN A
COUNTERCLOCKWISE DIRECTION (AS VIEWED
BY THE OPERATOR). SUCH LOADS CAN LEAD TO
THE LOSS OF OPERATOR CONTROL AND RESULT
IN PERSONAL INJURY. THE OPERATIONAL
EFFECTS ARE ALIKE TO THAT OF UTILIZING A
COMMON ELECTRIC DRILL AND OTHER,
ROTATION TYPE, POWERED EQUIPMENT. THE
RELATED PHENOMENON IS INHERENT WITH ALL
SUCH TYPES OF ROTATION TYPE, POWERED
EQUIPMENT AND IS TERMED AS KICKBACK.
UNDERSTANDING KICKBACK.
Application: All 200 Series models.
The operation of the Hole Digger involves engine
torque being transmitted and multiplied by the
transmission to the auger. The energy is then used to
dig holes. But to every force (action), there is always a
reaction force in the opposite direction. Thus, if the
auger contacts a buried obstruction, the operator will
feel the left side of the handle of the Hole Digger being
"thrusted" toward him. This "thrusting" force
experienced by the operator is called kickback. The
speed that the handle moves (and magnitude of the
resulting impact force) is directly proportional to the
amount/speed of the kickback force experienced by the
operator. The torque and kickback generated by the
digging process is inherent with a portable, one man
Hole Digger of this type. The operational effects are
alike to that of utilizing a common, electric drill and
other, rotation type, powered tools.
minimize fatigue and back-related injuries while
increasing overall productivity rates.
ANATOMY
The human body is supported by the spinal column.
The spinal column consists of thirty separate bones
called vertebrae, all linked and supported by a series of
tiny muscles. Small pads called discs are situated
between each vertebrae and act like shock absorbers
to cushion the pressure created from external forces.
The spinal column is wrapped by a system of nerves
and has three natural curves:
Cervical: from the base of the neck to the brain.
Thoracic: situated from the middle to the lower back.
Lumbar: located from the lower back to the buttocks
area.
These three curves need to be kept in natural
alignment in order to prevent discomfort.
PREVENTATIVE MEASURES
Most occupational physicians agree on several
“universal” preventative measures that an operator
should follow to help lower the risk of back-related
injuries:
1) Maintain proper body weight.
2) Maintain good posture while walking or sitting.
3) Be conscious of how you twist and bend your body
while digging. Twisting and bending the wrong way can
exert too much pressure on one side of your vertebrae.
4) Always use proper lifting techniques as described
below.
BACK CARE/PROPER LIFTING INFORMATION
Application: All 200 Series models.
In addition to kickback forces encountered during the
hole digging process, the operator will be required to lift
the Hole Digger and auger/auger extension with
numerous repetition, as demanded by the specific job
application. Utilizing proper lifting techniques will
5) Develop a consistent exercise routine.
6) Eliminate or reduce your use of tobacco. Smoking
reduces the supply of oxygen and nutrients to the discs
that cushion the vertebrae.
PROPER LIFTING PROCEDURES
The following are guidelines for properly lifting the Hole
Digger and auger/auger extension from the hole and
Page 24

240H ONE MAN HOLE DIGGER
FORM GOM14081201, VERSION 1.1
22
are not intended to be all inclusive. Plan your path and
make sure there are no obstructions or tripping
hazards. Consider how you will set the load. The spinal
column is a very sensitive mechanism. At any given
time, improper lifting procedures can cause damage
that can lead to injury.
1) Position your feet at a comfortable distance
(shoulder width) to help provide the necessary
balance.
2) Tighten your stomach muscles by pulling in your
stomach. Keep your back as straight as possible to
keep the spine, back muscles and ligaments in correct
alignment.
3) Remember to bend at the hips and knees as much
as possible.
4) Start lifting the Hole Digger with a thrust of your feet
while lifting as much as possible with your leg muscles.
Use smooth movements.
5) Once you lift the Hole Digger, keep it close as
possible to the body. Avoid turning at the waist. To turn,
pivot your entire body.
operating position is one of the most IMPORTANT and
EFFECTIVE procedures for controlling kickback.
Improper operating positions only aggravate the effects
of kickback upon the operator. FIGURE 7 depicts a
proper operator position. FIGURE 8 depicts an
improper operator position.
FIGURE 7
6) Keep your shoulders, hips and feet pointed in the
same direction.
7) Keep your footing firm and make sure that your
intended path is clear before attempting to carry the
Hole Digger.
MINIMIZING KICKBACK FROM AN OPERATIONAL
STANDPOINT.
Application: All 200 Series models.
The operator should keep the left side of the handle as
close to his body (left hip and leg areas) as possible to
minimize machine "kickback" when a buried
obstruction is encountered by the auger. Assume
operating positions that allow exercising reactive "body
english" against the torque sensation created by the
digging process. Keep upper arms as close to the
upper body as possible to maximize mechanical
leverage. An operator should position his back as
vertical as possible by bending the legs as required
during the digging process. Positioning the left foot
ahead of the right foot at a comfortable distance will
enhance proper body position. Maintaining proper
FIGURE 8
Keep a firm, but steady, grip on the operator handle.
Wrap your fingers around the handle and handle grip
areas, keeping them cradled between the thumbs and
forefingers. REMEMBER- PROPER OPERATOR
Page 25

240H ONE MAN HOLE DIGGER
FORM GOM14081201, VERSION 1.1
23
POSITIONS ENHANCE THE CONTROL OF THE
HOLE DIGGER, REDUCE OPERATOR FATIGUE,
AND INCREASE OVERALL PRODUCTIVITY.
Maintain the operator handle and throttle control
handle grip areas in good condition and free of
moisture, pitch, oil or grease. Wear gloves to
improve your grip. Bent and damaged handles, a
throttle control with a damaged/no grip or handles
without the gripping area material (PVC coating)
aggravate the effects of kickback upon the
operator by limiting control and comfort. Do not
operate the Hole Digger until such damage has
been repaired and/or replaced. Damage to property
and/or personal injury can result.
Always assume that any digging site can include
some form of buried obstruction. Always be
prepared for unexpected auger contact with buried
tree roots, rocks, etc. Under certain operating
conditions, striking a buried obstruction can
produce a severe and/or sudden kickback force to
the hip and/or leg areas. It is possible that this
kickback force can have the magnitude to "throw"
the operator from the Hole Digger. The operator
must maintain physical and mental alertness and
be prepared to accommodate this phenomenon.
Failure to properly accommodate this phenomenon
can result in property damage and/or personal
injury.
PROCEDURE REQUIRES THE OPERATOR TO
FULLY COMPREHEND THAT HE IS LOOSING
CONTROL OF THE HOLE DIGGER AND TO REACT
ACCORDINGLY WITH APPROPRIATE BODY
MOVEMENT. IMPROPER REACTIONS TO THIS
PHENOMENON CAN RESULT IN PROPERTY
DAMAGE AND/OR PERSONAL INJURY.
A HOLE DIGGER WITH AN IMPROPERLY
MAINTAINED ENGINE THROTTLE CONTROL WILL
"SPIN" ABOUT ITS AXIS WHEN THE OPERATOR
LOOSES FULL CONTROL. IN THE EVENT OF THIS
OCCURRENCE, DO NOT ATTEMPT TO STOP THE
ENGINE BY GRASPING THE ROTATING
OPERATOR HANDLE. DO NOT INTRODUCE ANY
FOREIGN OBJECT IN AN ATTEMPT TO STOP
AND/OR BLOCK THE ROTATING HANDLE.
INSTEAD, ALLOW THE ENGINE TO EXHAUST ITS
FUEL SUPPLY. DETERMINE THAT ALL
COMPONENTS OF THE ENGINE THROTTLE
CONTROL ASSEMBLY ALLOW FOR PROPER
FUNCTION BEFORE ATTEMPTING TO FURTHER
UTILIZE THE HOLE DIGGER.
MINIMIZING KICKBACK FROM A DESIGN
STANDPOINT.
Application: All 240 Series models.
1) The 240H Hole Digger features the widest operator
handle of any machine in its class. The handle is
biomechanically positioned to enhance control by
allowing the operator to exert "body english" against
the torque and kickback generated by the digging
process.
IF, DURING THE HOLE DIGGING PROCESS, THE
OPERATOR LOOSES FULL CONTROL OF THE
HOLE DIGGER FOR ANY REASON, THE
FOLLOWING PROCEDURE IS SUGGESTED:
AS A GENERAL RULE, AS SOON AS THE
OPERATOR REALIZES HE IS IN THE PROCESS OF
LOOSING FULL CONTROL OF THE HOLE DIGGER,
HE SHOULD "PUSH" HIMSELF FREE AND CLEAR
FROM THE OPERATOR HANDLE. THE
2) The Hole Digger utilizes an antivibration material
(PVC coating) that is applied to the operator handle
during the manufacturing process. This material is
intended to enhance control and help dampen the
torque and kickback experienced by the operator
during the digging process.
3) The Hole Digger utilizes a twist grip throttle control.
This type of throttle control device was selected over
other configurations (for the operator handle
configuration utilized and specific digging power)
Page 26

240H ONE MAN HOLE DIGGER
FORM GOM14081201, VERSION 1.1
24
because it allows the operator to wrap his thumb
around the forefinger and effectively maximize the
strength in his right hand. This design feature affords
the operator greater control of the machine when
counteracting the effects of torque and kickback during
the digging process.
4) The Hole Digger is designed to utilize the General
Equipment Company PN 2121 Auger Pin to retain the
earth auger to the transmission driveshaft. This pin is
not intended to shear and absorb kickback related
forces when the earth auger comes in sudden contact
with a buried object. The pins are utilized for the
following reasons:
a) Such an occurrence (pin shear) would result in
extensive physical damage to the driveshaft and auger
drive hub.
b) Even if the physical damage to the Hole Digger
could be eliminated and/or minimized from the actual
process, it could require an unknown (and potentially
large) number of auger pins to complete the digging
process for any specific hole.
c) Even if the cost of replacement auger pins is not a
factor, the resulting productivity produced by the actual
process would not be deemed acceptable by industry
and/or social standards for the Hole Digger.
5) For comparison purposes, it is interesting to note
that portable electric drills do not utilize any torque
limiting or clutch device to allow the drill bit to slip at
any specific torque value for drilling purposes. As with
a Hole Digger, such a device would make the drill a
useless tool because of the infinite number of potential
operating configurations and the inability to design
specific components to meet the requirements of each
operating configuration.
6) Many portable electric screwdrivers incorporate a
torque limiting or clutch device which allows the
operator to preset the torque output of the tool to a
specific value. This is especially useful and desirable
when hardware can be secured to specific torque
values according to industry published standards.
7) Portable electric drills and screwdrivers are two
separate tools designed for different and specific job
applications. The drilling process has different
requirements than the fastening process offered by
screwdrivers. The operational characteristics of
portable electric screwdrivers can not be confused
and/or substituted for the operational characteristics of
the Hole Digger.
OPERATING THE HOLE DIGGER CONTINUED.
Application: All 200 Series models.
d) Given the infinite number of soil conditions which
could be encountered during the actual process, it is
impossible to design and supply a specific auger pin to
shear at a specific torque value which would produce
acceptable operational results for the Hole Digger.
e) Given the infinite number of potential operators and
their methods utilized during the actual process, it is
impossible to design and supply a specific auger pin to
shear at a specific torque value which would produce
acceptable operational results for the Hole Digger.
f) Given the infinite number of combinations of soil
conditions, auger diameters, auger boring head
conditions, digging depths, mechanical operating
conditions, operators and operator methods
encountered during the actual process, it is impossible
to design and supply a specific auger pin to shear at a
specific torque value which would produce acceptable
operational results for the Hole Digger.
5) Auger boring heads are designed for digging in a
wide variety of soil types and/or conditions. Each
boring head design represents a compromise in overall
digging efficiency, productivity and service life for any
given soil condition. As a general rule, pressing down
on the operator handle is not required to initiate and/or
sustain the digging process. In most soils of moderate
Proctor Densities, augers will dig at rates that will not
cause the centrifugal clutch to overload and slip. In
most soft soils of low Proctor Densities (sandy, etc.), it
may be necessary to hold up on the operator handle to
reduce the digging rate of the auger. The natural
tendency of any auger design, in low Proctor Density
soil conditions, is to dig at a rate which causes the
centrifugal clutch to overload and slip. In most hard
soils of high Proctor Densities (hard clay, etc.), it may
be necessary to press down on the operator handle to
establish and maintain acceptable digging rates.
Proper digging procedure for any given soil condition is
the accumulation of actual experience, skill and
Page 27

240H ONE MAN HOLE DIGGER
FORM GOM14081201, VERSION 1.1
common sense. For any given soil condition, allow the
auger to dig at the rate most comfortable to the
operator, yet not causing the centrifugal clutch to
overload and slip.
An improper operating procedure can allow the
auger to "bind" and/or "bury" itself in the hole. This
is usually the result of allowing the auger to feed at
an excessive rate. This phenomenon is also
characteristic of digging with smaller (2 to 4 inch)
diameter augers. In this operating condition, the
Hole Digger is not capable of transmitting ample
power to "free" the auger. Do not continue to
overload and slip the centrifugal clutch assembly.
Damage to property and/or personal injury can
result if the operator looses partial and/or full
control of the Hole Digger while in this
configuration. STOP the Hole Digger and
disconnect it from the buried auger. The buried
auger can then be retrieved by various, industry
accepted methods. Contact the Customer Service
Department for specific information. There is no
charge for this service.
6) Some soil conditions may require more power to dig
the hole than the Hole Digger is capable of delivering
for a given auger diameter. This problem is more
noticeable in areas of semiconsolidated soils or
compacted soils having high Proctor Densities.
Examples of such soil types include: soft shale, hard
pan and cliche. The power required to dig a hole is
directly proportional to the soil resistance encountered
by the auger and the square of the auger diameter. For
example: an 8 inch diameter auger requires almost 2
times the power than that of a 6 inch diameter, given
identical soil conditions. This problem is best minimized
by the addition of suitable down force by the operator
and by utilizing augers equipped with new,
replacement screw bits and teeth. The manufacturer
makes no guarantee that the Hole Digger is capable of
digging a hole of specific diameter in any given soil
condition. Contact the Customer Service Department
for information relative to your specific requirements.
There is no charge for this service.
25
IT IS A MISCONCEPTION THAT A LARGER
DIAMETER HOLE CAN BE OBTAINED BY FIRST
DIGGING AN INITIAL HOLE WITH A SMALLER
"PILOT" AUGER AND THEN UTILIZING A LARGER
DIAMETER AUGER TO "REAM" THE HOLE TO THE
DESIRED SIZE. THIS METHOD WILL NOT ALLOW
THE AUGER SCREW BIT TO PRODUCE
SUFFICIENT DIRECTIONAL STABILITY FOR THE
LARGER DIAMETER AUGER DURING THE
"REAMING" PROCESS. THIS METHOD WILL
RESULT IN PROPERTY DAMAGE, LOSS OF
OPERATOR CONTROL AND/OR PERSONAL
INJURY.
7) When digging in areas filled with tree roots, small
rocks or other, buried obstructions, allow the auger
blade to "chip away" at the obstruction until the auger
can pass by (by working the object loose) or go through
it (as in the case of penetrating tree roots). This
technique usually involves holding up on the operator
handle and establishing a minimal feed rate for the
auger. Proper operator position will minimize the
effects of kickback being generated by the auger blade
contacting the object. As with any hole digging
procedure, the mechanics of this technique require the
accumulation of actual experience and common sense
to maximize its effectiveness. Many times the size and
nature of the buried object will simply prevent the auger
from passing by or going through it. Continued use of
the Hole Digger will only contribute to equipment
damage and/or personal injury. Instead, remove the
buried object with a shovel or other suitable tool and
proceed to dig the hole with the Hole Digger to the
desired depth.
Some job applications may encounter buried
obstructions on the job site that are too large in
size to allow the usage of a machine such as and/or
with the operating limitations of the Hole Digger.
Utilization of the Hole Digger on these job sites can
cause property damage and/or personal injury.
Exercise proper common sense by selecting the
proper size and/or type of equipment for the
intended job application.
Page 28

240H ONE MAN HOLE DIGGER
FORM GOM14081201, VERSION 1.1
Som e job a pplic a tions may encou n ter so il
cl a ssifi c ation s t hat a r e too c o mpact e d to
allow t h e u s ag e of a m a c h i ne the si z e
and / or with the ope r ating li m itati ons of the
Hol e Dig ger. Util i zatio n of the Hol e Dig ger
on thes e wo rk s ites can cau s e proper t y
damag e and/or perso n a l inju r y. Exe rcise
proper common sense by s e l e c t i n g t h e
pro per siz e and / or type of equ i pment fo r
the j o b appl i catio n .
8) In most soil conditions, the auger will retract with
less effort if allowed to rotate at a slow speed. This
procedure, however, will leave more loose soil at the
bottom of the hole. To minimize the amount of loose soil
that remains at the bottom of the hole, stop the rotation
before retracting the auger. Proper procedure for
obtaining the cleanest, most usable hole for any given
soil condition requires the accumulation of actual skill,
experience and common sense.
9) The twist grip throttle controls the digging process by
regulating the engine speed. Keep a firm grip on it at all
times. As with any safety device, it requires constant
and proper maintenance to function as intended.
10) Attempting to restart the Hole Digger's engine with
the auger in a partially or completely dug hole requires
extra caution. In this configuration, the throttle control
can be advanced beyond the idle speed position before
the operator can exercise proper control of the Hole
Digger. The more accepted procedure (when not
utilizing the nonflighted auger extension) is to first
remove the unit from the hole and restart the engine
according to the described method. Return the unit to
the hole with the engine running at idle speed (the
auger should not be rotating) and proceed to dig the
hole to the desired depth.
Restarting the engine with the auger in a partially
or completely dug hole requires a higher degree of
operator experience, skill and common sense over
that of an introductory or novice level of expertise.
The manufacturer is aware that many operators
elect to restart the Hole Digger's engine with the
26
auger in a partially or completely dug hole on a
regular basis while in the field. The manufacturer
also realizes that this procedure must be utilized
when the nonflighted auger extension is utilized to
extend the digging depth. The manufacturer has no
control over the experience, skill and common
sense levels of each operator of the Hole Digger.
The manufacturer has no control over each job site
or specific job application for the Hole Digger.
Individual operator experience, skill, common
sense, job site location and specific job application
must affect the final decision on specific operating
procedures for the Hole Digger. Each operator
must decide if he possesses adequate/proper
experience, skill and common sense for operating
the Hole Digger for any given and/or specific job
application.
11) Both the auger blade and screw bit must be
replaced when signs of excessive wear are visible. A
regularly scheduled maintenance program will
increase the service life of the auger and increase
overall productivity by substantially reducing operator
fatigue. An auger that requires discarding because of
excessive wear to the blade and screw bit is depicted
in FIGURE 9.
Do not utilize an auger with the blade and screw bit
worn past their specific service limits. Excessive
wear to the blade and screw bit will allow the auger
flighting to wear in a tapered or inverted cone
configuration. The work boring head may actually
be only capable of digging a hole 60 to 75 percent
of the nominal diameter of the auger. This
configuration will allow the auger flighting to
“bind” within the hole and substantially reduce
operator control and productivity.
Page 29

240H ONE MAN HOLE DIGGER
FORM GOM14081201, VERSION 1.1
FIGURE 9
12) Avoid placing serious stress to the back and lower
body members. Always lift in a straight line with your
legs. Maintain the back in a vertical position as much
as allowed by the digging process. Proper wrist
position during the digging process can minimize
and/or reduce stress and strain related damage
potential to this body area. Operator control can be
enhanced and fatigue reduced by attempting to keep
wrists as perpendicular to the operator handle as
feasible during the digging process. See BACK
CARE/PROPER LIFTING PROCEDURES. FIGURE
10.
27
the gasoline tank breather vent (if so equipped) when
the Hole Digger is not in use.
STOPPING THE HOLE DIGGER.
Application: 240H Hole Digger powered by the
Honda GX35 engine.
Stopping the Hole Digger is accomplished by rotating
the twist grip throttle control to its maximum, closed
position and allowing the engine to return to its idle
speed. Turn the engine ON/OFF ignition switch to the
OFF position. With the throttle control functioning
properly, the engine can be brought to idle speed and
the auger rotation stopped when the throttle control
lever is fully closed or suddenly released. If this is not
occurring, check the throttle control, throttle cable,
carburetor lever, and engine idle speed for binding
and/or improper adjustment.
TEMPORARY STORAGE FOR THE HOLE DIGGER
WHILE ON THE JOB SITE.
Application: All 200 Series models.
The Hole Digger can be temporarily stored on the job
site by one of three acceptable methods. The chosen
method is to be determined by the operator based
upon personal preference and/or job site conditions:
FIGURE 10
13) Stop the engine between each hole to minimize the
possibility of personal injury. Special care must be
exercised in slippery conditions and in difficult,
overgrown terrain. Store the Hole Digger on the job site
by digging a shallow hole or by disconnecting it from
the auger and/or nonflighted auger extension. Close
a) Digging a shallow hole and leaving the Hole Digger
connected to the auger with the engine not running.
FIGURE 11.
Page 30

240H ONE MAN HOLE DIGGER
FORM GOM14081201, VERSION 1.1
FIGURE 11
28
FIGURE 13
DO NOT STORE THE HOLE DIGGER WITH THE
ENGINE OPERATING. IMPROPER STORAGE
METHODS CAN RESULT IN PROPERTY DAMAGE
AND/OR PERSONAL INJURY.
b) Disconnecting the Hole Digger from the auger
and/or auger extension and storing it in a level
configuration. FIGURE 12.
FIGURE 12
c) Storing the Hole Digger while connected only to a
lead auger with the engine spark plug facing upward.
This configuration minimizes the potential for the hot
muffler and/or muffler heat shied area igniting grass or
other combustible materials. FIGURE 13.
DO NOT ALLOW THE HO LE DIGGER TO DROP
AND IMPACT AGAINST THE GROUND. SUCH
ACTION CAN RESULT IN DAMAGE TO THE TWIST
GRIP THROTTLE CONTROL AND ENGINE. A
THROTTLE CONTROL THAT DOES NOT OPERATE
PROPERLY CAN RESULT IN PROPERTY DAMAGE
AND/OR PERSONAL INJURY.
ADDING AND REMOVING THE NONFLIGHTED
AUGER EXTENSION.
Application: All 200 Series models.
Many digging jobs require a hole deeper than that
provided by standard length augers. For many such
requirements, a nonflighted auger extension is
available. The nonflighted auger extension extends the
digging depth by an additional 15 inches (381 mm).
Page 31

240H ONE MAN HOLE DIGGER
FORM GOM14081201, VERSION 1.1
29
Utilization of the nonflighted auger extension
requires additional operator experience, skill and
common sense over that of an introductory or
novice level of expertise. The manufacturer has no
control over the experience, skill and common
sense levels of each operator of the Hole Digger.
Each operator must decide if his experience, skill
and common sense level is sufficient to allow him
to proceed with the utilization of the nonflighted
auger extension for any given and/or specific job
application.
Follow this accepted procedure for utilizing the
nonflighted auger extension to extend the digging
depth:
1) Dig to the approximate full depth of the auger
utilizing the described operating instructions. Remove
as much loose soil from the hole as possible utilizing
the described operating instructions.
2) STOP the engine and remove the auger from the
hole. Disconnect the spark plug wire to prevent
accidental engine starting. Close the gasoline tank
breather vent (if so equipped).
3) Disconnect and remove the Hole Digger from the
auger. Place the auger in the hole. Attach the auger
extension to the auger and secure with an auger pin.
The Hole Digger can now be connected to the auger
extension and secured with an auger pin. Reconnect
the spark plug wire.
NEVER UTILIZE MORE THAN ONE NONFLIGHTED
AUGER EXTENSION TO INCREASE THE DIGGING
DEPTH OF THE AUGER. THIS EXTENSION IS NOT
EQUIPPED WITH AUGER FLIGHTING TO ELEVATE
THE LOOSE BORINGS FROM THE HOLE.
CONSEQUENTLY, MULTIPLE USE OF
NONFLIGHTED AUGER EXTENSIONS WILL ALLOW
THE AUGER TO "BURY" ITSELF IN THE HOLE.
SUCH USE CAN LEAD TO THE LOSS OF
OPERATOR CONTROL AND/OR PERSONAL
INJURY.
After the desired digging depth has been achieved, the
nonflighted auger extension is removed by utilizing this
accepted procedure:
1) Remove as much loose soil from the hole as
possible with the auger rotating at an intermediate
speed. STOP the engine and disconnect the spark plug
wire to prevent accidental engine starting. Close the
gasoline tank breather vent (if so equipped).
2) Lift the auger extension and the Hole Digger up far
enough out of the hole so that the auger extension is
clear. Block the remaining auger with an auger fork to
prevent it from falling back into the hole. Disconnect the
Hole Digger from the auger extension. Remove the
auger extension and auger from the hole. FIGURE 13.
3) Reconnect the engine spark plug wire.
4) Follow the instructions outlined for starting and
operating the Hole Digger. Use extra caution when
starting the Hole Digger's engine with the auger in the
hole. Proceed to dig to the desired depth or to the full
depth of the auger extension.
FIGURE 13
Page 32

240H ONE MAN HOLE DIGGER
FORM GOM14081201, VERSION 1.1
THE PROCEDURE OUTLINED FOR THE USE OF
THE NONFLIGHTED AUGER EXTENSION OFFERS
THE MOST ADAPTABLE METHOD OF EXTENDING
THE DIGGING DEPTH FOR THE WIDEST CROSS
SECTION OF PROBABLE OPERATORS. THIS
PROCEDURE TAKES INTO ACCOUNT
ANTICIPATED OPERATOR EXPERIENCE, SKILL
AND COMMON SENSE. THE MANUFACTURER IS
AWARE THAT NOT ALL OPERATORS WILL ELECT
TO FOLLOW THIS PROCEDURE. THE
MANUFACTURER HAS NO CONTROL OVER
INDIVIDUAL OPERATION PROCEDURES AND/OR
DECISIONS. MANY OPERATORS MAY ELECT TO
UTILIZE THE NONFLIGHTED AUGER EXTENSION
CONNECTED DIRECTLY TO THE AUGER AND
BYPASS THE LONGER, MORE TIME CONSUMING
PROCEDURE OUTLINED ABOVE. INDIVIDUAL
OPERATORS MAY ELECT TO CHOOSE OTHER
PROCEDURES IN AN EFFORT TO REDUCE THE
ASSOCIATED PRODUCTION COSTS. THE
RESULTING MACHINE CONFIGURATIONS CAN
PLACE THE HANDLE ALMOST LEVEL WITH (OR
EVEN ABOVE) THE SHOULDERS OF THE
OPERATOR. AT THIS HEIGHT LEVEL, THE HOLE
DIGGER IS DIFFICULT TO CONTROL AGAINST
POSSIBLE KICKBACK FORCES. THIS IS NOT A
MANUFACTURER APPROVED PROCEDURE
BECAUSE IT REQUIRES EACH POTENTIAL
OPERATOR TO HAVE EXCEPTIONAL HEIGHT AND
EXPERT WORK EXPERIENCE, SKILL AND
COMMON SENSE. UNFORTUNATELY, THERE IS
STILL NO REAL ASSURANCE THAT EACH AND
EVERY OPERATOR WITH EXCEPTIONAL HEIGHT
AND EXPERIENCE, SKILL AND COMMON SENSE
CAN ALWAYS EXERCISE ADEQUATE CONTROL
OF THE HOLE DIGGER TO GUARANTEE
PERSONAL SAFETY. PERSONAL SAFETY CAN
NEVER BE GUARANTEED FOR ANY GIVEN
AND/OR SPECIFIC JOB APPLICATION FOR ANY
TYPE OF POWERED EQUIPMENT. THE ACCEPTED
PROCEDURE, AS OUTLINED IN THIS OPERATOR'S
MANUAL, IS STRONGLY RECOMMENDED. THE
MANUFACTURER CAN NOT CONDONE AND/OR
APPROVE ANY OTHER PROCEDURE.
30
Service
DO NOT PERFORM SERVICE AND/OR REPAIR
RELATED FUNCTIONS WITH THE HOLE DIGGER
MOUNTED TO THE 999 SERIES DISPLAY STANDS.
THESE STANDS ARE NOT DESIGNED AND/OR
INTENDED FOR THESE FUNCTIONS. SUCH USE
CAN RESULT IN PROPERTY DAMAGE AND/OR
PERSONAL INJURY.
CHANGING THE HOLE DIGGER TRANSMISSION
LUBRICANT.
Application: All 200 Series models.
Tools Required:
1 each, 7/16 inch wrench
1 each, #2 Phillips head screwdriver
1 each, torque wrench, 120 inch pounds (13.5 N.m.)
capacity with 7/16 inch socket
1 each, rubber hammer
Parts Required:
1 each, PN 240-0100 gasket.
1 each, PN 210-0720 grease packet or 8 ounces
(224g) of high temperature transmission or marinegrade, wheel bearing grease classified for extreme
pressure (EP) applications. Fisk Brothers (Lubriplate
brand) GR132 is an approved lubricant.
The 240 Hole Digger utilizes a fully enclosed, double
reduction transmission for multiplying and transmitting
engine torque to the auger. The principle involves
engine horsepower and torque being transmitted
through a centrifugal clutch and two sets of gear
reductions into a final driveshaft. Grease is provided for
lubrication and heat dissipation for the bearings, gears
and clutch assembly.
A pressure relief valve, PN 5677, is located on the top
surface of the transmission cover to relieve any excess
pressure created in the transmission due to heat rise.
Should this valve become plugged, the following
problems can occur:
Page 33

240H ONE MAN HOLE DIGGER
FORM GOM14081201, VERSION 1.1
31
a) Lubrication grease can be forced out between the
bearings and the final driveshaft.
b) The gasket that separates the two halves of the
transmission can push out, causing a loss of lubrication
grease.
The potential for these problems can be minimized by
cleaning the pressure relief valve at regular intervals
with an approved safety solvent. The transmission is
shipped from the factory filled with approximately 8
ounces (224g) of high temperature lubricant. This
lubricant contains an extreme pressure additive which
is designed to cling to the gear teeth at high rotational
speeds.
1) Change the transmission lubricant every 50 hours of
operation, or more often as necessary, if the Hole
Digger is operated in extremely dusty or dirty
conditions.
2) Drain the fuel from the fuel tank into a UL® approved
container. Wipe any excess spilled fuel and dispose of
properly. Refer to the Service section for more detailed
information.
removal process. Remove the PN 37040200 Screw
from both bearing housings. Insert a 1/4-20 UNC
capscrew of one inch minimum length into the housing.
Using the wrench, turn the capscrew in a clockwise
direction. This will provide thrust against the pinion
bearing journal until it clears the pinion gear support
bearing. Repeat the process with the remaining pinion
gear bearing journal if necessary. FIGURE 14. Remove
the PN 210-0100 gasket. Remove the primary gear
and pinion assembly, PN 210-0340 and PN 210-0310.
NOTE: THIS PROCESS IS ONLY NECESSARY IF
THE FIT BETWEEN THE PINION GEAR JOURNALS
AN D T H E BAL L B E ARIN G S D O NOT AL L OW
DISASSEMBLY OF THE TRANSMISSION COVER
AND CASE.
3) Position the Hole Digger on a suitable work bench
with the operator handle level with the ground. As an
alternative, the transmission driveshaft can be securely
mounted in a suitable bench vice. Wipe any dust or dirt
from the area where the transmission separates.
GASOLINE IS AN EXTREMELY FLAMMABLE FUEL.
USE EXTREME CAUTION WHEN HANDLING
GASOLINE. DO NOT SMOKE OR BRING FIRE OR
FLAME NEAR THE FUEL.
4) Loosen and remove the six capscrews that fasten
the transmission together. Using the rubber hammer,
split and separate the transmission cover and case.
Exercise caution not to damage the dowel pins located
on opposite ends of the transmission.
5) If the bearing journals of the secondary pinion, PN
210-0310, are difficult to remove from the ball bearings,
the transmission cover and case will separate with
greater difficulty. It maybe necessary to provide a
supplemental force to the pinion journals to assist the
FIGURE 14
6) Clean the interior surfaces of the transmission cover
and case with an approved safety solvent.
7) Clean each gear with an approved safety solvent.
Inspect the teeth for excess wear, cracks or fatigue.
Replace each component as necessary.
Observe all applicable safety precautions for the
solvent. Dispose of the used transmission
lubricant according to all applicable laws and
regulations.
8) If necessary, reinstall PN 37040200 Screw into the
bearing housings. Properly secure with the provided
hardware.
Page 34

240H ONE MAN HOLE DIGGER
FORM GOM14081201, VERSION 1.1
32
9) Fill the transmission cover and case with 8 ounces
(224g) of high temperature transmission grease
containing an extreme pressure additive. Part Number
210-0720 lubrication grease or Fisk Brothers GR-132
is an approved lubricant. FIGURE 15. If the Fisk
Brothers lubricant can not be readily sourced, an
acceptable alternative is a marine-grade wheel bearing
grease that contains an EP (denoting extreme
pressure) additive. Distribute the grease equally around
all gear teeth. Do not utilize standard lithium based
greases intended for common lubrication purposes.
These types of grease are not formulated to operate at
the higher operating temperatures encountered during
the hole digging process. Such greases also do not
contain an extreme pressure additive for use with
gears.
Do not attempt any maintenance or repair work not
described in the Operator Manual. Have such work
performed at your dealer's servicing shop.
MAGURA® THROTTLE CONTROL MAINTENANCE
PROGRAM.
Applications: All 200 Series models.
The Magura twist grip throttle controls engine speed
during the actual hole digging process. It has proven to
be a rugged, dependable device that delivers
exceptional service life while requiring only minimal
maintenance. Every 8 hours of actual operation and
whenever the throttle cable is replaced, the following
maintenance program is to be followed:
1) Remove the plastic cover to properly inspect the
internal components. Any worn or damaged
component should be replaced with a factory approved
replacement part only. FIGURE 16.
2) Normal use will produce a wear pattern by the
braided inner cable into the idler pulley. Maximum
allowable groove depth wear created by the throttle
cable is 0.045 inch (1 mm). A wear depth in excess of
this limit will require the replacement of the idler pulley.
FIGURE 15
10) Reinstall the primary gear and pinion assembly.
Distribute the grease equally around all gear teeth.
Replace the old transmission gasket with a new gasket,
PN 240-0100. Align the transmission dowel pins when
reinstalling the cover. Reinstall the fasteners with the
hexagon nuts on the cover side of the transmission.
Torque all fasteners to 96 in lbs (12 N.m.) in an “X"
sequence.
11) Rotate the final driveshaft and check for excessive
noise and/or binding. If excessive noise and/or binding
is evident, disassemble the transmission and
investigate for probable causes. Reassemble and
retorque to the specified amount. Recheck for
excessive noise and/or binding.
12) Inspect the Hole Digger for loose, worn or
damaged parts. Replace any questionable part or
assembly with a genuine, approved replacement part.
3) Inspect the braided inner cable on a regular basis for
excessive wear and fraying in the area in direct contact
with the idler pulley. Abnormal wear or fraying will
require the replacement of the throttle cable.
FIGURE 16
4) Inspect the barrel end of the braided inner cable for
proper retention on a regular basis. A properly retained
barrel end will have no relative movement between it
and the inner cable. Any relative movement will require
the replacement of the throttle cable. FIGURE 17.
Page 35

240H ONE MAN HOLE DIGGER
FORM GOM14081201, VERSION 1.1
FIGURE 17
5) Inspect the receptacle area of the throttle control
which retains the barrel end of the braided inner cable
on a regular basis. A properly fitted barrel fitting should
have complete freedom of movement with no binding
restrictions or excessive play due to wear. A barrel
fitting which is binding within the receptacle should be
discarded in favor of a replacement throttle cable.
Excessive receptacle wear will require replacement of
the specific component assembly. FIGURE 18.
33
Do not operate the Hole Digger without a rubber
boot assembly in proper condition mounted in
position on the Magura throttle control. Without the
use of a proper rubber boot assembly, foreign
materials can accumulate within the throttle control
assembly. Such an occurrence can restrict the
movement of the internal components, reducing
operator control of the Hole Digger and result in
property damage and/or personal injury.
7) If a regular inspection of the throttle control
determines the carburetor return spring does not
properly return the throttle control to the idle position,
remove the throttle tube from the operator handle.
Further inspect the tube and the operator handle
surface area for an accumulation of foreign material,
including dirt, moisture, etc. Remove any accumulation
and clean as necessary. It is not necessary to provide
an external lubrication to this area during the
reassembly process. FIGURE 18
8) Inspect the handle grip on a regular basis to
determine it is properly secured to the throttle control.
A grip which fits loose on the throttle control or has
become worn or torn from use should be replaced with
a factory approved replacement part only.
FIGURE 18
6) The rubber boot assembly is designed to protect the
internal components of the throttle control from
excessive foreign material accumulations. The service
life of the boot assembly can be extended with the
application of an appropriate preservative on a regular
basis.
AUGER MAINTENANCE PROGRAM.
Application: All 200 Series models.
All General 200 Series Hole Diggers utilize earth
augers incorporating a boring head configuration
featuring the E-Series, knife-type blades. This design
has been field proven for several decades to provide
unequaled digging performance in a wide range
of unconsolidated and semiconsolidated soil
formations. As with any ground engaging tool, the
service life of the wear components will have limits
directly affected by soil classification, soil moisture
content and general operating procedures. A
consistent auger maintenance program will provide
maximum digging performance and investment
return.
Page 36

240H ONE MAN HOLE DIGGER
FORM GOM14081201, VERSION 1.1
REPLACING A WORN AUGER SCREW BIT.
Application: All augers.
34
Tools Required:
1 each, suitable safety glasses.
1 each, hammer
1 each, 1/4 inch diameter, straight-type punch.
Parts Required:
1 each, PN P302 Screw Bit (3 inch diameter auger).
1 each, PN P801 Screw Bit (2 inch and 4 to 8 inch
diameter augers).
1 each, PN 20041200 Roll Pin (2 and 3 inch diameter
augers, if required).
1 each, PN 20051800 Roll Pin (4 to 8 inch diameter
augers, if required).
The screw bit utilized with the 2 and 3 inch diameter
augers functions as the boring head. No other blade is
utilized.
1) The replacement of the auger screw bit will require a
level working platform of sufficient size and appropriate
height. Wear safety eye wear and any other apparel
deemed appropriate for the job application and/or job
site environment.
DO N OT OPERAT E AN AU G ER WHI C H HA S A
BEN T O R DA M AG E D AXLE W ITH A TOTAL
INDIC AT E D RU NOUT E X C EEDING T H E
MAX I MUM A LLOWA BLE L I MIT. E XCES S IVE
AUGER WOBBLE CAN REDUC E OPE R ATO R
CONTROL, RESU LT I N G IN P R O P E R T Y
DA MAG E AND/ O R PERS O NAL INJ URY.
3) Using the hammer and drift-type punch, remove the
roll pin from the auger axle.
4) Remove the worn screw bit from the auger axle.
Align the hole of the replacement screw bit with the
hole drilled in the auger axle.
5) Install the roll pin with the hammer and straight-type
punch.
6) Return the auger back to service.
REPLACING A WORN AUGER BLADE.
Application: All augers 4 inch diameter and larger.
Tools Required:
1 each, suitable safety glasses.
2 each, 7/16 inch wrenches.
WEAR SAFET Y EYEW EAR AN D ANY OTHER
SAFET Y A PPAREL DEEMED APP ROPRIATE
FO R TH E JOB APPLICATION AND/ OR JOB
SIT E ENVIRONM ENT. THE TO OT H
REP LAC EMEN T P ROCE SS CAN CREATE
FLYING S TEEL C HIPS A N D/OR OTH ER
DEB RIS. CAUTI ON A LL O NLOO KERS
REGA RDING THE POSSI BILITY OF AND/OR TO
REM AIN C LEAR OF FLYI NG DEBR IS.
IMP ROPE R SAFE TY PROCED U RES CAN
RES ULT IN PROP ERT Y DA MAGE AND/ O R
PERS ONAL INJURY.
2) Inspect the auger for worn or broken components.
Check to determine that the auger does not have a
bent or damaged axle. A bent or damaged axle will
cause the auger to "wobble" during use. Maximum
allowable auger wobble is 0.25 inch (7 mm) total
indicated runout (TIR). An auger with a total indicated
runout wobble in excess of this value should be
removed from service and scrapped.
Parts Required:
1 each, PN E244, 4 inch diameter auger.
1 each, PN E246, 6 inch diameter auger.
1each, PN E248, 8 inch diameter auger.
Required Quantity: 2425 bolt, washer and nut.
Blades are hot-coined from alloy steel and heat treated
to extend their service life. All blades utilize 1/4 inch
diameter capscrews, lock washers and standard nuts
to retain the blade to the auger plate. Each blade
incorporates a minimum of two capscrews. An auger
that has only one capscrew still visible and/or usable is
worn beyond its useful service life and should be
discarded.
1) The replacement of the auger blade will require a
level working platform of sufficient size and appropriate
height. Wear safety eyewear and any other safety
apparel deemed appropriate for the job application
and/or job site environment.
Page 37

240H ONE MAN HOLE DIGGER
FORM GOM14081201, VERSION 1.1
WEAR SAFET Y EYEW EAR AN D ANY OTHER
SAFET Y A PPAREL DEEMED APP ROPRIATE
FO R TH E JOB APPLICATION AND/ OR JOB
SIT E ENVIRONM ENT. THE BLAD E
REP LAC EMEN T P ROCE SS CAN CREATE
FLYING S TEEL C HIPS A N D/OR OTH ER
DEB RIS. CAUTI ON A LL O NLOO KERS
REGA RDING THE POSSI BILITY OF AND/OR TO
REM AIN CLEAR OF FLYI NG DEBR IS.
IMP ROP E R SAFE TY PROCED U RES CAN
RES ULT IN PROP ERT Y DA MAGE AND/ O R
PERS ONAL INJURY.
35
2) spark plug
3) air filter
4) carburetor adjustment
5) maintenance schedule
6) engine oil change
7) troubleshooting
8) short and long term storage
Keep this information stored with the Operator Manual
for the Hole Digger so it will always be available for use
when the engine requires service or maintenance. A
properly maintained engine will add considerably to the
service life and overall productivity of the Hole Digger.
2) Inspect the auger for worn or broken components.
Check to determine that the auger does not have a
bent or damaged axle. A bent or damaged axle will
cause the auger to "wobble" during use. Maximum
allowable auger wobble is 0.25 inch (7 mm) total
indicated runout (TIR). An auger with a total indicated
runout wobble in excess of this value should be
removed from service and scrapped.
DO N OT OPERAT E AN AU G ER WHI C H HA S A
BEN T O R DA M AG E D AXLE W ITH A TOTAL
INDIC AT E D R U N O U T E X C E EDING T H E
MAX I MUM A LLOWA BLE L I MIT. E XCES S IVE
AUGER WOBBLE CAN REDUC E OPE R ATO R
CONTROL, RESU LT I N G IN P R O P E R T Y
DA MAG E AND/ O R PERS O NAL INJ URY.
3) Using the 7/16 inch wrenches, loosen the capscrews
to remove the worn blade from the auger plate.
Remove any accumulated dirt from the auger plate
area. Install the replacement blade with the capscrew
threads facing up toward the hub. The replacement
blade will extend past the outside diameter of the auger
plate. This allows the blade to wear while providing
added component protection. Tighten firmly with the
wrenches.
Repair
DO NOT PERFORM SERVICE AN D/OR REPAIR
RELATED FUNCTIONS WITH THE HOLE DIGGER
MOUNTED TO THE 999 SERIES DISPLAY STANDS.
THESE STANDS ARE NOT DESIGNED AND/OR
INTENDED FOR MAINTENANCE FUNCTIONS.
SUCH USE CAN RESULT IN PROPERTY DAMAGE
AND/OR PERSONAL INJURY.
CENTRIFUGAL CLUTCH ROTOR AND SHOE
ASSEMBLY REMOVAL AND INSTALLATION.
Application: 240H Hole Digger powered by the
Honda GX35 engine.
The 240 Hole Digger utilizes an all metal centrifugal
clutch rotor and shoe assembly that expands with
engine RPM to engage the clutch drum and transfer
torque. The centrifugal clutch rotor and shoe assembly
is mounted to and operates concentrically about the
engine crankshaft. Symptoms for replacement of the
clutch assembly include the following:
4) Re t urn the a u ger back to se r v i ce.
ENGINE SERVICE
Consult Instructions for Use Manual provided by the
engine manufacturer for specific service and
maintenance information regarding:
1) muffler
1) Excessive clutch slippage and auger stalling at full
engine speed.
2) Partial clutch engagement (and resulting auger
rotation) at the specified engine idle speed.
Page 38

240H ONE MAN HOLE DIGGER
FORM GOM14081201, VERSION 1.1
36
To replace the clutch rotor and shoe assembly, proceed
as follows:
Tools required:
1 each, 7/16 inch wrench.
1 each, 17 mm socket with impact wrench
1 each, container of Locktite 609 or equivalent
1 each, torque wrench, 120 inch pounds (13.4 N.m.)
capacity and 17 mm socket.
Parts Required:
1 each, PN 240 0100 transmission gasket (if required)
1 each, PN 240-0160 drum and pinion shaft assembly
(if required)
1each, PN 240-0170 rotor and shoe assembly
Centrifugal clutch removal and installation will require a
level working platform of sufficient size and appropriate
height. As an alternative, the transmission driveshaft
assembly can be securely mounted in a suitable bench
vice.
The transmission is designed to allow removal of a
worn centrifugal clutch rotor and shoe assembly
without requiring the transmission cover and case to be
disturbed. Upon inspection, if the centrifugal clutch
drum and pinion shaft requirement replacement, the
transmission case and cover will then require further
disassembly.
1) Drain the fuel from the fuel tank and oil from the
engine into UL
spilled liquids and dispose of properly. Refer to the
Service section for more detailed information.
GASOLINE IS AN EXTREMELY FLAMMABLE FUEL.
USE EXTREME CAUTION WHEN HANDLING
GASOLINE. DO NOT SMOKE OR BRING ANY FIRE
OR FLAME NEAR THE FUEL.
2) Using the 7/16 inch wrench, remove the four K-lock
type nuts that retain the engine to the transmission.
Separate the engine from the transmission.
3) Position the engine with the rotor and shoe assembly
facing up and properly secured.
®
approved containers. Wipe any excess
4) Using the impact wrench and 17 mm socket, remove
the two retaining capscrews. Threads are right handed.
Remove the rotor and shoe assembly from the engine
flywheel.
5) Clean the engine flywheel and clutch drum areas
with an appropriate solvent.
Observe all applicable safety precautions for the
solvent.
6) Inspect the engine flywheel, crankcase castings,
mounting studs and clutch drum for cracks and other
signs of visible of damage. Any damaged component
will require immediate replacement with a suitable,
factory-replacement part.
7) If the clutch drum shows signs of severe wear and/or
damage, it will also require immediate replacement.
Refer to CENTRIFUGAL CLUTCH DRUM AND
PINION SHAFT REMOVAL AND INSTALLATION.
Severe wear is defined as:
a) Deep grooves cut into the walls of the drum that
measure greater than 3.140 inches (79.76 mm).
b) A deep, dark blue color that might indicate sustained
operation at high temperatures while slipping.
Extended and sustained operation can potentially
weaken the structural integrity of the brazed connection
between the drum and pinion shaft.
8) Clean and inspect the hardware that retains the rotor
and shoe assembly to the engine flywheel. Replace
any component with a factory approved replacement
part if cracks and other signs of visible damage are
present.
9) Apply Locktite 609 or equivalent to the shoulder bolt
threads.
10) Locate the replacement clutch rotor and shoe
assembly and thrust washers on the engine flywheel with
the direction arrow pointing in a counter-clockwise
direction. FIGURE 19. This orientation properly maximizes
the torque transmitting capabilities of the clutch.
Page 39

240H ONE MAN HOLE DIGGER
FORM GOM14081201, VERSION 1.1
37
13) Using the wrench, tighten the 1/4 inch K-lock type
nuts. There is not adequate space to allow the use of a
conventional torque wrench. Tighten the nuts to
approximate a 90 inch pound (10 N.m.) value. An
approximate value will place the nut flush with the end
of the mounting studs.
14) Rotate the final driveshaft and check for excessive
noise and/or binding. If excessive noise and/or binding
is evident, disassemble the engine from the
transmission and investigate for probable causes.
Reassemble and retorque to the specified values.
Recheck again for excessive noise and/or binding.
FIGURE 19
Improper orientation will result in increased
slippage, reduced digging capacity with increased
clutch wear.
11) Install the retaining shoulder bolts. Torque the
shoulder bolts to 5.4-7.2 ft. lbs. (7.5-10 N.m.). When
properly installed and torqued, the shoulder bolts
should not thrust directly against the washers and thus
apply a direct force against the clutch shoes. Such an
occurrence will restrict the proper movement of the
clutch shoes.
Improper shoulder bolt clearance will limit proper
movement of the clutch shoes and overall
operation. Such an occurrence can result in
property damage and/or personal injury.
15) Refill the engine fuel tank and crankcase with the
appropriate fluids as required.
16) If placing the machine back in service, follow the
procedures as outlined in this manual for starting the
engine. Refer to STARTING THE ENGINE WITH THE
AUGER CON NECTED TO THE TRAN SMISSION
DRIVESHAFT.
CENTRIFUGAL C L U T C H D R UM AND PINION
SHAFT REMOVAL AND INSTALLATION.
Application: 240H Hole Digger powered by the
Honda GX35 engine.
Tools Required:
2 each, 7/16 inch wrenches
1each, plastic hammer
1 each, powered impact wrench with 12 point, 25/32
inch socket
1 each, torque wrench,120 inch pounds (13.5 N.m.)
capacity.
Parts Required:
12) Reinstall the engine to the transmission with the
correct orientation to the operator handle.
IMPROPER ENGINE MOUNTING ORIENTATION TO
THE OPERATOR HANDLE CAN REDUCE MACHINE
CONTROL DURING THE HOLE DIGGING
PROCESS. SUCH OCCURRENCE CAN RESULT IN
P R O P E R TY DAM A G E A ND / OR P E R S O N A L
INJURY.
1 each, PN 240-0100 gasket
1 each, PN 240-0160 clutch drum and pinion shaft
assembly
1 each, PN 210-0320 pinion gear (if required)
1 each, container of thread anti-seize.
1) Drain the fuel from the fuel tank and oil from the
engine crankcase into UL
any excess spilled liquids and dispose of properly.
®
approved containers. Wipe
Page 40

240H ONE MAN HOLE DIGGER
FORM GOM14081201, VERSION 1.1
GASOLINE IS AN EXTREMELY FLAMMABLE FUEL.
USE E X T R E M E C AUTI O N W H E N H A N DLING
GASOLINE. DO NOT SMOKE OR BRING FIRE OR
FLAME NEAR THE FUEL.
2) Position the Hole Digger on a suitable work bench
with the operator handle level with the ground. As an
alternative, the transmission driveshaft can be securely
mounted in a suitable bench vice. Wipe any dust or dirt
from the area where the transmission separates.
3) Loosen and remove the four nuts that retain the
engine and operator handle to the transmission.
Separate the engine from the operator handle from the
transmission and store in a position that does not
damage the throttle cable.
38
5) If it is determined the transmission grease should be
replaced refer to CHANGING THE HOLE DIGGER
TRANSMISSION LUBRICANT in the Service section
of this manual for additional information.
6) The PN 210-0320 Pinion Gear is threaded on to the
clutch drum shaft. The threads are right hand rotation.
Using the impact wrench and 12 point, 25/32 inch
socket, remove the pinon gear from the clutch drum
shaft. FIGURE 21.
7) Using the rubber hammer, tap against the threaded
shaft until it is clear of the transmission cover. If
additional force is required, support the cover to
prevent damage in a suitable arbor press. Apply a
direct force against the threaded shaft until the drum
and shaft clear the transmission cover. FIGURE 22.
4) Loosen and remove the six capscrews that fasten
the transmission together. Using the rubber hammer,
split and separate the transmission cover and case.
Exercise caution not to damage the dowel pins. If the
bearing journals of the secondary pinion, PN 2100310, are difficult to remove from the ball bearings,
remove the PN 37040200 Screw from both housings.
Insert a 1/4-20 UNC capscrew into the housing. Using
the wrench, rotate the capscrew to thrust against the
pinion journal until it clears the pinion gear support
bearing. Repeat the process with the remaining pinion
gear bearing journal if necessary. FIGURE 20. Remove
the PN 240-0100 Gasket. Remove the primary gear
and pinion assembly, PN 240-0340 and PN 210-0310.
WEAR SAFETY EYEWEAR AND APPROPRIATE
APPAREL WHEN DISASSEMBLING THE CLUTCH
DRUM AND SHAFT FROM THE TRANSMISSION
COVER. FLYING DEBRIS CAN RESULT IN
PERSONAL INJURY.
FIGURE 21
FIGURE 20
Page 41

240H ONE MAN HOLE DIGGER
FORM GOM14081201, VERSION 1.1
FIGURE 22
8) Inspect the support bearings for excessive wear.
Replace as necessary. Install the replacement drum
and shaft assembly in the transmission cover.
Determine the drum fits tight against the bearings.
9) Apply a suitable amount of tread anti-seize material
to the exterior threads of the drum shaft. Reinstall the
pinion gear, PN 210-0320 to the drum shaft. Thread by
hand. If additional torque is required, the pinion gear
can be assembled to the shaft utilizing the impact
wrench and the 12 point, 25/32 inch socket. Thread the
pinion gear on the shaft until it fits tight against the
bearing. A thrust force that places an excessive preload
against the bearing is not necessary and can actually
reduce bearing service life.
39
13) Inspect the centrifugal clutch assembly for
excessive wear and/or damage. If it is determined the
centrifugal clutch rotor and shoe assembly requires
replacement, refer to CENTRIFUGAL CLUTCH
ROTOR AND SHOE ASSE MBLY REMOVAL A ND
INSTALLATION in the Service section of this manual
for additional information.
14) Reinstall the engine and operator handle to the
transmission. Torque the fasteners to 90 inch lbs (10
N.m.) in an “X” sequence.
15) Refill the engine crankcase with the correct amount
and type of grease. Refer to FILLING THE ENGINE
CRANKCASE WITH OIL in the Before Starting the
Engine section of this manual for additional
information.
16) Determine that the disassembly process has not
affected the proper operation of the twist grip throttle
control. If improper operation is detected, determine
the probable cause(s). Replace any suspect
component with a factory approved replacement part
only.
10) Reinstall the primary gear and pinion assembly.
Determine there is sufficient grease equally spread
around all gear teeth. Replace the old transmission
gasket with a new gasket, PN 240-0100. Align the
transmission dowel pins when reinstalling the cover.
Reinstall the fasteners with the hexagon huts on the
cover side of the transmission. Torque all fasteners to
96 inch lbs (12 N.m.) in an “X” sequence.
11) If necessary, reinstall PN 37040200 Screw into the
bearing housings. Properly secure with the provided
hardware.
12) Rotate the final driveshaft and check for excessive
noise and/or binding. If excessive noise and/or binding
is evident, disassemble the transmission and
investigate for probable causes. Reassemble and
retorque to the specified value. Recheck for excessive
noise and/or binding.
Page 42

240H ONE MAN HOLE DIGGER
FORM GOM14081201, VERSION 1.1
40
Troubleshooting
ENGINE.
ENGINE FAILS TO START
Ignition switch in OFF position. Place in ON position.
Incorrect carburetor adjustment. See Service section.
Ignition wire to spark plug loose or disconnected.
Reconnect.
Fuel supply exhausted. Refill fuel tank.
ENGINE LOOSES POWER
Incorrect carburetor adjustment. See Service section.
Water in fuel supply. Drain and replace fuel.
Plugged engine exhaust ports. See Service section.
Dirty spark plug. See Service section.
Centrifugal clutch assembly worn. Replace.
Auger diameter too large for given soil condition. See
Digging Operation section.
Incorrect throttle control/cable adjustment. See
Assembly section.
AUGER ROTATES AT IDLE SPEED
Incorrect throttle control/cable adjustment does not
permit proper engine idle speed. See Assembly
section.
Centrifugal clutch worn. Replace.
Incorrect engine idle speed. See Service section.
Storage
Proper procedure for long term storage of the Hole
Digger will protect it against the affects of corrosion and
damage. If the Hole Digger is not to be operated for a
period of 30 days or more, proceed to store as follows:
Incorrect throttle control/cable adjustment. See
Assembly section.
Gasoline tank breather vent closed (if so equipped).
Open vent.
Dirty air filter. See Service section.
ENGINE OVERHEATS
Incorrect carburetor adjustment. See Service section.
Incorrect fuel/oil mixture ratio. See Before Starting
The Engine section.
Cooling fins clogged. Remove engine blower housing
and clean cooling fins.
OPERATIONAL PROBLEMS.
HOLE DIGGER LACKS POWER
Incorrect amount of transmission lubricant. See
Service section.
1) Clean all accumulated dirt and grease from the Hole
Digger utilizing an approved safety solvent.
Observe all applicable safety precautions for the
solvent
2) Follow the procedure as outlined in the material
supplied by the engine manufacturer detailing long
term storage of the engine.
3) Check all visible parts for wear, breakage or
damage. Order any part required to make the
necessary repair. This will avoid a needless delay when
operating the Hole Digger at next use.
4) Apply a light coat of protective grease to the
transmission final driveshaft to prevent the formation of
rust.
5) Do not store the Hole Digger connected to an auger.
Always store the Hole Digger with the operator handle
level with the ground.
Page 43

240H ONE MAN HOLE DIGGER
FORM GOM14081201, VERSION 1.1
41
6) Store the Hole Digger inside. If the Hole Digger must
be stored outside, protect it and each auger with a
suitable covering.
Specifications
ENGINE.
TYPE Honda GX35
HIGH SPEED 9000 RPM (No Load)
IDLE SPEED 2900 RPM
SPARK PLUG GAP .030 inch (.76 mm)
FUEL Unleaded, automotive grade
GASOLINE TANK 22 US ounces (0.64 liter)
CAPACITY
TRANSMISSION.
LEAD AUGER SERIES General® 2135
TYPE/NUMBER
AUGER EXTENSION General® 2135
TYPE/SERIES NUMBER
TYPE Enclosed, spur geared, double reduction.
REDUCTION RATIO 42.5 to 1
LUBRICANT CAPACITY 8 US ounces (224 g)
LUBRICANT SPECIFICATION High temperature
transmission grease containing an extreme pressure
(EP) additive.
CLUTCH 3 inch (76 mm) diameter, all-metal,
automatic cam-type centrifugal.
AUGER CAPACITY: 2 inch (51 mm) diameter up to
and including 8 inch (203 mm) diameter. Refer to
Digging Operation for specific information.
GENERAL.
MODEL M240H
REQUIRED NUMBER OF OPERATORS 1
Page 44

240H ONE MAN HOLE DIGGER
File Name: MSDS0 1 561
Printed on: 06/21/07
1
UPDATED: J ul y 8, 2 0 0 4
MATERIAL SAFETY DATA SHEET
GROWMARK, INC
2200 South Avenue, P.O. Box 587, Council Bluffs, IA 51502-0587
EMERGENCY TELEPHONE NUMBER: 1 - ( 8 0 0 ) - 7 9 8- 6457
****************** I. PRODUCT
IDENTIFICATION ******************
Pr o d u c t Na me : Un i t e d Se l e c t 450 A/ S 1 0 w3 0
Che mi c al Na me : Lubr i c at i n g Oi l
Chemical Family: Petroleum Hydrocarbon
Tr a d e Na me s : Un i t e d™, Hyd e , Nou r s e , Tr a ct o , En - O- Co ( Enoc o)
********* II. TYPICAL CHEMICAL AND PHYSICAL PROPERTIES *********
Vapor Pressure (MM HG) : Ni l Va por Dens i t y ( Ai r =1) Ni l
So l u b i l i t y ( i n wa t e r ) : Ni l Me l t i n g P oi n t :
NA
Sp e ci f i c Gr a v i t y ( H2 O=1) : . 8 6 - . 9 4
Boiling Point
F( C) : Gr e a t e r t h a n 6 80 F (360C)
Eva por a t i o n Ra t e : Sl o we r t h a n n - But y l Ac et a t e
Ap p e a r a nc e a nd Od o r Amb e r Li q u i d , Sl i g h t Hy d r o c a r bo n Odo r
***************** III. HAZARDOUS COMPONENTS *********************
COMPONE
NT
CAS
Wt - %
ACGIH TLV
OS HA
PEL
STEL
Hi g h l y Re f i n e d Pe t r o l e um Oi l 6 4 7 42- 65- 0 8 0 - 9 5 5 mg / M
3
5
mg / M
3
10 mg/M
3
Zi n c d i a l k yl d i t h i o p h os ph a t e 2 510 3- 5 4 - 2 0 . 10 – 1 . 5 0 No l i mi t s
e s t a bl i s h e d
************* IV. FIRE AND EX
PLOSION HAZARD DATA **************
Fl a mma bi l i t y Cl a s s : NFPA 704 =1 NFPA 30=I I I -
B
Co mb u s t i b l e
Fl a s h Po i n t
F ( C) 3 7 0 F( 188 C) - 455F (235C) ( COC)
LEL:
n/ a v
EXTINGUISHING MEDI A:
According to the NFPA guide, use water fog. Foam. Dry chemical or CO
2
. Do
not use a direct stream of water. Product will float and can be reignited on
t h e s u r f a ce of wa t e r . Us e wa t e r t o c oo l c o nt a i n e r s
SPECIAL FIRE FIGHTING PROCEDURES AND PRECAUTIONS:
Material will not burn unless preheated. Do not enter confined fire-space
without proper protective equipment including a positive-pressure NIOSH
approved self-contained breathing apparatus. Use water to keep fire exposed
c o n t a i n e r s c oo l .
********************** V. REACTIVITY DATA *************
********
FORM GOM14081201, VERSION 1.1
42
Page 45

240H ONE MAN HOLE DIGGER
FORM GOM14081201, VERSION 1.1
Replacement Parts Diagrams
43
240H Hole Digger
Page 46

240H ONE MAN HOLE DIGGER
FORM GOM14081201, VERSION 1.1
44
Left Blank
Page 47

240H ONE MAN HOLE DIGGER
FORM GOM14081201, VERSION 1.1
[Starting With Serial Number 136636]
45
Transmission Assembly
240H Hole Digger
Page 48

240H ONE MAN HOLE DIGGER
FORM GOM14081201, VERSION 1.1
[Starting With Serial Number 136636]
46
Transmission Assembly
240H Hole Digger
REFERENCE
NUMBER
1
2
3
4
5
6
7
8
9
10
11
12
13
14
15
16
17
18
19
20
21
22
23
24
25
26
27
28
29
30
31
32
33
34
35
36
37
38
39
40
41
42
43
PART
NUMBER
GX35NTT3-BLK
240-0090
310-0030
240-0130
240-0120
240-0100
210-0330
240-0340
210-0310
210-0320
240-0350
240-0160
240-0170
240-0200
99502H
240H-0080
51020400
3
99R16
5160-98
34041600
37040200
16040000
63050400
18040000
AN-960-416L
5677
210-5021
210-5041
SG24-5072
240-5020
240-5100
GECD-5020
2121
AP-21-S
210-0010
12040001
20020900
240-0180
240-0170 KIT
240-0190
240-0150
48030401
DESCRIPTION QTY
Engine, Honda, GX35
Handle, Operator, Complete, Less Throttle Control
Assembly, Control, Throttle, Complete
Cover, Transmission
Case, Transmission
Gasket, Transmission
Shaft, Drive
Gear, Primary, 78 Tooth
Gear, Pinion, Secondary
Gear, Pinion, Clutch
Gear, Secondary, 78 Tooth
Drum, Clutch
Assembly, Rotor Shoe, Clutch
Stud, Mounting, M6 x 1/4-28, ZY
Bearing, Ball
Cable, Throttle
Pin, Dowel, 1/8” x 1/2”
Key, Woodruff, 1/8” x 1/2”, Alloy
Bearing, Ball
Ring, Snap
Screw, Machine, 1/4-20 UNC x 2”, ZY
Screw, Panhead, Philips, 1/4-20 UNC x 5/16”, ZY
Washer, Lock, 1/4” ZY
Key, Square, 5/16” x 1/2”, PF
Nut, Hex, 1/4-20 UNC, ZY
Washer, Flat, 1/4”, ZY
Valve, Relief
Decal, Danger
Decal, Muffler, Hot
Decal, Assistance
Decal, Starting
Decal, 811
Decal, GENERAL
Pin, Auger, w/Retaining Pin, 3/8” Diameter
Pin, Safety
Cap, Protective
Nut, Hexagon, 1/4-28 UNF, Washer, K-Lock, ZY
Pin, Roll, 1/8” x 1-1/8”
Screw, Cap, Retaining , Clutch
Kit, Repair, Clutch (Includes (1) P/N 240-0170,
(2) P/N 240-0180, and (2) P/N 350-0190)
Washer, Clutch
Clip, Modified
Screw, Drive, #10-24 UNC x 1/2”, ZY
1
1
1
1
1
1
1
1
1
1
1
1
1
4
1
1
2
1
2
2
6
2
8
1
6
8
1
1
1
1
1
1
1
1
1
1
4
1
2
1
2
2
2
Page 49

240H ONE MAN HOLE DIGGER
FORM GOM14081201, VERSION 1.1
[Starting With Serial Number 136636]
47
Transmission Assembly
240H Hole Digger
Referance
Number
44
45
46
47
48
49
50
51
52
PART
NUMBER
SP8-5041
240-5080
240-5030
240-5090
240H-0360
90050-ZE1-000
240H-0340
240H-0350
210-0720
DESCRIPTION QTY
Decal, Caution, Eye/Ear Protection
Decal, Weight
Decal, 4 Stroke
Decal, Carbon Monoxide
Bracket, Switch
Screw, Phillips, Self Tap, M5 x 8mm, ZY
Screw, Panhead, Phillips, #8-12, Type AB, ZY
Switch, Engine, ON/OFF
Packet, Grease
1
1
1
1
1
2
2
1
1
Page 50

240H ONE MAN HOLE DIGGER
FORM GOM14081201, VERSION 1.1
Replacement Parts Diagrams
48
2135 Series Earth Augers
1” Diameter Round Drive Connection
For Use With 200 Series Hole Diggers
Page 51

240H ONE MAN HOLE DIGGER
FORM GOM14081201, VERSION 1.1
49
Replacement Parts Diagrams
2135 Series Earth Augers
1Inch Diameter Round Drive Connection
For Use With 200 Series Hole Diggers
REFERENCE
NUMBER
1
2
3
4
5
6
7
PART
NUMBER
P801
P302
20051000
20051200
52040000
15040700
2121
DESCRIPTION QTY APPLICATION
Bit, Screw
Bit, Screw
Pin, Roll, 5/16” x 1-1/4”, PF
Pin, Roll, 5/16” x 1-1/2”, PF
Nut, Hex, 1/4” UNC, Two Way, ZY
Screw, Cap, 1/4” x 7/8” UNC, ZY
Pin, Auger (Includes P/N AP-21-S)
1
2135-2E Auger
2135-4E thru
2135-8E Augers
1
2135-3E Auger
1
2135-2E and
2135-3E Augers
1
2135-4E thru
2135-8E Augers
2
2135-4E thru
2135-8E Augers
2
2135-4E thru
2135-8E Augers
1
All Augers and
2135-15X Extension
8
9
AP-21-S
233-5092
Pin, Safety
Decal, Danger
1
All Augers and
2135-15X Extension
1
All Augers and
2135-15X Extension
Page 52

240H ONE MAN HOLE DIGGER
FORM GOM14081201, VERSION 1.1
Replacement Blade Diagrams
For Use With 2135 Series Earth Augers
50
REFERENCE
NUMBER
1
PART
NUMBER
E244
DESCRIPTION QTY
Blade, Earth, 4” Dia. Auger
AUGER
1
APPLICATION
2135-4E
2
3
E246
E248
Blade, Earth, 6” Dia. Auger
Blade, Earth, 8” Dia. Auger
1
1
2135-6E
2135-8E
Page 53

240H ONE MAN HOLE DIGGER
FORM GOM14081201, VERSION 1.1
51
Display Stand Assembly
210/240 Series Hole Diggers
Page 54

240H ONE MAN HOLE DIGGER
FORM GOM14081201, VERSION 1.1
52
Display Stand Assembly
210/240 Series Hole Diggers
REFERENCE
NUMBER
1
2
3
4
5
6
7
8
PART
NUMBER
999-4-010
999-4-020
FP-164
15041400
43040000
999-4-5010
SG24-5070
GEDC-5010W
DESCRIPTION QTY
Leg, Stand
Plate, Top
Plug, CAP, Stand, Display
Screw, Cap, 1/4-20 UNC x 1-3/4” Long, ZY
Nut, Wing, 1/4-20 UNC, ZY
Decal, Warning
Decal, Assistance
Decal, General
4
1
4
8
8
1
1
1
Page 55

240H ONE MAN HOLE DIGGER
FORM GOM14081201, VERSION 1.1
Magura® Throttle Control Assembly
53
Plastic Body Series 314
240/300 Series Hole Diggers
Reference
Number
1
2
3
4
5
6
7
8
PART
NUMBER
310-0030-010-A
310-0030-020-A
310-0020-030
310-0030-040
310-0030-050
310-0030-060
310-0030-070
310-0020-080
DESCRIPTION QUANTITY
Assembly, Body, w/Screws, (Includes P/N 310-0030-040, Qty 2)
Tube, Throttle, w/Grip (Includes P/N 310-0020-030)
Grip, Throttle
Screw, Head, Pan, M5 x 20
Screw, Self Tapping
Cover, Top
Sheave, Roller
Boot, Rubber
1
1
1
2
1
1
1
1
 Loading...