


DEHUMIDIFIER
SAFETY INFORMATION . . . . . . . . .3
OPERATING INSTRUCTIONS
Controls . . . . . . . . . . . . . . . . . . . . . . . . . . . . . .4
How the Dehumidifier Operates . . . . . . . . .5
Automatic Defrost . . . . . . . . . . . . . . . . . . . . .5
Choosing a Location . . . . . . . . . . . . . . . . . . .5
Removing Collected Water . . . . . . . . . . . . .6
Water Level. . . . . . . . . . . . . . . . . . . . . . . . . . .6
Bucket Operation . . . . . . . . . . . . . . . . . . . . . .6
CARE AND CLEANING
Grille and Case . . . . . . . . . . . . . . . . . . . . . . . .7
Water Bucket . . . . . . . . . . . . . . . . . . . . . . . . .7
Air Filter. . . . . . . . . . . . . . . . . . . . . . . . . . . . . .7
TROUBLESHOOTING TIPS. . . . . . .8
CONSUMER SUPPORT
Warranty . . . . . . . . . . . . . . . . . . . . . . . . . . . . 11
Consumer Support . . . . . . . . . . . . . . . . . . . . 12
Write the model and serial numbers here:
Model #_________________
Serial # _________________
You can find them on a label on the back of the dehumidifier.
OWNER’S MANUAL
ADEL30
ADEL50
ADEL70
ENGLISH/ESPAÑOL
GE is a trademark of the General Electric Company. Manufactured under trademark license.
49-7768 10-16 GEA

THANK YOU FOR MAKING GE APPLIANCES A PART OF YOUR HOME.
Whether you grew up with GE Appliances, or this is your first, we’re happy to have you in the family.
We take pride in the craftsmanship, innovation and design that goes into every GE Appliances product, and we think you will too. Among other things, registration of your appliance ensures that we can deliver important product information and warranty details when you need them.
Register your GE appliance now online. Helpful websites and phone numbers are available in the Consumer Support section of this Owner’s Manual. You may also mail in the pre-printed registration card included in the packing material.
2 |
|
49-7759 |

IMPORTANT SAFETY INFORMATION
READ ALL INSTRUCTIONS BEFORE USING THE APPLIANCE
 WARNING For your safety, the information in this manual must be followed to minimize the risk of fire, electric shock or personal injury.
Ŷ 8VH WKLV DSSOLDQFH RQO\ IRU LWV LQWHQGHG SXUSRVH DV described in this Owner’s Manual.
Ŷ 7KLV GHKXPLGLILHU PXVW EH SURSHUO\ LQVWDOOHG DQG grounded as described in this manual before it is used.
Ŷ 1HYHU RSHUDWH WKLV GHKXPLGLILHU LQ DQ DUHD WKDW LV likely to accumulate standing water. If this condition develops, for your safety disconnect the power supply before stepping into the water.
Ŷ 1HYHU XQSOXJ \RXU GHKXPLGLILHU E\ SXOOLQJ RQ WKH power cord. Always grip plug firmly and pull straight out from the receptacle.
Ŷ 5HSODFH LPPHGLDWHO\ DOO HOHFWULF VHUYLFH FRUGV that have become frayed or otherwise damaged. A damaged power supply cord must be replaced with a new power supply cord obtained from the
manufacturer and not repaired. Do not use a cord that shows cracks or abrasion damage along its length or at either the plug or connector end.
Ŷ ,I WKH UHFHSWDFOH GRHV QRW PDWFK WKH SOXJ WKH receptacle must be changed out by a qualified electrician
Ŷ 7XUQ WKH GHKXPLGLILHU 2)) DQG XQSOXJ LW EHIRUH cleaning.
Ŷ *( $SSOLDQFHV GRHV QRW VXSSRUW DQ\ VHUYLFLQJ RI WKH dehumidifier. We strongly recommend that you do not attempt to service the dehumidifier yourself.
Ŷ )RU \RXU VDIHW\ GR QRW VWRUH RU XVH FRPEXVWLEOH materials, gasoline or other flammable vapors or liquids in the vicinity of this or any other appliance.
Ŷ $OO GHKXPLGLILHUV FRQWDLQ UHIULJHUDQWV ZKLFK XQGHU federal law must be removed prior to product disposal. If you are getting rid of an old product with refrigerants, check with the company handling disposal about what to do.
Ŷ 'R QRW XVH RXWGRRUV
Ŷ 7KLV GHKXPLGLILHU LV LQWHQGHG IRU LQGRRU UHVLGHQWLDO
DSSOLFDWLRQV RQO\ 7KLV GHKXPLGLILHU VKRXOG QRW EH used for commercial or industrial applications.
Ŷ 7KHVH 5 $ 'HKXPLGLILHU 6\VWHPV UHTXLUH
contractors and technicians to use tools, equipment and safety standards approved for use with this
UHIULJHUDQW '2 127 XVH HTXLSPHQW FHUWLILHG IRU 5 refrigerant only.

 WARNING USE OF EXTENSION CORDS
RISK OF FIRE. Could cause serious injury or death. Ŷ '2 127 XVH VXUJH SURWHFWRUV RU PXOWL RXWOHW DGDSWRUV
Ŷ '2 127 XVH DQ H[WHQVLRQ FRUG ZLWK WKLV 'HKXPLGLILHU |
with this Dehumidifier. |
|
HOW TO CONNECT ELECTRICITY
Do not, under any circumstances, cut or remove the third
JURXQG SURQJ IURP WKH SRZHU FRUG )RU SHUVRQDO VDIHW\ this appliance must be properly grounded.
'2 127 XVH DQ DGDSWHU SOXJ ZLWK WKLV DSSOLDQFH
7KH SRZHU FRUG RI WKLV DSSOLDQFH LV HTXLSSHG ZLWK D
3-prong (grounding) plug which mates with a standard 3-prong (grounding) wall outlet to minimize the possibility of electric shock hazard from this appliance.
Have the wall outlet and circuit checked by a qualified electrician to make sure the outlet is properly grounded.
Where a 2-prong wall outlet is encountered, it is your personal responsibility and obligation to have it replaced with a properly grounded 3-prong wall outlet.
7KH GHKXPLGLILHU VKRXOG DOZD\V EH SOXJJHG LQWR LWV RZQ individual electrical outlet, which has a voltage rating matching the rating plate.
7KLV SURYLGHV WKH EHVW SHUIRUPDQFH DQG DOVR SUHYHQWV overloading house wiring circuits, which could cause a fire hazard from overheated wires.
RECYCLING INFORMATION
For appliance recycling information please visit www.geappliances.com/recycling.
READ AND SAVE THESE INSTRUCTIONS
INFORMATION SAFETY
49-7759 |
3 |
OPERATING INSTRUCTIONS
Controls
|
|
|
|
|
|
|
High, Medium and |
|
|
|
Bucket Full light indicates |
|
|
|
|
|
|
|
4 hour or 2 hour |
||||||
|
|
|
|
|
Continuous |
|
||||||
|
|
|
|
|
|
Low fan indicator |
|
delay off |
|
bucket needs to be emptied |
||
Power On |
|
|
|
Operation on |
|
|
|
|||||
|
Clean the Filter |
|
|
|||||||||
|
|
|
light |
|
indicator lights |
|
or is not in place in the unit |
|||||
indicator light |
|
indicator light |
|
indicator light |
|
|
|
|||||
|
|
|
|
|
|
|
|
|
||||
|
|
|
|
|
|
|
|
|
||||
|
|
|
|
|
|
|
|
|
|
|
|
|
|
|
|
|
|
|
|
|
|
|
|
|
|
|
|
|
|
|
|
|
|
|
|
|
|
|
|
|
|
|
|
|
|
|
|
|
|
|
|
|
|
|
|
|
|
|
|
|
|
|
|
|
|
|
|
Nonstop |
|
|
|
|
|
|
|
|
|
Empty |
|
On |
|
Filter |
- |
+ |
|
|
|
|
Delay |
|||||
|
|
|
|
|
||||||||||
Power |
|
Filter |
|
Fan |
||||||||||
Timer |
|
Off |
||||||||||||
|
|
|
Hold 3 Sec To Rest |
|
|
|
|
|
|
|
|
|
|
|
|
|
|
|
|
|
|
|
|
|
|
|
|
|
|
|
|
|
|
|
|
|
|
|
|
|
|
|
|
|
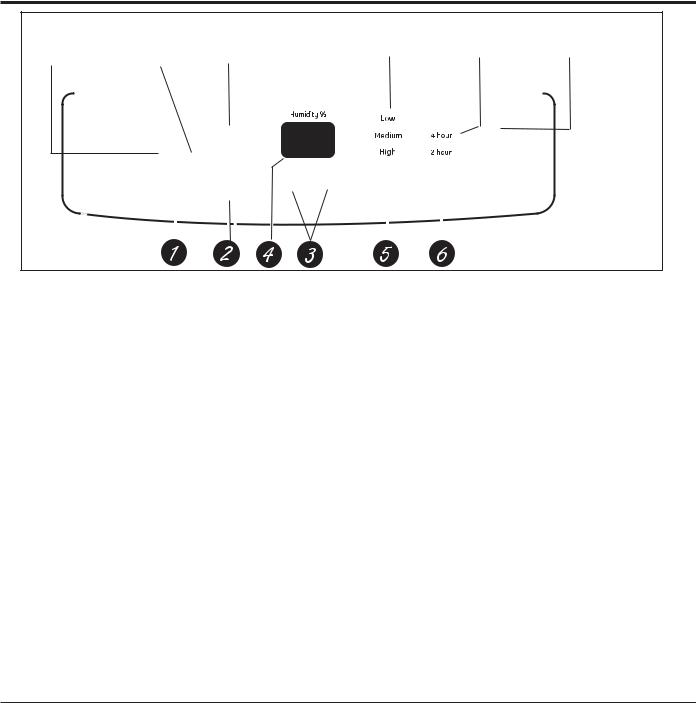
Controls
NOTE: When the bucket is full or removed, the controls cannot be set.
1. Power Pad
Press to turn the dehumidifier on and off.
2. Filter Timer
$IWHU KRXUV RI RSHUDWLRQ WKH &OHDQ WKH )LOWHU indicator light will glow to remind you to clean the filter. Remove the filter and clean it.
3UHVV WR WXUQ RII WKH &OHDQ WKH )LOWHU OLJKW 6HH WKH &DUH and Cleaning section.
3. Humidity Set Control Pads
7KH KXPLGLW\ OHYHO FDQ EH VHW ZLWKLQ D UDQJH RI 5+ 5HODWLYH +XPLGLW\ WR 5+ 5HODWLYH +XPLGLW\ LQ LQFUHPHQWV RU DW 16 IRU FRQWLQXRXV RSHUDWLRQ 7R VHW WKH XQLW IRU FRQWLQXRXV RSHUDWLRQ SUHVV WKH ź SDG XQWLO WKH VFUHHQ UHDGV 16
NOTE: ,I 16 1RQVWRS LV VHOHFWHG WKH GHKXPLGLILHU ZLOO
RSHUDWH FRQWLQXRXVO\ DW LWV PD[LPXP GHKXPLGLILFDWLRQ settings if attached to a hose to drain or until the bucket is full.
)RU GULHU DLU SUHVV WKH ź SDG DQG VHW WR D ORZHU SHUFHQW YDOXH
)RU GDPSHU DLU SUHVV WKH Ÿ SDG DQG VHW WR D KLJKHU SHUFHQW YDOXH
When you first use the dehumidifier, set the humidity
FRQWURO WR RU $OORZ DW OHDVW KRXUV IRU WKH dehumidifier to achieve the humidity level. If you still have damper air than desired, set the humidity level
WR D ORZHU VHWWLQJ RU VHOHFW 1RQVWRS IRU PD[LPXP dehumidification.
4. Display
6KRZV WKH VHW KXPLGLW\ OHYHO ZKLOH VHWWLQJ WKHQ VKRZV WKH DFWXDO ± DFFXUDF\ URRP KXPLGLW\ OHYHO
5.Fan Speed Pad
Controls the fan speed.
Press to select either High, Medium or Low fan speed.
6HW WKH IDQ FRQWURO WR +LJK IRU PD[LPXP PRLVWXUH removal. When the humidity has been reduced and quiet operation is preferred, set the fan control to Medium or Low.
6. Delay Off
While the dehumidifier is in operation, press this pad to
VHW LW WR DXWRPDWLFDOO\ WXUQ RII LQ KRXUV RU KRXUV
Other Features
Empty Light
Glows when the bucket is ready to be emptied, or when the bucket is removed or not replaced in the proper position.
Alarm
If the bucket is full or missing for more than 3 minutes, an
DODUP ZLOO VRXQG IRU DERXW VHFRQGV WR UHPLQG \RX WR empty and replace the bucket.
Auto Shut Off
7KH :DWHU /HYHO &RQWURO 6ZLWFK VKXWV RII WKH GHKXPLGLILHU when the bucket is full, or when the bucket is removed
or not replaced in the proper position. NOTE: )DQ ZLOO
FRQWLQXH WR UXQ DSSUR[LPDWHO\ PLQXWHV DIWHU EXFNHW LV removed.
Auto Defrost
When frost builds up on the evaporator coils, the compressor will cycle off and the fan will continue to run until the frost disappears.
Power Outage
In the case of a power outage or interruption, the unit will automatically restart, in the settings last used, after the power is restored.
|
49-7759 |
Using the Dehumidifier
When first using the dehumidifier, operate the unit continuously for 24 hours.
How the Dehumidifier Operates
Moist, humid air is drawn over a cold refrigerated |
It is normal for the surrounding air to become slightly |
dehumidifying coil. Moisture in the air condenses on this coil |
warmer as the dehumidifier operates. |
and drains into a bucket (or through a hose and drain). |
|
Dry, clean air is drawn through the condenser where it is |
|
heated and discharged out the top grille into the room. |
|
Automatic Defrost
When frost builds up on the evaporator coils, the |
When the coil is defrosted, the compressor or fan will |
compressor will cycle off and the fan will continue to run |
automatically restart and dehumidifying will resume. |
until the frost disappears. |
|
|
|
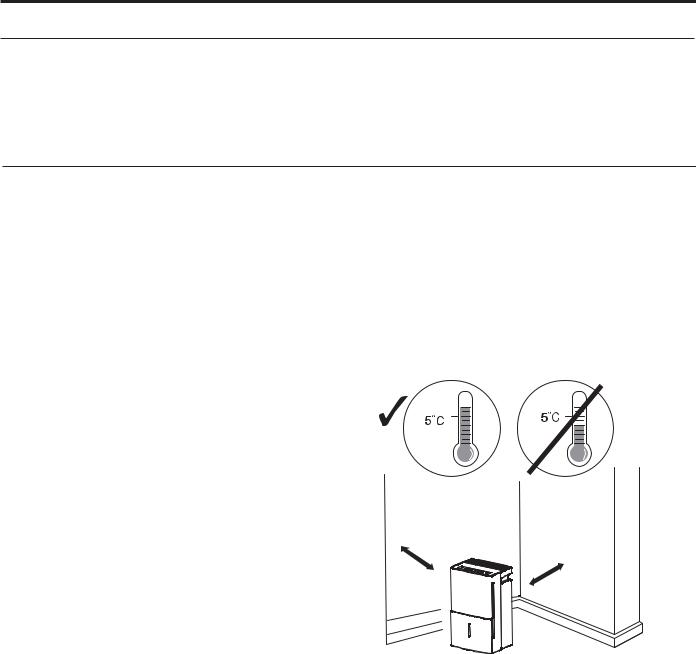
Choosing a Location
A dehumidifier operating in a basement will have little or no effect in drying an adjacent enclosed storage area, such as a closet, unless there is adequate circulation of air in and out of the area.
Ŷ 'R QRW XVH RXWGRRUV
Ŷ 7KLV GHKXPLGLILHU LV LQWHQGHG IRU LQGRRU UHVLGHQWLDO
DSSOLFDWLRQV RQO\ 7KLV GHKXPLGLILHU VKRXOG QRW EH XVHG for commercial or industrial applications.
Ŷ 3ODFH WKH GHKXPLGLILHU RQ D VPRRWK OHYHO IORRU VWURQJ enough to support the unit with a full bucket of water.
Ŷ $OORZ DW OHDVW ± LQFKHV RI DLU VSDFH RQ DOO VLGHV RI the unit for good air circulation.
Ŷ 3ODFH WKH GHKXPLGLILHU LQ DQ DUHD ZKHUH WKH WHPSHUDWXUH ZLOO QRW IDOO EHORZ ) & 7KH FRLOV FDQ EHFRPH
FRYHUHG ZLWK IURVW DW WHPSHUDWXUHV EHORZ ) ZKLFK may reduce performance.
Ŷ 8VH WKH GHKXPLGLILHU LQ FRRNLQJ ODXQGU\ EDWKLQJ DQG
GLVKZDVKLQJ DUHDV WKDW KDYH H[FHVVLYH PRLVWXUH
NOTE: Place the dehumidifier away from the clothes dryer.
Ŷ 8VH WKH GHKXPLGLILHU WR SUHYHQW PRLVWXUH GDPDJH anywhere books or valuables are stored.
Ŷ 8VH WKH GHKXPLGLILHU LQ D EDVHPHQW WR KHOS SUHYHQW moisture damage.
Ŷ 7KH GHKXPLGLILHU PXVW EH RSHUDWHG LQ DQ HQFORVHG DUHD to be most effective.
Ŷ &ORVH DOO GRRUV ZLQGRZV DQG RWKHU RXWVLGH RSHQLQJV WR the room.
Correct Wrong
Above Below
at |
least |
|
|
|
|
18inchs |
|
18inchs |
|
|
|
|
||
|
|
|
at |
least |
|
|
|
|
NOTE: 7KH GHKXPLGLILHU KDV UROOHUV WR DLG SODFHPHQW but it should only be rolled on smooth, flat surfaces. Do not attempt to roll the dehumidifier on carpet or over objects.
INSTRUCTIONS OPERATING
49-7759 |
5 |

OPERATING INSTRUCTIONS
Using the Dehumidifier
Always make sure the water bucket is locked into place on the dehumidifier.
Removing Collected Water
7KHUH DUH ZD\V WR UHPRYH FROOHFWHG ZDWHU
Use the bucket. When the bucket is removed, the unit will shut off. Empty and replace the bucket.
Use a hose. Water can be automatically emptied into a floor drain by attaching a garden water hose (not included).
5HPRYH WKH EXFNHW IURP WKH IURQW RI WKH XQLW
2. Open the drain cover on the back of the unit.
IMPORTANT: Do not use the hose if using the bucket to collect water. When the hose is connected, water will flow through it onto the floor instead of into the bucket.


 Handle
Bucket
NOTES:
drain hose
nozzle
7KUHDG D JDUGHQ KRVH QRW VXSSOLHG RQWR WKH QR]]OH FXW to length, and lead it to the floor drain.
Ŷ 'R QRW UHPRYH WKH EXFNHW ZKLOH WKH GHKXPLGLILHU LV
RSHUDWLQJ RU LI LW KDV MXVW VWRSSHG RSHUDWLQJ 7KLV PLJKW cause some water to drip from the drain pan.
Ŷ 7KH EXFNHW PXVW EH LQ SODFH DQG VHFXUHO\ VHDWHG IRU WKH dehumidifier to operate.
5HSODFH WKH EXFNHW LQ WKH XQLW
NOTE: 7KH EXFNHW PXVW EH LQ SODFH DQG VHFXUHO\ VHDWHG for the dehumidifier to operate.
Water Level
7KH GHKXPLGLILHU ZLOO WXUQ RII DXWRPDWLFDOO\ ZKHQ WKH EXFNHW is full, or when the bucket is removed or not replaced in the proper position.
7KH EXFNHW PXVW EH UHSODFHG LQ WKH SURSHU SRVLWLRQ IRU
WKH GHKXPLGLILHU WR ZRUN 7KH OLJKW ZLOO EH RQ DQG WKH dehumidifier will not run if the bucket is not in the proper position.
Bucket Operation
'2 127 UHPRYH WKH IRDP SLHFH LQ WKH EXFNHW DVVHPEO\
If removed the Dehumidifier will not work properly.
When the coil is defrosted, the compressor or fan will automatically restart and dehumidifying will resume.
Foam
6 |
49-7759 |
Care and Cleaning
Turn off the dehumidifier and remove the plug from the wall outlet before cleaning.
Grille and Case
To clean the case: |
To clean the front grille: |
8VH ZDWHU DQG D PLOG GHWHUJHQW 'R QRW XVH |
8VH D YDFXXP DWWDFKPHQW RU EUXVK |
bleach or abrasives. |
|
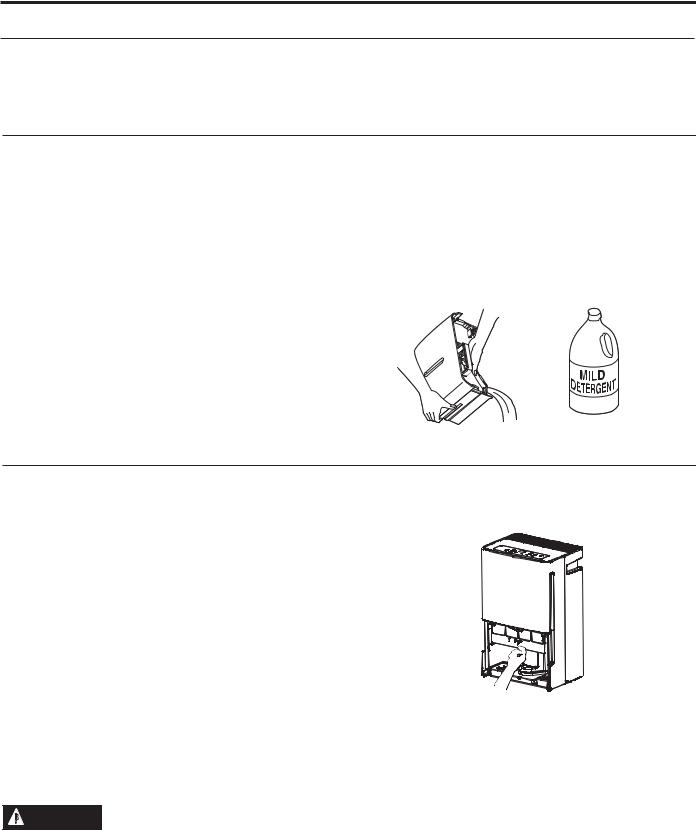
Water Bucket
To clean:
Every few weeks, clean the bucket to prevent growth of mold, mildew and bacteria. Partially fill the bucket with clean water and add a little mild detergent. Swish it around in the bucket, empty and rinse.
NOTE: Do not use a dishwasher to clean the water bucket.
To remove:
Remove the bucket and pour out any water.
To replace:
Slide the bucket into the dehumidifier.
NOTE: 7KH EXFNHW PXVW EH LQ SODFH DQG VHFXUHO\ VHDWHG for the dehumidifier to operate.
Air Filter
7KH DLU ILOWHU EHKLQG WKH IURQW JULOOH VKRXOG EH FKHFNHG DQG
FOHDQHG DW OHDVW HYHU\ KRXUV RI RSHUDWLRQ RU PRUH RIWHQ if necessary.
$IWHU KRXUV RI RSHUDWLRQ WKH &OHDQ WKH )LOWHU LQGLFDWRU light will glow to remind you to clean the filter. Remove the
ILOWHU DQG FOHDQ LW 5HSODFH WKH ILOWHU DQG SUHVV WKH )LOWHU 7LPHU SDG WR WXUQ RII WKH &OHDQ WKH )LOWHU OLJKW
To remove:
Remove the bucket. Grasp the filter edge, and pull it straight down and out.
To clean:
Clean the filter with warm, soapy water. Rinse and let the filter dry before replacing it.
NOTE: '2 127 ULQVH RU SXW WKH ILOWHU LQ DQ DXWRPDWLF dishwasher.
Air Filter 


NOTE: Avoid using a dishwasher to clean the filter.
 CAUTION '2 127 RSHUDWH WKH GHKXPLGLILHU without a filter because dirt and lint will clog it and reduce performance.
CLEANING AND CARE
49-7759 |
7 |

TROUBLESHOOTING TIPS
Troubleshooting Tips... Before you call for service
Save time and money! Review the charts on the following pages first and you may not need to call for service.
Problem |
Possible Cause |
What To Do |
|
Dehumidifier does not |
The dehumidifier is unplugged. |
Makes sure the dehumidifier’s plug is pushed |
|
start |
|
completely into the outlet. |
|
|
The fuse is blown/circuit breaker |
&KHFN WKH KRXVH IXVH FLUFXLW EUHDNHU ER[ DQG UHSODFH |
|
|
is tripped. |
the fuse or reset the breaker. |
|
|
Dehumidifier has reached its |
7KH GHKXPLGLILHU DXWRPDWLFDOO\ WXUQV RII ZKHQ HLWKHU |
|
|
preset level or bucket is full. |
condition occurs. Change to a lower setting or empty |
|
|
|
the bucket and replace properly. |
|
|
Bucket is not in the proper |
7KH EXFNHW PXVW EH LQ SODFH DQG VHFXUHO\ VHDWHG IRU |
|
|
position. |
the dehumidifier to operate. |
|
|
Power Failure. |
7KHUH LV D SURWHFWLYH WLPH GHOD\ XS WR PLQXWHV WR |
|
|
|
SUHYHQW WULSSLQJ RI WKH FRPSUHVVRU RYHUORDG )RU WKLV |
|
|
|
reason, the unit may not start normal heating or cooling |
|
|
|
for 3 minutes after it turned back on. |
|
Dehumidifier does not dry |
Did not allow enough time to |
:KHQ ILUVW LQVWDOOHG DOORZ DW OHDVW KRXUV WR PDLQWDLQ |
|
the air as it should |
remove the moisture. |
the desired dryness. |
|
|
Airflow is restricted. |
Make sure there are no curtains, blinds or furniture |
|
|
|
blocking the front of back of the dehumidifier. See the |
|
|
|
Choosing a Location section. |
|
|
Dirty Filter |
See the Care and Cleaning section. |
|
|
The Humidity Control may not be |
)RU GULHU DLU SUHVV WKH SDG DQG VHW WR D ORZHU |
|
|
set low enough. |
SHUFHQW YDOXH RU DW 16 1RQVWRS IRU PD[LPXP |
|
|
|
dehumidification. |
|
|
Doors and windows may not be |
Check that all doors, windows and other openings are |
|
|
closed tightly. |
securely closed. |
|
|
Clothes dryer may be blowing |
,QVWDOO WKH GHKXPLGLILHU DZD\ IURP WKH G\HU 7KH GU\HU |
|
|
moisure-laden air into the room. |
should be vented to the outside. |
|
|
Room temperature is too low. |
Moisture removal is best at higher room temperatures. |
|
|
|
Lower room temperatures will reduce the moisture |
|
|
|
removal rate. Models are designed to be operated at |
|
|
|
WHPSHUDWXUHV DERYH ) & |
|
Dehumidifier runs too |
Area to be dehumidified is too |
7KH FDSDFLW\ RI \RXU GHKXPLGLILHU PD\ QRW EH DGHTXDWH |
|
much |
large. |
|
|
|
Doors and windows are open. |
Close all doors and windows to the outside. |
|
Frost appears on the coils |
Dehumidifier has been turned on |
7KLV LV QRUPDO )URVW ZLOO XVXDOO\ GLVDSSHDU ZLWKLQ |
|
|
recently, or room temperature is |
minutes. See the Automatic Defrost section |
|
|
below 41 F (5 C) |
|
|
Control cannot be set |
The compressor will turn off and |
7KLV LV QRUPDO :DLW DSSUR[LPDWHO\ PLQXWHV DQG VHW |
|
|
the fan will automatically continue |
the fan as desired. |
|
|
to run for approximately 3 minutes |
|
|
|
at a fixed setting. |
|
|
Fan noise |
Air is moving through the |
7KLV LV QRUPDO |
|
|
dehumidifier. |
|
|
Water on floor |
Hose connection may be loose. |
Check the hose connection. See the Removing |
|
|
|
Collected Water section. |
|
|
Intended to use the bucket to |
Disconnect the hose if using a bucket to collect water. |
|
|
collect water, but a hose was |
See the Removing Collected Water section. |
|
|
attached. |
|
|
Bucket Full LED light |
Drain hose not tight on fitting. |
Check drain hose connection. |
|
flashing and alarm sounds |
|
|
|
Drain hose is kinked. |
Ensure the drain hose is pointed straight down to the |
||
while drain hose is |
|||
|
floor and is not kinked in anyway. |
||
connected. |
|
||
|
|
8 |
49-7759 |
 Loading...