


Model 29875
Digital Answering System
(with English or Spanish Voice Prompts)
User’s Guide

Equipment Approval Information
Your telephone equipment is approved for connection to the Public Switched Telephone Network and is in compliance with parts 15 and 68, FCC Rules and Regulations and the Technical Requirements for Telephone Terminal Equipment published by ACTA.
1Notification to the Local Telephone Company
On the bottom of this equipment is a label indicating, among other information, the US number and Ringer Equivalence Number (REN) for the equipment. You must, upon request, provide this information to your telephone company.
The REN is useful in determining the number of devices you may connect to your telephone line and still have all of these devices ring when your telephone number is called. In most (but not all) areas, the sum of the RENs of all devices connected to one line should not exceed 5. To be certain of the number of devices you may connect to your line as determined by the REN, you should contact your local telephone company.
A plug and jack used to connect this equipment to the premises wiring and telephone network must comply with the applicable FCC Part 68 rules and requirements adopted by the ACTA. A compliant telephone cord and modular plug is provided with this product. It is designed to be connected to a compatible modular jack that is also compliant. See installation instructions for details.
Notes
•This equipment may not be used on coin service provided by the telephone company.
•Party lines are subject to state tariffs, and therefore, you may not be able to use your own telephone equipment if you are on a party line. Check with your local telephone company.
•Notice must be given to the telephone company upon permanent disconnection of your telephone from your line.
•If your home has specially wired alarm equipment connected to the telephone line, ensure the installation of this product does not disable your alarm equipment. If you have questions about what will disable alarm equipment, consult your telephone company or a qualified installer.
US Number is located on the cabinet bottom
REN number is located on the cabinet bottom
2Rights of the Telephone Company
Should your equipment cause trouble on your line which may harm the telephone network, the telephone company shall, where practicable, notify you that temporary discontinuance of service may be required. Where prior notice is not practicable and the circumstances warrant such action, the telephone company may temporarily discontinue service immediately. In case of such temporary discontinuance, the telephone company must: (1) promptly notify you of such temporary
discontinuance; (2) afford you the opportunity to correct the situation; and (3) inform you of your right to bring a complaint to the Commission pursuant to procedures set forth in Subpart E of Part 68, FCC Rules and Regulations.

The telephone company may make changes in its communications facilities, equipment, operations or procedures where such action is required in the operation of its business and not inconsistent with FCC Rules and Regulations. If these changes are expected to affect the use or performance of your
telephone equipment, the telephone company must give you adequate notice, in writing, to allow you to maintain uninterrupted service.
Interference Information
This equipment has been tested and found to comply with the limits for a Class B digital device, pursuant to Part 15 of the FCC Rules. These limits are designed to provide reasonable protection against harmful interference in a residential installation.
This equipment generates, uses, and can radiate radio frequency energy and, if not installed and used in accordance with the instructions, may cause harmful interference to radio communications. However, there is no guarantee that interference will not occur in a particular installation.
Privacy of Communications may not be ensured when using this product.
If this equipment does cause harmful interference to radio or television reception, which can be determined by turning the equipment off and on, the user is encouraged to try to correct the interference by one or more of the following measures:
•Reorient or relocate the receiving antenna (that is, the antenna for radio or television that is “receiving” the interference).
•Reorient or relocate and increase the separation between the telecommunications equipment and receiving antenna.
•Connect the telecommunications equipment into an outlet on a circuit different from that to which the receiving antenna is connected.
If these measures do not eliminate the interference, please consult your dealer or an experienced radio/television technician for additional suggestions. Also, the Federal Communications Commission has prepared a helpful booklet, “How To Identify and Resolve Radio/TV Interference Problems.” This booklet is available from the U.S. Government Printing Office, Washington, D.C. 20402. Please specify stock number 004-000-00345-4 when ordering copies.
Notice: The changes or modifications not expressly approved by the party responsible for compliance could void the user's authority to operate the equipment.
Hearing Aid Compatibility
This telephone system meets FCC standards for Hearing Aid Compatibility.
Table of Contents
Equipment Approval Information.................. |
2 |
Setting The Incoming |
|
|
Interference Information............................. |
3 |
Message Time.............................................. |
12 |
|
Hearing Aid Compatibility (HAC).................. |
3 |
Setting the Security Code....................... |
12 |
|
Licensing...................................................... |
3 |
Reviewing the Settings............................... |
13 |
|
Introduction................................................ |
5 |
Adjusting the Volume.................................... |
13 |
|
Before You Begin......................................... |
5 |
Message Counter....................................... |
13 |
|
Parts Checklist |
5 |
Less Than 10 Messages................................ |
13 |
|
More Than 10 Messages |
14 |
|||
Modular Jack Requirements |
5 |
|||
Message Counter Display |
14 |
|||
Important Installation Information.............. |
6 |
|||
Layout.......................................................... |
7 |
Playing Messages....................................... |
14 |
|
Important Instructions for |
|
Erasing All Messages.................................... |
15 |
|
Moving the Answering System...................... |
8 |
Leaving a Memo.............................................. |
16 |
|
Answering System Set Up............................. |
8 |
Screening Calls (Auto |
16 |
|
Recording the Greeting |
8 |
Disconnect Feature)...................................... |
||
Remote Access |
16 |
|||
Information About the Greeting.................... |
9 |
|||
Changing the Settings |
9 |
To Access Your |
|
|
Answering System |
17 |
|||
Setting the Language |
9 |
|||
General Product Care |
18 |
|||
Setting the Time/Day................................ |
10 |
|||
Hour....................................................... |
10 |
Troubleshooting Tips................................. |
18 |
|
Minutes.................................................. |
10 |
Service....................................................... |
20 |
|
Day.......................................................... |
11 |
Limited Warranty....................................... |
21 |
|
Setting the Rings |
|
Remote Access Card................................... |
23 |
|
|
Index |
25 |
||
to Answer................................................... |
11 |
|||
Information About |
|
|
|
|
Toll Saver............................................. |
11 |
|
|
WARNING:TO PREVENT FIRE OR ELECTRICAL SHOCK HAZARD, DO NOT EXPOSETHIS PRODUCT TO RAIN OR MOISTURE.
|
|
|
|
|
|
|
CAUTION: |
|
|
|
|
RISKOFELECTRICSHOCK |
|
|
|
|
DONOTOPEN |
|
|
THE LIGHTNING |
CAUTION: TO REDUCE THE |
THE EXCLAMATION |
||
FLASH AND ARROW |
RISK OF ELECTRIC SHOCK, DO |
POINT WITHIN THE |
||
HEAD WITHIN THE |
NOT REMOVE COVER (OR |
TRIANGLE IS A |
||
TRIANGLE IS A |
BACK). NO USER |
WARNING SIGN |
||
WARNING SIGN |
SERVICEABLE PARTS INSIDE. |
ALERTING YOU OF |
||
ALERTING YOU OF |
REFER SERVICING TO |
IMPORTANT |
||
“DANGEROUS |
QUALIFIED SERVICE |
INSTRUCTIONS |
||
VOLTAGE” INSIDE |
PERSONNEL. |
ACCOMPANYING |
||
THE PRODUCT. |
|
|
|
THE PRODUCT. |
|
|
|
|
|
SEE MARKING ON BOTTOM / BACK OF PRODUCT
Introduction
Your Digital Answering System is designed to give you flexibility in use and high quality performance. To get the most from your new answering system, we suggest that you take a few minutes right now to read through this instruction manual.
CAUTION: When using telephone equipment, there are basic safety instructions that should always be followed. Refer to the
IMPORTANT SAFETY INSTRUCTIONS provided with this product and save them for future reference.
Before You Begin
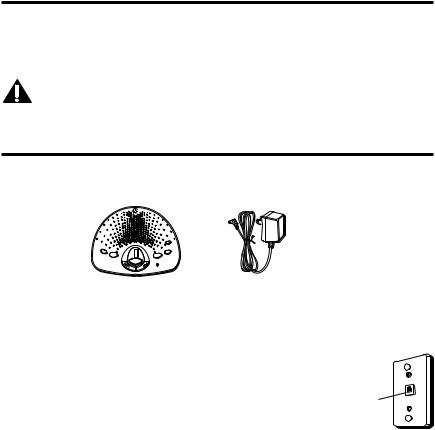
Parts Checklist
Make sure your package includes the following items:
STOP/SET PROGRAMMAR
GREETINGS ALUDO
MESSAGE
PLAY |
|
MEMO |
|
PREVIOUS |
NEXT |
PREVIO |
SIGUIENTE |
_
MIC
ON/OFF
ERASER
BORRA
+
VOLUME
Answering System |
AC power supply |
Modular Jack Requirements
You need an RJ11C type modular jack, which is the most common type of phone jack and might look like the one pictured here. If you don’t have a modular jack, call your local phone company to find out how to get one installed.
Wall plate
Telephone
line jack
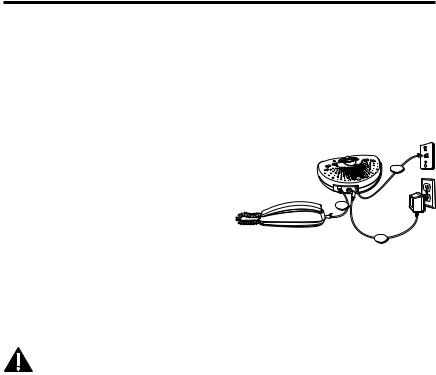
Important Installation Information
•Never install telephone wiring during a lightning storm.
•Never touch non-insulated telephone wires or terminals, unless the telephone line has been disconnected at the network interface.
•Use caution when installing or modifying telephone lines.
•Never install telephone jacks in wet locations unless the jack is specifically designed for wet locations.
1. Plug the telephone line cord into a modular wall jack.
2. Connect the telephone line cord from your |
|
telephone into the jack on the back of the |
1 |
answering system marked PHONE. (You
don’t have to connect your telephone in
2
order for the answering system to record
incoming messages.)
3
3.Connect the small end of the power supply
into the POWER 5V AC jack on the back of the answering system. Plug the other end into an AC power outlet. The unit performs the initialization, pauses a few seconds and then beeps when it is ready for setup or to answer calls with the default greeting and settings.
CAUTION: To reduce risk of personal injury, fire, or damage use only the 5-2767 (white), 5-2633 (black) or 5-2778 (black) power adaptor(s) listed in the user’s guide. This power adaptor is intended to be correctly orientated in a vertical or floor mount position.

Layout
PLAY/MEMO button
STOP/SET |
ST |
MMAR |
|
|
|
||
|
OP/SETRA |
|
|
|
PROG |
|
|
button |
|
|
GREETINGS |
|
|
ALUDO |
|
|
|
|
|
GREETING button
PREVIOUS button
MESSAGE
PLAY |
|
MEMO |
|
PRE |
NEXT |
VIOUS |
|
PREVIO |
TE |
SIGUIEN |
|
MESSAGE counter
|
|
ON/OFF/ |
|
|
ERASE |
|
F |
button |
/OF |
||
ON |
|
|
|
|
|
SE |
|
|
ERA |
R |
|
BORRA |
|
|
+ |
|
|
_ |
|
|
VOLUME |
|
VOLUME |
|
|
|
MIC |
|
buttons |
NEXT |
MIC |
|
|
button |
|

Important Instructions for Moving the Answering System
To move the answering system to a different location in the house, follow these instructions:
1.Disconnect the phone line or any phones you may have connected to the answering system.
2.Unplug the power supply from the electrical outlet.
3.Move the answering system and phone line to the desired location.
4.Plug the power supply into an electrical outlet.
5.The MESSAGE counter flashes if there is a new message.
6.Connect all necessary phone lines.
Answering System Set Up
Recording the Greeting
Before using your new answerer, you should record a greeting (the announcement
callers hear when your answering system answers a call). If you don’t record a greeting, callers hear a default greeting which says, “We are not available to take your call. Please leave a message. Thank you for calling.”
When recording the greeting you should be about 6 inches from the unit. Eliminate as much background noise as possible.
1.Prepare your greeting.
Sample Greeting: “Hi, this is (use your name here). I can’t answer the phone right now, so please leave your name, number, and a brief message after the tone, and I’ll get back to you. Thanks for calling.”
2.Hold down the GREETING button. The unit announces “Record your greeting after the tone,” and displays GREETING RECORD. After the tone, you have 30 seconds to record your greeting.
3.Release GREETING when you finish.
Information About the Greeting
1.To review the greeting, press and release GREETING. The unit plays back your greeting automatically.
2.To return to the answerer’s default greeting after you’ve recorded one, press GREETING and release it when you hear the tone, or press and hold DELETE when the greeting is playing.
NOTE: Your recording time should not be less than two seconds. Otherwise the unit will return to the default greeting.
Changing the Settings
This function allows you to change the Language, Time/Day, Rings to Answer, message time and Security Code settings.
Setting the Language
This setting allows you to set the answer in either English or in Spanish voice menu mode. Once the language is set, all voice menu, including the ones used in Remote access mode, will be switched to the selected language.
1.Press and hold the STOP/SET button for two seconds, then release to access the set-up menu.
2.The answering machine announces, “For English, press NEXT, press SET to continue (in English). Para espanol, oprima PREVIO, oprima PROGRAMAR para continuar (in Spanish)”.
3.Press NEXT, answerer enters English voice menu mode. If PREVIOUS is pressed, answerer enters Spanish voice menu mode. If SET is pressed, answerer remains in the current language mode. In any case, the answerer enters to the TIME/DAY menu.
NOTE: Language can only be set when the user is in physical access of the unit. When you are running in Remote Access mode, the language cannot be changed and will remain in the language you’ve previously set.

Setting the Time/Day
This setting allows you to set the current time and day for the Time/Day stamp attached to each message.
|
Range of Settings |
|
Default Settings |
|
Time |
|
|
||
|
|
Time |
12 a.m. Sunday |
|
Hour |
12 a.m. - 11 p.m. |
|
||
|
Rings to Answer |
4 |
||
Minute |
0 - 59 |
|
||
|
Message time |
2 |
||
Day |
Sunday - Monday |
|
||
|
Security Code |
123 |
||
Rings |
2,3,4,5 toll saver |
|
||
|
|
|
||
to Answer |
|
|
|
|
Message time 1,2,3,4, minutes |
|
|
|
|
Security |
0 - 9, 0 - 9, 0 - 9 |
|
|
|
Code |
|
|
|
|
Hour
1.When you have completed setting the Language, the unit will enter the TIME/DAY menu. The answering system announces, “Time (the current time and day setting) To set hour, press next...press set to continue.”
2.To change the hour, press and release the NEXT or PREVIOUS button and the answering system announces an hour, such as “12am, 1am, 2am,” or “12am, 11pm, 10pm.”
3.After choosing the hour, press and release the STOP/SET button to store the hour. The answering system enters the Minute menu.
Minutes
1.The answering system announces, “(the current minutes setting). To set minutes, press next...press set to continue.”
2.To change the minutes, press and release the NEXT or PREVIOUS button, and the answering system announces a minute such as “1, 2, 3” or “59, 58, 57.”
3.After choosing the minute, press and release the STOP/SET button to store the minute. The answering system enters the Day menu.
10
Day
1.The answering system announces, “(the current day setting) To set day, press next...
press set to continue.”
2.To change the day, press and release the NEXT or PREVIOUS button, and the answering system announces a day, such as “Sunday, Monday” or “Sunday, Saturday.”
3.After choosing a day, press and release the STOP/SET button to store the day. The answering system enters the Rings to Answer menu.
Setting the Rings to Answer
This setting allows you to select the number of rings before the answering system answers a call. This menu comes after you have finished setting the TIME/DAY.
1.The answering system announces, “Rings to Answer ( the current rings to answer setting ) To set rings to answer, press next...press set to continue.”
2.To change the rings to answer, press and release the NEXT or PREVIOUS button and the answering system announces a number such as “2,3,4,” or “2, toll saver, 5.”
3.After choosing a number, press and release the STOP/SET button to store the rings to answer. The answering system confirms the setting and enters Message Length menu.
Information About Toll Saver
Toll Saver can save you the cost of making a call when you access your messages from another phone:
•If you have new messages, the answering system answers after the 2nd ring.
•If you have no new messages, the answering system answers after the 5th ring.
You can hang up after the 3rd ring and save the pay telephone or long distance charge.
11
Setting The Incoming Message Time
This setting allows you to select the length of the incoming message.
This menu comes when you have finished setting the Rings to Answer.
1.The answering system announces “Message Time (current message length) minutes. To set message time, press next, press set to continue.”
2.To change the message length, press and release the NEXT or PREVIOUS button and the answering system announces a number, such as “1,2,3,4.”
3.After choosing a number, press and release the STOP/SET button to store the message time. The answering system enters Security Code Menu.
Setting the Security Code
This setting allows to change the factory default security code used to access your answering system from a remote location. This menu comes after you have finished setting the Incoming Message Time. The default code is 123.
1.The answering system announces, “Security code (the current 3 number Security Code setting). To set security code, press next...press set to stop.”
2.If you press and release the STOP/SET button, the answering system announces all the new settings and exit the set up menu.
3.If you press and release NEXT or PREVIOUS button, answering system announces “Security Code (current 3 number). To set security code, press next, press set to continue”.
4.To change the first security code number, press and release the NEXT or PREVIOUS button again. The answering system announces all three numbers, but only the first number will change, such as “123, 223,” or “123, 023”.
5.After choosing the first number, press and release the STOP/SET button to store the first number.
12

6. The answering system automatically advances to the second number and announces “Security Code (current 3 number). To set security code, press NEXT then press SET to continue.” To change the second and third numbers, repeat steps 4 and 5. After the third number is stored, the answering system announces all the stored settings and exits the setup menu.
Reviewing the Settings
This function allows you to review the current time, rings to answer, message time and security code.
•Press and release the STOP/SET button to start the review. The answering system announces the current settings.
Adjusting the Volume
Use the VOLUME + and - buttons to increase or decrease the volume. The answering system beeps when it is not announcing a setting or playing a message.
Message Counter
The message counter displays the number of messages you have received.
If the answering system is off, the message counter displays a dash (-). If the answering system is on, the message counter displays the number of messages.
Less Than 10 Messages
When you have new messages, the message counter continuously flashes the number of new (from 1 to 9), unheard messages in the display.
When you have no new messages, the message counter displays the number of old messages (from 0 to 9).
When you have both new and old messages, the message counter continuously flashes the total number of messages (from 1 to 9) in the display.
13

More Than 10 Messages
When you have both old and new messages, the message counter continuously flashes the total number of messages followed by a dash, such as 2, 8, -.
Message Counter Display
In addition to message information, the message counter also displays information about the digital answering system’s status.
•When memory is full, an “F “ flashes in the message counter display.
•When you’re recording a greeting, “o” shows in the message counter display.
•When the answering system is answering a call, “A” shows in the message counter display.
•When the answering system  s playing messages, “ “ shows in the message counter display.
•Whenyou’rerecordingamemo,“L” shows in the message counter display.
•When the remote functions are accessed, “A “ shows in the message counter display.
•When you’re erasing all the messages, “E “ shows in the message counter display.
Playing Messages
When the message counter flashes you have new messages. Messages play back in first received-first played order. If there are new messages, the answering system plays new messages first, followed by old messages. If using remote access, the answering system plays all messages, new and old, in first-received-first played order.
NOTE: When the answering system is off, it answers calls after 10 rings but doesn’t play the greeting. The answering system doesn’t take messages when it is turned off.
• To playback messages, press and release the PLAY/MEMO button.
14
•To stop playback, press and release the STOP/SET button.
•To restart playback of a current message, press and hold the PREVIOUS button until the message restarts from the beginning.
•To go back to the beginning of a previous message, press and release the PREVIOUS button within one second.
•To fast forward through a message, press and hold the NEXT button.
•To skip to the beginning of the next message, press and release the NEXT button.
•To erase a message while it is playing, press the ON/OFF ERASE button. The answering system announces, “Message Erased” to confirm the message has been erased.
NOTE:
•An ‘old’ message is a message that has been listened to completely (including the time and day) and not erased.
•A ‘new’ message is a message that has not been listened to completely.
•At the end of each message the answering system announces the time and day the message was received.
•At the end of messages playback the answering system announces “end of messages.”
Erasing All Messages
When the answering system isn’t playing or recording messages, press and hold the ERASE button until you hear the “Messages Erased” announcement. Release the button after the announcement. This feature allows you to erase all old messages but not new messages. If you do not have any messages, the answering system announces, “Zero Messages.”
NOTE: To erase new messages, play them, then press ERASE during playback.
15

Leaving a Memo
Press and hold the PLAY/MEMO button. Record your message after the announcement and the beep are heard. Release the PLAY/MEMO button when you’re finished talking. The answering system treats the memo as a message, and the MESSAGE counter flashes.
Screening Calls (Auto Disconnect Feature)
When a call comes in the answering system rings the number of set times, plays the greeting, and records the incoming call.
You may screen incoming calls by listening as the caller leaves a message. If you want to talk to that caller, pick up any extension phone.
Auto Disconnect tells the answering system to stop playing the greeting or recording a message when an extension phone is picked up. Sometimes you may pick up the phone and the machine keeps playing the greeting. This is normal. If you want to pick up the phone while the greeting is playing, wait about two seconds after the system answers before picking up the phone.
If the greeting continues to play after picking up an extension phone, press and release the STOP/SET button.
Remote Access
You can access your answering system from any touch-tone phone by entering your 3-digit security code (the default security code is 123, but you can change it.) Be aware that remote functions do not work with rotary or push-button, pulse-dialing phones.
You can cut out the wallet-size remote card located at the end of this instruction book so you will have the touch-tone commands when you’re picking up messages from another location.
16
 Loading...