GBC C250Pro User Manual [en, ru, de, es, fr, it, cs, pl]
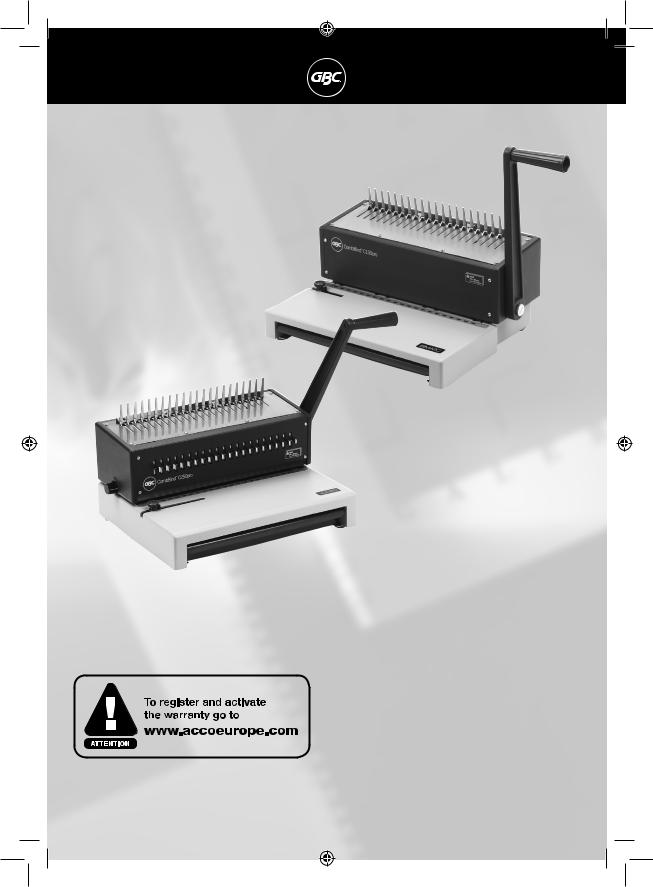
CombBind
C150Pro &
C250Pro
G Instruction Manual F Manuel d’utilisation D Bedienungsanleitung I Manuale d’istruzioni O Gebruiksaanwijzing
E Manual de instrucciones
P Manual de Instruções
T Kullanım Kılavuzu K Οδηγίες
c Brugsvejledning oFI Käyttöopas
oNO Bruksanvisning
S Bruksanvisning
Q Instrukcja obsługi oCZ Návod k obsluze H Használati útmutató
oRUS Руководствo по
зкcплyатации

|
|
|
|
|
|
|
|
|
|
|
|
|
|
|
|
|
|
|
|
|
|
|
|
|
|
|
|
|
|
|
|
|
|
|
|
|
|
|
|
|
|
|
|
|
|
|
|
|
|
|
|
|
|
|
|
|
|
|
|
|
|
|
|
|
|
|
|
English |
4 |
|
|
|
|
|
|
|
|
||
|
|
|
|
|
|
|
|
|
|
|
|
|
|
|
|
||||
|
|
|
|
|
|
|
|
|
|
|
|
|
|
|
|
||||
|
|
|
|
|
|
|
|
|
|
|
|
|
|
|
|
||||
|
|
|
|
|
|
|
|
Français |
5 |
|
|
|
|
|
|
|
|
||
|
|
|
|
|
|
|
|
Deutsch |
6 |
|
|
|
|
|
|
|
|
||
|
|
|
|
|
|
|
|
Italiano |
7 |
|
|
|
|
|
|
|
|
||
|
|
|
|
|
|
|
|
Nederlands |
8 |
|
|
|
|
|
|
|
|
||
|
|
|
|
|
|
|
|
Español |
9 |
|
|
|
|
|
|
|
|
||
|
|
|
|
|
|
|
|
Português |
10 |
|
|
|
|
|
|
|
|
||
|
|
|
|
|
|
|
|
Türkçe |
11 |
|
|
|
|
|
|
|
|
||
|
|
|
|
|
|
|
|
Ελληνικά |
12 |
|
|
|
|
|
|
|
|
||
|
|
|
|
|
|
|
|
Dansk |
13 |
|
|
|
|
|
|
|
|
||
|
|
|
|
|
|
|
|
Suomi |
14 |
|
|
|
|
|
|
|
|
||
|
|
|
|
|
|
|
|
Norsk |
15 |
|
|
|
|
|
|
|
|
||
|
|
|
|
|
|
|
|
Svenska |
16 |
|
|
|
|
|
|
|
|
||
|
|
|
|
|
|
|
|
Polski |
17 |
|
|
|
|
|
|
|
|
||
|
|
|
|
|
|
|
|
Česky |
18 |
|
|
|
|
|
|
|
|
||
|
|
|
|
|
|
|
|
Magyar |
19 |
|
|
|
|
|
|
|
|
||
|
|
|
|
|
|
|
|
Pyccкий |
20 |
|
|
|
|
|
|
|
|
||
|
|
|
|
|
|
|
|
|
|
|
|
|
|
|
|
|
|
|
|
|
|
|
|
|
|
|
|
|
|
|
|
|
|
|
|
|
|
|
|
|
|
|
|
|
|
|
|
|
|
|
|
|
|
|
|
|
|
|
|
|
|
|
|
|
|
|
|
|
|
|
|
|
|
|
|
|
|
|
|
|
|
|
|
|
|
|
|
|
|
|
|
|
|
|
|
|
|
|
|
8 2 1
3
4
5

 7
7
6
1 |
2 |
3 |
4 |
5 |
6 |
7 |
8 |
4

|
|
|
|
|
|
|
|
|
|
|
|
|
|
|
|
|
|
|
|
|
|
|
|
|
|
|
|
|
|
|
|
|
G |
|
|
|
|
|
|
|
|
|
|
|
|
|
|
|
|
|
|
|
|
|
|
|
|
|
|
|
|
|
|
|
|
|
|
|
|
|
|
|
|
|
|
|
|
|
|
|
|
|
|
|
|
|
|
|
|
|
|
|
|
|
|
|
|
|
|
|
|
|
|
|
|
Specifications |
|
|
|
|
|
|
Location of controls |
|
|
|
|
|
|
|
|
|
|
|
|
|
GBC CombBind C250Pro |
GBC CombBind C150Pro |
|
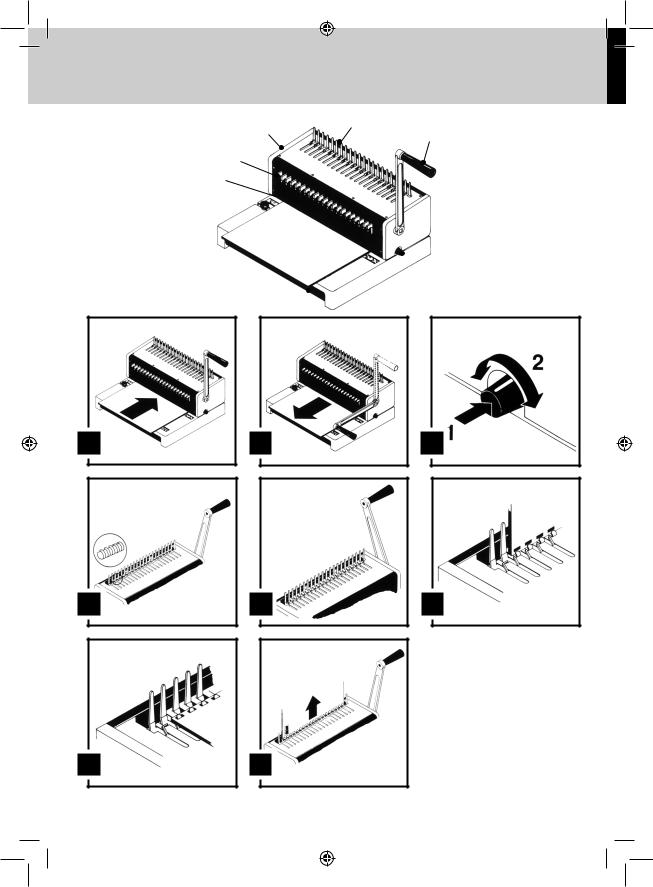
1 Punching Handle/Comb Opening Handle |
|
|
|
|
|
|
|||
|
|
|
|
|
|
Operation Mode |
Manual |
Manual |
|
2 Comb Opening Teeth |
|
|
|
|
|
|
|||
|
|
|
|
|
|
Max. Punch Capacity per lift |
20 |
20 |
|
|
|
|
|
|
|
|
|
|
|
|
|
|
|
|
|
|
|
|
|
3 De-selectable punching pins |
|
|
|
|
|
|
|||
|
|
|
|
|
|
(80 gsm) |
|
|
|
|
|
|
|
|
|
|
|
|
|
|
|
|
|
|
|
Max Punch Capacity per lift Foils/ |
2 x Foils/PVC Covers (0.2mm) |
2 x Foils/PVC Covers (0.2mm) |
|
(C250Pro Only) |
|
|
|
|
|
|
|||
|
|
|
|
|
|
PVC Covers |
|
|
|
|
|
|
4 Punching Slot |
|
|
|
|
|
|
|
|
|
|
|
|
Max. Approx. Binding Capacity |
450 |
450 |
|
|
|
|
|
|
|
|
|
|
|
|
|
|
|
|
|
|
|
|
|
5 Paper Edge Guide |
|
|
|
|
|
|
|||
|
|
|
|
|
|
(80 gsm) |
|
|
|
|
|
|
|
|
|
|
|
|
|
|
|
|
|
|
|
Paper Formats |
A4, A5, US Letter, |
A4, A5, US Letter, |
|
6 Clippings Drawer |
|
|
|
|
|
|
|||
|
|
|
|
|
|
Max Binding Element Cap |
51mm |
51mm |
|
|
|
|
|
|
|
||||
|
|
|
|
|
|
|
7 Margin Adjuster (C250Pro Only) |
|
|
|
|
|
|
||||||
|
|
|
|
|
|
De-Selector Pins |
Full 21 disengageable |
Fixed 21 Ring |
|
|
|
|
|
|
|
||||
|
|
|
|
|
|
|
8 Comb Opening Lock (C250 Pro Only) |
|
|
|
|
|
|
||||||
|
|
|
|
|
|
Margin Depth Selector |
3 |
Fixed |
|
|
|
|
|
|
|
||||
|
|
|
|
|
|
Machine Dimensions mm |
380 x 300 x 240 |
385 x 300 x 210 |
|
|
|
|
|
|
|
|
|||
|
|
|
|
|
|
(HxWxD mm) |
|
|
|
|
|
|
|
|
|
|
|
|
|
|
|
|
|
|
|
Weight |
10.4kg |
8.7kg |
|
|
|
|
|
|
|
|
|||
|
|
|
|
|
|
Punching capacity, plastic foils |
Max 2 foils of 0,2 mm each |
Max 2 foils of 0,2 mm each |
|
|
|
|
|
|
|
|
|||
Setting up
1Attach the handle to the machine on the right side and thread the screw into the hole at the end of the square shaft to complete the installation.
Punching
1With the handle in the upright position, insert sheets into machine, making sure they are flush into the machine. (Use the side guide to adjust the position of the document before punching (fig. 1).
2Pull the handle down to punch. Return the handle to original upright position. Remove paper (fig. 2).
Note: The black knob on the right side of the machine is used to select the margin depth. This feature is ideal for thicker documents that require wider margins for easy page turning and more secure binding. (C250 Pro Only) (fig. 3).
Custom Binding
CombBind C250Pro has 21 de-selectable punching pins which make it possible to punch virtually any length of document. Simply select or deselect the pins to adjust the punching pattern as required.
Binding
1 Place binding element, open side up, behind metal fingers (fig. 4). 2 Push handle to the rear to open rings (fig. 5).
3 Insert paper vertically, front cover facing you (fig. 6). 4 Lay down paper horizontally (fig. 7).
5 Return handle to upright position to close rings.
6Lift vertically to remove bound document (fig. 8).
Note: The black knob on the left hand side of the machine can be set to lock in comb opening settings. The handle stops automatically at the same position each time for quicker operation during long binding runs. Simply turn the knob clockwise to open, pull handle
to desired opening, then turn the knob counter-clockwise to lock. (C250 Pro only)
Maintenance
Always remember to regularly empty the drawer of clippings.
Guarantee
Operation of this machine is guaranteed for two years from date of purchase, subject to normal use. Within the guarantee period, Acco Brands Europe will at its own discretion either repair or replace the defective machine free of charge. Defects due to misuse or use for inappropriate purposes are not covered under the guarantee. Proof of date of purchase will be required. Repairs or alterations made by
Register this product online at www.accoeurope.com
4
persons not authorised by Acco Brands Europe will invalidate the guarantee. It is our aim to ensure that our products perform to the specifications stated. This guarantee does not affect the legal rights which consumers have under applicable national legislation governing the sale of goods.
F
Spécifications
|
GBC CombBind C250Pro |
GBC CombBind C150Pro |
|
||
Mode d’opération |
Manuel |
Manuel |
Capacité de perforation maxi pour |
20 feuilles |
20 feuilles |
feuilles de 80 g/m² |
|
|
Capacité de perforation maxi pour |
2 couvertures PVC |
2 couvertures PVC |
couvertures en PVC |
(0,2 mm chacune) |
(0,2 mm chacune) |
Capacité de reliure approx. |
450 feuilles |
450 feuilles |
(80 g/m²) |
|
|
Formats papier |
A4, A5, US Letter |
A4, A5, US Letter |
Diamètre de peigne maxi |
51 mm |
51 mm |
Poinçons débrayables |
Tous débrayables (21) |
Tous fixes (21) |
Sélecteur de profondeur de marge |
3 |
Fixe |
Dimensions (H x L x P) mm |
380 x 300 x 240 |
385 x 300 x 210 |
Poids |
10,4 kg |
8,7 kg |
Capacité de perforation pour |
2 couvertures de 0,2 mm |
2 couvertures de 0,2 mm |
couvertures plastique |
chacune maxi |
chacune maxi |
Emplacement des pièces
1Poignée de perforation/ Poignée d’ouverture de peigne
2 Dents d’ouverture de peigne
3Poinçons débrayables (uniquement pour la C250Pro)
4 Fente de perforation
5 Butée papier
6 Tiroir à confettis
7Bouton de réglage de marge (uniquement pour la C250Pro)
8Bouton de fixation d’ouverture de peigne (uniquement pour la C250 Pro)
Installation
1Fixez la poignée à la machine sur la droite et enfilez la vis dans le trou situé au bout du manche rectangulaire.
Perforation
1La poignée étant en position verticale, chargez les feuilles dans la fente de perforation en veillant à bien les aligner. (Avant la perforation, réglez la position du document à l’aide de la butée papier) (fig. 1).
2Abaissez la poignée pour perforer. Remettez la poignée à sa position verticale initiale Retirez les feuilles (fig. 2).
Remarque : Le bouton noir situé sur la droite de la machine sert à sélectionner la profondeur de marge. Cette fonction est idéale pour perforer les documents épais nécessitant des marges plus larges, pour tourner les pages avec aise et pour sécuriser la reliure (uniquement pour la C250 Pro) (fig. 3).
Reliure personnalisée
La CombBind C250Pro est dotée de 21 poinçons débrayables, ce qui lui permet de perforer des documents de presque n’importe quelle longueur. Il vous suffit de sélectionner et désélectionner les poinçons pour adapter la perforation à vos besoins.
Garantie
Le fonctionnement de cet appareil est garanti pendant deux ans à partir de la date d’achat, sous réserve d’un usage normal. Pendant la période de garantie, Acco Brands Europe décidera, à son gré, de réparer ou
de remplacer gratuitement l’appareil défectueux. Les défauts dus à un usage abusif ou un usage à des fins non appropriées ne sont pas
couverts par cette garantie. Une preuve de la date d’achat sera exigée.
Enregistrez ce produit en ligne à : www.accoeurope.com
Reliure
1Placez le peigne plastique derrière les doigts métalliques en faisant en sorte que les boucles s’ouvrent vers le haut (fig. 4).
2 Poussez la poignée vers l’arrière pour ouvrir les boucles (fig. 5).
3Chargez les feuilles verticalement, la première de couverture vous faisant face (fig. 6).
4 Mettez le document à l’horizontale (fig. 7).
5Relevez la poignée dans sa position verticale pour fermer les boucles.
6Soulevez le document relié pour le retirer de la machine (fig. 8).
Remarque : Le bouton noir situé sur la gauche de la machine peut être réglé de façon à fixer la largeur d’ouverture de peigne en fonction de vos exigences. La poignée d’ouverture de peigne s’arrêtera alors automatiquement à la même position à chaque fois, d’où une accélération de la procédure de reliure de plusieurs documents identiques. Il vous suffit de tourner le bouton dans le sens des aiguilles d’une montre, de pousser sur la poignée jusqu’à l’obtention de la largeur d’ouverture de peigne voulue, puis de tourner le bouton dans le sens inverse des aiguilles d’une montre pour fixer le réglage (uniquement pour la C250 Pro)
Maintenance
N’oubliez jamais de vider le tiroir à confettis à intervalles réguliers.
Les réparations ou modifications effectuées par des personnes non autorisées par Acco Brands Europe annuleront la garantie. Notre objectif est d’assurer le bon fonctionnement de nos produits conformément aux spécifications précisées. Cette garantie ne compromet pas les droits légaux des consommateurs au titre de la législation nationale en vigueur régissant la vente des biens de consommation.
5
D
Technische Daten |
|
|
Anordnung der |
|
|
|
|
|
Komponenten |
|
GBC CombBind C250Pro |
GBC CombBind C150Pro |
|
|
Betrieb |
Manuell |
Manuell |
|
1 Stanzhebel/Bindrückenöffnungshebel |
Stanzkapazität |
20 Blatt |
20 Blatt |
|
|
|
2 Binderückenöffner |
|||
(80 g/m²) |
|
|
|
|
Stanzkapazität |
2 Einbanddeckel (je 0,2 mm) |
2 Einbanddeckel (je 0,2 mm) |
|
3 Versenkbare Stanzstifte |
(PVC-Einbanddeckel) |
|
|
|
(nur Modell C250Pro) |
Bindekapazität |
450 Blatt |
450 Blatt |
|
|
|
4 Stanzöffnung |
|||
(ca., bei 80 g/m²) |
|
|
|
|
Papierformate |
A4, A5, US-Letter |
A4, A5, US-Letter |
|
5 Papierführung |
Max. Ringdurchmesser |
51 mm |
51 mm |
|
|
|
6 Stanzabfallbehälter |
|||
Versenkbare Stanzstifte |
Alle 21 |
- |
|
|
|
7 Stanztiefenwähler |
|||
Stanztiefenwähler |
3 |
- |
|
|
Abmessungen (HxBxT in mm) |
380x300x240 |
385x300x210 |
|
(nur Modell C250Pro) |
Gewicht |
10,4 kg |
8,7 kg |
|
8 Öffnungsweitenarretierung |
Stanzkapazität, |
Max. 2 Einbanddeckel |
Max. 2 Einbanddeckel |
|
(nur Modell C250Pro) |
PVC-Einbanddeckel |
(je 0,2 mm) |
(je 0,2 mm) |
|
|
Einrichtung
1Hebel an der rechten Geräteseite anbringen, Schraube durch die Bohrung an der rechteckigen Hebelstange stecken und im Gerät festdrehen.
Stanzen
1Stanzhebel nach oben stellen und Dokument sauber gestapelt in die Stanzöffnung einführen. Das Dokument an der Papierführung ausrichten (fig. 1).
2Den Stanzhebel nach unten ziehen. Stanzhebel wieder in die Ausgangsstellung zurückbringen. Dokument entnehmen (fig. 2).
Hinweis: Die erforderliche Stanztiefe kann über den schwarzen Knopf an der rechten Geräteseite eingestellt werden (nur Modell C250Pro). Das ist bei dickeren Dokumenten zu empfehlen, bei denen eine größere Stanztiefe erforderlich ist, damit die Seiten anschließend einfacher gewendet werden können (fig. 3).
Binden
1Binderücken mit der offenen Seite nach oben hinter die Metallfinger legen (fig. 4).
2 Hebel nach hinten drücken, um den Binderücken zu öffnen (fig. 5).
3Dokument vertikal einführen, wobei das vordere Deckblatt zur Gerätevorderseite zeigt (fig. 6).
4 Dokument dann in die horizontale Position bringen (fig. 7). 5 Hebel nach oben drücken, um den Binderücken zu schließen.
6Dokument entnehmen (fig. 8).
Hinweis: Die erforderliche Öffnungsweite kann nach Bedarf über den schwarzen Knopf an der linken Geräteseite eingestellt werden (nur Modell C250Pro). Der Binderücken wird dann nicht weiter als bis zur eingestellten Position geöffnet. Diese Arretierung ist hilfreich, wenn mehrere gleichartige Dokumente gebunden werden sollen. Zur Arretierung der Öffnungsweite den Knopf nach rechts drehen, den Hebel in die gewünschte Position bringen und diese Öffnungsweite dann durch Drehen des Knopfes nach links arretieren.
Auswahl der Stanzstiftstellung
Bei dem Modell CombBind C250Pro sind alle 21 Stanzstifte versenkbar. Damit lassen sich Dokumente quasi beliebiger Länge stanzen. Die Stellung der Stifte nach Bedarf einstellen.
Garantie
Der Betrieb des Geräts ist bei zweckmäßiger Verwendung für 2 Jahre ab Kaufdatum gewährleistet. Innerhalb des Garantiezeitraums wird Acco Brands Europe nach eigenem Ermessen das Gerät bei einem Defekt entweder kostenlos instandsetzen oder ersetzen. Die Garantie deckt keine Mängel ab, die aufgrund missbräuchlicher Verwendung oder Verwendung für unangemessene Zwecke entstanden sind. Ein Nachweis des Kaufdatums muss vorgelegt werden. Instandsetzungen
Registrieren Sie dieses Produkt online bei www.accoeurope.com
Gerätepflege
Stanzabfallbehälter regelmäßig leeren.
oder Änderungen, die von nicht durch Acco Brands Europe autorisierten Personen vorgenommen werden, setzen die Garantie außer Kraft. Es ist unser Ziel, sicherzustellen, dass die Leistung unserer Produkte den angegebenen technischen Daten entspricht. Diese Garantie stellt keine Einschränkung der nach dem geltenden Kaufvertragsrecht gültigen Rechte des Verbrauchers dar.
6
I
Caratteristiche tecniche
|
GBC CombBind C250Pro |
GBC CombBind C150Pro |
|
||
Modalità operativa |
Manuale |
Manuale |
Capacità perforazione per singola |
20 fogli |
20 fogli |
operazione – carta 80 gm2 |
|
|
Capacità perforazione per singola |
2 copertine PVC |
2 copertine PVC (0,2 mm |
operazione - Copertine PVC |
(0,2 mm ognuna) |
ognuna) |
Capacità rilegatura approssimativa |
450 fogli |
450 fogli |
(80 gm2) |
|
|
Formato documento |
A4, A5, US Letter |
A4, A5, US Letter |
Diametro max. dorso |
51 mm |
51 mm |
Punzoni di perforazione |
Tutti i 21 punzoni retraibili |
21 fissi |
deselezionabili |
|
|
Distanza dal margine regolabile |
3 |
Distanza dal margine fissa |
Dimensioni (AxLxP) mm |
380 x 300 x 240 |
385 x 300 x 210 |
Peso |
10,4kg |
8,7kg |
Capacità perforazione, copertine |
Max. 2 copertine da 0,2 mm |
Max. 2 copertine da 0,2 mm |
in plastica |
ognuna |
ognuna |
Parti
1Maniglia di perforazione/Maniglia di apertura anelli plastici
2 Meccanismo di apertura degli anelli
3Punzoni di perforazione deselezionabili (solo C250Pro)
4 Vano di perforazione
5 Guida di allineamento della carta
6 Cassetto ritagli
7Manopola di regolazione distanza margine (solo C250Pro)
8 Blocco apertura anelli (solo C250 Pro)
Installazione
1Attaccare la maniglia alla macchina sul lato destro ed inserire la vite nel foro all’estremità dell’albero a sezione quadra.
Perforazione
1Con la maniglia in posizione verticale, inserire i fogli nel vano di perforazione controllando che siano ben allineati. (Usare la guida di allineamento dei fogli per regolare la posizione del documento prima di effettuarne la perforazione) (fig. 1).
2Premere la maniglia verso il basso per perforare i fogli. Riportare la maniglia nella posizione originale verticale. Togliere il documento (fig. 2).
Nota - La manopola nera posta sul lato destro della macchina serve a selezionare la distanza dal margine. Questa funzione è ideale per la rilegatura di documenti più spessi che richiedono margini più larghi, per voltare le pagine con maggiore facilità e per ottenere una rilegatura più sicura (solo C250 Pro) (fig. 3).
Perforazione personalizzata
CombBind C250Pro ha 21 punzoni di perforazione deselezionabili per consentire la perforazione di fogli praticamente di qualsiasi lunghezza. Selezionare o deselezionare semplicemente i punzoni per regolare la perforazione a seconda delle esigenze.
Rilegatura
1Inserire gli anelli plastici dietro il meccanismo in metallo con il lato aperto rivolto verso l’alto (fig. 4).
2Spingere la maniglia all’indietro per aprire gli anelli di plastica (fig. 5).
3 Inserire i fogli verticalmente con la copertina rivolta in avanti (fig. 6). 4 Mettere quindi il documento in posizione orizzontale (fig. 7).
5 Riportare la maniglia in posizione verticale per chiudere gli anelli.
6Togliere il documento rilegato sollevandolo dalla macchina (fig. 8).
Nota - La manopola nera posta sulla sinistra della macchina può essere impostata in modo da bloccare la misura di apertura degli anelli a seconda delle esigenze. La maniglia di apertura degli anelli si arresta automaticamente nella stessa posizione ogni volta per consentire un’operazione più veloce quando si rilega una serie di documenti identici. Girare semplicemente la manopola in senso orario, premere la maniglia fino alla distanza di apertura richiesta e girare la manopola in senso antiorario per bloccare (solo C250 Pro).
Manutenzione
Non dimenticare di svuotare periodicamente il cassetto ritagli.
Garanzia
Questa macchina è garantita per due anni dalla data di acquisto, per quanto ne concerne il funzionamento, subordinatamente ad uso
normale. Durante il periodo di garanzia, Acco Brands Europe provvederà, a propria discrezione, a riparare o sostituire gratuitamente la macchina difettosa. Difetti risultanti dall’uso improprio o dall’uso per scopi diversi da quelli per cui la macchina è stata concepita non sono coperti dalla garanzia. Sarà necessario fornire una prova della data di acquisto.
Registrare il prodotto online al sito: www.accoeurope.com
Riparazioni o modifiche effettuate da persone non autorizzate da Acco Brands Europe invalideranno la garanzia. Acco Brands Europe si
propone di assicurare che i propri prodotti funzionino in conformità alle caratteristiche tecniche indicate. La presente garanzia non pregiudica alcun diritto riconosciuto ai consumatori dalla normativa nazionale vigente in materia di vendita di beni.
7
 Loading...