


CombBind C20
G Instruction Manual F Manuel d’utilisation D Bedienungsanleitung I Manuale d’istruzioni O Gebruiksaanwijzing
E Manual de instrucciones
P Manual de Instruções
T Kullanım Kılavuzu K Οδηγίες
c Brugsvejledning oFI Käyttöopas
oNO Bruksanvisning
S Bruksanvisning
Q Instrukcja obsługi oCZ Návod k obsluze H Használati útmutató
oRUS Руководствo по
зкcплyатации
|
|
|
|
|
English |
4 |
|
|
Français |
6 |
|
|
Deutsch |
8 |
|
|
Italiano |
10 |
|
|
Nederlands |
12 |
|
|
Español |
14 |
|
|
Português |
16 |
|
|
Türkçe |
18 |
|
|
Ελληνικά |
20 |
|
|
Dansk |
22 |
|
|
Suomi |
24 |
|
|
Norsk |
26 |
|
|
Svenska |
28 |
|
|
Polski |
30 |
|
|
Česky |
32 |
|
|
Magyar |
34 |
|
|
Pyccкий |
36 |
|

1 |
2 |
3 |
4 |
5 |
6 |
7 |
8 |
9 |

Specifications
|
GBC CombBind C20 |
|
|
|
|
Max. width of paper |
Letter, DIN A4 – 297mm |
|
|
Punching capacity paper |
Max. 20 sheets (80gsm) |
|
|
Punching capacity, plastic covers |
Max 2 sheet, 0.2mm each |
|
|
Net weight |
9.8 kg |
|
|
Dimensions (W x D x H) |
465x405x150mm |
Subject to technical changes without prior notice.
Special notice
Thank you for choosing a GBC Binding Machine. We aim to produce quality binding machines at an affordable price, with many advanced features to enable you to create excellent results every time. Before using your machine for the first time, please take a few minutes to read through this guide.
Maintenance
Please ensure that the clippings tray is emptied on a regular basis. This will prevent blockage and ensure that the unit is always ready to punch. The clippings tray can be accessed from the side of the machine.
In order to prevent overloading never try and punch more than the maximum numbers of sheets recommended (20 sheets of 80gsm). The unit is maintenance free if handled correctly.
Safety instructions |
m |
YOUR SAFETY AS WELL AS THE SAFETY OF OTHERS IS IMPORTANT TO ACCO BRANDS EUROPE. IN THIS INSTRUCTION MANUAL AND ON THE PRODUCT ARE IMPORTANT SAFETY MESSAGES. READ THESE MESSAGES CAREFULLY.
Helpful hints
For maximum productivity follow stages 6 to 9 starting with your front cover, then your paper sheets (20 at a time) and finishing with the back cover.
For best results always use GBC brand covers with GBC colourcoordinated binding combs.
The binding comb can be opened and closed again at any time to replace or add individual sheets (see step 2).
Service
Contact an authorised GBC service representative for any required repairs.
4

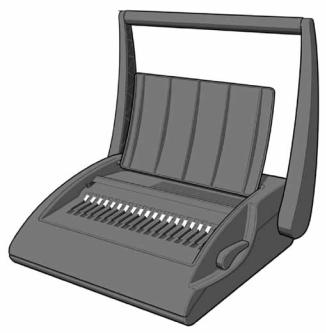
How to bind
1Measure document using colour coded guide (fig.1)
Open the lid of the machine and rest your document (including any cover sheets you have chosen) against the lid on the ‘staging’ area provided. Gently push the document back against the lid and check the document size using the colour coded guide on the staging area. You can leave your document on the staging area in readiness to punch.
2Select comb which fits your document (fig.2)
Use the comb size guide to select the size of comb that fits your document i.e. 25 sheet document = 6mm comb.
3Load comb onto machine (fig.3)
Insert the binding comb next to the white positional arrow on the machine, behind the metal comb support fingers, with the open side of the comb pointing upwards.
Note: If using GBC ProCombs™ the white arrow on your comb should align to the white arrow on the machine.
4Open comb by turning lever towards you (fig.4)
The coloured arrows adjacent to the opening comb act as a guide as to how far to open in order to allow punched sheets to be easily inserted.
Note: If using GBC ProCombs™ the coloured line on your comb should align to the coloured arrows on the machine for faster binding.
5Select document size (fig.5)
Adjust the edge guide button to select the paper / cover size you wish to bind; A4 (297mm x 210mm) or Letter (215mm x 279mm) When using oversized covers, select the oversize position, punch the covers for your document and set aside. Then select either A4 or Letter and proceed.
G
6Load pages into slot (fig.6)
You can punch 2 cover sheets (PVC /240gsm Card only - other materials x 1 sheet) or up to 20 sheets of paper (80gsm) at a time.
Using the conventional method: Select the quantity of sheets to punch and tap the edge of the sheet stack against the staging area to ensure that all sheets are aligned. Place the stack to be punched directly into the punching slot and slide to the left until it comes to rest against the edge guide. Your sheets will now be perfectly aligned. Let go of the sheets and grasp the punch handle with both hands.
Using the gravity fed paper count method for increased productivity: Pull forward your document (or a stack of sheets from your document) from its resting position against the lid. Continue until it meets the wall in front of the punch slot. Relax your grip on the document or stack and the first 20 sheets will fall directly into the punching slot. Return the sheets not engaged in the punch slot back to a resting position against the lid. Slide the sheets in the punching slot to the left as far as they will go. Your sheets will now be perfectly aligned. Let go of the sheets and grasp the punch handle with both hands.
7Punching the document (fig.7)
Punch pages by pulling handle down, then lift the handle back to the vertical position and remove the punched sheets. Note: To prevent jams do not attempt to punch more than two cover sheets at a time. (PVC /240gsm Card only, other materials x 1 sheet)
8Assemble pages onto open comb (fig.8)
Remove the sheets from the punch slot and insert onto the fingers of the binding comb.
9Repeat process as required
Repeat stages 6-8 until your document is fully loaded on the comb.
JClose (fig.9)
Close comb and remove document.
Guarantee
Operation of this machine is guaranteed for two years from date of purchase, subject to normal use. Within the guarantee period, ACCO Brands Europe will at its own discretion either repair or replace the defective machine free of charge. Defects due to misuse or use for inappropriate purposes are not covered under the guarantee. Proof of date of purchase will be
Register this product online at www.gbceurope.com
required. Repairs or alterations made by persons not authorised by ACCO Brands Europe will invalidate the guarantee. It is our aim to ensure that our products perform to the specifications stated. This guarantee does not affect the legal rights which consumers have under applicable national legislation governing the sale of goods.
5

Spécifications
|
GBC CombBind C20 |
|
|
Largeur papier maxi |
Letter, DIN A4 – 297 mm |
|
|
Capacité de perforation maxi, |
20 feuilles (80 g/m²) |
papier |
|
|
|
Capacité de perforation maxi, |
2 feuilles de couverture de 0,2 mm |
couvertures plastique |
d’épaisseur |
|
|
Poids net |
9,8 kg |
|
|
Dimensions (l x p x h) |
465 x 405 x 150 mm |
Données techniques sujettes à modification sans préavis.
Notification spéciale
Merci d’avoir choisi une perforelieuse GBC. Nous visons à produire des machines de qualité à un prix abordable et offrons de nombreuses fonctions sophistiquées garantissant d’excellents résultats à chaque usage. Avant d’utiliser votre machine pour
la première fois, veuillez prendre quelques minutes pour lire attentivement ce guide.
Maintenance
Veuillez vider le bac à confettis à intervalles réguliers pour éviter les blocages et vous assurer que la machine est toujours prête à perforer. Le bac à confettis est accessible à partir du côté de la machine.
Pour éviter toute surcharge, n’essayez jamais de perforer un nombre de feuilles supérieur à la capacité de perforation (20 feuilles de 80 g/m2). La machine ne nécessite aucun entretien en cas d’utilisation correcte.
Consignes de sécurité |
m |
VOTRE SÉCURITÉ AINSI QUE CELLE DES AUTRES EST IMPORTANTE POUR ACCO BRANDS EUROPE. DANS CE MANUEL D’UTILISATION ET SUR LE PRODUIT, VOUS TROUVEREZ DES MESSAGES DE SÉCURITÉ IMPORTANTS. MERCI DE LES LIRE TRÈS ATTENTIVEMENT.
Conseils utiles
Pour optimiser la productivité lors des étapes 6 à 9, commencez par la première de couverture, puis ajoutez les feuilles de papier (20 à la fois) et terminez par la dernière de couverture.
Pour optimiser les résultats, utilisez les couvertures de marque GBC et les peignes de reliure de couleurs assorties GBC.
Vous pouvez ouvrir et refermer le peigne à tout moment afin de remplacer des feuilles ou d’en ajouter d’autres (voir étape 2).
Dépannage
Contactez un représentant de dépannage GBC agréé pour toute réparation requise.
6

Comment relier
1Mesurez le document à l’aide du guide à codage couleur (fig. 1)
Ouvrez le couvercle de l’appareil et placez le document (y compris les feuilles de couverture que vous avez choisies) contre le couvercle sur la partie plate de l’appareil. Repoussez doucement le document contre le couvercle et vérifiez la taille du document par rapport au guide à codage couleur. Vous pouvez laisser le document dans cette position, prêt à la perforation.
2Sélectionnez le peigne plastique adapté à votre document (fig. 2)
Utilisez l’indicateur de diamètre de peigne pour sélectionner le peigne de la taille adaptée au document, c.-à-d. document de 25 feuilles = peigne de 6 mm.
3Chargez le peigne sur la machine (fig. 3)
Placez le peigne près de la flèche blanche de l’appareil, derrière les doigts métalliques, en faisant en sorte que les boucles du peigne s’ouvrent vers le haut.
Remarque : Si vous utilisez les peignes GBC ProCombs™, la flèche blanche du peigne doit s’aligner avec la flèche blanche de l’appareil.
4Ouvrez le peigne en tirant le levier vers vous (fig. 4)
Les flèches de couleur situées près du peigne ouvert servent de guides pour savoir jusqu’où ouvrir le peigne afin de faciliter l’insertion des feuilles perforées.
Remarque : Si vous utilisez les peignes GBC ProCombs™, la ligne de couleur du peigne doit s’aligner avec la flèche de couleur de l’appareil pour assurer la rapidité de la reliure.
5Sélectionnez le format du document (fig. 5)
Réglez le sélecteur de butée en fonction du format des feuilles/ couvertures que vous souhaitez utiliser : A4 (297 mm x 210 mm) ou Letter (215 mm x 279 mm). En cas d’utilisation de couvertures surdimensionnées, sélectionnez la position « oversize », perforez les couvertures du document et mettez-les de côté. Sélectionnez ensuite A4 ou Letter et continuez.
Garantie
Le fonctionnement de ce produit est garanti pendant 2 ans à partir de la date d’achat, sous réserve d’un usage normal. Pendant la période de garantie, ACCO Brands Europe décidera, à son gré,
de réparer ou remplacer gratuitement l’appareil défectueux. Les défauts dus à un usage abusif ou un usage à des fins non appropriées ne sont pas couverts par cette garantie. Une preuve de la date d’achat sera exigée. Les réparations ou modifications
Enregistrez ce produit en ligne à www.gbceurope.com
F
6Insérez les feuilles dans la fente de perforation (fig. 6)
Vous pouvez perforer 2 feuilles de couverture à la fois (uniquement PVC/carton de 240 g/m2. Pour les autres matériaux, perforez une seule feuille de couverture à la fois) ou jusqu’à 20 feuilles de papier (80 g/m2) à la fois.
Utilisation de la méthode conventionnelle : Sélectionnez la quantité de feuilles à perforer et taquez la pile de feuilles sur une surface plate de l’appareil devant le couvercle ouvert pour qu’elle soit bien homogène. Placez la pile à perforer directement dans la fente de perforation et faites-la glisser vers la gauche jusqu’à ce qu’elle soit contre la butée papier. Les feuilles sont maintenant parfaitement alignées. Laissez les feuilles en place et saisissez la poignée de perforation des deux mains.
Utilisation de la méthode d’alimentation par gravité pour une productivité accrue : Déplacez vers l’avant le document (ou une partie du document), qui était appuyé contre le couvercle, jusqu’à ce qu’il touche la paroi située devant la fente de perforation. Lâchez le document ou
la pile de feuilles et les 20 premières feuilles tomberont directement dans la fente de perforation. Repositionnez contre le couvercle les feuilles qui ne sont pas tombées dans la fente. Faites glisser le plus loin possible vers la gauche les feuilles se trouvant dans la fente de perforation. Les feuilles sont maintenant parfaitement alignées. Laissez les feuilles en place et saisissez la poignée de perforation des deux mains.
7Perforation du document (fig. 7)
Perforez les feuilles en abaissant la poignée, puis relevez la poignée à la verticale et retirez les feuilles perforées. Remarque : Pour éviter les bourrages, n’essayez pas
de perforer plus de deux feuilles de couverture à la fois (uniquement en PVC/carton de 240 g/m2. Pour les autres matériaux, perforez une seule feuille de couverture à la fois).
8Chargez le document sur le peigne ouvert (fig. 8)
Retirez les feuilles de la fente de perforation et insérez-les dans le peigne ouvert.
9Répétez les étapes 6-8 autant de fois que nécessaire
Répétez les étapes 6-8 jusqu’au chargement complet du document sur le peigne.
JFermez le peigne (fig. 9)
Fermez le peigne et retirez le document.
effectués par des personnes non autorisées par ACCO Brands Europe annuleront la garantie. Notre objectif est d’assurer le bon fonctionnement de nos produits conformément aux spécifications précisées. Cette garantie ne compromet pas les droits légaux des consommateurs au titre de la législation nationale en vigueur régissant la vente des biens de consommation.
7

Technische Daten
|
GBC CombBind C20 |
|
|
|
|
Max. Arbeitsbreite |
DIN A4, US-Letter – 297 mm |
|
|
Stanzkapazität, Papier |
max. 20 Blatt (80 g/m²) |
|
|
Stanzkapazität, PVC-Einbanddeckel |
max. 2 Einbanddeckel (je 0,2 mm) |
|
|
Nettogewicht |
9,8 kg |
|
|
Abmessungen (B x T x H) |
465 x 405 x 150 mm |
Änderungen ohne vorherige Ankündigung vorbehalten.
Spezieller Begriff
Wir danken Ihnen, dass Sie sich für ein GBC Bindegerät entschieden haben. Es ist unser Ziel, Qualitätsbindegeräte mit vielen modernen Leistungsmerkmalen zu einem günstigen Preis anzubieten, damit Sie bei jedem Bindevorgang ausgezeichnete Ergebnisse erzielen können. Vor dem ersten Benutzen des Geräts sollten Sie sich bitte einige Minuten Zeit nehmen, um diese Anweisungen durchzulesen.
Gerätepflege
Stanzabfallbehälter regelmäßig leeren. Dies gewährleistet, dass der Stanzbereich nicht blockiert wird und das Gerät stets betriebsbereit ist. Der Stanzabfallbehälter befindet sich an der Geräteseite.
Zur Vermeidung von Stanzproblemen die empfohlene Stanzkapazität (20 Blatt à 80 g/m²) nicht überschreiten. Bei korrekter Handhabung ist das Gerät wartungsfrei.
Kundendienst
Zur Durchführung von Reparaturarbeiten an den autorisierten GBC-Kundendienst wenden.
Sicherheits-Instruktionen m
ACCO BRANDS EUROPE MÖCHTE IHRE UND DIE SICHERHEIT ANDERER SICHERSTELLEN. IN DIESEM BEDIENUNGSHANDBUCH UND AM PRODUKT BEFINDEN SICH WICHTIGE SICHERHEITSHINWEISE. BITTE LESEN SIE DIESE HINWEISE SORGFÄLTIG DURCH.
Tipps
Zum optimalen Betrieb bei Durchführung der Schritte 6 bis 9 stets folgende Reihenfolge beachten: zuerst den vorderen
Einbanddeckel, dann die Dokumentblätter (jeweils 20 Blatt) und abschließend den hinteren Einbanddeckel stanzen.
Zur Gewährleistung optimaler Ergebnisse wird die Verwendung von Einbanddeckeln vom Typ GBC sowie von farbig abgestimmten Binderücken empfohlen.
Zum Austausch oder Hinzufügen einzelner Blätter können die Binderücken jederzeit wieder geöffnet oder geschlossen werden (s. Schritt 2).
8

Bindeverfahren
1Dokumentstärke an der farbigen Dokumentmesshilfe messen (fig.1)
Hierzu die Geräteabdeckung öffnen und den Dokumentstapel (einschließlich aller Einbanddeckel) so halten, dass er an der Abdeckung und auf der
Dokumentmesshilfe anliegt. Die Dokumentstärke an der Dokumentmesshilfe ablesen. Das Dokument in dieser stanzbereiten Position belassen.
2Den passenden Binderücken für das Dokument auswählen (fig.2)
Die für die Dokumentstärke geeignete Binderückengröße anhand der Auswahlhilfe bestimmen (z. B. bei einer Dokumentstärke von 25 Blatt die Binderückengröße 6 mm wählen).
3Den Binderücken in das Gerät einlegen (fig.3)
Den Binderücken an dem weißen Pfeil am Gerät ausrichten und hinter die Metallfinger einsetzen. Dabei muss die offene Seite des Binderückens nach oben weisen.
Hinweis: Bei Verwendung von Binderücken vom Typ GBC ProCombs™ muss der weiße Pfeil des Binderückens mit dem weißen Pfeil am Gerät ausgerichtet sein.
4Den Bindehebel nach vorne ziehen und so den Binderücken öffnen (fig.4)
Anhand der seitlichen Farbmarkierungen lässt sich die für die jeweilige Anzahl Stanzdokumente nötige Binderückenöffnungsweite ermitteln.
Hinweis: Zur schnelleren Abwicklung des Bindevorgangs bei Verwendung von Binderücken vom Typ GBC ProCombs™ die Farbmarkierung auf dem Binderücken mit der Farbmarkierung am Gerät ausrichten.
5Dokumentformat einstellen (fig.5)
Die Papierführung am Einstellschalter auf die dem Papier-/ Einbanddeckelformat entsprechende Größe einstellen:
A4 (297 x 210 mm) oder US-Letter (215 x 279 mm). Bei Verwendung von Einbanddeckeln in Übergröße die
Übergrößeneinstellung wählen, die Einbanddeckel stanzen und beiseite legen. Anschließend die A4oder US-Letter- Einstellung wählen und mit dem Stanzvorgang fortfahren.
Gewährleistung
Der Betrieb des Geräts ist bei normaler Verwendung für 2 Jahre ab Kaufdatum gewährleistet. Innerhalb des
Gewährleistungszeitraums wird ACCO Brands Europe nach eigenem Ermessen das defekte Gerät entweder kostenlos instandsetzen oder ersetzen. Die Gewährleistung deckt keine Mängel ab, die aufgrund missbräuchlicher Verwendung oder Verwendung für unangemessene Zwecke entstanden sind. Ein Nachweis des Kaufdatums muss vorgelegt werden.
Registrieren Sie dieses Produkt online bei www.gbceurope.com
D
6Die Blätter in die Stanzöffnung einführen (fig.6)
Maximal 2 Einbanddeckel (PVC-Deckel oder Deckel à 240 g/m², ansonsten max. 1 Einbanddeckel) bzw. bis zu 20 Blatt Papier à 80 g/m² in einem Durchgang stanzen.
Herkömmliche Blattzufuhr: Die zu stanzende Anzahl Blätter auf die flache Oberfläche vor der Geräteabdeckung aufstoßen, damit alle Blätter bündig sind. Den zu stanzenden Stapel direkt in die Stanzöffnung einführen und nach links an die Papierführung heranschieben. Der Stapel ist damit richtig ausgerichtet. Die Blätter loslassen und den Stanzhebel mit beiden Händen fassen.
Effizientere Freifallstapelzufuhr: Den gegen die Abdeckung lehnenden Dokumentstapel (oder Teilstapel) nach vorne gegen den Anschlag der Stanzöffnung ziehen. Den Stapel loslassen, damit die ersten 20 Blätter selbständig in die Stanzöffnung fallen können. Die dabei
nicht in die Stanzöffnung zugeführten Blätter wieder gegen die Abdeckung lehnen. Den zu stanzenden Stapel ganz nach links an die Papierführung heranschieben. Der Stapel ist damit richtig ausgerichtet. Die Blätter loslassen und den Stanzhebel mit beiden Händen fassen.
7Dokument stanzen (fig.7)
Stanzhebel nach unten drücken, dann wieder senkrecht stellen und die gestanzten Blätter entnehmen. Hinweis: Zur Vermeidung von Papierstaus stets jeweils maximal zwei Einbanddeckel (PVC-Deckel oder Deckel à 240 g/m², ansonsten max. 1 Einbanddeckel) stanzen.
8Dokument in den offenen Binderücken einführen (fig.8)
Die aus der Stanzöffnung entnommenen Blätter in den Binderücken einführen.
9Die Schritte 6 bis 8 gegebenenfalls wiederholen
Die Schritte 6 bis 8 wiederholen, bis das gesamte Dokument im Binderücken eingeführt wurde.
JBinderücken Schliessen (fig.9)
Den Binderücken schließen und das Dokument entnehmen.
Instandsetzungen oder Änderungen, die von nicht durch ACCO Brands Europe autorisierten Personen vorgenommen werden, setzen die Gewährleistung außer Kraft. Es ist unser Ziel sicherzustellen, dass die Leistung unserer Produkte den angegebenen technischen Daten entspricht. Diese Gewährleistung stellt keine Einschränkung der nach dem geltenden Kaufvertragsrecht gültigen Rechte des Verbrauchers dar.
9

Specifiche
|
GBC CombBind C20 |
|
|
|
|
Larghezza carta max. |
Letter, DIN A4 – 297 mm |
|
|
Capacità perforazione, carta |
Max. 20 fogli (80 g/m²) |
|
|
Capacità perforazione, copertine |
Max. 2 copertine da 0,2 mm |
in plastica |
|
|
|
Peso netto |
9,8 kg |
|
|
Dimensioni (L x P x A) |
465 x 405 x 150 mm |
Dati soggetti a variazioni tecniche senza preavviso.
Avviso speciale
Grazie per aver scelto una rilegatrice GBC. La nostra azienda si propone di produrre rilegatrici di qualità ad un prezzo accessibile che presentano molte funzioni avanzate per ottenere ogni volta risultati eccellenti. Prima di usare la macchina per la prima volta, è opportuno leggere questa guida.
Manutenzione
Controllare che il vassoio ritagli sia svuotato periodicamente. Questo accorgimento evita che si blocchi la macchina ed assicura che l’unità sia sempre pronta per le operazioni di perforazione. Si può accedere al vassoio ritagli dal lato della macchina.
Per prevenire eventuali sovraccarichi, non tentare mai di perforare un numero di fogli superiore a quello massimo raccomandato (20 fogli da 80gm2). L’unità non richiede manutenzione se usata correttamente.
Assistenza
Rivolgersi ad un rivenditore o distributore GBC per eventuali riparazioni.
Istruzioni di sicurezza |
m |
ALLA ACCO BRANDS EUROPE STA A CUORE LA SICUREZZA DEGLI UTENTI E DEI TERZI. IN QUESTO MANUALE OPERATIVO E SUL PRODOTTO SONO RIPORTATI IMPORTANTI INDICAZIONI DI SICUREZZA, CHE VANNO LETTE ATTENTAMENTE.
Consigli e suggerimenti utili
Per ottenere la massima produttività seguendo le istruzioni riportate ai punti da 6 a 9, iniziare con la prima di copertina e poi aggiungere i fogli di carta (20 alla volta) e finire con l’ultima di copertina.
Per ottenere la migliore finitura, utilizzare sempre copertine GBC con anelli di rilegatura GBC di colore abbinato.
Gli anelli di rilegatura possono essere aperti e chiusi di nuovo in qualsiasi momento per sostituire o aggiungere singoli fogli (vedere le informazioni riportate al punto 2).
10
Rilegatura
1Misurare il documento da rilegare utilizzando la guida codificata per colore (fig.1)
Aprire il coperchio della macchina ed appoggiare il documento (comprese eventuali copertine scelte) contro il coperchio sulla superficie piana della macchina. Spingere delicatamente il documento contro il coperchio e controllarne il formato servendosi della guida codificata per colore. Si può lasciare il documento in questa posizione pronto per la perforazione.
2Selezionare gli anelli plastici adatti al documento da rilegare (fig.2)
Utilizzare la guida del diametro degli anelli per selezionare il diametro del dorso plastico adatto al documento da rilegare, cioè documento da 25 fogli = dorso plastico da 6 mm.
3Caricare il dorso plastico nella rilegatrice (fig.3)
Inserire gli anelli plastici accanto alla freccia bianca situata sulla macchina, dietro il meccanismo in metallo con il lato aperto rivolto verso l’alto.
Nota - Se si usano gli anelli plastici GBC ProCombs™, la freccia bianca sugli anelli deve essere allineata alla freccia bianca riportata sulla macchina.
4Aprire gli anelli plastici portando la leva verso di sé (fig.4)
Le frecce colorate adiacenti agli anelli che si aprono fungono da guida per indicare la distanza di apertura degli anelli necessaria a consentire un agevole inserimento dei fogli perforati.
Nota - Se si usano gli anelli plastici GBC ProCombs™, la linea colorata sugli anelli deve essere allineata alle frecce colorate riportate sulla macchina per consentire una più veloce operazione di rilegatura.
5Selezionare il formato del documento (fig.5)
Regolare il selettore della guida di allineamento della carta per selezionare il formato del foglio/della copertina che si desidera rilegare: A4 (297 mm x 210 mm) o Letter (215 mm x 279 mm). Quando si usano copertine di formato over-size, selezionare la posizione “oversize”, perforare le copertine del documento e mettere da parte. Selezionare quindi A4 o Letter e procedere.
I
6Inserire i fogli nel vano di perforazione (fig.6)
Si possono perforare 2 copertine (solo PVC/cartoncino da 240gm2. Con altri materiali è possibile perforare solo 1 copertina) oppure fino a 20 fogli di carta (80gm2) alla volta.
Metodo convenzionale - Selezionare la quantità di fogli da perforare e dare un colpetto sul bordo del pacco di fogli contro la superficie piana della macchina davanti al coperchio aperto per assicurare che tutti i fogli siano allineati. Inserire il pacco di fogli da perforare direttamente nel vano di perforazione e spostarlo a sinistra fino a quando non tocchi la guida di allineamento della carta. I fogli saranno ora perfettamente allineati. Lasciare andare i fogli ed afferrare la maniglia di perforazione con entrambe le mani.
Metodo di conteggio fogli con alimentazione per gravità per una maggiore produttività - Portare in avanti il documento (oppure un pacco di fogli del documento), allontanandolo dalla posizione di appoggio contro il coperchio fino a quando non tocca la parete davanti al vano di perforazione. Allentare la presa del documento o del pacco di fogli e i primi 20 fogli cadranno direttamente nel vano di perforazione. Riportare i fogli che non sono caduti nel vano di perforazione nella posizione di appoggio contro il coperchio. Spostare fino in fondo a sinistra i fogli che si trovano nel vano di perforazione. I fogli saranno ora perfettamente allineati. Lasciare andare i fogli ed afferrare la maniglia di perforazione con entrambe le mani.
7Perforazione del documento (fig.7)
Perforare i fogli tirando la maniglia verso il basso e riportare poi la maniglia in posizione verticale e rimuovere i fogli perforati. Nota - Per evitare eventuali inceppamenti, non cercare di perforare più di due copertine alla volta (solo PVC/cartoncino da 240gm2. Con altri materiali è possibile perforare solo 1 copertina).
8Inserire il documento negli anelli aperti (fig.8)
Togliere i fogli dal vano di perforazione ed inserirli negli anelli aperti.
9Ripetere le istruzioni riportate ai punti 6-8 a seconda delle necessità
Ripetere le istruzioni riportate ai punti 6-8 fino a quando il documento non è completamento inserito nel dorso plastico.
JChiusura degli anelli (fig.9)
Chiudere gli anelli e rimuovere il documento rilegato.
Garanzia
Questo prodotto è garantito per 2 anni dalla data di acquisto, per quanto ne concerne il funzionamento, subordinatamente ad uso normale. Durante il periodo di garanzia, ACCO Brands Europe provvederà, a propria discrezione, a riparare o sostituire gratuitamente la macchina difettosa. Difetti risultanti dall’uso improprio o dall’uso per scopi diversi da quelli per cui la macchina è stata concepita non sono coperti dalla garanzia. Sarà necessario fornire una prova di
Registrare il prodotto online presso www.gbceurope.com
acquisto. Riparazioni o modifiche effettuate da persone non autorizzate da GBC invalideranno la garanzia. ACCO Brands Europe si propone
di assicurare che i propri prodotti funzionino in conformità alle caratteristiche tecniche indicate. La presente garanzia non pregiudica alcun diritto riconosciuto ai consumatori dalla normativa nazionale vigente in materia di vendita di prodotti.
11

Specificaties
|
GBC CombBind C20 |
|
|
|
|
Maximale papierbreedte |
Letter, DIN A4 – 297 mm |
|
|
Ponscapaciteit, papier |
Max. 20 vellen (80 gsm) |
|
|
Ponscapaciteit, plastic omslagen |
Max. 2 omslagen, elk 0,2 mm dik |
|
|
Netto gewicht |
9,8 kg |
|
|
Afmetingen (B x D x H) |
465 x 405 x 150 mm |
Deze gegevens kunnen zonder voorafgaande kennisgeving gewijzigd worden.
Speciaal bericht
U bent nu de gelukkige eigenaar van een GBC inbindmachine. Wij hebben ons tot doel gesteld om betaalbare inbindmachines van uitstekende kwaliteit te produceren, met vele extra functies, zodat u keer op keer uitstekende resultaten behaalt. Lees deze instructies goed door, voordat u de machine voor het eerst gebruikt.
Onderhoud
Zorg ervoor dat de snipperlade regelmatig wordt geleegd. Dit voorkomt een verstopping en zorgt ervoor dat het toestel altijd gebruiksklaar is. De snipperlade wordt uit de zijkant van het toestel getrokken.
Om overbelasting te voorkomen, mag u nooit meer dan het maximumaantal vellen ponsen (20 vellen, 80 gsm). De eenheid behoeft geen onderhoud, zolang hij juist wordt gebruikt.
Reparaties
Neem contact op met een erkende GBC-reparateur voor alle benodigde reparaties.
Veiligheidsvoorschriften m
UW VEILIGHEID EN DIE VAN ANDEREN HEEFT VOOR ACCO BRANDS EUROPE HOOGSTE PRIORITEIT. IN DEZE HANDLEIDING EN OP DE MACHINE ZELF TREFT U
VERSCHILLENDE BELANGRIJKE VEILIGHEIDSVOORSCHRIFTEN AAN. LEES DEZE ZORGVULDIG.
Handige tips
Voor maximale productiviteit bij het uitvoeren van stappen 6 t/m 9, begint u met de vooromslag. Voeg daar uw vellen aan toe (telkens een stapel van 20) en eindig met de achteromslag.
Voor het beste resultaat gebruikt u altijd omslagen van GBC samen met de bindruggen van GBC in een bijpassende kleur.
U kunt de bindrug op elk moment weer openen en sluiten, zodat individuele vellen verwijderd of toegevoegd kunnen worden (zie stap 2).
12
 Loading...