

Page 1

TABLE OF CONTENTS
Forward . . . . . . . . . . . . . . . . . . . . . . . . . . . . . . . . . . ii
Introduction . . . . . . . . . . . . . . . . . . . . . . . . . . . . . . . 1
Installation . . . . . . . . . . . . . . . . . . . . . . . . . . . . . . . . 2
Quick Start Reference Guide . . . . . . . . . . . . . . . . . . . . 3
The Main Menu . . . . . . . . . . . . . . . . . . . . . . . . . . . . . 4
Playing the Game . . . . . . . . . . . . . . . . . . . . . . . . . . . . 7
The Basics. . . . . . . . . . . . . . . . . . . . . . . . . . . . . . 7
Pause Time . . . . . . . . . . . . . . . . . . . . . . . . . . . . . 7
Interface . . . . . . . . . . . . . . . . . . . . . . . . . . . . . . . . . 7
Game Interface . . . . . . . . . . . . . . . . . . . . . . . . . . 7
Away Team Com – Team Selection Screen . . . . . . . . . 12
Briefing and Debriefing Screens. . . . . . . . . . . . . . . 13
Story Background. . . . . . . . . . . . . . . . . . . . . . . . . . . . 14
Away Team Roster . . . . . . . . . . . . . . . . . . . . . . . . . . . 15
Command Officers . . . . . . . . . . . . . . . . . . . . . . . . 15
Medical Officers . . . . . . . . . . . . . . . . . . . . . . . . . . 16
Security Officers . . . . . . . . . . . . . . . . . . . . . . . . . 18
Engineering Officers . . . . . . . . . . . . . . . . . . . . . . . 20
Science Officers . . . . . . . . . . . . . . . . . . . . . . . . . . 22
Weapons. . . . . . . . . . . . . . . . . . . . . . . . . . . . . . . . . . 24
Equipment . . . . . . . . . . . . . . . . . . . . . . . . . . . . . 26
Skills . . . . . . . . . . . . . . . . . . . . . . . . . . . . . . . . . 28
Enemies . . . . . . . . . . . . . . . . . . . . . . . . . . . . . . . . . . 29
Gameplay Tips . . . . . . . . . . . . . . . . . . . . . . . . . . . . . . 30
Multiplayer . . . . . . . . . . . . . . . . . . . . . . . . . . . . . . . . 31
Updates and Future Releases . . . . . . . . . . . . . . . . . . . . 33
Customer Support . . . . . . . . . . . . . . . . . . . . . . . . . . . 34
Credits . . . . . . . . . . . . . . . . . . . . . . . . . . . . . . . . . . . 36
Software License Agreement . . . . . . . . . . . . . . . . . . . . 40
Page 2

FOREWORD
Thank you for purchasing Star Trek® Away Team for your PC. This
manual will show you how to install the game and quickly jump
into the action and adventure that Away Team has to of fer.
Reflexive Entertainment and Activision® have worked long and hard
to provide you with the best interactive experience possible. We
hope you enjoy playing Away Team as much as we enjoyed making
it!
Visit us on the web at http://www.reflexive.net,
http://www.stawayteam.com, http://www.activision.com and let us
know what you think. We look forward to hearing from you.
Have fun!
Sincerely,
The Away Team Development Team
INTRODUCTION
Communiqué from Admiral Nolotai
to Starfleet Command
I have concluded my analysis of Starfleet’s ability to respond to threats and
found the mobility and adaptability of our forces to be lacking.
Enemies like the Borg, the Romulans, the Dominion, and many others seek to
dissolve the United Federation of Planets. With our own resources spread thin
across the galaxy, it is becoming increasingly difficult to protect all of our
borders.
I propose that Starfleet Command form a special crew for a new time. A team
prepared for the most extreme missions, capable of entering places that our
conventional forces cannot go.
Starfleet research has completed their work on the U.S.S. Incursion, a
Starship equipped with the Holographic Masking System. With this
holographic technology, the Incursion can assume the form of any ship,
allowing the crew to infiltrate areas that the rest of our fleet cannot enter.
To complement the Incursion’s stealth power, I have worked closely with
Commander Data to train a diverse crew of seventeen very talented
individuals.
I believe that this new crew represents the best and brightest from Starfleet.
Enclosed in this document, you will find dossiers on all the officers of this
team, detailing their talents and
abilities.
It is my opinion that we establish this elite Away Team immediately. Without
their presence, the integrity of the Federation will be endangered.
Fleet Admiral Nolotai
Starfleet Command
ii
1
Page 3

INSTALLATION
QUICK START REFERENCE GUIDE
TO INSTALL STAR TREK AWAY TEAM
Insert the game CD into your CD-ROM drive. Please close all open
programs before installation. Choose one of the following options
to install the game:
• If your CD-ROM drive has AutoPlay enabled, the setup will begin
automatically. Simply follow the on-screen installation
instructions.
• If AutoPlay is not enabled, double-click on the My Computer
icon on your desktop. Double-click on the CD-ROM drive icon.
Then double-click on the Away Team setup icon and follow the
on-screen installation instructions.
COPY PROTECTION
To play Star Trek Away Team, you must have the Away Team CD in
your CD-ROM drive.
2
For those that like to jump right into the game, we’ve created a
quick reference guide. These are all the default controls you will
need to play Away Team. If you would like to change any of these
settings, you can easily do so in the Configure menu.
BASIC DEFAULT CONTROLS
Mouse
Select/Move Left Button
Use/Fire Right Button
Next/Previous
Inventory Mouse Wheel
(if available)
Movement
Walk W
Run R
Crouch C
Cycle Movement X
Map Controls
Scroll Left
Scroll Right
Scroll Up
Scroll Down
Inventory
Next Inventory ]
Previous Inventory [
Phaser P
Concussion Grenade G
EMP Grenade E
Neural Disruptor N
Hypospray H
Sniper Rifle F
Vulcan Nerve Pinch K
Enhanced Mind Meld D
General
Pause Time ENTER
Center on Last Hit SPACE
Select Vision Cone V
Cycle Vision Cone TAB
Toggle Sound Cone S
Chat (Network Only) T
Select Entire Team A
Select Individual
Team Members 1-6
Objectives O
Mini-Map M
Zoom In KEYPAD +
Zoom Out KEYPAD Zoom Reset KEYPAD *
Configuration Menu F1
Save Menu F9
Load Menu F10
Quick Save F11
Load Quick Save F12
3
Page 4

THE MAIN MENU
MAIN MENU SYSTEM
When you load Star Trek Away Team, you will see the Main Menu
system. Maneuver the cursor with the mouse to highlight the
options.
At the Main Menu, you can choose from the following: Start New
Game, Load Game, Settings, Play Network Game, Credits, and Quit.
Start New Game
When you select Start New Game, you will be prompted to select a
difficulty mode. The default mode is Normal. If you are a novice
gamer, or would like an easier gameplay experience, select Easy as
the difficulty mode. Once the difficulty has been set, select Start
and the Introduction Cinematic will play. You can skip this movie,
and any other cinematic movie, by pressing the Spacebar (or the Esc
key). After the cinematic, the game will begin with a Captain’s Log
briefing for Mission One. Click on End Briefing to start the mission.
Load Game
This sub menu lets you load a saved game to resume where you left
off on a previous mission.
When you select this menu, a list of all your saved game files will
appear. You will see the text description of the file next to a
thumbnail picture of the game where you saved. Then click on the
highlighted file you wish to load.
SETTINGS
When you select Settings, you will bring up the Conf igure menu. This
sub menu allows you to adjust many of the game settings to
optimize your experience.
Brightness: You can move the slider on this setting to change the
Brightness of your screen.
Scroll Speed: You can affect the speed of scrolling when you move
your cursor off the screen, or use the arrow keys on your keyboard.
Scroll Accel: You can control the acceleration rate of scrolling when
you move your cursor off the screen.
Pause Game When Hit Off Screen: Checking this option will auto pause
the game when a member of your team is hit off screen, allowing
4
you the choice to issue orders.
Difficulty: You can select a new difficulty mode with this option.
The default difficulty mode is Normal. This setting can be changed
at any time during the game with this option.
Configure Keyboard
Within this sub menu, you can customize your control set. If you
don’t like the default keyboard settings, you can rebind the
keyboard commands in this menu. You can change the following
settings:
• General: This menu allows you to bind key commands for various
controls.
• Inventory: Change the controls that select items and equipment.
You can bind key commands for items like the Cloaking Band and
the Teleportation Brig with this menu.
• Movement: The movement menu allows you to rebind the
commands that move your Away Team. You have the ability to
change the keyboard commands associated with the Movement
Toggle keys.
• Weapon: Change the controls allowing you to select your
different weapons.
• Mouse: On the right side of the key configuration screen, there is
a representation of your current mouse controls. The default
setting for the mouse utilizes the Left Mouse Button for moving
and selecting, the Middle Mouse Wheel for cycling through the
inventory, and the Right Mouse Button for firing weapons and
using items. These buttons can be reversed by clicking on the
Reverse Mouse Buttons icon.
• Reset to Default: You can restore the original control
configurations by selecting this icon.
Configure Sound
Master Volume: Adjusting this will affect the overall volume of the
game. Raising or lowering this control will change all sound in the
game: music, sound ef fects, and voices. Press the M button if you
want to mute the volume.
Sound Effects Volume: Adjusting this setting will only change the
volume of the sound effects in the game, like explosions, Phaser
blasts, doors opening, and other effects.
Music Volume: Adjusting this setting will change the volume of the
music in the menus and briefing screens and the background
ambient music played during the game.
Voice-Overs: This setting turns Voice Overs On or Off. Your Away
Team members will occasionally talk to each other, depending on
5
Page 5

the circumstance. Also, enemies or characters in the environment
may say something to you. If turned off, you will not hear the
audio portion of the dialogue, but you will still see the dialogue's
text.
Stereo: Mono or Stereo. The default setting is Stereo sound. If you
are experiencing performance issues, you can adjust the sound
quality to Mono.
Sound Mixing: Set this to Better or Faster depending on your
system requirements. The Better setting plays the highest quality
sounds. If you are experiencing slowing during the game, you could
set this to Faster.
Credits
An homage to all of the people at Reflexive, Activision, and other
companies who worked together to bring you Star Trek Away Team.
Quit
Selecting the Quit icon will bring up a screen that asks if you are
sure that you want to quit the game. Select Yes if you want to exit
the game and return to your desktop environment or No if you
want to remain in the game.
OPTIONS MENU
Once you begin the game, you can enter the Options Menu by
pressing the Esc key. From this menu, you can perform several
functions: Configure, Load, Save, End Game, and Resume.
Configure: You can also configure your keyboard controls from this
menu, and access it directly with the F1 key. From the Configure
menu you can also select a new Diff icutly mode. The default
difficulty mode is Normal. This setting can be changed at any time
during the game with this option.
Save: You can save your progress with this option. You will be
prompted to name the saved game file. You can access this menu
directly with the F9 key.
Load: You can load any saved game with this option. This menu can
be accessed directly using the F10 key.
Restart Mission: Restarts the current mission.
End Game: This will quit your current mission and return you to the
Main Menu.
Resume: Select this to continue your mission, or you can simply
6
press Esc again.
PLAYING THE GAME
THE BASICS
Once you have installed the game and have set up your configuration in the game menus, you’re ready to join the Incursion crew on
their first mission. This manual will introduce you to the basics of
the game and show you the interface used to select and control an
Away Team.
Throughout Star Trek Away Team, you will assume control of a team
of one to six operatives to perform missions. These missions will
take you across the galaxy to confront enemies of the Federation.
For the first tutorial mission, a team has been selected for you that
will teach you the basics of the game interface. After Mission One,
you will have the opportunity to choose your own team for each
mission.
PAUSE TIME
A very important tool in Star Trek Away Team is the Pause Time
feature. By default, Pause Time is set to the Enter key. By pressing
this key, you can pause the game and issue commands to your team
members. After you've given orders to the team, you can exit Pause
Time and return to the game by pressing the Pause Time key. In
later missions when the action becomes intense, this invaluable
feature will help you complete all your objectives.
INTERFACE
GAME INTERFACE SCREEN
Most of the action will take place in the main screen. If you would
like to zoom in to see something more closely, or zoom out to see
more of the environment, use the numeric keypad + and – to zoom
in and out. Note: The Zoom feature is available in Single Player only.
7
Page 6
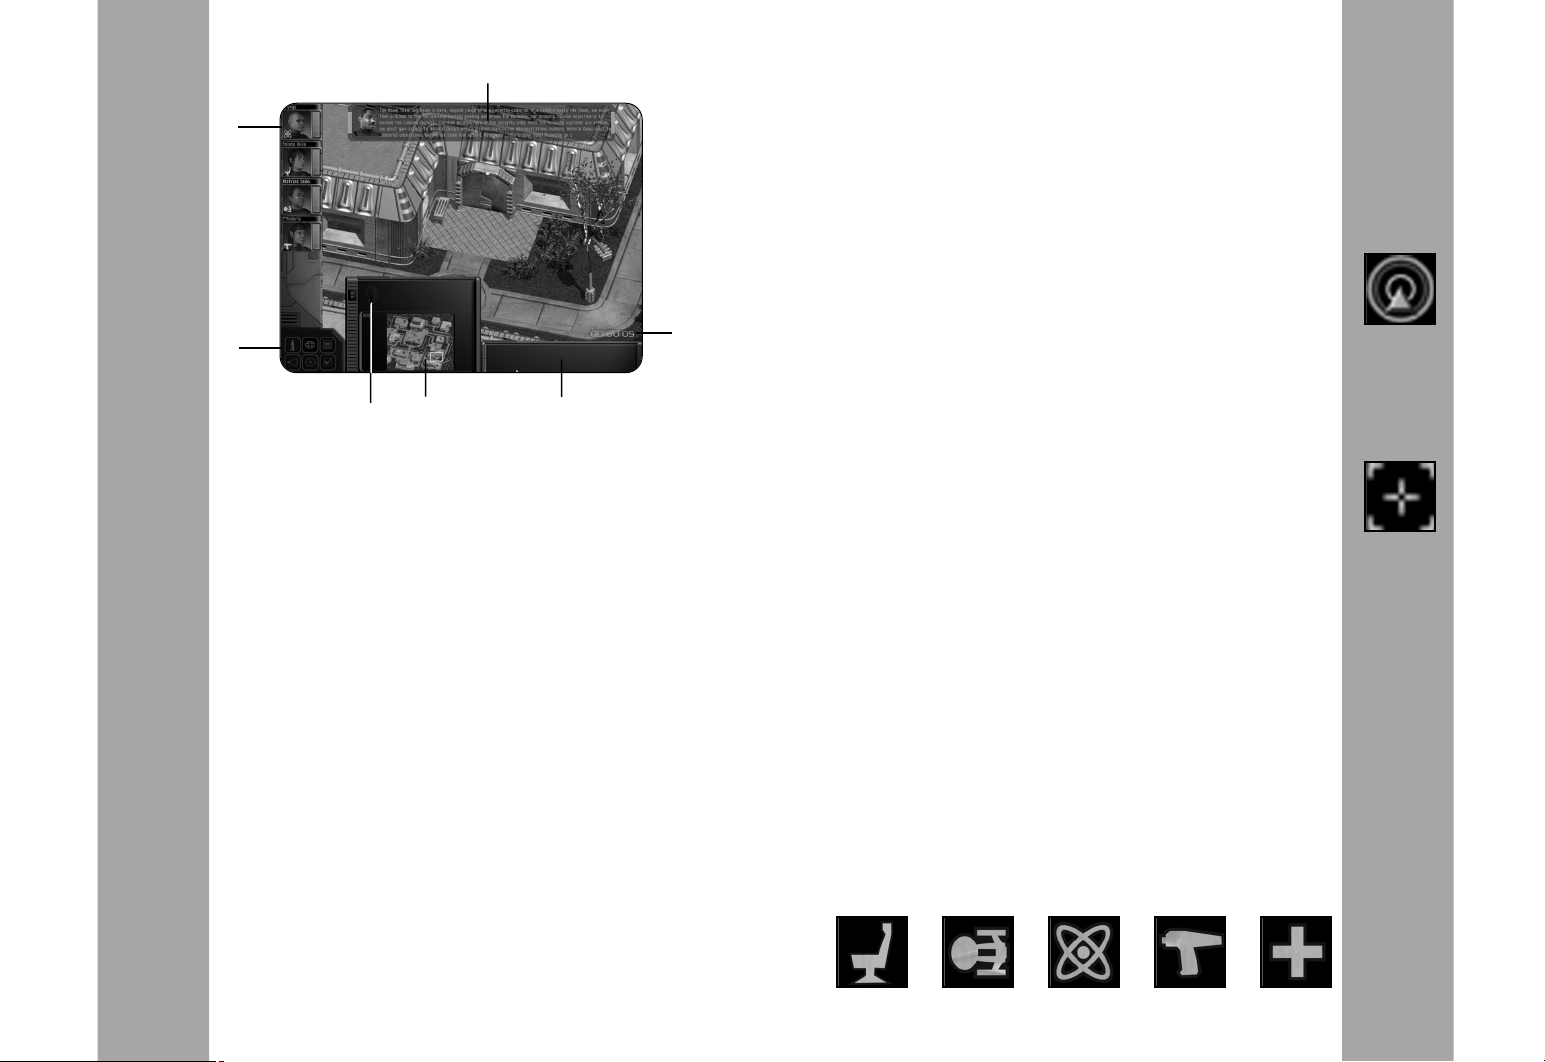
Communications Window
number from 1-6. Once this group is assigned, you can press and
hold Shift then the number from 1-6 to select that group again.
Team
Status
Bar
If you attempt to move any character to an inaccessible area, or to a
location that is too far away from the current position, you might
see the cursor change into a large X. This X cursor lets you know that
your character cannot move to the location from the current
position.
Interact Cursor
If you move the cursor over something that you can interact with,
the cursor will change to an Interact cursor. If the object is
something you can pick up, you can right-click on the object to pick
Action
Icons
Chronometer
it up. If the object is a computer terminal or control device, you can
right-click to attempt to use the object. Some terminals can only be
used by characters with specific skills, like Terminal Repair.
If the character you have selected can’t perform an interaction, the
Text Area
Mini-Map
Inventory
Tray
cursor will change to an X or you will hear a voice-over explanation.
Combat Crosshair Cursor
The following list details all of the elements of the main game
interface.
Cursor
Your cursor allows you to interact with the game world. You will
primarily use the cursor to select members of the Away Team to
When you have a weapon selected, the cursor changes to a Combat
Crosshair cursor. Any ranged weapon, like a Phaser, displays the
Combat cursor to show you if the shot is clear. If the cursor is green,
you have a clear shot at the acquired target. A red crosshair lets you
know that your shot is obstructed or that your target is out of range.
When using the Sniper Rifle, pay attention to the cursor—you don’t
want to waste a valuable round when the cursor is red.
move them in and out of combat, but you can also interact with
your environment. If you see an object or console that you would
like to inspect, move the cursor over it. The cursor will change to
let you know what kind of interaction could occur.
Movement Cursor: Selecting and Moving the Away Team
You will see a simple arrow cursor when you are moving Away Team
characters. You can select a single character by left-clicking on the
character on the screen, or on the character’s portrait. Then use
the movement cursor to point to an area you want to move to and
left-click again. If you want to move a group of characters, leftclick and drag a selection box to select all available team members
within that area. Once selected, you can left-click to move the
team. Holding down the Shift key and clicking on a team member
will add them to the current group, while holding down the Control
key will deselect the crew member clicked on. You can also select
Team Status Bar
On the left side of the screen, there is a vertical bar with the
portraits of your Away Team characters. This is the Team Status bar.
It not only shows you the current roster of your Away Team, it also
displays their current health level. The red bar next to the portrait
indicates the health level—as a character takes damage, the red bar
will shrink. The portraits of the team members selected will be
displayed in color. Double-clicking on a team member’s portrait will
center the screen on that person, allowing you to easily locate them
on the map.
Each portrait also has a Discipline symbol that shows which class the
character belongs to. There are five classes: Command, Engineering,
Science, Security, and Medical.
team members with the keyboard numbers 1 through 6.
You can also assign a group of characters to a key command so that
they can be selected quickly. Group select the characters you would
like to assign to a new group, then press and hold Control and a
8
9
Page 7

10
Inventory Tray
The lower right portion of the interface is dedicated to
your inventory tray. By right-clicking on this tray, you
will bring up a pop-up menu showing all the weapons
and items possessed by the character you have selected.
If you have more than one character selected, then all
of their items, skills and weapons will be shown. Once
the inventory is open, you can equip a character with a
weapon or select an item or skill by left-clicking on the
appropriate icon.
You will notice that the tray is sorted by groups of items. When you
have the entire team selected and you bring up the inventory tray,
you will see all of their weapons, skills, and items. The tray has
been arranged so that you can quickly find the weapon types
aligned in the same column and likewise for items and skills.
Chronometer
This clock continues to tick as you progress through a mission. If
you click on the time, you can enter Pause Time. While in Pause
Time, you can issue orders to any of your Away Team members. To
return to real-time action, simply click on the chronometer again.
You can also enter Pause Time by pressing Enter on the keyboard.
GAME TIP: Pause Time is an excellent way to control your
Team during combat, allowing you to choose your attack
and defense strategy.
Text Window
The text window displays text descriptions of different objects in
the game. When you select a weapon or an object from your
inventory, a brief description appears in the text window. If you
use the tricorder to examine something in the environment, the
tricorder will display text in this window.
Mini-Map
To bring up the Mini-Map, press the M key. The Mini-Map will show
you a representation of the entire mission map. Animated blue
squares on the Mini-Map will show you the locations of mission
objectives. Use the Mini-Map to find where you need to go to
complete your primary and secondary objectives.
Communications Window
If a character speaks to you or sends you a communication, you will
hear the character’s voice and see a message at the top of the
interface. Next to the message, you will see the portrait of the
character sending you the message. If at any time you would like to
skip through the dialogue, press the Spacebar and you will skip the
message.
Action Icons
The lower left area of the inventory has six important icons.
Movement Mode Toggle – This button allows you to change the
movement mode of any number of characters you have currently
selected. The three movement modes for a character are Walk, Run,
and Crouch. You can cycle through these modes by pressing the
X key or by using the mouse to press the toggle button. There are
advantages to the different modes. Running allows you to travel
through the environment faster, but it is the loudest of the three
modes. Crouching is the slowest movement mode, but it is the
quietest. Walking is moderately fast and moderately quiet.
Select All – This useful command allows you to quickly group select
all of your Away Team characters, regardless of their position. Once
selected, you can move them to a location by left-clicking. This is
a great way to gather your operatives to one place if they are
separated. You can also press the A button to group select.
Display Objectives – You can view Primary Objectives and Secondary
Objectives for your current mission. During a mission, you could
receive new objectives, so check this screen periodically. You can
also press the O key to access this screen.
Toggle Vision Cone – To help you prepare for encounters with enemy
guards, you can select the vision cone feature to see a guard’s field
of view. Press the vision cone button on the interface or press the
V key to turn on vision cone—you will notice that the cursor
changes to a blue vision cursor. Now click on a guard and you will
be able to see the guard’s field of view, represented by a
transparent blue area on the screen.
You can also use the Tab key to cycle through the fields of views for
the different guards on screen. You can only see the field of view
for one guard at a time.
Toggle Sound Cones – During stealth missions, the sound cone
toggle is a vital asset. When turned on, you see blue circular sound
cones emanating from characters making noise (shooting a gun,
running, etc.). Enemy guards will react to noises that they can
11
Page 8

12
hear—if a sound cone hits a guard, the guard has “heard” that
sound. You can also press the S key to toggle sound cones on.
Louder noises create larger cones of sound. You can minimize your
noise by crouching while moving.
GAME TIP: Use sound cones when you’re trying to sneak up
on an enemy. It is recommended that you turn sound cones
off when you’re running with an entire group, as many
sound cones will emanate from the characters and obscure
your view of the map.
Options Menu – You can access the Options Menu by clicking on this
icon. You can also use the Esc key to bring up this menu.
AWAY TEAM COM – TEAM SELECTION SCREEN
After Mission One, you will be able to choose a team
before each mission, for most missions. Once you have
completed a mission, you will receive a debrief ing for the
mission and a new briefing for the next mission. Once the
briefings finish, the Team Selection screen will appear. You
can return to the briefing screen again by clicking on
Briefing at the top lef t of the screen.
The Team Selection screen utilizes an intuitive folder tab
system to let you access more information about the
different characters.
Character Screen
On the left side of the screen are the available characters you can
choose for a mission. These characters are separated into folder tabs
marked with their respective Discipline symbols. Click on a new folder
tab to show all the characters available for a given discipline. If you
would like to see the weapons and items for a given character, click
on Inventory (then press Character to see their statistics again).
Take time to look at the different characters to get a feel for their
different strengths and abilities.
Required Skills or Items
The upper right region of this interface tells you what skills or items
are necessary for the current mission. Skills or items that are
required for the mission are listed on top. You can click on this to
cycle through Away Team members with the respective skill needed
for the mission. There is also an area of Recommended Items. By
clicking on these skills or items, you can cycle through the different
characters with the recommended skills or items.
Transporter Pad
When you are ready to add characters to your Away Team, select the
appropriate character and then click on the right arrow button at
the middle of the screen or double-click on their portrait. Clicking
this will “transport” that character to the Transporter Room on the
right side of the interface. Continue choosing characters in this
manner until you have selected all the Away Team members
required for the mission—the middle arrows will fade if you can’t
choose any more team members. If you change your mind, you can
select another Away Team character by selecting a character on the
Transporter Pad and clicking on the left arrow button—this puts
that character back into the roster pool.
For some missions, there are specialists that are required to go on a
certain mission. For instance, Slovaak and Refelian must accompany
you for Mission Two. However, you are free to choose the remaining
members of the team.
BRIEFING AND DEBRIEFING SCREENS
Briefing
Before you begin a mission, you will receive a briefing
from a Command Officer like Admiral Nolotai or Captain
Refelian. You will be given plot information about the
current mission.
Press Continue after the first briefing to see if there are
any other messages from other crewmembers. For later
missions, you may receive messages from other Away
Team members, informing you that they have researched
a new weapon or equipment upgrade.
You can also review the briefing again by pressing Replay. When
you are ready to start the mission, select End Briefing.
Debriefing
Once you’ve completed a mission, you will proceed to a debrief ing
screen where a Command Of ficer will summarize your
accomplishments. You’ll also be given information pertaining to the
next mission.
When the debriefing for the completed mission is done, you then
receive a briefing for the next mission. Once you are briefed, you
will then go to the Away Team Com screen so you can pick your
squad.
13
Page 9

14
STORY BACKGROUND AWAY TEAM ROSTER
The seventeen-member crew of the Incursion is a diverse group of
elite Starfleet officers. Each of these officers possesses weapons and
Several days ago, strange events were detected from deep
within Klingon space. Numerous disturbances throughout the
Klingon Empire, including distress calls and reports of
scattered battles, have raised concern among Starfleet
Command.
To assess the situation discreetly, Starfleet Command
activated the newly formed Away Team for its first mission.
The Incursion team has been ordered to use the holographic
power of the Starship to enter Klingon space undetected and
determine the nature of these events. If the Klingons are
waging a civil war or battling a new foe within their borders,
it could change the political balance of the galaxy.
Using the different skills of the Away Team, the answers to
these strange occurrences must be discovered. It is likely that
the search for these answers will take the Away Team to
different hostile systems. Starfleet Command has given the
Away Team the freedom to enter any system to determine the
nature of these events, within the reasonable boundaries of
the Prime Directive.
Commander Data, the team’s Technical Advisor, has
volunteered to accompany the crew of the Incursion on their
maiden voyage.
equipment designed for their personalities and their abilities.
COMMAND OFFICERS
Captain Marcus Refelian
Marcus Refelian is a highly decorated Starship Captain, handpicked by Admiral Nolotai to lead the crew of the Incursion.
Marcus distinguished himself several years ago when he
defended a group of Federation Colonies against Breen
Raiders.
Because of his remarkable accomplishments, Starfleet
Command asked Refelian to select a new team of secret
operatives. Starfleet allowed Refelian to train an elite team
comprised of Starfleet’s most gifted officers. This team would
be given a prototype vessel, the U.S.S. Incursion, equipped
with new stealth technology to carry out extremely dangerous
missions. Refelian worked with Starfleet, going through hundreds of
personnel files to gather the most effective team. With Refelian’s
aid, Starfleet chose a team with diverse talents and knowledge,
forming one of the most highly trained Away Team groups in
Federation history. His weapon of choice is the Concussion Grenade.
Quint Freedman
Quint grew up on a reservation on Earth among people that
could trace their ancestry back to ancient Maori tribes of New
Zealand. As a proud Maori warrior, Quint has a Moko, a facial
tattoo that displays his character and identity.
Before joining the Away Team, Quint was an operative for the
Maquis, an organization dedicated to stopping Cardassian
aggression. During the long campaign against the
Cardassians, Quint trained many of the resistance members
and became good friends with the Maquis leader Chakotay.
Captain Refelian personally recruited Quint to be his second
command officer, knowing that he possessed tremendous leadership
potential. He is the stealthiest Away Team member and a master of
infiltration techniques.
Quint utilizes an Herbal Extractor to gather useful items from the
environment around him.
15
Page 10

Yulana Oxila
Yulana descends from the House of Oxila, a prominent
Betazoid family that is the keeper of the Six Orbs of Choiza
and guardian of the Sceptre of Betazed. Yulana’s mother was
an influential diplomat for the Betazoid government, helping
to form a favorable trade arrangement with the Ferengi.
Yulana uses her empathic abilities to know the minds of
those with whom she serves. In combat, her empathic ability
helps her to guess the next move of an opponent.
Before her role as a Command Officer, Yulana served on a
Starship as a Medical Officer. She still retains some healing
knowledge, and she carries Hyposprays to help wounded Away Team
members.
Marcus Refelian recruited Yulana for her leadership skills and for
her ability to know the mind of an opponent.
Her ship’s first assignment was to track down Andorian
renegades, those who rejected the notion that Andoria
should belong to the Federation. During her first battle
against a squadron of renegades, her ship took heavy
casualties. When the Chief Medical Officer was killed during
the attack, Sirta took control of sick bay and had to treat
dozens of wounded Andorians. After the battle was won,
Sirta was commended and quickly promoted.
News of her bravery reached Starfleet, and Sirta was soon
invited to join Starfleet Academy. The study of medicine
came easily to Sirta, who possesses a keen mind for grasping
the many differences between alien physiologies.
Medical Officer Sirta is an Andorian with a fiery attitude. She uses
her knowledge of anatomy to her advantage in battle. She prefers to
carry a fully loaded Neural Disruptor over many Hyposprays.
16
MEDICAL OFFICERS
Dr. Sheila Thatcher
Sheila is the Chief Medical Officer aboard the U.S.S.
Incursion. Raised in London, she joined Starfleet at a young
age. She is a very talented healer and a respected authority
on alien biology. While her battle skills are not as strong as
the other Medical Officers, her healing skills are unmatched.
Throughout her career, Dr. Thatcher has been credited with
discovering cures for seven disease-causing alien agents. She
is widely regarded as Starfleet’s foremost authority on alien
pathogens and physiological disorders.
Sheila prefers to carry numerous Hyposprays over spare
Neural Disruptor recharge clips.
Sirta D’Qua
Sirta comes from a large Andorian family with a long military
history. Her father was an engineer of the Andorian Defense Force
and two of Sirta’s siblings joined Starfleet to protect the
Federation. When Sirta was of the proper age, she trained as a
battle medic at the Andorian Academy. After graduating with
honors, she joined the Andorian Defense Force and was assigned to
a small Starship patrolling a local system.
Kolanis Mikala
Kolanis is a half-Betazoid with limited empathic powers. He
grew up under the care of his mother on the planet Betazed.
His father, a human trader crossing the stars in a small
vessel, left while Kolanis was still an infant. His mother
raised him alone, urging him to study hard and embrace his
Betazoid heritage. While growing up, Kolanis wondered about
his human heritage and his father, a subject his mother
never really wanted to talk about. When he was old enough,
Kolanis wandered space looking for his father.
He traveled space for years, learning many skills, until he
chanced upon a derelict Federation vessel. He rescued many
trapped crewmembers and treated dozens of wounded.
Because of his valor, Starfleet extended an invitation to Kolanis to
join the Academy. Kolanis performed exceptionally at the Academy
and was handpicked by Dr. Thatcher to join the Incursion’s Medical
Team.
Kolanis is equally skilled at warfare and healing.
17
Page 11

18
SECURITY OFFICERS
Ty Mijoral
Ty is a unique Bolian warrior. What he lacks in brilliance he
makes up for with his tremendous brawn.
Ty originates from a conclave on the southern hemisphere of
Bolarus IX, the Bolian home planet. Like all Bolians, his head
is divided with a bifurcated ridge.
When he was of age, Ty left his planet to join a Bolian
Exploration Starship. An unfortunate incident with a
Cardassian Patrol Ship sent Ty and the Bolian crew to a harsh
prison planet. Ty escaped capture with a handful of other
prisoners. Using guerilla tactics, Ty attacked the Cardassians
for several months until the prison planet was liberated by a
Federation Starship.
Since his rescue, Ty has dedicated his life to serving Starfleet.
Ty is adept with Phaser weapons and explosive ordnance. He is
especially proficient with Mines.
Vin Asunder
Vin is a hardened veteran of many battles with a checkered
past. The son of a Chinese mother and an English father, Vin
left to explore space and eventually become a mercenary
working for a band of Orion pirates. For several years, Vin
learned to wield heavy weaponry and design explosive
devices. His skills allowed the pirates to prey on shielded
cargo transports. During a raid, a Federation Starship
attacked the pirates. Vin refused to fire on Federation
personnel. After he was captured and placed in a Federation
prison, Vin entered a rehabilitation program sponsored by
Starfleet Command.
Years of intense rehabilitation eventually allowed him to enter
Starfleet Academy. He shared his knowledge of martial arts with
many fellow cadets and became the leader of his squadron before
graduation.
After graduation, Vin served on several different Starships. He has
survived many missions and has the most combat experience of any
Away Team member in Starfleet. Over the years, Vin has become a
bit superstitious. He carries a Tribble named Spike on all his away
missions, believing that the creature brings him luck and prevents
him from becoming a “redshirt statistic.”
Captain Refelian recruited Asunder for his raw physical talents and
highly developed combat skills.
T’Andorla
Intrigued with the ancient history of Vulcan, T’Andorla
studied the period before Surak brought logic to the race, a
time of great savagery and warfare. She learned that some of
the fighting styles still survived today, taught by secluded
Vulcan Masters honoring ancient rites. Seeking out these
trainers, T’Andorla learned old battle meditations to increase
her combat proficiency and awareness during critical
situations. She also found Romulan and Vulcan history
fascinating, and studied it exhaustively.
After graduating from the Vulcan Academy, T’Andorla joined
the elite Vulcan Guard, well-trained guardians for the leaders
of the Vulcan government. As a Vulcan Guard, T’Andorla
distinguished herself several times by helping to defend the council
members against several Romulan assassination plots.
Ironically, T’Andorla’s focused Vulcan nature has allowed her to
become the perfect warrior.
As a Security Officer, she has been trained to use the Phaser Rifle.
She has also become an expert with the Sniper Rifle. As a Vulcan,
she has the natural ability to use the Vulcan Nerve Pinch.
Sinjin Kirk
Sinjin is the grandson of George Samuel Kirk, who was the
brother of the famous Captain James T. Kirk. George Samuel
Kirk and one of his three sons were killed by Denevan neural
parasites in 2267. However, Samuel Kirk’s youngest son,
Craig Kirk, was visiting relatives in Iowa at the time and
survived the disaster. After George Kirk’s death, his son Craig
decided not to enter Starfleet and stayed on Earth to become
an engineer. He raised a family shortly af ter, having Sinjin
and a daughter.
While growing up, Sinjin lived on a rural farm in Iowa with
his family and studied to become an agricultural engineer like his
father. When Sinjin expressed interest in joining Starfleet, Sinjin’s
father discouraged him from applying to the Academy, believing it
to be too dangerous.
19
Page 12

In his third year at the Academy, Sinjin became squad leader of his
class. He continued to study military history, mastering the
Academy’s battle tactics classes. That year, Sinjin recorded one of
the highest scores for the Kobayashi Maru in the Academy’s
history.
When Sinjin graduated, all of his instructors recommended him for
the special Away Team being formed by Captain Refelian. Af ter
reviewing his sterling record, Captain Refelian recruited Sinjin out
of the Academy for his superior tactical knowledge and security
skills. He is the undisputed marksman of the team with his Phaser
Rifle and Sniper Rifle.
ENGINEERING OFFICERS
Brexen Ijoula
Brexen Ijoula is a Trill, a being composed of two sentient
individuals living symbiotically. The symbiont being, Ijoula,
has had more than twenty hosts throughout its long lifespan.
It joined with the female host Brexen five years ago and
entered Starfleet. Ijoula’s vast experience allowed her to
excel at the Academy, graduating at the top of her
Engineering class.
Brexen’s research into electromagnetic field technology has
allowed her to create several weapons capable of disrupting
electronic equipment.
Because of Ijoula’s long lifespan, she has been to many worlds and
encountered many alien races. Not only is Brexen valuable for her
combat engineering skills, but her familiarity with different planets
and enemy races are valuable to an Away Team leader. She is
especially familiar with the Borg, a species she has fought several
times during her life.
Slovaak
The Vulcan Slovaak was born to a well-known family,
descendants of the Vulcan explorers that initiated first
contact with Earth.
Slovaak graduated from the Vulcan Science Academy with top
honors, studying neurochemistry and physics.
After achieving Kolinahr, Slovaak noticed a dramatic increase
in his psychic abilities. Fascinated by the increase in his
telepathic prowess, he began to develop his mental energies.
After many years of study, Slovaak developed the Enhanced
Mind Meld, a powerful mental discipline that allowed him to
initiate a Vulcan Mind Meld from a ranged distance, even through
walls and doors. Slovaak refined the skill’s power so that he could
mentally influence and control a target’s mind and body.
Hearing of his research, Captain Refelian requested that Slovaak be
transferred to the Incursion.
Matrina Sedik
Matrina is a dedicated engineer from Earth. She has
developed an Equipment Enhancement technology that
boosts the efficiency of the Away Team’s weapons.
Matrina was born in the African Confederation to a large
family. Her father was an exobiologist and her mother was a
psychologist that worked on a Starship as ship’s counselor.
As a young adult, Matrina had a high proficiency with
technology and an affinity with computer engineering.
Matrina entered Starfleet to pursue engineering and studied
hard to graduate with honors to become an outstanding
officer.
Captain Refelian recruited Matrina for her flexible thinking and
ability to adapt technology for different needs.
20
21
Page 13

SCIENCE OFFICERS
Aloram Vas
Vas was born to a modest family on Bajor and studied at a
local temple. While interested in science, she concentrated
on religious studies during her early years, until one day she
had an epiphany of her becoming a scientist. Believing it to
be the will of the Prophets, Vas received permission from her
family to join Starfleet Academy. Although the conflict
between the Bajorans and Cardassians troubled her deeply,
Vas realized that she was not destined to f ight in the
conflict. She believed she could affect more positive changes
by joining Starfleet rather than the Bajoran resistance.
At Starfleet Academy, Vas studied physics and transporter
technologies. Since graduating from the Academy, Vas has been
responsible for many improvements to transporter technology.
When Vas was recruited by Captain Refelian to join the Incursion,
she developed a mobile teleportation brig capable of transporting
dead bodies into a transport buffer.
Vas is a deeply spiritual person. She is a dichotomy, a staunch
believer in hard science and the mysticism of faith. She is a loyal
Starfleet officer and a respected member of the Incursion crew.
Ivan Verov
Ivan grew up in central Russia in a large family. While
growing up, it became apparent that Ivan was a child
prodigy.
His parents enrolled Ivan into a special education program at
the Daystrom Institute. Ivan’s photographic memory allowed
him to retain incredible amounts of information.
When Ivan was old enough, he was accepted into Starfleet
Academy. At the Academy, Ivan pursued degrees in several
scientific disciplines, including cybernetics, advanced
computer studies, and energy field studies. One of Ivan’s
inventions included a dynamic stasis field that would later become
a critical part of the U.S.S. Incursion’s Holographic Masking
Technology.
Ivan is widely regarded as one of Starfleet’s brightest minds, a
renaissance scientist who has mastered several fields of study.
Although he is a pure scholar, Ivan is a robust young man who is
more than able to protect himself. During stressful situations, he
unconsciously mumbles in Russian.
Captain Refelian recruited Ivan to become the Chief Science Officer
of the Incursion and to develop new weapons and equipment for
the team.
Yraxys
A Bolian of many talents, Yraxys studied Botanical Sciences
on Bolarus before joining Starfleet Command. She has
developed an Extractor that allows her to take elements from
alien plants so that she can create useful items. With the
extractor, she can create things like healing Hyposprays and
from poisonous plants she can create toxins that can hurt or
paralyze enemies. Yraxys delights in concocting dangerous
brews from exotic and deadly alien plants.
Wes Pulaski
Wes is the nephew of Dr. Catherine Pulaski, noted physician
that once served on the Enterprise. Wes broke a longstanding family medical tradition by not following a medical
career. While always interested in science, Wes preferred the
comfort of technical journals and warp drives over the study
of medicine.
Wes graduated with honors from Starfleet Academy,
furthering the field of advanced engineering mechanics with
a thesis on modified pulse fields. Tapped by Starfleet
Command to join a weapon research division, Wes developed
new defensive systems and advanced shielding technology for
prototype Starships.
Captain Refelian recruited Wes as an engineer to develop new
weapons for his Away Teams and to improve the stealth technology
on the U.S.S. Incursion. He is a dedicated and enthusiastic officer.
Wes utilizes the Audio Decoy, a technology that allows him to
distract enemy guards.
22
23
Page 14

WEAPONS
Each member of the Away Team is equipped with an arsenal of
weaponry. Most of these weapons are restricted to a specific class and
can only be used by a trained officer.
You will undoubtedly discover more weapons during your missions
aboard alien vessels. It will be up to you to discover the powers and
functions of these weapons.
Phaser
A slightly modified Type-II Standard Phaser has been issued to every
Away Team member. This dependable weapon will serve you well for
most occasions. These Phasers have been optimized for the crew of
Incursion—the settings have been limited so that the recharge feature
will never deplete the power supply. These Phasers feature two main
settings: Kill and Stun.
• Stun Setting: On this setting, a single shot will knock out most
enemies for a short period. After 10 to 15 seconds, the effects of
the stun will wear off. Most guards will react after being stunned,
and will definitely attempt to find out who attacked them. This is a
good setting to use when you want to limit casualties. The stun
setting allows you to incapacitate guards without killing, allowing
you to move on to other areas.
• Kill Setting: The kill setting inflicts serious damage to enemies.
Most people will die from three to four shots from a Phaser set to
kill. Because some of the enemies you will face wear some type of
protective armor, it may require three or more shots to take them
down. Other enemies, like the Borg, could become immune to your
Phaser blasts. A Phaser set to kill is a good standard weapon to use
for most occasions. However, you will find that the special weapons
carried by the other Away Team members are far more effective.
Phaser Rifle
The Type-III Phaser Rifle is a more powerful version of the standard
issue Phaser. The Phaser Rifles have Stun and Kill settings. Like the
Phaser, the Phaser Rifle has unlimited power ammunition, but this has
necessitated the limitation of two settings. The Kill setting of the
Phaser Rifle does more physical damage than that of a standard
Phaser. These rifles have been issued to Security Officers.
Sniper Rifle
The most deadly weapon in the Away Team arsenal, the Sniper Rifle
uses packets of phased molecular particles to take down an enemy
target. The Sniper Rifle has the longest range of all the weapons,
and can only be used by trained Security Personnel.
When the Sniper Rifle is selected, the cursor becomes a circular
crosshair. When the crosshair is green you have a clear shot. If the
crosshair is red your shot is either obstructed or out of range.
Concussion Grenade
The Concussion Grenade is a special device issued to trained
personnel only. A few seconds after being thrown, the Grenade will
explode with massive concussive force, taking down any targets in
its range.
To throw, select the Grenade from the inventory. The cursor will
turn into a green oval target. Throw by right-clicking the area
where you want the Grenade to land.
Electromagnetic Pulse Grenade
When the EM Pulse Grenade detonates, it unleashes a pulse that
disrupts all nearby electrical equipment. You can use an EM Pulse
Grenade to disable security cameras and terminals. Starfleet
Research reports that these Grenades also stun the Borg for long
periods of time.
Like the Concussion Grenade, you can throw the EM Pulse Grenade
by selecting it and right-clicking the area where you want it to
land.
Proximity Mine
These powerful Mines are only given to trained Security Officers. A
Proximity Mine will detonate if an enemy approaches within its
blast radius. Because of a Friend-or -Foe signal in the comm badges
of your Away Team, your own team will not set these Mines off.
However, an enemy can walk near the Mine and set it off, damaging
anyone in the blast radius.
Remote Mine
Your team has been researching the Remote Mine for some time. It
is possible that you could receive this weapon later in the game.
You will receive upgraded weapons like this one faster if you
complete all the Secondary Objectives for a given mission.
24
25
Page 15

The Remote Mine is similar to a Proximity Mine, except that you can
detonate it whenever you like. When you have the Remote Mine
selected, you will see a Detonate button on the bottom left of your
screen. Clicking on Detonate will blow up all remote Mines on the
map, even those left by other players.
Neural Disruptor
Only Medical Officers are trained to wield the Neural Disruptor. A
strike from a Neural Disruptor causes havoc to a victim’s nervous
system. One shot from a Neural Disruptor will incapacitate any one
target. The Neural Disruptor must be used at close range. To attack
with the Neural Disruptor, select the weapon and right-click on the
target. Neural Disruptors have limited charges.
Anti-Matter Charges
These explosive charges can only be handled by Security Officers.
Because of their explosive power, these weapons can only be used
on certain missions to destroy specific targets. These items are
used to blow up structures, not enemies, so you will not be able to
use them for combat.
EQUIPMENT
Cloaking Band
Usable only by Science Officer Ivan Verov, the Cloaking Band turns
Ivan invisible for brief periods of time. When activated, the
Cloaking Band allows Ivan to be completely invisible until the
energy reserve is depleted. However, he can still be heard. Once the
band is out of energy, it cannot be reused until Ivan can charge it
again for the next mission.
GAME TIP: If you use the Cloaking Band for short bursts of
invisibility, you will be able to stealthily infiltrate more
areas. Monitor the energy meter for this item carefully!
beyond the patrol routes of guards). In the inventory of the person
with the Brig, you will see a control device. When you want to
beam a body into the Brig, use the device on the body by right-
clicking it.
Holographic Projector
There are rumors that Starfleet Scientists have created a
Holographic Projector. If you can f ind this item, you will be able to
create a virtual image of another guard anywhere you like. This
projector is perfect for distracting enemy guards.
Hypospray
These invaluable medical tools heal wounds. Hyposprays are only
usable by medics.
GAME TIP: You may often find Hypospray refills in enemy
territories.
Tricorder
The Tricorder is a multipurpose scientif ic and technical instrument.
Developed by Starfleet, the Tricorder incorporates sensors,
computers, and recorders in a convenient portable form.
Use the Tricorder to give you information about your environment.
Once selected, the cursor will change to the Tricorder cursor and
will update information in the text window whenever the cursor
hovers over something.
Medical Tricorder
Like a standard Tricorder, the Medical Tricorder is tuned for medical
purposes. Certain missions may order you to use the medical
tricorder to perform a more thorough examination of a subject.
26
Teleportation Brig
This useful item uses modified transporter technology to beam
away fallen enemies. During a mission, a guard will enter a
heightened sense of alert or summon other guards if a body is
seen. With the Teleportation Brig, you can beam a body into the
Brig’s containment buffer so guards won’t see it.
To use the Brig, select it and f ind a secluded area to activate it. The
Brig remains on the ground where it is activated (choose an area
Audio Decoy
The Audio Decoy emits sound pulses to distract enemies. Using a
unique sonic enhancer, the Audio Decoy can “throw” sounds
anywhere you want.
Once the Audio Decoy is selected, you will see an oval cursor. This
cursor will turn green when the decoy can be used. If you right-
click, you will create a noise emanating from that location. If an
enemy hears the noise, the sound will most likely lure the guard
away.
27
Page 16

Herbal Extractor
Only skilled personnel wield the Herbal Extractor. The Extractor can
harvest specific plants so that the character can create useful
items: Healing Elixirs and Paralysis Toxins, though Paralysis Toxins
can only be extracted once Yraxys has completed her research.
A healing elixir heals wounds just like a Hypospray, though it heals
about half of the damage that a Hypospray does. Paralysis Toxins
are as potent as Neural Disruptors.
When the Extractor is selected, you will see the Extractor Cursor.
When the cursor is red, there is nothing to extract. If you move the
cursor over a plant and the cursor turns green, you can harvest
that plant to create something. Plants suitable for healing
extraction show a small white berry in the leaves. Plants suitable
for paralysis extraction are relatively small, unobtrusive plants. A
tricorder can be used in-game for assistance in locating them.
SKILLS
Vulcan Nerve Pinch
The two Vulcan characters, Slovaak and T’Andorla, can use this skill.
The skill requires the Vulcan to approach the victim close enough so
that fingers can grip the nerve points at the base of the neck. A
successful strike with a Vulcan Nerve Pinch will incapacitate a
victim for a short period of time.
To use the Enhanced Mind Meld, select the skill and right-click on a
target. You can initiate this skill over a distance. You can sever the
link at any time by clicking on Break Control in the text window.
Computer Skill
The Computer Skill can be used by Science Officers to access alien
computer terminals. Some missions require at least one Computer
Skill expert to retrieve critical information buried in an enemy
computer database.
Security Doors and Systems
This skill allows a character to bypass security systems. Some
missions require at least one Security Specialist to deactivate an
enemy security device.
Terminal Repair
Terminal Repair is a skill only available to Engineers. It allows a
user with this skill to tap into computer systems that have been
damaged.
ENEMIES
BORG
28
Equipment Enhancement
This Engineer skills augments the range and/or damage of all
weapons in the target character’s inventory. Once the skill is
selected, you can then choose one of your Away Team members.
The enhancement effect only lasts for a short period of time.
Enhanced Mind Meld
Engineer Slovaak perfected this unique skill after years of difficult
training. By performing a rapid Mind Meld, Slovaak is able to
disorient the mind of his victim and control his actions directly. The
Enhanced Mind Meld requires extraordinary concentration, so
Slovaak cannot move while he is joined with a target. Also, Slovaak
has a limited pool of psychic energy—when this psychic energy is
depleted, Slovaak cannot perform any more Mind Melds, and his
psychic energy will take a long time to come back to him. If the
enemy Slovaak is controlling is attacked, Slovaak will also take
damage because of the link.
The Borg are a relentless species, part organic and part machine.
They have taken over countless worlds and assimilate conquered
enemies into their vast Collective. Those beings that are assimilated
lose their identities and serve the Collective as Drones.
Unfortunately, the Borg possess many powerful abilities and few
weaknesses. Utilizing highly advanced technology, Borg Drones have
the ability to capture and assimilate others, converting them into
Borg Dones to increase the Collective’s efficiency. Defensively, the
Borg can adapt their personal shields to the frequency of different
types of energy weapons, including Federation Phasers.
Because they share a single mind, an attack against a single Borg
instantly alerts any nearby drones.
29
Page 17

30
KLINGONS
Klingon warriors revel in the glory of honorable combat. All
Klingons are very experienced combat veterans and formidable
opponents.
The home planet of the Klingon Empire is Qo’noS, a heavily
populated and well-fortified world where elite Klingon warriors
train.
ROMULANS
Few races are as cunning and dangerous as the Romulans. Like the
Klingons, Romulans are a warlike race. However, Romulans are not
bound by honor, in fact most Romulan centurions use trickery and
treachery most effectively. Romulans share a common ancestry with
Vulcans.
Some high-ranking Romulans also utilize cloaking technology to
hide their presence. They also use cloaked Mines to stop invaders—
you can use a tricorder to detect cloaked Mines when you enter
Romulan territory.
The home world of the Romulan Empire is Romulus, a dangerous
place beyond the Neutral Zone.
GAMEPLAY TIPS
• If you enjoy a gaming experience with more strategy than reflex
action, pause the game and issue orders to your crew. This will
allow you to play the game at your pace and will help you during
combat.
• The Borg will attack if they perceive you to be a threat. If you
fire at them, all Borg in the surrounding vicinity will activate to
assimilate you. Also, the Borg possess a defensive capability that
allows them to adapt to a Phaser’s energy frequency. You will
only have a few shots before the Borg adapt, so use them wisely.
• During a mission, seek out stockpiles of items to replenish your
weapons and equipment. You will often be able to take an
enemy’s cache of weapons and Hypospray refill cartridges.
• You should check your mission objectives frequently to see if
your goals have been changed or if you’re unsure of what to do
next. You can check your mission objectives at any time by
pressing the O key.
• If you bring up your Mini-Map, the locations of your main
objectives will show up on the map as animating blue squares.
Bring up the Mini-Map and look for these squares when you’re
not sure where to go next. You can access the Mini-Map by
pressing the M key.
• Pay close attention to your Secondary Objectives. By completing
the secondary objectives, you earn special upgrades for your
Team members.
• Use Slovaak’s Enhanced Mind Meld to disrupt a guard’s patrol
route. By just controlling a guard for a few seconds, you can
save Slovaak’s mental energy reserves and avoid killing an
enemy.
MULTIPLAYER
Away Team features a cooperative mode that can be played over a
LAN between two players. During a network game, the host and
other player share control of the Away Team members. Either player
may select any team members they choose at any point, just as
long the other player does not have that unit selected. In-game
chat is available to help players coordinate their team orders. (By
default, the T key brings up the in-game chat window.) You must
also enter a player name before joining a game.
To start a multiplayer game, click Play Network Game from the
Away Team Main Menu. This will bring you to the Create/Join
screen. In this screen, already available games are displayed in the
window at the left hand side, the upper right is where you can
enter your player name.
Select Type of Netgame – This is where the host can select the type
of network protocol to use in the game. Options are TCP/IP (this is
the default protocol) and IPX. If one or the other of these
protocols is not installed on your computer, this protocol cannot be
selected.
Create Game – This allows the host to create a new game, taking
them to the Net Lobby screen.
Join Game – Allows a player to join an already created game. To
join, simply highlight an available game from the list on the lef t,
enter your desired player name, then click this button. (Player must
also enter a player name to be able to proceed).
Refresh List – Refreshes the available game list to update it with
recently created games.
31
Page 18

32
Cancel – Returns you to the Away Team Main Menu.
Once the host has created a game and a player joins, both are
brought to the Net Lobby.
In this screen, the host selects the mission to be played. Available
missions are listed in the lower left side of this screen, a brief
description and outline of mission objectives is given at the lower
right. (When you play for the first time, only Mission 1 will be
available; you must complete a mission to make the next one
available.)
There is a chat window at the upper left. To use the chat, click on the
text box to the left of send button to activate the cursor there, then
type in your message and click Send (or press the Enter key). The
upper right hand window displays the names of players in the game.
Once a mission has been selected and players are ready to continue,
the host clicks Start Game to proceed.
Exit to Main Menu – Exits you to the Away Team Main Menu.
Special Ops Briefing – At this screen, players receive a more detailed
briefing of the mission they are about to enter. Players will also
sometimes receive special additional briefings informing them of new
technologies that have become available.
Player Status – This list shows the status of each player, either ready
or waiting.
Exit – Exits game and returns player to Main Menu.
Replay – Will repeat the briefing for you.
Continue – Takes you to next portion of briefing. (This won’t always
be available, as some missions only have the initial briefing.)
End Briefing – Clicking this changes your Player status from Waiting
to Ready. Once both players have clicked this, you will either continue
on to the Away Team Com to select your team, or load into the
mission, depending on which mission you are in.
Away Team Com – In this screen, the host will select the team
members to be taken on the mission. This screen is identical to the
Away Team Com screen in Single Player, and is thoroughly described
in the Single Player portion of this manual. Clicking Start Mission
once a team has been selected will launch both host and client into
the game.
Game Play – Game play in Multiplayer mirrors the Single Player
experience, with a few exceptions. Only the host may pause the
game—if the client needs the game to be paused, they can still press
the Pause key (Enter by default) and the host will receive a message
that the other player would like the game to be paused. Pressing
the key again during pause time will send a message that player
would like the game to be unpaused. Left-clicking on the
Chronometer at the lower right of the screen accomplishes the same
thing.
Chat – Players may type chat in-game to one another. The chat
window is opened by hitting the T key (by default).
Ending the Game or Restarting – As in the Single Player game, your
mission will end if one of your team dies, or you fail a Primary
Objective. Once a mission is failed, the host will get a window with
End Game and Restart options. Clicking End Game brings the host
back to the Main Menu, and clicking Restart will load the host and
client back into the mission with the team that was previously
selected. The client will only see an End Game option, and should
only click this if they intend to quit playing the current game. The
client will launch automatically if the host clicks Restart. At any
time during the mission, either player may press the Esc key to
bring up the in-game menu. This menu functions just as the one in
Single Player does, with the exception of Load/Save Games options.
Completing a Mission – Once all primary objectives have been
completed, your mission will end successfully. Upon clicking
Continue, you will be brought to the Debriefing screen where you
can review the results of your mission. Clicking Continue from here
will bring you back to the Net Lobby, where you can begin your next
mission.
UPDATES AND FUTURE RELEASES
Please refer to the Documentation folder on the Away Team CD or in
the Away Team install directory on your hard disk for updates to
this manual and for the latest support and compatibility
information. The information presented in this manual cannot be
considered 100% final at the time of printing.
Updates for Away Team may be available for download in the near
future from www.stawayteam.com and www.activision.com.
33
Page 19

CUSTOMER SUPPORT
You should read through the manual and the readme file on the CD before
contacting Activision Customer Support. Additionally, if you have internet access,
check out our Top Solutions and/or search our troubleshooting database at:
http://www.activision.com/support.
Please ensure that your computer system meets the minimum system requirements
that are listed on the bottom of the box. Our Customer Support representatives will
not be able to help customers whose computers do not meet the requirements. So
that we can better help you, please have the following information ready:
• Complete product title (include version number)
• Exact error message reported (if any) and a brief description of the problem
• Your computer’s processor type and speed (e.g., Pentium 200 MHz)
• Amount of RAM
• Make and model of your video and sound cards
(e.g., Diamond Viper V770, Creative Sound Blaster Live Platinum)
• Make & model of your CD-ROM or DVD-ROM drive
(e.g., Samsung SC-140)
• Operating system (e.g., Windows 95)
NOTE: Please do not contact Customer Support for hints/codes/
cheats; only technical issues.
NOTE: Internet/e-mail support is handled in English only.
INTERNET
http://www.activision.com/support
Our support section of the web has the most up-to-date information available
including patches that can be downloaded free-of-charge. We update the support
pages daily so please check here first for solutions. By selecting the game you are
inquiring about you can view the Top Solutions for the game to date. If you don’t
find your question/solution there try using the Search.
NOTE: You must be at least the age of 13 years old in order for us to assist you
when contacting Customer Support.
are running the program from when e-mailing to the above address. A response
may take anywhere from 24-72 hours depending on the volume of messages we
receive and the nature of your problem. During the first few weeks of a game
release and during holiday seasons the response time may take a little longer.
NOTE: The multiplayer components of Activision games are handled only
through internet/e-mail.
PHONE
(310) 255-2050
You can call our 24-hour voice-mail system for answers to our most frequently
asked questions at the above number. Contact a Customer Support representative
at the same number between the hours of 9:00 am and 5:00 pm (Pacific Time),
Monday through Friday, except holidays. When calling please make sure you are in
front of your computer with the power on and have all the necessary information
as listed above at hand.
Please do not send any game returns directly to Activision. It is our policy that
game returns must be dealt with by the retailer or online site where you
purchased the product.
IN AUSTRALIA & THE U.K.
For technical support:
• In Australia please call 1902 263 555. Calls are charged at $1.50 per minute.
• In the U.K. please call +44 (0)870 2412148 (between 8:00 a.m. and 7:00 p.m.
UK time)
If you have any comments, questions or suggestions about this game or any other
Activision product, you can contact us in the U.K. at +44 (0) 1753 756 189
between the hours of 1:00pm and 5:00pm (U.K. time) Monday through Friday,
with the exception of holidays.
For Technical Support and Customer Service in areas not listed, please contact
your local distributor or Activision via online services. (Please note that online
support is available in English only.)
34
E-MAIL
support@activision.com
The best way for you to help us aid you is through the use of the E-Mail Support
Request Form. Simply click on the E-Mail link from our Support section of our
website. You can also e-mail us directly at the above e-mail address. Please ensure
that you include all of the bulleted information asked above for the computer you
35
Page 20

CREDITS
REFLEXIVE ENTERTAINMENT
Producer . . . . . . . . . . . . .Lars Brubaker
Project Lead . . . . . . . . . . . . .John Price
Art . . . . . . . . . .Chad Max (Art Director)
Nathan Campbell
Computer Rendered Animation
. . . . . . . . . . . . . . . . . . . . . .Chad Max
Level Design . . . . . . . . . . . .Ion Hardie
. . . . . . . . . . . . . . . . . . . . .Zach Young
Brent Spiner . . . . . . . . . . . . . . . . . . . . . . . . . .Commander Data
Michael Dorn . . . . . . . . . . . . . . . . . . . . . . . . . .Ambassador Worf
Jerome Butler .Captain Refelian / Klingon Guard / Klingon Scientist
Iris Bar-Ziv . . . . . . . . . .Sirta D’Qua / Romulan Female Commander
Carolyn Hennesey . . . . . . . . . . . . . . . . . . . . . . . . . . .Aloram Vas
David Graf . . . . . . . . . . . . . . . . . . . . . . . . . . . . . . . . .Ty Mijoral
Matt Prescott Morton . . . . . . . . . . . . . .Wes Pulaski/Captain Jurai
Lise Simms . . . . . . . . . . . . . . . . . . . . . . . . . . . . . . . . .T’Andorla
Jimmie Skaggs . . . . . . . . . . . . .Quint Freedman / Romulan Guard
June Chadwick . . . . . . . . . . . . . . . . . . . . . . . .Dr. Sheila Thatcher
Tim Lounibos . . . . . . . . . . . . . . . . . . . . . . . . . . . . .Vin Asunder
Henri Lubatti . . . . . . . . . . . . . . . . . . . . . . . . . . . .Kolanis Mikala
Ravil Isyanov . . . . . . . . . . . . . . . . . . . . . . . . . . . . . . .Ivan Verov
Scott Lawrence . . . . . . . . . . . . . . . . . . . . . . . . . . . . . . .Slovaak
Kim Rhodes . . . . . . . . . . . . . . . . . . . . . . . . . . . . . .Yulana Oxila
Michael E. Strickland . . . . . . . . . . . .Sinjin Kirk / Federation Guard
Beverly Leech . . . . . . . . . . . . . . . . . . . . . . . . . . . . . . . . .Yraxys
Renee Goldsberry . . . . . . . . . . . . . . . . . . . . . . . . .Matrina Sedik
Devon Raymond . . . . . . . . . . . . . . . . . . . . . . . . . . .Brexen Ijoula
Joseph Ruskin . . . . . . . . . . .Admiral Nolotai / Vulcan Master N’Kal
Alexander Enberg . . . . . . . . . . . . . . . . . . . . . . .Vulcan Acoloye /
36
Jeff McAteer
Dylan Gottlieb
Mike Suyo
VOICE TALENTS
Programming
. . . . . . .John Price (Lead Programmer)
Lars Brubaker
. .James Smith (Director of Engineering)
Steve Ecker
Loren Osborn
Director of Finance . . . . . .Ernie Ramirez
Chairman . . . . . . . . . . . . . .Marlin Eller
Production Testing . . . . . .Ernie Ramirez
Sound Effect Mixing . . . . . . .Ion Hardie
Story . . . . . . . .Ion Hardie, Eric Dallaire
Character Dialog . . . . . . . . . .Ion Hardie
Zach Young
Eric Dallaire
Romulan Commander/Vulcan Guard
VO Director . . . . . . . . .Jonathan Knight
VO Producer . . . . . . . . . . . .Eric Dallaire
CASTING
Casting Director . . . . . . . . . .Ron Surma
Casting Assistant . . . . .Chadwick Struck
Voice Over Recorded at:
POP Sound
Salami Studios
ACTIVISION
PRODUCTION
Producer . . . . . . . . . . . . . .Eric Dallaire
Executive Producers . . .Jonathan Knight
. . . . . . . . . . . . . . . . . . . .Mark Lamia
Production Coordinators
. . . . . . . . . . . .Jim Hudson, Aaron Gray
INSTALLER
. . . . . . . . .John Fritts, Drew Petterson
LOCALIZATION
Localization Mgr . . . .Stephanie O’Malley
U.S. MARKETING
Global Brand Manager . .Jenny Stornetta
Associate Brand Manager . .Mike Webster
Vice President – Global Brand
Management . . . . . . . . . .Tricia Bertero
Executive Vice President – Global
Publishing and Brand Management
. . . . . . . . . . . . . . . . . . .Kathy Vrabeck
PUBLIC RELATIONS
VP Corporate Communications
. . . . . . . . . . . . . . . . .Maryanne Lataif
Director Corporate Communications
. . . . . . . . . . . . . . . . . . .Michelle Nino
Senior Publicist
. . . . . . . . . . . . . . . . . .Michael Larson
INTERNATIONAL
United Kingdom
Senior Brand Manager. .Matti Kuorehjarvi
Associate Brand Manager . . . .Bruni Brar
Director of Global Brand Management –
Europe . . . . . . . . . . . . .Roger Walkden
UK PR Manager/Specialist Media
. . . . . . . . . . . . . . . . . . . . . .Guy Cunis
Head of Publishing Services
. . . . . . . . . . . . . . . . . . .Nathalie Dove
Localization Project Asst . . . . .Mark Nutt
Creative Services Graphic Designer
. . . . . . . . . . . . . . . . . . . . .Alex Wylde
Production Manager . . . .Heather Clarke
Germany
Brand Manager . . . . . . . .Achim Kaspers
Junior Brand Manager . .Stephan Ricken
Localization Director
. . . . . . . . . . . . . . . . .Natascha Conrad
Localization Project Manager
. . . . . . . . . . . . . . . . . .Bettina Bucher
Localization Project Manager
. . . . . . . . . . . . . . . . . . . .Klaus Müller
PR Manager . . . . . . . . . .Markus Wilding
Australia/Asia Pacific
Marketing Director Asia/
Pacific Region . . . . . . . . . .Paul Butcher
Product Manager . . . . . . . .Leigh Glover
Marketing Coordinator . . .Elisa Biberian
France
Marketing Director . . . . . .Bernard Sizey
Brand Manager . . . . . . .Carole Chachuat
Associate Brand Manager
. . . . . . . . . . . . . . . .Gautier Ormancey
PR Manager . . . . . . . .Diane de Domecy
37
Page 21

QUALITY ASSURANCE TEAM
QA Project Lead . . . . . . . . .Matt McClure
Floor Lead . . . . . . .Jay Anthony Franke
Senior QA Project Lead . . . .Juan Valdes
Manager, PC Testing . . . . .Sam Nouriani
TESTERS
. . . . . . . . .Doug Mirabello, Andy Lamp
Michael Beck, Henry Villanueva
Kevin Spangler, Rob Fleischacker
Jesse Shannon, Brad Arnold
Thaddeus Sasser, Damien Fischer
LOCALIZATION
Lead . . . . . . . . . . . . . .Eric Zimmerman
Floor Lead . . . . . . . . . . . .Jeffry Moxley
Testers . . . . . . . . . . . . . . . . . .Frank So
Anthony Korotko, Dustin Thomas
SPECIAL THANKS
. . . . . . . . . . . . . . . . . .Laird Malamed
Bill Anker, Graham Fuchs
Mitch Lasky, Zack Norman
Doug Pearson, Thaine Lyman
Suzy Luko, Chad Bordwell
George Rose, Jim Summers
Jason Wong, Sion Gibson
Indra Gunawan, Todd Komesu
Scott Kiefer, Tanya Langston
Joe Favazza, Nadine Theuzillot
Chad Siedhoff, Mike Walker
Mike Larson, Daniel Hagerty
Frank Gale, Stephen Washington
Francis O’Neill, Paul Baker
Glenn Vistante, Jeff Holzhauer
Jeremy Gage
INTRO MOVIE CINEMATIC
Cyberlore Studios
Lead Artist . . . . . . . . . . . . .Dave White
Artist . . . . . . . . . . . . . . . .Matt Skutnik
MUSIC COMPOSITION
Danny Pelfrey, Earmark Productions
CREATIVE SERVICES
V.P., Creative Services . . . .Denise Walsh
Manager, Creative Services
. . . . . . . . . . . . . . . . . . . . . .Jill Barry
Ignited Minds LLC
Manual Layout and Design
. . . . . . . . . . . . . . . . . . . .Sylvia Orzel
Mike Rivera, Belinda Van Sickle
FRIENDS
Danny and Linda Pelfrey, Earmark
Productions
Joe Minton, Cyberlore Studios
Christina Whalen
Terri Hardie
Teresa Brubaker
Angela Adams
Carol Martino
VERY SPECIAL THANKS
Gene Roddenberry
DeForest Kelley
EXTRA SPECIAL THANKS
Our Friends who host Star Trek Sites and
Away Team Fan Sites
CODE RELEASE GROUP
Manager, Code Release Group
. . . . . . . . . . . . . . . . . . . . .Tim Vanlaw
Lead . . . . . . . . . . . . . . .Brad Saavedra
COMPATABILITY
Lead, QA Network Testing . . .Chris Keim
NETWORK LAB
Lead, QA Compatibility Testing
. . . . . . . . . . . . . . . . . . . . .Neil Barizo
NETWORK LAB TESTERS
. . . . . . . . . .Jason Kim, John Sweeney
CUSTOMER SUPPORT
Customer Support Manager
. . . . . . . . . . . . . . . . . .Bob McPherson
Customer Support Leads
. . . . . .Rob Lim, Gary Bolduc, Mike Hill
38
ADDITIONAL
VIACOM CONSUMER
PRODUCTS/PARAMOUNT
PICTURES LIASONS
Director, Product Development –
Interactive and Technology
. . . . . . . . . . . . . . . . . . . . .Harry Lang
Supervisor, Product Development –
Interactive and Technology
. . . . . . . . . . . . . . . . . . . . . .Dan Felts
VIACOM CONSUMER
PRODUCTS/PARAMOUNT
PICTURES
Rick Berman
Dave Rossi
Pam Newton
Terri Helton
Andrea Hein
Sylvia Cascallar
VISIONEER TESTERS
Mike Allen, Eric Aupperlee, Tim Barnes,
CJ Biro, Jeffrey Call, Wayne Chang,
Chris Chao, Armond B.Clark,
Dan Condon, Aaaron Cox, Chad Cutlip,
James Dicken, Ethan Dicks, Steve Erhardt,
David Finan, Gary Gray, Philip Hansen,
Clint Hastings, Jeff Hexter, Iain Hill,
Seth Hoe, Josh Horowitz, Ben Jones,
Mark W.Kaelin, Scott Kasai,
Vince Leamons, Craig Lewis,
Mick McCurdy, Matthew Monaco,
Jeff Reitman, Joseph Ruffolo,
David Seale, Ken Steiner, Joshua Tacey,
David Teague, Mark Valentine,
John Vernon, Glenn Vistante,
Timothy Wilson, John Yan, Baldwin Yen,
Dominick Ziccarelli
Uses Bink Video.
Copyright © 1997-2000
by RAD Game Tools, Inc.
39
Page 22

SOFTWARE LICENSE AGREEMENT
IMPORTANT - READ CAREFULLY: USE OF THIS PROGRAM IS SUBJECT TO THE SOFTWARE LICENSE TERMS SET FORTH BELOW.
"PROGRAM" INCLUDES ALL SOFTWARE INCLUDED WITH THIS AGREEMENT, THE ASSOCIATED MEDIA, ANY PRINTED MATERIALS, AND
ANY ON-LINE OR ELECTRONIC DOCUMENTATION, AND ANY AND ALL COPIES OF SUCH SOFTWARE AND MATERIALS. BY OPENING
THIS PACKAGE, INSTALLING, AND/OR USING THE PROGRAM AND ANY SOFTWARE PROGRAMS INCLUDED WITHIN, YOU ACCEPT THE
TERMS OF THIS LICENSE WITH ACTIVISION, INC. ("ACTIVISION").
LIMITED USE LICENSE. Subject to the conditions described below, Activision grants you the non-exclusive, non-transferable, limited right
and license to install and use one copy of this Program solely and exclusively for your personal use. All rights not specifically granted
under this Agreement are reserved by Activision and, as applicable, Activision’s licensors. This Program is licensed, not sold, for your
use. Your license confers no title or ownership in this Program and should not be construed as a sale of any rights in this Program.
LICENSE CONDITIONS.
You shall not:
• Exploit this Program or any of its parts commercially, including but not limited to use at a cyber cafe, computer gaming center or any
other location-based site. Activision may offer a separate Site License Agreement to permit you to make this Program available for
commercial use; see the contact information below.
• Use this Program, or permit use of this Program, on more than one computer, computer terminal, or workstation at the same time.
• Make copies of this Program or any part thereof, or make copies of the materials accompanying this Program.
• Copy this Program onto a hard drive or other storage device; you must run this Program from the included CD-ROM (although this
Program itself may automatically copy a portion of this Program onto your hard drive during installation in order to run more
efficiently).
• Use the program, or permit use of this Program, in a network, multi-user arrangement or remote access arrangement, including any
online use, except as otherwise explicitly provided by this Program.
• Sell, rent, lease, license, distribute or otherwise transfer this Program, or any copies of this Program, without the express prior written
consent of Activision.
• Reverse engineer, derive source code, modify, decompile, disassemble, or create derivative works of this Program, in whole or in part.
• Remove, disable or circumvent any proprietary notices or labels contained on or within the Program.
Export or re-export this Program or any copy or adaptation in violation of any applicable laws or regulations of the United Sates
•
government.
OWNERSHIP. All title, ownership rights and intellectual property rights in and to this Program and any and all copies thereof (including
but not limited to any titles, computer code, themes, objects, characters, character names, stories, dialog, catch phrases, locations,
concepts, artwork, animation, sounds, musical compositions, audio-visual effects, methods of operation, moral rights, any related
documentation, and "applets" incorporated into this Program) are owned by Activision, affiliates of Activision or Activision’s licensors. This
Program is protected by the copyright laws of the United States, international copyright treaties and conventions and other laws. This
Program contains certain licensed materials and Activision’s licensors may protect their rights in the event of any violation of this
Agreement.
PRIVACY. Please be advised that the engine of this Program is able to collect, accumulate and report to Activision certain information
about your computer, including processor, memory, hardware and connection information. However, the engine of this Program cannot
and does not collect any personally identifiable information about you. The computer information that is collected simply helps Activision
to understand and analyze broad, anonymous market information about our consumers, so that Activision can better serve their needs
and demands. Activision will only share such information with third parties, if at all, in the aggregate, reflecting overall computer features
and capabilities.
PROGRAM UTILITIES. This Program contains certain design, programming and processing utilities, tools, assets and other resources
("Program Utilities") for use with this Program that allow you to create customized new game levels and other related game materials for
personal use in connection with the Program ("New Game Materials"). The use of the Program Utilities is subject to the following
additional license restrictions:
• You agree that, as a condition to your using the Program Utilities, you will not use or allow third parties to use the Program Utilities
and the New Game Materials created by you for any commercial purposes, including but not limited to selling, renting, leasing,
licensing, distributing, or otherwise transferring the ownership of such New Game Materials, whether on a stand alone basis or
packaged in combination with the New Game Materials created by others, through any and all distribution channels, including, without
limitation, retail sales and on-line electronic distribution. You agree not to solicit, initiate or encourage any proposal or offer from any
person or entity to create any New Game Materials for commercial distribution. You agree to promptly inform Activision in writing of
any instances of your receipt of any such proposal or offer.
• If you decide to make available the use of the New Game Materials created by you to other gamers, you agree to do so solely without
charge.
New Game Materials shall not contain modifications to any COM, EXE or DLL files or to any other executable Product files.
•
• New Game Materials may be created only if such New Game Materials can be used exclusively in combination with the retail version of
40
the Program. New Game Materials may not be designed to be used as a stand-alone product.
• New Game Materials must not contain any illegal, obscene or defamatory materials, materials that infringe rights of privacy and
publicity of third parties or (without appropriate irrevocable licenses granted specifically for that purpose) any trademarks,
copyright-protected works or other properties of third parties.
• All New Game Materials must contain prominent identification at least in any on-line description and with reasonable duration on the
opening screen: (a) the name and E-mail address of the New Game Materials’ creator(s) and (b) the words "THIS MATERIAL IS NOT
MADE OR SUPPORTED BY ACTIVISION."
LIMITED WARRANTY: Activision warrants to the original consumer purchaser of this Program that the recording medium on which the
Program is recorded will be free from defects in material and workmanship for 90 days from the date of purchase. If the recording
medium is found defective within 90 days of original purchase, Activision agrees to replace, free of charge, any product discovered to
be defective within such period upon its receipt of the Product, postage paid, with proof of the date of purchase, as long as the
Program is still being manufactured by Activision. In the event that the Program is no longer available, Activision retains the right to
substitute a similar program of equal or greater value. This warranty is limited to the recording medium containing the Program as
originally provided by Activision and is not applicable to normal wear and tear. This warranty shall not be applicable and shall be void if
the defect has arisen through abuse, mistreatment, or neglect. Any implied warranties prescribed by statute are expressly limited to the
90-day period described above.
EXCEPT AS SET FORTH ABOVE, THIS WARRANTY IS IN LIEU OF ALL OTHER WARRANTIES, WHETHER ORAL OR WRITTEN, EXPRESS
OR IMPLIED, INCLUDING ANY WARRANTY OF MERCHANTABILITY, FITNESS FOR A PARTICULAR PURPOSE OR NON-INFRINGEMENT,
AND NO OTHER REPRESENTATIONS OR CLAIMS OF ANY KIND SHALL BE BINDING ON OR OBLIGATE ACTIVISION.
When returning the Program for warranty replacement please send the original product disks only in protective packaging and include:
(1) a photocopy of your dated sales receipt; (2) your name and return address typed or clearly printed; (3) a brief note describing the
defect, the problem(s) you are encountered and the system on which you are running the Program; (4) if you are returning the Program
after the 90-day warranty period, but within one year after the date of purchase, please include check or money order payable to
Activision for $10 U.S. (A$17 for Australia, or £10.00 for Europe) currency per CD. Note: Certified mail recommended.
In the U.S. send to:
Warranty Replacements
Activision, Inc.
P.O. Box 67713
Los Angeles, California 90067
LIMITATION ON DAMAGES: IN NO EVENT WILL ACTIVISION BE LIABLE FOR SPECIAL, INCIDENTAL OR CONSEQUENTIAL DAMAGES
RESULTING FROM POSSESSION, USE OR MALFUNCTION OF THE PROGRAM, INCLUDING DAMAGES TO PROPERTY, LOSS OF
GOODWILL, COMPUTER FAILURE OR MALFUNCTION AND, TO THE EXTENT PERMITTED BY LAW, DAMAGES FOR PERSONAL
INJURIES, EVEN IF ACTIVISION HAS BEEN ADVISED OF THE POSSIBILITY OF SUCH DAMAGES. ACTIVISION’S LIABILITY SHALL NOT
EXCEED THE ACTUAL PRICE PAID FOR THE LICENSE TO USE THIS PROGRAM. SOME STATES/COUNTRIES DO NOT ALLOW
LIMITATIONS ON HOW LONG AN IMPLIED WARRANTY LASTS AND/OR THE EXCLUSION OR LIMITATION OF INCIDENTAL OR
CONSEQUENTIAL DAMAGES, SO THE ABOVE LIMITATIONS AND/OR EXCLUSION OR LIMITATION OF LIABILITY MAY NOT APPLY TO
YOU. THIS WARRANTY GIVES YOU SPECIFIC LEGAL RIGHTS, AND YOU MAY HAVE OTHER RIGHTS WHICH VARY FROM
JURISDICTION TO JURISDICTION.
TERMINATION: Without prejudice to any other rights of Activision, this Agreement will terminate automatically if you fail to comply with
its terms and conditions. In such event, you must destroy all copies of this Program and all of its component parts.
U.S. GOVERNMENT RESTRICTED RIGHTS: The Program and documentation have been developed entirely at private expense and are
provided as "Commercial Computer Software" or "restricted computer software." Use, duplication or disclosure by the U.S. Government
or a U.S. Government subcontractor is subject to the restrictions set forth in subparagraph (c)(1)(ii) of the Rights in Technical Data and
Computer Software clauses in DFARS 252.227-7013 or as set forth in subparagraph (c)(1) and (2) of the Commercial Computer
Software Restricted Rights clauses at FAR 52.227-19, as applicable. The Contractor/Manufacturer is Activision, Inc., 3100 Ocean Park
Boulevard, Santa Monica, California 90405.
INJUNCTION: Because Activision would be irreparably damaged if the terms of this Agreement were not specifically enforced, you agree
that Activision shall be entitled, without bond, other security or proof of damages, to appropriate equitable remedies with respect to
breaches of this Agreement, in addition to such other remedies as Activision may otherwise have under applicable laws.
INDEMNITY: You agree to indemnify, defend and hold Activision, its partners, affiliates, licensors, contractors, officers, directors,
employees and agents harmless from all damages, losses and expenses arising directly or indirectly from your acts and omissions to
act in using the Product pursuant to the terms of this Agreement.
MISCELLANEOUS: This Agreement represents the complete agreement concerning this license between the parties and supersedes all
prior agreements and representations between them. It may be amended only by a writing executed by both parties. If any provision of
this Agreement is held to be unenforceable for any reason, such provision shall be reformed only to the extent necessary to make it
enforceable and the remaining provisions of this Agreement shall not be affected. This Agreement shall be construed under California
law as such law is applied to agreements between California residents entered into and to be performed within California, except as
governed by federal law and you consent to the exclusive jurisdiction of the state and federal courts in Los Angeles, California.
If you have any questions concerning this license, you may contact Activision at 3100 Ocean Park Boulevard, Santa Monica,
California 90405, (310) 255-2000, Attn. Business and Legal Affairs, legal@activision.com
In Europe send to:
Activision (UK) Ltd.
Parliament House
St. Laurence Way,
Slough
Berkshire SL1 2BW
United Kingdom
In Australia send to:
Warranty Replacements
Activision
P.O. Box 873
Epping, NSW 2121, Australia
41
Page 23

NOTES
NOTES
42
43
Page 24

 Loading...