

Page 1
1
CONTENTS
Introduction…………………………………………………………………………1
This Manual ………………………………………………………………………1
Technical …………………………………………………………………………2
Specification………………………………………………………………………………………2
Installation ………………………………………………………………………………………2
Loading ……………………………………………………………………………………………2
The Readme file …………………………………………………………………………………2
QUICKSTART SECTION ……………………………………………………………3
Part One: The Driving Controls and Keys …………………………………………3
Keyboard Driving Controls ………………………………………………………………………3
Joystick Driving Controls…………………………………………………………………………3
Other Keys ………………………………………………………………………………………4
Driving Aids Keys ……………………………………………………………………………4
Action Keys……………………………………………………………………………………4
Miscellaneous Keys …………………………………………………………………………4
View Keys ……………………………………………………………………………………4
Network Keys …………………………………………………………………………………4
Two Player Link Keys ………………………………………………………………………4
Part Two: Getting Started …………………………………………………………5
One Lap of Monza for Rookie Drivers …………………………………………………………5
Controlling Your Own Brakes …………………………………………………………………10
Controlling Your Own Gears ……………………………………………………………………11
Driving into the Pits ……………………………………………………………………………12
Refuelling ………………………………………………………………………………………13
Tyres ……………………………………………………………………………………………13
Leaving the Pits…………………………………………………………………………………14
Car Setup Options ………………………………………………………………………………14
A Timed Qualifying Session ……………………………………………………………………15
A Non-Championship Race ……………………………………………………………………17
Pitstops………………………………………………………………………………………18
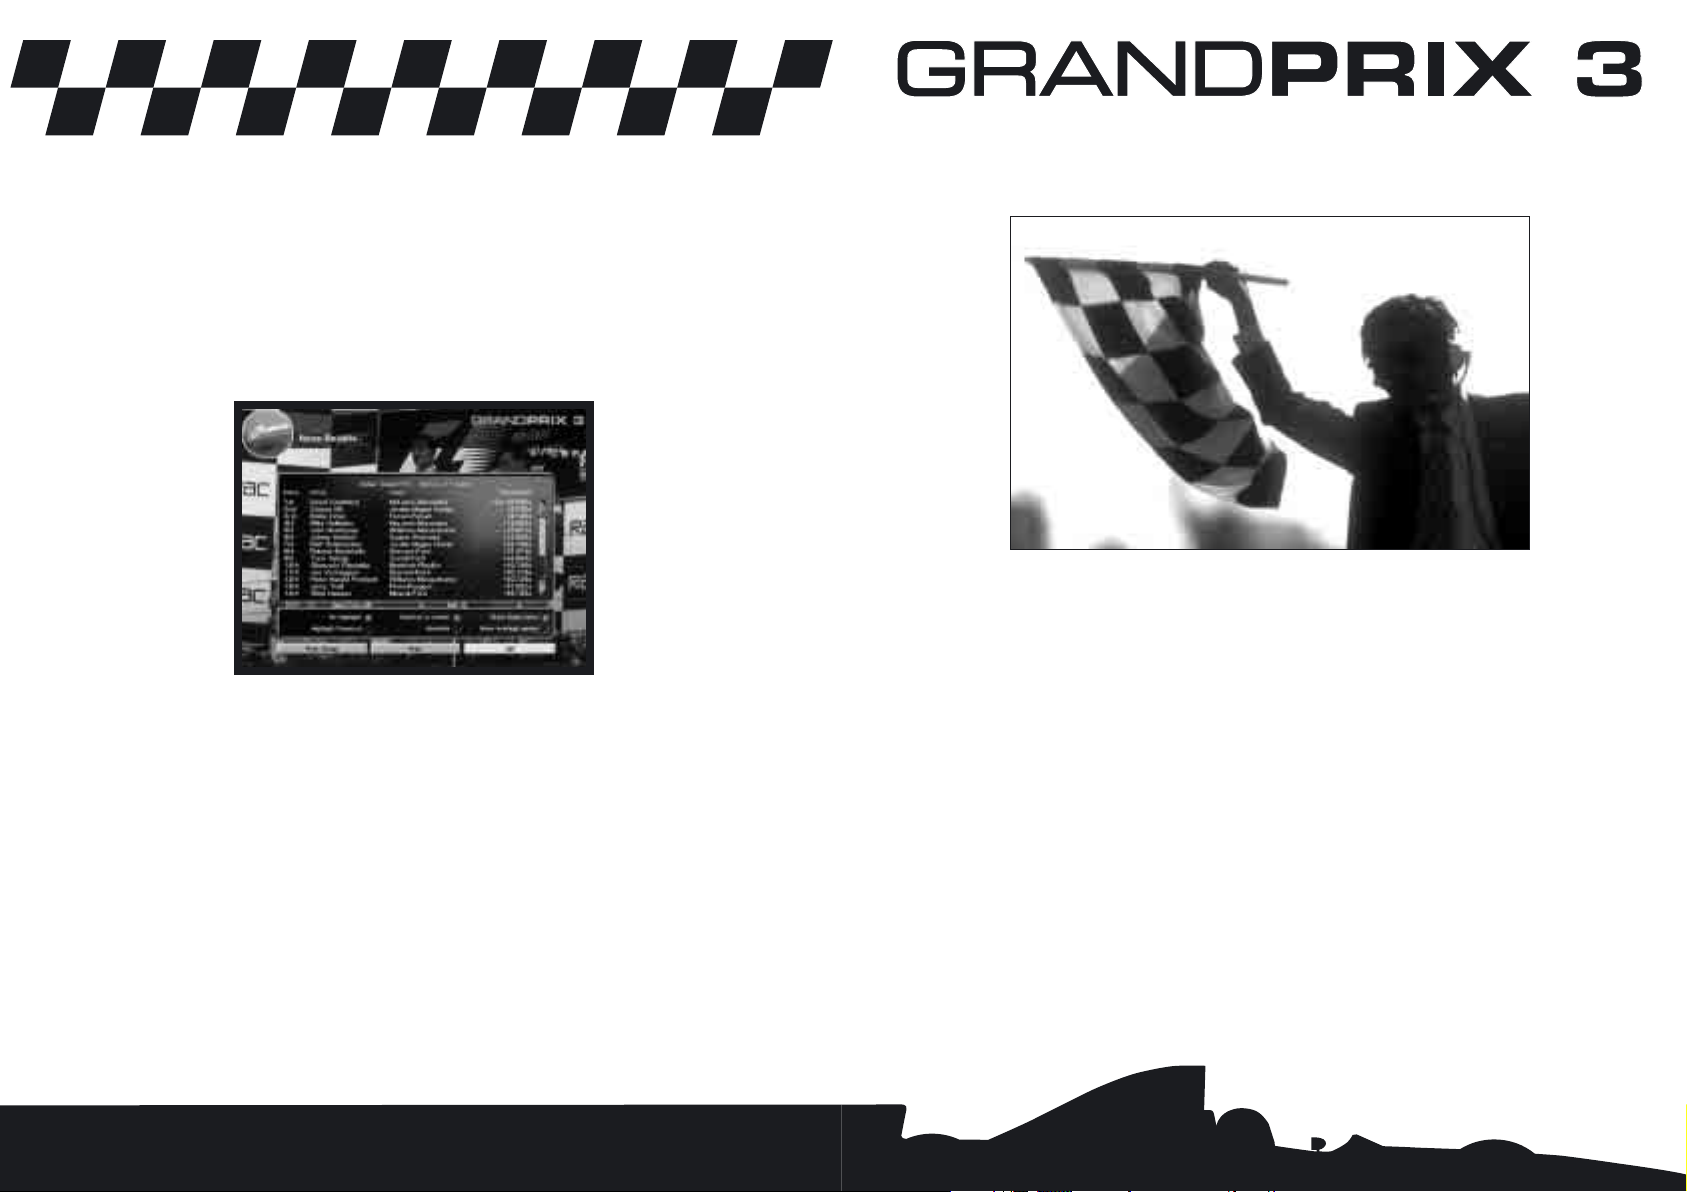
Flags …………………………………………………………………………………………18
Pulling Out …………………………………………………………………………………19
Saving the Game……………………………………………………………………………19
Finishing the Race …………………………………………………………………………20
Winning the World Championship ……………………………………………………………21
i
HEALTH WARNING
For your health, rest about 15 minutes for each hour of play. Avoid
playing when tired or suffering from lack of sleep. Always play in a
brightly lighted room, and stay as far from the television screen as
possible. Some people experience epileptic seizures when viewing
flashing lights or patterns in our daily environment. These persons
may experience seizures while watching TV pictures or playing
video games. Even players who have never had any seizures may
nonetheless have an undetected epileptic condition. Consult your
doctor before playing video games if you have an epileptic
condition or immediately should you experience any of the
following symptoms during play: dizziness, altered vision, muscle
twitching, ther involuntary movements, loss of awareness of your
surroundings, mental confusion, and / or convulsions.
Page 2

Spanish Grand Prix ……………………………………………………………………………36
Monaco Grand Prix ……………………………………………………………………………37
Canadian Grand Prix ……………………………………………………………………………38
French Grand Prix ………………………………………………………………………………39
British Grand Prix ………………………………………………………………………………40
Austrian Grand Prix ……………………………………………………………………………41
German Grand Prix ……………………………………………………………………………42
Hungarian Grand Prix …………………………………………………………………………43
Belgian Grand Prix ……………………………………………………………………………44
Italian Grand Prix ………………………………………………………………………………45
Luxembourg Grand Prix ………………………………………………………………………46
Japanese Grand Prix ……………………………………………………………………………47
MENU REFERENCE SECTION ……………………………………………………49
Startup Menu Screen ……………………………………………………………49
Quickrace ………………………………………………………………………………………49
Weather, Track and Sky Conditions ………………………………………………………49
Last Minute Changes button ………………………………………………………………49
Pitstop Strategy…………………………………………………………………………49
Tyre Choice ……………………………………………………………………………49
Car Setup ………………………………………………………………………………49
The Race ……………………………………………………………………………………50
Main Menu Screen ………………………………………………………………50
Driver ……………………………………………………………………………………………50
Load Driver Names/Save Driver Names …………………………………………………51
Edit Team Name ……………………………………………………………………………51
Driver Car Setups …………………………………………………………………………51
Track ……………………………………………………………………………………………51
Race Type ………………………………………………………………………………………52
Quickrace ……………………………………………………………………………………52
Practice………………………………………………………………………………………52
Non-Championship Race …………………………………………………………………53
The Championship Season ………………………………………………………………53
Difficulty …………………………………………………………………………………………53
Multiplayer ………………………………………………………………………………………53
iii
Part Three: The Cockpit Controls ………………………………………………22
Difficulty Level …………………………………………………………………………………23
Driving Aids ……………………………………………………………………………………23
Driving Aids and Difficulty Levels ……………………………………………………………24
Opposition Spread………………………………………………………………………………24
RPM Indicators …………………………………………………………………………………25
Gear Indicator …………………………………………………………………………………25
Flag Warning Lights ……………………………………………………………………………25
Driver Status Indicator …………………………………………………………………………25
Suggested Gear Indicator………………………………………………………………………25
Damage Indicator ………………………………………………………………………………25
Pits Indicator ……………………………………………………………………………………26
LCD Displays ……………………………………………………………………………………26
During Qualifying/Practice…………………………………………………………………26
During the Race ……………………………………………………………………………26
Split Times …………………………………………………………………………………26
Pitstop Controls …………………………………………………………………………………27
Qualifying ……………………………………………………………………………………27
Race …………………………………………………………………………………………27
Pit Strategy …………………………………………………………………………………27
Part Four: Camera Views and TV Director ………………………………………28
Cockpit View ……………………………………………………………………………………28
On Car Camera Views …………………………………………………………………………28
Other Car Views …………………………………………………………………………………28
Trackside Camera Views ………………………………………………………………………29
Chase View ………………………………………………………………………………………29
Reverse Chase View ……………………………………………………………………………29
TV Director ………………………………………………………………………………………30
Replay Mode ……………………………………………………………………………………30
CIRCUITS ON THE FORMULA ONE CIRCUS ………………………………………31
Australian Grand Prix …………………………………………………………………………32
Brazilian Grand Prix ……………………………………………………………………………33
Argentinian Grand Prix …………………………………………………………………………34
San Marino Grand Prix …………………………………………………………………………35
ii
Page 3

Race Weather……………………………………………………………………………………60
Multiplayer (Hotseat) …………………………………………………………………………61
Opposition Spread………………………………………………………………………………61
All the Same ………………………………………………………………………………61
1998 Levels…………………………………………………………………………………61
Random ……………………………………………………………………………………61
Player Cars Only ………………………………………………………………………………61
Race Type ………………………………………………………………………………………61
Car Realism ……………………………………………………………………………………61
Graphics Options …………………………………………………………………62
Graphics Detail …………………………………………………………………………………62
Screen Resolution ………………………………………………………………………………62
Render Device …………………………………………………………………………………62
Advanced Options (Graphics) …………………………………………………………………62
Trackside Objects …………………………………………………………………………63
Frame Rate …………………………………………………………………………………63
Sound Options ……………………………………………………………………63
Save Options………………………………………………………………………63
Loading and Saving Files ………………………………………………………………………63
File Suffix Codes ………………………………………………………………………………64
THE GRAND PRIX MENU SECTION ………………………………………………65
Non-Championship Race …………………………………………………………65
Friday Free Practice ……………………………………………………………………………66
Add/Reduce Fuel……………………………………………………………………………66
Tyres …………………………………………………………………………………………66
Car Setup ……………………………………………………………………………………67
Saturday Free Practice …………………………………………………………………………67
Qualifying ………………………………………………………………………………………68
Quitting a Qualifying Lap …………………………………………………………………68
Accelerating Time …………………………………………………………………………68
Logged Data…………………………………………………………………………………69
Pre-Race Warm-Up ……………………………………………………………………………69
v
Workshop ………………………………………………………………………………………53
About Grand Prix 3…………………………………………………………………………53
Utilities………………………………………………………………………………………53
View Circuit Records ………………………………………………………………………53
Review Performance ………………………………………………………………………53
Load Game ………………………………………………………………………………………54
Options …………………………………………………………………………………………54
Drive ……………………………………………………………………………………………54
Icon Buttons ……………………………………………………………………………………54
Exit ………………………………………………………………………………………………54
Game Options ……………………………………………………………………54
Controls …………………………………………………………………………………………54
Calibrate Joystick …………………………………………………………………………55
Keyboard Setup ……………………………………………………………………………55
Wheels/Pedals ………………………………………………………………………………55
Controls (Advanced) ……………………………………………………………………………55
Controller Type………………………………………………………………………………55
Steering ……………………………………………………………………………………56
Accelerate……………………………………………………………………………………57
Brake…………………………………………………………………………………………57
Clutch ………………………………………………………………………………………57
Gear Change…………………………………………………………………………………57
Force Feedback ……………………………………………………………………………57
Choose Control Method ……………………………………………………………………57
Edit Set Name………………………………………………………………………………57
Load Control Set ……………………………………………………………………………58
Save Control Set ……………………………………………………………………………58
Calibrate Joystick …………………………………………………………………………58
Keyboard Setup ……………………………………………………………………………58
Driving Aids Options………………………………………………………………58
Driving Aids ……………………………………………………………………………………58
Driving Aids available with Difficulty Levels …………………………………………………59
Race Options ……………………………………………………………………60
Time/Distance Race Options …………………………………………………………………60
Quickrace Options ………………………………………………………………………………60
iv
Page 4

‘Hotseat’ Multiplayer Games ……………………………………………………79
How Does a ‘Hotseat’ Game Work?……………………………………………………………79
THE CAR HANDLING SECTION ……………………………………………………81
Introduction ………………………………………………………………………81
Part One: Basic Car Setup ………………………………………………………82
Basic Car Setup Options ………………………………………………………………………84
Front/Rear Wing Downforce Adjust ………………………………………………………84
Front/Rear Brake Balance …………………………………………………………………84
Gear Ratios …………………………………………………………………………………84
Putting it into Practice …………………………………………………………………………85
A Quick Demo ………………………………………………………………………………85
Part Two: Standard Car Setup Procedure ………………………………………88
Getting to Grips with Understeer and Oversteer ……………………………………………88
Typical Problems in Standard Setup …………………………………………………………89
Making step-by-step Setup Changes: Basic Principles ……………………………………90
Wing Angles …………………………………………………………………………………91
Gear Ratios …………………………………………………………………………………92
Brake Balance ………………………………………………………………………………92
Be Systematic ………………………………………………………………………………93
Save the Car Setup…………………………………………………………………………93
Choosing a Pit Strategy ………………………………………………………………………93
Part Three: Advanced Car Setup Procedure ……………………………………93
Part Four: Data Logging and Performance Analysis ……………………………94
Recording Data …………………………………………………………………………………95
Viewing Data ……………………………………………………………………………………95
Loading Data ………………………………………………………………………………95
Saving Data …………………………………………………………………………………95
Remove Lap/Remove All Laps ……………………………………………………………96
Copy to Foreground…………………………………………………………………………96
Graph Selected Laps ………………………………………………………………………96
Clear Selected Lap …………………………………………………………………………96
Performance Analysis …………………………………………………………………………96
Speed ………………………………………………………………………………………97
Steering Demand……………………………………………………………………………97
vii
The Race…………………………………………………………………………………………69
The Grid Display ……………………………………………………………………………69
Weather………………………………………………………………………………………69
Last Minute Changes ………………………………………………………………………69
Car Setup ……………………………………………………………………………………70
Starting Off …………………………………………………………………………………70
Escape Menu ………………………………………………………………………………70
Finishing the Race …………………………………………………………………………71
Race Completed Menu ……………………………………………………………………71
The Championship Season ………………………………………………………72
Hot Laps …………………………………………………………………………73
Saving a Hot Lap ………………………………………………………………………………73
Viewing a Hot Lap Replay ……………………………………………………………………73
THE MULTIPLAYER SECTION ……………………………………………………75
Connection Type ………………………………………………………………………………76
Serial Cable (2 players) ……………………………………………………………………76
Modem (2 players) …………………………………………………………………………76
IPX Network (2 or more players) …………………………………………………………76
TCP/IP Network (2 or more players)………………………………………………………76
Number to Dial …………………………………………………………………………………76
Player Name ……………………………………………………………………………………76
Game Selection …………………………………………………………………………………76
Session Selection ………………………………………………………………………………76
Host a New Session ………………………………………………………………………76
Join an Existing Session …………………………………………………………………77
Session Name …………………………………………………………………………………77
The Settings Button ………………………………………………………………………77
The Phonebook Button ……………………………………………………………………77
Connecting ………………………………………………………………………………………77
The Linking Screens ………………………………………………………………………77
The Network Game …………………………………………………………………………77
The Chat Button ……………………………………………………………………………77
The Options Button…………………………………………………………………………78
The Leave Session Button …………………………………………………………………78
The Close Session Button …………………………………………………………………78
Weather Screen ……………………………………………………………………………78
Last Minute Changes (Network) Screen …………………………………………………78
The Two-Player Link Screen ………………………………………………………………78
vi
Page 5

The Teams ………………………………………………………………………119
Williams Grand Prix Engineering ……………………………………………………………119
Ferrari SpA ……………………………………………………………………………………120
Benetton Formula Ltd ………………………………………………………………………121
McLaren International Ltd……………………………………………………………………122
Jordan Grand Prix Ltd ………………………………………………………………………123
Prost Grand Prix ………………………………………………………………………………124
Sauber AG ……………………………………………………………………………………125
Arrows Grand Prix International Ltd…………………………………………………………126
Stewart Grand Prix ……………………………………………………………………………127
Tyrrell Racing Organisation Ltd………………………………………………………………128
Minardi Team SpA ……………………………………………………………………………129
GRAND PRIX VETERANS’ SECTION………………………………………………131
Secrets of the Pro’s – Driving at the Limit …………………………………………………131
Introduction ………………………………………………………………………………131
How does a Tyre Work? …………………………………………………………………132
The Slip Zone ……………………………………………………………………………134
Controlling Weight Transfer ………………………………………………………………135
Weight Transfer and Balance (Understeer and Oversteer) ……………………………136
Traction Circle ……………………………………………………………………………137
Understeer versus Oversteer ……………………………………………………………138
Wet Weather Setup ………………………………………………………………………140
The Pits ………………………………………………………………………………………142
Summary …………………………………………………………………………………142
Basic Car Setup Options ……………………………………………………………………142
Front/Rear Wing Downforce Adjust ……………………………………………………142
Front/Rear Brake Balance ………………………………………………………………143
Gear Ratios ………………………………………………………………………………143
Save the Car Setup ………………………………………………………………………143
Advanced Car Setup………………………………………………………………………144
Typical Problems in Standard Setup ……………………………………………………144
Data Logging Guide ………………………………………………………………………146
Recording Data ……………………………………………………………………………146
Speed …………………………………………………………………………………146
Steering Demand ……………………………………………………………………147
RPM ……………………………………………………………………………………147
Throttle…………………………………………………………………………………147
Brake …………………………………………………………………………………147
Gear ……………………………………………………………………………………147
ix
RPM …………………………………………………………………………………………97
Throttle ………………………………………………………………………………………97
Brake…………………………………………………………………………………………98
Gear …………………………………………………………………………………………98
Ride Heights - for each wheel ……………………………………………………………98
Suspension Travel - for each wheel ………………………………………………………98
Wheelspin - for each wheel ………………………………………………………………99
Lateral Acceleration ………………………………………………………………………99
Longitudinal Acceleration …………………………………………………………………99
Looking for Optimum Traction ……………………………………………………………99
Performance Display Controls ………………………………………………………………100
Map…………………………………………………………………………………………100
Zoom ………………………………………………………………………………………100
Highlight Selection ………………………………………………………………………100
Print/Print Setup …………………………………………………………………………100
Wet Weather Setup……………………………………………………………………………100
Part Five: Driving Techniques …………………………………………………101
The Racing Line ………………………………………………………………………………101
Typical Corners and Bends …………………………………………………………………102
Reaction of the Car Through a Corner ………………………………………………………106
Marker Points …………………………………………………………………………………107
Braking …………………………………………………………………………………………107
Changing Down ………………………………………………………………………………108
Overtaking ……………………………………………………………………………………108
Driving Faster Through a Corner than a Rival ……………………………………………108
Slipstreaming …………………………………………………………………………………109
Outbraking a Rival Car ………………………………………………………………………109
Driving Errors …………………………………………………………………………………109
Loss of Control ………………………………………………………………………………110
Summary ………………………………………………………………………………………110
Flags ……………………………………………………………………………112
Race Marshal’s Flags …………………………………………………………………………112
Observation Post Flags ………………………………………………………………………112
Performance Analysis Colour Charts …………………………………………114
1998 SEASON STATISTICS ……………………………………………………117
Constructors’ Championship Results 1998 ……………………………………117
Drivers’ World Championship Results 1998……………………………………118
viii
Page 6

Introduction
Welcome to the most advanced Formula One racing simulation ever made. Grand Prix 3
is specifically designed to give you the complete racing experience. Whether you’re new
to the game or a Grand Prix 1 or 2 veteran there’s plenty in this simulation for everyone.
No matter what your experience of racing games, you’ll know that Grand Prix 3 is an
instant classic, achieving new heights of performance, accuracy and attention to graphic
3D detail. Designed and written by the legendary Geoff Crammond, Grand Prix 3 is the
answer to all Formula One racing fans’ prayers: it has the real teams, the real drivers, the
real cars, the real engines, and the real tracks. In fact, everything you could ever want to
tackle the Formula One World Championship Season. Complete!
But the cars are always the stars of this simulation. It’s not just that they look so perfect
(which they do in abundance) but they handle just like the real thing (so we’ve been told
by real Formula One drivers). Springs, dampers, wings, gear ratios, brake balance and ride
height are just a few of the items that are realistically adjustable and that will truly affect
car performance and handling characteristics. And you can study the effects of these
adjustments by downloading telemetric data into the highly accurate performance analysis
utility that will help you compare different car setups.
Now you’ve got Grand Prix 3 in your hands, get racing and good luck!
This Manual
This manual is structured in such a way as to introduce the game to rookie players and to
encourage them to delve deeper to get the most out of the real simulation. If you’re a
Grand Prix 2 veteran you’ll be familiar with the basic controls and could probably get racing
quite quickly, but be aware that there are many differences between Grand Prix 2 and
Grand Prix 3 so you’ll find it very worthwhile reading the manual to understand all the
simulation controls.
1
Ride Heights – for each wheel ………………………………………………………148
Suspension Travel – for each wheel ………………………………………………148
Wheelspin – for each wheel …………………………………………………………149
Standard Car Setup Procedure …………………………………………………………149
Making step-by-step Setup Changes: Basic Principles ………………………………149
Wing Angles……………………………………………………………………………149
Gear Ratios ……………………………………………………………………………151
Brake Balance…………………………………………………………………………151
Car Setup Advanced Level 1 ……………………………………………………………151
Making Setup Changes: Advanced Level 1 ……………………………………………152
Springs…………………………………………………………………………………152
Ride Height ……………………………………………………………………………153
Dampers ………………………………………………………………………………153
Anti-Roll Bars …………………………………………………………………………154
Tyre Wear ………………………………………………………………………………154
Car Setup Advanced Level 2 ……………………………………………………………154
Making Setup Changes: Advanced Level 2 ……………………………………………155
4-Way Adjustable Dampers …………………………………………………………155
Packers…………………………………………………………………………………155
Differential ……………………………………………………………………………157
Car Setup Reference Charts ……………………………………………………………158
Data Logging Guide ………………………………………………………………………165
Lateral Acceleration …………………………………………………………………165
Longitudinal Acceleration ……………………………………………………………165
GLOSSARY ………………………………………………………………………167
CUSTOMER INFORMATION ………………………………………………………170
Customer Services ………………………………………………………………170
Web Sites ………………………………………………………………………171
Notice/Warranty …………………………………………………………………171
Credits …………………………………………………………………………173
x
Page 7
QUICKSTART SECTION
Part One: The Driving Controls and Keys
Throughout this manual, you’ll see references to the Accelerator, the Brake, Changing
Gear and Steering. How these controls operate depends on your preference of Keyboard,
Joystick, Wheel, or Joypad. The default Keyboard and Joystick driving controls are:
Keyboard Driving Controls
Accelerate = A
Brake = Z
Steer Left = <,
Steer Right = >.
Change Up a gear = Accelerate A key + Space
Change Down a gear = Space
(If you are using separate buttons for changing up or down a gear there is no need to
accelerate when changing up.)
Joystick Driving Controls
Accelerate = Forward
Brake = Back
Steer Left = Joystick Left
Steer Right = Joystick Right
Change Up a gear = Accelerate + Press Fire Button
Change Down a gear = Press Fire Button
(If you are using separate buttons for changing up or down a gear do not accelerate.)
Note: All the above driving controls can be reassigned (see page 54).
3
Technical
Specification
Make sure the specification shown on the Grand Prix 3 box matches that of your computer.
Installation
• Insert the Grand Prix 3 CD into your CD-ROM drive.
If autorun is enabled, Grand Prix 3 will take you to the Installation screen.
• Simply click on the ‘Install’ button and follow all on-screen directions.
• If autorun has not been enabled, you’ll have to double-click on the ‘My Computer’ icon
on the Windows
®
Desktop, then on the CD-ROM icon, and then click on ‘Setup.exe’.
The simulation will now install.
• Follow all on-screen instructions.
• Once Grand Prix 3 is installed it will appear in the Program Group on the START Menu.
Loading
• Select Start > Programs > Hasbro Interactive > Grand Prix 3.
The game will now load.
The Readme File
Note that this manual will guide you through most of the Grand Prix 3 simulation but due
to printing constraints may not contain the most up to date information. For all last
minute information you are advised to consult the Readme file found on the CD (selected
by clicking on View Readme in the Program group).
2
Page 8
Part Two: Getting Started
One Lap of Monza for Rookie Drivers
• Install and load Grand Prix 3 as explained previously.
After the opening animations, you will be given the choice of Quickrace or Main Menu. Use
Quickrace if you want a quick blast of Grand Prix 3. But for the purposes of this tutorial
guide…
• Click on Main Menu.
For the duration of this Quickstart tutorial, you will be racing under your own name.
You just need to select a team to race for and rename one of its drivers.
• Click on the Driver panel to go to the Driver Select screen.
5
Other Keys
Driving Aid Keys:
Auto Brakes = F1 Show Best Line = F5
Auto Gears = F2 Suggested Gear = F6
Auto-right the Car = F3 Throttle Help = F7
Indestructible = F4 Steering Help = F8
Action Keys:
Intending to Pit = Enter/Return
Return to Pits (Qualifying/Practice) = SHIFT + Q
Leave Race = Esc
Pause = P
Pause (when using Joystick) = Space
Replay = R (when the game is in the PAUSED state)
Miscellaneous Keys:
See Driver Name = N
See Processor Occupancy = O
Decrease Cockpit View Angle = Minus –
Increase Cockpit View Angle = Plus +
Virtual Cockpit On/Off = @ (Software graphics only)
PC Spec Information = CTRL + I
Joystick On/Off = CTRL + J
Background Sound On/Off = CTRL + S
View Keys:
Your Car Cockpit View = Right Arrow
Trackside Camera View = Left Arrow
All On-car Camera Views = Page Up (Cycle through)
Chase View = Page Down
Reverse Chase View = Delete
Car Ahead = Up Arrow
Car Behind = Down Arrow
Return to Your Cockpit = Home
TV Director Mode = Insert
Network Keys:
All Escape to Menu Screen = SHIFT + U
Two Player Link Keys:
Send Message = CTRL + M
Host Release Control in Menus to other player = CTRL + R
Hang Up = CTRL + H
4
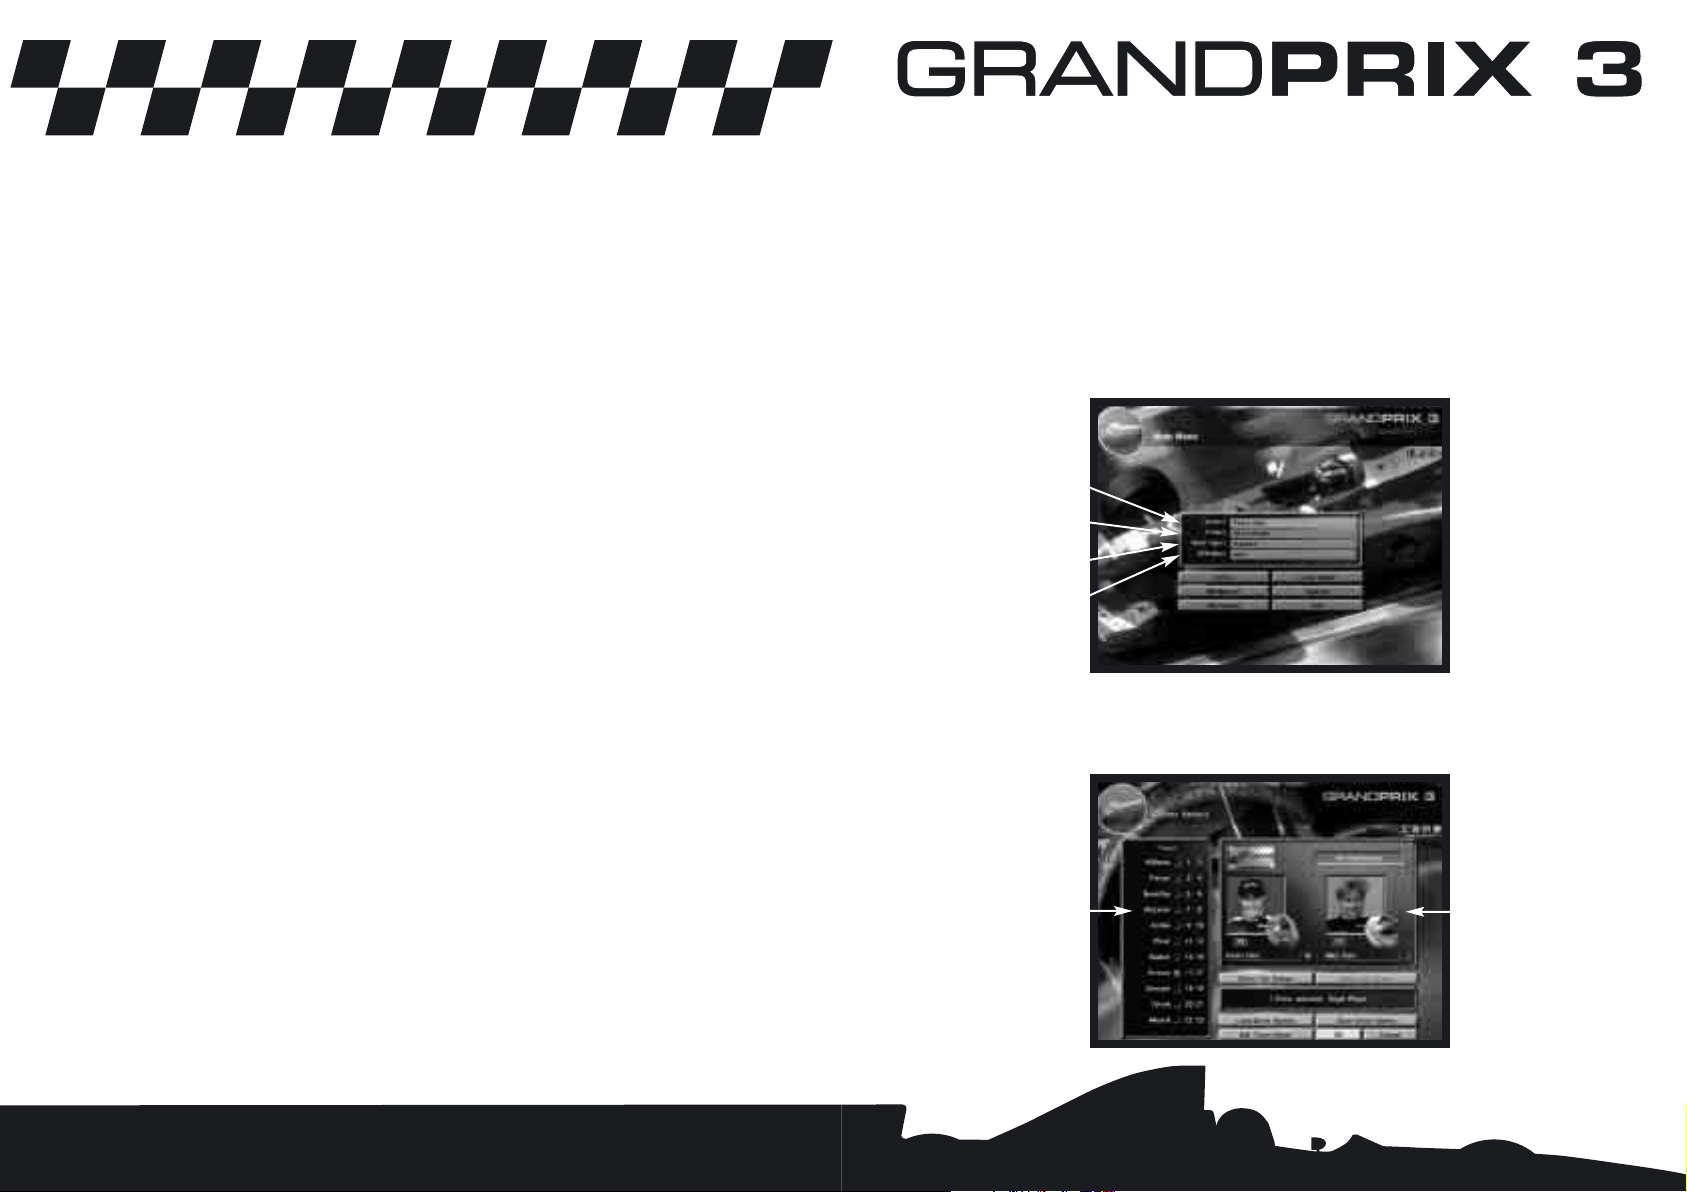
Driver Panel
Track Panel
Race Type
Difficulty Level
Teams Panel
Driver Panel
Page 9
• Below the LCD screen on the steering wheel is a row of eight lights. Each corresponds
to a Driving Aid designed to help you control the car. Keys F1 to F8 turn each of these
on and off. In Rookie mode, all lights should be on. If they’re not, press the relevant
F key. Suggested Gear (F6) is not needed for this session.
With the Driving Aids activated, you won’t have to worry about changing gear or braking:
this will be done automatically and all basic steering around the circuit will also be assisted.
You may crash if you stray from the racing line, but your car will not be damaged. If you
spin off the track, the car will right itself once it has come to rest and face the right direction
so you can get on with the session.
• Now check the Monza track plan below…
7
• In the left hand Teams panel, one of the drivers is already selected (the number is
highlighted). Click on the driver’s photo to deselect.
• Click on the button to the right of Ferrari to view the two team drivers, then click on
the button to the right of driver number 4’s name: Eddie Irvine.
• Click on the name panel under Eddie’s photo and delete his name with the
backspace key.
• Type in your name (or the name you want to race under) and press Return.
You are now Driver 4, racing for the Ferrari team. Your team’s badge now appears on
screen, rotating in the top left corner.
From this screen you can also access your individual Car Setup options and save the driver
names. But for this tutorial, simply click OK and you’ll return to the Main Menu screen.
The name you typed in will be shown as the Driver.
Monza has been chosen as the track where you’ll have your shakedown test.
• Click on the Track panel and you’ll be taken to the Track screen. A list of the 1998
Championship Season tracks appears on the left and allows you to view each one from
a number of positions.
• Click on Italy then select OK to return to the Main Menu.
Italy now appears in the Track panel.
Now choose the kind of race you want.
• Click on the Race Type panel and select Practice.
• Click OK to return to the Main Menu.
The preparations are over. It’s time to drive!
• Click on the Drive button. You’ll see a Weather screen that details the Current Track and
Sky conditions and the Forecast chance of rain.
• Click OK to start your first practice session.
You’re now sitting in the Ferrari cockpit in the pits at Monza. As with any test session,
it’s now time to check the instruments and controls…
6
Speed
Current Position
RPM
Fuel Remaining
(in laps)
Opposition Spread
Current Lap
Current Gear
Water Temperature
Suggested Gear
Pits
Driving Aids
RPM
Difficulty Level
Current Lap Time
Driver Status
Damage
Flag Warning Lights
LCD
CURVA DI LESMOS
4TH-5TH GEAR
DELLA ROGGIA
5TH GEAR
CURVA GRANDE
VARIANTE
CURVA DEL SERRAGLIO
VARIANTE GOODYEAR
CURVA DE VIALONE
VARIANTE ASCARI
200 MPH PLUS
RETTIFILIO
START/FINISH CLOCKWISE
6TH GEAR 190 MPH
PARABOLICA
140 MPH
PIT LANE
Page 10

This is what Formula One racing is all about: being aware of the next part of the course
and making sure you are properly prepared to drive through it. Only by knowing what lies
ahead can you optimise the line you take through each corner.
• Reactivate the simulation by pressing P or the Space bar.
• Steer carefully around Variante Goodyear (don’t try to go too fast) - left then right, along
a short straight and left and right again. Try to follow the broken line even though it
sometimes appears to be aiming away from the track.
If you do leave the track at any time, steer back towards it (this might be slippery on grass
or gravel) to get back on the tarmac. If you have spun and are facing the wrong way (and
you still have the Auto-right the Car (F3) Driving Aid on), don’t touch the controls. Wait for
the car to right itself and point in the correct direction.
• See how the ideal racing line takes you out of this last corner, using the whole width
of the track and taking you over to the left side of the road, ready for the approach to
the long sweeping right-hander: the Curva Grande. You’ll probably find that you can
drive quite fast through this bend.
• Continue along the straight and go under the bridge. Just after the bridge is a
left turn.
• Press pause and have another look at the track plan. This left turn is the first part of
the Variante della Roggia: another chicane. Check how this looks and imagine how you
will drive through it.
• Now look ahead on the plan to the next three bends and try to imagine what they will
look like from the cockpit.
• Press the pause button again to continue.
• Steer through the chicane and on through the next two right hand curves (Lesmo 1 and
Lesmo 2).
You’ll now face a long, downhill straight.
• Accelerate!
As you’re moving, glance at the gear indicator (the red number in the centre of the wheel
display) as the car changes gear automatically. Listen to the sound of the engine and
watch the rpm indicator lights as the gears change up and down. Get used to glancing
quickly at the displays and the mirrors as you’re travelling at speed.
At the end of this straight is an unusual chicane called the Variante Ascari. Pause, check
your track plan, analyse and memorise, reactivate the game and drive through the corners,
following the ideal racing line. The more you can commit to memory, the easier the corners
will be to drive through at speed.
9
• Find the Start/Finish line and then run your eye clockwise around the course until you
come back to the Finish line. Check where the pit lane joins the track so you’ll know
exactly when you’ll be on the actual racing track. Memorise the track plan so you can
anticipate what the corners will be like. As you improve your racing skills and become
more experienced, you’ll realise just how important knowing each circuit will be to
your success.
Your car is still on its jacks in the pits.
• Select the Leave the Pits option on the LCD, using the Throttle and Brake controls,
then press the Gear Change button.
The car will come down off its jacks and you’ll see a new LCD screen appear on the central
steering wheel panel.
• Now slowly squeeze the accelerator…
Your car will begin to move forward (if it doesn’t, check that you’ve pressed F2 and that
the second symbol on the Driving Aids display is lit).
• Steer out from your pit and drive down the pit lane. Remember that in race conditions,
you’ll need to stick to the pit lane speed limit of 50mph/80kph.
If you want to pause the simulation at any point, press key P (or Space if you are driving
with a Joystick, Wheel or a Joypad). Press P again to reactivate. During this session, pause
as many times as you feel you need to, so that you can study the track plan and anticipate
what’s coming next.
As you steer out of the pit lane, join the main track, keeping on the inside of the broken
yellow line. Once on the circuit proper, the yellow line will be replaced by a long broken
white line.
• Try to keep the middle of the steering wheel lined up with the broken white line as you
progress around the circuit. This white line is the Best Driving Line Driving Aid (F5):
the quickest possible line into and out of bends without spinning off the track.
At some point before the first bend, you should, see a white sign with a black arrow bending
to the left, then countdown marker signs with 200 and 100. These signs show how many
metres remain before the approaching left-hand bend.
• This is a good spot to pause the simulation and check the Monza track plan again:
The first bend at Monza turns to the left and is followed by a sharp right. Next is another
left-right combination making up a double chicane called the Variante Goodyear.
• Find the Variante Goodyear on your track plan and examine the next bend, the Curva Grande.
8
Page 11

Controlling Your Own Gears
• When you’re ready to try controlling your own gears, stop on a straight part of the
circuit and press F2 to cancel the Auto-gears Driving Aid.
• Now press F6 to activate the Suggested Gear Driving Aid we left off earlier in the session.
The corresponding icon will light up on the display.
You’re now in control of ALL gear changes, but to guide you, when you see a number in
the Suggested Gear panel, that will be the gear to be in as you go into the NEXT corner.
Check the gear change method for your choice of controller:
Keyboard
Change Up a gear = Accelerate A key + Space
Change Down a gear = Space
Joystick
Change Up a gear = Accelerate + Press Fire Button
Change Down a gear = Press Fire Button
Note: If you have separate buttons for gear changes then you do not need to accelerate
to change up.
• Practise gear changing up and down and watch the red gear indicator.
• Try to get into neutral (N) and then accelerate. The engine will rev and make a highpitched noise.
• Blip the accelerator and look at how the revs rise on the digital rev counter, then select
first gear BUT keep the revs up - not too much power otherwise the car may spin.
The ‘1’ on the red gear change indicator in the centre will appear, showing that you’ve
successfully selected 1st. You’ll start moving forward…
• Listen to the change in engine tone and watch your speed rise on the mph/kph indicator.
• Accelerate away and watch the rpm indicator lights illuminate as the revs increase.
When the red light appears at the end of the set of green lights, change up to second
gear (you’ll see a ‘2’ on the display).
• Try changing up as far as fourth gear, then try changing down before a corner by taking
note of the Suggested Gear indicator.
Note: You don’t have to be braking when changing down, but you must not be accelerating.
Your car has six forward gears, neutral (N), and reverse (R). If you are in reverse, accelerate
to move backwards (just like in a real car).
11
• Accelerate along the straight and see if the automatic gear change will take you into
top gear (6th) before the auto-brakes slow you down for the Curva Parabolica.
As you come out of the bend, you’ll see the grandstands, the pits and a yellow dotted line
marking the pit lane entrance. Remember that each track has its own specific pit entrance
and exit layout, and it’s important to take a note of this as part of your race preparation.
• Keep following the broken white line. You’re now back on the start/finish straight: the
Rettifilio Tribune.
• Accelerate at full speed. You’ll see the starting grid - the spaces where the cars line
up for start of the race - and a thick solid white line across the track that marks the
end of this lap.
• As you cross the line, you’ll be starting your first flying lap: the timer on your cockpit
lap time display will start. You can pause the game at any time to double-check the
track plan – your lap time will not be affected.
• When you complete your first flying lap, check your time and try another lap to see if
you can beat your previous time.
Controlling Your Own Brakes
Although the auto-brakes you were using are effective, they’re still a Driving Aid. To get
the very best lap speeds, you’ll need to apply your own brakes.
When you feel confident you’ve mastered steering and the racing line, try switching off
the Auto-brakes Driving Aid:
• Press F1 and check that the auto-brakes light has gone out on the bank of green icons
below the LCD.
Now it’s up to you to choose the best moment to brake as you continue lapping Monza!
The car will feel very different this time.
Remember how the brakes are operated by your choice of controller:
Keyboard
Brake = Z
Joystick
Brake = Back
10
Page 12
Note: Grand Prix 3 features extremely detailed Car Setup Options, ranging from Basic to
Advanced (Level 1) and Advanced (Level 2). To enjoy the simulation to the full, you can
learn much more about setting up the car for the track conditions later in the manual.
Refuelling
• First select the Fuel option from your cockpit LCD menu.
• Use your left/right steering control to alter the amount of fuel (in laps) to be taken
on board.
• Press the space bar or the joystick fire button to quit the Fuel menu.
Tyres
• Select Tyres from your cockpit LCD menu. The cockpit LCD will show your available
sets of tyres with the amount of laps completed on each set. At the top of the LCD is
the tyre type.
• Select using the A/Z keys or joystick Up/Down. Switch tyre type using the left/
right controls.
When you select Tyres on the LCD you will see three tyre sets marked 0, three tyre sets
marked r1, r2, r3, three tyre sets marked q1, q2, q3 and one set marked qr.
The 0 sets are for practice.
The ‘r’ tyres are the sets allocated for the race (r1 starts the race, r2 being used at the
first pitstop etc.) but you can also use these sets in practice if you have used up the other
0 sets.
13
Driving into the Pits
Once you’re familiar with the Monza circuit and the basic car controls, practise driving
back into the pits.
• At any point during the lap before you want to come in, press the Return key to let
your pit crew know you’re going to come into the pits. The pit signal on your instrument
panel will light up in green, giving you the ‘all clear’ to come in. If the pit signal is
red, this means that your crew are busy with the other team car. Do another lap before
trying again.
• Drive slowly into the pit lane keeping on the inside of the broken yellow line. The
simulation will then ‘direct’ you into the correct bay, but you must brake when you
have fully entered the bay.
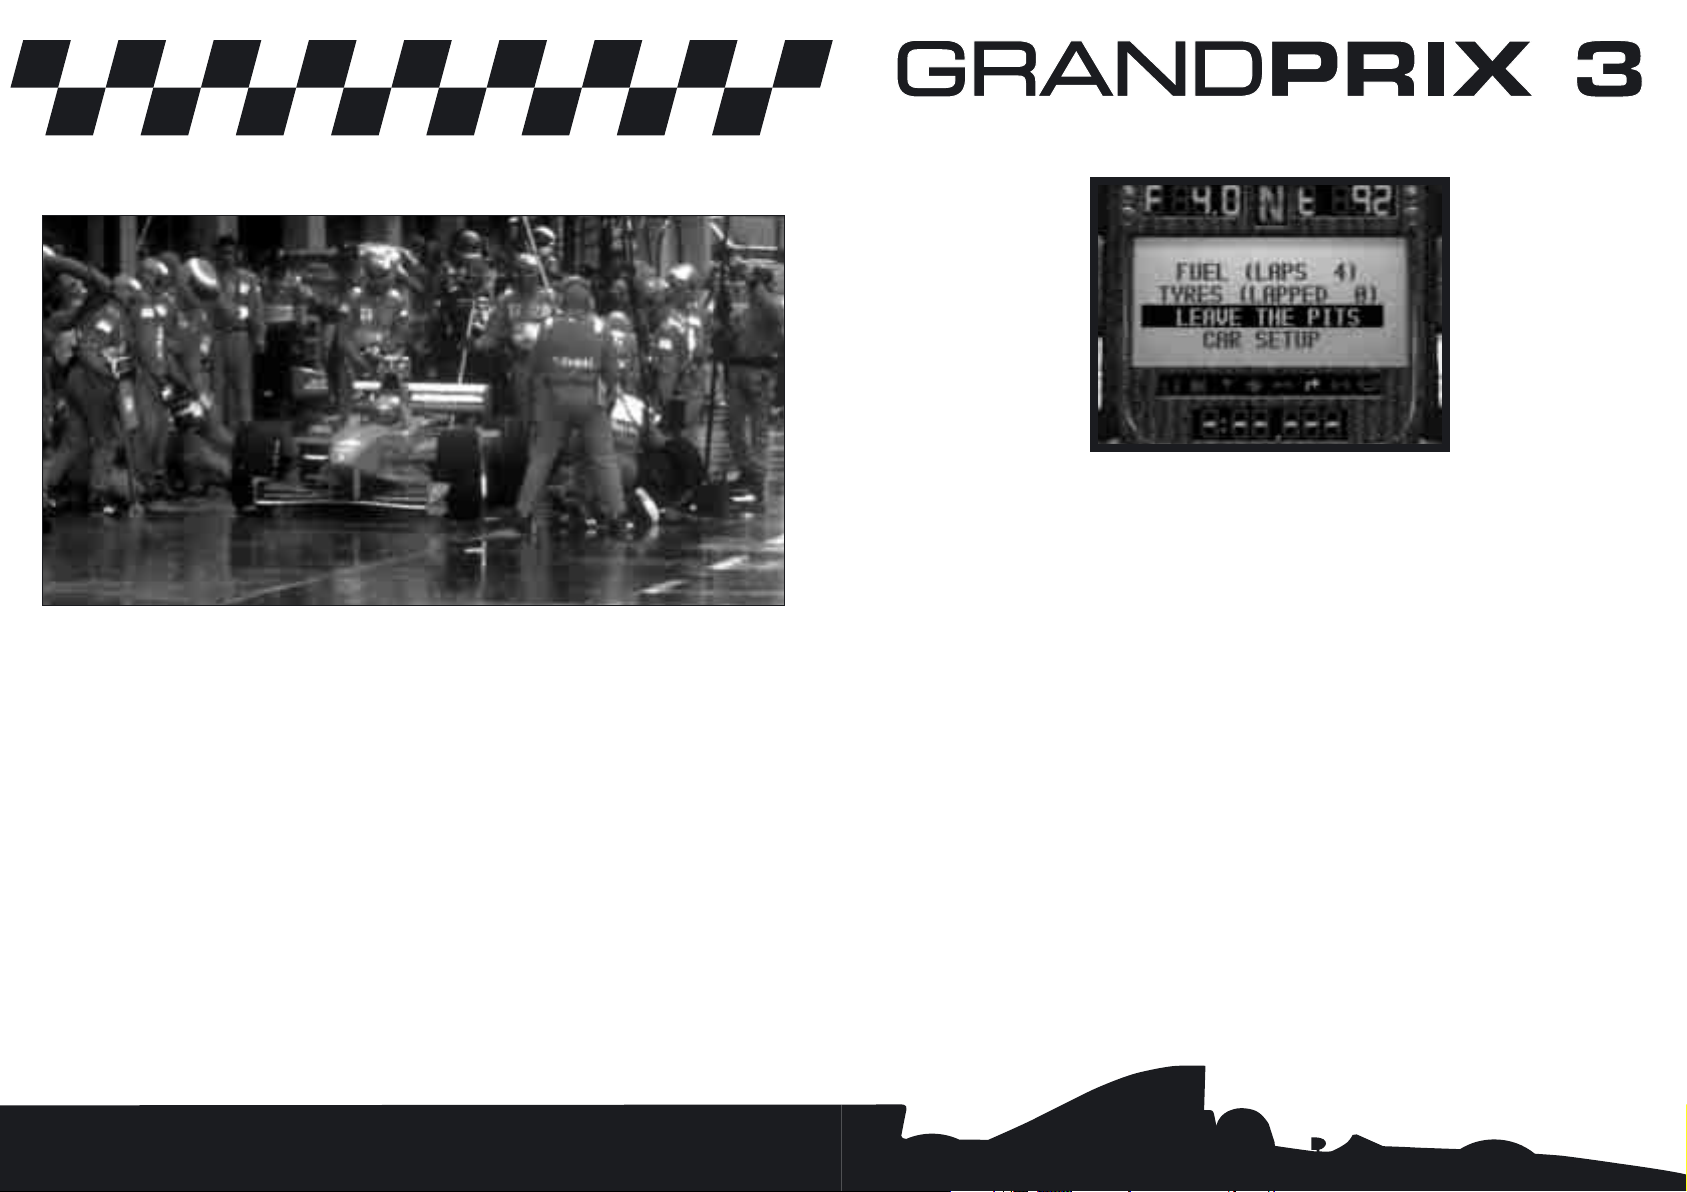
As your car is jacked up by your crew, a Pit Options menu will appear on your cockpit LCD
allowing you to add Fuel, change Tyres, Leave the Pits or go to the Car Setup Options.
Use the A/Z keys or joystick Up/Down to select the option you want from your cockpit
LCD menu.
12
Page 13
A Timed Qualifying Session
• From the Main Menu screen, click on the Race Type panel.
• Click on the Non-Championship Race button, then click on OK to go back to the Main Menu.
• Click on the Drive button and you’ll be taken to the Italian Grand Prix menu screen.
• Select Qualifying.
The Track and Sky conditions and Weather screen will appear. If it’s raining, you’ll want
to fit special tyres for wet conditions. These wet tyres vary depending on whether it’s a
light drizzle, rain or very heavy rain (monsoon). Remember, you can also do this from within
the cockpit (in a pitstop) if race conditions change during a race.
• Click OK. You’ll now be taken to the Pits, but this time, a ‘telemetric’ monitor will
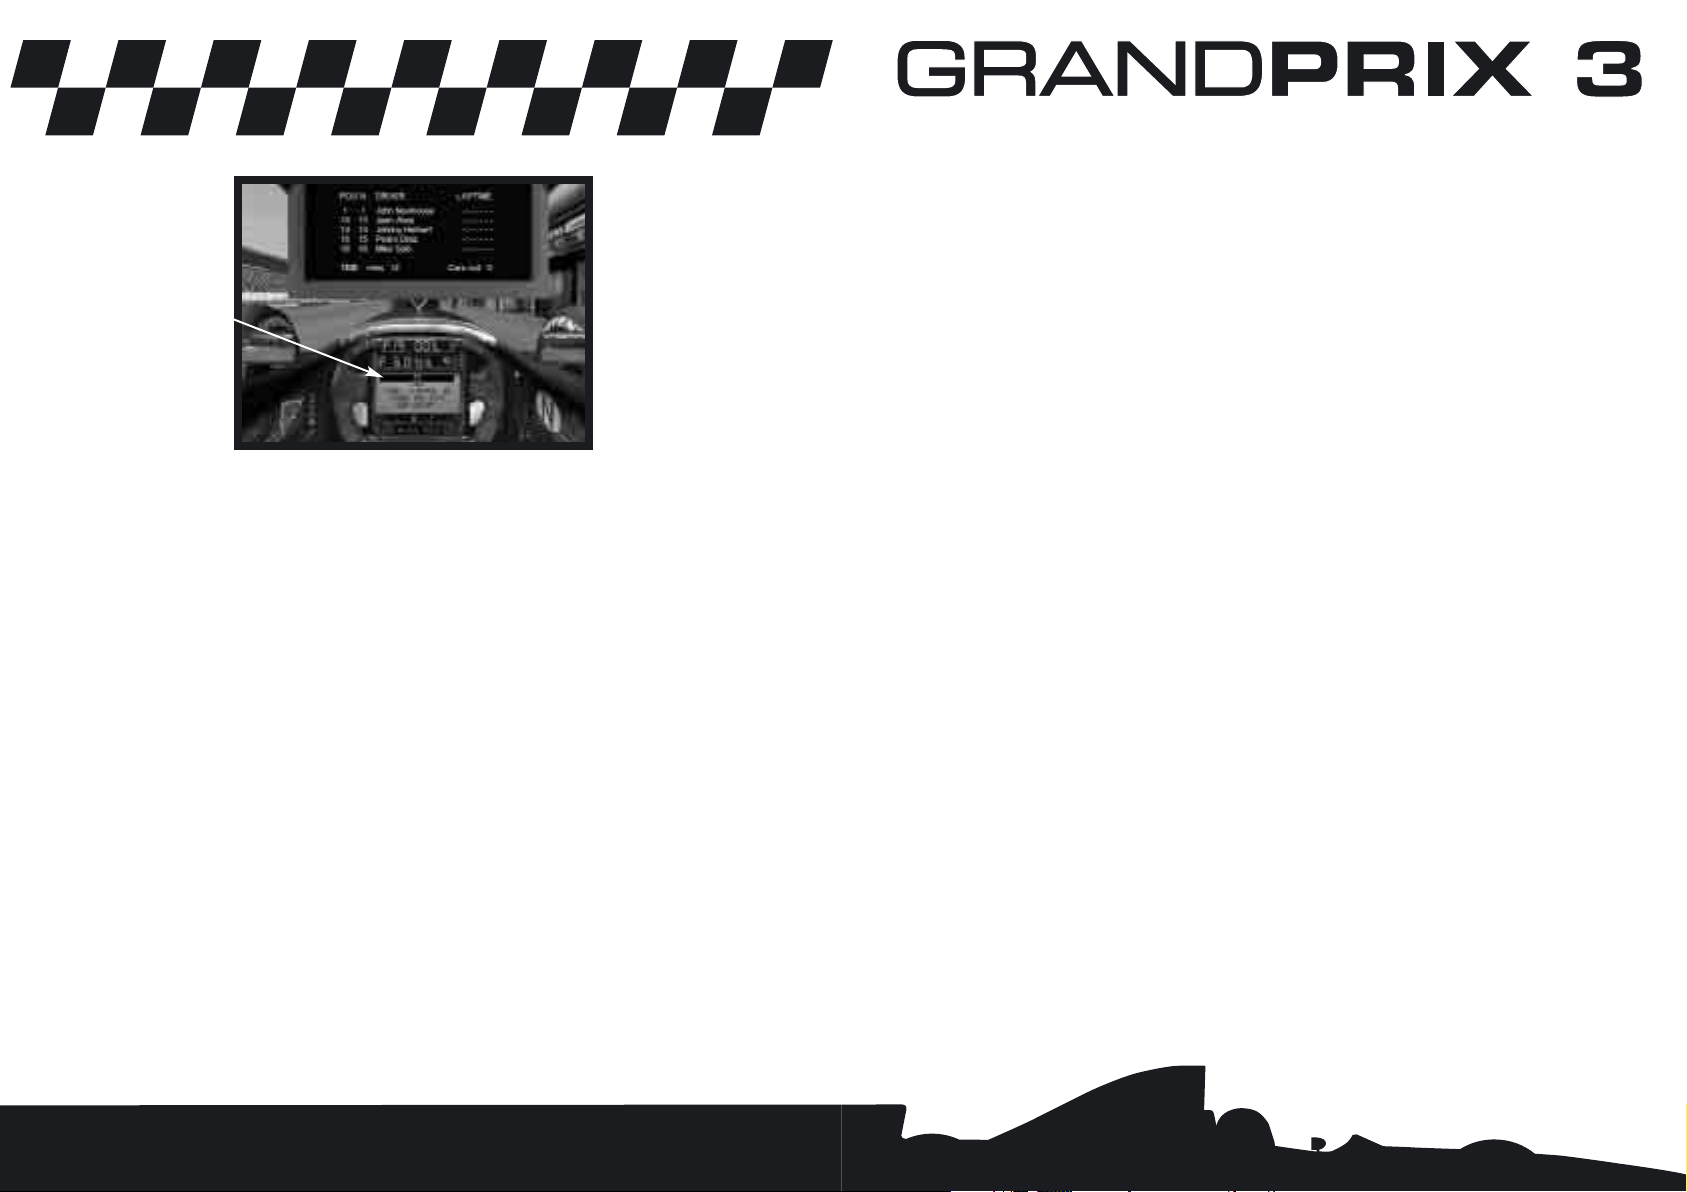
appear in front of your cockpit. This lists all drivers in the qualifying session, with your
name highlighted.
Ideally, you should still be in Rookie difficulty level and have all your Driving Aids (F1 to
F8) switched on - you’re free, of course, to deselect one or more of them.
15
The q sets are reserved for qualifying sessions with the exception of the one qr set which
can be used in qualifying and race.
Note: A tyre set comprises of 4 tyres.
Be aware that there are different tyre sets for different conditions: two types of Dry – Hard
and Soft and four types of wets – Intermediate, Hard, Soft and Monsoon, and that before
you begin your qualifying sessions you will have to decide what type of Dry tyres you are
going to race on during the rest of the race weekend
• Press the spacebar or the joystick fire button to exit the Tyres option.
Leaving the Pits
When you’re ready to leave the pits, highlight this option on the LCD, press the spacebar
or fire button and the jacks will be lowered. You can now drive down the pit lane (remember
the speed limit!) and re-join the circuit.
Car Setup Options
Select Car Setup Options from your cockpit LCD menu.
• This will take you to the Car Setup screen where you’ll be able to adjust all the basic
options for your car: Front Wing, Brake Balance, Rear Wing, Gear Ratios and Pitstop
Strategy. The Car Setup Options screen also gives you access to all the Advanced Setup
options (Levels 1 and 2). For details on all these, see The Car Handling Section on page 81.
• Press OK to return to the Pits Options screen.
• Press Return to Cockpit to get back to your car.
• Press the Esc key to open the Practice menu.
• Select Leave Practice to return to the Main Menu screen.
Now you can try to get a good qualifying lap time and enter a race at Monza (you should
know the track quite well by now). This will be a ‘one-off’ Non-Championship Race.
14
Page 14
You can now alter the setup of your car by selecting the Car Setup Options on the LCD
display. If you’re still new to Formula One car setups, stick to the default settings of
Grand Prix 3.
• If you want to speed up the qualifying session, select the fast forward symbol (>>) in
the cockpit LCD menu.
• If you ever want to exit the session before the end, press Esc and select Abandon
Qualifying. No time will be logged and you will start the race from the back of the grid.
When time is up, the Qualifying Over screen will appear. You can choose to View Full
Session Times, or go to the Options screen (where you can alter Controls, Driving Aids,
Race Options, Graphics, Sound, Save or Exit the game) or Continue with the NonChampionship Race.
• When you click on the Continue button, you’ll have the option of a Pre-Race Warm Up
or you can go straight to the Race.
The Pre-Race Warm Up is a chance to practise on the circuit in full racing trim. For this
Quickstart tutorial, you will go straight to the race.
• When Race is selected, you will see side-on views of the cars in their qualifying positions
on the starting grid.
• Click on the control buttons to find your name and car, then click OK.
Again, the track, sky and weather conditions will appear on the screen, but this time,
you’ll also be given the option to make Last Minute Changes such as altering Pitstop
Strategy, Tyre Choice (for instance, if the weather has changed radically) and full Car Setup
Options (at all 3 levels).
• Click OK when you’re ready to race.
A Non-Championship Race
You’re now on the starting grid at Monza – somewhere between a headline-grabbing pole
position at the front of the field or on the last row if your performance was poor (or you
failed to get a time)!
Your LCD display will show the number of laps in the race. This will be a percentage of
the real race and can be altered in the Options menu (see page 60 for details). Your pitstop
strategy (No Stop, One, Two or Three Stops) is also pre-set.
Whatever your position on the grid, you’ll be able to see the starting gantry: five banks of
five lights.
17
Check your tyres. You will see that qualifying tyres q1, q2, q3 and qr are available plus
seven sets of the four wet types. Note: Once you go to qualifying the Dry tyre choice (Hard
or Soft) in Car Setup screens is fixed for the rest of the race weekend. Wet tyres will always
be available however.
Don’t adjust anything on the car at the moment. When you’re ready, set off on your first
qualifying session.
• Press the spacebar (or the fire button in joystick control) and the telemetric monitor
will swing out of the way and your car will lowered off its jacks.
• Using the experience you gained in the earlier session, drive away from the pits and
complete a lap.
Remember, you won’t be timed until you cross the start/finish line for the first time.
As soon as you do, the lap timer in the panel below the LCD will be triggered and your
time for that lap will be displayed when you next cross the start/finish line.
The time remaining in the qualifying session is shown on the LCD in your steering wheel.
• When you have logged two lap times, return to the pits. (You can either drive around
to the pit lane entrance or hit SHIFT + Q to jump back to the pits.)
• Once you are in your bay, your car will be raised on its jacks and the monitor will
appear once again in front of you showing practice times so far – the four nearest to
your times and the current pole.
You can now change the qualifying tyre set by selecting Tyres and using the left/right control.
Note: Qualifying tyres are only good for a limited amount of laps and the fresher they are
the more effective they are.
16
Accelerate
Time Option
Page 15
Pulling Out
If you ever want to leave the race at any time press the Esc key. A menu screen will
appear: if you select the Abandon race option, you can Save the game (see below) and then
return to the Main Menu.
Saving the Game
You can save the race at any point. Here’s how:
• Press Esc to freeze the race and access the Race menu.
• Select the Options button.
• Click on Save to go to the Save Game screen.
Note: The Option panels allow you to change the Path and Drive on your computer, but
leave these as default for now.
• Click on Filename and name your saved game ‘Monza1’. Notice that it is given a .ran
suffix where ra- stands for a non championship race, and -n identifies Monza as the
track (see page 64 for a full list of track codes).
• When you have named the saved game, click on OK and you’ll get a confirmation that
the game is saved.
If you return to this Saved Game screen, you will see Monza1.ran in the file/directories
panel. If you select this file and look at the information panel (bottom right), you’ll see
detailed information about this specific save:
Date saved Number of Players
Time saved Race condition (e.g. in race/in pits)
Race Type Laps completed
Track Race Leader
19
Wait for the banks of lights to come on in sequence. When all five are glowing red, watch
for the moment when they all go out. This is a random number of seconds later.
• When the red lights go out, the race is on!
The most dangerous moment of the race, yet also the best chance to make up places on
the grid, be prepared to jostle for position as you head for the first corner. Be extra careful
when you approach the braking area and be prepared to take evasive action to avoid
touching other cars.
If you’ve selected Driving Aid F4, you’ll be indestructible but you might still be slowed
and perhaps pushed off the track by other cars.
As you race, keep checking the cockpit display for:
• Your position = P
• The lap you are currently on = L
• The fuel left in tanks (in laps) = F
• Your water temperature = T
It’s best to choose a moment on one of the straights to carry out these checks.
Pitstops
If the Pits Indicator (cockpit lower right) turns green, you’re being called into the pits by
your crew for a planned pitstop (to change tyres and refuel) or for an unplanned pitstop
to repair damage. Drive into the pits as soon as you complete the current lap. If you want
to cancel this order, press Return and the light will go out. Similarly if you decide you
want to pit, press Return and the green Pit Indicator will light (press Return again to cancel).
Flags
At the side of the track, you may see race marshals waving different flags at the drivers:
YELLOW means NO OVERTAKING – there’s probably been a spin or accident on, or near
the track. Do not overtake. When you see a marshal waving a GREEN flag, the yellow flag
order has been cancelled – continue all out racing!
RED means stop racing immediately.
BLUE means a faster car is trying to overtake you.
The cockpit has flag warning LEDs to show which of the main flags are in force.
Throughout the race, you’ll be given information about who is achieving the fastest laps.
18
Page 16
Winning the World Championship
If you have followed the Quickstart guide up to now, you should know the Monza circuit
pretty well, but winning a World Championship means acquiring intimate knowledge of all
16 tracks on the calendar. If you undertake a Championship Season, you’ll be entered into
the 1998 championship and race on all the tracks in the correct sequence – it’s hard work
and there are no easy answers except practice and defining the correct car set up.
You can win the World Championship in Grand Prix 3 even at the lowest level starting with all
eight Driving Aids turned on (F1 to F8) and with the opposition on their lowest performance
level. Then, as you progress through the season, you can begin to turn off some of the
Driving Aids, but if you do win the Championship, it will still only be at the lowest level.
To win the Championship at the highest Ace Level, you’ll need to drive with just the Ace
Level Driving Aids on for the complete duration of the season.
• Click on the Cancel button to return to the Options screen.
• Click on the Back button to return to the Race screen.
• Click on Return to Cockpit to return to the race (the game will be paused when you
return to the cockpit).
• Press P to resume the race.
Finishing the Race
• Keep racing until you see the chequered flag waved over the start/finish line or you see
a ‘Race Over’ message. You will then be taken to the Race Results screen.
This screen allows access to a number of screens showing extensive race information:
Full Race Results Driver Race Points
Driver Best laps Constructor Race Points
Circuit Records Lap Chart
Starting Grid
• Click on the Continue button and you’ll be taken to the Race Completed screen. This gives
you the option to Race Again On This Circuit or to Leave the Circuit (return to Main Menu).
By now you will have seen just how different it feels to race compared to the practice and
qualifying sessions. The big difference, of course, is the proximity of other cars and the
competitive attitude of the other drivers - some are aggressive, others take chances, all
have a real passion to win.
21
20
Page 17

Difficulty Levels
These five lights indicate your chosen Difficulty Level, the hardest at the top, the easiest
at the bottom:
Ace
Pro
Semi-Pro
Amateur
Rookie
The Difficulty Level affects the ability of the opposition and also limits the number of driving
aids you can switch on.
Driving Aids
These eight icons show which Driving Aids are active. The higher the Difficulty Level, the
fewer of these will be switched on. Some can be turned on and off from inside the cockpit.
F1 – Auto Brakes
The computer applies braking functions to suit the circuit but will not brake to avoid other
cars.
F2 – Auto Gears
The computer changes all the gears for you at the correct point.
F3 – Auto-right the Car
If you spin off the track, the computer will auto-right the car by pointing it in the correct
direction so you can keep racing (so long as your car is not too badly damaged, in which
case it will be craned off the track).
23
Part Three: The Cockpit Controls
Packed into the confines of a typical Formula One car is a wealth of information designed
to help the driver extract the best performance from his machine, to work out his race
strategy and keep an eye on the opposition. Knowing how to use this information and acting
on it in a fraction of a second can mean the difference between winning and losing.
You’ve had a taste of racing, but now it’s time to delve a little deeper into the cockpit and
its many secrets.
22
Lap Time/Split Time
Display
Page 18

RPM Indicators
These two banks of five LEDs will light up as your revs increase and guide you as to when
to change up or down a gear.
The final LED on each bank is red: when this lights up, change up a gear; when all the
lights go out, change down a gear.
Like a conventional rev counter measuring revs per minute (rpm), the LCDs tell you at
what speed your engine is spinning when in a particular gear. Keeping within the limits
of the LCD scales will help you to change up a gear at the right time, avoid hitting the rev
limiter (a device designed to prevent engine damage due to over-revving, for instance
when dropping down to a lower gear), as well as show you when you are using too high a
gear, losing speed in the process.
Gear Indicator
This tells you what gear you are currently in. There are 6 forward gears (6, 5, 4, 3, 2, 1),
Neutral (N), and Reverse (R).
Flag Warning Lights
These two sets of three flag warning lights indicate the current colour flag in force, if any
(yellow flag – no overtaking, red flag – stop the race, blue flag – car trying to overtake).
If all six flags are flashing, look at your instruments or read the message on the LCD.
Driver Status Indicator
This shows the car is being driven by a player.
Suggested Gear Indicator (F6)
If the F6 Driving Aid is on, you will see a small number here telling you what gear you
should be in before the next bend. This is an ‘intelligent aid’ and the suggestion will vary
depending on the car setup you have chosen.
Damage Indicator
This diagram will highlight any faulty or damaged parts on the car. If any section is lit and
you can still drive the car, make your way back carefully to the pits where the damage will
be repaired.
25
F4 – Indestructible
Your car will not be damaged, no matter how serious the shunt.
F5 – Ideal Line
A broken white line on the track shows the ‘best line’ around the track. Keep the line in
the centre point of the cockpit.
F6 – Suggested Gear
This cockpit indicator shows the best gear to be in as you approach the next corner.
F7 – Throttle Help
This will reduce the throttle when the rear wheels spin.
F8 – Steering Help
This will help you with any basic circuit-driving manoeuvre that requires the steering
wheel to be turned.
Driving Aids and Difficulty Levels
The number of Driving Aids available varies with each Difficulty Level:
Opposition Spread
The Opposition Spread indicator displays your chosen performance distribution among the
other drivers. You can set up racing Opposition Spread by accessing Main Menu > Options
> Race Options screen.
A flat line means all teams and drivers have the same potential performance.
A rising line simulates 1998 performances for all drivers and teams.
A wavy Line represents a random distribution of performance for all drivers and teams.
24
F1 F2 F3 F4 F5 F6 F7 F8
Auto Auto Auto-right Indestructible Ideal Suggested Throttle Steering
Brakes Gears the car Line Gear Help Help
Ace ✓✓✓
Pro ✓✓✓✓
Semi-Pro ✓✓ ✓ ✓ ✓✓
Amateur ✓✓ ✓ ✓✓ ✓✓
Rookie ✓✓ ✓ ✓ ✓ ✓ ✓ ✓
Page 19
During a race, a timed gap is shown on the LCD a little time after you cross the
Start/Finish line. This shows the time difference between your car and the one behind and
the one in front.
Pitstop Controls
Qualifying
The LCD shows Tyres, Fuel, Leave the Pits, Car Setup and (if in the middle of a session)
>> Accelerate Time
All tyres are marked with the number of laps driven on them.
Race
The LCD shows Fuel Laps + /- and Stops to Go +/-
When you come into the pits, the crew will automatically change your tyres to the next set
of selected race tyres, and refuel the car according to the current pitstop strategy. If your
race position warrants it, then you can adjust the pitstop strategy by increasing or decreasing
Fuel carried and increasing or decreasing the number of pitstops. Use your Selector and
Controller to change these values.
Pit Strategy
In the basic Car Setup screen there is a Pitstop Strategy panel that can be set to Automatic
or Custom. Automatic will allow the computer to set a ‘sensible’ strategy based on race
length and conditions. Custom allows you to set your own choice from None, 1 Stop, 2 Stops
or 3 Stops. The bar graphs indicate a percentage and a lap of the race that you will stop at.
Just before you enter a race, a Last Minute Changes button (shown on the Weather >
Conditions screen) allows you to alter the Pitstop Strategy, Car Setup (and Tyre Choice)
taking into account track conditions.
Your ‘Come into the Pits’ warning light (green) will come on as you cross the finishing/start
line of the lap before you stop. Remember that you must go into the pits next time you
pass the pit lane (or cancel the call by pressing Return).
27
Pits Indicator
This gives you the current status of your pit-to-crew communication:
Off – No pits request in force.
Green – You’ve been called in to the pits by your team (press the Return key to
cancel this order).
Green – You’ve warned your team you’re coming in to the pits (by pressing the
Return key).
Red Cross – Your pit crew are currently busy with your other team car. Stay out.
Press the Return key to inform your crew of your intention to pit. Press again to cancel.
LCD Displays
The central steering wheel LCD shows a lot of important information, depending on what
you are doing at any given stage of the Grand Prix weekend.
During Qualifying/Practice:
Time to go – The amount of time in minutes and seconds left to complete this part
of the qualifying session.
Car – Your car number.
Runners – The number of cars on the track.
Split/Best – Your best lap time or split time.
During the Race:
XX Lap Race – The number of laps in the race.
Car – Your car number.
Runners – The number of cars on the track.
You will also receive split time information and nearest rival details.
Split Times
On each circuit, there are two intermediate timing points in addition to the start/finish line.
During practice, a ‘split’ time is shown on the LCD as you do a timed lap. This is a time
you are trying to beat at the next intermediate timing point. The split times come from
the best lap time you have achieved so far. As you cross the intermediate timing point,
you will see a new time displayed. If this has a minus symbol, you know that you have put
in a faster time.
26
Page 20
Trackside Camera Views
Left Arrow Key
View all the action centred on any car at
any time during the race (Use Up/Down
arrow keys to move through the field). The
Right Arrow Key will return you to your own
cockpit view.
Chase View
PageDown Key
View any car from just behind and slightly
above it.
Reverse Chase View
Delete Key
View any car from the front and slightly
above.
29
Part Four: Camera Views and TV Director
You’re not limited to the cockpit view in Grand Prix 3. The simulation allows you to access
a large number of other camera views. And if you’ve just pulled off a breathtaking overtaking manoeuvre or want to review a spin to see just what went wrong, you can select the
replay option.
Cockpit View
Right Arrow Key
The race from the cockpit of your car. This
is your default racing view.
On Car Camera Views
PageUp Key (Cycle through)
You can view the action from various cameras
attached to your car. The PageUp key scrolls
through a large number of views.
Other Car Views
Up Arrow/Down Arrow/Home
You can ‘jump’ into the cockpit of the car ahead by pressing the Up Arrow Key. Further
presses will move you forward (one car per press). In the same way, you can move back
through the field with the Down Arrow Key. The Home key will return you to your own car.
28
Page 21

CIRCUITS ON THE FORMULA ONE CIRCUS
Between the claustrophobic, twisting streets of yacht-strewn Monte Carlo and the open
sweeps of a modern facility such as Austria’s A1-Ring with its generous run-off areas,
similarities are few. Teams face a bewildering set of variables as the Formula One circus
re-invents the playing field every two weeks.
Venues like Monza and Silverstone may be part of racing lore, corners like Lesmo, Tabac
and Eau Rouge, part of every fan’s vernacular. But to a driver, they are simply places
to be mapped and memorised, a clinical mix of braking point, apex and rumble strip.
A trajectory to be optimised. An opportunity or a problem.
31
TV Director
Insert Key
TV Director mode automatically shifts the trackside views between different cars and
different camera angles. When you press the Insert key, a ‘clapperboard’ will be displayed
for five seconds in the top right hand corner of the screen. When you turn Director Mode
off (by selecting any other view) the clapperboard will appear with a cross through it.
Replay Mode
Pause Key P + R
The Pause key (P) pauses the action and the R key replays the previous 20 seconds of
action with an ‘R’ displayed on the top left of the screen. You can change all camera views
during a Replay (see above). At the end of the 20 seconds, the game is left in Pause
mode. Either press R again to see the replay as many times as you want, or press P to
continue with the game and return to your original position (in your cockpit if you were
racing).
30
Page 22

BRAZILIAN GRAND PRIX
27-29 March 1998
Autodrómo José Carlos Pace, Interlagos, São Paulo
1 lap: 2.667 miles/4.292km (anti-clockwise)
72 laps: 192.018 miles/309.024km
Punishing your transmission and neck muscles alike, marshy Interlagos is notorious for its
bumps. Overtaking opportunities are few, so although low downforce may make the car
skittish on the track’s inner section, it’s best to sacrifice cornering stability in favour of
the straight-line speed you’ll need to overtake at the end of the two long straights.
Your best chance comes at the first corner: if you crest the rise with enough speed, pull out
of the slipstream and dive for the inside at 180mph. Watch your line through the S do Senna,
keeping it tidy and building speed up for the critical Curva do Sol. A good exit here means
good top speed for the Reta Oposta straight, ready for the track’s second overtaking
opportunity, Descida do Lago, a tight left-hander where it’s easy to spin off. Sweep through
another left-hander in fourth at 135mph, accelerate to 170mph before braking for
Ferradura, a sweeping, double apex right. Maintain a smooth flowing rhythm as you tackle
a series of slow winding bends, dropping as low as second and 55mph for Bico do Pato, before
building momentum up the slope, past the pit lane entry and back onto the main straight.
33
AUSTRALIAN GRAND PRIX
6-8 March 1998
Albert Park Circuit, Melbourne
1 lap: 3.295 miles/5.303km (clockwise)
58 laps: 191.117 miles/307.574km
Kicking off the new season, Albert Park’s mix of tight corners and sweeping curves is
popular with the drivers. Despite some bumps and a certain appetite for tyres, the track
is less demanding than conventional street circuits. A high downforce set up is best, with
good traction a must.
With the exception of the pit straight where speeds top out at 185mph, Melbourne mixes
short bursts of acceleration with hard braking, sharp bends being linked by short sweeps
rather than straights worthy of the name. A couple of 45º right and left turns lead to one
of the circuit’s best overtaking spots, a right-left S bend. Expect trouble here in the opening
lap. After braking hard down to 70mph for the tight right-hander at Turn 9, the middle
section of the lap opens out, giving cars with good horsepower the chance to pull away,
while the tighter section that links Turn 13 to the last corner at Turn 16 will favour cars
with good handling, bringing them back into contention. Finish the lap close enough here
and you may get enough tow down the pit straight to take you past the car in front.
32
MELBOURNE
CLARK STAND
FITTIPALDI STAND
WHITEFORD STAND
BRABHAM STAND
FANGIO
GRANDSTAND
WAITE STAND
START/FINISH CLOCKWISE
HILL STAND
SENNA STAND
STEWART STAND
PROST
STAND
INTERLAGOS
2
ND
CURVA
-
3
RD GEAR
SUBIDA
CURVA 3
4
BICO DO PATO
2
ND GEAR
55 MPH
RETA OPOSTA
6
TH GEAR
190 MPH
MERGULHO
ARQUIBANCADAS
PINHEIRINHO
LARANJINHA
GEAR
2ND
55 MPH
FERRADURA
CURVA DO SOL
TH GEAR
4
PIT LANE
START/FINISH
ANTI-CLOCKWISE
CURVA 2
CURVA 1
6
TH GEAR
200 MPH
Page 23

SAN MARINO GRAND PRIX
24-26 April 1998
Autodromo Enzo e Dino Ferrari, Imola (Italy)
1 lap: 3.061 miles/4.927km (anti-clockwise)
62 laps: 189.782 miles/305.443km
Imola is a medium speed circuit where brakes take a pounding. To get a good balance
under deceleration, set up the car for medium downforce with stiffer settings, even if it
means sacrificing grip.
At the end of the main straight, brake hard down to 3rd gear for Tamburello, a left-right
S-bend. Accelerate down the straight and slow for Villeneuve, another S-bend, this time
in 4th. Next is Tosa, one of the best places to pass and pick off back-markers. Out of the
2nd gear hairpin, head up the 175mph climb to Piratella. Brake as you enter this blind
left-hand curve, exiting at about 160mph, over the crest and down to the Acqua Minerale
chicane, where the approach is blind and off-camber. Mind the kerbs as the car will tend
to bounce, trying to throw you into a spin. Now flat out to the 3rd gear chicane at Variante
Alta, before dropping down towards two bumpy left-handers – Rivazza – braking hard,
dropping from 6th to 2nd. Back up to 5th as you approach Variante Bassa, a right hand
kink with another hidden apex. Finally thread through the Traguardo chicane, checking
your mirrors for any cars looking for a tow as you race down the straight.
35
ARGENTINIAN GRAND PRIX
10-12 April 1998
Autodromo Oscar Alfredo Galvez, Buenos Aires
1 lap: 2.645 miles/4.256km (clockwise)
72 laps: 190.418 miles/306.449km
A technically challenging course with many twists, low speed corners, bumps and changes
in gradient. Good grip is critical here, calling for steep wing angles for high downforce. The
sheer variety and frequency of corners will have you flicking the car left and right, so keep
your lines clean to set yourself up for the best overtaking spot at the end of the main
start/finish straight.
Be prepared to go on the attack, or to defend the inside line as you brake hard from
180mph down to 2nd gear and 60mph for the first corner. Accelerate up to a right-hand
kink, taken at 130mph and push to 150 before driving into the Curva de la Confiteria,
clipping the apex at 60mph. Sweep through a left-right combination to the long constant
radius right-hander that opens onto the second longest straight. Lift off for the 165mph
Curva de Ascari, before braking hard for a 180º right that leads to the Esses. Carry as
much speed as you can out of Ombú onto the short straight before braking hard for the
Senna ‘S’. A short burst up to 150mph, then slow to 55mph for the hairpin, before building
speed through the kink onto the half-mile Tribunas straight and the finish line.
34
BUENOS AIRES
ASCARI CURVE
OMBÚ
CURVE
CURVÓN
CURVE 1
CONFITERIA
CURVE
VIBORITA
START/FINISH CLOCKWISE
MIXTOS
HAIRPIN
SENNA ‘S’
GRANDSTANDS
HORQUILLA
IMOLA
PIRATELLA
VARIANTE ALTA
TRAGUARDO
RIVAZZA
VARIANTE BASSA
PIT LANE
ACQUA MINERALE
2ND GEAR 50 MPH
START/FINISH
ANTI-CLOCKWISE
2ND GEAR 60 MPH
TOSA
RETTIFILIO
6TH GEAR
200 MPH
TAMBURELLO
Page 24

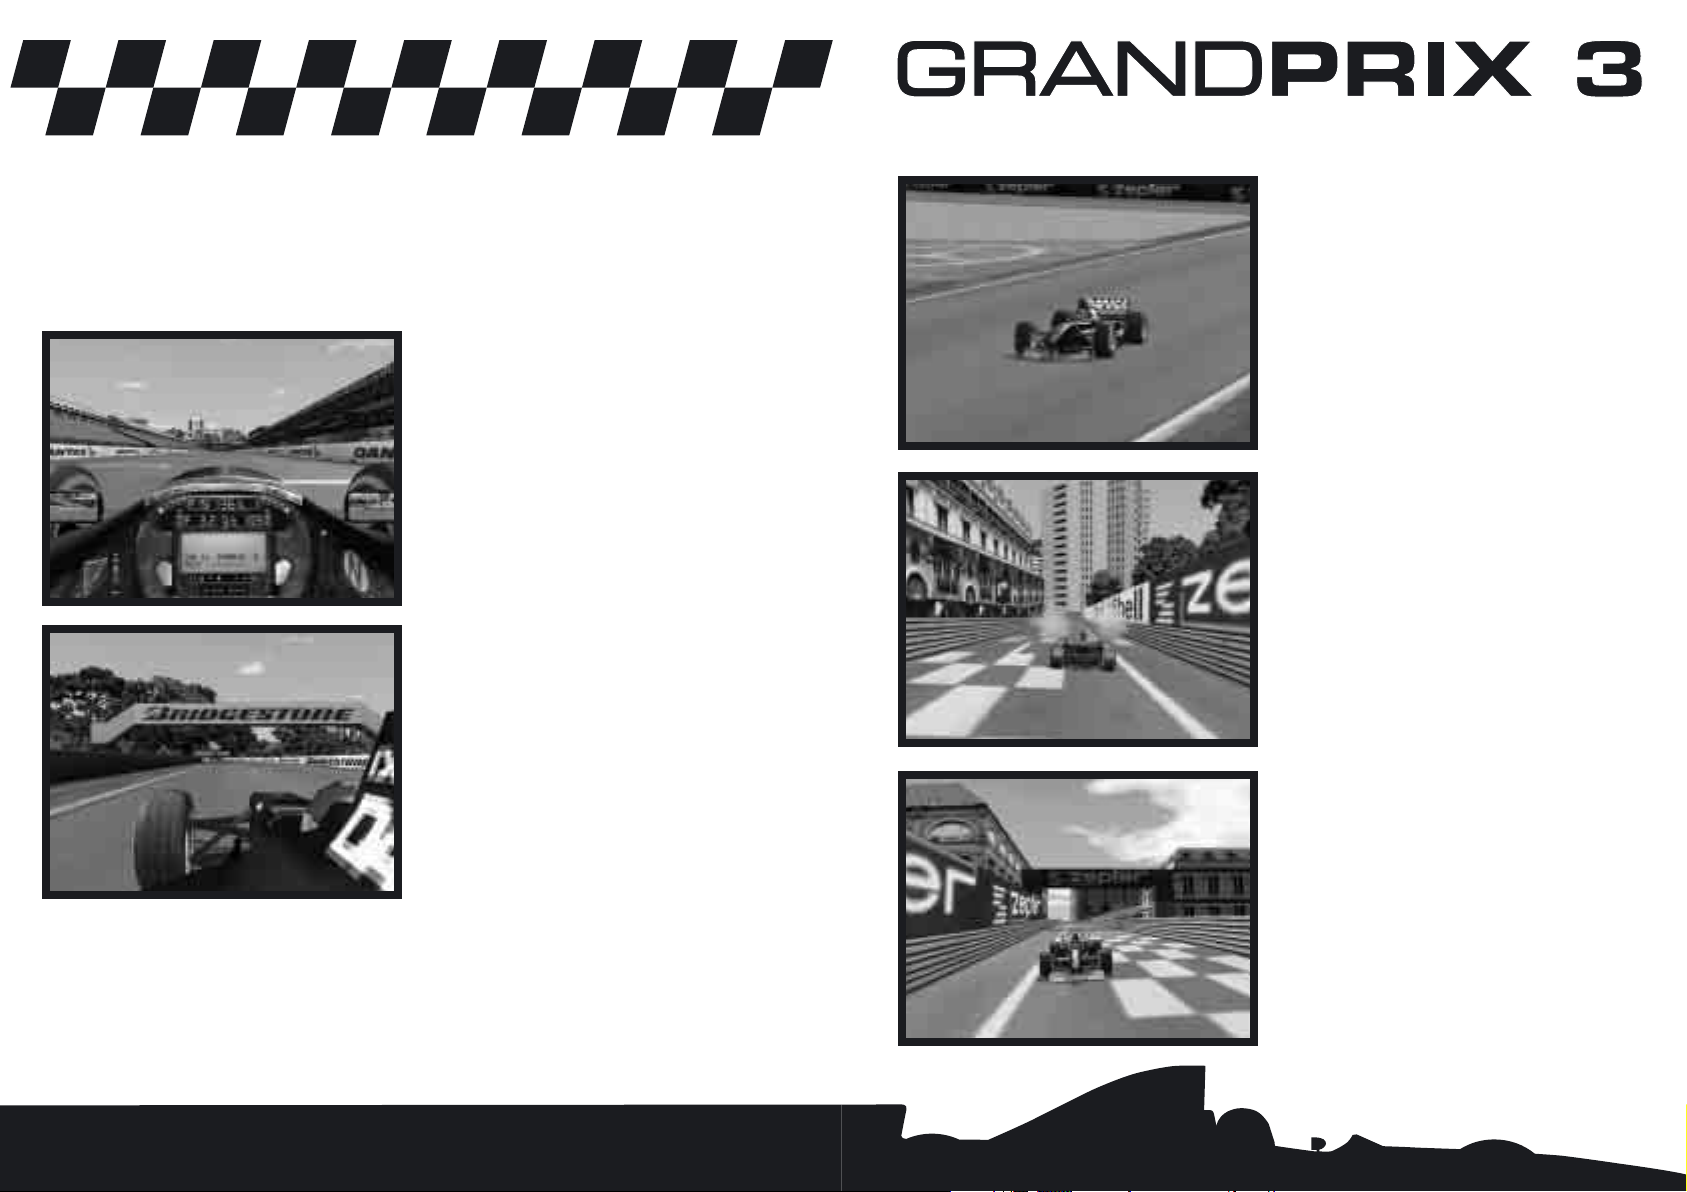
MONACO GRAND PRIX
21-24 May 1998
Circuit de Monaco, Monte Carlo
1 lap: 2.092 miles/3.367km (clockwise)
78 laps: 163.186 miles/262.624km
The definitive street circuit, a test of stamina, precision and smoothness. With passing so
difficult, a pole here is the most prized of the season. Good chassis balance, a flexible
engine, strong brakes, a high downforce set up and keeping out of trouble are all key.
If you can funnel through the first corner on race day, Sainte Dévote, you’ll emerge in line,
snaking uphill, the car juddering and thumping over manhole covers. Hug the barrier on
the inside for Massenet at the top, a long left-hander taken in 3rd at about 80mph. Into
Casino Square and out again as you go light over the hump before dropping downhill, offcamber, almost brushing the barrier and on to the hairpin at Mirabeau (an overtaking
opportunity for the brave). A short burst down to Loews, braking almost to a standstill
(2nd gear, 20mph), arms crossed for maximum lock (be ready to queue here in the early
laps). Then it’s right through Portier and flat out through the Tunnel, emerging in 6th at
about 175mph. Stay well to the right as you brake to 30 for the Nouvelle Chicane. Head
down to the 90º left-hander, Tabac, in 4th at about 90mph and into the Swimming Pool
Complex, hopping over the kerbs and skimming the walls. La Rascasse is next, taken at
a crawl in 1st, before flicking through the last corner, looking for a way past as you go flat
out across the finish line.
37
SPANISH GRAND PRIX
8-10 May 1998
Circuit de Catalunya, Barcelona
1 lap: 2.937 miles/4.726km (clockwise)
65 laps: 190.882 miles/307.196km
Featuring a wide range of corners from slow 2nd gear turns to fast 4th or 5th gear curves,
and a very long, high-speed overtaking straight, Catalunya calls for compromise: you need
enough grip for neutral handling through the many bends, but low downforce to achieve a
good top speed at the end of the straight.
The first corner, Elf, is probably your best overtaking opportunity on the circuit. Then it’s
a gentle left before a long sweeping 4th gear 100mph right-hander and a short straight
to Repsol, taking a late apex and accelerating hard as the turn gradually opens out. Next,
a short burst up to 155mph in 5th takes you into Seat, the hairpin, braking hard down to
60mph in 2nd. Sweep through a gentle left before braking hard again at Würth, a sharp
90º left before a right kink leads to Campsa, a blind right-hander. After that it’s right and
left through Nissan and flat out up to La Caixa (65mph in 2nd) that leads into the long
right-hander at Banc Sabadell. From here, build your speed for the two corners that
follow, taking the last one in 5th at 140mph and charge out hitting top gear, flat out over
the line.
36
BARCELONA
ELF
START/FINISH
CLOCKWISE
RENAULT
PIT LANE
LA CAIXA
BANC SABADELL
NISSAN
CAMPSA
WÜRTH
SEAT
REPSOL
MONTE CARLO
STE DEVOTE
START/FINISH
CLOCKWISE
PIT
LANE
TABAC
SWIMMING POOL
COMPLEX
ANTHONY NOGHES
LA RASCASSE
NOUVELLE
CHICANE
HARBOUR
ROSIE’S BAR
6TH GEAR
170 MPH
6TH GEAR 175 MPH
CASINO
LOEWS
1ST GEAR
40 MPH
TUNNEL
MIRABEAU
2ND GEAR
PORTIER
Page 25

FRENCH GRAND PRIX
26-28 June 1998
Circuit de Nevers, Magny-Cours
1 lap: 2.639 miles/4.247km (clockwise)
71 laps: 187.383 miles/301.564km
Smooth and challenging, Magny-Cours is a mix of fast 4th and 5th gear corners, 1st gear
hairpins and five fast straights. Teams choose a medium downforce set up with a lower ride
height to reduce drag. Acceleration and top speed are more important than the fraction
of a second gained by carrying more downforce through the corners.
Past the pits, brake from about 170mph down to 4th gear and 120mph for the Grande
Courbe, an easy left before setting up the car for Estoril, a seemingly endless right that
leads onto the circuit’s longest straight. Take the kink (Golf) flat out before breaking hard
for Adelaide, a 40mph, 2nd gear hairpin, the best place for overtaking. Accelerate hard
through a gentle right-left to the chicane at Nürburgring, before another short burst leads
to the ‘180º’ hairpin, taken at 50mph. Accelerate out to the right-left combination of
Imola before slowing for the Château d’Eau turn. Exit in 2nd at 50mph then attack the
straight before braking hard for the Chicane, a tight right-left. Finally, watch for cars taking
the inside line as you turn into Lycée and the home straight. A clean exit here will get you
on the throttle early, in good shape for the start/finish straight.
39
CANADIAN GRAND PRIX
5-7 June 1998
Circuit Gilles Villeneuve, Montréal
1 lap: 2.747 miles/4.421km (clockwise)
69 laps: 189.548 miles/305.049km
This island circuit is a mix of fast sweepers and straights punctuated by hard-breaking
chicanes and hairpins. A low downforce set up gives maximum straight line speed, even
if it makes slower sections tricky and emphasises the uneven road surface.
After sweeping left and right, overtaking is possible into the first corner, braking hard for
this 90º left, often a trouble spot on the first lap. This leads directly into a 180º 2nd gear
right-hander before you pick up speed through a long series of sweeping bends, together
with a swift right-left combination. Scrub off speed for Turn 10, down from about 180mph
in top gear to 40mph. Check your mirrors or try to out-brake a rival yourself as you dive
into the hairpin. Build your speed up for the fastest part of the circuit, before braking very
hard for Turn 11. At the end of the next straight is another overtaking spot as you brake
for the right-left combination that takes you back onto the main straight. Watch you don’t
clip the kerb on the entry or the apex as you’ll come mighty close to the wall on the exit.
Come out cleanly and you’ll be well set up for a charge down to the finish line.
38
MONTREAL
PITS HAIRPIN
6TH GEAR 165 MPH
6TH GEAR 175 MPH
ISLAND HAIRPIN
1ST GEAR 45 MPH
5TH GEAR 160 MPH
START/FINISH
CLOCKWISE
6TH GEAR 180 MPH
6TH GEAR 195 MPH
PIT LANE
1ST GEAR 40 MPH
OLD PITS
MAGNY-COURS
GOLF KINK
NÜRBURGRING
ESTORIL
BEND
GRANDE COURBE
180 DEGREES
START/FINISH
CLOCKWISE
LYCEE BEND
CHICANE
ESSE
IMOLA BEND
PIT LANE
ADELAIDE
BEND
CHATEAU
D'EAU
Page 26

AUSTRIAN GRAND PRIX
24-26 July 1998
A1-Ring, Zeltweg
1 lap: 2.684 miles/4.319km (clockwise)
71 laps: 190.543 miles/306.649km
Despite a new name and major refurbishment, the A1-Ring opened in 1997 retains the
essential character of the old Österreichring: big changes in gradient, long straights and
tight sweeping corners in a setting as spectacular as ever. While the straights suggest low
downforce, the track’s lack of grip leads many to choose a medium downforce set up.
Power uphill in top gear and 180mph, brake hard for the first corner, the Castrol Curve,
taken at 65mph in 2nd. This leads to a long, fast section that’s almost straight, taken flat
out. Brake very hard on the approach to Remus, down to 40mph on the apex for this 150º
turn, one of several overtaking spots. Another long, very fast straight lies ahead: you’ll
reach 180mph before down-shifting into the Gösser Curve double right-hander, going into
it in 2nd gear at 50mph and exiting in 4th at 105. The tarmac drifts round to the Niki
Lauda Curve, a sweeping left turn leading into another, the Power Horse Curve. Rattle up
through the gears on the straight to 175mph, ready for an open right-hander, Jochen
Rindt (100mph) and the A1 Curve that leads you back to the finish.
41
BRITISH GRAND PRIX
10-12 July 1998
Silverstone Circuit, Northamptonshire
1 lap: 3.193 miles/5.139km (clockwise)
60 laps: 191.566 miles/308.296km
Once one of the quickest venues on the calendar, in recent years Silverstone’s character
has changed to a mix of fast straights and a greater variety of corners. Calling for a medium
downforce set up, its smooth surface gives good grip in the dry.
The first corner, Copse, is a daunting 4th gear, 140mph curve with a blind apex where
grip and grit will let you overtake. A short straight leads to the fast left-right sweeps that
are Maggotts and Becketts. Chapel Curve follows, exiting at 150mph in 6th gear onto the
Hangar Straight (185mph), the longest on the circuit. Now brake hard for the double apex
right-hander at Stowe, taken in 4th at about 100mph - again a place where a well-planned
overtaking manoeuvre can succeed. The road dips into Vale as you drop to 2nd for a hard
left into Club, which you’ll exit at 130mph. Up the rise to Abbey now, another overtaking
spot, before building to 160mph and dabbing the brakes for the spectacular sharp right
at Bridge where the road falls away and the banked track catapults you round into the
‘complex’: Priory, Brooklands and Luffield follow in quick succession before Woodcote
opens out, letting you sweep flat out onto the finishing straight.
40
SILVERSTONE
CHAPEL
4TH GEAR
COPSE
START/FINISH
CLOCKWISE
WOODCOTE
MAGGOTTS
PIT LANE
PRIORY
BRIDGE
BROOKLANDS
2ND-3RD GEAR
BECKETTS
ABBEY
FARM STRAIGHT
6TH GEAR 185MPH
LUFFIELD
HANGAR STRAIGHT
DOUBLE APEX
THE VALE
CLUB
2ND GEAR
STOWE
3RD-4TH
100MPH
A1–RING
REMUS
CURVE
NIKI LAUDA CURVE
CASTROL CURVE
GÖSSER CURVE
POWER HORSE CURVE
START/FINISH
CLOCKWISE
JOCHEN RINDT
CURVE
A1 CURVE
Page 27

HUNGARIAN GRAND PRIX
14-16 August 1998
Hungaroring, Budapest
1 lap: 2.468 miles/3.972km (clockwise)
77 laps: 190.036 miles/305.844km
This is a tough but relatively slow circuit: poor grip, many bends and very few straights
make it difficult to pass, so qualifying well is critical. Cars are set up for high downforce
to improve grip, but the twisting, up-and-down track means tyres wear quickly as drivers
lose patience and try to exit corners faster than their tyres will allow. Pitting at the right
time, if only to avoid the queues that develop here, is often the key to victory.
The first corner - downhill, flat out in 6th at 175mph – is the main overtaking spot on the
circuit. Next is the first of several constant radius bends requiring a clean line to keep
you off the ‘marbles’, the loose rubber chippings shed by the tyres. A short straight takes
you into a 4th gear right, before the road drops and rises again towards a double apex lefthander and a long 3rd gear 85mph sweeping right. Slow down for the 2nd gear right-left
chicane before gradually building speed for the series of 3rd gear corners that follow, taking
Turn 10 in 5th. Watch the kerbs as you thread through the tight section at Turn 12 and
onto the penultimate corner, a slow left-hander setting yourself up for a long right-hander,
sticking cleanly to the racing line for a quick exit onto the finishing straight.
43
GERMAN GRAND PRIX
31 July-2 August 1998
Hockenheim
1 lap: 4.240 miles/6.823km (clockwise)
45 laps: 190.782 miles/307.035km
Despite three chicanes and a winding ‘Stadium’ section, much of the course is a series
of very long straights calling for slim wings and low downforce. This makes the cars very
twitchy on the bends, and unsteady under braking, a situation made worse by brakes
cooled below optimum temperature on the long straights.
The circuit features a number of overtaking opportunities, starting with the 4th gear,
125mph Nord Kurve. Then comes the first of the straights cutting through dense pine
forests, hitting speeds close to 210mph. Brake hard and drop to 2nd for the first chicane,
the Jim Clark Kurve. (Watch your line, as a mistake may force you down to 1st.) Up
through the gears again as the road sweeps into the braking area for the second chicane.
Full throttle pushes up the Gs as you tackle the Ostkurve, one of the fastest bends in
Formula One, taken in 6th at 200mph. Keep the power on until the Ayrton Senna Kurve,
a left-right 2nd gear 60mph chicane. The final stretch through the woods leads up to the
Agip Kurve, an important place to pass if you don’t want to get held up through the
Stadium’s slippery Sachs Kurve and a double apex right-hander, the Opel Kurve, which
leads onto the pit straight.
42
HOCKENHEIM
JIM CLARK KURVE
CHICANE 1
2ND GEAR 50 MPH
CHICANE 3
NORD KURVE
4TH GEAR 125 MPH
START/FINISH
CLOCKWISE
PIT LANE
SACHSKURVE
OPELKURVE
6TH GEAR 200 MPH
AYRTON SENNA KURVE
3RD-4TH GEAR
AGIPKURVE
6TH GEAR 200 MPH
6TH GEAR 200 MPH
2ND GEAR 50 MPH
CHICANE 2
OSTKURVE
HUNGARORING
6TH GEAR
185 MPH
START/FINISH
CLOCKWISE
PIT LANE
4TH GEAR
130 MPH
5TH GEAR 165 MPH
2ND GEAR
Page 28

ITALIAN GRAND PRIX
11-13 September 1998
Autodromo Nazionale di Monza
1 lap: 3.585 miles/5.770km (clockwise)
53 laps: 189.858 miles/305.548km
Monza’s innumerable chicanes have done nothing to dampen the spirits of the faithful
tifosi. Despite the twists, Monza still requires a low downforce set up to take advantage of
the very fast start/finish straight. The downside is poor grip in slower corners, making outbraking a tricky business.
The fast, long starting straight (Rettifilio) leads to a bumpy 2nd gear double chicane, the
braking area being an ideal spot for a calculated overtaking attempt. Exit at 80mph and
head for the Curva Grande, a long, bumpy right-hander that’s tough on steering, exiting
at about 185mph. Next, it’s flat out along the straight to the Variante della Roggia, another
2nd gear chicane. Now accelerate hard to the first of the Lesmo bends, building up speed
for the second that opens onto the long 200mph Curva del Serraglio. Scrub off speed for
the tricky 3rd gear Variante Ascari chicane, trying to carry as much speed onto the straight
down to the famous Parabolica (also a good place to overtake), coming out in 4th at 170mph
ready for the long drag down the home straight.
45
BELGIAN GRAND PRIX
28-30 August 1998
Circuit de Spa-Francorchamps
1 lap: 4.329 miles/6.968km (clockwise)
44 laps: 190.498 miles/306.577km
Fast, challenging and exhilarating, Spa is a favourite circuit among drivers. Cars are set
up with low to medium downforce to deal with the track’s variety of fast 6th and 5th gear
corners, as well as its tricky 1st gear hairpins and 2nd gear chicanes. Wet weather is often
a big factor at Spa, with the track sometimes dry at one end and rain-soaked at the other.
From the grid, a short straight takes you into the 1st gear 40mph La Source hairpin, the
scene of many an opening lap shunt. Then it’s a race through the gears, heading downhill at 180mph into the Eau Rouge dip, before sweeping uphill on the legendary Raidillon.
This is one driving line you cannot afford to get wrong! Speed through the Kemmel kink,
checking your gauges on the straight before braking hard for Les Combes (a good overtaking section), a 3rd gear chicane that takes you into Malmedy and Rivage, a tricky 180º
corner leading downhill to Pouhon, a hugely challenging double-apex 140mph left-hander.
Through Fagnes, flicking smoothly right and left before heading back onto the old circuit
with its daunting series of corners - Blanchimont is taken in 6th at 185mph! Now brake
hard for the Bus Stop chicane (another good place to overtake), bumping over the shallow
kerbs and back on the pit straight.
44
SPA
STAVELOT
LES FAGNES
START/FINISH LINE
CLOCKWISE
BUS STOP CHICANE
RAIDILLON
EAU ROUGE
6TH GEAR 180 MPH
MALMEDY
2ND GEAR 50 MPH
LES COMBES
POUHON
5TH GEAR 150 MPH
6TH GEAR 195 MPH
BLANCHIMONT
KEMMEL
LA SOURCE
PIT LANE
MONZA
CURVA DI LESMOS
4TH-5TH GEAR
CURVA DEL SERRAGLIO
VARIANTE
DELLA ROGGIA
5TH GEAR
CURVA GRANDE
VARIANTE GOODYEAR
CURVA DE VIALONE
VARIANTE ASCARI
200 MPH PLUS
RETTIFILIO
START/FINISH CLOCKWISE
6TH GEAR 190 MPH
PARABOLICA
140 MPH
PIT LANE
Page 29

47
JAPANESE GRAND PRIX
30 October-1 November 1998
Suzuka Racing Circuit, Mie-ken
1 lap: 3.641 miles/5.860km (clockwise & anti-clockwise figure of eight)
51 laps: 185.708 miles/298.868km
The only ‘figure of eight’ circuit on the calendar, the undulating track mixes tough 4th
gear corners with 1st gear hairpins to give tyres a hard time. Medium downforce is the best
compromise, to take account of the many twists.
After the 190mph straight, brake hard into the First Curve, looking for overtaking opportunities. Drift the car out to the left and you head for the ‘S’ Curves, a series of 4th gear
bends. Driving as tight a line as possible through these, exit Dunlop Curve at full throttle,
uphill, heading for a blind left-hander. The car lifts over the bumpy crest and comes down
hard for a tightening right-hander, Degner, before running under the bridge at the
Crossover. Next is the slow 40mph 2nd gear Hairpin (watch for wheelspin on the exit).
A fast, looping right will put you in top gear at 170mph approaching Spoon Curve, a long,
tricky double left-hander (where you need to slow for the second apex). Hit 180mph as
you sweep over the Crossover this time, slowing for ‘130 R’, before braking hard to weave
through the Casio Chicane and accelerating over the finish line.
LUXEMBOURG GRAND PRIX
25-27 September 1998
Nürburgring (Germany)
1 lap: 2.831 miles/4.556km (clockwise)
67 laps: 189.664 miles/305.235km
Playing host to the Luxembourg Grand Prix, the German track is typical of a fast, modern
circuit with many wide run off areas and large gravel traps. Teams usually choose a medium
downforce set up as the best compromise to suit the track’s short straights and its wide
variety of corners.
From the start, it’s foot down to 180mph before braking for the Castrol-S, a quick 3rd
gear right-left. Accelerate hard to the left at Valvoline and then straight into Ford, dropping
to 65mph and 2nd gear. The road stretches downhill now to the Dunlop turn, a slow, looping,
190º right-hander best taken in 2nd - often a good overtaking area. The exit is fast as you
speed through a gentle left and right, getting up to top gear at about 175mph, before a
near 90º left, good for 80mph. This is immediately followed by the Bit-Kurve, a slightly
tighter bend to the right, yet taken slightly faster. Now apply full throttle for the straight,
barely lifting for a fast right kink before braking hard for the 60mph, 2nd gear Veedol
Chicane, the slowest part of the course. Now accelerate out up to 130mph before slowing
for the Coca-Cola Kurve, a long, sharp 2nd gear left-hander, ready to press on across the
finishing line.
46
NÜRBURGRING
ITT KINK
BIT CURVE
DUNLOP
HAIRPIN
RTL CURVE
FORD CURVE
VALVOLINE
CURVE
CASTROL-S
VEEDOL
CHICANE
START/FINISH
COCA COLA
CLOCKWISE
CURVE
SUZUKA
START/FINISH CLOCKWISE
FIRST
CURVE
4TH GEAR
4TH GEAR
SPOON CURVE
HAIRPIN CURVE
1ST GEAR 40-45MPH
6TH GEAR
CASIO CHICANE
CROSSOVER
DUNLOP
CURVE
5TH GEAR
DEGNER CURVE
PIT LANE
S CURVE
6TH GEAR 200 MPH
Page 30

MENU REFERENCE SECTION
Startup Menu Screen
When Grand Prix 3 loads, the Startup Menu will be displayed. This gives you the option
of jumping straight into a Quickrace (a one-off, short lap contest) or to continue to the
Main Menu.
Quickrace
Select this option if you want a quick blast of Grand Prix 3 in a short distance race.
• Select your preferred control method from Keys, Joystick, Joypad and Wheel. If you
choose joystick it will need to be calibrated (follow all on-screen instructions).
Quickrace will take you to the Track Selection screen where you can choose which track
you will be racing on.
• Select the track you want to race on and click OK.
Weather, Track and Sky Conditions
You will be shown the Weather screen that will indicate track and sky conditions and
forecast (as a percentage over the race period) any chance of light rain, rain or heavy rain.
Last Minute Changes button
This will take you to a screen where you can change your Car Setup, your Pitstop Strategy
and adjust your Tyre Choice (Soft Drys or Hard Drys) taking into account the track conditions
and forecast weather (if it’s raining, fit Wets).
Pitstop Strategy
Select from Custom or Automatic Pitstop Strategy. Custom allows you to set one, two or
three stops and the actual lap to stop on.
Tyre Choice
Select the tyres you want to use in the race.
Car Setup
This button allows you to go to the basic car setup screen (where you can alter the front
wing, the rear wing, brake balance, gear ratios and pit strategy). It also allows your current
car setup for the specified track to be loaded and saved, and all of your car setups for all
tracks/conditions to be loaded and saved.
49
48
Page 31

• Click on the Team to access and select the 1998 team drivers.
In the left hand Teams panel, there will be a driver already selected (the number is
highlighted).
• If you want to deselect or rename that driver, click on the driver’s photo.
• To change the driver’s name, click on the driver’s photo. Delete the existing name in
the panel (under the photograph) and type in your name and press Return.
You can also select multiplayer ‘hotseat’ drivers from here. Simply click on other driver
positions. The panel in the screen will show you how many ‘hotseat’ drivers have been
selected and confirm if you are playing Multiplayer or Single Player.
Load Driver Names/Save Driver Names
This screen also allows you to Save the driver name(s) and Load the driver names you have
set up by clicking on the Load Driver Names/Save Driver Names buttons.
Note: Driver names will be saved to a file with a .NAM suffix.
Edit Team Name
If you want to change the name of the Team, or Team Engine, click on the Edit Team
Name button. Type in your choice of Team/Engine Name and press Return.
Driver Car Setups
Once you have selected a driver position you can go to Driver Car Setup from this screen
by clicking on the button under the portrait. This will access the Car Setup section for
your choice of car (plus all other Advanced Level setup options).
• Click on OK to return to the Main Menu. If you have entered a driver name, that name
will be shown in the Main Menu Driver panel.
Track
• Click on the Track panel to access the Track screen. It’s from here that you can choose
a track to race on (unless you are in Championship Season mode when you will have
to tackle all the races in the correct sequence).
51
Car setup is a complex and extremely realistic part of the game. More in-depth car setup
controls are accessible by clicking on the Advanced button.
For full car setup details see pages 83-94.
The Race
You will begin any Quickrace on the grid of your chosen track, in the grid position you have
set in Race Options (Quickrace). The default position is 6th on the grid.
Wait for the five banks of red lights to go out for the race to start.
Main Menu Screen
The Main Menu screen allows you to set up your basic Grand Prix 3 racing options from:
Driver
• Click on the Driver panel to access the Driver Select screen.
50
Driver Panel
Page 32

Non-Championship Race
This option allows you to participate in a complete race event; including Practice and
Qualifying sessions. Once you are familiar with a circuit this is your next big step before
attempting the complete Championship Season.
The Championship Season
This will take you through all 16 races of the 1998 season, starting from the Australian
Grand Prix and ending in Suzuka, Japan. This is the ultimate challenge in Grand Prix 3.
Difficulty
• Click on the Difficulty panel to choose the Level of Opposition you want to race against
from Ace, Pro, Semi-Pro, Amateur or Rookie.
Multiplayer
The Multiplayer button takes you to the Multiplayer screen that allows you to set up the game
to play against real opponents across a local area network, via modem or by serial link.
For full details on the Grand Prix 3 multiplayer game see the Multiplayer section on page 75.
Workshop
The Workshop screen offers important game information and utilities:
About Grand Prix 3
Grand Prix 3 credits.
Utilities
This allows you to delete unwanted Save files and to Load/Save the game state and Menu
Setup options (‘Show Tooltips’, ‘Highlight Follows Mouse’, ‘Fast Fades’ and ‘Disable
Joystick Control in Menus’).
View Circuit Records
Select this option to get information about all 16 track records (Qualifying and Race) with
options to Restore all Original Records, Restore Current Track Record, Merge Track Records
(if you are importing records created on another machine) and to Save Track records.
Saved circuit records have a .REC suffix.
Review Performance
This option allows you to view saved hotlaps and graph, load, save and extract performance
charts for any track. For more details on Performance Analysis see page 94.
53
• Click on your choice of track and use the directional view buttons (+/-) to orientate the
4-way track illustration.
The Info button gives you details of Track Length, Qualifying Lap Record and Race Lap
Record (1998).
The View button gives you a clear view of the track with an orientation panel allowing you
views from the North, South, East and West.
Also, by placing the mouse pointer over the various sections of the track, information
regarding those sections will be shown.
• Click on OK to return to the Main Menu. Your chosen track name will be shown in the
Track panel.
Race Type
• Click on the Race Type panel to select the type of race you want to participate in.
Choose from:
Quickrace
This is a quick blast. A short race that’s ideal if you want to jump in the cockpit and get
driving. You’ll start on the grid ready for the off.
Practice
This option allows you to practise on any chosen circuit and is the best way to get to know
a particular track without the pressures of competition or having to achieve fast qualifying
times. You will start in the pits.
52
Page 33

• Select your preferred method of control.
You can also select an Advanced Control option for the four control methods, by clicking
on the Advanced button.
Calibrate Joystick
To calibrate your joystick, first select joystick control method and click on the Calibrate
Joystick button. This will take you to the Joystick Calibration screen. Follow all on-screen
instructions and click on OK to return to the Controls screen.
Keyboard Setup
This shows you the keys used in the simulation and allows you to customise the ‘drive
keys’. Click on the Change Drive Keys button and follow all on-screen directions to set up
your choice of drive keys.
Wheels/Pedals
Calibration of wheels/pedals should be done with the Control Driven Calibration option
selected in Advanced Controls.
Controls (Advanced)
This menu allows you to change most aspects of the way in which your car is controlled
as well as creating, saving and loading custom control sets, calibrating joysticks and
changing keyboard keys assigned.
Controller Type
• Set your controller from Keyboard, Joypad, Joystick and Wheel.
55
Load Game
Select to load a previously saved game. All saved game files are stored in the form of .RA
plus the track code (e.g. MONZA = N). Select a file and look at the Screen Information
panel for full Saved Game details.
Options
The Options button allows you to set up Controls, Graphics, Sound and Race Options (see
below for details).
Drive
When you have set up your choice of Race, Driver, and Team, select the Drive button to
go to the track and begin driving.
Icon Buttons
At the top right of the screen are a number of icon buttons. These are shortcut buttons to
access various game functions such as Information about your PC specification, Joystick
on/off and Background Sound on/off.
Exit
Select to leave Grand Prix 3 and return to your desktop.
Game Options
Controls
• From the Main Menu click on the Options button.
• Click on the Controls button.
Grand Prix 3 allows you to control the simulation using the Keyboard, a Joypad, a Joystick
or a Wheel and to Save/Load individual control sets for each of these control methods.
54
Page 34

Accelerate
Acceleration Device
Select your acceleration device using the drop-down menu options.
Acceleration Mode
Select the acceleration mode between Switched and Analog (see page 56 for explanation).
Low Sensitivity Zone (acceleration)
See page 56 for explanation.
Brake
Brake Device
Select your brake device using the drop down menu.
Brake Mode
Select the brake mode between Switched and Analog (see page 56 for explanation).
Low Sensitivity Zone (brake)
See page 56 for explanation.
Clutch
Clutch Device
Select a clutch device from the pop up menu. Choose from Use Gear Change to Joystick
Vertical or Joystick Horizontal travel.
Low Sensitivity Zone (Clutch)
See page 56 for explanation.
Gear Change
Use the drop down menus to select a method for gear changing up and down.
Force Feedback
Click in the box to enable a Force Feedback device.
Scaling
Set a stronger or weaker level for your Force Feedback device.
Choose Control Method
You can select one of four control method presets for Keyboard, Joypad, Joystick or Wheel
or you can select from a choice of four user sets.
Edit Set Name
Select this button to edit the name of your User Controls Set. The name will be shown in
the User Sets column.
57
Steering
Steering Device
• Select your steering device using the pull-down menu.
Note: Joystick Horiz means this function is operated by moving the joystick along its
horizontal axis. Similarly, Joystick Vert means that the function is operated by moving the
joystick along its vertical axis.
Steering Mode
• Select a Steering Mode from Switched or Analog.
Switched means that the action is either On or Off while Analog means that the action is
performed to a lesser or greater extent. For example, with Joystick steering set in Analog
mode moving the joystick slightly to the left would make the car alter its course only
slightly.
Low Sensitivity Zone (0% – 100%)
The low sensitivity zone enables you to control how sensitive the controls are as you move
your controller from its centre point. For example, if you set the low sensitivity zone to
30%, then the first 30% of travel from the centre of the control is progressively sensitive
but the remaining 70% of the control remains at the sensitivity level reached at the end
of the low sensitivity zone. Use this feature to make steering, throttle, clutch and brake
controls less sensitive to small control changes. A setting of 0% will give constant sensitivity
and a setting of 100% will give progressive sensitivity across the full range of the control
device.
Steering Help (0% – 100%)
This estimates the amount of steering help your car requires by taking account of your
control input and the manoeuvre you are trying to perform on the track.
Maximum Lock
Lock can range from 8 degrees to 20 degrees and will affect the overall sensitivity of your
steering control (if you are using analog steering). At a high setting your car will be
extremely responsive to your steering control. At a low setting the car will be less sensitive
to your steering control.
Reduce With Car Speed
This feature helps to compensate for the small travel of a joystick or the limited turn of a
steering wheel. The maximum lock sensitivity setting is automatically reduced as the car
speed increases. Big steering locks are only really needed at low speed corners. At high
speeds, by reducing the overall sensitivity, you will achieve more precision in steering the
car. 0% is no effect and 100% is maximum effect.
56
Page 35

F4 – Indestructible
Your car will not be damaged no matter how serious the shunt.
F5 – Ideal Line
A broken white line on the track shows the ‘best path’ to drive along the whole circuit.
This is particularly useful for approaching and driving through bends. Keep the line in the
centre point of the cockpit.
F6 – Suggested Gear
Show on a cockpit indicator the gear to be in at the next corner.
F7 – Throttle Help
Will reduce the throttle when the rear wheels spin.
F8 – Steering Help
Will assist any basic circuit-driving manoeuvre that requires the steering wheel to be turned.
Driving Aids available with Difficulty Levels
All available Driving Aids can also be turned on or off from inside the cockpit by pressing
the appropriate buttons.
59
Load Control Set
This allows you to load in previously saved user control sets. Select the name of the user
set and click on OK. User Control Set files are shown with a .CON suffix.
Save Control Set
Allows you to save a user control set under a given name with a .CON suffix.
Calibrate Joystick
See page 55 for explanation.
Keyboard Setup
See page 55 for explanation.
Press the Back button to return to the previous menu with all changes in force and the
Cancel button to return to the previous menu without implementing the changes made in
Advanced Controls.
Driving Aids Options
• From the Main Menu click on the Options button to enter the Options screen.
• Click on the Driving Aids button.
Driving Aids
These are shown as a bank of eight icons in the lower centre of the wheel below the LCD.
The number of driving aids will reduce according to the level of difficulty selected but
(if available) can be turned on and off from within the cockpit.
F1 – Auto Brakes
The computer applies braking functions to suit the circuit but will not brake to avoid other
cars.
F2 – Auto Gears
The computer changes all the gears for you at the correct point.
F3 – Auto Right the Car
If you spin off the track, the computer will auto right the car by pointing it in the correct
direction to continue the race (if your car is not too badly damaged) and you can continue
to race). Note that cars that cannot continue to race will be craned off the track.
58
F1 F2 F3 F4 F5 F6 F7 F8
Auto Auto Auto-right Indestructible Ideal Suggested Throttle Steering
Brakes Gears the car Line Gear Help Help
Ace ✓✓✓
Pro ✓✓✓✓
Semi-Pro ✓✓ ✓ ✓ ✓✓
Amateur ✓✓ ✓ ✓✓ ✓✓
Rookie ✓✓ ✓ ✓ ✓ ✓ ✓ ✓
Page 36

Multiplayer (Hotseat)
Players can control the number of changeovers that occur during a ‘hotseat’ multiplayer
race by specifying the number of turns per player. Remember to set up enough laps for
each person to get a good drive.
Opposition Spread
This allows you to alter the strength of all the other simulation drivers in any game against
the computer AI from All the Same, 1998 Levels and Random. Details are shown on a display
in the car cockpit.
All the Same
All teams and drivers with the same potential performance (The Flat Line).
1998 Levels
Simulated 1998 performance for all drivers and teams (The Rising Line).
Random
A random distribution of performance for all drivers and teams (The Wavy Line).
Player Cars Only
If you are playing a multiplayer game you can choose to exclude all AI driven cars and
feature only those cars driven by the human players.
Race Type
Alter the Race Type from Quickrace, Practice, Non-Championship Race and Championship
Season.
Car Realism
Setup the Car Realism elements you require from:
Suspension Failure
Loose Wheel
Puncture
Engine Failure
Transmission Failure
Oil/Water Leaks
Throttle or Brake Problems
Electrical Problems
You can also choose to set up the correct qualifying time criteria and make sure only
times 107% of pole get on to the starting grid.
61
Race Options
From the Main Menu click on the Options button to enter the Options screen then click on
Race Options. The Race Options screen allows you to set or adjust a number of in-race
features:
Time/Distance Race Options
Select (by clicking on the +/- buttons) a time limit for Practice sessions, a time limit for
Qualifying sessions and a Race Distance (as a percentage of the actual race length).
Quickrace Options
Select a starting position for yourself on the grid for any Quickrace (by clicking on the
+/- buttons).
Race Weather
Select a Race Weather option from Realistic Weather or Custom Weather. Realistic Weather
gives you a realistic weather pattern for the race. Custom Weather allows you, via a slider
bar, to select the chance of rain within a race.
60
Page 37

Trackside Objects
Select the level of Trackside Objects you want from None, Low, Medium or All.
Frame Rate
The 3D frame rate can be set using the + or – buttons or you can choose to select the
frame rate estimated by the computer (click the Use Estimate button).
Note: Whenever you are in the 3D, you can press the Occupancy Key ‘O’. If this is on average
less than 100%, you could increase your detail level or frame rate, however, if it is on
average more than 100% you could try reducing detail level or frame rate.
Sound Options
From the Main Menu click on the Options button to enter the Options screen then click on
Sound to go to the Sound Options menu. This allows you to increase or decrease:
Music Volume
Background Music Volume
Car Engine Volume
Car Skid Volume
Sound Effects Volume
Save Options
From the Main Menu click on the Options button to enter the Options screen then click on
the Save button (if accessible).
It’s from here that you can save races, hot laps etc.
Loading and Saving Files
Grand Prix 3 will let you save and load a number of different file types. You are able to
save and load Championship Seasons, Individual Races, Hot Laps and Performance
Analysis files.
Using an appropriate Save/Load screen you can enter a name for your stored Grand Prix 3
files and select any Grand Prix 3 files you want to load.
Each different file type has its own distinctive file suffix (the bit after the .dot). The first
two letters of the suffix identify the file type and the third letter represents the race circuit.
63
Graphics Options
From the Main Menu click on the Options button to enter the Options screen, then click
on Graphics. This allows you to set the following Screen Resolution and Details Levels:
Graphics Detail
Use the +/- buttons (or click inside the bar) to increase/decrease graphics detail.
This control will inevitably depend on the specification of your machine but if you find
the game does not run smoothly you may have to reduce detail.
Screen Resolution
Set a resolution from the available options.
Render Device
Select the card fitted to your machine.
The Graphics Option also allows access to Advanced Options for graphics:
Advanced Options (Graphics)
Note: The level of graphic detail and the amount of texture mapping will affect the speed
of the game. Select Automatic graphics detail to let the game set up the best detail level
for your specification machine, or choose Manual mode to set up your own detail level.
In Manual mode you can choose to display textures on various aspects of the game display
(including cockpit mirrors).
62
Page 38

THE GRAND PRIX MENU SECTION
Non-Championship Race
This race will be a complete race session for a pre-selected track. Once you have chosen to
drive a Non-Championship Race, you will be shown the Grand Prix menu (below). This shows
you all the available race event options. You can (if you so wish) select simply to Race (but
you will begin at the back of the grid because you will have no qualifying time logged).
65
File Suffix Codes
File Type (the first two letters)
Championship Season files = CH Hot Lap files = HL
Non-Championship Race files = RA Performance Analysis files = PA
Race Circuit (the last letter)
Australia = A Great Britain = I
Brazil = B Austria = J
Argentina = C Germany = K
San Marino = D Hungary = L
Spain = E Belgium = M
Monaco = F Italy = N
Canada = G Luxembourg = O
France = H Japan = P
So, for example, a Championship Race file in Canada will show the suffix .CHG, and
Performance Analysis from the Italian GP will have the suffix .PAN.
Other Save/Load file suffixes
This driver car/track car setup .CS + track code letter (see above)
This driver all tracks/car setups .TSU
Driver names .NAM
Track records .REC
User control set (joystick/keys etc) .CON
Return to the Main Menu by pressing the Back button or Exit the game.
64
Page 39

At the start of a race weekend, every driver has 10 sets of the two different Dry compounds
(Soft/Hard) and 7 sets of the four different Wet compounds (Intermediates, Hard Wets,
Soft Wets, or Monsoon), making 48 sets in total.
Prior to the start of First Practice, each driver has to reserve 4 sets from each of the dry
compound groups. These are reserved for the Qualifying session. Grand Prix 3 does this
for you automatically.
During the Practice sessions, drivers can use any tyre compound. This is normally done
to enable the team to test and compare the available grip and wear under various load
conditions – important factors when calculating the pitstop strategy.
After all Practice sessions are completed, the driver has to decide on which of the two dry
compounds he will use for the rest of the race weekend. In Grand Prix 3 you will make
that decision when selecting the tyre compound for use in the Qualifying session.
The drivers will then only be allowed seven sets of the selected dry compound for the rest
of the event: 4 sets for Qualifying session (the 4th set can be used in the race) and 3 sets
for the Race itself.
Car Setup
Select Car Setup to go to the Pits Options:
The Pits Options screen gives you access to all Logged Data information and all levels of
Car Setup.
Fetch Logged Data
Transfers any lap data currently held by the Data Logger.
View Logged Data
Accesses Data for Performance Analysis (see page 67 for details).
Car Setup
This will go to the basic car setup screen for your car and give you access to all other
Advanced Setup options.
Return to Cockpit
Takes you back to the cockpit.
Saturday Free Practice
This is the same as Friday Free Practice.
67
Friday Free Practice
Select Friday Free Practice and you will be shown the Track And Sky Conditions screen and
be given a rain forecast.
You will be taken to the pits. The in-car steering wheel display (the LCD) allows you to:
• Add Fuel (in Laps).
• Change Tyres.
• Leave the Pits.
• Go to Car Setup.
Add/Reduce Fuel
Highlight and select the Fuel option, then use your left/right controller to add or reduce
fuel carried by the car.
Tyres
Select the Tyre Type by using the left/right controller and select a set of tyres.
When you select Tyres on the LCD you will see three tyre sets marked 0, three tyre sets
marked r1, r2, r3, three tyre sets marked q1, q2, q3 and one set marked qr.
The 0 sets are for practice.
The ‘r’ tyres are the sets allocated for the race (r1 starts the race, r2 being used at the
first pitstop etc.) but you can use these sets in practice if you have used up the other
0 sets.
The q sets are reserved for qualifying sessions with the exception of the one qr set which
can be used in qualifying and race.
Be aware that there are different tyre sets for different conditions: two types of Dry – Hard
and Soft and four types of wets – Intermediate, Hard, Soft and Monsoon, and that before
you begin your qualifying sessions you will have to decide what type of Dry tyres you are
going to race on during the rest of the race weekend.
Tyre Rules
The rules surrounding the selection of tyres are complicated, however, they do add to the
strategic nature of the sport. Note: A ‘set’ of tyres consists of all four tyres (2 front and
2 rear) required by one car.
66
Page 40

Logged Data
The Data Logger will begin to work as soon as you leave the Pits (a message on the car
LCD will tell you this). When you return to the pits, you can select Car Setup to go to Pits
Options and click on the Fetch Logged Data/View Logged Data buttons to undertake
Performance Analysis. Remember that to win at the highest levels in the simulation you
must achieve good car setups for all 16 tracks.
Pre-Race Warm-Up
This gives you the option to race in full racing trim (fuel, settings etc). All qualifying and
race tyres (and Wets) are available to you (but limited to your earlier choice of Drys
(Soft/Hard). This session has a time limit of 30 minutes (or your set up % on this). This
is your final chance to get to know how well your car will perform in the race itself. Be
careful in this session, there will be a lot of other cars on the circuit.
The Race
Once you have practised, got to know the track, qualified for a good grid position and
performed a pre-race warm up, you will enter the race itself. If you have not managed to
get a qualification lap time you will start at the back of the grid.
The Grid Display
Check the position of all the cars/drivers on the starting grid. Scroll the screen by using
the + or – buttons to view the complete field. Select OK to continue.
Weather
You will be shown the weather conditions/forecast screen with the option to make any Last
Minute Changes.
Last Minute Changes
This will take you to a screen where you can adjust Pitstop Strategy, Car Setup and Tyre
Choice taking into account the track and forecast weather conditions.
Pitstop Strategy
Select Custom or Automatic Pitstop Strategy. Custom allows you to set one, two or three
stops and to select on which lap to stop.
Tyre Choice
Select the tyres you want to use in the race from Soft Drys/Hard Drys, Intermediates, Hard
Wets, Soft Wets, or Monsoons. Remember that your choice of Dry tyres will be limited to
the selection you made before Qualifying.
69
Qualifying
The Qualifying session is where you can try to get the best lap time possible in order
to start the race as near to the front of the starting grid as possible. Note that on some
circuits, such as Monaco, overtaking is very difficult and pole position almost guarantees
a podium place.
You will begin your qualifying session in the Pits with a telemetric monitor placed just
above your cockpit showing the times of other drivers. The monitor will show the four nearest
times to yours plus the pole position driver/time. If you see that other drivers are improving
on your lap times, you can go out (as long as there is time left) to set up a better lap time.
You will have four sets of your choice of Dry (Hard or Soft) qualifying tyres available to
you (q1, q2, q3, and qr) and ideally you should go out on the first lap, do your best time
on the middle lap and come back in on the third lap, then change tyres and do it again.
Note that there is a maximum qualifying session lap limit of 12 laps. Exceeding this limit
will result in a disqualification of your times.
Quitting a Qualifying Lap (SHIFT+ Q)
If you want to quit a qualifying session and return to the pits without having to drive
around the track, simply press SHIFT + Q.
Accelerating Time
Once back in the pits you can choose to accelerate time for all the other drivers by selecting
the >> symbol at the top of the LCD. This will take you to the Accelerated Time screen.
You can leave Accelerated Time mode and return to the Pits by pressing the Spacebar.
68
Page 41

Finishing the Race
When the race is over you will be taken to the podium Results screen.
The top panel shows the first six drivers (the ones in the points) and further Results screen
buttons show the following:
Full Race Results
Complete information on position, times, and average speeds relative to the winner or in
absolute format.
Driver Best Laps
The best lap times for all participating drivers.
Circuit Records
Details of the records for the current event and previous track records.
Starting Grid
How the drivers lined up on the grid at the start of the race.
Driver Race Points
The points gained by the top six drivers at this race.
Constructor Race Points
The points gained by the top six constructors at this race.
Lap Chart
A lap-by-lap chart of the race with options to view the path of the top six finishers, the
grid, the players or your choice of any driver.
All results screens can be printed out on your printer and printer options help you setup
your printer.
Race Completed Menu
At the end of a Non-Championship Race you will be given the option to ‘Race again on
this circuit’ or ‘Leave the circuit’ (to try another track).
71
Car Setup
This button allows access to the basic car setup screen (front wing, rear wing, brake balance,
gear ratios and pit strategy). It also allows your car setup for that track to be loaded and
saved and all of your car setups for all tracks/conditions to be loaded/saved.
More in-depth control of car set up is also accessible by clicking on the Advanced button.
For full car set up details see later in this manual.
Click the OK button to go to the starting grid.
Starting Off
When the race is about to start you will hear the sound of a horn. You must then wait as
five banks of five red lights are lit from left to right. After the fifth bank has been lit you
must wait for the lights to go out. That is the signal for the start of the race.
Escape Menu (ESC Key)
An Escape Menu is always available to you by pressing the ESC key. This freezes the race
and shows the current first six race positions plus additional options to:
Return to Cockpit
Takes you back to the cockpit at the point when you pressed the ESC key.
Accelerate Time
Accelerates the race and shows the status of the first 10 race positions plus their current
times.
Current Race Positions
Shows the complete current race positions and the times of all participants.
Options
Takes you to the Options menu (see page 54).
View Track
Take a look at the track graphic at various orientations. You will be warned that you’ll have
to Save the race before continuing with this option.
Leave Race
Exit from the race.
70
Page 42

Hot Laps
A Hot Lap is a full lap in race, qualifying or practice that is saved to disk then loaded,
replayed and reviewed from the many camera angles available in Grand Prix 3.
Saving a Hot Lap
If you are racing, practicing or qualifying and want to have a second look at the action all
around you and feel that a particular ‘hot’ lap was worth saving:
• Press Esc and select the Options button to go to the Options screen.
• Select Save and you will be given the option to Save Game or Save Hot Lap.
• Click on the Hot Lap button and you will go to the Hot Lap Replay screen.
In the Hot Laps Replay screen you will be shown all the Hot Laps available with one or a number of - lap times.
• Click on the lap you want to save and click on OK.
You will go to the Save Hot Lap screen.
• Give the Hot Lap a filename, for example Monza1 (it will be given a .HLN suffix meaning
HL = Hot Lap, N = Monza).
• Click on OK.
Viewing a Hot Lap Replay
The real fun about viewing hot lap replays is to be able to view all the action from all the
different track cameras available in Grand Prix 3. You will have experienced the hot lap
from your cockpit so it’s fun to find out what really happened from an external view or
what happened in an exciting shunt in another part of the circuit!
• To view the Hot Lap replay return to the Main Menu and click on the Load Game button
to go to the Load Game screen.
• Select the filename you saved (Monza1.HLN for example), click on OK and you will
be taken to the View Hot Lap screen.
73
The Championship Season
The full Championship Season will take you through the sixteen races from the Australian
Grand Prix to the Japanese Grand Prix.
The specific menu details for the individual Championship Season races are the same as
for the Non-Championship Race (see page 65) but at the end of a Championship Season
Race you will be shown the Championship screen that summarises the Driver and
Constructor points won to date. You will then be given the option to go to the next Grand
Prix, exit the season, or go to the Options menu, from where you can save the game.
If you have completed the last race of the season (Suzuka, Japan), you will be shown the
final points total. This is where you hope to be number one at the end of the 1998 season!
72
Page 43

THE MULTIPLAYER SECTION
• Select Multiplayer from the Main Menu.
Grand Prix 3 allows you to play the simulation across a number of multiplayer connection
types from Serial Cable, Modem, IPX Network and TCP/IP Network. The top panel in this
screen allows you to set up the following connections:
75
The View Hot Lap screen has options to:
• Cycle through the hot lap (show repeatedly) or to Show Once.
• View Hot Lap.
• Save Hot Lap without Performance Data.
• Select View and you will be taken to your cockpit (in paused mode) - this is the Hot Lap.
• Unpause the game and you will begin the Hot Lap Replay.
Remember to use all available cameras to get the best view of all the action.
Your car cockpit view = Right Arrow
Trackside Camera View = Left Arrow
On car camera views = Page Up (10 x Cycle through)
Chase View = Page Down
Reverse Chase View = Delete
Car Ahead = Up Arrow
Car Behind = Down Arrow
Return to Your Cockpit = Home
You can also pause the replay at any time (as normal).
74
Page 44

Join an Existing Session
In a two-player link game, the player joining the session will ‘follow’ the host, who will
have control of the menus on both computers. In a modem link game, the player joining
will dial the other player.
Session Name
Click on the default name, delete and type in a session name to identify the multiplayer
game on a Network.
The Settings Button
This will take you to the Multiplayer Settings screen and detect technical settings (Port,
Baud Rate and TCP/IP Address) for the link method you are using.
The Phonebook Button
Takes you to your phonebook. Use it to store phone numbers for 2-player modem linked
games. Click on the Add button to enter a telephone number and name. Click on the Add
button to add numbers to your book. Up and Down buttons allow you to scroll through
your phone number list. Other buttons allow editing or removal of numbers. You can also
Load and Save phonebook numbers (saved with a .pho suffix).
Connecting
The Linking Screens
The Connect button will take you to the Linking screen. This will implement the linkup
for the multiplayer game using the method you have selected (Network game or Modem/
Serial Cable game).
The Network Game
The Linking screen shows (in the top panel) the players’ names, which drivers they are
playing and where they are in the game (Main Menu etc). The lower panel shows the number
of players who are Ready to Play.
The lowest panel in the Linking screen allows access to Driver selection, Track, and
Difficulty Level. All players can access Driver Selection but Track and Difficulty Level are
set by the Host.
The Chat Button
The Chat button allows you to type in a message to chat to other players. Type a message
in the lower panel and press the Send button to transmit). The chat messages will appear
in the central main panel of the chat screen showing who sent the message and when.
77
Connection Type
Serial Cable (2 players)
Creates a serial cable link between two machines.
Modem (2 players)
Creates a modem connection between two machines.
IPX Network (2 or more players)
A local area network game.
TCP/IP Network (2 or more players)
A local area network game.
Number to Dial
This allows you to enter the number to dial for a modem game.
Player Name
Enter the name that you will be known by in a network game.
Game Selection
The lower panel in this screen allows you to input the number of players.
Two Players
Two player games can use all connection types (Serial, Modem, IPX, TCP/IP) and allow all
Grand Prix 3 race types (Quickrace, Non-Championship Race, and Championship
Season).
Two or More Players
Multiplayer games are Local Area Network only (TCP/IP and IPX) and will only allow players
to jump into the race without needing to qualify.
Session Selection
This allows you to select whether you want to Host or Join a multiplayer session.
Host a New Session
In a two player Serial link, the host has control of both machines during setup.
In a Modem link, the host also has control of both machines but must initially wait for
the joining player to dial through.
76
Page 45

‘Hotseat’ Multiplayer Games
Two or more players can enjoy a Grand Prix 3 ‘multiplayer’ game on the same computer
by selecting a Hotseat game.
To set up Hotseat mode you must select more than one driver in the Driver Select screen
(accessed from the Main Menu). The central information panel in the Driver Select screen
will show, for example, ‘2 Drivers Selected. Multiplayer.’.
Hotseat games can be played by any number of players up to the maximum number of
drivers that can start a race.
The Car Setup screen functions in the usual way (see page 70), simply select a driver from
the list and enter the Car Setup screen for that driver’s car.
How Does a ‘Hotseat’ Game Work?
The game will allocate equal time slots to each human driver in a race. For example, if
two players want to compete in a ten lap race, they each select a driver from the Driver
Select screen. The computer then chooses one human driver to drive first and drives the
opponent’s car (plus all the other cars) in the race. The computer then allocates equal
driving time to each human driver.
When changeover is approaching, the single LED (light) to the right of the steering wheel
will flash as a warning and the message ‘Automatic in 5 Seconds’ will eventually appear on
the screen. You will still be driving during these five seconds. The seconds are counted down
on the screen and on reaching the zero the computer will take over control of your car.
This is the point when you can change seats with your human opponent (literally, take the
‘hotseat’). His/her car cockpit will now appear (still controlled by the computer). A message
‘Control in 5 Seconds’ will then appear on the screen. Again, when this is counted down
to zero the second player gets control of his/her car and drives the race as normal.
The option to pause the game and watch a replay of the recent action is always available
and can be used very effectively here to view all the action and how the two rival cars outmanoeuvre each other.
Remember that to get a good drive in a hotseat race you must set a sufficient number of
laps.
When you are in qualifying mode during a hotseat multiplayer game, changeovers will take
place when you return to the pits. The qualifying session will end once the time period is
over and all the players have used the same number of tyre sets.
79
The Options Button
This allows you access to all the game options: setup controls, graphics, sound and
race options.
The Leave Session Button
Click to leave the multiplayer game and return to single player mode. If you are hosting
the session, then host control will migrate to the next player in the session.
The Close Session Button
Select if you are the host and wish to end the race session.
• Click on Ready to get started. The game will wait for all players to be Ready.
The Ready message will flash to prompt you to click on it. It will flash more intensely
when everyone else is ready and waiting for you. Once everyone has clicked on ready all
other linking options will be greyed out and unavailable to you.
Weather Screen
Once all players have clicked Ready you will be taken to the Weather Network screen. This
is similar to the standard Grand Prix 3 Weather screen but also has options for going to
the Last Minute Changes screen (and then Car Setup), to Chat or Leave the session. You
also have option to Continue/Go Back.
Click on the flashing Ready button to indicate you are ready to race.
Last Minute Changes (Network) Screen
This summarises the weather/track and sky conditions and has a Driver list, Pitstop
Strategy settings and Tyre choice. You can also access Car Setup from here as well as the
Chat and Leave Session options.
• Click Continue and Ready to get racing.
The Two-Player Link Screen
When you link up for a 2-player session you will access the Two-Player Link screen which
will show you the Selected Drivers (This Machine and Other Machine). You can also
choose a different Driver and you will be taken to the Driver Select Screen. If you click
on Other Machine control will pass to the other machine player to reselect a driver and
then return to This Machine.
• Click the Continue button to go to the Main Menu.
• Click on Drive to get racing.
The 2-player game has the following quick keys:
Send Message to other player = CTRL + M
Host release menu control to other player = CTRL + R
Hang Up = CTRL + H
78
Page 46

80
Page 47

GRAND PRIX VETERANS’ SECTION
Written by Dave Surplus
Secrets of the Pro’s – Driving at the Limit
Introduction
Anyone can drive a Formula One car fast. It’s easy. You get in and point it in a straight
line with your foot down hard on the throttle until you reach maximum revs in 6th gear.
And there you are. Going fast. Only there aren’t many Formula One tracks that consist of
just one long straight. Drive too fast on most tracks and you’ll end up in the first gravel
trap. Which is why professional drivers talk about being ‘quick’ rather than being simply
‘fast’ – ‘quick’ is the controlled application of speed around a race circuit.
In order to drive a Formula One car ‘quickly’ you need three things:
• A fast car.
• Knowledge of the best route around the circuit.
• The ability to operate the car at its limits.
But what do we mean by these things and how are they achieved?
131
130
Page 48

The last and most important factor for determining grip, as far as the driver is concerned,
is the downward force acting on the tyre. This force or load comes from the combined
weight of the car and the aerodynamic downforce generated by the wings. In general, the
greater the combined vertical load, the more friction there is between the tyre and the
road surface and the more grip the tyre will generate. However, when the tyre is close to
the limit of its grip it is useful to consider these two vertical loads separately.
Firstly, the weight of the car. While cornering, the tyre is not only supporting the weight
of the car, but it is also preventing that weight from travelling on in a straight line (which all
things in motion have a tendency to do). This puts the tyre under considerable sideways
stress and becomes a critical factor when the tyre is close to the limit of its grip. For
example, when the car is heavy with a full fuel tank at the beginning of a race, there is
more weight acting downwards and you may expect this to increase the available grip. But
in practice, while cornering, the extra weight causes extra sideways stress on the tyres,
which is concentrated on the outside tyres due to roll of the car. However, instead of simply
cancelling out the benefit of the extra downward weight, this concentration of stress causes
the limit of grip on the outside tyres to be reached sooner and as a result, the car will not
be able to take the corner as fast. As the car becomes lighter through using up the fuel,
the cornering speeds will begin to increase (assuming that the tyres are not wearing out).
Secondly, the aerodynamic downforce generated by the wings. Again while cornering, the
tyre is supporting an aerodynamic down force which has no sideways influence and which
therefore exerts no additional sideways stress on the tyre. It follows that by increasing the
wing angles to add more aerodynamic downforce, the available grip will always be
increased. With more grip, the car will be able to take a corner at a higher speed, it will
be able to brake harder and later and it will have better traction from the driven wheels
when accelerating out of corners. However, there is a penalty to be paid for all this extra
grip, which is as you increase your wing angles, your top speed will be reduced due to
increased aerodynamic drag.
Clearly, it is important to know when the car is being driven at the grip limit of the tyres.
But how can the driver know if he is at the limit? In the case of longitudinal grip, during
braking and acceleration, it is difficult to feel the limit of the tyres and much reliance is
put on familiarity and experience.
Expert Tip:
Some drivers adopt a technique called cadence braking which is a repeated on-off application of the brakes with the limit being reached and possibly exceeded each time the
brake is applied. Care must be taken not to upset the balance of the car during cadence
braking.
133
A fast car is generally one with a relatively high-powered engine, low overall aerodynamic
drag and well-balanced setup of suspension, drivetrain and aerodynamic wings. Some of
these things are set by the designer and cannot be changed but others are fully within the
driver’s ability to adjust in order to achieve greater performance from the car. These setup
parameters are described in detail on pages 158-164.
The best line to take around the circuit is determined by the layout of the corners and
straights. You’ve already had a chance to experiment and learn the lines around Monza if
you followed the Quickstart guide. More instruction on how to calculate the ideal racing
line is described in detail in the Driving Techniques section (see page 101).
However, a fast car driven on the best line around the circuit will not perform very well
unless it is driven correctly and to its limits. This is an important concept to grasp and
means that it is crucial for you, the driver, to develop your driving style and proficiency at
the same time as developing an understanding for setting up your car. The setup must
suit your driving style and equally, your driving style must suit the setup. No two drivers
are exactly the same and so their optimum setups may differ. What’s more, it’s always
possible to improve your driving style and/or setup in order to find more speed, even if it’s
only improving a lap time by a 1000th of a second!
Discovering how to operate the car at its limits is a challenging and rewarding process.
And this is where it starts! During braking, cornering and acceleration, the car will always
be on the verge of sliding, spinning off or losing rear wheel traction. Generally the term
for this is "losing grip" and it has all to do with the adhesion of the tyre to the surface of
the track. It is worth looking at tyre grip in some detail as it is fundamental to the rest of
the section.
How does a Tyre Work?
A tyre grips the track as a result of the friction between it and the road surface. This can
vary with the smoothness and dryness of the track surface and the compound of the rubber used in the manufacture of the tyre. The driver has no control over the track surface
but he can select different tyre compounds. In general, the softer the rubber compound
chosen, the more grip the tyre will generate.
The amount of grip is also related to the surface area of the tyre that is in contact with
the road. The bigger this "contact area", the more grip will be generated. The tyre contact
area is determined partly by the Formula One rules on tyre width and diameter and partly
by the design of the suspension geometry.
132
Page 49

When the driver makes adjustments to the steering or throttle, he is actually controlling
the distribution of the car’s weight between the 4 wheels and therefore the amount of
downward force being exerted on each tyre. Controlling this weight transfer is another fundamental part of developing a fast driving style and understanding how to set up the car.
Controlling Weight Transfer
The driver has complete control over the distribution of weight between the 4 tyres by virtue
of how he controls the car and by the way he has adjusted the car setup. An effective driving
style is just as important as finding a suitable setup and indeed the two compliment each
other.
Expert Tip:
Each driver has his own preferences for style and setup and so an excellent setup for one
driver may not produce the same results for another.
Every control action that the driver makes will result in weight transferring between the
wheels. Coming off the throttle and applying the brakes transfers the weight forward, turning
into a corner moves the weight towards the outside wheels and acceleration transfers the
weight towards the rear wheels. Both the amount and speed of the driver’s action will
influence exactly how much weight is transferred.
For example, the harder he applies the brakes or the quicker he applies the brakes, the
more weight will be transferred forward. The stiffness of the suspension elements will also
determine how fast this weight is transferred. If the front springs and/or dampers are set
relatively stiff, then the weight will transfer forward faster. In general, the driver will feel
more in control of the car if he adopts a smooth style, which allows him to sense where
the weight is at any moment. He must allow time for the car to settle into each of the
operations such as braking, cornering and acceleration and in order to be smooth he
needs to feel that the suspension is working at the same rate that he is.
The different corner characteristics at each circuit will determine how quickly the car
needs to settle into the next operation. Slow and twisty circuits will require more rapid
weight transfer than fast and open circuits. If he feels that the handling is too twitchy (too
stiff with rapid weight transfer) or sloppy (too soft with slow weight transfer) then he can
make adjustments to the setup and/or driving style accordingly. However, because most
circuits have a variety of corner types and the priority is to set the car up in favour of the
most important corner (normally the one leading into the longest straight), it follows that
some corners will be taken with a compromised setup. On these corners the driver needs
to adjust his style to suit.
135
Most acceleration near the limit of the tyre is carried out when exiting corners. We shall
look at this later in the section dealing with power oversteer.
The Slip Zone
When cornering, contrary to what you may think, the tyres do not suddenly lose grip
beyond the limit. There is actually a grey zone between gripping and spinning off which
comes about as a result of the way the tyre rubber behaves under stress. At cornering
speeds well below the limit, the tyre will travel along the road in the same direction as it
is pointing. But as cornering speeds increase and sideways stress builds up in the tyre,
the rubber in contact with the road is deformed slightly like an elastic band. This causes
the remainder of the tyre in question, and the car in general, to actually move sideways
towards the outside of the corner by a small amount. When the tyre rolls forward, the
stretched portion of rubber is no longer in contact with the road and so it contracts to its
original shape. The process then starts again with the next piece of rubber being stretched
and so on.
On each occasion, the tyre moves further towards the outside of the corner and to the
observer the tyre appears to travel in a slightly wider arc than the direction it is pointing.
In other words it seems to slip sideways. Although we know that the actual rubber in contact
with the road at any moment is not slipping, we still describe the angle between the path
the tyre is travelling and the direction it is pointing as the slip angle. As the cornering
speeds increase, the driver can sense the increasing sideways motion and through
experience he knows when the grip limit of the tyres has been reached.
Expert Tip:
In Grand Prix 3 the onset of the tyre screeching sound denotes when the tyres are
slipping at or near the limit of grip. This means that unless you hear a lot of screeching
while you drive through corners, you are not going fast enough!
When the limit of grip is exceeded, the tyre is carrying more sideways stress than the
friction between tyre and road can withstand and so physical sliding does take place. At
best this will lose significant amounts of time and at worst the driver will be unable to
recover from the slide. To avoid this, the driver can control the car at the limit by adjusting
the steering or throttle position or a combination of the two. In general, steering into the
corner more and/or increasing throttle will bring the car to the limit. Straightening the
wheel and/or easing the throttle will prevent the limit being exceeded. The adjustments
being made in each case must be small and subtle so as not to upset the balance of the
car. There will be more about balance later.
134
Page 50

Traction Circle
So far we have considered how grip is
generated by the deformation of the tyre,
both for the longitudinal case of acceleration
and braking and the sideways case of
cornering. We can draw a simple traction
circle diagram to represent these forces…
Position 1: The car is at the end of a fast straight with tyres under little stress
Position 2: The driver has applied maximum braking force and the car slows down for
a corner.
Position 3: The braking has finished and the driver is about to turn into the corner.
Position 4: The driver has applied steering demand and the car is turning the corner
with high sideways stress on the tyres.
Position 5: The car has exited the corner, the steering wheel has been straightened and
the driver is about to accelerate along the next straight.
Position 6: The throttle has been applied and the rear tyres are now stressed with traction
effort.
Position 7: The car has returned to full speed and once again the tyres have become
relatively unloaded.
The problem with such a simple traction circle is that the tyres are not being used to their
full potential at positions 3 and 5.
The solution is to overlap the end of braking with the start of turning in order to move
position 3 out onto the traction circle. (See Idealised Traction Circle diagram on page 138.)
The brake must be partially released before turning commences and progressively eased as
the steering wheel is turned further. The outside front wheel is the highly loaded one in this
case, so watch out for the onset of excessive understeer.
137
Weight Transfer and Balance (Understeer and Oversteer)
The front-to-rear balance of the weight transferred to the outside wheels in a corner is one
of the most important aspects of controlling the car at the limit of grip. Although the weight
of an Formula One car is concentrated towards the rear, it is convenient to consider an
example of a car, where the weight is in the middle and the front wheels are identical to
the rear wheels. If the car is neutrally balanced with front and rear tyres taking their ideal
share of the car’s weight, when cornering, both tyres will see the same sideways stress and
reach their limit of grip at the same time.
But if the front tyre takes more of the weight than the rear tyre, then it will become overloaded before the rear tyre and will begin to slide sooner. This makes the car feel as if it
does not want to turn the corner, a condition known as understeer.
Conversely, if the rear tyre takes more of the weight than the front, then it will lose grip
before the front tyre. This makes the car feel as if it wants to spin, a condition known
as oversteer.
In theory, the combined grip of front and rear tyres, and hence the cornering speed,
is greater with a neutral balance than with either understeer or oversteer, because the
available grip of the rear tyre of an understeering car and the front tyre of an oversteering
car are not being used to their full capability. In practice however, the understeering car
is directionally more stable and easier to control than the neutrally balanced or oversteering car, although oversteering does have advantages in some circumstances.
In slow speed corners, the front/rear balance is mainly determined by the relative
stiffness of the front/rear suspension, including springs, anti-roll bars and dampers, with
a relatively stiff suspension attracting more weight. In fast corners, the front/rear balance
is mainly determined by the relative size of the front and rear wing angles, with a larger
angle creating more downforce. This means, for example, that the car could be set up to
oversteer in slow corners but understeer in fast corners.
Expert Tip:
The slow corner setup can be adjusted to give a different balance at each of the three
stages of the corner. For example, in the middle of the corner, when the springs and antiroll bars are supporting the car, it may understeer due to the stiffer setting of the front
anti-roll bar. When entering the corner the car is additionally supported by the dampers
and so the relative stiffnesses of these will affect the balance until the car has settled into
the corner. For example, if you stiffen the rear dampers relative to the front, this would
give rise to oversteer at corner entry, which changes to the balance determined by the
anti-roll bars and springs, as the roll motion stops and the dampers become unloaded.
More of how setup changes affect balance can be found on pages 158-164.
136
SIMPLE TRACTION CIRCLE
Braking
2
13
75
6
Accelerating
4
Cornering
Front tyres
Rear tyres
Page 51

On entry to a corner, the driver is easing off the brakes and turning the steering wheel into
the corner. The weight is coming off the front wheels and moving onto the outside wheels.
If the driver feels the car begin to understeer, then he can reduce speed and/or remove
some steering wheel angle in order to regain front outside tyre grip and continue with turning the corner. This is a stable and manageable situation, which can be brought about by
using slight understeer to the setup. If an oversteer setup is chosen, then the weight moving towards the outside rear, due to the car rolling, may overload the outside rear tyre and
cause a spin. This is an unstable situation and very difficult for the driver to recover from.
Expert Tip:
Adjustment of the corner entry balance can be made using the dampers.
In the mid part of the corner when braking has finished and the throttle has not yet been
increased, a neutral balance would ideally achieve the best cornering speed. In practice
though, the driver needs to make small adjustments to the controls and wants to know
that these will not suddenly induce oversteer. This is achieved again by selecting a slight
understeer setup for the mid corner. In this case, the dampers are unloaded so the adjustment of mid corner balance will be made using the anti-roll bars.
On exit from a corner, the main priority is to be able to stay on the throttle to maximise
the car’s speed down the straight. As the throttle is gradually applied, the rear tyres
become more heavily stressed and the car transforms from slight understeer to slight oversteer. This condition is only felt while the throttle is pushing the tyres close to their limit
and so it is described as power oversteer. The driver can feel the limit of tyre grip during
acceleration by sensing the onset of excessive power oversteer. In this condition, the
steering wheel can be used to control the direction of the car towards the overrun kerb
with the throttle only being reduced as a last resort.
Steering angle should be gradually reduced as the car gathers speed. It is important to steer
as straight as possible in order to reduce drag from the front tyres. It is also important to
keep steering wheel movements to a minimum so that there is less chance of making a
mistake. The dampers will be in operation as the car rolls back to the upright position but
in this case their setup, (i.e. understeer bias for corner entry), has the beneficial effect of
helping to keep both rear tyres in contact with the road and thereby improving traction.
139
Similarly, position 5 can be moved out to the traction circle by overlapping the final stages
of turning with feeding in the throttle. The steering wheel must have been partially
straightened before applying more throttle and progressively returned to the centre as the
throttle is increased to full power. The outside rear wheel is the highly loaded one in this
case, so watch out for the onset of excessive oversteer.
Grand Prix 3 has two additional data trace functions which are recorded by the data logger
and these are Lateral Acceleration and Longitudinal Acceleration. Lateral Acceleration is
influenced strongly by steering angle and Longitudinal Acceleration is influenced strongly
by throttle and brakes. By overlaying the lateral and longitudinal acceleration traces it is
possible to see how much the tyres are being used in the overlap of braking/turning and
turning/acceleration.
Understeer versus Oversteer
The aim of balancing the car with oversteer or understeer is to achieve the fastest laptime, the fastest cornering speeds and the most reliable and consistent results. An understeering car is inherently directionally stable and relatively easy to control whereas an
oversteering car is unstable, more difficult to control and will spin round to face the wrong
direction without much warning.
138
IDEALISED TRACTION CIRCLE
Braking
front tyre close to
3
limit, therefore risk
of understeer
Cornering
rear tyre close to
limit, therefore risk
5
of oversteer
Accelerating
Front tyres
Rear tyres
Page 52

If it is already raining before the start and it looks set to continue for the majority of the
race, then choose an appropriate wet setup and wet tyre type from the start and reassess
the situation at each pitstop. If the weather and track conditions change, then it’s up to
you to judge if it is better to come in and change tyres to improve your laptimes (and suffer
the lost time in making the pitstop), or stay out and wait until your next scheduled stop.
You can compromise by changing your pitstop strategy mid-race and come in earlier. Fuel
consumption is much less in the wet, so extended runs, and runs with lighter fuel loads
are both possible tactics.
If the track is wet at the start but you are confident that the rain will stop fairly early in
the race, then use a dry setup with wet tyres, but be careful: the dry brake balance will
lead to difficult driving in the wet. When the dry conditions arrive, switch to dry tyres at
the next suitable opportunity. There will be more grip on the drying line but remember
that the tyre wear will also increase.
If the track is dry at the start but there is a fair probability that rain will arrive later, then
the choice of setup is a difficult one. If you choose a wet setup and the rain comes late
in the race, then you will lose out to those on a dry setup. If you go for a dry setup and
the rain comes early then you will lose out to those on a wet setup. The solution is to
choose one and hope for the best! In either case start the race on dry tyres and switch to
wets at a suitable opportunity after the track conditions change.
Tyre choice at the start and at pitstops should suit the conditions that are current unless
you think this will change very soon. Bear in mind that the track conditions may change
from one side of the circuit to the other due to local variations in the rainfall. This is
especially noticeable at long circuits such as Spa.
There are other hazards associated with wet weather. Bad visibility will force you to rely
on your prior knowledge of the circuit layout and to watch out for familiar trackside
objects. You will have to think further ahead and have a strong mental picture of where
you want the car to go. The kerbs are more slippery than the road surface and should be
avoided unless you want to end up on the grass. And the grass is like ice!
141
Wet Weather Setup
Driving in wet conditions is more difficult than in the dry. This is because the tyres have
much lower grip on the slippery road surface so that any problems encountered while driving
the car become exaggerated.
Lower grip means that less weight can be transferred during braking, cornering and
acceleration before the limit is reached. This forces the driver to brake earlier and lighter,
to corner at a slower speed and to accelerate more gently out of corners. The resulting
lower weight transfer means less body roll and pitch. It also means that the dry setup of
springs, anti-roll bars and dampers will be overly stiff for the lighter loads and this will
make the car feel twitchy. A wet setup therefore will be much softer all round for springs,
anti-roll bars and slow speed dampers.
In addition, weight transfer towards the front is smaller in the wet so that the brake balance
needs to be moved to the rear to avoid the front wheels from locking up under braking.
Top speeds will be lower in the wet, so aerodynamic drag is less of a concern. This will
let you run the car with higher wing settings for greater downforce to try to increase the
available grip.
When the setup and driving style bring about understeer in the dry, the effects in the wet
will be more exaggerated. This is because the grip limit for the outside front tyre will be
reached sooner. Similarly when the car is required to oversteer, the outside rear tyre will
also lose grip sooner. As a result, you need to be gentler with the brakes and steering
wheel movements.
With the enormous horsepower of the engine being unchanged, throttle control becomes
the most difficult aspect of driving in the wet. One way of helping this situation is to short
shift the gears, changing up through the lower gears at lower engine speeds to avoid the
maximum drive from the engine. In the higher gears, short shifting is not necessary
because the aerodynamic downforce is greater and the drive on the rear wheels is less.
A major factor which influences wet weather performance is choice of tyre. There are 4
wet weather tyres available; intermediate, hard wet, soft wet and monsoon. In this order,
they are capable of coping with increasing levels of wetness on the track. This is achieved
by increasing the amount of tread on the tyre, which removes more water and allows the
tyre to have better contact with the road surface. The problem with more tread is that the
actual area of rubber in contact with the road is smaller. This reduces tyre grip in dry or
drying conditions, which is not a problem in short qualifying runs because the correct tyre
can be chosen, but it can easily affect the outcome of a race.
140
Page 53

Front/Rear Brake Balance
Grand Prix cars have a low centre of gravity, centred just behind the driver. If you brake
hard at speed, the weight – and the centre of gravity – shift towards the front of the car.
Therefore, brakes must be balanced to cope with the weight transfer during deceleration
(slowing down).
You can change the brake balance of your car by altering the way in which the front and
rear brakes are applied. Remember that in the dry, it’s always best to have more brake
bias at the front than at the rear.
The scale goes from 50% to 75%. The lower the figure, the more balance is applied to
the rear of the car. Adjust the balance by clicking on the +/- buttons.
Gear Ratios
You must set the gear ratios in your gearbox to suit each circuit. This is usually done by
setting the 6th gear for the fastest possible speed along the longest straight and then setting
the lowest gear for the slowest corner. The rest of the gears are ranged evenly between
the two.
Gear ratio selection is very important. Different cogs can be fitted to the gearbox that can
have a major effect on the car’s acceleration, performance in bends and top speed.
• Twisty circuits with few long straights and plenty of chicanes need ‘short’ gearing - the
cogs are closer together - for quick acceleration. The nearer the cogs are to each other,
the less work the lower gear has to do to get to the higher gear.
• Circuits with predominantly long straights require ‘long’ gearing - the cogs are further
apart - to help the car reach a higher top speed. The further away the cogs are from
each other, the more work it has to do to get up to the higher gears but the faster the
speed in top gear.
The gearbox has a range from 1 to 64. Select +/- to change the gear ratios.
The nearer the cogs are to each other, the less work the lower gear has to do to get to the
higher gear (short gearing).
The further away the cogs are from each other the more work it has to do to get up to the
higher gears but the faster the speed at the top gear (long gearing).
Save the Car Setup
You can save the Setup you have chosen for your car when you are in the pits, by selecting
Car Setup and then selecting Save Setup. From the Save Setup Menu enter the name by which
you wish to save your car setup in the filename section and press Return.
143
The Pits
Summary
You begin any practice or timed/qualifying session in the pit lane. From here you can
choose to drive straight away with the current setup, or change any of the car settings.
You can also drive into the pits at any time during practise to change your car setup.
For the Rookie Driver, the car setup will seem very complex at first. Do not worry! Accept
the current setup, learn to drive fast around the circuits, then return to this section and
adjust the settings. Do not adjust more than one setting at a time before trying it out in
a practice session. This is when you will notice the difference in performance.
Each of the 16 circuits is unique so it’s necessary to setup your Formula One car with the
correct combination of Wing, Gear Ratios and Brake Balance. You are advised to study the
track layouts and take note of all the track notes and summaries; these will give you an
indication of the type of car setup required, but there is no substitute for experience.
Try a few laps with various settings, get an idea of how the car is running through corners
and along straights. Compare your performance with other cars in practice, go into the
pits and adjust a setting then try again.
A good pit strategy can make all the difference. You can decide your strategy just prior to
racing or you can make your choice in the Car Setup screen. You can also change your
strategy during the course of the race by entering the pits and changing the number of
pitstops to go and which lap to stop next on.
If you are having problems with your car setup and are finding it difficult, for example, to
drive into corners please consult the Car Setup Procedure Guide and the Car Setup
Reference Guide. It may help to read the "Secrets of the Pros – Driving at the Limit" section.
Basic Car Setup Options
Front/Rear Wing Downforce Adjust
In general terms the wings on a Formula One car push it down on the track, creating
‘downforce’. This produces better grip and less roll, giving better control in corners, but
less speed on the straights because of greater aerodynamic drag.
You can adjust the amount of front and rear wing used by the car, using a scale from
1 to 20. The higher the number, the more downforce. Adjust the wings (front and rear) by
clicking on the +/- buttons.
142
Page 54

Problem: rival cars are much faster on long straights.
Cause: too much downforce/gear ratio too ‘short’/not enough speed through previous corner.
Remedy: reduce wings front and back/space out higher gear ratios/use more throttle.
Further Options: check correct driving line.
Problem: car does not grip in corners/other cars are faster in corners.
Cause: too little downforce/speed too high.
Remedy: increase wing front and back/slow down in corner.
Problem: car lacks acceleration over short distances.
Cause: gear ratios too ‘long’.
Remedy: close down gaps between gears.
Problem: car tends to spin-off when braking into corners.
Cause: underbraking/braking too late.
Remedy: move brake balance towards front/brake earlier.
Further Options: increase wing.
Problem: car is slow in corners and straights.
Cause: gearing.
Remedy: lengthen the gears.
Further Options: reduce wing.
Problem: a gradual worsening of performance.
Cause: tyres wearing out.
Remedy: fit a new set of tyres.
Further Options: none.
Problem: sudden loss of performance.
Cause: car damaged in accident.
Remedy: return to pits.
Further Options: check outside views for obstructions.
Problem: car stops suddenly.
Cause: no fuel.
Remedy: none.
Further Options: none.
145
Advanced Car Setup
For advanced changes to your car setup select Advanced from the Car Setup Menu. The
changes to your car setup that you make in Advanced Car Setup will affect your vehicle’s
suspension. For each wheel, you will be able to adjust the settings for the following:
Advanced Level 1
• Damper
• Spring
• Ride height
• Anti-roll bars
Advanced Level 2
• Packers
• Damper fast bump
• Damper fast rebound
• Damper slow bump
• Damper slow rebound
• Spring
• Ride Height
• Anti-roll bars
• Differential
Note: For a full explanation of the above please consult the Car Setup Reference Charts on
pages 158-164.
Typical Problems in Standard Setup
Problem: the car does not want to steer into the corners.
Cause: understeer.
Remedy: increase front wing or decrease rear wing values.
Further Options: bias brake balance towards rear (-).
Problem: the car turns too quickly into corners or spins too easily when cornering.
Cause: oversteer.
Remedy: decrease front wing or increase rear wing.
Further Options: bias brake balance to the front (+).
144
Page 55

Steering Demand
This trace shows the position of the steering wheel and is useful for seeing the point at
which you turned into a corner. The car will be faster if the steering wheel is kept as
straight as possible. Upwards deviations indicate turns to the left, downward deviations
show turns to the right.
RPM
The RPM shows how you made use of the engine in relation to the gears.
You can also see when rev limiting occurs by looking at when the revs are at their highest
and the speed curve becomes flat instead of climbing.
Throttle
The throttle can be of interest when comparing laps to see which level of throttle produces
the best result through a given corner.
You can also use this measure to assess the level of wheelspin. This occurs when the car
is travelling at low speeds, or is in a low gear and there is a large throttle demand. If the
inside rear wheel goes ‘light’, when travelling around a corner, then traction may be lost
and you may wonder whether too much throttle was applied (as opposed to there being a
need to soften the rear suspension).
One sign that a setup change has been successful is if the throttle traces of ‘before’ and
‘after’ laps demonstrate that you were able to get on the throttle earlier, or had more throttle
through a bend.
Remember that the more time you spend with the throttle on full, the faster your lap will be!
Brake
Use the trace to compare laps and see which braking points produce the best result.
One sign that a setup change has been successful is if the brake traces of ‘before’ and
‘after’ laps demonstrate that you were able to brake later for a bend.
Remember that the less time you spend braking, the faster your lap will be.
Gear (See colour chart on page 114.)
The gear display shows when gear changes occur. These can sometimes explain spikes in
other traces as the forces on the car change temporarily.
147
Data Logging Guide
The Data Logger records car performance information that can be graphed and analysed
in the Performance Analysis Menu. This information can be useful when adjusting car
setups, to compare performance over different laps and help you improve your driving
technique. It will most often be of use in Practice or in Qualifying sessions and is a great
way to compare your performance with that of a friend.
Recording Data
Data recording starts when the car exits the pit lane. You will see a message on the LCD
as you leave the pits: Starting Data Logger. A lap of logged data is registered when the car
either crosses the start/finish line or comes back into the pit lane. All registered laps are
available after they have been fetched from the Data Logger. You can also convert saved
‘hot laps’ into ‘data logged’ data (i.e. Performance Analysis files).
The data logger records the following information:
Speed
Steering demand
RPM
Throttle
Brake
Gear
Ride height (for each wheel)
Suspension travel (for each wheel)
Wheelspin (for each wheel)
Lateral acceleration
Longitudinal acceleration
Speed (See colour chart on page 114.)
The Speed trace enables you to analyse your speed at any point in the lap.
It can be particularly useful when comparing laps, especially when you have one split time
better than the other. Used in combination with Steer, Brake, Throttle, RPM and Gear, you
can discover which driving techniques produce the best results.
If you are adjusting the car setup, the Speed trace can show on which section of the circuit
the car is fastest and show you where the fastest corners are. All of this information should
help you improve your car setup and performance.
146
Page 56

Wheelspin - for each wheel (See colour chart on page 116.)
The trace shows the wheel circumference velocity. If the wheel is gripping without slipping,
then this velocity is the road speed of the wheel. You can see how, when the car goes
around a bend, the outside wheels have further to go and so have a higher speed than the
inside wheels. Wheelspin is shown on the trace as sharp upward spikes. Wheels locking
due to braking or scrub, are shown as a sharp downward spike. This trace can be useful
when assessing traction on a bumpy circuit, or in corners generally. It may indicate a need
to soften the suspension at the rear of the car.
Standard Car Setup Procedure
You can improve your chances of qualifying on pole position by looking for the optimum
set up. The key is to use a systematic approach. Check out the list of common problems
you’re likely to encounter when using the Standard Setup (see page 144). Then using the
first part of the step-by-step guide to setting up the car that follows, you should start to
see an improvement in your lap times.
Note: You may need to consult the Glossary (at the back of this manual) to gain a clearer
understanding of some of the technical terms used in this section.
Making step-by-step Setup Changes: Basic Principles
Setting up the car is an exercise in compromise - everything affects everything else!
Remember, if you try something and it doesn’t work, you still have a positive result because,
if nothing else, you can disregard that particular solution by a process of elimination.
Wing Angles
Option 1. Select an initial set-up with slight understeer.
Grand Prix 3 provides you with an initial set-up with slight understeer for each track.
Ask yourself: ‘does the circuit have high, low or medium downforce priority?’
This depends on the characteristics of a given circuit. For example, Monaco needs high
downforce because of the many corners and few straights. Hockenheim requires low
downforce because of the long straights and few corners, while Suzuka, with its mix of
long corners and fast straights calls for medium downforce (see the Circuits section for a
full list of tracks and their characteristics).
Examine the track layout diagrams and try out a few laps to get a feel for each circuit.
If you decide on low downforce, choose…
149
Ride Heights - for each wheel (See colour chart on page 115.)
The ride height measures the distance between the car floor and the ground.
When the car is travelling on a straight, the two rear wheel traces should be virtually
identical to each other. The same applies to the two front wheel traces. Then, for example,
if the car goes around a right hand corner, the left hand side of the car floor drops and
the right hand side of the car floor rises. This results in the two rear traces moving apart
from each other, and similarly with the front traces.
You can examine how low the car gets as it travels around the circuit to examine what
adjustments, if any, you should make.
For example, if the ride height is 25mm above the ground at its lowest point (probably a
fast straight) then, considering there is a 10mm plank under the floor, this means you
could lower the ride height by 15mm before the plank would start to rub on the ground.
This is a slight simplification, but the principle is important. The plank is located in the
middle of the car and not at the front. This means that the plank may be off the ground
if the front is less than 10mm off the ground. This is due to the pitch angle of the car
(i.e. the pitch angle may be higher at the back of the car than at the front). The same is
true for roll angle. One side of the car can dip lower than 10mm. Ultimately inspection
of the plank will produce the final verdict. However you can make sensible judgements
using the trace.
Remember: When the car is moving, the lower the ride height, the greater the undercar
downforce. Downforce will tend to be biased towards the front of the car if the front ride
height is lowered much more than the rear and vice-versa.
Suspension Travel - for each wheel (See colour chart on page 115.)
Useful in Car Setup Advanced Level 2 this trace helps to identify how many packers you
need to keep the plank off the ground. The Performance Analysis trace actually represents
suspension movement relative to any packers you have fitted. This means that the trace
relative to the bottom of the chart actually shows the available remaining travel of the
suspension. Therefore, if you find the point on the circuit with the lowest ride height
(using the ride height trace) and then check the available suspension travel at the same
part of the lap, this will show you the depth of additional packers required to remove
the remaining suspension travel. So, in effect, at that part of the lap the car is on the
bump rubbers.
Once those packers have been inserted, if you reduce the ride height by, for example,
3mm, then an additional 3mm of packing is required to keep the plank off the ground at
the worst part of the lap (i.e. where the ride height is at its lowest). Inspection of the plank
indicates the actual wear, but the traces allow you to make the best judgements.
148
Page 57

Option 3. Adjust the front wing setting to achieve balance in high speed corners.
This adjustment should be made in tandem with rear wing adjustments (see Options 2a,
2b or 2c).
Unlike the body, wheels and rear wing, the front wings don’t add to aerodynamic drag
because of the nature of the airflow over a Formula One car. As a result, the front wing is
used to control the aerodynamic balance of the car. However, more front wing can interfere
with airflow over the rear wing, resulting in reduced rear downforce. Remember that
compensating for this with more rear wing will increase drag, or that compensating with
more steering demand will increase tyre wear.
Gear Ratios
Option 4a. Adjust the gear ratios if reaching the rev limit in 6th gear.
In these circumstances, lengthen the 6th gear ratio.
Option 4b. Adjust the gear ratios if there is a lack of acceleration in 6th gear.
If this happens, shorten the 6th gear ratio.
In both cases, use the Speed trace on the Performance Analysis Graph to determine the
fastest straight on the circuit. Use the speedometer to determine the fastest speed on the
straight. It may be necessary to adjust 3rd, 4th and 5th gears to prevent a large gap in
the gear ratios. This adjustment should be made in tandem with rear wing adjustments
(see Options 2a, 2b or 2c).
Brake Balance
Option 5. Adjust the brake balance to avoid understeer or oversteer when braking at turn-in.
If the car understeers when braking, adjust brake balance towards the rear of the car. If
the car oversteers when braking, adjust brake balance towards the front of the car. Both
of the above conditions can result in braking distances on the straights being too long.
Keep making adjustments until you achieve the preferred balance.
Car Setup Advanced Level 1
Advanced Level 1 introduces the setup options of springs, dampers, ride height and antiroll bars. In general, the stiffer a wheel’s suspension is, compared to the other wheels, the
more load it will attract as the car moves around the track. The more heavily loaded a tyre
is, the less efficient its grip becomes. You’ll see that a stiff front leads to understeer, while
a stiff rear leads to oversteer.
151
Option 2a. Reduce the rear wing setting to reach high speeds on the straights.
If you reduce the rear wing setting by a large amount, reduce the front wing setting by an
equal amount to avoid large balance changes. Eventually, if you reduce the rear wing too
much, a resulting lack of cornering performance will outweigh any straight line speed
advantage. This will become apparent by trial and error and when your lap times slow
down. Remember, too, that the car’s top speed will have increased, so you will need to
brake earlier for corners.
Use the Speed trace on the Performance Analysis Graph to determine the fastest straight
on the circuit. Use the speedometer to determine the fastest speed on the straight. If the
rev limit is reached in 6th gear then lengthen the gear ratio (see Option 4a). If the car
oversteers in fast bends then lower the front wing (see Option 3).
If you decide on high downforce, choose…
Option 2b. Increase the rear wing setting to reach high speeds in corners.
Use the Speed trace on the Performance Analysis Graph to compare your speeds through
the corners with different wing settings. Also use the speedometer to determine the
fastest speeds through the corners. If you have no acceleration in 6th gear, then shorten
the gear ratio (see Option 4b). If the car understeers in fast bends, then increase the front
wing setting (see Option 3). Eventually a lack of straight line performance will outweigh
any cornering speed advantage. Again, this will become apparent by trial and error and
when your lap times slow down.
Setting up the car is an exercise in compromise - everything affects everything else!
Remember, if you try something and it doesn’t work, you still have a positive result because,
if nothing else, you can disregard that particular solution by a process of elimination.
If you decide on medium downforce, choose…
Option 2c. Adjust the rear wing setting to find the best overall compromise between high
speeds on straights and in corners.
Do this along with adjustments to the front wing and the gear ratios (see Options 3 and
4). Use the Speed trace on the Performance Analysis Graph to study the circuit. Use the
split times, to compare laps with differing car set-ups. The best adjustment is found by
trial and error and by comparing your lap times.
150
Page 58

Softer springs will lead to more weight being shifted to the front wheels during braking.
This leads to a loss of braking power due to the front tyres locking. Therefore, you will
need to shift the brake balance, by a small amount, towards the rear of the car.
Option 6b. Stiffen the springs on a smooth circuit to allow a reduction in ride height.
On a relatively smooth circuit, you should stiffen the springs to facilitate a reduction in
ride height because…
• Stiffer springs mean less suspension travel.
• Smaller suspension travel allows a reduction in ride height.
• Reducing the ride height will increase undercar downforce.
Be careful not to lose traction by stiffening the rear too much. Compare the Speed trace
on the Performance Analysis Graph to determine where loss of acceleration occurs.
Ride Height
Option 7. Ride height adjustment.
Ride height values are inspected when the car is stationary. When the car is in motion,
the ride height at the rear will be higher than at the front ride, owing to the car’s design.
Downforce, weight transfer and bumps will vary the overall ride height. It must be high
enough to keep the plank off the ground when the springs compress, yet as low as possible
to increase undercar downforce. Ride height settings will vary depending on spring settings,
needing to be higher if the springs are softer.
Note: Downforce gained from lower ride height has no drag penalty. Therefore, reducing
ride height all round is better than increasing wing settings. This needs to be carefully
judged as this will increase plank wear if the car gets too low. Use the Ride Height trace
on the Performance Analysis Graph to see what ride height you are achieving around the
circuit.
Dampers
Option 8. Adjust dampers to improve performance over bumps.
As well as adjusting springs, corresponding changes must be made to the dampers to help
keep the tyres in contact with the track (see Option 6a). If the car understeers on bumps,
soften the front dampers. If the car oversteers on bumps, soften the rear dampers.
Continue to make adjustments until the car ceases to skate or step out of line. If you are
losing traction on bumps, soften the rear dampers. Making the dampers too soft will cause
sloppy handling.
153
When the car is travelling in a straight line, only the springs support the weight of the car.
In the middle of a long corner, as the car leans, the anti-roll bars also help to support the
car, controlling the extent to which the car will be allowed to lean. Dampers also help
support the car, but their main job is to dissipate any energy stored in the springs as they
compress and expand. Generally stiffer springs require more damping. There’ll be more
about dampers in Advanced Level 2.
Dampers are necessary to dissipate any energy that is stored in the springs as they compress
and expand (e.g. when going over bumps). Generally stiffer springs require more damping.
Usually, the setup on the left and right side of the car will be the same (giving a condition
of lateral symmetry). However, on certain tracks that have a bias in the number of left or
right hand corners, you could try different setup values on the left and right sides of the car
(lateral asymmetry).
Ride height – the distance between the road and the bottom of the car - is strictly controlled
in Formula One. Since 1994, rules require that the teams fit a 10mm thick wooden plank
to the underside of the car in an attempt to slow cars down and as a means of checking
that cars are not running closer to the ground than regulations permit. No more than 1mm
plank wear (due to rubbing on the ground) is allowed during the race. The Advanced Level
1 menu allows you to inspect the plank, but in Grand Prix 3, rather than being disqualified
for excessive plank wear, you will find that there is an extra drag penalty (once the legal
limit has been exceeded) as the plank runs along the ground.
Take a look at how these variables affect the performance of the car…
Making Setup changes: Advanced Level 1
Springs
Option 6a. Fit softer springs to improve your performance over bumps.
Because some circuits have more bumps than others, suitable spring adjustments have
to be made to smooth out the ride over bumps. Only driving round the tracks will reveal
just how much more bumpy some tracks are than others. Make small adjustments in tandem
with Options 8 and 11.
If the car understeers on bumps then soften the front springs. If the car oversteers on
bumps, soften the rear springs. If the car loses traction on bumps, then soften the rear
springs. Use the Wheelspin trace, on the Performance Analysis Graph, to determine any loss
of traction. If softening the springs makes the plank rub along the ground, you may need
to increase the ride height (see Option 7). Use the Ride Height trace on the Performance
Analysis Graph to determine any ride height variations. Continue making adjustments until
these become smoother. Maximum suspension travel will now have been finalised.
152
Page 59

Making Setup Changes: Advanced Level 2
4-Way Adjustable Dampers
The dampers on a Formula One car are designed to have different stiffnesses when the
wheel is moving up and towards the body (bump) and when it is moving down and away
from the body (rebound). The bump direction, as its name suggests is meant principally
to cope with bumpy road surfaces. The rebound direction is used to control car balance
at entry to and exit from corners. Rebound forces are typically two or three times the
strength of bump forces of the same setting. As a car rolls into a corner, the outside
wheels go into bump and the inside wheels go into rebound, the rebound tending to provide
the dominant damping. Both the bump and rebound directions have high and low speed
adjustments. The low speed adjustment sets the car handling characteristic of the damper
and the high speed adjustment allows further adjustment of the damper’s effect over
surface bumps.
Option 11a. Soften bump dampers to improve performance over bumps.
Bump damper adjustments are made to help keep the tyres on the track. Make small
adjustments in tandem with adjustment of the springs (see Option 6a). If the car understeers on bumps, soften the front bump dampers. If the car oversteers on bumps, soften
the rear bump dampers. Set the slow bump first and then the fast bump. Continue to
make adjustments until the car ceases to skate or step out. If losing traction on bumps,
soften the rear dampers. Making the dampers too soft will cause sloppy handling.
Option 11b. Adjust the rebound dampers to obtain desired balance during cornering.
Rebound damper settings affect car balance during cornering at the entry to and exit from
a corner. If the car understeers through a corner, soften the front rebound damper (or stiffen
the rear). If the car oversteers in a corner, soften the rear rebound damper (or stiffen the
front). Be careful not to lose traction by stiffening the rear too much. Compare the Speed
trace on the Performance Analysis Graph to determine areas with loss of acceleration. Use
the Wheelspin trace to see where loss of traction occurs. Set the slow rebound first and
then the fast rebound.
Packers
Advanced Level 2 makes it possible to run the car on a set of bump stops (or bump rubbers)
to limit the downward movement of the body: for a given spring stiffness, the ride height
can be substantially reduced to gain downforce, without the plank rubbing on the ground.
The method adopted for controlling at what ride height the bump stops come into play is
to fit packers (spacers) into the spring/damper unit so that the bump rubbers are reached
prematurely and to limit suspension travel.
155
Anti-Roll Bars
Option 9. Adjust anti-roll bars for balance in slow and medium corners.
Anti-roll bars only come into play when the car has ‘roll angle’ (for example when leaning
in a bend). Pick a long corner to ensure damper effects have finished. If the car understeers in corners, soften the front anti-roll bars, or stiffen the rear anti-roll bars. If the car
oversteers in corners, stiffen the front anti-roll bars, or soften the rear anti-roll bars. Keep
making adjustments until the preferred balance has been achieved. You may have to
adjust the front wing since the anti-roll bars also work in fast corners (see Option 3).
Softer anti-roll bar settings all round will improve cornering grip/traction and reduce tyre
wear. Stiffer settings all round will improve sloppy handling and allow lower ride heights
without the plank rubbing on one side.
Tyre Wear
Option 10. Soften the suspension all round, if necessary, to prevent excessive tyre wear.
Use the tyre wear display on the Performance Analysis Graph to assess the amount of
tyre wear.
Car Setup Advanced Level 2
In Advanced Level 1, we saw that springs support the car on the straights and that they
are helped by anti-roll bars in corners. Besides absorbing energy from the springs,
dampers also help to support the car, but only when the car is actually rolling. As a result,
the support from the dampers is only noticeable at the entry to and exit from corners.
Advanced Level 2 lets you fine-tune the 4-way adjustable dampers and packers. This is
useful if the driver wishes to have a different balance at the turn-in to, or exit from a corner
than the balance determined for the apex of the corner by the spring and anti-roll bar stiffness.
The transient effect of the dampers will last longer if their settings are stiffer.
As you may have found in Advanced Level 1, the only way to keep the plank off the ground
when the springs are compressed under downforce is to raise the ride height of the car,
losing undercar downforce in the process.
Another disadvantage is that the car rolls and pitches more as a result of the higher centre
of gravity, becoming less responsive to sudden changes in direction or sudden braking.
The balance of the car is also affected due to an exaggeration of any front/rear bias in the
setup. Advanced Level 2 will allow you to overcome these difficulties.
154
Page 60

Differential
The differential connects the output shaft of the gearbox to the two drive-shafts which
power the rear wheels . The differential allows the outside wheel in a corner to travel faster
than the inside wheel while still transmitting power from the gearbox.
This freedom of relative movement between the two shafts can be a disadvantage when
on the limit of grip: one wheel can lose traction while the other can gain traction and start
to ‘spin up’. This can be countered by using a differential with some added coupling
between the two shafts. The stiffness of the coupling can be adjusted to suit the type of
circuit and your driving style. A higher stiffness coupling will improve traction out of corners,
especially in the wet. This is because the outside wheel will be receiving more of the
engine’s power and the inside wheel will have reduced wheel spin due to the coupling.
On the minus side however, too high a stiffness coupling will reduce the ability of the
differential to allow the outer wheel to go at a different speed to the inside wheel on
corners, thereby reducing the steering response and tending to make the car understeer,
particularly in tight corners.
157
Lowering the car will result in less roll and pitch as the centre of gravity is lowered.
That will affect cornering and brake balance, which must be adjusted afterwards.
Do you wish to run for periods on the bump rubbers?
As we have seen, running on bump rubbers allows a reduction in ride height, but it can
also allow softer springs to be used for bumpy tracks. But bump rubber suspensions only
become usable at high speeds. When in use, the bump rubbers are the only active part of
the suspension and are very much stiffer than springs, bars and dampers. However, the
additional stiffness does not generally affect handling because the tyres are so heavily
loaded by the time the bump rubbers come into play.
Answer: Yes - to intentionally use the bump rubbers as suspension.
Option 12a. Fit packers to facilitate a reduction in ride height.
A reduction in ride height does not affect suspension travel. Consequently, for the same
spring rate, the car may ground at high speeds. Use the Speed trace on the Performance
Analysis Graph to determine the fastest straight on the circuit. Start by lowering the ride
height until the car grounds at high speed (use the plank wear display to verify that
grounding has occurred). Then, fit packers to restrict the suspension travel and keep the
car off the ground. You can use the Suspension Travel trace on the Performance Analysis
Graph to determine when the bump rubbers are in play and how many packers to use (see
the Data Logging Guide). Carry on until the suspension travel is too restricted (in corners
or over bumps). If the track is bumpy, the ride height may end up relatively high.
Answer: Yes - to intentionally use the bump rubbers as suspension but not in high speed
corners.
Option 12b. Adjust the ride height to prevent running on bump rubbers in high speed corners.
When the car slows down to enter a corner, the ride height increases. This increase will
ideally bring the car off the bump rubbers. If not, then increase the ride height and
remove the redundant packers. Use the Suspension Travel trace on the Performance
Analysis Graph to determine how many packers to fit (see Data Logging Guide). Finish the
adjustment when you’re no longer running on bump rubbers.
Answer: No - to intentionally avoid running on bump rubbers.
Option 12c. Increase the ride height to prevent excessive use of bump rubbers.
As above, but increase the ride height further and remove the redundant packers. Use the
Suspension Travel trace on the Performance Analysis Graph to determine the frequency of
bump stop contact. Finish adjusting when you are no longer running on the bump rubbers.
If a new ride height is excessive, consider fitting stiffer springs.
156
Page 61

Ride height (Static): Set to maximise downforce and minimise plank wear.
Action Effect on Car Balance Other effects
Reduce at front More oversteer in fast More front-biased undercar downforce.
corners because of more More chance of plank wear at front.
front under-car downforce May restrict use of soft front springs on bumpy surfaces
(Level 1).
May force the use of additional front packers (Level 2).
Reduce at rear More understeer in fast More rear biased undercar downforce.
corners because of more Increase or decrease in total undercar downforce.
rear under-car downforce More chance of plank wear at rear.
May restrict use of soft rear springs on bumpy surfaces
or for extra traction (Level 1).
May force the use of additional rear packers (level 2).
Reduce all round More chance of plank wear all round.
May restrict use of soft springs all round (Level 1).
May force the use of additional packers all round (level 2).
More undercar downforce all round.
NB: Downforce gained from lower ride height has no
drag penalty therefore reducing ride height all round is
more desirable than increasing wing settings.
Increase at front More understeer in fast Less front biased undercar downforce.
corners because of less Less chance of plank wear at front.
front under-car downforce May allow use of softer springs to improve performance
over bumps.
May allow removal of front packers to increase
suspension travel over bumps (Level 2).
Increase at rear More oversteer in fast Less rear biased undercar downforce.
corners because of less Increase or decrease in total undercar downforce.
rear under-car downforce Less chance of plank wear at rear.
May allow use of softer springs to improve performance
over bumps and traction out of corners.
May allow removal of rear packers to increase
suspension travel over bumps (Level 2).
Increase all round Less chance of plank wear all round.
May allow use of softer springs to improve
performance over bumps.
May allow removal of packers all round to increase
suspension travel over bumps (Level 2).
Less undercar downforce all round.
159
Car Setup Reference Charts
Springs: (Set to maximise traction, cornering grip and vertical car movement).
Action Effect on Car Balance Other effects
Stiffen the front More understeer in corners Additional traction, especially when exiting corners.
Less cornering grip on bumpy surfaces.
Additional front tyre wear.
Handling more responsive.
Less drive under braking.
Stiffen the rear More oversteer in corners Traction loss, especially when exiting corners.
Less cornering and traction grip on bumpy surfaces.
Additional rear tyre wear.
Handling more responsive.
Stiffen all round Can achieve lower ride heights and so more downforce.
Less cornering and traction grip on bumpy surfaces.
Additional tyre wear all round.
Handling more responsive.
Soften the front More oversteer in corners Traction loss, especially when exiting corners.
Additional cornering grip on bumpy surfaces.
Less front tyre wear.
Handling less responsive.
May be forced to increase front ride height.
More drive under braking.
Soften the rear More understeer in corner Additional traction, especially when exiting corners.
Additional cornering grip on bumpy surfaces.
Less rear tyre wear.
Handling less responsive.
May be forced to increase rear ride height.
Soften all round Improved traction and cornering grip on bumpy surfaces.
Additional cornering grip on bumpy surfaces.
Reduced tyre wear all round.
Handling less responsive.
May be forced to increase ride height.
158
Page 62

…Wings: Only effective when car has forward velocity.
Action Effect on Car Balance Other effects
Increase at rear More understeer in fast Increase aerodynamic downforce on rear wheels.
corners Increase aerodynamic drag.
Reduced top speed on straights.
May need to shorten 6th gear ratio.
Increase cornering speed in fast corners.
May need increased rear ride height or extra rear
packers to avoid plank wear (Level 2).
May need to stiffen rear springs to avoid plank wear.
Increase, front Increase aerodynamic downforce on wheels all round.
and rear Increase aerodynamic drag.
Reduced top speed on straights.
May need to shorten 6th gear ratio.
Increase cornering speed in fast corners.
May need increased ride height or extra packers to
avoid plank wear (Level 2).
May need to stiffen springs to avoid plank wear.
Decrease at front More understeer in fast corners.
Decrease aerodynamic downforce on front wheels.
No reduction in aerodynamic drag, but may increase
effectiveness of rear wing.
Decrease cornering speed in fast corners.
May allow decreased front ride height or removal of
packers for extra front undercar downforce (Level 2).
May allow softer front springs for more cornering grip
on bumpy surfaces.
Decrease at rear More oversteer in fast Decrease aerodynamic downforce on rear wheels.
corners Decrease aerodynamic drag.
Increase top speed on straights.
May need to lengthen 6th gear ratio.
Decrease cornering speed in fast corners.
May allow decreased rear ride height or removal of
packers for extra rear undercar downforce (Level 2).
May allow softer rear springs for more cornering and
traction grip on bumpy surfaces.
Decrease front Decrease aerodynamic downforce on wheels all round.
and rear Decrease aerodynamic drag.
Increase top speed on straights.
May need to lengthen 6th gear ratio.
Decrease cornering speed in fast corners.
May allow decreased ride height or removal of packers
for extra undercar downforce (Level 2).
May allow softer springs all round for more cornering
and traction grip on bumpy surfaces.
161
Anti-roll bars: Only effective when car is leaning in the corners.
Action Effect on Car Balance Other effects
Stiffen at front More understeer in corners Less cornering grip on bumpy surfaces.
Additional front tyre wear.
Handling more responsive.
Stiffen at rear More oversteer in corners Traction loss, especially when exiting corners.
Less cornering grip on bumpy surfaces.
Additional rear tyre wear.
Handling more responsive.
Stiffen, front Less cornering and traction grip on bumpy surfaces.
and rear Additional tyre wear all round.
Handling more responsive.
Soften at front More oversteer in corners Gain cornering grip on bumpy surfaces.
Reduced front tyre wear.
Handling less responsive.
Soften at rear More understeer in corners Gain cornering grip on bumpy surfaces.
Traction gain, especially when exiting corners.
Reduced rear tyre wear.
Handling less responsive.
Soften, front May need increased ride height or extra packers to
and rear avoid plank wear at the sides.
Gain cornering and traction grip on bumpy surfaces.
Reduced tyre wear.
Handling less responsive.
Wings: Only effective when car has forward velocity…
Action Effect on Car Balance Other effects
Increase at front More oversteer in fast Increase aerodynamic downforce on front wheels.
corners No additional aerodynamic drag, but may reduce
effectiveness of rear wing.
Increase cornering speed in fast corners.
May need increased front ride height or extra front
packers to avoid plank wear (Level 2).
May need to stiffen front springs to avoid plank wear.
160
Page 63

…Packers: Used to vary the limit downward suspension travel (Level 2).
Action Effect on Car Balance Other effects
Reduce number More understeer Reduce rear ride height.
at rear More rear biased under car downforce.
Increase or decrease in total undercar downforce.
May need to stiffen rear springs to avoid plank wear.
May need increased rear ride height to avoid plank wear.
Allows extra benefit of soft rear springs over bumpy
surfaces.
Reduce number Reduce ride height all round.
front and rear More undercar downforce.
May need to stiffen springs to avoid plank wear.
May need increased ride height to avoid plank wear.
Allows extra benefit of soft springs over bumpy surfaces.
Bump Dampers: Dissipates spring energy and is mostly effective when car is on bumpy surfaces.
Action Effect on Car Balance Other effects
Stiffen at front More understeer Additional front tyre wear.
in bumpy corners
Stiffen at rear More oversteer Less traction grip on bumpy surfaces.
in bumpy corners Additional rear tyre wear.
Stiffen, front Less traction grip Additional tyre wear all round.
and rear on bumpy surfaces Twitchy handling over bumps.
Soften at front More oversteer Reduced front tyre wear in bumpy corners.
Soften at rear More understeer More traction grip on bumpy surfaces.
in bumpy corners Reduced rear tyre wear.
Soften, front More traction grip Reduced tyre wear all round.
and rear on bumpy surfaces
163
Gear Ratios.
Action Effect on Car Balance Other effects
Lengthen 6th gear Decrease acceleration in 6th gear.
May need to change other gears to prevent large gaps
in ratios.
Shorten 6th gear May find rev. limiting in 6th gear.
May need to change other gears to prevent too much
overlap in ratios.
Packers: Used to vary the limit downward suspension travel (Level 2)…
Action Effect on Car Balance Other effects
Increase number More understeer Increase front ride height at front.
Less front-biased undercar downforce.
Run on front bump rubbers more often.
May restrict benefit of soft front springs on bumpy
surfaces.
Allows front ride height to be reduced with no extra
plank wear.
Increase number More oversteer Increase rear ride height at rear.
Less rear-biased undercar downforce.
Increase or decrease in total undercar downforce.
Run on rear bump rubbers more often.
May restrict benefit of soft rear springs over bumpy
surfaces.
Allows rear ride height to be reduced with no extra
plank wear.
Increase number Increase ride height all Less undercar downforce.
front and rear round Run on bump rubbers more often.
May restrict benefit of soft springs on bumpy surfaces.
Allows ride height to be reduced with no extra plank wear.
Reduce number More oversteer Reduce front ride height.
at front More front-biased undercar downforce.
May need to stiffen front springs to avoid plank wear.
May need increased front ride height to avoid plank wear.
Allows extra benefit of soft front springs over bumpy
surfaces.
162
Page 64

Data Logging Guide
Lateral Acceleration (See colour chart on page 116.)
This trace is a record of the sideways acceleration acting on the car and is measured in
multiples of the force of gravity (g)s. Lateral acceleration is mainly influenced by steering
angle so that on a straight the value is zero and in corners the value is either positive for
a right hand corner, or negative for a left hand corner. The trace can be used to determine
the amount of downforce being achieved in a corner. It is also possible to determine how
close you are to the idealised traction circle by overlaying the lateral and longitudinal
acceleration traces and assessing how much the tyres are being used in the overlaps of
braking/turning and turning/acceleration. The larger the values are in the overlap the closer
you are to the idealised traction circle. (See "The Secrets of the Pros – Driving at the
Limit".) It may also be useful to plot the steering trace at the same time as lateral and
longitudinal acceleration.
Longitudinal Acceleration (See colour chart on page 116.)
This trace records the forward and backwards acceleration acting on the car and is
measured in multiples of the force of gravity (g)s. Longitudinal acceleration is mainly
influenced by throttle and brakes. The value of longitudinal acceleration is positive when
the throttle is applied and negative during braking. The trace can help to determine if the
best brake balance is being used. It is also possible to determine how close you are to the
idealised traction circle by overlaying the lateral and longitudinal acceleration traces and
assessing how much the tyres are being used in the overlaps of braking/turning and
turning/acceleration. The larger the values are in the overlap the closer you are to the
idealised traction circle. (See "The Secrets of the Pros – Driving at the Limit".) It may also
be useful to plot the steering trace at the same time as lateral and longitudinal acceleration.
165
Rebound Dampers: Dissipates spring energy and dominates over bump dampers when car is
rolling or pitching.
Action Effect on Car Balance Other effects
Stiffen at front More understeer during Additional front tyre wear.
turn entry and exit
Stiffen at rear More oversteer during Less traction grip during turn exit.
turn entry and exit Additional rear tyre wear.
Stiffen, front Tendency towards more Body motions slowed down; pitch and roll.
and rear responsive handling Body roll takes longer; full anti-roll bar forces delayed.
Quicker load transfer - corner balance determined more
by damper stiffnesses.
Becomes difficult to differentiate from springs that are
too stiff.
Soften at front More oversteer during Reduced front tyre wear.
turn entry and exit
Soften at rear More understeer during More traction grip during turn exit.
turn entry and exit Reduced rear tyre wear.
Soften, front Tendency towards Body motions speeded up; pitch and roll.
and rear unresponsive handling Body roll completed sooner; full anti-roll bar forces
sooner.
Slower load transfer - corner balance determined more
by springs and bars.
Brake Balance: Only effective when braking.
Action Effect on Car Balance Other effects
Move towards Understeer under braking Fronts can lock-up giving lower overall brake force.
the front at turn-in Braking distance lengthened.
Move towards Oversteer under braking Rears can lock-up giving lower overall brake force.
the rear at turn-in Braking distance lengthened.
164
Page 65

166
167
GLOSSARY
Active Suspension Software controlled method of automatically pitching the suspension
for specific bends.
Aerodynamics The force that comes into play when the car has picked up speed.
Wings mounted upside down give negative lift and hold the car down.
Angle of Slip The angle between the direction of the wheels (front and rear) and
the direction of travel.
Anti-Roll Bar Forms part of the suspension assembly and helps to support the car
when cornering, by resisting the tendency for the body to roll.
Apex or Clipping Point The nearest point a car gets to the inside of a curve in an ideal racing
line.
Balance The degree to which a car has understeer or oversteer in a corner.
Brake Balance The bias of braking power between the front and rear tyres.
Braking Distance The distance between the point where braking starts and ends.
Bump Damper An energy absorbing device, fitted between the wheel and car body,
which resists upward movement by the wheel.
Camber Slight upward curve to the centre of race track.
Camber Angle Camber angle is designed to make a tyre work as effectively as
possible when a car is going through a corner. Negative camber is
applied so that when fully stressed a tyre will be as close to
perpendicular as possible.
Castor Angle Castor gives greater responsiveness and stability to the front wheels.
The larger the castor angle, the heavier the steering and more stable
the front end.
Centre of Gravity The position within the car around which all the mass is gathered.
The lower the centre of gravity, the greater the downforce.
Chicane A sharp ‘S’ bend that reduces speeds by forcing drivers to drive
through in single file.
Damper Forms part of the suspension system and absorbs the energy that is
produced when the spring is compressing or extending. Damper force
increases with speed (heave, roll and pitch velocity).
Downforce The force which pushes the car downward allowing the vehicle to
‘grip’ the road surface.
Drag Resistance to forward motion of the car. Can be caused by aero-
dynamic resistance or mechanical resistance.
Electronic Control Box Contains, among other information, the Driver aids software and
settings, (traction control, active suspension etc.) The Electronic
Control Boxes are frequently inspected by the FIA following a race to
test for illegal driving aids being used by constructors.
Page 66

169
168
Rumble Strip The bobbly, coloured strip on the edge of the track which serves as a
warning to the driver to transgress no further.
Run Off Track A stretch of track close to a dangerous section of the circuit, that
gives the driver an escape route if things go wrong, e.g. the driver
loses control of the car.
Shunt A knock from the car behind you.
Skidblock See Plank, The.
Springs The springs form part of the suspension assembly and are the main
means of supporting the car.
Stewards Decision In the event of a breach of FIA rules, a stewards enquiry is normally
called. The party in question is called before the ‘Steward of the
Meeting’ who issues a ‘Stewards Decision’ with accompanying
fine/disciplinary action, if relevant.
Super Licence A licence required by all drivers, competitors and officials participating
in a Formula One Championship.
Suspension travel The distance through which the moving parts of the suspension travel
in relation to the fixed parts.
Telemetry System Multi-function system that measures all aspects of car and driver
performance.
Tifosi Italian Fans.
Time Penalties Should the stewards choose to impose a time penalty the offending
driver must, in normal circumstances, proceed to the designated area
and remain there until a specified time period has passed, after
which the driver may rejoin the race.
Torque The amount of thrust driving through from the engine to
the wheels.
Traction The ability of the rear tyres to grip the track surface and cause the
car to accelerate.
Traction Control An electronically-controlled clutch allowing the car to accelerate as
fast as possible without losing traction and the wheels spinning. This
system was outlawed in the ‘94 season.
Turn-in The point on the track where the driver starts to steer the car into a
corner.
Tyre Blankets Special electric blankets placed over tyres just before a start to keep
them up to racing temperature.
Understeer Understeer is characterised by the front end of the car losing grip.
This gives the rear of the car a tendency to carry straight on, through
a corner.
Wings Devices fitted to the front and rear of the car which produce aero-
dynamic downforce. This allows faster cornering speeds. The rear
wing also produces significant aerodynamic drag.
FIA Federation Internationale de l’Automobile. The motor racing sport’s
governing body.
Getting a Tow Another term for ‘slipstreaming’, gaining speed by sitting behind a
rival car prior to overtaking.
Ground Effect Now outlawed by FIA but in the period 1980 to 1982 virtually all
cars were built in this way. The car had an underbody shaped like an
inverted wing which almost sucked the car on to the track and gave
tremendous grip.
Increase the Lock For some tight hairpins, such as Loews in Monaco, the car steering
lock is increased to take the bends faster albeit to the detriment of
the tyres.
Logged data chart Graphical method of displaying information which has been recorded
during a lap. Also known as Performance Analysis.
Outbrake To brake very late into a corner when dicing with a rival car.
Oversteer Oversteer is characterised by the rear end of the car losing grip, giving
the car a tendency to spin.
Packers Packers form part of the suspension assembly and adjust the position
at which the bump rubbers become loaded.
Paddock The parking area behind the pits where all the equipment, trucks and
spare cars are kept by the teams.
Parc Fermé The area where cars are isolated after a race finishes. Only officials
may touch the vehicles for an hour after the finish.
Some engines may be ‘sealed’ for later inspection.
Plank, The A 10mm plank running down the length of the underside of all
Formula One cars. This addition following the ’94 Imola Grand Prix,
means that the ride height of the car must be sufficient to avoid the
plank ‘grounding’. This results in less downforce and therefore lower
speeds, particularly round dangerous corners.
Points System The points awarded for finishing a Grand Prix are as follows:
1st = 10 points, 2nd = 6 points, 3rd = 4 points, 4th = 3 points,
5th = 2 points and 6th = 1 point.
Rebound damper An energy absorbing device fitted between wheel and car body which
resists downward movement by the wheel.
Refuelling Refuelling is an essential part of race strategy. The less fuel a car
holds, the faster it can travel, but this will result in the need for more
time-consuming pit stops to refuel.
Responsive handling The car responds quickly to steering, acceleration and braking inputs
from the driver, allowing very accurate manoeuvres.
Rev limiter A device which limits the RPM of the engine to a preset value. This
is used in the pit lane to keep the car speed within the pit lane speed
limit.
Ride height The height of the car floor, above the ground, measured from
the wheels.
Page 67

171
170
• The version of Windows you are using.
• Total memory installed.
• The exact error message (if any).
• For Windows users, the version of DirectX installed.
• The type of CD-ROM drive.
• For Windows users, the total system resources free before running the program.
• The name of any programs running in the background.
If you decide to email our Customer Services, to ensure a prompt reply please summarise
your
issues as concisely as you can, giving details, as above, of the product, the problem or
error and any circumstances that you feel relevant and your particular computer system.
Web Sites
At MicroProse, it is a priority to ensure that you have everything you need to get the best
out of your product. In fact, our web sites are designed to enhance your playing or learning
experience and not just be there to help if you have a problem. Therefore, MicroProse has a
full and exciting web site dedicated to ensuring you can see the latest information, obtain
technical support, download the latest upgrade, read the latest hints and tips and a great deal
more. You can reach the site at:
http://www.grandprixgames.com
For more information on forthcoming and existing products from MicroProse, please visit our
main site at:
http://www.microprose.com
Notice/Warranty
1. Licence
The software and all images, photography, animations, video, audio, music and text
contained on the enclosed CD-ROM and this manual, (together, ‘the Product’) are protected by
copyright and other intellectual property rights which are owned by or licensed to Hasbro
Interactive Limited of 2 Roundwood Avenue, Stockley Park, Uxbridge, UB11 1AZ, UK (‘Hasbro’).
Hasbro grants to you as the original purchaser of this Product a non-transferable right to use
the Product for your own personal and private use and not in connection with any business
activity. Unless otherwise permitted by law, no part of this Product may be copied, reproduced,
translated, modified, decompiled or reduced into any electronic or other form without the prior
written consent of Hasbro. You may not rent or lease, or sell or transfer copies of the Product
or any part of it.
CUSTOMER INFORMATION
Customer Services
If you have problems and require assistance you can contact our Customer Services on:
Phone: +44 (0) 1454 893900 (Hours of operation: 0900-1730 GMT/BST, Monday to Friday)
Fax: +44 (0) 1454 894296
Email: support@hiuk.com
Address: Hasbro Interactive (Europe) Customer Services
The Ridge, Chipping Sodbury, South Gloucestershire, BS37 6BN, England, UK
Sweden only:
Phone: 0858 77 04 24*
Denmark only:
Phone: 38 487 134*
Finland only:
Phone: 0800 11 44 99*
Norway only:
Phone: 23 16 21 36*
*Please note that you may be assisted by English speaking Customer Services staff.
Australia only:
If you have problems and require assistance you can contact the Hasbro Interactive Customer
Services Hotline on:
Phone: 1902 262 667*
Email: support@hiuk.com
*Calls are charged at $1.50 per minute. A higher rate applies to mobile and public phones.
If you decide to telephone our Customer Services, please try to be sitting in front of your
computer and have a pen and paper at the ready. Before contacting us, please try to have the
following information ready so that we may help you more efficiently:
• The name of the product.
• The make and model of your computer.
• The processor and its speed.
• Any peripherals attached to the computer.
• The graphics card, driver date and version.
• The sound card, driver date and version.
Page 68

173
172
Credits
Game Design & Programming
Geoff Crammond
Menu Design & Additional Programming
Pete Cooke
Circuit Topography
Norman Surplus
Performance Analysis & Test Driving
David Surplus
With special thanks to John Cook
MicroProse MotorSport
Lead Programmer
Nick Thompson
Programmers
Adrian Scotney
Duncan Rooth
Gareth Jones
Jeremy Sallis
Neil Alford
Simon Michael
Yueai Liu
Lead Artist
Andy Cook
Artists
David Smith
Eddie Garnier
Greg Shill
Jeffrey Miranda
Maff Evans
Paul Ayliffe
Paul Truss
Pete Austin
Additional Art
Drew Northcott
Jonathan Rowe
Graphic Design
Jonathan Rowe
Audio Producer
John Broomhall
Additional Sound Design
Darren Lambourne
Sound Programming
Geoff Crammond
Pete Cooke
Additional Field Recording
Peter Guppy
Video Production
Andy Cook
John Broomhall
Andy Grierson
Music
"Furious Angels"
Written by Rob Dougan
Published by BMG Music Publishing
European Director of Development
Andrew Parsons
Producer
Nick Court
Thank you…
AutoSport Magazine
John Cook
Laura McNamara
Russell Lewis
Steinberg Software for audio recording
systems.
Sutton Motorsport Images
Pete Secchi and the students of the
University of Bath for their help with the
crowd photography.
Special thanks go to…
The Orange Arrows Formula One Team for
all their help during the development of this
product.
2. Warranty
Hasbro warrants to you only that for a period of ninety days from purchase the Product will
perform substantially in accordance with the specifications set out in this manual and that the
original CD-ROM disk itself will be free from defects in materials and workmanship.
During this period the Product, if defective, will be replaced free of charge if returned to
Hasbro at Caswell Way, Newport, Gwent, NP9 0YH, together with a dated proof of purchase, a
brief description of the defect and the address to which it is to be returned. Any replacement
will be warranted for a further 90 day period. This warranty does not affect your statutory rights
in any way.
This warranty does not apply to defects caused by misuse, neglect, incorrect installation,
damage, alteration, repair or excessive wear.
3. Liability
Except as stated at 2 above, all conditions, warranties, terms, representations and undertakings
express or implied, statutory or otherwise, in respect of the Product are expressly excluded.
Hasbro’s liability to you shall under no circumstances exceed the original retail price of the
Product and Hasbro does not accept liability for any indirect or consequential damage or loss
(even if it is aware that the possibility of such damage or loss) including lost profits or revenues,
or for any damages, costs or loss incurred as a result of loss of time or data or from any other
cause.
Nothing set out above shall limit or exclude the Hasbro’s liability to you for death or
personal injury resulting from its own negligence or any other liability not capable of exclusion
or limitation by law.
If you do not agree to be bound by these terms, you should immediately return the Product to
Hasbro at Caswell Way, Newport, Gwent, NP9 OYH, UK, together with a dated proof of purchase,
for a full refund.
Page 69

175
174
Support Services
QA Manager
Andrew Luckett
Lead Tester
Daniel Luton
Testers
Andrew Coward
Andrew Spratt
Andrew Stainer
Chris Knaggs
Darren Bates
Darren Kirby
Eric Manktelow
Garry Mullett
Jamie Toghill
Lee Evans
Luke Williams
Matt Nation
Nick Thorpe
Paul Coppins
Phil Gilbert
Robert Ward
Tim Stokes
Hardware Compatibility Testing
Alan Clark
Ian Palfrey
PC Technician
Martin Brabham
Localisation Project Manager
Anton Lorton
Localisation Co-Ordinator
Katie Harris
Translators
Claude Esmein
Project Synthesis
Peter Bagney
Uli Mühl
Pi Editora
Reintaal Translations
Testers
Anke Mittelberg
Emmanuelle Dumas
Benjamin Bazounguissa
Valeria Motterle
Blandine Prost
Manual Writers
The Write Stuff
David Surplus
Geoff Crammond
Manual Editor
Bill Martin
Manual Manager
Sam Hart
Manual Co-Ordinator
Jane Corfe
Art Director
Ed du Bois
Customer Services Manager
Caroline de Silva
Customer Services Supervisor
Mark Rich
Technical Advisors
Andy Taylor
Antonio Almaraz
Daniel Lowe
Jon Mayes
Olly Portingale
Warren Rowlands
PA/Administration Supervisor
Christine Upham
Administration Assistants
Alex Nowosielski
Pat Edwards
infogrames@telerom.co.il
Country
• Österreich
-
--
PC: +32 (0)2 72 18 633
Gamecube: 0900 10800
+31 (0)40 24 466 36
09:30 to 17:00 Monday to Friday (except Bank Holidays)
+44 (0)161 8278060/1
09:30 to 17:00 Monday to Friday (except Bank Holidays)
+44 (0)161 827 8060/1 -
Soluces:
0892 68 30 20
(0,34 €/mn) (24h/24)
3615 Infogrames
(0,34 €/mn)
Technique:
0825 15 80 80
(0,15
€/mn
Du lundi au samedi de 10h-20h non stop)
Infogrames France / Euro Interactive
Service Consommateur
84 rue du 1
er
mars 1943
69625 Villeurbanne Cedex
Technische: 0190 771882 Spielerische: 0190 771 883
301 601 88 01
-
--
PC: +31 (0)40 23 93 580
GameCube: 0909 0490444
+31 (0)40 24 466 36
+44 (0)161 827 8060/1 -
35121 46085 83/8950 351 21 460 85 88
+34 91 747 03 15 +34 91 329 21 00
17:00 till 20:00 helgfri måndag till fredag
08-6053611 -
Technische: 0900 105 172 Spielerische: 0900 105 173
• Belgie
• Danmark
• Suomi
• France
• Deutschland
• Greece
• Italia
• Nederland
• Norge
• Portugal
• España
• Sverige
• UK
•
Schweiz / Suisse
http://www.de.infogrames.com
helpdesk@nl.infogrames.com
(PC only)
helpline@uk.infogrames.com
helpline@uk.infogrames.com
support@fr.infogrames.com
http://www.fr.infogrames.com
http://www.de.infogrames.com
info@gr.infogrames.com
info@it.infogrames.com
http://www.infogrames.it
helpdesk@nl.infogrames.com
(PC only)
helpline@uk.infogrames.com
apoiocliente@pt.infogrames.com
stecnico@es.infogrames.com
rolf.segaklubben@bredband.net
helpline@uk.infogrames.com
http://www.de.infogrames.com
Email
(€1,24 pro Minute) Täglich 14.00 bis 21.00 Uhr
(mit Ausnahme von Feiertagen)
(2,50 CHF/Min) Täglich 14.00 bis 21.00 Uhr
(mit Ausnahme von Feiertagen)
lunes a viernes de 9:00h -14:00h / 15:00h-18:00h
de 2ª a 6ª, entre as 10:00 e as 17:00
09:30 to 17:00 Monday to Friday (except Bank Holidays)
Open Maandag t/m Vrijdag 9.00 tot 17.30
Open Maandag t/m Vrijdag 9.00 tot 17.30
Infogrames Games Customer Service Numbers
Telephone Fax
Hints & Cheats:
09065 55 88 88
*
*24 hours a day / 1£ /min / inside UK only
“You need the bill payer’s permission before calling.”
TechnicalSupport:
0161 827 8060/1
09:30 to 17:00 Monday to Friday
(except Bank Holidays)
+ 972-9-9712611
16:00 to 20:00 Sunday - Thursday
•
Israel
 Loading...