


A |
SUPPLEMENTAL |
|
BRIEFING |
||
|
****CLASSIFIED COMMUNIQUE****
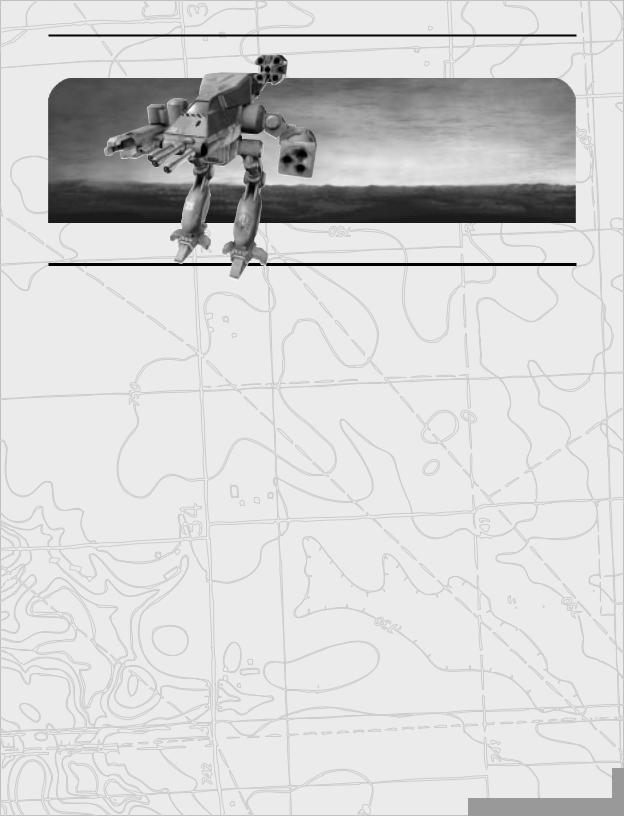
Commander, as I stated in the vidcom, I am canceling your orders to return home. I know this is very tough on morale—you and your men deserve some R&R after your distinguished service in the attacks on the Clan Homeworlds. But I know that you understand the need to finish the job: to eliminate this threat to the Inner Sphere once and for all. On a positive note, Battalion has sent some new ’Mechs and weapons your way that should help bolster spirits some.
•Three new Inner Sphere ’Mechs and the specifications for three new Clan ’Mechs.
•Six new vehicles.
•Five new weapons.
•The waypoint feature.
•The ammo conservation fire command.
•Difficulty level settings.
•Fire support mission hotkeys (for large and small artillery, sensor probes, and camera drones).
In addition, Commander, keep your troops at combat readiness with Mission Editor. Create new solo or multiplayer missions on either Port Arthur or the latest battlefield, Cermak. Mission Editor includes:
•Terrain, overlay, and building palettes for maximum geographic and structural flexibility.
•Toolbars that allow you to manipulate your map in a variety of ways.
•Unit and vehicle palettes through which you can detail variants, orders, speed, and colors, to name a few.
•Objectives tools through which you can mastermind a scenario and play it out.
Good Luck and Good Hunting,
Colonel Reese
©1999 Microsoft Corp. Developed by Microsoft Corporation. Published by Hasbro Interactive, Inc. BattleTech, MechCommander, MechWarrior, BattleMech and 'Mech are trademarks or registered trademarks of FASA Corporation and Microsoft Corporation. Microsoft, MS, Windows, and the Windows logo are either registered trademarks or trademarks of Microsoft Corporation in the US and/or other countries. BattleTech material ©1998-1999 FASA Corporation. Used under license. MicroProse is a trademark of Hasbro Interactive or its affiliates. All other trademarks are the property of their respective holders.
MECHCOMMANDER DESPERATE MEASURES |
1 |
GETTING STARTED
Please follow the instructions below to install MechCommander Gold. References in the manual to “MechCommander Desperate Measures” should be read to mean “MechCommander Gold.”
MECHCOMMANDER DESPERATE MEASURES SYSTEM REQUIREMENTS
MechCommander Desperate Measures requires the following minimum system requirements:
•
•
•
•
•
•
•
133MHz Pentium
Windows® 95 or Windows® 98 32MB RAM
Super VGA graphics (640 x 480 x 256 colors) Quad-speed CD-ROM drive
Hard drive (210MB free) DirectX-compatible sound card
The following system requirements are recommended:
•
•
•
•
166MHz Pentium 64MB RAM
8x-speed CD-ROM drive Hard drive (620MB free)
The following system requirements are required for multiplayer:
•
•
•
•
Null-modem serial cable; or
Windows-compatible 28.8kps modem or faster; or Local area network using IPX or TCP/IP; or Internet play requires a true TCP/IP connection

2 MECHCOMMANDER DESPERATE MEASURES
INSTALLING MECHCOMMANDER DESPERATE MEASURES
You do not need to have the original MechCommander game installed on your computer in order to install MechCommander Desperate Measures.
To install MechCommander Desperate Measures
1 |
. |
2If AutoPlay is enabled, click Install MechCommander Desperate Measures, and then follow the instructions that appear on the screen.
–or–
3If AutoPlay is disabled, double-click the My Computer icon on your desktop, double-click the icon for your CD-ROM drive, and then double-click the MechCommander Desperate Measures icon. When the Setup screen appears, click Install MechCommander Desperate Measures, and then follow the instructions that appear on the screen.
When asked which files you would like to install, be sure to check the box for “Install Required Files.” If you wish to create your own missions, check the box for “Install Mission Editor.”
MECHCOMMANDER DESPERATE MEASURES
a MechCommander Desperate Measures campaign
1If the MechCommander Desperate Measures disc is already in your CD-ROM drive,
click Start, point to Programs, point to MicroProse, point to MechCommander Desperate Measures, and then click MechCommander Desperate Measures.
You can skip the opening cinematics by pressing ESC.
2On the main menu, click Expansion Campaign.
If you are playing a multiplayer mission, all MechCommander participants must use the same software, either the original MechCommander or MechCommander Desperate Measures.
You can play a number of precreated missions or missions created by your friends and converted by you by choosing the Solo Missions and Multiplayer commands on the main menu.
the difficulty level
1On the MechCommander main menu, click Preferences.
2Under Difficulty, click Easy, Regular, or Hard.
Easy level, your units’ hit and damage points are significantly increased.

MECHCOMMANDER DESPERATE MEASURES |
3 |
THE MISSION EDITOR
The Mission Editor lets you design your own MechCommander missions. Place buildings, set mission objectives, landscape the terrain—you control everything. After you’re finished creating your mission, share missions with friends or play theirs.
INSTALLING THE MISSION EDITOR
If you did not install the Mission Editor when you installed the game, you will need to install the Mission Editor manually.
1 |
disc into your CD-ROM drive. |
2Open Windows Explorer and click the icon for your CD-ROM drive (usually D:).
3Double-click the Mcedsetp folder.
4Double-click the Disk1 folder.
5 Double-click the Setup.exe file.
6 Follow the instructions onscreen to install the Mission Editor.
THE MISSION EDITOR
the Mission Editor, if the MechCommander Desperate Measures disc is already in your ROM drive, click Start, point to Programs, point to MicroProse, point to MechCommander
Measures, and then click Mission Editor.
4 MECHCOMMANDER DESPERATE MEASURES
CREATING A NEW MISSION
When creating a mission, keep the following in mind
•Make the objectives fun and create multiple ways to achieve each objective
•Compartmentalize battles so they don’t run into each other
•Create terrain that assists and challenges the commander, such as mountains, cliffs, bridges, etc.
•Create choke points (geography that constrains movement) for tactical maneuvers such as ambushes or blowing up a bridge
•In a multiplayer game, provide only just enough resources for one team
To create a new mission
1Choose either Multiplayer Mission Editor or Solo Mission Editor at the first dialog box.
2Select New Mission at the next dialog box.
3Select a locale (Port Arthur or Cermak) and Terrain at the next dialog box. Then use the slider bars to specify Water, Forest and Hill Coverage. Note that water coverage is mutually exclusive with forest and hill coverage. Click the OK button to continue.
4After the Mission Editor loads, apply your terrains, overlays and buildings. If you want to place walls, runways, etc. where they normally cannot go, use the Force palette to force them onto the map.
5 From the Units palette, select the classes, teams and variants for the computercontrolled units. You have a total of 45 ’Mechs and vehicles to allocate between Allied and Enemy teams.
6 To make changes to a unit’s settings, double-click that unit.
7 To set mission objectives, select Objectives from the Mission menu. If you are creating a multiplayer mission, set objectives for both Team 1 and then Team 2.
8 To set mission parametres such as points and drop weight, select Settings from the Mission menu. Type in a briefing for the mission by clicking the Player Briefing button. If you are creating a multiplayer mission, select Settings and create Player Briefings for both Team 1 and Team 2.
MECHCOMMANDER DESPERATE MEASURES |
5 |
9To place at least one Drop Zone for your units, select Drop Zones from the Mission menu.
If you are creating a multiplayer mission, place three Drop Zones each for Team 1 and Team 2.
10To save your mission, select Save from the File menu and type a name for your mission no longer than eight characters.
For more information about how to use the Mission Editor, select Help Topics from the Help menu. The Help topics include design tips, keyboard shortcuts, troubleshooting tips and explanations of error messages. You can also right-click on an object (such as a unit)
and then select Help from the pop-up menu.
Creating a Map
You can customize the terrain for your mission. The Tactical Map gives you an overall view of the mission map. Select Tactical Map from the View menu. Click anywhere on the Tactical Map to zoom to that spot on the regular map. To view the gridlines on the map, select Gridlines from the View menu. To zoom the map in, select Zoom In from the View menu or press the PLUS key. To zoom out, select Zoom Out or press MINUS.
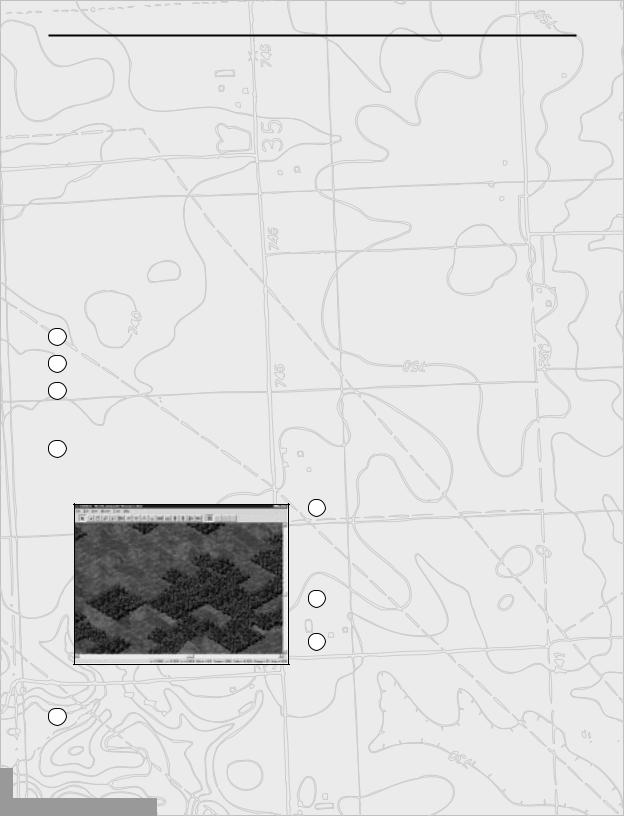
The Map Features Palette lets you add various elements to the map: Terrains, Overlays, Force, Buildings and Units. Select Map Features palette from the View menu. Click on a palette tab, click on an item on that palette and then click on the map to place that palette item. If a map tile is already selected, clicking a palette item will place that object on the selected map tile. Drag an element along the map to create a path of that item. The Terrains palette offers different terrain types such as Grass and Dirt. The Overlays palette adds elements such as Forest and Roads. Use the Force palette to break the normal map rules. Choose from the various buildings from the Buildings palette. Select ’Mechs and vehicles from the Units palette. For more information about the palettes, see the Help file.
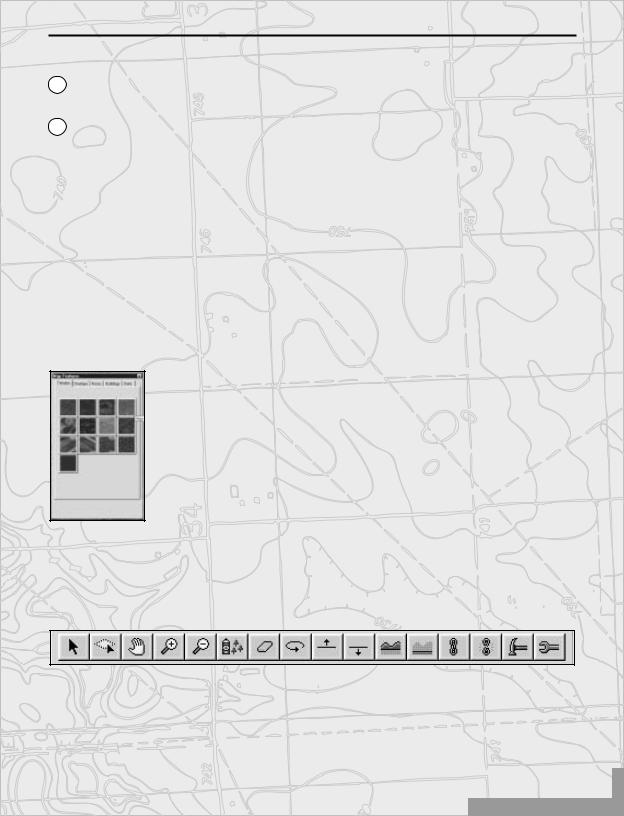
The Main Toolbar and Tools Menu
Use the Main Toolbar and Tools menu to make changes to the map.
•Select selects a single map tile. Click a grid on the map and then either click a toolbar button or a palette tile.
•Select Area selects a map area for large-scale changes such as Erase or applying terrain. The selected area must include at least one vertex and three tiles on each side of the vertex.
6 MECHCOMMANDER DESPERATE MEASURES
•Drag View moves the map as you drag the cursor.
•Zoom In magnifies the map.
•Zoom Out reduces the map view.
•Spray Trees randomly places assorted trees in a 9-tile area.
•Erase deletes objects on the map. It does not delete map objects that were placed from the Terrains palette. The cursor will look like an eraser when placed over an object it can erase. If the object cannot be erased, the eraser will be all red.
•Rotate changes the selected object’s orientation. Click the object to cycle through the rotation.
•Raise Vertex raises the height of the selected vertex for two cells along its axis. Each click raises the vertex and the transition area by one level. Use Raise Vertex to create mountain ranges.
•Lower Vertex lowers the height of the selected vertex for two cells along its axis. Use Lower Vertex to create troughs. You can lower the slope to sea level (0 height) and it will be filled with water.
•Make Hilly randomly changes the slope of the selected area.
•Flatten flattens the slope of the selected level by one level in height.
•Link Buildings connects structures so that a control structure, such as a gate control, commands all of its linked structures. For example, if a gate control is linked to a series of gates, an enemy that captures the gate control gains commands of all the gates linked to that gate control.
Controlling Structure |
Controlled Structure |
Main or Auxiliary Power |
Turret Control |
Turret Control |
Turret |
Sensor Control |
Sensor |
Gate Control |
Gate |
Make sure that controlling structures, such as a gate control, are set to the correct alignment (Allied, Enemy or Neutral) in order for the controlled structures, such as gates, to react correctly to units.
•Unlink Buildings breaks a selected link between a control and controlled structure.
•Damage damages overlays and structures for a more realistic, war-torn environment. Damaging a turret, for example, renders it inoperative.

MECHCOMMANDER DESPERATE MEASURES |
7 |
•Repair fixes damaged overlays and structures.
The Standard Toolbar
•Display Grid either shows or hides the gridlines on the map.
•Undo reverses the last command you made or deletes the last item you placed on the map. Click Undo repeatedly to undo to the point of the file’s last save.
•Redo reverses the Undo command.
•Set Height adjusts the height of a selected map area. First, select an area on the map by clicking the Select Area button on the toolbar. Then click the Set Height button, type in a height and click the OK button. Click the Apply button to look at the height before accepting the change.
Unit Settings
The Unit Settings dialog box is only available for solo missions. To set a unit’s settings, double-click a unit on the map and the dialog box below will appear.
•Allied or Enemy selects which side the unit belongs to.
•Variant determines which variant of the ’Mech it is.
•Color specifies the color scheme for the unit.
•Pilot determines which pilot is assigned to the unit.
•Orders sets the specific orders for the unit. An explanation of the order appears to the right when you select an order from the drop-down list.
•Engage Radius sets the active radius for the unit. Short is 150 metres (12.5 tiles), Medium is 350 metres (28 tiles) and Long is 650 metres (52 tiles).
•Tactic sets the tactic for the unit. For more information about each type of tactic, see Unit settings dialog box in the Help file.
•Move Speed sets the movement rate for the unit: Walk or Run.
8 MECHCOMMANDER DESPERATE MEASURES
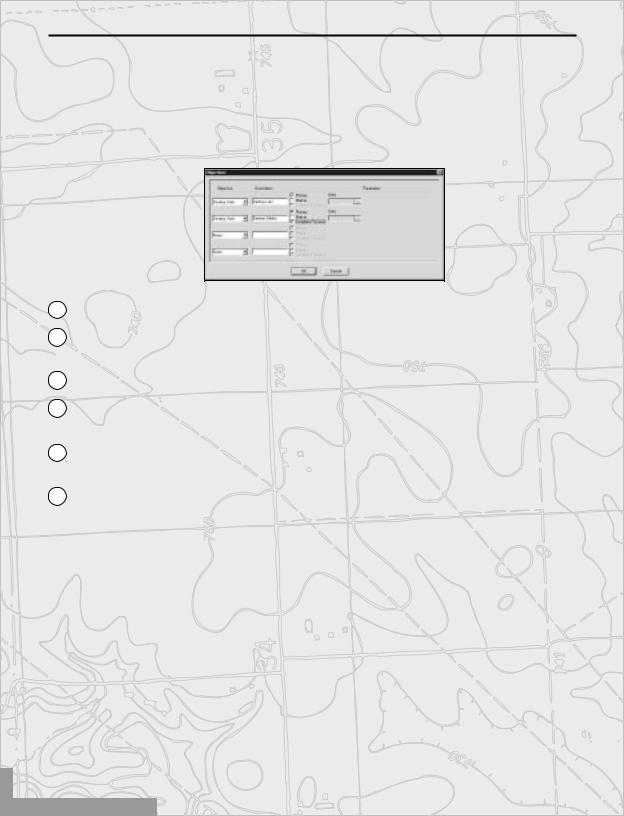
Mission Objectives
In order to successfully complete the mission you design, players must complete the objectives you set. Select Objectives from the Mission menu to set up to four primary objectives, each with up to three parametres.
 Selection icon
1Select an objective, such as Move to Area.
2In the Description box, type an explanation of the task for the player (such as “Move to compound centre”).
3If the objective must be completed for the mission to be successful, check the Primary box.
4If you want a marker to be displayed for this objective in the Campaign Data box and the tactical map, check the Marker box.
5If the primary objective prior to one must be completed before this objective is started, check the Complete Previous box.
6To select a particular objective, click the Selection icon. The dialog box will disappear and your icon will change to cross hairs. The cross hairs will turn white to indicate a valid target. Click on the desired objective on the map.
To delete a mission objective, select it and press ESC.
MECHCOMMANDER DESPERATE MEASURES |
9 |
Mission Settings
Select Settings from the Mission menu to adjust the following settings for your mission:
•Small Artillery is the maximum number of small artillery per mission (5 is the maximum).
•Sensor Probes is the maximum number of sensor probes per mission (5 is the maximum).
•Time Limit sets the time limit to complete a mission (3 minutes is the minimum and zero means no limit).
•Camera Drones is the maximum number of camera drones available per solo mission (5 is the maximum).
•Large Artillery is the maximum number of large artillery available per mission (5 is the maximum).
•Resource Points set the resource points given to the player at the start of the mission (100000 is the default and 9999999 is the maximum).
•Drop Weight sets the maximum drop weight, in pounds, for a mission (990 is the default, 1200 is the maximum and 5 is the minimum).
•Technology Base determines which side you are playing during a solo mission: Inner Sphere (the default) or Clan.
Player Briefing
Click on the Player Briefing button in the Settings dialog box to write the text for your own mission briefings.
•
•
•
•
•
Mission Title provides a brief title for the mission.
Objectives lists the objectives in the order in which they must be completed.
Description describes the overall mission.
Tactical Warnings provides intelligence reports and other critical information.
Tactical Notices provides information about unit and weapon strengths.
10 MECHCOMMANDER DESPERATE MEASURES
Drop Zones
Select Drop Zones from the Mission menu to display the Drop Zones cursor. Then click on the map to set landing points for each player’s or team’s forces. Solo missions must contain at least one Drop Zone. Multiplayer missions must contain three Drop Zones per team. A solo mission or Team 1 Drop Zone is indicated by a green and yellow icon. A Team 2 Drop Zone is indicated by an orange and red icon.
Your Mission File
Use the File menu to create, open, save and compress your mission file.
•New creates a new solo or multiplayer mission file.
•Open loads a previously saved mission or map.
•Save saves your current map, including its mission data. The file is saved to your C:\Program Files\MicroProse\MCX\Data\Terrain folder.
•Save As lets you save your map and mission data under a new file name.
•Write Distribution File (DPK) compresses an already saved map and mission data into a DPK file, which you can then share with other players. Missions you create with the Mission Editor are displayed in the Select Mission list. Missions created by other people or on other computers must be converted from a DPK file to be displayed in the Select Mission list. For information on how to convert a DPK file, refer to Using DPK files to Share Missions in the Help file.
•Save Map Only saves just the map without any mission data.
•Exit exits the Mission Editor.
 Loading...